Coxcomb – 13,663 and Redcliff – 13,648

1

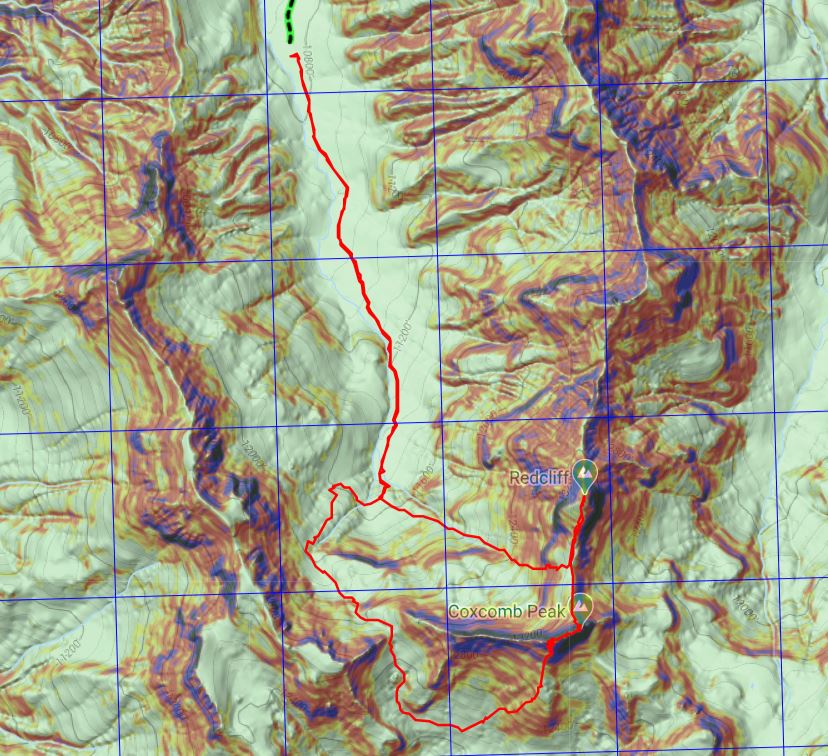
RT Length:  13.24 miles

Elevation Gain: 4654’

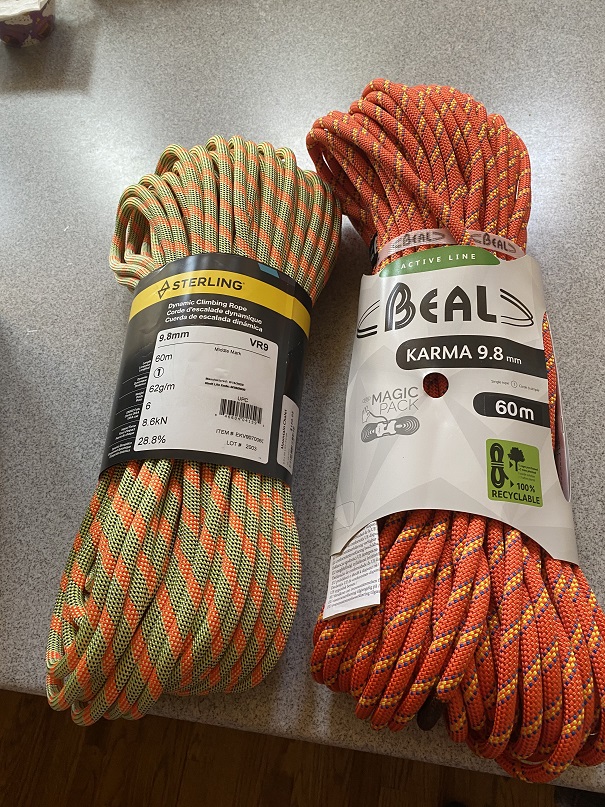
Climbing Gear included 2  60 meter 7.9mm ropes.

I’ve been up in my head about this peak since my failed attempt last month.  Last time I’d turned around because I wasn’t 100% sure I was in the right area and I was afraid of cliffing out.  All of the information I had on Coxcomb was conflicting (some called areas class 3 and others class 5, etc.) and none of the pictures I had from others lined up with what I was seeing.  After going back home and researching more I realized I had been in the correct area, and now I was ready to try again.

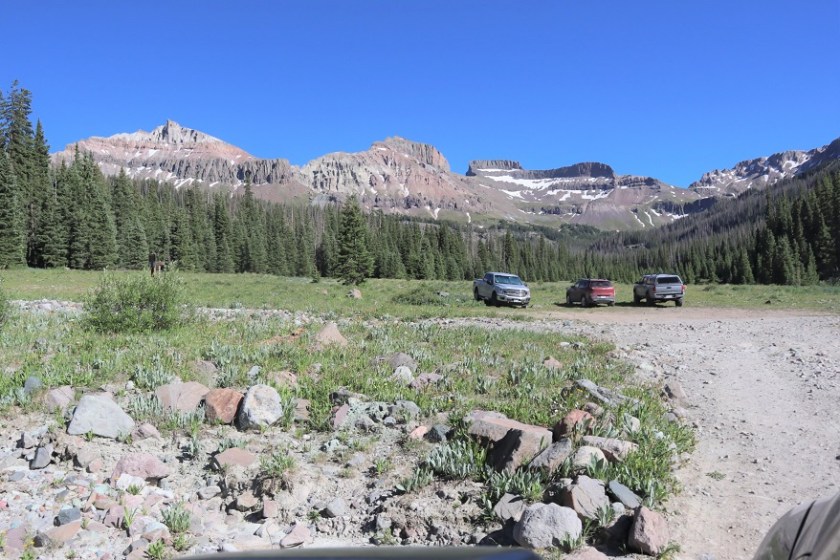
I drove to the Wetterhorn Trailhead and was surprised to see no one else parked in the lot.  The last time I was here there were several other vehicles.  I got out, walked around, and signed the trail register so I wouldn’t need to in the morning.  It was cloudy and windy but on the plus side there were no mosquitoes.

2

I tried to pump myself up for the hike tomorrow, but was still having trouble mentally.  I told myself to just enjoy the hike and focus on learning something, even if I didn’t summit (again).  I got out the book I’m (still) reading:  Death in Yosemite, and noted I was still on the ‘death while climbing’ chapter.  It may sound macabre, but reading about how other, more experienced climbers have died while climbing puts climbing into perspective for me:  gravity never sleeps, and I can never be too careful (which is another reason why I turned around last time).  I like to review potential mistakes so I don’t make them.

A group of three (shirtless) guys in their early 20s walked by, carrying gear and pads.  I stopped them to see where they were headed and they told me they were just out bouldering.  Hmmmm… I didn’t think the area was good for bouldering, but I wished them luck.

I made sure to get to bed early, and wouldn’t you know it, I heard a mouse moving around under/inside my truck as I was trying to sleep.  I guess those mothballs don’t work.  Also, I believe it was the same mouse as last week:  it’s most likely been living in my truck, building a nest, etc.  I was going to need to get some traps asap.

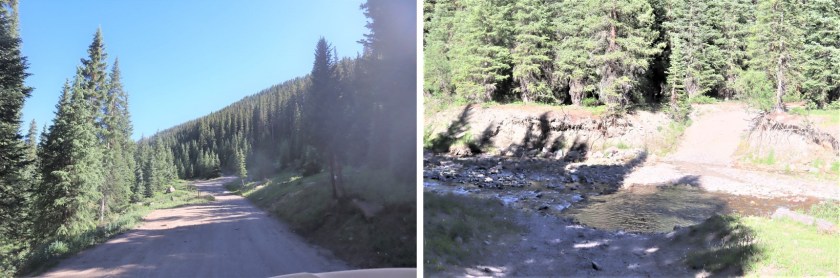
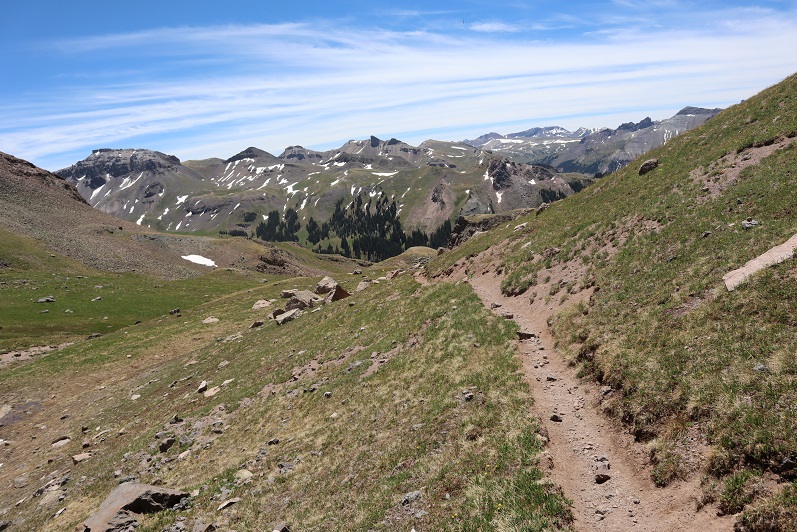
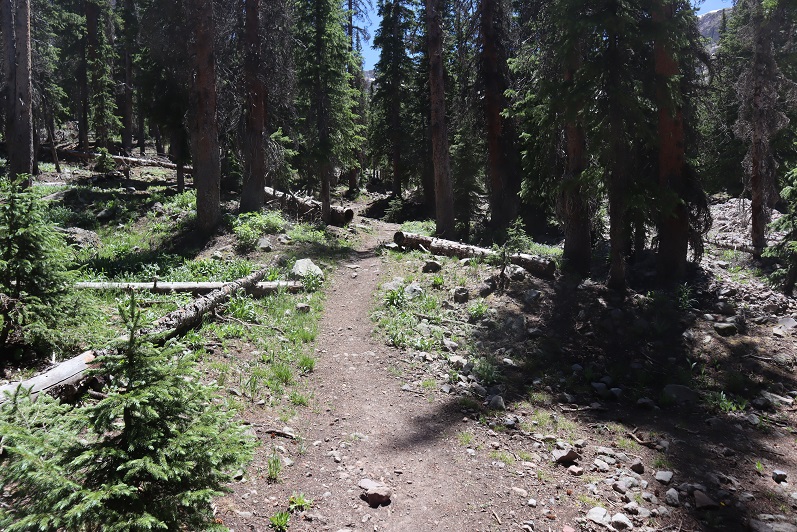
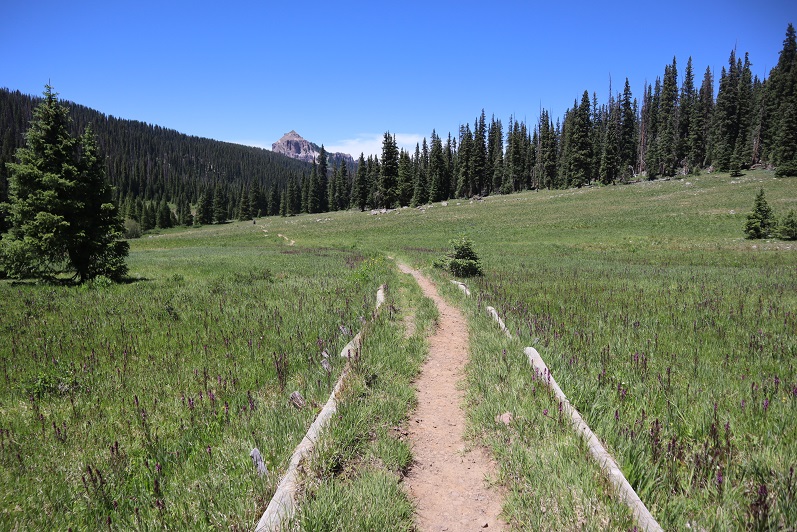
I woke up and was on the trail at 4:30am, taking the same route as last time. There’s an obvious trailhead with a register.

3

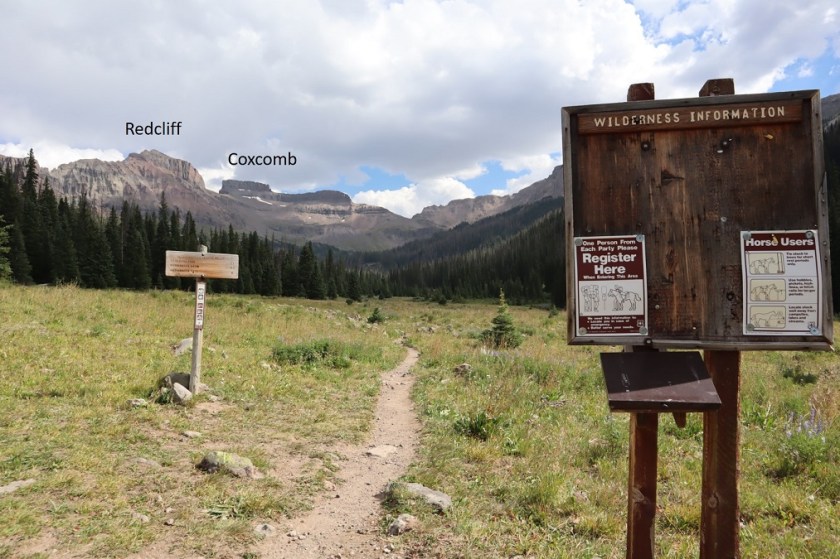
I followed the class 1 trail for 3.4 miles up to the top of the pass, and then lost 450’ of elevation as I descended into the basin.

4

5

6

7

8

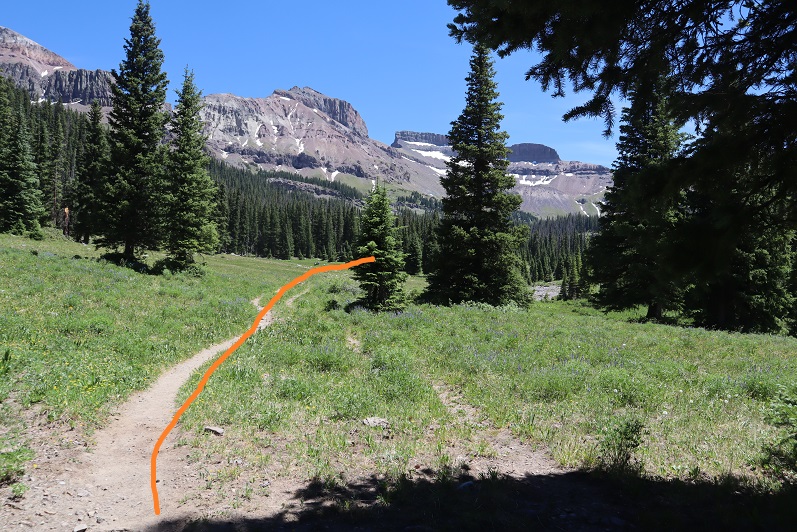
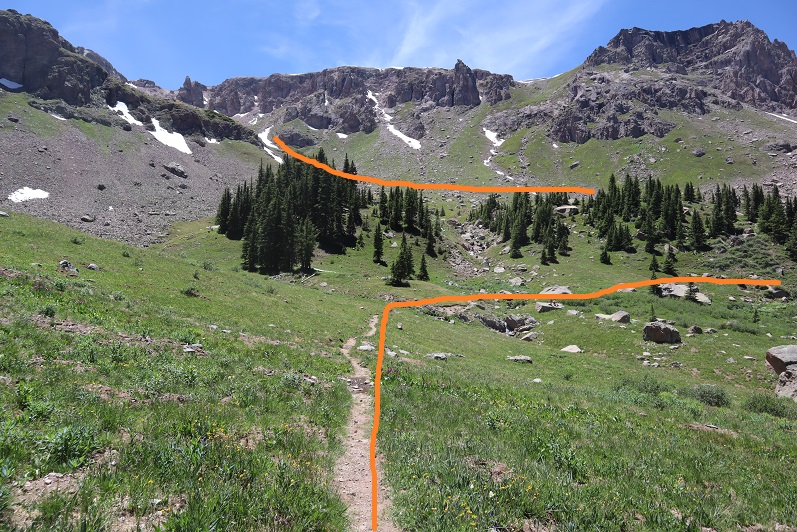
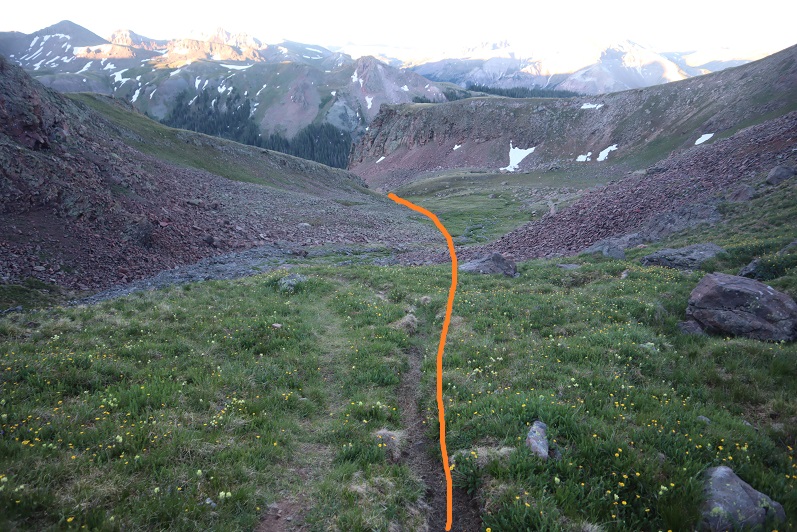
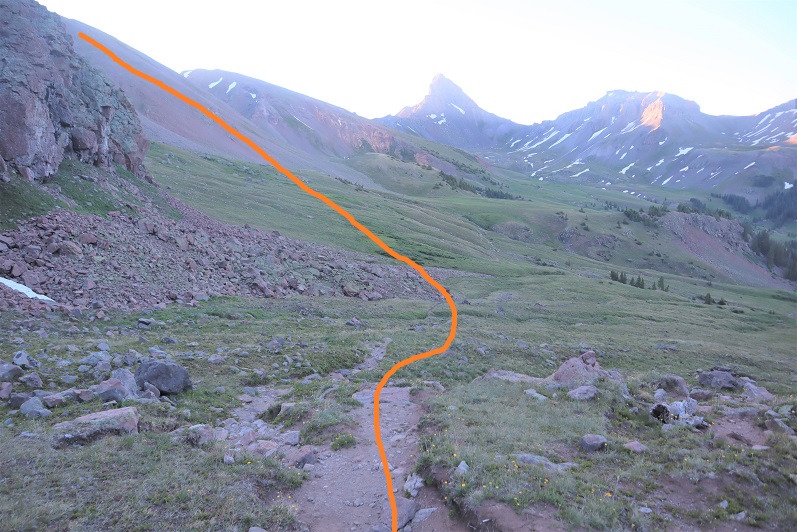
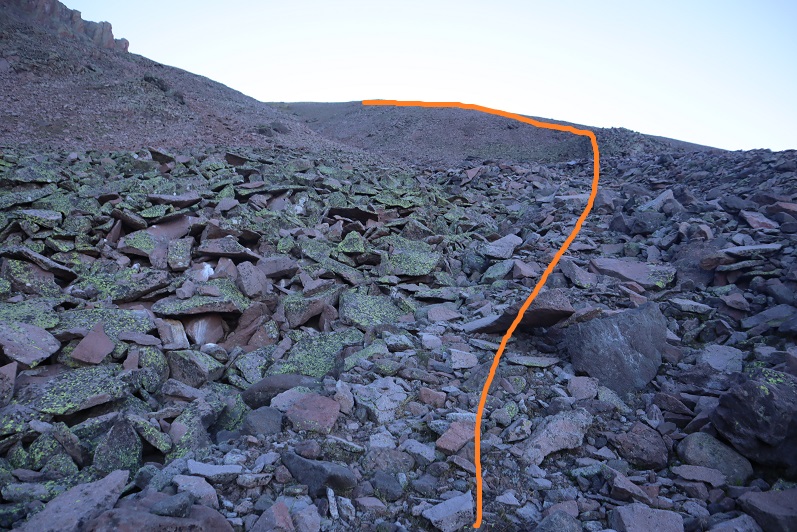
I’ve heard of others who’ve stayed high here instead of going into the basin, and from my perspective, the rubble and talus and scree aren’t worth it:  I’m ok losing a little elevation, and I’m actually convinced it saves time.   Once in the basin I left the trail, crossed the basin and followed the ridge up to the base of Coxcomb

9

10

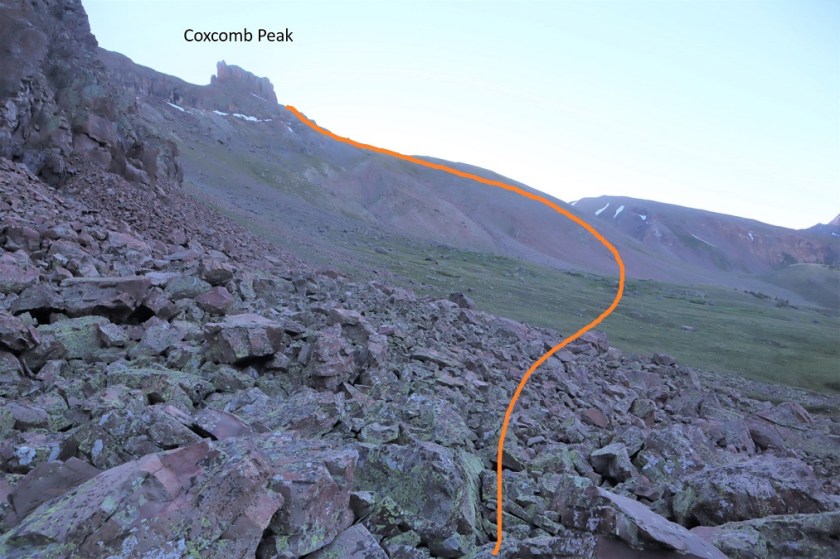
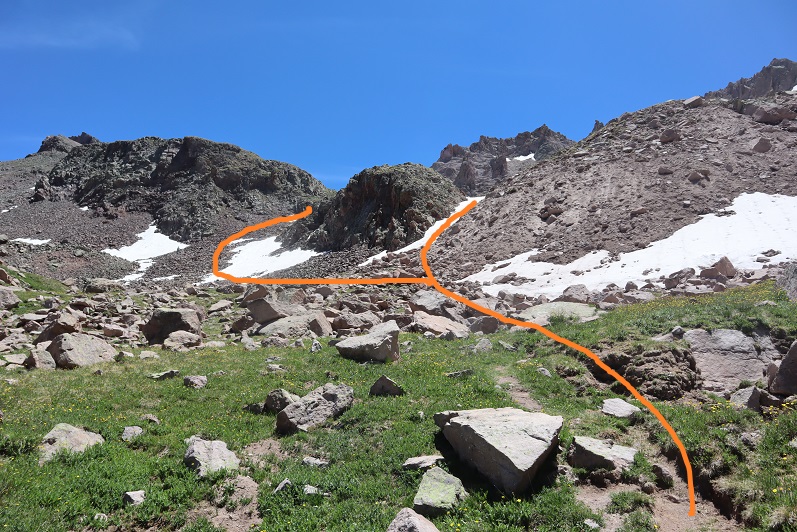
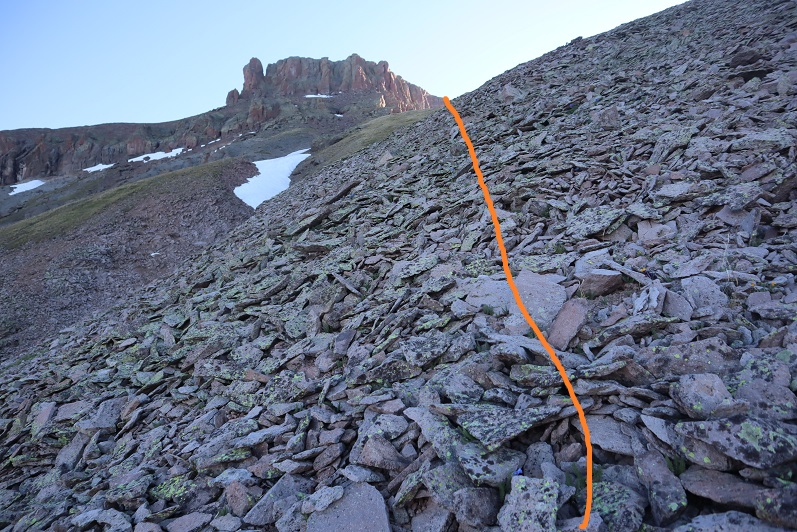
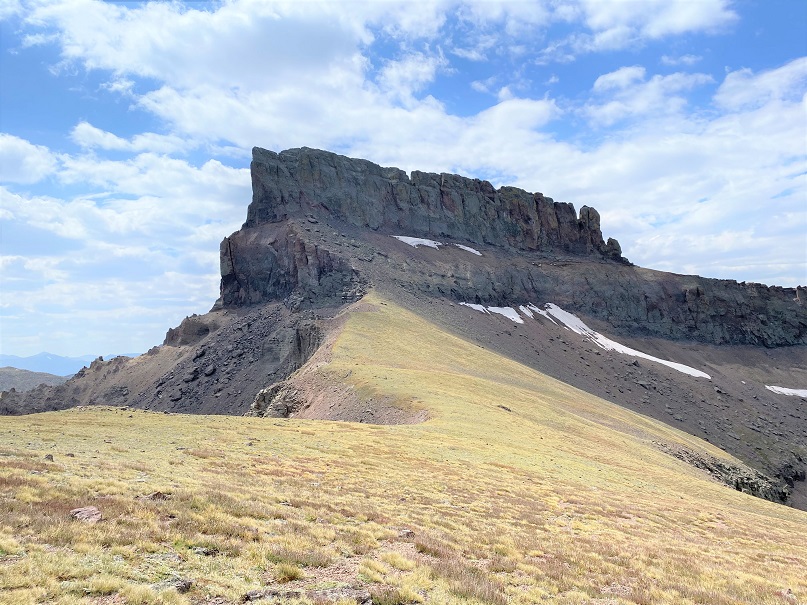
There was a little bit of scrambling to get to the base

11

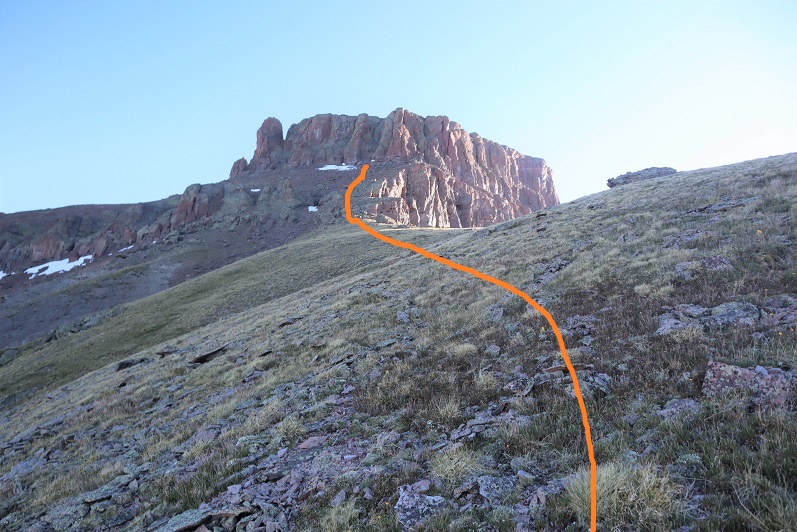
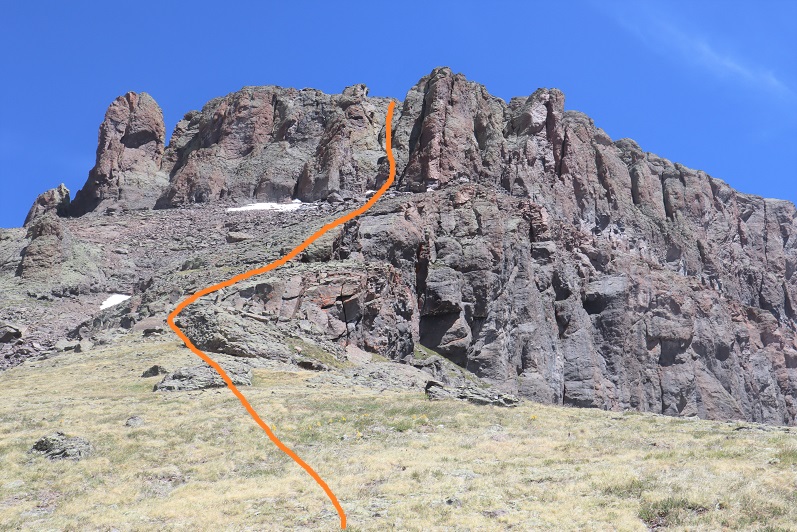
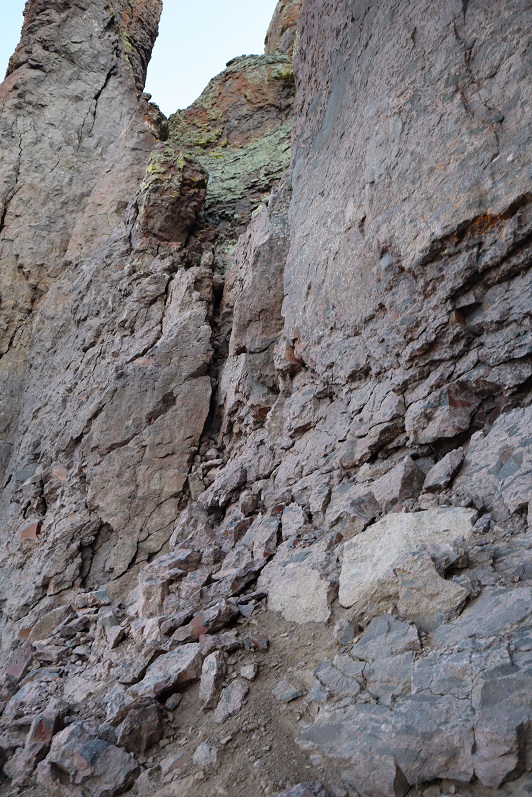
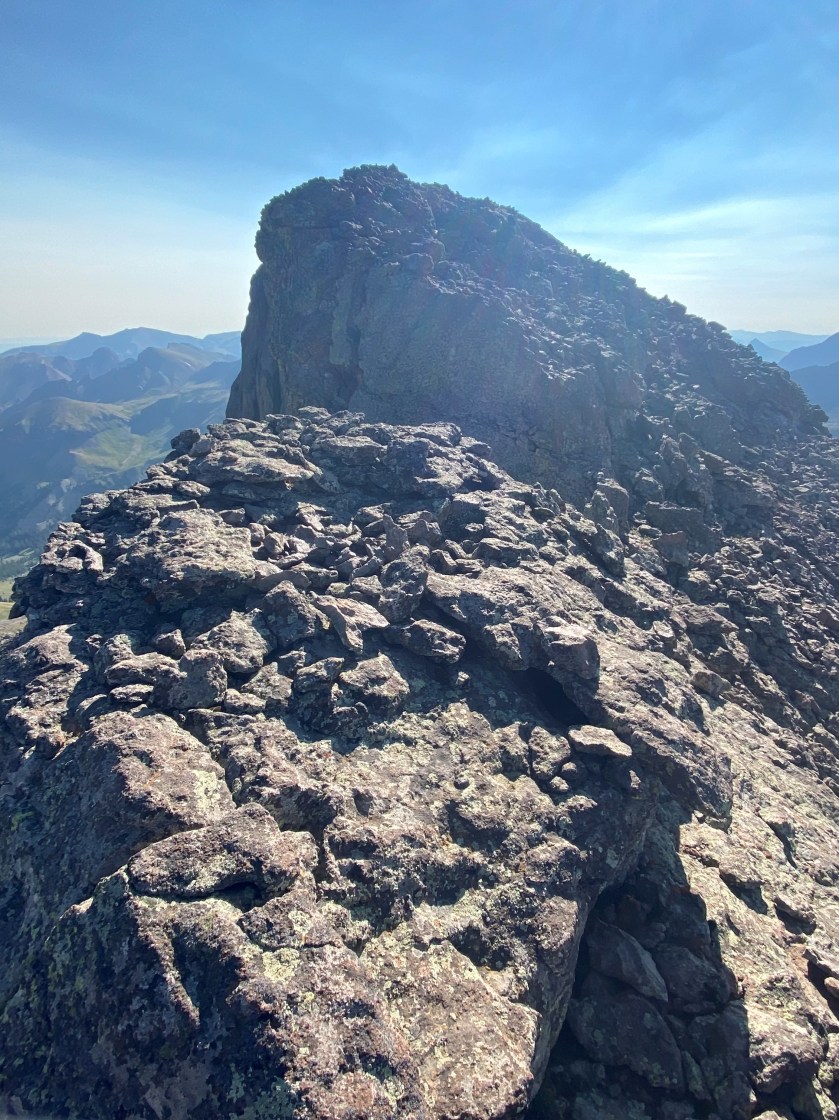
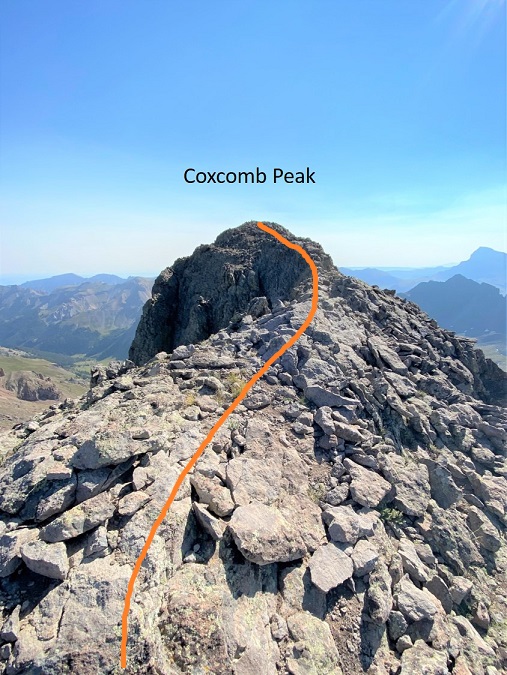
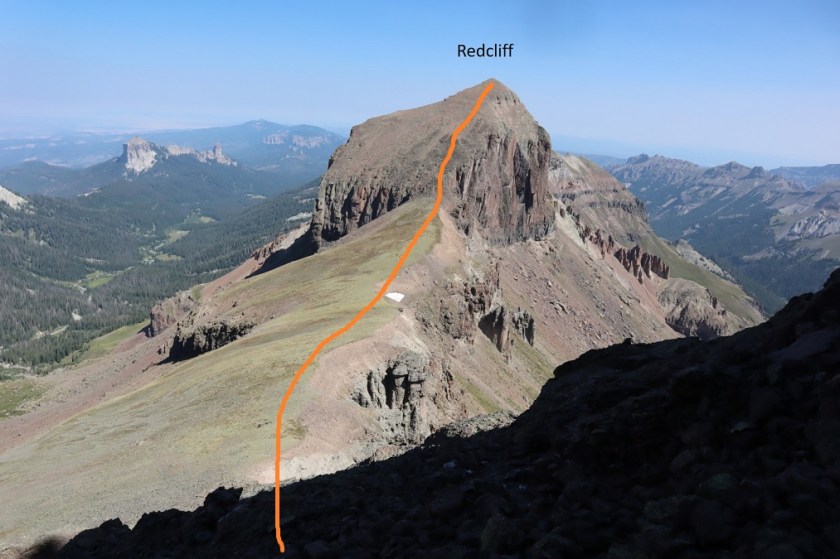
Here’s an overall view of the route up

12

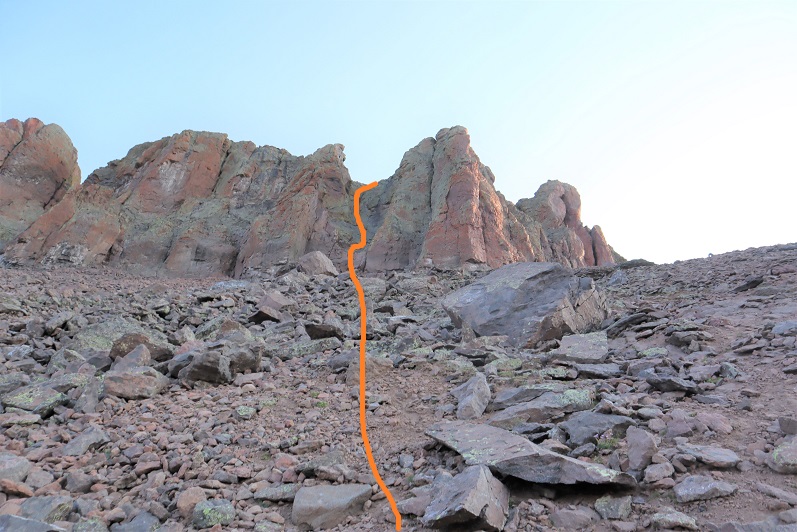
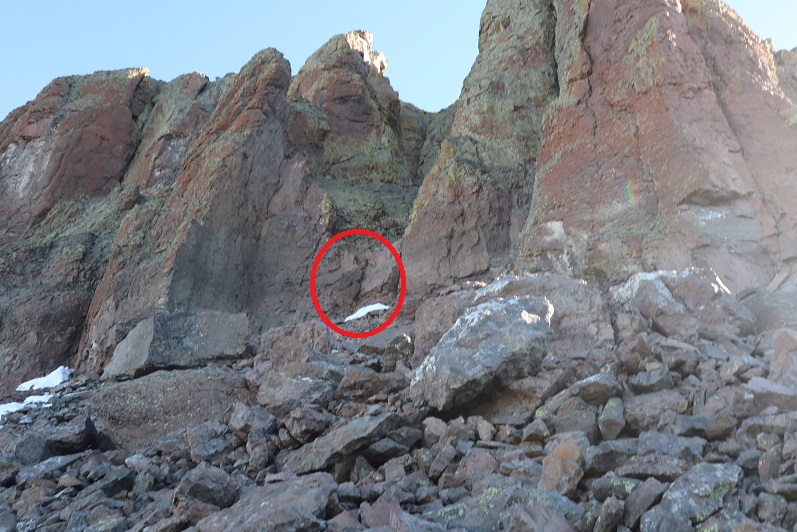
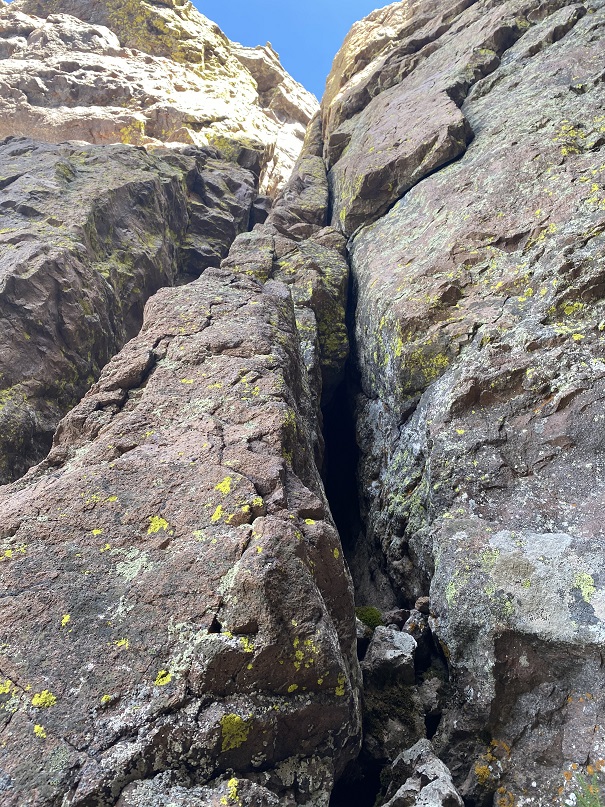
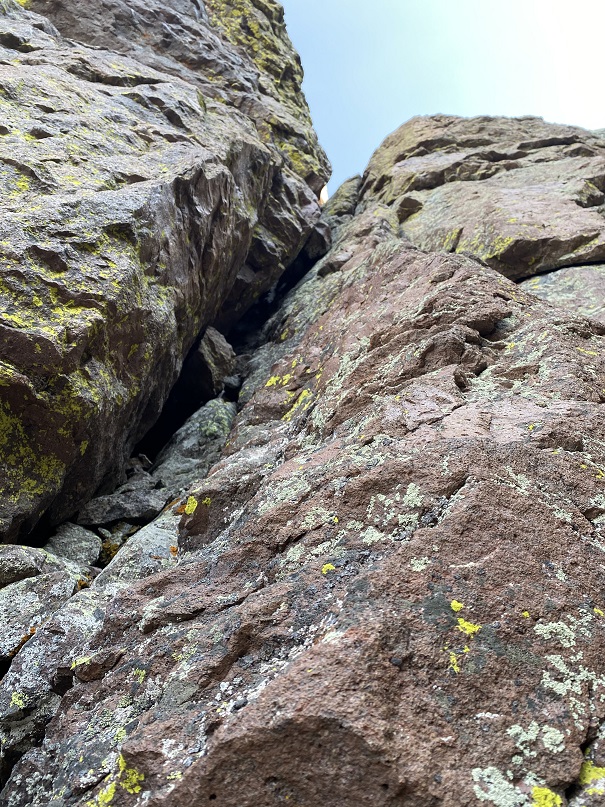
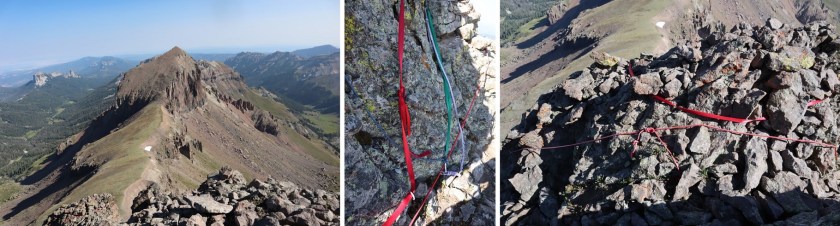
Once there I was happy to see the rocks I’d placed in the chimney were still where I’d put them.  I sat down, put on my helmet, and mentally prepared myself to begin.  Here’s the first chimney

13

I made my way over to the chimney and tried to climb up.  No dice.  I love to boulder, but I haven’t been since COVID started due to the gym being closed and now requiring masks (say what you will, but I cannot work out with a mask on.  I respect the rules however, and thus choose not to go).  All this to say I’m a little rusty when it comes to my bouldering skills.

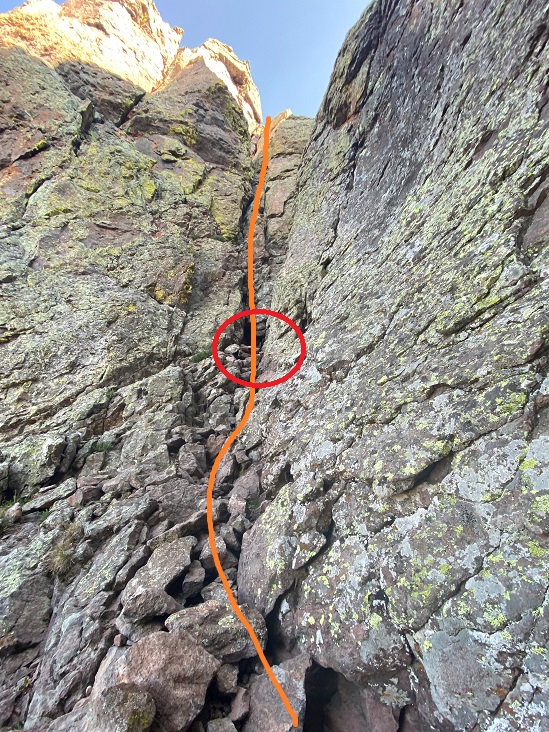
Ok, so if I couldn’t just climb up I’d do what I did last time:  I took off my pack, attached a rope to the pack and my harness, and tried climbing up without a pack.  The rock was cold and my fingers were stiff and I tried and tried but was unable to climb up the chimney.  What was wrong?  I’d been able to do it last time!  Ugh.  That was when I realized last time I’d worn climbing shoes.  I guess they did make a difference.  Oh well, I was just going to need to get creative.  I tried once again, this time angling myself sideways, putting my thigh into a crack, shimmying around, and pressing into the side of the rock with my inner thigh and hoisting myself up.  This took me halfway up the chimney.  From there I was able to hoist myself up and use my arms to do the rest.  I made it to the top of the chimney, hauled up my gear, and prepared for the second part for the climb.  The red circle is where I ‘sat’

14

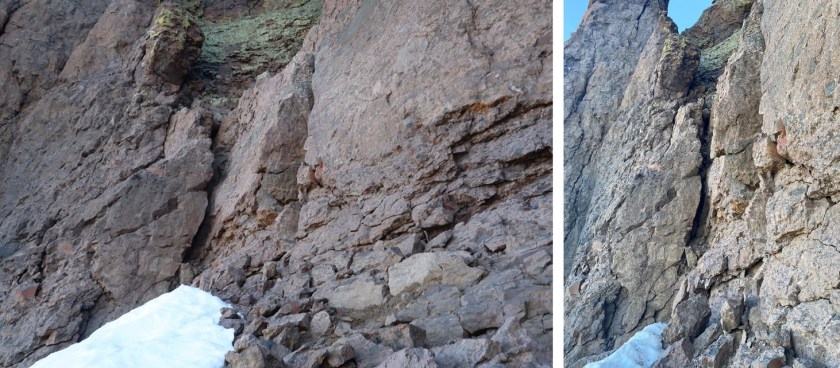
The next section was easy class 3.  I re-coiled my rope, put on my pack, and made my way to the base of the next chimney

15

16

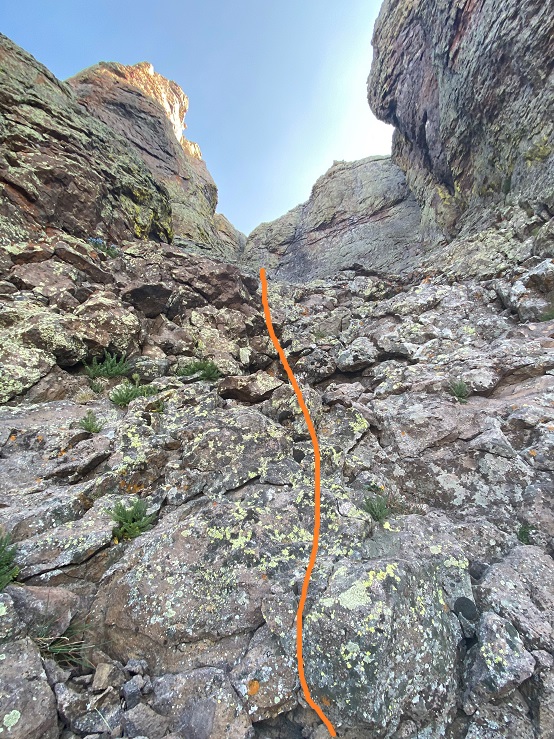
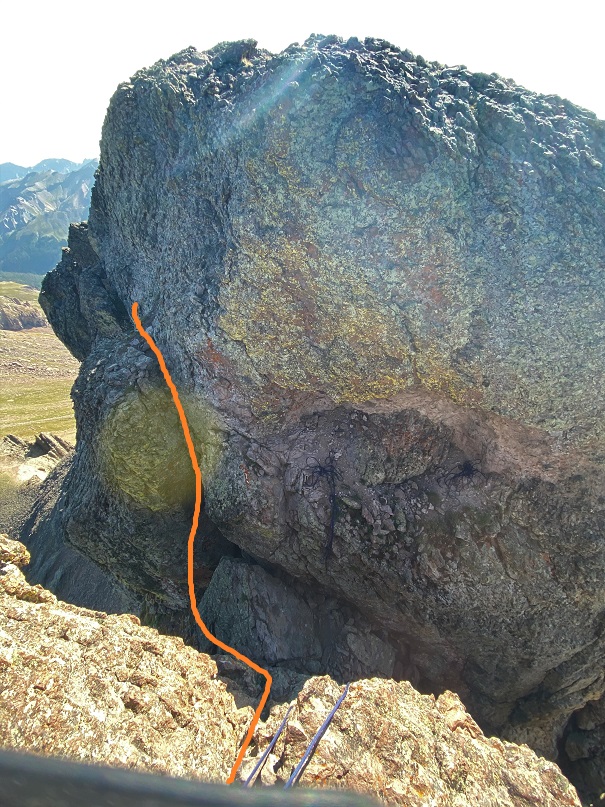
This is where I’d gotten stuck last time.  This time however, I was sure I was in the correct spot.  I initially tried to climb this with my pack on, realized that wasn’t going to happen (the pack was too heavy and put me off balance) and decided to try climbing this chimney without my pack.  The red circle is where I took off my pack.

17

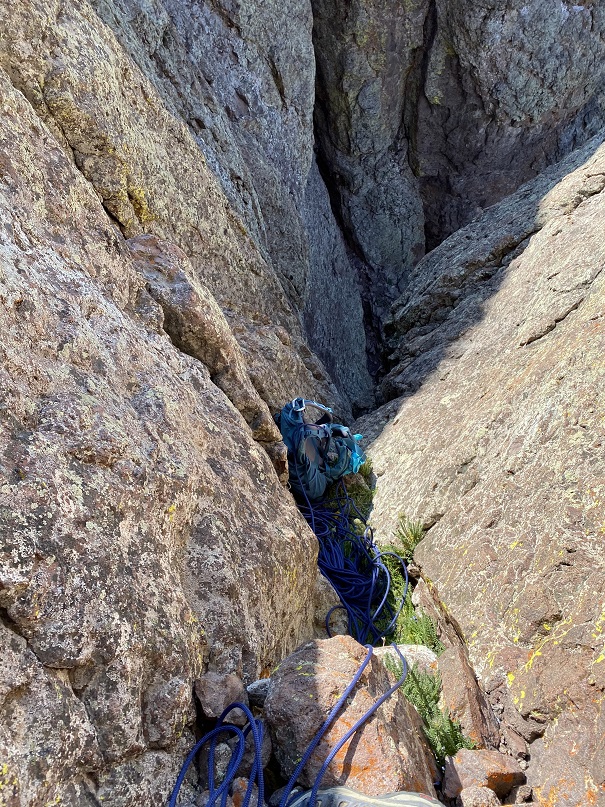
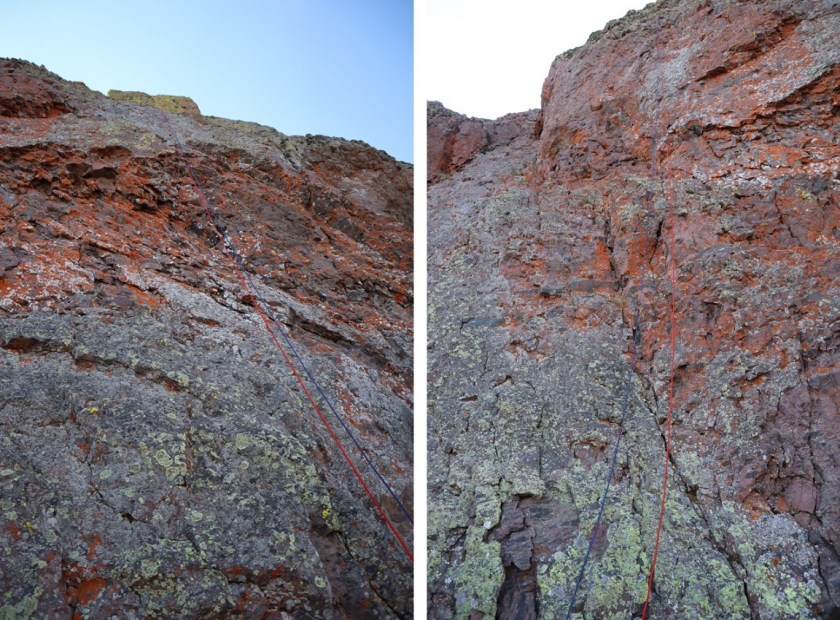
Here’s what the climb looks like from there.  Knowing I wouldn’t be able to climb this with my gear, but also knowing I needed my gear to descend I decided to once again tie the rope to my harness and loop it around my pack.  I was very careful to make sure my rope didn’t get tangled, and I had an exit strategy in case the whole ‘rope around the pack thing’ didn’t work in this area.  I wouldn’t recommend this tactic unless you put a lot of thought and planning into its execution, as so many things can go wrong in this scenario.  Here’s a look at the beginning of the route

18

I made it halfway up and stopped.

19

At the halfway point I hauled up my gear to where I was positioned.  I figured this would lessen the chances of my pack getting stuck when I hauled it all the way up, and also gave me a chance to test whether or not hauling the pack would work in an area where I still felt I could downclimb safely.  This tactic proved successful, so I continued on.

20

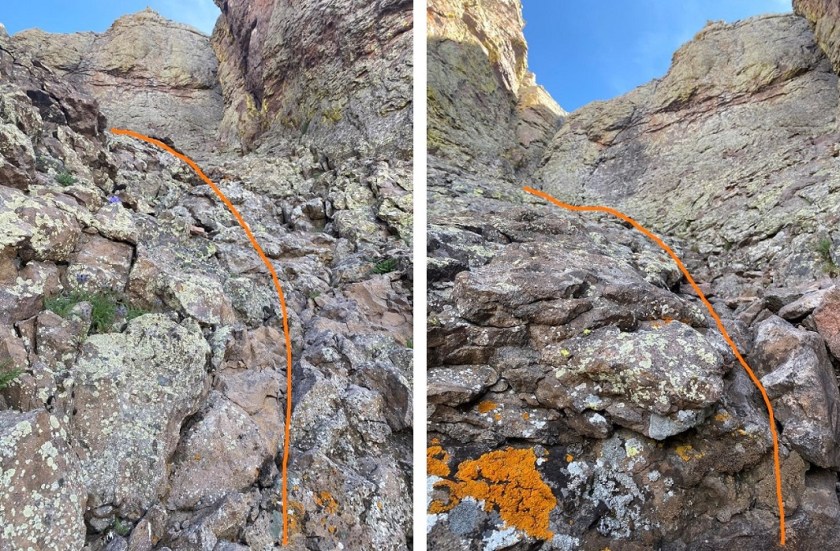
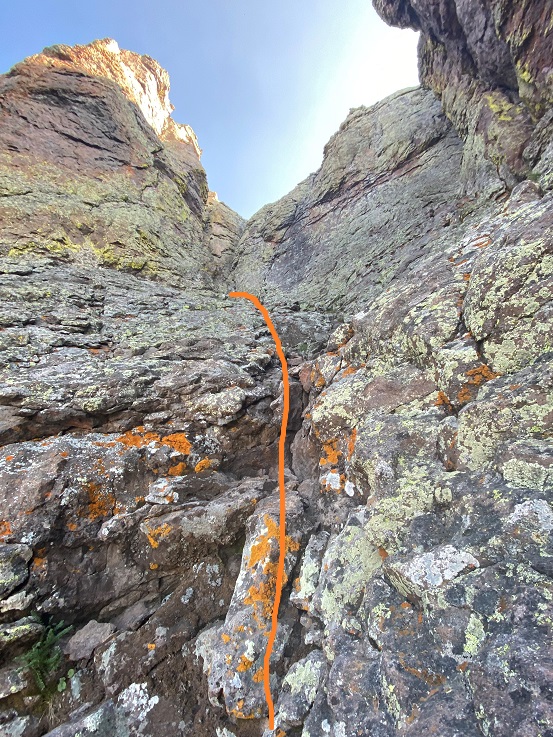
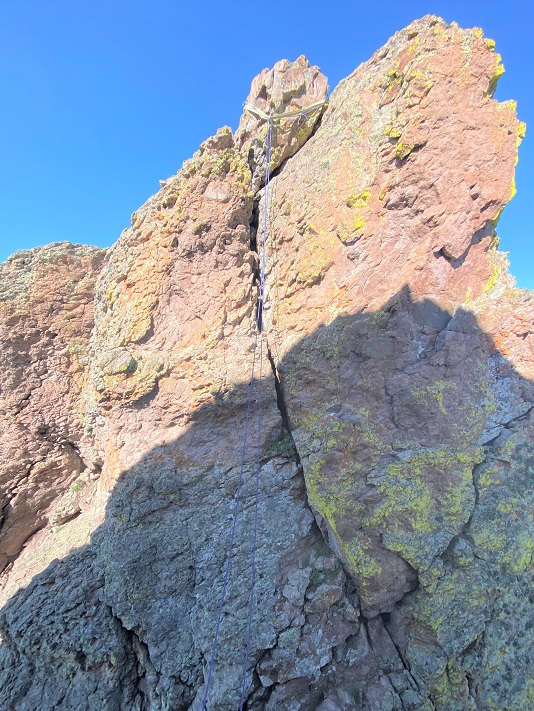
From the halfway point, here’s looking up at the rest of the route

21

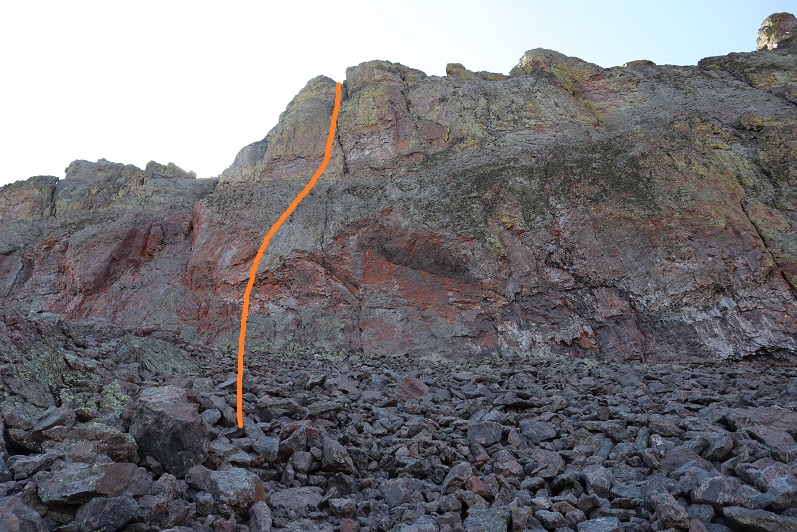
This is a class 5.2 chimney that requires some stemming/fun/creative moves to ascend.  At one point I even used a crack climbing technique to get a good hold with my arm vertically and hoist myself up.  This is the point I wasn’t able to make it past last time, but after talking with others who’d successfully climbed this area I felt confident I’d be able to as well.  There are some sketchy moves, but plenty of opportunities for stemming/hand holds to make the ascent doable.  I was terrified but just told myself not to look down, to focus ahead, and soon enough I’d made it out of the chimney.  Here’s the route I took

22

Once at the top of the chimney I turned and hauled up my gear, feeling pretty pleased with myself for making it this far.  I recoiled my rope and put it in my pack.

23

I’ve heard it’s class 3 after this point to exit the chimney, but it felt class 2 to me

24

Last time I’d been worried I was in the wrong gully. Since I hike solo I’m extra careful, and probably turn back more often than I should when uncomfortable.  One of the reasons I’d turned back here last time was I was worried if I ascended the wrong gully I’d be cliffed out.  It turns out that wouldn’t have been the case, so if you’re worried about cliffing out in this area don’t be:  all chimneys exit in the same area, and it’s solid. Here’s looking back

25

And forward towards the summit of Coxcomb

26

There was still one more obstacle before reaching the summit:  a 25 foot notch I’d need to rappel before upclimbing to the summit.

27

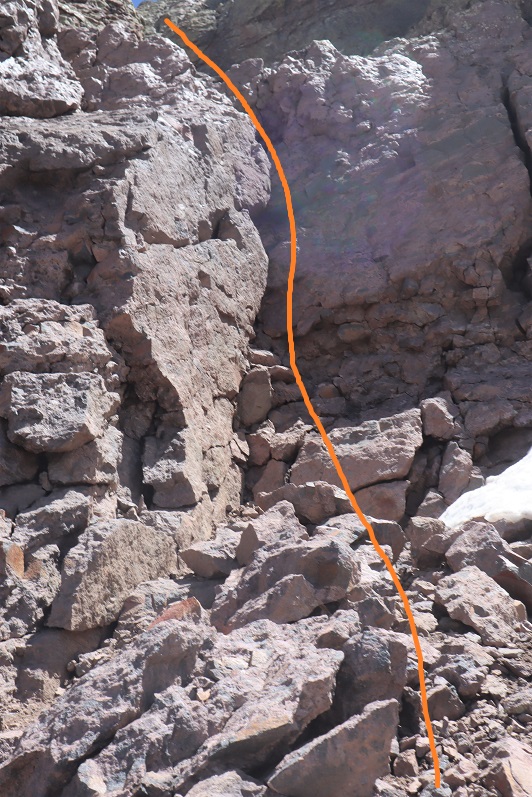
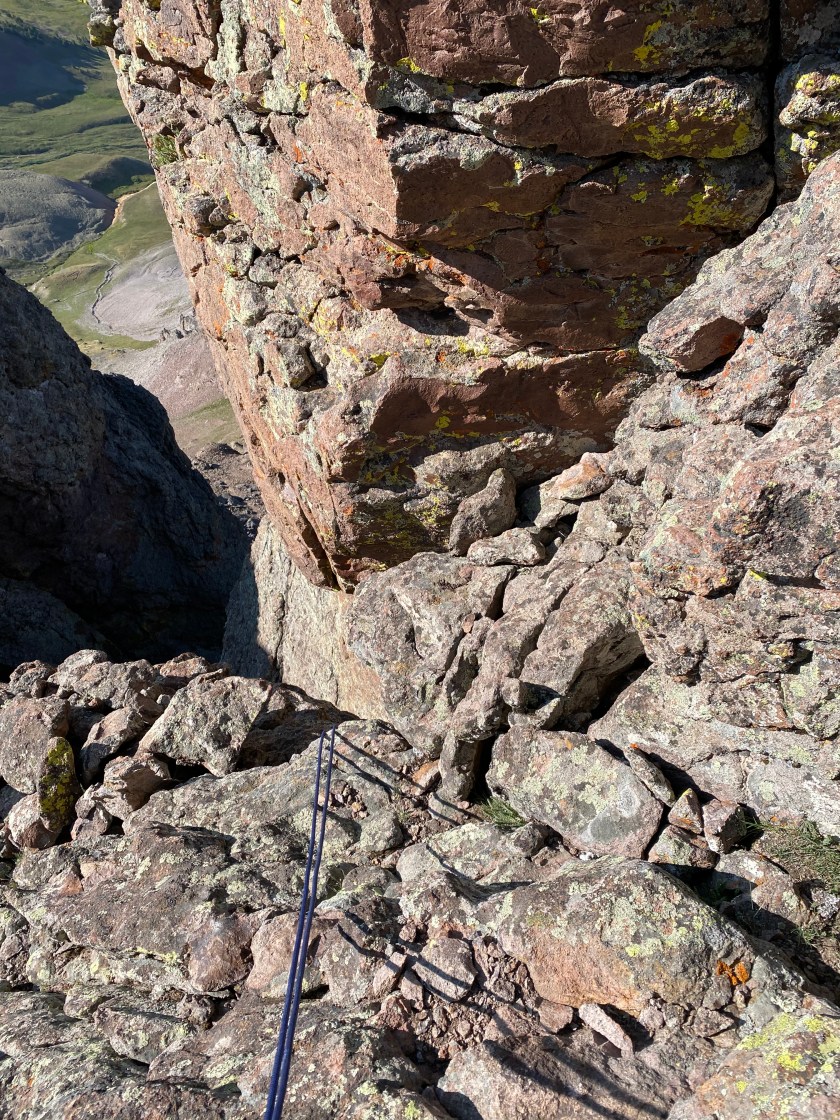
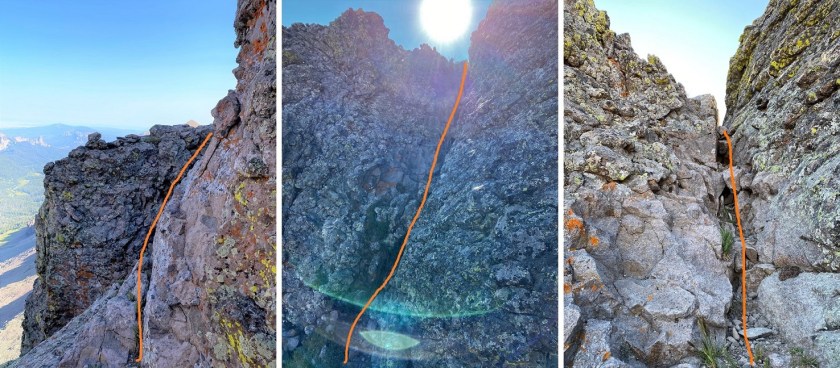
I got out my rope, attached it to my gear and the anchor (which looked solid so I didn’t replace the webbing) and rappelled down into the notch. This is committing because it’s class 5.6 to climb back up.  I’m not a climber, and I knew I wouldn’t be able to upclimb this section on my own:  forward was the only way from here on out.  This last bit included rappelling down, then climbing out of the notch

28

Here’s a look back up at this section from inside the notch

29

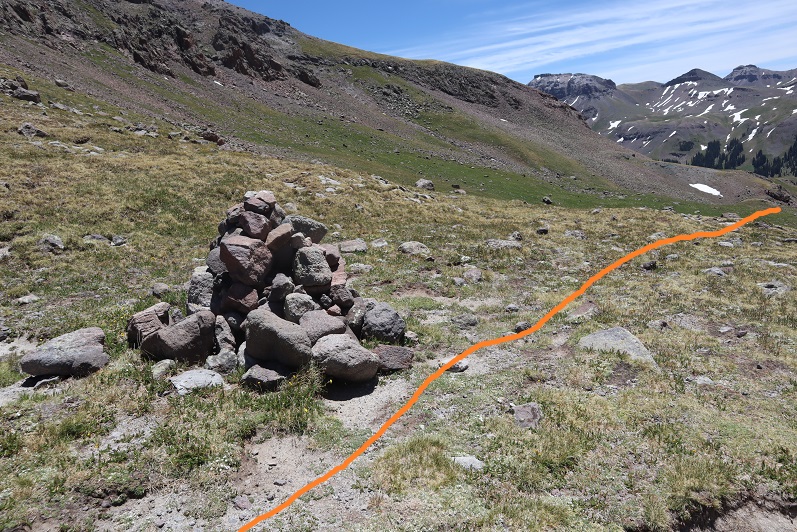
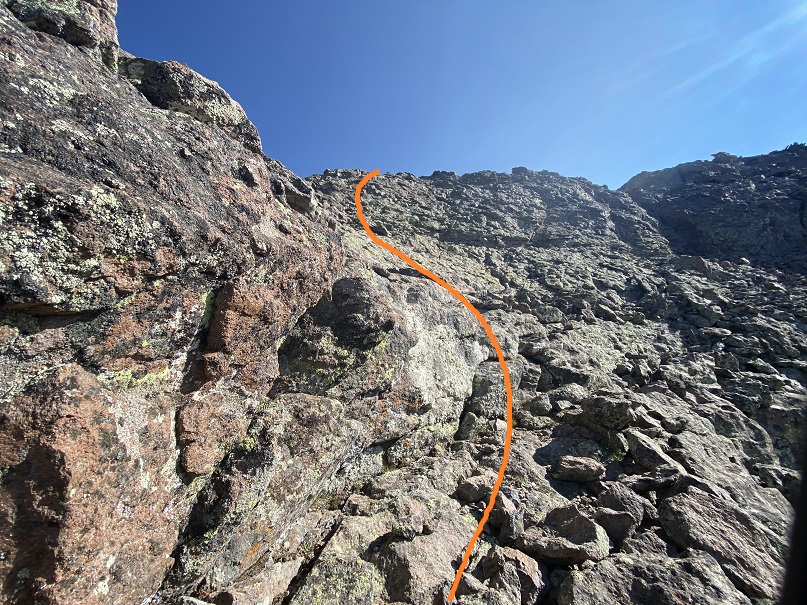
I once again retrieved and recoiled my rope, and got ready for the final pitch to the summit.  I went north, following the cairns, and climbed up an easy chimney

30

From there it was an easy walk to the summit

31

I summited Coxcomb Peak at 9:30am.  There was a summit register in a powerade bottle that should probably be replaced.  I didn’t open it, but it looked like the papers were smushed in there.

32

Coxcomb:

I was thrilled I’d made it this far, but I still had the 170’ rappel to accomplish.  I went to work, looking for the webbing and anchor set up.  It was easy to find and still looked good, so I decided to use what was already there.

33

34

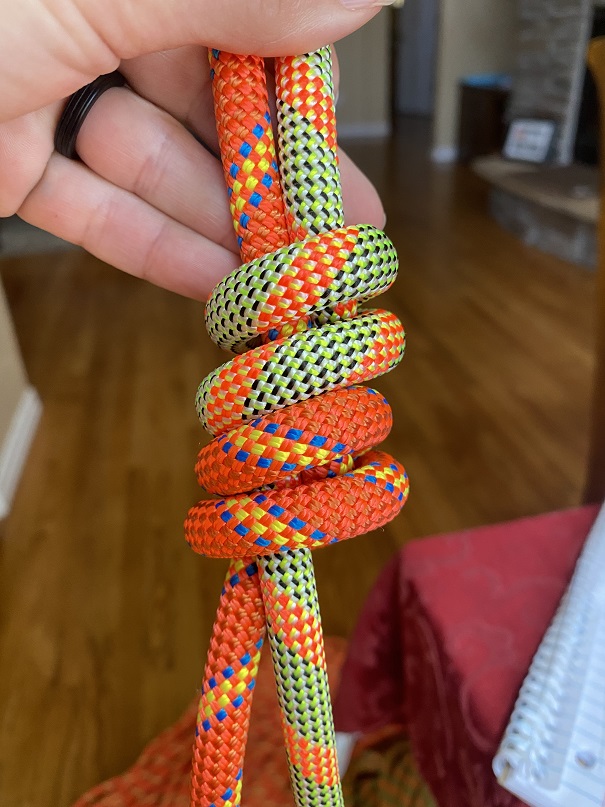
I tied my two ropes together with a double fisherman’s knot and threw my ropes.  It was quite windy, and the wind was coming at me, so it took a couple of tries to make sure the ropes made it all the way to the ground.  This was quite frustrating, but worth the extra effort to make sure it was done correctly.  Next, I tested the rope, watched my knot to make sure it was secure, unclipped my safety, and started the rappel.  Everything went smoothly. I even noticed 2 more anchors set up below where I’d rappelled, so if you brought just one rope it would have been enough (the webbing looked old though, and should probably be replaced).

My feet touched the ground and I gave out a “Woot!”  I was so excited!  I’d done it!!!  I’d solo’d Coxcomb Peak, a peak I wasn’t sure I’d ever be able to climb, let alone solo.  I gave myself a minute to let it sink in, and then went about retrieving my ropes.

I had two ropes, one purple, one orange.  I always pull the darker one.  I pulled the purple one and was thrilled when it moved.  I pulled it about 10 feet when it stopped.  Hmmm.  Ok, maybe it got stuck?  So I pulled the orange rope back a few feet, and then tried the purple one again. Once again, it got stuck.  I whipped the ropes and they moved as far as I could see, so one of the ropes must have been stuck up at the very top.  I spent the next hour doing everything I could think of to retrieve those ropes, to no avail.  In the end I made the very difficult decision to leave them there.  I did put a note in the trail register on the way down and I posted to some climbing social media sites about their whereabouts, so at this point I’m fairly confident they’ve been retrieved. It hurt to leave them there, not only because of LNT, but also because this is the first time I’ve used them (besides the initial breaking in).

35

Here’s the rappel

36

I sighed heavily and turned to hike up Redcliff.

37

This was a very short, simple, and straightforward climb. I summited Redcliff at 11:15am
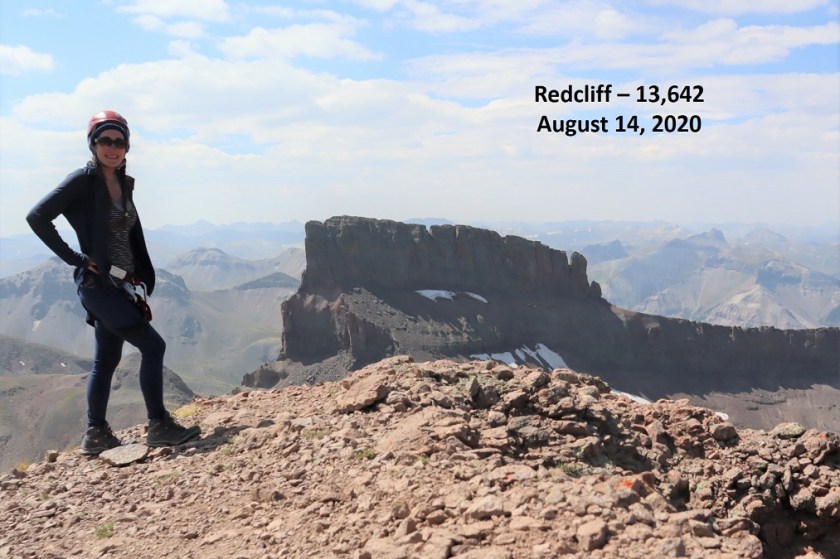
38

Redcliff:

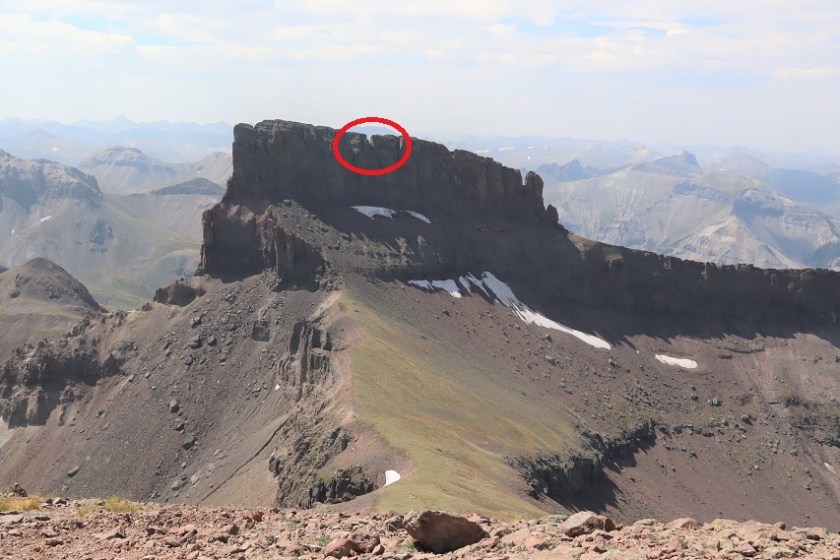
Here’s looking back at Coxcomb.  I’ve circled the notch that needs to be rappelled down and then climbed back up

39

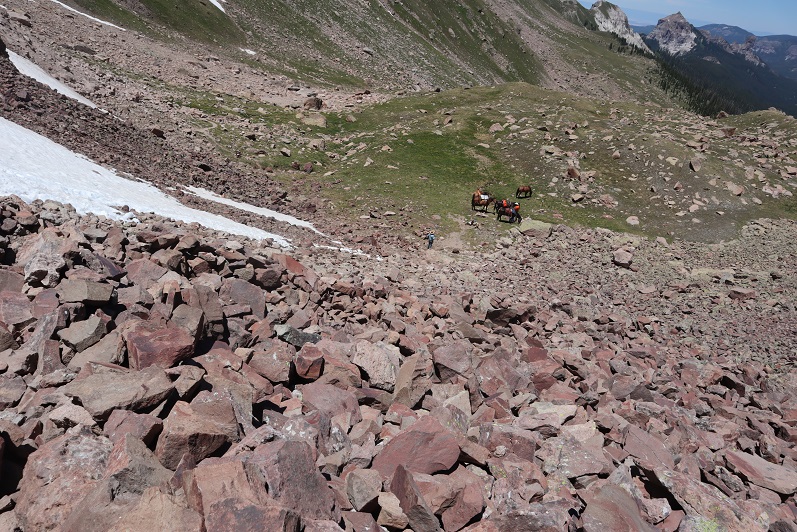
I turned and headed back to the Coxcomb/Redcliff saddle, and then descended west into the basin

40

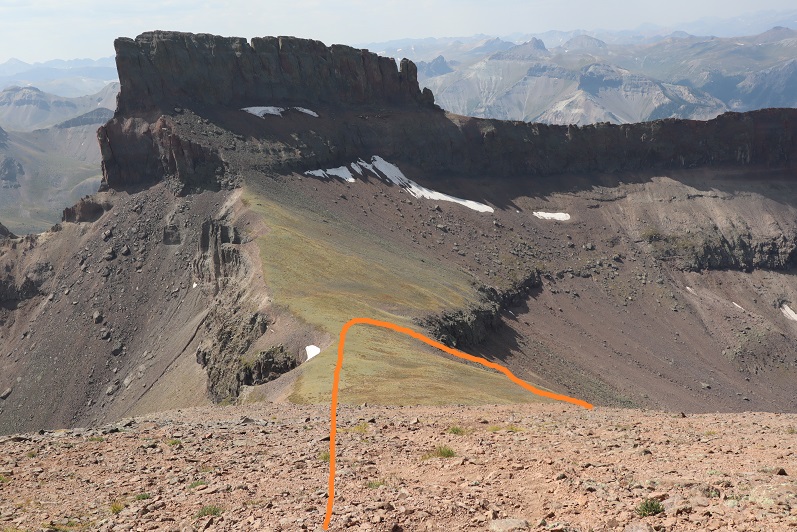
There wasn’t a well stablished trail here, but the route was easy enough to figure out.  I just aimed for the visible class 1 trail below I’d taken on my way in this morning

41

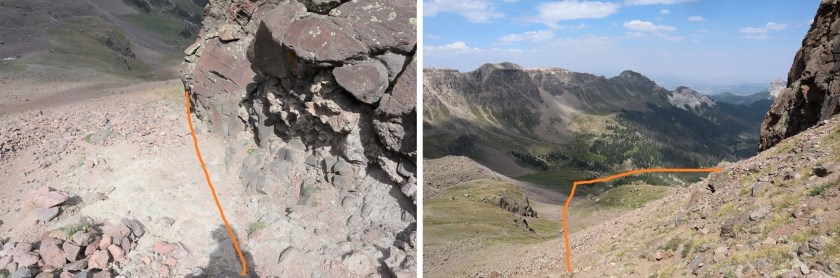
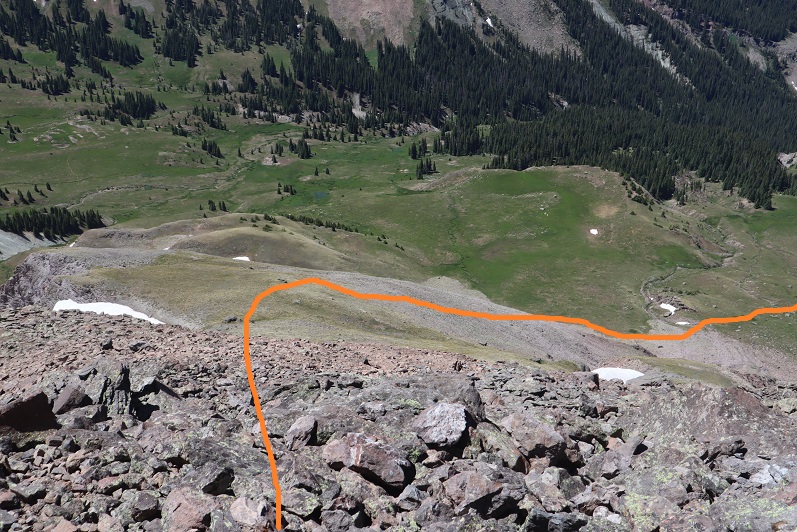
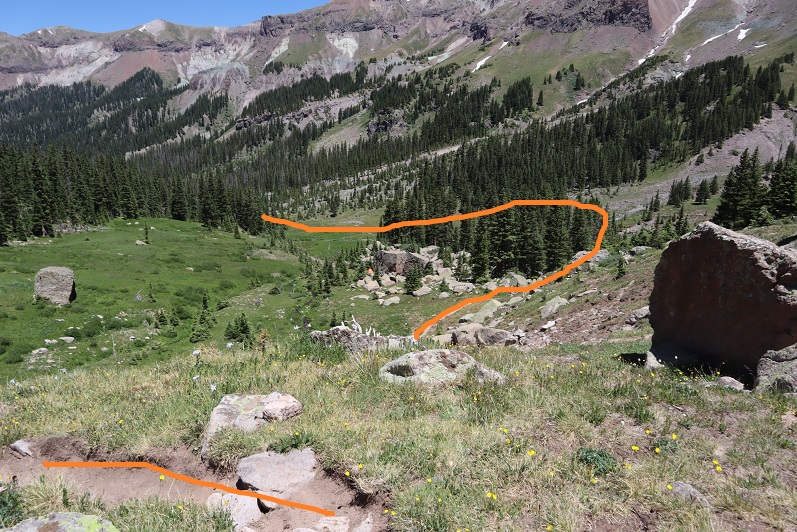
Here’s looking back at the route from the saddle to the trail

42

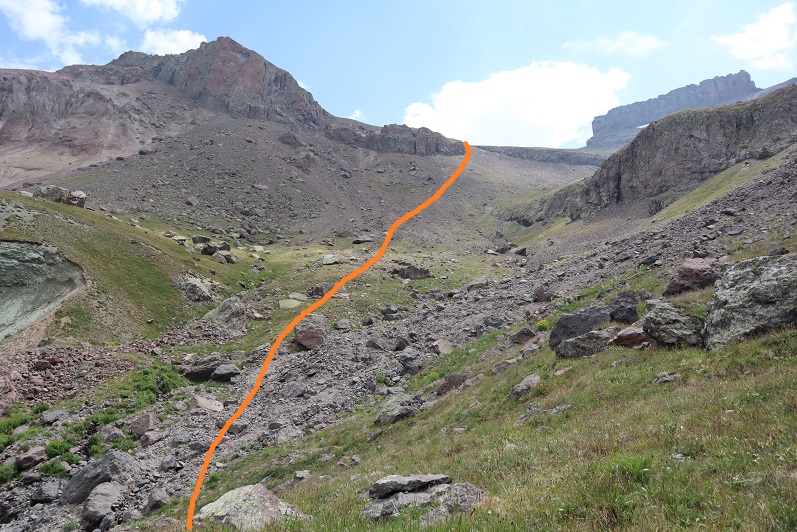
And a look at the hike out

43

I made it back to the now full trailhead and my truck at 1:10pm, making this a 13.24 mile hike with 4654’ of elevation gain in 8 hours, 40 minutes.

44

I was thrilled with today’s success, and even though I’d lost two new climbing ropes I drove to the next trailhead on a bit of a high.

Coxcomb Peak (attempt) – 13,656

1

RT Length: 17.4 miles

Elevation Gain: 5544’

NOTE:  I’ve since summited this peak successfully.  that trip report can be found here.

I told myself as soon as someone posted a successful summit for either Coxcomb or Peak 15 I’d attempt it as soon as the weather was good (they’re my last 2 class 5 bicentennials). A conditions report was posted for Coxcomb where the couple summited but the woman had to be belayed up. I’ve done several class 5 peaks solo, and I’ve talked to two men who’ve done Coxcomb solo, so I felt confident I could summit this peak solo as well.  Now I’m not so sure.

The weather was perfect and I had the day off. The only problem? I needed 2 60 meter ropes for the final rappel, and I only had 1 50 meter rope. I went to REI and Mountain Chalet and bought 2 new ropes (REI only had 1, but on the positive side I got to use my dividend).

2

Then I spent the afternoon practicing my double fisherman’s knot. That’s how you tie two ropes together so they don’t come undone.

3

Confident I had the knot down, I wanted to practice rappelling with the two ropes, and I also wanted to break them in before using them for the first time in a scary situation (yes, a 175 foot rappel is committing, and can be scary, especially if you haven’t rappelled all season). I decided to go to Red Rock Open Space to break them in.

4

Success! I practiced setting up the anchor, tying the ropes together, and rappelling on easy terrain at least 9 times to break the ropes in. Yes, they were heavy to carry, and coiling them was no fun, but everything went smoothly. The weather forecast for the weekend was phenomenal: sunny skies with no chance of rain. I decided to drive to the trailhead the next afternoon and attempt Coxcomb peak the following day.

Most of the drive in to the trailhead was on a 2wd dirt road.

5

Then all of the sudden I came upon stopped vehicles along the road. A rancher was moving a herd of cattle, and the first vehicle in line didn’t feel comfortable driving alongside the moving herd so he decided to stop and park his car until the herd had moved (despite the rancher continually waving him on: the cattle would have been fine if he’d just drove slowly past). I wasn’t in a hurry so I wasn’t too bothered by the extra time spend sightseeing cattle. A lot of the other drivers were though.

6

The last 2 miles to the trailhead were 4WD and included a fun creek crossing.

7

I made it to the trailhead, parked my truck, and got out and took a look around.

8

I wanted to get a visual of the route for tomorrow’s hike. I took some pictures of the trail entrance, trail register, and the way I wanted to head out tomorrow. Then I ate my dinner, did a little knitting, and generally enjoyed the view as I relaxed in the bed of my truck.

9

The next morning I was on the trail at 4:40am, armed with my helmet, harness, 3 climbing ropes (2 60 meter ropes and one 30 meter half rope) and my climbing shoes. My pack was completely filled, and I’m guessing it weighed 40lbs. I only took the essentials.

The trail starts at the east end of the parking area and heads south.

10

I followed the class 1 trail for 2 miles until I came to a steep section

11

12

At the pass the trail diverged into two and then kind of ended. I could tell I just needed to get around the small outcropping. I decided to go up right and descend on the left on my way back down. Both sides were easy.

13

14

The trail picked up again after I climbed this area.

15

After 3.3 miles of hiking I came to the top of the pass.

16

From here I continued following the class 1 trail, losing 400’ in elevation as I went

17

18

At the bottom of the pass I left he trail and headed east

19

My goal was to gain the ridge and follow it to the base of Coxcomb Peak

20

The ridge was full of loose talus

21

22

The talus eventually gave way to a little bit of tundra

23

Then I came to a rocky class 3 section

24

Which brought me to the base of the crux of Coxcomb. Wow! The approach had been much easier than expected. The entrance to the climb starts at the small gully. I’ve seen a few reports on how to climb this area, and every report rated the difficulty different. Some gave it class 3 (it’s NOT class 3, but there could have been a rock slide since that person posted conditions), some gave it class 4, and some class 5. The couple that summited last week said this was the most difficult part of their climb.

25

I walked up to the gully and tried to devise a plan. I decided to put on my climbing shoes and just go for it. I tried to ascend, but there just weren’t enough foot/hand holds. I tried and tried and tried. Then I tried ascending to the left but those rocks are loose and kept crumbling in my hands. I wasn’t about to put any physical weight on them.   I tried the gully again, and then the rocks to the left again. I spent over an hour trying to figure this problem out! If I were only a few inches taller this wouldn’t have been an issue. Hmph. I sat down to think. Here’s a close-up of the gully

26

All I needed were a few more footholds. That’s when it came to me: there were rocks all around! I’d just fill the gully as far as I could and use those rocks as stepping stones. I dropped my pack and spent the next 45 minutes or so filling the small gully with rocks. I even put in a chockstone for a handhold. When I felt I’d done enough I tried climbing a few feet to see if the rocks were stable. Success!

27

I put my pack back on and started to climb but my pack was heavy. It made me top heavy and I couldn’t pull myself over. Drat! I sat back down to think. I could see a rappel set up at the top of the gully. I decided to take my 30 meter short rope, attach it to my backpack and my harness as well, leave my backpack below, and climb up the gully without gear. Then I’d use the rope to pull up my pack. If I wasn’t able to pull my pack up I knew I could just rappel back down with the sling already in place and the rope I’d attached to my harness (I was glad I’d brought the 3rd rope!).

I looped the rope around the straps of my pack, attached the other end to my harness, and easily climbed up the gully. Success! Wow, I felt great! That had been the crux of the route for the couple who were here last week, so I now felt confident I’d be able to make this summit. I hauled up my pack, which took quite a bit of upper arm strength and balance not to fall back down the gully as I was lifting the pack up.

28

I coiled up my rope, attached it to my pack, and continued on. The next section was class 3, and only lasted about 50 feet or so

29

This brought me to a class 4 section I had to upclimb. I was able to do this wearing my pack

30

I’d made it to the base of the chimney area, also rated class 4.

31

From my research I’d learned to take the ‘easier’ chimney to the left. Um, this did not look easy! I spent a lot of time determining if I was even in the correct area, and backtracked a little just to make sure. Yep, this was it. I decided to just start climbing. Boy, was this tiring work! My pack made climbing so much more difficult, but I wasn’t giving up. I made it about half way up the chimney and wasn’t able to stem with my pack on. I decided to retreat and try again.

32

Taking off my pack had worked last time, so I decided to try that again. I rigged the rope the same way I had last time and started up. Wow! This was so much easier! I made it about ¾ of the way up the chimney when the hand/foot holds gave out. This was definitely difficult class 4 (if not class 5). The pictures I’d seen of others climbing this part made it look so much easier! They looked like they just walked up this section. They’d been roped in, and about a foot taller than I am, but still, it didn’t seem fair. From here I just needed to stem for about 20 more feet which would put me in the upper gully, and then I’d need to exit via the right side. The problem? I couldn’t see any anchors set up, or even any places to set an anchor, and without a visual of the last part of the gully I didn’t feel comfortable committing to this part of the climb, not knowing if I’d be able to rappel down. I knew if I went any further I would not be able to climb back down, so rappelling was my only option. It was here I made the decision to call the climb for the day. I just didn’t feel like I could commit to continuing on without putting myself in unnecessary danger. I kept thinking how infrequent this mountain is climbed and how I’d be stuck for weeks, if not months (or longer) if I wasn’t able to downclimb.

Note: On my drive home I came up with the idea of tying all my ropes together, carrying an empty pack up, and then hauling the ropes up behind me. The only downside to this scenario is if the ropes got caught on something while I’m trying to haul them up (a very real possibility). I need to do more research and find out if there is a sling set up in the gully, or if I just need to commit. Also, I need to practice stemming in a climbing gym with a full pack. That’s not going to be easy…

Here’s how far I made it up the chimney.

33

I made it back to my backpack and set up a rappel to head back down. At least I was getting some use out of my 60 meter ropes today.

34

Here’s a picture of the route

35

I rappelled back down, changed back into my hiking boots, and retraced my steps back down the ridge and back to the trail.

36

37

38

I followed the trail back up the pass, cursing the weight of my pack the entire way

39

40

As I was coming back down I noticed blood along the trail, and a few guys with horses down below.

41

I made it to the bottom of the pass and the oldest man there talked with me for a bit (he looked like a grandpa out with his grandsons). He wanted to know if there was more snow further along the trail. The blood I’d seen had been from one of his horses: it had spooked on the rocks and snow and flipped over backwards when it lost its footing. It had injured its hoof. I was confused as to why they were even contemplating continuing on? They had an injured animal! The man agreed with me and I’m pretty sure he decided to head back.   A little further along the trail I met up with a woman who said when the group had passed by their campsite earlier this morning one of their horses stepped on their dog (the horseback riders horse stepped on the horseback riders dog) and caused an awful commotion. And one of the boys had lost his jacket. So the group wasn’t having a great day.

Here’s my route back down the mountain to my truck

42

43

44

45

The entire route down I ruminated on the days experiences and tried to think if I could have done anything differently. I also considered the need for a climbing partner on this route: someone taller than me who could belay me from the top. This idea doesn’t sound appealing, but it is the safest option. In the end I decided I needed more stemming practice, and I need to actually speak with people who’ve accomplished this route.

I made it back to my truck at 2:40pm, making this a 17.4 mile hike with 5544’ of elevation gain in 10 hours. Here’s a topo of my route

46

And just for fun here’s a close-up of my problem solving skills. I worked this problem for a long time!

47

When I pulled up my gpx file I found I made it to 13,560’, which means I was less than 100 feet from the summit when I turned back. Ouch. On to the next trailhead!