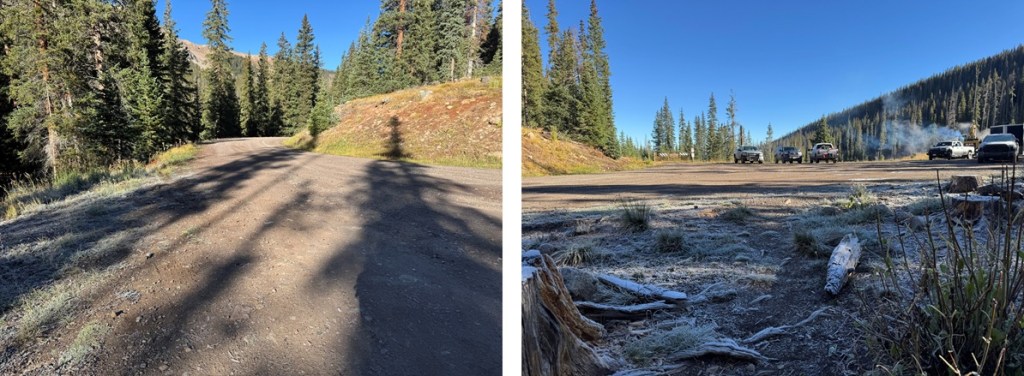
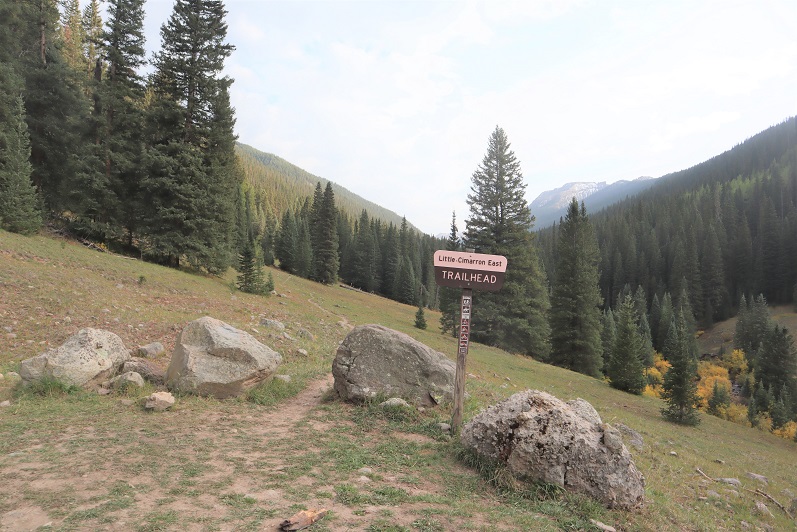
This hike starts at Fall Creek Trailhead. However, Google doesn’t seem to know where that is. To get there first go to the Little Cimarron Trailhead and continue past it for 4.4 miles until the road ends. It’s a total of over 18 miles on a 2WD dirt road to get to Fall Creek Trailhead. There’s room for about 10 vehicles to park, and some dispersed campsites along the way and at the trailhead.
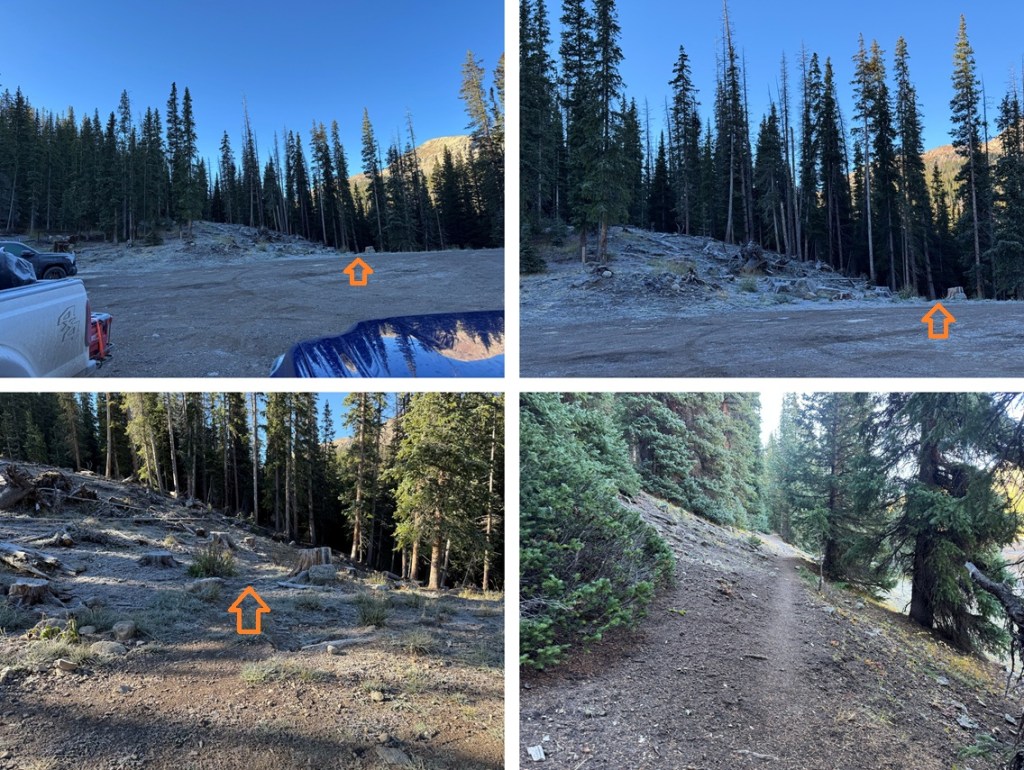
There’s been a fire and a lot of logging in the area, so the beginning of the trail isn’t easy to find. There isn’t a trailhead marker, etc. but the trail starts at the south end of the parking area.
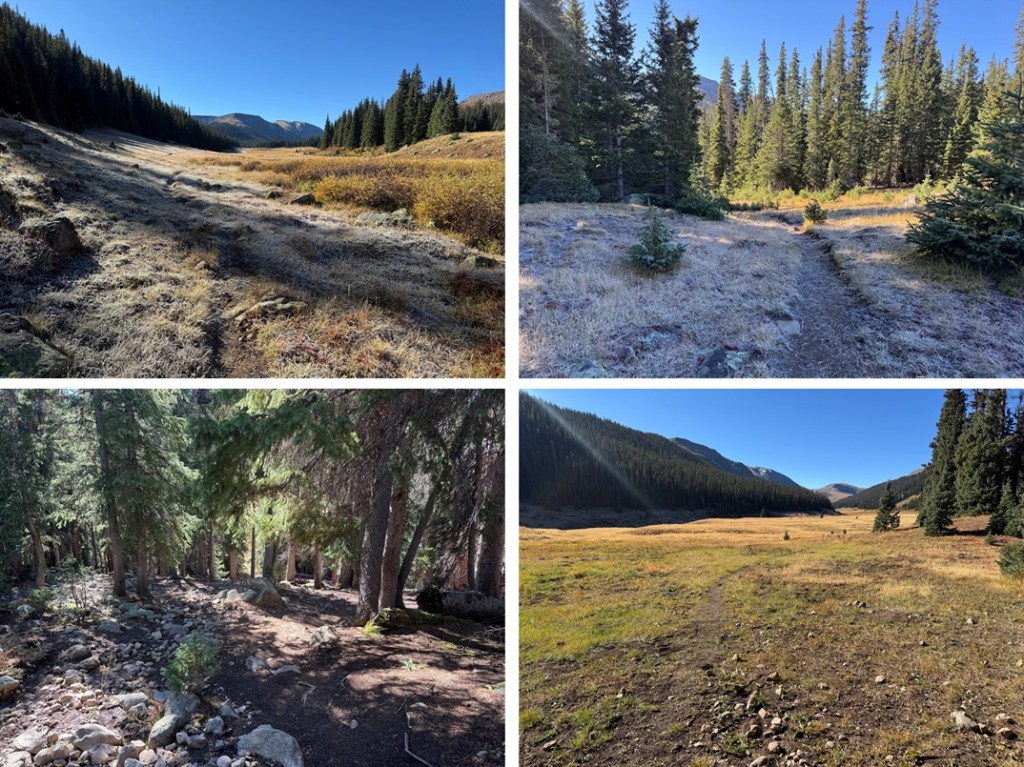
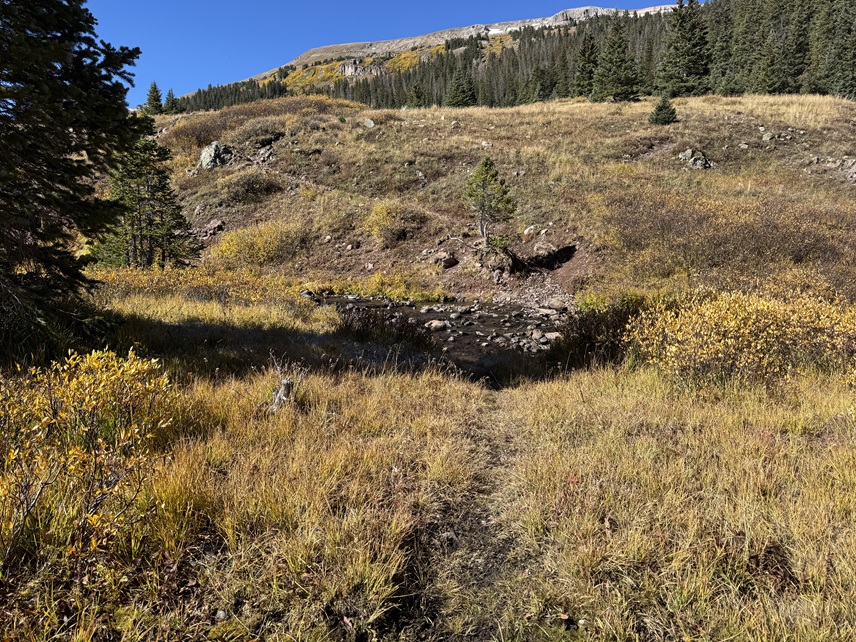
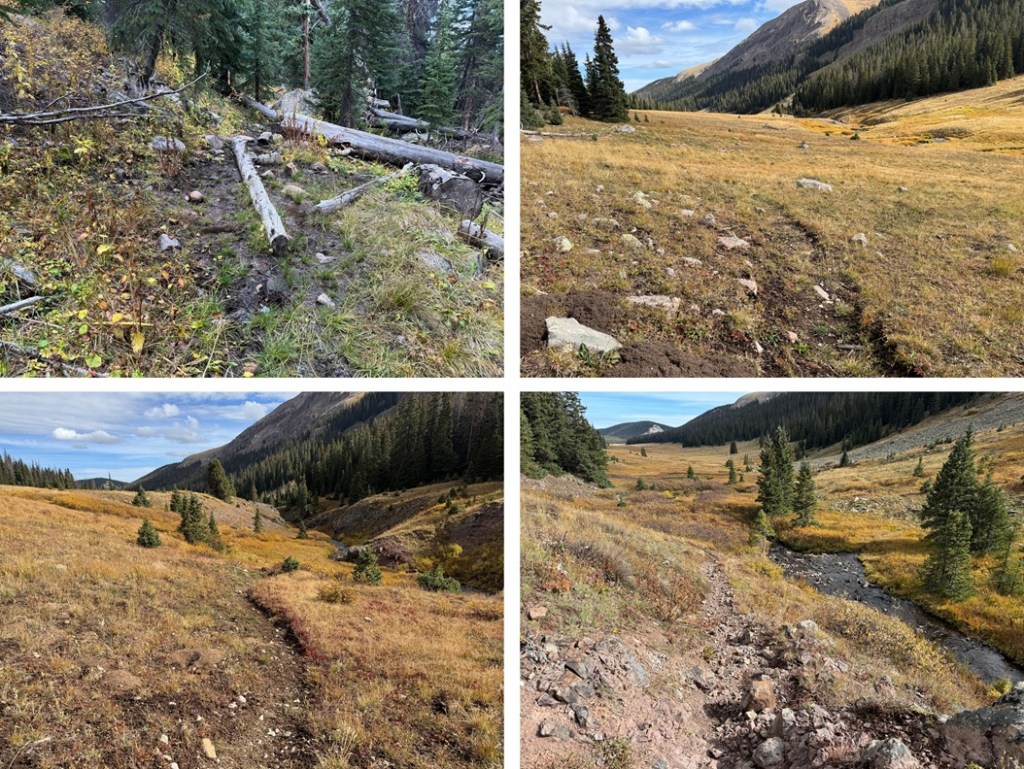
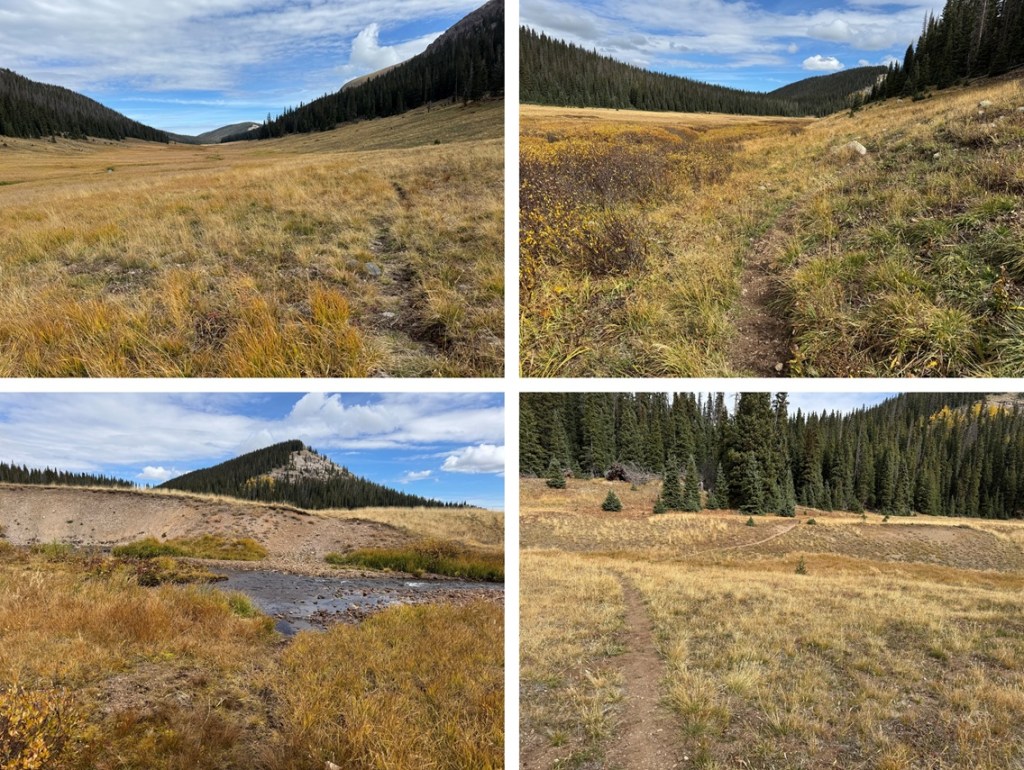
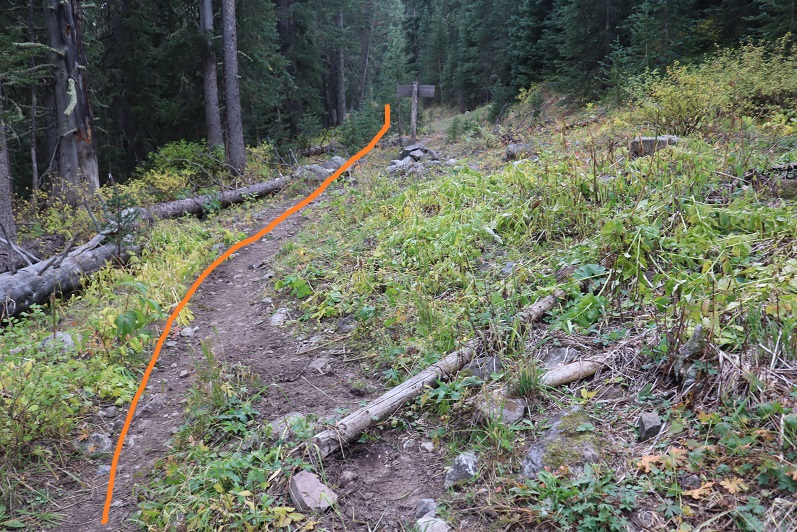
Once I found the trail I followed it south. This trail follows Fall Creek, and on a map is labeled Fall Creek Trail 9231. For the first few miles the trail is easy to follow. It goes through a rocky area and through several large meadows following the creek.
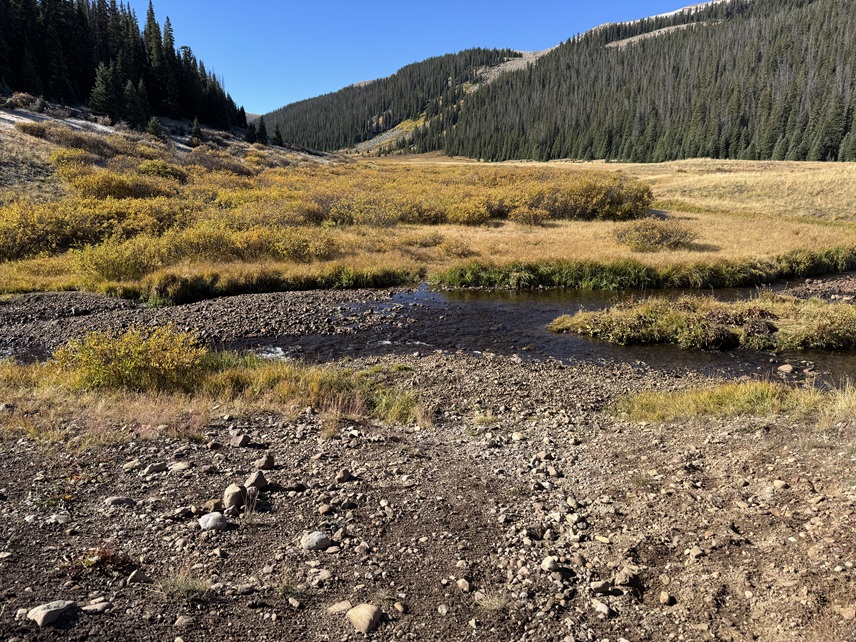
Just after descending through the trees I came to a creek crossing.
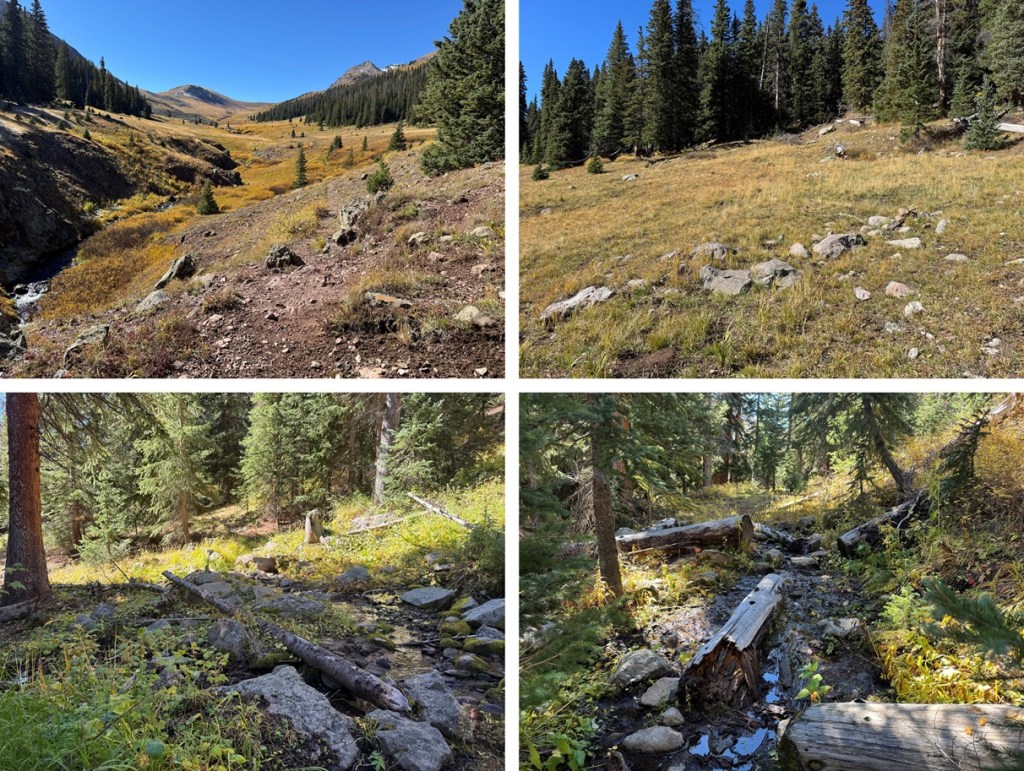
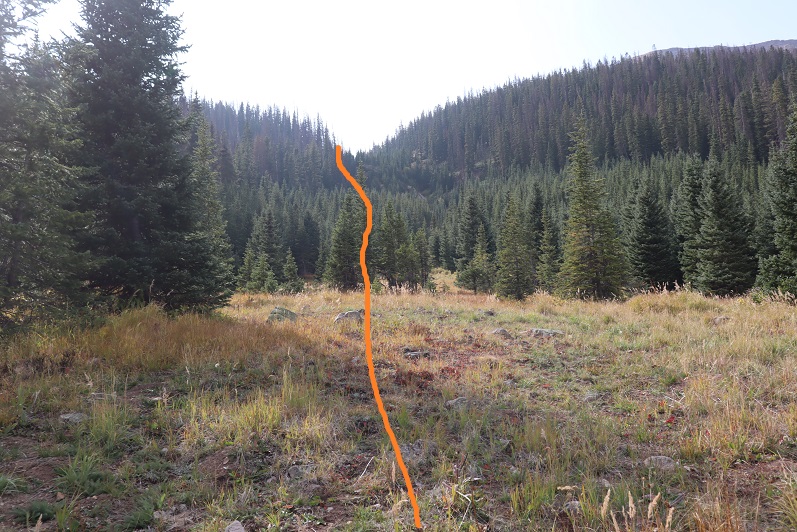
From here the trail can be difficult to follow but there are no trail junctions. It gets marshy and there are many game trails due to the mud and water. Also, horses have torn up this area. Be prepared with an extra pair of socks. From here I stayed on the left side of the creek until an obvious crossing point.
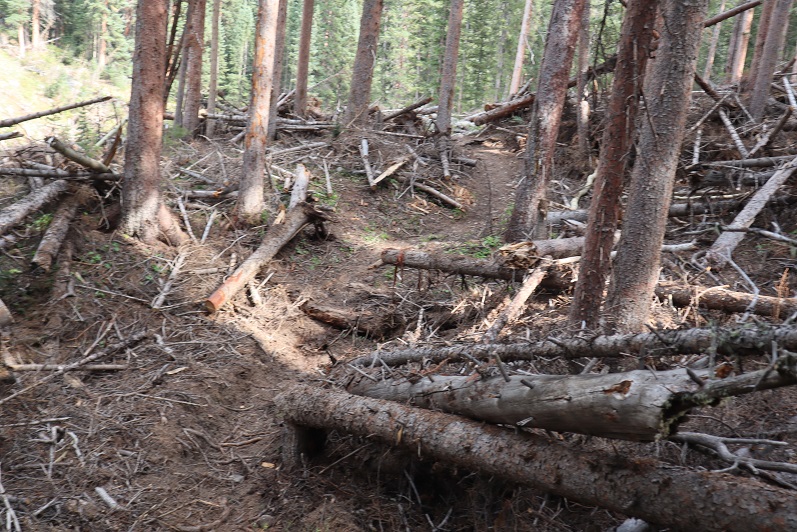
I crossed the stream and the trail brought me into the trees to avoid the willows below. This is where the elevation gain begins. There are some downed trees in this area but overall it was much easier to follow than heading through the marsh. But don’t change your socks yet: it’s going to get muddy through the willows up ahead.
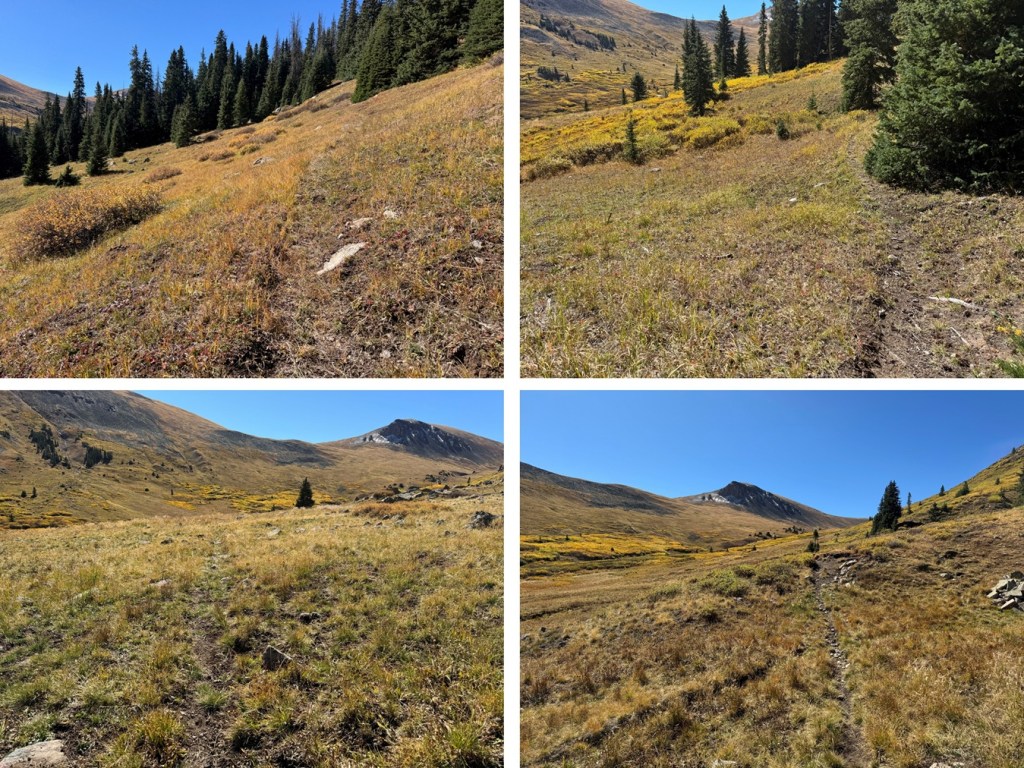
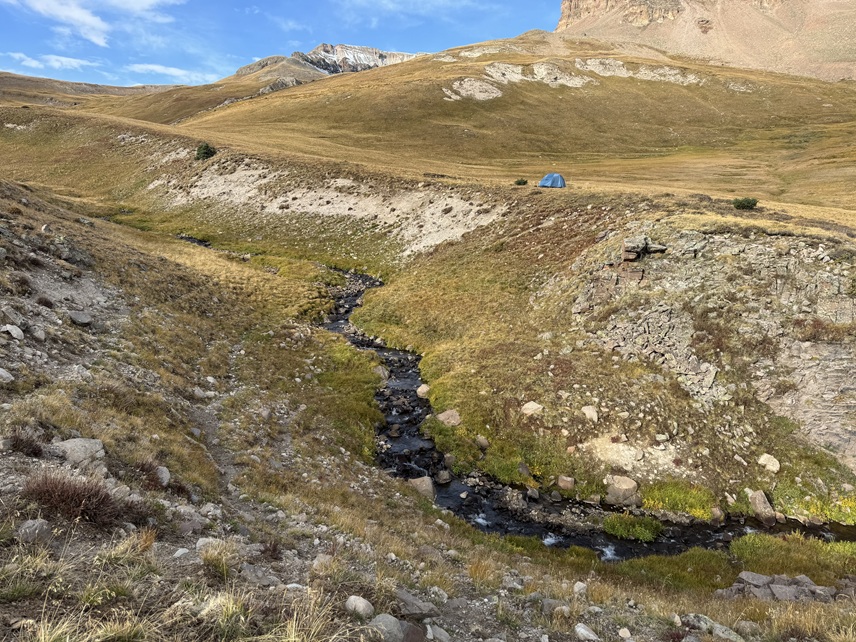
After hiking for 6 miles, and at 12050’ of elevation I found my campsite for the night. It’s important to note this spot even if you don’t plan on making this an overnight, as this is where you’ll cross the creek again.
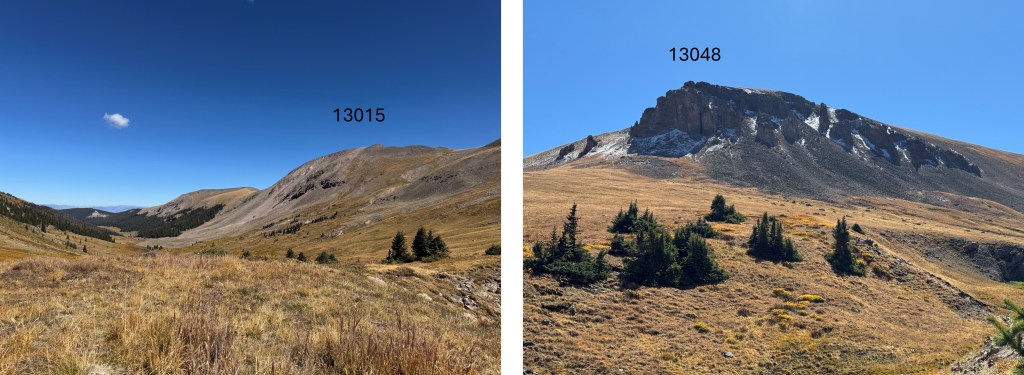
It took me just under 3 hours from the trailhead to my campsite. I set up camp and enjoyed the rest of my afternoon. I saw two different herds of elk, lots of raptors, and had amazing views of the peaks nearby. I could see PT 13015 to the northeast, and PT 13048 to the south. It was my goal to just enjoy the solitude.
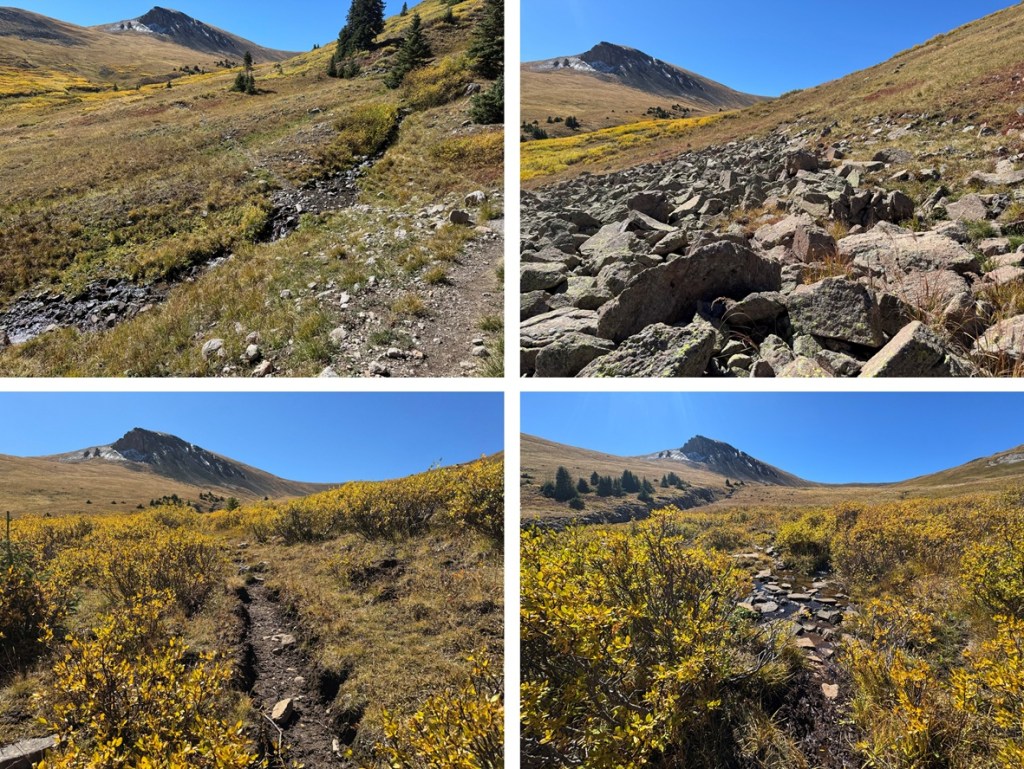
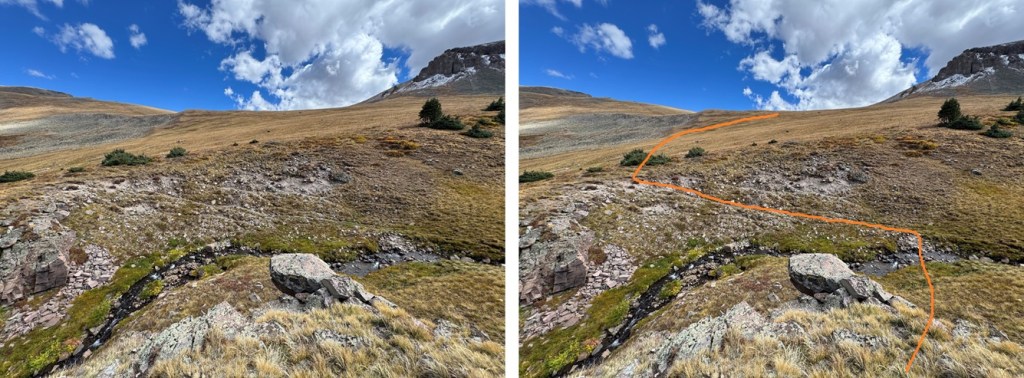
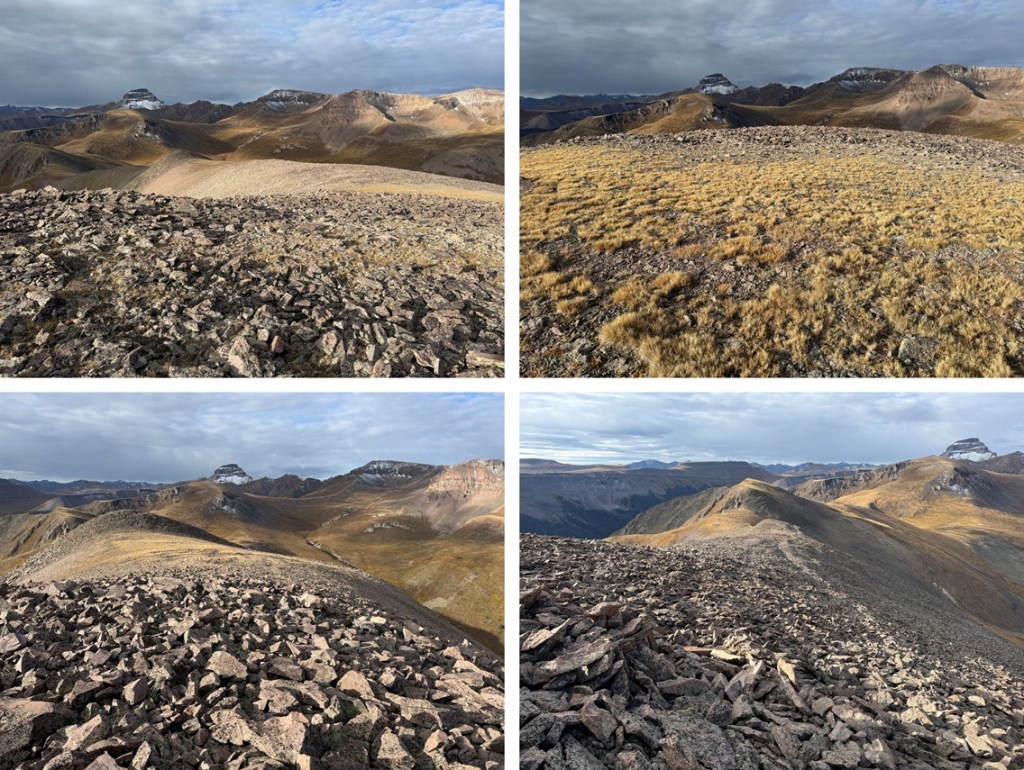
It was a long night, but that was just because I could hear the elk bugling and calling to each other. I’m also pretty sure I heard a cow moose at one point. This was why I’d made this trek an overnight: to enjoy the wildlife and fall scenery. It was worth it. I was the only one in the basin the entire time I was there. The next morning I was up and on the trail by 7am. I crossed the creek on a game trail and headed for the 13015/13048 saddle on tundra.
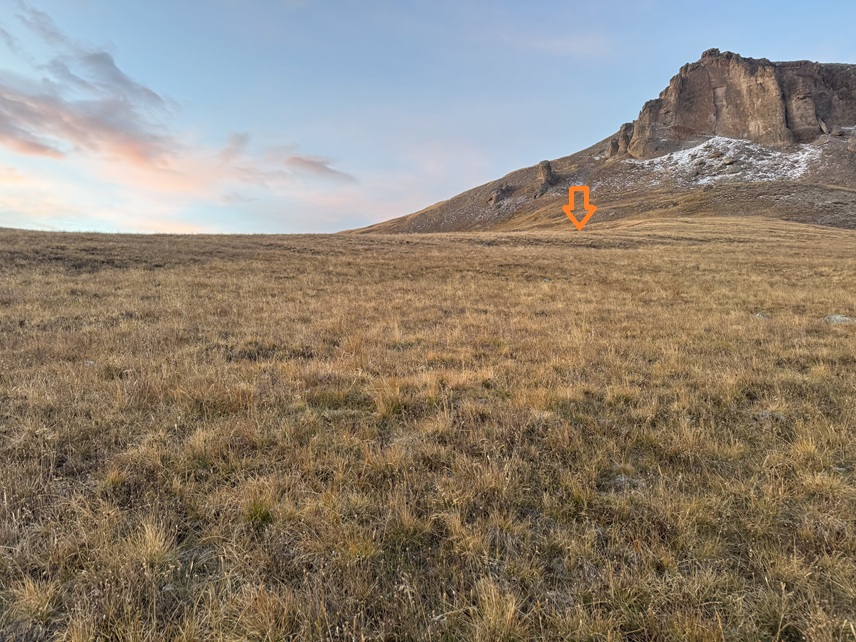
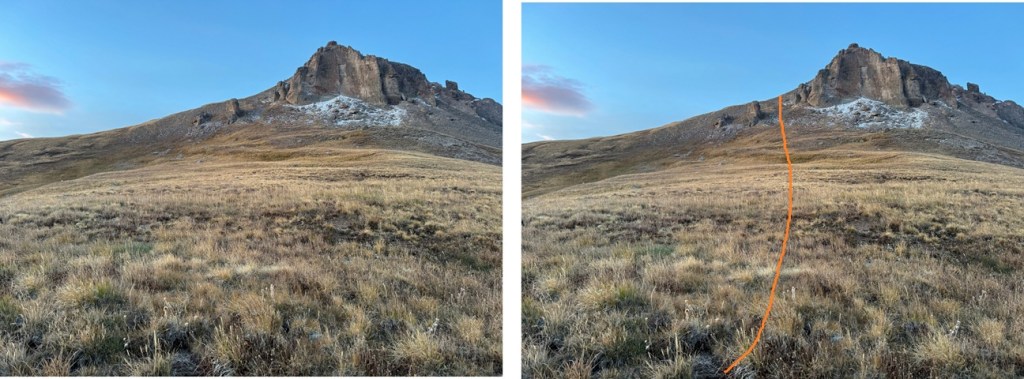
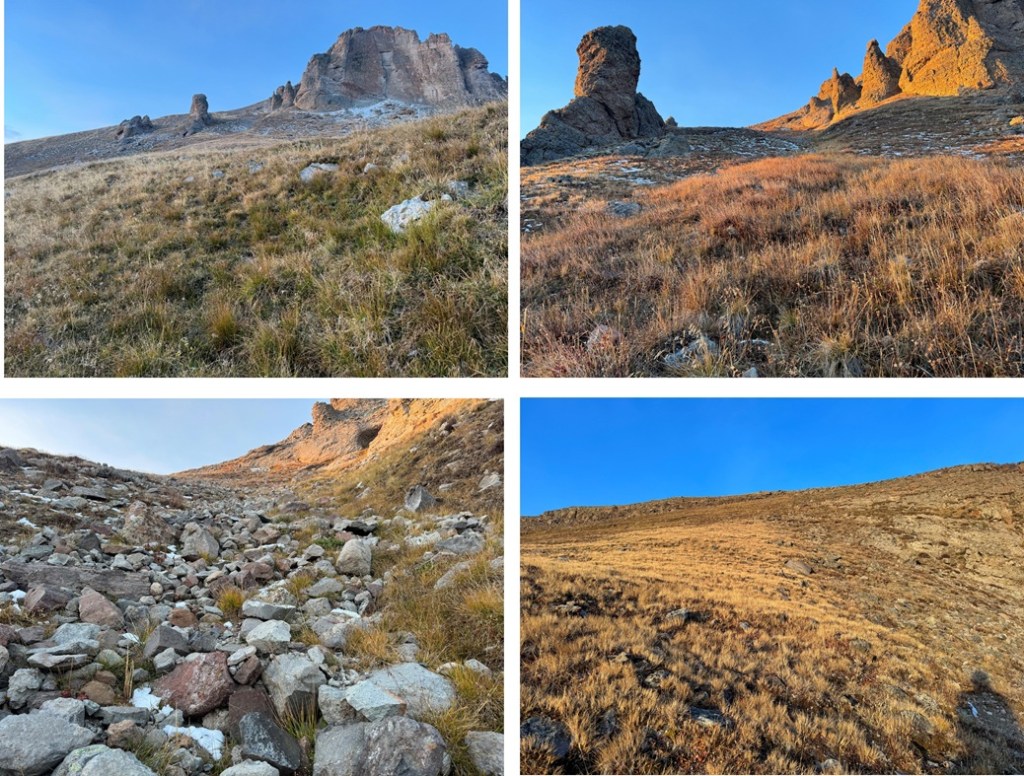
Once on the saddle my first objective was 13048. I turned right and headed up a small gully to the ridge. This was a class 2 gully and easy to navigate.
At the top of the gully I turned right to gain the ridge, also on class 2 tundra.
Once I’d gained the ridge I followed it southwest on easy tundra terrain to the summit.
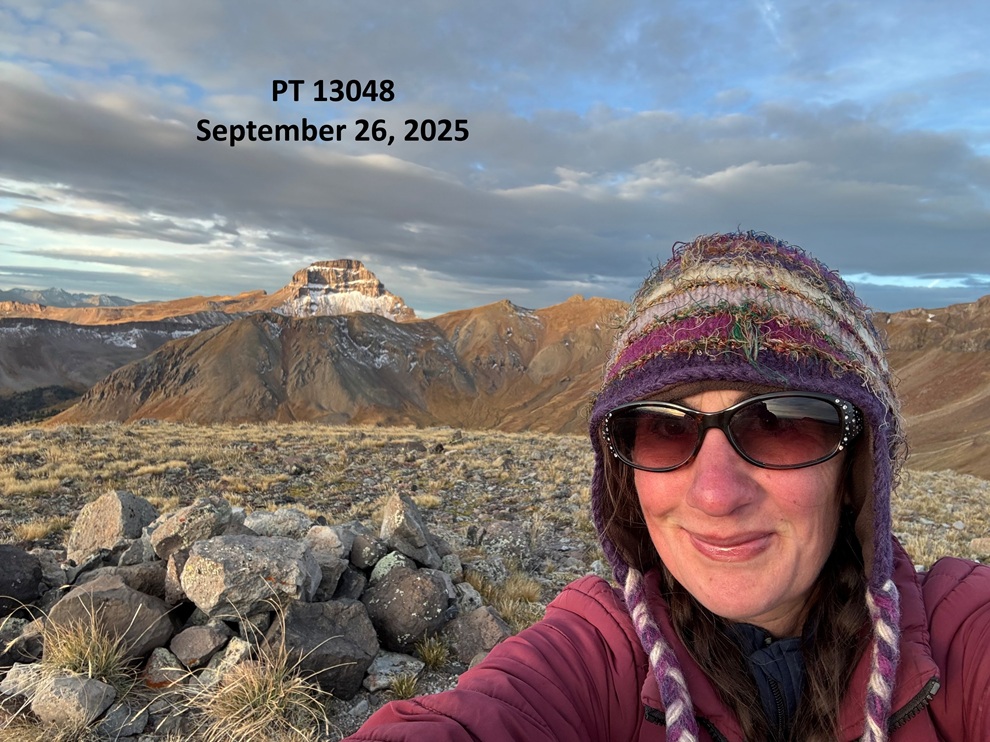
I summited PT 13048 at 7:30am
PT 13048:
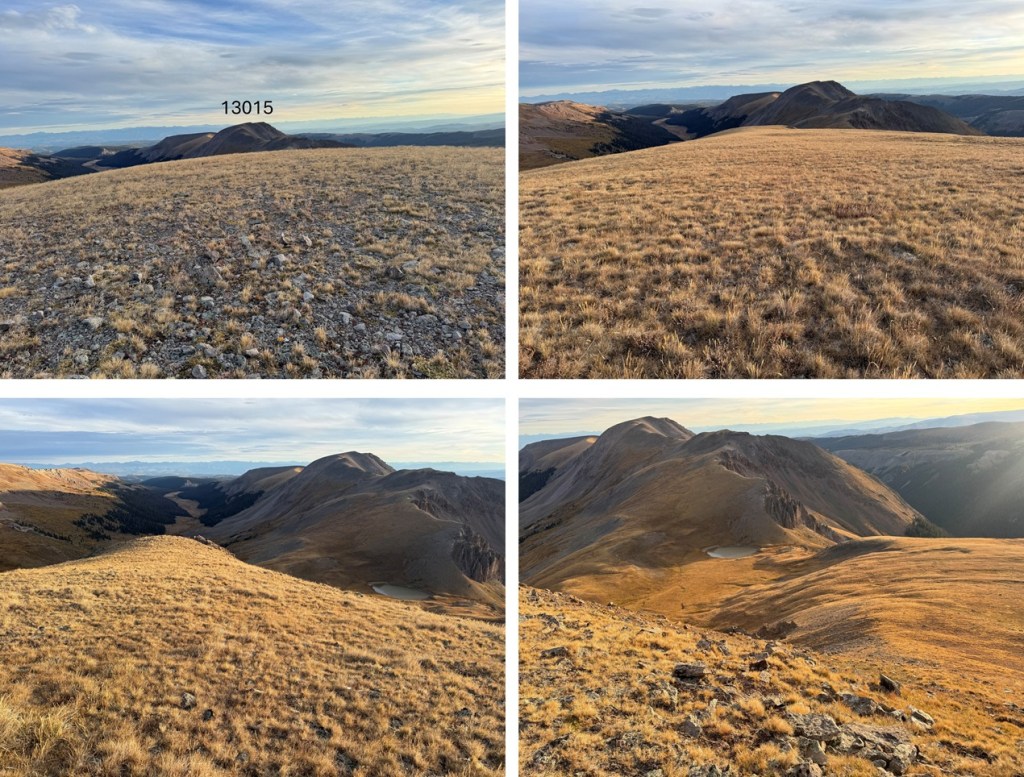
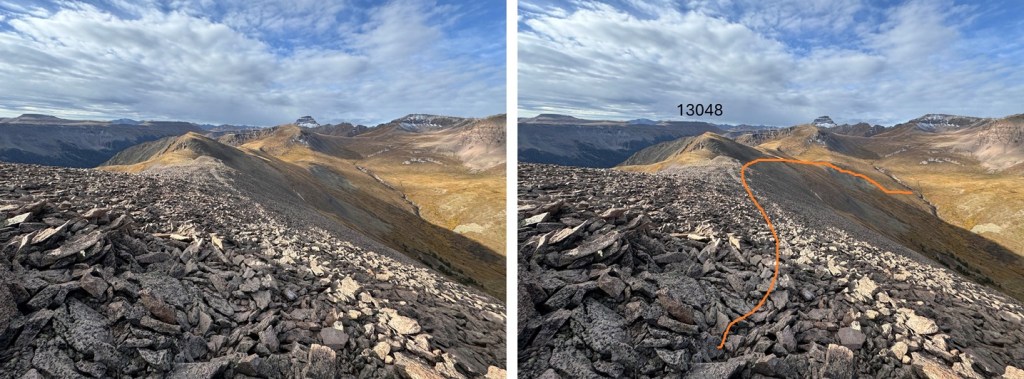
I could see PT 13015 to the northeast, so I descended back to the 13015/13048 saddle.
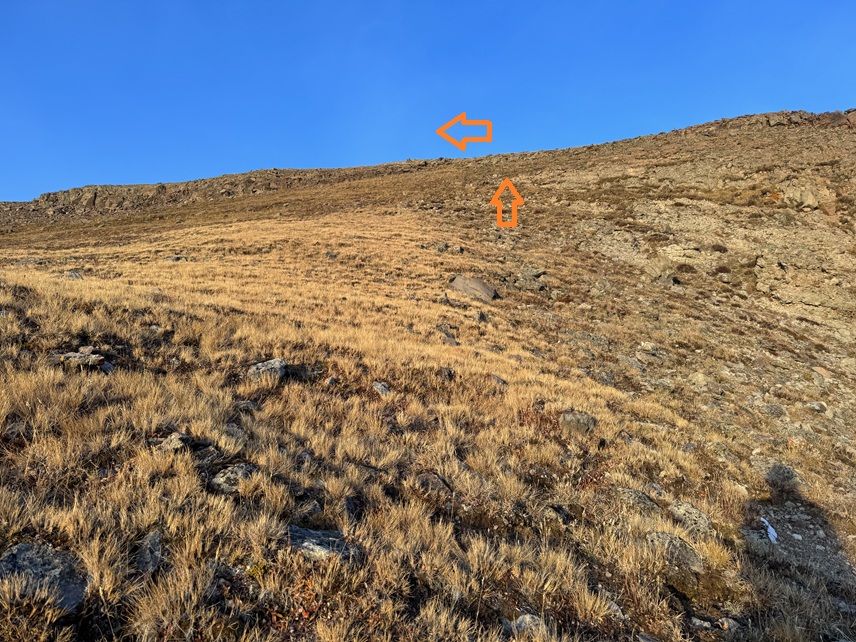
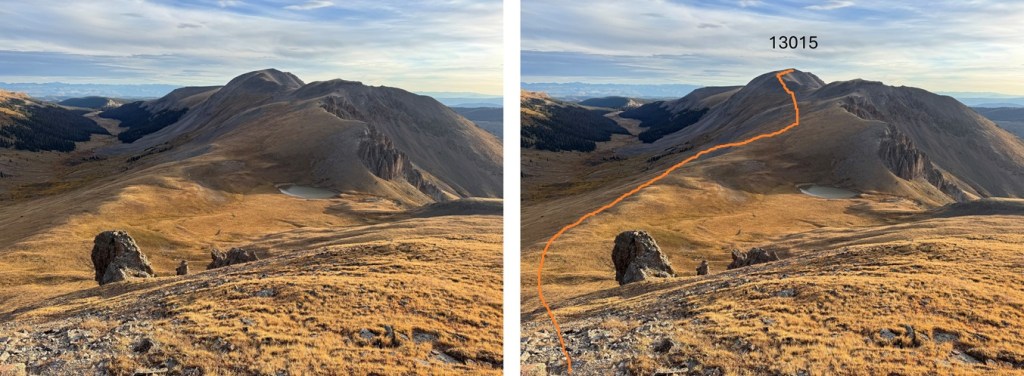
Here’s my overall route to the summit of 13015. It’s all class 2 on mostly tundra and then rocks at the end.
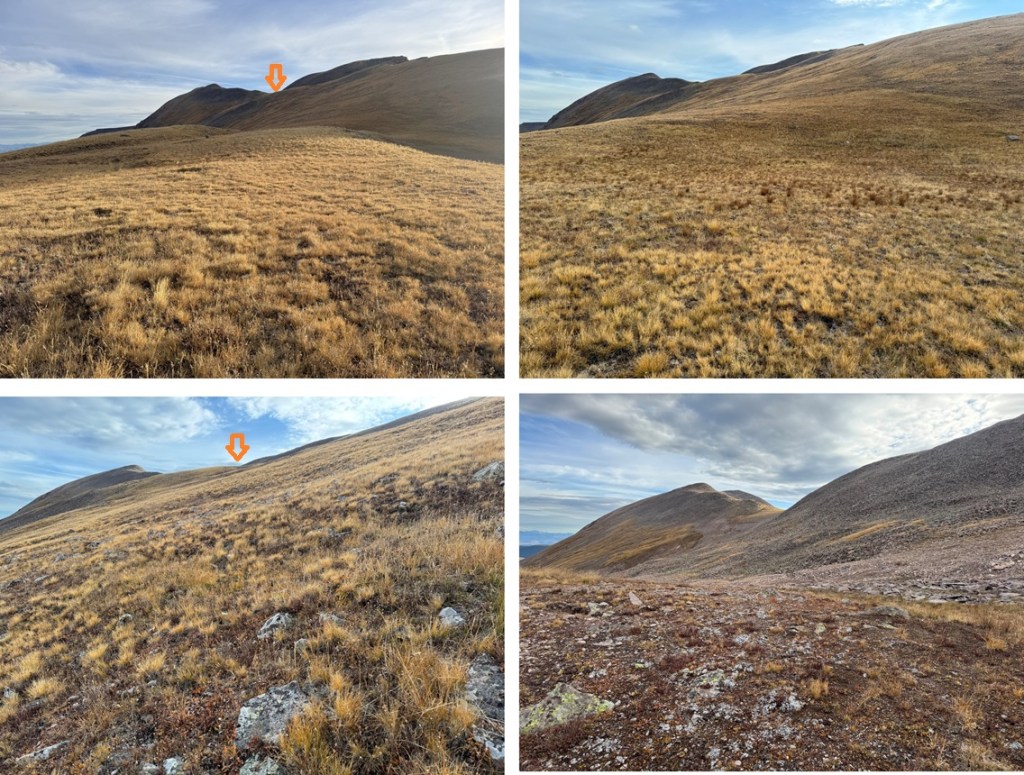
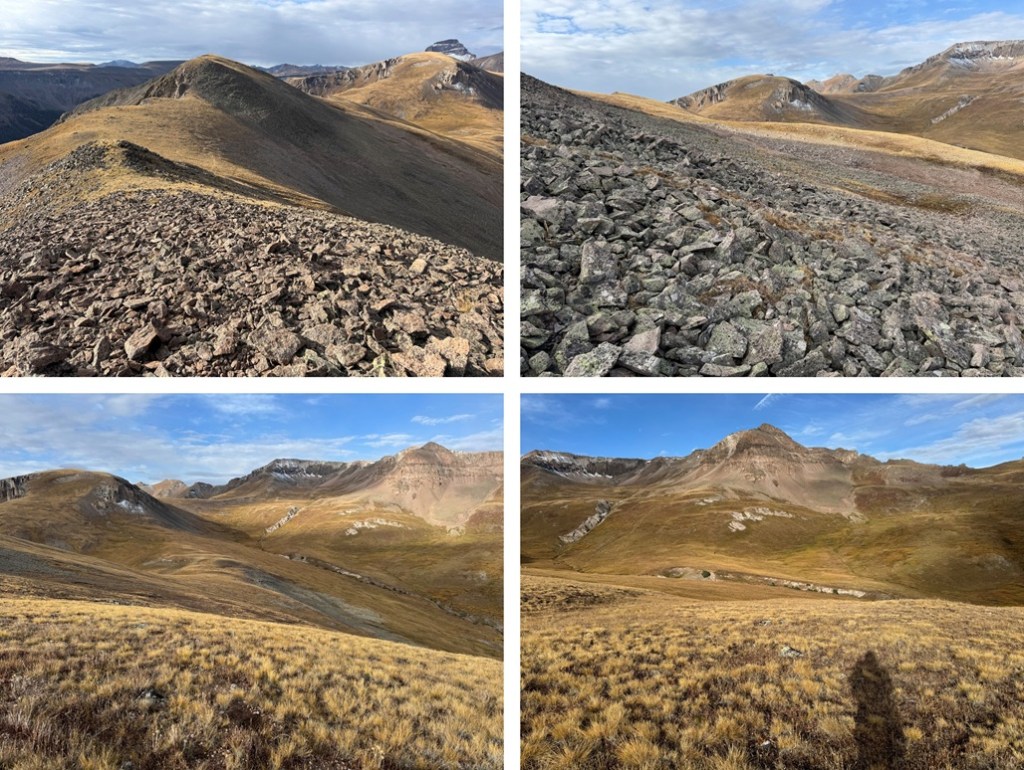
Back on the saddle I aimed for a low point in the tundra
Then I rock hopped to the saddle.
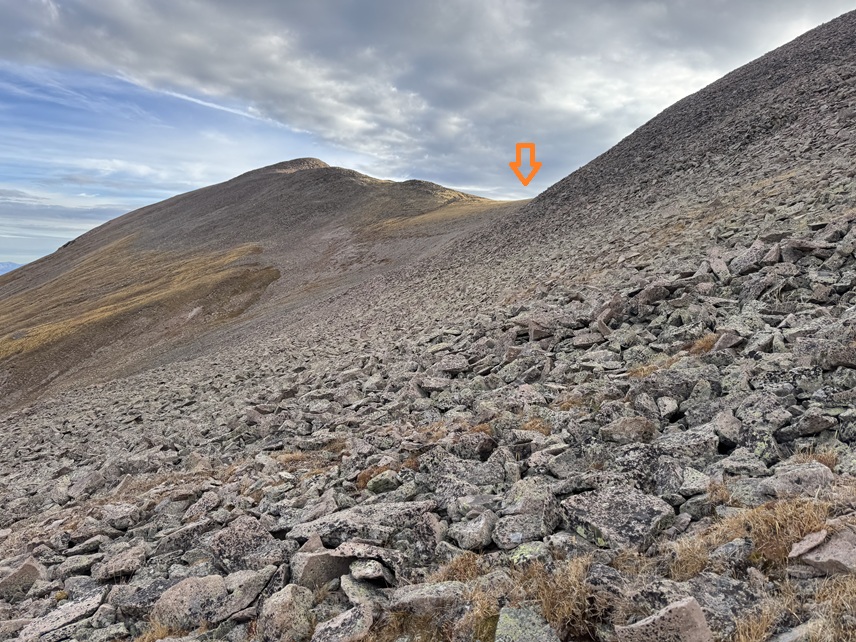
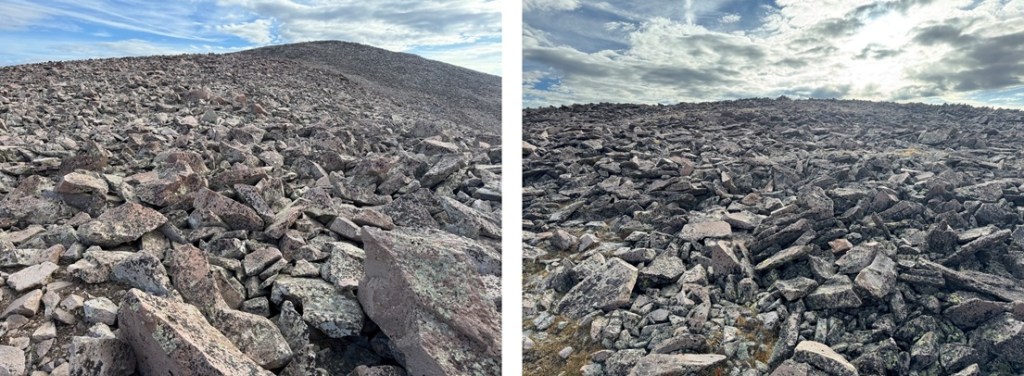
Once on the ridge I followed it north to the saddle. There was a game trail here to follow. There are a few false summits, and the last one has a trail that goes to the left so you don’t need to summit it if you don’t want to. It’s rocky, but all class 2.
I summited PT 13015 at 8:30am
PT 13015:
By this point it was very windy and very cold. I need to start carrying my balaclava again. I turned and headed back down towards the saddle.
Here’s the overall route back to my campsite:
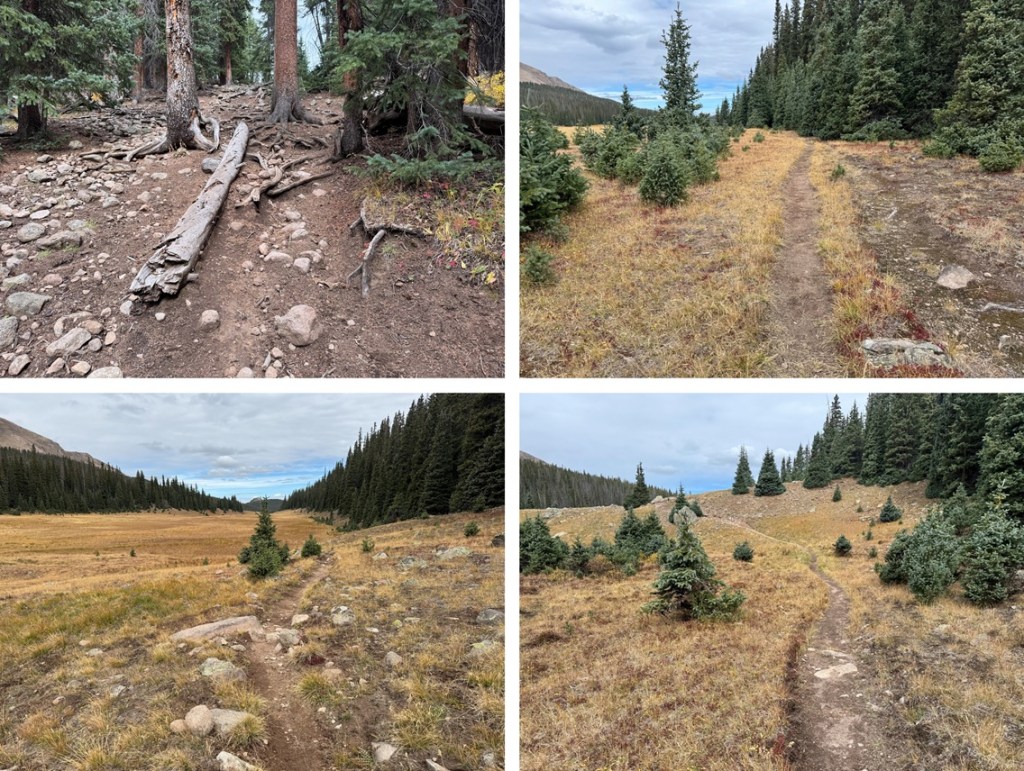
I made it back to my campsite at 9am, so I’d summited both peaks in under 2 hours. I ate breakfast, packed up my gear, and was back on Fall Creek trail heading north by 9:30am. Here are some pictures of the 6 miles back to Fall Creek Trailhead.
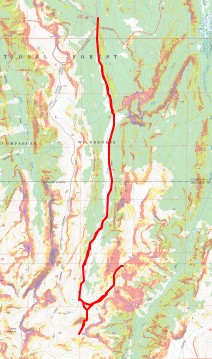
I made it back to the trailhead at 11:50am, making this a 16.36 mile hike with 3188’ of elevation gain.
Ah, the thrill of changing plans. I like to check off a bucket list item for my birthday, usually involving a lot of effort or planning and mileage. I was supposed to do the Rim to Rim Grand Canyon hike for my birthday, and due to COVID and the shuttles not running so my boyfriend was going to be my shuttle driver (with the east gate closed it’s now a 5 hour drive from one rim to another). However, last week I broke up with my boyfriend. After the breakup I gave myself a day to wallow, and then came up with a plan B (Plan C was Rim to Rim to Rim). In the end I wasn’t able to hike Rim to Rim on my birthday, but I was able to find someone to shuttle my truck a week earlier (in exchange for a photo shoot along the way at both Horseshoe Bend and Ouray Via Ferrata… to be featured in his next book). So instead I hiked Rim to Rim on September 12, and decided for my birthday I’d try to get in a long hike somewhere in the San Juan’s.
After birthday dinner with my daughters I drove to the Little Cimarron East trailhead and parked for a few hours sleep. This is a 2WD drive on a dirt road. There was space for 2 vehicles at the trailhead, but it looks like you can park along the road as well if needed. Side note: This trailhead is much preferred to the Nellie Creek Trailhead approach. Hands down.
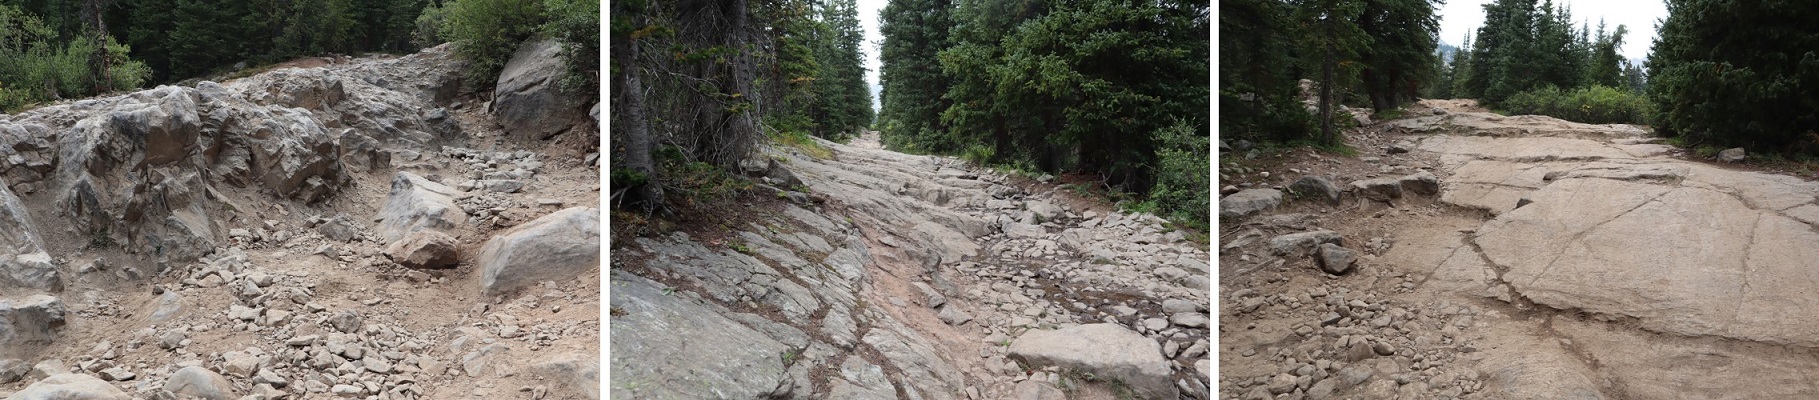
I got in a few hours sleep and was on the trail at 4:30am. This is a class 1 trail (at least until the first stream crossing) that looks like it used to be a 4WD road.
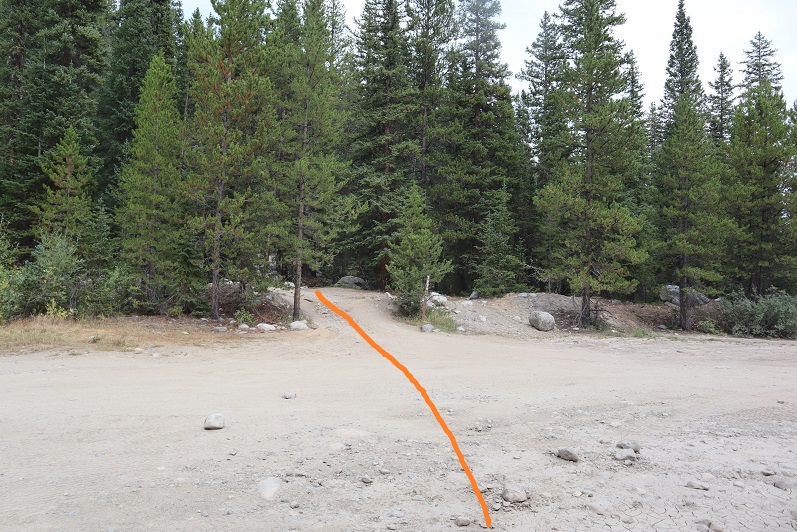
After the stream crossing there’s a junction. Continue straight.
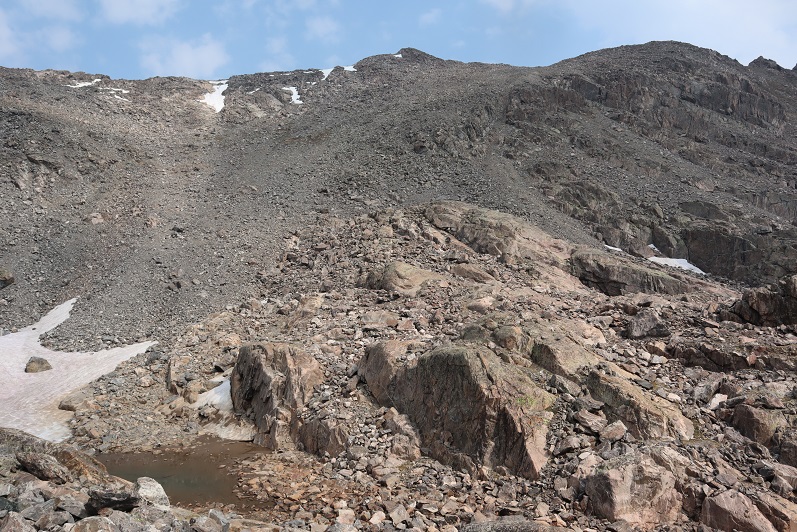
The trail goes through an avalanche area but a clear path has been established.
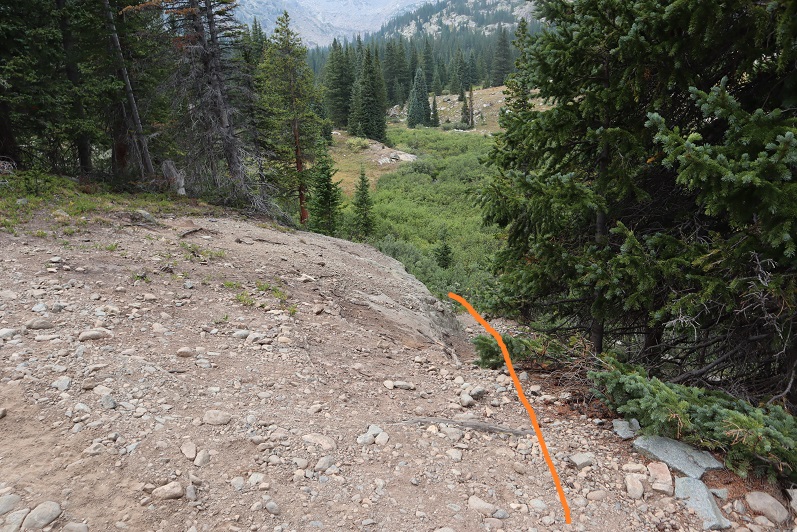
After hiking for 5 miles (exactly) I came to a small meadow. Here I left the trail and headed west, staying to the left of the gully, but following it up.
I eventually picked up a faint trail. There were a lot of game trails in the area, so I kept losing then re-finding the trail.
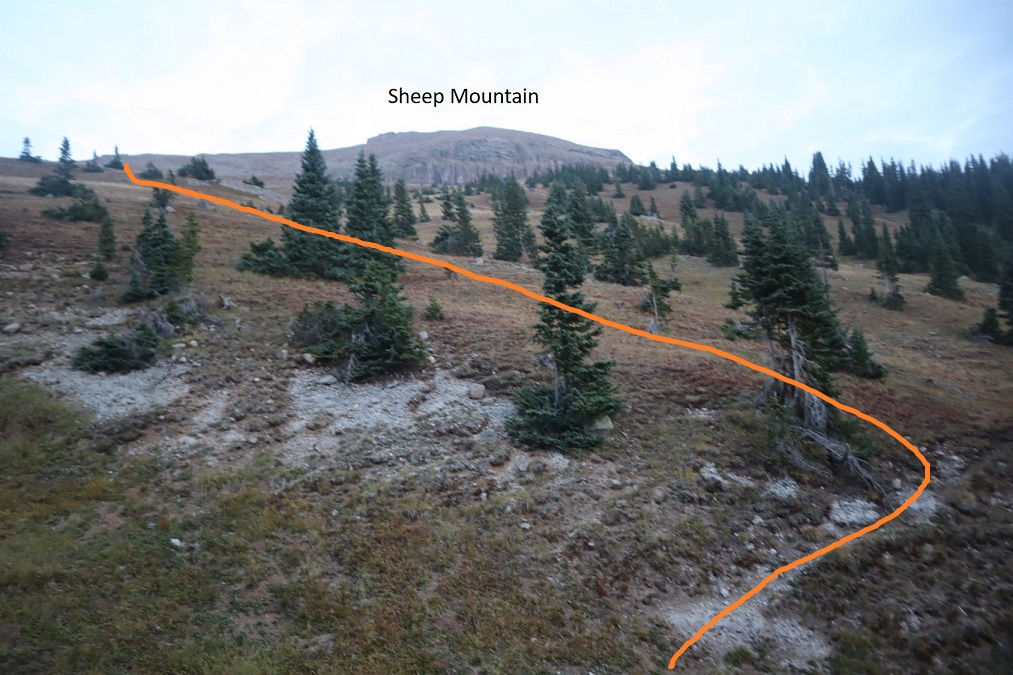
When I hit treeline I crossed the gully and headed left and northwest up the side of the mountain
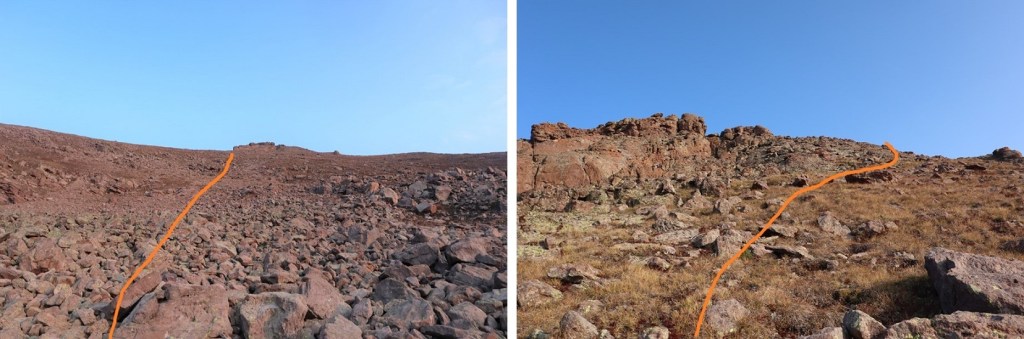
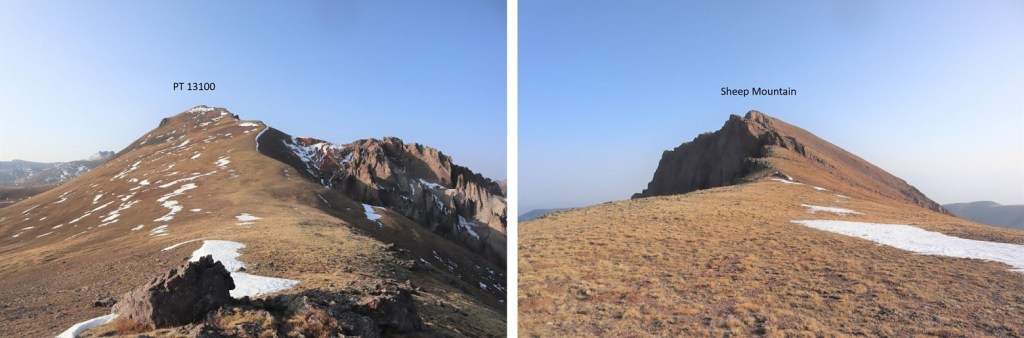
The rest of the hike to the summit of Sheep Mountain was fairly straightforward. Here’s the route I took, staying to the left of the cliffs
Once on the ridge I skirted the rocks to the right to keep this class 2
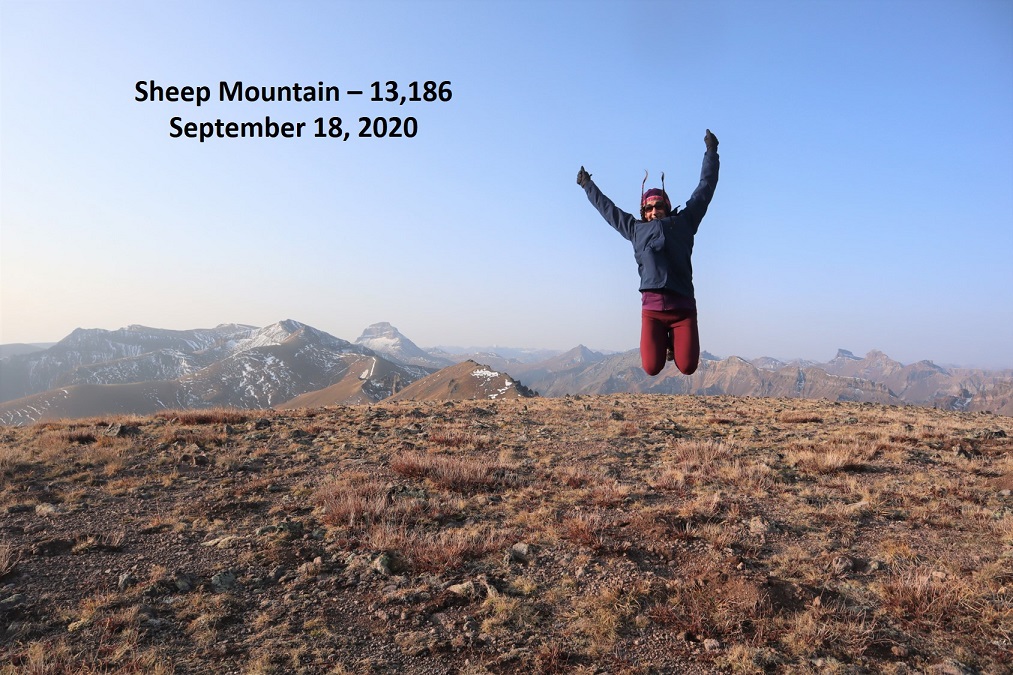
I summited Sheep Mountain at 7:55am. The summit was wide and flat and it was my birthday, so I decided to jump for the photo.
Sheep Mountain:
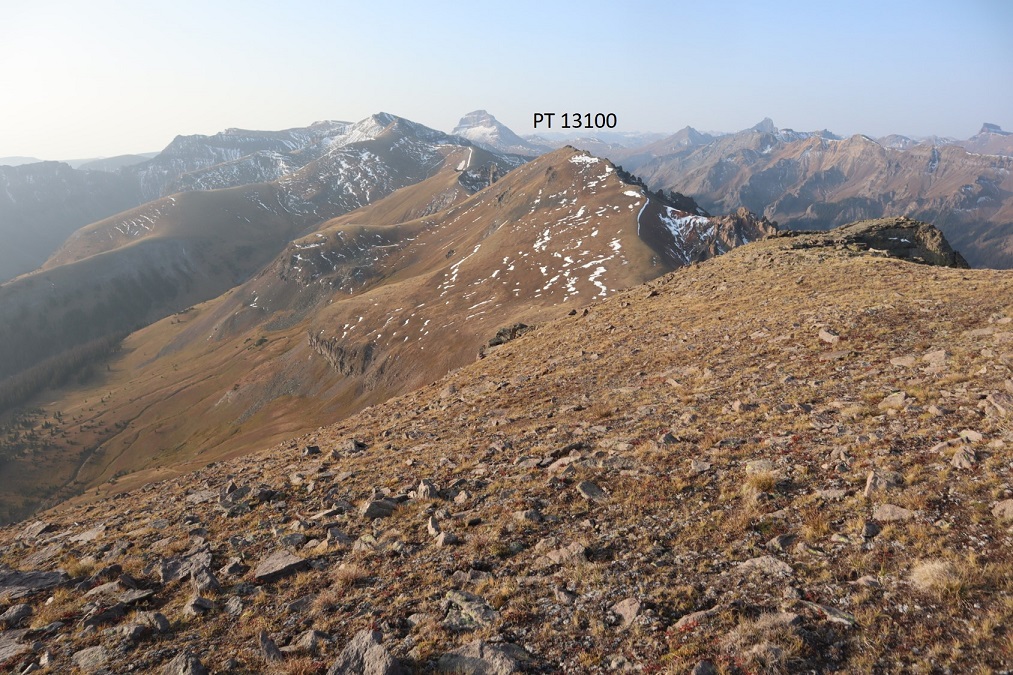
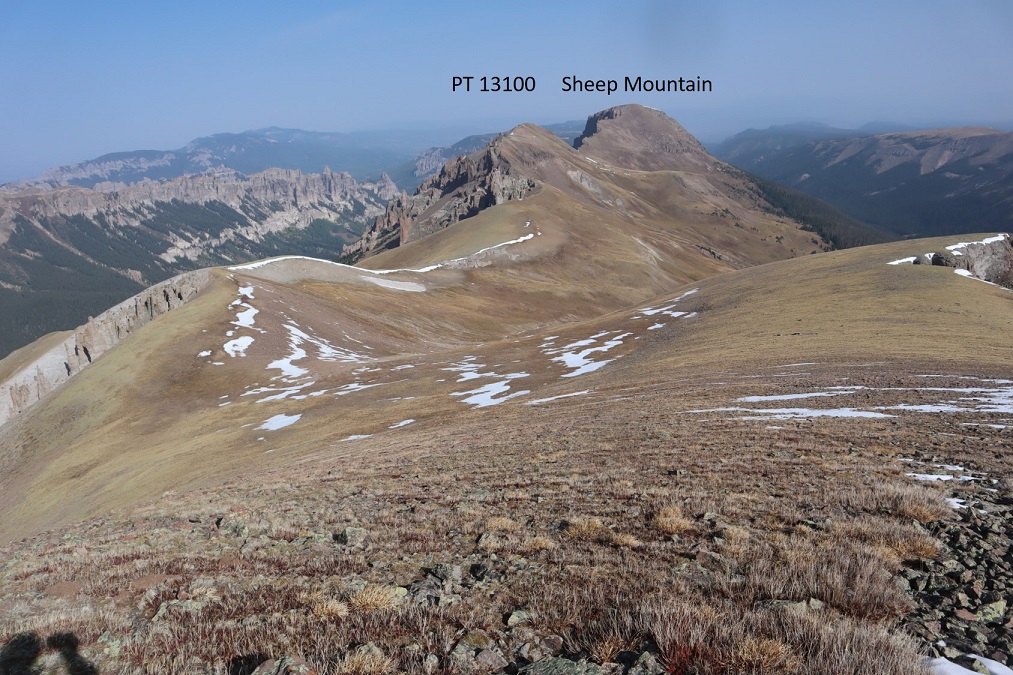
I was making this a ridge hike today. Next on the agenda: PT 13100. I turned and followed the ridge south
This was an easy class 2 ridge to follow. As times I stayed left to avoid rocks.
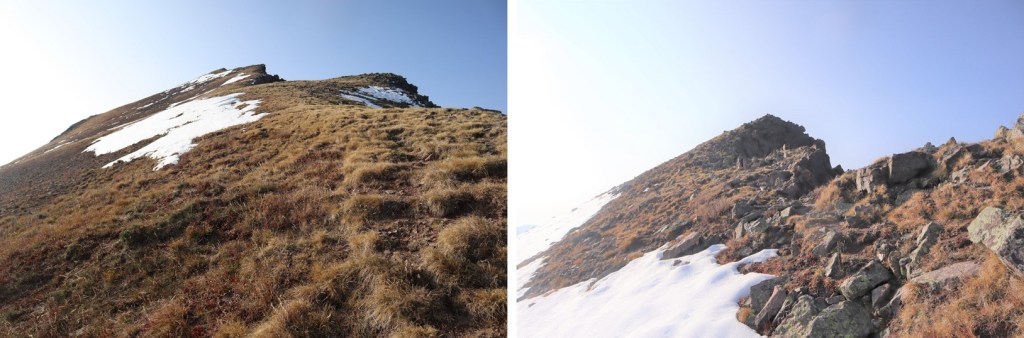
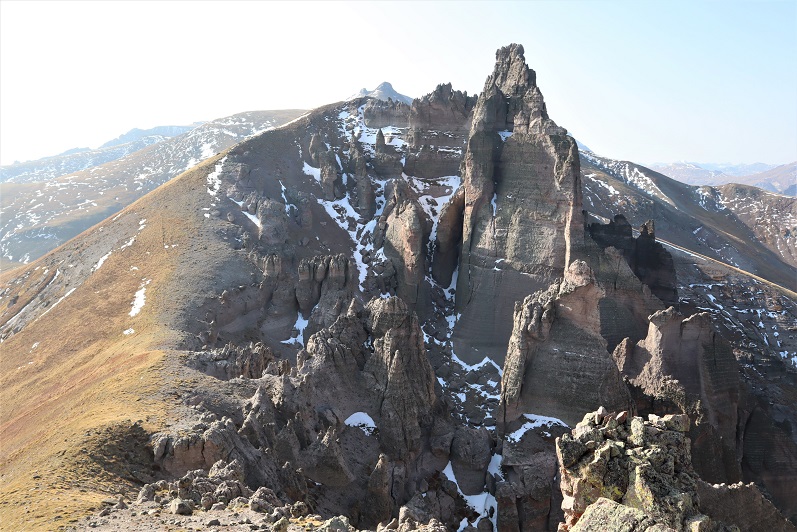
From the saddle, here’s looking up at PT 13100 and back at Sheep Mountain
It was a simple ridge hike up tundra until the very end. Then the terrain became rock and it was difficult to tell where the actual summit was, so I followed the entire ridge. I spied a cairn and I considered the cairn the summit.
I’ve circled the summit cairn in red (although the rock outcropping certainly felt/looked the same height)
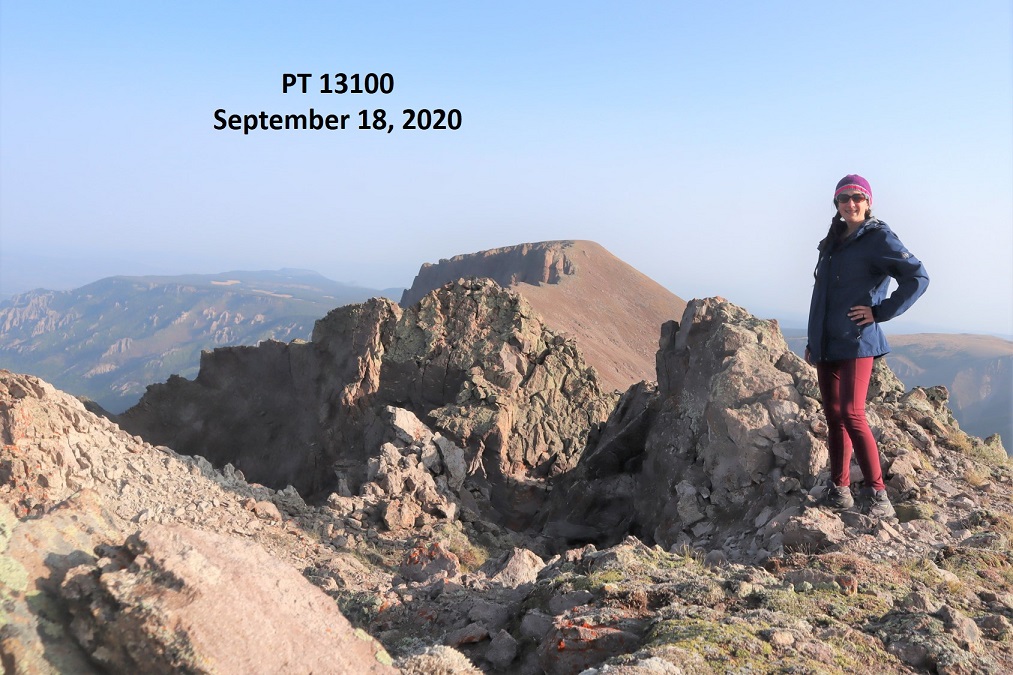
I summited PT 13100 at 8:50am
PT 13,100:
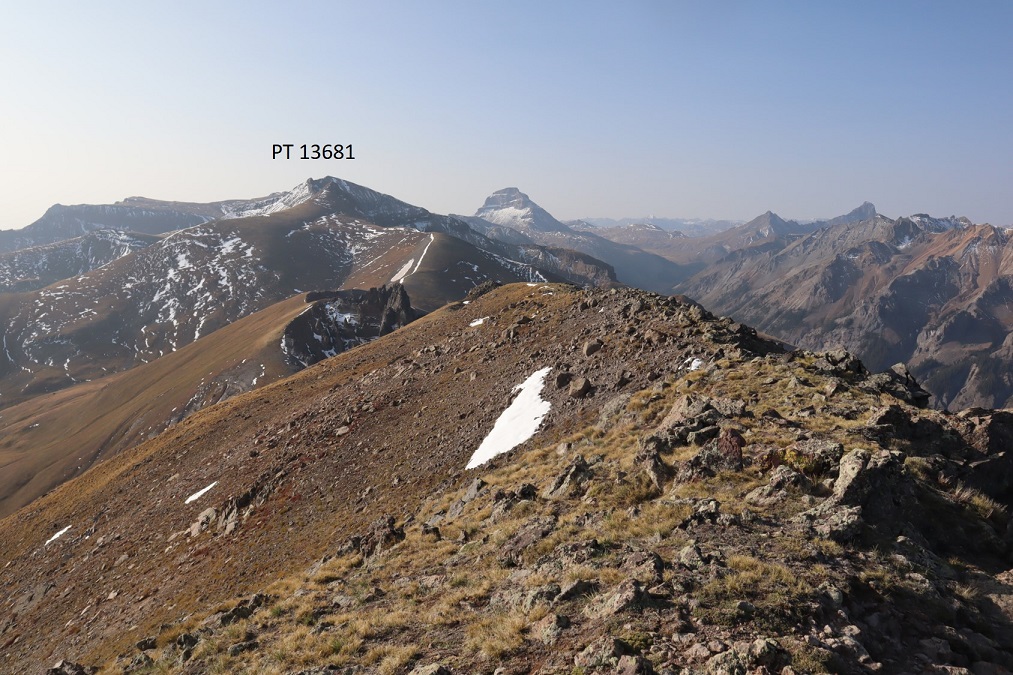
Next up was PT 13,681. Once again, I followed the ridge south
The volcanic ash towers at the saddle were pretty cool!
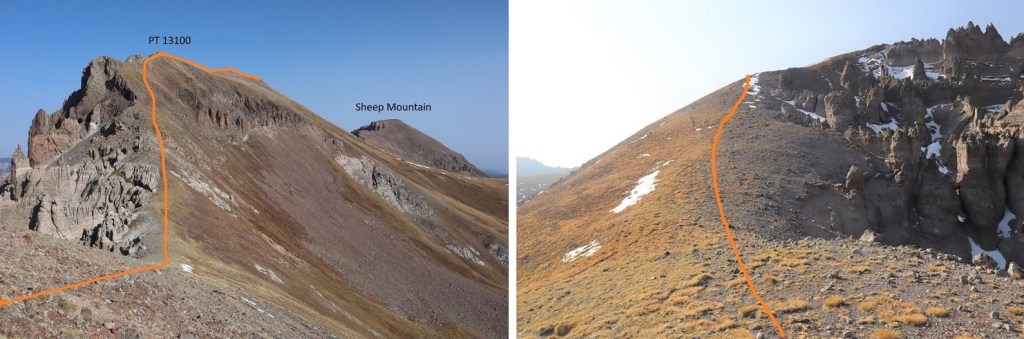
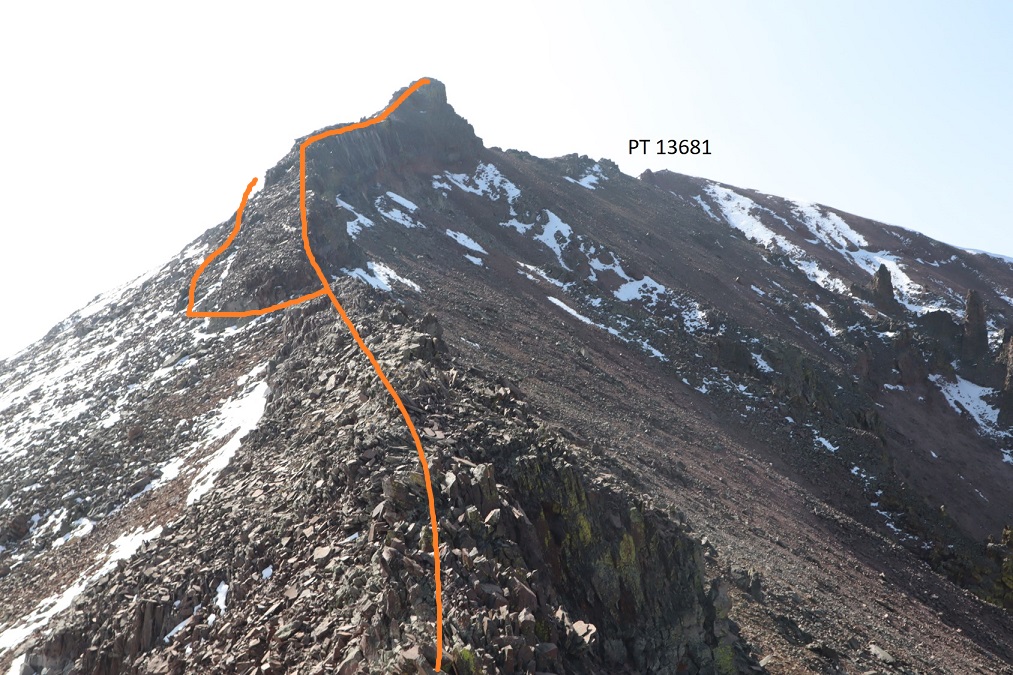
From the first saddle, here’s looking back at PT 13100 and Sheep Mountain, along with my route, and a look up the ridge
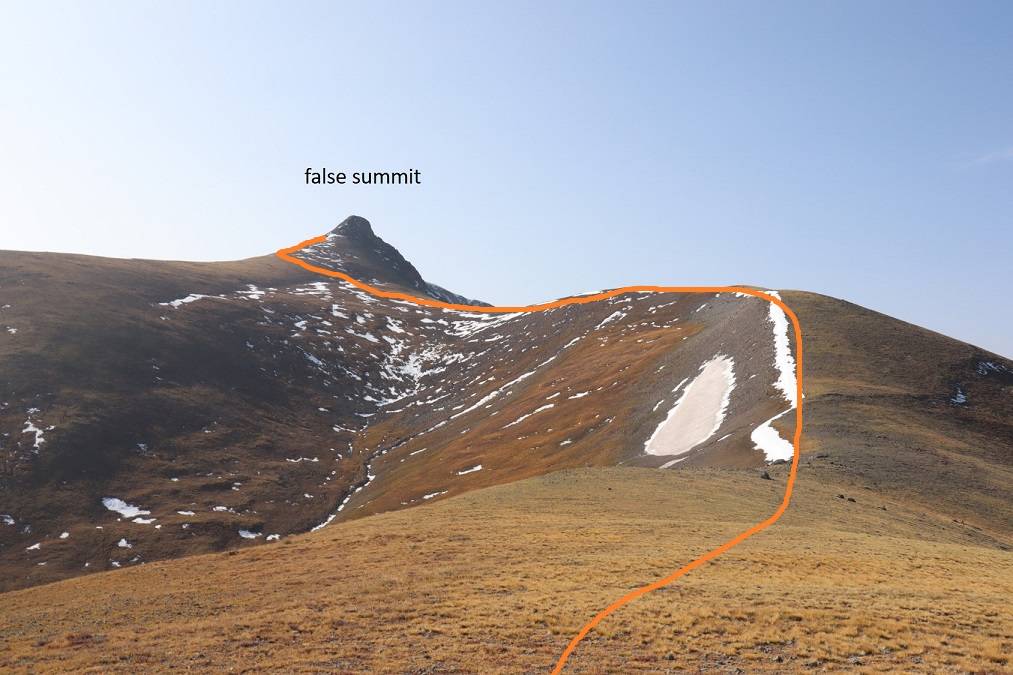
I followed the ridge to the false summit of PT 13681
When I made it to the ridge, instead of climbing the false summit I stuck to the left, keeping this class 2
Here’s a look back from the ridge
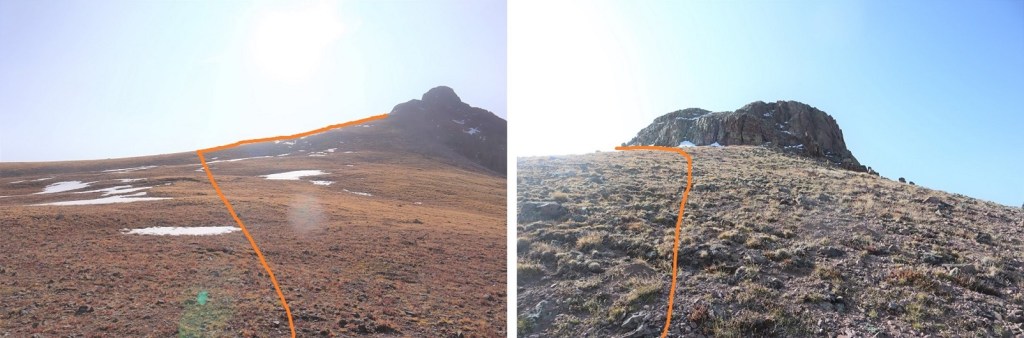
After skirting the false summit to the left I could see PT 13631. I stayed low until I made it to the saddle, and then stuck to the ridge until I hit the second false summit
From the saddle, here’s looking back at how I skirted the bump
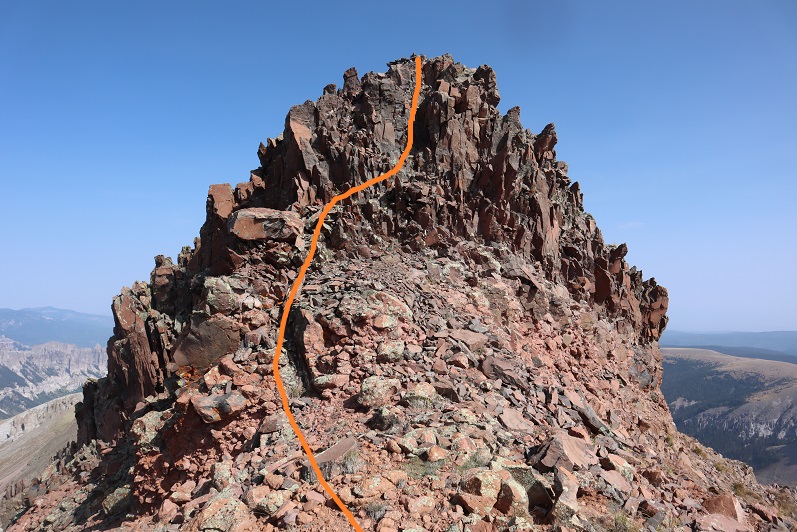
From here I took the ridge straight up and over, making this class 3. You can keep it class 2 by going to the left and skirting the ridge. They both end up in the same place.
A view from halfway up the ridge
If you go over the ridge, this is the downclimb (still class 3, not as bad as it looks)
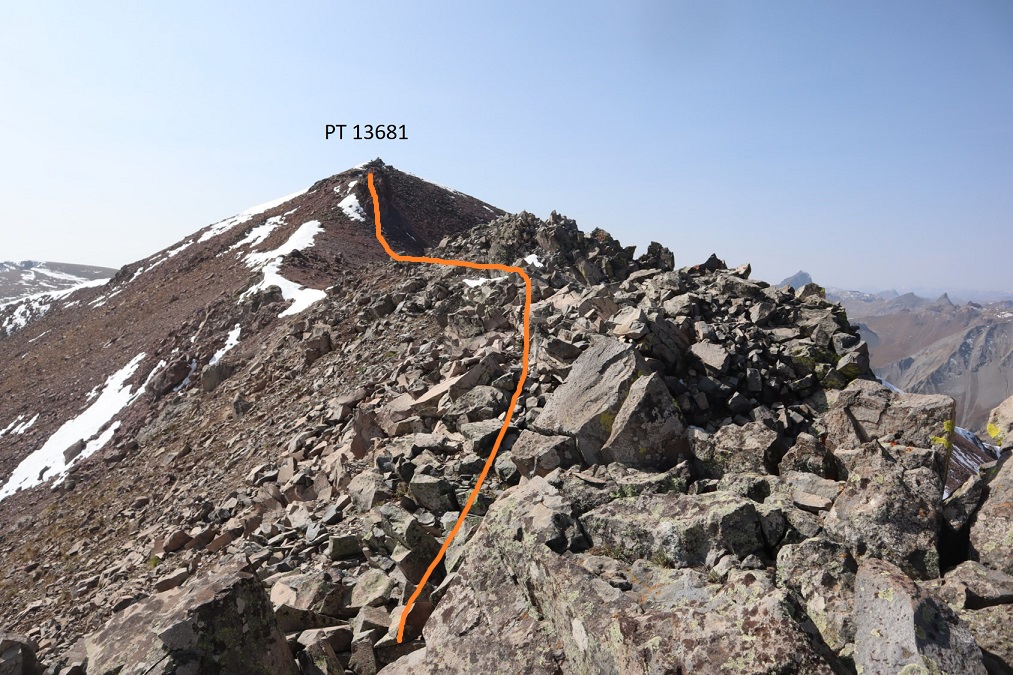
And here’s the rest of the class 2 route to PT 13681
I summited PT 13681 at 10:45am
PT 13,681:
Here’s a look back on the route so far
And a look at the route to Silver Mountain. The rest of the way was a simple tundra ridge walk
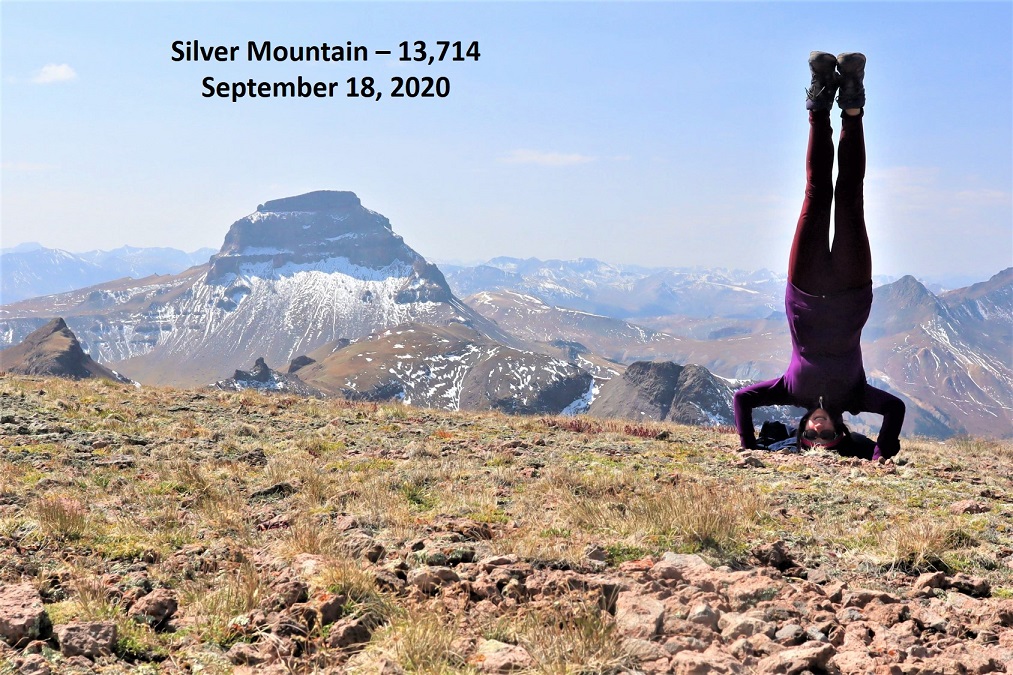
I summited Silver Mountain at 11:35am, and since it was my birthday (my 40th!) I kept my tradition of standing on my head because I still can. Also, this is harder than it sounds, as I had to set up the automatic timer, get far enough away from the camera and then actually do the headstand before the camera took the picture.
Silver Mountain:
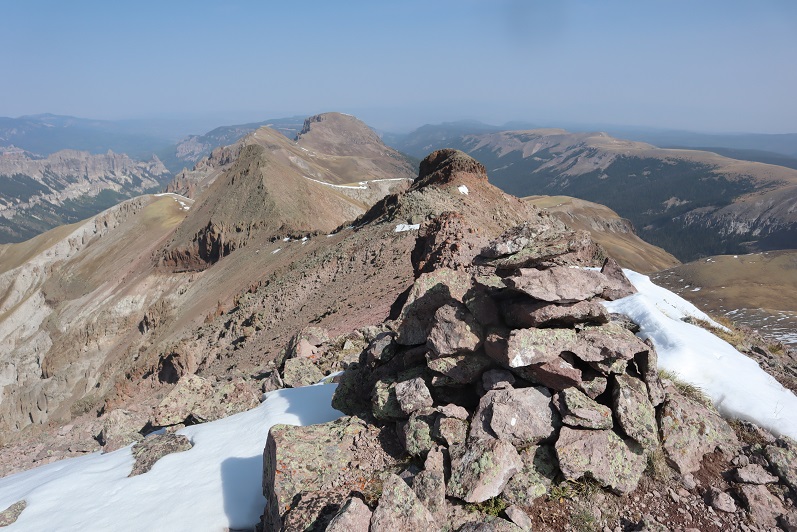
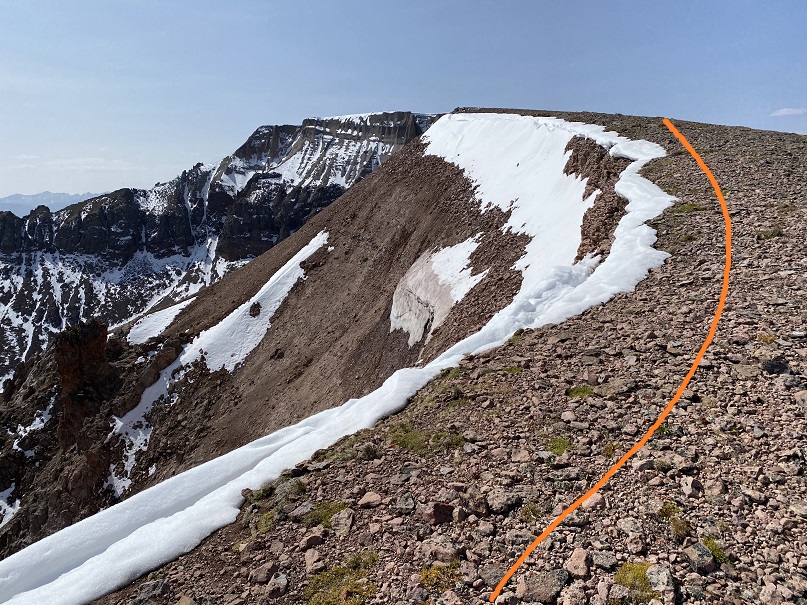
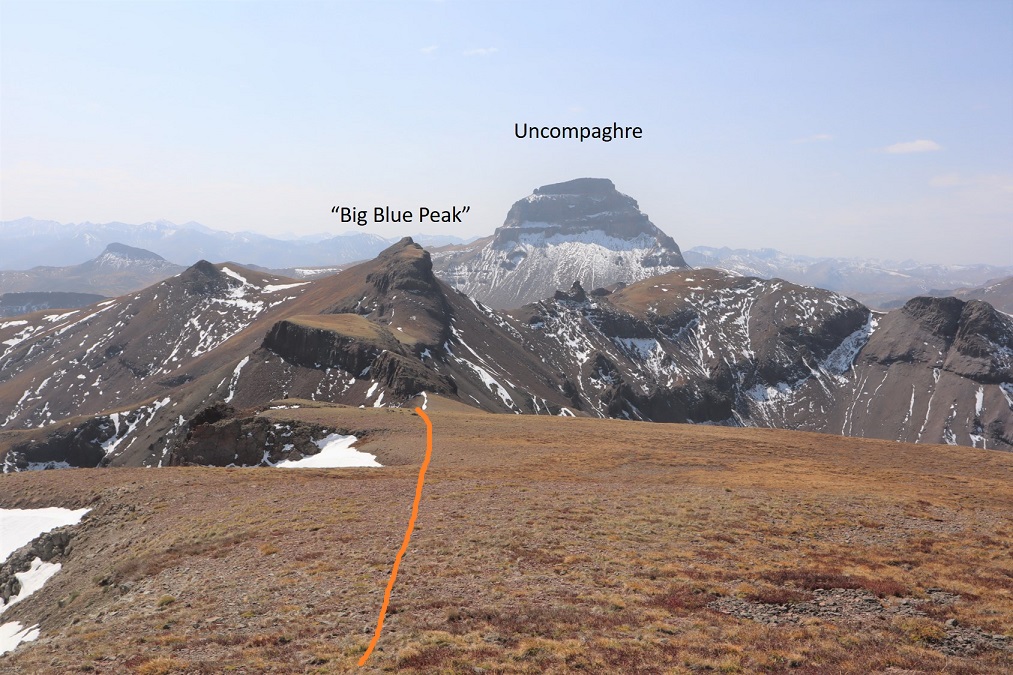
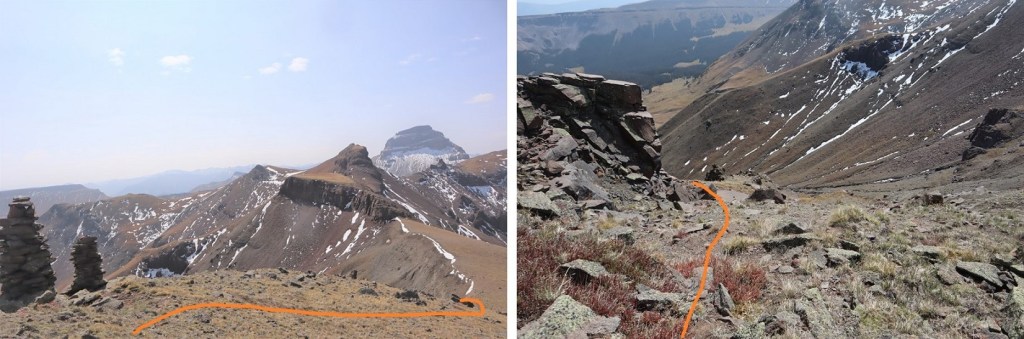
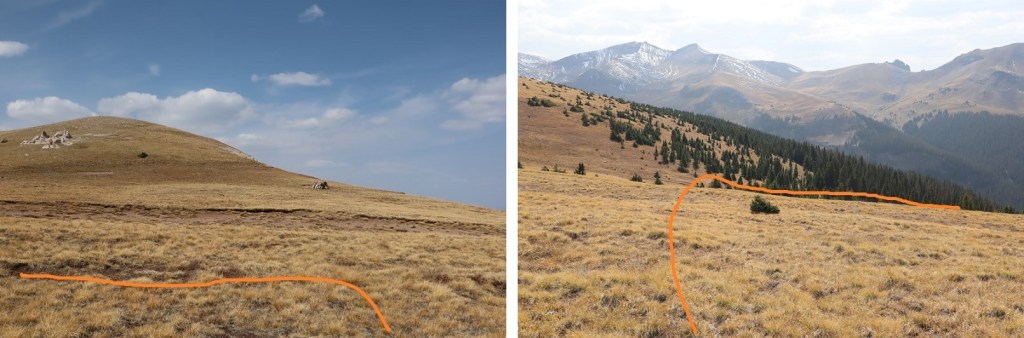
Now to head back down. I had several options, but chose this one because it looked easier on a topo map (it most likely wasn’t). I continued south along the ridge to the Silver Mountain/Big Blue Peak (unranked) saddle.
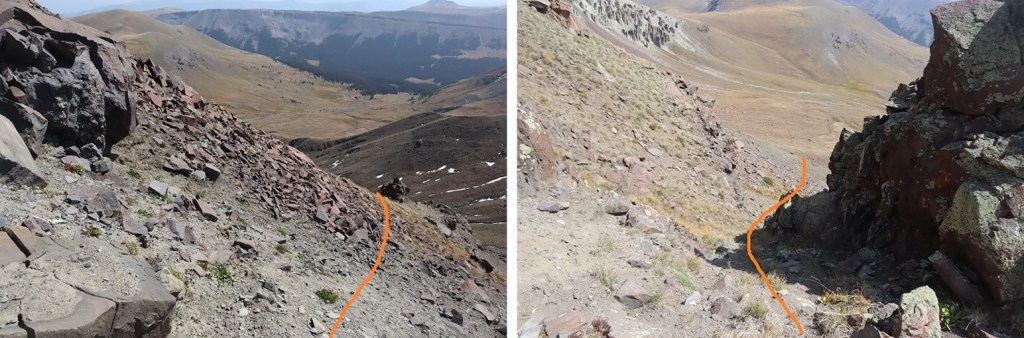
After passing the two large cairns, I continued a bit further down, turned left, and headed east down the gully
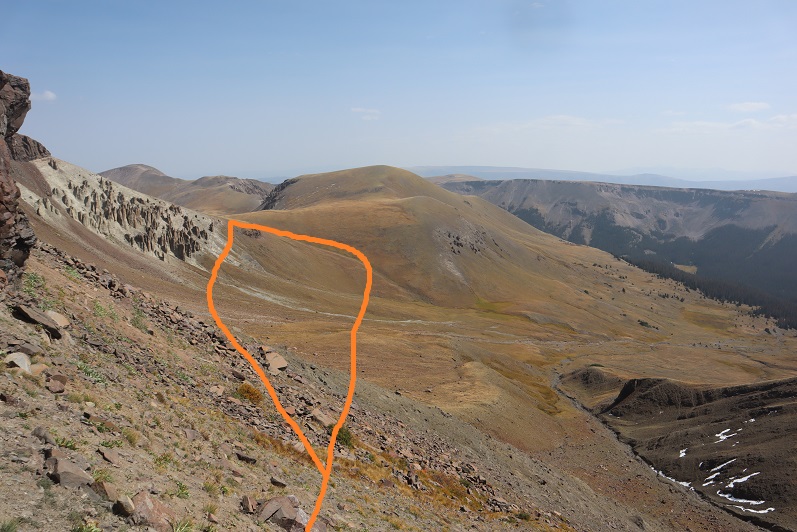
My goal was to link up with the Fall Creek Trail. Here you can see it to the right. However, I didn’t want to lose too much elevation, so I took a game trail up high to the left (they both link up on the other side of the hill). I lost just over 1000’ of elevation here, and gained under 200’ by staying high to the left.
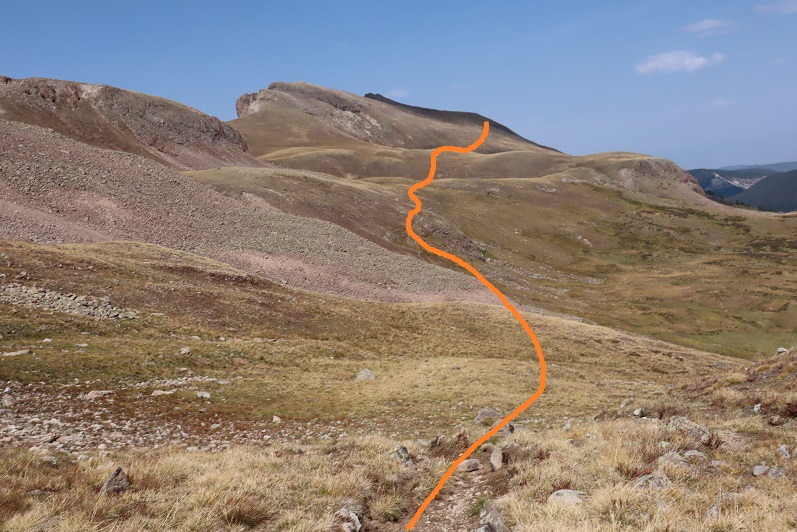
Once at the top of the hill I figured my elevation gain was over for the day. Boy, was I wrong! I dipped down once again, losing another 400’ of elevation, only to gain another 500’ of elevation to make it to the next ridge. I was following the Fall Creek Trail, then switched as I stayed high on the Little Cimarron Trail, but this trail doesn’t look like it gets used much by people. There are many game trails in the area that parallel this one, and they make route finding frustrating at times. Here’s the overall route:
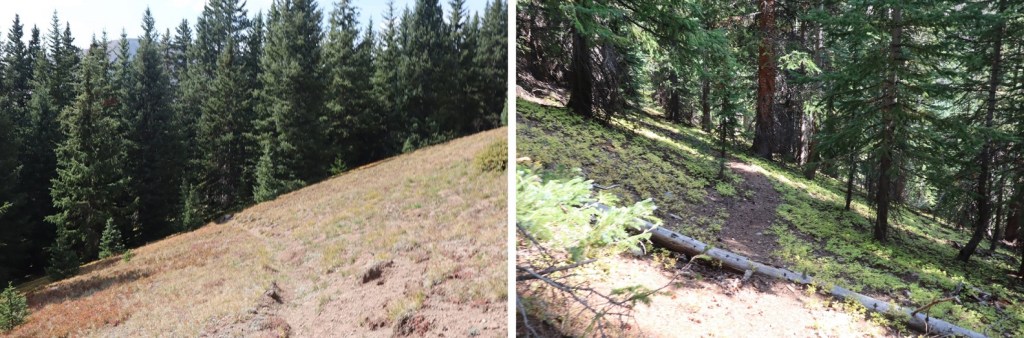
Once I’d regained the ridge it was a nice 2 mile tundra walk on a fairly visible trail. Side note: It’s hunting season, and the elk are bugling. Advice to hunters: Practice using your bugle call BEFORE trying it in the wild for the first time. I heard some pretty funny noises coming from what were obviously hunters and not elk.
At exactly 2 miles of mesa walking, and just before reaching this old shack I turned left and headed west. Here the trail pretty much ended. There were 2 cairns in the area (which surprised me, the first I’d seen all day), so I just kept aiming for the valley below, where I knew I’d pick up with the trail I’d hiked in on.
I had a good view of the path I’d taken up to Sheep Mountain that morning
Gradually, the Little Cimarron Trail became more visible, as I followed it towards the creek below.
I crossed the Little Cimarron River (more of a creek now)
And headed north, easily picking back up the trail
I stayed right this time at the junction between the Little Cimarron Trail and Little Cimarron East Trail, crossed the stream again, and followed the trail back to my truck. Along the way I saw a dad holding a rifle and two daughters, both under 10 years old, sporting camo and bright orange hunting hats. They were the only other people I saw all day. The girls had big smiles, and looked thrilled to be camping/hunting with their daddy.
I made it back to my truck at 5pm.
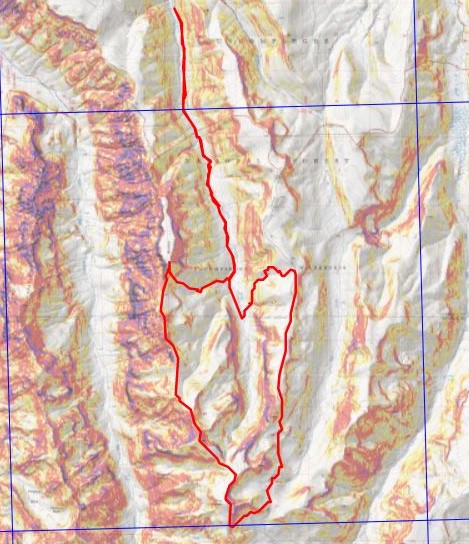
This was a 25.26 mile hike with 6689’ of elevation, completed in 12.5 hours. Here’s a topo of my route.
Not a bad way to celebrate my 40th birthday! On to the next trailhead!
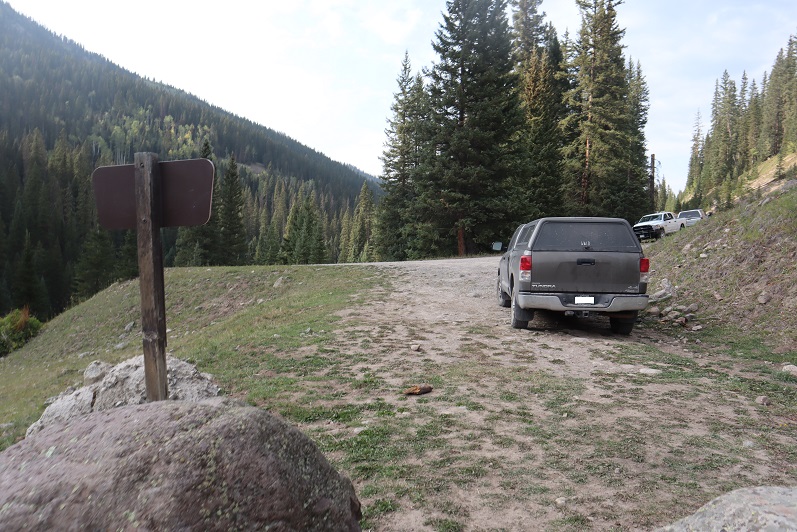
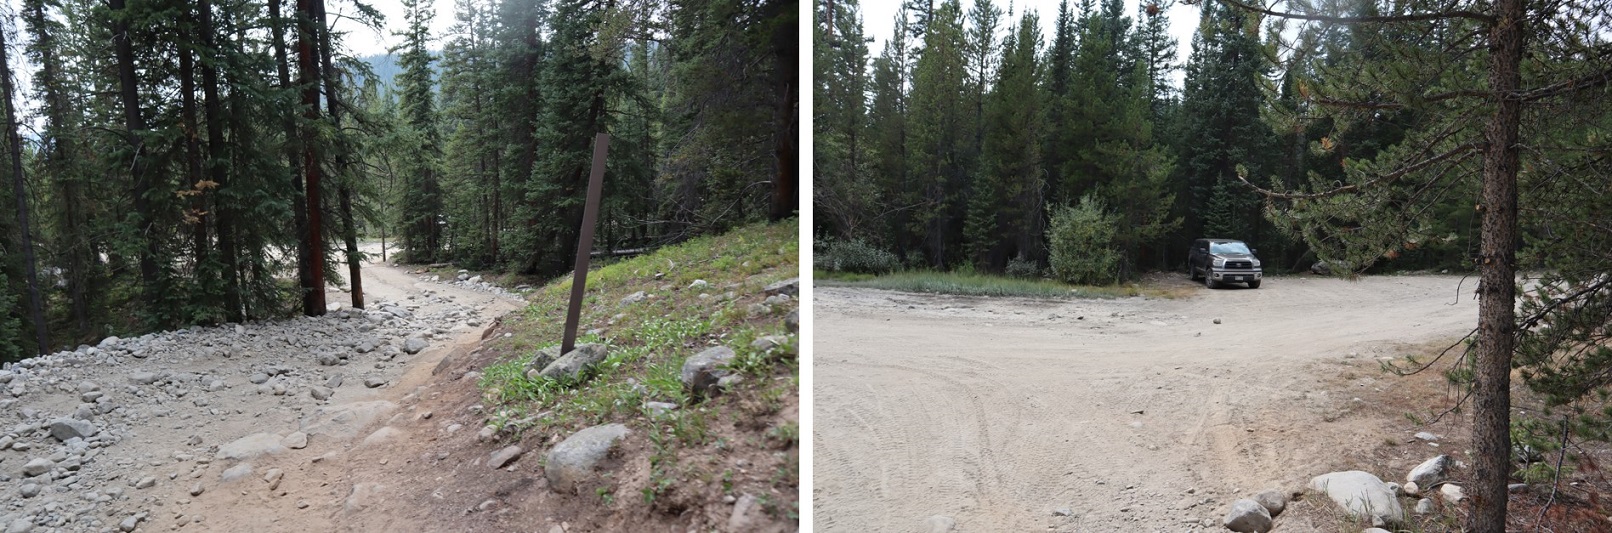
After a long day and a wedding reception I arrived at the trailhead at 10pm and quickly went to sleep. The trailhead for this hike is located at the end of 4WD road 727. Well, the road goes up further, but it’s excessive 4WD (pictures and description to come). Any 4WD vehicle can make it to this point.
I woke up at 3:15am, intent on being on the trail by 3:30am. Sleepy-eyed, I opened the back of my truck and scanned the area with my flashlight for wildlife. Sometimes I see deer/raccoons/porcupines outside and like to shoo them along before getting outside my vehicle. Nothing this morning. Great. So I hopped out to find an area to pee (I know you’re thinking “why is she telling me this?” but it will all make sense in a minute).
As I’m looking for an appropriate area I scan around with my flashlight and just behind the reflective trailhead flag/post/marker I notice a small greenish-yellow circle reflecting in the light. My first thought was ‘animal’ as this looked like an eye. But it was only one eye. So I waved my flashlight back and forth to get a better look. I couldn’t define a body and the circle didn’t move so I assumed it wasn’t an animal and was most likely some piece of reflective trash.
I went about my business, turning my flashlight off (others were camping in the area and in the dark I didn’t want what I was doing to be the only thing they could see). I turned my flashlight back on and the reflecting circle was gone. And then as I waved my flashlight around all the sudden it was back again. Just one small circle, reflecting in the glow of my flashlight.
I got into my truck to put on the heat while I put on my hiking boots and turned the car on. At that moment 3 things happened:
The engine turned over and made a loud, V8- – ‘VROOM’ sound
My trucks daytime running lights turned on and I could clearly see I’d just
Scared the mountain lion walking towards my truck
The frightened mountain lion crouched to the right, did a 180 degree turn, and bounded off into the trees to my left, his long tail the last thing I saw as he hurried away. Well, that was certainly cool! It all happened so fast I wasn’t able to see if it had 2 eyes or 1 (I’d only seen one glow), but I knicknamed him ‘One Eyed Willy’ just the same. It wasn’t lost on my I’d just had a mountain lion ‘stalk’ / watch me while I was peeing. I bet not many people can say that.
I sat in my truck for about 15 minutes, this time with the high-brights on, waiting to see if he came back. After he didn’t return where I could see him I decided to give One Eyed Willy as much time as needed to get as far away from me as possible, and instead of putting on my shoes I went back to sleep and woke up at 5:15am. I was on the trail by 5:25am.
The 727 trail starts at the east end of the parking area
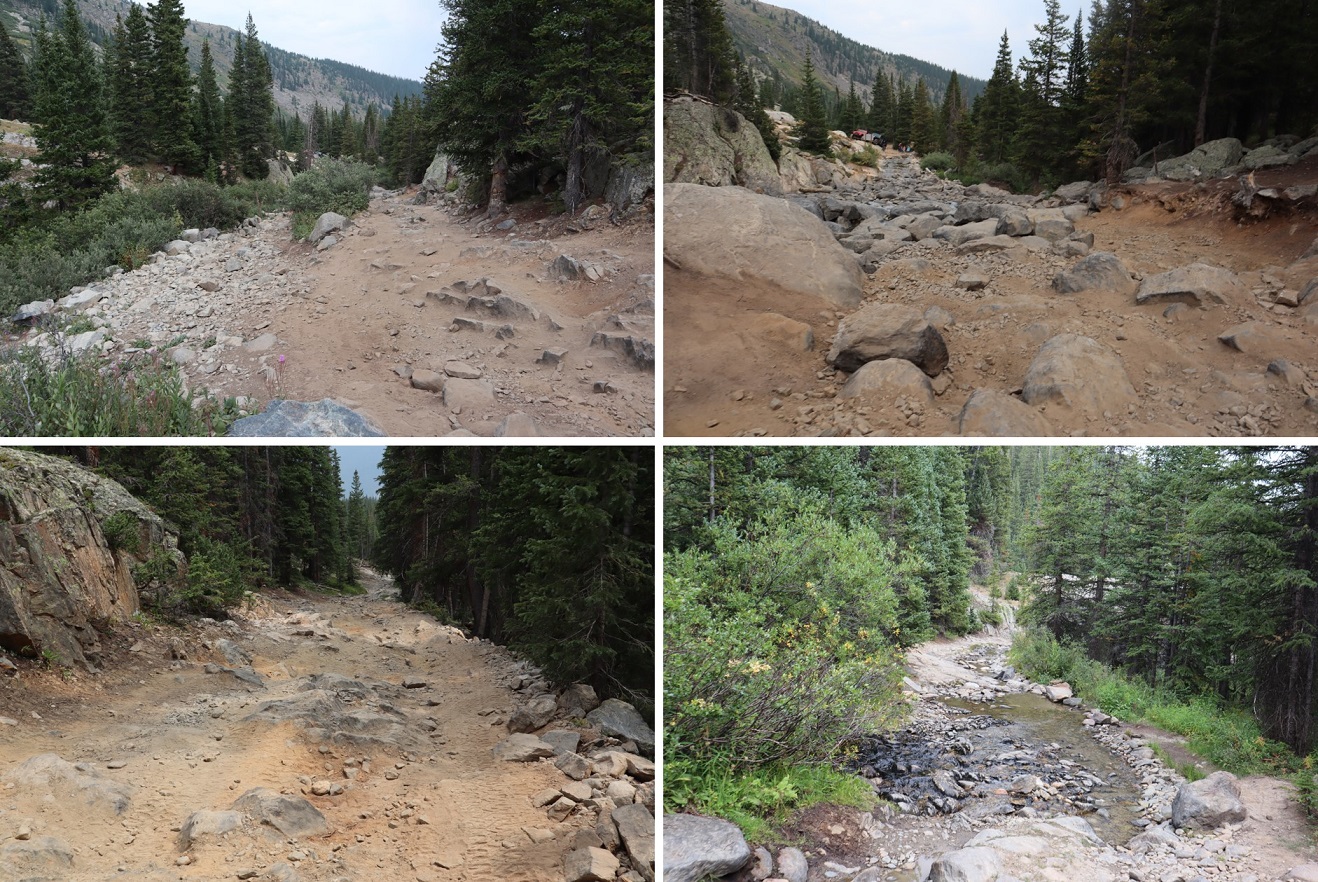
After a short distance I turned left and followed the extreme 4WD road for 1.8 miles.
This road should not be attempted by a stock 4×4 vehicle, and unless your vehicle thinks making it up to Lake Como is easy, don’t attempt this road.
I came to an area with a creek crossing. There’s a trail that goes to the right. I could have followed the trail, but instead I crossed the creek and followed the road for a short bit, until the road curved.
In the dark I missed the sign and followed the road, but just before crossing the creek you can take this junction to the trail instead
If you miss this junction no worries, just as the road curves to the left there’s a great trail that will take you to Fall Creek trail 2001 (apparently a lot of people miss the ‘sign’ and take this way, like I did)
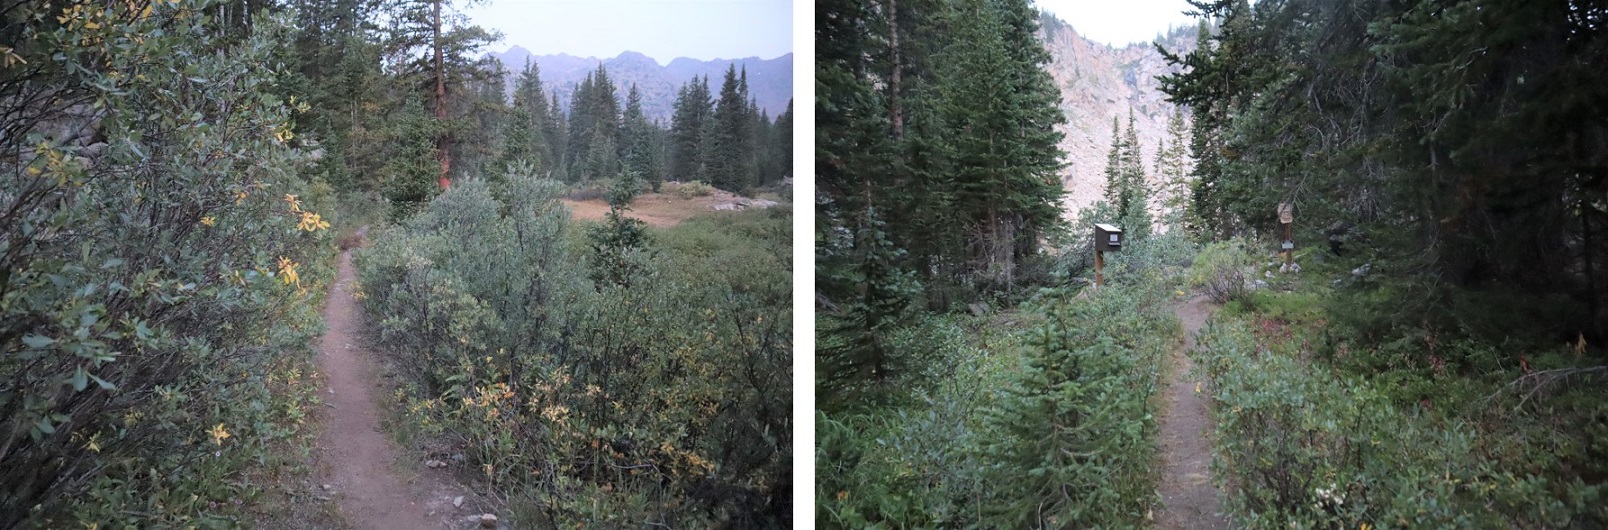
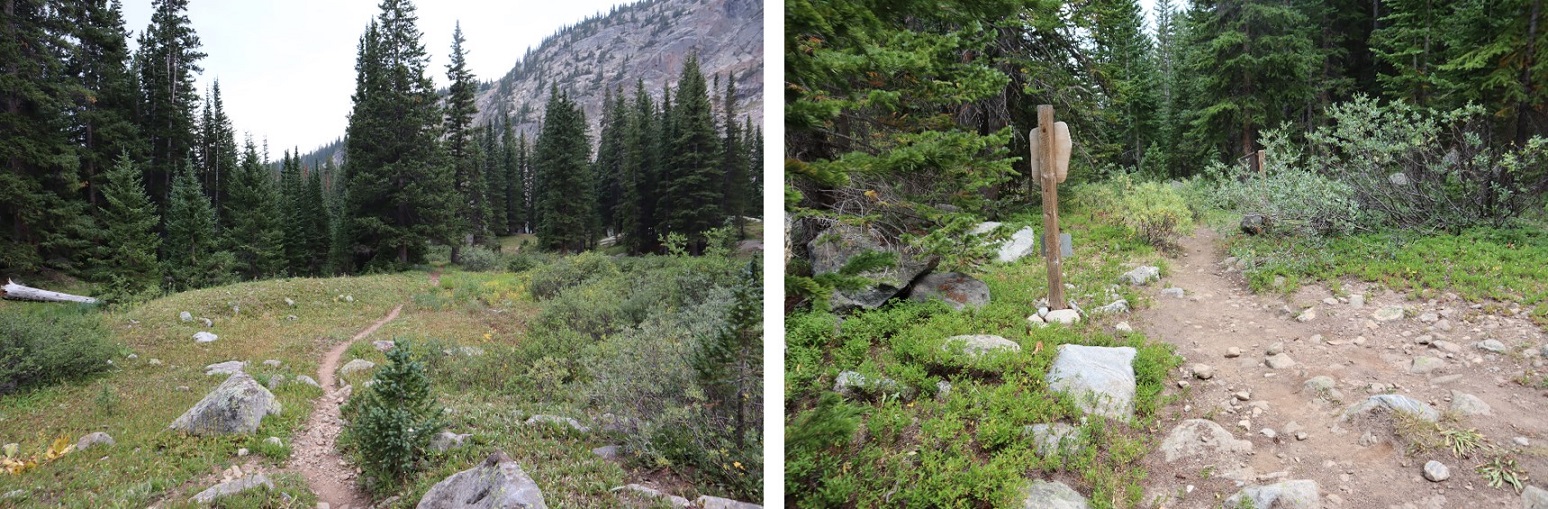
This is a class 1 trail that will take you all the way to the Seven Sisters Lakes area.
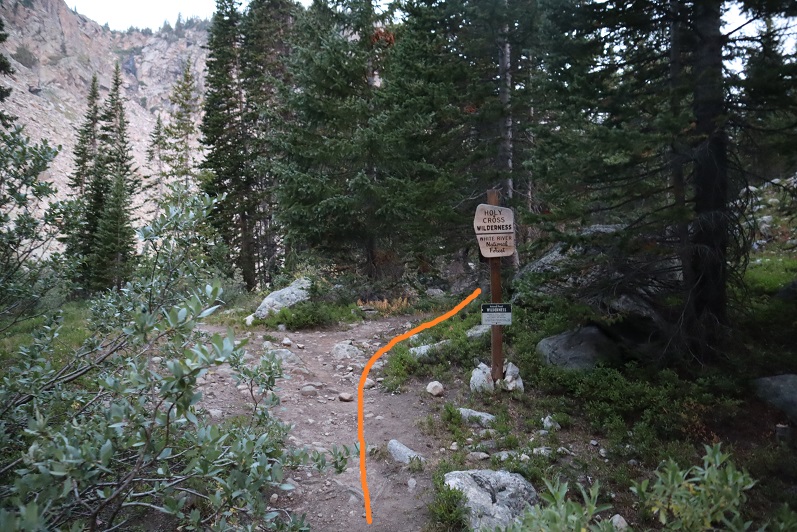
At this sign go right (going left will take you to a camping area, near a lake)
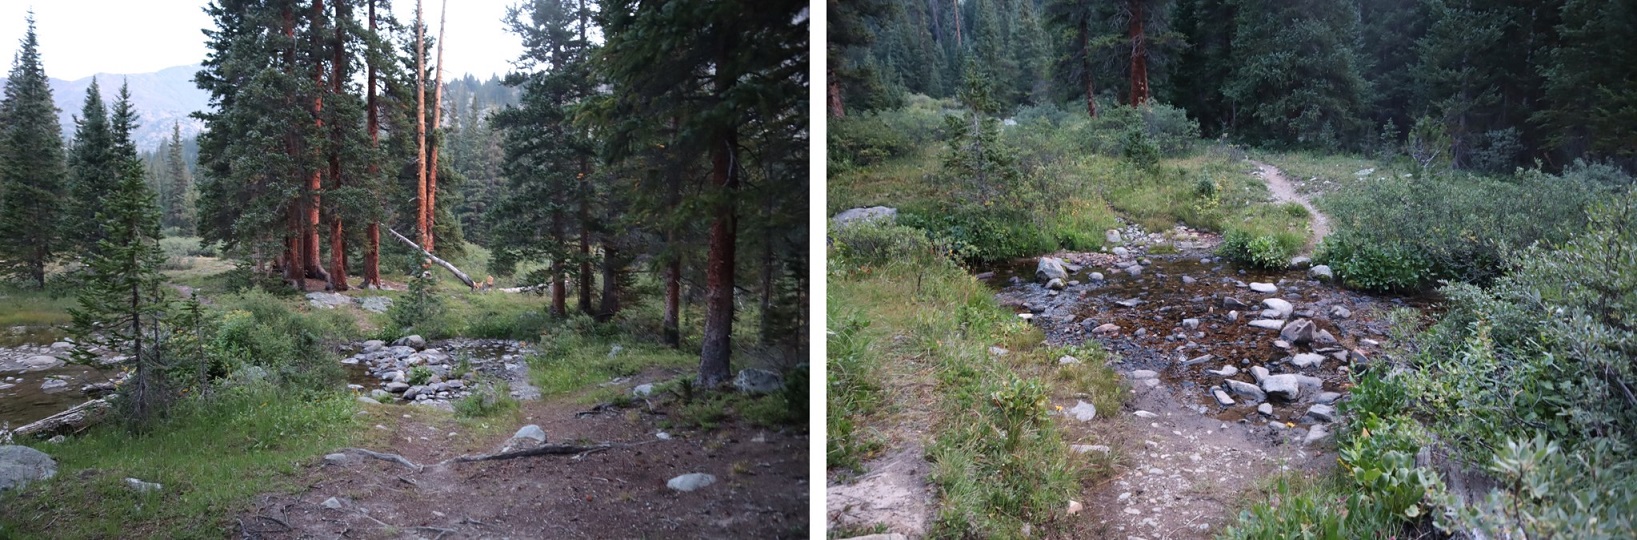
This late in the year all stream crossings were easy
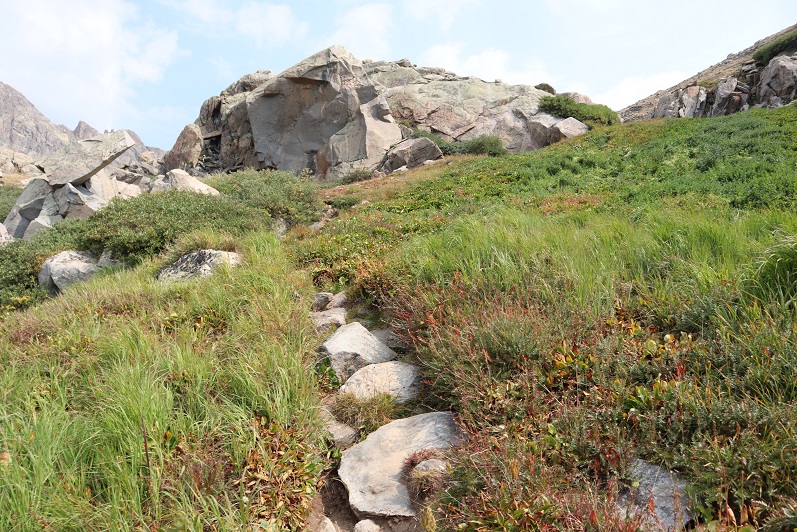
Here are a few more pictures of the class 1 trail up to the Seven Sisters Lake area
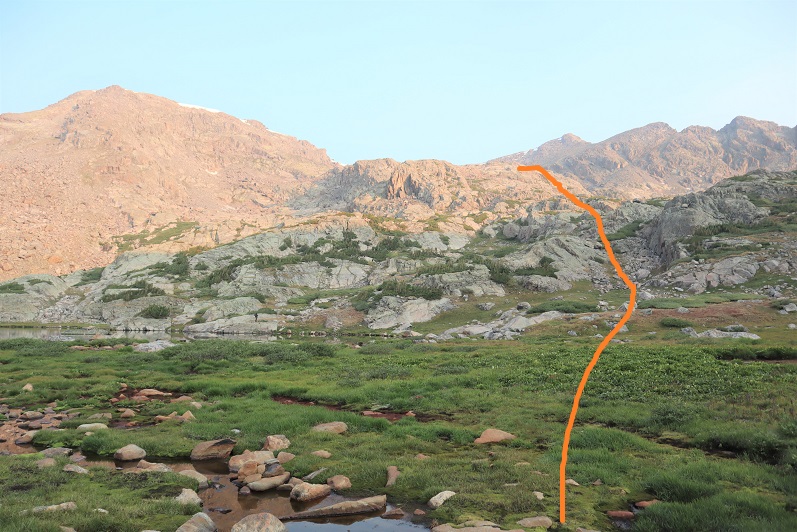
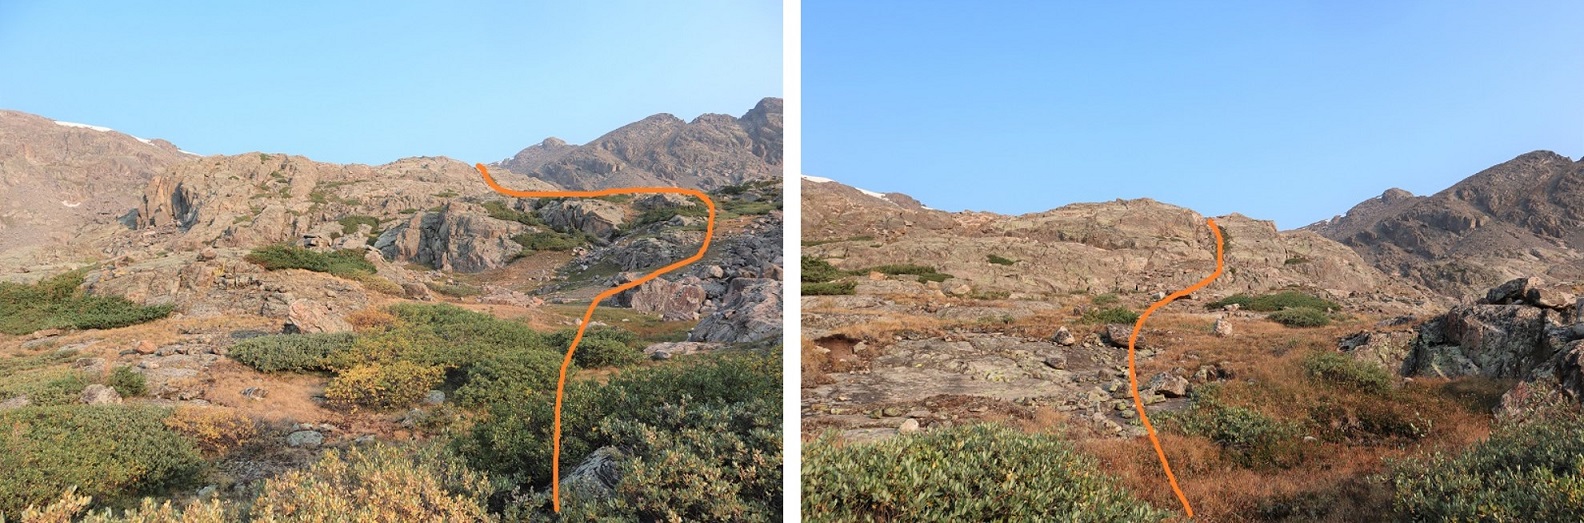
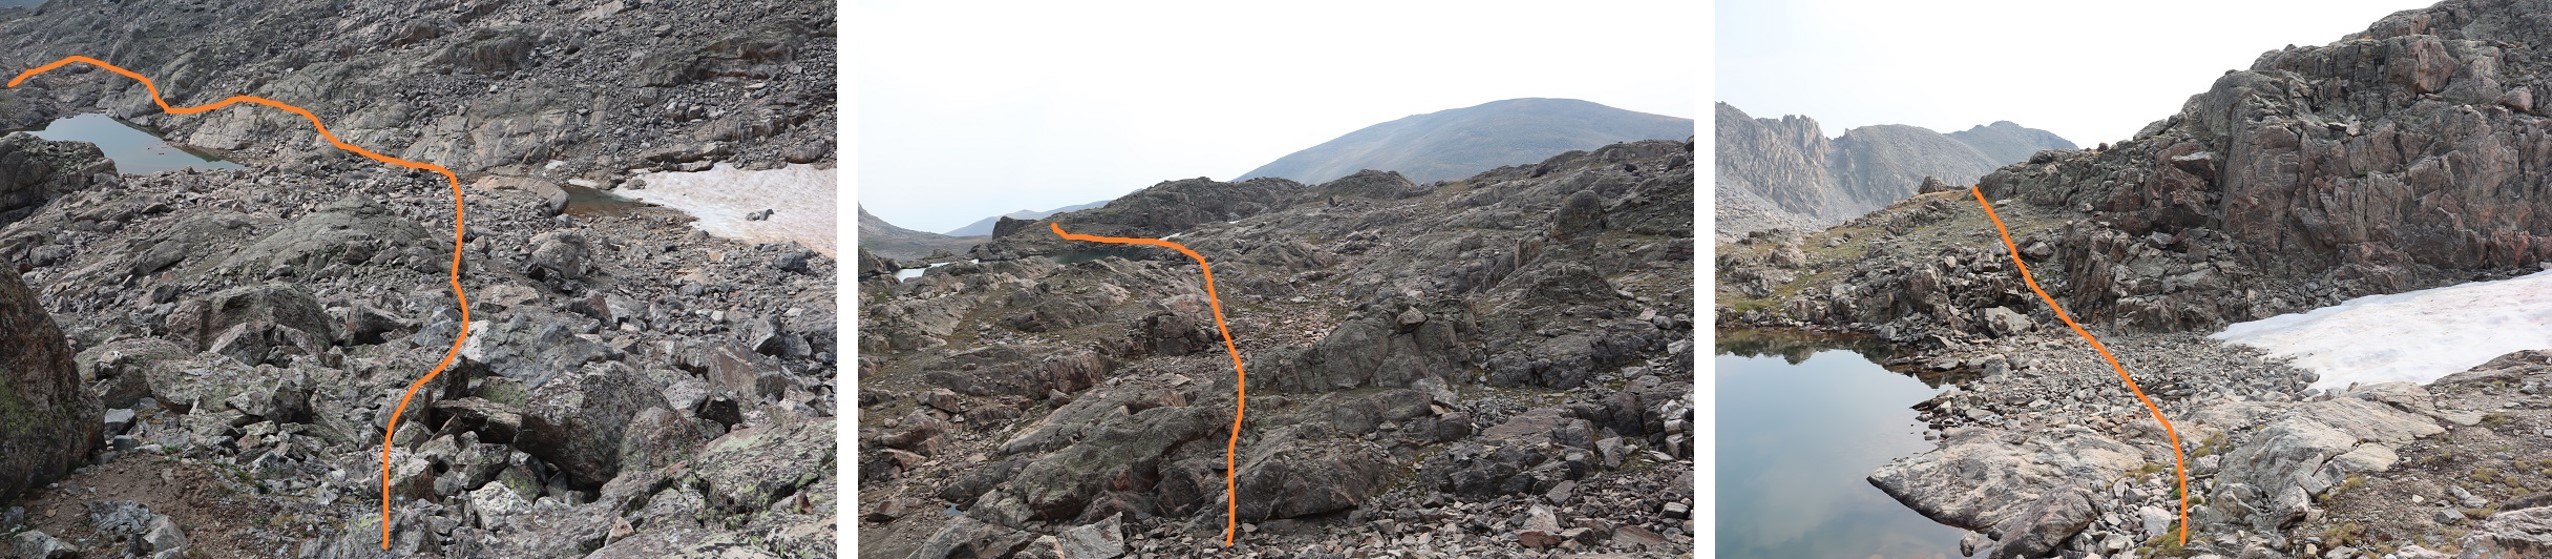
Once at the upper lake, before you reach the pass, there are several options to ascend up the slope. In fact, I took a different route up than I did back down, and as I was coming down I saw several other viable routes, depending on conditions, snow levels, etc. Here’s an overview of the route I took:
And step by step
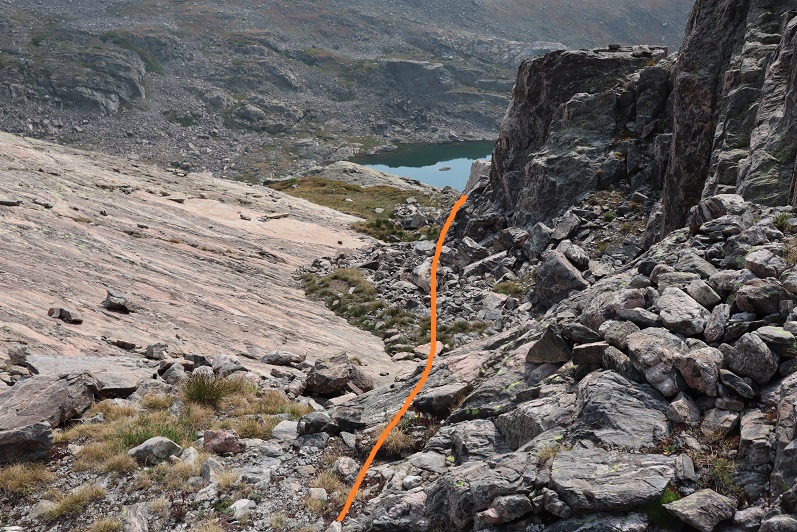
I took the ramp to the left on the way up, to the right on the way down
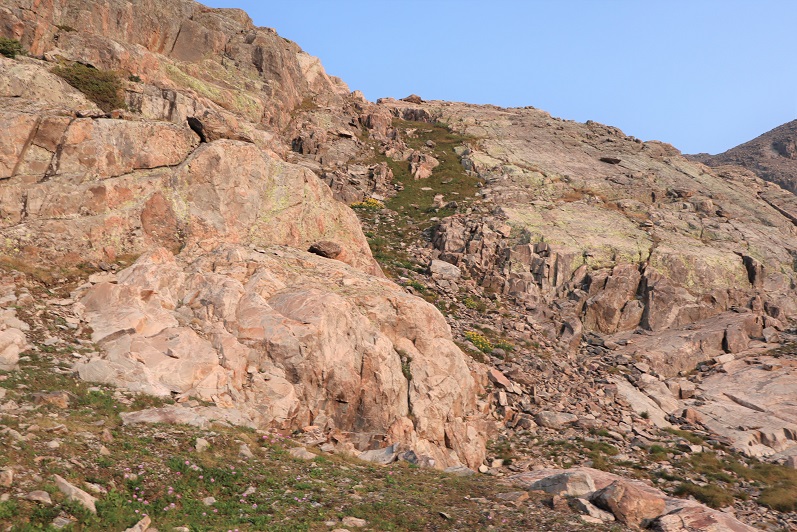
Close up of the grassy ramp
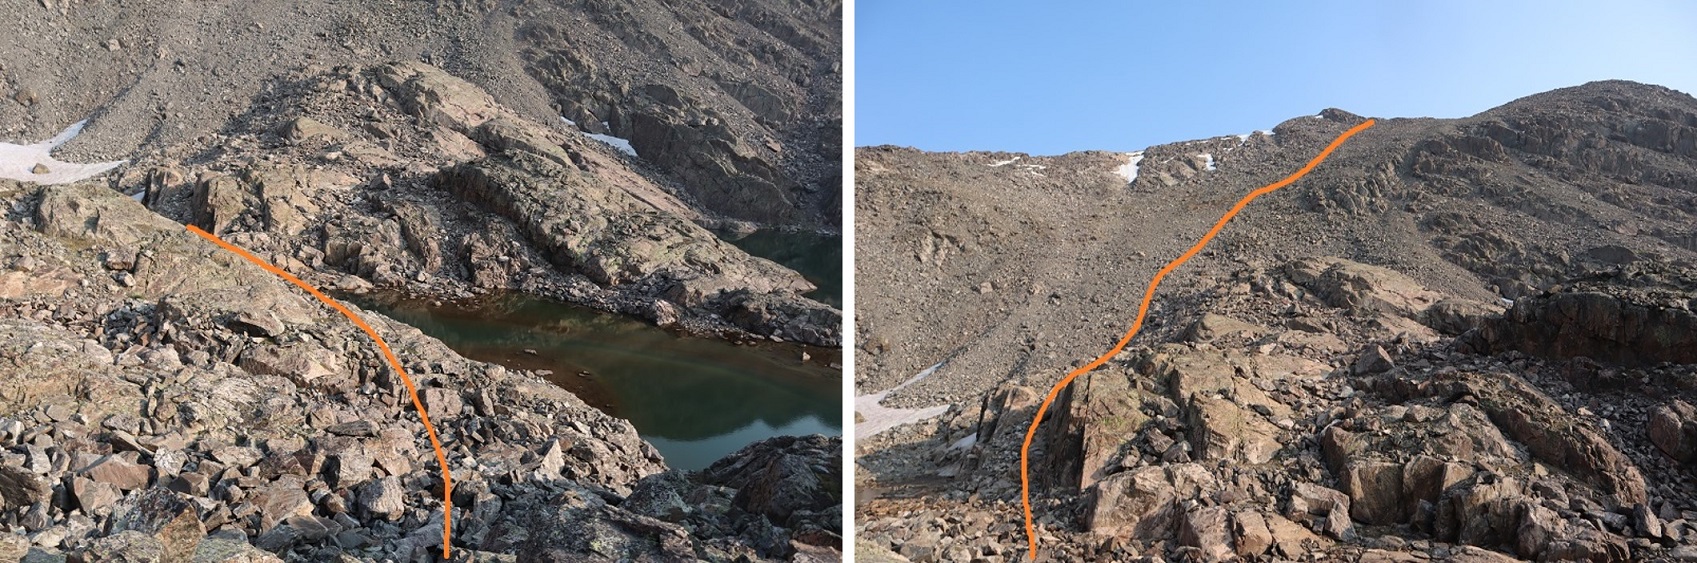
At the top of the ramp I was at a lake. This lake looks like it shifts shoreline depending on where the waterline lies at different points in the year. Here’s the route I took around the lake and up the side of the mountain (note: I went right on my ascent, left on the descent, and while both were class 2, left was easier.
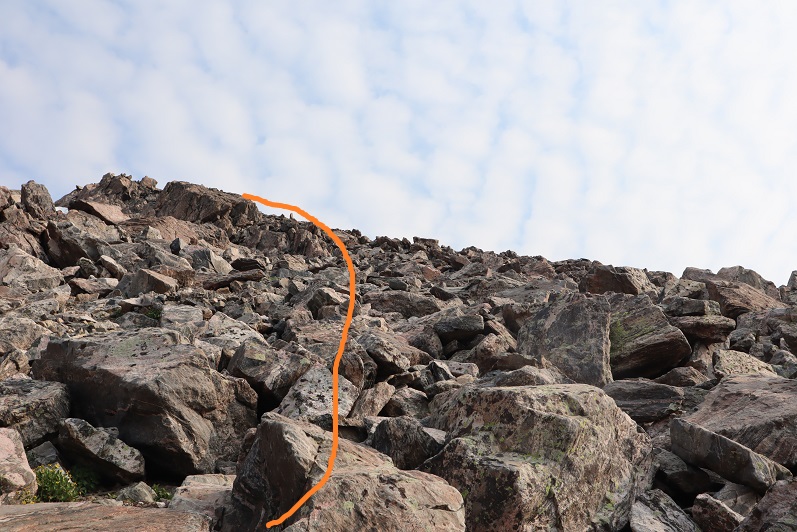
Here’s what this looked like step by step. This is all class 2:
There are many ways to ascend to the summit. You can take the saddle to the left as well and then follow the ridge, but I chose to go straight up the south face. This area is more stable than it looks, with large rocks and boulders to hike up.
I summited PT 13,768 at 9:15am. It was hazy due to the fires in the area, but I couldn’t smell any smoke
PT 13,768:
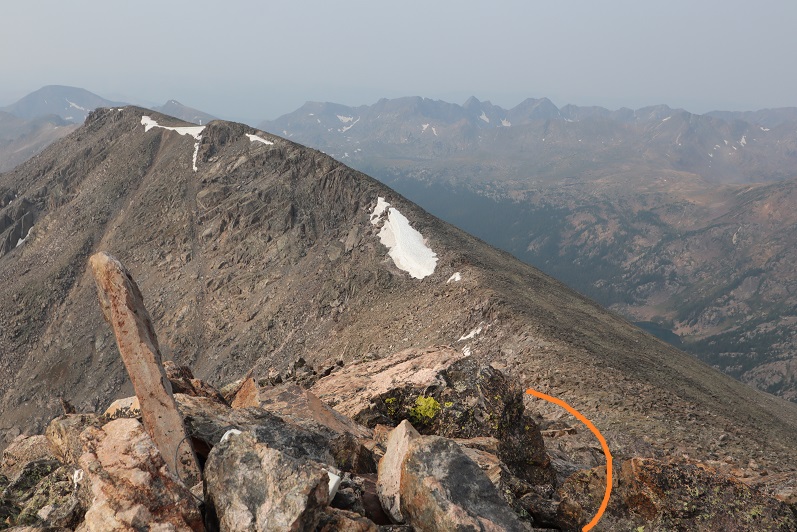
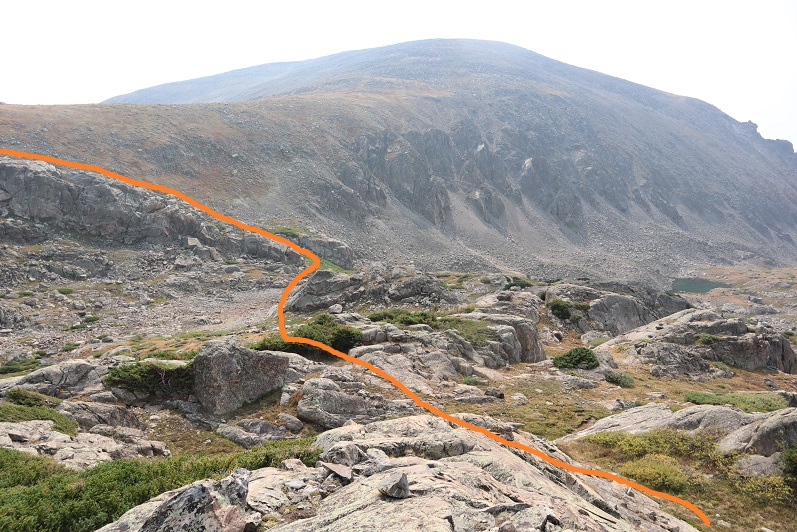
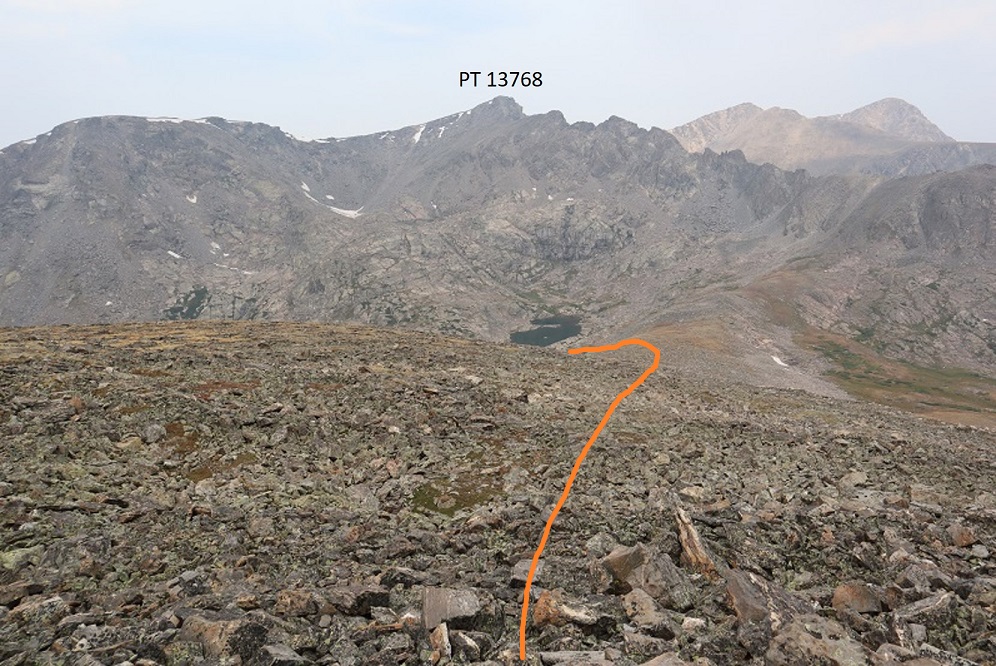
Here’s a look back at the route I took in
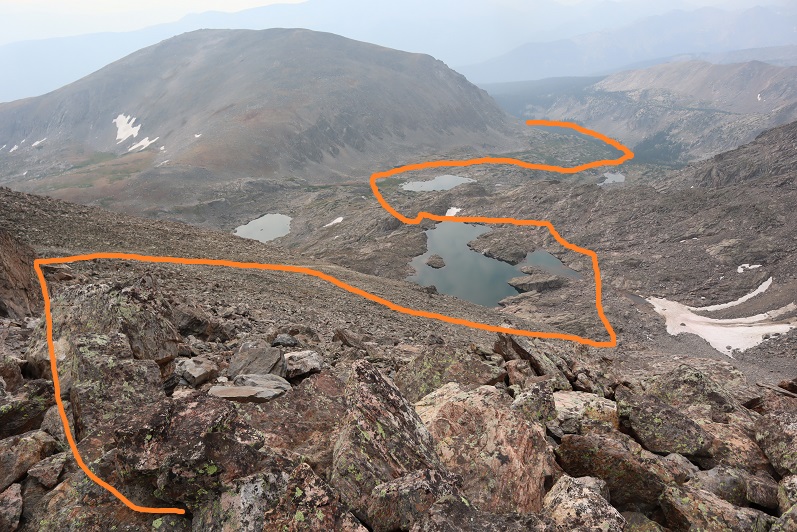
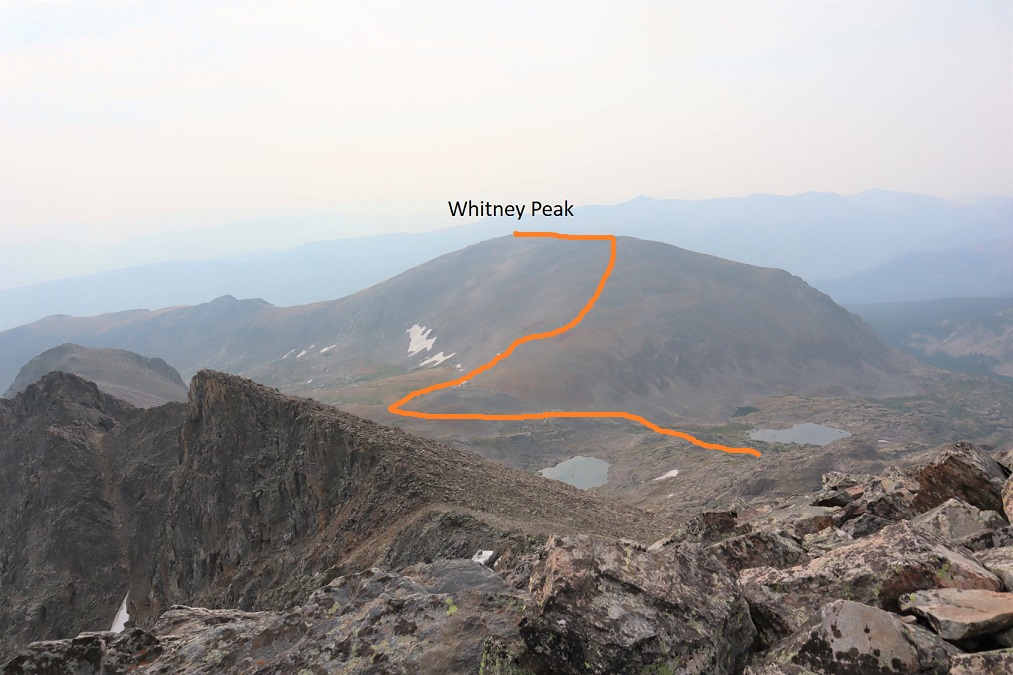
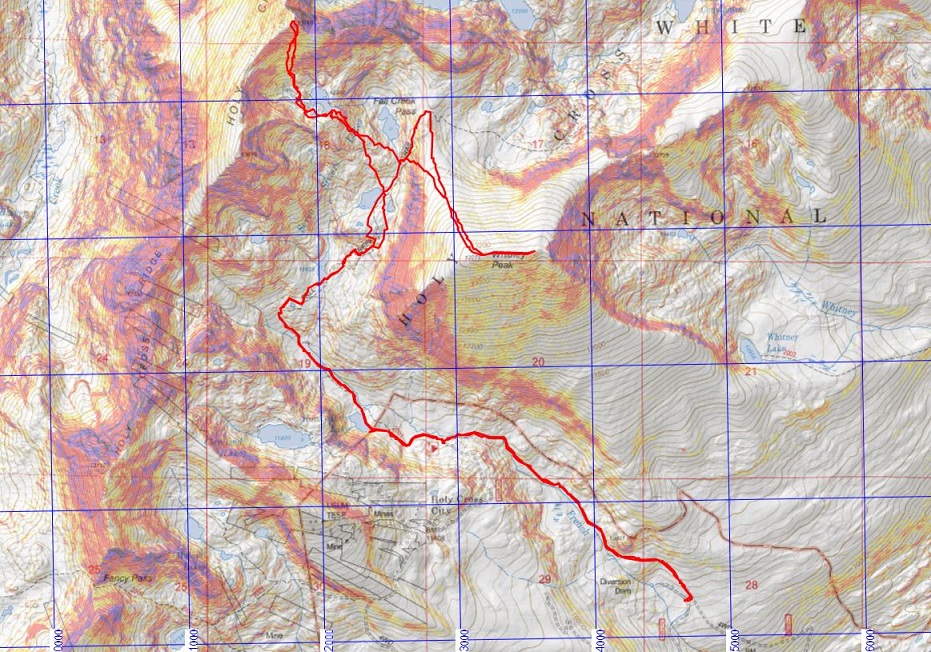
From the summit, here’s a look over at Whitney Peak and the overall route I took to get there
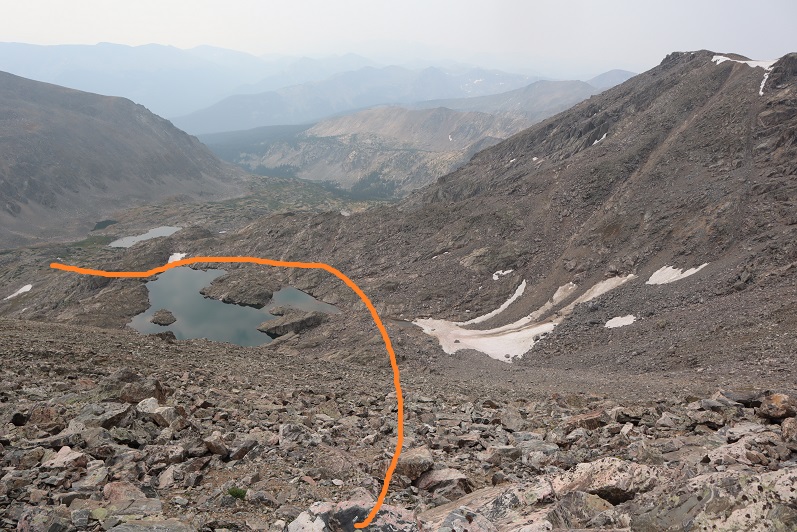
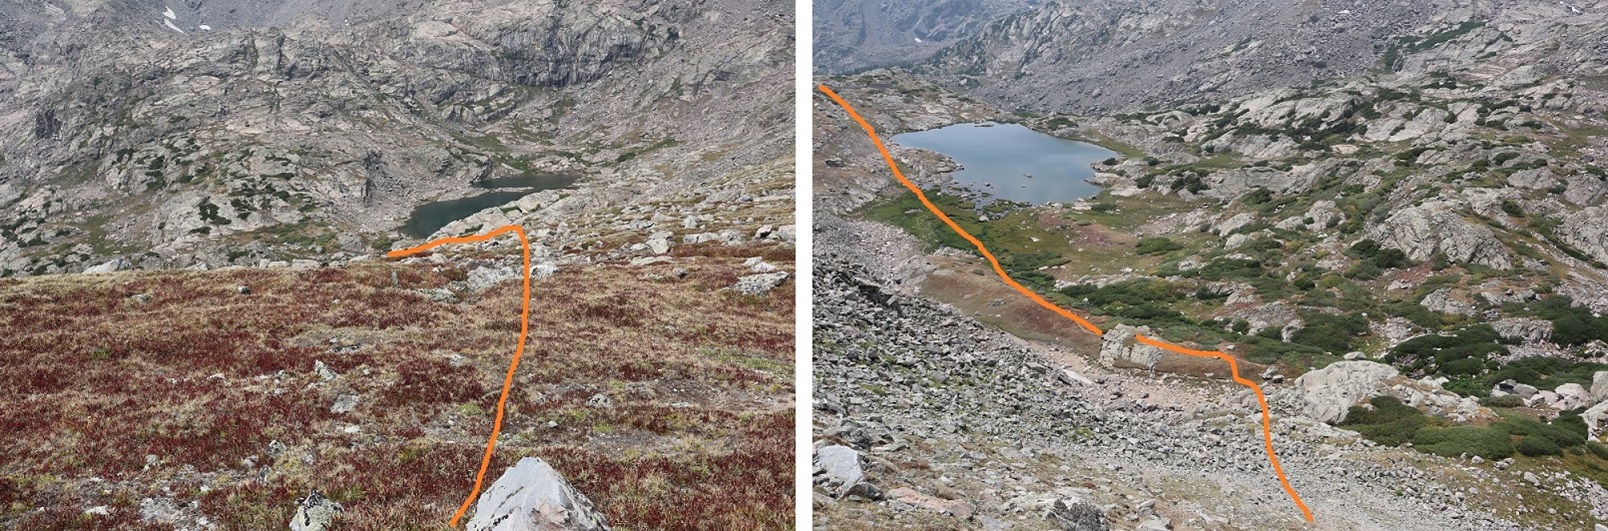
I started by heading southwest, finding a good descent point, and heading back down to the lake
Once around the lake I took the ramp back down and headed southeast until I connected back up with the Fall Creek Trail
I took Fall Creek Trail up to Fall Creek Pass
And then turned right (south) and followed the ridge. This was an easy walk compared to the rest of the day (which had been easy as well). If you’re in the area, hike this peak, it’s worth it!
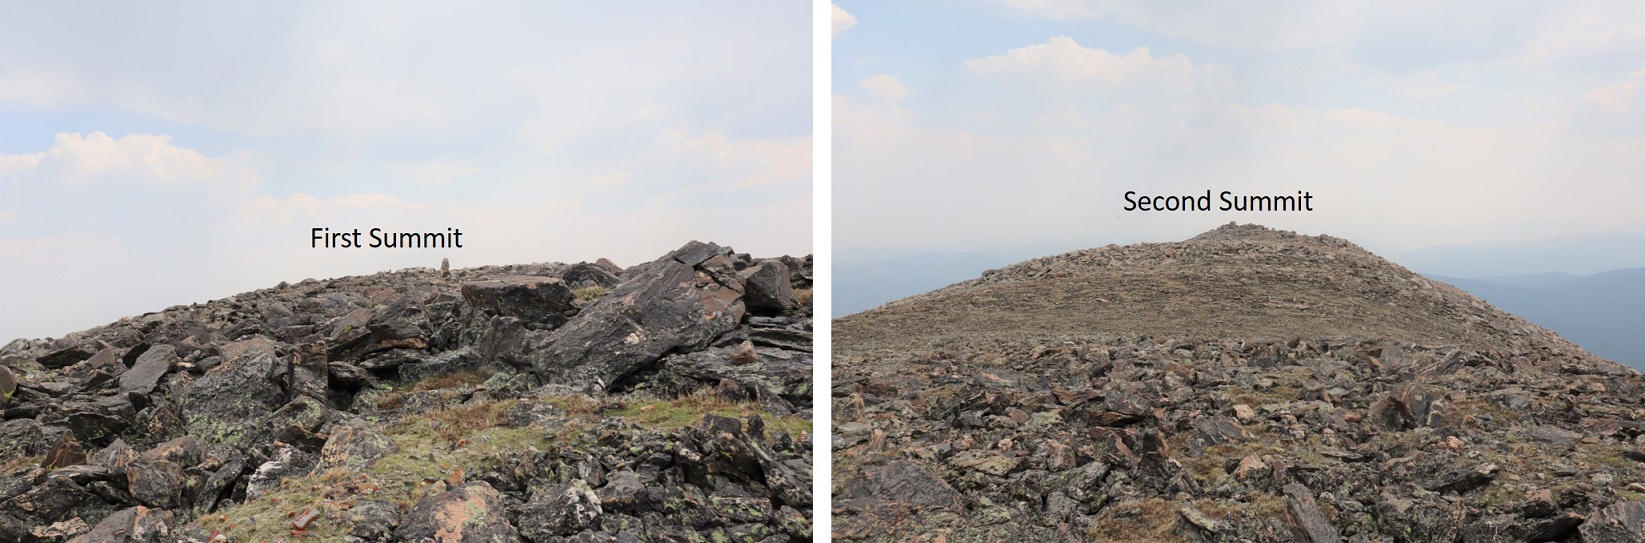
At the top of the ridge is what looks like the summit, but it also looks like the summit could be further east. Spoiler: I climbed to both ‘summits’ and when I got home and looked at my altimeter they had 2’ of difference in height, and the one furthest west I stood on top of, while the one more east I sat on the summit block, pretty much canceling out those 2 feet of difference. Either way, I hit both summits, and I think both should count, especially if you don’t feel comfortable with climbing.
I crossed the first ‘summit’ and headed east towards the second ‘summit’
I walked over to the second summit and all around the summit block. I’ve heard some people wondering how you can “just climb up” and let me tell you, it’s actually pretty easy and doesn’t require an explanation (but I’ll give you one).
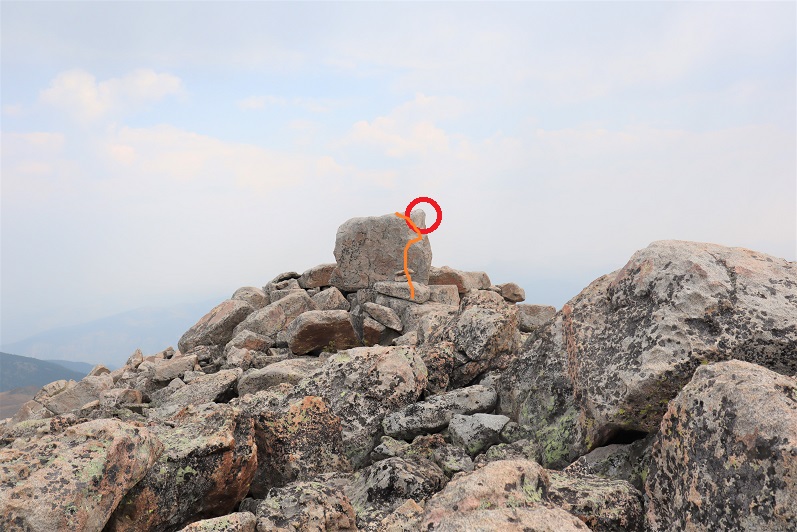
This is how you’re supposed to ascend the block: I’ve circled where there’s a good grip to place your right hand. Set your right knee below that as you press your knee against the rock, and then you place your left hand on the top and pull yourself up. I’m 5’4” and this worked for me. The two rocks at the base are very loose, so don’t trust them too much. Or, even better yet, if you’re with a friend do the ‘stand on the knee’ thing and help each other one at a time reach the summit.
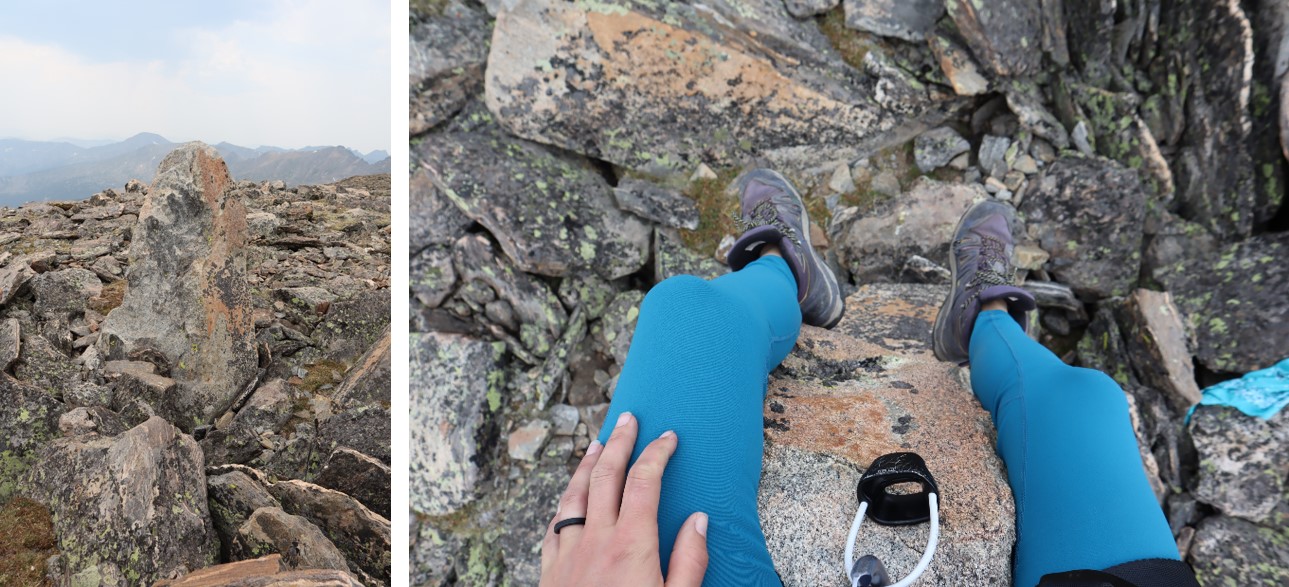
I knew I could climb up this rock, but I wasn’t sure I could downclimb. It’s rated 5.6, and since I solo I wanted to be over-prepared. That and I’d brought my 30 meter half rope with me just in case and it seemed a shame not to use it. So before I climbed the rock I set up an anchor and attached my rope to it, then set the rope over the rock. Note: ROPES ARE NOT NEEDED FOR THIS CLIMB. They were overkill, but fun just the same, and gave me some practice and extra leverage. Here’s my (not needed) set-up:
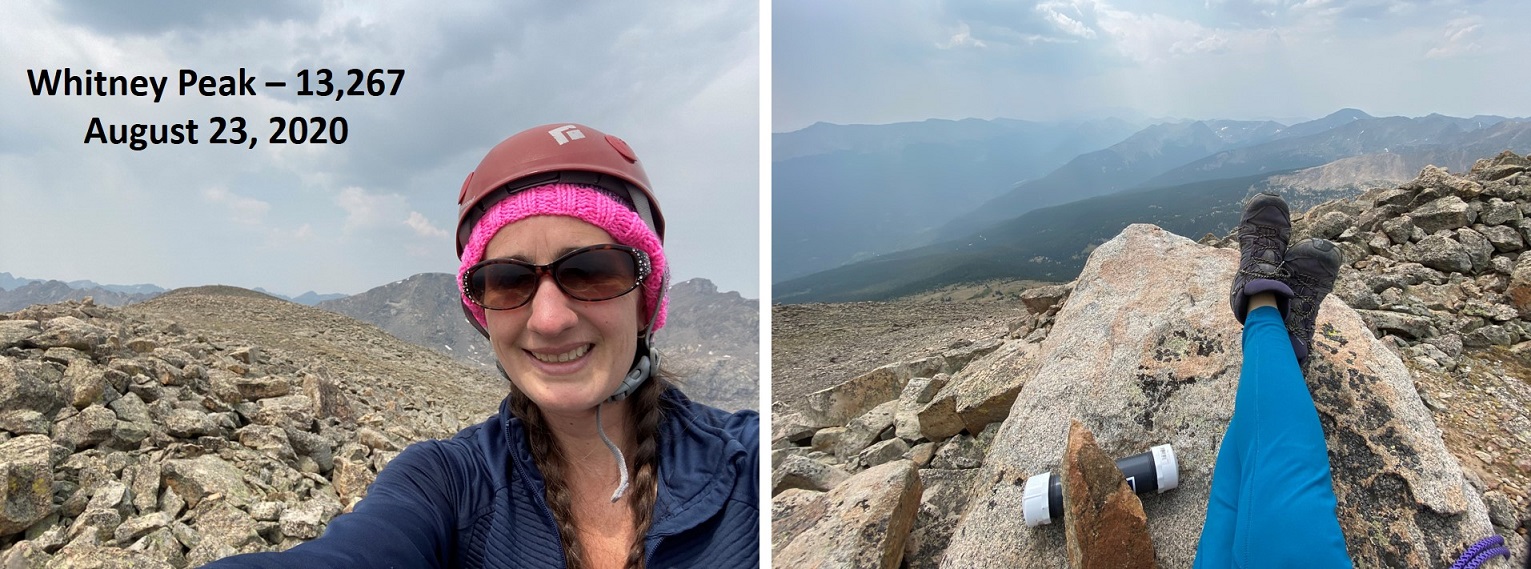
I summited Whitney Peak at 12:15pm. The summit block is about 4 feet by 2 feet.
Whitney Peak:
I rappelled back down because I could. Note: you can just slide down on your belly until you reach the rock, but don’t aim for the rocks you used to get higher ground: aim for the stable rock they’re rested on.
The rope allowed me to belay down past the unstable rocks and even a bit further, getting a secure footing on the ground. I packed up my gear and headed east towards the other summit of Whitney Peak.
There’s a summit boulder here too, but it’s only about 4 feet high and easily climbable, so I climbed it and sat on top just in case.
Time to head back. I hiked back down the slope but before making it to the pass I went left and headed down west until I reached Fall Creek Trail. If you decide to do this there are a lot of options to make it happen, but also a few areas where you could ‘cliff out’ (you’d just have to backtrack, nothing too serious) so pick your line carefully
Once back on the Fall Creek trail I followed it out of the basin
And back to the 4×4 road and my truck
I made it back to my truck at 2:45pm, making this a 15.85 mile hike with 4866’ of elevation gain in 9 hours, 20 minutes.
Due to the One Eyed Willy delay I was late driving home. Tomorrow is my daughter’s last first day of school (first day of her senior year of high school) and I wanted to make her a special dinner. She requested my fried chicken, and I didn’t want to disappoint her. A big thank you to the lazy construction worker who forgot to turn off the “HWY 24 is closed past Hartsel: Find an alternate route” sign, as on a Sunday night around 5pm I was the only car taking my chances and using the road. There never was a closure, and I was able to get home in record time to make a special dinner for my baby girl.