Copeland Mountain – 13,183

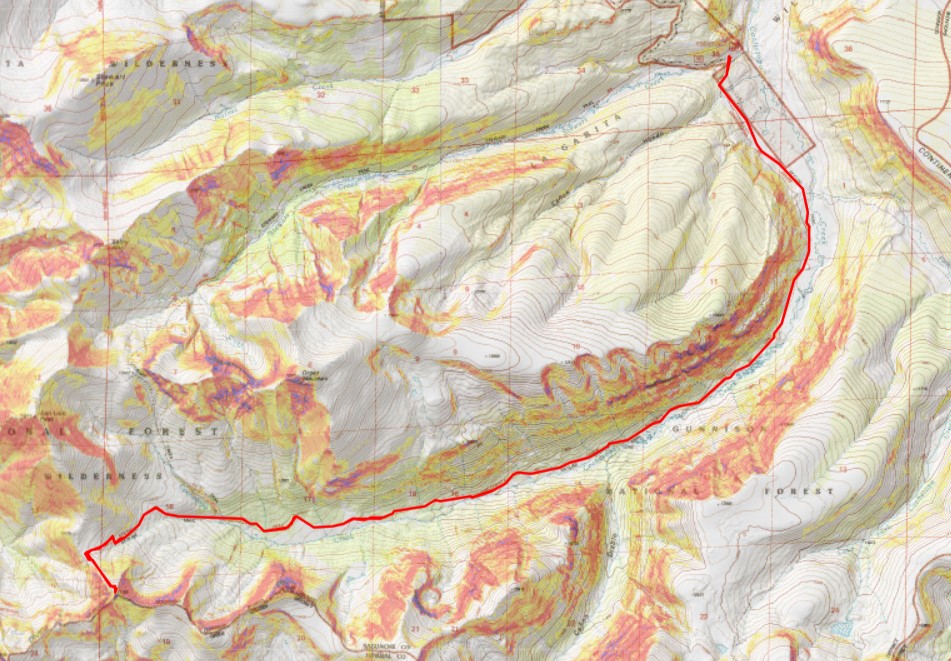
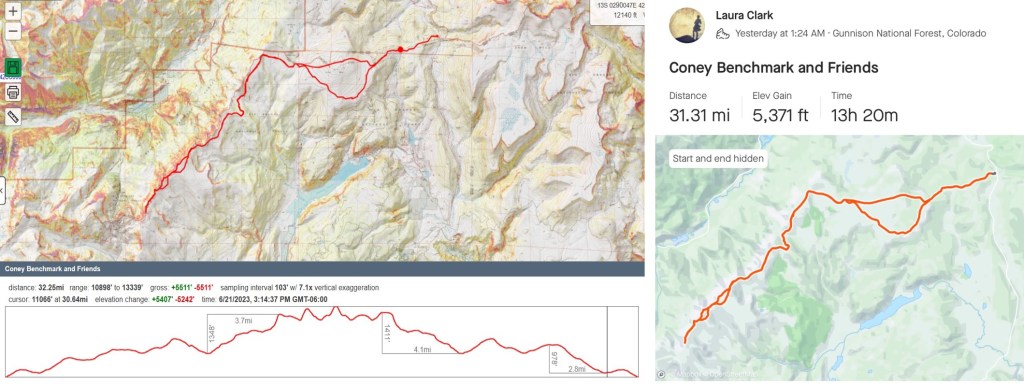
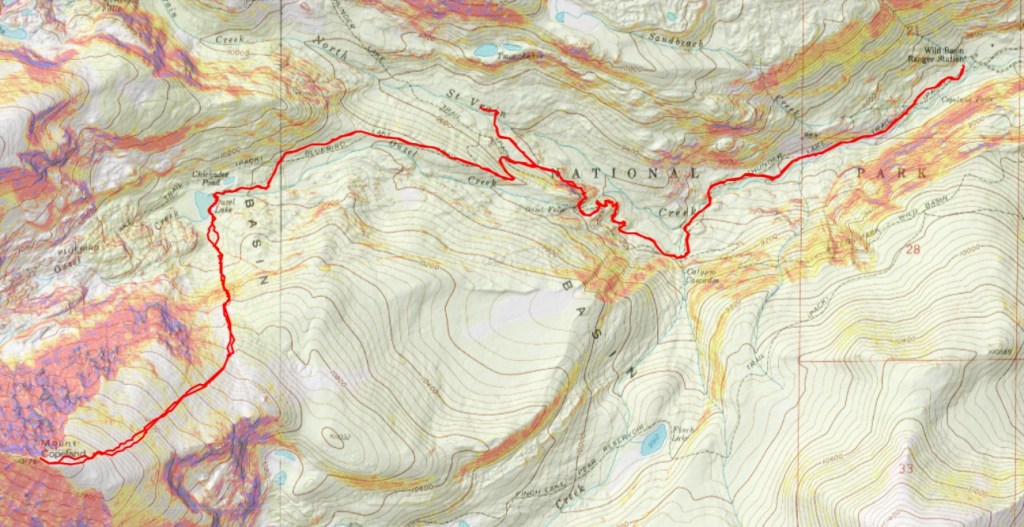
RT Length:  17.49 miles

Elevation Gain:  4975’

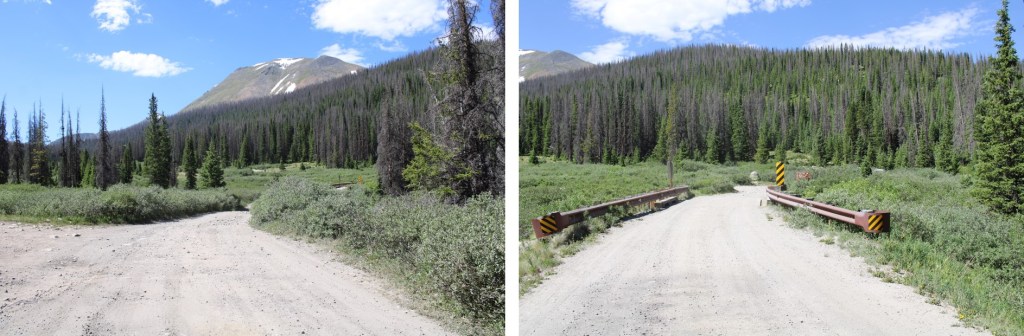
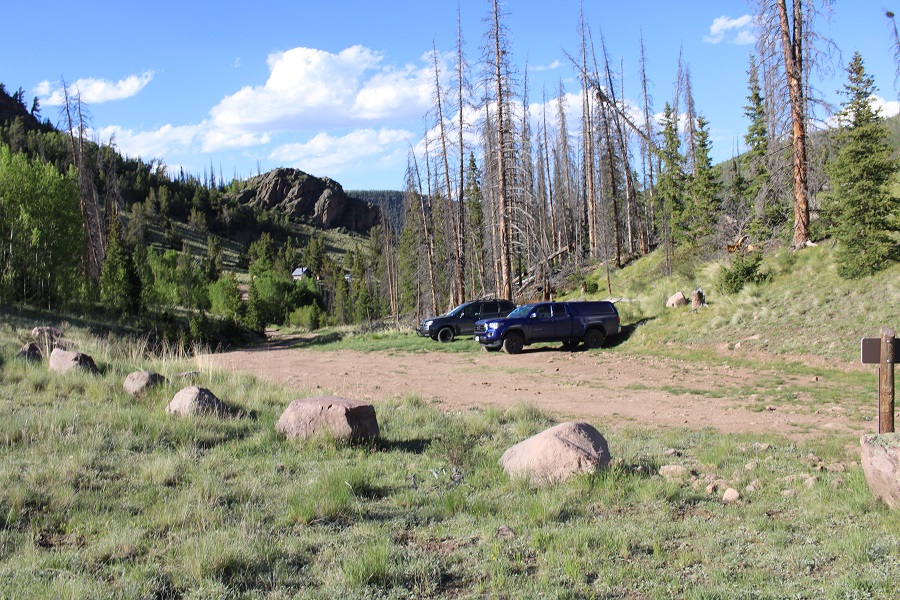
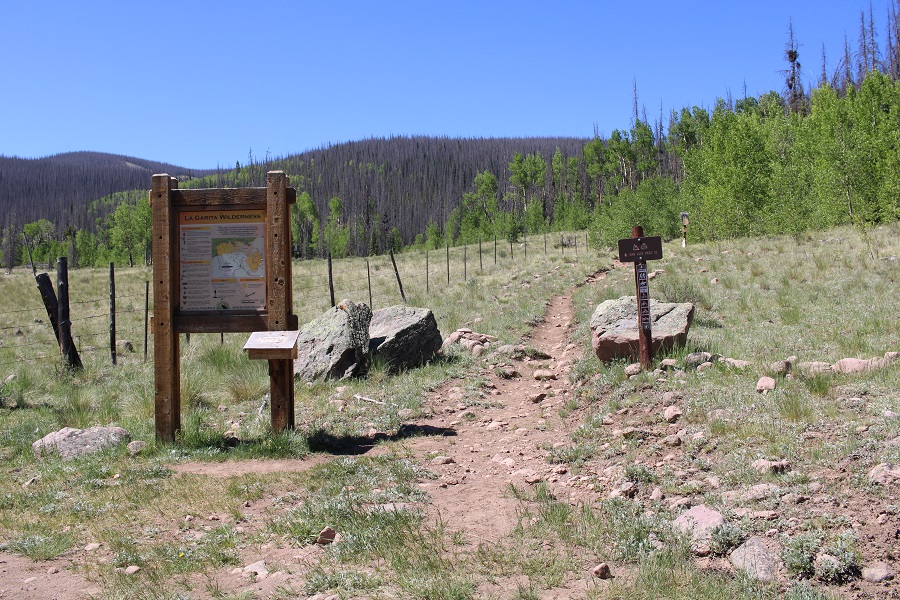
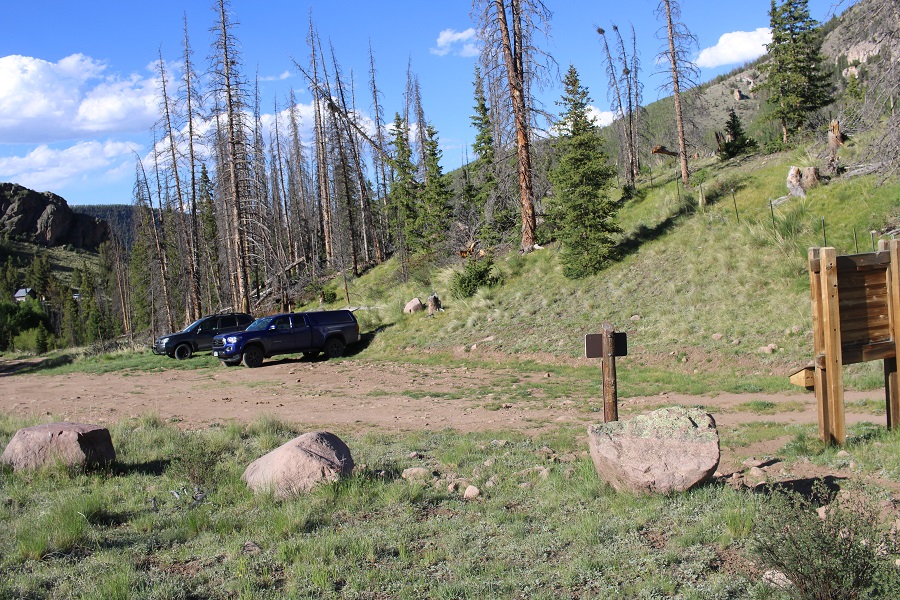
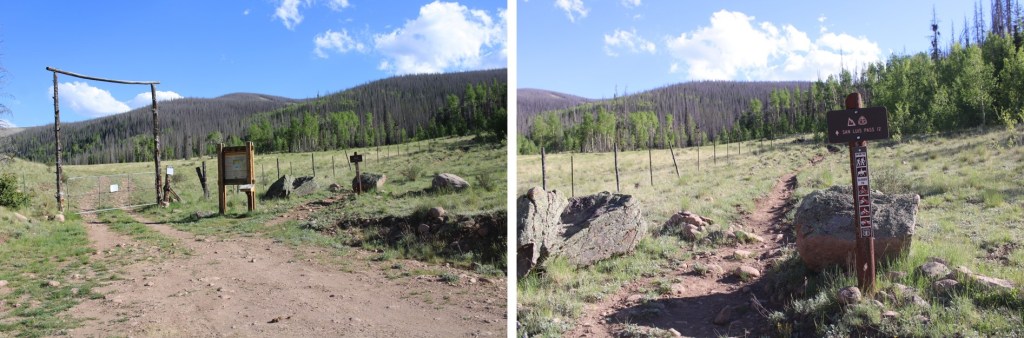
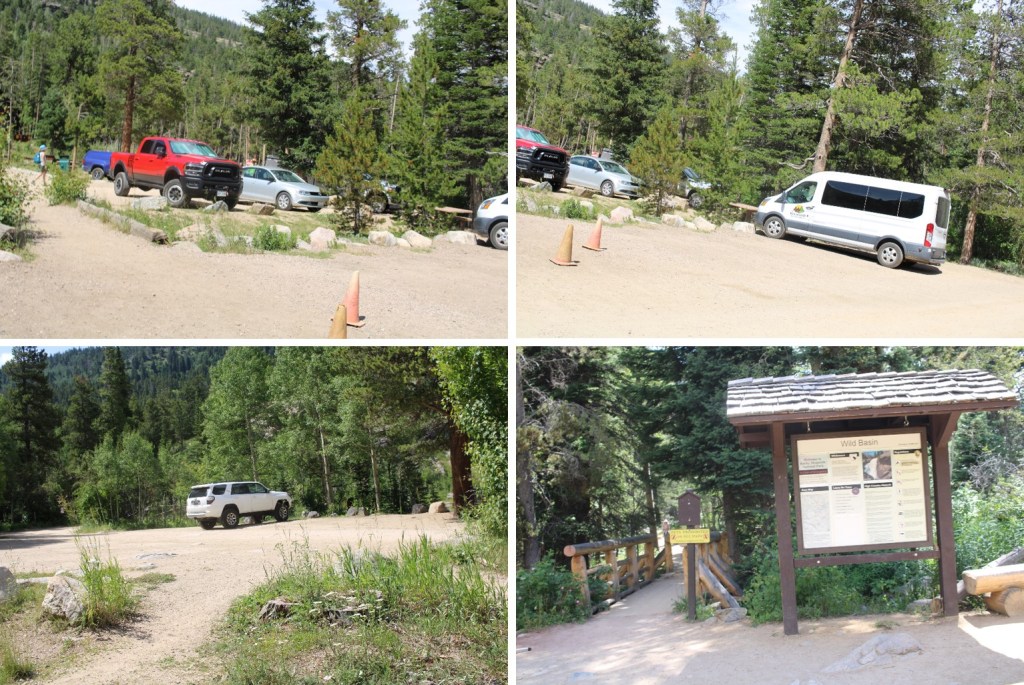
I arrived at the Wild Basin Ranger Station I RMNP at 4:30am and was on the trail at 5am.  There are several adjoining lots in the area, with room for about 50 vehicles.  The very well market trail starts at the southwest end of the parking area.

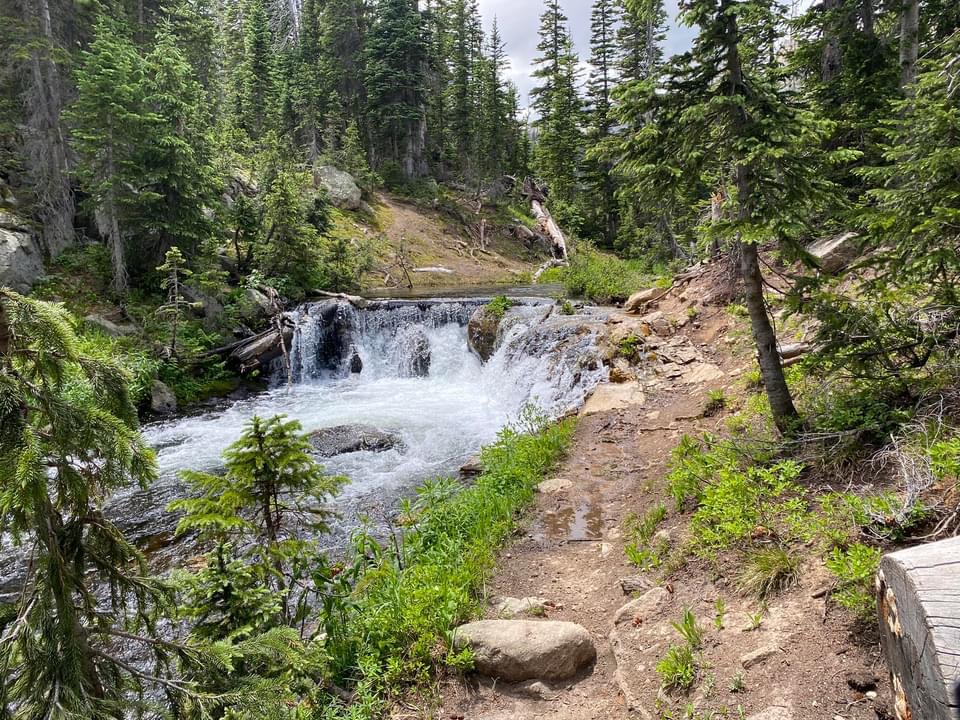
I was headed to Ouzel Lake, on a trail that first passed Copeland Falls, Calypso Falls, and Ouzel Falls (that’s a lot of falls) along the way. 

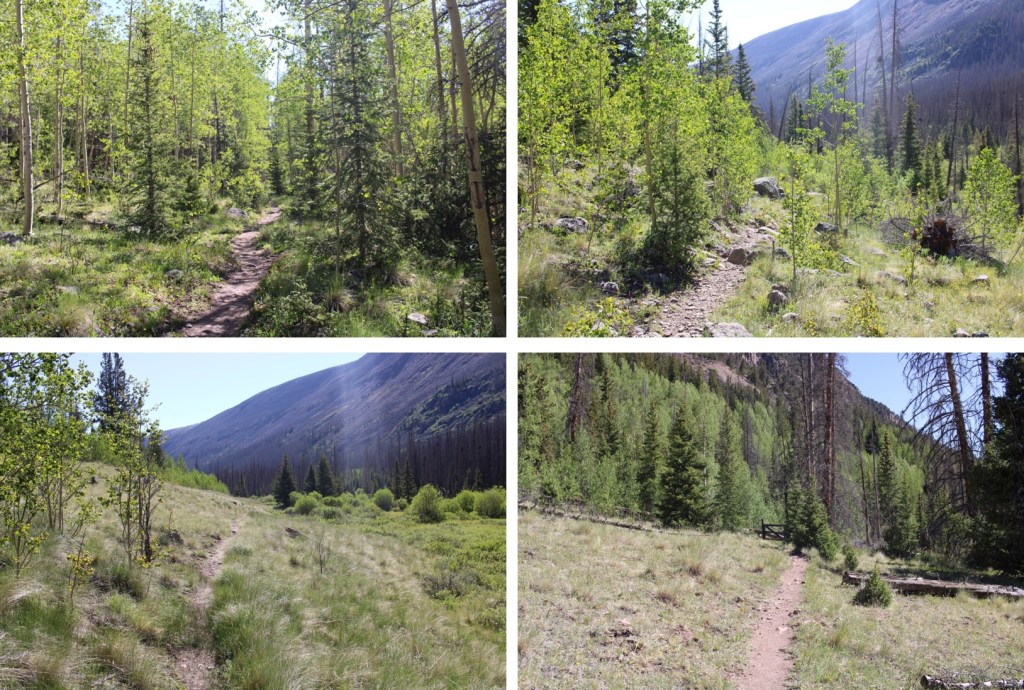
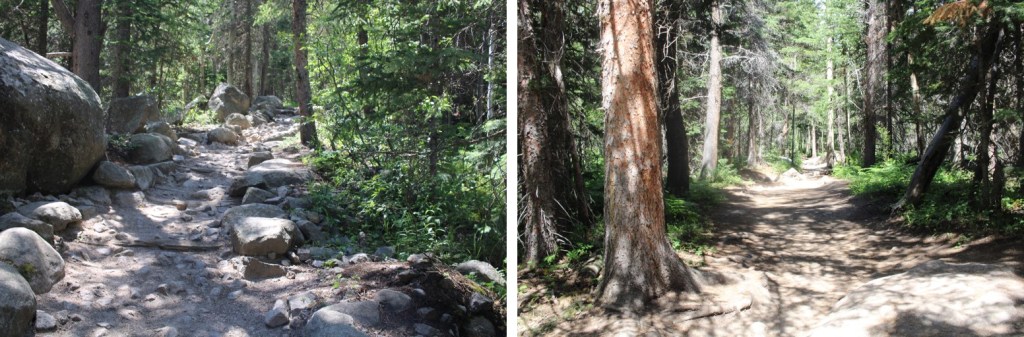
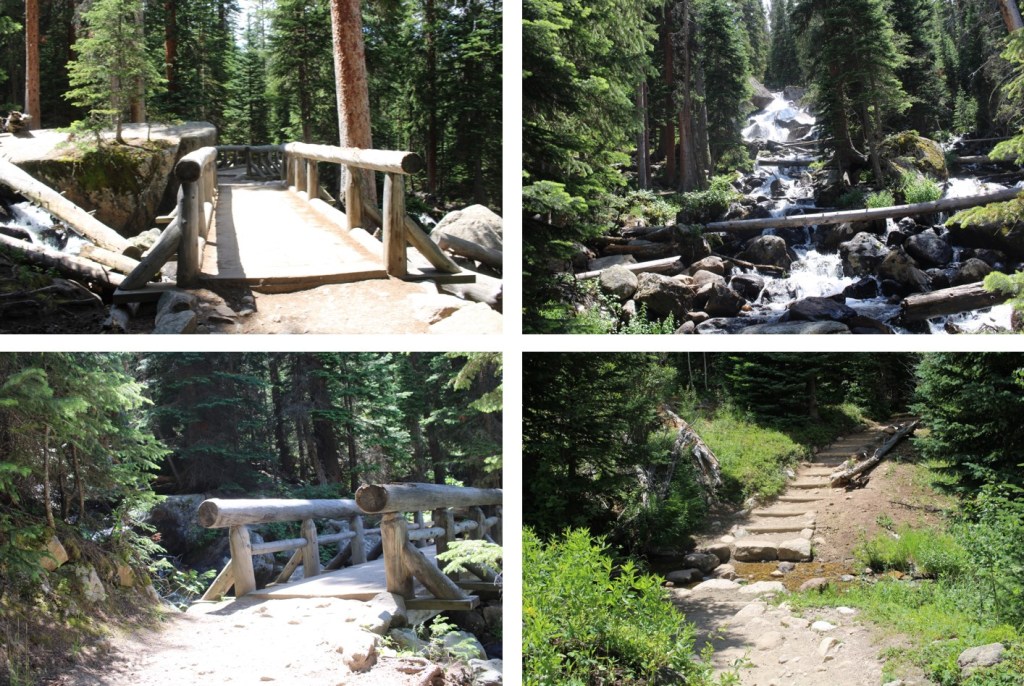
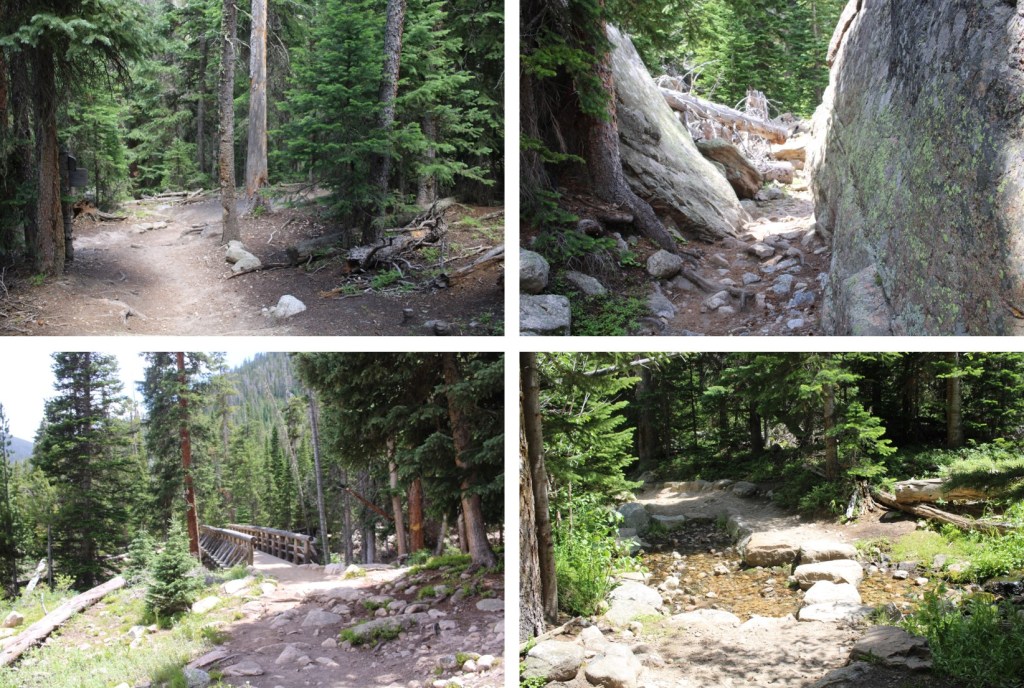
In true RMNP fashion, this is a well maintained, class 1 trail.

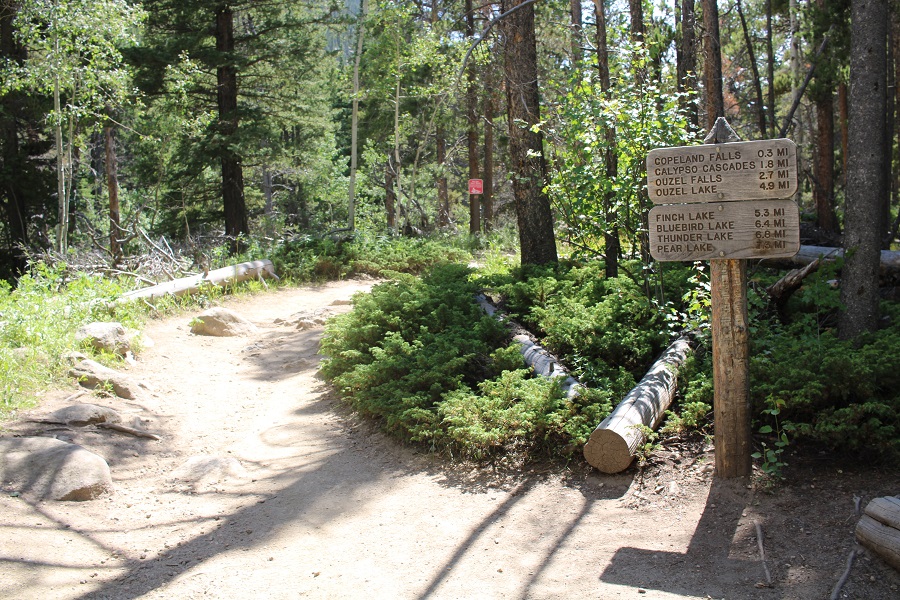
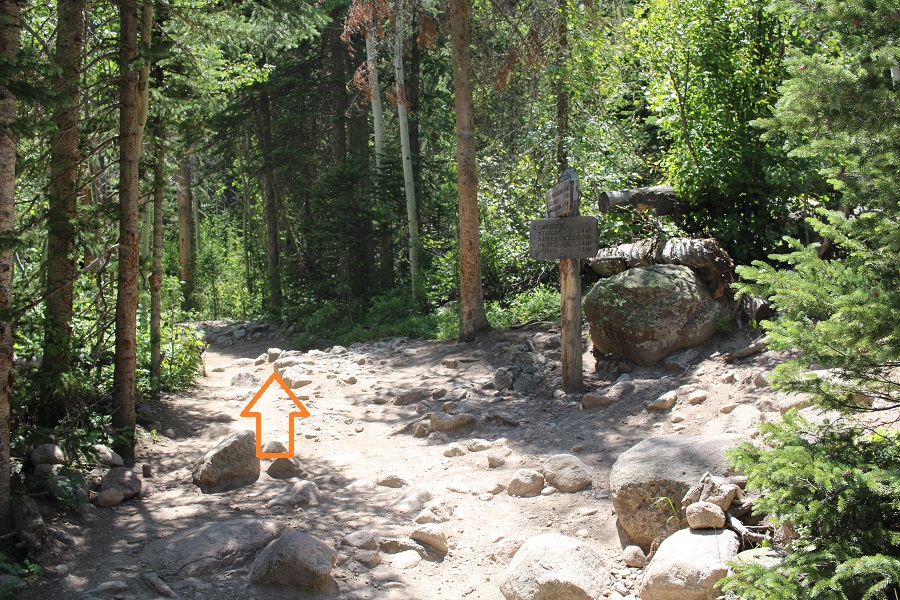
After hiking for 1.5 miles, I continued straight (towards Calypso Lake and Ouzel Falls) at this junction

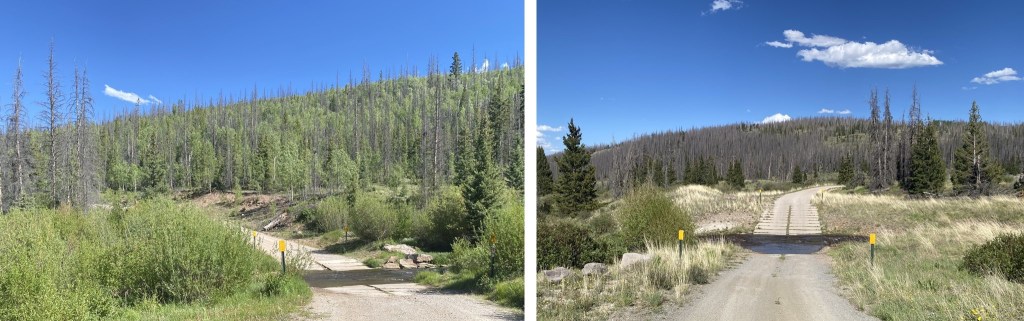
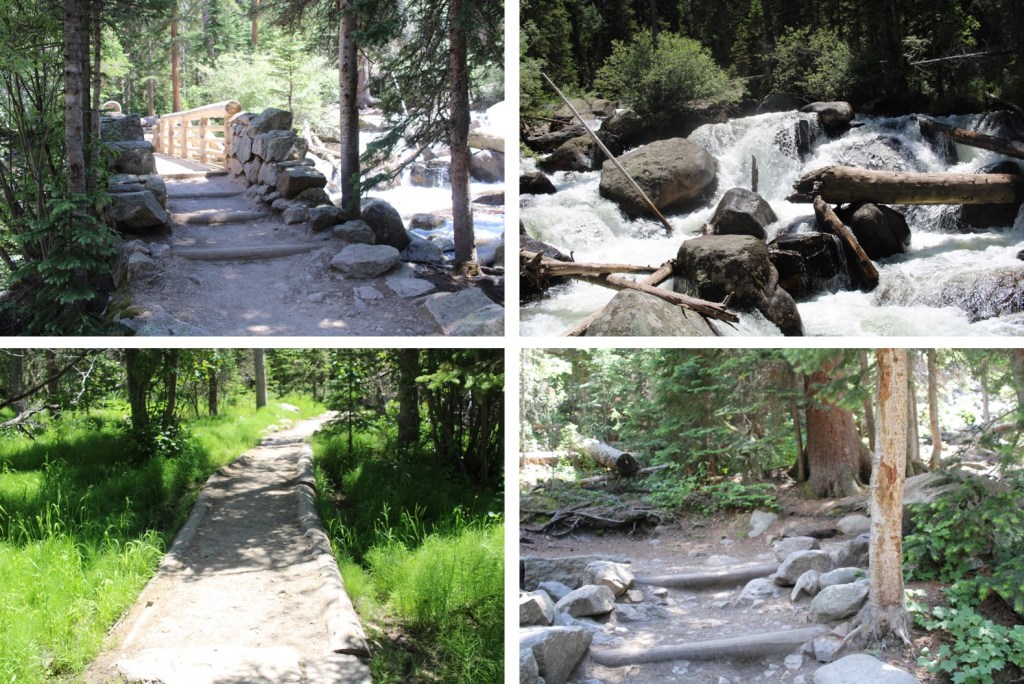
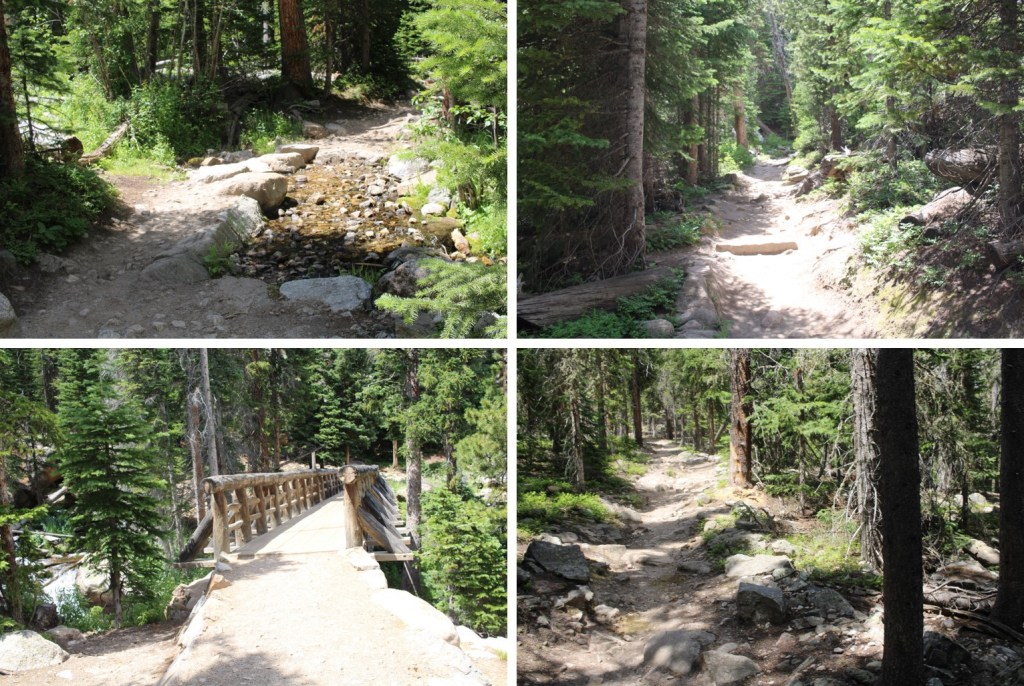
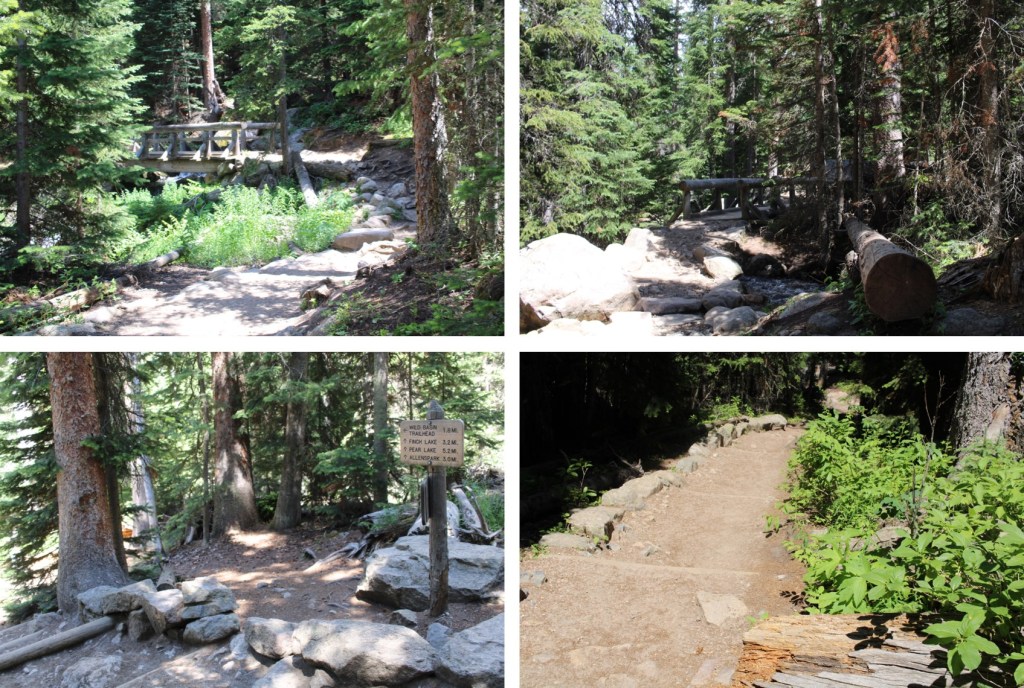
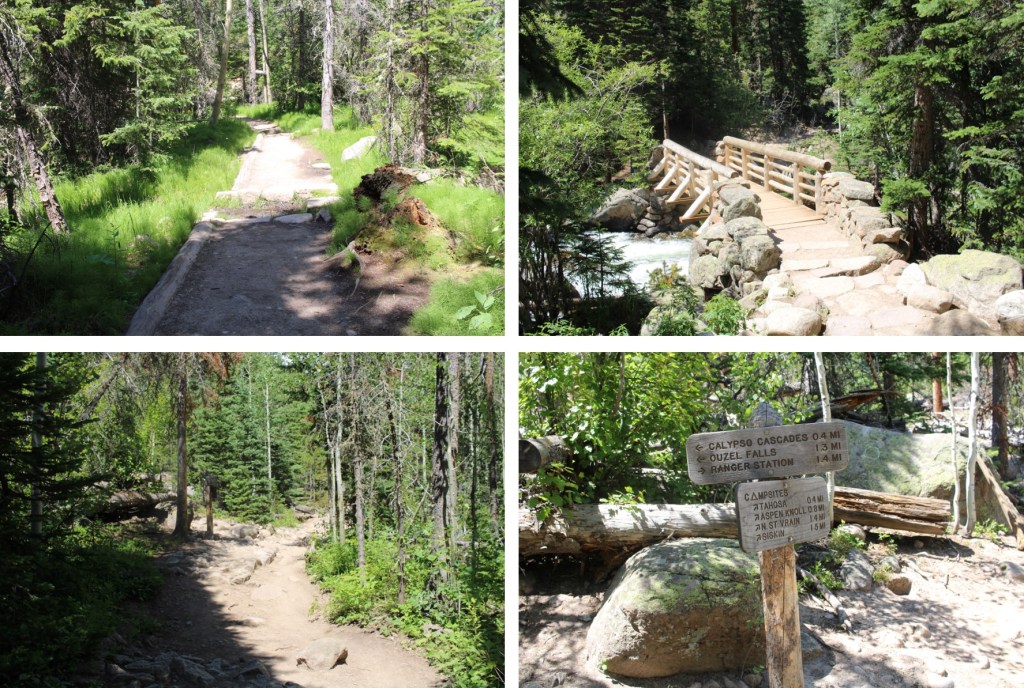
I continued to follow the well-maintained trail southwest, crossing several bridges

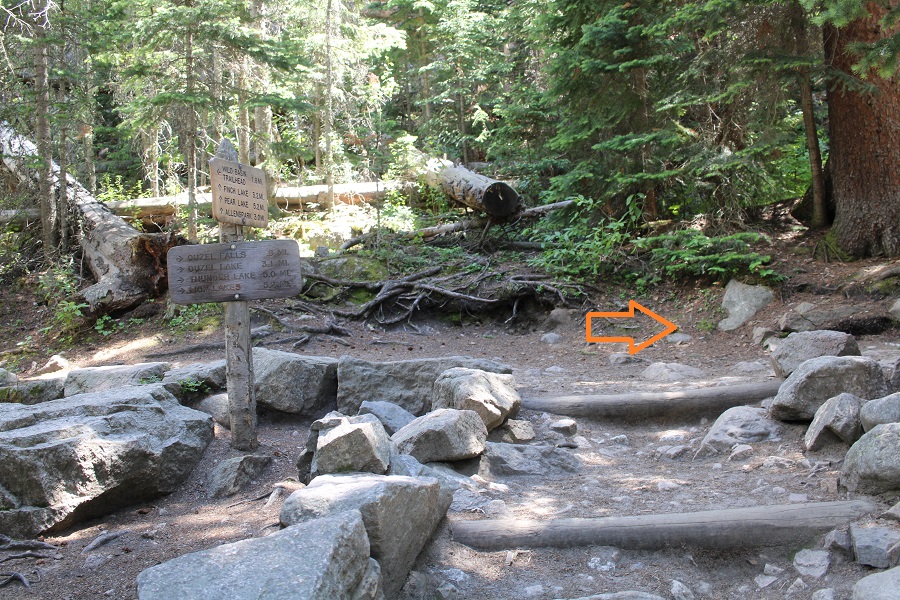
After hiking for just under 2 miles, I came to another junction, where I turned right and continued following the trail towards Ouzel Falls

Here’s where I made a mistake.  After hiking for about 3 miles there’s a junction where you turn left. In the dark, I didn’t see this junction, and continued on another half mile before realizing my mistake.  In any event, turn left at this junction, and continue heading towards Ouzel Lake.

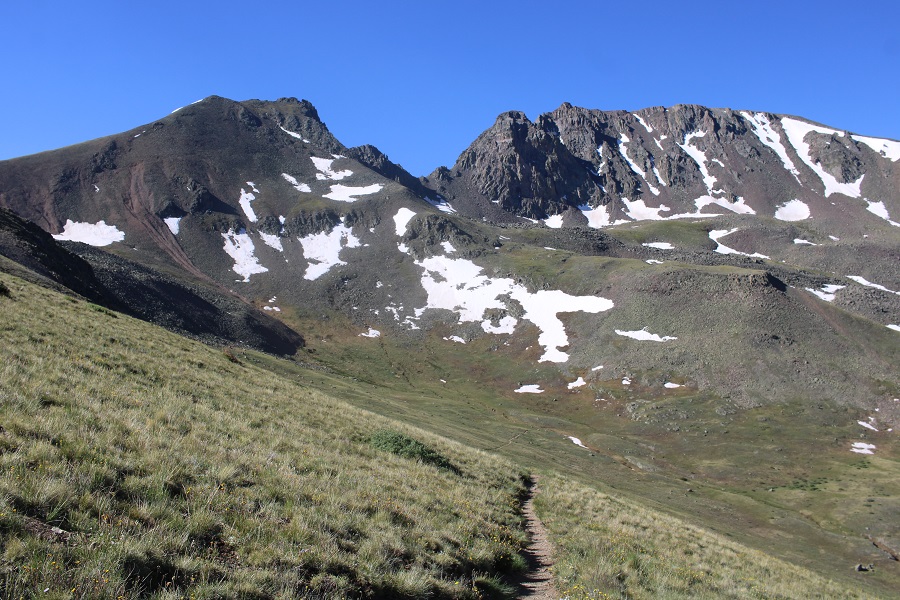
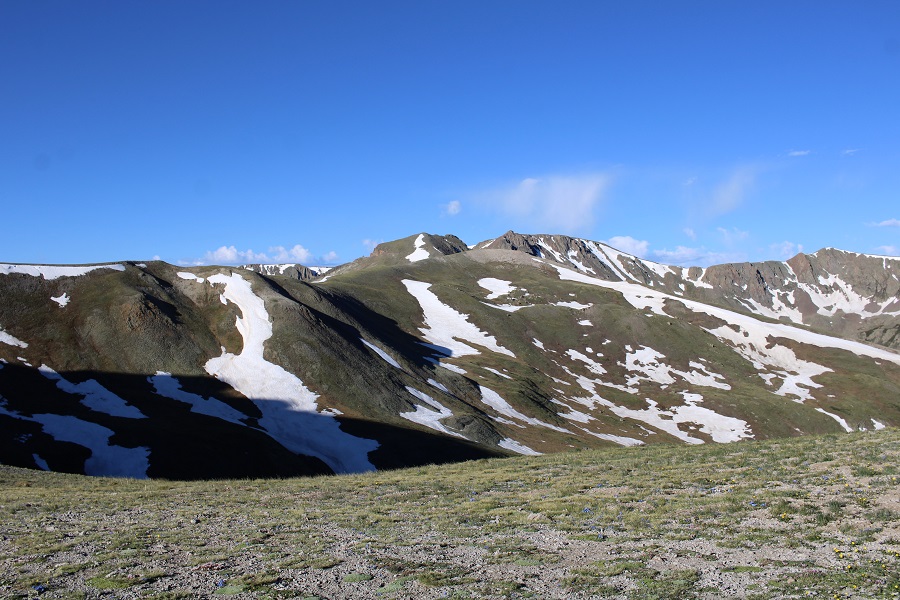
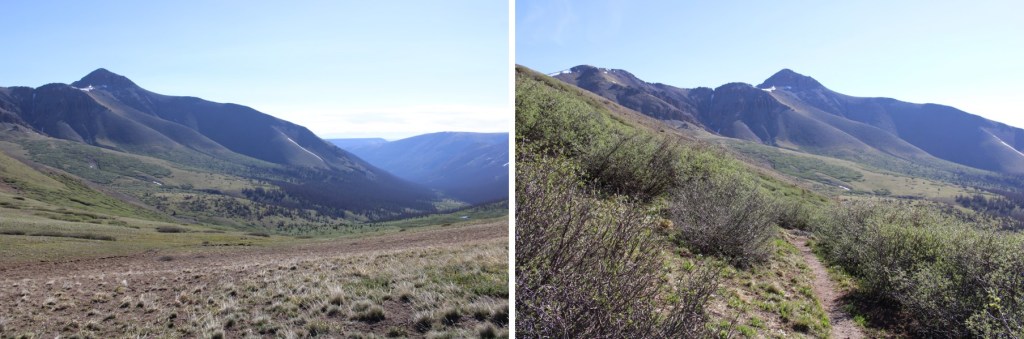
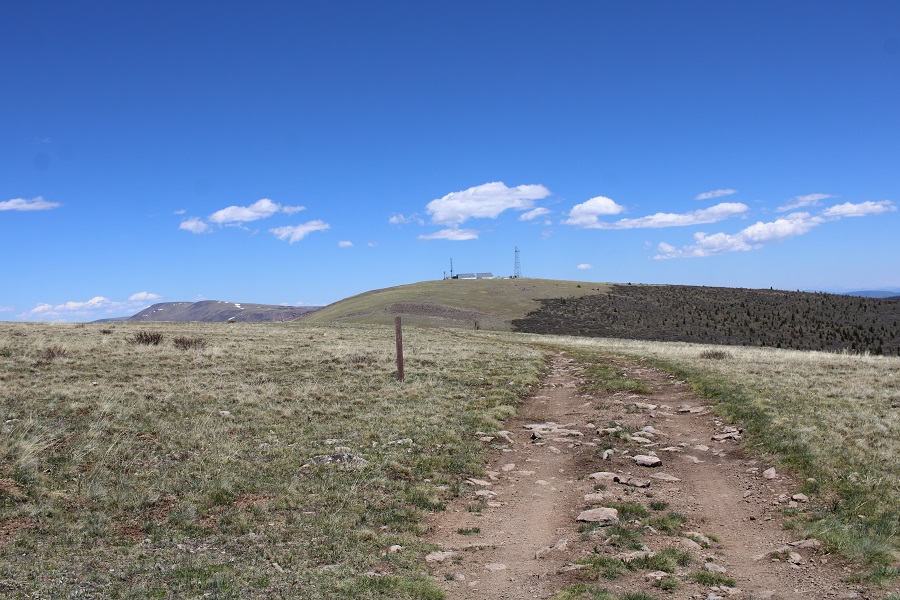
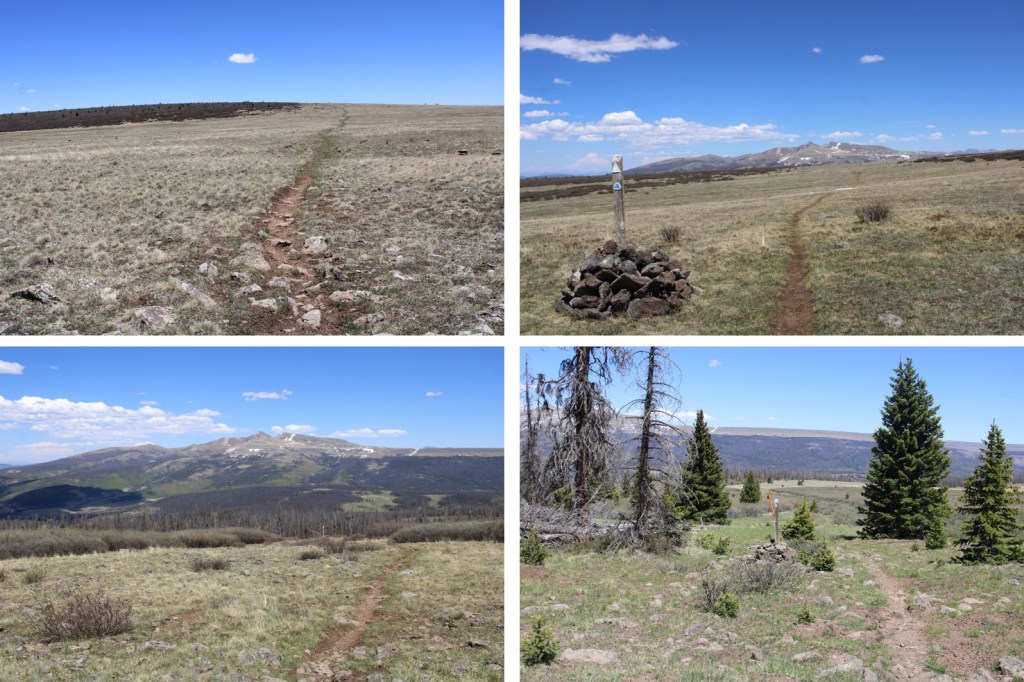
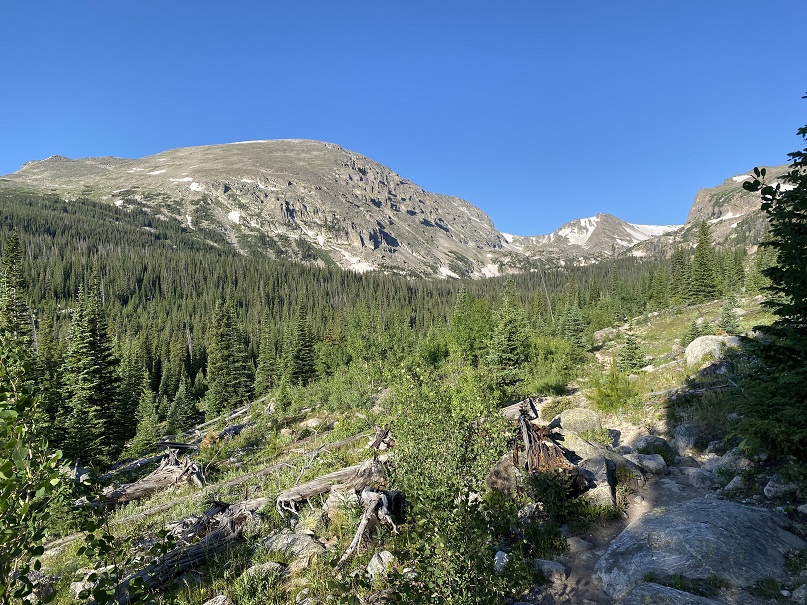
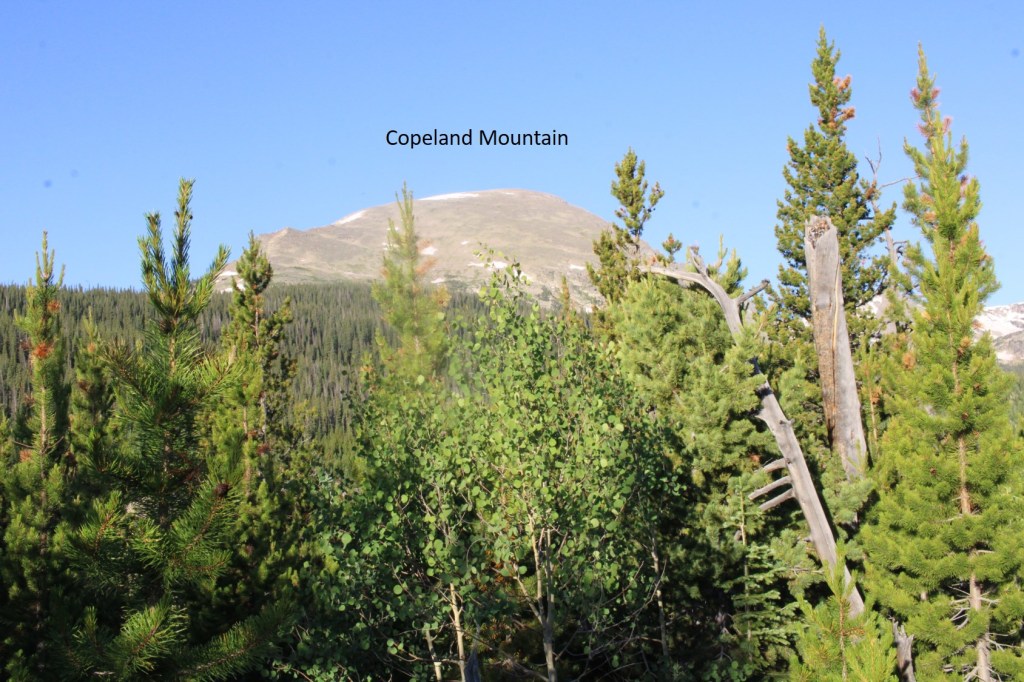
It is along this part of the trail you’ll get your first glimpse of Copeland Mountain.

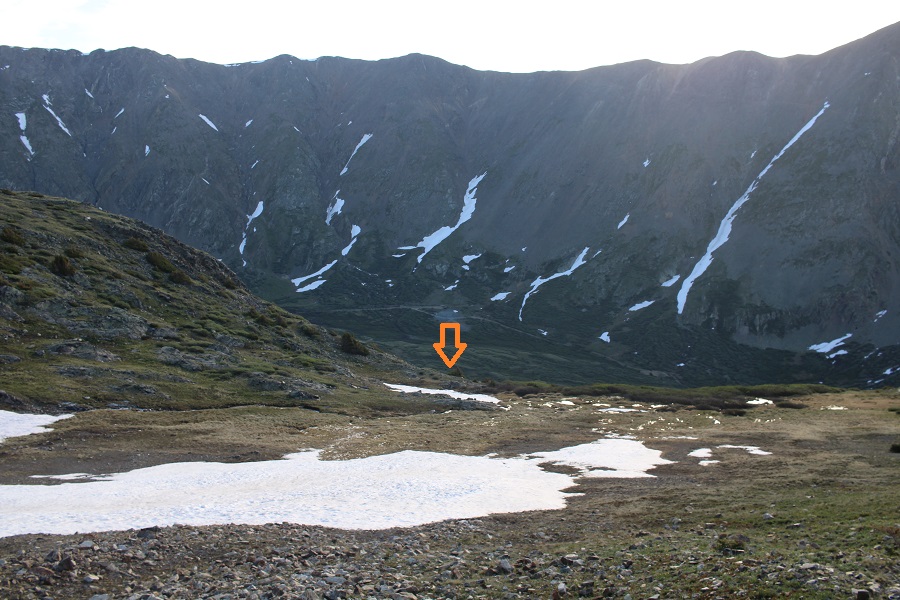
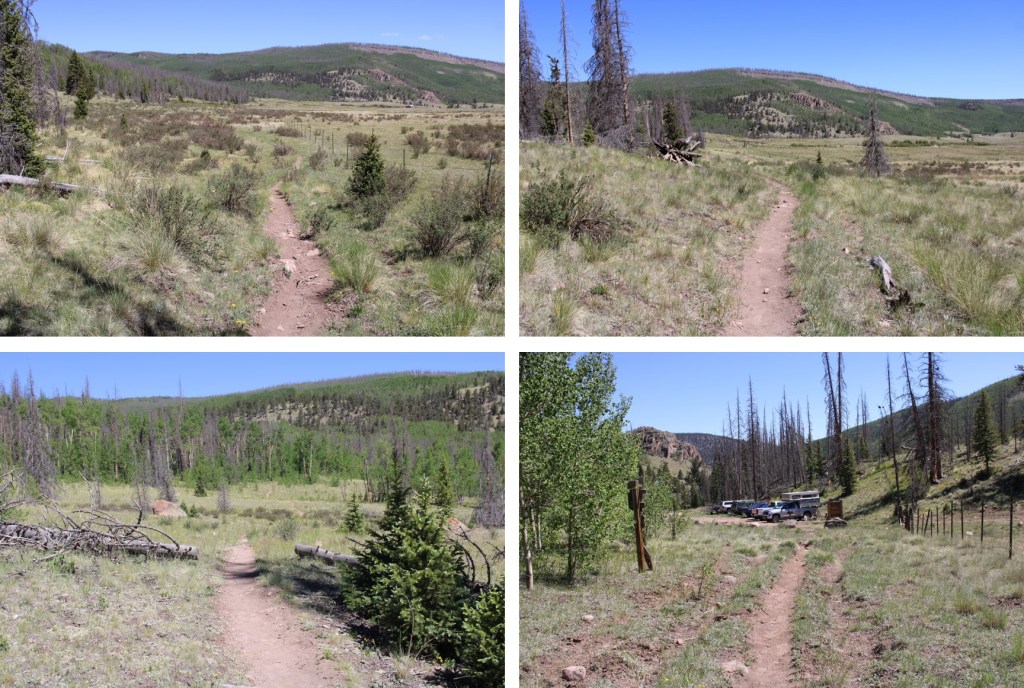
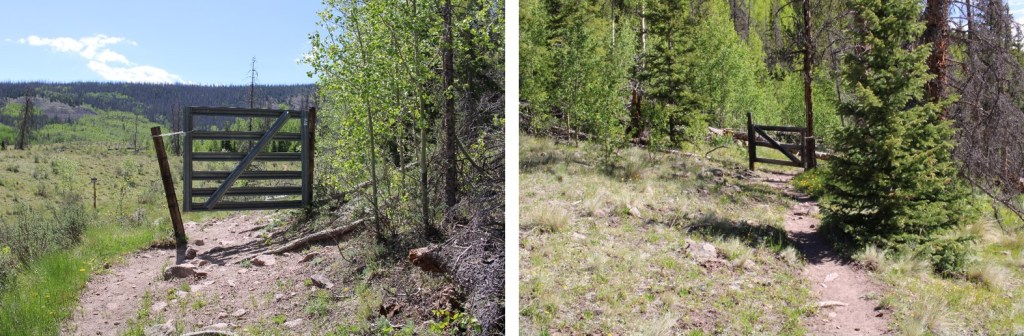
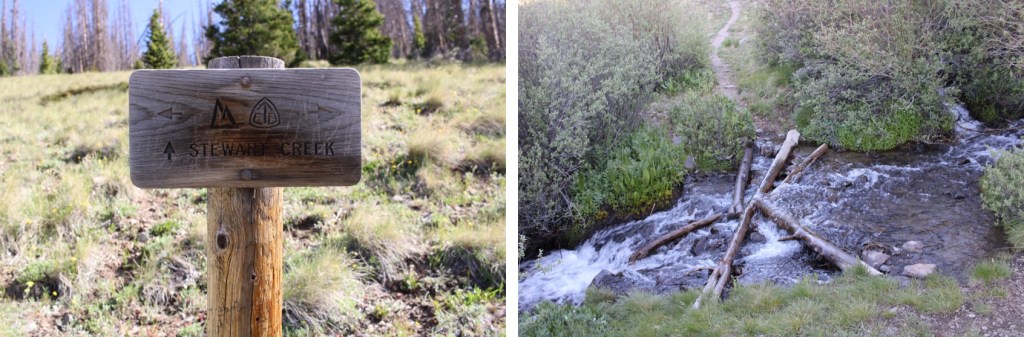
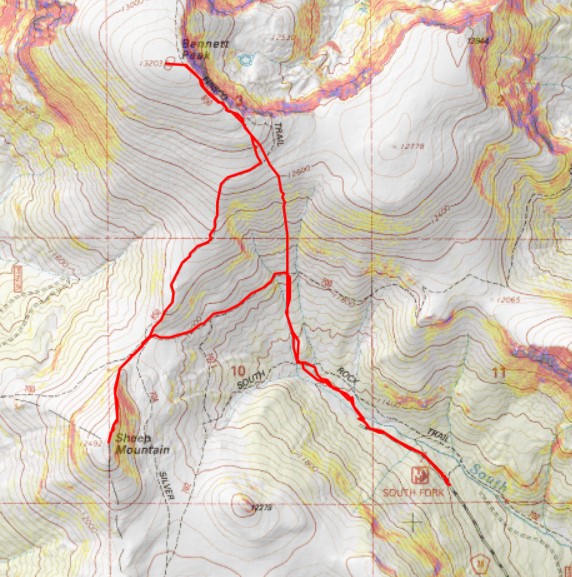
Here’s the final junction before coming to Ouzel Lake.  Follow the signs and continue straight.  Also, tale note of the gully on the left.  That’s what you’re going to want to ascend, and it’s a bushwhack below treeline with very little for sense of direction. That’s where you’re going to want to aim for to gain the ridge.

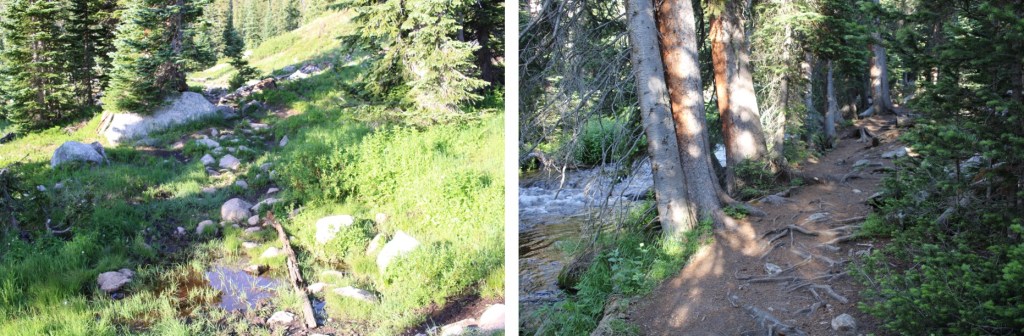
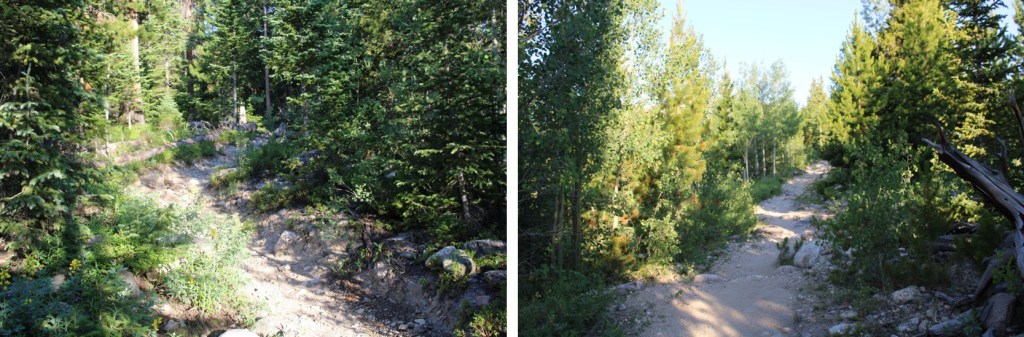
The trail was a bit washed out just before making it to the lake

After hiking for a total of 6.75 miles, you should make it to the lake.  It was more than that for me, because of my little side trip.

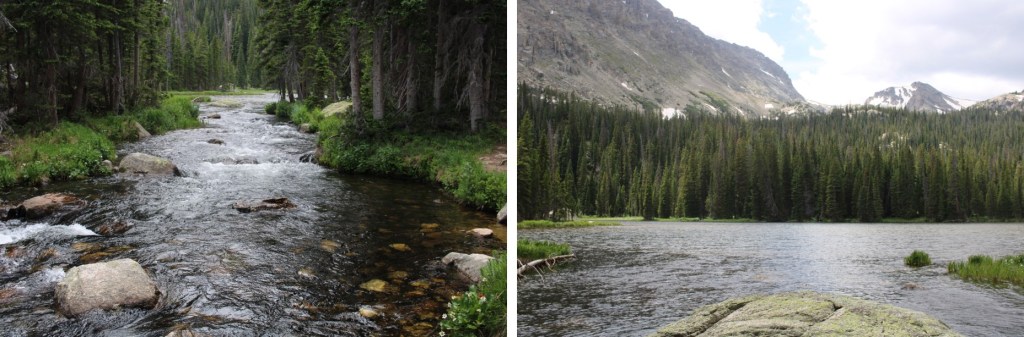
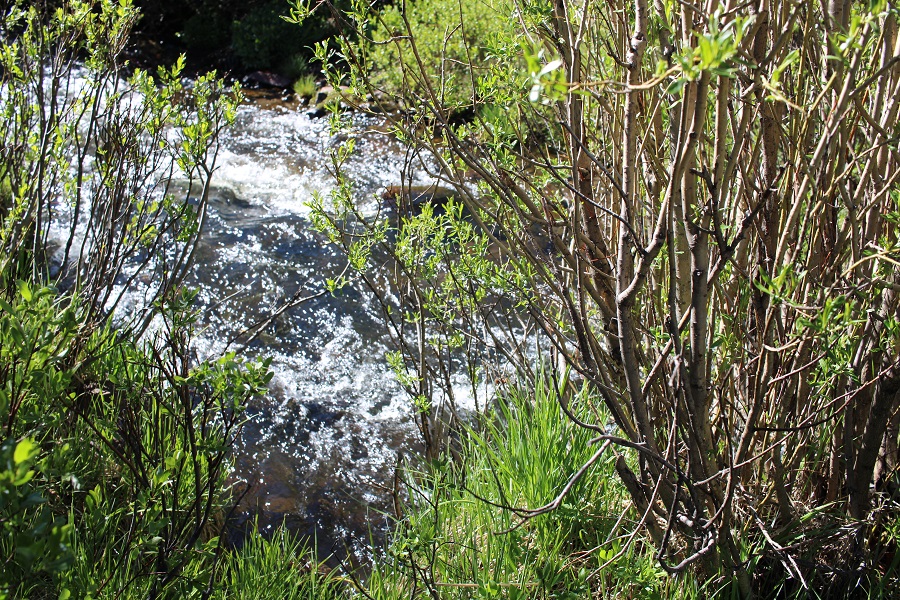
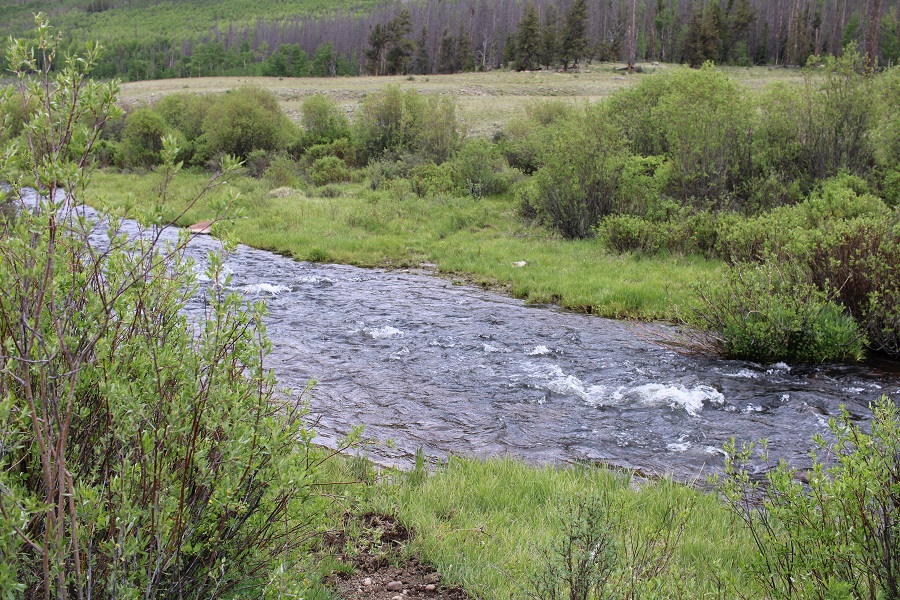
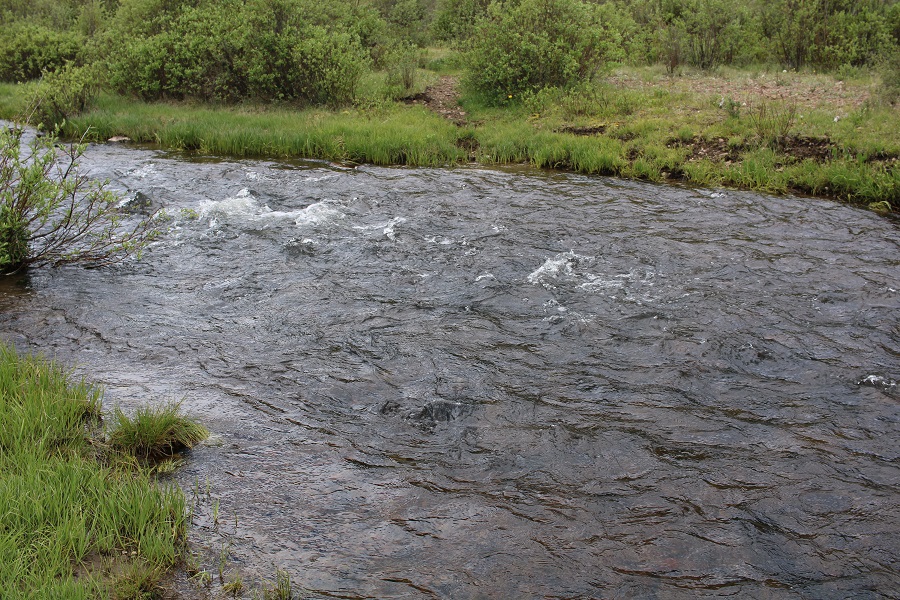
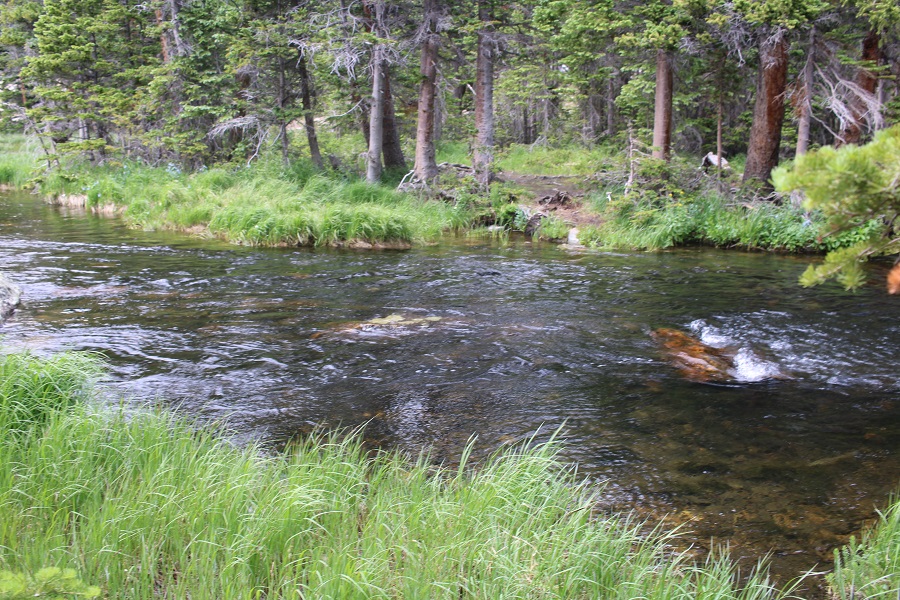
The water level was high, so the place where I would usually cross was underwater.  I changed to my creek crossing shoes, and waded the creek here.  The water level was up to my thighs.

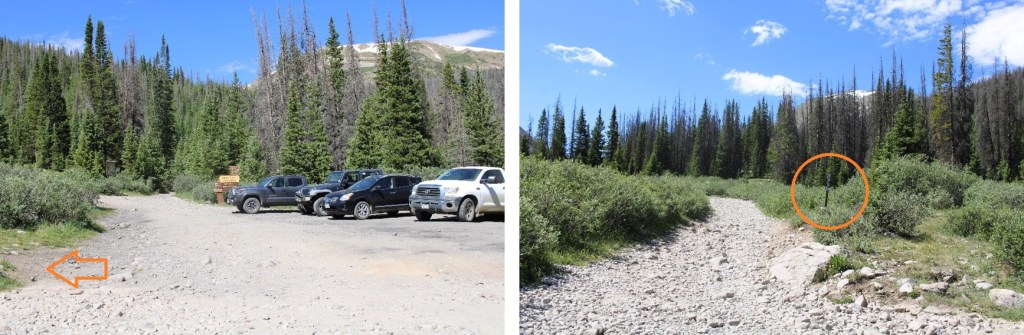
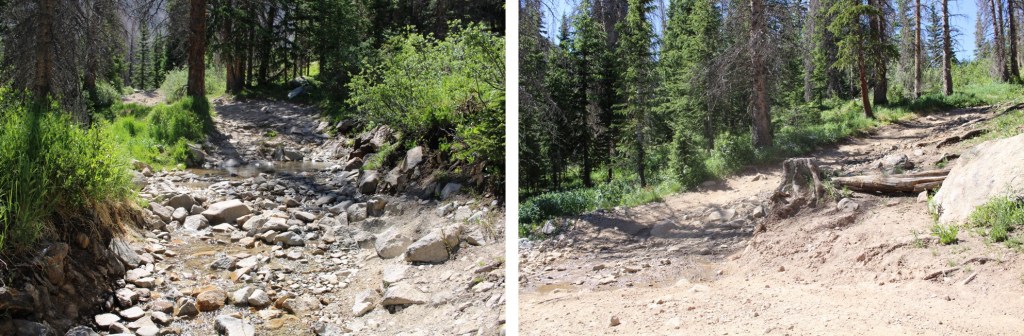
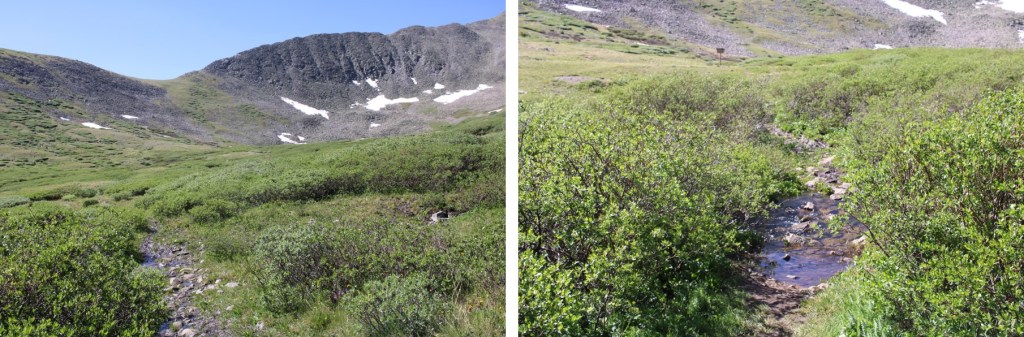
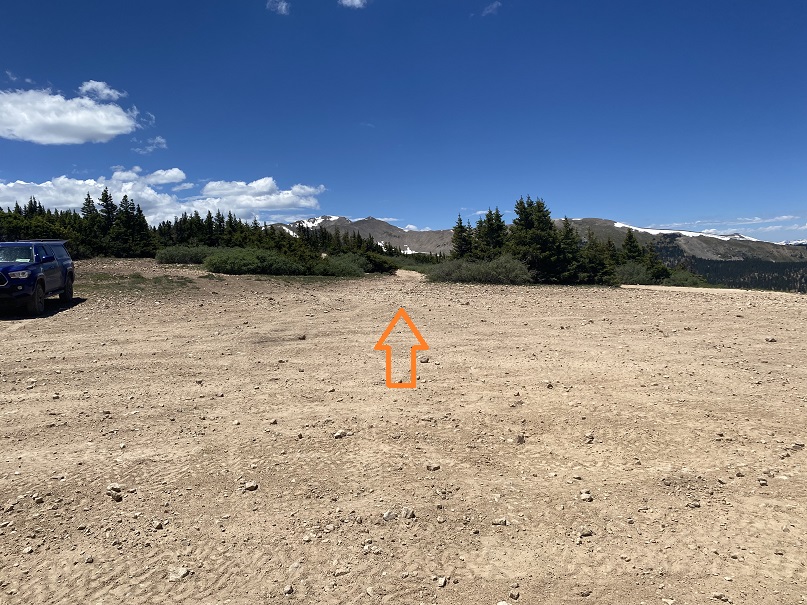
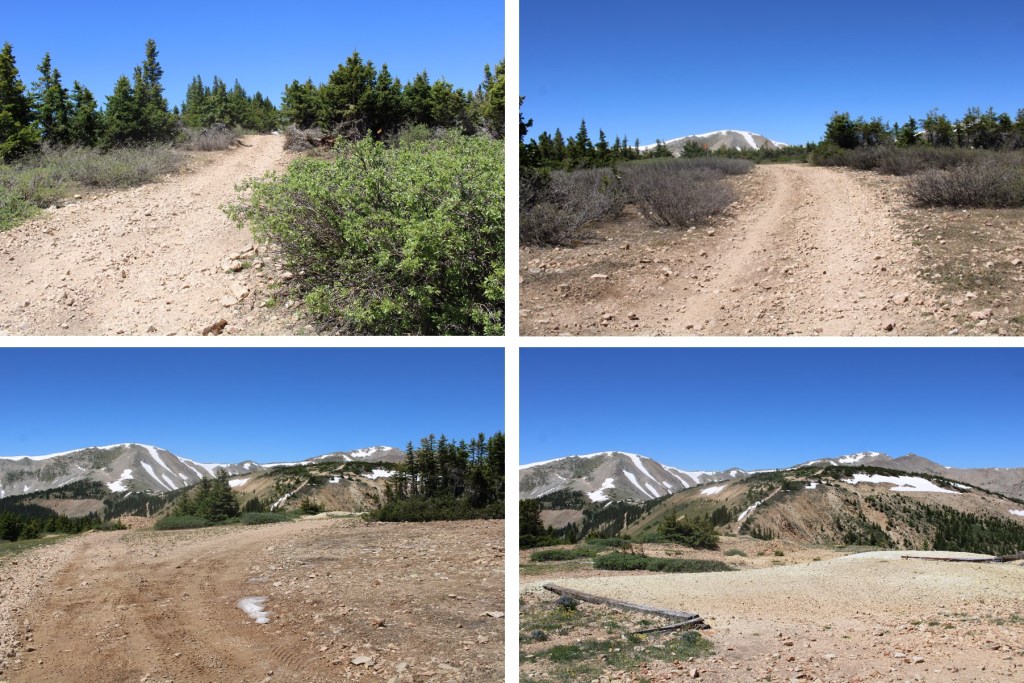
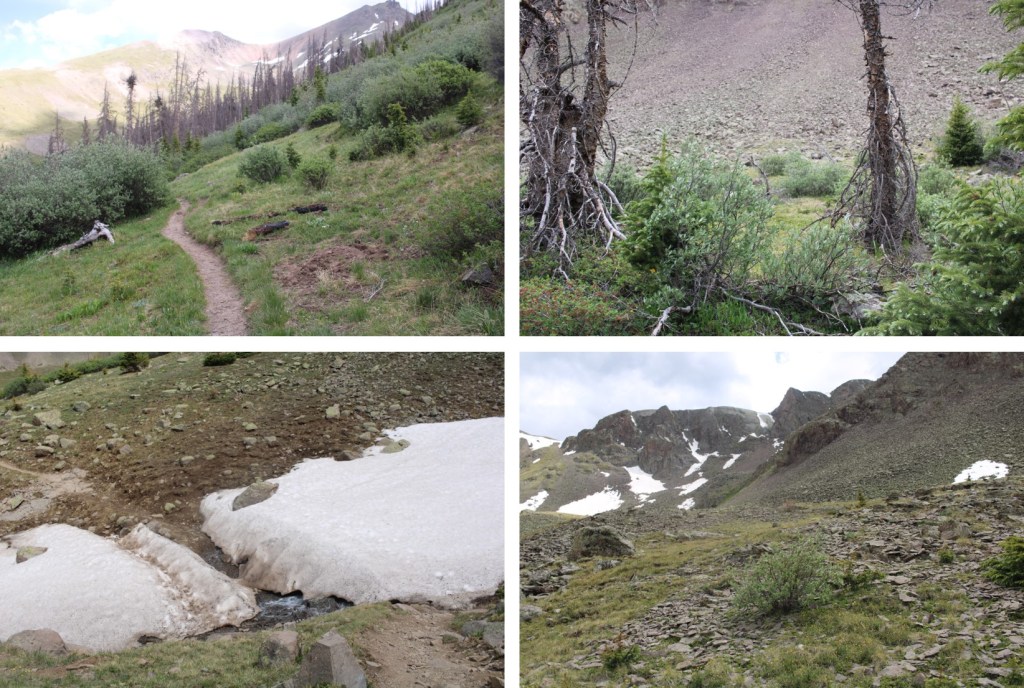
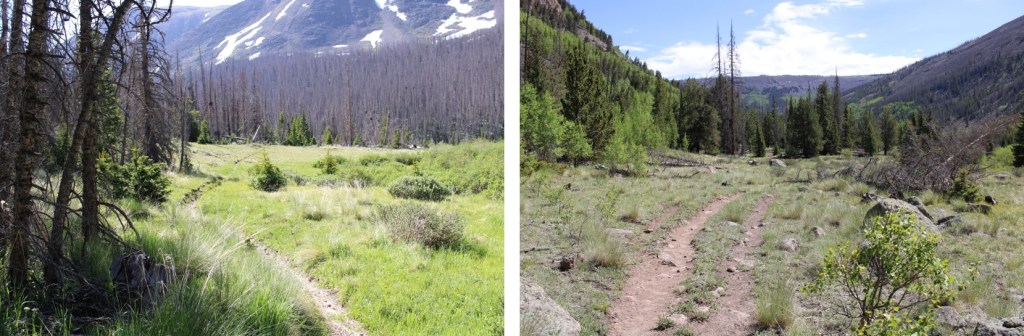
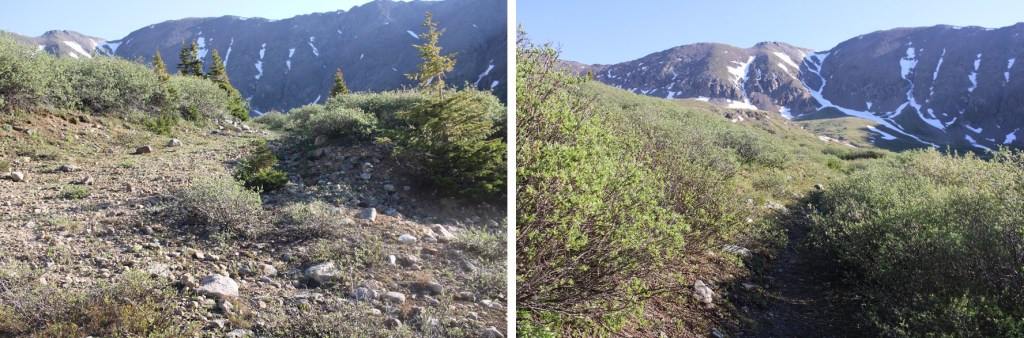
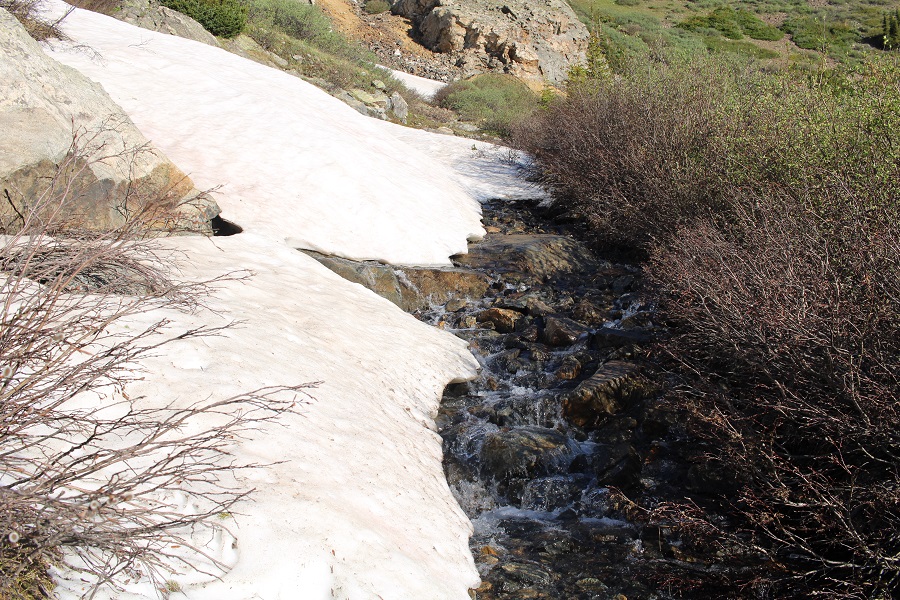
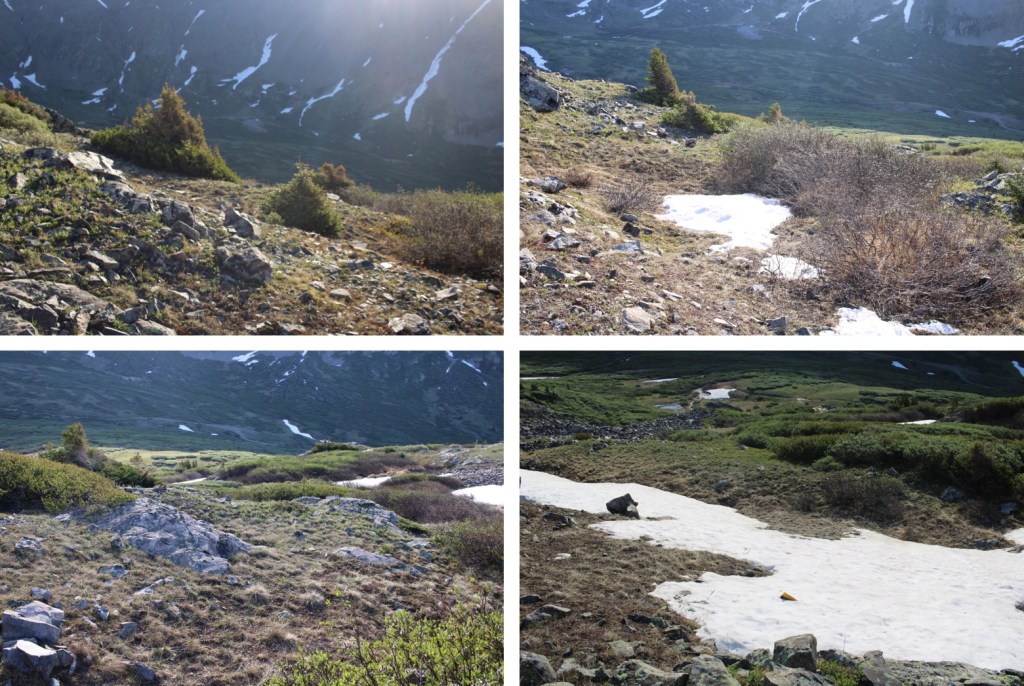
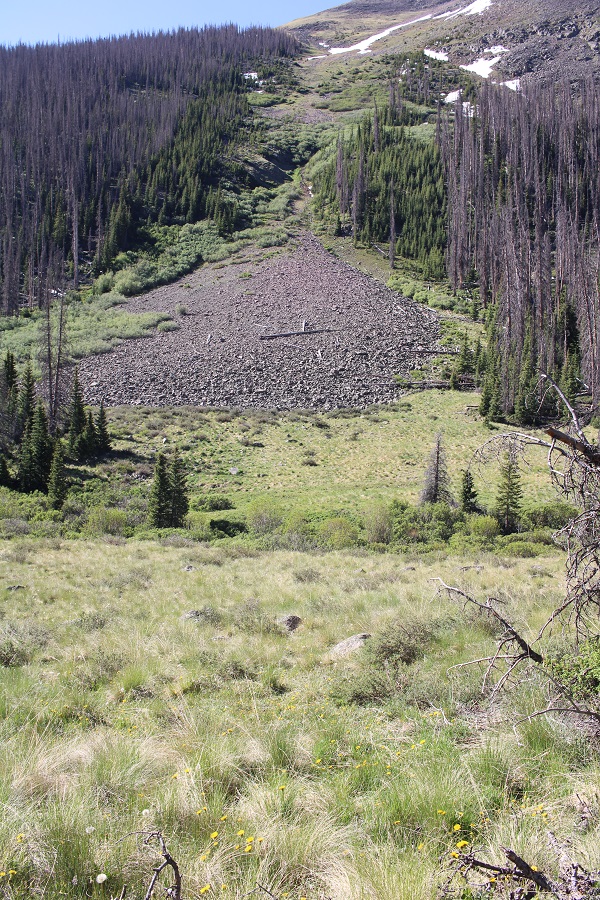
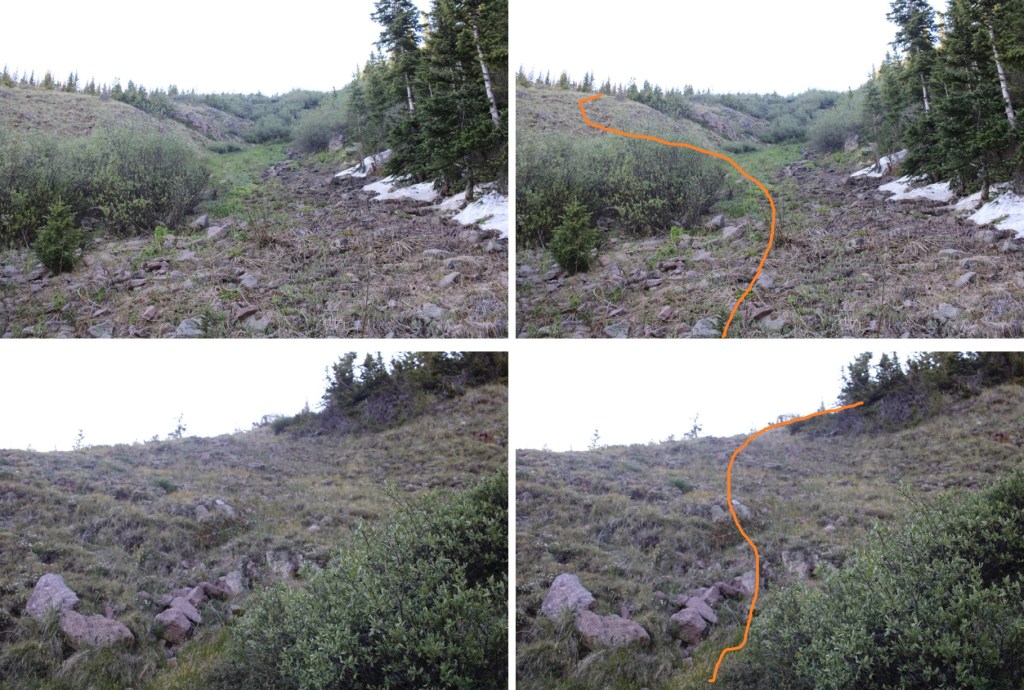
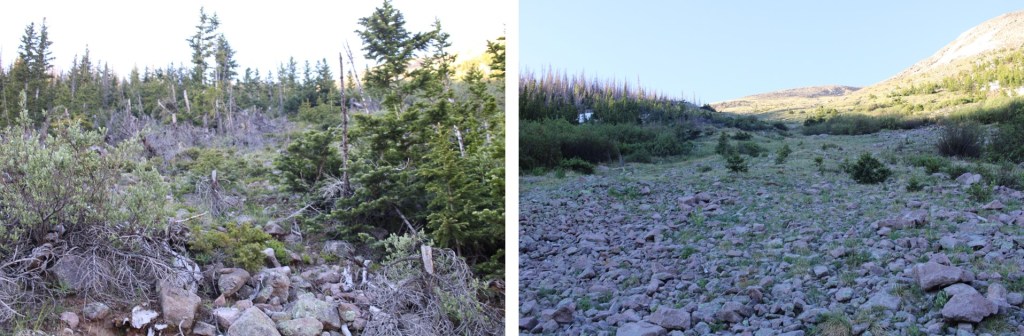
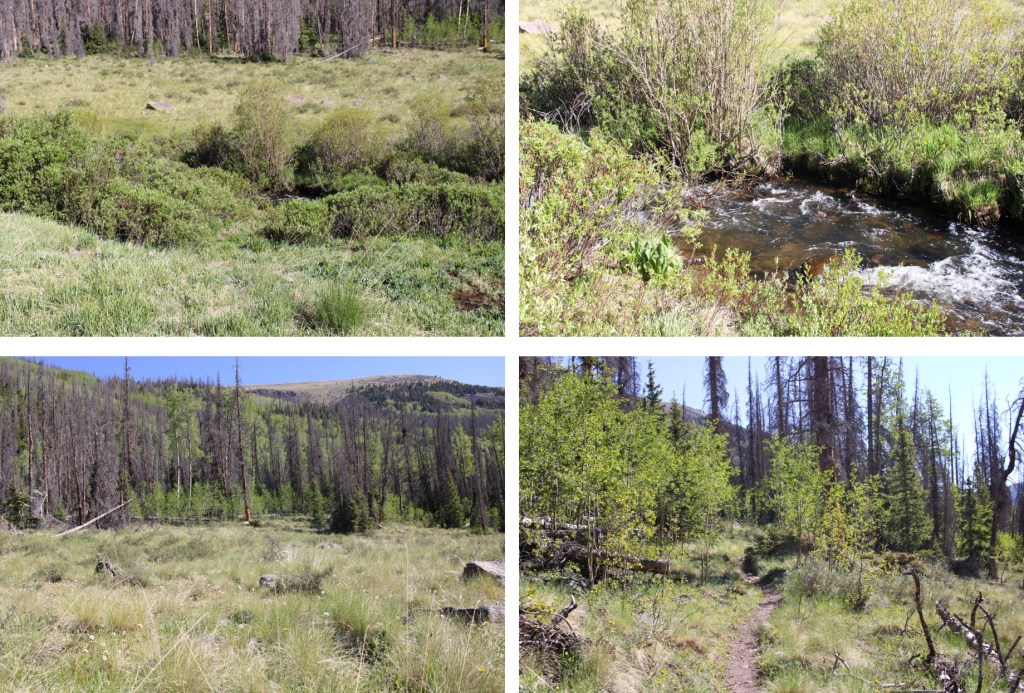
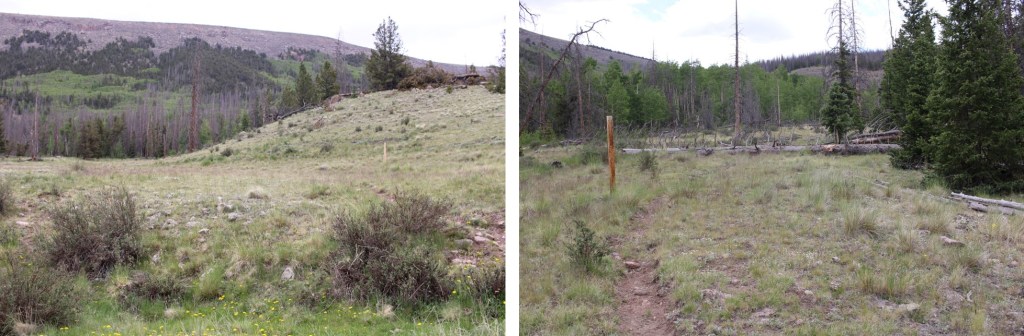
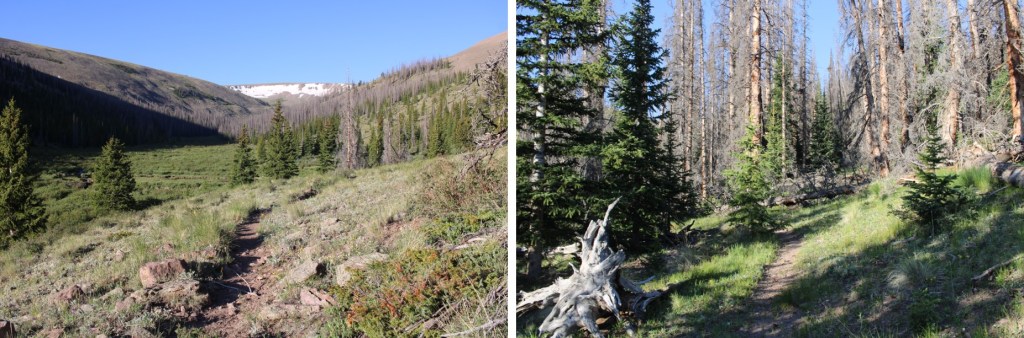
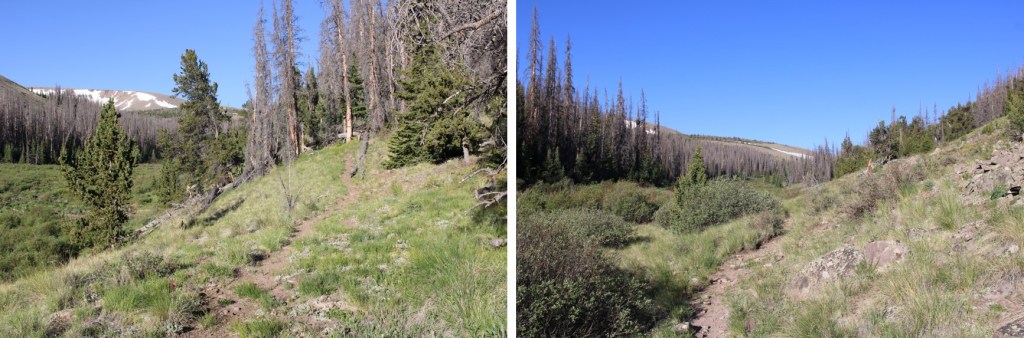
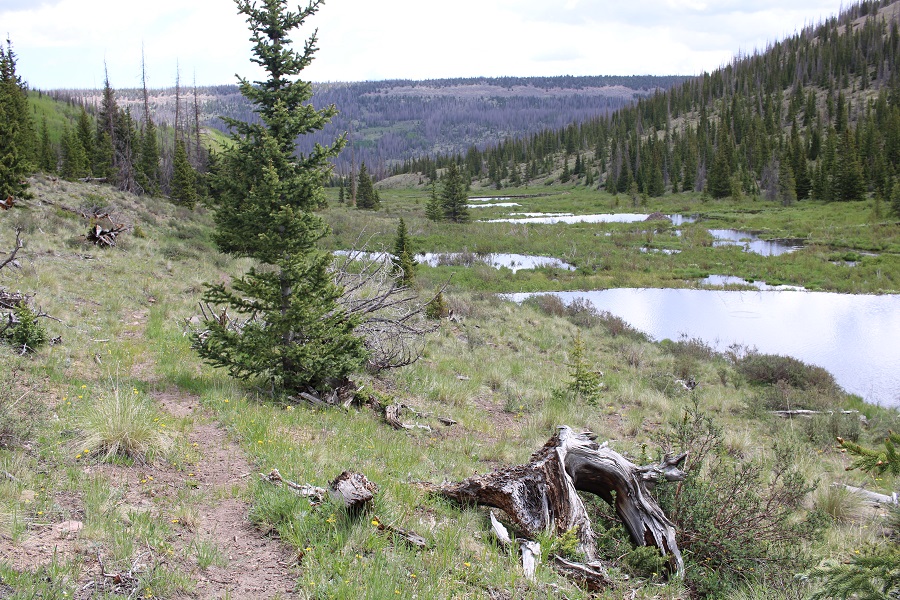
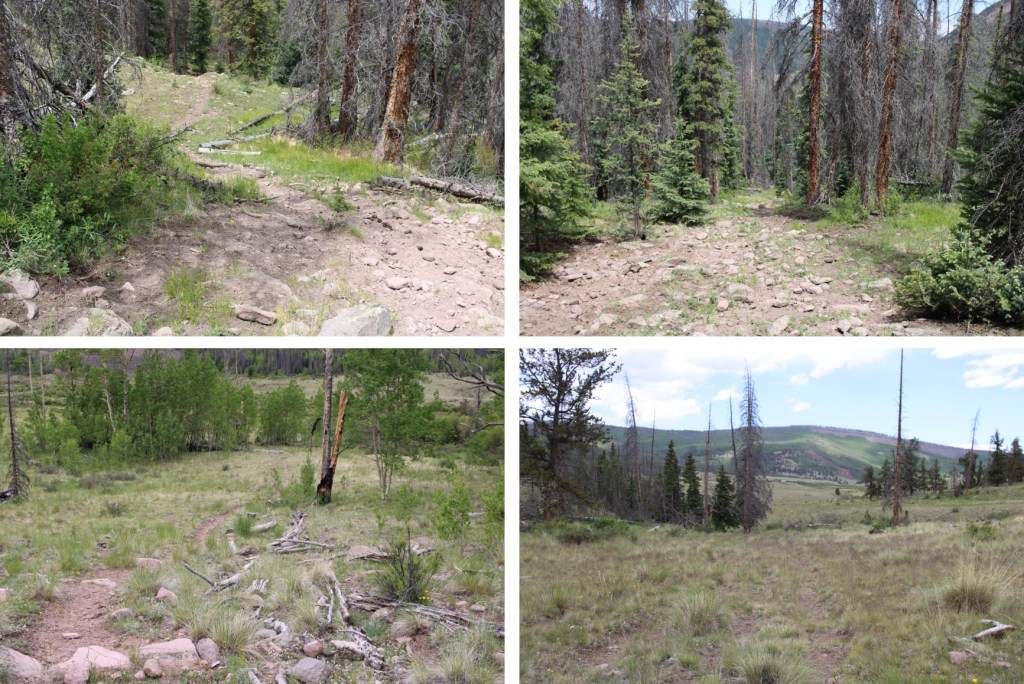
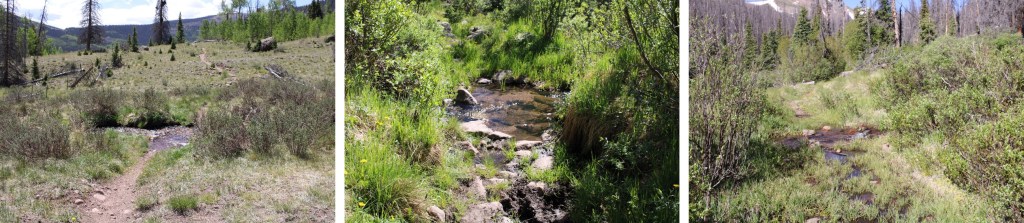
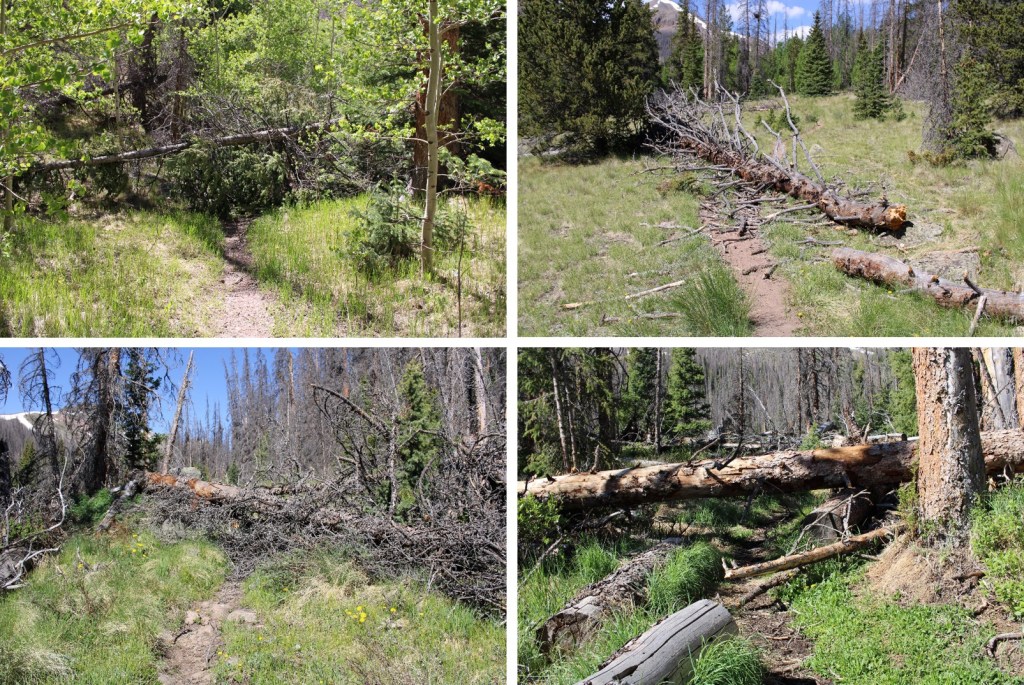
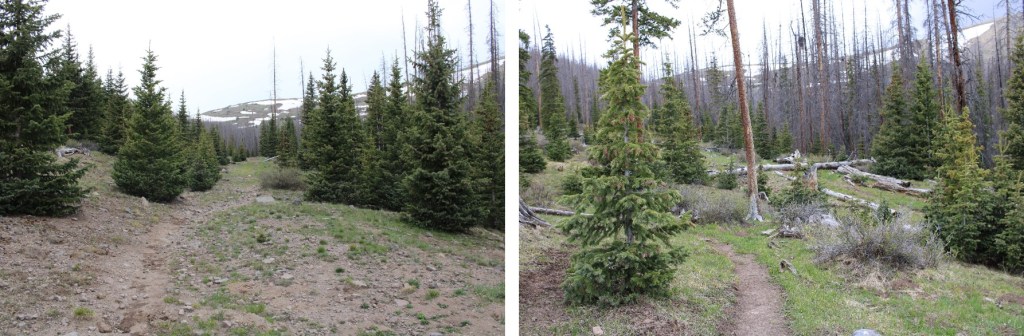
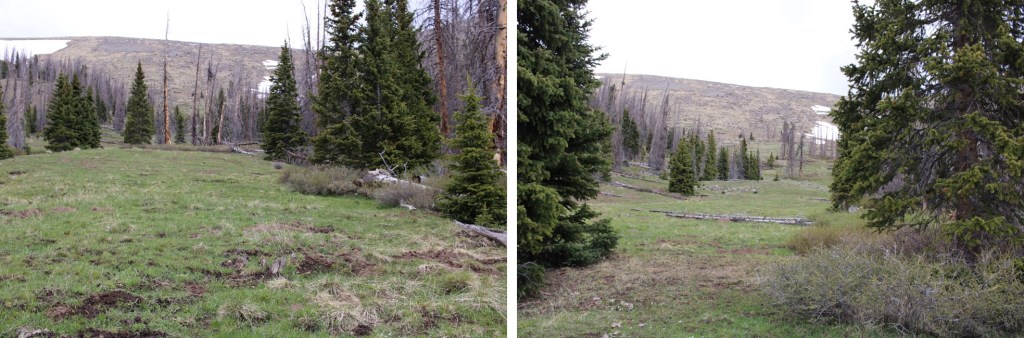
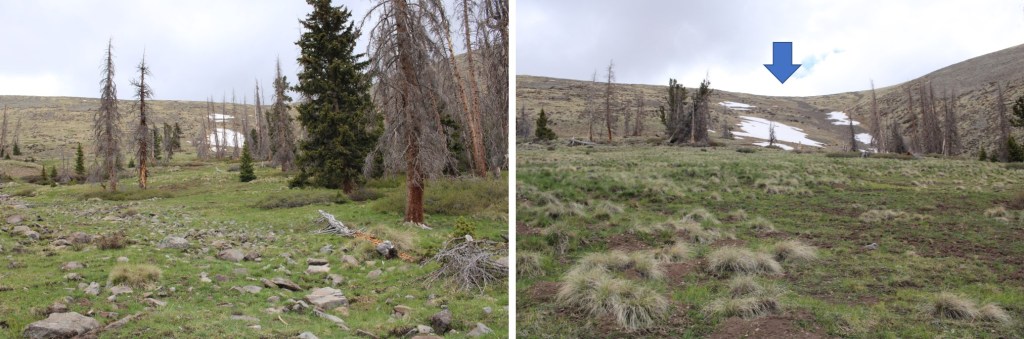
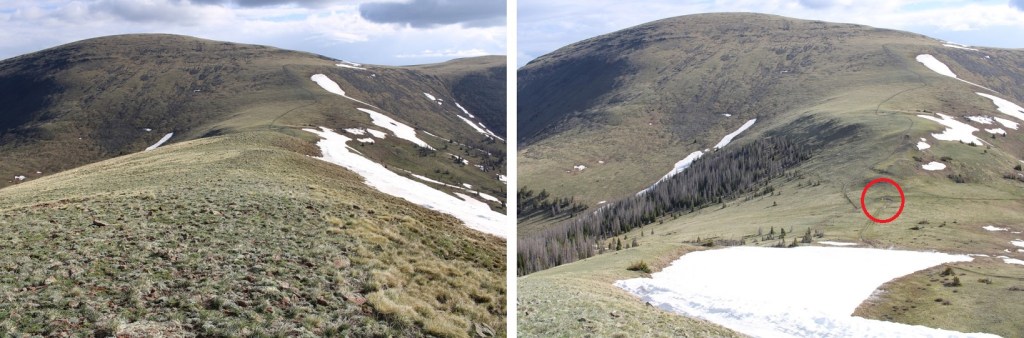
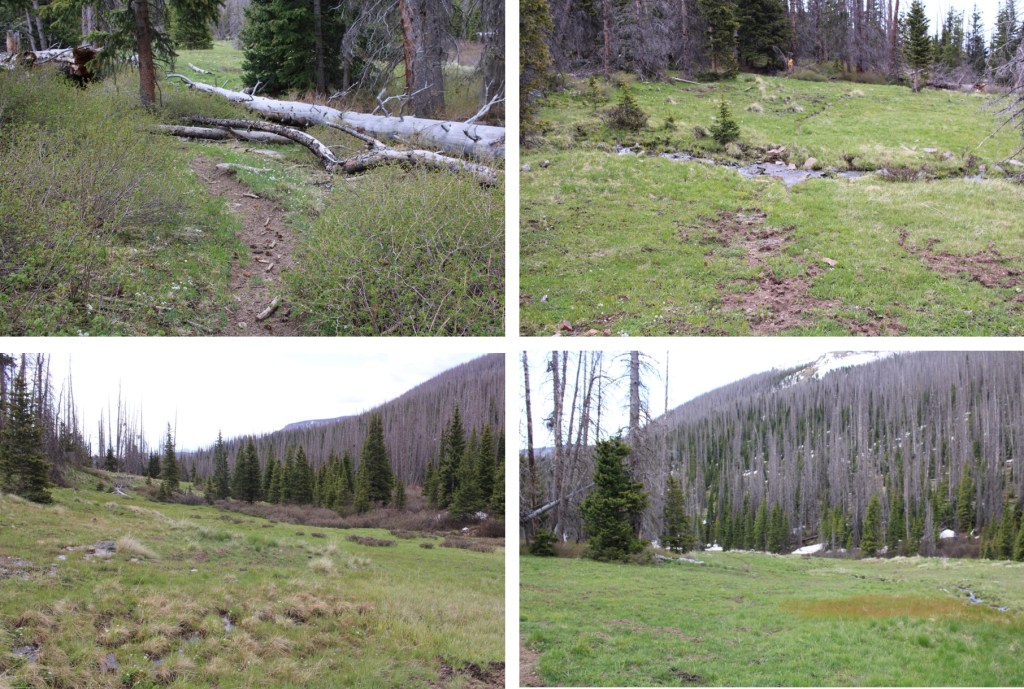
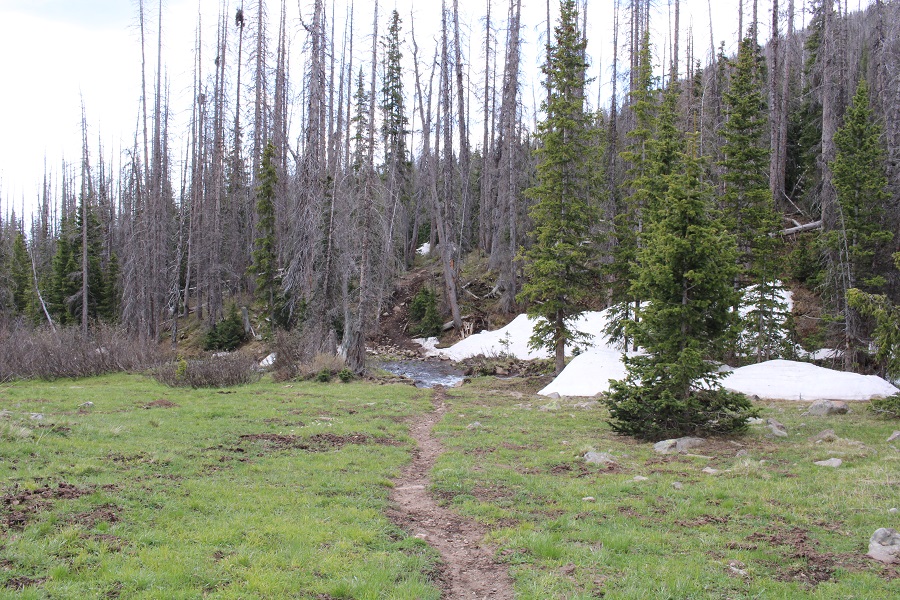
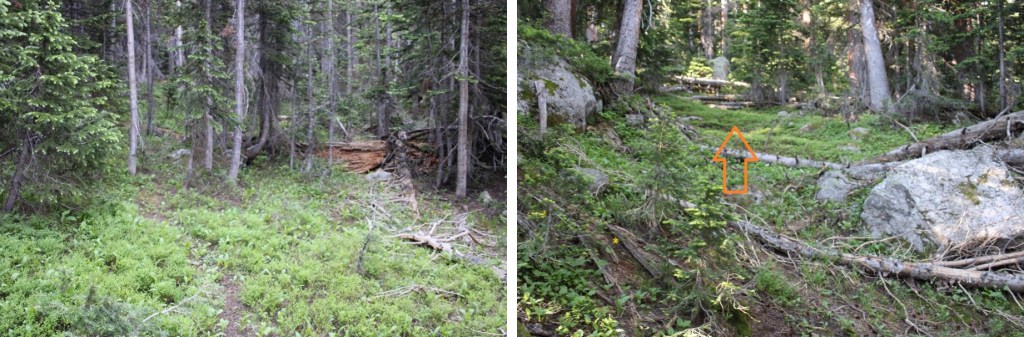
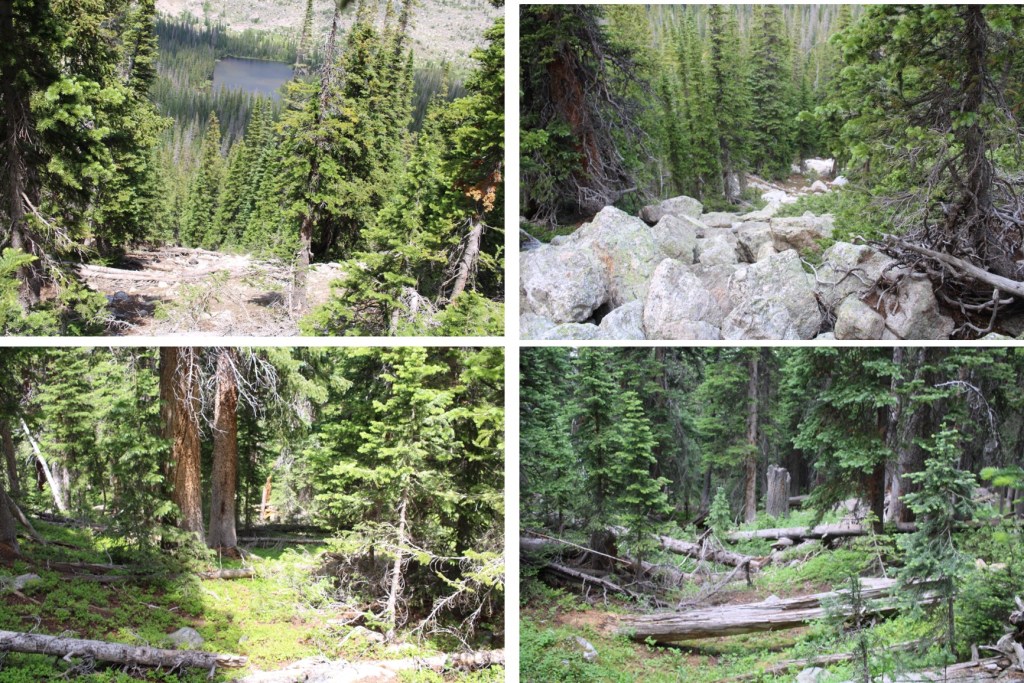
This is where the bushwhacking begins.  I followed light game trails as they skirted the east side of the lake, then found a creek/drainage (not on a topo map), and followed it south to the ridge.  When you see it, you’ll know it’s an obvious drainage, the trouble is finding it in the dense growth.  Here are some pictures of the terrain.

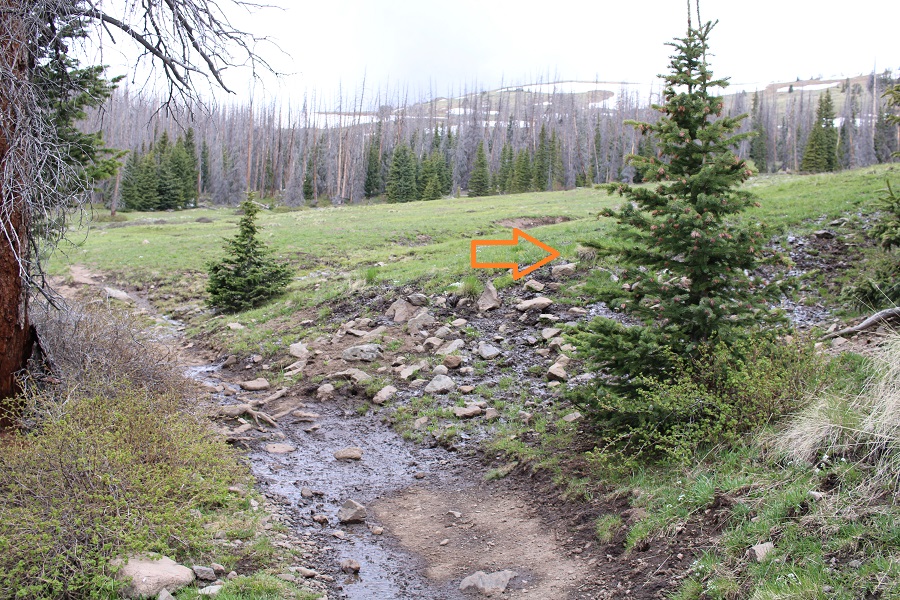
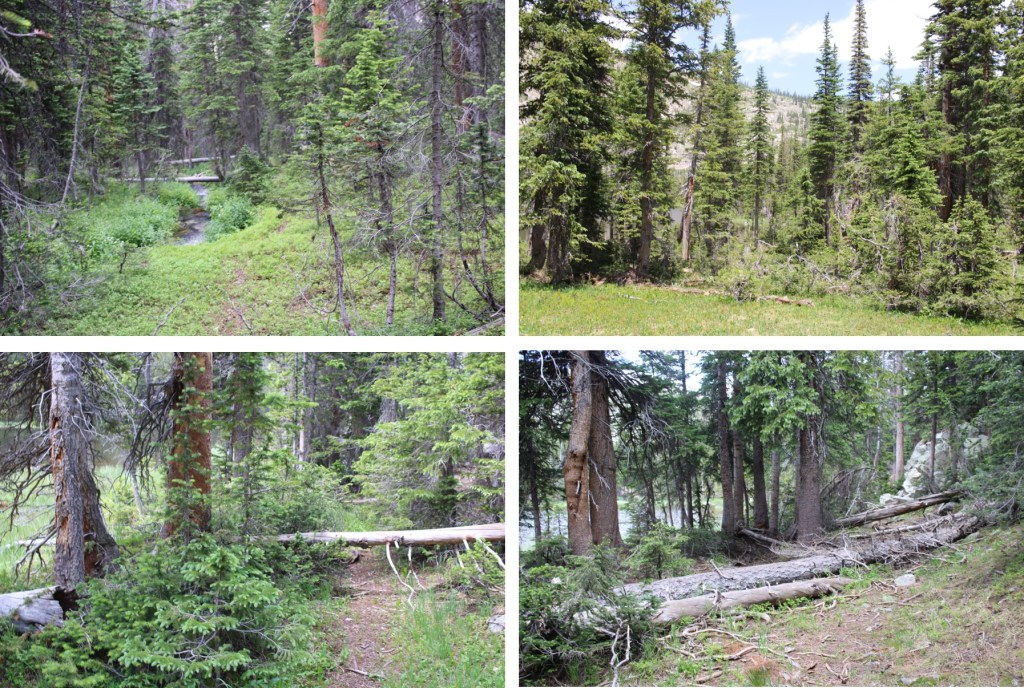
Once you find the drainage, which will be full of vegetation and downed trees, and maybe even some water, continue heading south.

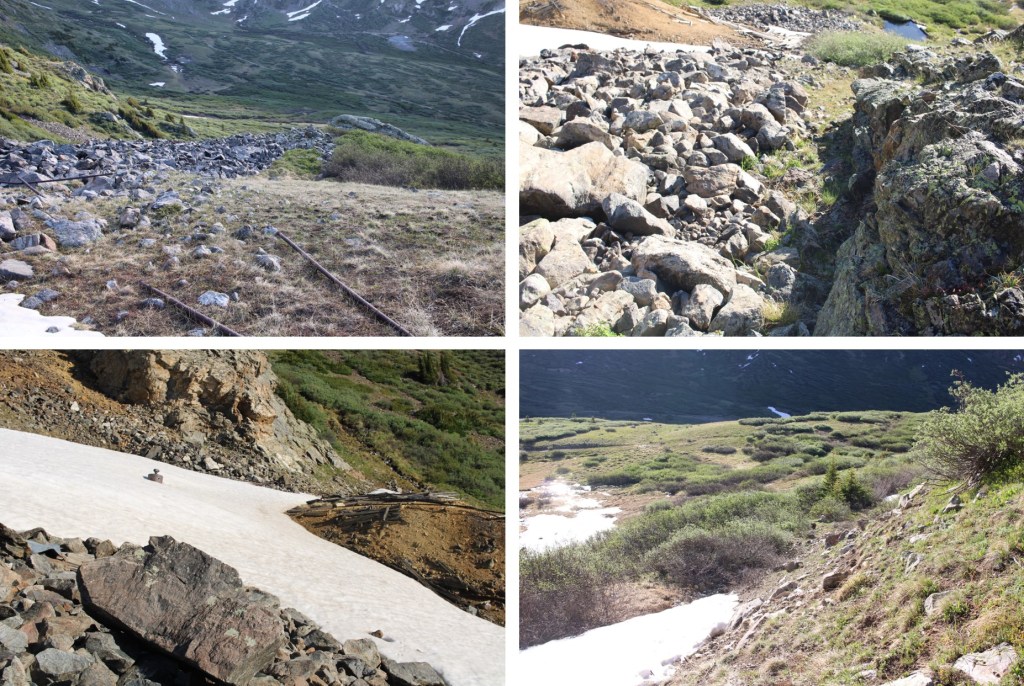
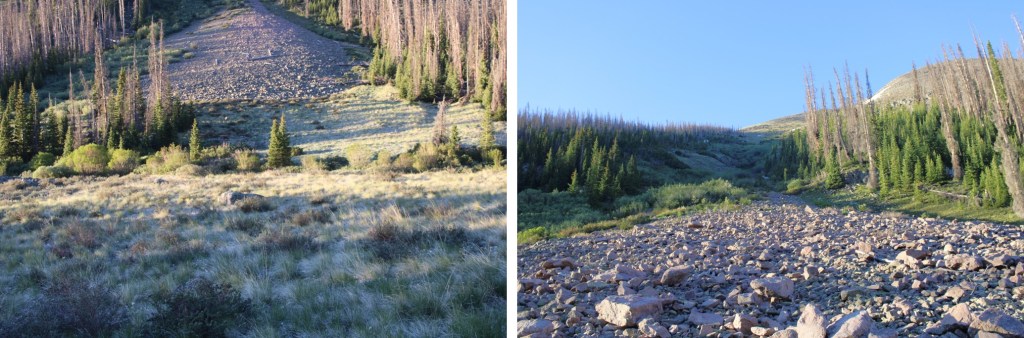
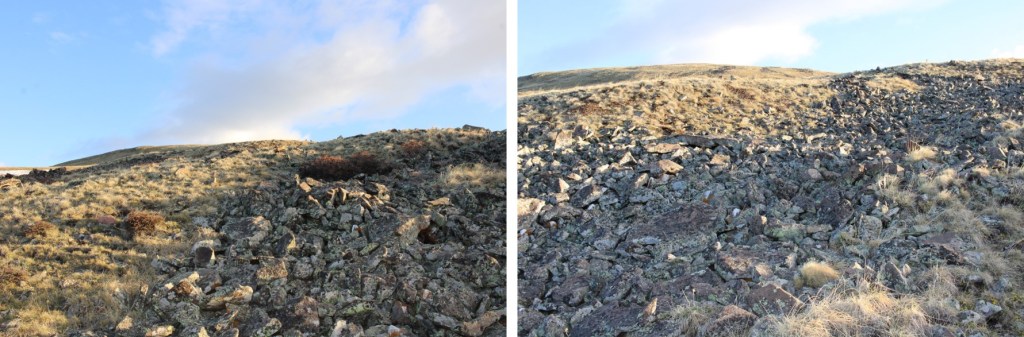
The drainage became rocky, which meant route finding was easier.

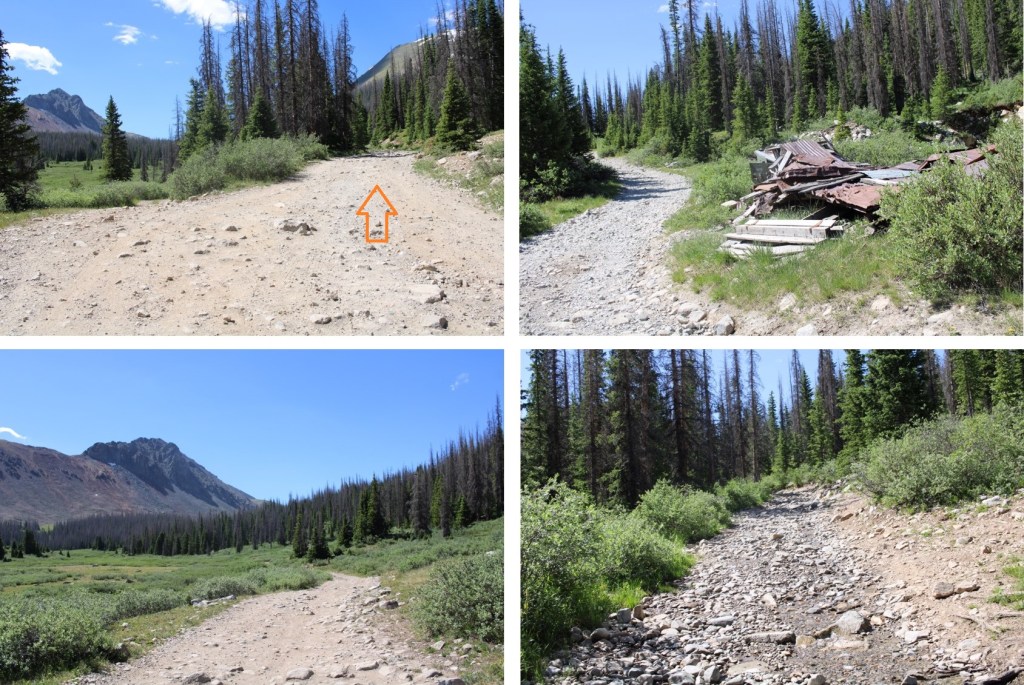
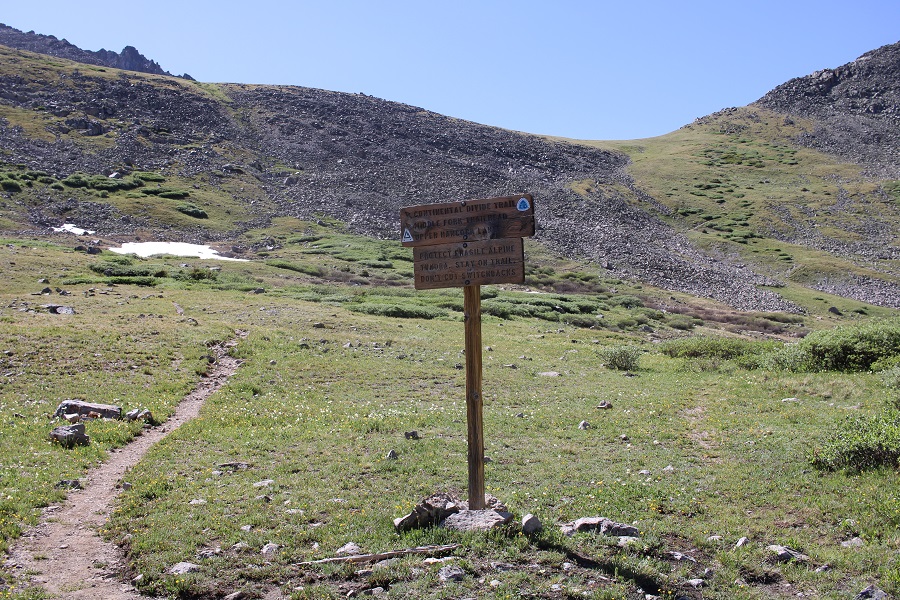
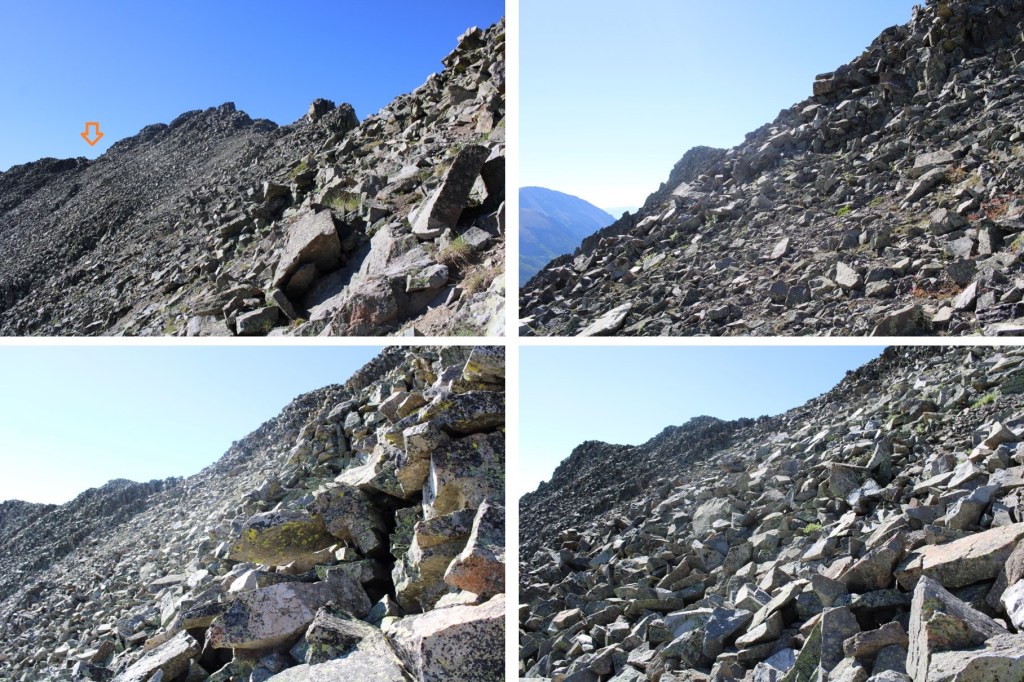
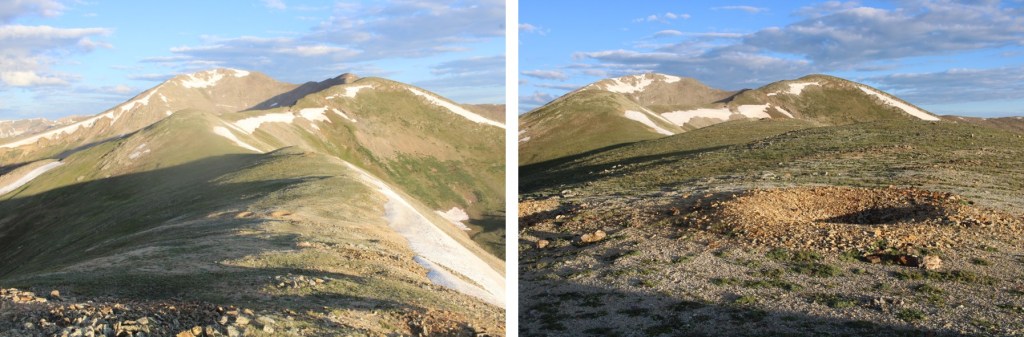
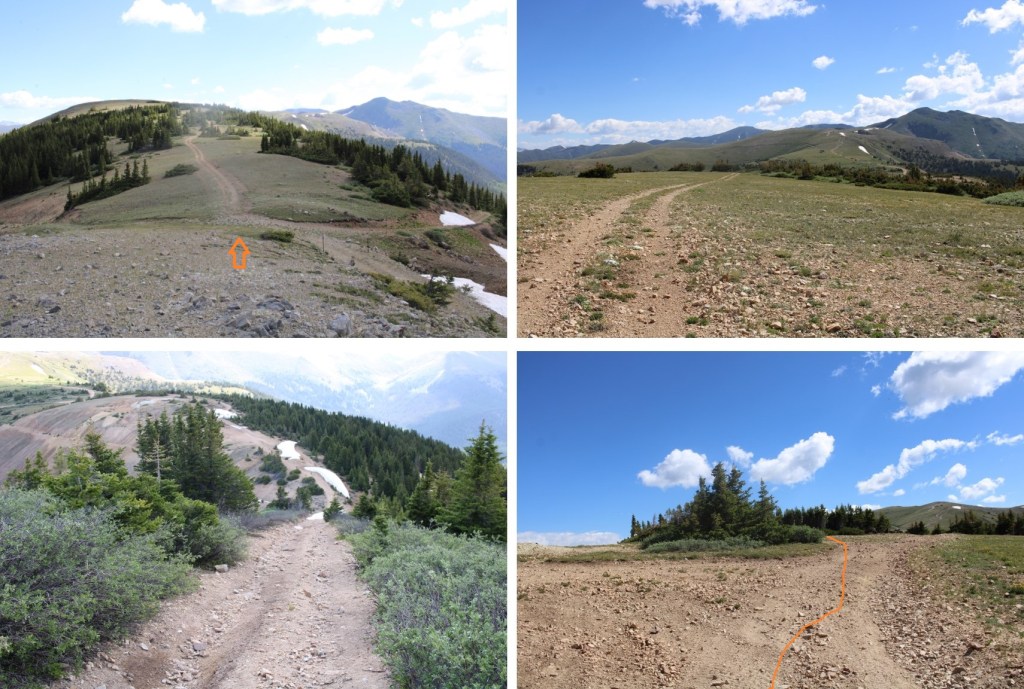
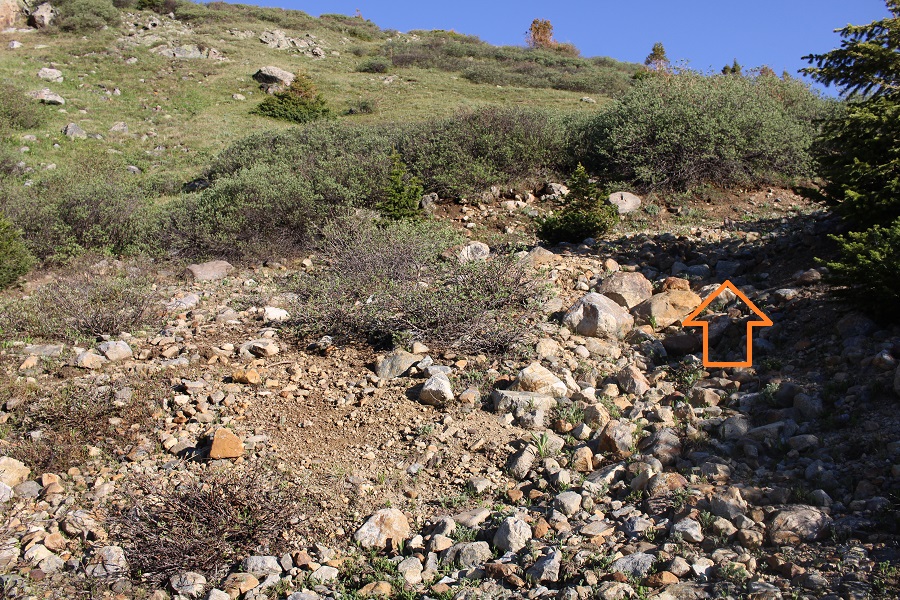
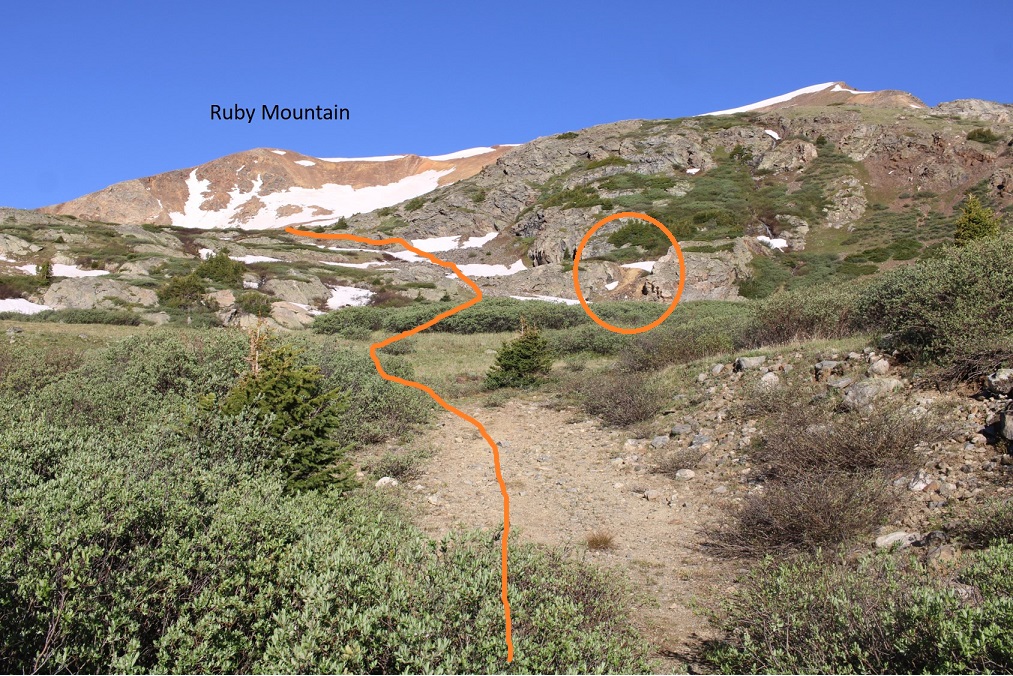
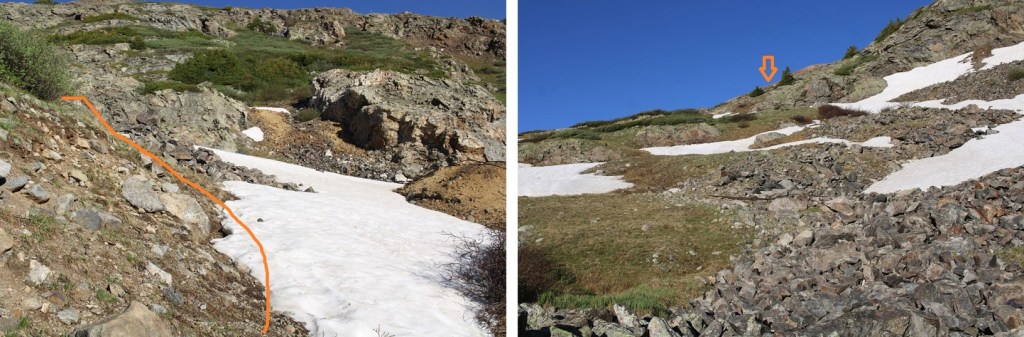
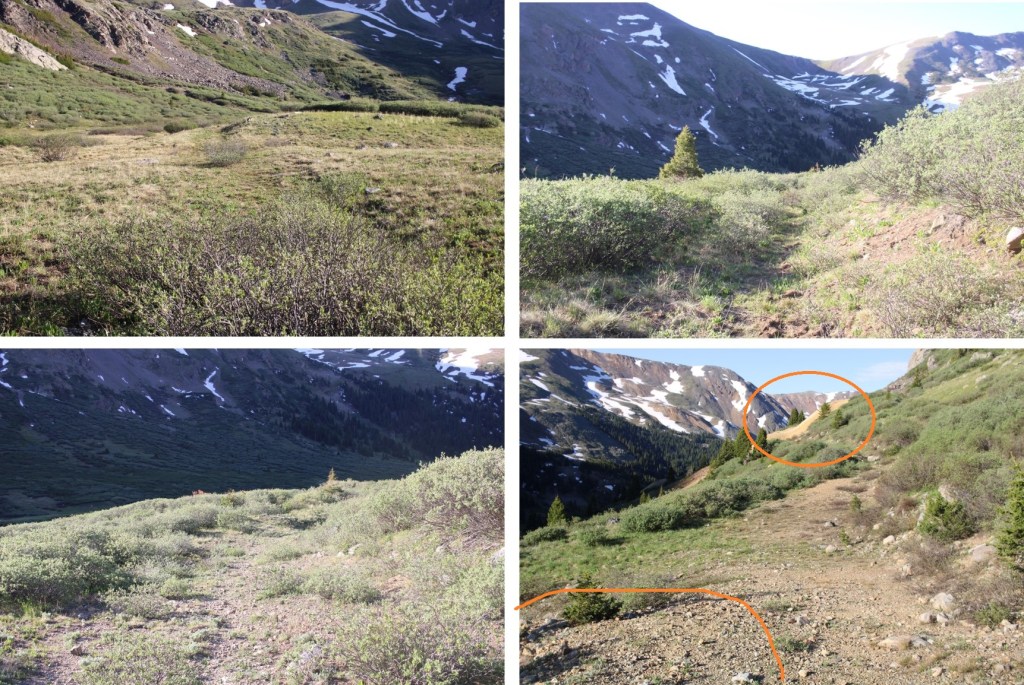
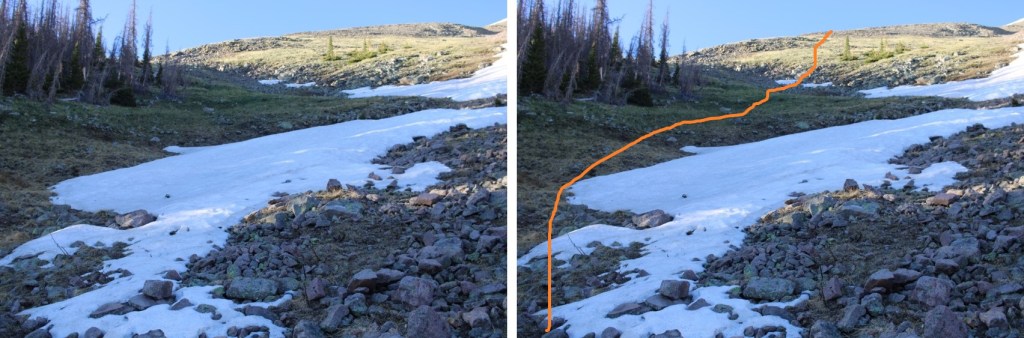
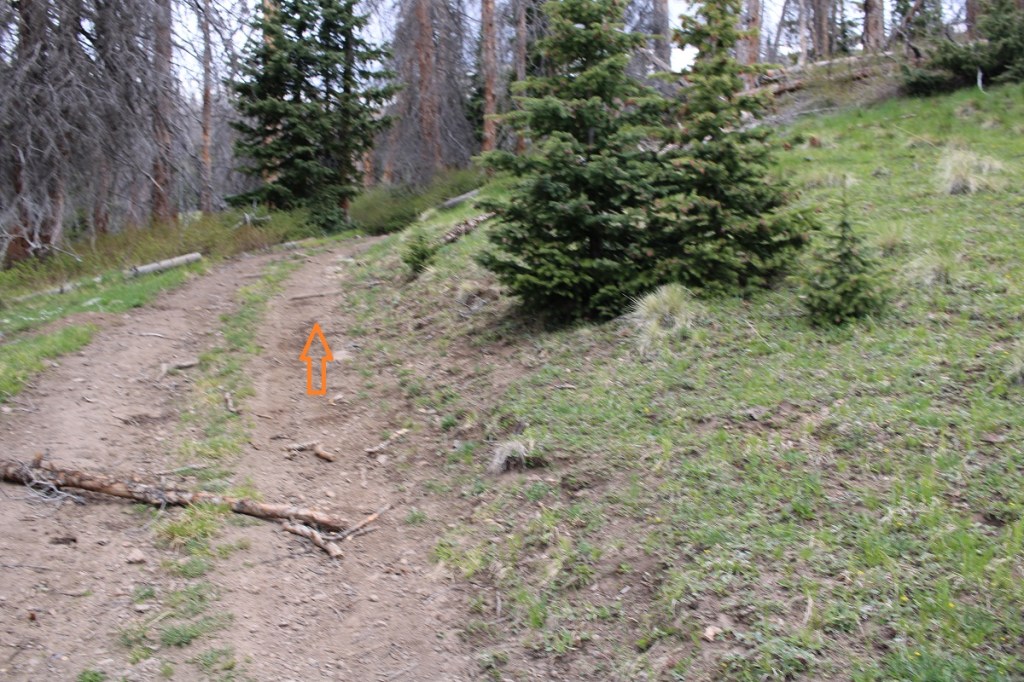
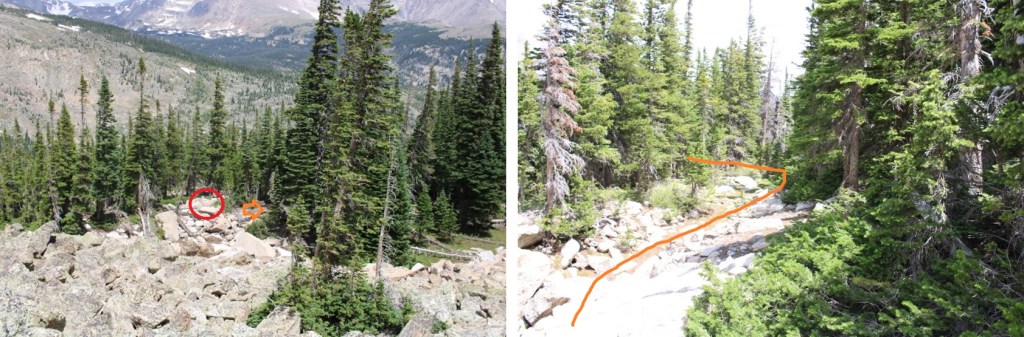
I headed up the rocks until they stopped, then turned right, and followed what could have almost once been a road for about 10 yards west, turned left, and followed another rocky drainage south to treeline. There was actually a cairn here (circled)

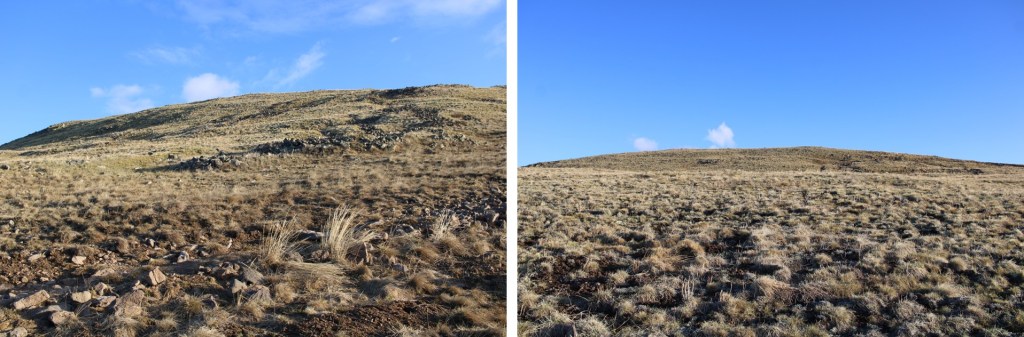
The rocks were solid, and easy to scramble over.  The rocks eventually became dirt, and I briefly entered the trees before making it to treeline, but I was always going south

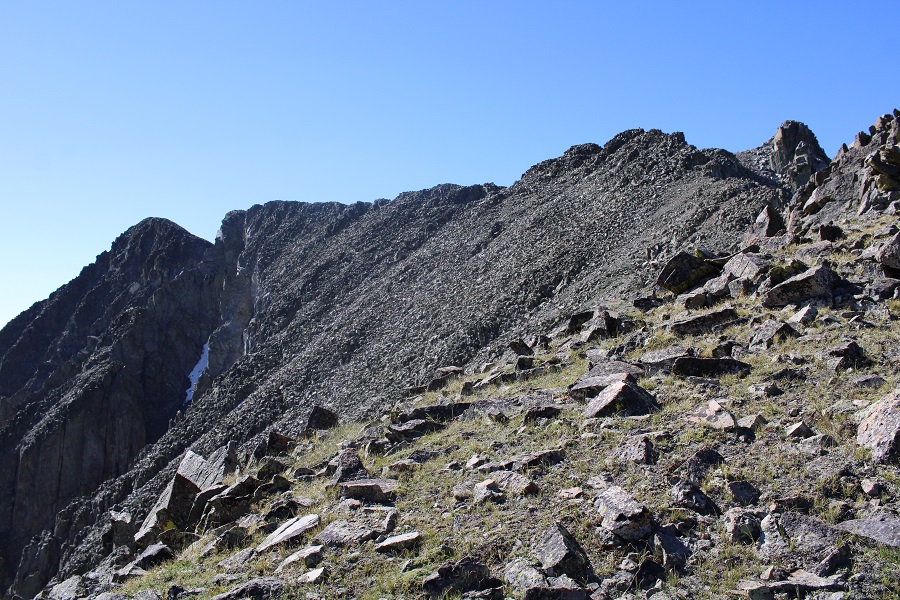
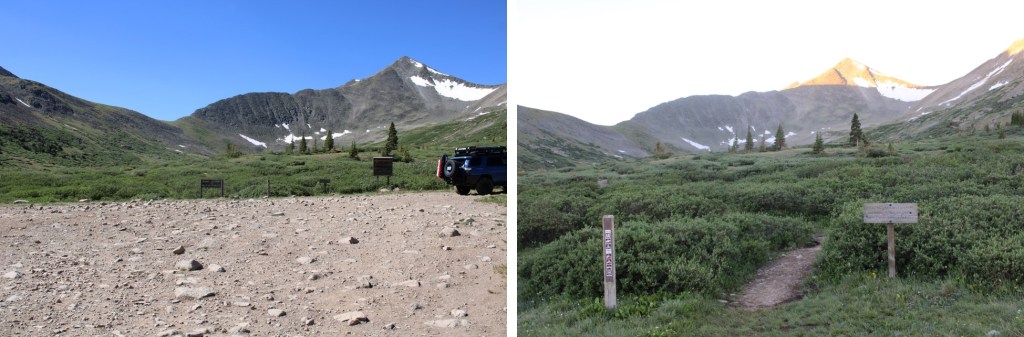
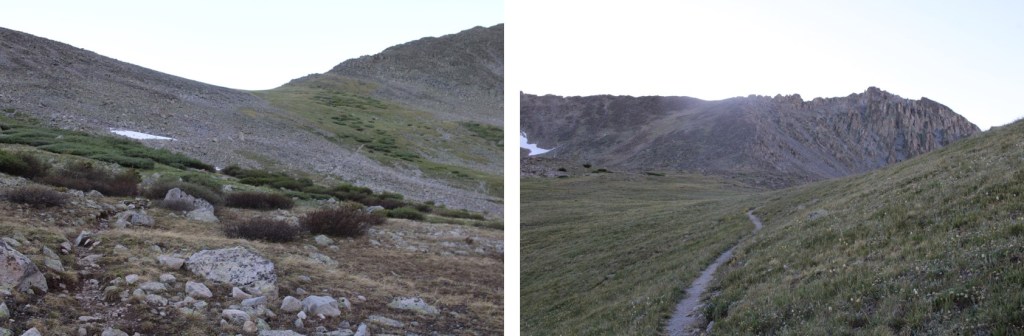
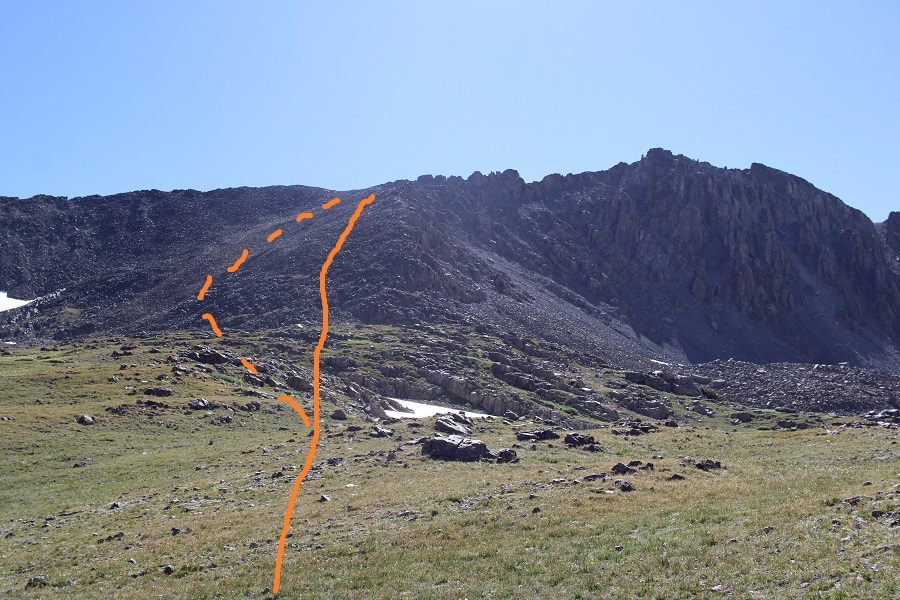
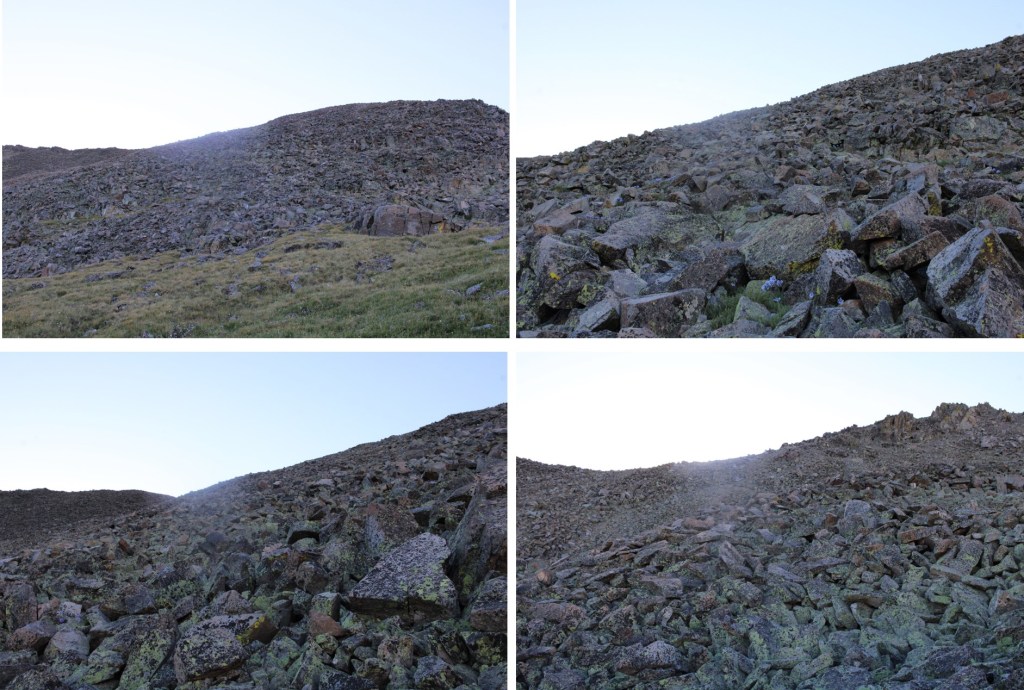
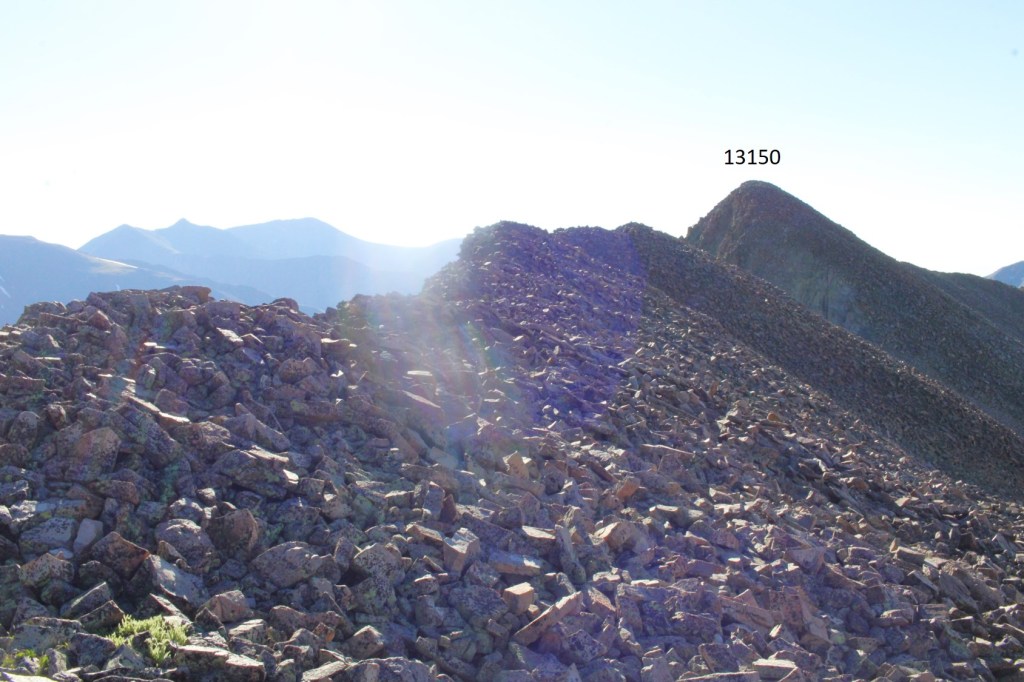
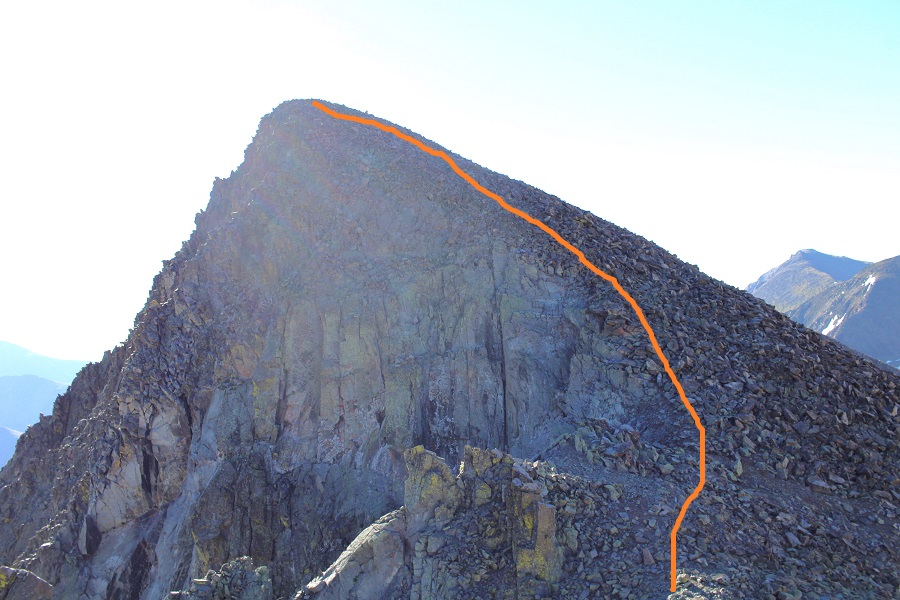
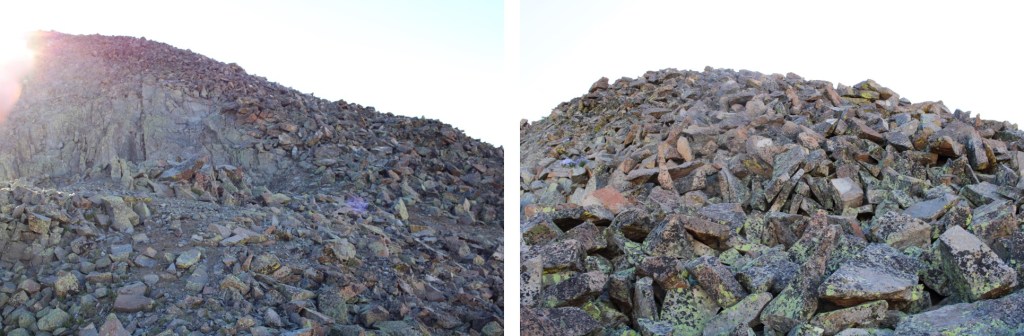
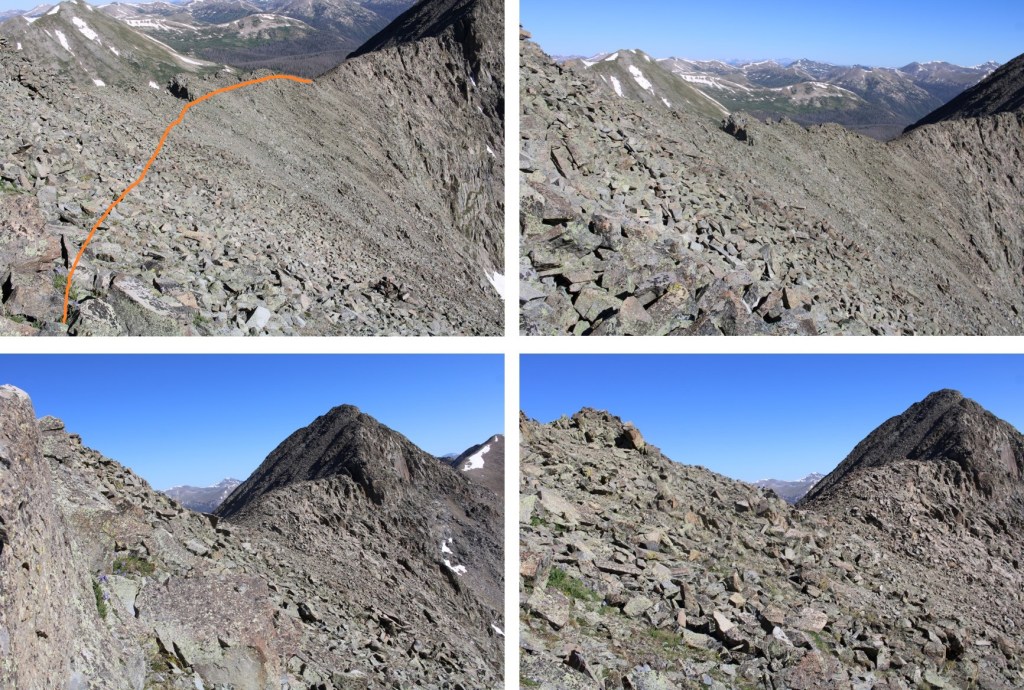
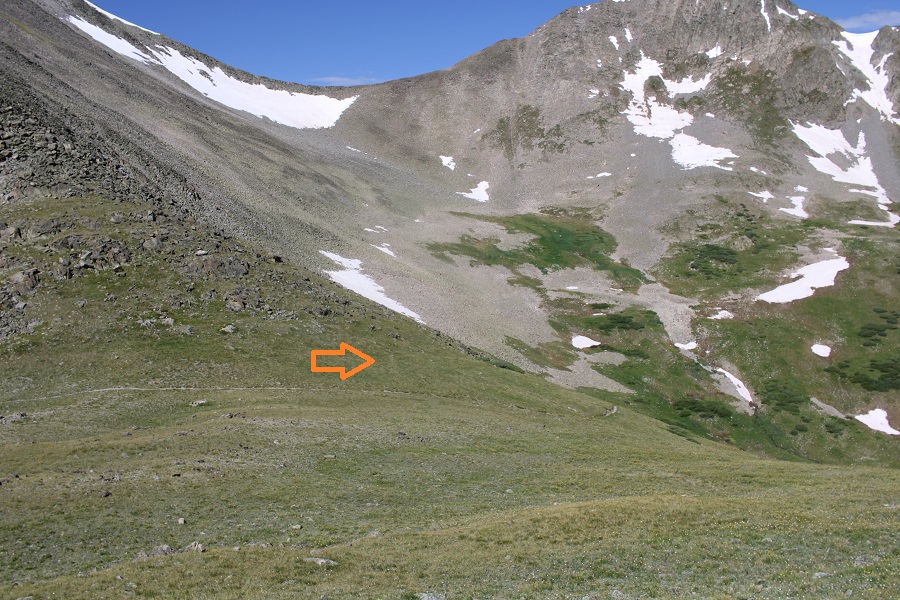
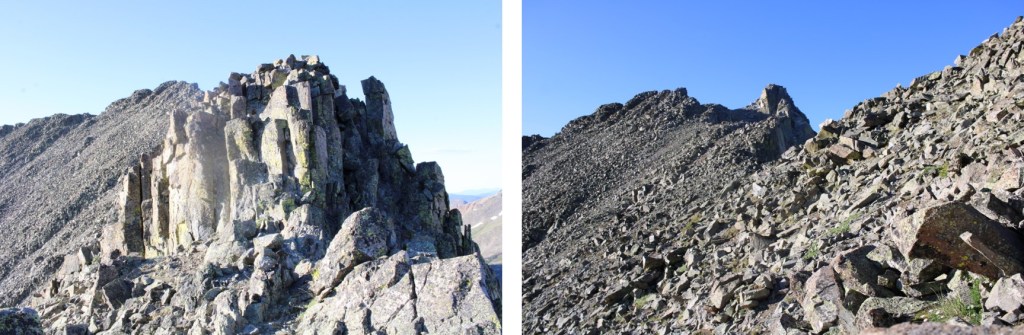
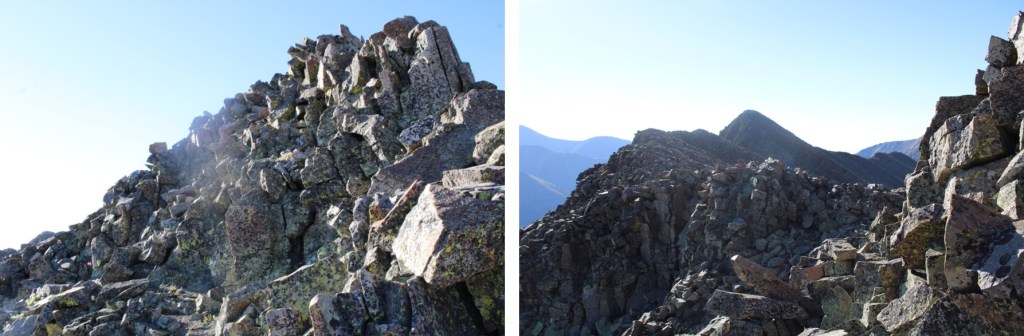
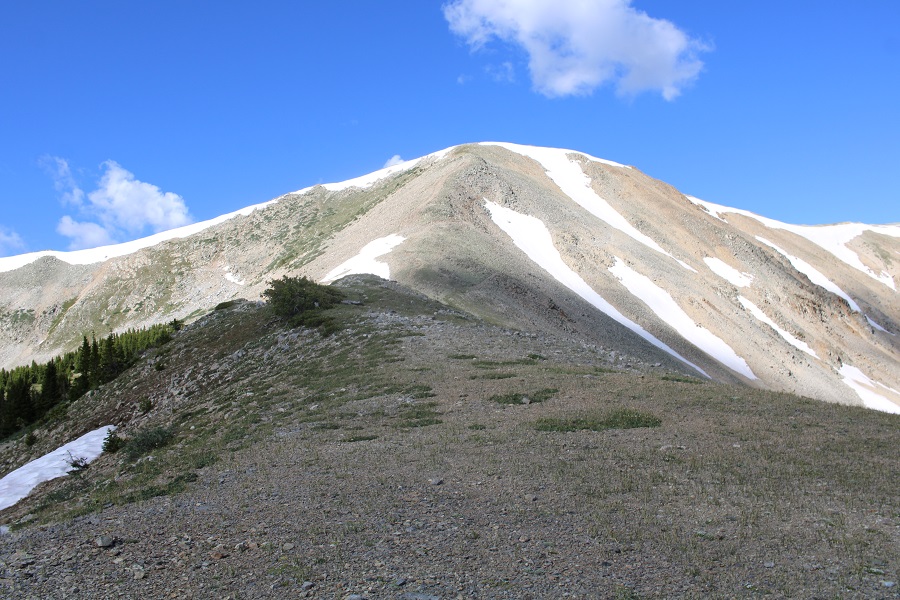
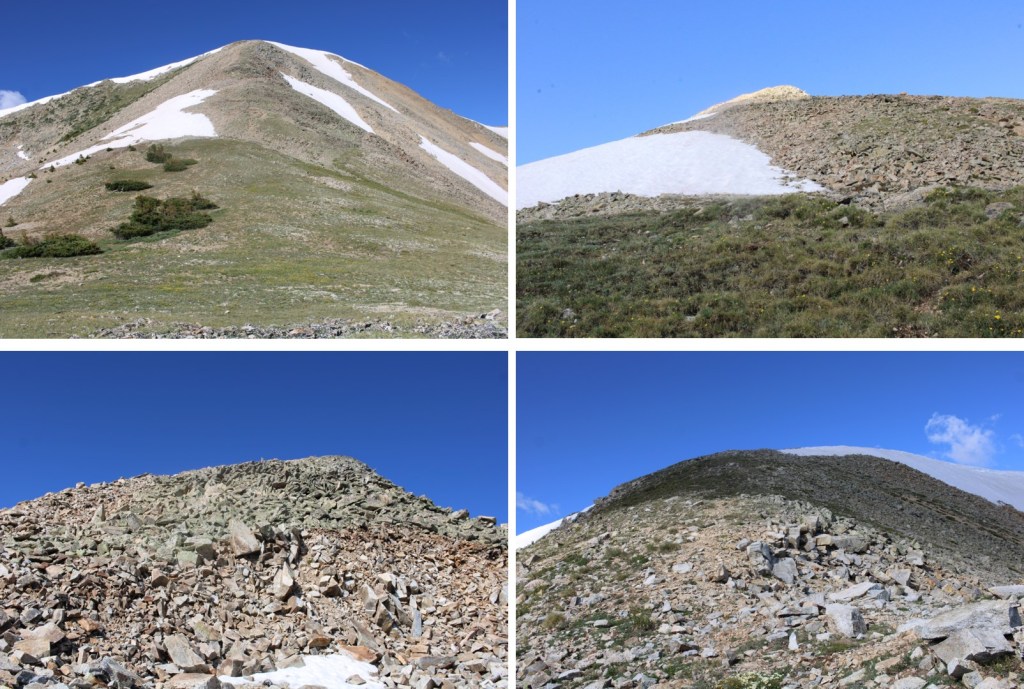
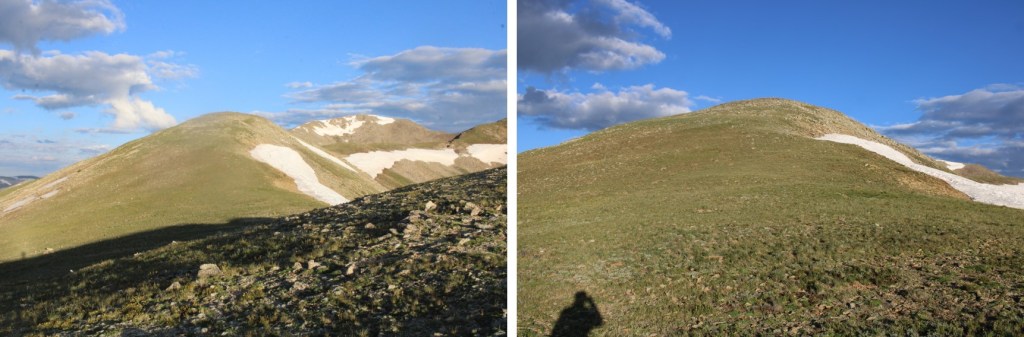
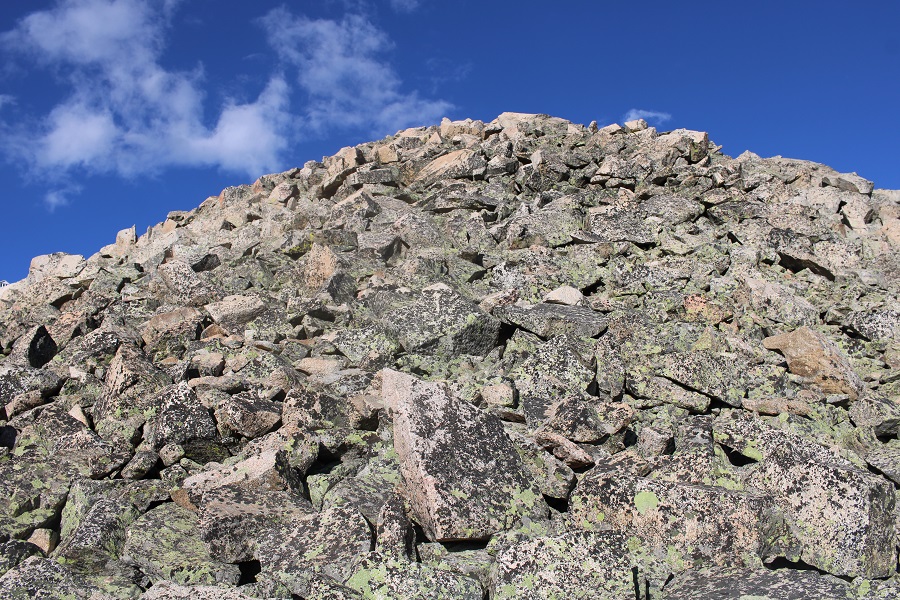
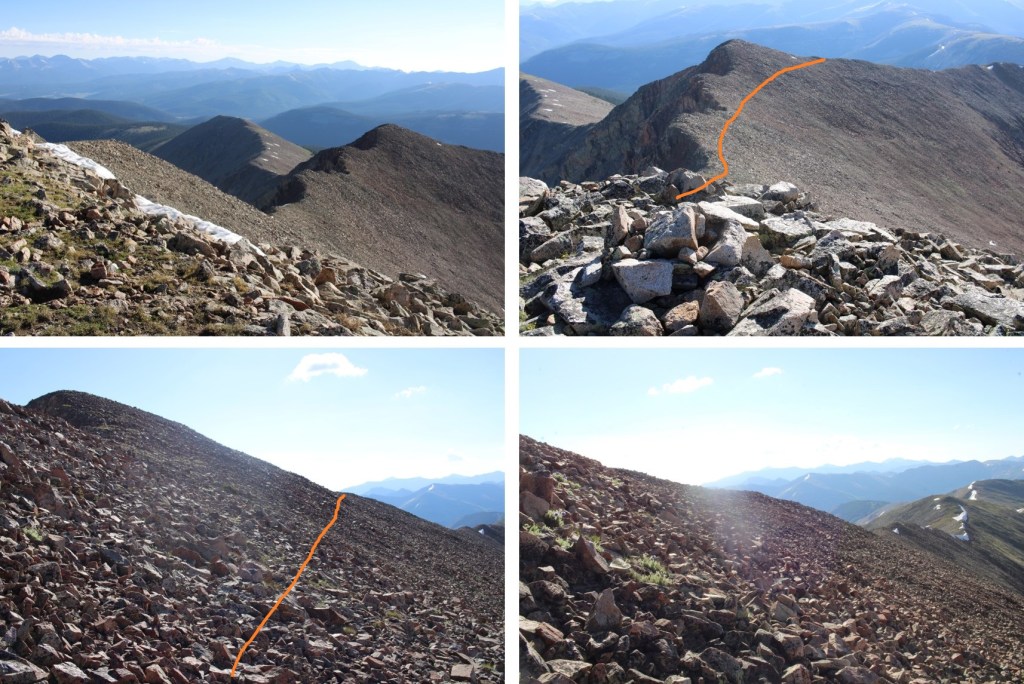
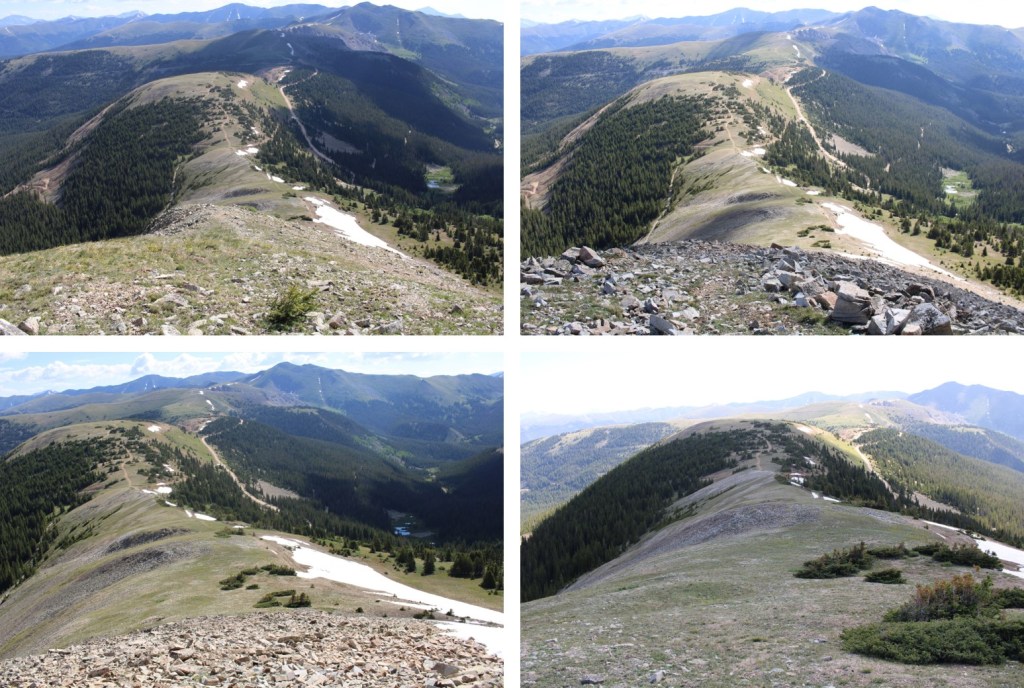
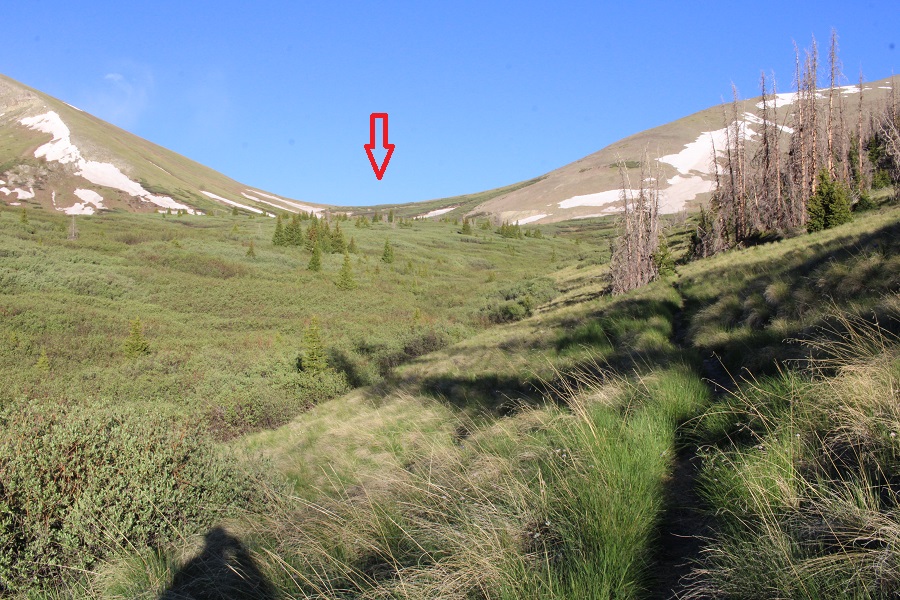
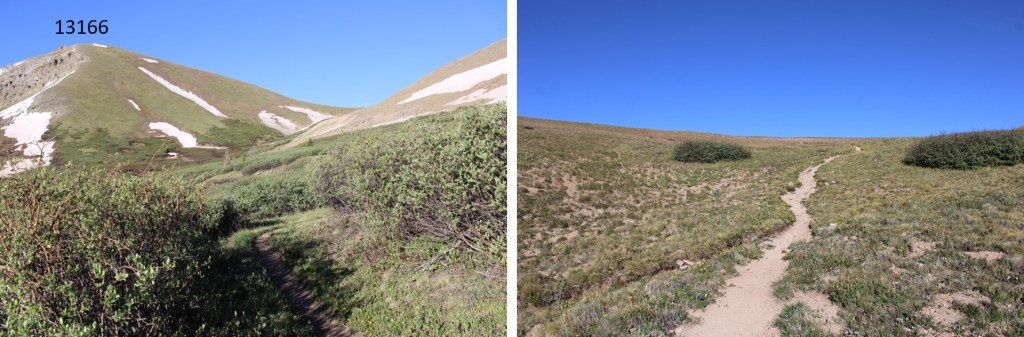
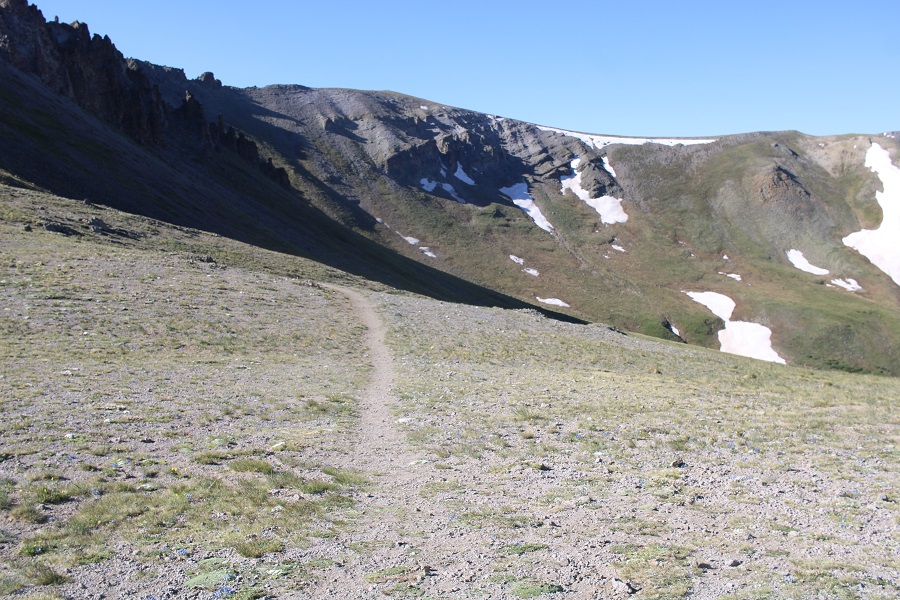
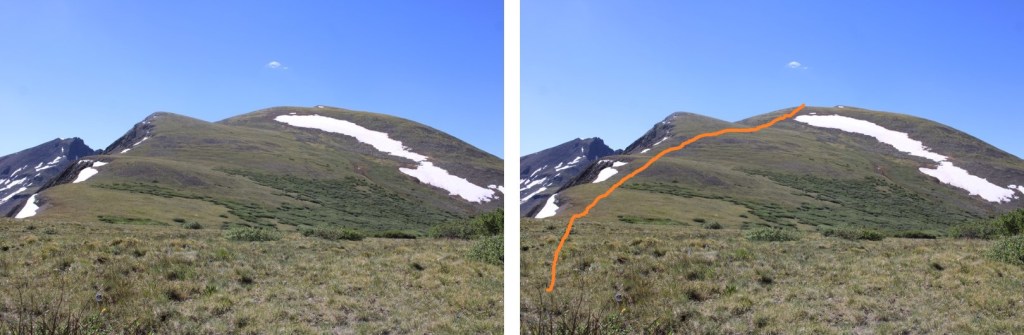
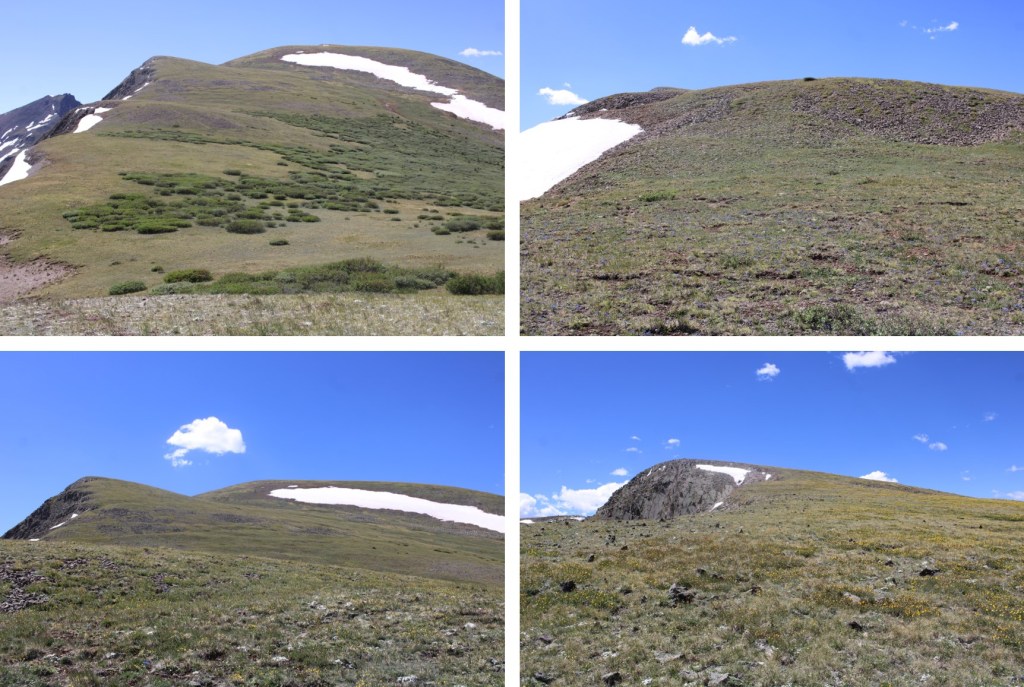
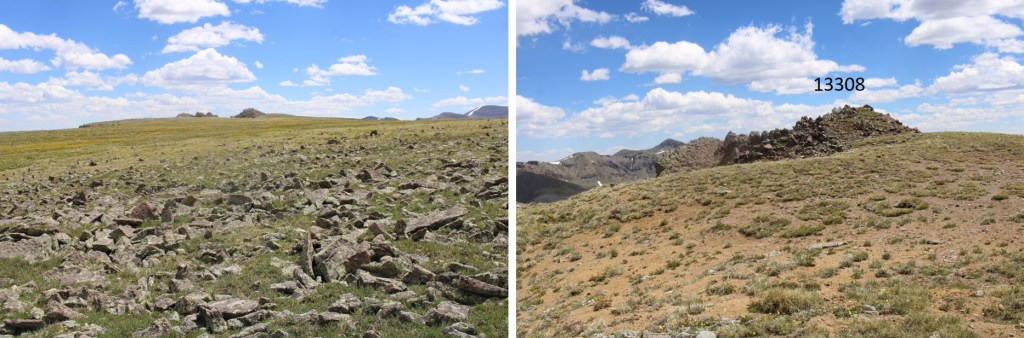
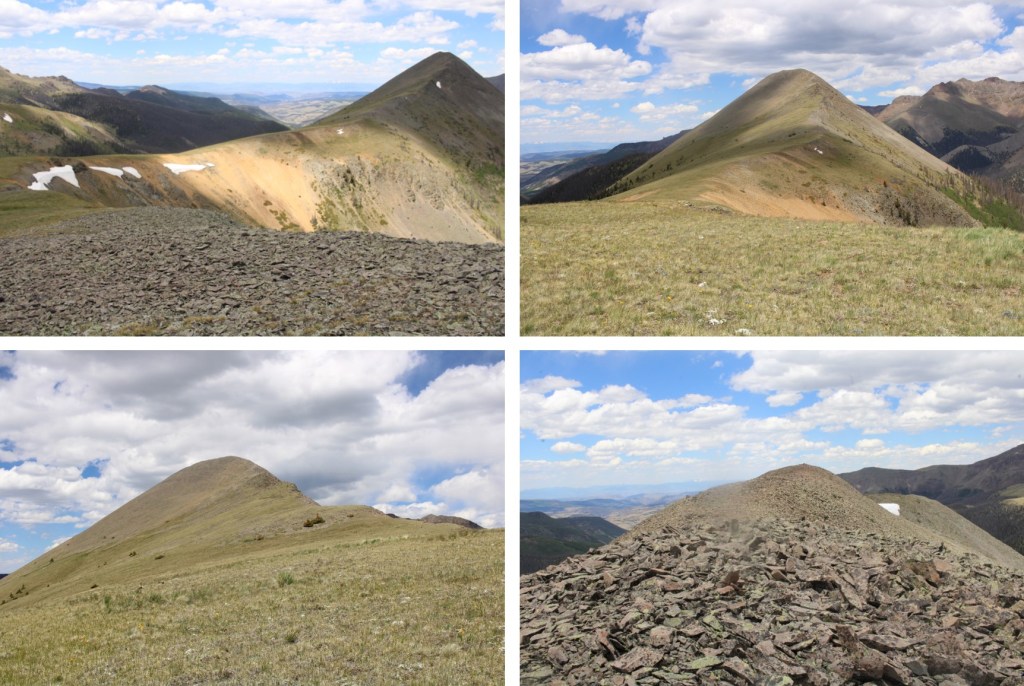
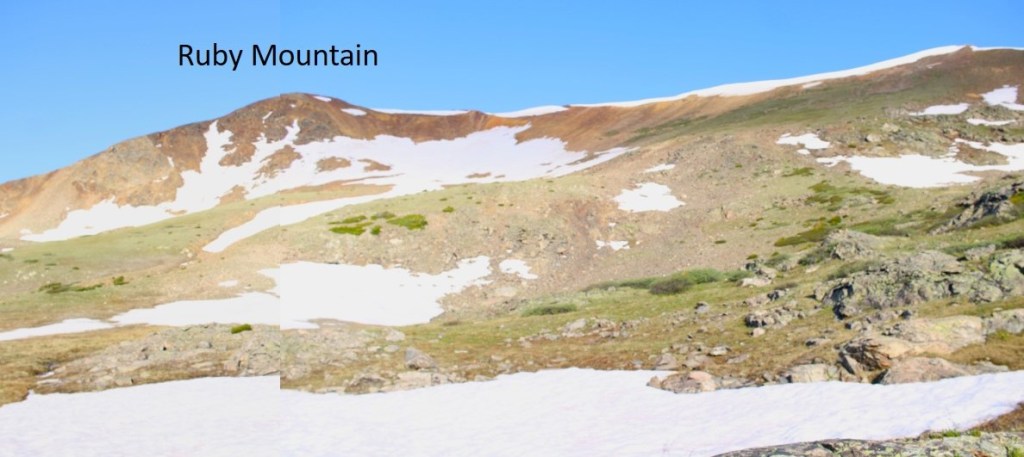
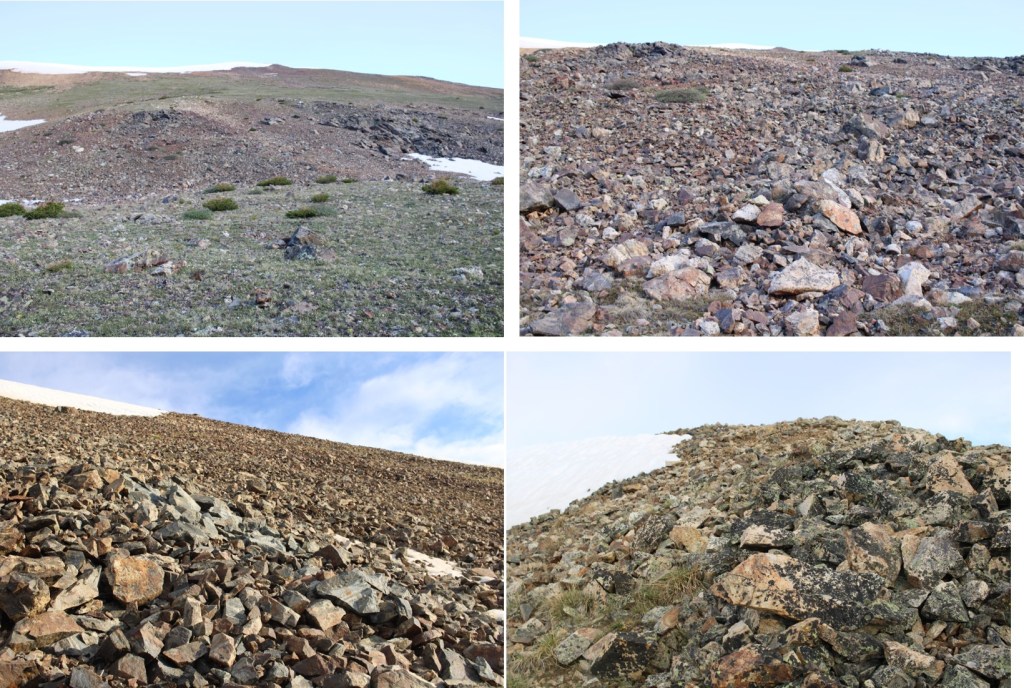
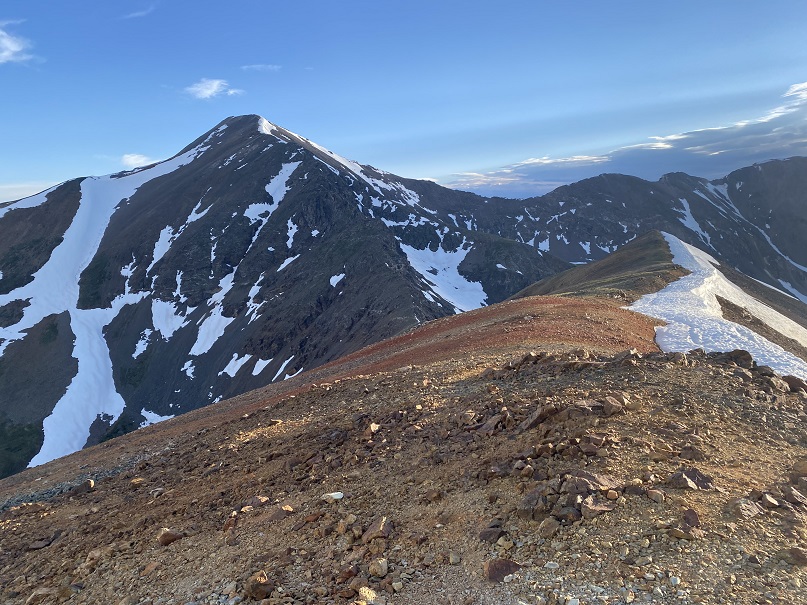
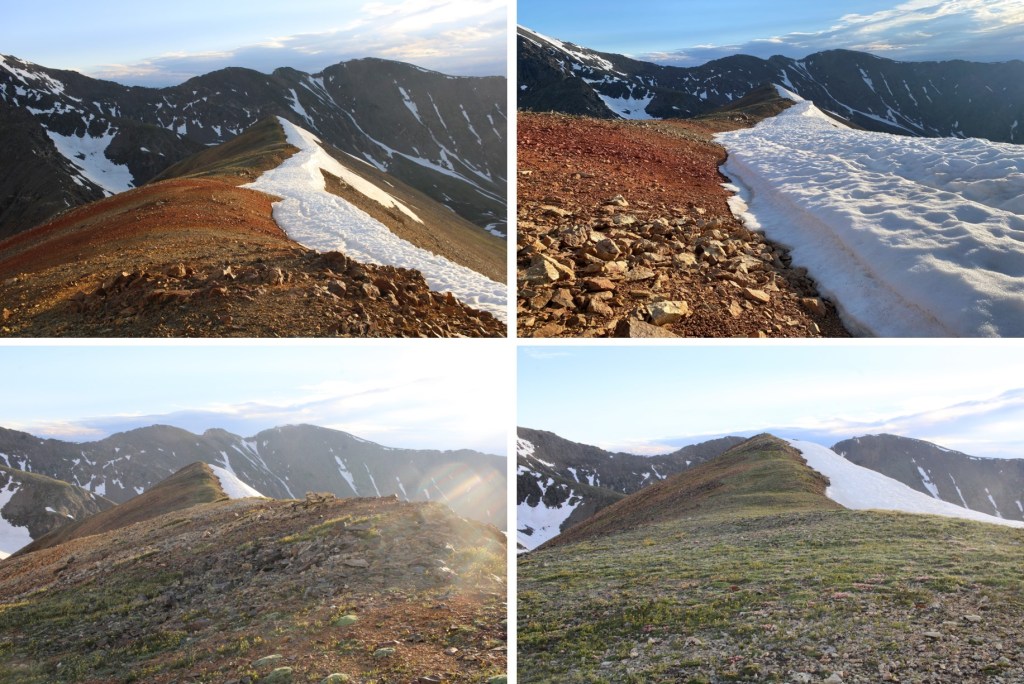
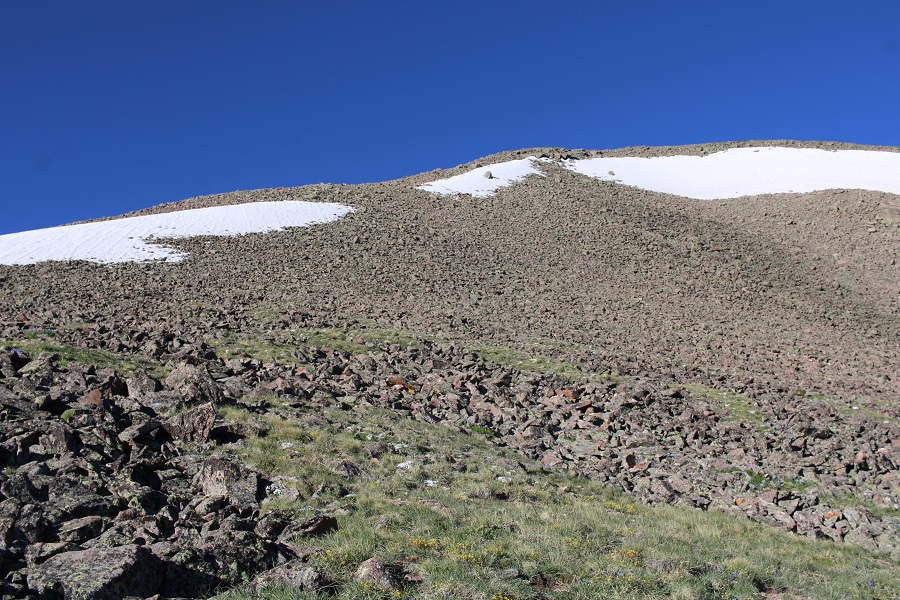
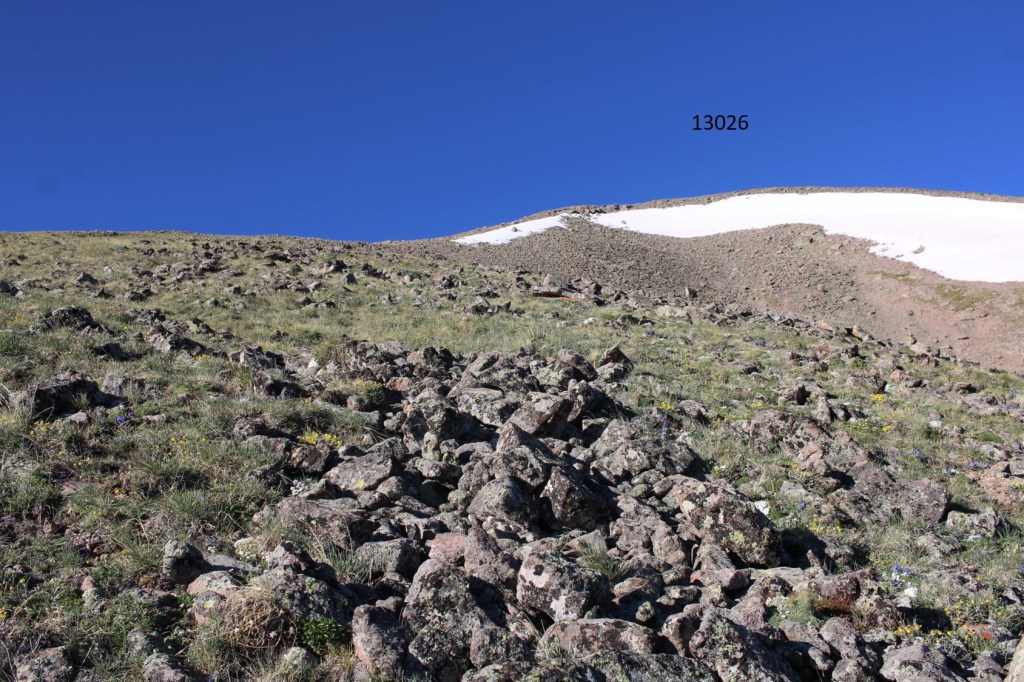
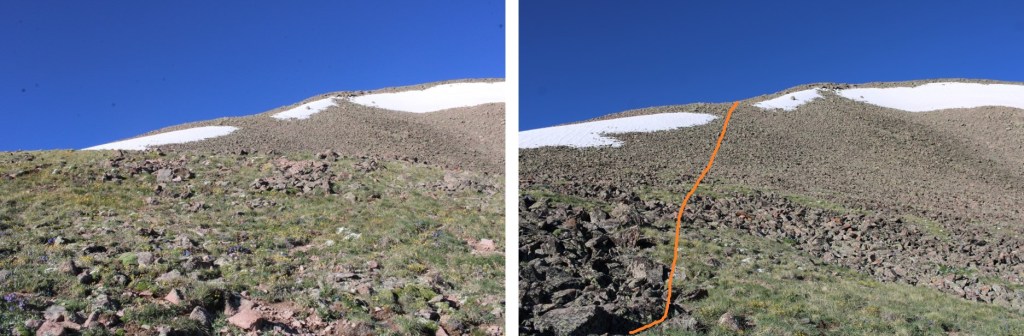
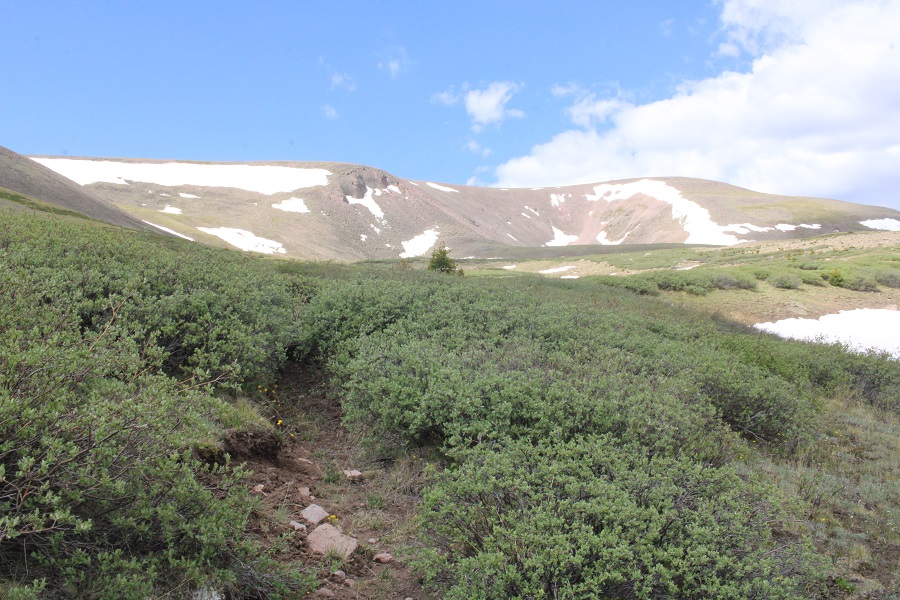
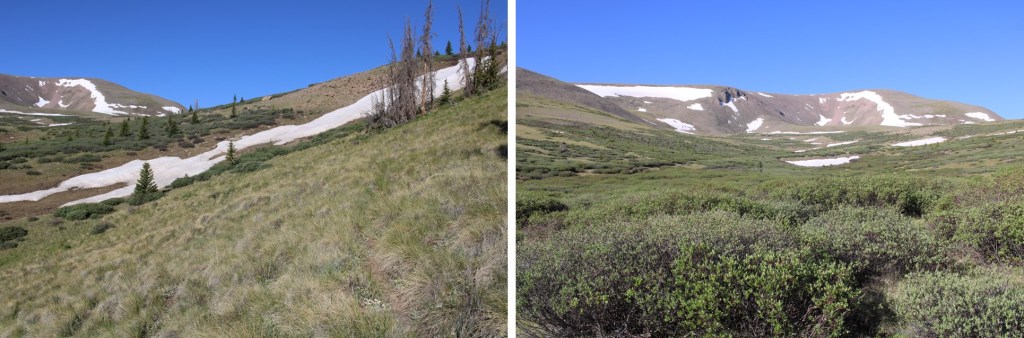
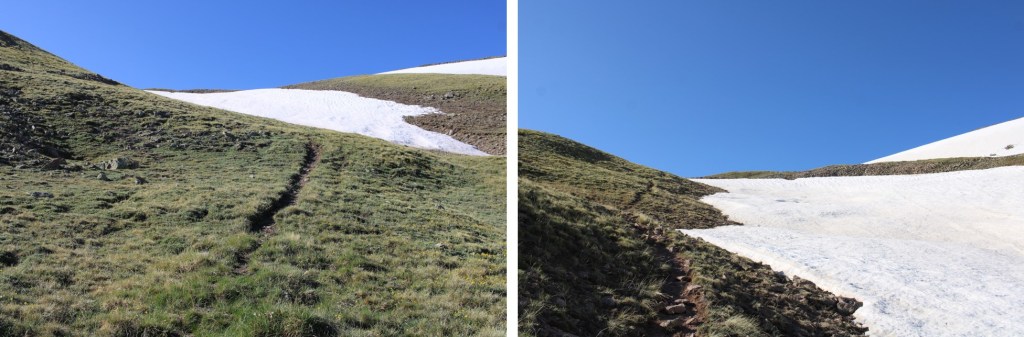
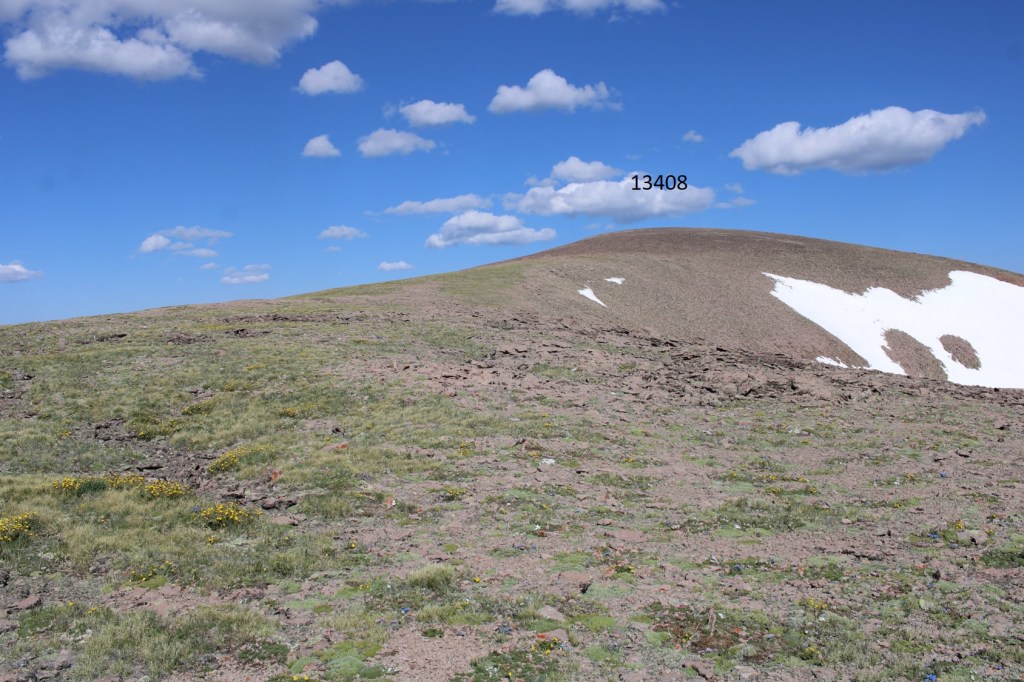
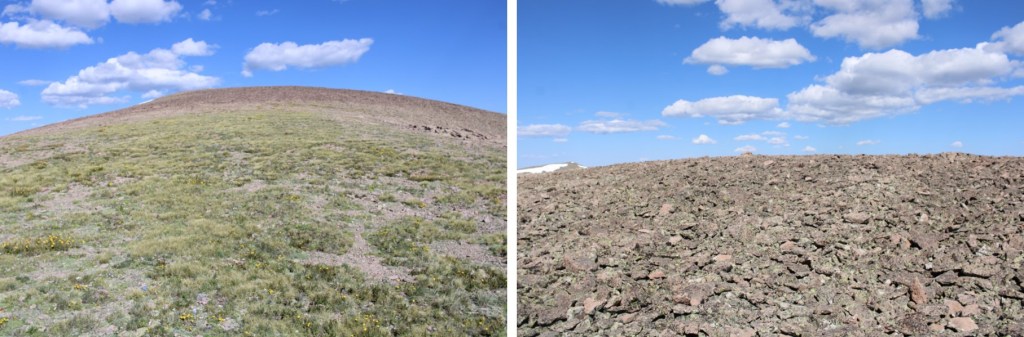
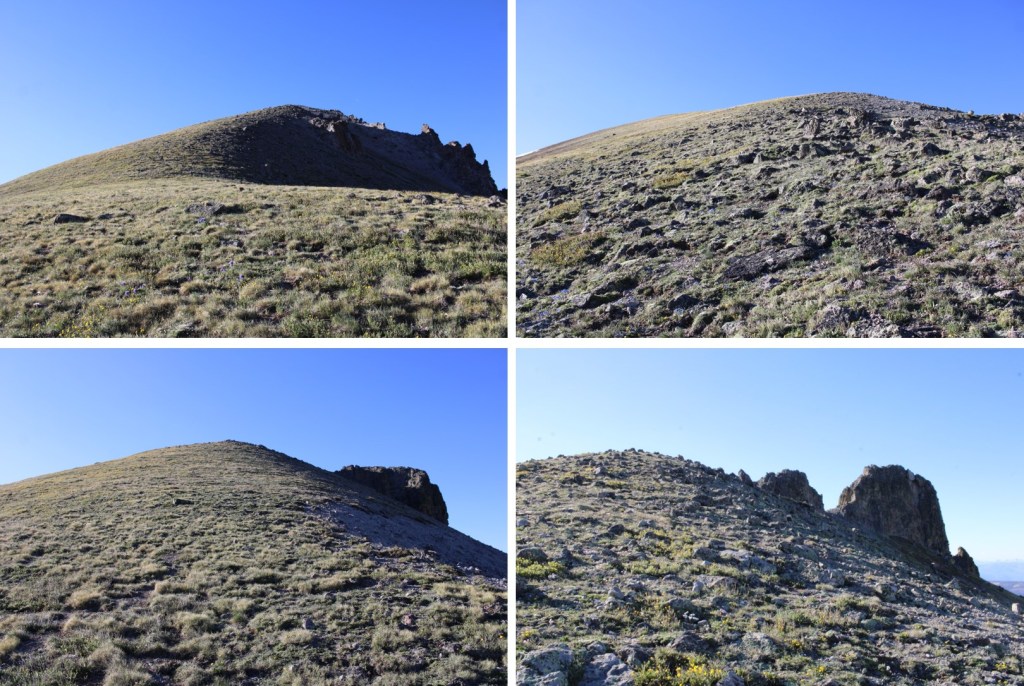
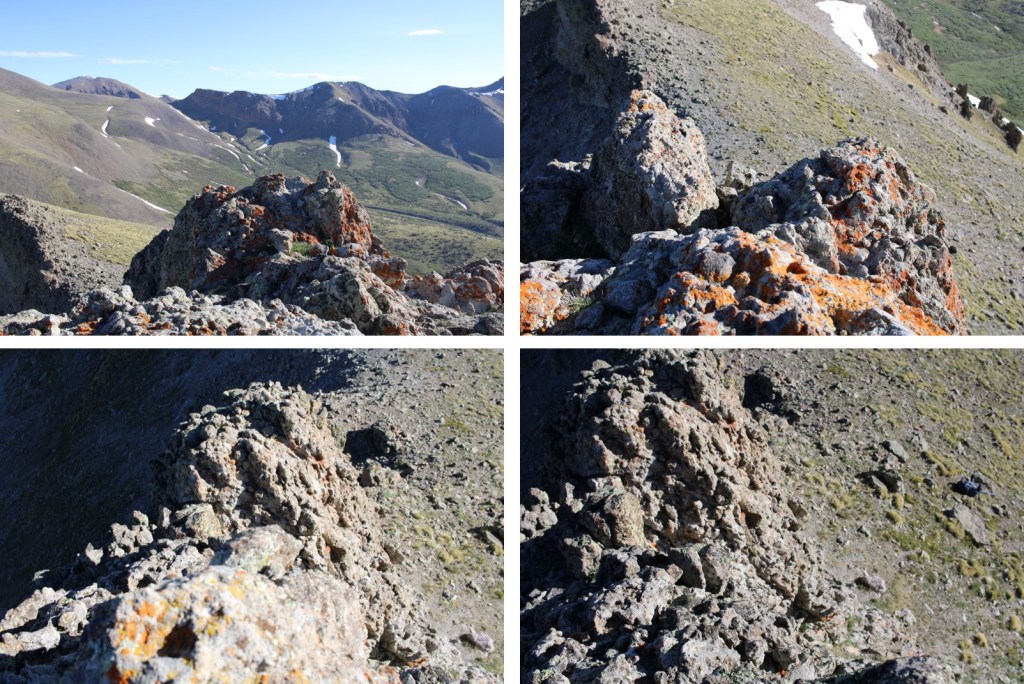
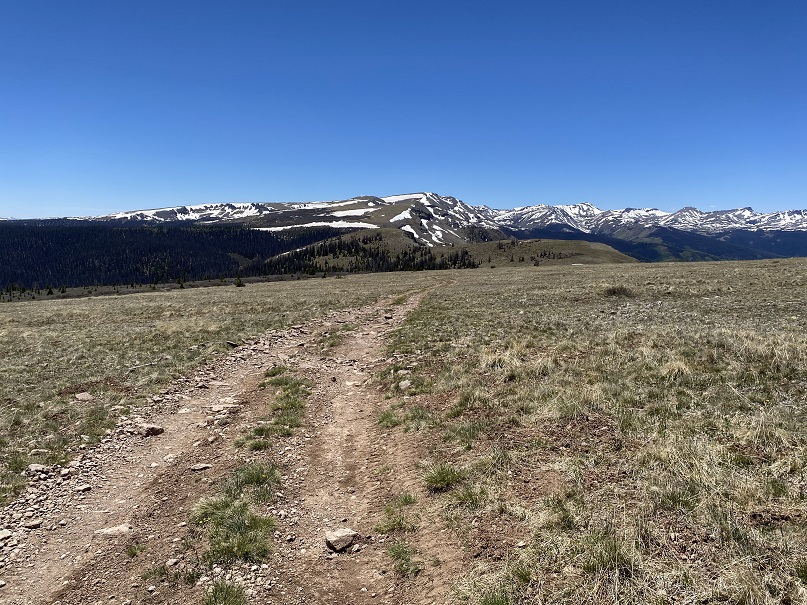
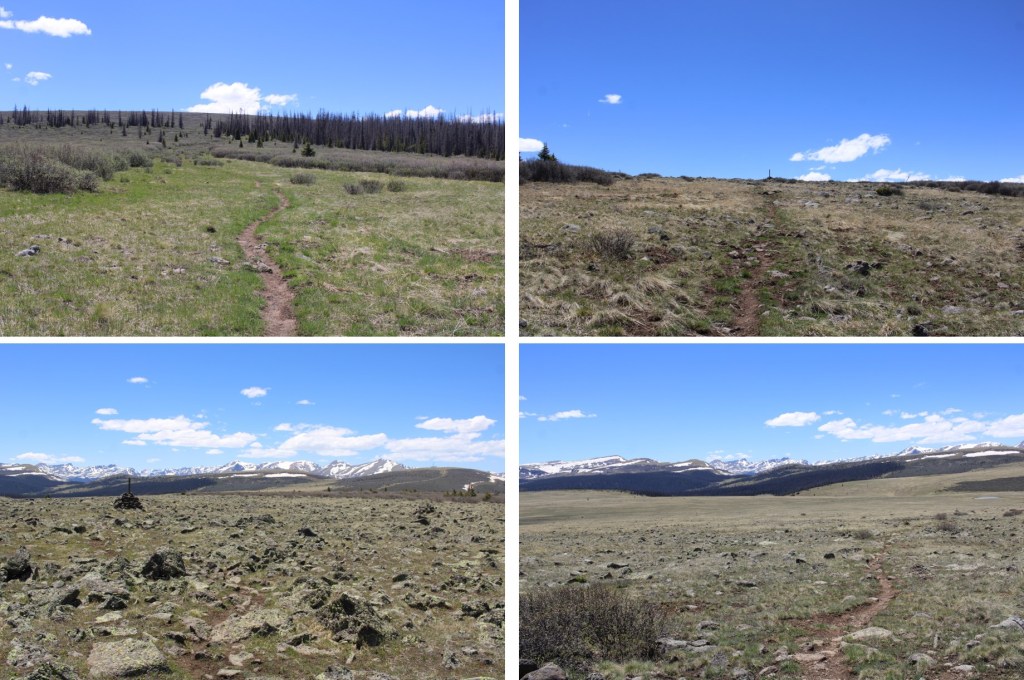
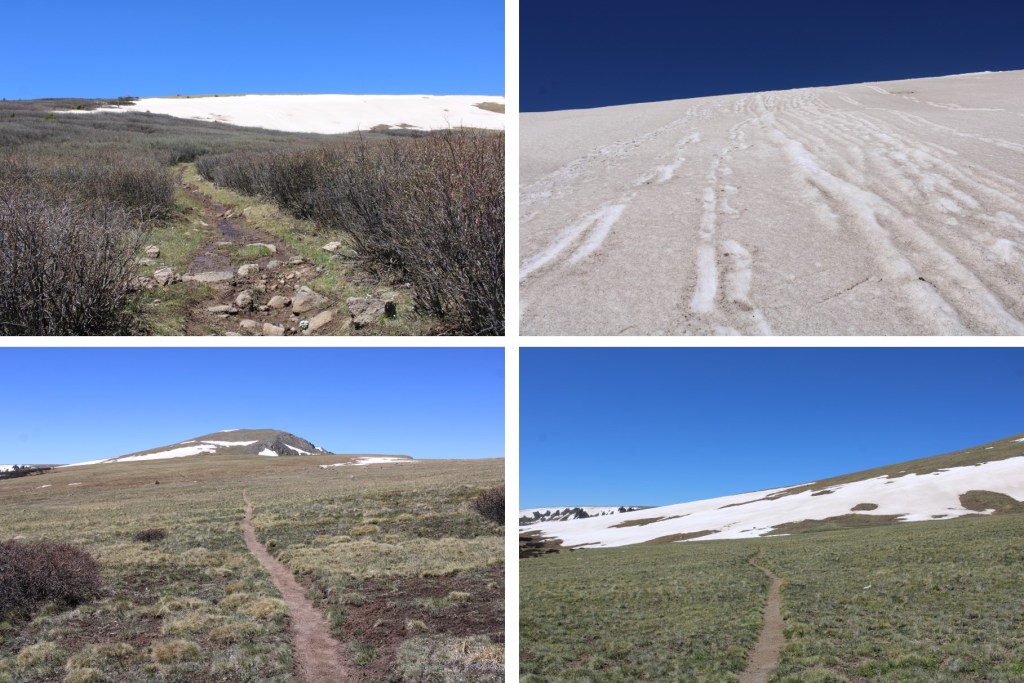
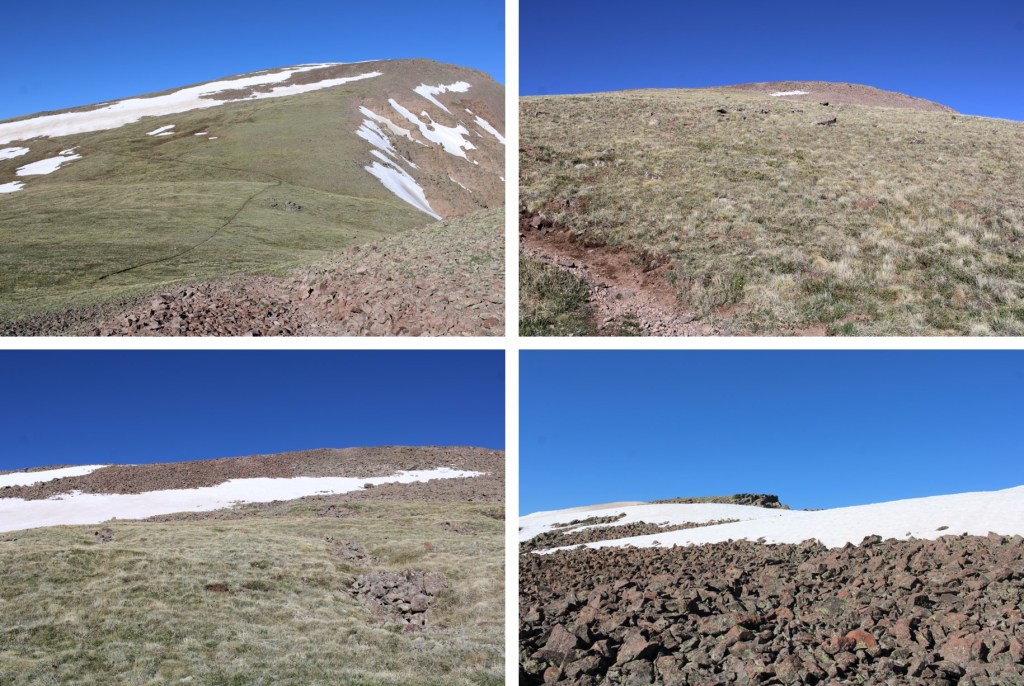
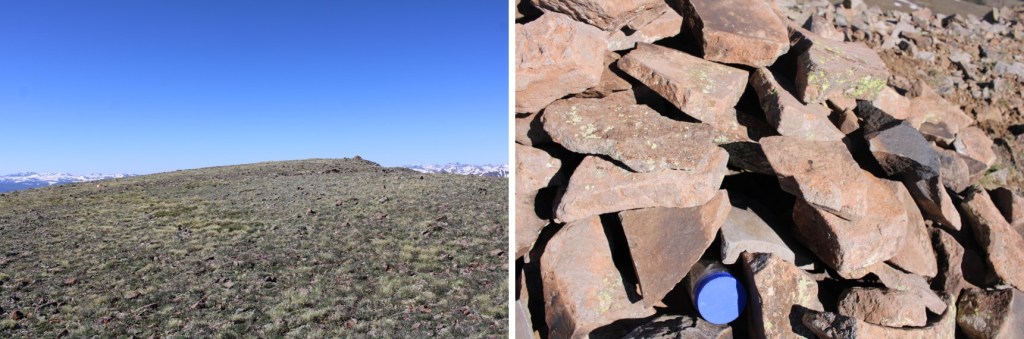
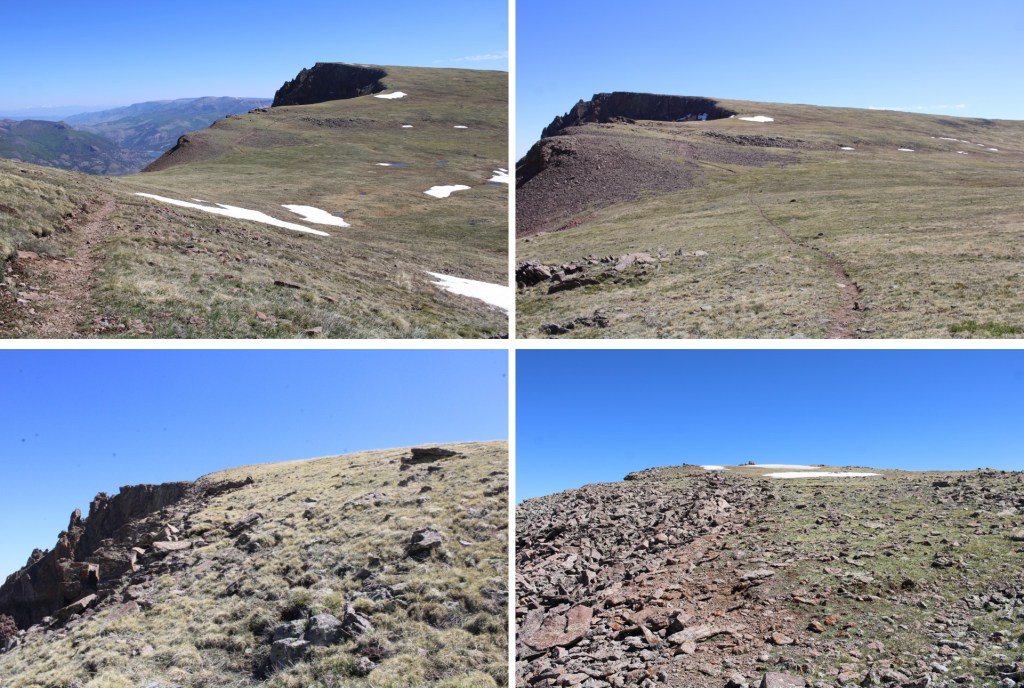
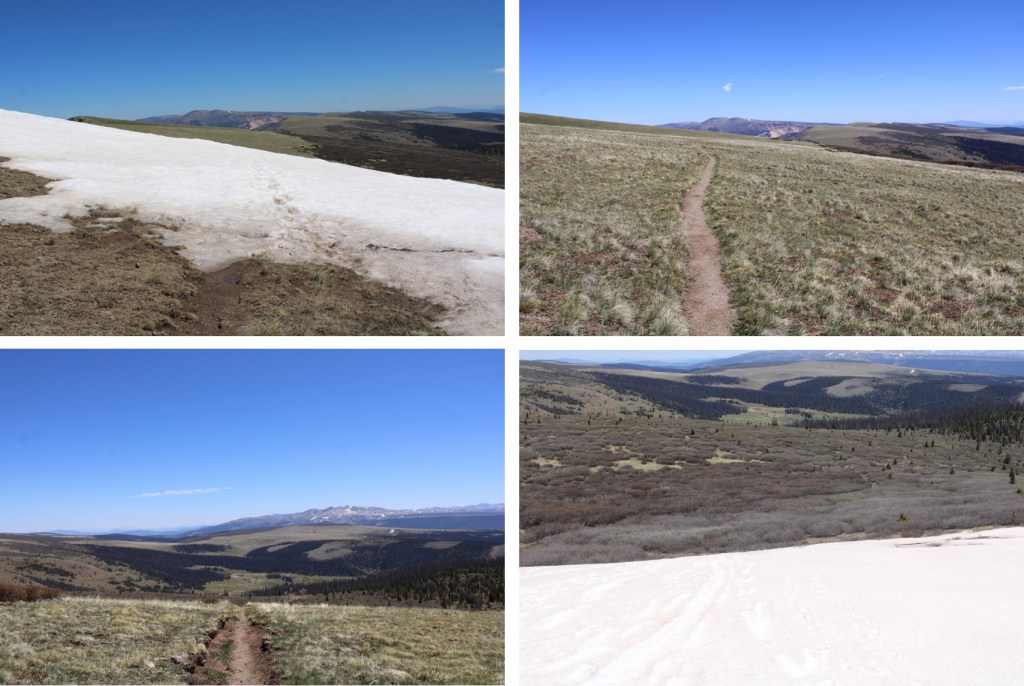
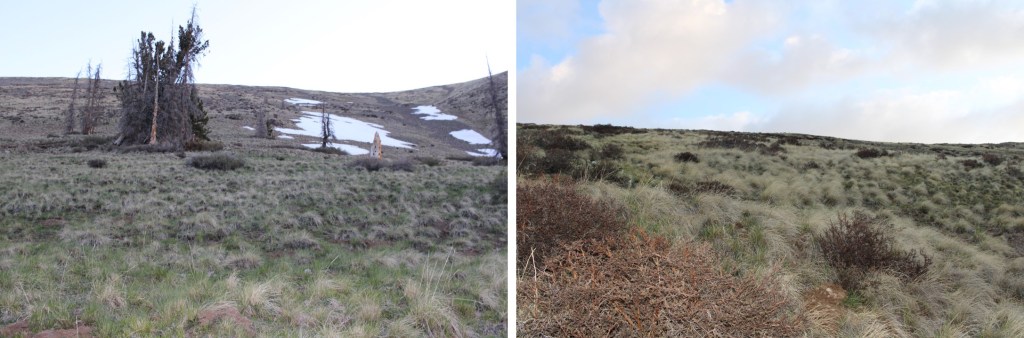
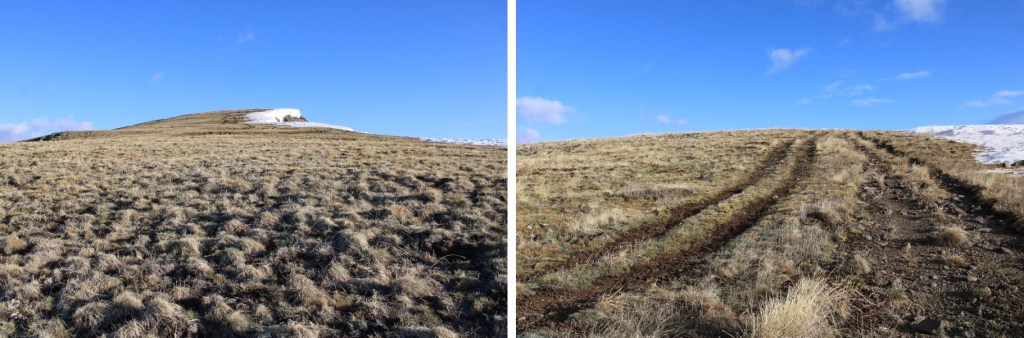
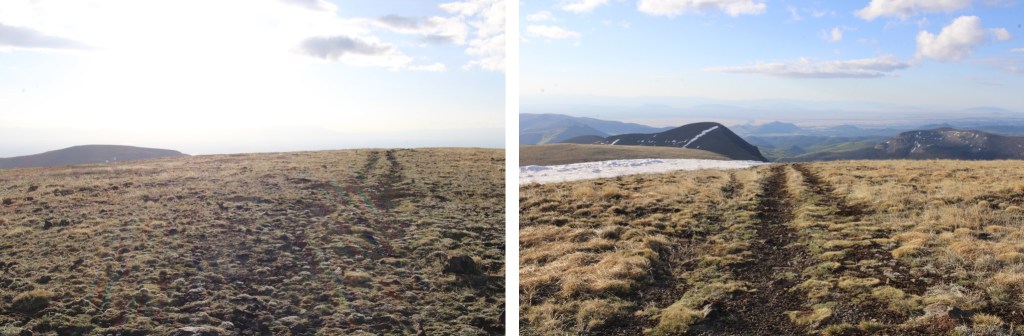
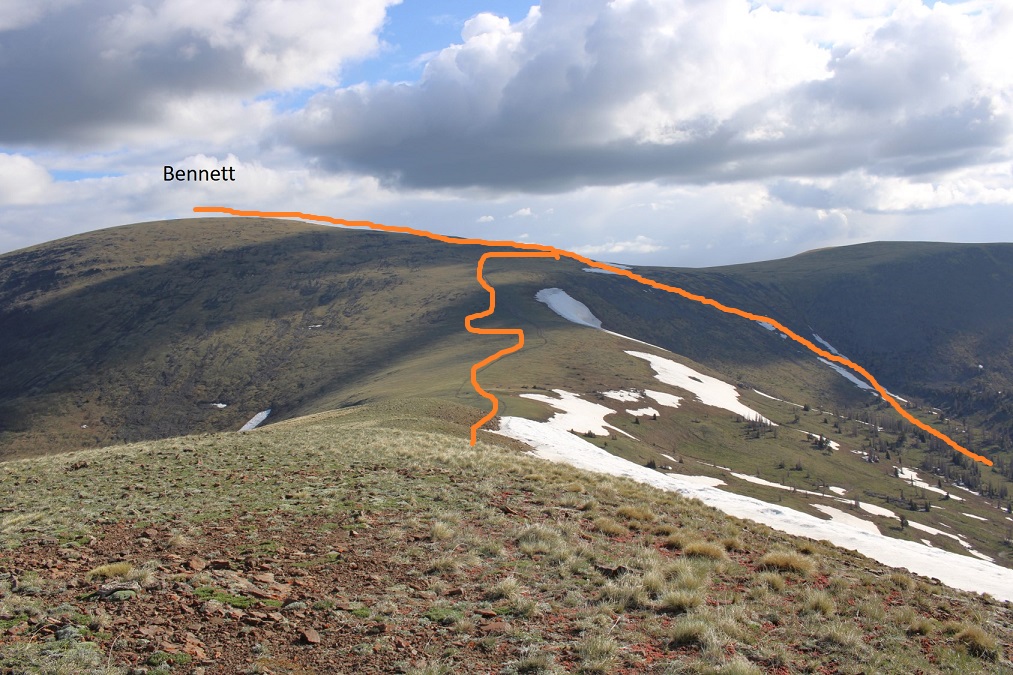
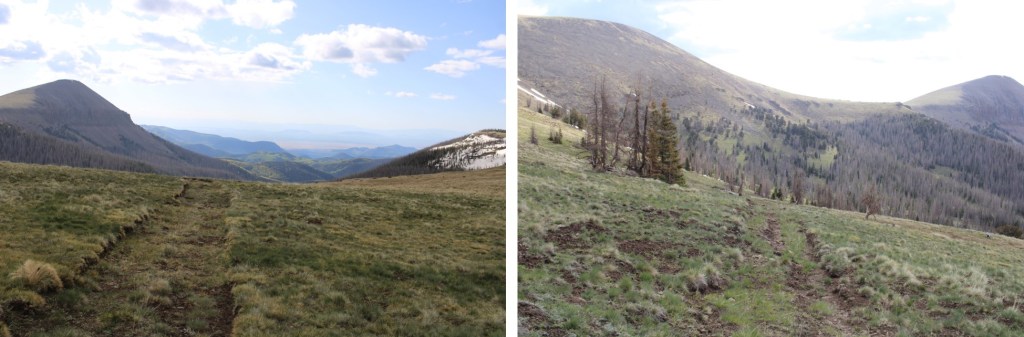
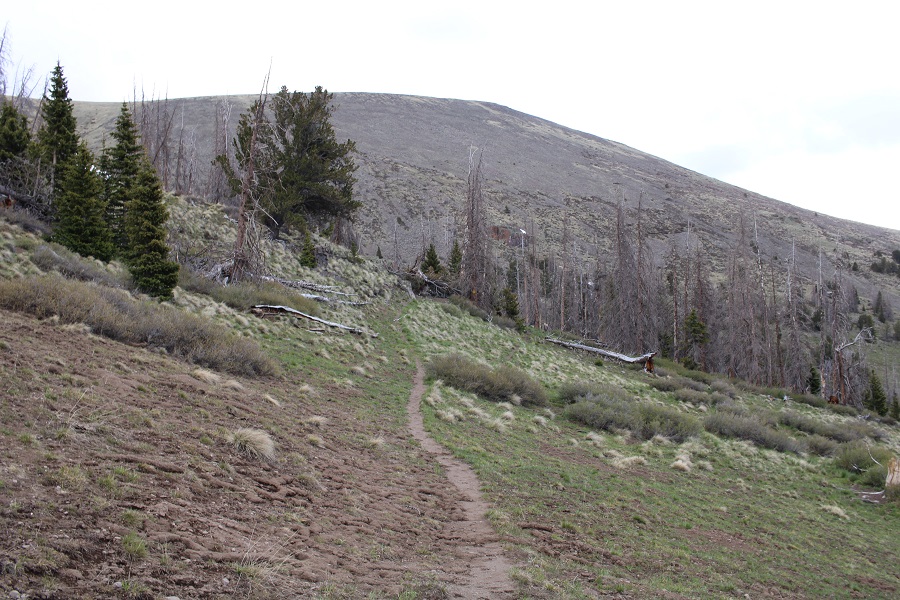
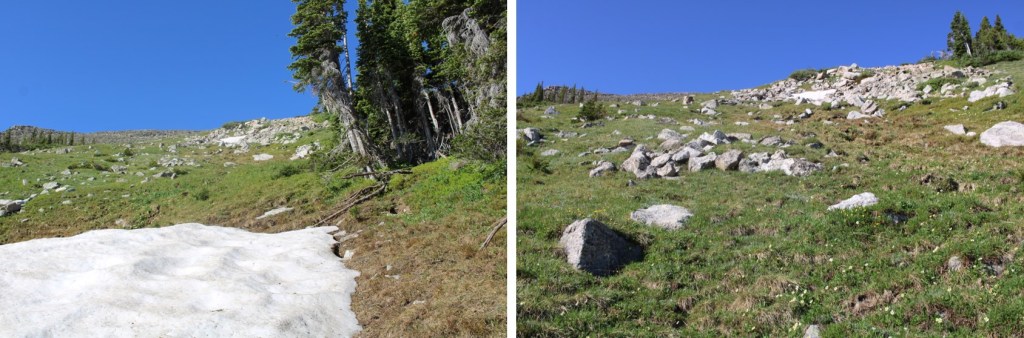
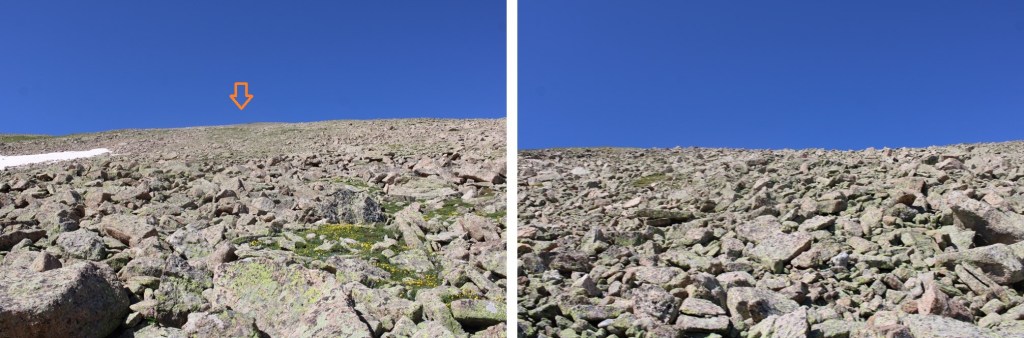
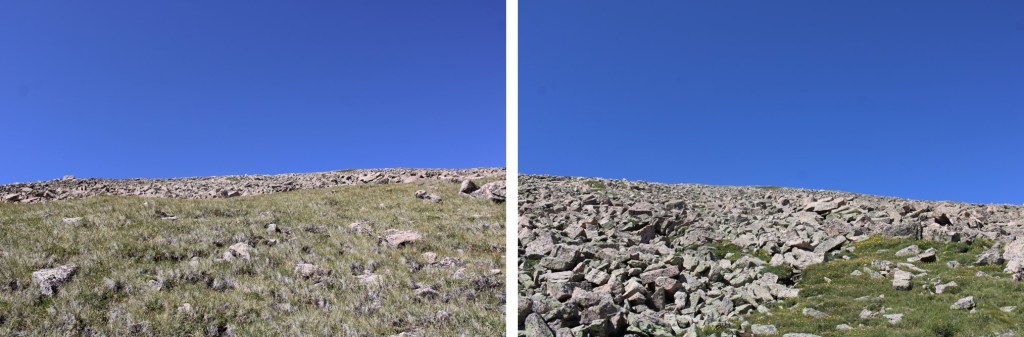
From the lake, it was 1.2 miles, with 1100’ of elevation gain to treeline.  At treeline, I turned right, and followed the slope southwest towards the summit, gaining another 2100’ in 1.2 miles.  While a topo map makes it look like a gentle slope, it was anything but. The summit always looked out of reach.  It was one long false summit, where you thought you were almost there, and then you were surprised by more rock. The terrain started out as tundra, then switched to rocks that tended to roll if you weren’t careful. Route finding and terrain were all class 2.  There was also a lot of water here.  Even at the summit, I could hear the water rushing under the rocks.  Below, on the tundra, I saw several small streams of water flowing downhill.  This was all choose your own adventure.  Here are some pictures. 

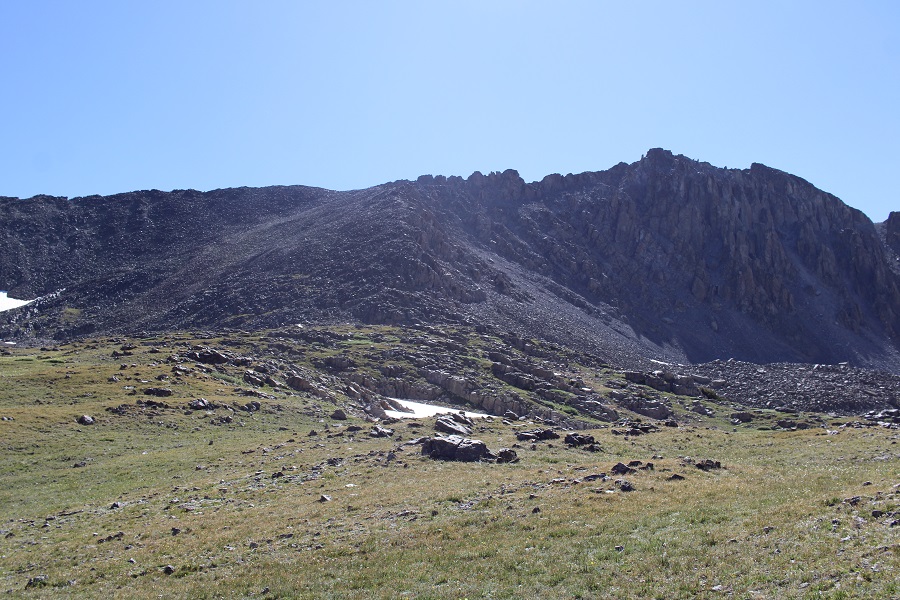
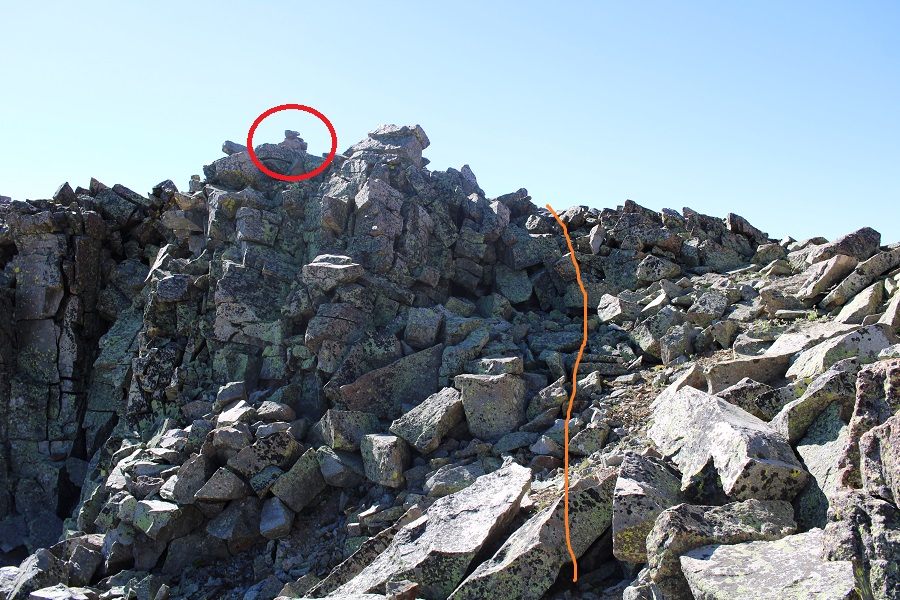
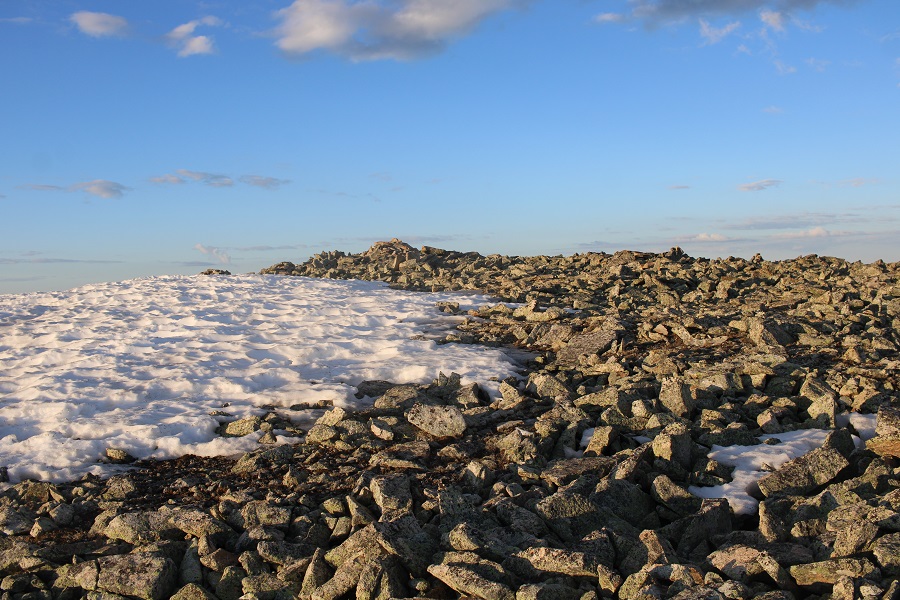
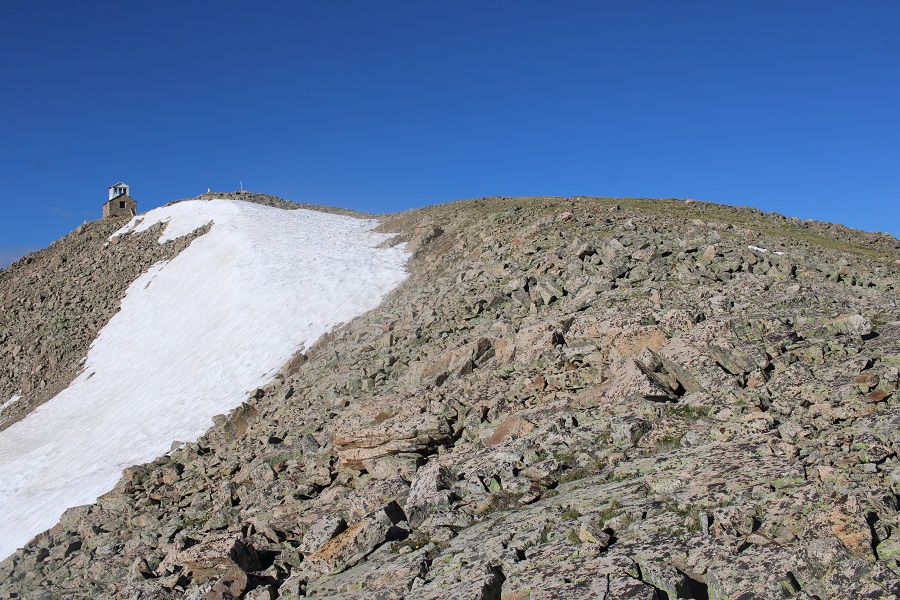
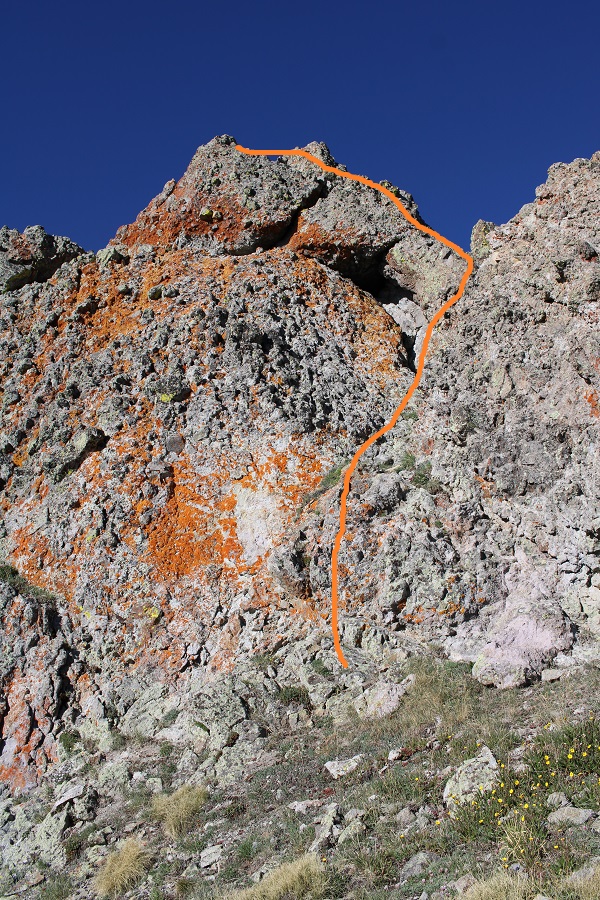
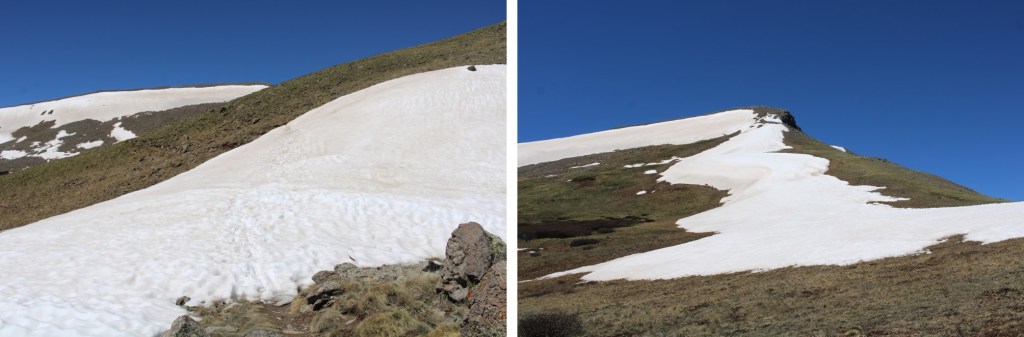
At what I thought was going to be the summit I was met with some unexpected snow.  The snow was punchy, so I skirted it to the right and regained the ridge

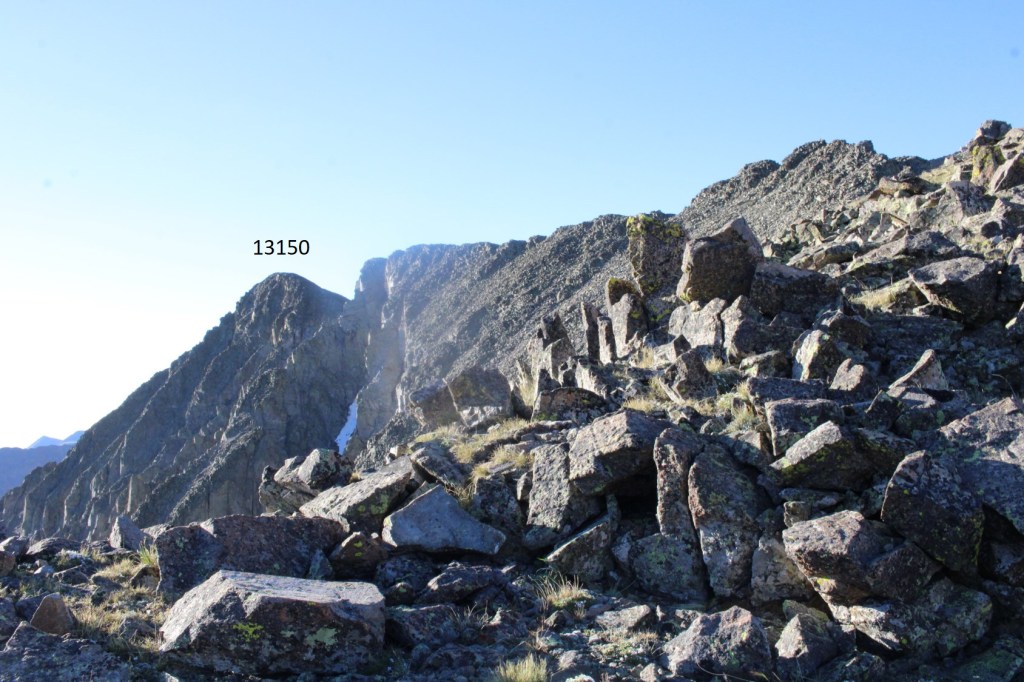
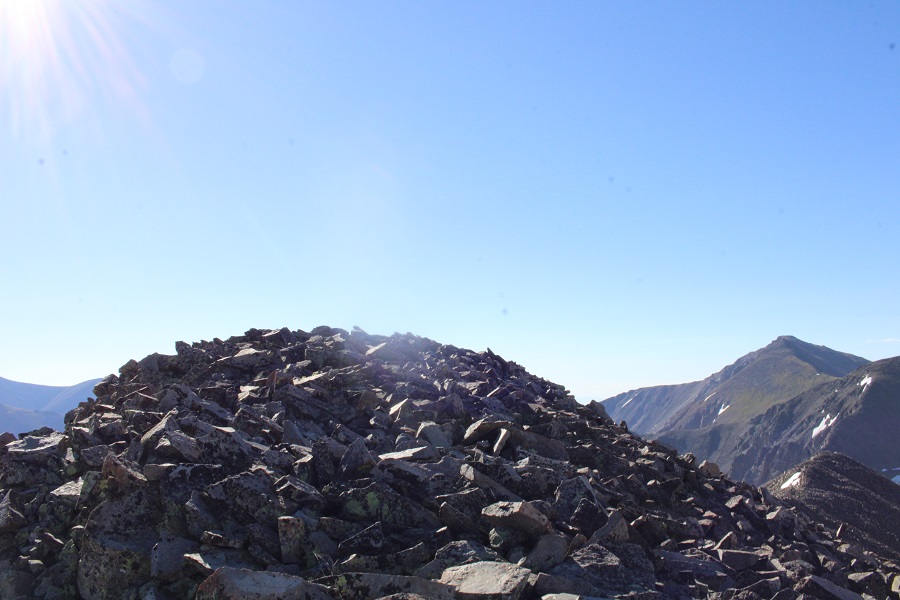
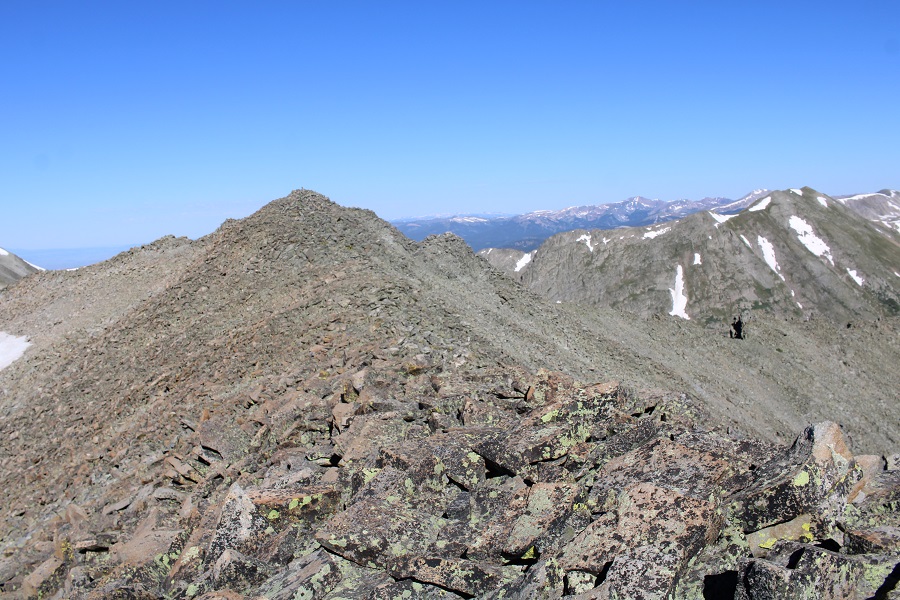
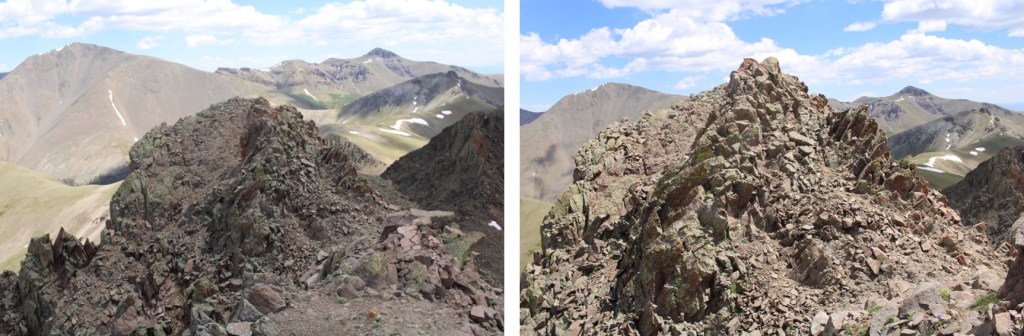
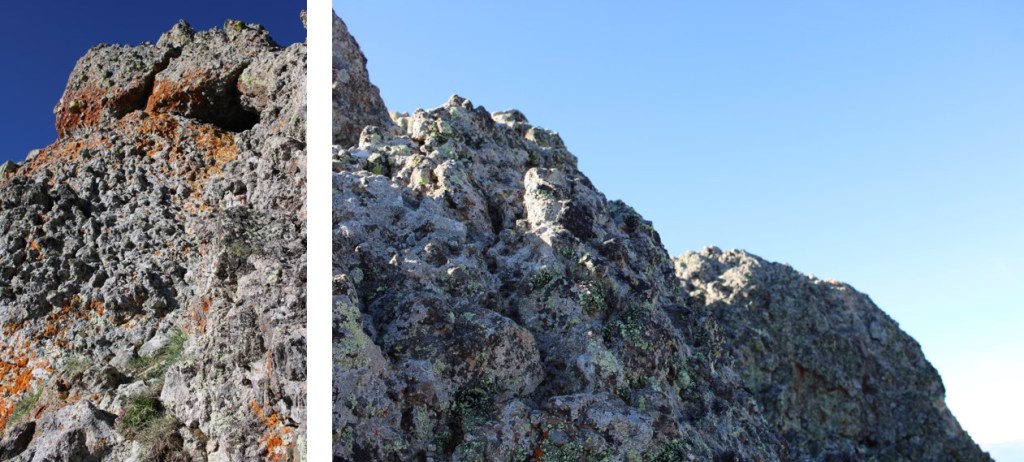
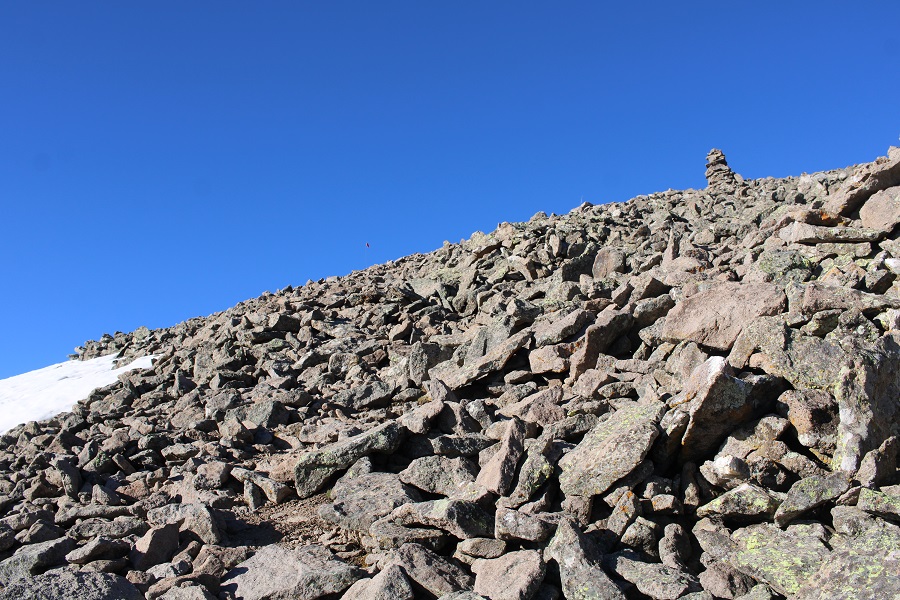
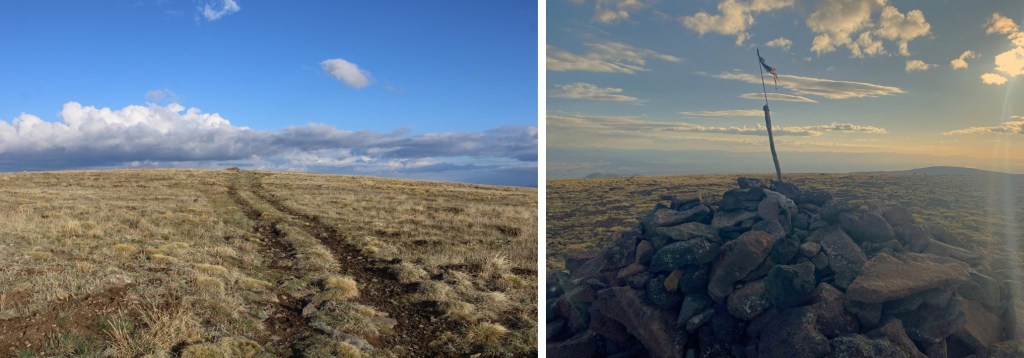
Only to find more rocks,  Here you can see the true summit of Copeland Mountain

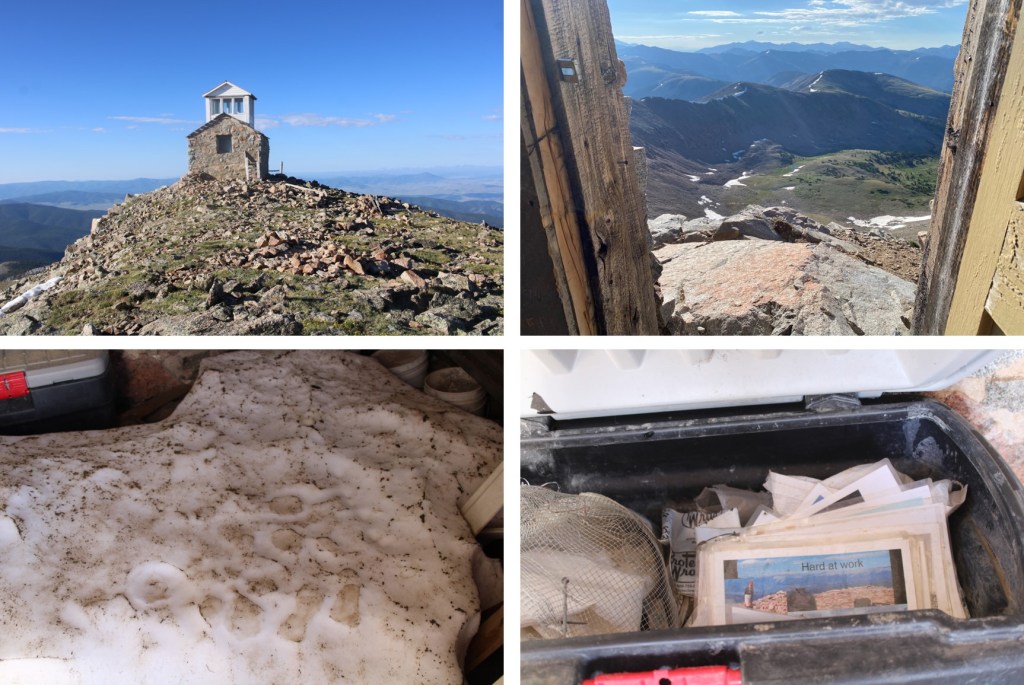
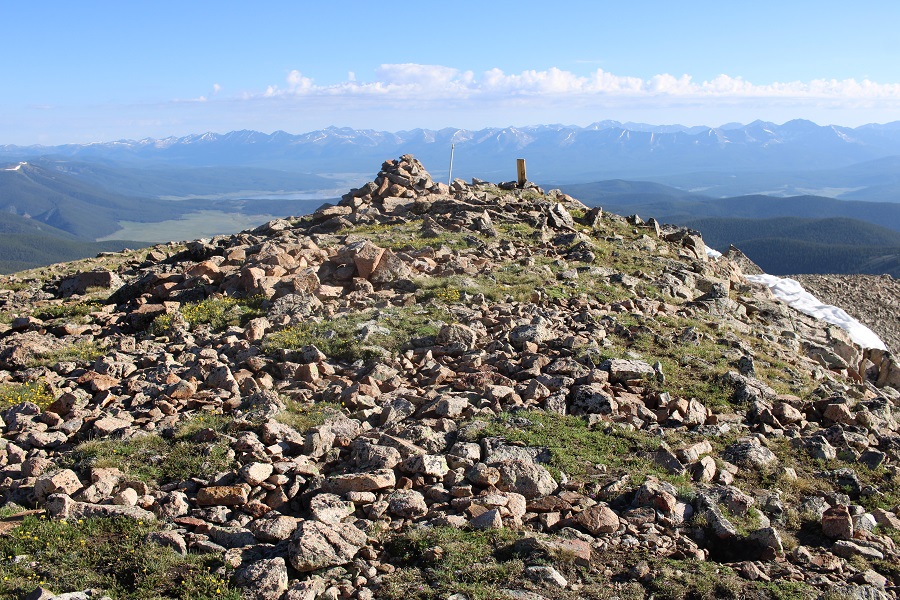
I summited Copeland Mountain at 10:45am
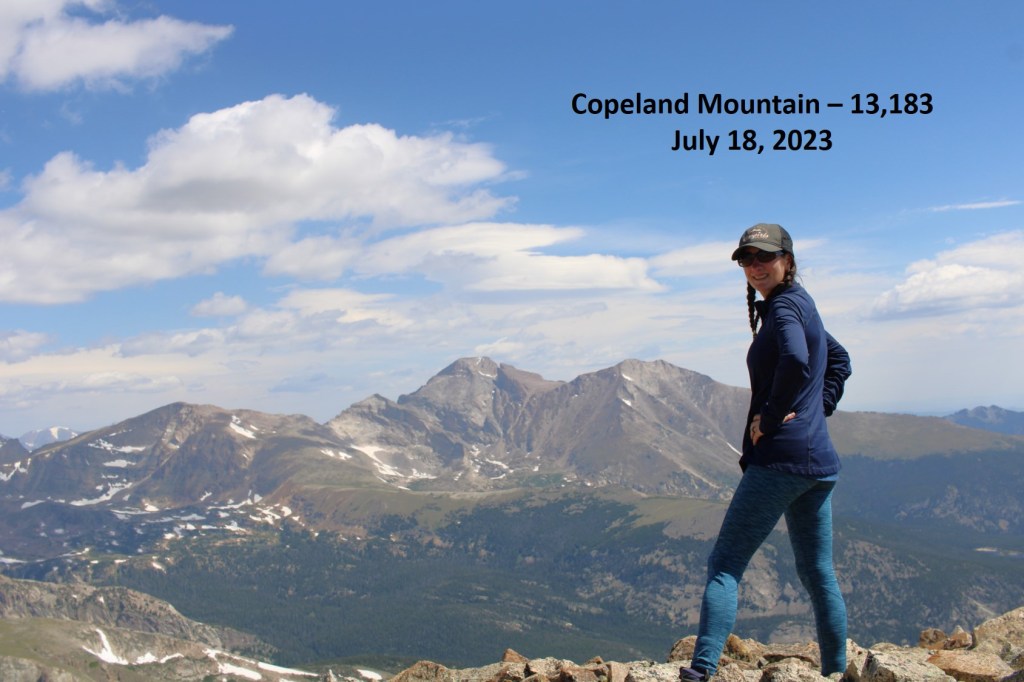
Copeland Mountain:

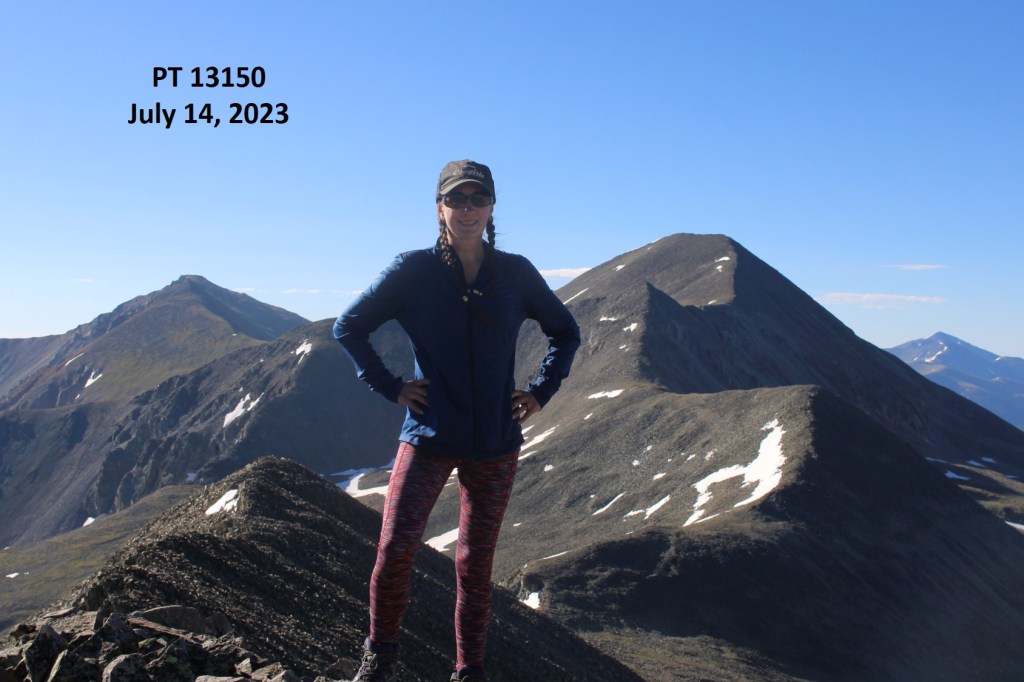
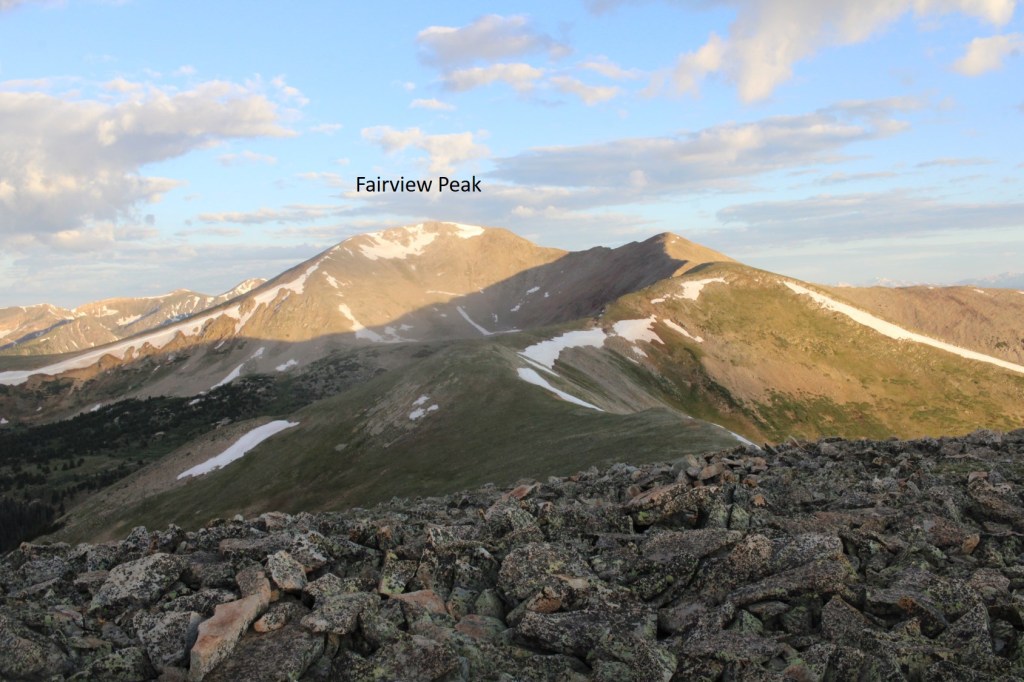
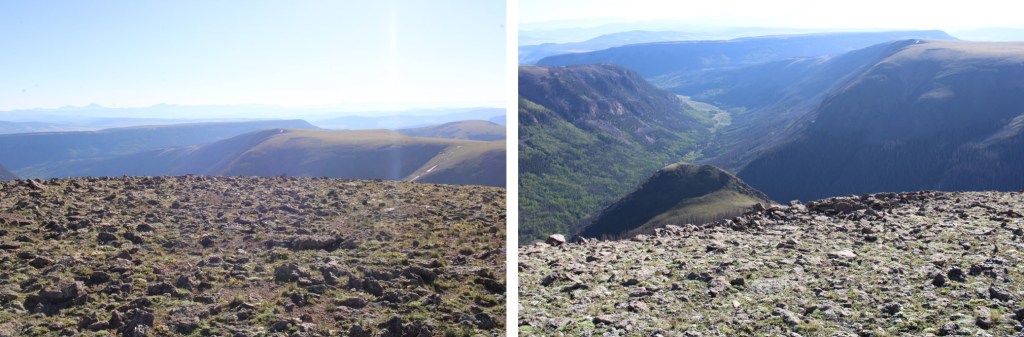
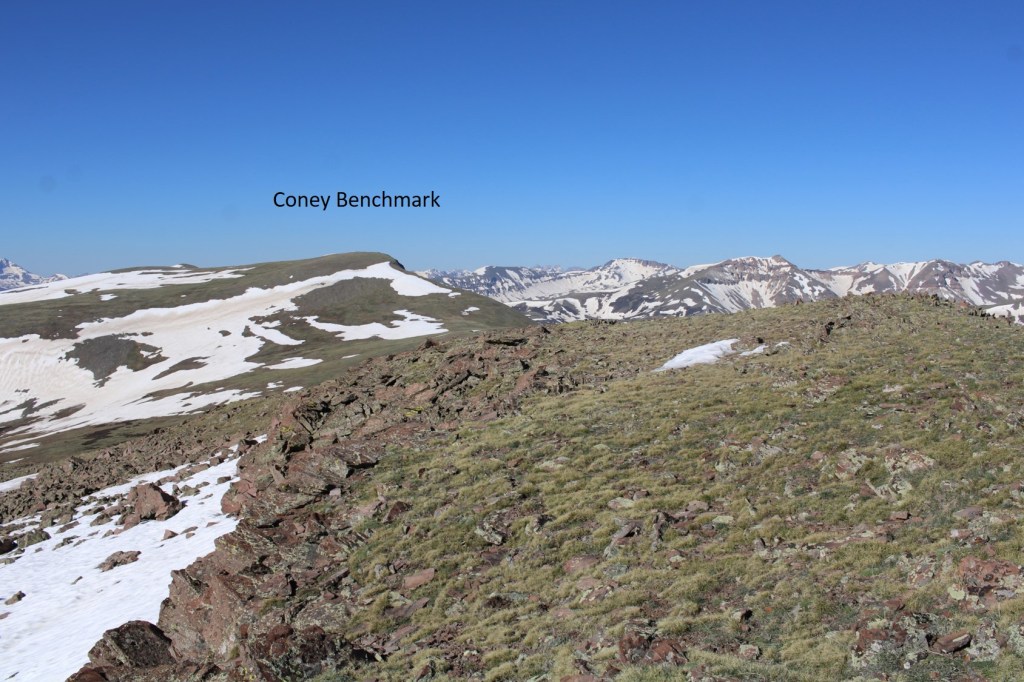
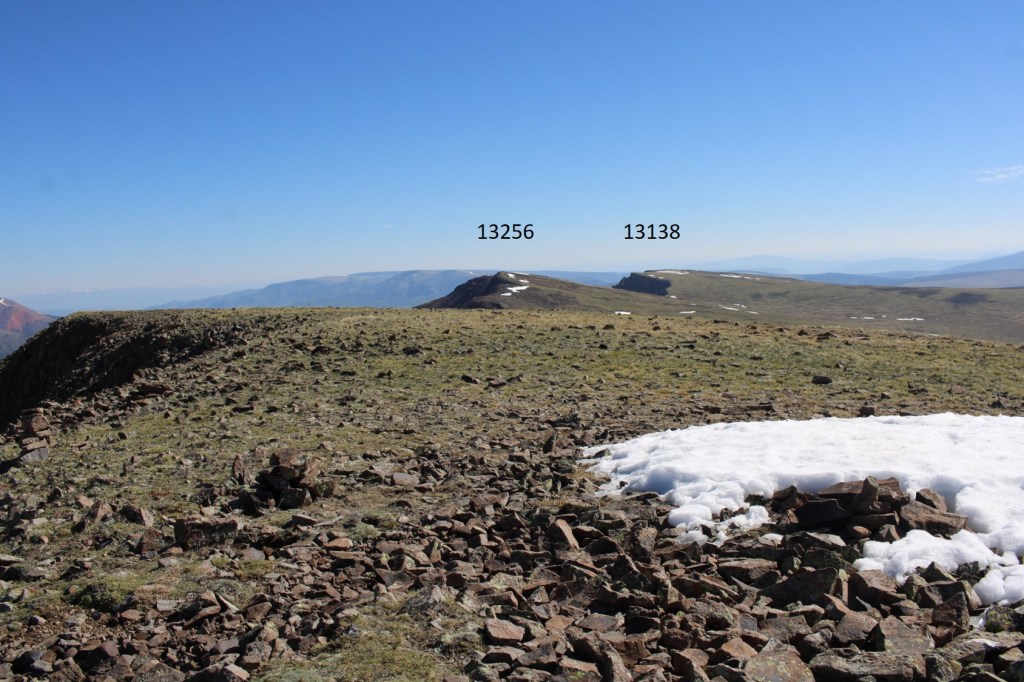
There was a plastic tube summit register at the top, which needs more paper. The only paper in there was (of course, since it’s a plastic tube) wet.  Here are some of the views from the top of other peaks in the area

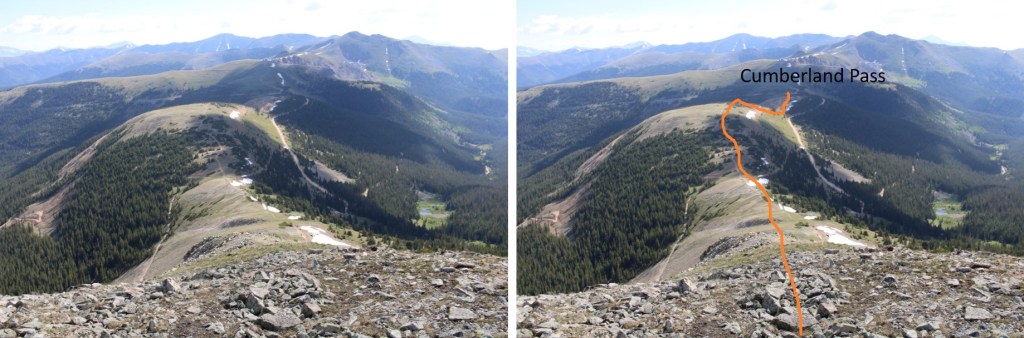
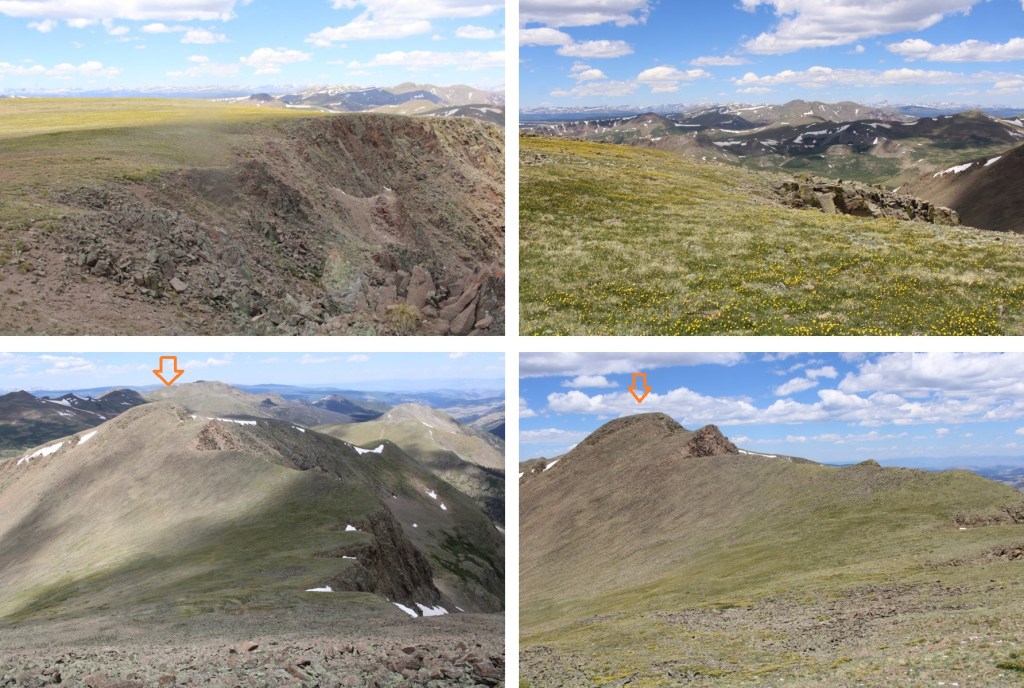
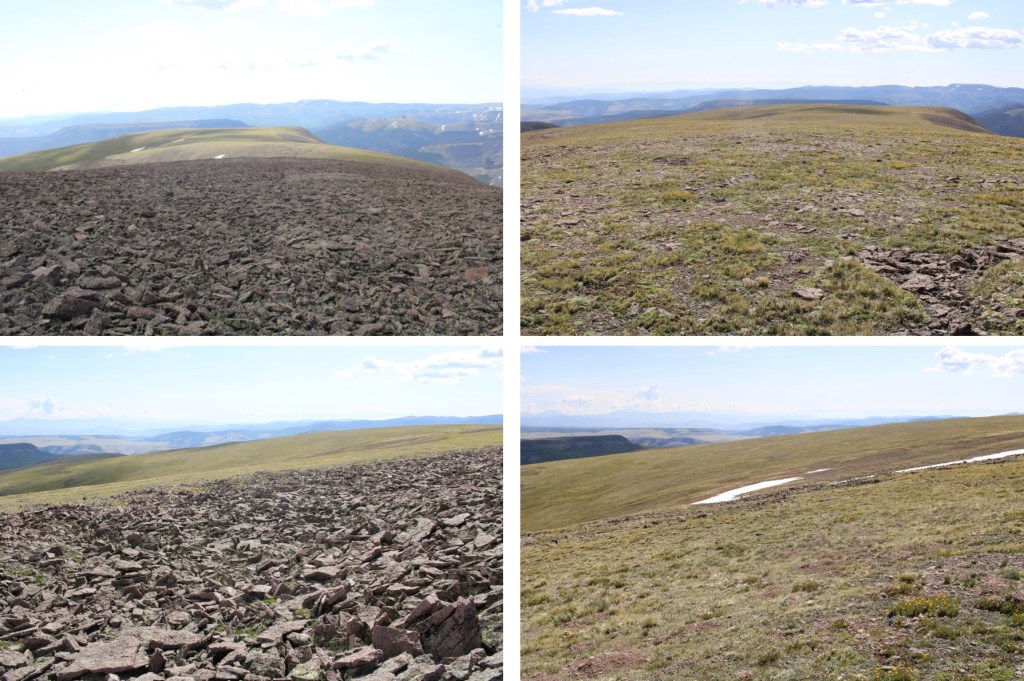
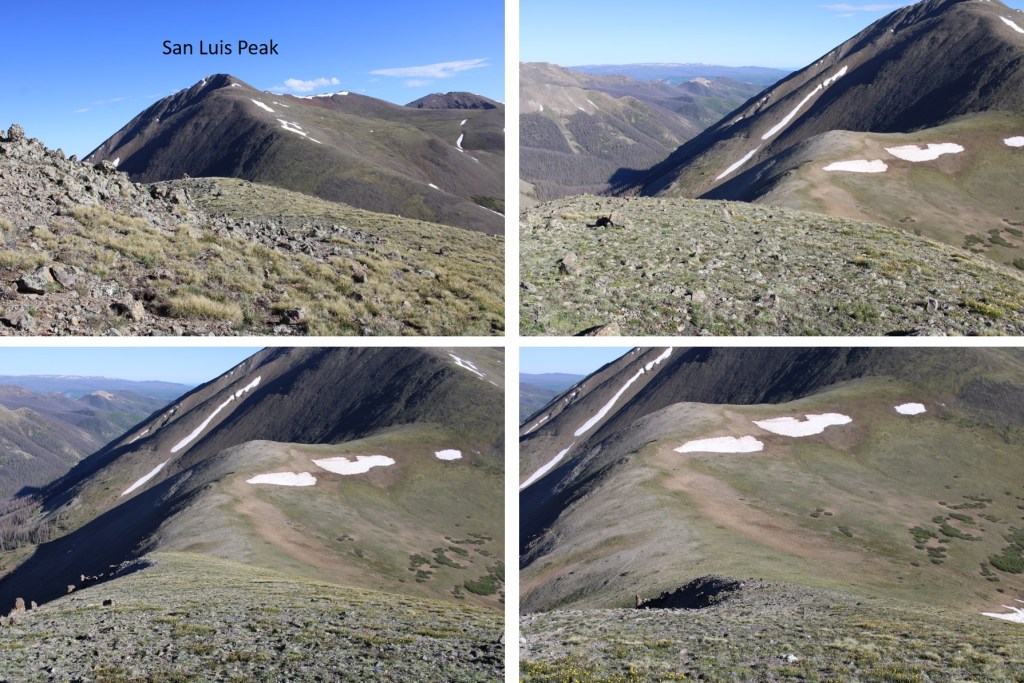
I turned around and headed back the way I came, but navigation was a bit tricky, as everything looked the same

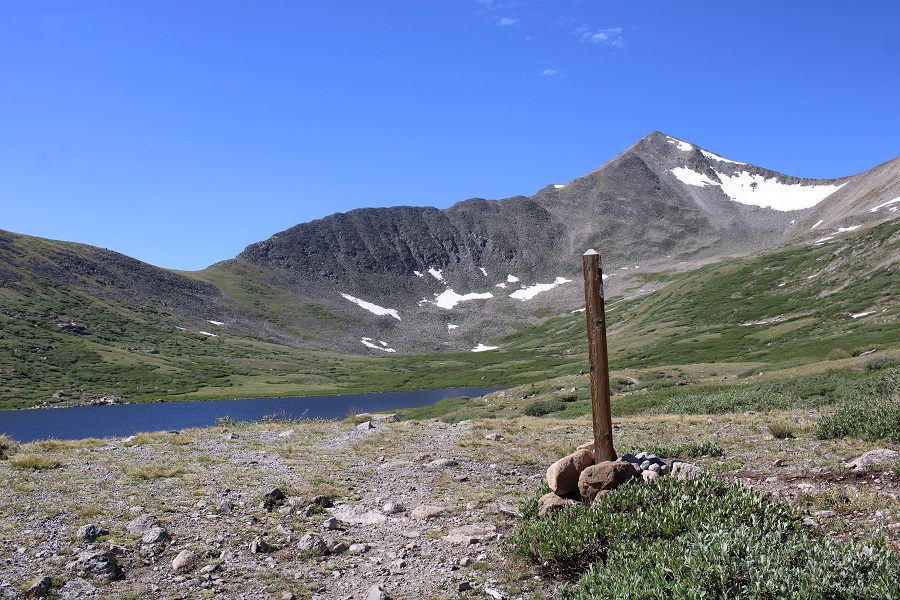
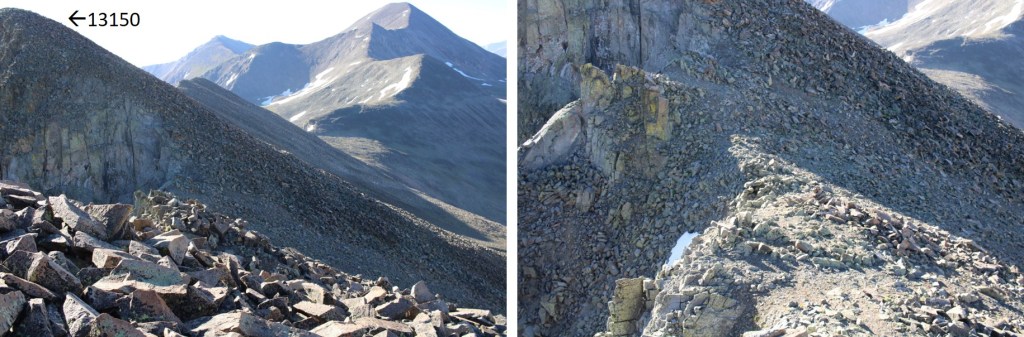
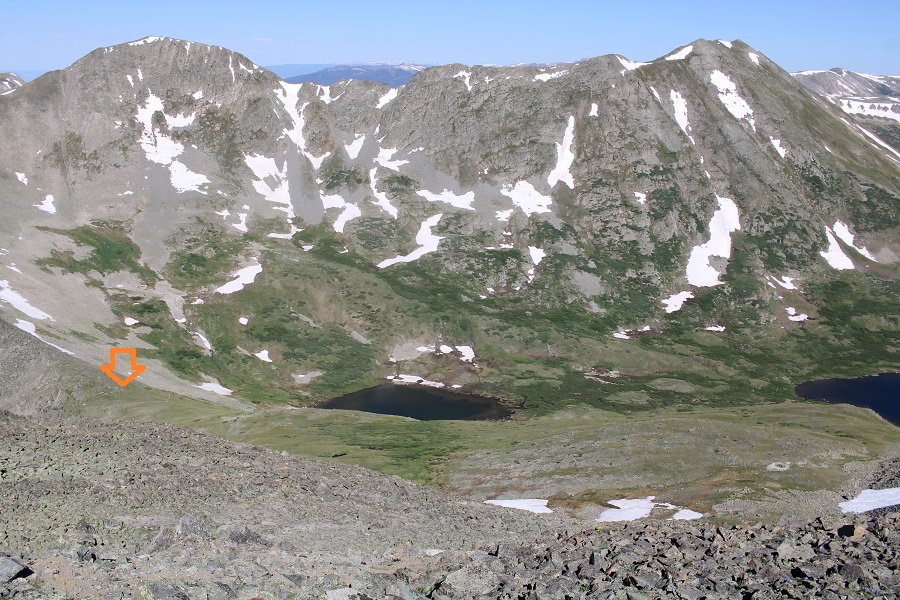
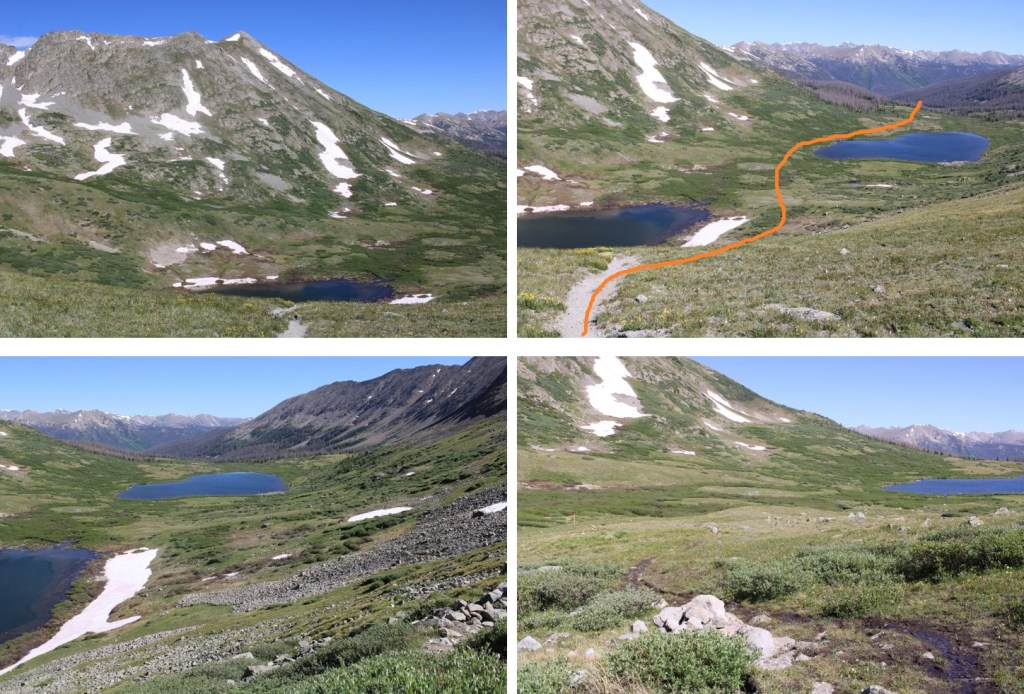
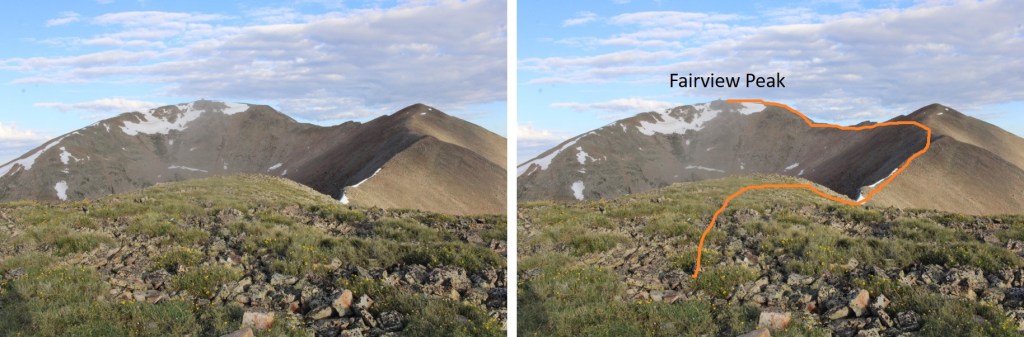
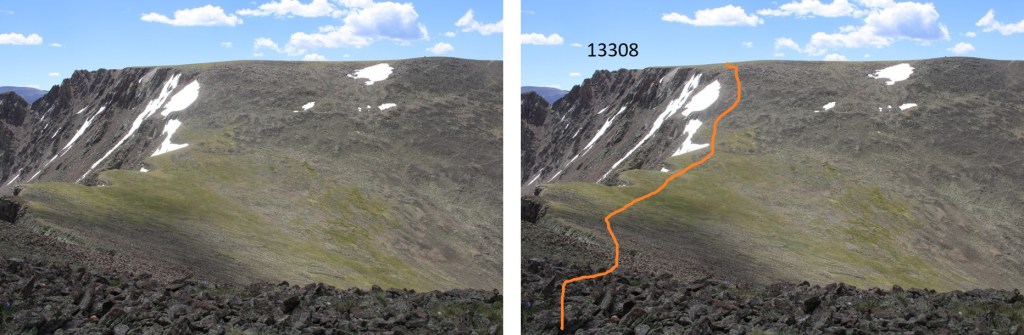
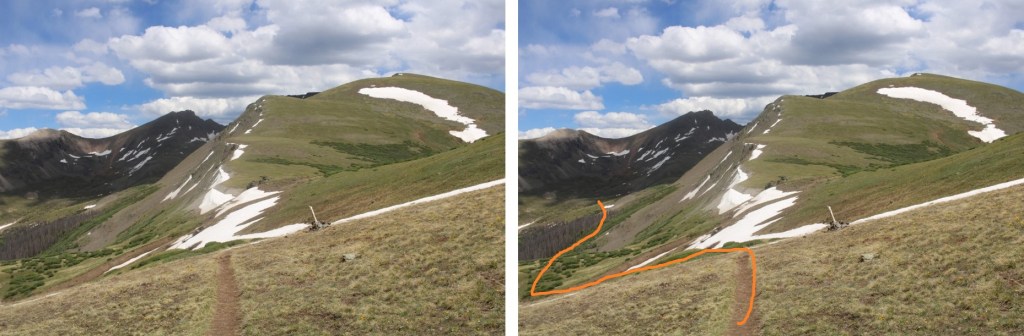
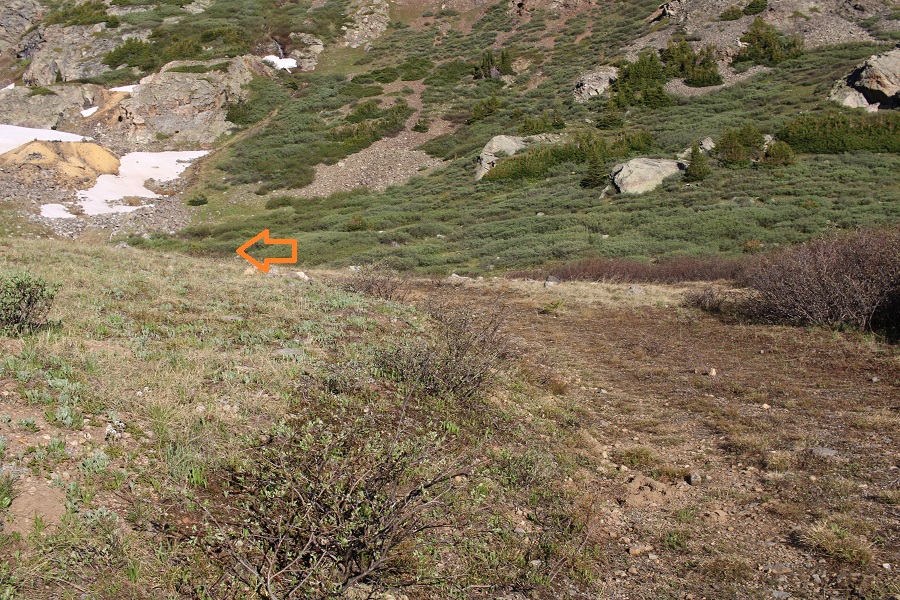
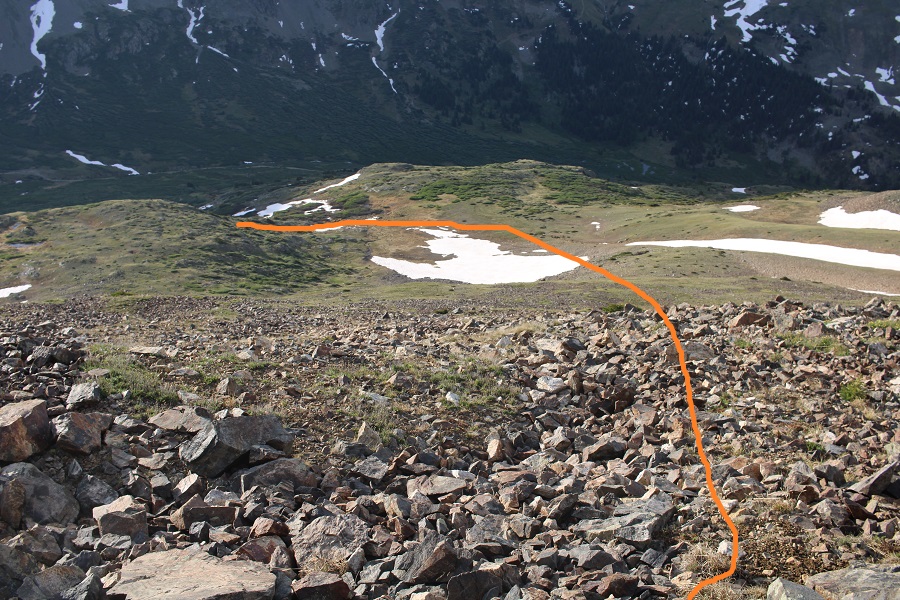
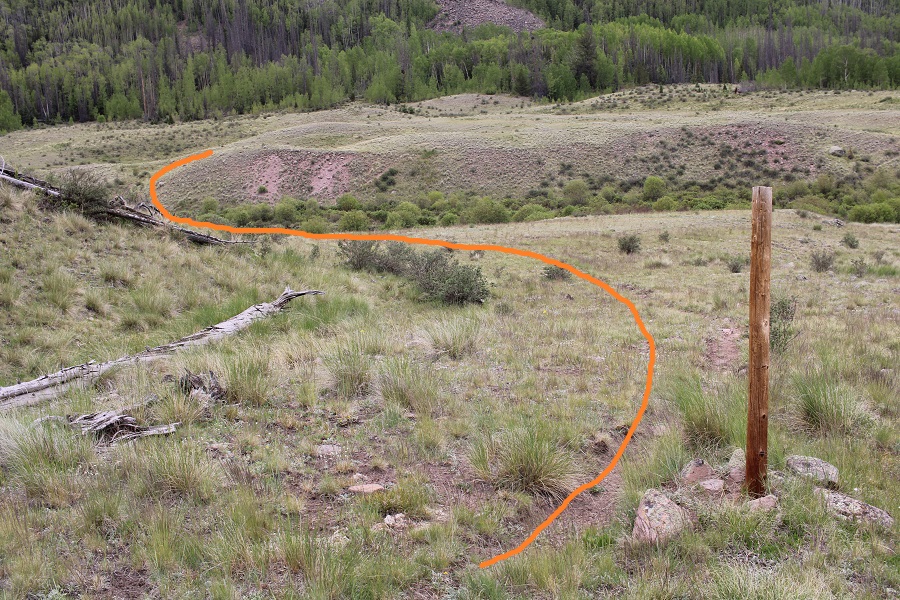
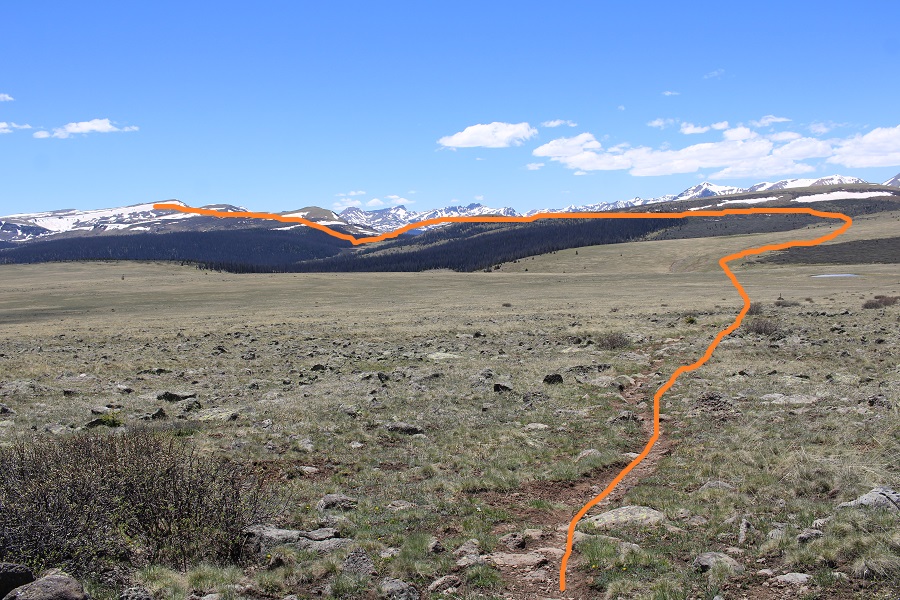
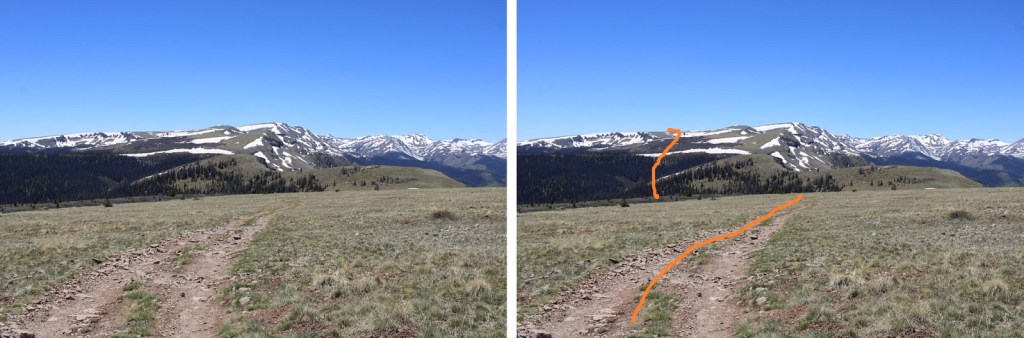
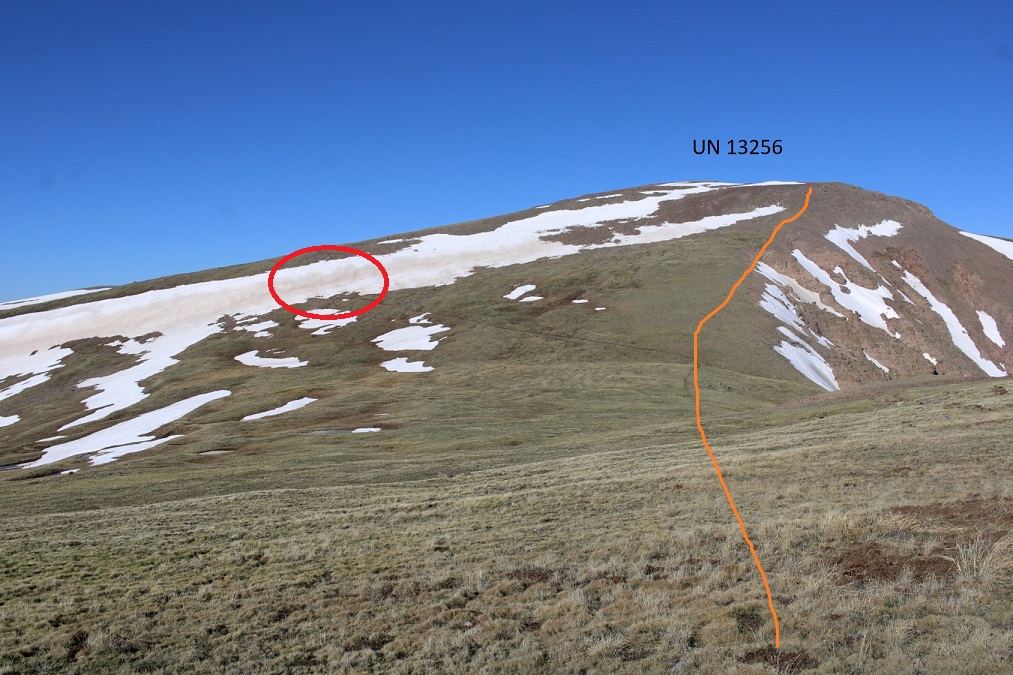
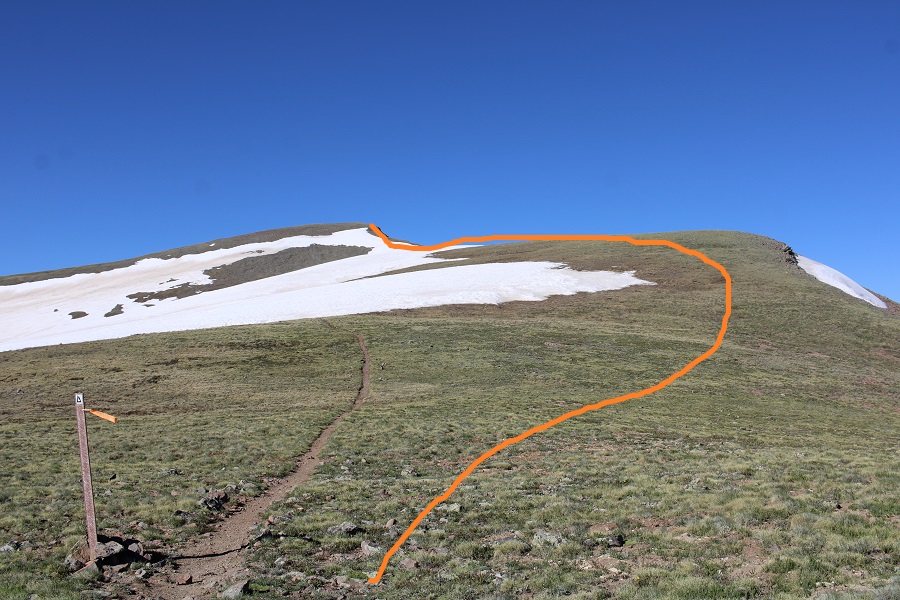
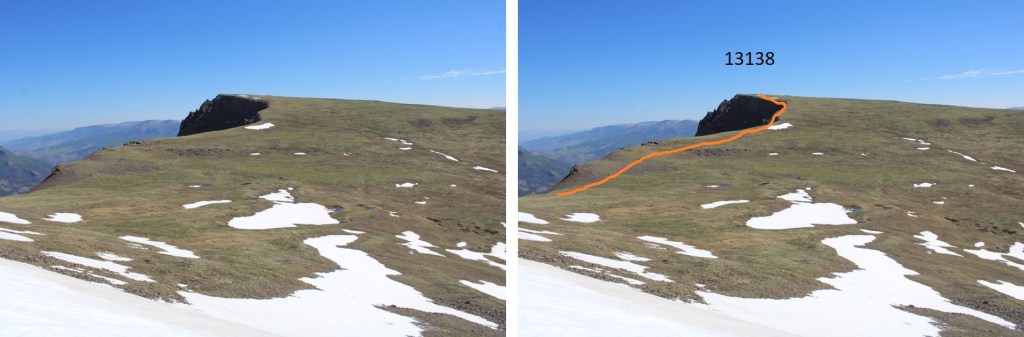
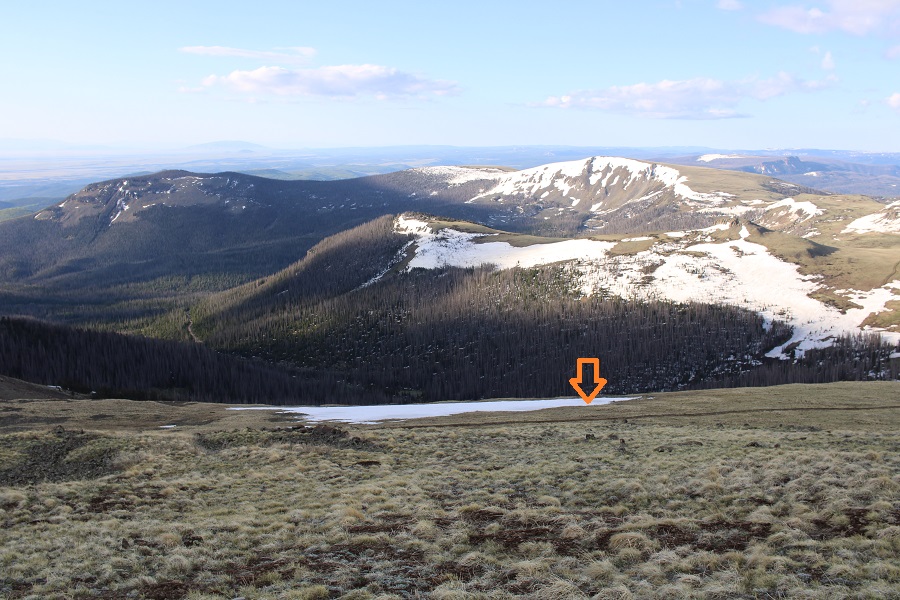
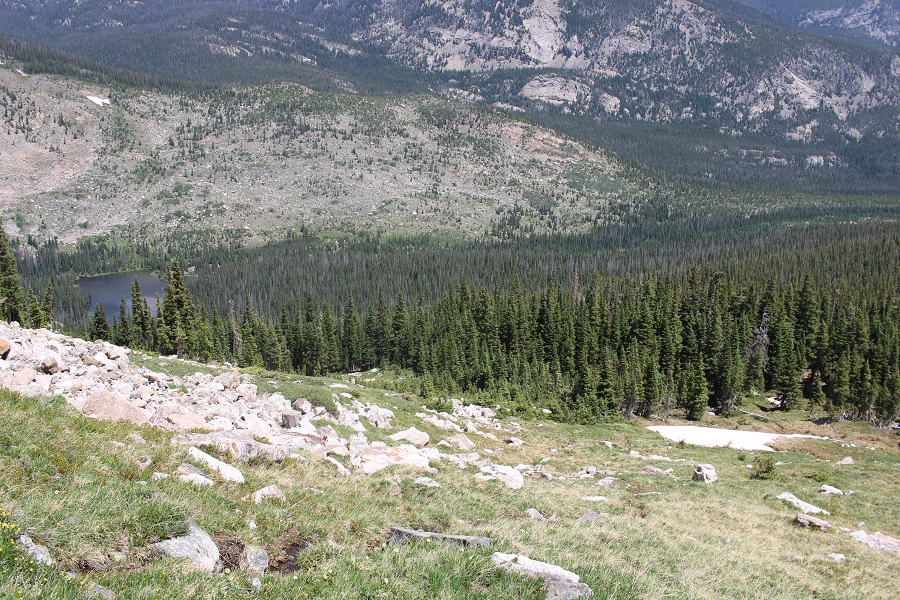
I headed northeast, and knowing if I went too far north I’d cliff out, I kept this meadow in my sights and aimed for it until I could see a proper route back down

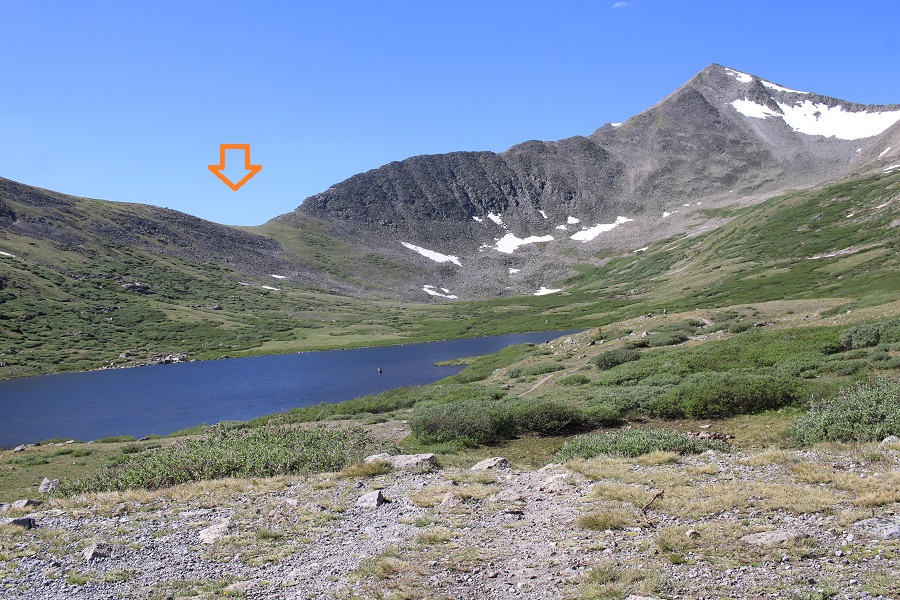
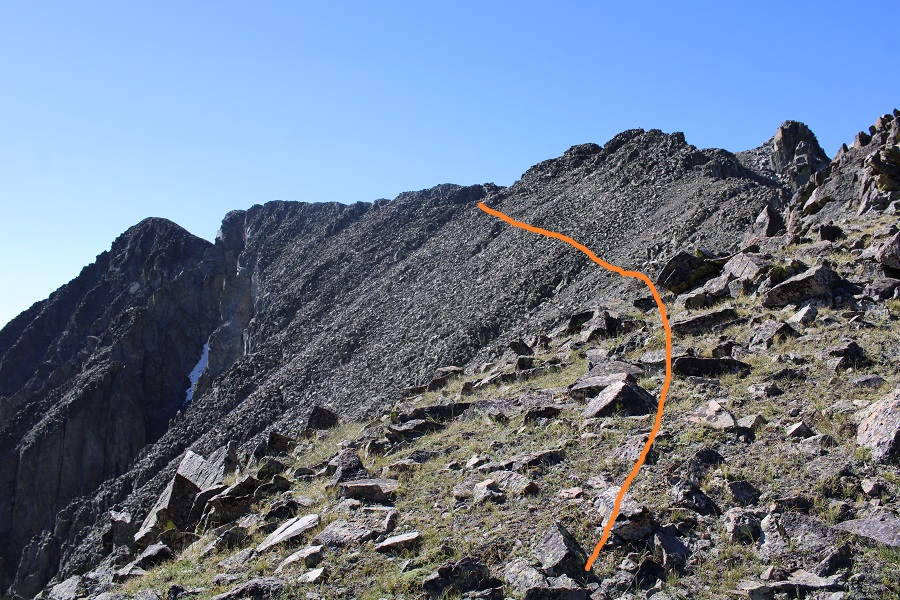
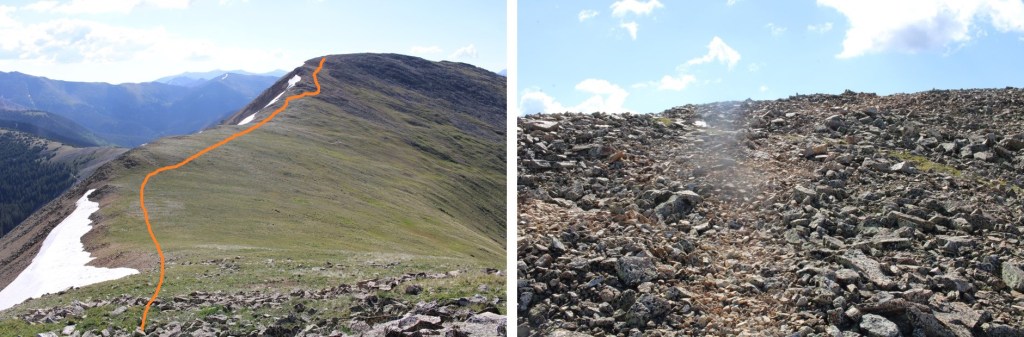
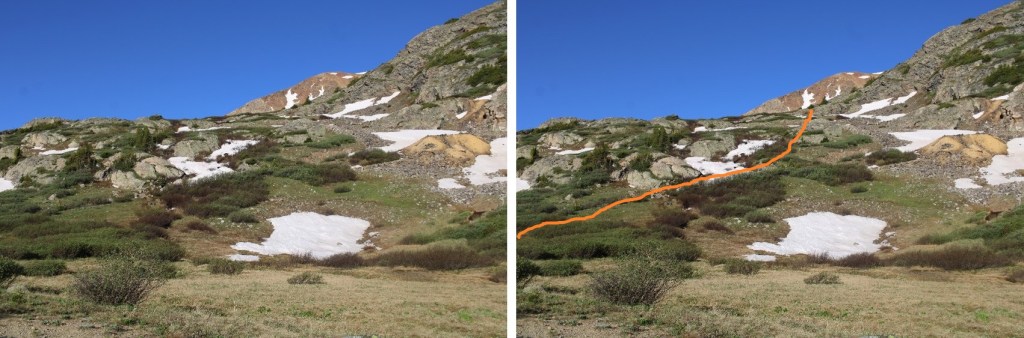
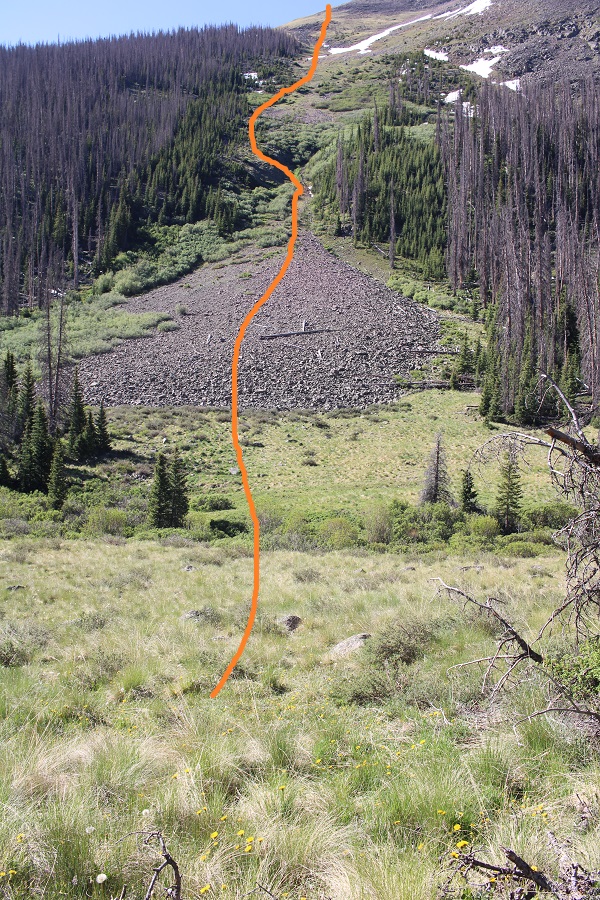
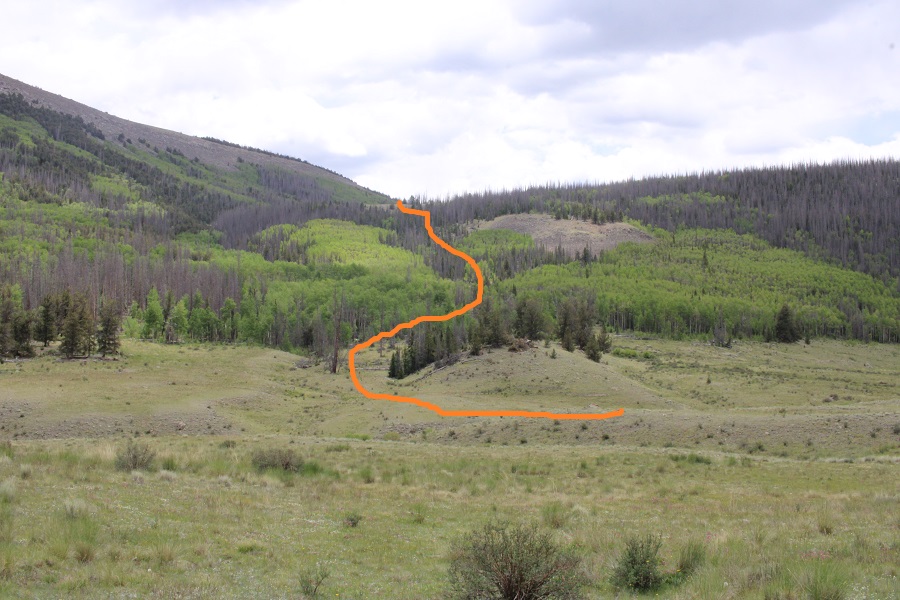
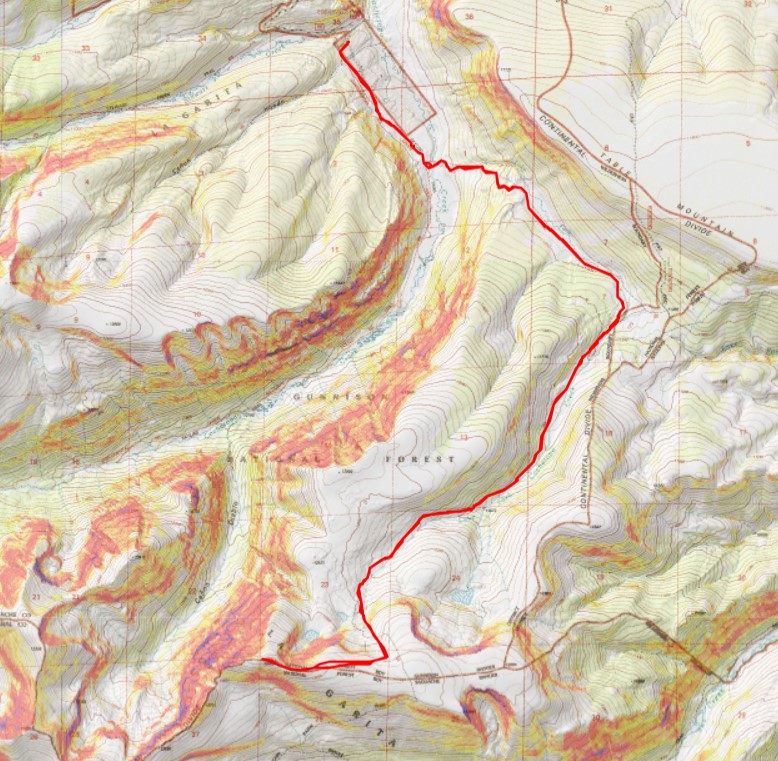
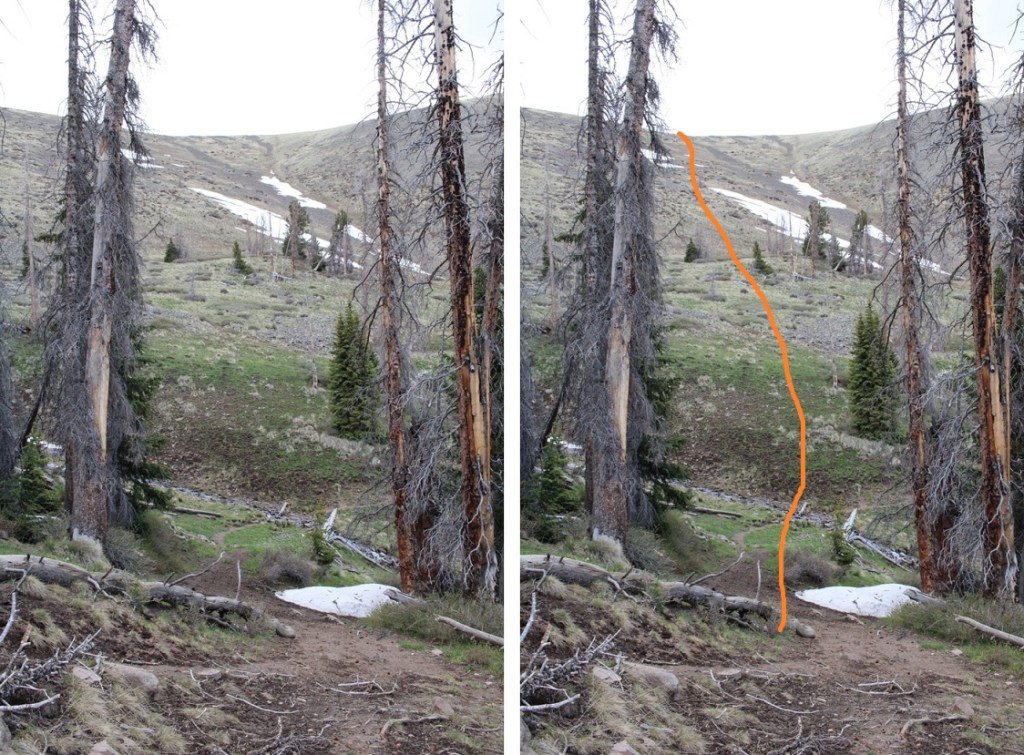
Here’s the route I took back to treeline

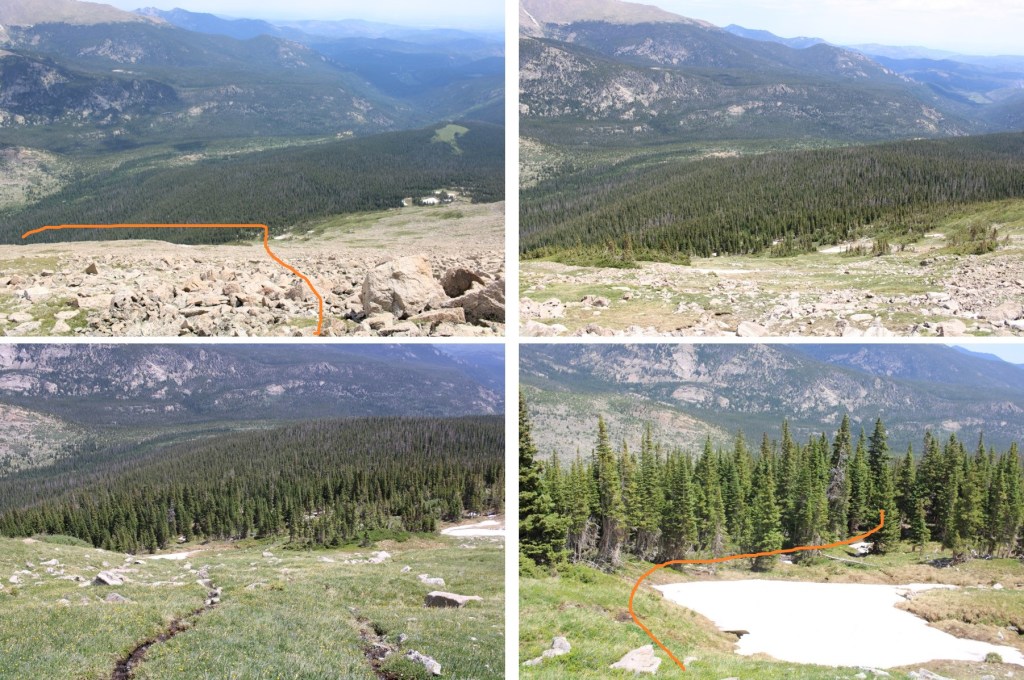
Note where Ouzel Lake is to the left, as that’s where you’re headed.

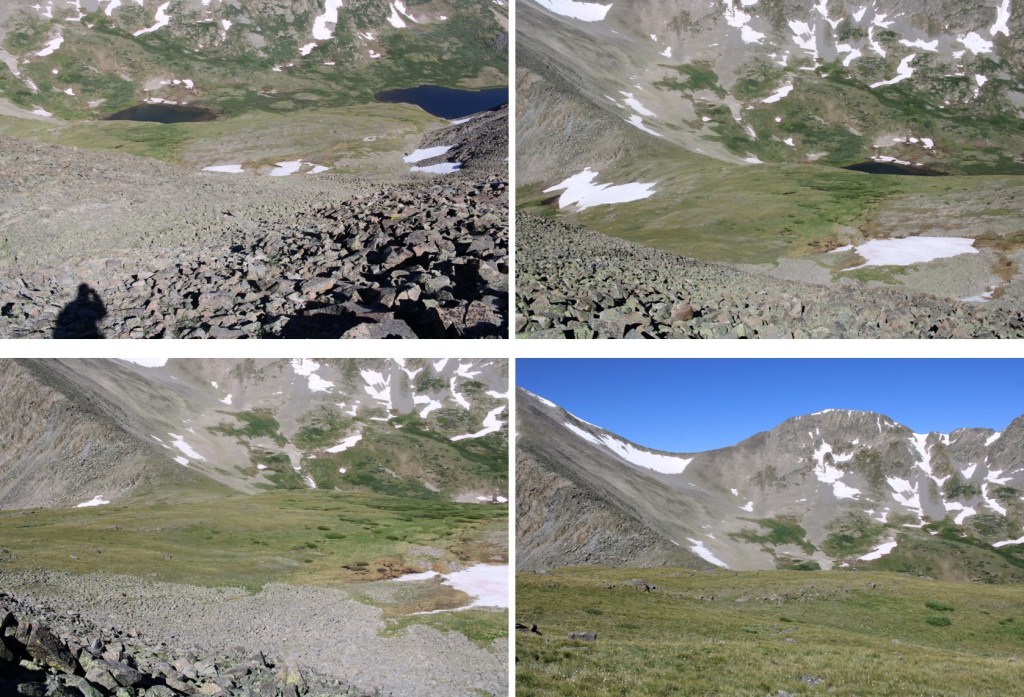
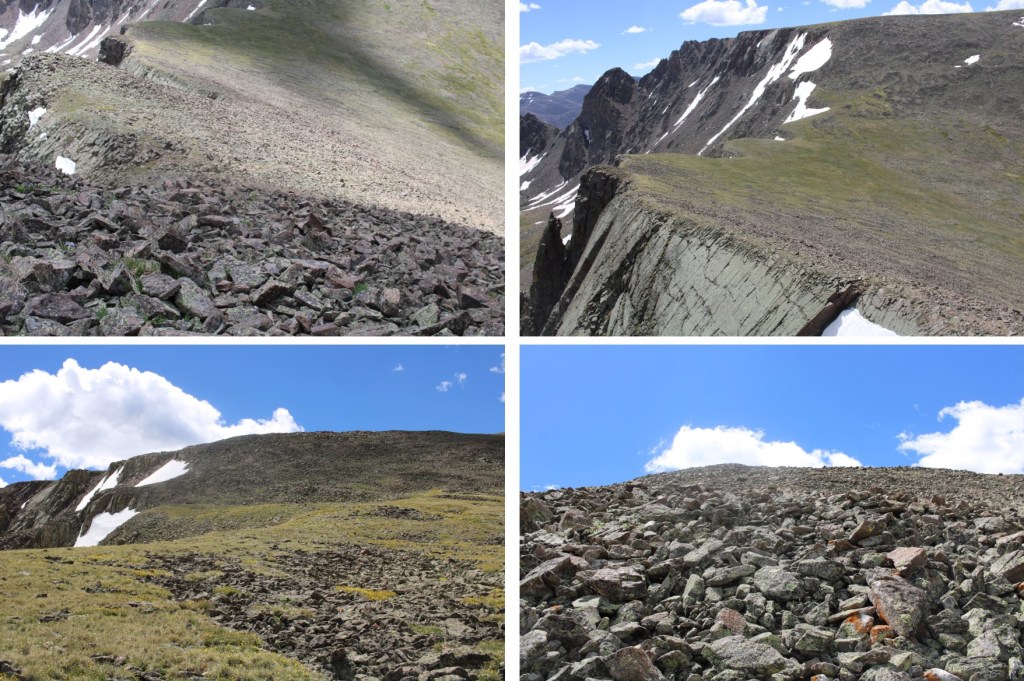
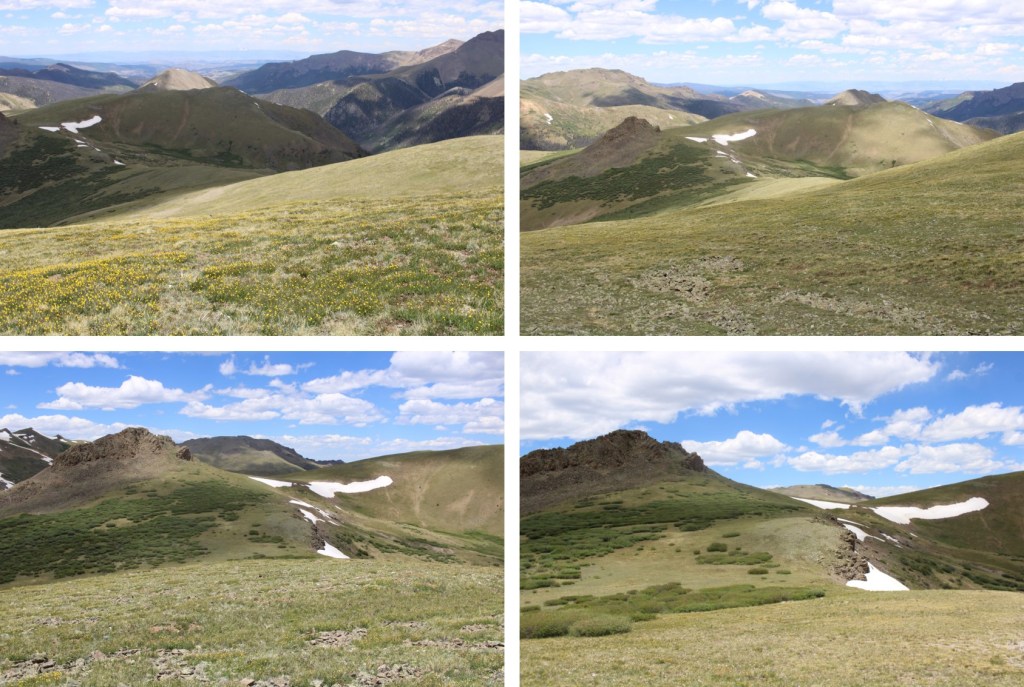
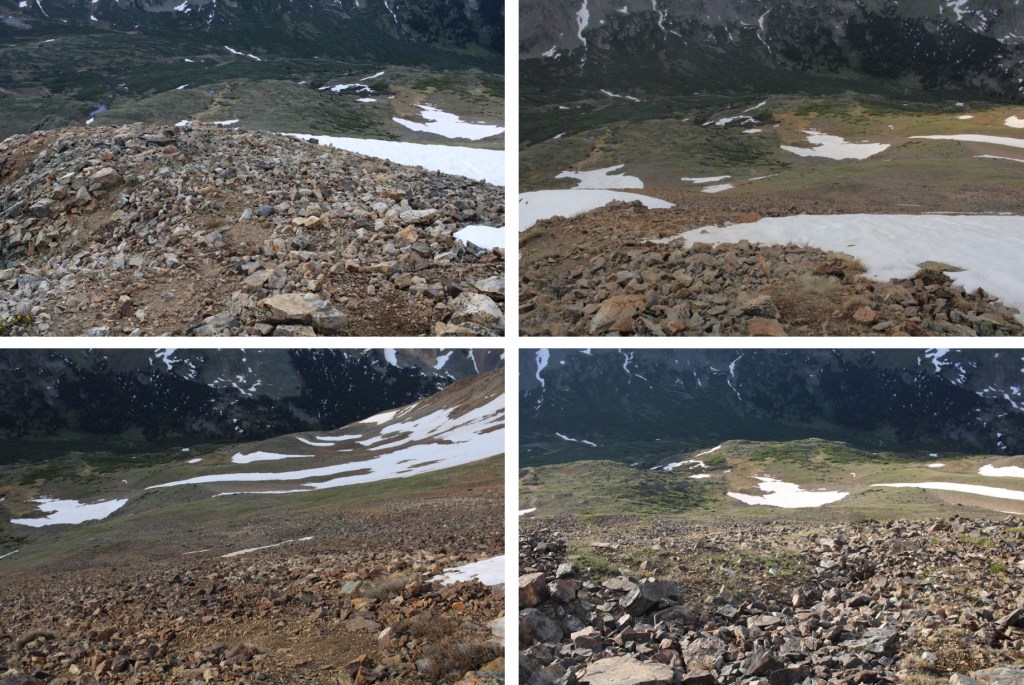
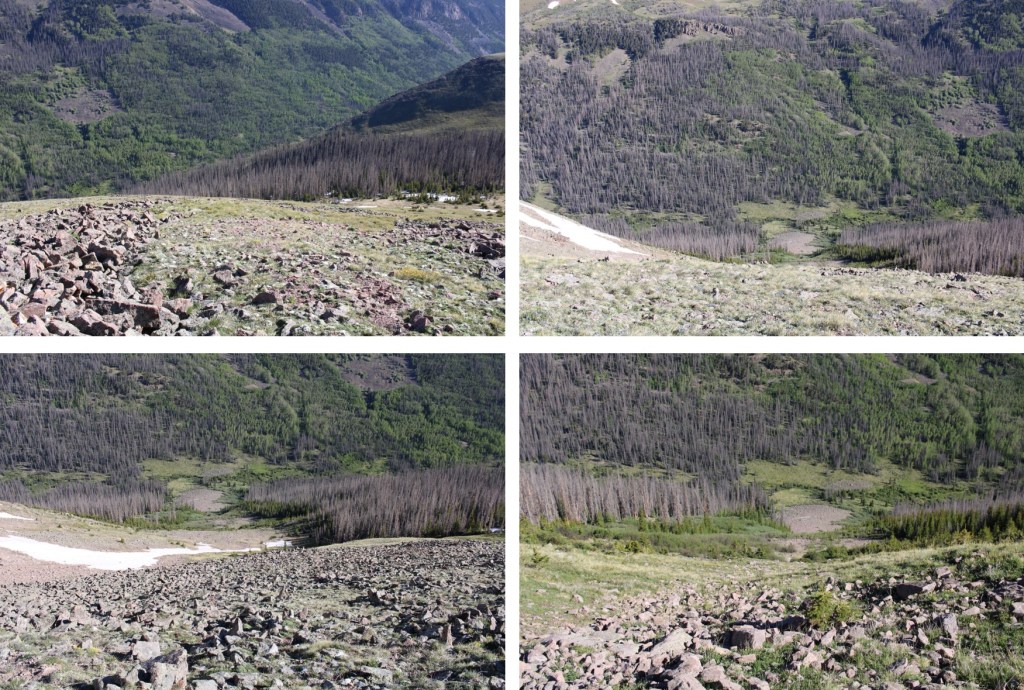
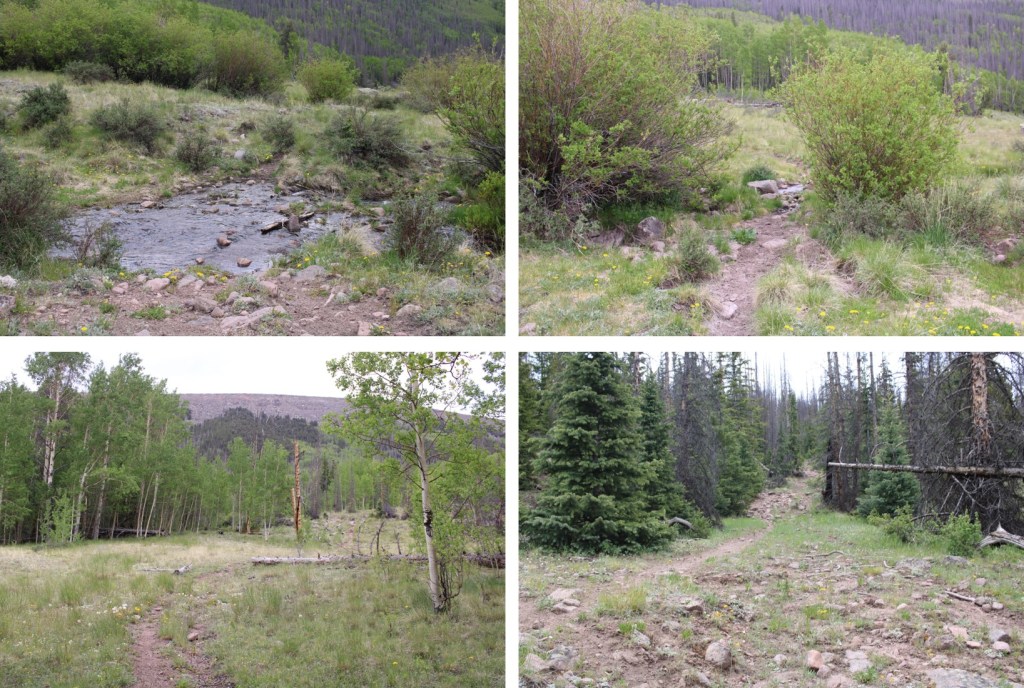
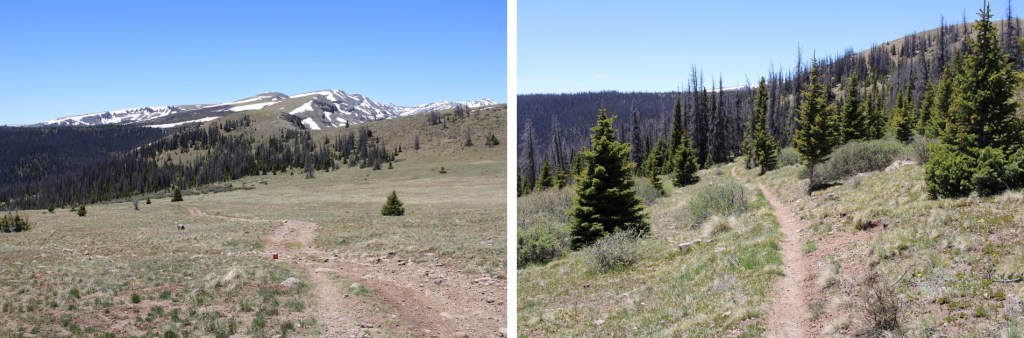
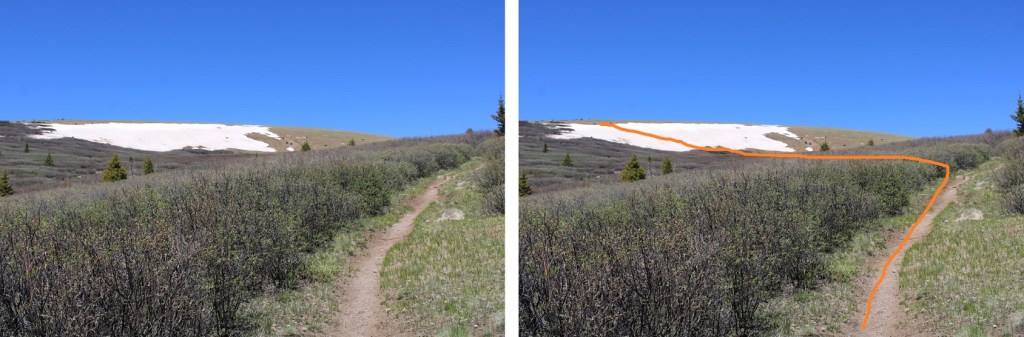
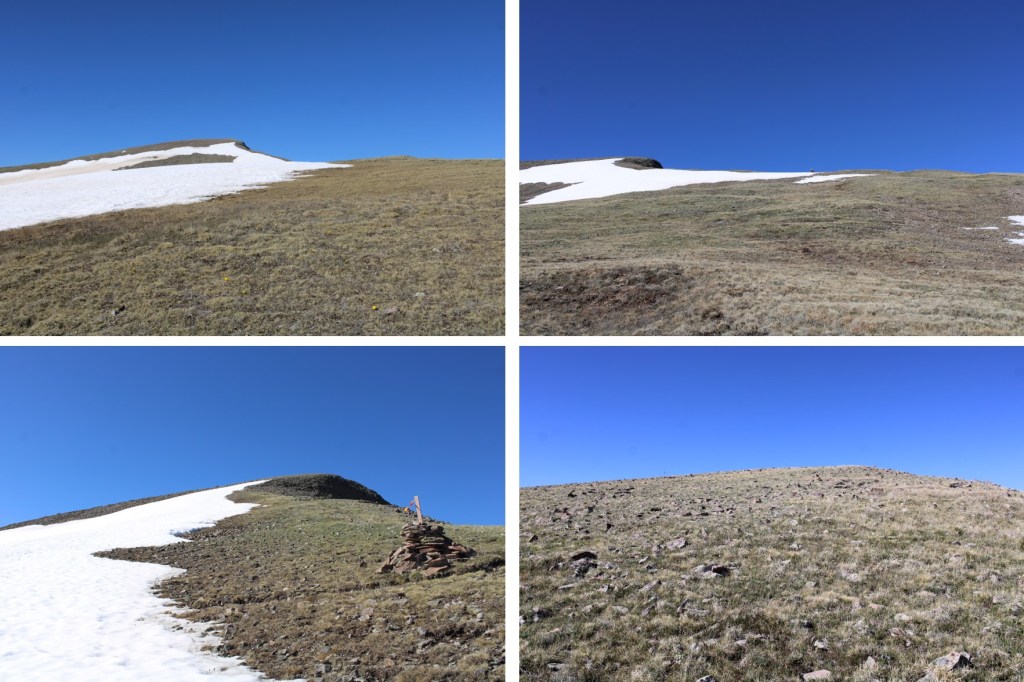
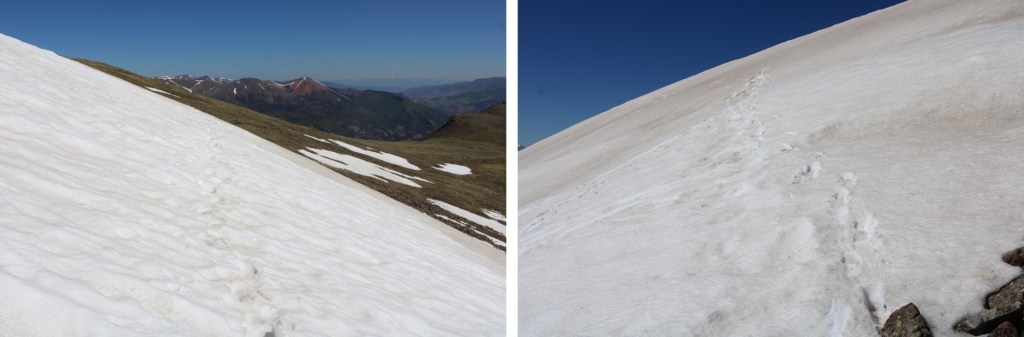
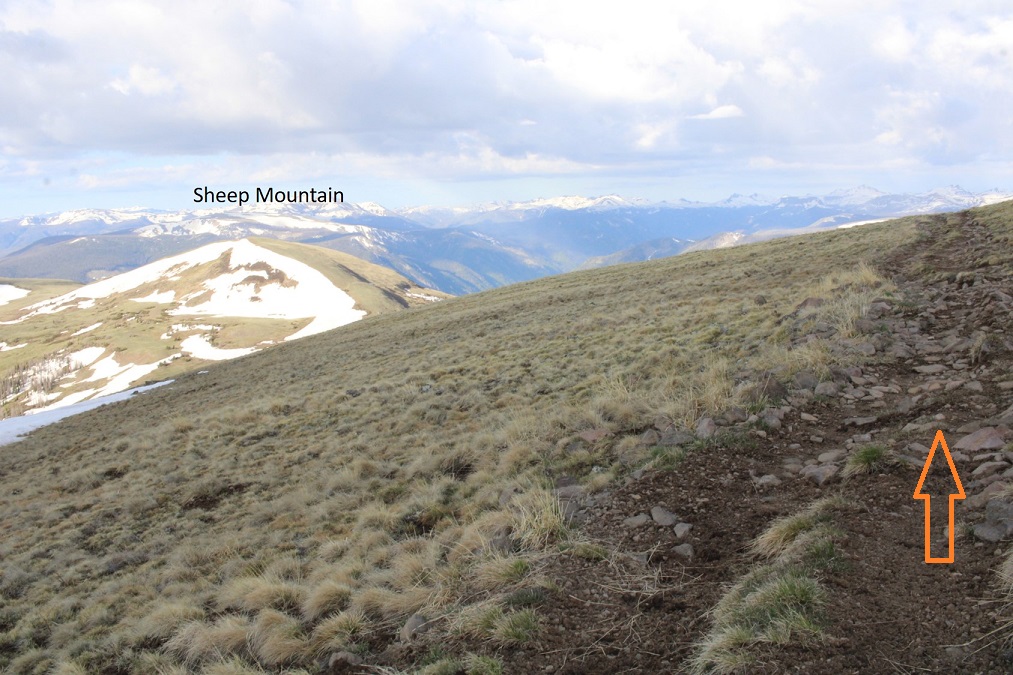
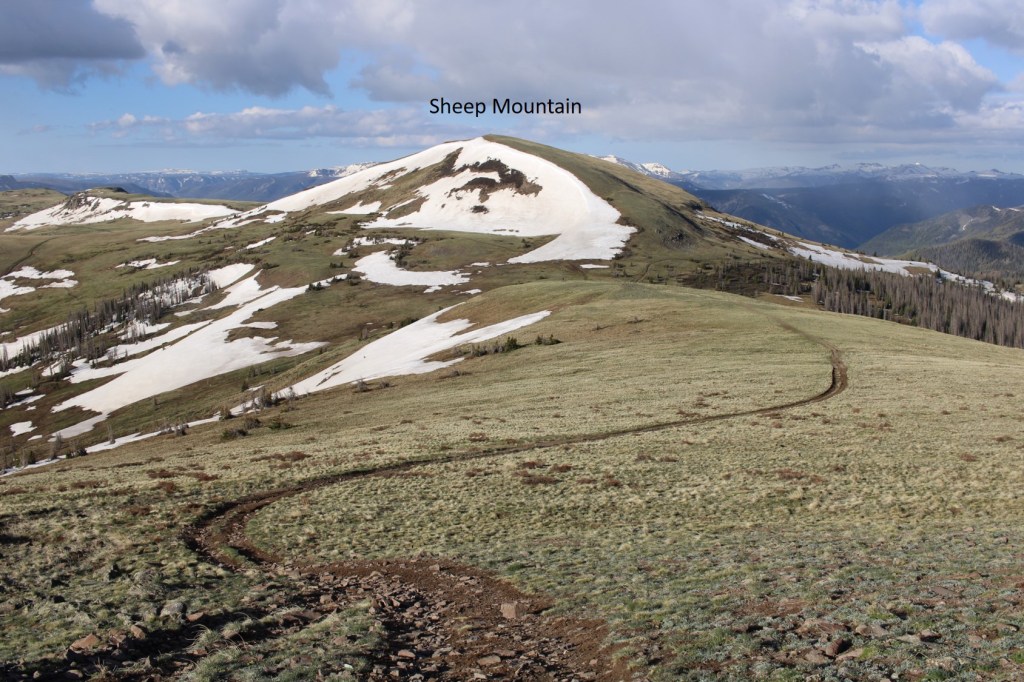
Here are some pictures of the gully down

And the short traverse to the east

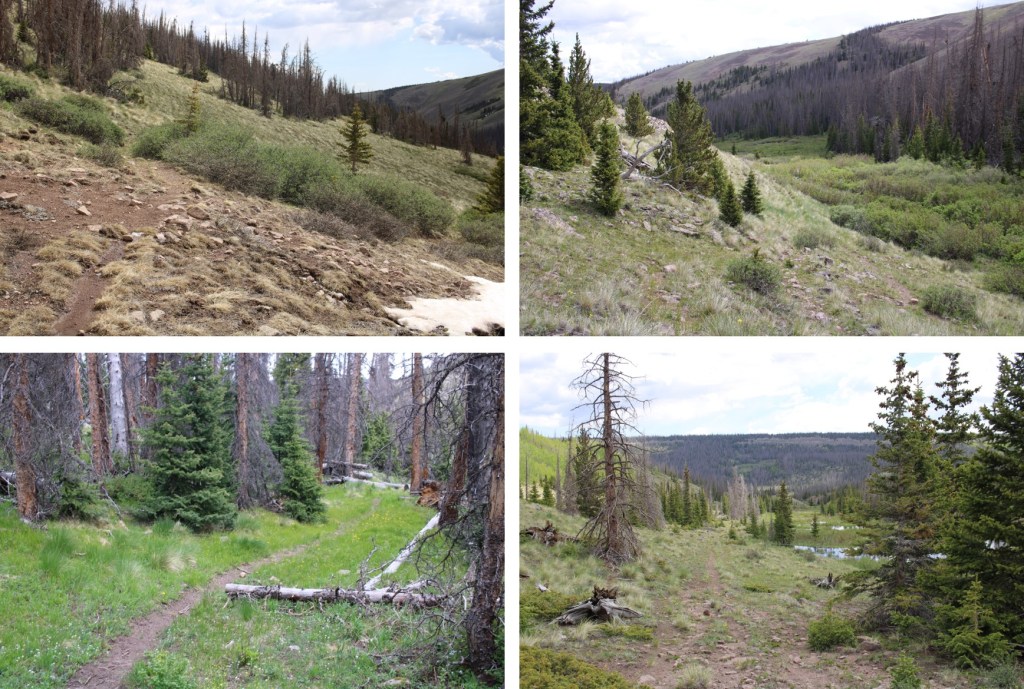
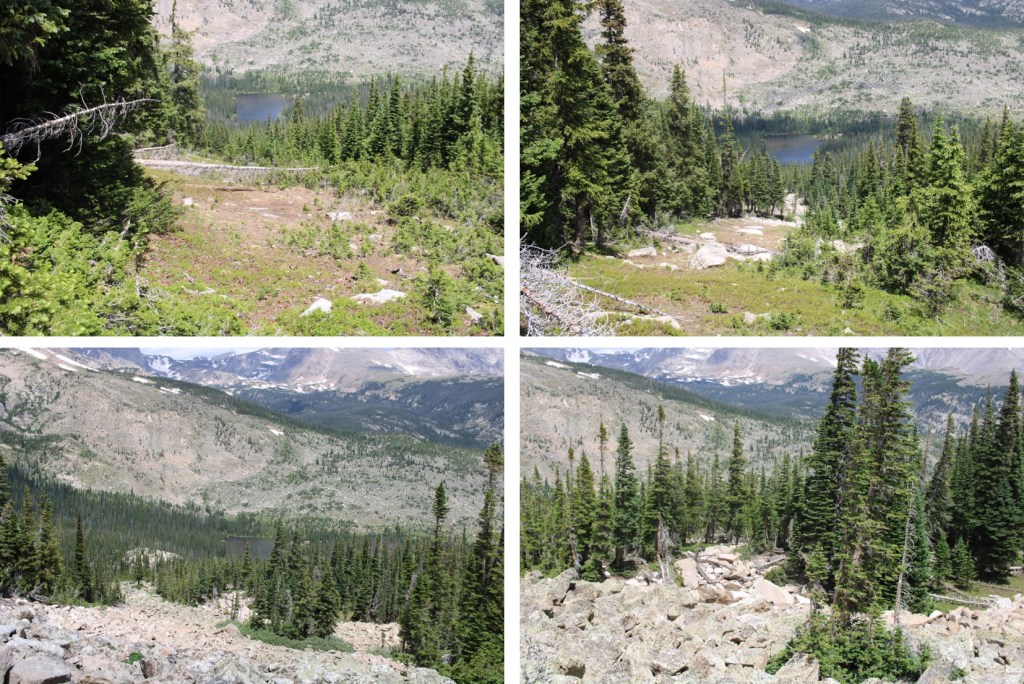
Then the bushwhack back down to the lake, following game trails where I could find them

I once again put on my creek crossing shoes and crossed Ouzel Creek.  I’d really recommend creek crossing shoes, as the rocks under the water were very slippery

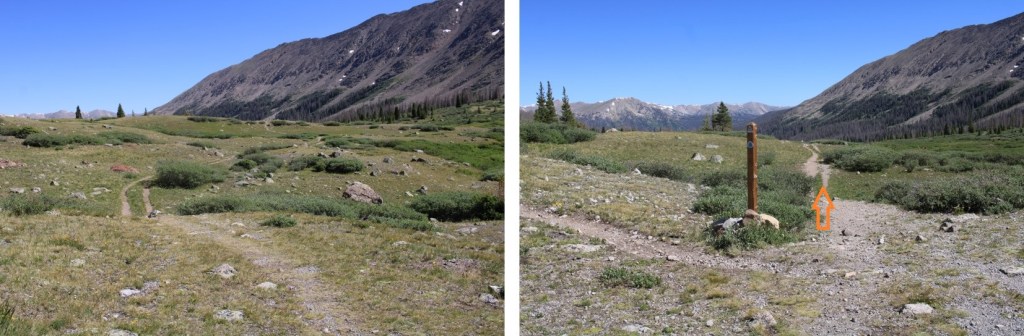
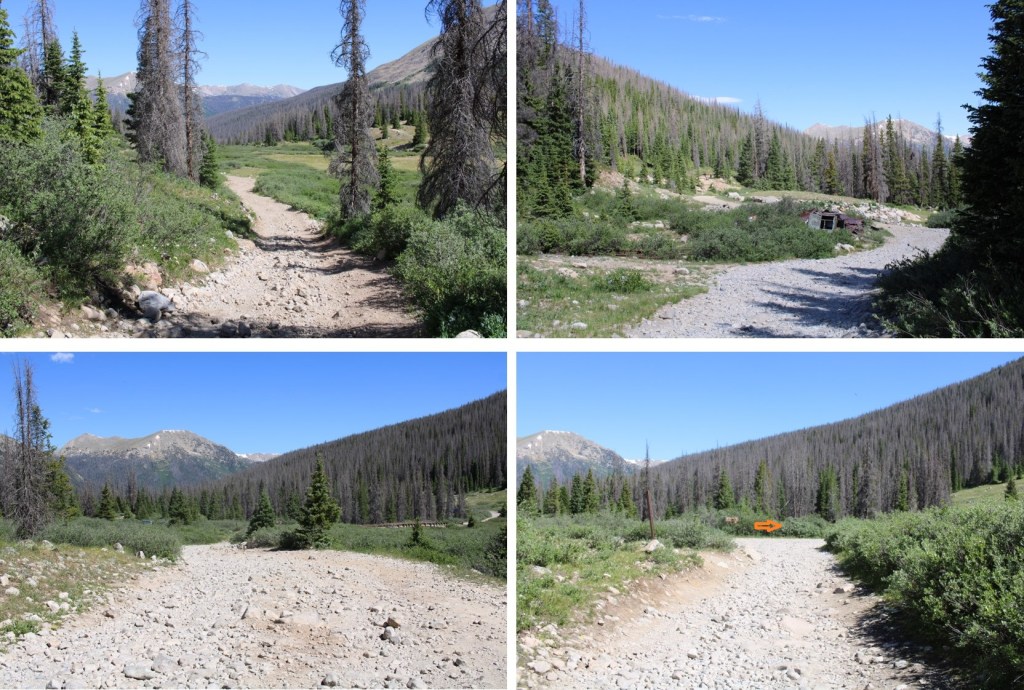
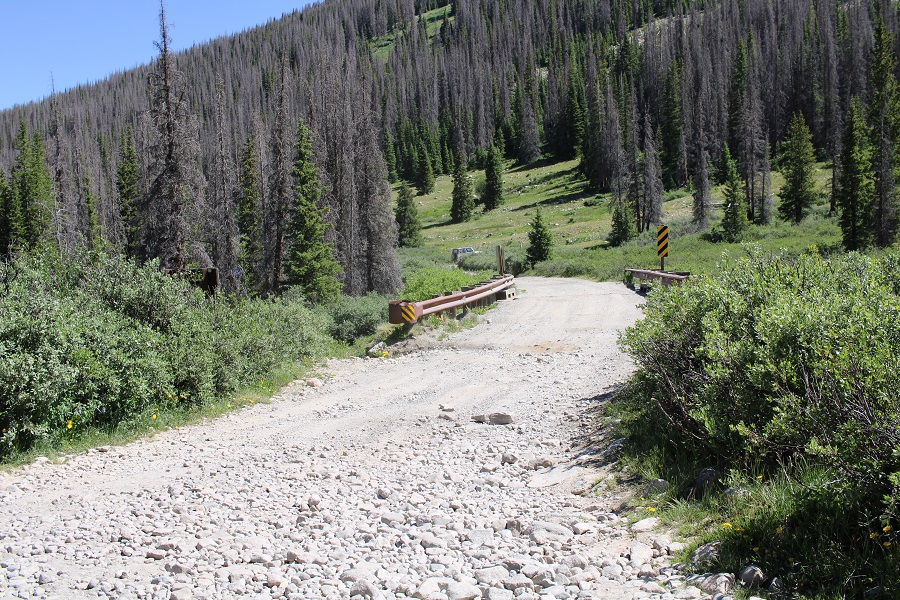
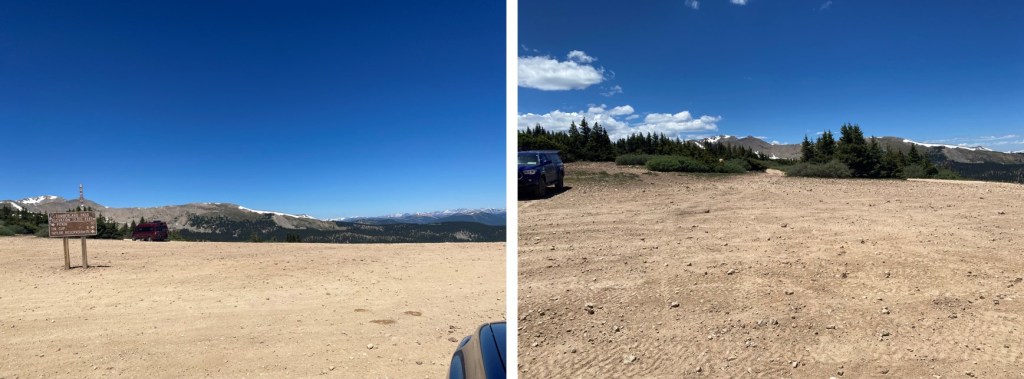
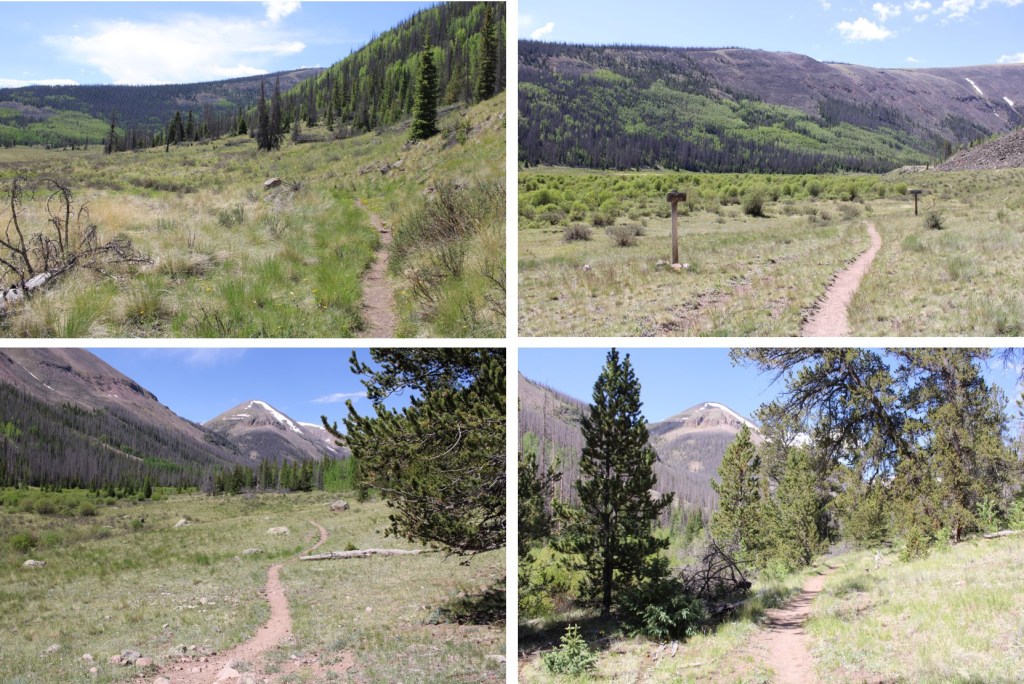
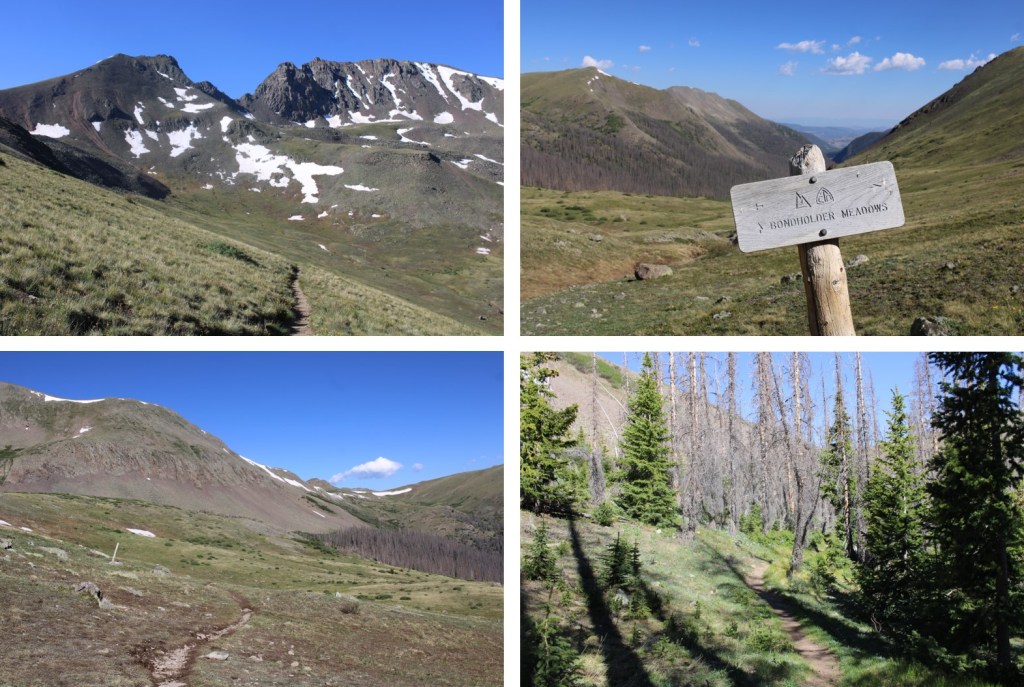
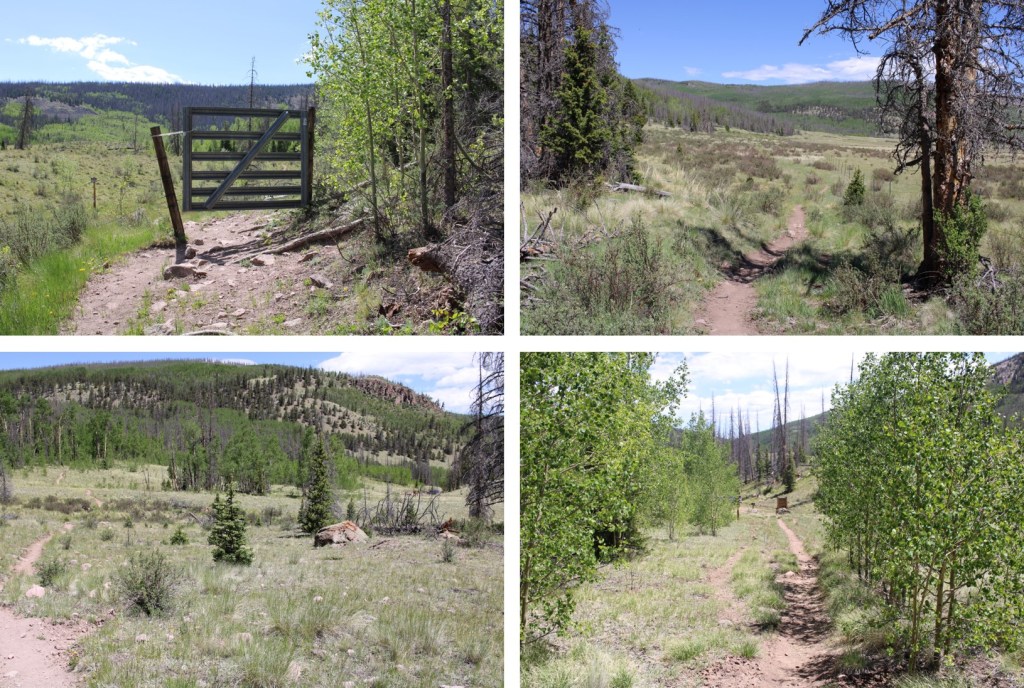
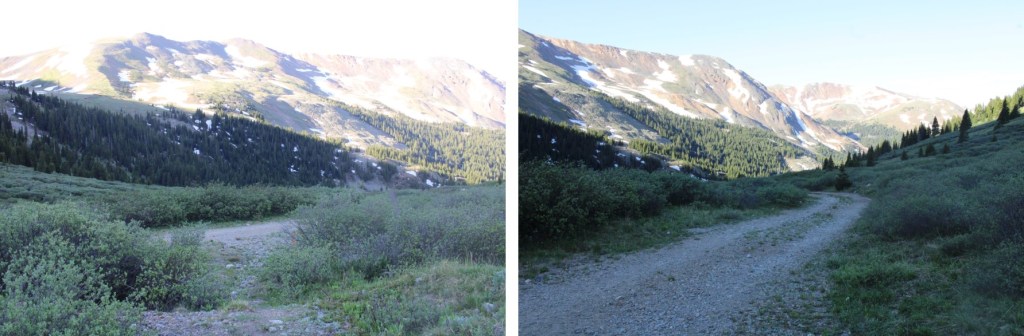
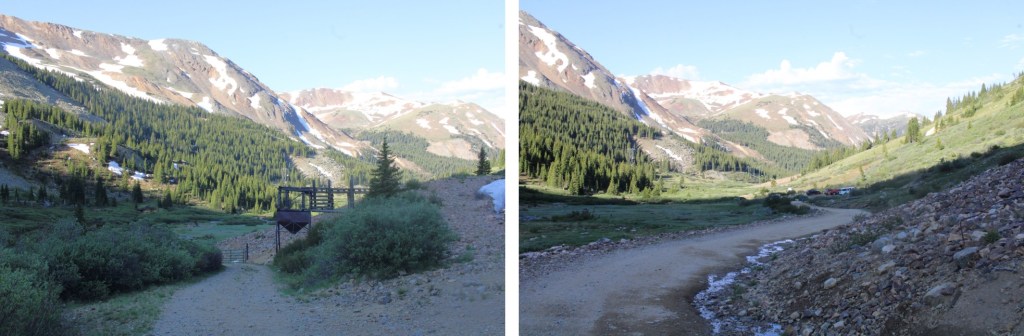
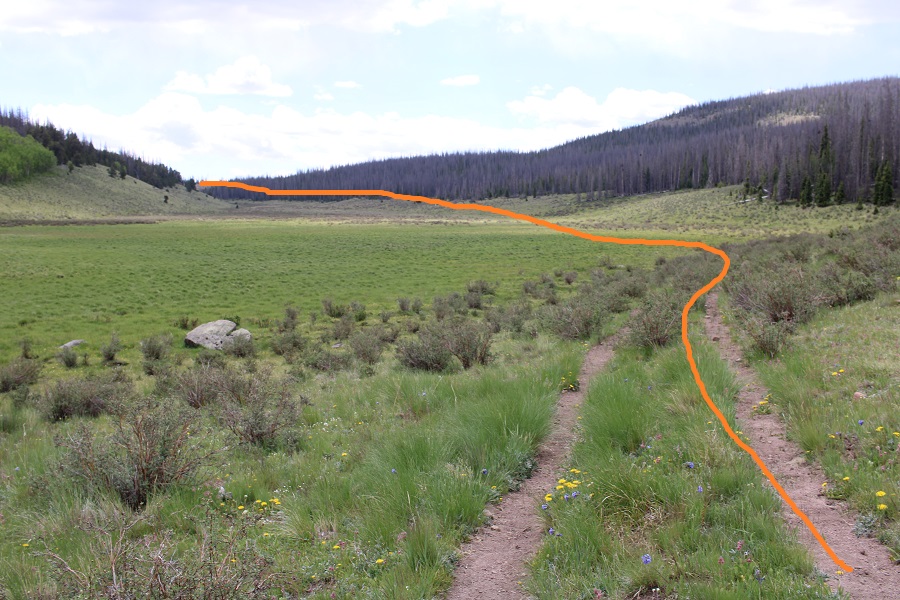
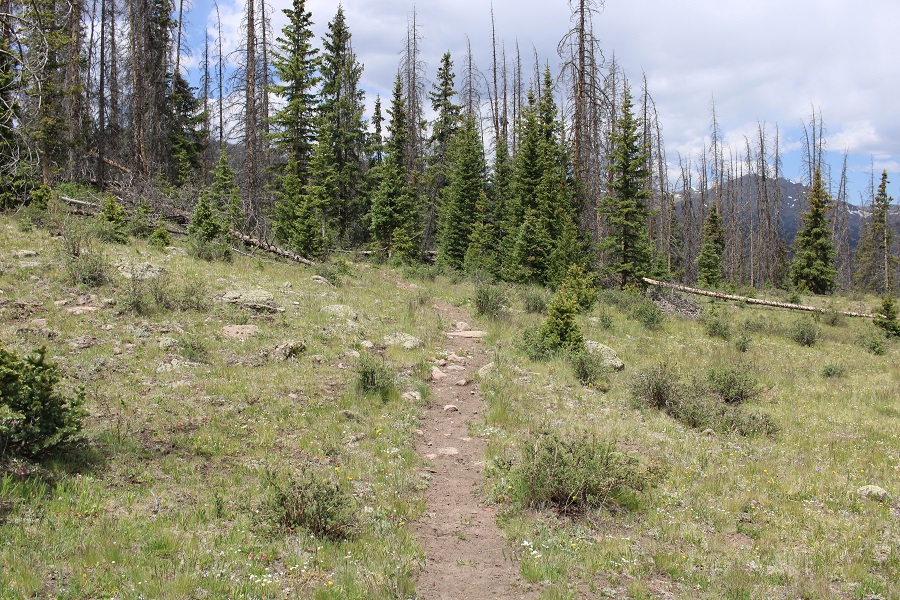
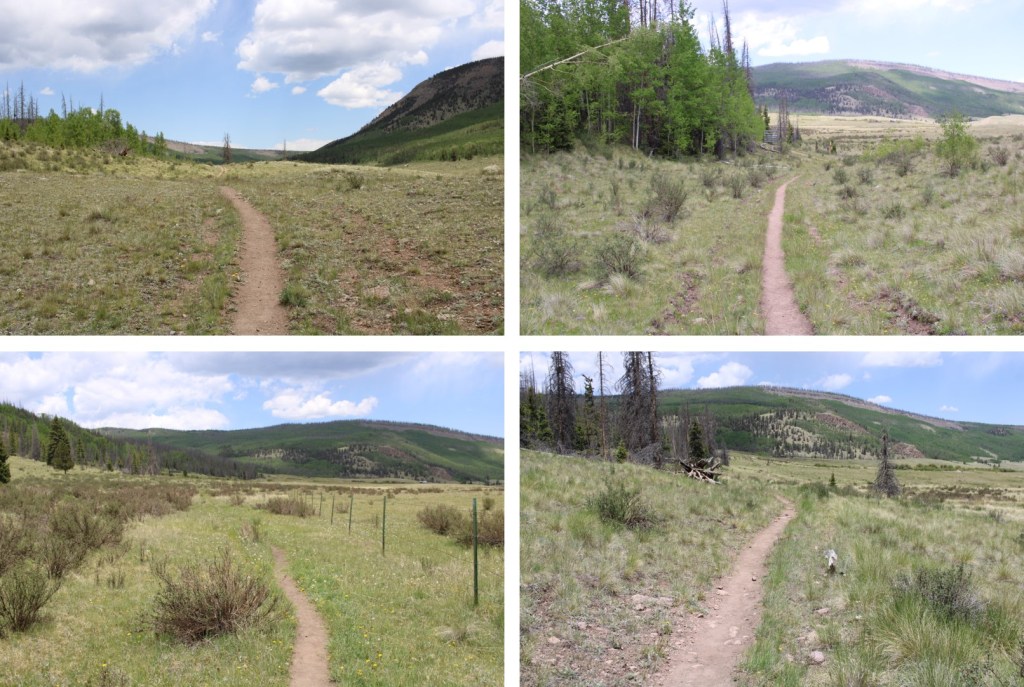
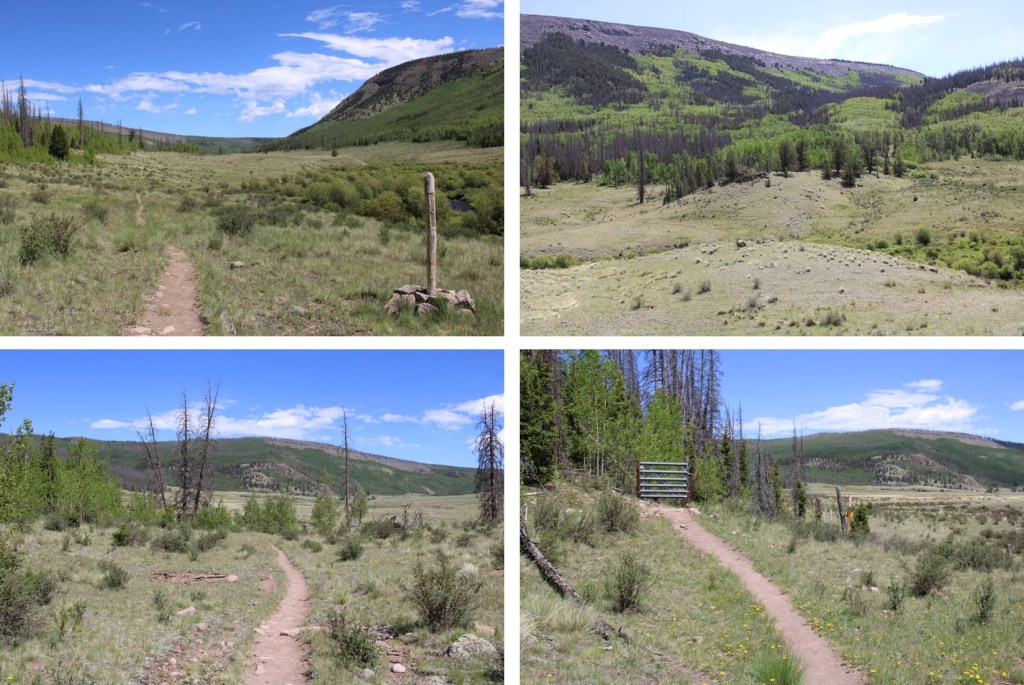
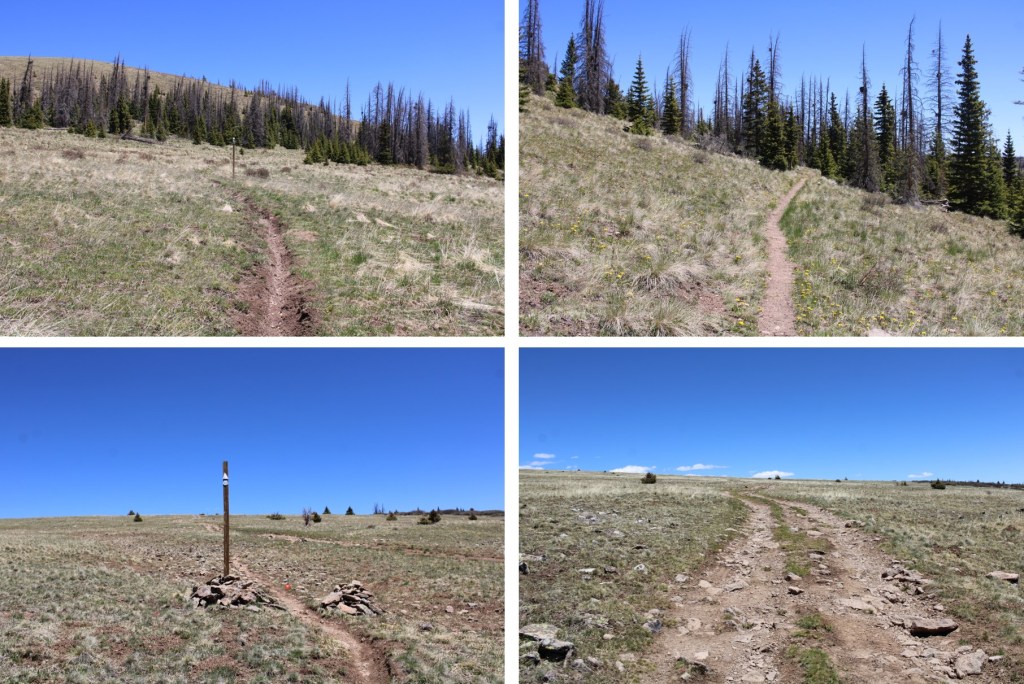
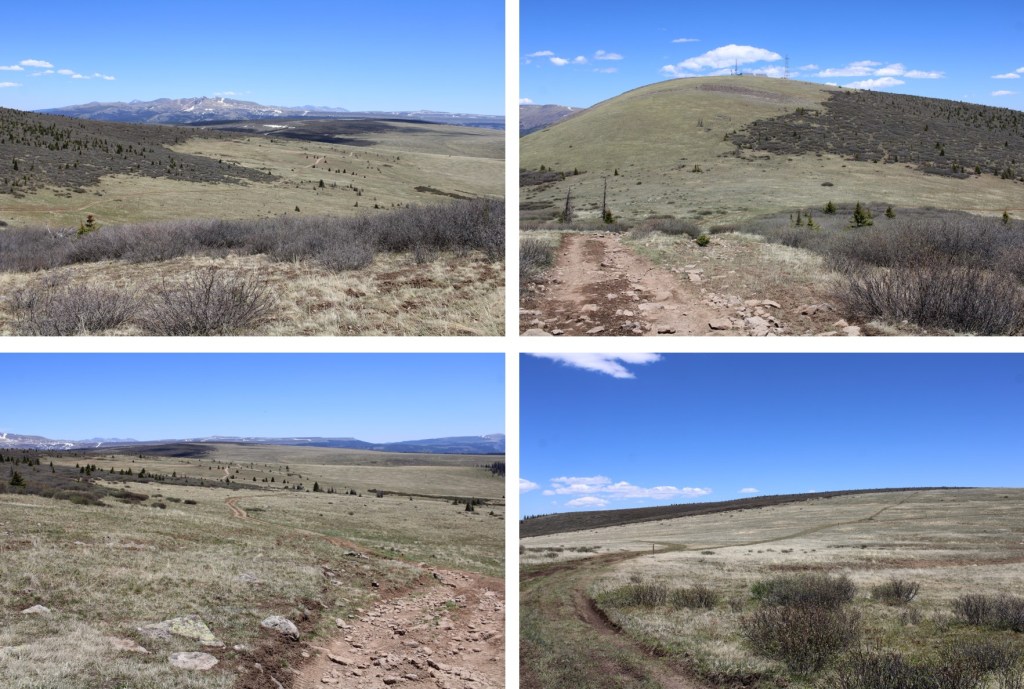
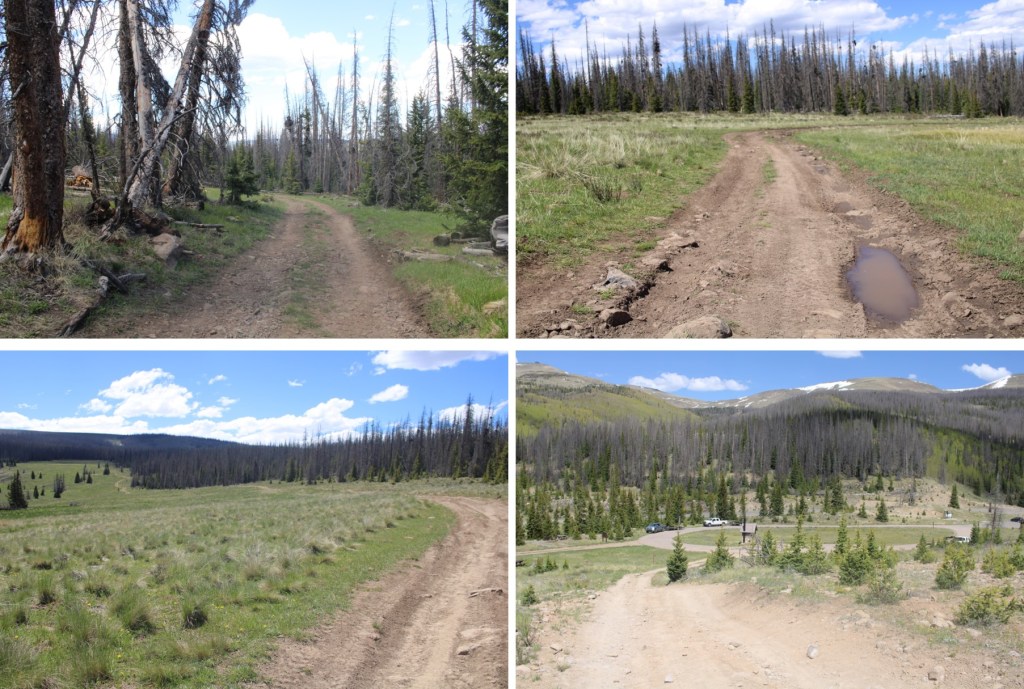
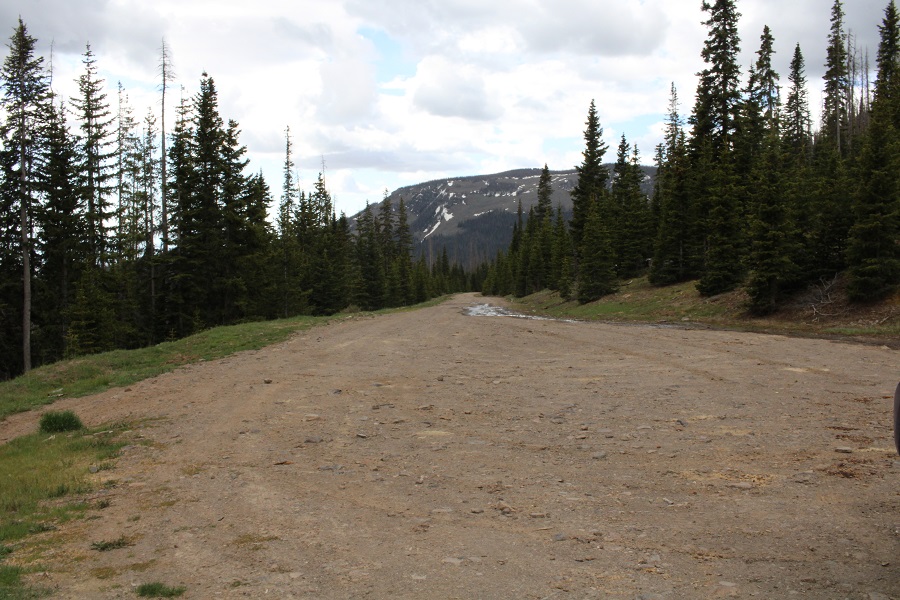
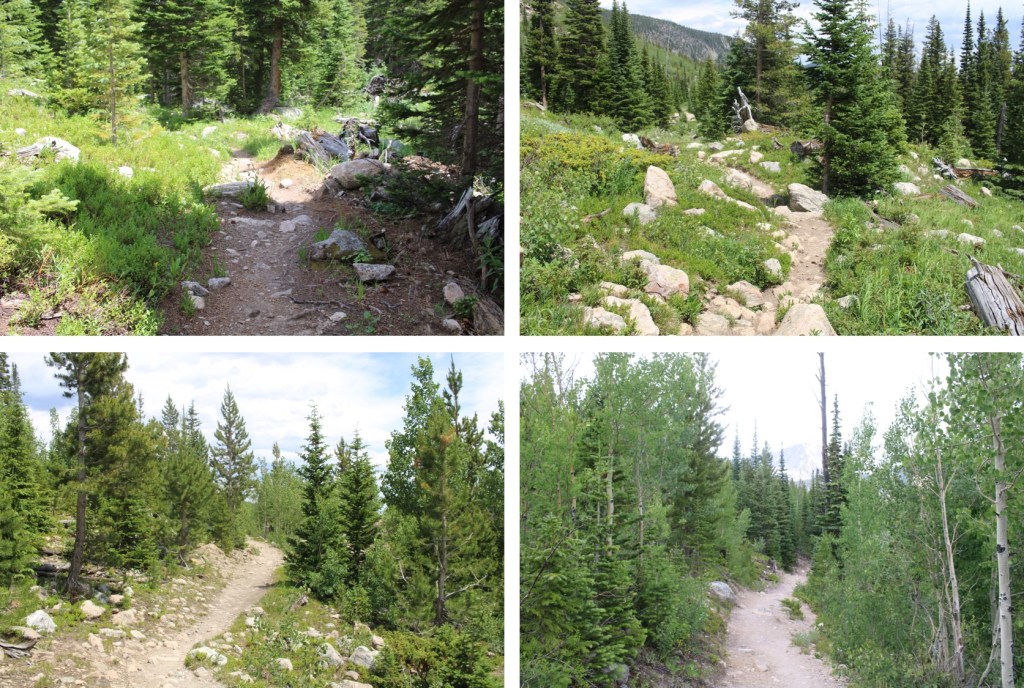
Here are some pictures of the trail back to the trailhead.  The signs (in daylight) make route finding easy.  Keep heading east towards either the Ranger Station, or Wild Basin Trailhead (the signs differ, but they get you to the same place).

I made it back to my truck at 2:45pm, making tis a 17.49 mile hike (with a bit added due to missing my cutoff) and 4975’ of elevation gain in 9 hours, 45 minutes. 

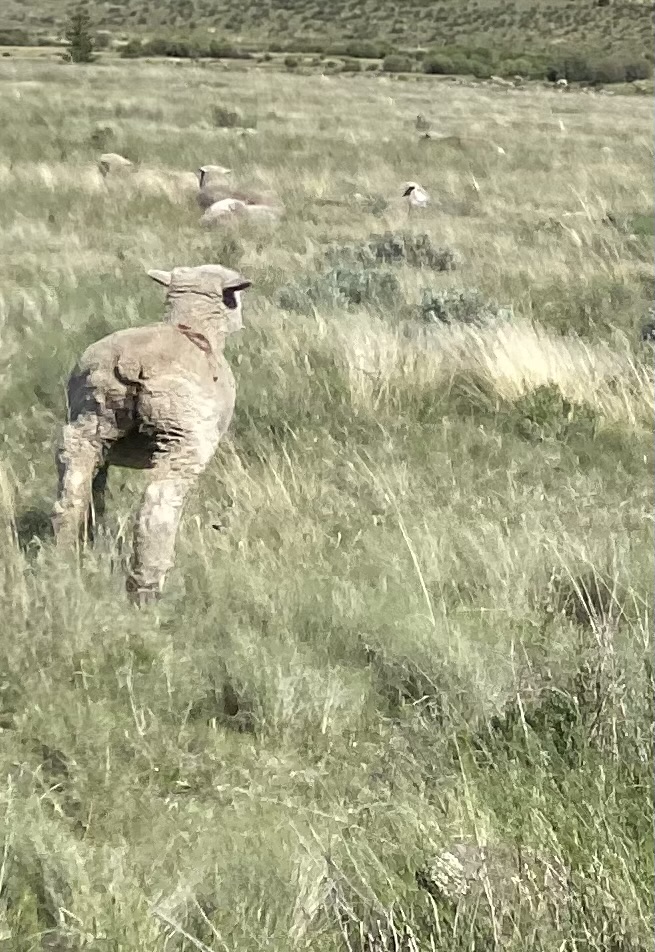
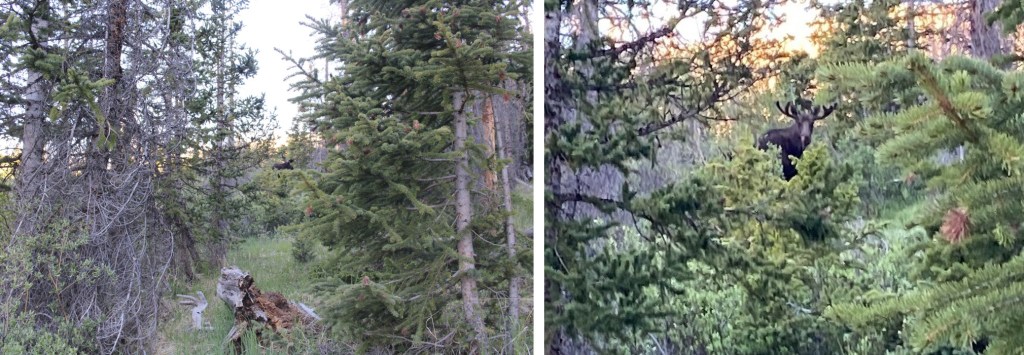
Side note:  if you see strange looking tracks, that look like a cross between a moose and a deer, they’re probably Alpaca Tracks.  I saw a trekking company with a few guests and 6 alpacas hiking into the basin to camp.  It looks like they do this a lot.  Make sure to step aside for them as they pass by you on the trail.

On to the next trailhead! 

Or so I thought… While I’d been hiking they had closed off the parking area, with about 15 vehicles in the lot.  As I tried to exit, a ranger asked me if I’d mind waiting a few minutes, as they were felling trees in the area.  While I waited for about 45 minutes, not one single tree was felled, and they decided to let me go.  I drove out, and someone was grading the road, so I waited for him to pass by.  He asked me to drive slower (although I’m not sure how I could drive much slower than 5mph).  When I got to the gate, it was locked, and I had to wait again for someone to open it. Apparently, they’d closed the roads for mitigation/tree work, etc. but hadn’t put up any signs warning people arriving before they got there they were going to close the road.  3 hours later, I was on my way home. 

13150

RT Length:  8.32 miles

Elevation Gain:  2188’

I drove up to Hancock Ghost Town outside of St. Elmo and parked my truck in the dark. The road was better than I remembered it:  Dirt 2WD with some clearance needed.  It was just before the Alpine Tunnel Trailhead. If you have a high-clearance 4WD vehicle you’re ok trashing, you can drive it all the way to the Upper Hancock Lake Trailhead. 

I was on the road at 5:30am, following the road south, crossing a bridge, and then turning left onto 4WD road 295.

I followed 295 south for 1.75 miles, where it ended at the Upper Hancock Lake Trailhead

At the Upper Hancock Lake Trailhead there was an obvious trail at the south end of the lot.  I continued following it south, and it eventually crossed and became the Colorado Trail/CDT

On this trail I skirted the west side of Hancock Lake, and the east side of Upper Hancock Lake.  This was an easy to follow, class 1 trail.  I was headed to Chalk Creek Pass.

The trail was wet and muddy, but luckily the water wasn’t too deep.

At this sign I went left, and followed the trail as it switchbacked up Chalk Creek Pass

At the top of the pass, I left the trail and headed east.  It was my goal to gain the ridge. 

There are a ton of ways to gain the ridge.  I took a different way up than I did down. Word of caution: the terrain is rocky and loose. Don’t trust any rock, even the large ones, as they roll. Here are the routes I took, solid line up, dotted line down (but it’s really choose your own adventure).  This is how I would recommend ascending and descending.

Here are some pictures of the route up.  Oh, and there were quite a few spiders/spiderwebs here.  The spiders had bodies about as thick as a nickel, and I probably saw 200 of them or more.  My trekking pole was useful in clearing away the spiderwebs.

Once I gained the ridge, I turned right and looked southeast, and I could see the summit of PT 13150

I made this a ridge hike, and was able to keep it class 3, but on the way back I was able to keep the hike class 2, so that’s the description I’m going to give you.  Instead of taking the ridge, this is the route you want to take, staying level at about 12975’ of elevation:

Here are some pictures of the route

You’re looking for this gully to ascend on the ridge. There’s a cairn at the top.

I gained the gully, and looked east.  I could see PT 13150

This was an easy ridge hike on very loose rock.  I stayed on the ridge.

Then the ridge dipped down a bit before the final ascent

This was once again a loose, rocky ascent

Here’s the route I took

I summited PT 13150 at 8am

13150:

There was a plastic summit register tube, and of course, everything inside was wet.  For the descent, I turned and headed back the way I’d come, but this time I descended via a small gully, then stayed level at 12975’ to make it back to the saddle.  The arrow in the first picture points to where I descended

Here are some pictures of the route to the ridge

I then dipped down, and aimed for the saddle

Here are pictures of my route back to the saddle

At the saddle, I turned left and headed east back down into the basin.  I could clearly see the Colorado Trail/CDT below

Back on the trail, I followed it back to Hancock Lakes

And left the Colorado Trail/CDT to head back to 295

The 4WD road back

I made it back to my truck at 10:30am, making this an 8.32 mile hike with 2188’ of elevation gain in 5 hours.

On to the next trailhead!

For anyone interested, here are a few pictures from the ridge (that you can avoid, if you want)

Fairview Peak – 13,224 and Green Mountain 12,692

RT Length:  7.75 miles

Elevation Gain:  2314’

I drove up to Cumberland Pass from Pitkin the night before my hike, and settled in.  The road was dirt 2WD, with a few places where clearance would be helpful, but otherwise it was an easy drive.  There was someone in a tractor grading the road, so I can only imagine it will get better from there.  I people watched for a few hours, then had the pass to myself for the next 18 hours, as it was only busy during the afternoon.

The next morning, I was on the trail at 5:30am.  I actually followed a 4WD road, at the west end of the parking area.  Side note:  On this hike I saw over a dozen grave markers.  I’m not sure if there were bodies buried underneath, or ashes spread, but it seemed excessive. 

I followed this road west and then southwest as it gained and lost elevation. 

After hiking for a little over a mile the road didn’t end, but it was snow covered, so I followed the ridge. 

Here’s the route up to Green Mountain

I could tell there was a road here at one time, but it hasn’t been used in quite a while.  At points it was a small trail, and at others it resembled a runnel.  It was rocky, but only about 650’ of elevation gain to reach the unranked summit. Here are some pictures of the route.

The summit was to the left (south)

I summited Green Mountain at 6:20am

Green Mountain:

From Green Mountain I turned around, and looked northwest.  I could clearly see the summit of Fairview Peak, and the route I needed to take to get there.

This was going to be a ridge hike, with a lot of ups and downs, but also fairly straightforward.  I headed northwest, and followed the ridge.  There were a lot of mines in the area.

Here’s the view looking over at PT 12556 (not ranked, etc.).  There were 5 crosses in a circle at the summit.  I’m not sure of their significance.

This was fairly easy terrain, mainly tundra that eventually became rocky

From 12556, this is the route I took over to Fairview Peak, skirting one of the points on the ridge to the left by traversing over rocky, but stable terrain.

Here are some pictures of the route, which was very rocky

At the top of the ridge, I could clearly see the summit hut at the top to my left.  I headed south to the summit

I summited Fairview Peak at 7:45am

Fairview Peak:

The summit hut was open, so I went inside.  There was still a lot of snow on the floor.  It didn’t look like anyone had been there yet this year.  There were tools, ladders, and a box with the history of the structure and improvements being made inside. 

From inside the structure, I could see Green Mountain to the southeast

I turned and headed back the way I’d come, back down the ridge

Here are some pictures of my route back to Green Mountain

Here’s a look at re-gaining the last 225’ to the top of Green Mountain

From the summit of Green Mountain, I headed northeast.  I could clearly see the road I was aiming for that would take me back to Cumberland Pass.  I’m sure you can see the road in this picture, but snow blocked my access to get to it, so this is the route I took.

Here are some pictures of my way back to the 4WD road, which started out rocky and then turned to tundra

And from the road back to Cumberland Pass

I made it back to my truck at 10am, making this a 7.75 mile hike with 2314’ of elevation gain and a ton of searching for cool rocks in 4.5 hours.

On to the next trailhead!

13,308 and 12,580

RT Length:  31.68 miles

Elevation Gain: 6041’

I drove to the Eddiesville trailhead the night before, and was up and on the trail at 4:30am.  I’ve been in this area for over a week, and was fairly confident I wasn’t going to need microspikes or an ice axe (I didn’t).  The trail starts at the south end of the parking area, and follows the Colorado Trail. 

I followed the Colorado Trail for 8.25 miles, all the way to the San Luis Peak/13166 saddle.  This was a very well-marked trail, which made it difficult to get lost.  Also, there weren’t many trail intersections, also making it easy not to get lost.  I crossed several small creeks and downed trees on my way, and passed through two gates (latched, not locked). 

Here are some pictures of the terrain, which followed Cochetopa creek up the basin.

After hiking for 7 miles, I crossed Stewart Creek

I was now above treeline, and could see the 13166/San Luis Peak saddle. 

The Colorado Trail nicely brought me there.

I would now lose 255’ of elevation as I headed down west, towards another pass, still following the Colorado Trail

Here’s the route

It was all pretty easy, class 1 hiking

I arrived at the next pass, and lost another 460’ of elevation, once again, on a nice class 1 trail.  This one took me through Bondholder Meadows

Here’s the route

After hiking for a total of 12.5 miles, and at 12290’ of elevation, I saw this cairn, and turned left, leaving the Colorado Trail.  I headed south a short ways to the ridge.  There was a little bit of snow here, but spikes (etc.) were not needed.

Once on the ridge, I turned left again and followed it southeast.  Here I stashed my backpacking gear and started hiking with a daypack with just the necessities.  Please keep in mind, what you see here is a false summit.  This was all easy class 2 on tundra.

At the false summit, I could see the true summit of 13308.  I would need to descend about 135’, and then re-ascend another 335’ to make it to the summit.  This area was a mix of tundra and rocks.  I followed the ridge southeast.

Once I reached the top of the rocky ridge I was greeted with Alpine tundra.  I headed east towards the summit.

When I got there, I was unsure if I was at the summit, or if it were the pint further, so I climbed up and down (still class 2) to the summit further east, but when I got there, the first summit looked higher.  When I checked my altimeter, both summits had the same elevation, but when I got back to the first summit, there was a summit register, so there’s no need to climb back and forth.  Here’s the view looking at the second summit

And a view from the second summit looking back at the first

I summited PT 13308 at 11:45am

PT 13308:

I headed back down the ridge to where I’d stashed my gear, first descending, then reascending, then descending again.

Here’s looking at that rocky false summit

From that summit, I could see my next peak, 12580

This is where the wind picked up.  Forecasted winds were 20-25mph, but I’m sure these exceeded 50mph.  I had to hold onto my bandana, as it kept getting blown off my head.  I made my way back to my stashed gear, then back to the Colorado Trail.

Once on the Colorado Trail, I continued following it northwest for about .75 miles

I rounded the side of a hill, and PT 12580 came into view.  I left the trail, and headed towards the summit.  This was all class 2 on tundra, then class 2 on rocks

There was a summit register, which hadn’t been signed in over a year, so I’m thinking this isn’t a very popular peak.  I summited PT 12580 at 2pm

PT 12580:

Now to head back down the trail.  I took the same way out as I did in.   I wanted to sleep close to Bondholder Meadows, but preferably in the trees. 

I ended up hiking further than intended, because the campsites I found were full of very dead trees, each placed perfectly to fall on me wherever I chose to sleep.  With the current wind gusts, I didn’t want to chance it, so I hiked to the very end of the trees, and found a place to camp surrounded by willows, near a creek that still had a little bit of snow.

I set up my bivy, ate dinner, and bedded down for the night.  It was an uneventful and warm night, except for the purring I heard around midnight and the thundering hooves I heard when I woke up.  I never saw either animal.

The next morning I was up and on the trail by 6am, headed northeast along the Colorado trail.  Here are the two passes I needed to go over

At the top of the last pass, now all I had to do was follow the class 1 trail back to the trailhead. 

Here are some pictures the rest of the way back to the trailhead.  I saw a couple of bull moose munching in the willows, but that’s common for this area.

I made it back to my truck at 10am. 

This was a 31.68 mile hike with 6041’ of elevation gain.

On to the next trailhead!

Ruby Mountain – 13,278

RT Length: 4.74 miles

Elevation Gain: 2212’

I started from the Argentine Pass Trailhead at 5am.  The 214 road in was easy 4WD, with a lot of small potholes, so I took it slow.  There’s room for several vehicles at the trailhead.

I continued following 214 northeast (the road parallels Peru Creek)  and quickly came to a gate and Shoe Basin mine.

I passed the gate, and continued along the road. 

After hiking for about half a mile I turned left onto what used to be a road, but is now more of a trail.

I continued following the trail until I came to a junction. Going left will take you to the Peruvian Mine, and going left will take you to the Paymaster Mine.  I turned right, and continued following the road.

The trail became overgrown with willows but was still easy to follow

I now had a pretty good overview of the route into the upper basin. The Paymaster mine is circled.

And some step-by-step pictures along the way.  There is a cairn marking where you leave the trail.  The willows here are pretty thick, but only lasts for 20 feet or so.

There was still melting snow and water on this part of the trail

Just before making it to the mine, I turned left and climbed up the hill.  The route was obvious.

Now in the upper basin, the route seemed obvious to me.  I was going to take the snow free slope to the ridge.

This was all class 2.  Here are some step-by-step pictures of the route I took to the ridge

The tundra quickly turned to talus, but was all class 2 and easy to navigate.

Once gaining the ridge, I turned left and followed the ridge southwest to the summit.  This was an easy tundra stroll

I summited Ruby Mountain at 6:30am

Ruby Mountain:

Here’s a view of Gray’s Peak from the summit of Ruby Mountain

It was a windy day on the summit, so I turned around and headed back the way I came.  Also, beware of the cornices… there’s plenty of tundra to walk on, so use that.

Here are some pictures of the descent route back to the basin

Back in the basin, I turned left and headed northeast towards the Paymaster mine and back to the road

I followed the road back towards the Peruvian mine (circled), turned left, and followed it back to 214.

Then I followed the road back to the trailhead

I made it back to the trailhead at 7:45am, making this a 4.74 mile hike with 2212’ of elevation gain in 2 hours, 45 minutes.

On to the next trailhead!

13,026

RT Length:  12.96 miles

Elevation Gain:  2979’

Day 3 at the Eddiesville Trailhead, and I really, really didn’t want to get out of bed.  It had been between 25-30 degrees the past two mornings when I woke up, and this morning it was going to be even colder.  There had been a thunderstorm last night, and I knew there would be a thick layer of frost on the ground.  And it was cold.  I mean really, really, cold, and I had a creek crossing I knew I was going to have to get through.  I have Raynaud’s, so this is actually something rather dangerous for me to attempt, especially in cold weather so far from communication.  And all I had to wear were yoga pants and a thick jacket.  The weather forecast had called for warmer weather, so I hadn’t brought my warm snow pants.  I stayed under the covers for about 15 minutes, contemplating if I should even go out.  I mean, I didn’t even know if the route I was going to attempt ‘went’.  Then, all of the sudden, something clicked.  I started asking myself if it were really worth it, and immediately my attitude changed, and I shot out of bed.  No, I love mountaineering, and that comes with being uncomfortable sometimes.  This was all mental, and I needed to get myself out of this funk.  I never regret a hike, and I was just being silly.  Once I started hiking, I’d warm up.  I had to just rip the band aid off and go. 

I was on the trail at 4:15am.  The trail starts off at the south end of the parking area.

I followed the Colorado Trail south and then southwest for 5.4 miles.  This is a well maintained, class 1 trail, easy to follow, even in the dark.

After hiking for about 5.4 miles, I came to a clearing, and to my left I could see an avalanche runout.  It was my plan to climb up this runout and see if I could summit the peak this way.

I left the trail, and sat down on a rock to exchange my hiking shoes for my stream crossing shoes.  The creek was too big to pole vault across, and the water level was too high to rock hop, so even though it was 5am and freezing cold out, I was going to cross the stream and get my feet wet. 

Imagine my surprise when the water was warm!  Well, not warm exactly, but warmer than the 25-degree air I’d been hiking in.  It was an easy stream crossing, with the water coming up to just above my knees.  I exited the stream, changed back into my socks and hiking boots, and was on my way. 

This is the route I took up the avalanche drainage

And some step-by-step photos.  This ended up being about 2000’ of elevation gain in 1 mile.

Eventually, the terrain gave way to tundra

Once I made it to the ridge, I turned right, and followed it southeast to the summit.  The terrain here was still all class 2, starting out as tundra and then changing to rocky.

I summited 13,026 at 7:45am

13026:

And now, to head back down. I just retraced my steps back to the avalanche runout, heading northeast

And then made my way back down to the creek

I crossed the creek again, and headed back to the Colorado Trail

I then took the Colorado Trail northwest back to the trailhead.  I’d been on this trail 3 times in the past 3 days, and this afternoon I noticed bear tracks along the trail.  A bear must have come through last night, as these tracks hadn’t been there before.

Here are some pictures of the trail back to the trailhead

I made it back to my truck at 10:45am, making this a 12.96 mile hike with 2979’ of elevation gain in 6.5 hours.

On to the next trailhead!

13,408

RT Length: 17.32 miles

Elevation gain: 3326′

Day 2 of my trip staying at Eddiesville Trailhead.  It was even colder this morning than last morning.  I woke up to 33 degrees outside, but needed to get going.  I got dressed and was on the trail at 5:15am.  This trailhead can accommodate up to 10 vehicles if everyone parks nicely.

The trail starts at the south end of the parking area.  This is also a Colorado Trail trailhead. 

I followed the Colorado Trail southeast for about 1.25 miles

Just for reference, you’re eventually headed here

After hiking for 1.25 miles I left the trail.  I turned left, and made my way down to the Cochetopa creek.  If you look closely, you can see the trail on the other side, along with two wooden sticks that probably used to hold signs indicting which trail this was.

I crossed the creek, which was less than a foot deep.

And picked up the 784 trail on the other side. 

I use the term trail loosely.  It starts off as a trail, then turns into kind of a road, then vanishes, then turns into 4 or 5 trails, then vanishes… you get my point.  With careful route finding you should never lose the trail, but it’s difficult in the dark.  Remember that picture I showed you earlier about where you’re headed?  Here’s the overall route through the trees.

Here are some pictures of the way through the trees to the meadow

Once out of the trees I came to a rather large meadow, and followed the trail southeast for 1.25 miles.  There are many trails here, presumably cattle trails.  I always chose the one closest to the trees and was never disappointed. 

This meadow was 1.25 miles long.  At 11,050’, after hiking for a total of 3.3 miles, I turned right and followed the trail southwest to the upper basin. 

This is where the trail gets iffy.  There are a lot of downed trees, and in some places the trail is wide, and in others it looks like a rabbit path, overgrown with grass and wildflowers.  Just keep heading southwest, staying to the right of the Lake Fork Cochetopa creek.  Here are some pictures of the terrain

Once above treeline, I was deposited into a willow filled basin.  There is a trail here, but once you lose it, it can be very difficult to find again.  It’s more of an overgrown game trail.  This is the path I took

Here are some step-by-step pictures

Yep, that’s the trail

I was headed for the gully to my left.  I could see a game trail that would lead me to the ridge and looked snow free (it was)

I made my way up the gully, staying to the left of the snow

As soon as the snow stopped, I turned right and gained the ridge

I followed the tundra and talus filled ridge east to the summit

I summited 13,408 at 9:15am.  Also, as you can tell by my bandana, it was windy.

13408:

Be careful, there’s a lot of bailing wire littering the summit, which is easy to not see and trip on. 

Ok, time to turn back.  I retraced my steps back down the ridge to the gully

Then down the gully into the basin

Through the willows, back to treeline

From there I caught back up with the trail, and took it down to the meadow

There were a lot of beaver dams and lodges along the creek

At the meadow I turned left, and followed the trail back down into the trees

Now the trail was easy to follow back to the creek

I crossed the creek slowly.  In fact, I stood in the middle for a few minutes to cool off my feet

The Colorado Trail was waiting for me on the other side.  I followed it northwest to the trailhead

I made it back to my truck at 12:15pm, making this a 17.32 mile hike with 3326’ of elevation gain in 7 hours.

13166

RT Length:  17.29 miles

Elevation Gain:  3120’

I drove to the Eddiesville trailhead the night before, hoping to get a good look at current conditions in the mountains.  On the way in I saw an old, 1980s brown Tacoma parked on the side of the road, and a man sitting on a rock, watching a herd of sheep.  All the sheep were facing the opposite way (I’ve become a pro at animal butt shots at this point).

Both creek crossings were manageable, and all the downed trees had been cleared off the dirt road.

There was only one other vehicle in the parking area, which fits about 10 vehicles if everyone parks nicely.  No mosquitoes, but tons of flies (they didn’t bite, they were just annoying).

I threw 3 socks full of moth balls under my truck, wondering where the 4th one went (maybe a marmot absconded with it?) and went to bed.  I was on the trail at 4am. The trail starts at the south end of the parking area, and follows the Colorado Trail. 

I followed the Colorado Trail for 8.25 miles, all the way to the San Luis Peak/13166 saddle.  This was a very well-marked trail, which made it difficult to get lost.  Also, there weren’t many trail intersections, also making it easy not to get lost.  I crossed several small creeks and downed trees on my way, and passed through two gates (latched, not locked). 

Here are some pictures of the terrain, which followed Cochetopa creek up the basin.

After hiking for 7 miles, I crossed Stewart Creek

and saw a moose.  I have him his space, even though he was directly on the trail.

I was now above treeline, and could see the 13166/San Luis Peak saddle. 

The Colorado Trail nicely brought me there.

For those of you looking for the current conditions for San Luis pass, here they are.  Still areas of snow on the trail, but passable.

At the saddle, I disturbed a small herd of deer. 

Deer:

From the saddle, I turned left and headed southeast, gaining 525 feet of elevation towards the summit.  This was easy tundra to navigate.

Until I saw this.  Hmmm… I was going to have to go and investigate.  I headed to the east side of the formation, dropped all my gear except my camera, and headed up.  Sorry, no helmet, as I wasn’t aware this was more than a class 2 hike. 

This was easier than it initially looked, nothing worse than rainbow climbing at the gym. The rock was all grippy, sturdy, and had lots of hand/footholds.  The rock was solid, like in the Crestones, but with more and larger hand holds. I’d call this 30 feet of vertical climbing exposed class 3.

Here’s the route I took up, following the orange rock to the ridge, turning left, and crawling on hands and knees to the summit because it was windy (and exposed, and I didn’t have a helmet, etc.).

I summited 13,166 at 8am

13166:

Now to head back down.  I actually just did this feet first, no need to turn and face the wall.  There are plenty of hand and foot placements to use for support.

Back on firm ground, I grabbed my gear, and headed back to the saddle.

Back on the Colorado Trail, I followed it back to the trailhead

Oh, and I saw another moose.  This one was curious, and kept walking towards me, so I didn’t stay long.

Here are some pictures the rest of the way back to the trailhead

Back at the trailhead, I noticed a chipmunk under my truck, seated atop a sock full of moth balls.  So I’m guessing they don’t work with chipmunks.  Oh well, at least it wasn’t a marmot.  I made it back to my truck at 11am, making this a 17.29 mile hike with 3120’ in elevation gain in 7 hours. 

I’d say “on to the next trailhead!” but I’m staying here.

UN 13256, Coney Benchmark – 13,339 & UR 13138

RT Length: 32.25 miles

Elevation Gain: 5511’

I know the traditional way to do this peak is from Carson Pass, but the last time I drove that road I told myself it would be the last time.  I had marmot issues parking at the pass, and lost my 4WD on the way down.  It wasn’t ideal.   Earlier this summer I had attempted to make it to Carson Pass from the bottom of the trail, near where CR 30 and 36 meet.  I was greeted with hoards of mosquitoes, and decided to hike another peak instead. 

This time, I parked at Spring Creek Pass, knowing it was going to be a long day.  What I hadn’t anticipated were all the elevation gains and losses along the way.  The parking lot holds about 20 vehicles if everyone parks nicely.  Another bonus:  It’s a paved 2WD road to get there, and the bathroom was stocked and clean.

I parked and was on my way at 1:45am.  I followed Trail 813/Colorado Trail/Continental Divide Trail for most of this hike.  On the way in, in the dark, I took the 4WD road 547.1, which eventually connected back up with the Colorado Trail, but added about an extra mile.  I followed the very well-marked trail west for  8.25 miles.  Here are some pictures of that well marked trail, as it went in and out of the trees (which it seemed to do the entire hike).

Here’s an overview of the route you can see at this point

After hiking about 8.25 miles, the road curved to the left, and I was now heading southwest.  Here the trail loses about 500’ of elevation as it brings you back into the trees.

I passed through some willows, and continued following the trail to gain the ridge.  This is where the snow began and the trail was no longer obvious.  I was able to do all of this with just microspikes, but on the way back, I really, really wished I had an ice axe.  

Here the trail was again obscured by snow, so this is the route I took to gain this ridge, keeping it mostly snow free

It was rocky near the top, but still class 2, and there was a large cairn to guide me.

The trail picked back up again, and I followed it southwest, skirting below UN 13138

After hiking for 14.5 miles, I could finally see the two ranked peaks I was aiming for today

To avoid the snow on the way up (circled in red) I decided to just ascend straight up the slope.  (I crossed the snow on the way back down, and this is mainly where I wished I’d had an ice axe).

The terrain quickly turned from tundra to rocks (still class 2)

After gaining the ridge, the summit was to the southwest.

I summited UN 13256 at 8:15am.

UN 13256:

To the southwest, I could see Coney Benchmark.  I would lose almost 400’ of elevation to get there.

Knowing the Colorado Trail was down there somewhere, I headed south until I found it.

I then gained 475 feet to the summit of Coney Benchmark.  Here’s the route I took.

This was all class 2 to the summit.

The summit was easy to find, but someone put a plastic summit register at the top, so of course the paper inside was wet.

I summited Coney Benchmark at 9:15am

Coney Benchmark: 

Looking northeast, back the way I came, I could see UN 13256 and UR 13138

I retraced my steps back to the Coney Benchmark/13256 saddle

This time I skirted around 13256 and followed the Colorado Trail

This was the sketchy part, where I wished I’d had my ice axe.  It’s steeper than it looks.

To summit 13138, I made my way to the 13256/13138 saddle, and just followed the ridge.  All class 2.

I summited UR 13,138 at 10:35am

UR 13,138: 

Knowing if I continued to follow the ridge northeast I’d come back to the Colorado Trail, that’s what I did.

I picked up the Colorado Trail, and followed it 13 miles back to the trailhead, losing and gaining elevation the entire way back.

I made it back to my truck at 3:45pm, making this a 32.25 mile hike with 5511’ of elevation gain in 14 hours. 

Check out all that elevation gain/loss!

On to the next trailhead!

Bennett Peak – 13,203 and Sheep Mountain – 12,492

RT Length:  6.91 miles

Elevation Gain: 2451’

I started at 5am from the South Fork Trailhead, at the end of 28 and Trail 702.  The road was a well maintained dirt 2WD road, with about 5 parking spaces at the trailhead.

Instead of taking the trail, I followed the road that had been blocked off

This road eventually became a trail.  I followed that trail northwest to the stream crossing

The I was able to cross by hopping across the rocks and jumping a few feet at the end.

A trail picked up on the other side, but quickly dissipated.  To combat this, I just kept heading north-northwest up the basin, towards the gully I could see ahead of me to the northeast (I know that sounds contradictory, but I had to make my around the trees to get there.  If you’re doing this in the daylight, the gully should be obvious above the trees).

After hiking a total of .81 miles, I came to South Rock trail, turned left, and followed it about 20 yards to a small stream crossing and a ravine.  I turned right, and followed the ravine to the gully, staying in what looks like an avalanche runout.

This is the route I took up the gully.  This was easy to navigate, all class 2.  I just kept heading north.

Here are some pictures of the route

At the top of the gully I headed northwest, which included a lot more class 2 ascending on grassy tundra

I eventually came upon an ATV road, and followed that to the summit

I summited Bennett Peak at 6:45am.  It was 2.37 miles to the summit from where I parked.

Bennett Peak: 

My next objective was Sheep Mountain, but I wanted to take the ATV road to get there, so I headed back south, the way I’d come in, towards the road.

Here you can see the road below I was aiming for

When I made it to the road I turned right, and followed it southwest to the Bennett/Sheep saddle

As you can see, this was an easy descent to the saddle

I hiked down to an open gate at the saddle, walked through it, and ascended the ridge

Here’s my route

And some pictures of the class 2 ridge covered in tundra

And the false summit

Here’s the real summit

There was no summit register.  It was 1.6 miles from Bennett to Sheep

I summited Sheep Mountain at 8am

Sheep Mountain: 

Here’s a look back in the route from Bennett Peak to Sheep Mountain

And the route I took up the gully to the summit of Bennett, and over to Sheep

I turned and headed back towards the Bennett/Sheep Saddle.  Specifically, to that open gate

Once at the gate, I turned right and followed Trail 700 back towards the gully (I’d noticed it on my way up, and thought it would be a convenient way back down).  You could also take it to the saddle and summit that way.

It actually became a nice trail

When I made it back to where I’d ascended the gully, I turned right and followed it south, and then southeast,  back down to the road

This was a drainage, and very marshy

I turned left at the road, and followed it for about 20 yards before turning off the road and heading back down to the creek.

There are a lot of game trails here, but they aren’t all consistent

I crossed the creek again, which was a little more difficult with the rising temperatures and rising water level

I then picked up the trail on the other side, and followed it south back to my truck

I made it back to my truck at 9am, making this a 6.91 mile hike with 2451’ of elevation gain in 4 hours.

On to the next trailhead!