Monitor Peak – 13,707 and Animas Mountain – 13,789

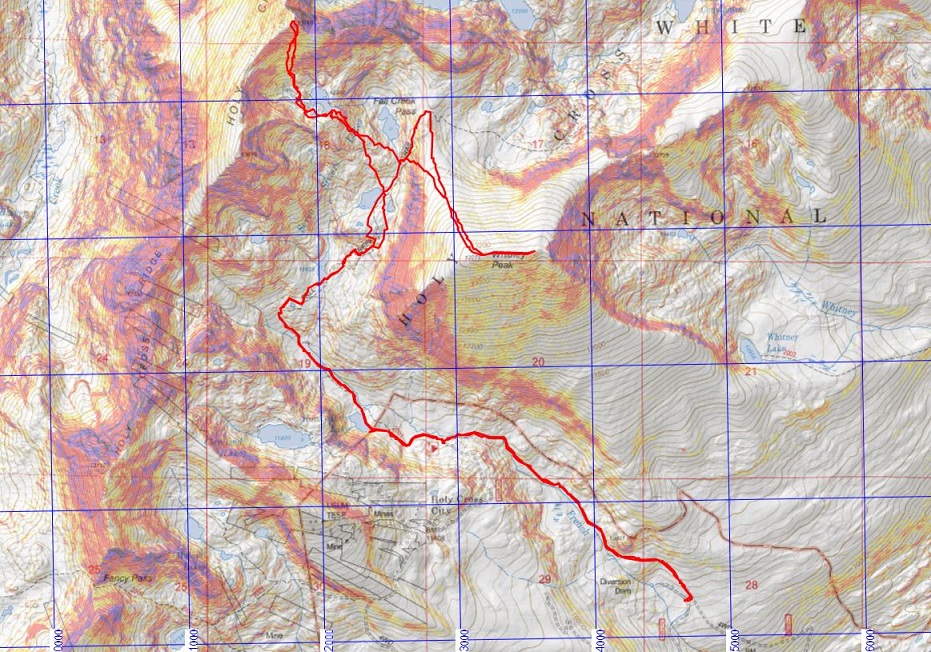
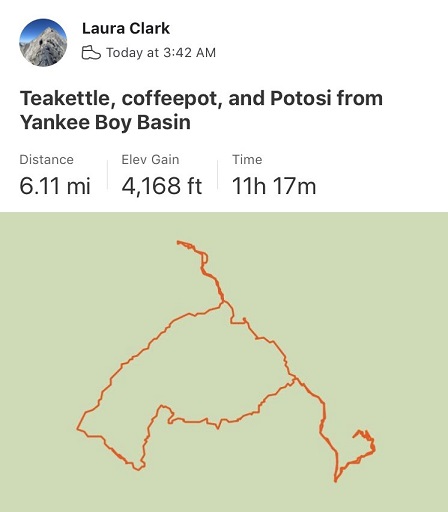
RT Length: 45.07 miles

Elevation Gain: 12,724’

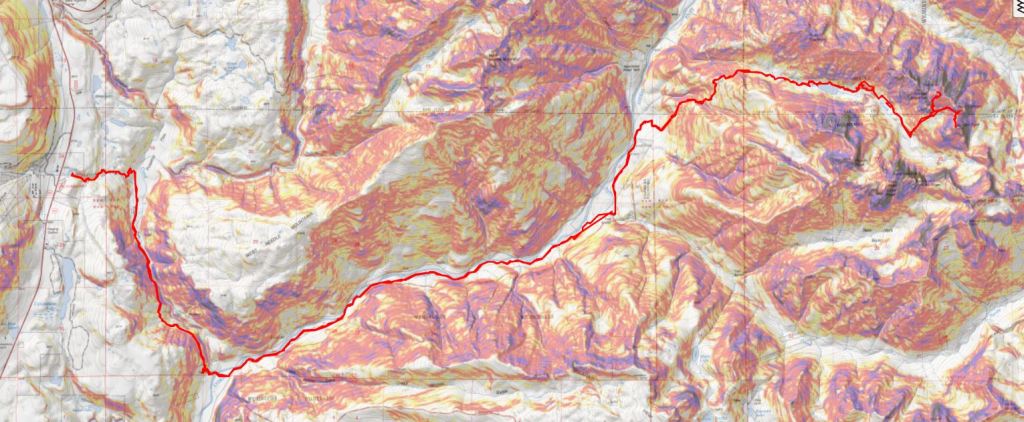
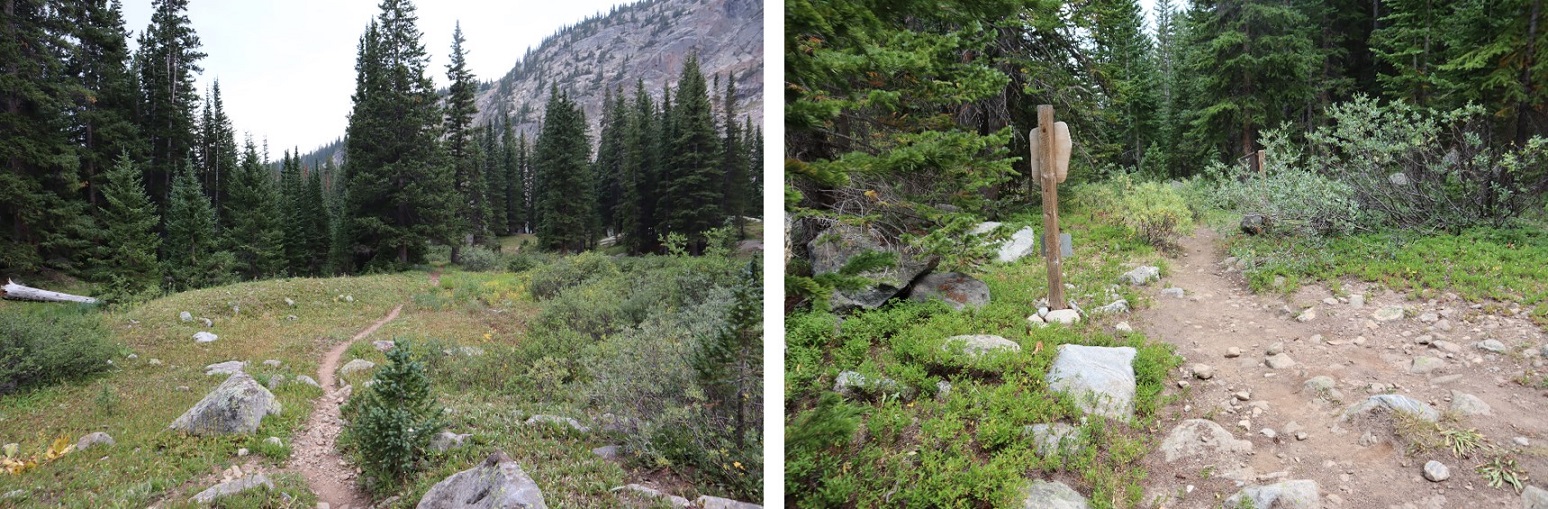
I started this hike from Purgatory Creek Trailhead.  I’ve put together a route description of the trek from Purgatory to Ruby Basin, which can be found here.

For my first day in, I decided to camp at the Ruby Basin junction. I started at 3pm and made it to my camping spot at 6:45pm.  I made it to the train tracks just as a train was approaching, to which a passenger pointed at me and said “Hey look:  Wildlife!” and everyone got out their cameras and waved at me.  I smiled and waved back.  I gathered some acorns to snack on as I hiked (just before the railroad tracks there are tons of scrub oak, and the acorns are now in season). 

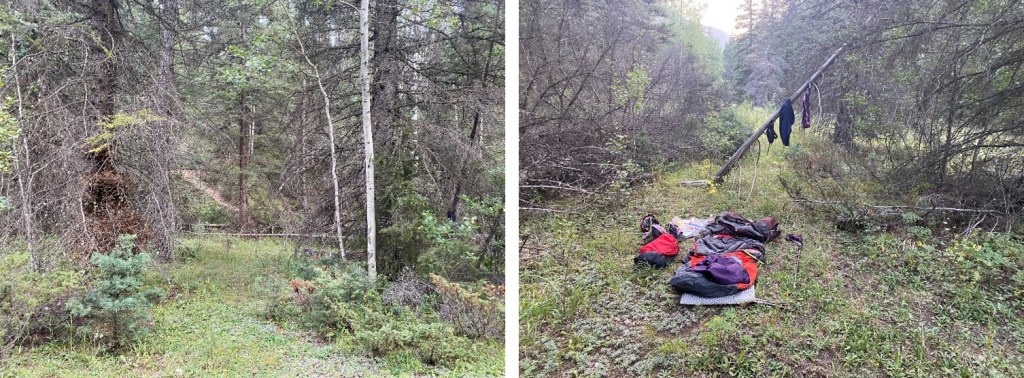
I was so glad it didn’t rain!  I think this is the first time I’ve done this approach where it hasn’t rained. As I got closer to my camping spot, I came across two girls camping there already. I chatted with them for a minute: they were headed to Ruby Basin too, to hike Turret.  I wished them well and picked a spot closer to the Ruby Basin junction to set up for the night.  I dried out my clothes as best I could, ate some popcorn, and went to bed.

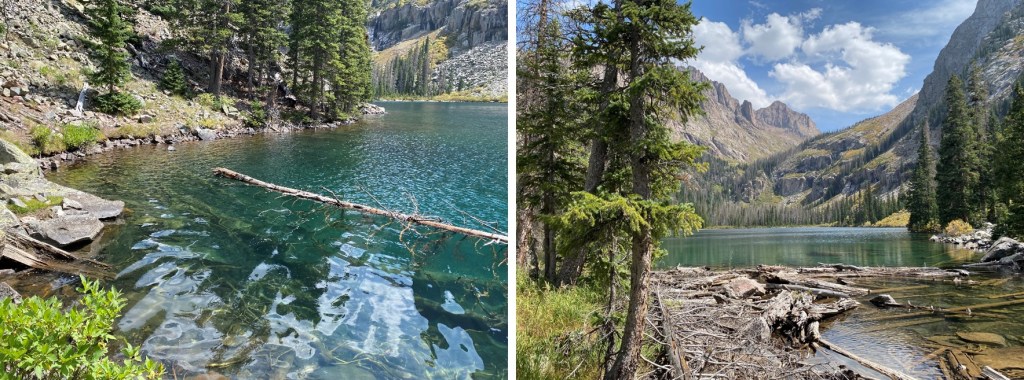
It was a warm but windy night.   I was up early, and spent a good half hour just stargazing.  Eventually I got up and was on the trail at 5:45am, headed to Ruby Lake.  I made it to the lake just before 9am.  Today I was taking my time, so I sat by the lake for a bit, filtered water, and watched the trout swim by the shore, every once in a while snagging a fly for breakfast.  

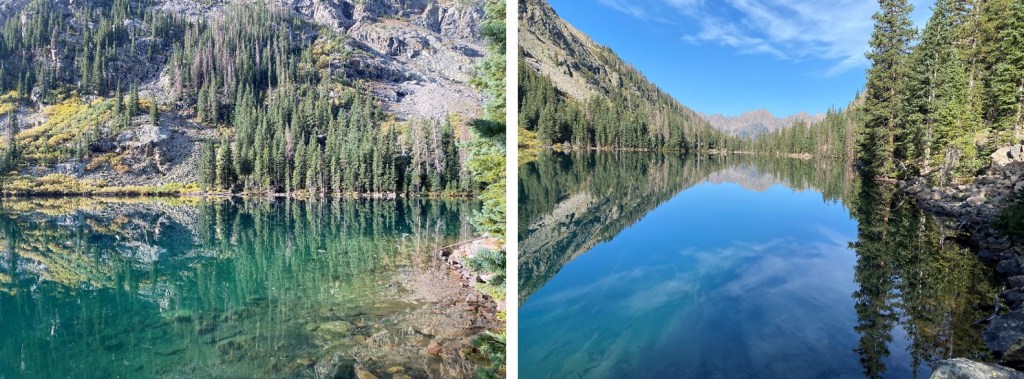
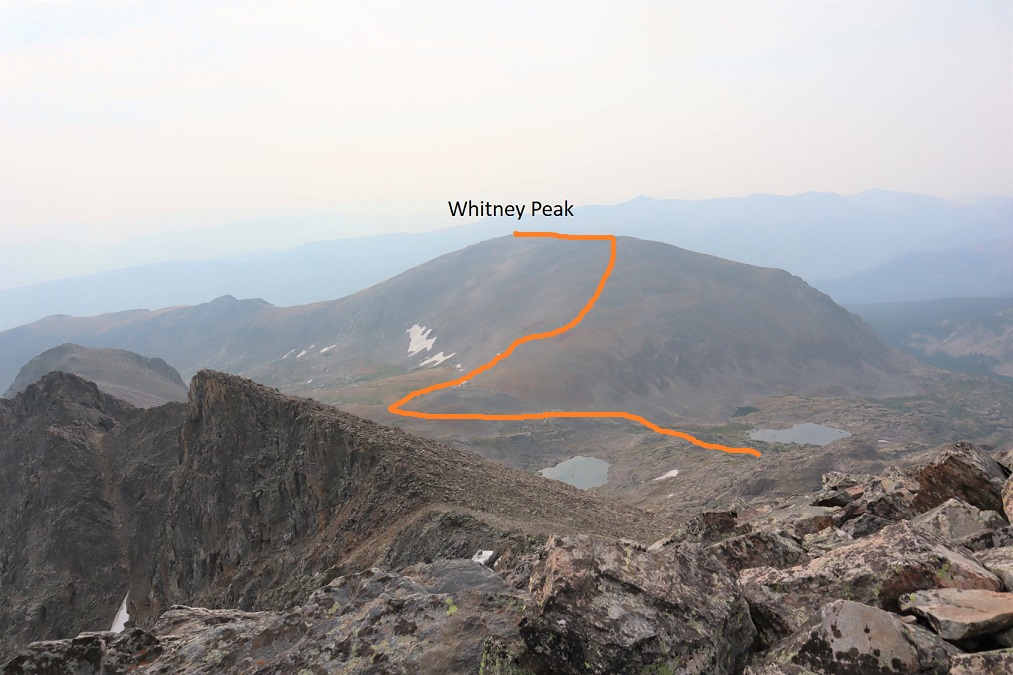
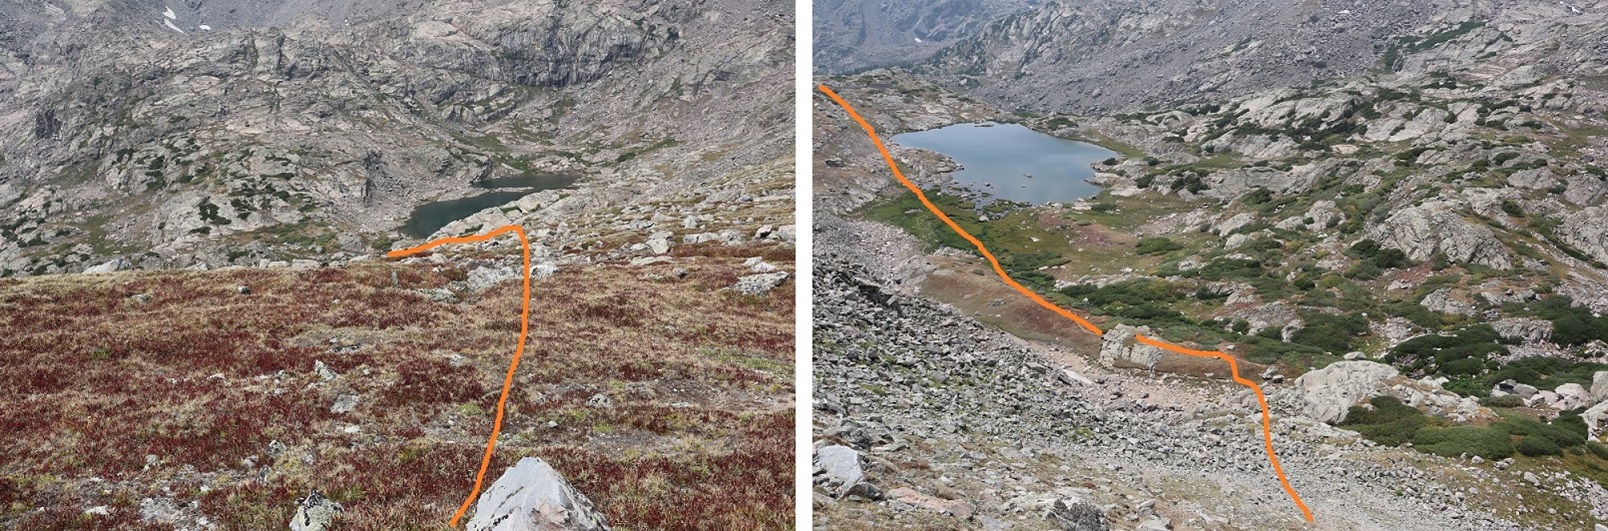
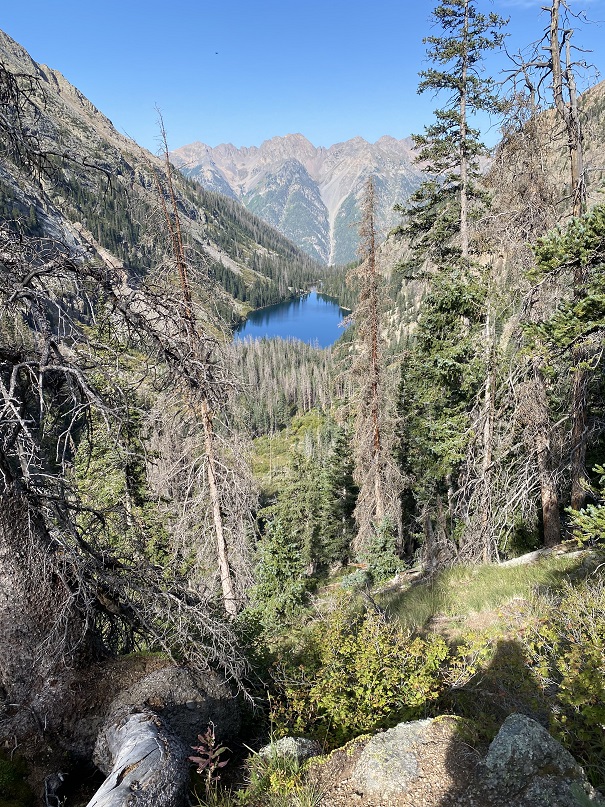
My only goal today was to make it to Ruby Basin.  I knew it wouldn’t take long, but I wanted to hike in the cool of the morning, instead of the heat of the day.  Here’s looking back at Ruby Lake from just before making it to the basin

I made it to Ruby Basin, in all its willow filled splendor, at 10:45am.  For those doing the math, it took me less than 5 hours to hike from the Ruby Basin cutoff to Ruby Basin, and I took my time. 

There was a tent set up in the far side of the basin (east), but I didn’t see anyone camping there. Basically, I had the basin to myself.  I strapped on my creek crossing shoes and took a walk in the creek(s).  They were running at a trickle.

I relaxed for the next few hours, drying out, enjoying the sunshine, and going over my notes for my day tomorrow. This was my second attempt at these peaks. It hurt to turn around last time, but I had bad beta (and not enough beta, as I had other goals in mind and these peaks had been secondary).  I’d been up in my head that entire weekend, and in the end turned around much sooner than I should have. I went home, got better beta, and was now back to attempt these peaks again. Around 2pm I saw the girls I’d met the night before enter the basin, and to my surprise, they headed directly up Turret.  Rock on ladies!

Also, there were bees and crickets. Crickets everywhere!  They jumped around my ankles as I walked through the basin, munched on my journal and hopped onto my gear. I ate dinner and went to bed as the sun was going down (it goes down over Turret early this time of year).

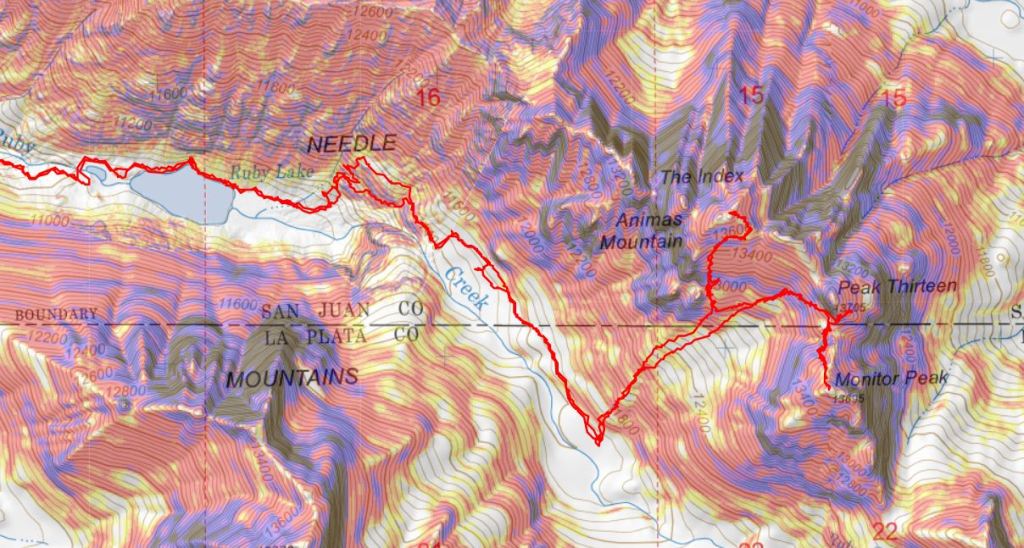
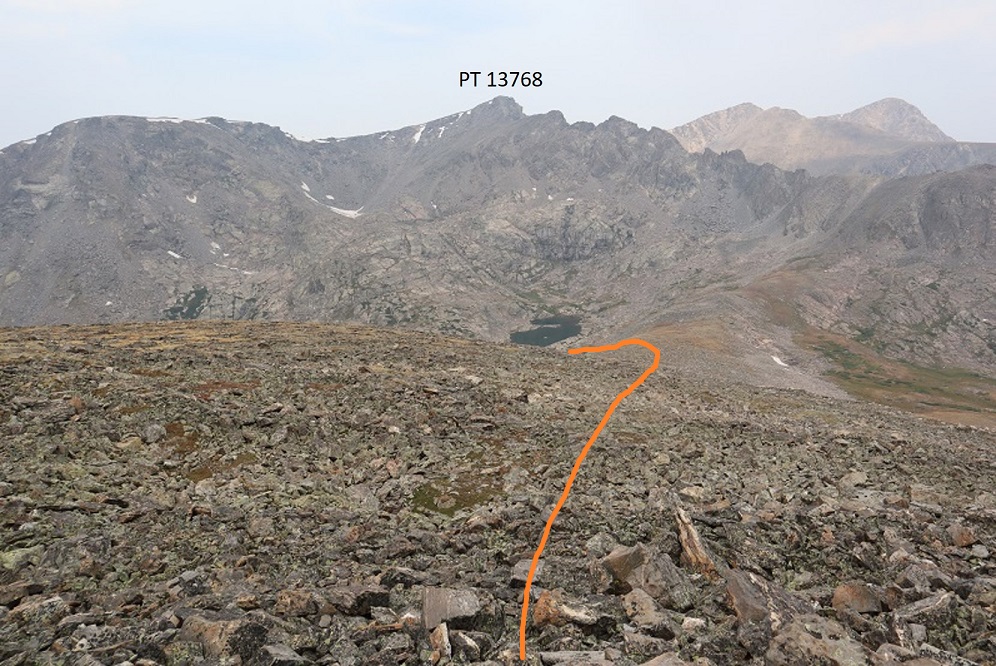
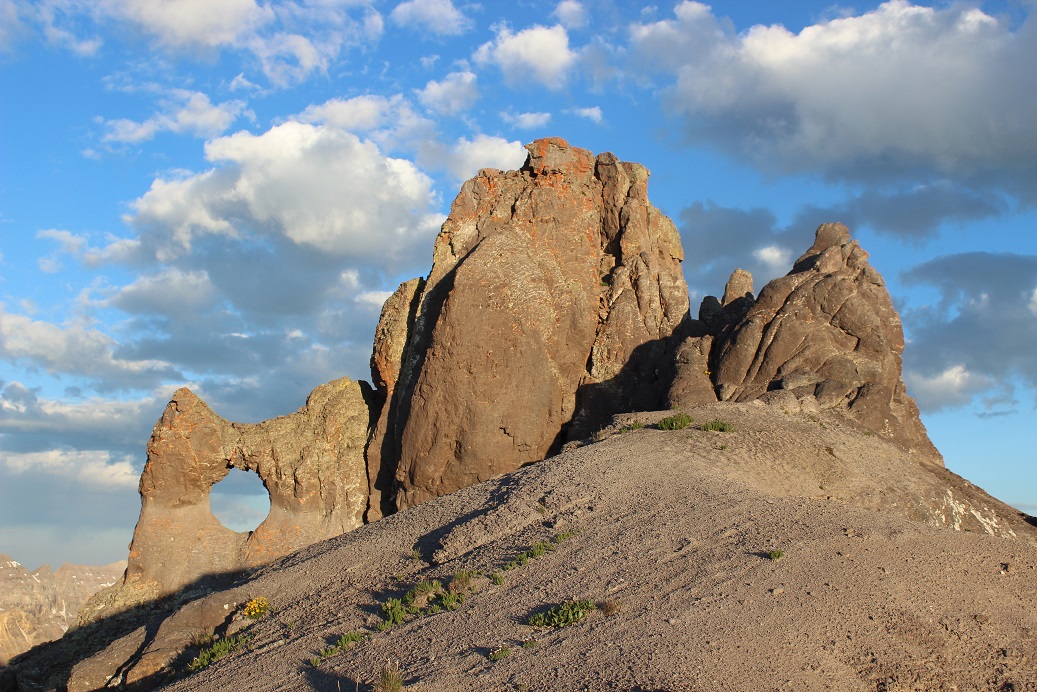
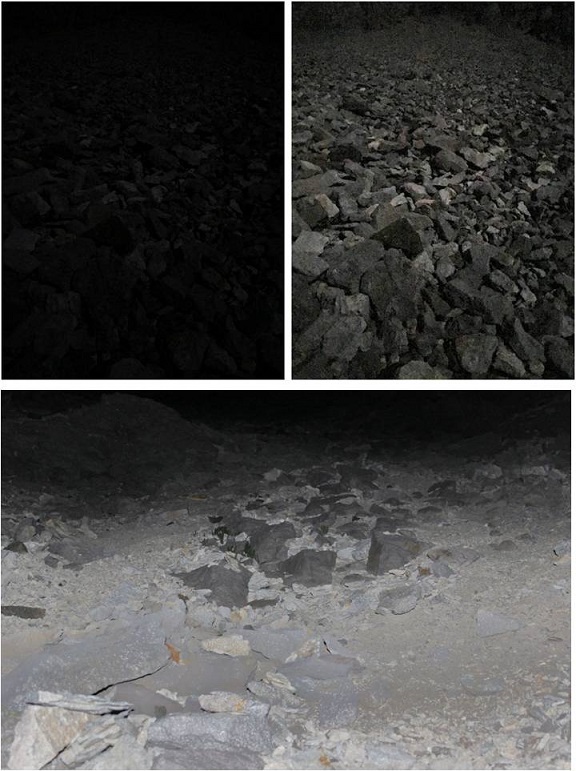
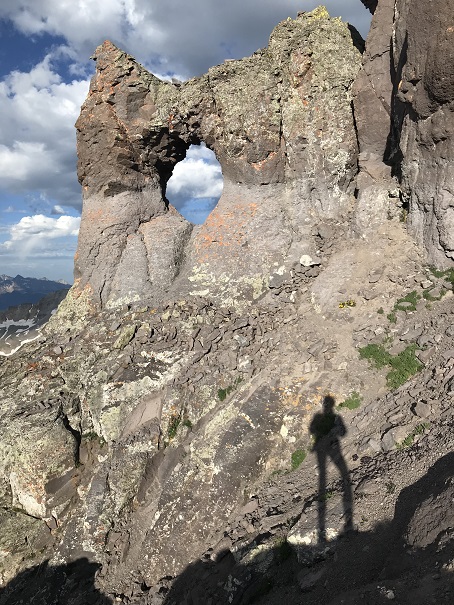
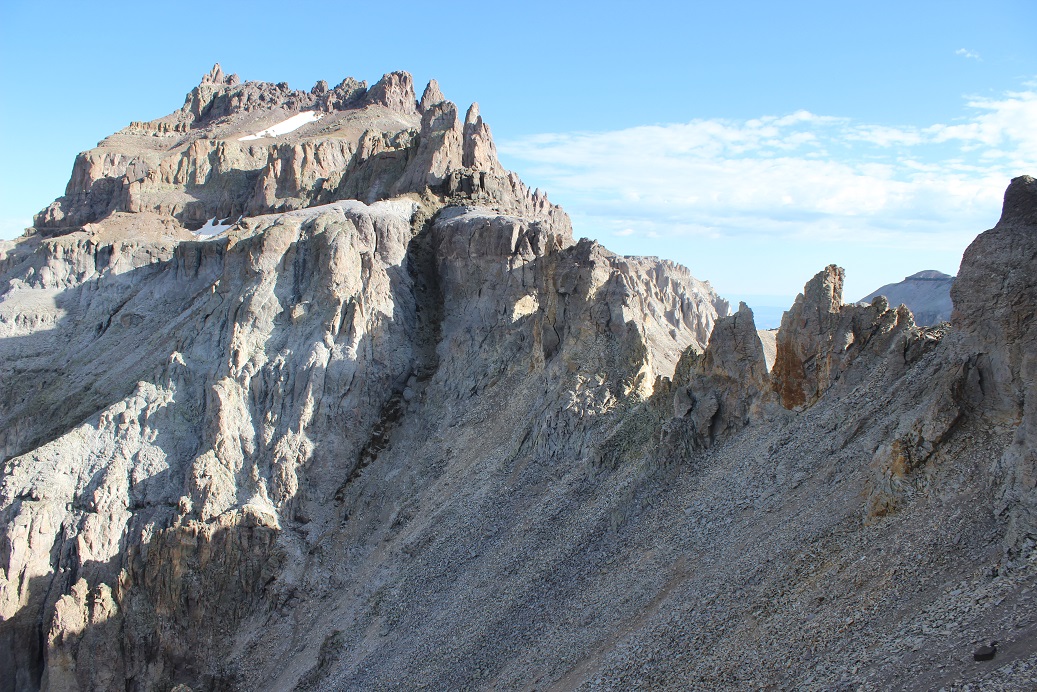
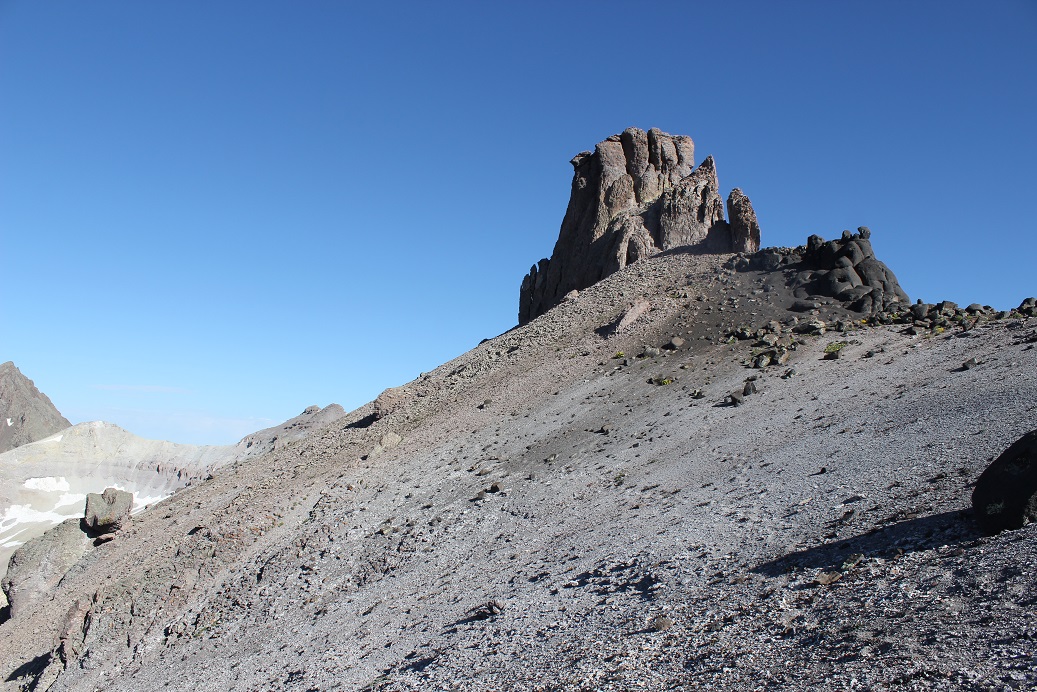
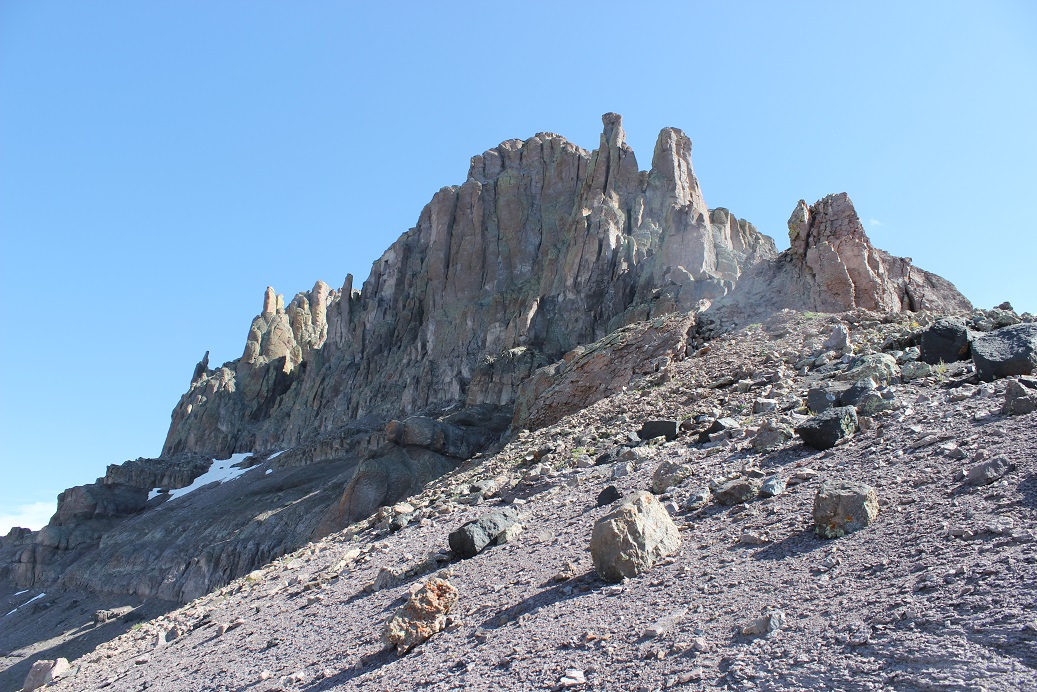
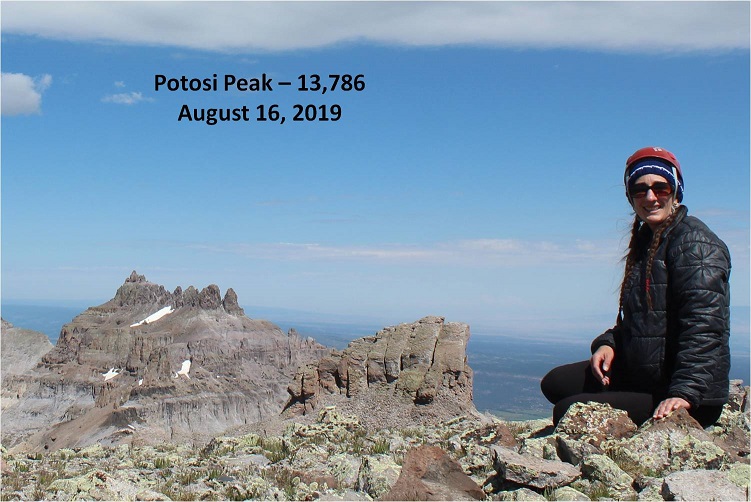
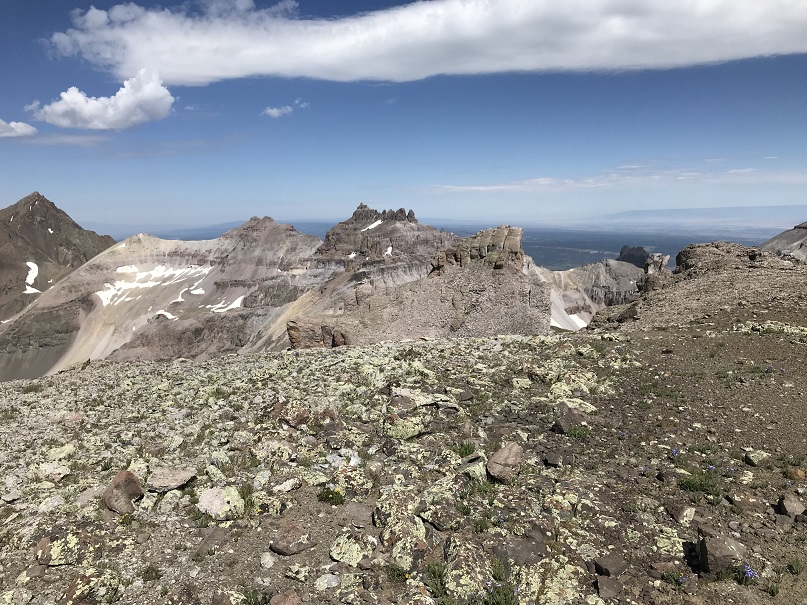
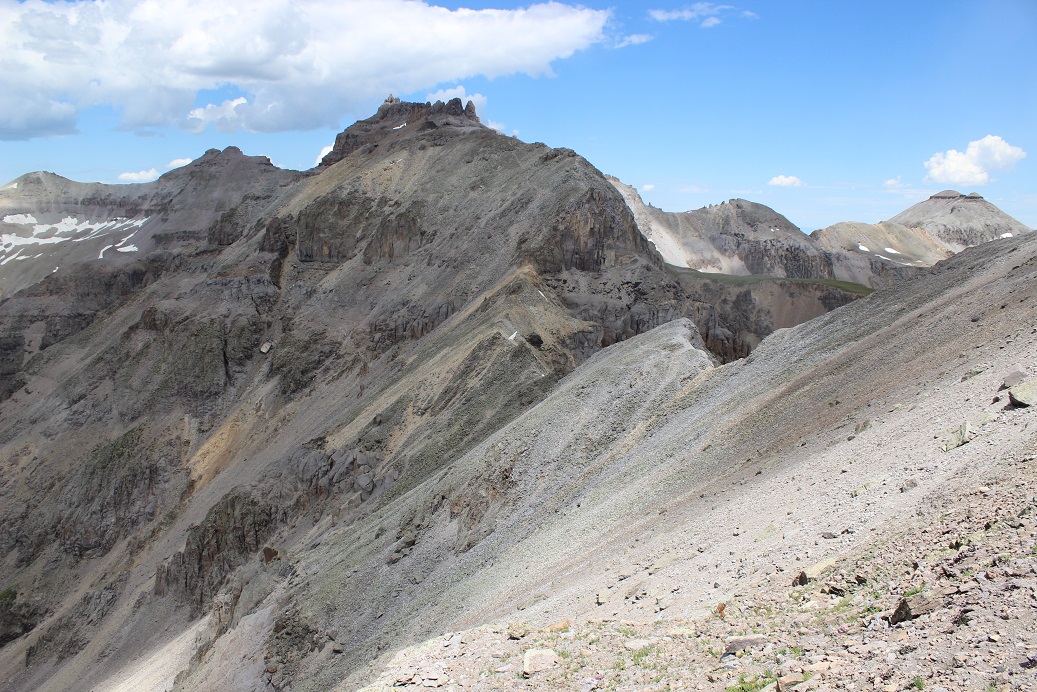
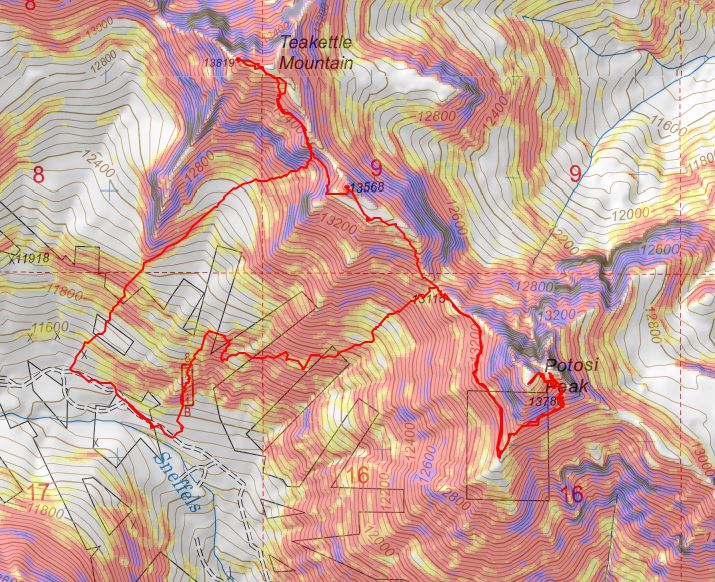
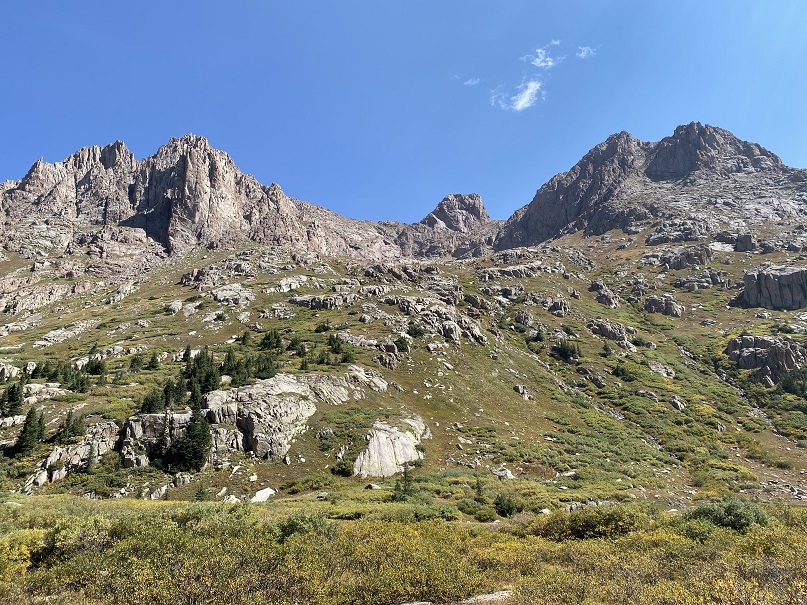
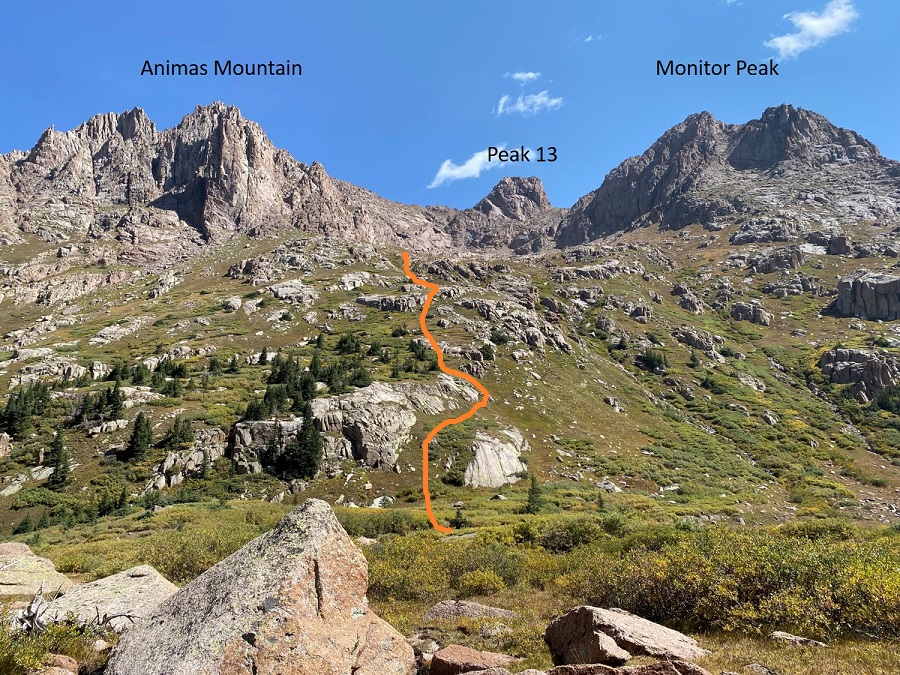
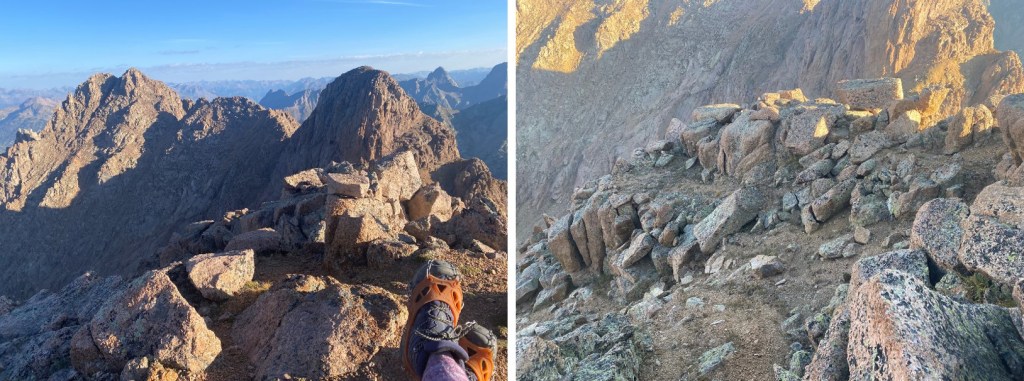
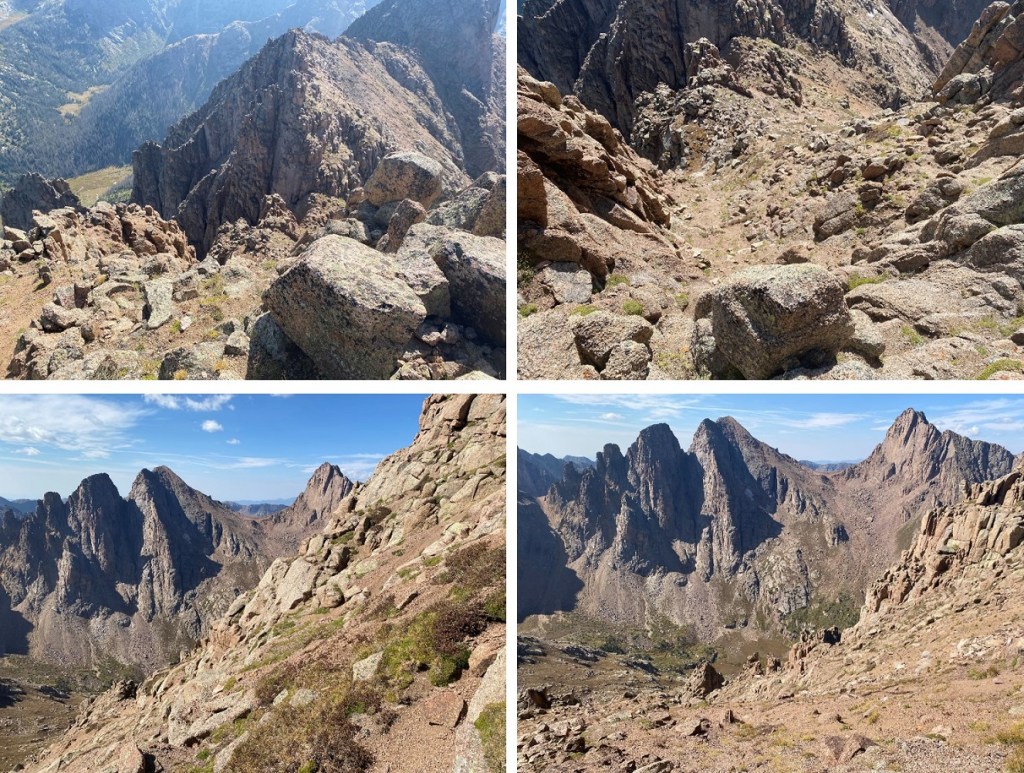
Once again, I got up before my alarm, and spent some time stargazing.  I saw several shooting stars, and a few airplanes coasting across the night sky. There was no moon, but I could see the stars clearly. I made out a few constellations, and noted the frost on the outside of my bivy. I wanted to start at first light, but ended up starting a little earlier, around 6am.  These are the peaks I was attempting today

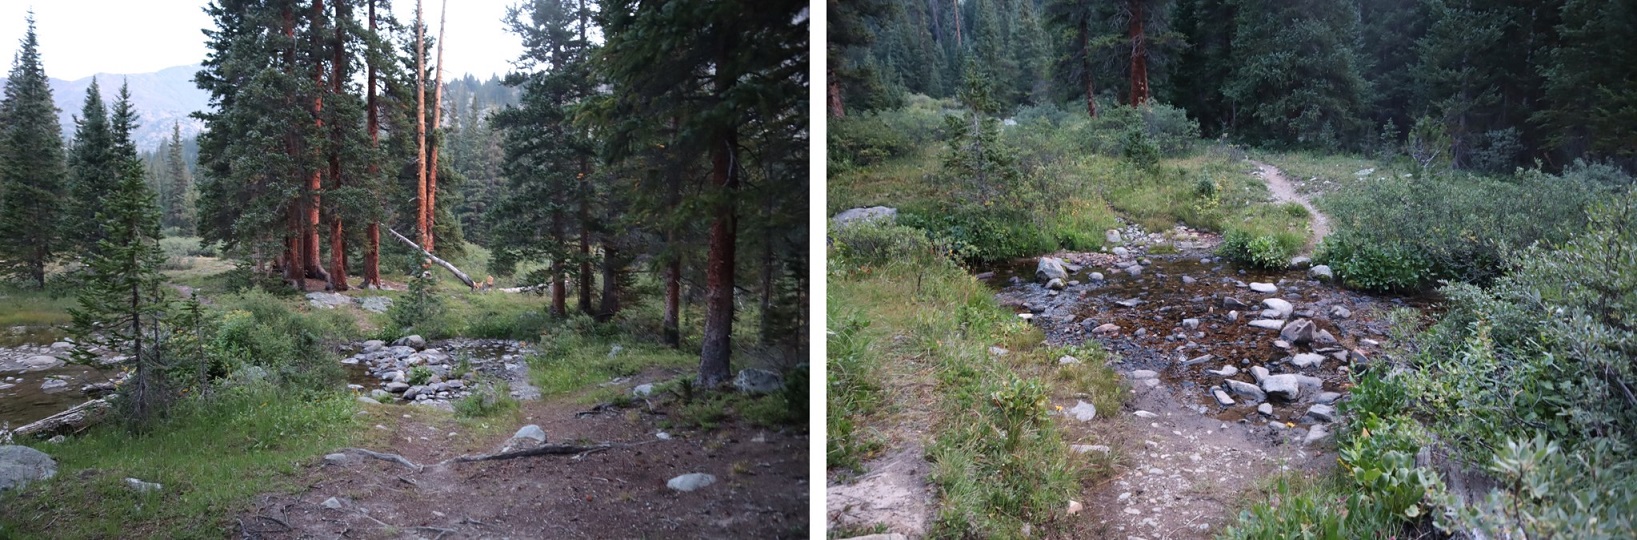
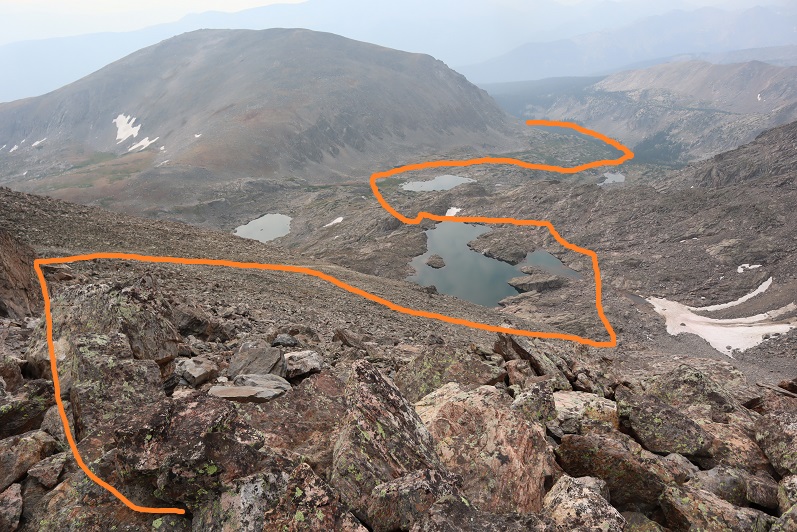
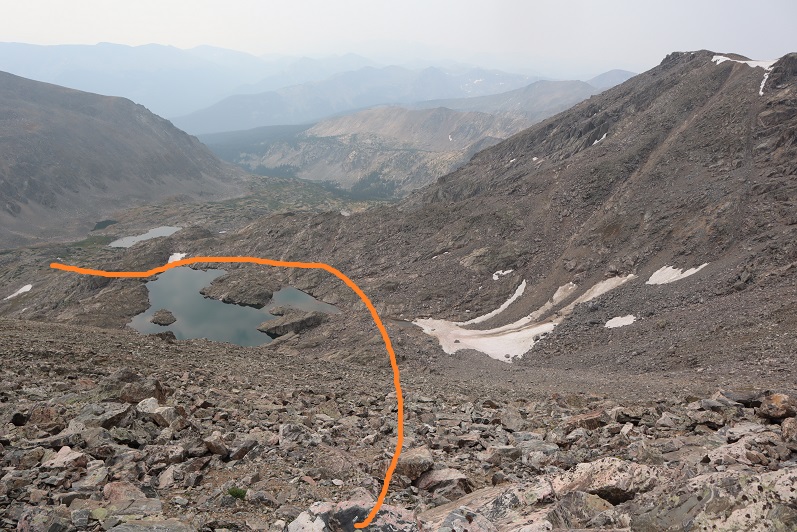
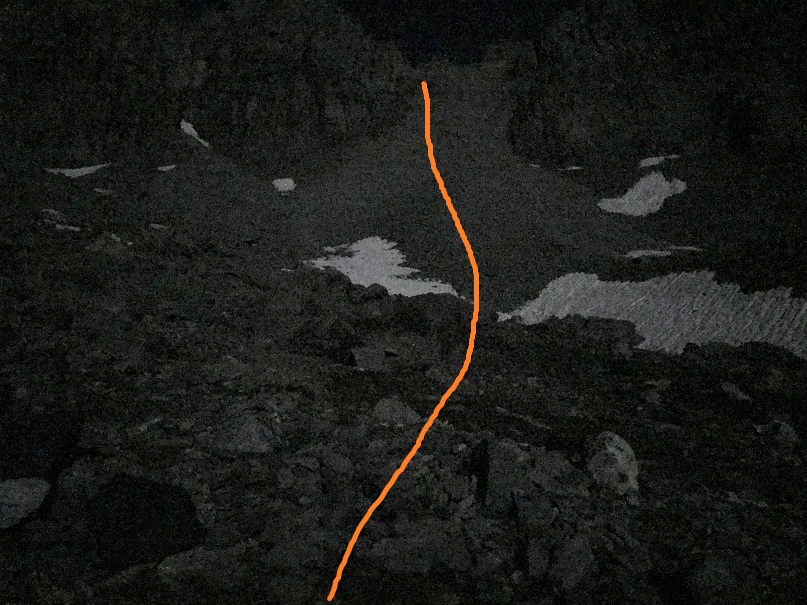
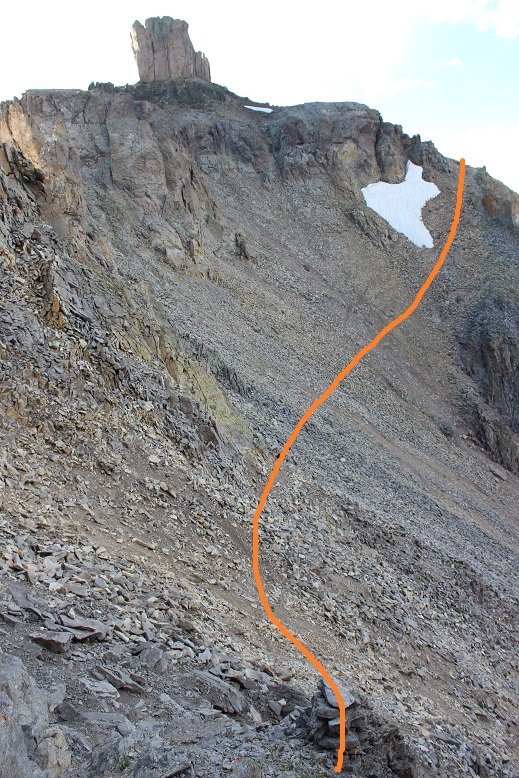
Here’s an overview of the route from Ruby Basin to the upper basin below Animas, Peak 13, and Monitor.  After about 20 feet of willows, I was able to stay on tundra the entire time. This is choose your own adventure, but it’s easy to find a class 2 route into the upper basin. I just kept aiming towards Peak 13.

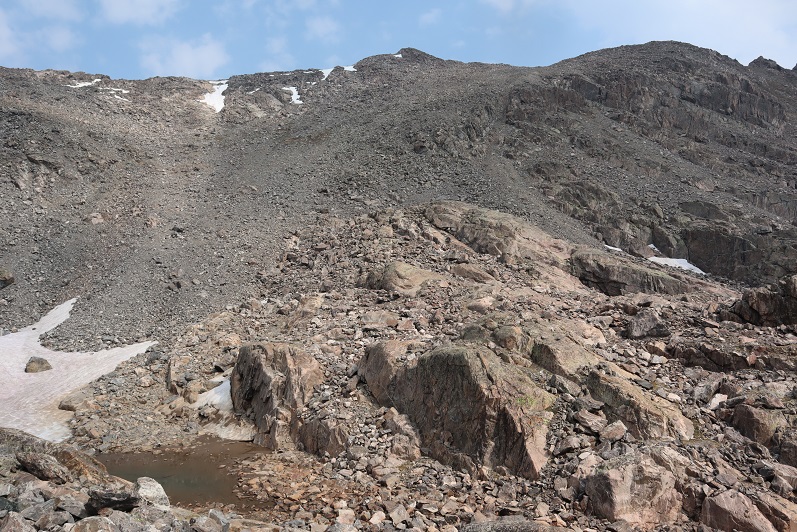
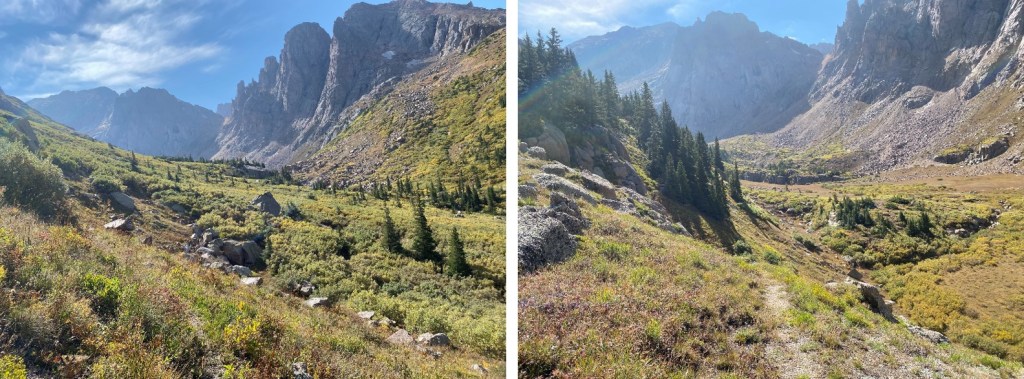
Here’s a look at the upper basin.

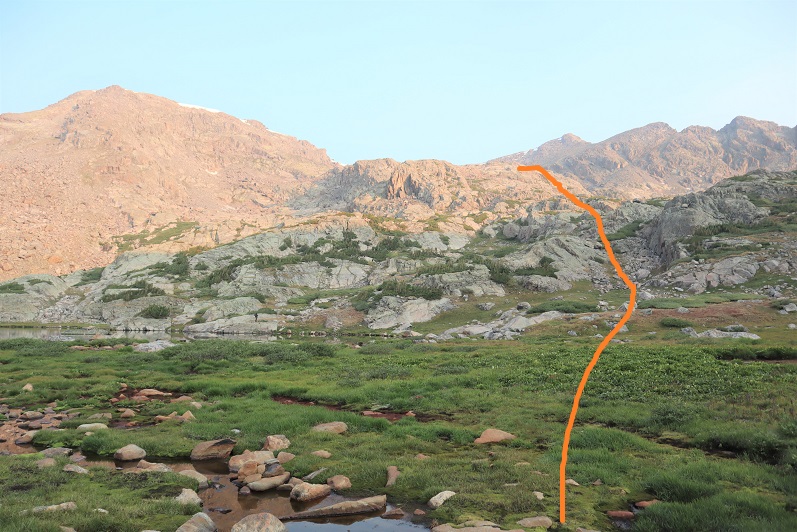
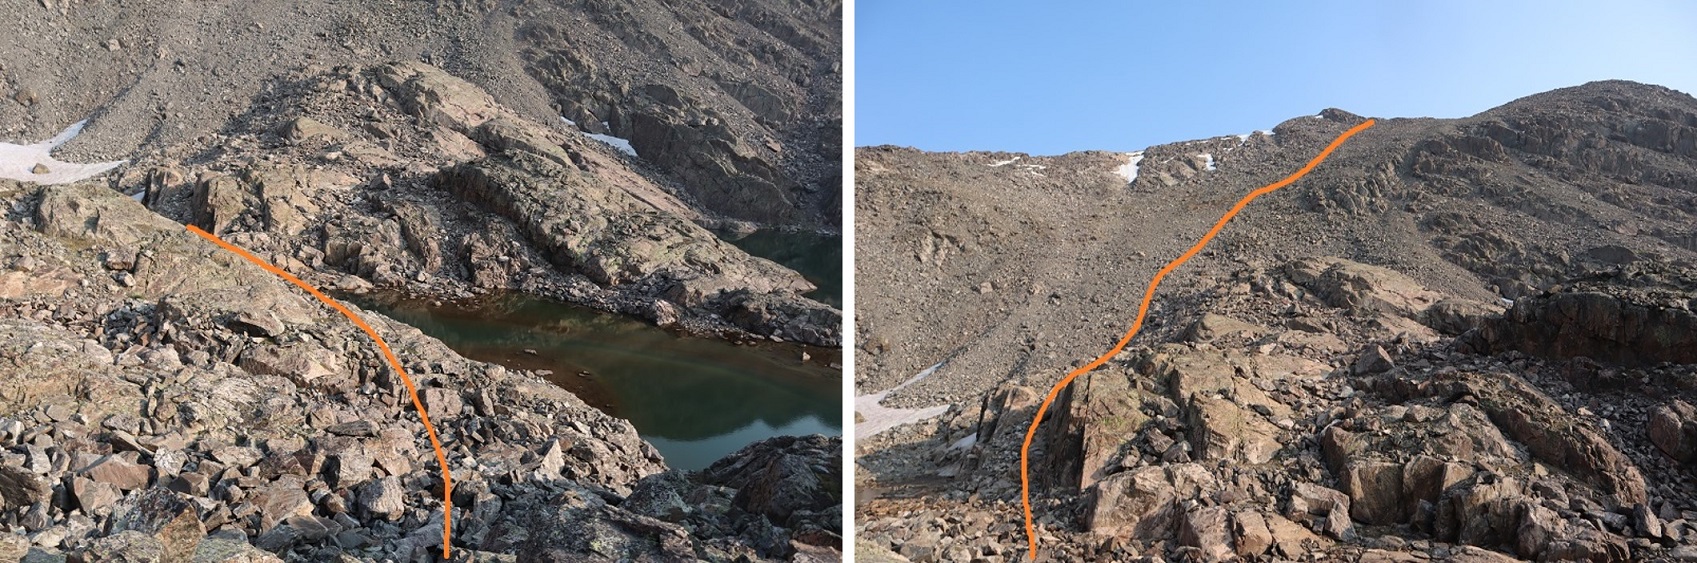
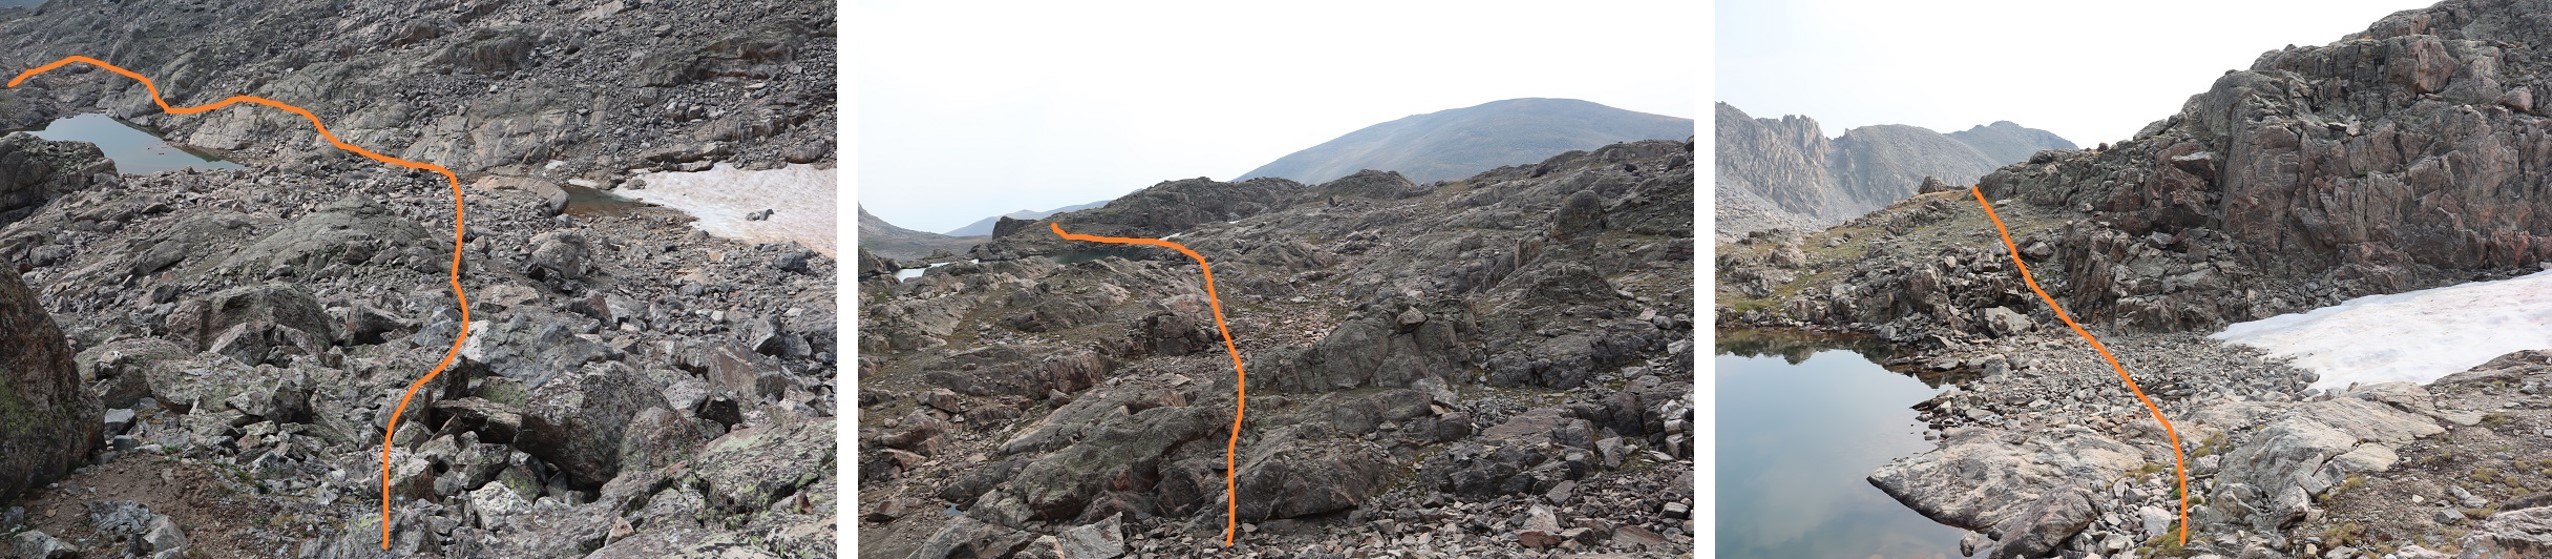
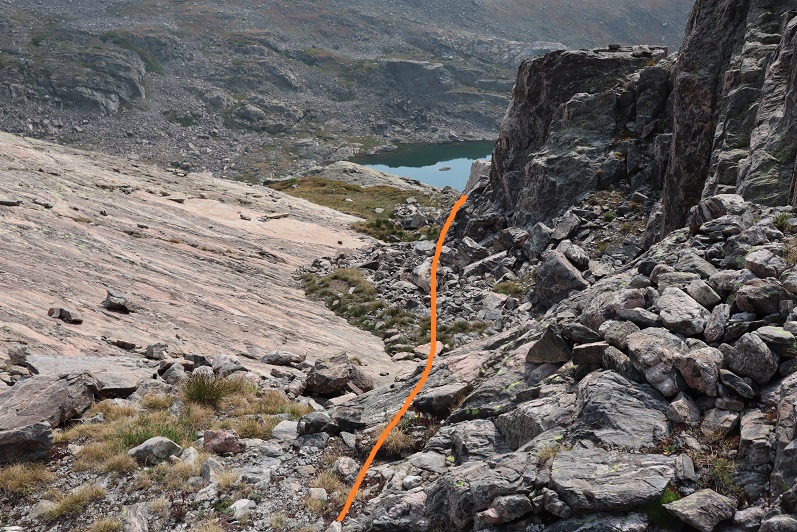
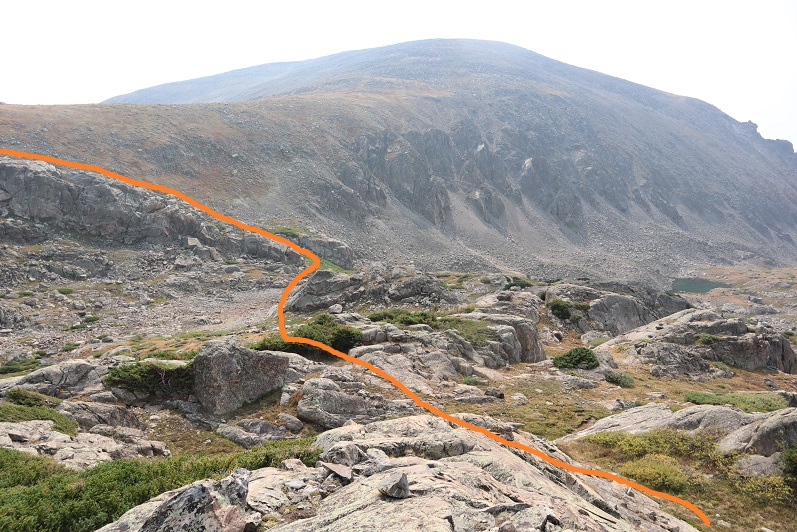
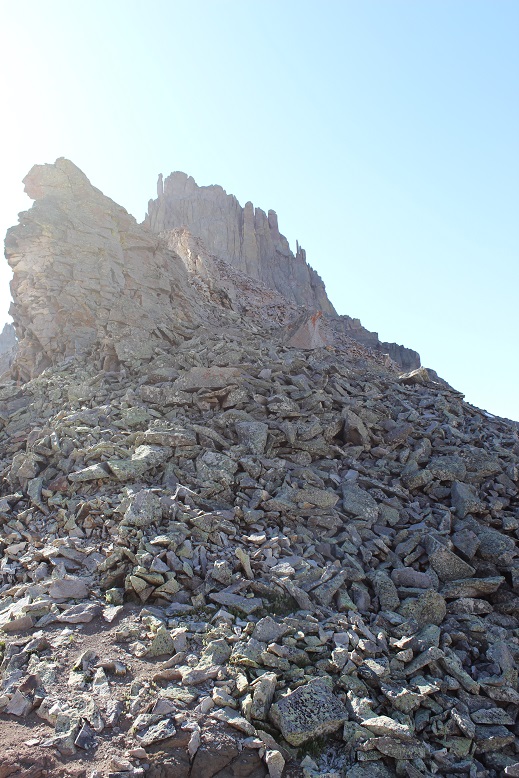
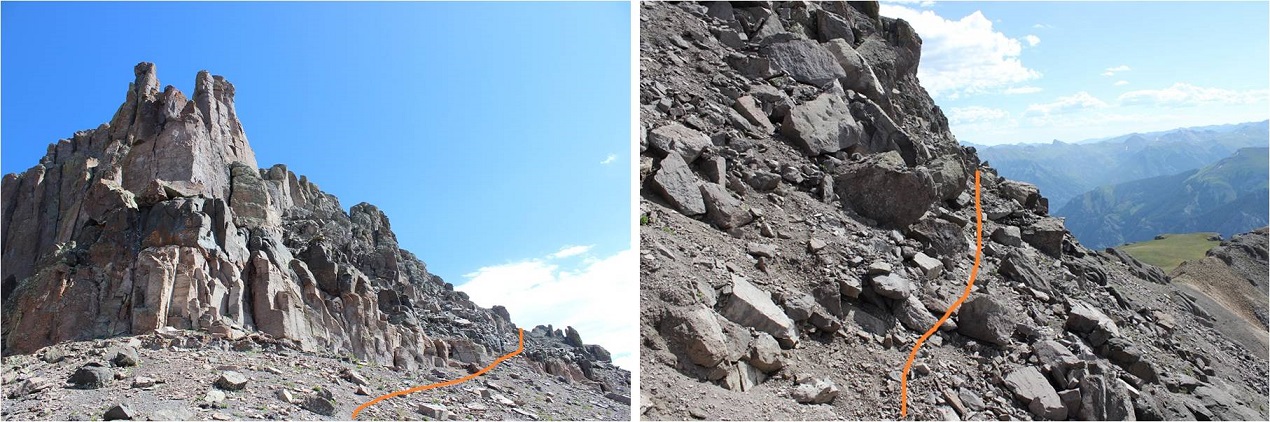
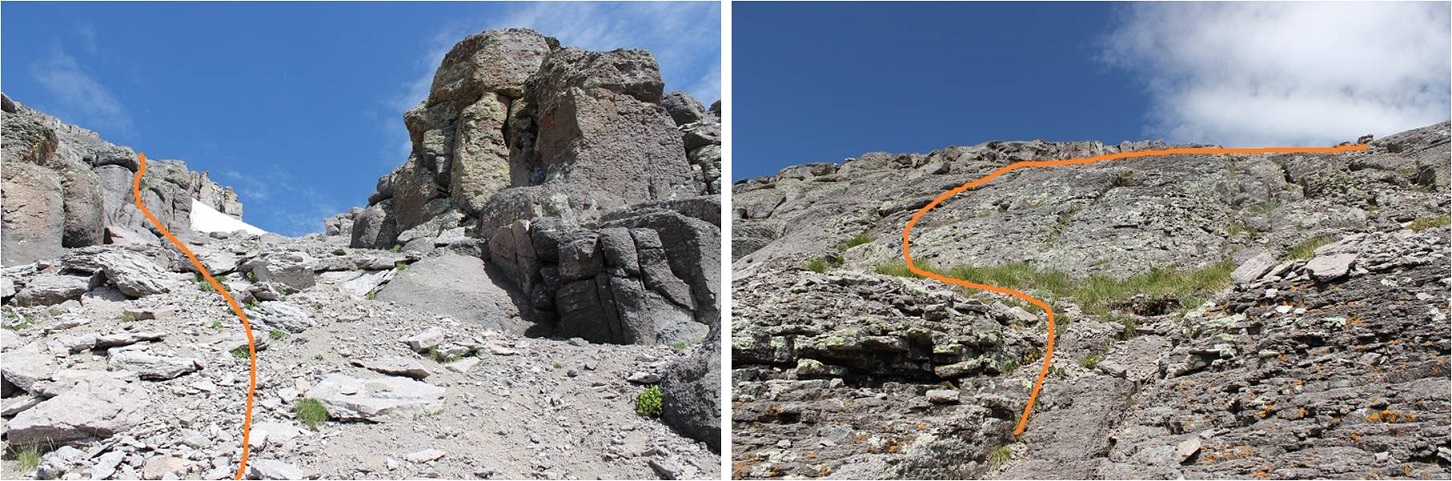
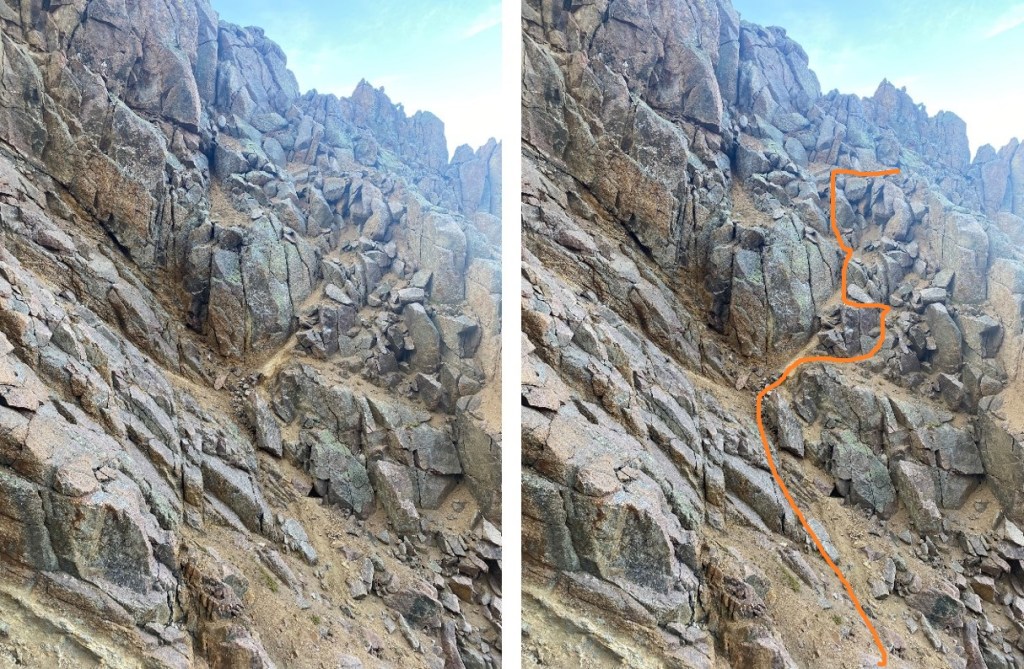
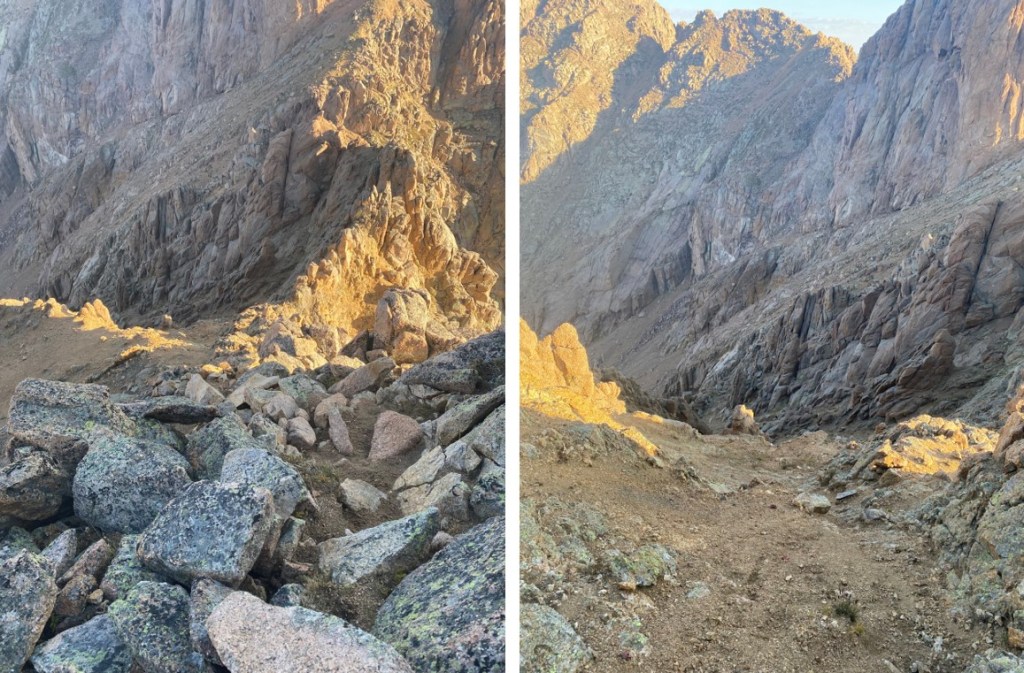
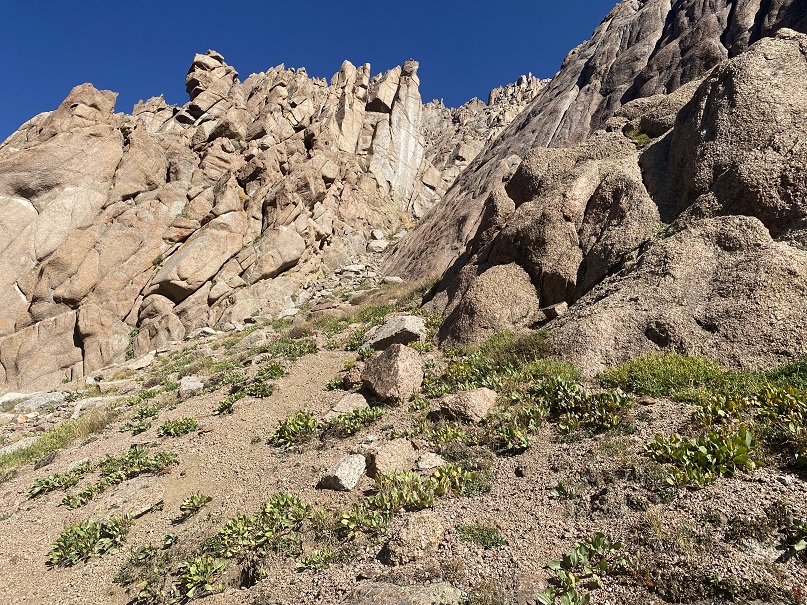
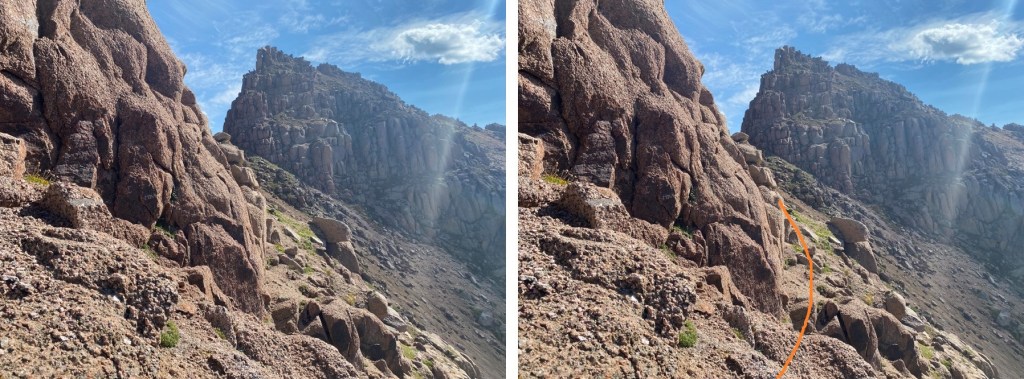
I was headed towards Monitor Peak first. There are several ways to do this.  This time I took what I consider to be the ‘easy’ approach.  Directly below Peak 13 there are two ramps you can ascend. I chose the further one, as it was less steep. I followed the basin northeast, towards an obvious ramp. It’s just below a section of a white and black streaked slab.

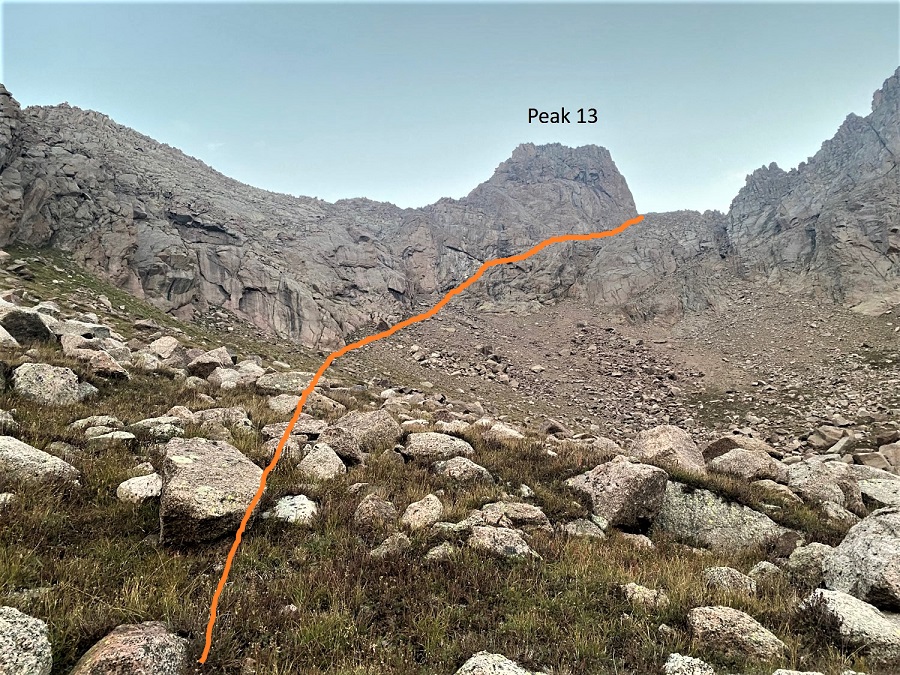
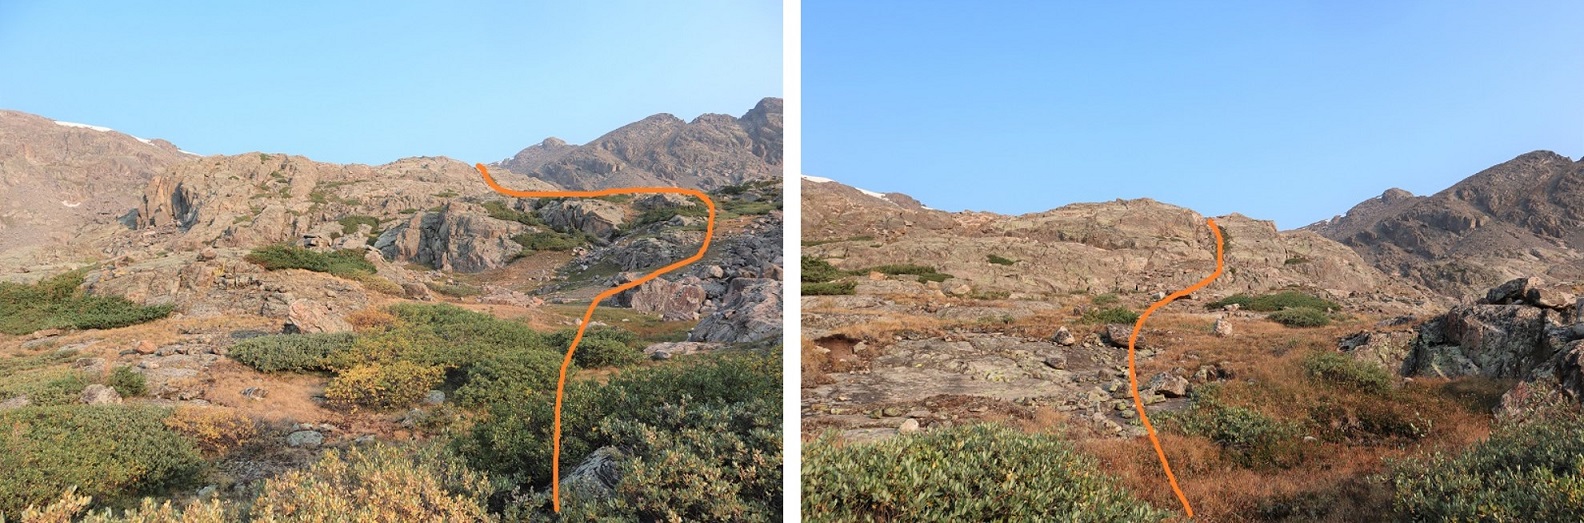
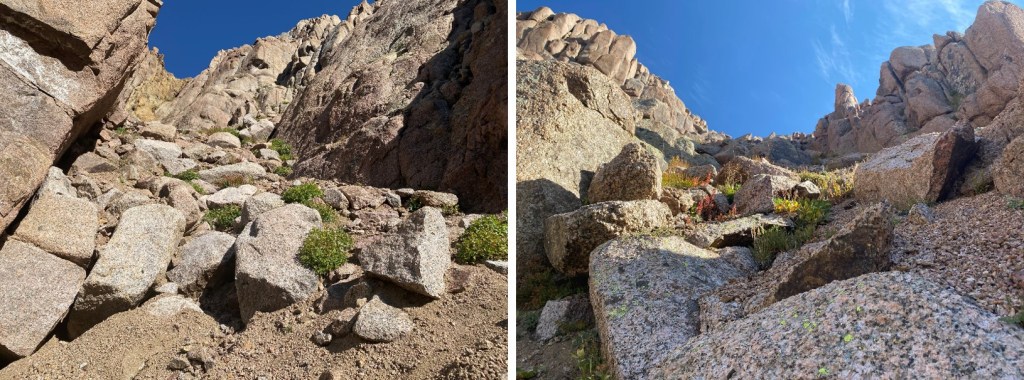
Here are some closer pictures. There are two ramps here, an upper ramp and a lower ramp. Both go, but the upper ramp is less steep, and all class 2 in my opinion.

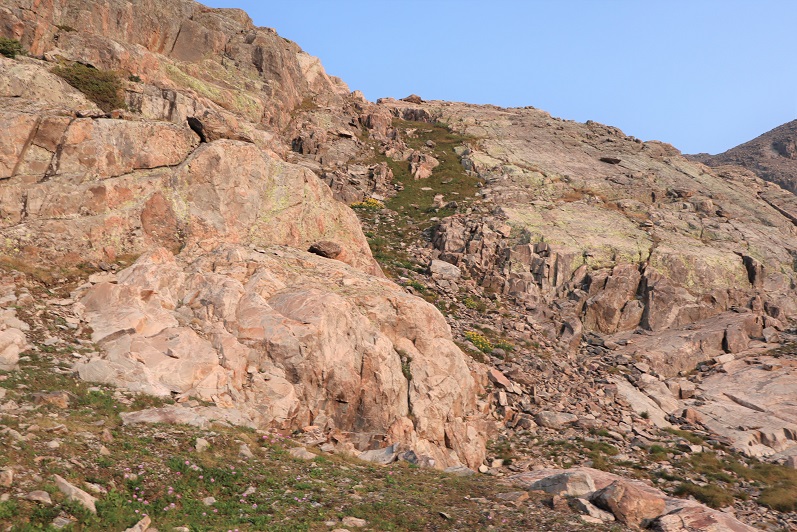
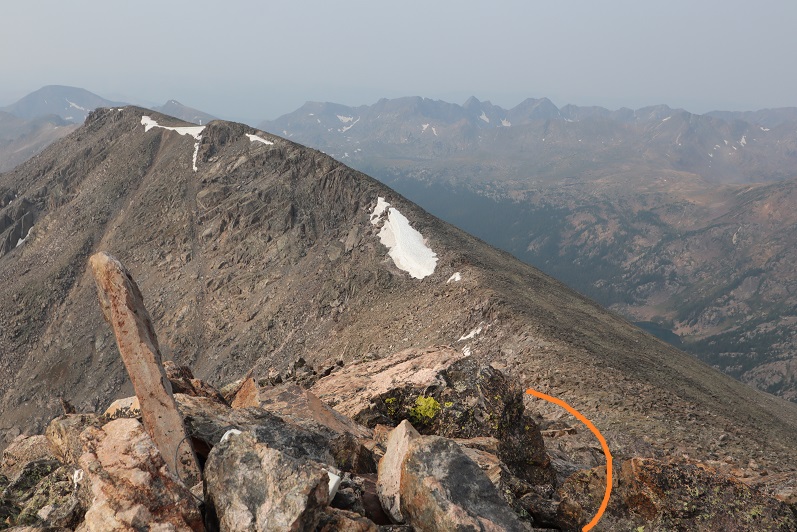
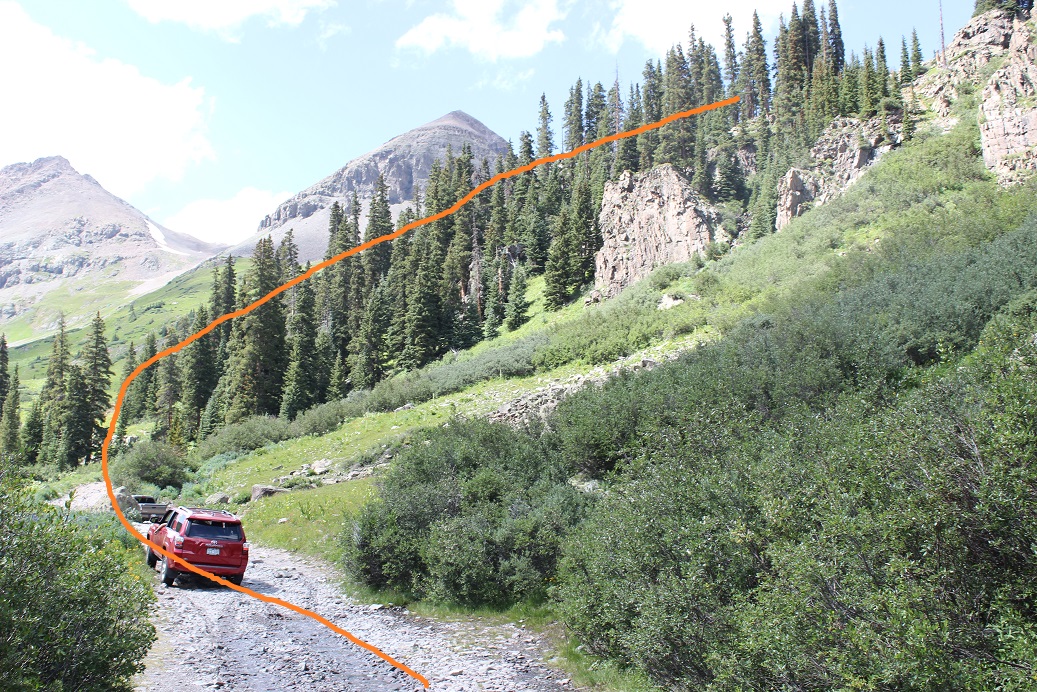
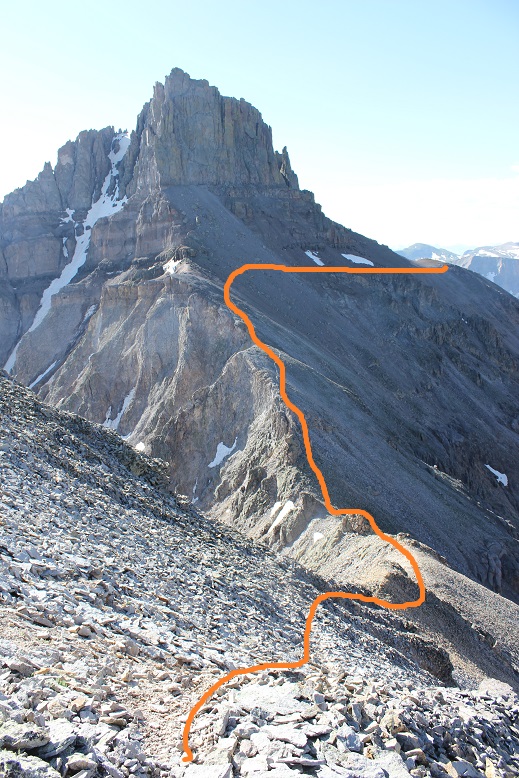
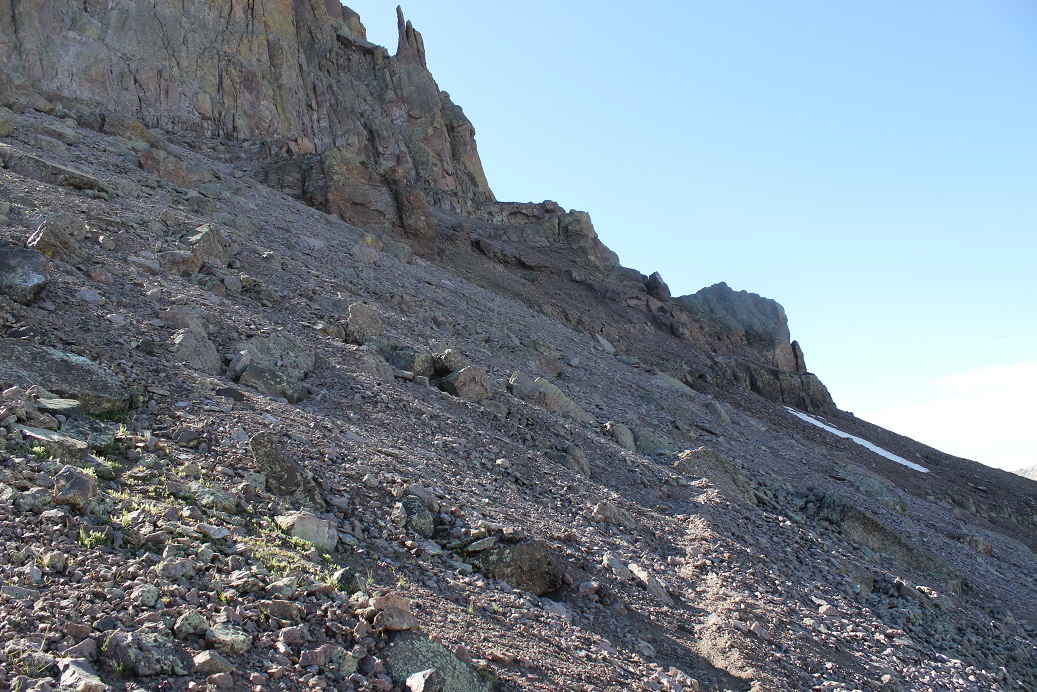
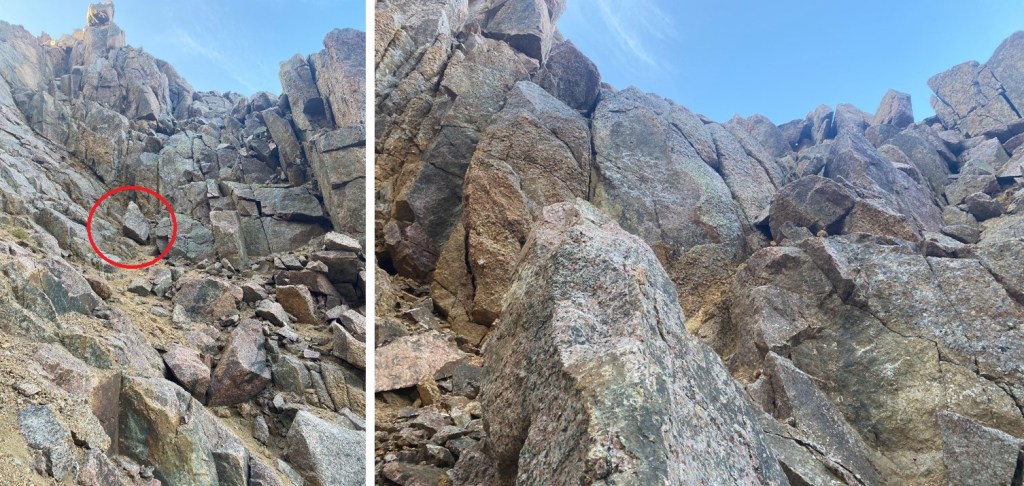
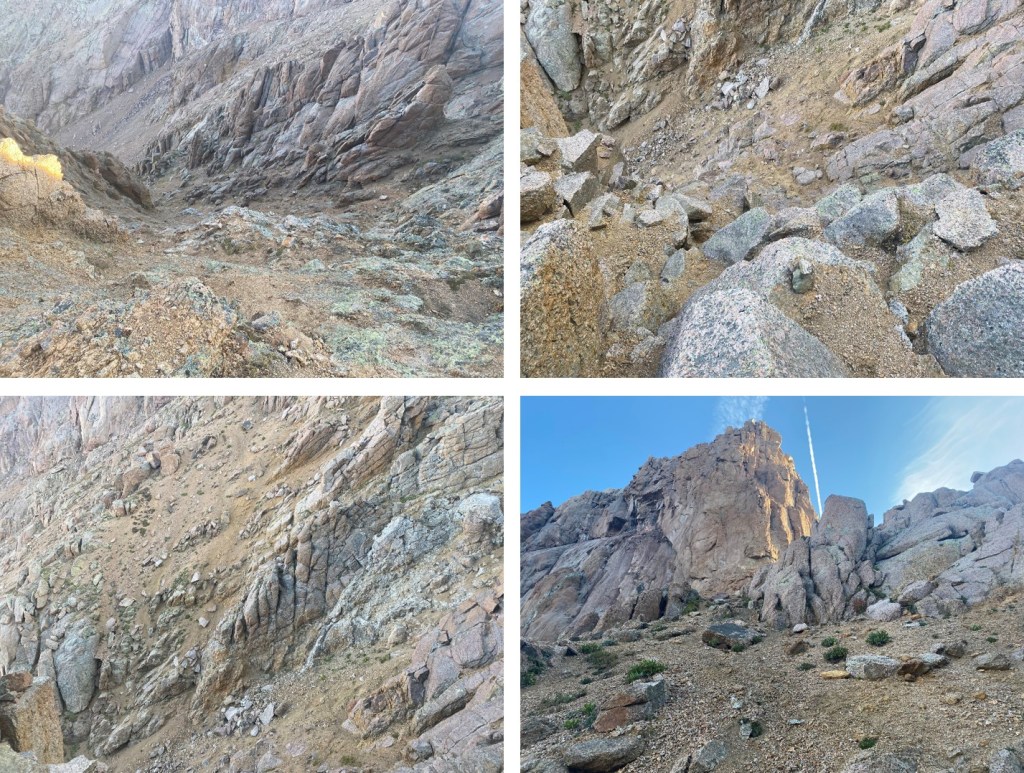
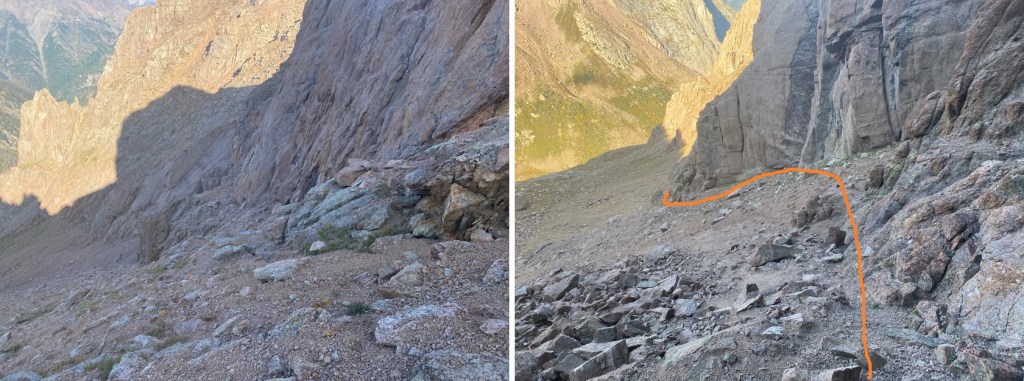
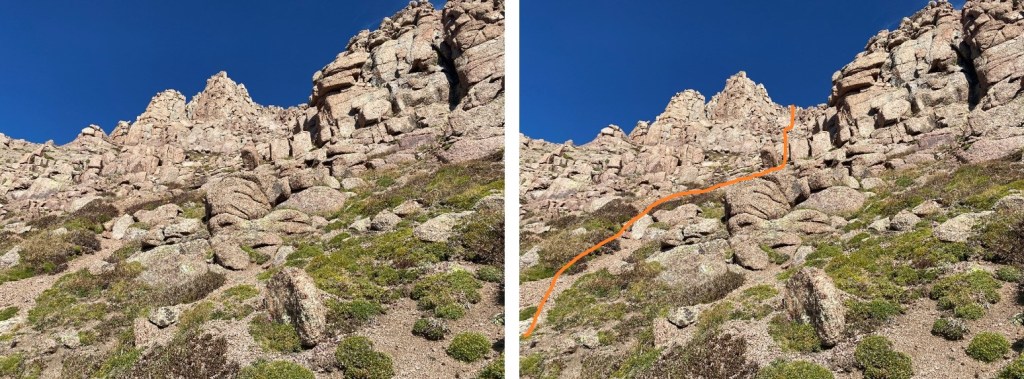
Also, while you’re here, look to your right.  Find this gully (circled in red). It’s the gully you will be aiming for when ascending the ridge (ascending to the ridge before this point is fruitless). Here’s an overall view of the climb to Monitor from the Peak 13/Monitor saddle. You’ll know you’re in the right gully because there’s a white vein of rock going through it (more on this later, but from this spot you can clearly see the white vein, so it’s a good time to get a visual of where you’re aiming).

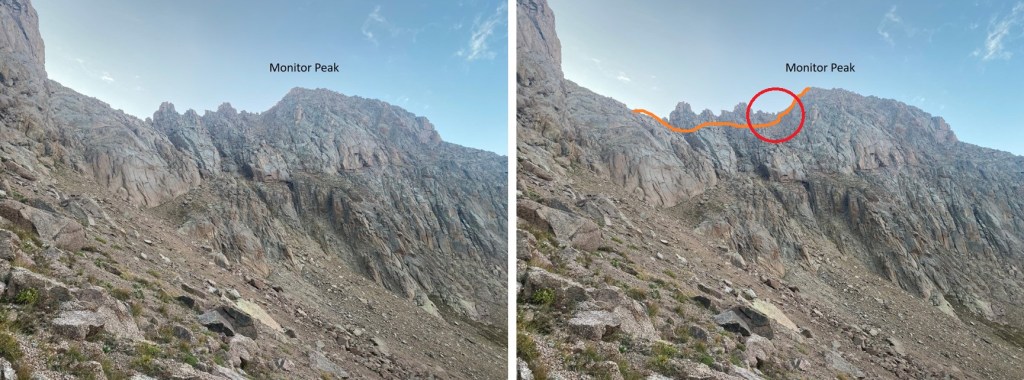
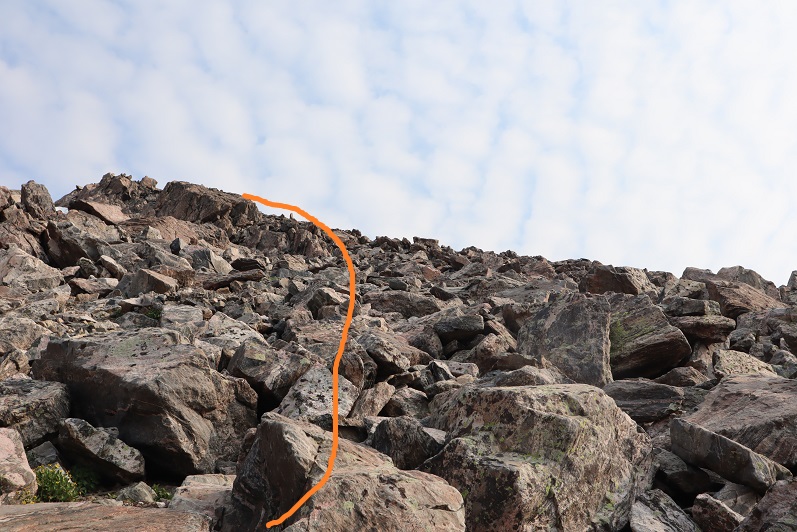
But first, let’s get to the saddle, by going up that ramp.  As you can see, it’s wide, and easy to navigate.

The top of the ramp deposited me at the Peak 13/Monitor saddle.   Well, actually, I didn’t need to go all the way to the saddle.  I skirted the saddle and continued south across scree, following the ridge.

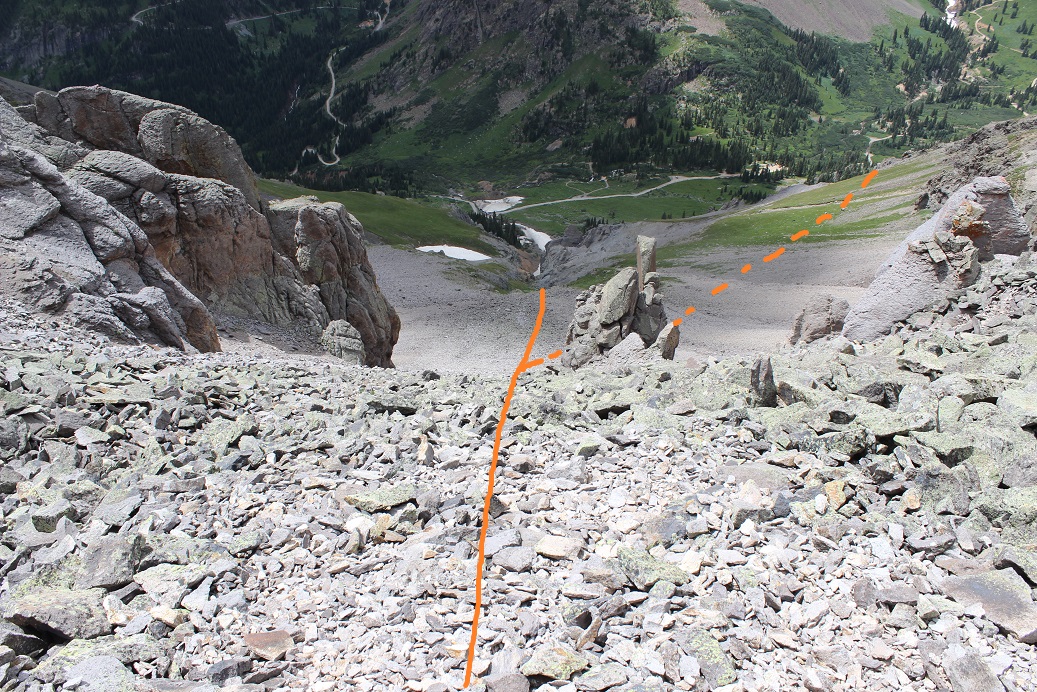
Now for the gullies. There are several of them, and in order to cross the first one I had to descend about 100 feet down, then re-ascend. Before doing that however, I got a good look at my route.  This looks harder than it is.  Here’s the route I took after re-ascending the gully.

But first, I had to descend on kitty-litter scree, and then re-ascend. 

When re-ascending there were a couple of ways I could have gone (all felt class 3). This is the way I chose. 

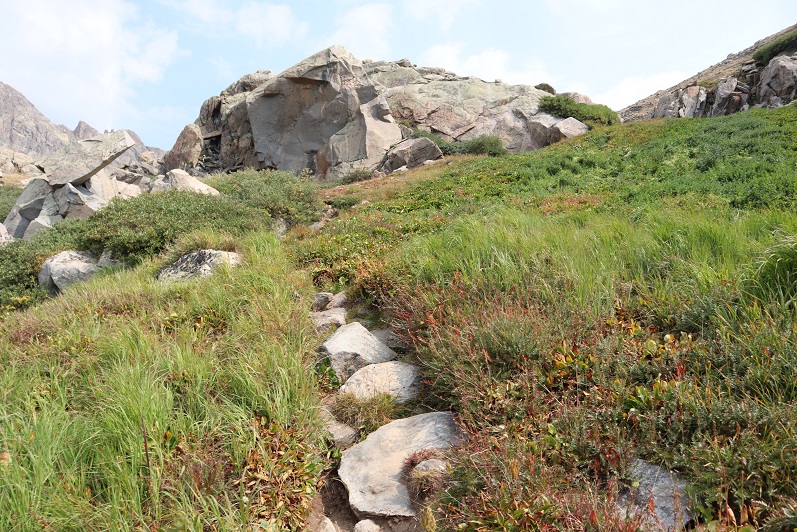
Get a good look at your intended route from above, as this is what it looks like from below.  Hint: aim for this rock, go behind it, turn right, and follow the areas covered I dirt.

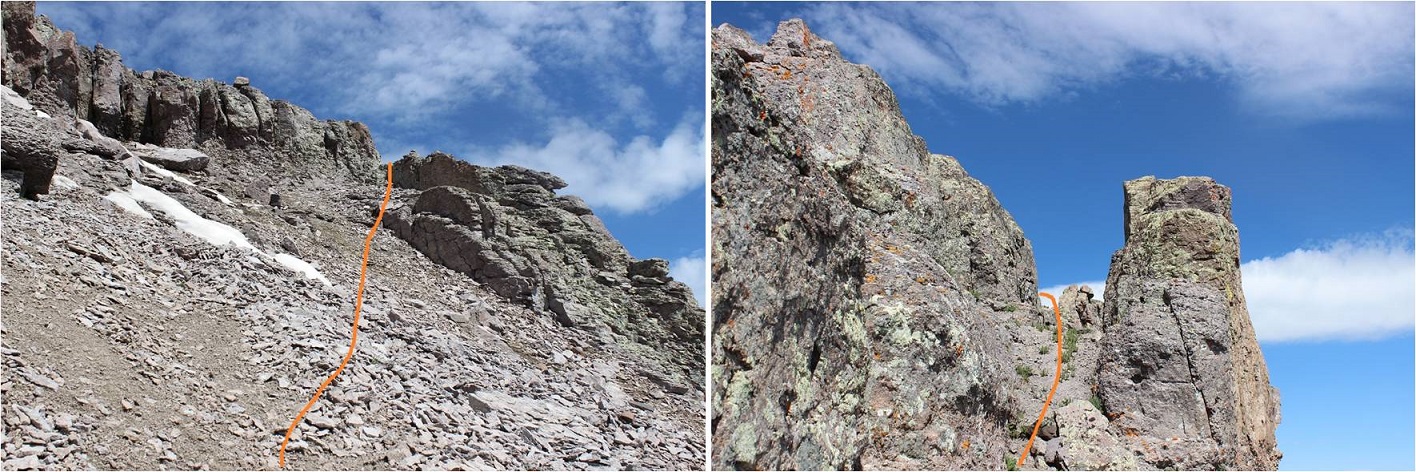
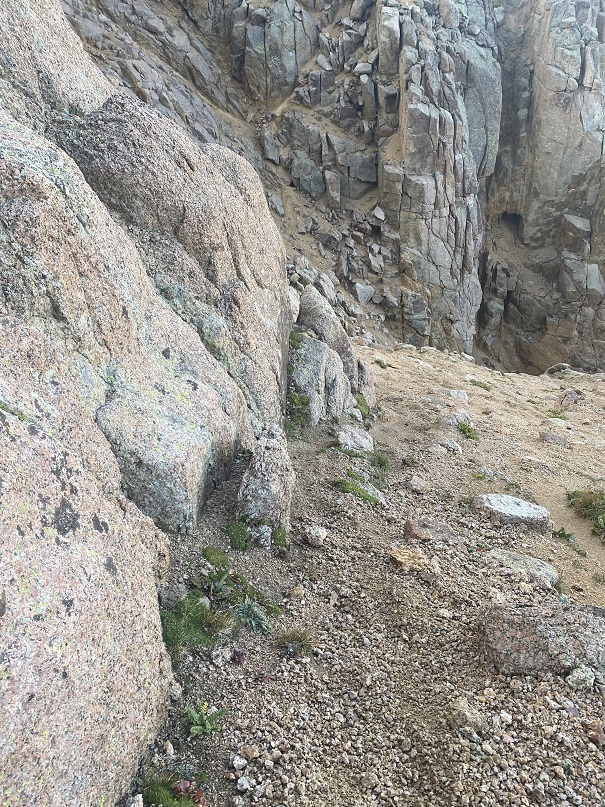
Ok, now to find that gully. Luckily, from here there were cairns, and even a bit of a game trail.  I followed them south, staying well below the ridge

I rounded the corner, and could clearly see the correct gully.  I followed this gully to the ridge

Once on the ridge, I turned right, and followed it to the summit, dipping to the right at the end, but always following a class 2 game trail. 

I summited Monitor Peak at 8am.
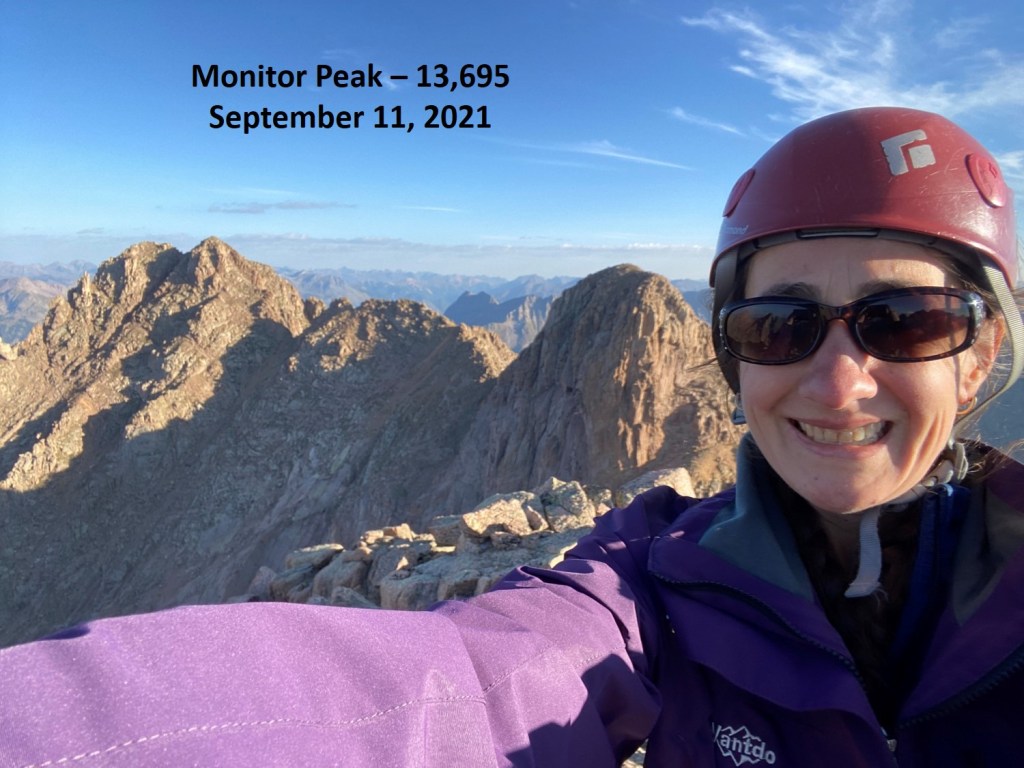
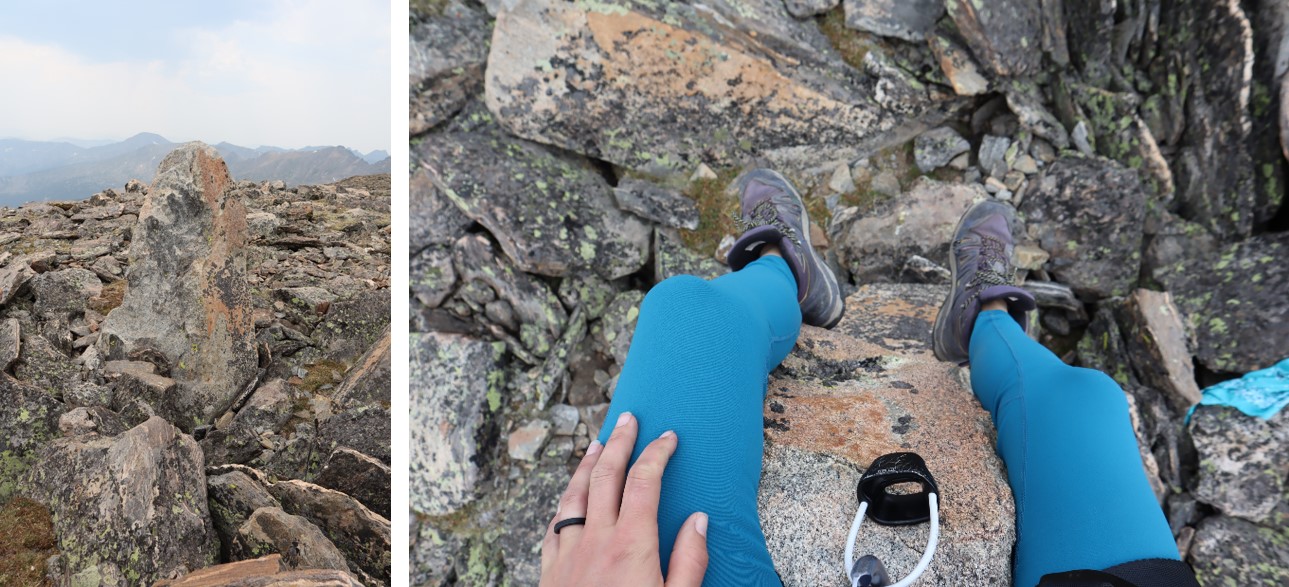
Monitor Peak:

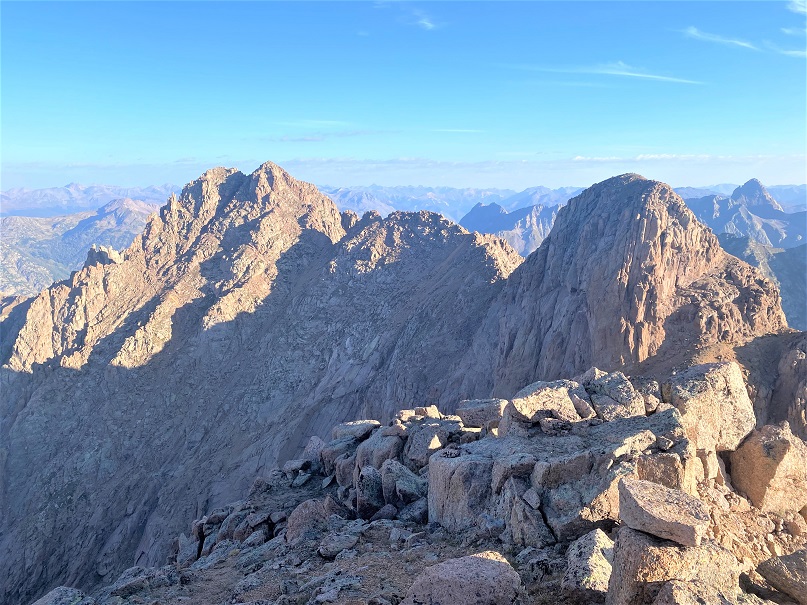
There was a summit register in need of new paper (but with 2 pencils), and great views! 

Next on the agenda was Peak 13. Spoiler alert:  I didn’t summit Peak 13. When I got to the area where I was supposed to “just go straight up” I found that while it was class 4, there were no hand/foot holds, and everything I tried to grasp turned to kitty litter in my hands.  Since I hike solo, I have a rule not to upclimb anything I don’t think I can downclimb (if I don’t have rope), and while I could probably have upclimbed this, I wouldn’t have been able to downclimb it, and a fall would be deadly (lots of exposure). In any event, I’ll describe the process of getting there.  Now is also a good time to get a visual of how I climbed Animas Mountain as well. These were my routes:

From the summit of Monitor Peak, I headed back to the Monitor/13 saddle, retracing my steps

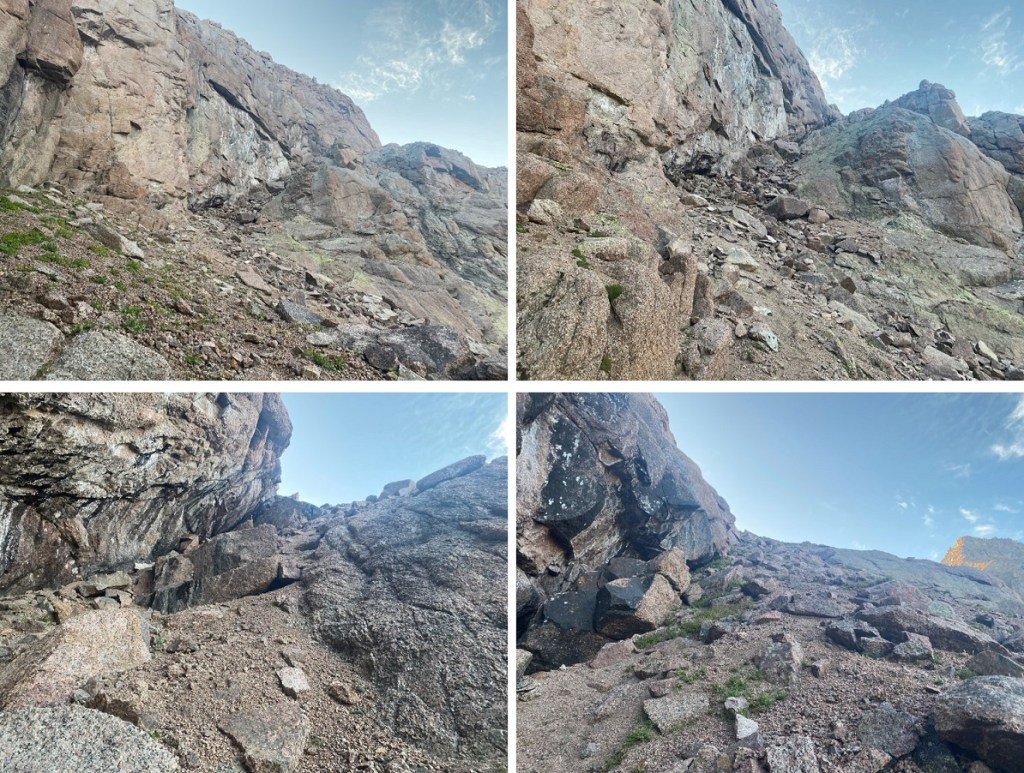
Once at the saddle I followed it northeast, to an obvious stopping point. Here I turned to head up, and, like I said before, I deemed it unsafe, so I turned around, tried several other ‘ledges’, and in the end decided to just head back to the upper basin and summit Animas from the gully.  I was very happy with this choice.  Here are pictures of the two possible routes up to Peak 13 I decided not to take

Instead, I descended back into the upper basin by way of the upper ramp.

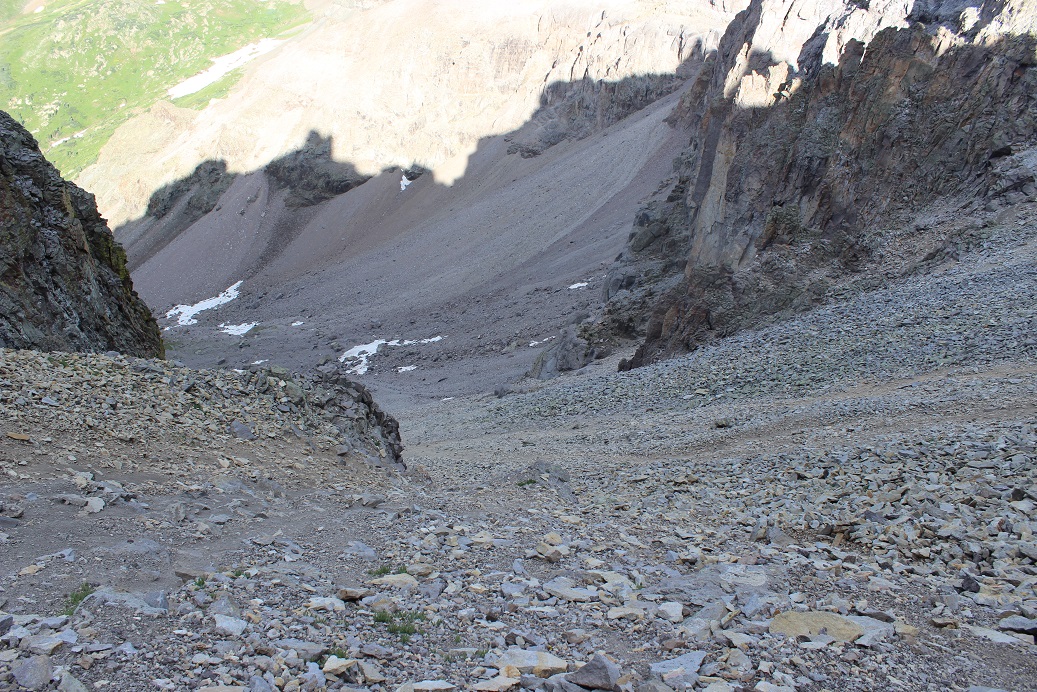
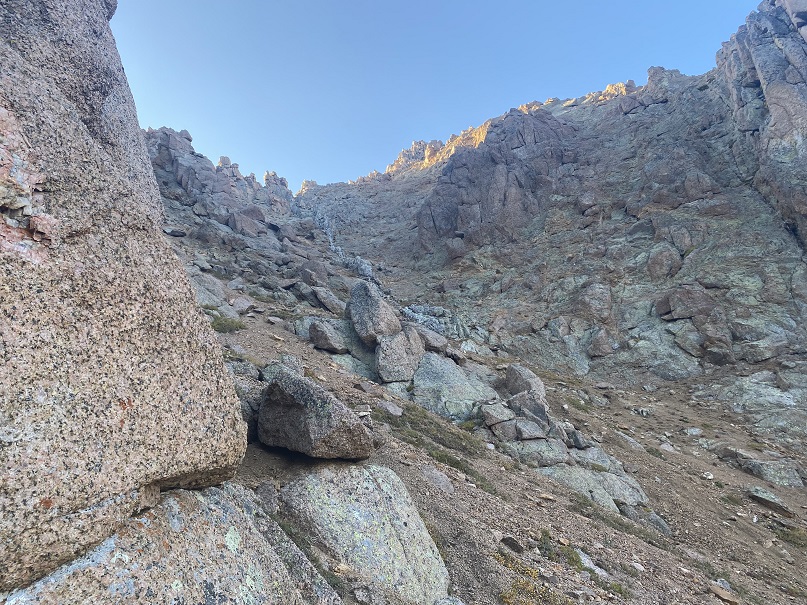
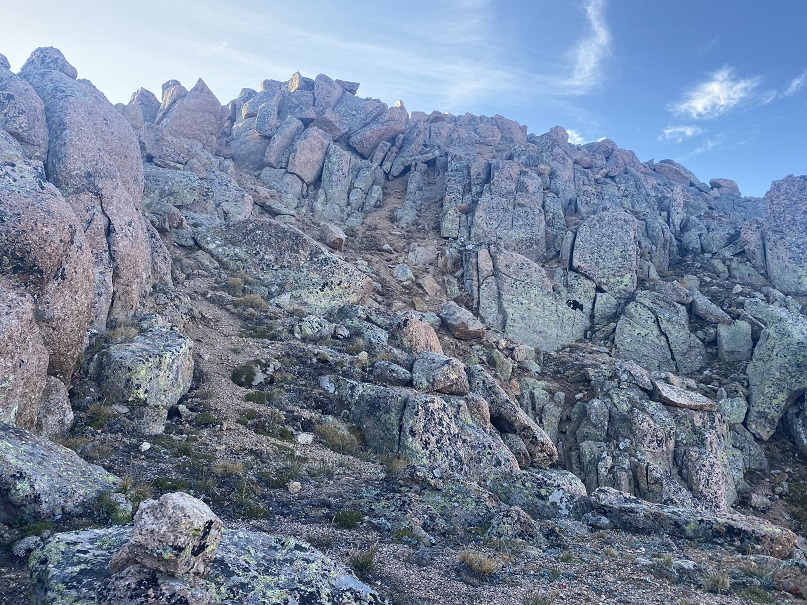
I followed the contour of the mountain all the way down to 12860’, and the only obvious gully that ‘went’

I then followed this gully north.  There are lots of divergences here, but if you keep heading north, they all seem to ‘go’. I just kept the spires to my left and followed the obvious contour of the gully. I as able to keep this all class 3.  If you’re in class 4 territory, back up and look for an easier route.

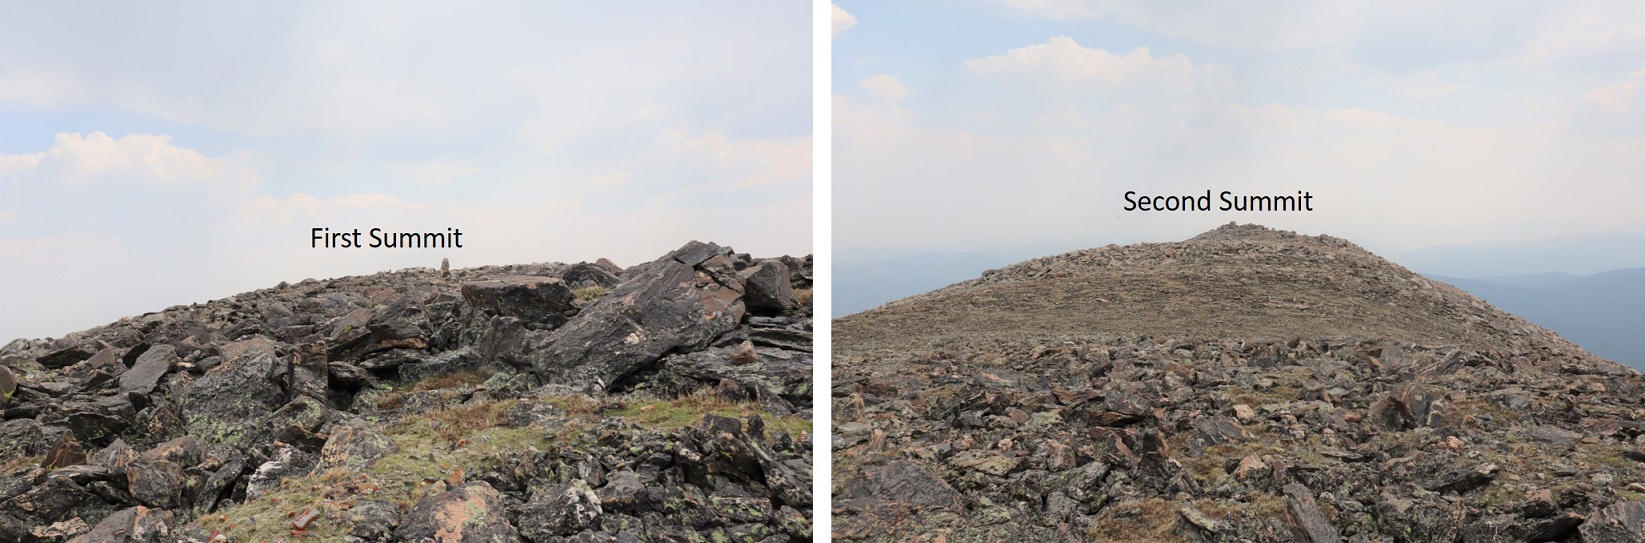
When I made it to 13580’ I headed east, towards the sandy saddle between Monitor and 13500’

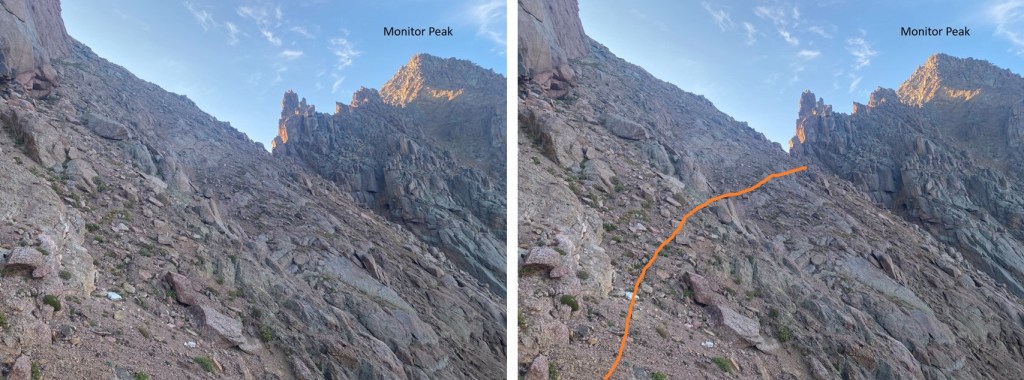
I didn’t go all the way to the saddle however, because I saw cairns leading me up the ridge (class 2).

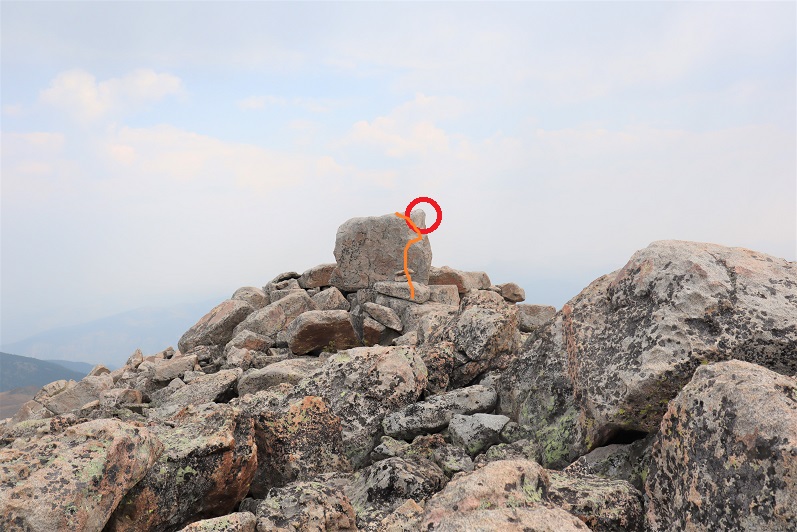
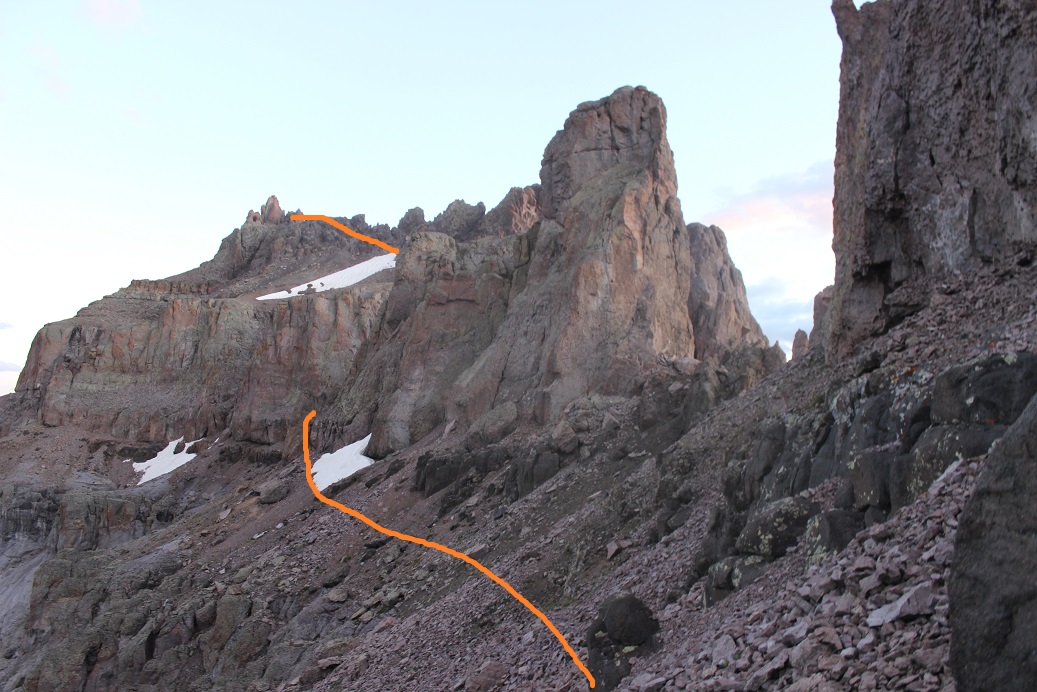
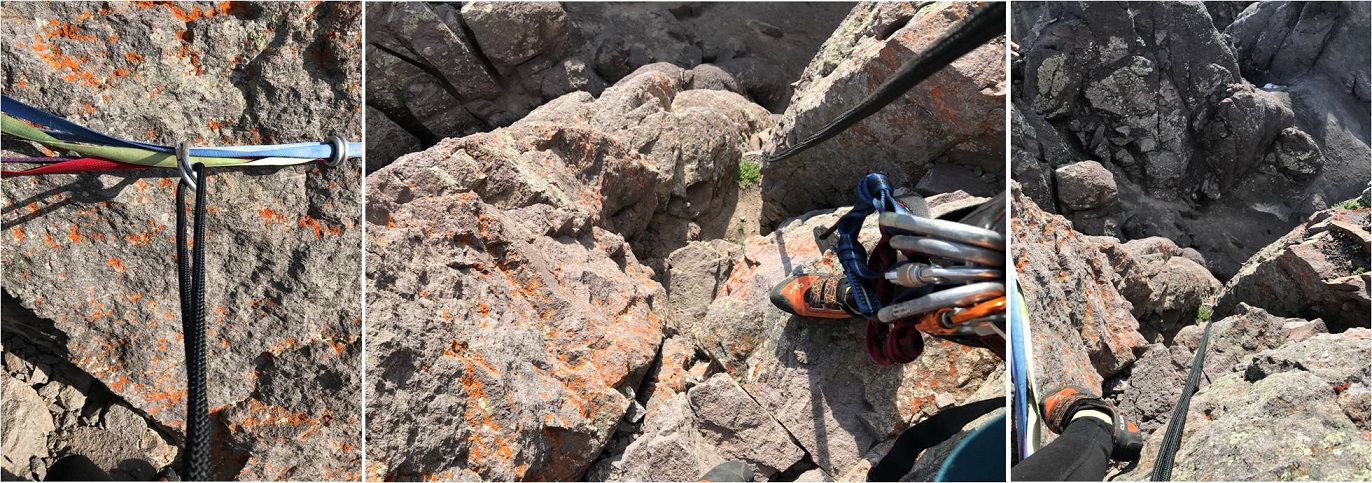
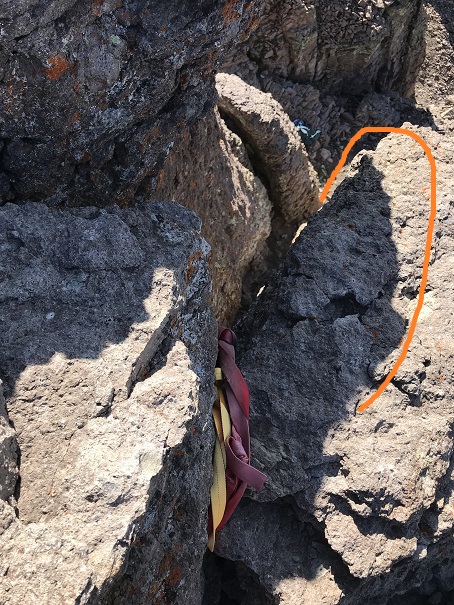
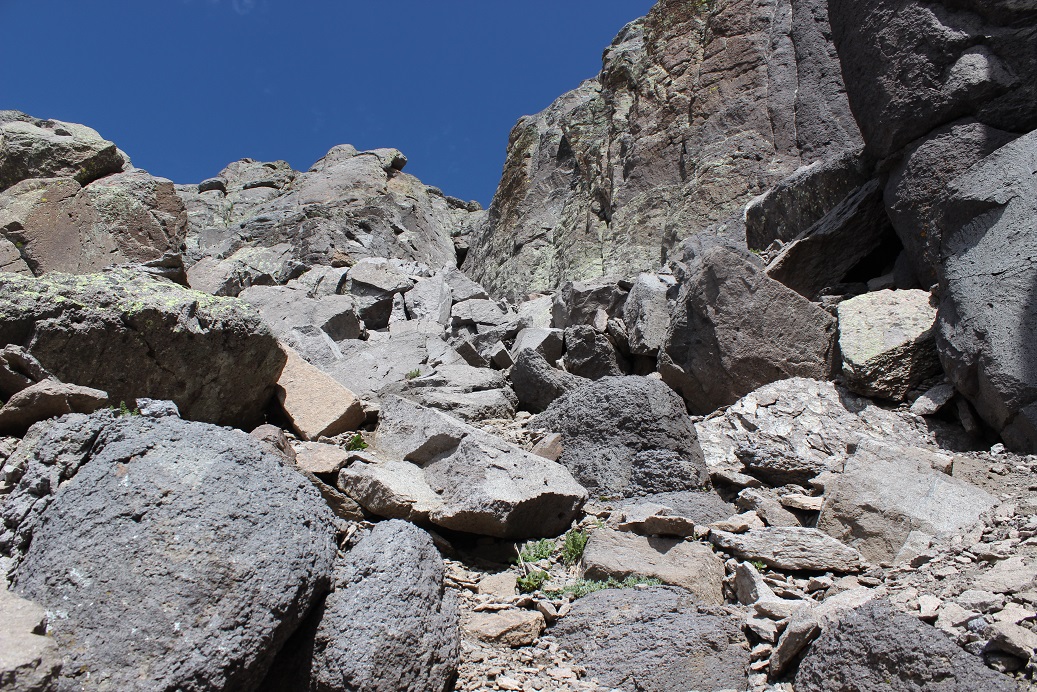
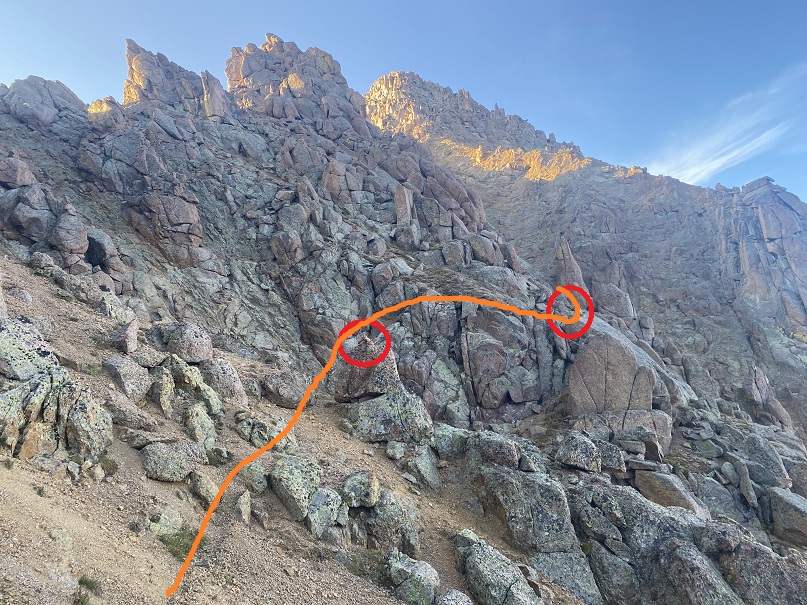
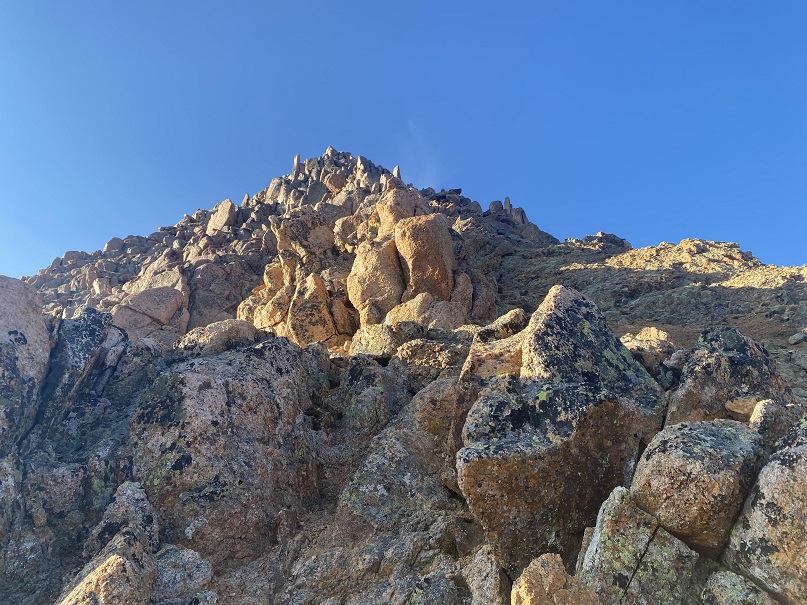
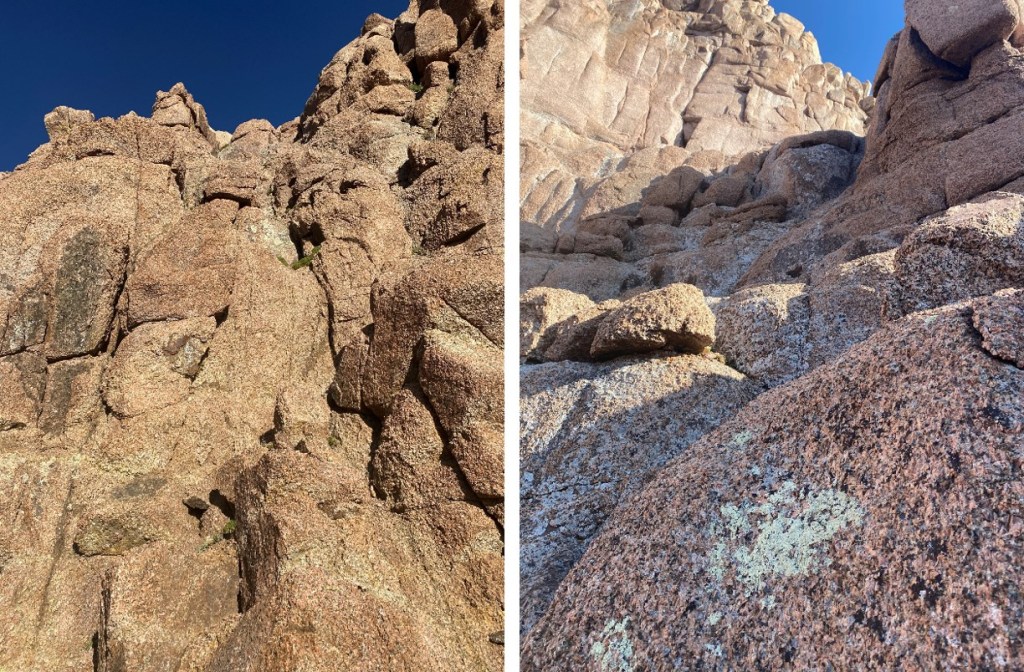
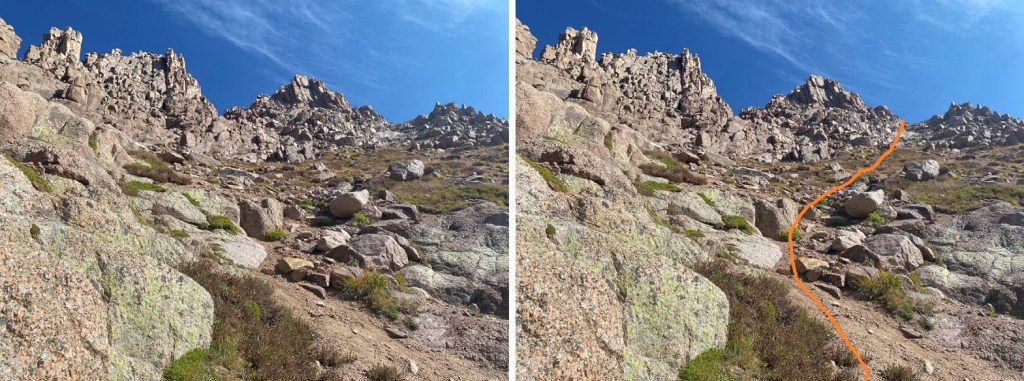
Here’s the overall route to the summit, all well cairned.  The circled area is a brief class 4 chimney section (less than 10 feet or so) that is the only obvious way out of the gully.  When you make it above the chimney you’re about 20 vertical feet from the summit on easy to navigate ledges.

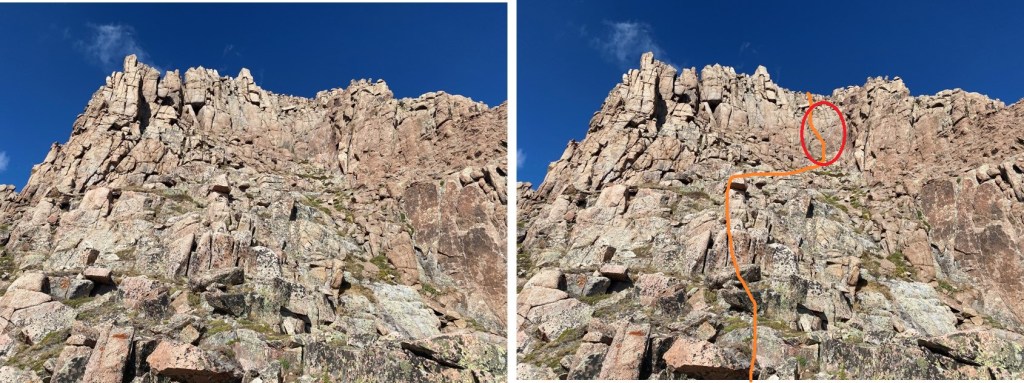
To get up the chimney I jammed my arms into either side and used my forearms to lift myself up. On the way down, I faced the rock and put both hands/arms in the left crack to lower myself down.  You may be asking yourself why I was fine climbing this chimney and not the class 4 section on Peak 13?   It’s because the rock here was firm, and I didn’t have to worry about it crumbling in my hands as I was climbing.  When I made it to the top of the chimney I turned right and followed the cairns to the summit.

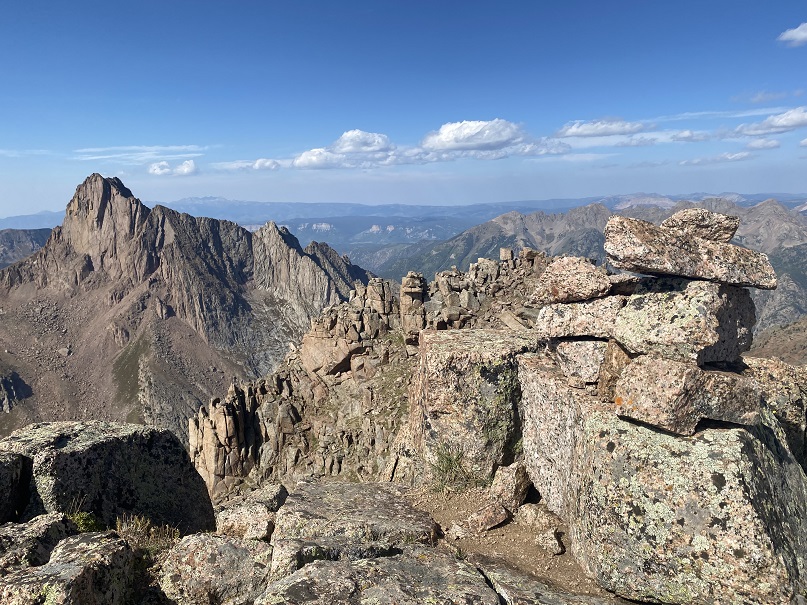
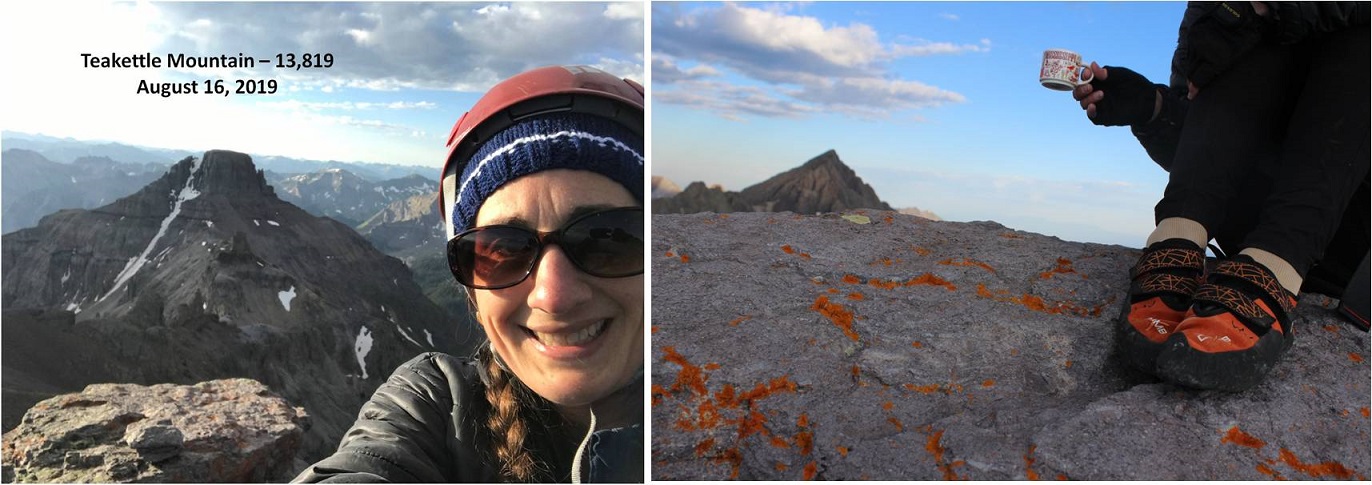
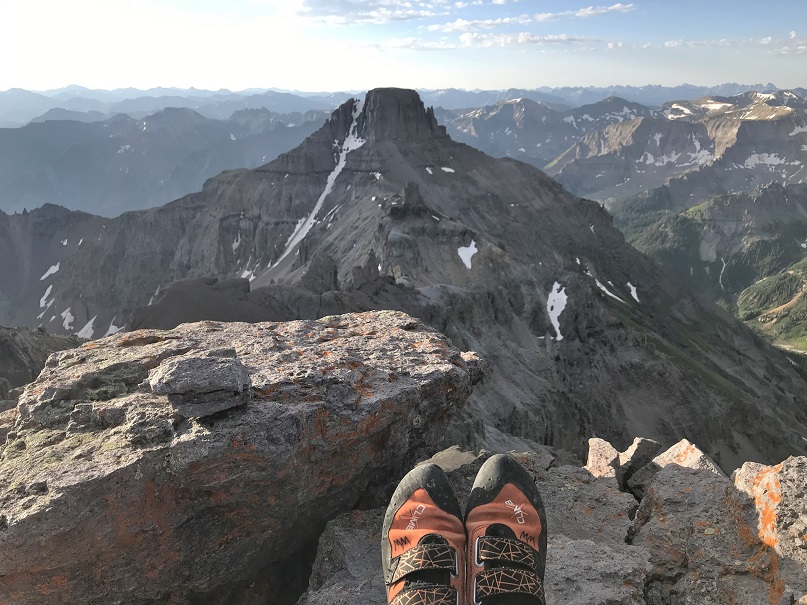
I summited Animas Mountain at 10:30am

Animas Mountain:

There was a trail register in dire need of paper.  With no place to sign I put it back and turned and descended the same way I ascended, back to the saddle, and then down the gully. Note, I did not descend the scree filled gully, but instead the rocky one I ascended, this time keeping the rock spires to my right.

Once in the upper basin I headed southwest on the slope, back to my campsite. It helped to stay to the right of the waterfall area, on the tundra. 

I made it back to my campsite in the Ruby Basin at 11:40am.  I ate lunch, packed up my gear, thanked the marmots for not messing with it this time, and headed back through the willows towards Ruby Lake.  It was a really hot day. I stopped at the lake to dip my bandana in the water and cool off my face.  The water felt so good!  As I was skirting the lake and looking at the clear water I couldn’t help but want to jump in.  I did some mental calculations, and before I could stop myself I set all my stuff aside and went into the lake.  I swam around for a few minutes, hopped back out, dried off in the sun (it only took about 30 seconds in the dry Colorado heat) dressed and was back on the trail within 10 minutes.

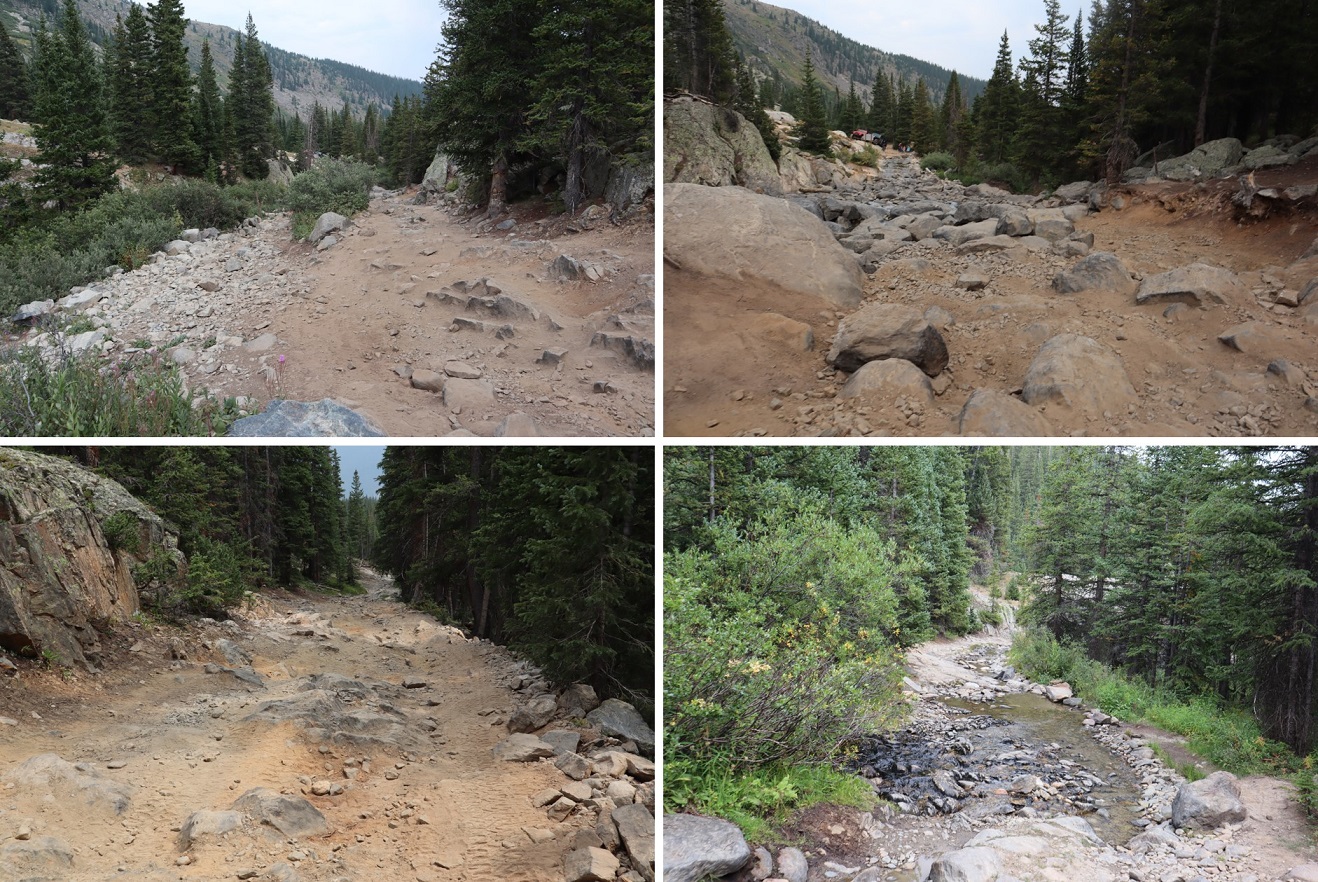
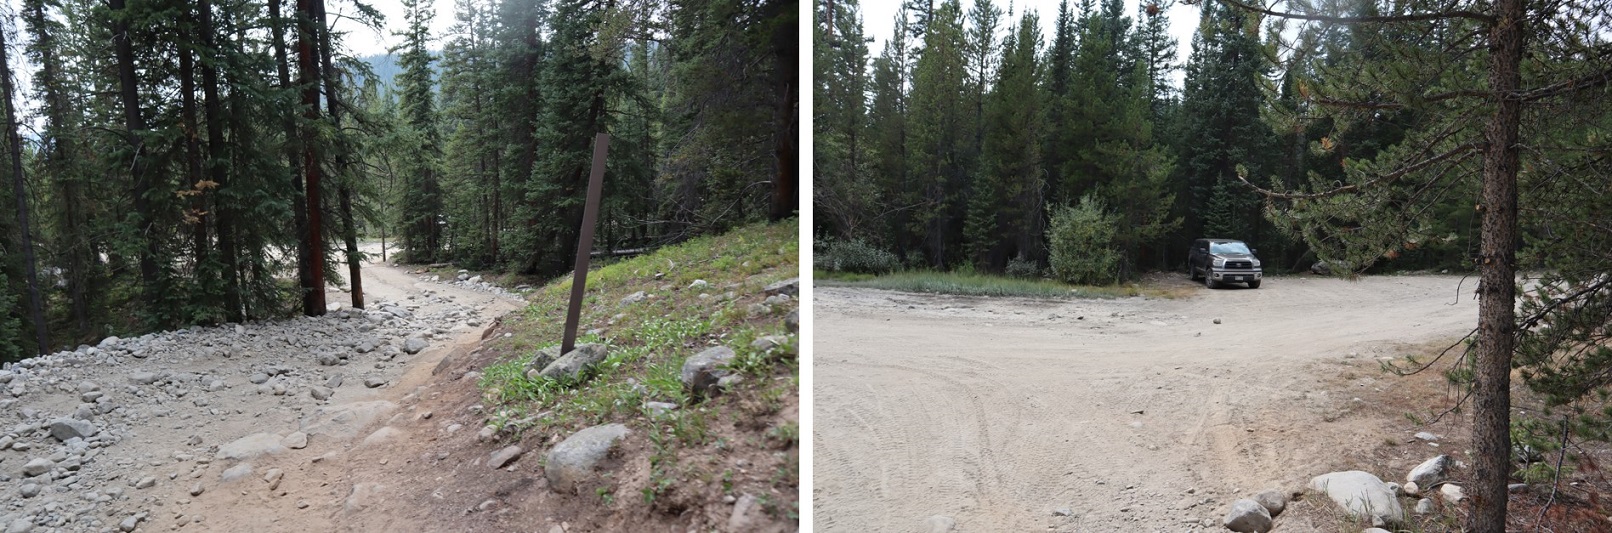
I made it to the Chicago Basin cutoff and decided to once again spend the night. There was a woman in a hammock waiting for her husband, who was running the Chicago Basin 14ers (woot!).  I couldn’t help thinking to myself how I wish I could find a partner who would support me like that (or join me?).   I set up my gear, talked with a man who’d lost his water filter and had a busted eyebrow (he got it crossing the creek?).  I told him where to find the train, and campsites, and made it an early night (again). I woke up before my alarm, and was on the trail at 4am, out and back at the Purgatory trailhead at 8am.  Side note: hiking in the Purgatory Flats area on the way out was by far the coldest part of my weekend.  By this time I’d already taken off my coat and gloves, but had to put them back on because the temperatures were so cold. I’m thinking this isn’t the best place to camp for the night.

CalTopo tells me my stats were 45.07 miles with 12724’ of elevation gain.

PT 13786 & Whitney Peak – 13,286

1

RT Length: 15.85 miles

Elevation Gain: 4866’


After a long day and a wedding reception I arrived at the trailhead at 10pm and quickly went to sleep.  The trailhead for this hike is located at the end of 4WD road 727.  Well, the road goes up further, but it’s excessive 4WD (pictures and description to come).  Any 4WD vehicle can make it to this point.

I woke up at 3:15am, intent on being on the trail by 3:30am.  Sleepy-eyed, I opened the back of my truck and scanned the area with my flashlight for wildlife.  Sometimes I see deer/raccoons/porcupines outside and like to shoo them along before getting outside my vehicle.  Nothing this morning.  Great.  So I hopped out to find an area to pee (I know you’re thinking “why is she telling me this?”  but it will all make sense in a minute).

As I’m looking for an appropriate area I scan around with my flashlight and just behind the reflective trailhead flag/post/marker I notice a small greenish-yellow circle reflecting in the light.  My first thought was ‘animal’ as this looked like an eye.  But it was only one eye.  So I waved my flashlight back and forth to get a better look.  I couldn’t define a body and the circle didn’t move so I assumed it wasn’t an animal and was most likely some piece of reflective trash.

I went about my business, turning my flashlight off (others were camping in the area and in the dark I didn’t want what I was doing to be the only thing they could see).  I turned my flashlight back on and the reflecting circle was gone.  And then as I waved my flashlight around all the sudden it was back again. Just one small circle, reflecting in the glow of my flashlight.

I got into my truck to put on the heat while I put on my hiking boots and turned the car on.  At that moment 3 things happened:

  • The engine turned over and made a loud, V8- – ‘VROOM’ sound
  • My trucks daytime running lights turned on and I could clearly see I’d just
  • Scared the mountain lion walking towards my truck

The frightened mountain lion crouched to the right, did a 180 degree turn, and bounded off into the trees to my left, his long tail the last thing I saw as he hurried away.  Well, that was certainly cool!  It all happened so fast I wasn’t able to see if it had 2 eyes or 1 (I’d only seen one glow), but I knicknamed him ‘One Eyed Willy’ just the same.  It wasn’t lost on my I’d just had a mountain lion ‘stalk’ / watch me while I was peeing.  I bet not many people can say that.

I sat in my truck for about 15 minutes, this time with the high-brights on, waiting to see if he came back.  After he didn’t return where I could see him I decided to give One Eyed Willy as much time as needed to get as far away from me as possible, and instead of putting on my shoes I went back to sleep and woke up at 5:15am.  I was on the trail by 5:25am.

The 727 trail starts at the east end of the parking area

2

After a short distance I turned left and followed the extreme 4WD road for 1.8 miles.

3

This road should not be attempted by a stock 4×4 vehicle, and unless your vehicle thinks making it up to Lake Como is easy, don’t attempt this road.

4

5

I came to an area with a creek crossing.  There’s a trail that goes to the right.  I could have followed the trail, but instead I crossed the creek and followed the road for a short bit, until the road curved.

6

In the dark I missed the sign and followed the road, but just before crossing the creek you can take this junction to the trail instead

7

If you miss this junction no worries, just as the road curves to the left there’s a great trail that will take you to Fall Creek trail 2001 (apparently a lot of people miss the ‘sign’ and take this way, like I did)

8

This is a class 1 trail that will take you all the way to the Seven Sisters Lakes area.

9

At this sign go right (going left will take you to a camping area, near a lake)

10

This late in the year all stream crossings were easy

11

Here are a few more pictures of the class 1 trail up to the Seven Sisters Lake area

12

Once at the upper lake, before you reach the pass, there are several options to ascend up the slope.  In fact, I took a different route up than I did back down, and as I was coming down I saw several other viable routes, depending on conditions, snow levels, etc.  Here’s an overview of the route I took:

13

And step by step

14

15
I took the ramp to the left on the way up, to the right on the way down

16

Close up of the grassy ramp

17

At the top of the ramp I was at a lake.  This lake looks like it shifts shoreline depending on where the waterline lies at different points in the year.  Here’s the route I took around the lake and up the side of the mountain (note:  I went right on my ascent, left on the descent, and while both were class 2, left was easier.

18

Here’s what this looked like step by step.  This is all class 2:

19

20

There are many ways to ascend to the summit.  You can take the saddle to the left as well and then follow the ridge, but I chose to go straight up the south face.  This area is more stable than it looks, with large rocks and boulders to hike up.

21

23

I summited PT 13,768 at 9:15am.  It was hazy due to the fires in the area, but I couldn’t smell any smoke

24

PT 13,768:

Here’s a look back at the route I took in

25

From the summit, here’s a look over at Whitney Peak and the overall route I took to get there

26

I started by heading southwest, finding a good descent point, and heading back down to the lake

27

28

29

Once around the lake I took the ramp back down and headed southeast until I connected back up with the Fall Creek Trail

31

32

I took Fall Creek Trail up to Fall Creek Pass

33

And then turned right (south) and followed the ridge.  This was an easy walk compared to the rest of the day (which had been easy as well).  If you’re in the area, hike this peak, it’s worth it!

34

At the top of the ridge is what looks like the summit, but it also looks like the summit could be further east.  Spoiler:  I climbed to both ‘summits’ and when I got home and looked at my altimeter they had 2’ of difference in height, and the one furthest west I stood on top of, while the one more east I sat on the summit block, pretty much canceling out those 2 feet of difference.  Either way, I hit both summits, and I think both should count, especially if you don’t feel comfortable with climbing.

I crossed the first ‘summit’ and headed east towards the second ‘summit’

35

I walked over to the second summit and all around the summit block.  I’ve heard some people wondering how you can “just climb up” and let me tell you, it’s actually pretty easy and doesn’t require an explanation (but I’ll give you one).

This is how you’re supposed to ascend the block:  I’ve circled where there’s a good grip to place your right hand.  Set your right knee below that as you press your knee against the rock, and then you place your left hand on the top and pull yourself up.  I’m 5’4” and this worked for me.  The two rocks at the base are very loose, so don’t trust them too much. Or, even better yet, if you’re with a friend do the ‘stand on the knee’ thing and help each other one at a time reach the summit.

36

37

I knew I could climb up this rock, but I wasn’t sure I could downclimb.  It’s rated 5.6, and since I solo I wanted to be over-prepared.  That and I’d brought my 30 meter half rope with me just in case and it seemed a shame not to use it.  So before I climbed the rock I set up an anchor and attached my rope to it, then set the rope over the rock.  Note:  ROPES ARE NOT NEEDED FOR THIS CLIMB.  They were overkill, but fun just the same, and gave me some practice and extra leverage. Here’s my (not needed) set-up:

38

I summited Whitney Peak at 12:15pm.  The summit block is about 4 feet by 2 feet.

39

Whitney Peak:

1

I rappelled back down because I could.  Note:  you can just slide down on your belly until you reach the rock, but don’t aim for the rocks you used to get higher ground:  aim for the stable rock they’re rested on.

40

The rope allowed me to belay down past the unstable rocks and even a bit further, getting a secure footing on the ground.  I packed up my gear and headed east towards the other summit of Whitney Peak.

41

There’s a summit boulder here too, but it’s only about 4 feet high and easily climbable, so I climbed it and sat on top just in case.

42

Time to head back.  I hiked back down the slope but before making it to the pass I went left and headed down west until I reached Fall Creek Trail.  If you decide to do this there are a lot of options to make it happen, but also a few areas where you could ‘cliff out’ (you’d just have to backtrack, nothing too serious) so pick your line carefully

43

44

Once back on the Fall Creek trail I followed it out of the basin

45

And back to the 4×4 road and my truck

46

47

48

I made it back to my truck at 2:45pm, making this a 15.85 mile hike with 4866’ of elevation gain in 9 hours, 20 minutes.

49

Due to the One Eyed Willy delay I was late driving home.  Tomorrow is my daughter’s last first day of school (first day of her senior year of high school) and I wanted to make her a special dinner.  She requested my fried chicken, and I didn’t want to disappoint her.  A big thank you to the lazy construction worker who forgot to turn off the “HWY 24 is closed past Hartsel: Find an alternate route” sign, as on a Sunday night around 5pm I was the only car taking my chances and using the road.  There never was a closure, and I was able to get home in record time to make a special dinner for my baby girl.


Teakettle – 13,815, “Coffeepot” – 13,568 & Potosi Peak 13,793


1

RT Length: 6 miles (seems fake but I’ll take it)

Elevation Gain: 4168’

This climb was several years in the making. Knowing if I wanted to complete the Centennials (etc.) I’d need to have rock climbing skills I started going to a rock climbing gym once a week a few years ago.  While I enjoyed the climbing and the skills I learned helped immensely with scrambling on class 3+ peaks, I didn’t get a lot of experience with actually setting up/taking down ropes and anchors.

I bought books on mountaineering and watched YouTube videos, but there isn’t a lot of information out there on self-belaying/rappelling (I wonder why?). So I turned to friends I knew who rock climbed and picked their brains.  A couple even offered to take me out and show me the ropes.  I took them up on their offers, and by mid-summer this year I felt confident enough to go out and try this peak on my own.  Please note, I’d already gone out dozens of times and set up anchors and rappelled locally, this was just the first time I was going to do so solo and, well, without anyone to help if needed.

I arrived at the Yankee Boy Basin restroom area at 3:30am and was on the trail by 3:45am.

2

I put my helmet on before I left the truck, and my pack was curiously not as heavy as I’d anticipated. I considered this my first win of the day.  I walked about 1/10 of a mile down the road, realized I’d left my DSLR in the front seat and quickly turned around to retrieve it.  I’d been a little worried about my bruised tailbone from last week, and while I have a good 5 inch bruise on my backside my pack wasn’t bothering it as I hiked.  Second win of the day!

Camera retrieved I hiked northwest along the dirt road, crossing a large mud puddle and turning right.

3

Note: I chose this route because on a topo map it looked easier.  After completing the hike I have my doubts, and believe this is the correct entry point:

4

The elevation gain begins immediately and doesn’t quit. I headed northwest up a steep grassy slope, enjoying the meteor shower and a herd of either goats of sheep watching my ascent (in the dark I couldn’t tell which they were, but could see them watching me).

The grassy slope turned to large rocks and talus as I entered a basin.

5

In the moonlight I could see my goal: this steep scree section at the base of the black gully. I’ve lightened these pictures up for detail, but this is where I was headed.

6

The ascent was a grueling climb over steep scree, made marginally easier when I put on my microspikes. The worst part was getting all those small rocks inside my shoes.  I couldn’t help but think I should be wearing gaiters to keep the rocks out.  Don’t they make something for this for runners so they don’t get rocks in their shoes?  Anyway, the terrain was not ideal in the least:  some of the worst scree/talus/etc.  I’ve ever encountered.  At times I was literally grasping the dirt for traction with my hands.

7

I exited climbers left out of the black gully. The black gully is class 2+ climbing, and much easier than the scree/talus I encountered before the gully.  I was pleasantly surprised with how easy it was to climb.

8

Here’s a look back down the black gully. You can see “Coffeepot” in the upper left corner

9

Here’s a look at the route from the top of the black gully

10

I followed the rock rib around until I came to another gully, climbed up, and turned left

11

From here there’s some rock scrambling. I kept heading northwest towards the summit tower

12

Ok, easy part over. Now it was time to get out my gear and mentally prepare for this climb.  Looking at the route it didn’t look that difficult.  I felt confident I could climb both up and down without needing ropes (ha!).  I changed into my rock climbing shoes, put on my harness just so I wouldn’t need to at the top, and left my trekking pole and hiking boots at the base of the climb: no need to carry unnecessary equipment.

Here’s the route up

13

The first half of this climb was indeed straightforward, but as soon as I crossed over to the ‘actual’ climb things got a little more hairy and I quickly came to the realization I was not going to be able to downclimb if I continued, and if I were to go any further, I would need to fully commit. It was either downclimb now or I was doing this all the way.  My legs started to shake so I took a steadying breath and reminded myself I’d trained for this and it was within my abilities.  I looked up and steadily climbed to the top, being careful with each hand/foothold I chose.  I couldn’t help thinking to myself (over and over again) how much easier this would have been if I’d been a few inches taller.  I’m happy with being 5’4”, but at times like this being 5’6”+ definitely would have its advantages.

I made it to the top and looked back down on what I’d done. Woot!  I’d made it!  I dropped my gear and tried to get a few pictures.  This wasn’t working, mainly because the summit just wasn’t big enough.  So, selfies it is again.  I did get a video and a few pictures to prove I’d summited (you’d be surprised how much some other people care…).  I summited Teakettle Mountain at 7:15am

14

Summit Video:

Oh, and I know that’s not a teacup but an espresso cup. I don’t own any teacups and I was planning on climbing “Coffeepot” today as well, so I compromised (also, this is Teakettle, not Teacup… and btw I do love all those teacup photos, not throwing shade here, just rambling).  Mississippi is a nod to family.  Also, there may or may not be whiskey in that cup.  Ok, there was, but only a sip.  I still had to make it back down but still felt a bit like reveling:  I’d climbed up without a rope!

15

Now for the true test: setting up an anchor and rappelling back down.  There were several anchors already set up, and while I’d love to trust someone else’s’ anchor (let’s face it, the odds are in their favor here) I didn’t know how long they had been there, so I decided to set my own anchor up and attach it to the ones already in place.

I was worried I’d forget something. Not that I didn’t know what I was doing, but I was at altitude, hadn’t had any food/water besides a sip of whiskey (personal choice on 99% of my hikes to prevent nausea) and had done a lot of physical activity and I didn’t want to mess up here, so I checked and re-checked everything twice and then a third time and made sure to secure my sling(s) before even beginning. Luckily there was a stable rock behind the anchor for me to use during set-up as well.

Anchor all set up I uncoiled my rope, attached it to the anchor, and threw it in the position I wanted for a rappel.

16

OK, moment of truth. I put back on all my gear, attached the belay device, leaned back and everything held, so I unhooked my slings, took a deep breath, and leaned back.  It all went smoothly and faster than I’d anticipated.  So much so that I stopped about 10 feet from the ground and played with the side of the wall, pushing my feet off the rocks and bouncing back and forth for a bit before finishing the rappel.  Yes, I was pretty proud of myself when my feet hit the ground safely, and even more so after I’d retrieved and recoiled my rope.

17

After changing back into my hiking shoes and putting all my gear away I figured it was a good time to celebrate: I actually took a full shot of whiskey (now that the hard part was over) and decided to play a bit with the rock formation.  It would have been really cool to get one of those pictures with me in the hole, but there was no way I could set up my camera and make it back into position in time, so I settled for one of my shadowselfies.

18

I spent a lot more time here than I usually would at a ‘summit’ but I was celebrating: This climb had been several years in the making, I’d put a lot of energy and effort into all this climb entailed, and (with the training help of friends) I’d successfully summited solo.  I was going to celebrate!!!

After a few minutes of fun I turned and headed back towards the Black Gully. From the Black Gully here’s the look at the route over to “Coffeepot” (and the route I would have taken over to the Black Gully had I not taken the scree route up)

19

Here’s a look in the daylight back down the scree route up

20

From the bench below “Coffeepot” here’s a look back at the Black Gully

21

From here I turned left (east) and decided to check out “Coffeepot”. It doesn’t much look like a coffeepot from this angle, does it?  It’s basically a quick class 3 climb over some rocks, and a short class 5.0-5.2 climb (per Roach) up a chimney.

22

I made it about ¼ of the way up the chimney and realized I didn’t fit with my backpack on, so I retreated, set down my pack at the top of the class 3 part, and tried again sans gear. It was much easier this time and reminded me of when I was younger and would climb through a tree hollowed out by lightning.  It was a tight fit but I felt very secure as I twisted around and topped out at the top of “Coffeepot”.  I summited “Coffeepot” at 8:45am

23

Video:

Back down was a bit tricky because I had to go over an overhang to get back into the chimney, but in today’s conditions I felt in no way was a rope necessary (I did hold onto the anchor a bit as I was steadying myself in the beginning, but it wasn’t necessary).

24

It you feel comfortable at class 4 climbing and are considering trying “Coffeepot” I’d say go for it. Here’s a look at the climbing side of “Coffeepot”

25

From here I could see Potosi Peak, my next objective.

26

I was feeling pretty good at this point, having completed two Class 5 climbs. However, this peak actually proved to be difficult because there were some unexpected obstacles in the way.  Here’s the initial route down and back up the ridge, over to the corner of the cliffs

27

From the Coffeepot/Potosi saddle up the ridge was full of very loose talus. I’d encourage you to keep your helmet on for the entire hike, even though some of this stuff is labeled at 2+

28

The traverse around to the corner of Potosi took much longer than anticipated, but was straightforward.

29

At the corner I turned left and headed northeast up and over some more loose talus and rocks

30

And around the south side of Potosi until I came to a gully. This area was well cairned until the gully.

31

As I rounded the corner and came to the gully I was surprised to find a large mass of snow blocking the route up. This snow was at least 4 feet thick, 30 feet across, and 50 feet vertical, turning the class 2+ gully into a class 3 climb over large, unstable and loose rocks to get around the soft snow.

32

Here’s looking back down on the snow filled gully area

33

After the snow there was more class 3 climbing to get to the top of the gully. To be fair, it looked like there had been quite a bit of recent rockfall, including several large boulders.

34

About 100 feet before the top of the gully I headed up and over this rocky area. The rock is stable but covered in a lot of small rocks, making it slippery to climb.  There were cairns here as well.

35

Almost done, I headed up through more loose talus, through a notch, and turned left for the short push to the summit

36

There was a bit of snow here, surrounded by squishy mud: the kind that will suck your shoes off if your foot settles on it for any length of time, so I quickly traversed this area to the summit

37

I summited Potosi Peak at 11:05am

38

Summit Video:

The summit was relatively flat

39

I pulled out my phone and checked my tracker. It said I’d gone 3.9 miles so far today and that seemed like a lie.  I thought to myself I’d need to delete and re-download the app because last week it had stopped on me unexpectedly during my last hike and now it wasn’t tracking accurately… it must need a reboot.

I quickly headed back down the gully, around the side of Potosi, and back towards the Potosi/Coffeepot saddle. This is where I made my first mistake:  I had the option of climbing back up to Coffeepot and taking the traditional way down, or going straight down from the Potosi/Coffeepot Gully.  I chose the gully (I’d advise you to instead head back up to “Coffeepot” and then down).

40

In any event, I made it to the saddle and turned to head down the gully, aiming for the most stable sections of scree, navigating between rock formations

41

Here’s a look back up at the decent route I took from the saddle

42

When I got to the base of the rock formations I looked ahead and could tell I did not want to continue straight: The gully turned into a waterfall and I could see snow at the base.  It did not look safe.  (Solid line).  That was ok though because I had beta from a friend telling me I could just traverse over the hillside and I’d eventually run into the trail that led up “Coffeepot” (dotted line).  I figured nothing could be worse than the talus on the ascent, right?

43

Here’s what I was trying to avoid

44

Let me tell you, this beta was FALSE! Even though it looks like you can traverse over, you cannot.  Well, I did, but went through a lot of very sketchy terrain.  Visually it looks like you can cross on tundra the entire way but there are rock gullies you can’t see from here, and in fact can’t see until you’re right up on them.  Yes, I checked beforehand it looked like it went on a topo, but on the ground it wasn’t working. There were gullies everywhere that were extremely difficult to cross.  Every time I made it over one I’d encounter another.  I didn’t even feel comfortable stopping to take pictures.  It was frustrating because I could clearly see where I needed to be, I just couldn’t get there. Please don’t take this way. It looks like it goes, and maybe it does in winter, but it wasn’t safe. My advice is to skip this decent route all together and hike back up to “Coffeepot” and then down.  It took me a lot longer than it should have to descend, and there were many times I almost turned around and retraced my steps back up to the saddle (which I was very close to doing before figuring out the route). Oh, and there was graupel involved.  I was ecstatic when I finally did link up to the ascent route and made my way down to the parking lot.

45

Here’s a look from the road at the route I don’t advise you to take

46

I made it back at 3pm, making this a 6 mile hike/climb with 4168’ in elevation gain in just over 11 hours. And yes, my tracker was correct (it just felt like so much longer due to all the elevation gain).

47

48

All in all, I considered today a great success: I’d summited Teakettle solo, tagged “Coffeepot” and Potosi, and learned a lot about trusting someone else’s’ beta.  I drove the 6 hours home, took a bath, and then took my daughters out to a late dinner to celebrate my oldest being home from drum corps and my youngest completing her first week as an upperclassman.