Mt Meeker 13,916, Meeker Ridge (UR) 13,861, & Southeast Longs (UR) 14,060

1

RT Length: 13.5 miles

Elevation Gain: 5764’

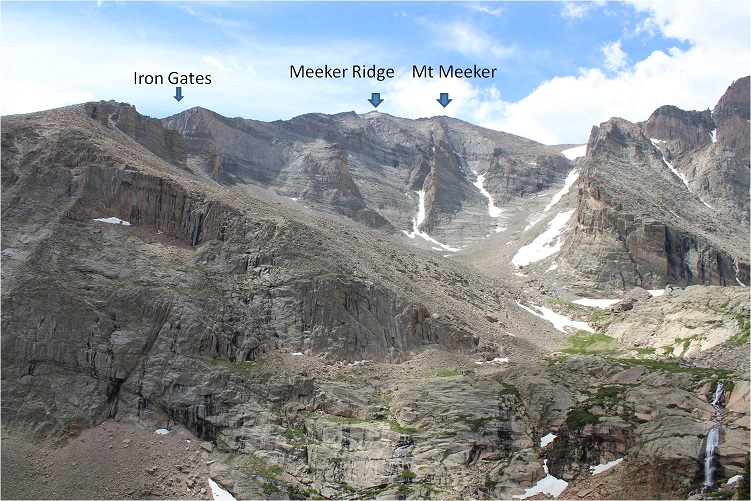
There are so many routes up Mt Meeker, and some have pretty cool names: Flying Dutchman, Dream Weaver, Dragon’s Tail, etc.  I chose the Iron Gates route because for some reason it sounded cool to climb through The Iron Gates.  I was also told this route had the best views of Longs Peak (I wasn’t disappointed).  Plus… the knife edge between Meeker Ridge and Mt Meeker sounded like fun, and I wanted to find out what a “flying buttress” was.

I was surprised with how many vehicles were in the Longs Peak Trailhead parking area when I arrived. It’s a large lot, and was at least halfway full.  Several hikers were readying their gear.  Last time I was here was the Friday before a Labor Day weekend, and I hadn’t seen very many people at all.  I saw dozens of hikers on the trail this morning.

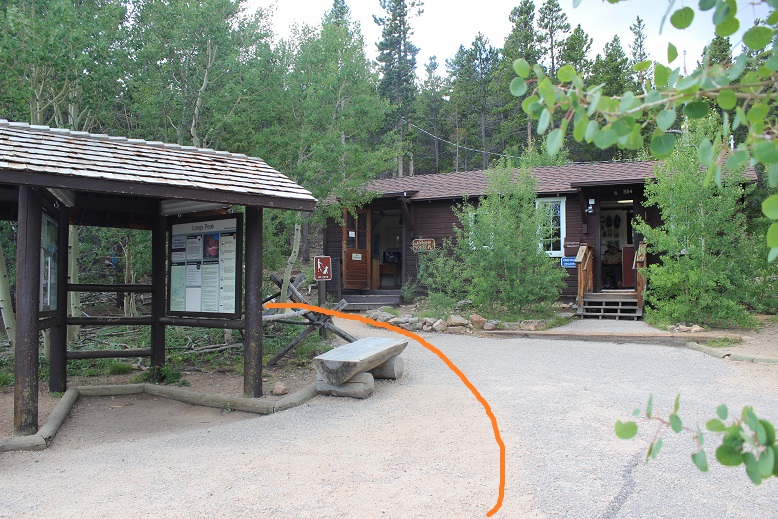
I arrived at the parking lot at 2:30am and was on the trail by 2:40am. I chose to take the Chasm Meadows Approach from Longs Peak Trailhead.  The trail starts to the left of the Rangers Station.

2

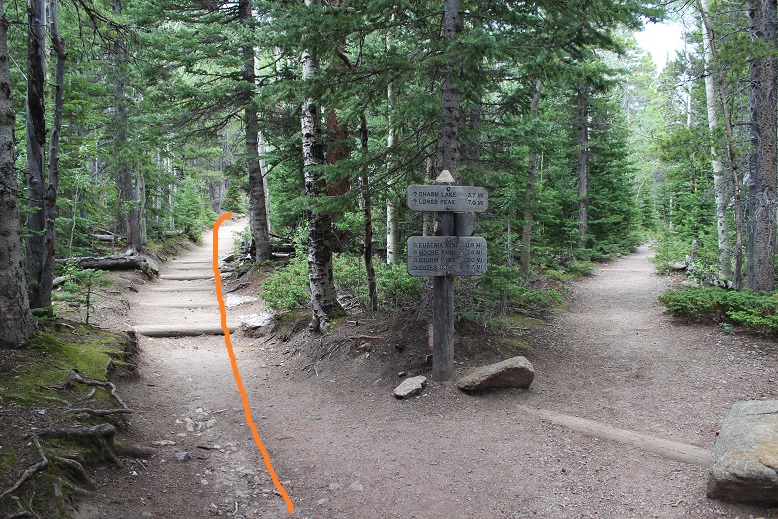
I could see headlamps shining brightly ahead of me, and passed four groups of hikers before making it to the first junction about ½ a mile from the trailhead. Stay left here

3

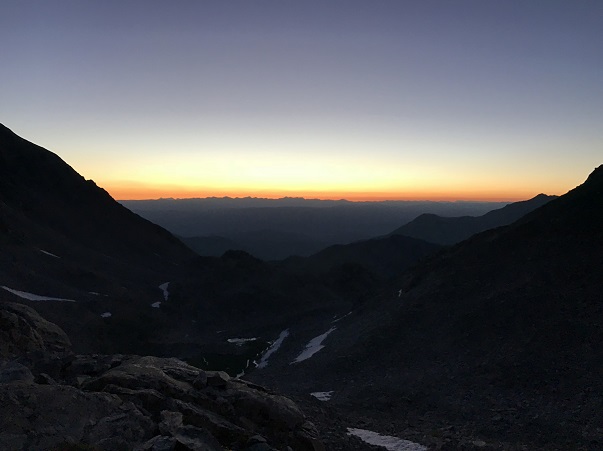
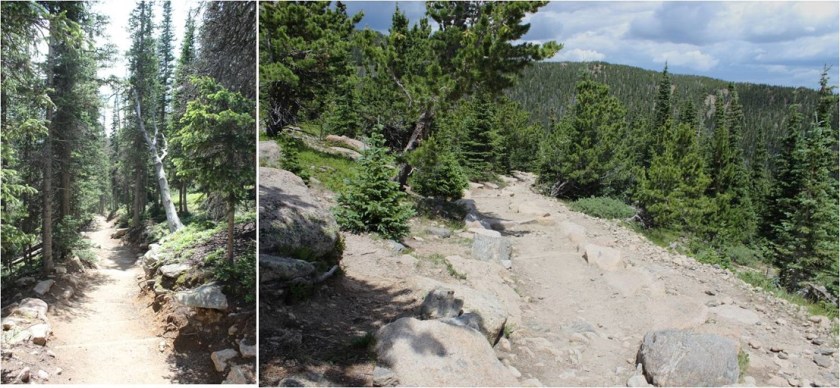
The trail is definitely class 1 all the way to Chasm Lake. I saw multiple groups ahead of me, all intent on Longs Peak.  They had very bright headlamps.  Very bright.  In fact, at times they were almost blinding, especially as I got closer to a group of hikers and they’d turn around to look at me.  I realized this morning just how dim my flashlight actually is (but I like it that way:  sometimes a bright flashlight gives too much information).

4

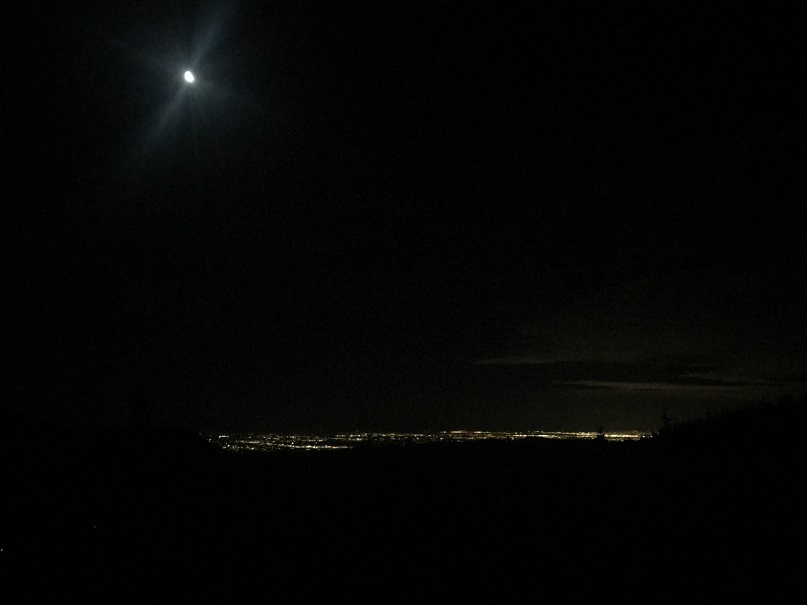
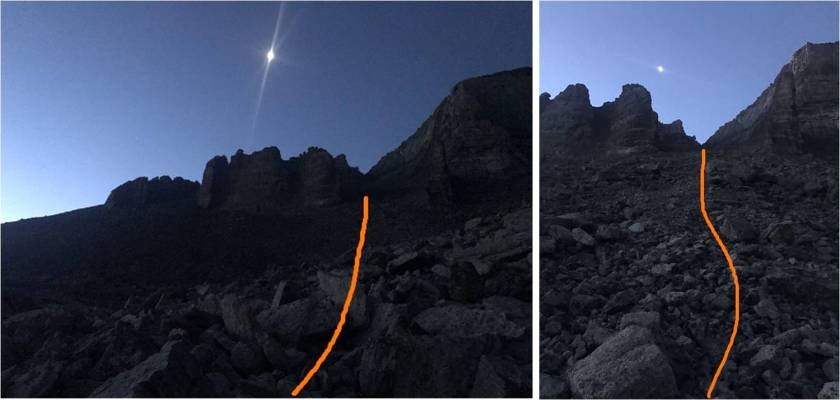
Around treeline I could see the full moon with city lights in the background.

5

After making it to treeline there’s still 1.7 miles left to Chasm Lake. Stay left here as well.

6

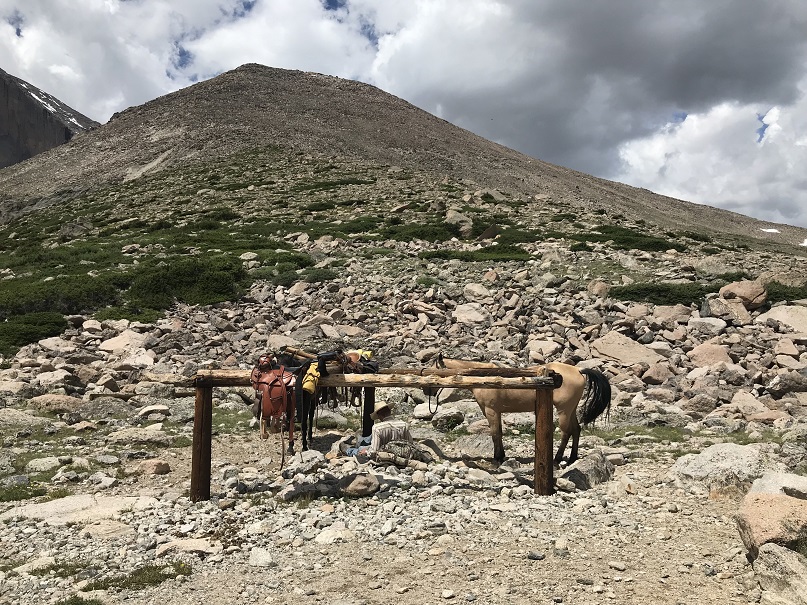
About a mile before reaching chasm lake there’s a trail junction where you can stop for a bit to use the privy and let your horses rest.

7

Having to do neither I continued on towards chasm lake, a little disappointed to lose a couple hundred feet in elevation in the process.

8

Here there were a couple of small snow areas to cross that were quite slippery in the morning, but easy to navigate in the afternoon.

9

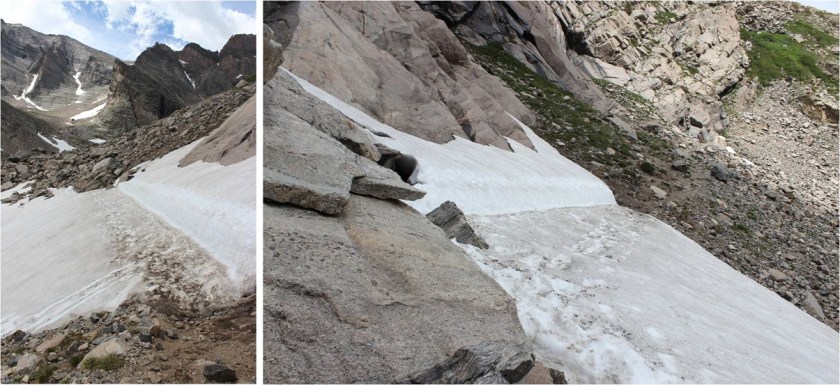
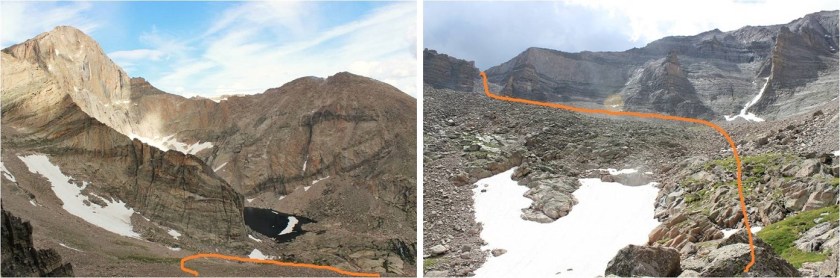
Just before Chasm Lake the trail ended. I made it to this area while it was still dark and it looked like there was a lot more snow than there actually was.  The dotted line is the route I took up the gully, the solid one is the route I took on my way back down. This ended up being a good approach, as the solid way down went through a waterfall that would have been messy in the dark.

10

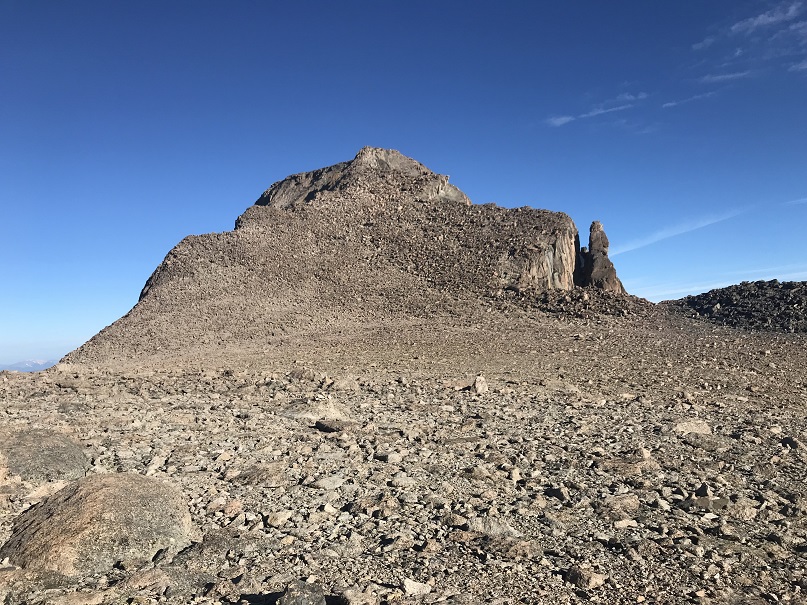
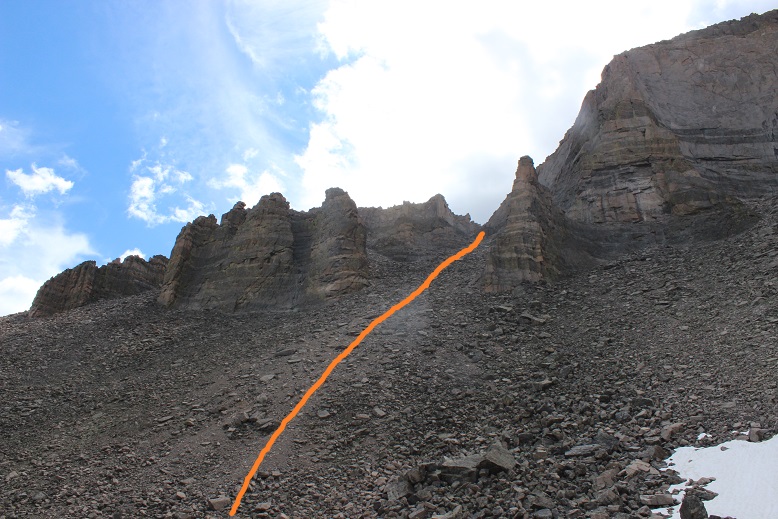
My goal was to make it to the Iron Gates. In the dark I couldn’t see much and while I knew I was headed in the correct direction I didn’t have a visual yet of the Iron Gates.

11

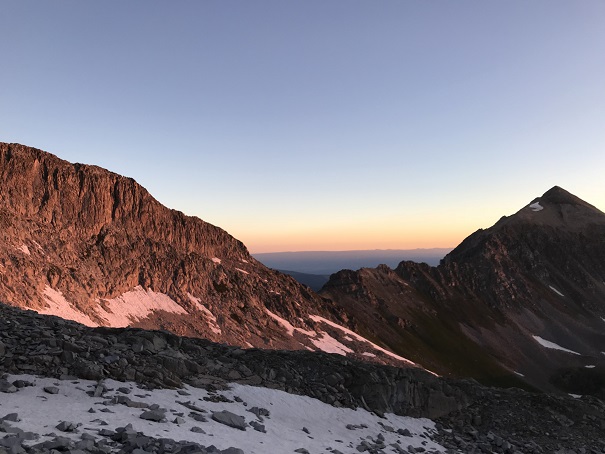
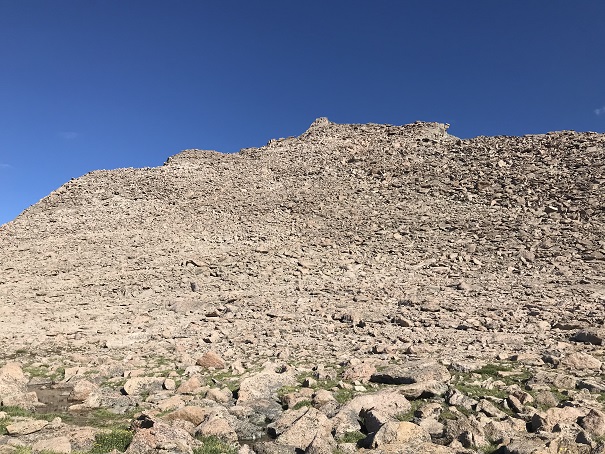
The terrain at the base of the Iron Gates was very loose scree, mixed with small rocks. As I climbed higher the ground became loose talus that became more stable until it eventually turned into solid rocks.  I headed straight through to the back of the Iron Gates

12

13

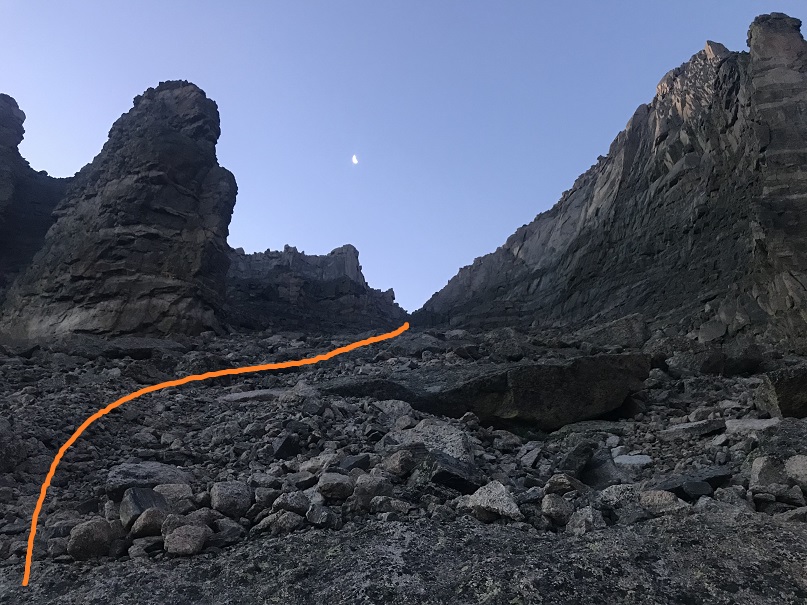
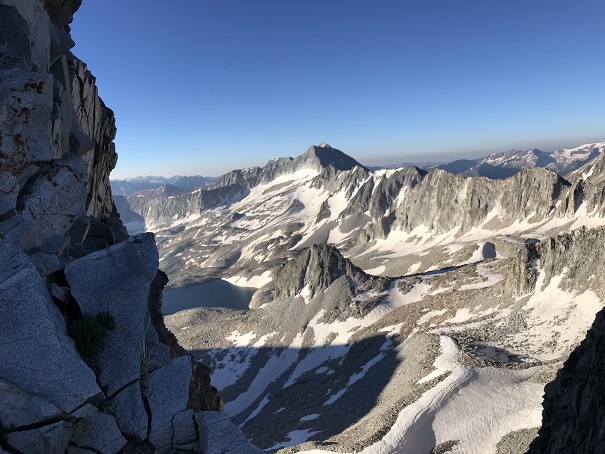
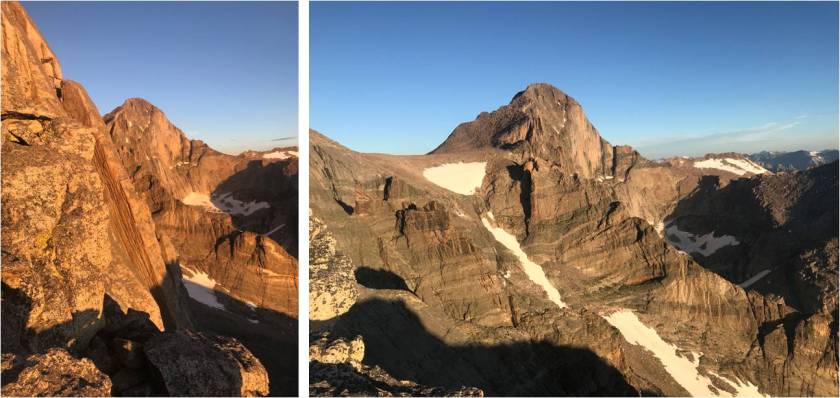
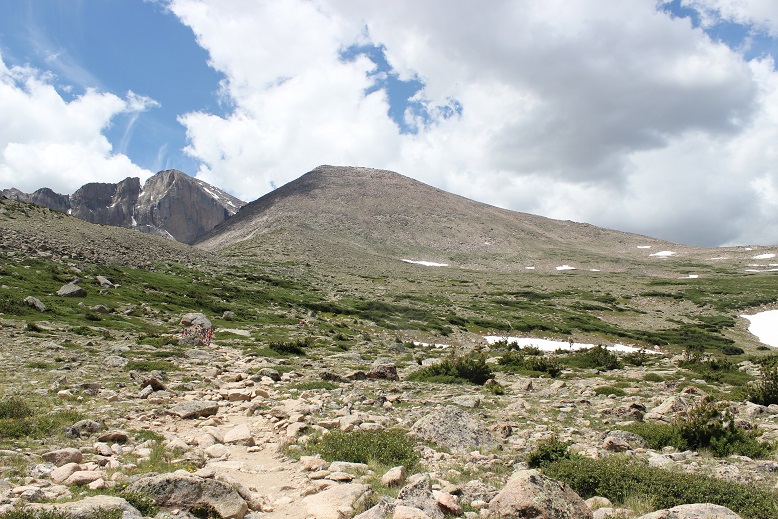
Here the sun began to rise and I was able to see why this route is said to have great views of Longs Peak

14

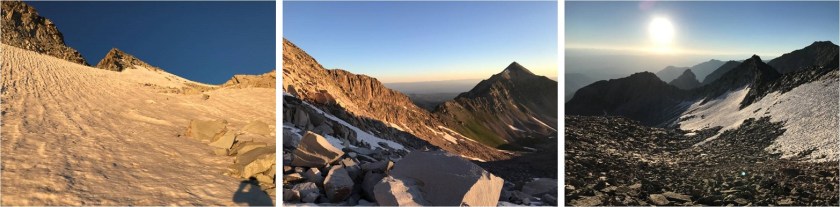
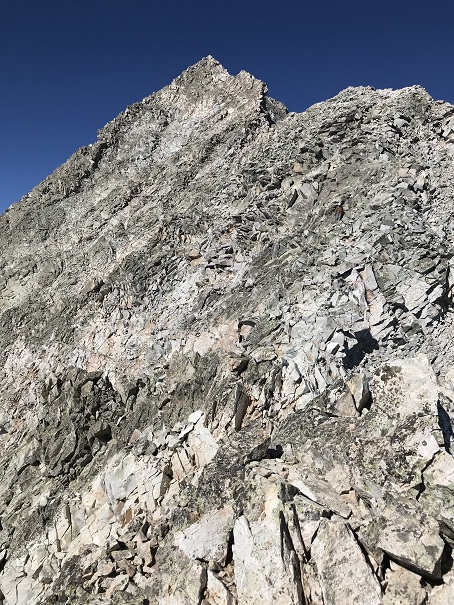
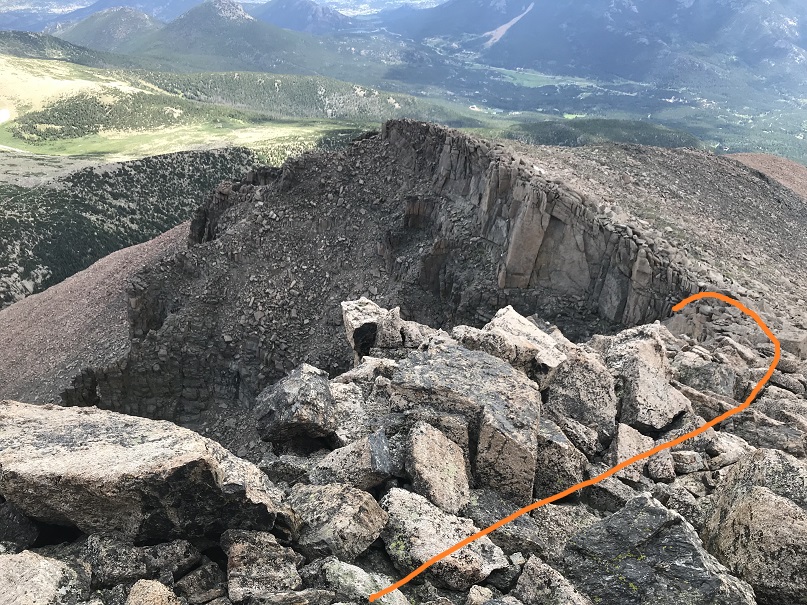
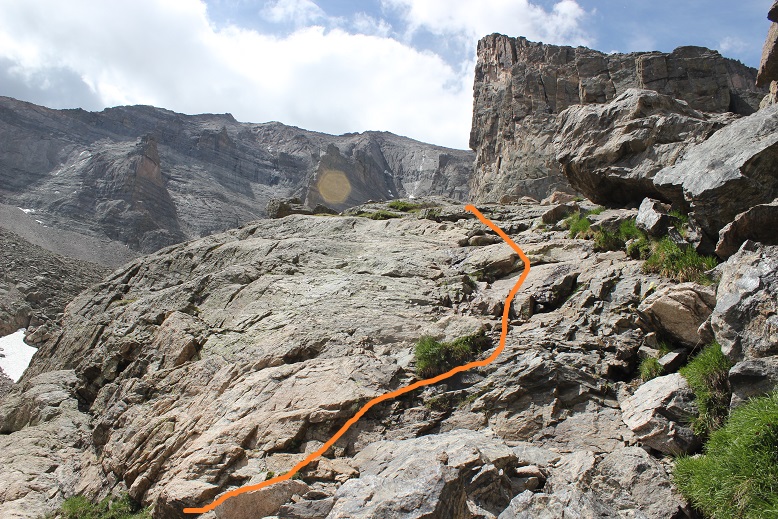
At the end of the Iron Gates there’s some class 3 scrambling to gain the ridge

15

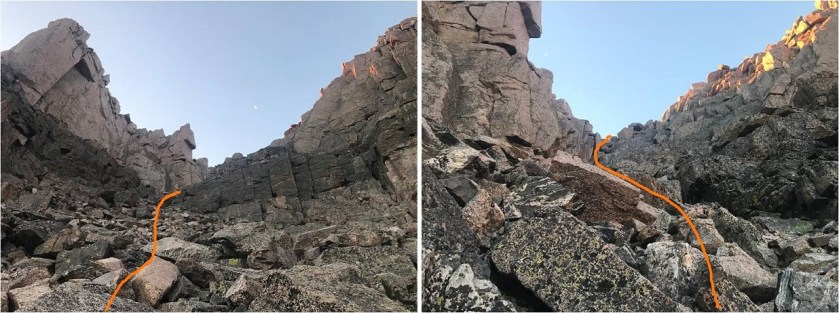
There’s a cairn at the top I made a mental note of to help me find the entrance on the way back down

16

Here’s a look back down the Iron Gates at Chasm Lake

17

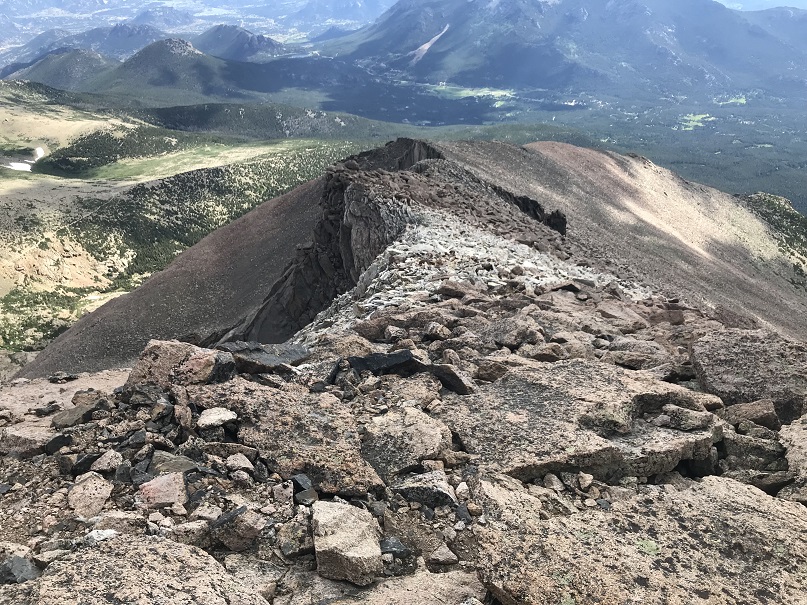
At the top of the Iron Gates I turned right (south) and climbed the northeast ridge to Meeker Ridge (the unranked peak, not the ridge itself)

18

Yes, there were some pretty awesome views of Longs Peak

19

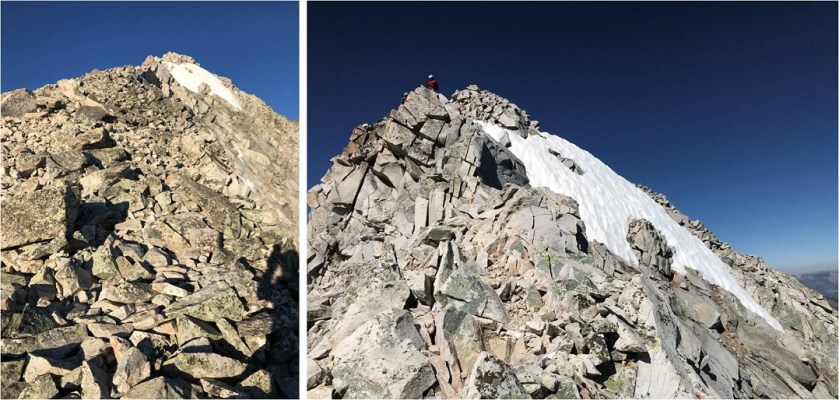
I made it to Meeker Ridge at 6:45am. I got a quick selfie and video at this unranked 13er

20

Meeker Ridge:

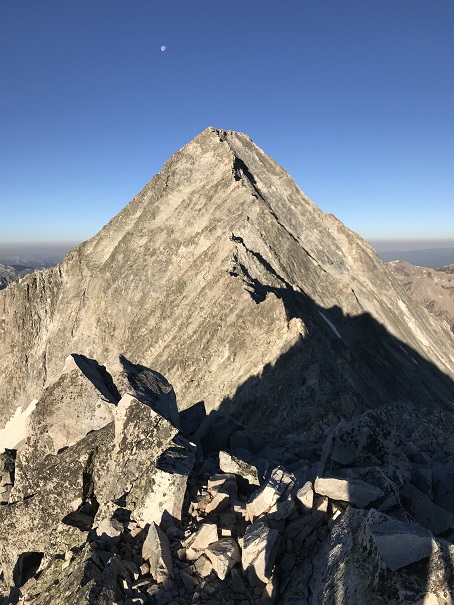
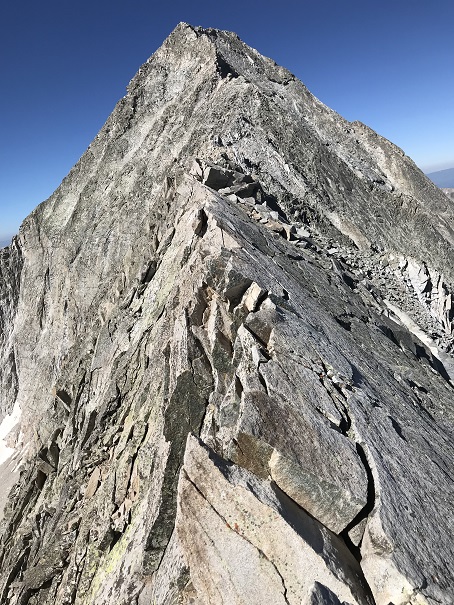
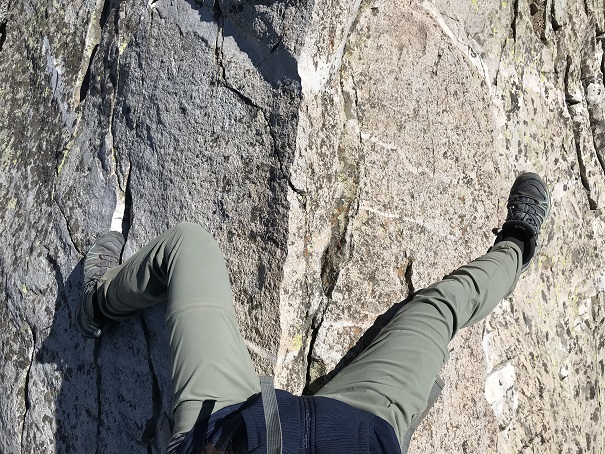
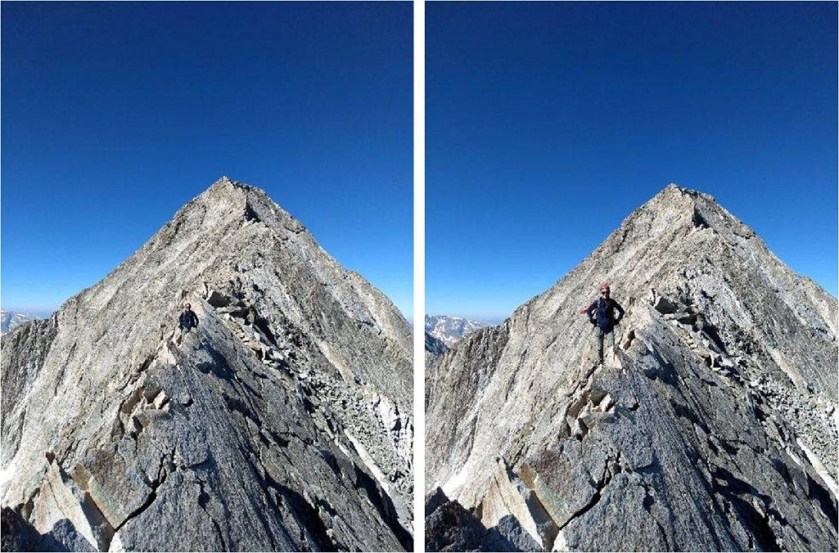
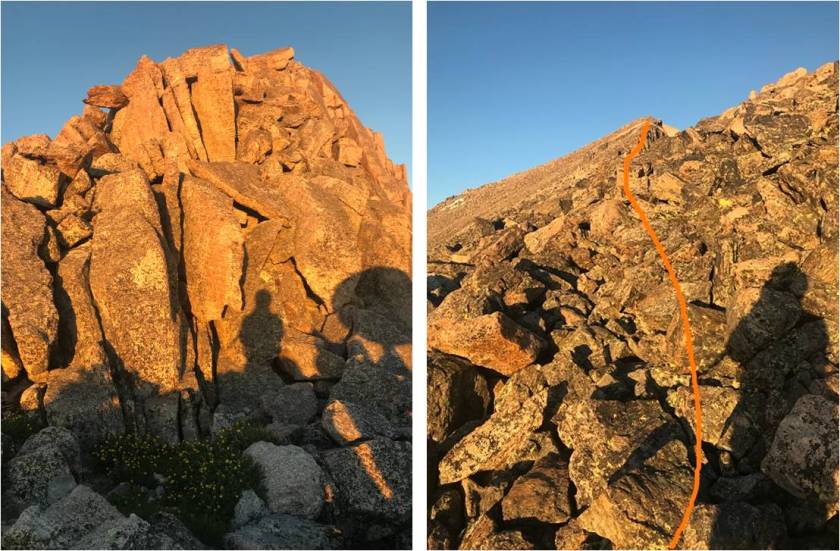
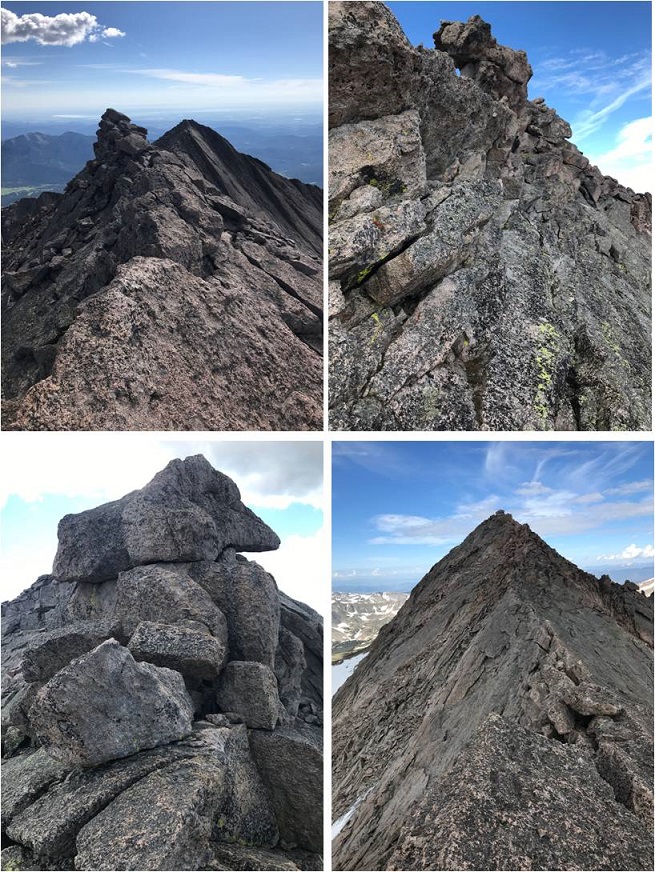
Up until this point the hike had been easy, but now it was about to get a little spicy. It was time to traverse the short ridge between Meeker Ridge and Mt Meeker.  This ridge has a ‘mini-knife edge’ similar to the one on Capitol Peak.  I was able to stick to the ridge for this short traverse, dropping down to the right only once when absolutely necessary. This is a solid class 3 ridge with exposure.

21

Here’s a tip for the knife-edge part: It’s very similar to the one on Capitol Peak, and would make for a great practice run if you’re hesitant to try Capitol but feel solid with class 3 climbing. While on Meeker’s knife edge you can cross and use your right foot for balance by placing it on the rock beneath the ledge.  This rock is underneath the knife ledge and difficult to see, but a few inches wide, solid, and you can use it for extra balance if needed. The rock here felt more solid than on Capitol.

Here’s looking back at Meeker Ridge

22

And some of the climbing/exposure on route

23

I made it to the summit of Mt Meeker at 7:15am, or what I thought was the summit of Mt Meeker. At the top of the traverse there were two points about 40 feet apart that both looked like the true summit.  I sat on top of the first point, but the second point looked higher.  So I went over and climbed to the top of the second point, but from there the first point looked higher.  So I decided to take a video from the middle of both points and pictures from both.
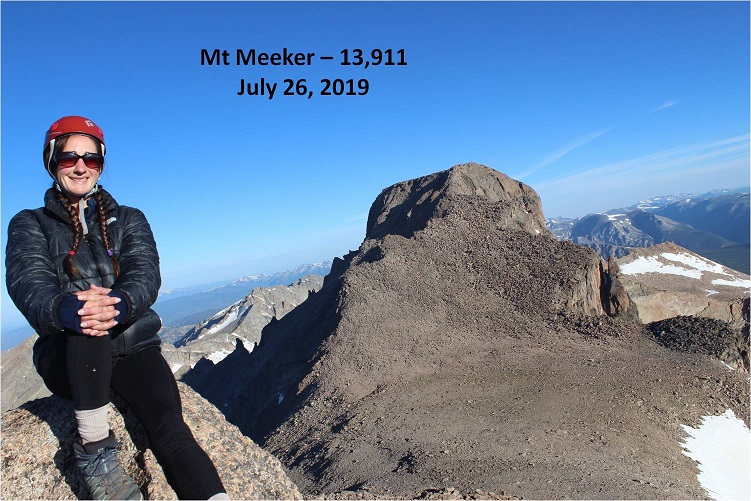
24

Mt Meeker:

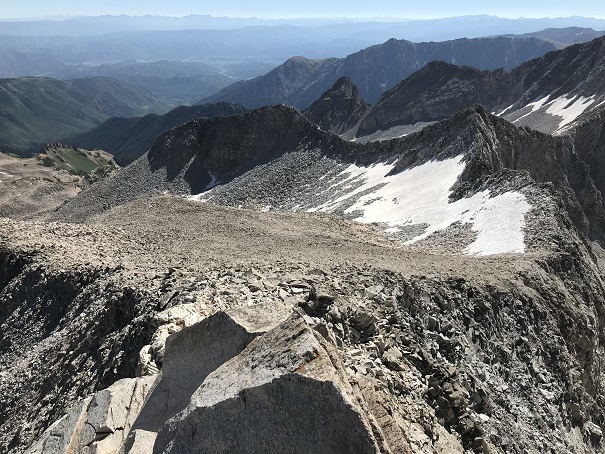
It was still early in the morning and the weather was holding out nicely. I decided to descend Mt Meeker and cross the Loft towards Longs Peak.  Longs Peak wasn’t my goal, as I’ve already summited Longs, but I wanted to get a look at the Notch route up Longs and summit Southeast Longs (an unranked 14er sub summit).  Southeast Longs is where the orange line ends.

25

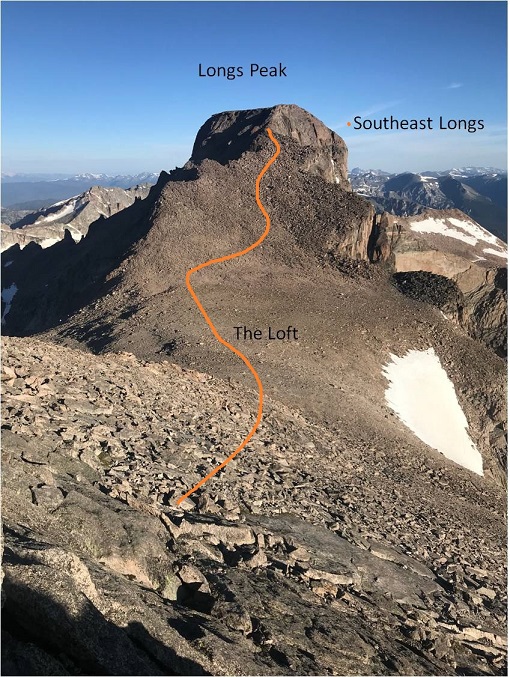
To get there I descended 450’ to the loft, and then gained 600’ to the top of Southeast Longs.

26

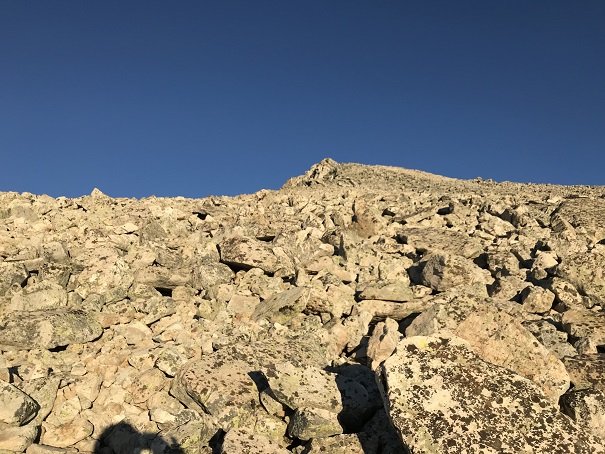
The rocks here were solid and much larger than they looked from Mt Meeker. There were a bunch of social trails here so I just took the path of least resistance to the top.

27

I made it there at 8:25am. You can see Longs Peak Summit in the background

28

Curious as to what the Notch and path to Longs Peak looked like from here I descended to the cairn that indicated the entrance to the Notch and looked over. It looked like a class 3 scramble that would lose a couple hundred feet in elevation, and then re-gain it on the other side, connecting with the traditional Longs Peak Route just before the final pitch.

29

I briefly thought about attempting Longs Peak as well, but did some mental calculations and figured it would get me back around 3-3:30pm, and I really wanted to be back around 1:30pm, so I decided to save Longs Peak round 2 for another day. Also, there were a ton of people queued for the final push on Longs (I could see/hear them) and a lot of people on the summit as well.  I’m not a fan of crowds, especially on peaks.  In any event, I still had some more climbing to do myself, as I needed to re-ascend Mt Meeker to head back.  I did not want to make this a loop.

30

The clouds were starting to build as I gained Meeker’s ridge

31

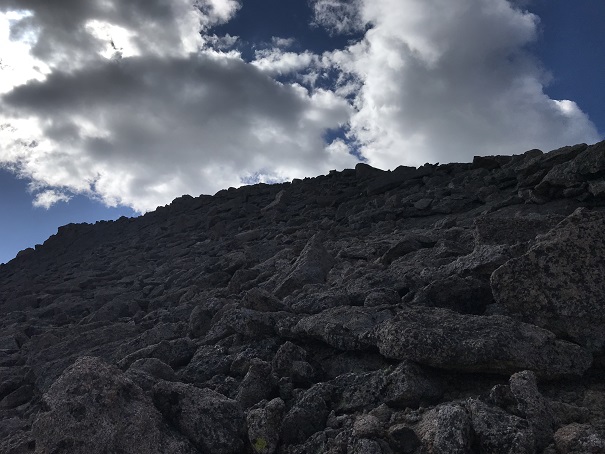
While they looked ominous at first (especially for being so early in the day) nothing came of them. The clouds did hide the sun for most of my return back to the trailhead and I did get a few drops of rain here and there, but I was never worried about thunderstorms.

Time for knife-edge part 2. I felt much more confident the second time around, and the traverse went much faster.  I was well aware of the group of 15 or so people on top of Longs Peak watching me make the traverse.  I could hear them talking to each other as I climbed up boulders and balanced on the ridge.

32

Just as I made it back to Meeker Ridge I met a young man beginning his attempt of the traverse. He’d had a long day, starting from Sandbeach Lake.  I wished him luck and was on my way back down the Northeast Ridge towards the Iron Gates

33

34

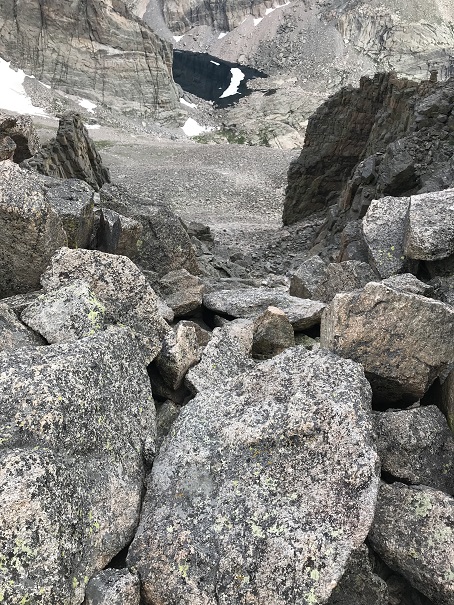
As Chasm Lake came into view I could hear loud shouts that sounded like a large group was down there having fun. A group was paddleboarding. It seemed like a lot of work to me to get multiple paddleboards up to Chasm Lake, but hey, they must really be into the sport. I wondered to myself if it was legal to paddleboard there?  I descended into the Iron Gates and had no problem on the larger rocks/talus.  However, descending the scree was a bit of a small nightmare.  I was so glad when I made it to the bottom of the Iron Gates and turned around to see them in the daylight

35

36

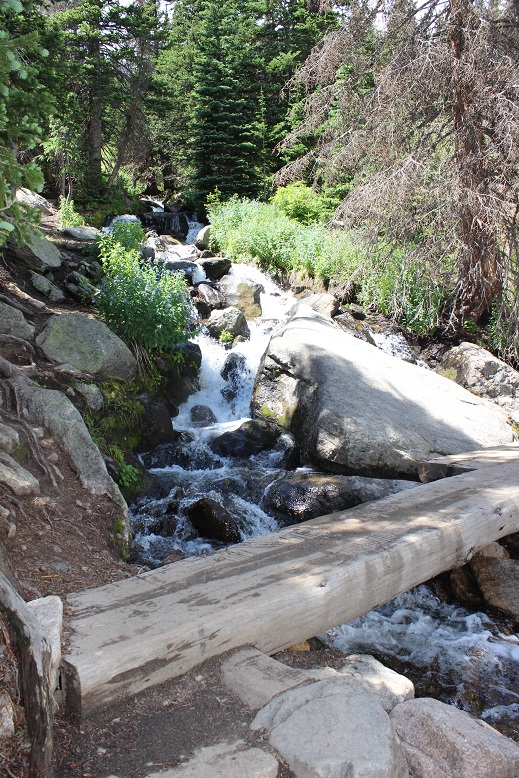
I followed the gully more to the west this time and descended via a wide waterfall area with small rivers of water flowing throughout

37

38

This brought me to the base of Chasm Lake, where I picked up the trail back to Chasm Meadows. This is also where I met up with a group of 12 or so campers from a nearby camp.  I could tell immediately they weren’t Girl Scouts because there was only 1 adult with them, the girls were all wearing shorts and did not look like they’d been “roughing it”.  I asked them where they were from and wished them well as I hiked out.

39

A few minutes later as I reached the Jims Grove area I could hear the girls behind me, their counselor yelling at them every 10 seconds or so to “hurry up” even though they were setting a fast pace. Long story short, she pushed them too hard and one of the girls clipped and fell. She’s alright and just scraped her knee, but I hope the counselor learned her lesson and slowed down a bit.

40

It was great seeing the waterfall crossing areas on my way down in the daylight.

41

I made it back to my truck at 1:15pm, making this a 13.5 hour hike with 5764’ in elevation gain in 10 hours 30 minutes

42

43

Today’s hike was absolutely beautiful! I can’t wait to head back here to tackle a few more 13ers…

Capitol Peak 14,130

1 Capitol IMG_6984

RT Length – 18 miles

Elevation Gain – 5300’

I’ve been longing to tackle Capitol Peak for quite a while now. I told myself as soon as a favorable conditions report came out I’d hike Capitol on the first day I was available that had a good weather window. That day was today.  The forecast called for low winds, clear skies, and 60 degrees on the summit.  I couldn’t ask for a better day!

After taking the kids to Elitch’s water park all day I took a 2 hour nap and headed out to the trailhead at 8pm, stopping by Walmart first to buy new batteries for my flashlight. My flashlight wasn’t out of batteries, but I haven’t replaced the batteries in it in over a year and I planned on hiking for hours tonight in the dark: I didn’t want my flashlight failing on me.

For the first time in a very long time I made it to the trailhead without a hitch. My directions all synced up and I arrived at 1am to a parking lot filled with cars.  The Capitol Creek trailhead is a rough 2WD / easy 4WD trailhead.  I put it in 4WD because I could on the way in, and on the way out used 4WD because of the elevation loss.  Beware:  there are cows on this road.

2 Trailhead

I parked next to a ranger’s vehicle and didn’t fill out a camping permit. I wondered to myself if I was supposed to (it was 1am and I was going to be parked there all day, so it would look like I was camping), but in the end didn’t because I wasn’t setting up a tent and didn’t plan to stay overnight.  There wasn’t a trail register.

I started just a bit before 1:30am (I stayed in the truck to eat breakfast and replace the batteries in my flashlight) and hiked in the dark for about 4 hours. My flashlight failed, but not because of the batteries.  I had to hit it against a tree a few times to get it to go on again.  It might be time for a new flashlight.   It’s funny how I wasn’t thinking of bears this time at all: I knew if I saw an animal it was most likely going to be a cow, and I used to raise cows, so I’m not scared of seeing them in the dark.  I was kind of expecting them.  There was also a full moon which made night hiking phenomenal!  If you want an easy segway into night hiking I’d recommend hiking when there’s a full moon.  The (many) stream crossings were made easier with the reflection of the moon on the water.

I appreciate good signage! I took the Ditch Trail and loved all the great signs.

4 Signs

The signs were useful because there were a lot of offshoot cattle trails. Cattle trails tend to parallel each other, and sometimes weave around each other, making route finding challenging in the dark. Here’s a photo of the junction just before the large stream crossing and meet up with Capitol Creek trail.

5 Junction to cross river IMG_1108

I came upon an unexpected gate in the dark. It was there to keep cattle out, and difficult to open and close and lock with one hand (the other was holding my flashlight.  I’m not fond of headlamps because they don’t allow you to scan ahead of you effectively in the dark).

6 gate IMG_1103

From here it was about 3 more miles to the lake. I followed the stream for most of the route, hiking up a hill and into a small basin.  In the basin I passed several tents lit with  flashlights, as it was now 4am and people were just getting up to start their hike up Capitol.  There were also a few flashlights already visible on the trail ahead of me.  It looked like there were a lot of people intent on summiting Capitol Peak today.  Since it’s the Sunday before the 4th of July this was actually anticipated.  In the end I saw 7 people today hiking Capitol.

I was able to hike the switchbacks up to the saddle without too much difficulty, as the trail was well maintained. In fact, I wasn’t even tired yet and didn’t need to pause for breath on the 900’ of elevation gain on the way up.  The sun was just beginning to rise as I passed the saddle. There are several fires in the area, but none were visible on my hike today, and no smell of smoke in the air.  The sunrise however clearly showed evidence of fire activity.

7 Sunrise IMG_6904

I stashed my trekking pole and looked at my map. At this point I was supposed to traverse south across the slope, but there were several gullies filled with just enough snow to make the crossing dangerous without crampons.  I tried to down-climb one section and realized my legs weren’t long enough to make the stride needed to safely down climb and sighed inwardly.  I had crampons, but didn’t want to put them on, so instead I found a route lower on the slope to traverse, being careful to stay as high on the ridge as I could because my directions said not to traverse too low.  There were at least 3 different cairned routes here to get across the ridge, which I’m assuming are there due to different snow lines.  Here’s a picture looking back at the ridge.  The route I was supposed to take went through each of those sections of snow, which were only problematic around the gullies.

8 Sunrise over saddle IMG_6906

This is where the talus and loose rock began. I followed a cairned trail to the right and looked up at K2 and a lot of avoidable snow and some not so avoidable snow.  I didn’t really want to keep away from the snow, so I put on my crampons and aimed for K2.

9 Snow AM

At the top of the basin crampons were no longer necessary. I still had some trekking and rock hopping to do to get to K2.  There were cairns, but most were toppled over.  I just pointed towards K2 and aimed up.

10 Up at K2 IMG_6912

Once I reached K2 I looked for the route to hike around it, thinking I’d just summit it on my way back, but the class 3 route was covered in snow that wasn’t easily traversable.

11 K2 snow

OK, so up and over K2 it was! There were several Class 4 moves required to gain this unranked 13,664’ summit, as well as to cross over it to get back down to the trail.

12 K2 class 4 moves

Here’s the view from the top, looking at the trail back

13 K2 looking down IMG_6964

While K2 is a class 4 on the way up from the basin, it’s a sheer drop from the other side! (So be sure to descend to the west) Here’s a look at that cliff face as well as the start of the trail of the ridge to Capitol.

14 K2 down and next ridge

Here’s a look at the ridge before me leading to Capitol Peak.

15 RESIZE

The first big obstacle of this ridge is the Knife Edge. The Knife Edge is considered to be the crux of the route.  About 150 feet long, but with a drop of over 1000’ to cliffs below, the exposure here is dramatic.  The ridgeline of the knife edge is indeed sharp, making straddling and sitting on it extremely uncomfortable and not practical.

16 Knife IMG_6959

Many people use rope to cross this section (belaying partners across). There are several ways to negotiate Capitol’s Knife Edge solo:  the monkey crawl, butt scoot, side to side foothold shuffle, and (dare I say it) the tightrope traverse (not recommended), just to name a few.

I’ve been working on my upper body strength lately, bouldering at a rock climbing gym once a week and practicing my pushups (I’m now up to 100 pushups a day). I chose to cross the Knife Edge by straddling the (mostly) stable rock, hugging the sides with my knees.  I then leaned forward and used my arm strength to lift myself up, bending my elbows, lifting my arms, and placing my hands one in front of the other to press myself forward.  This meant I always had at least 3 (but usually 4) points of contact on the ridge at all times. Every 5 feet or so I’d stop to give my arms a rest, but not for too long because it was an extremely uncomfortable edge on which to sit.

17 Knife IMG_6956

I know it looks like a lot of exposure, and it is, but for me it wasn’t scary. I just focused on putting one hand in front of the other and didn’t look down (too often).  It only takes about 5 minutes to cross, and when you do you have the whole rest of the ridge still to traverse!

18 Ridge IMG_6944

The rest of the route stays to the left of the ridge. Wow.  This was going to be intense!  I was just glad the route was free from snow.  I took a deep breath and reminded myself that even though I’d passed the crux of the route this ridge is not an obstacle to be taken lightly:  It’s full of unstable rock that can give way at any moment.  That combined with a lot of exposure makes for a mission that required 100% of my attention.  Many people have died hiking this ridge; 5 last year alone.  I cannot die.   Not now anyway.  I realize no one wants to die when they set out hiking a 14er, but I cannot die.  I have three teenagers at home I’m the sole caretaker and provider for.  If I died there’d be left without their only parent, and I can’t let that happen.  I have to be prepared and stay focused at all times so I can return safely home to them.  I don’t take this responsibility lightly.

Knowing how people have run into trouble on this mountain helped me prepare. I felt I knew what to look out for and how to stay as safe as possible on this ridge.  I know the rock is infamously unstable, even when it appears to be solid.  So I took extra care with every handhold and foothold, making sure I was completely stable before making my next move.  This meant I was scrambling slowly, but at least I was being safe.  And that exposure!!!  I knew if I slipped and fell I wasn’t stopping for a long time.  Just as with the Knife Edge, I stayed focused on the task before me, only taking my eyes off what I was doing to make sure I was on route, after making sure I was secure.

The ridge seemed to go on and on and on, but it wasn’t really that long. There was a relatively solid grey gully just before the final push to the summit.

19 Final push to summit IMG_6933

At 11:30am I was there! I’d summited Capitol Peak!  I looked back at the route I’d taken from the saddle.

20 Ridge to Daly IMG_6945

Here’s a view of Capitol Lake from Capitol Peak

21 Lake from summit IMG_6961

I was surprised to see how little snow there was left on Snowmass: last month the mass had been full of snow!

22 View of Snowmass IMG_6924

I was ecstatic! Capitol Peak is arguably the most difficult 14er to climb, and I’d just climbed it.  Solo.  I was on top of the world, but I was also realistic:  I still had to climb back down.  I don’t consider a summit successful until I’m back on class 2 terrain, and for me that meant getting back to the saddle before I could really celebrate.  So I got a summit photo and prepared to head back down.

23 Capitol Peak Summit Photo

I looked at the route below me

24 Ridge from Summit loose rock

It was full of very unstable rock and loose boulders. Some sat precariously on top of another rock or lose dirt, while others were part of a larger boulder, ready to cleave off and tumble down the mountain when touched.  I’d heard numerous rock slides today, and didn’t really want to be a part of one.  In many ways down climbing is more difficult than climbing up because you’re off balance and begin with less stable footing and facing the pitch, but it’s made even harder when climbing alone because no one’s there to help tell you where to place your hands and feet, something more obvious when climbing up. Much of this route requires you to turn and face the rock before descending.  As I did so I reminded myself once again to take it slow and test out every hand and foot hold before putting my trust in its support.  Several rocks did indeed give way or slip out from underneath me, but I was never put in a position where I fell.   I did smack my knees and shins few times though.

I made it back to the Knife Edge ready to tackle it once more. This time there was another group crossing when I got there, so I took their picture and text it to them.  This really is a very cool accomplishment, made even cooler with picture proof.  The people behind me took a picture of me crossing.

25

The rock is indeed stable, but there were two slabs near the middle that were wobbly.  I probably could have dislodged them if I tried (I didn’t).  They will almost certainly flake off in the next year or two on their own.

After crossing the Knife Edge I thought about how Capitol Peak is considered the most difficult 14er by many, and for good reason. Personally I think Little Bear in winter was more difficult (and one I never want to do again) but that could have been because of the conditions.  The Knife Edge of Capitol wasn’t scary for me at all.  I didn’t experience heightened adrenaline or fears.  I just looked ahead and crossed the same way as I’d done earlier in the day.  Apparently exposure is only an issue for me if steep snow and ice is involved.

I navigated up and over K2 (again, so does that mean I get to count it twice?) and back down the basin. This time I put on my crampons and hiked straight down the snow.  There was definitely some glissading to be had here.  I kept on my crampons for the entire basin, even though they were only needed half the time.  I just didn’t want to take the time to keep putting them on and taking them off.  It made for an interesting (and noisy) time hopping from boulder to boulder, made totally worth it cruising through the snow.

25 Snow afternoon

I made it back to the gully I didn’t feel comfortable crossing this morning and watched someone else climb up the side. I took off my crampons and found footholds I was unable to see in the dark this morning.  The only downside was my shoes were wet from the snow, and it’s no fun climbing with wet soles!

At the saddle I picked up my trekking pole and started my way back down to Capitol Lake. Here’s a view of the trek up the saddle

26 Saddle view IMG_1083

About halfway down I came across a Ptarmigan and her chicks. They were adorable!  The hen seemed a bit overwhelmed.

27 Ptarmigan and Chicks

The wildflowers here were fantastic!

28 Wildflowers

Now I felt as if I’d truly safely summited Capitol Peak… and… I had a new favorite 14er! Capitol was everything I looked for in a 14er:  a good trek in (although I could have used with a mile or two less on this one), gear required, scrambling, a real crux (Knife Edge), class 3/4 terrain, awesome views, just enough snow in the right places to make it interesting, and not too many people. There are some hikes I never want to take again.  This is not one of them.  I had to get a selfie with my new pal

29 Back down IMG_1093

It was now mid afternoon and the weather was fantastic. There were wildflowers all around, bees and butterflies flitting about, and a light breeze in the air.  This was hiking!!!

In the daylight I had a better view of the trail

30 Trail IMG_1104

And stream crossings

31 Stream Crossings

The hike out seemed to take forever, but that was probably because it was warm out and my backpack was heavy. I made it back to my truck at 2:30pm, making this an 18.3 mile hike/climb completed in 13 hours.

32 Mileage IMG_6991

The drive home took much longer than the drive in because the 285 was closed for the Weston pass Fire and lots of people were evacuating.

33 Weston pass fire

Also, it’s a holiday weekend and there were TONS of motor homes, RV’s, and vehicles hauling toys on the road. We didn’t go above 35mph for over a 70 mile stretch, despite it being a 65mph zone.  Such misuse of time makes me go insane!!!  Drivers who are driving that slow need to pull over to let faster drivers  pass.  Think of it as a law or something.  I need to time my drives better so I’m driving home later in the day!