PT 13220 and PT 13291

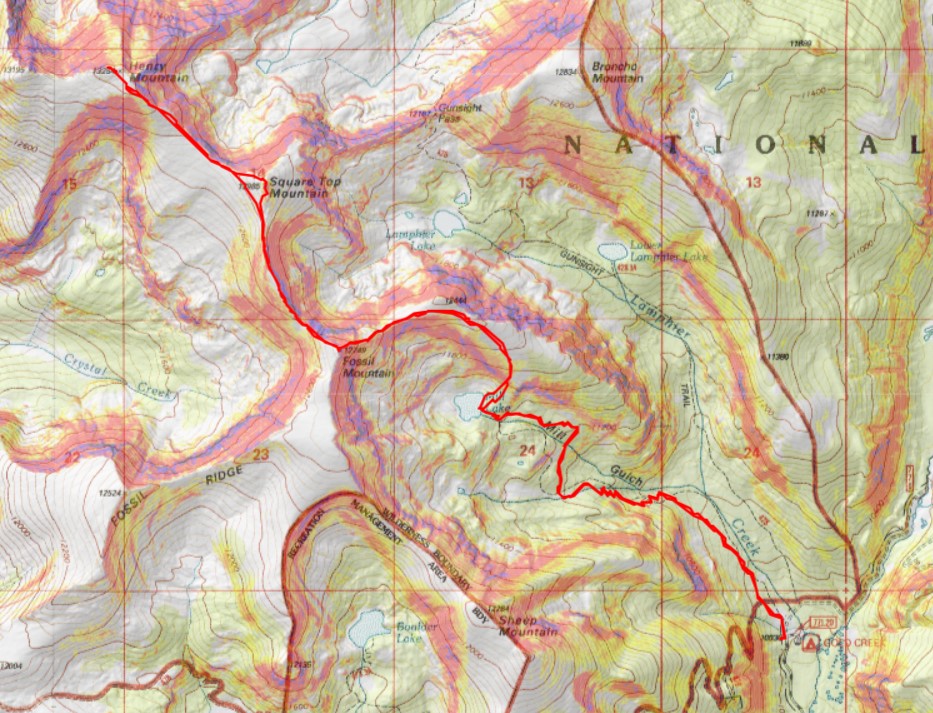
RT Length: 11.89 miles

Elevation Gain: 3560’

Full disclosure, I did these peaks in two days.  The first day I got thunder stormed out just before the access gully of PT 13291, and had to turn around.  I came back 2 days later to finish the summit.

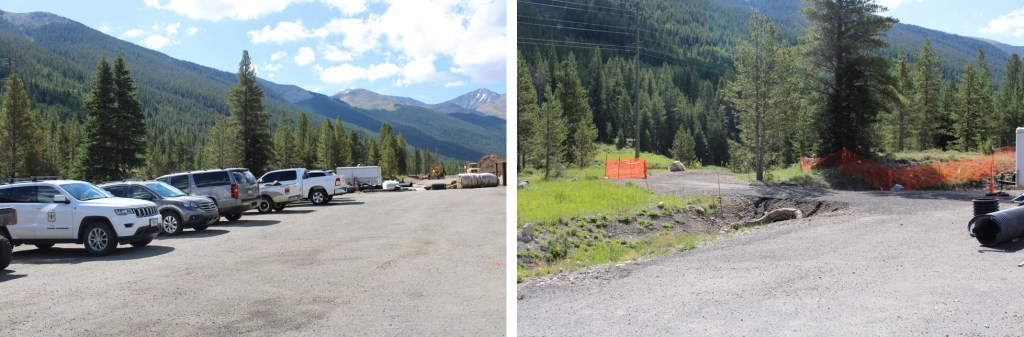
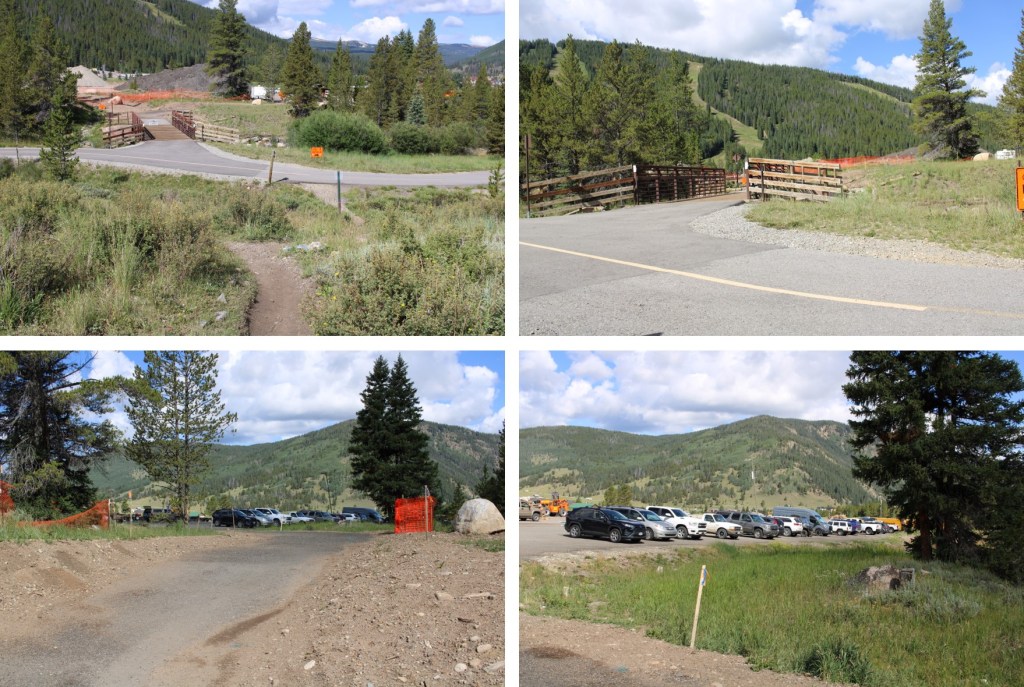
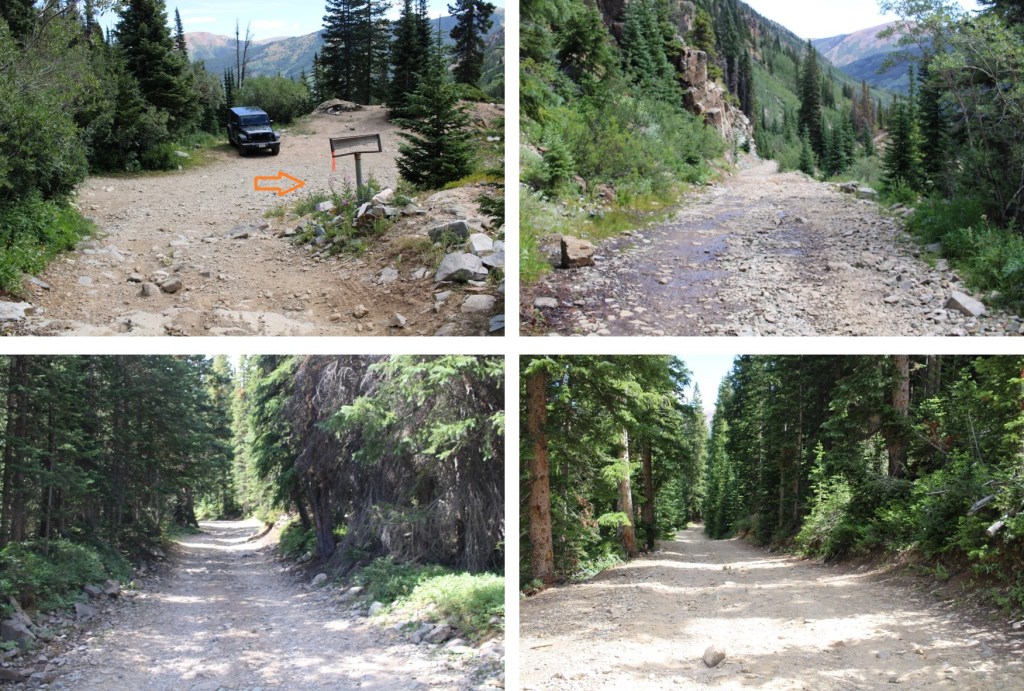
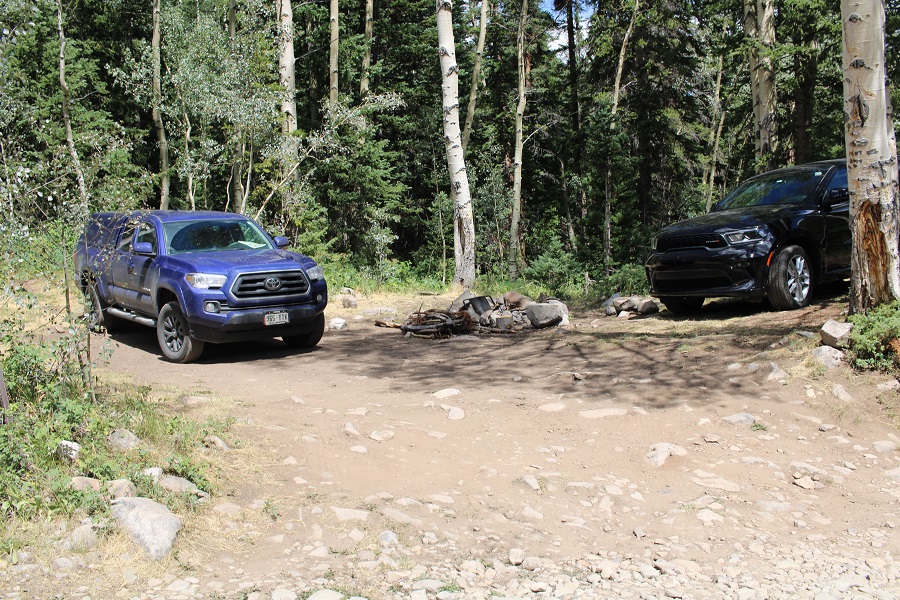
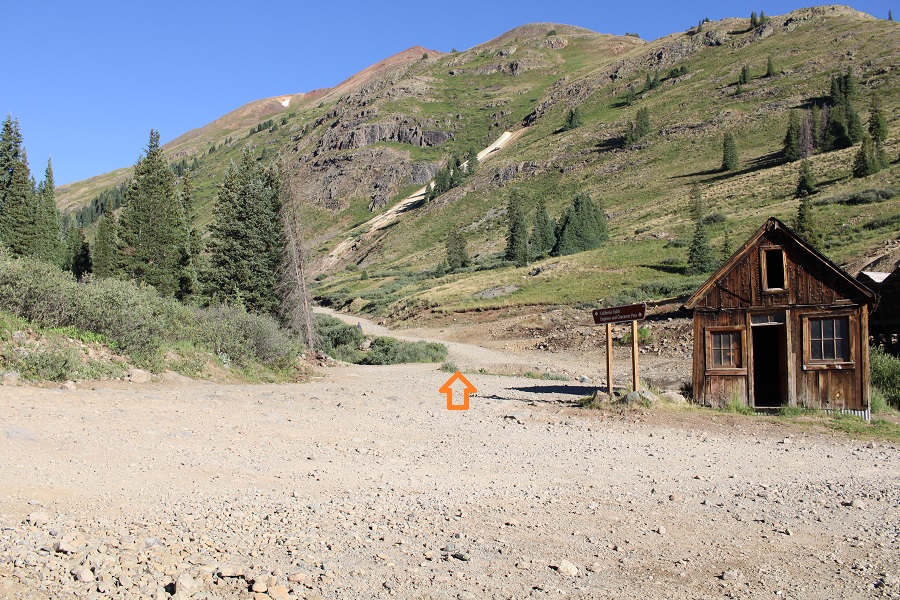
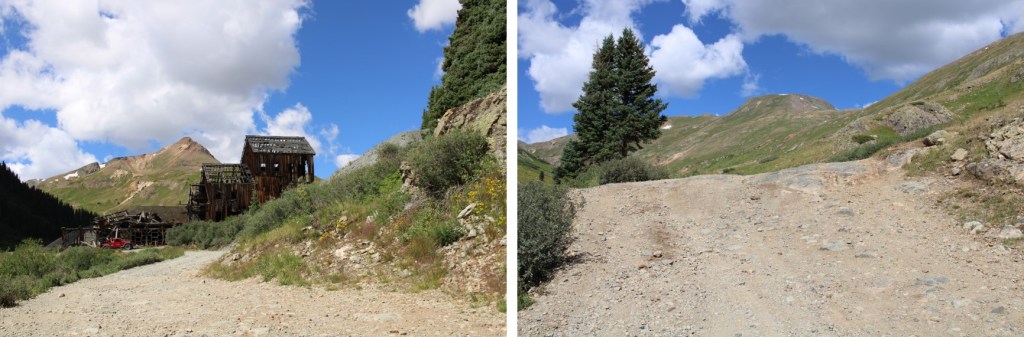
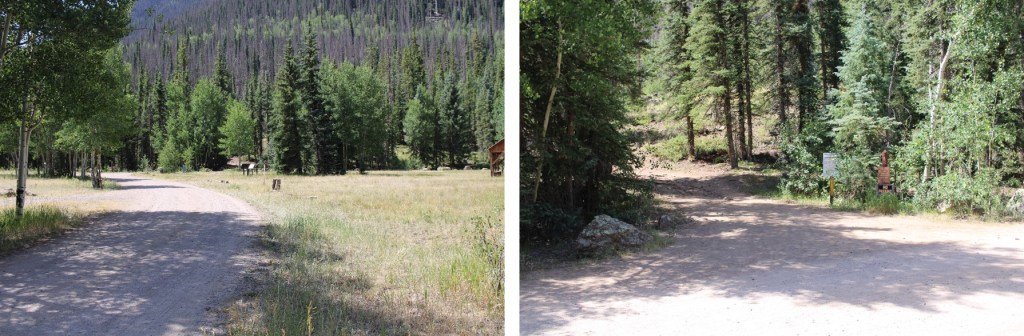
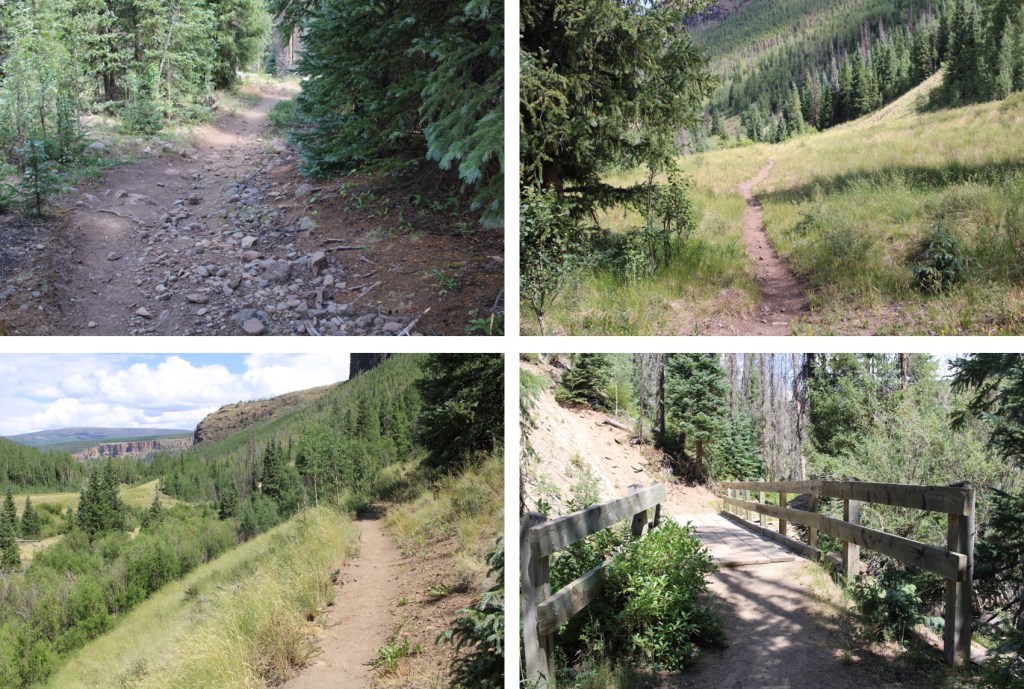
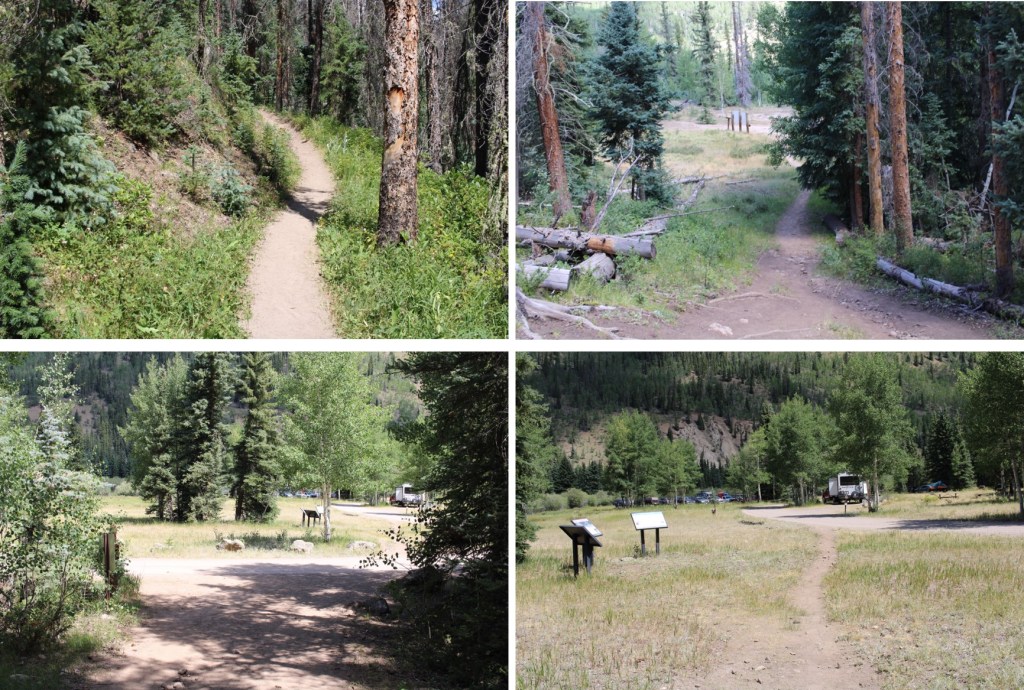
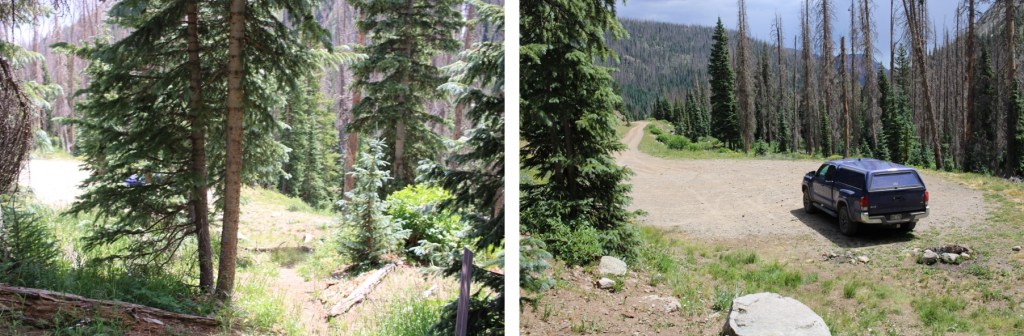
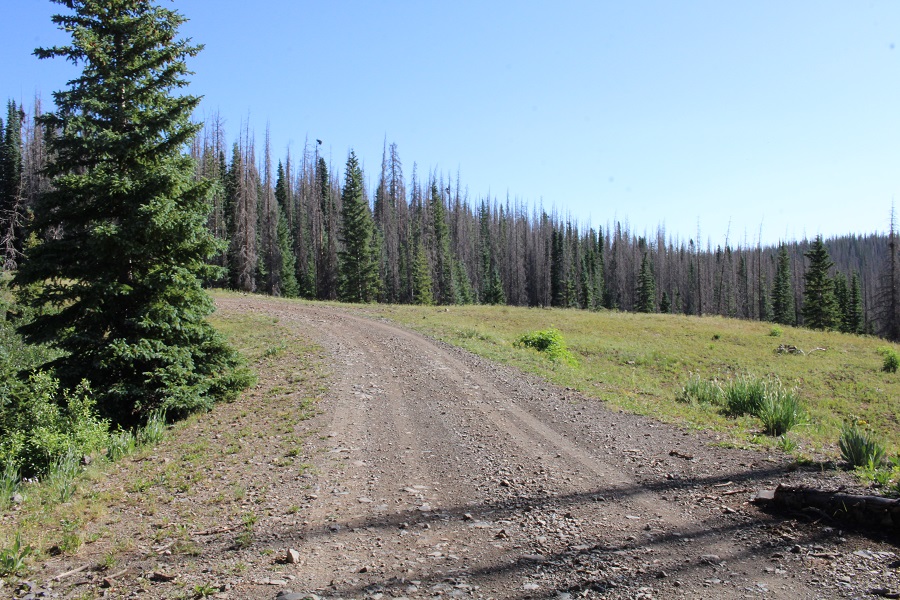
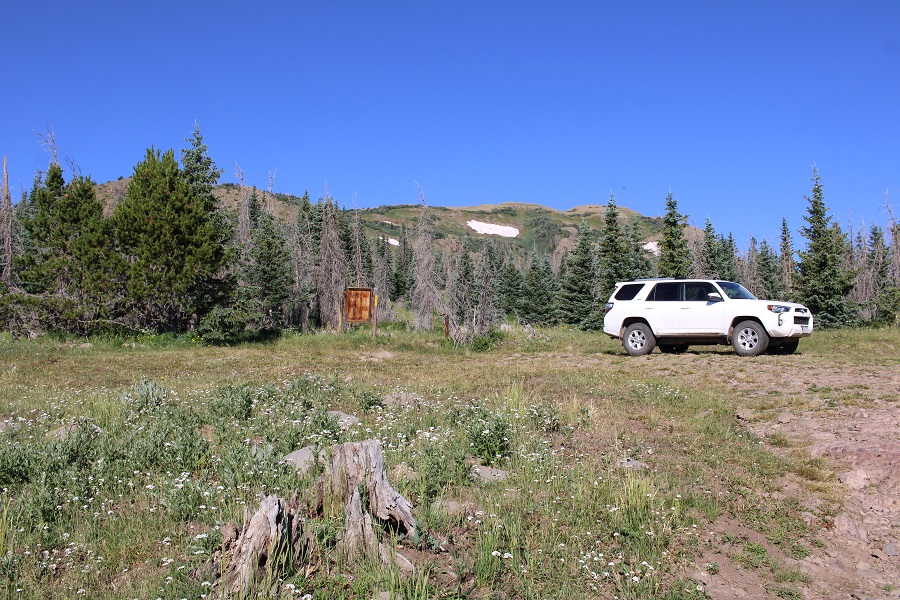
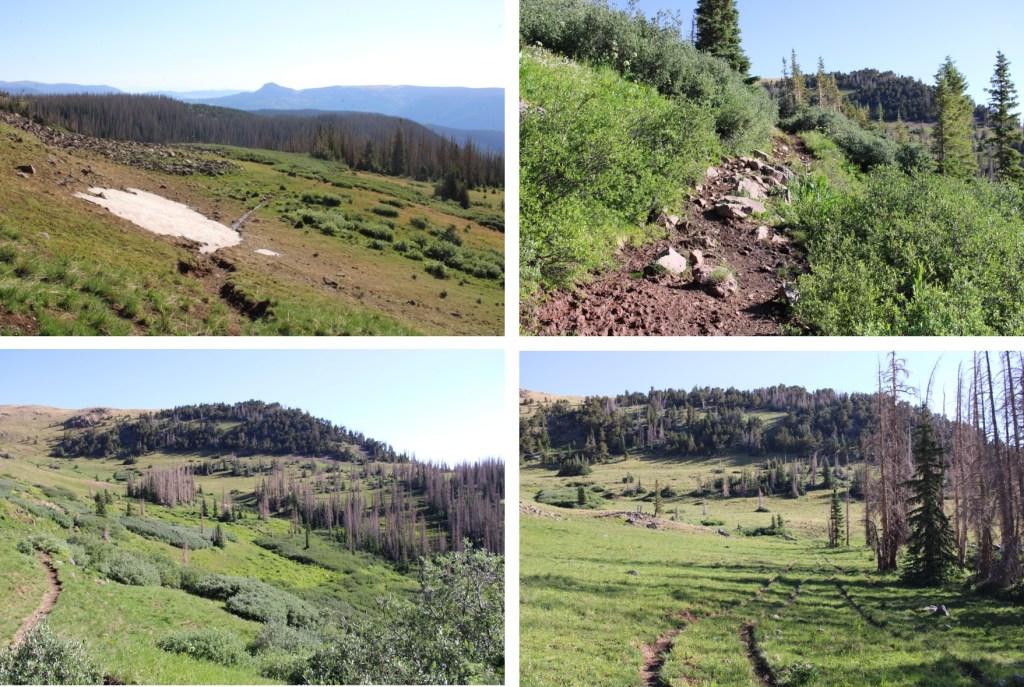
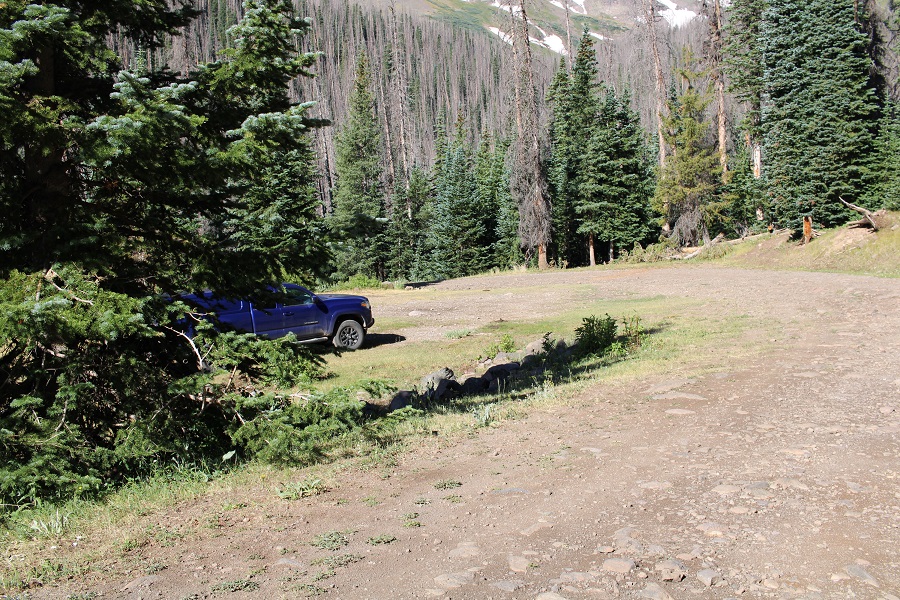
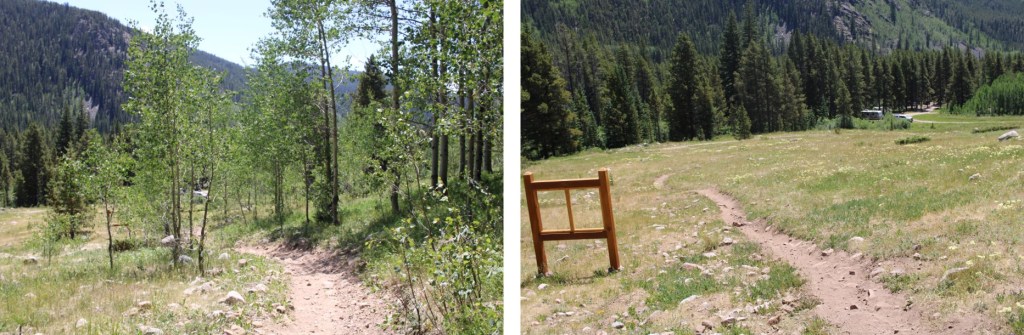
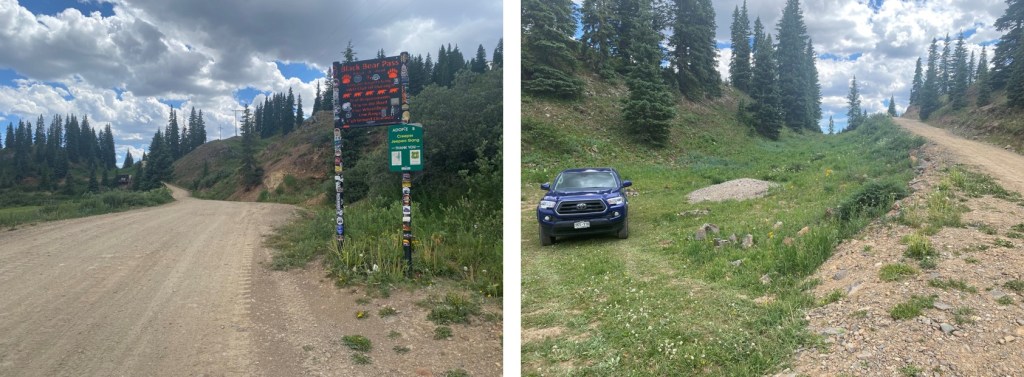
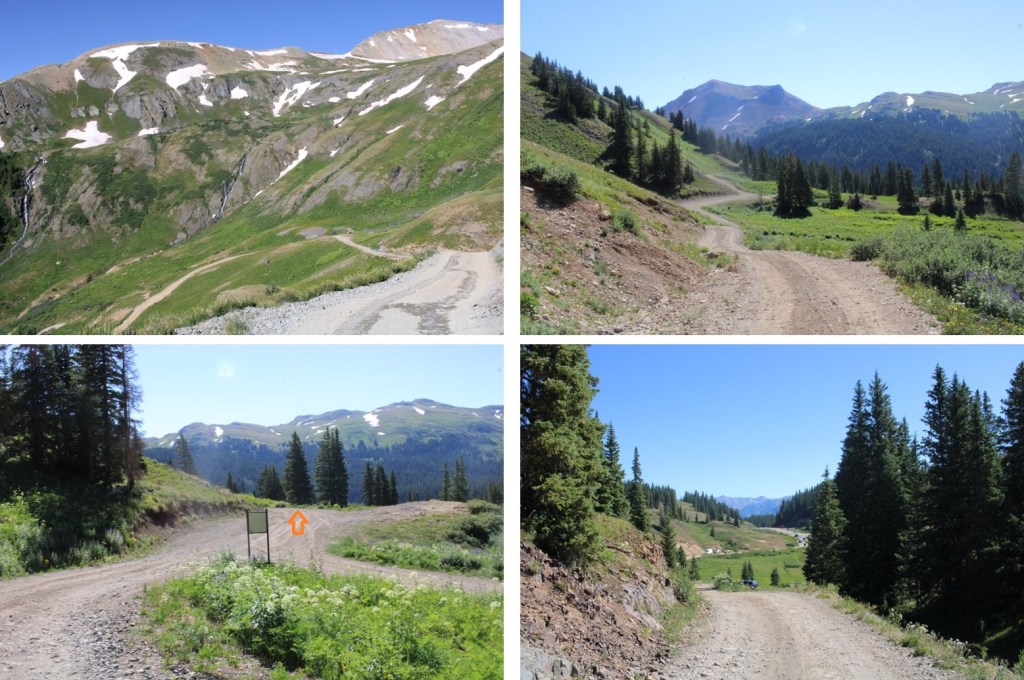
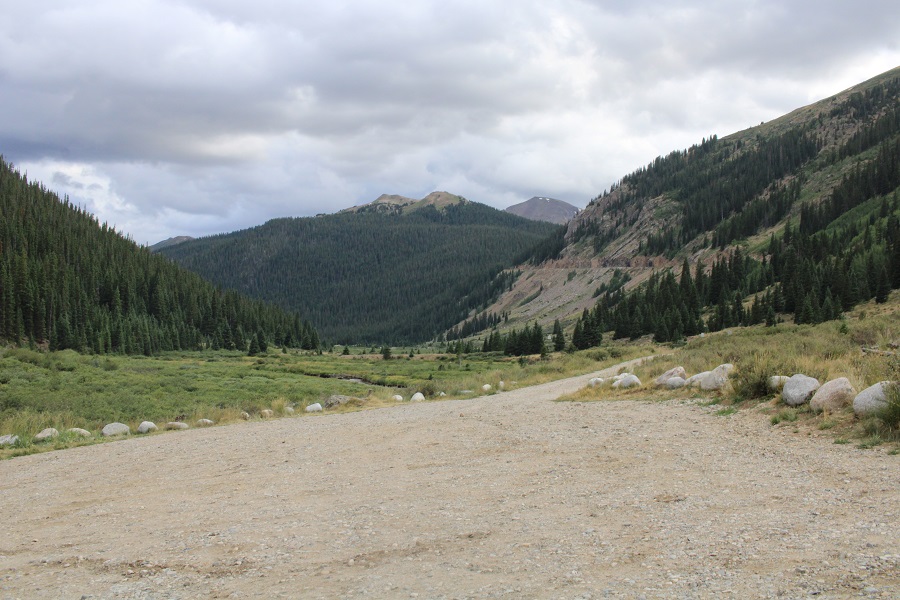
I stayed overnight at the North Fork Lake Creek Trailhead, and was on the trail at 5am the next morning.   The parking area has room for about 15 vehicles if everyone parks nicely, as well as some overflow spots on the short drive in.

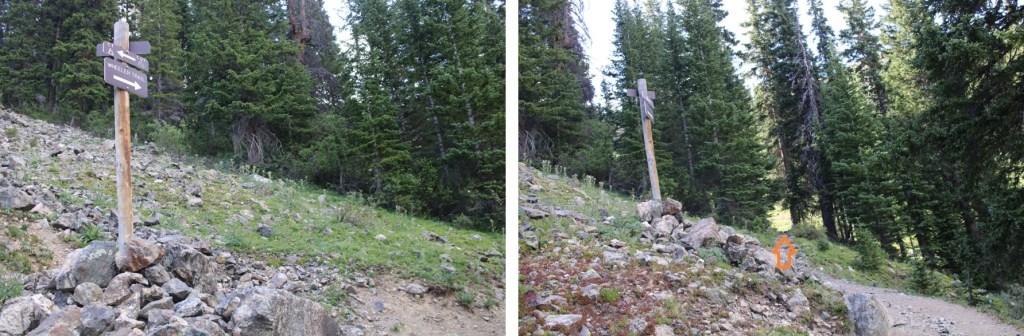
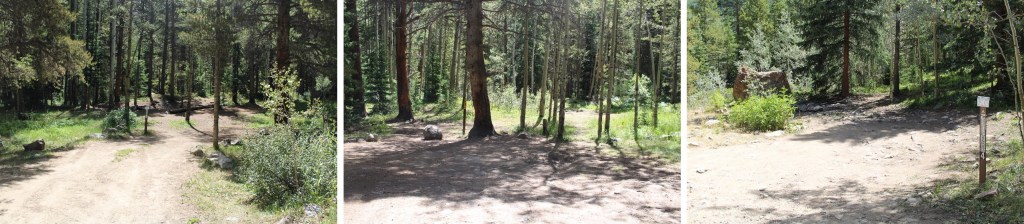
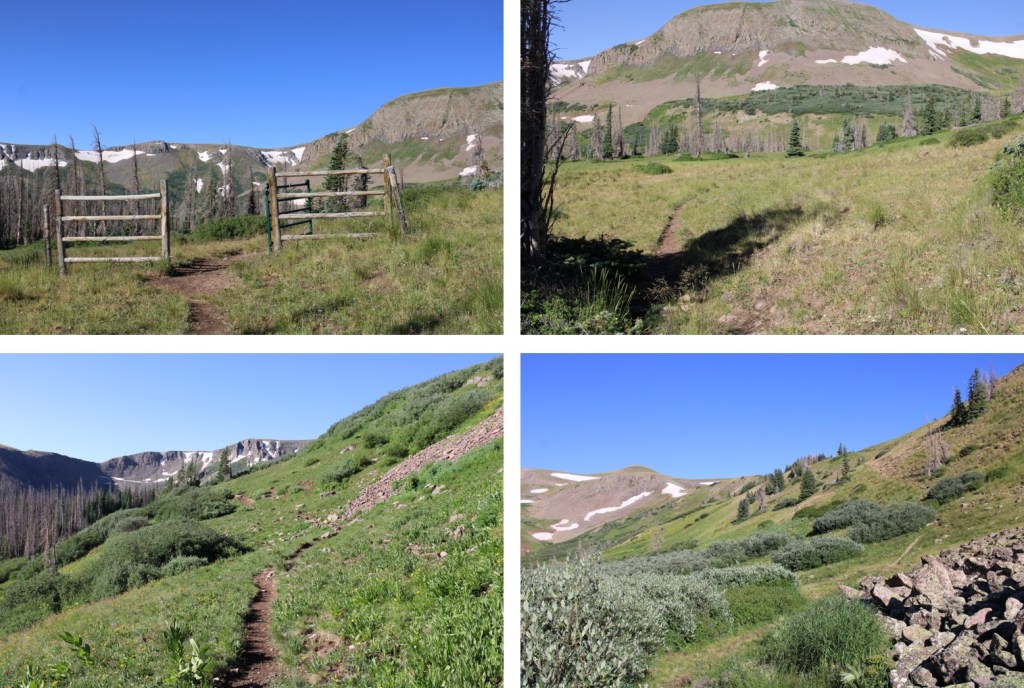
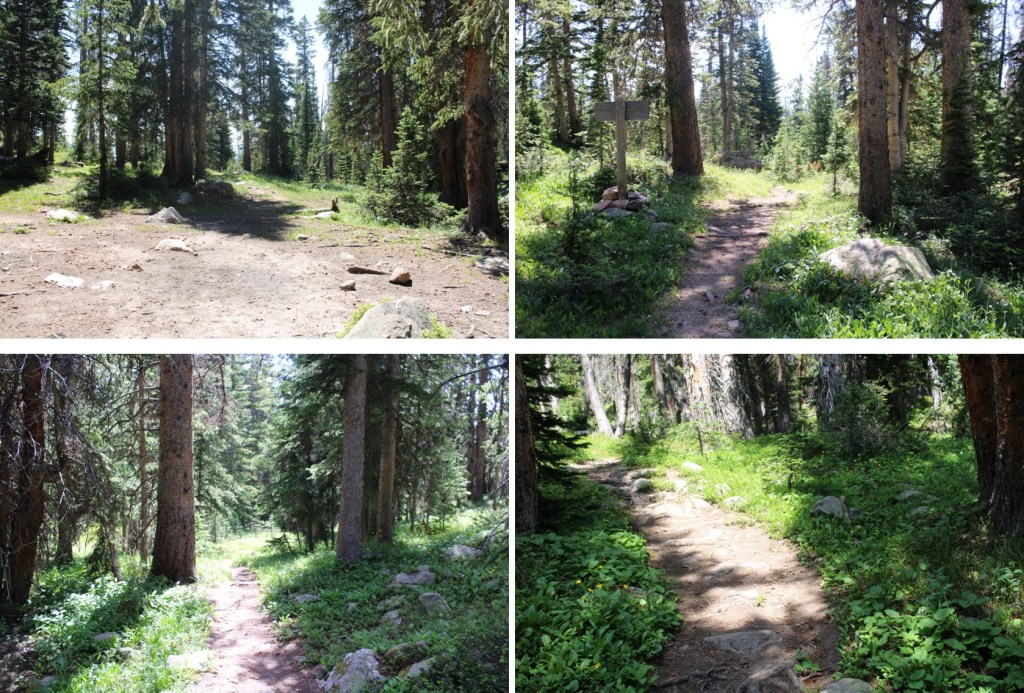
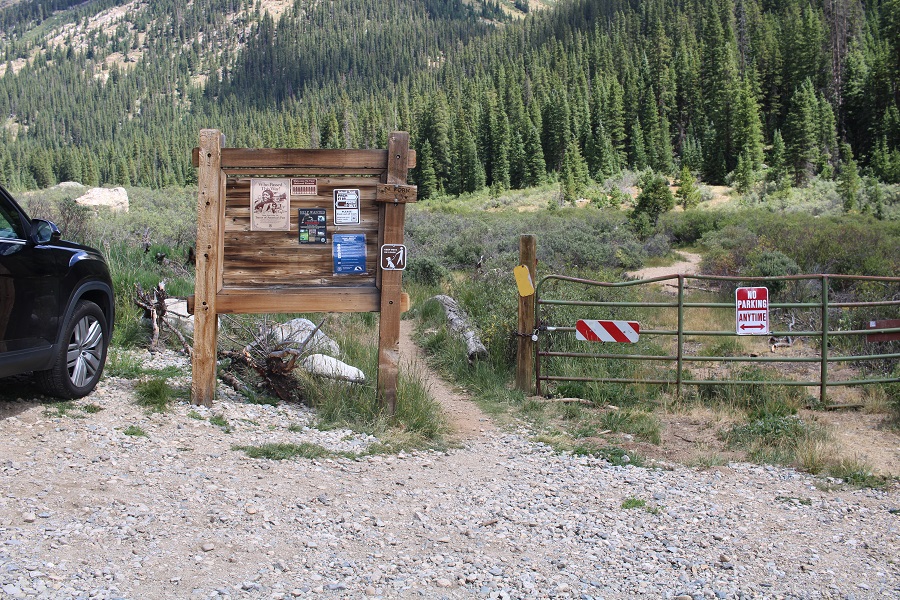
The trail starts at the north end of the parking area, close to a locked gate.  It’s trail number 1483.

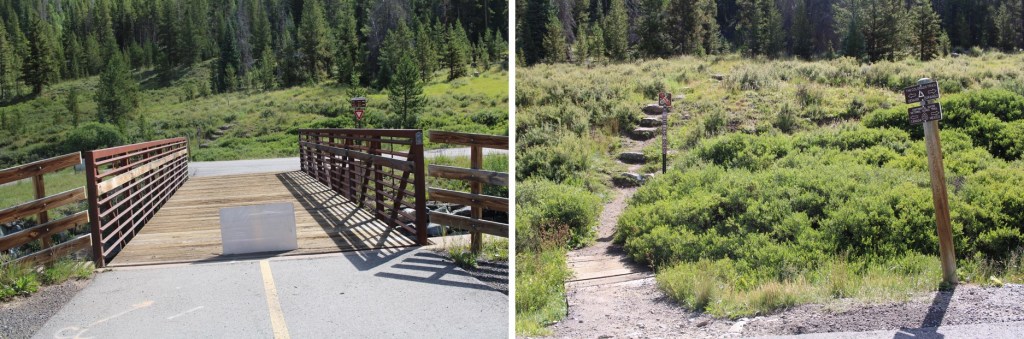
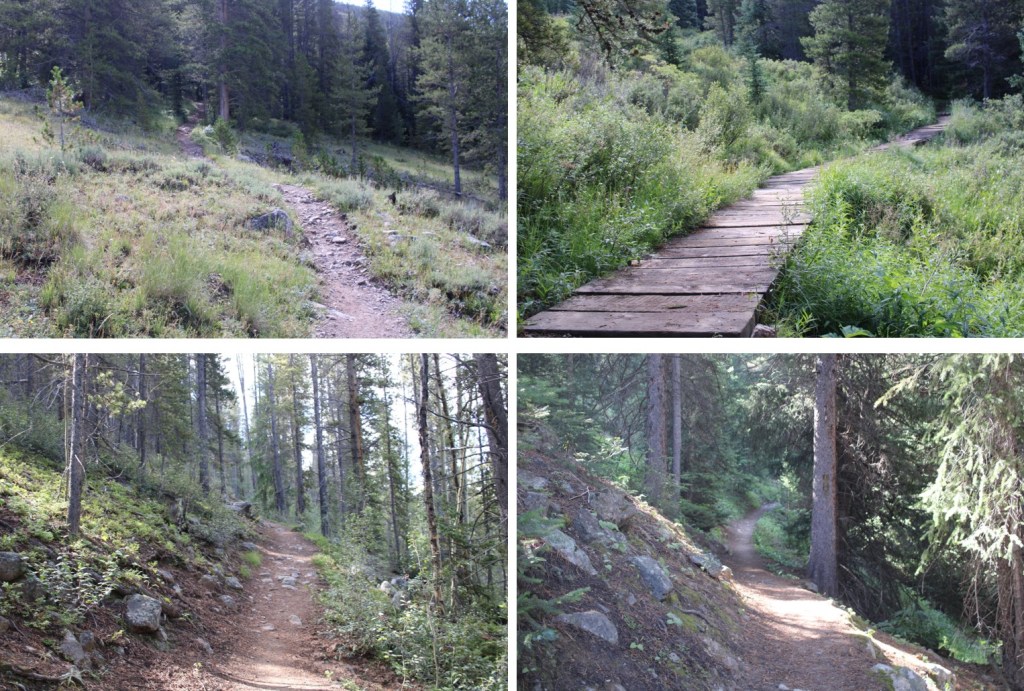
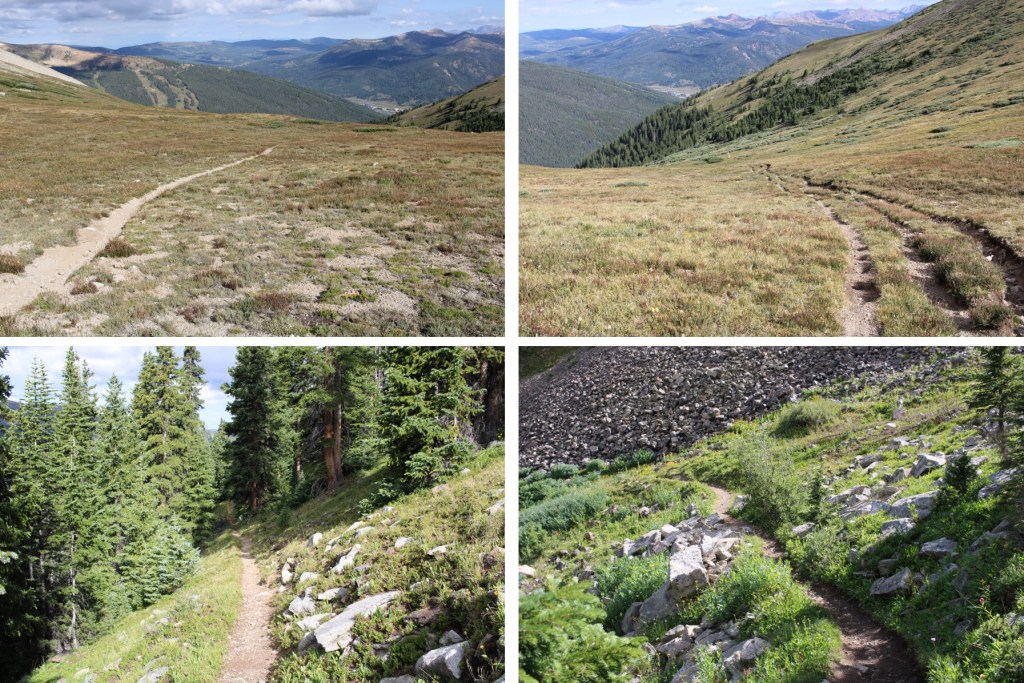
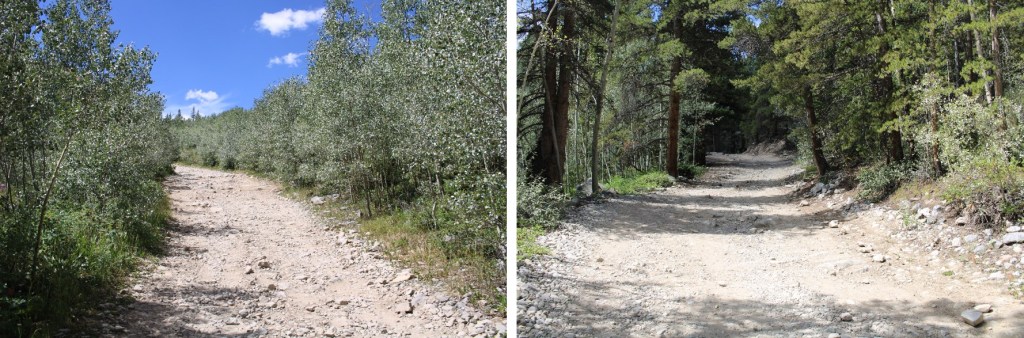
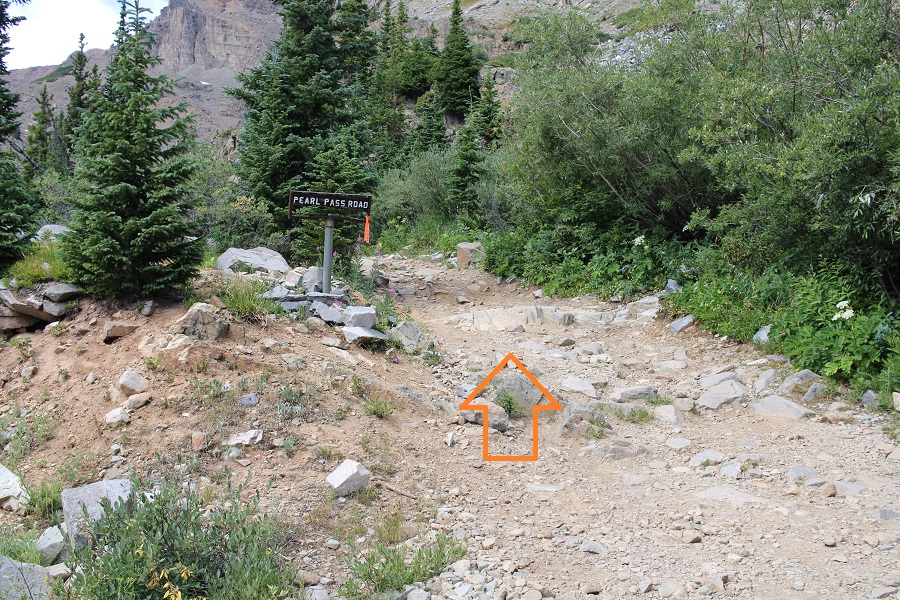
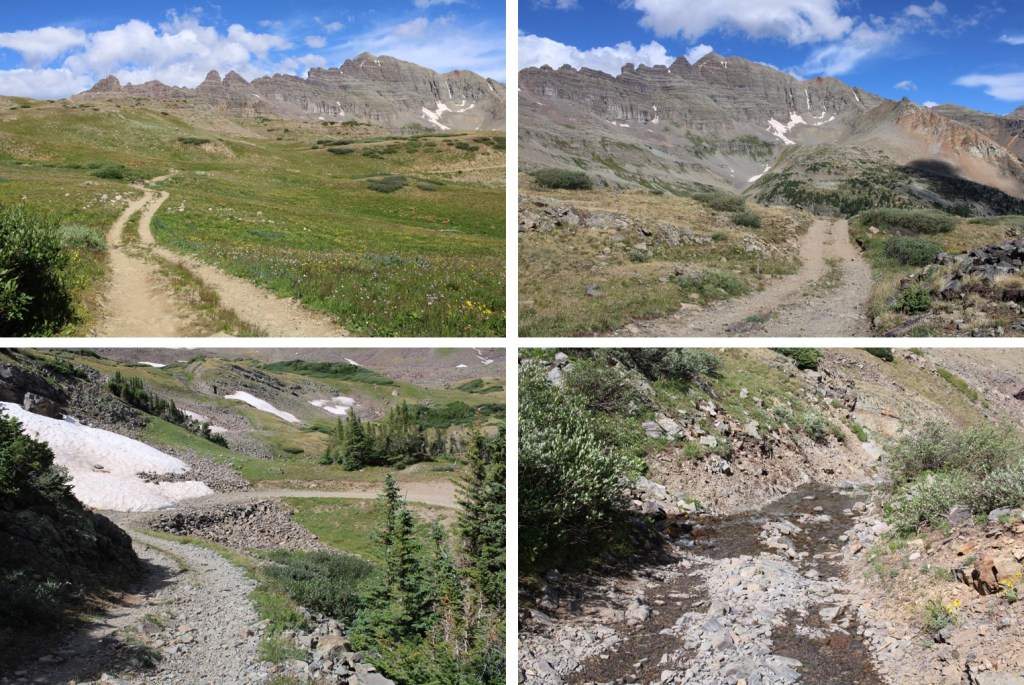
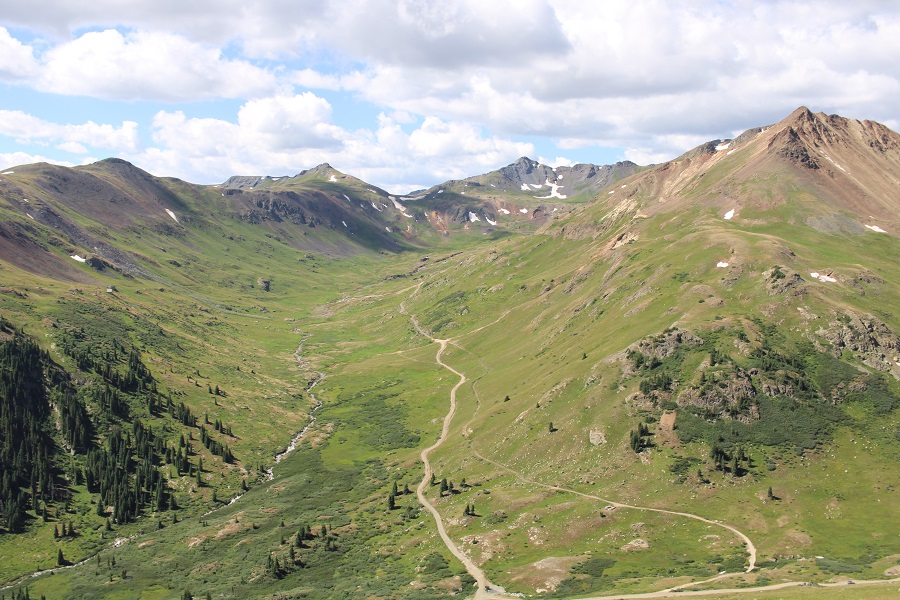
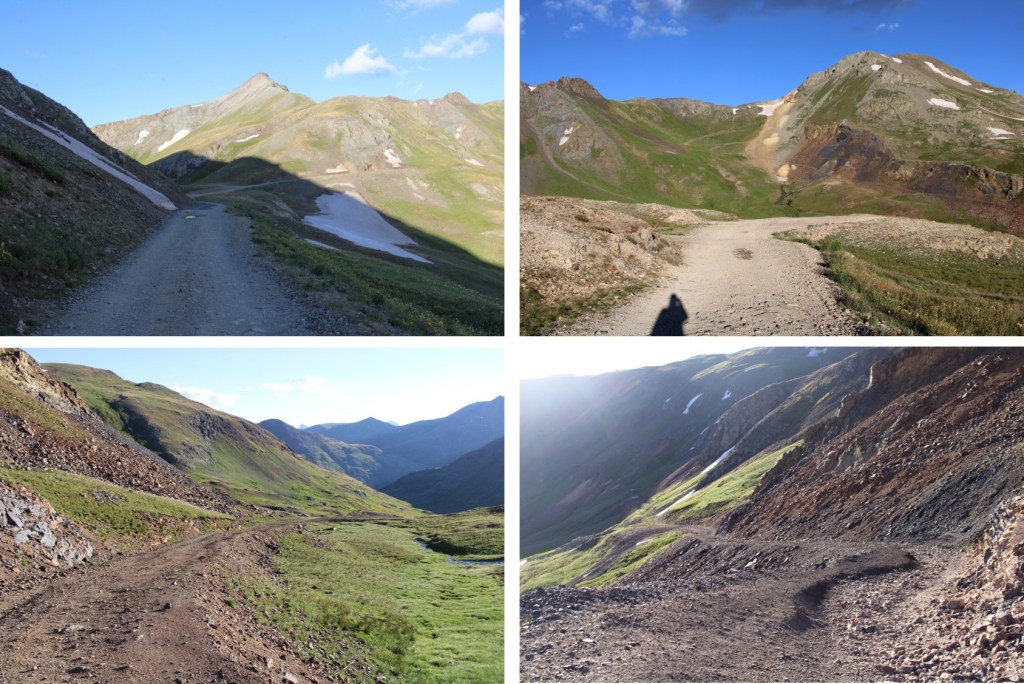
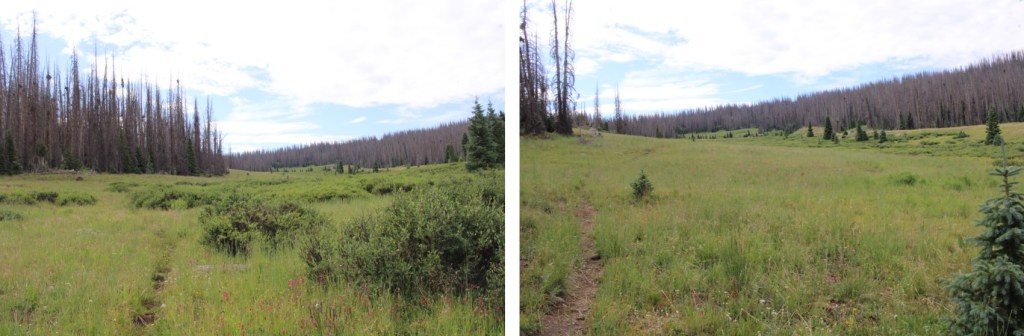
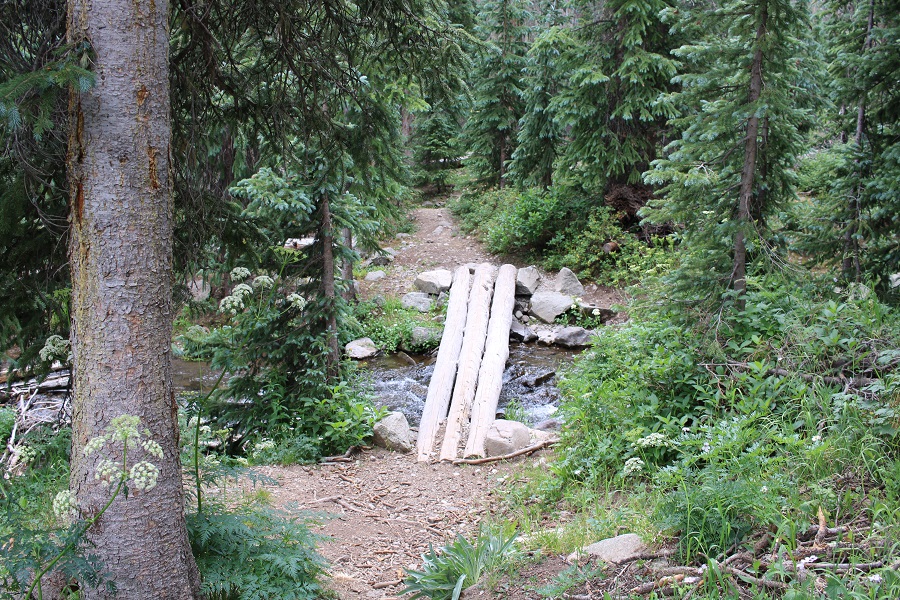
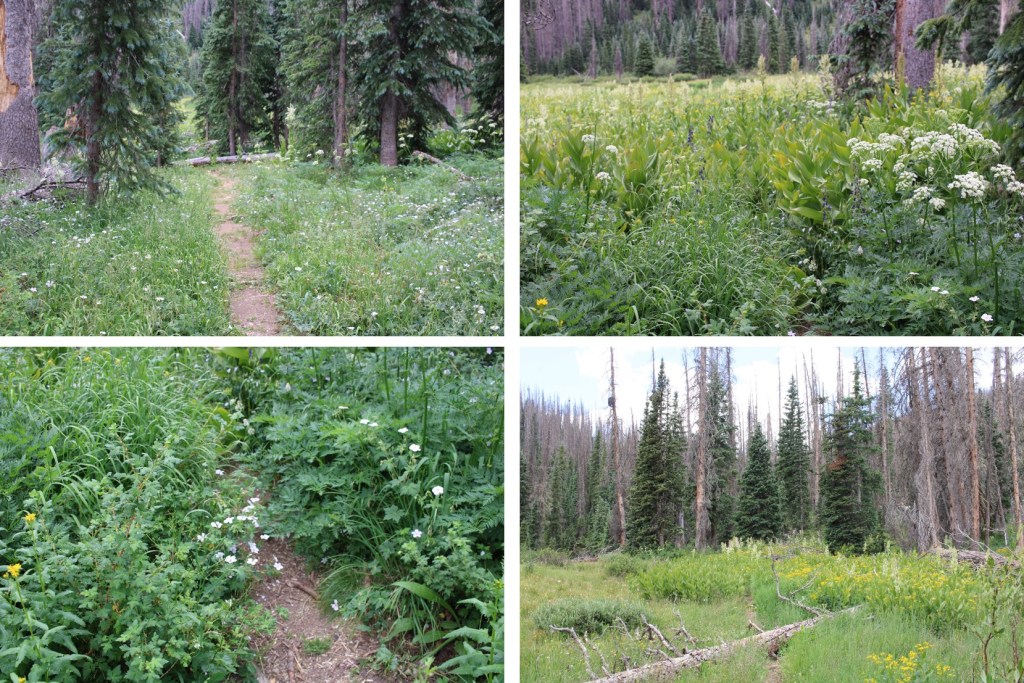
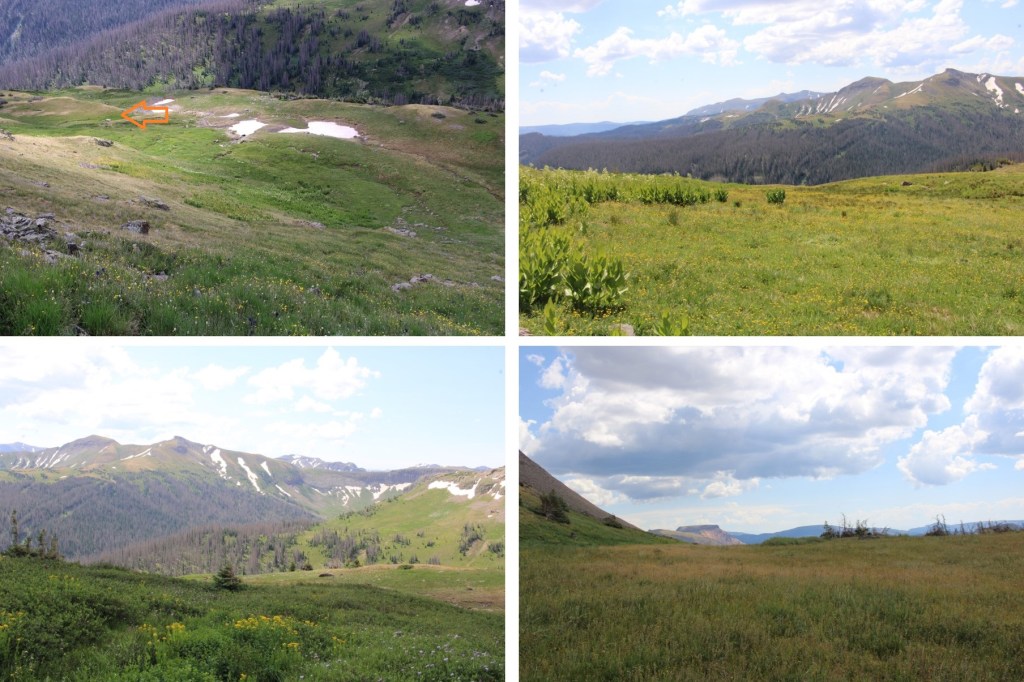
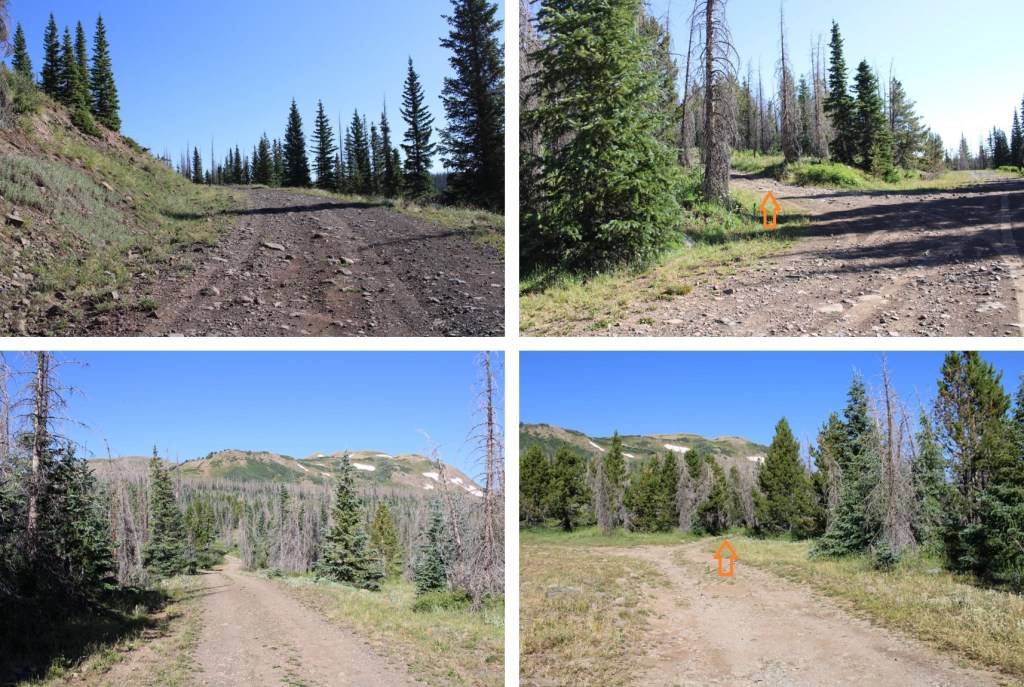
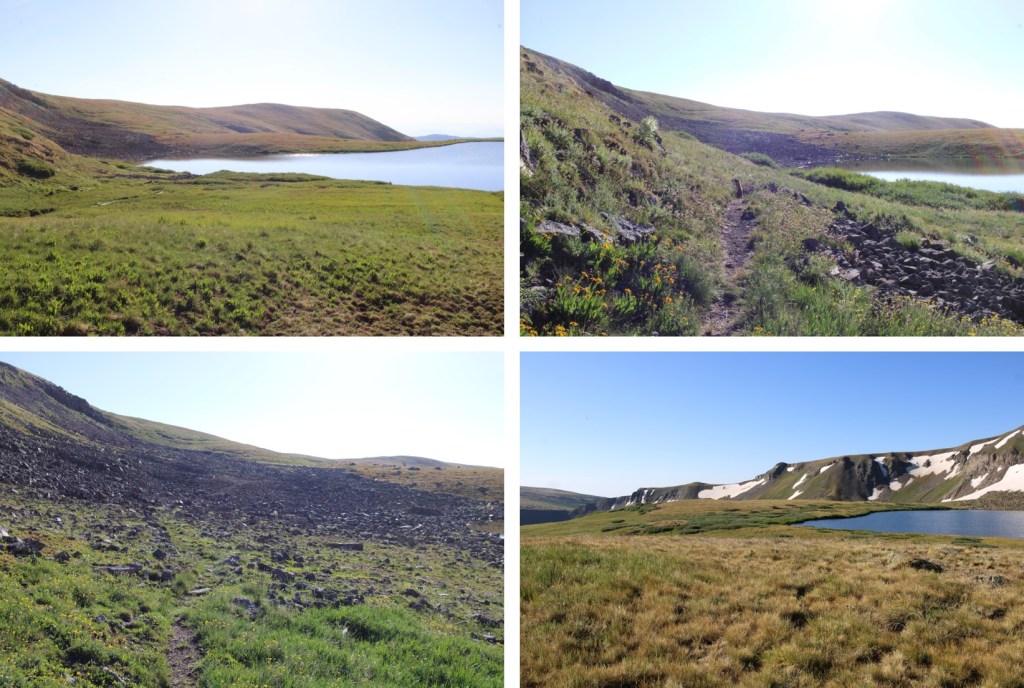
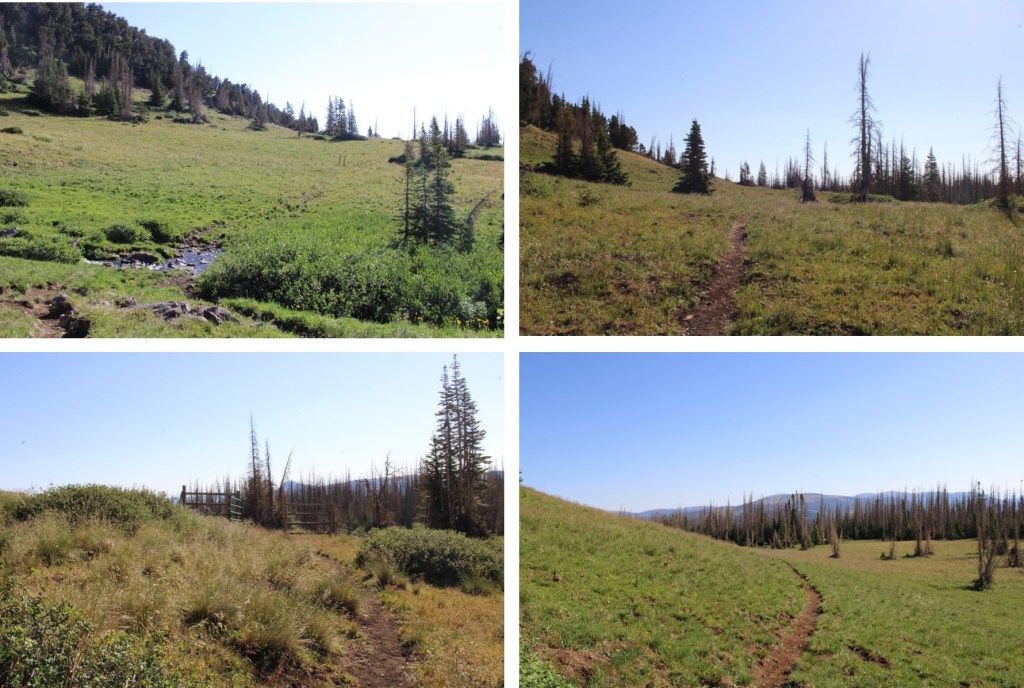
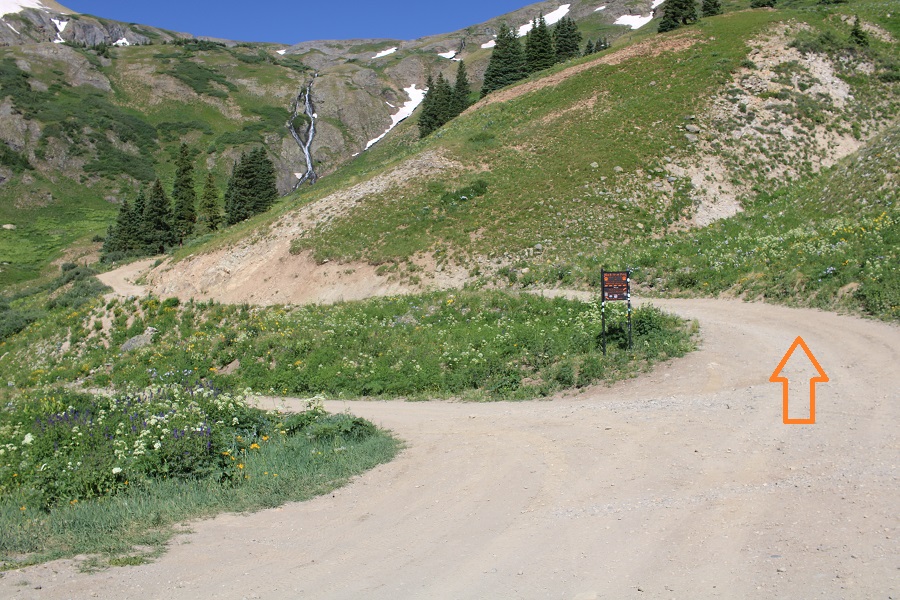
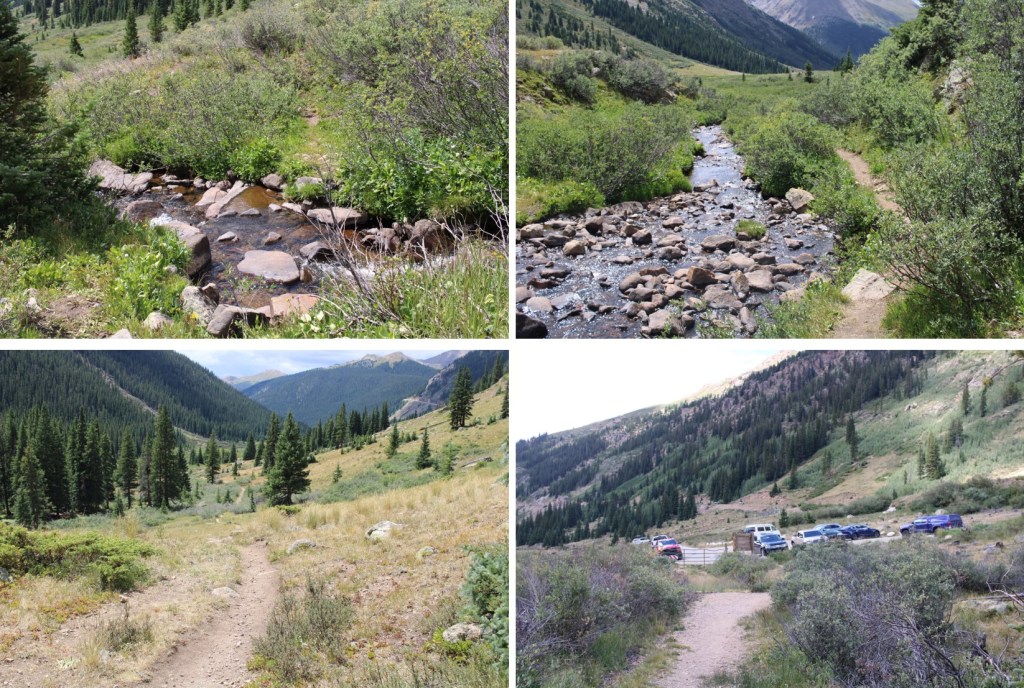
I followed this class 1 trail for 3 miles north into the basin

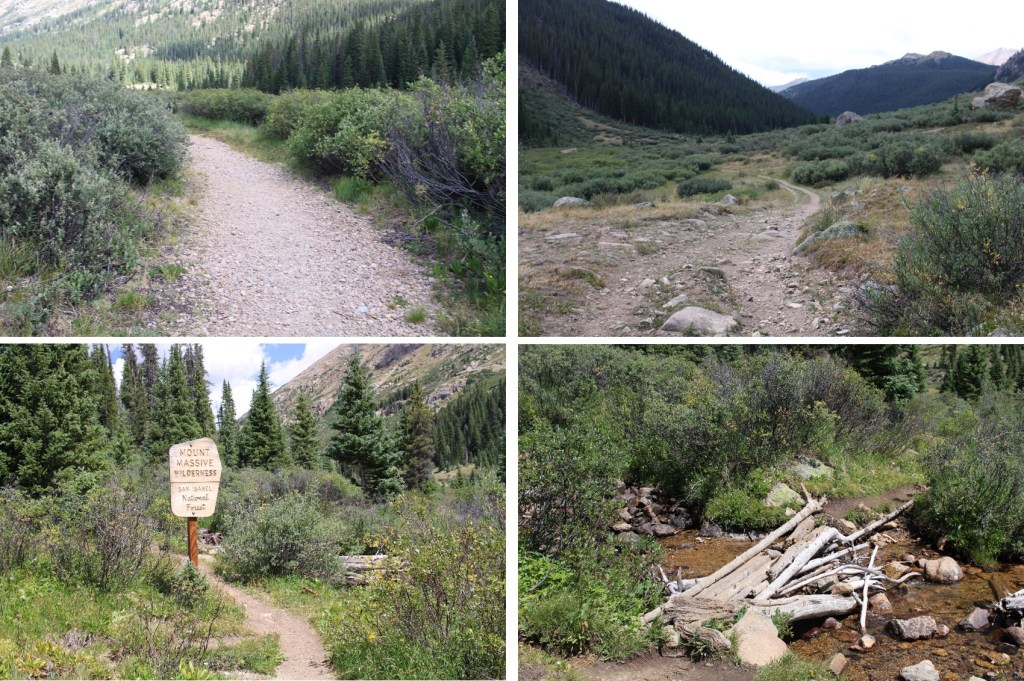
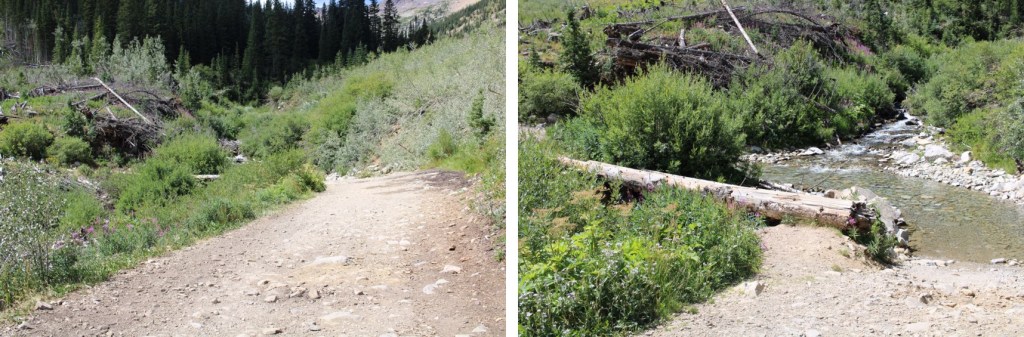
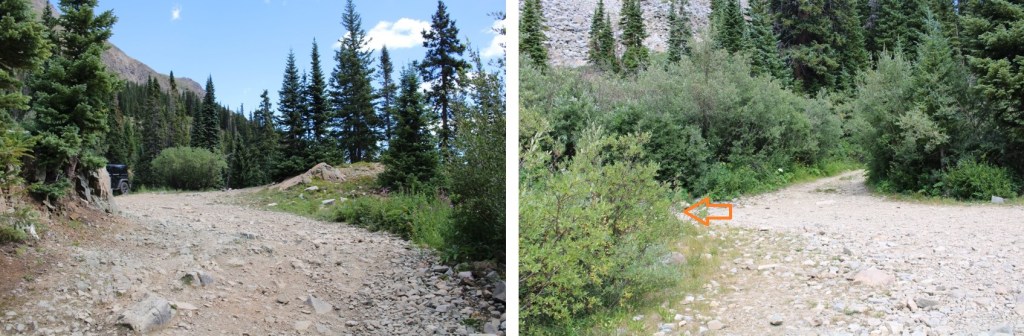
When I came to a creek, I crossed it and turned left. 

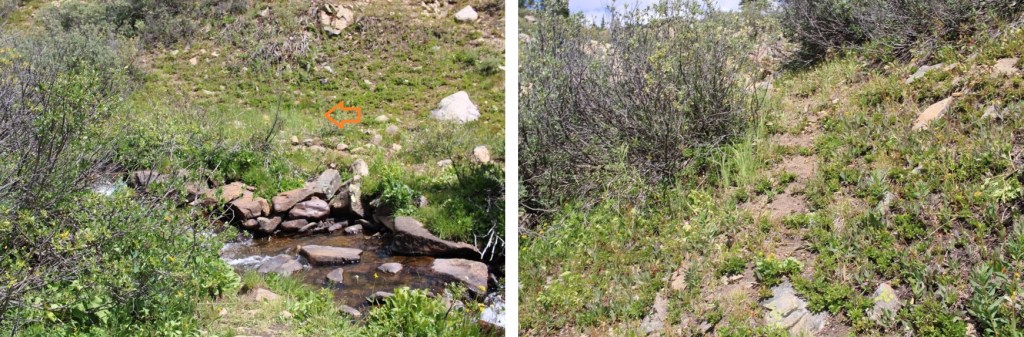
Here there is a faint trail for a few yards, and then it fades out.  I headed northwest into the upper basin.

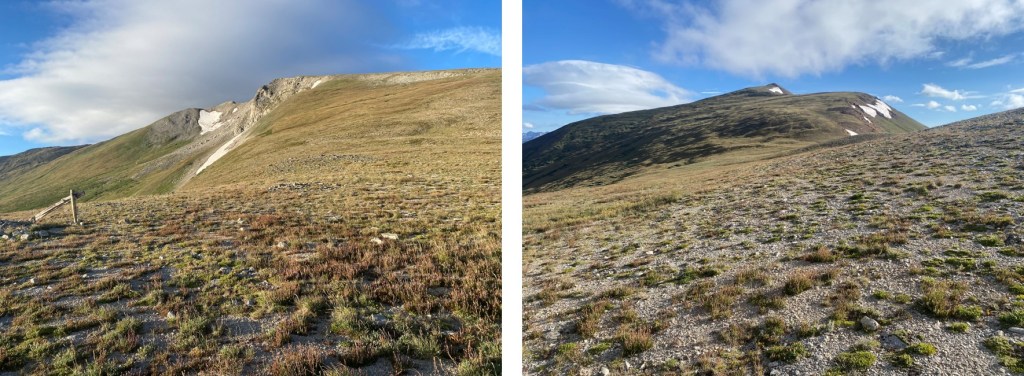
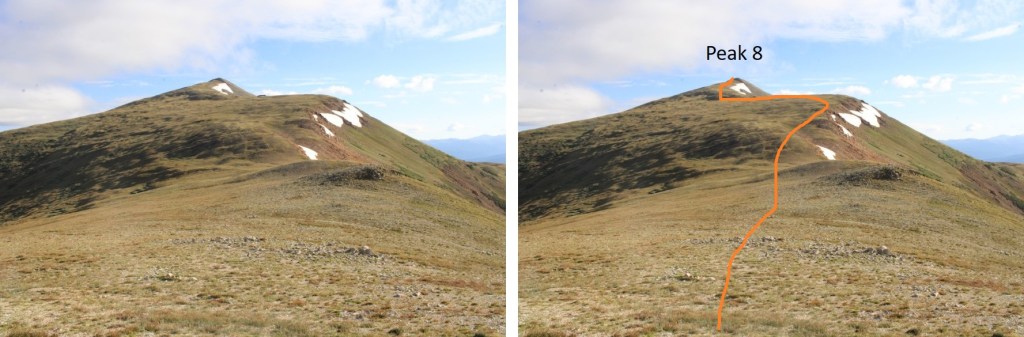
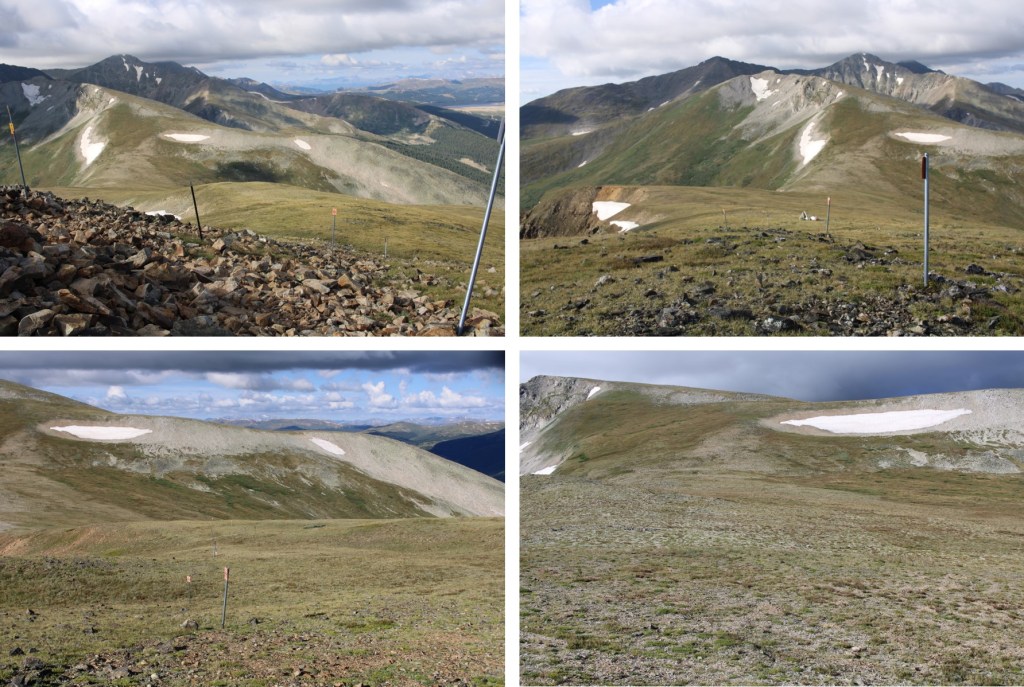
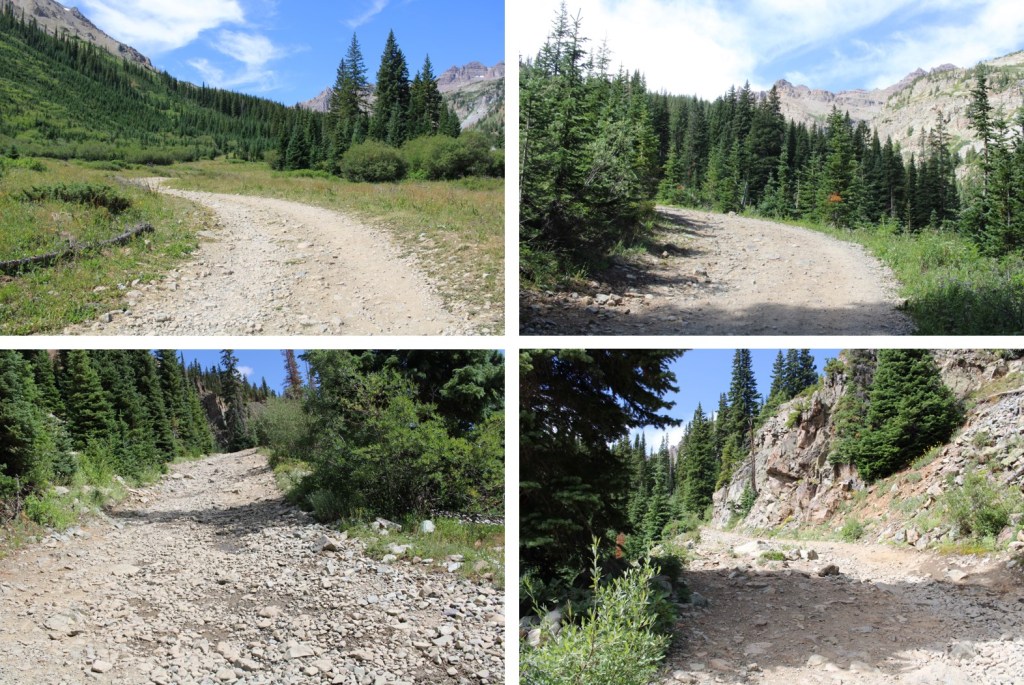
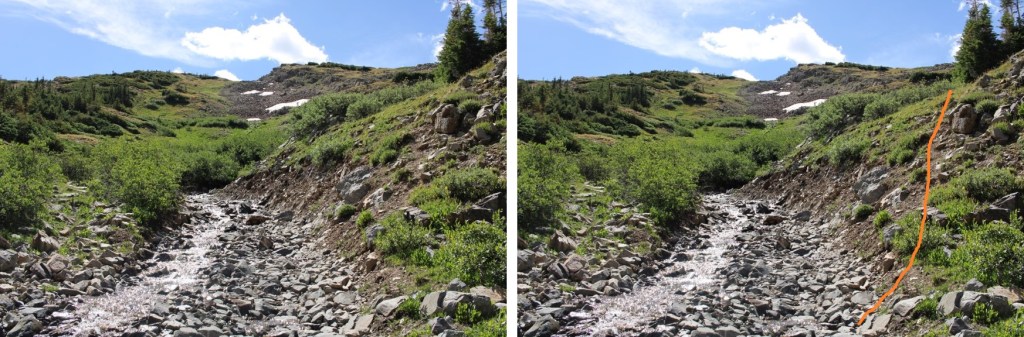
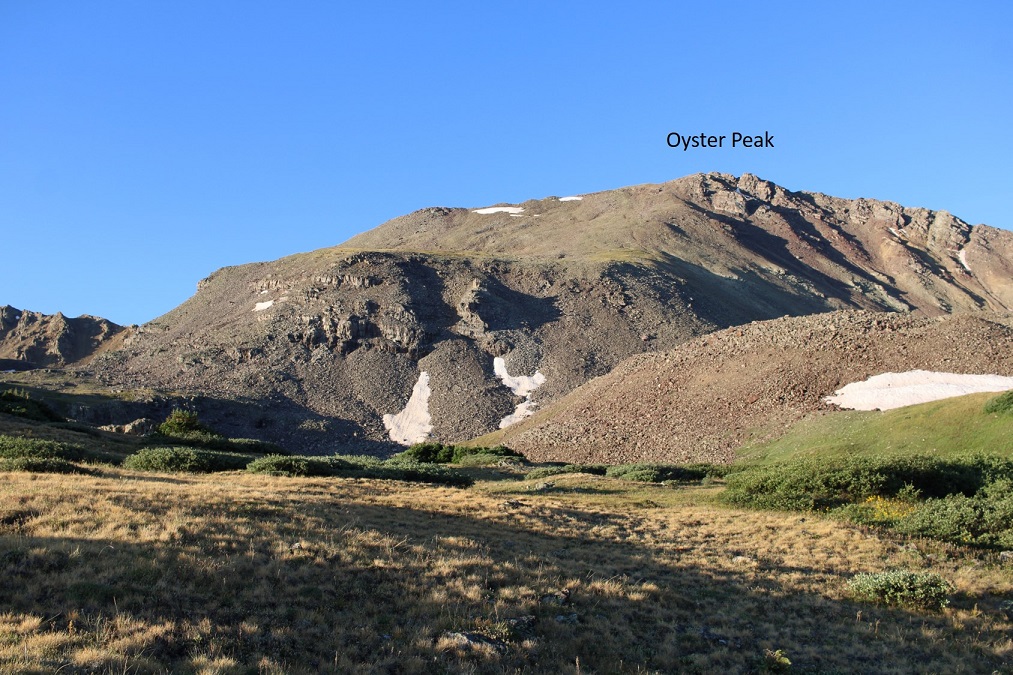
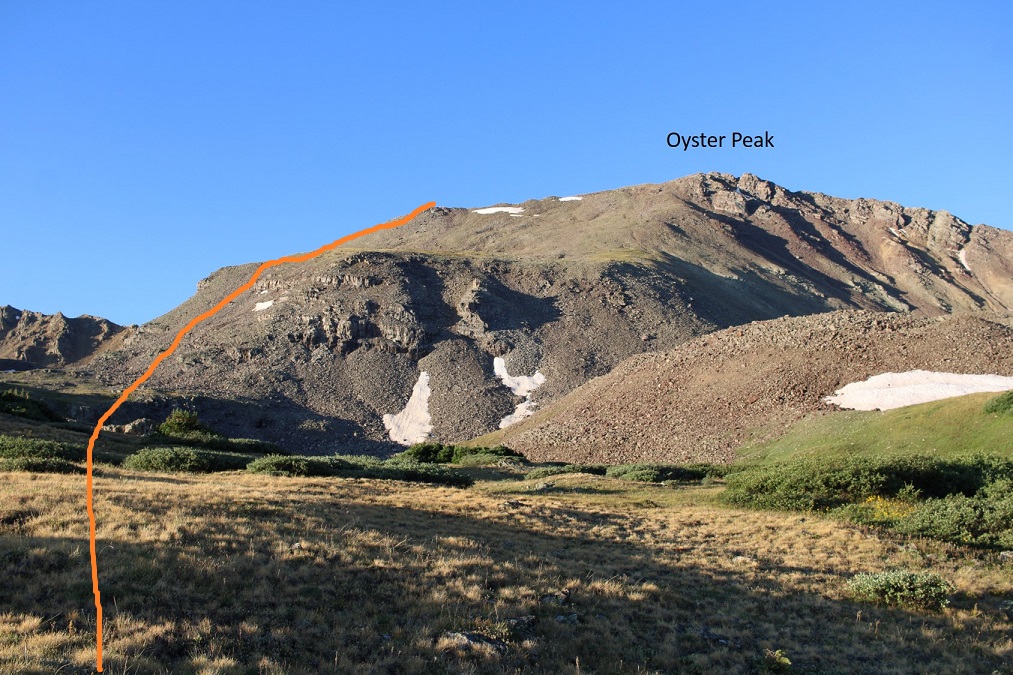
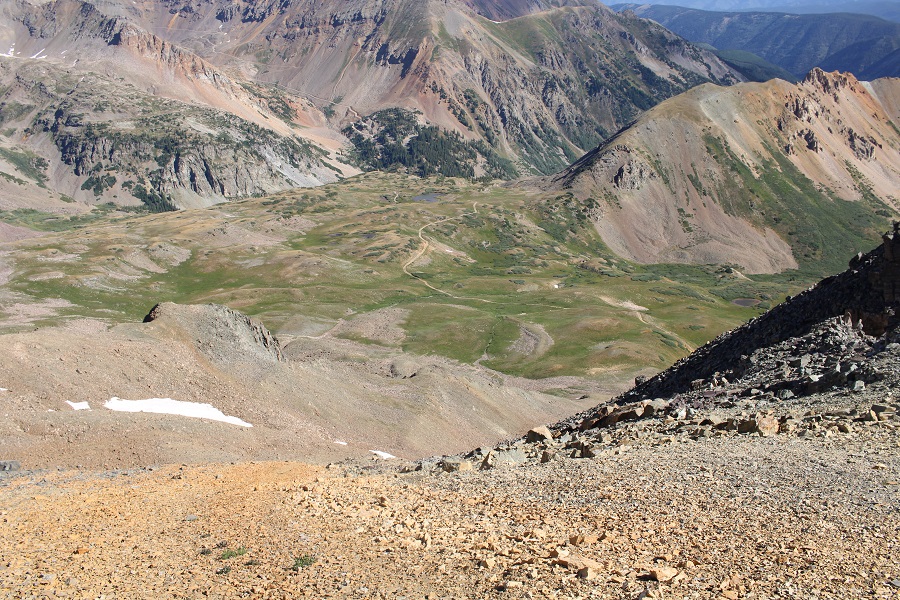
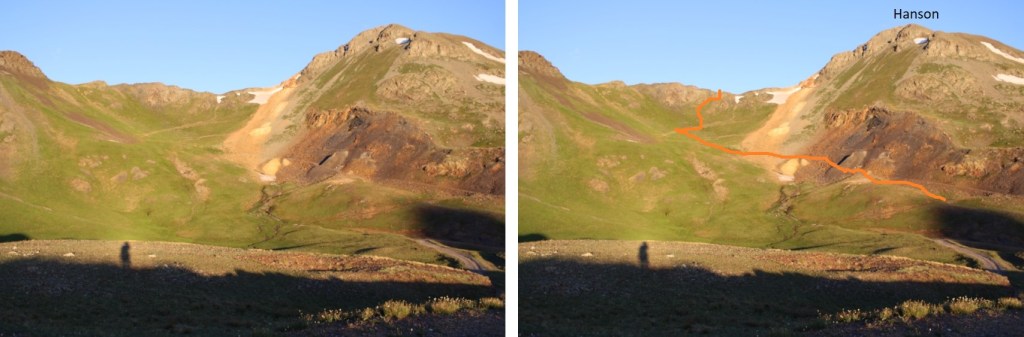
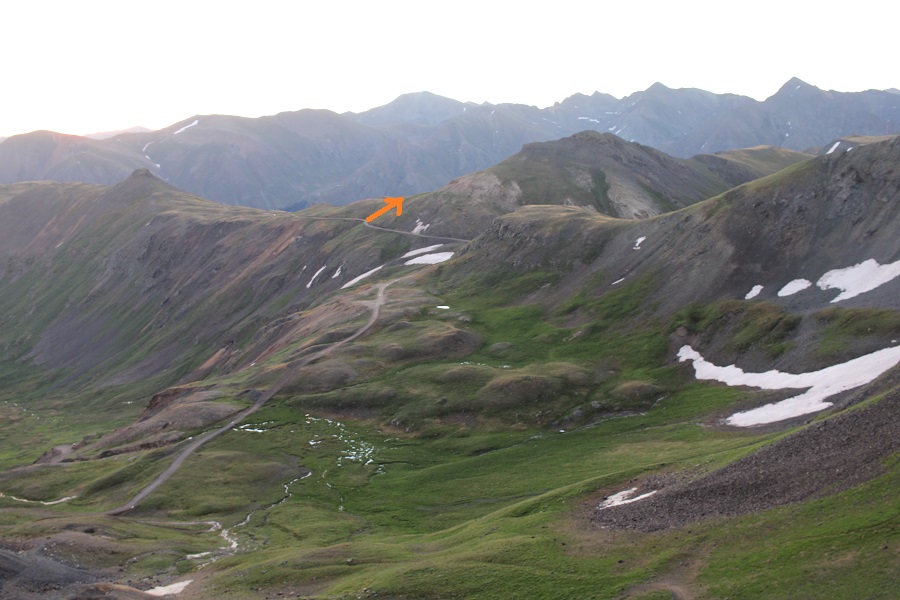
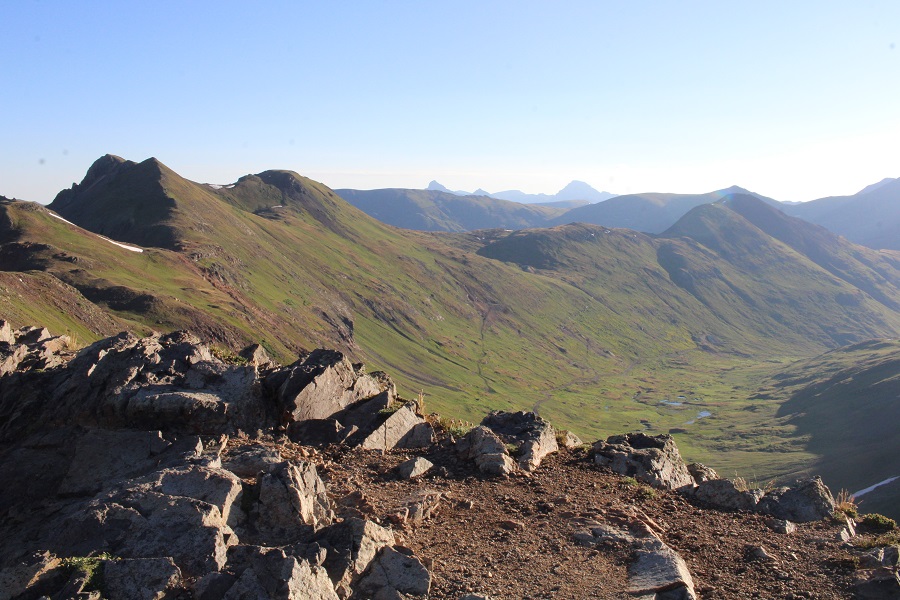
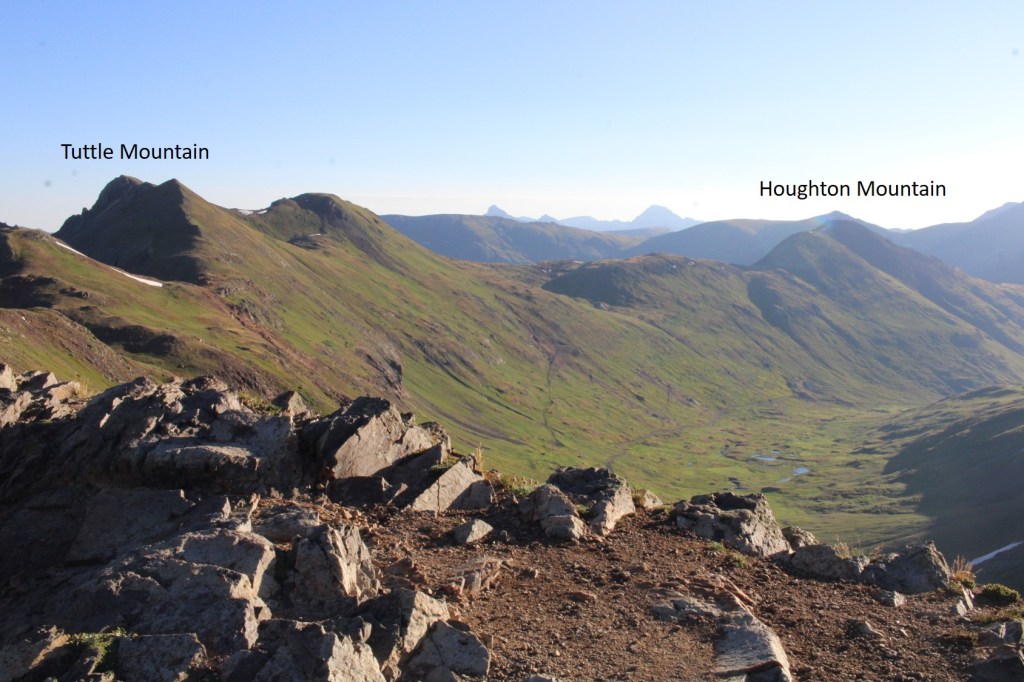
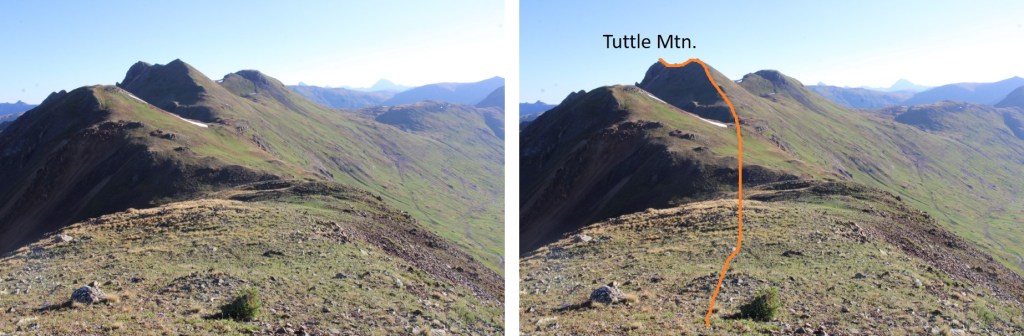
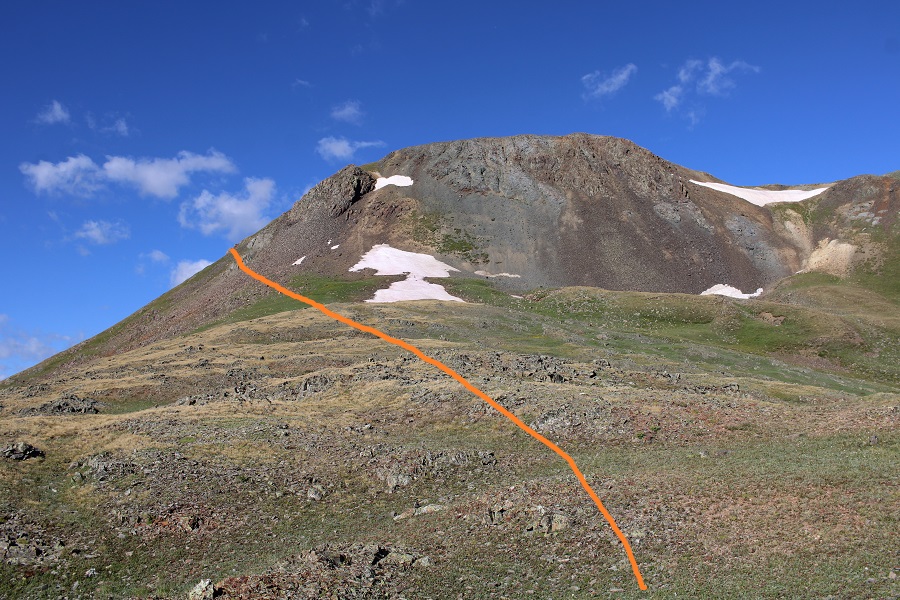
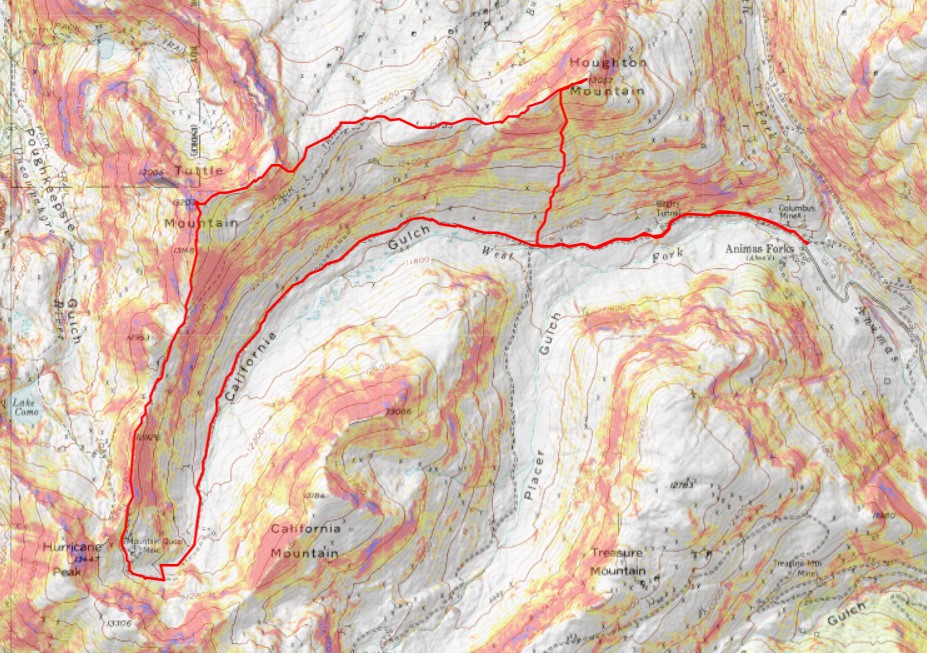
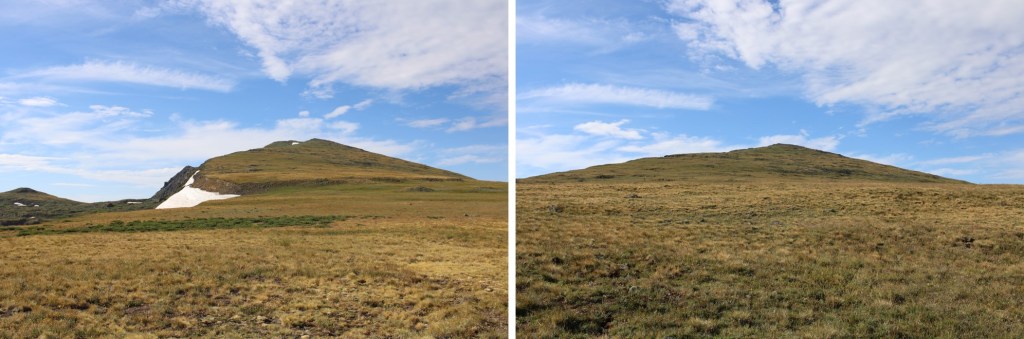
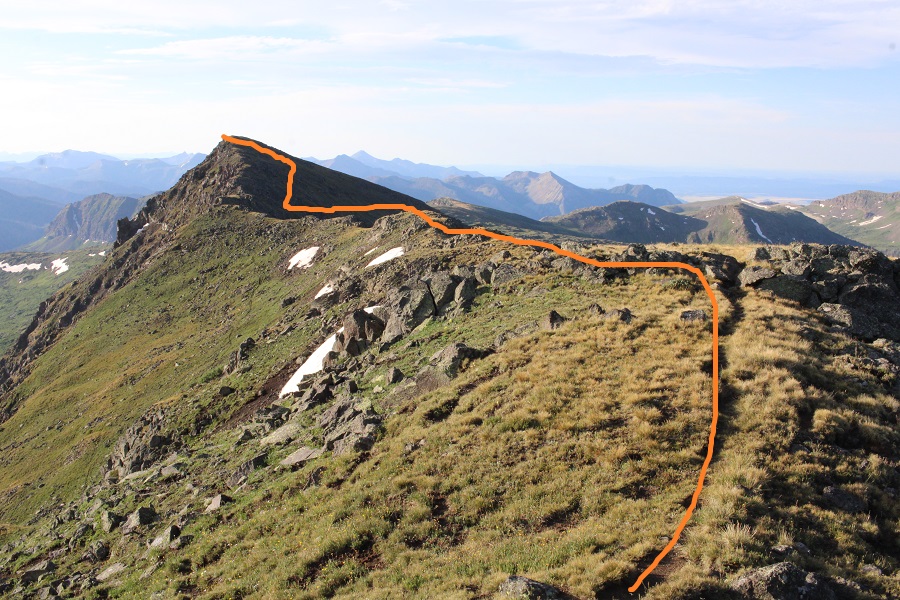
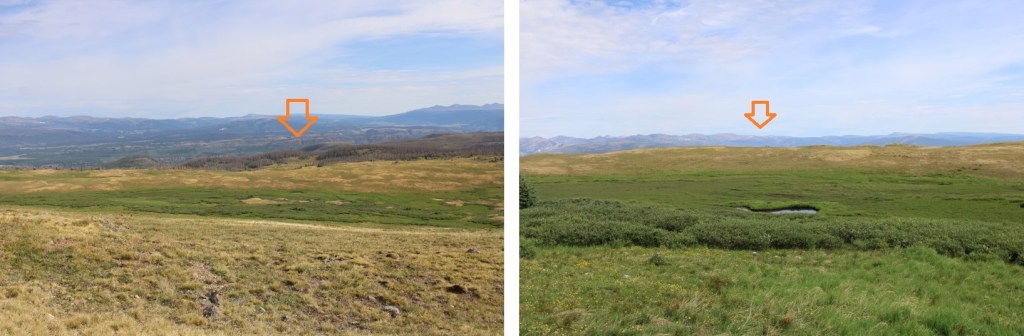
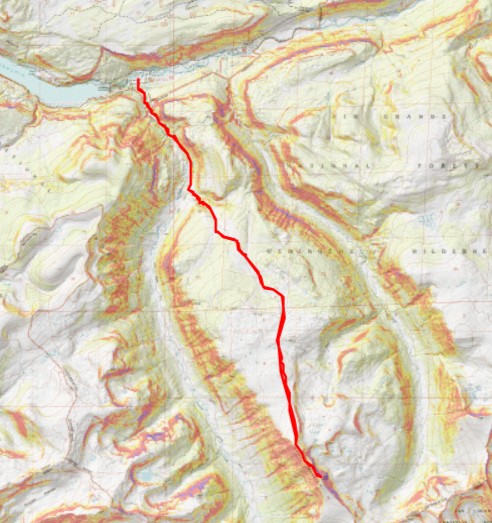
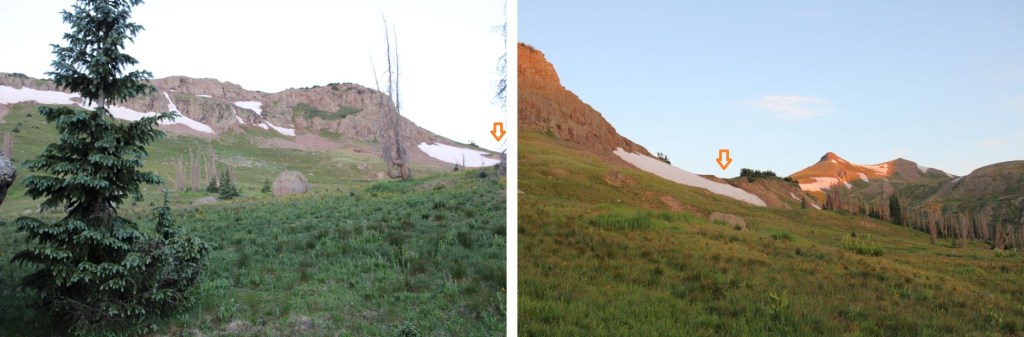
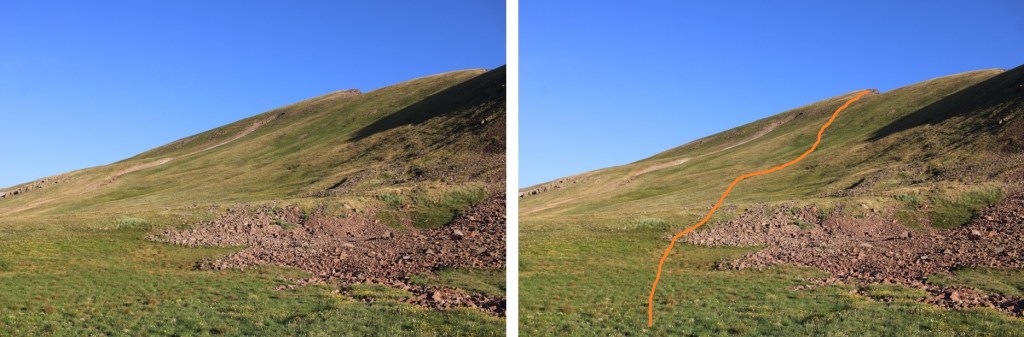
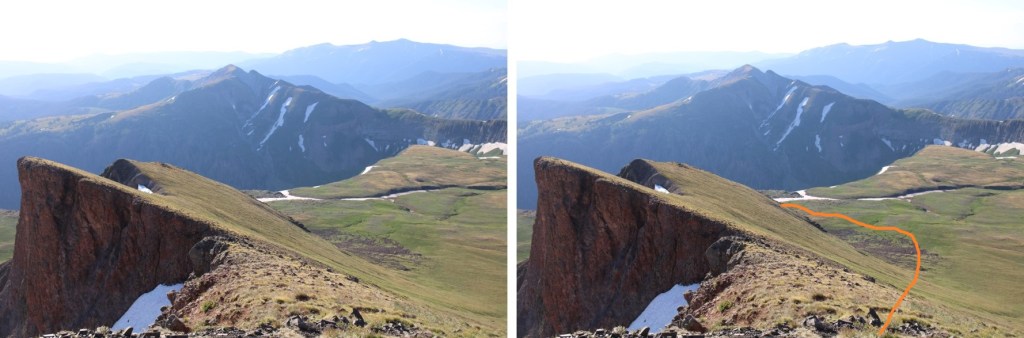
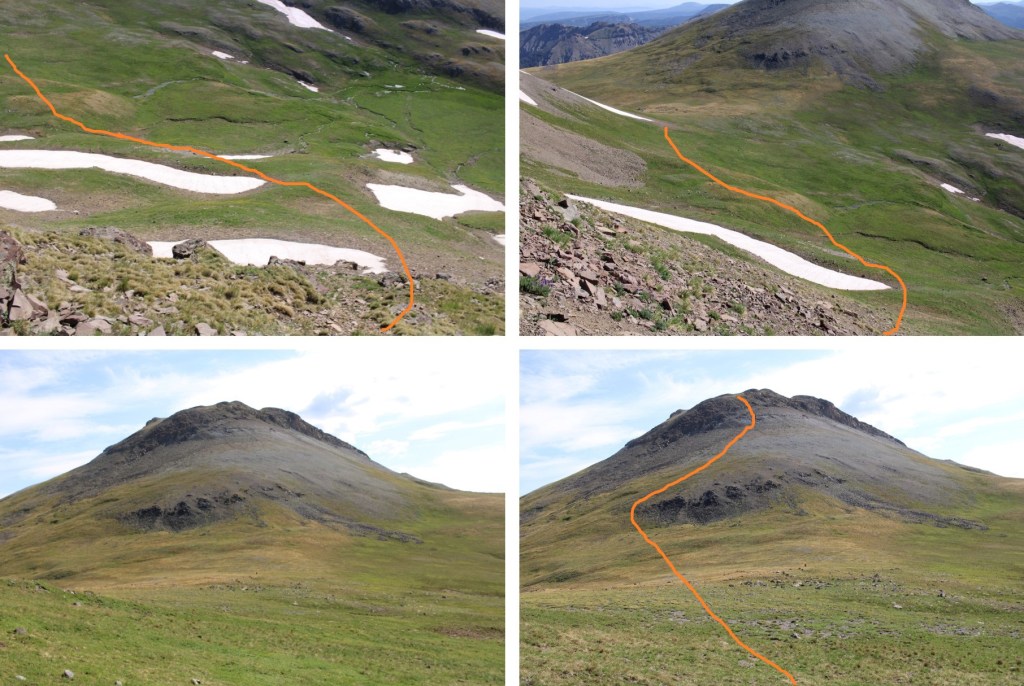
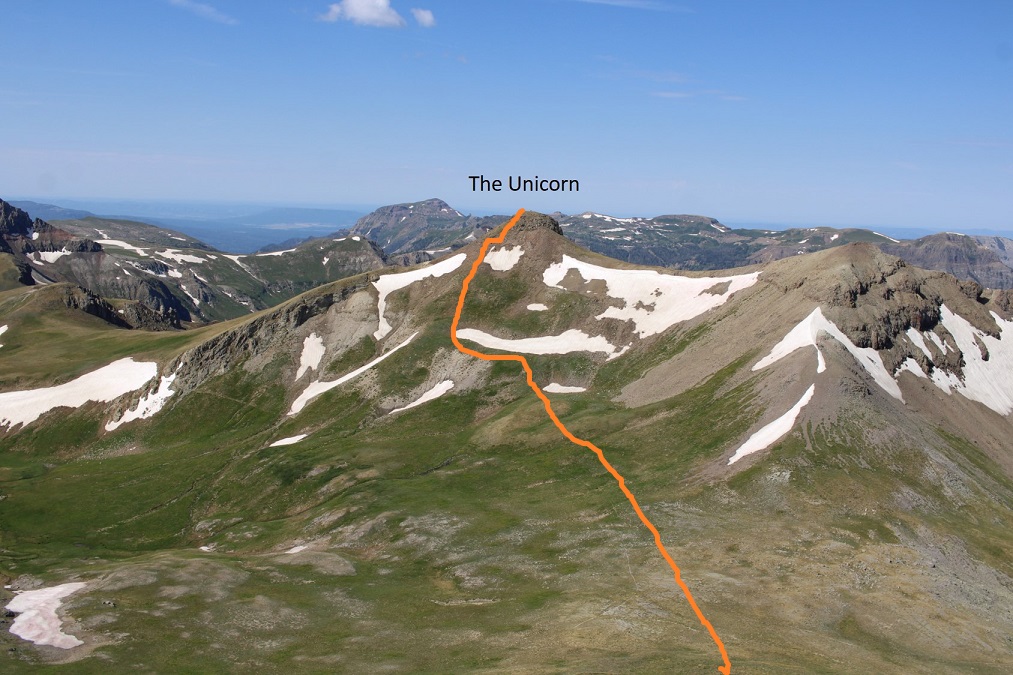
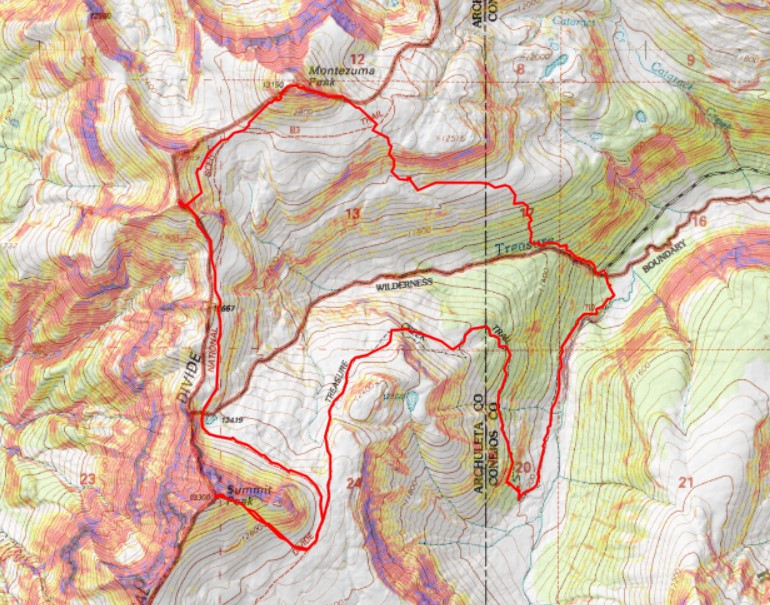
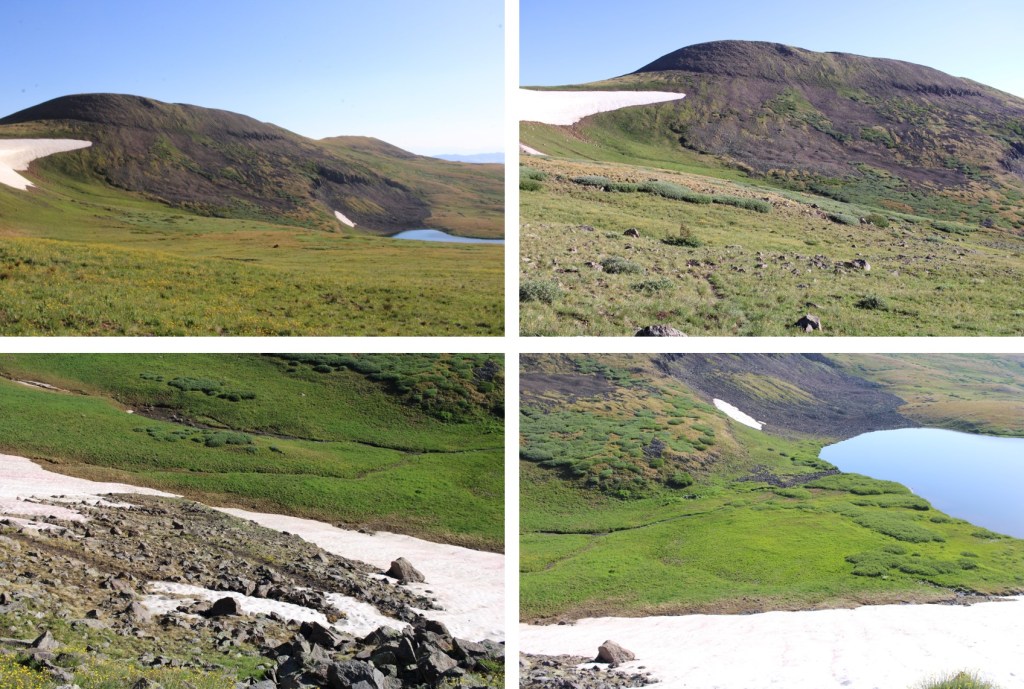
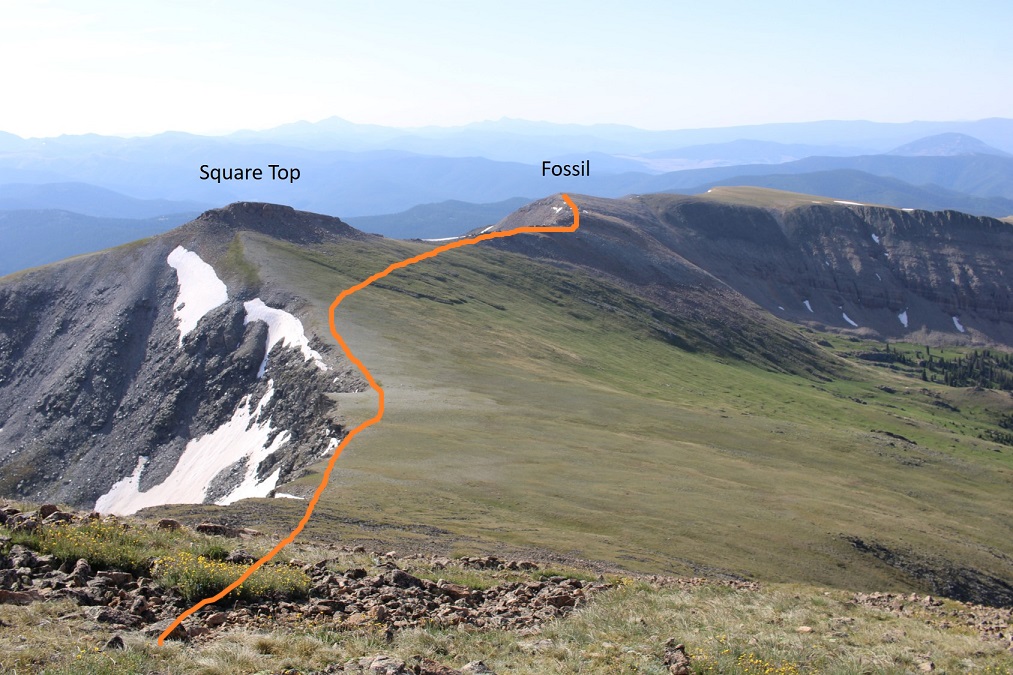
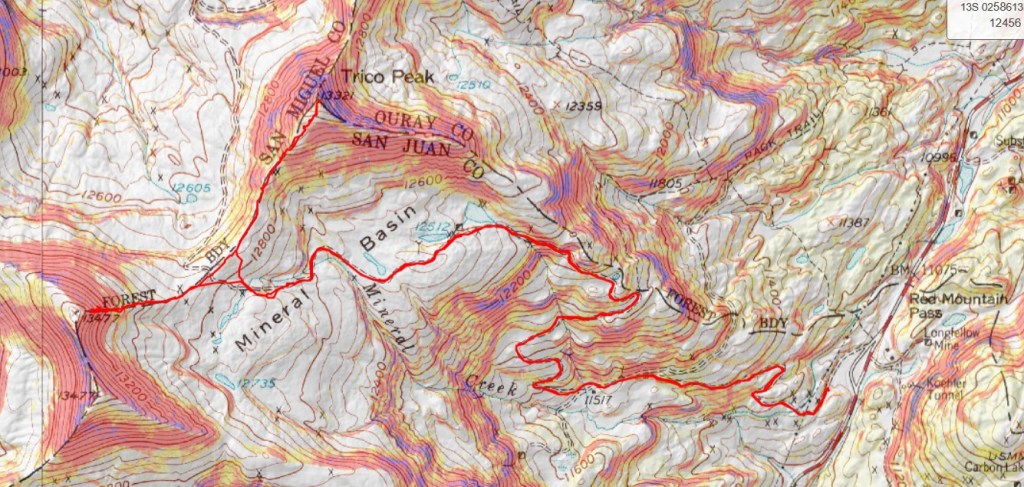
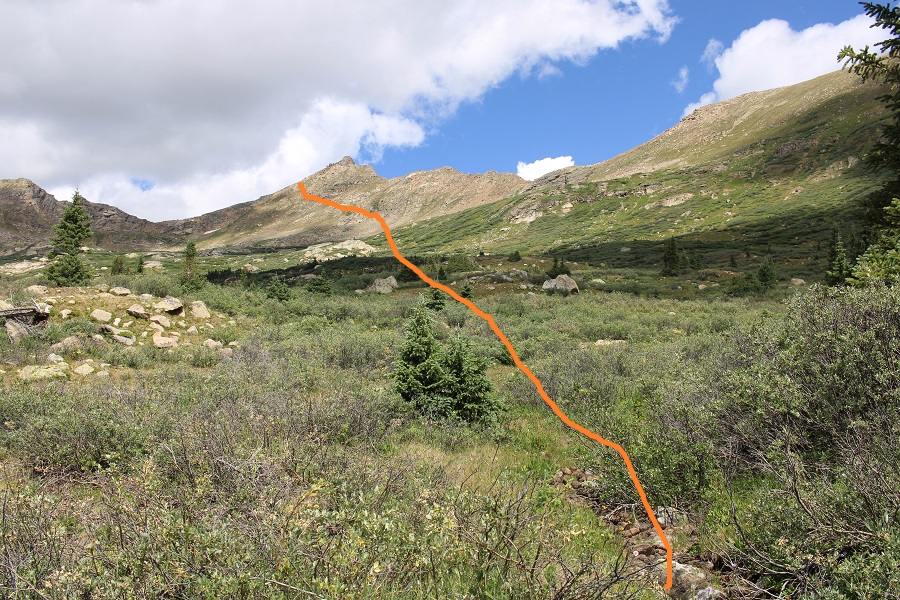
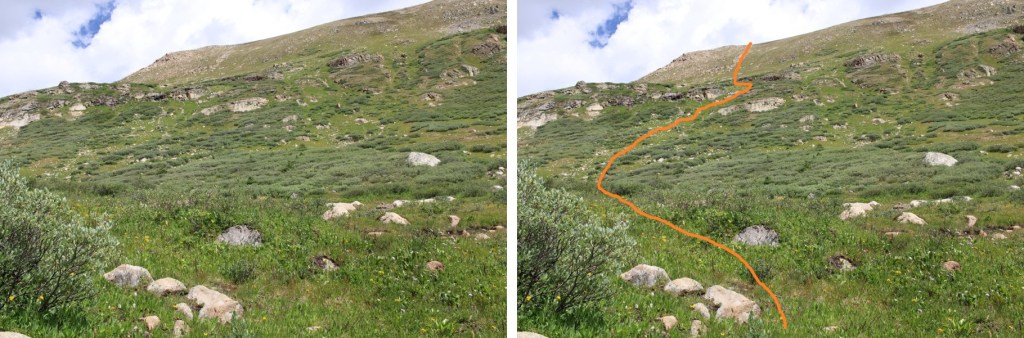
Here’s an overall view of my route to the ridge

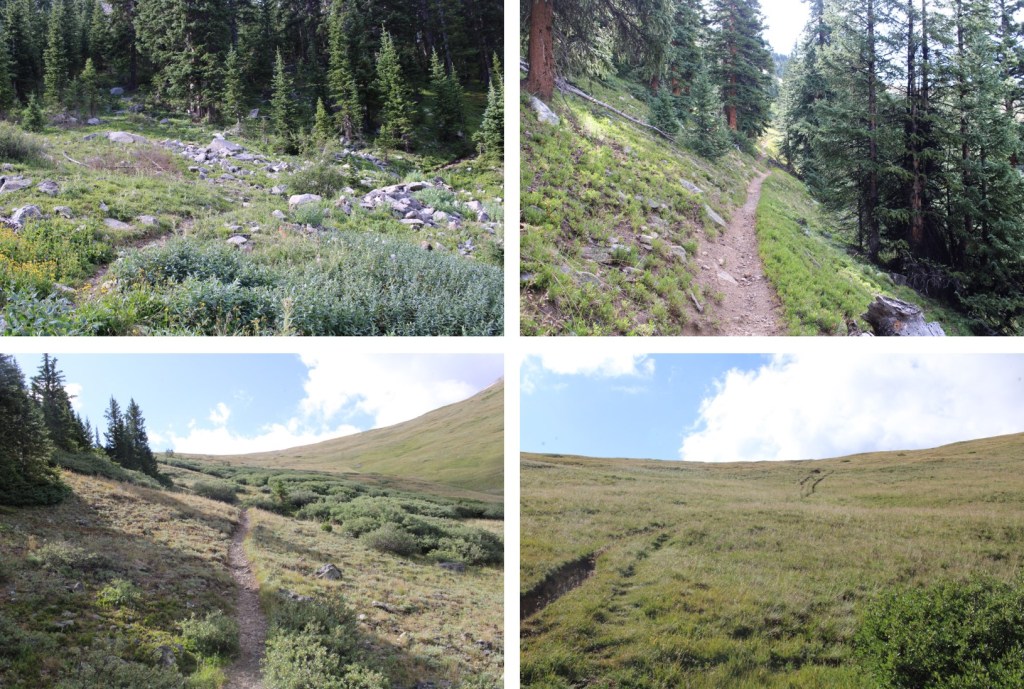
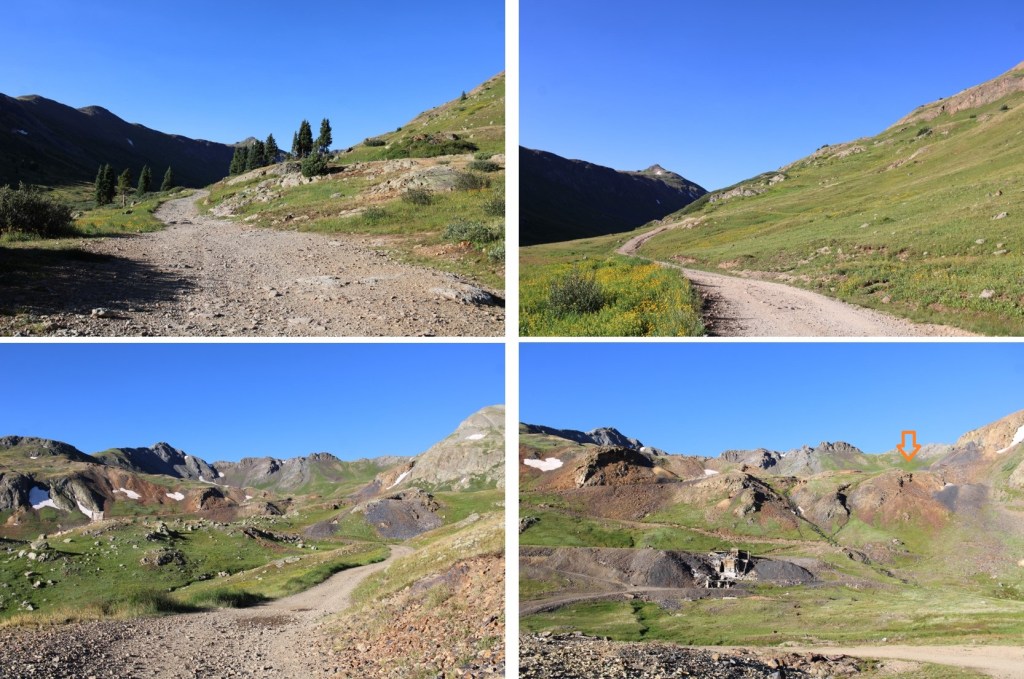
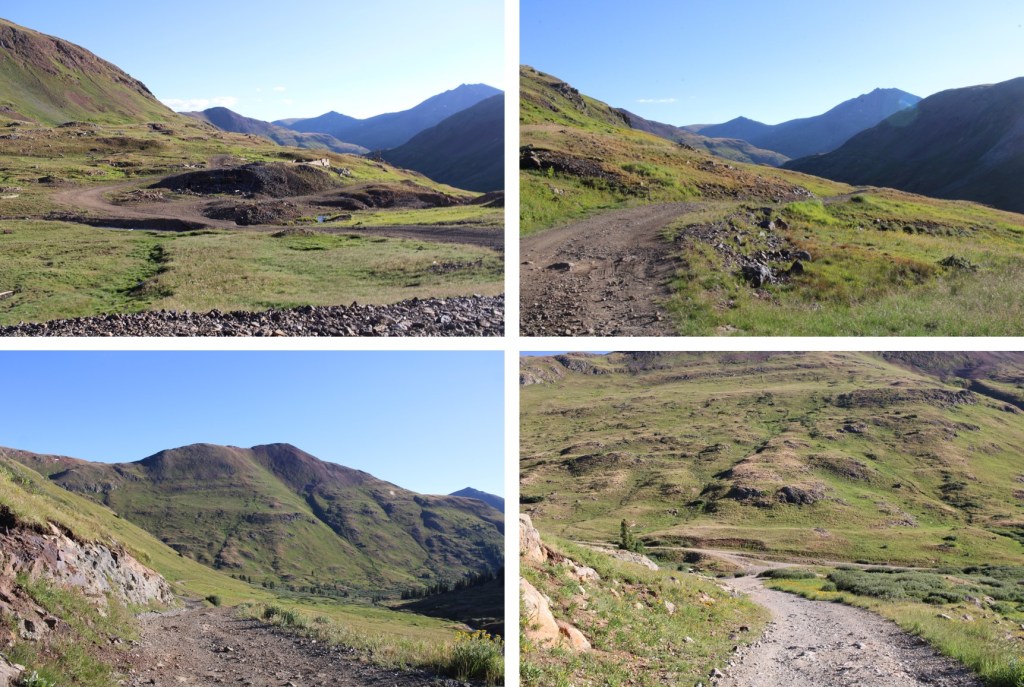
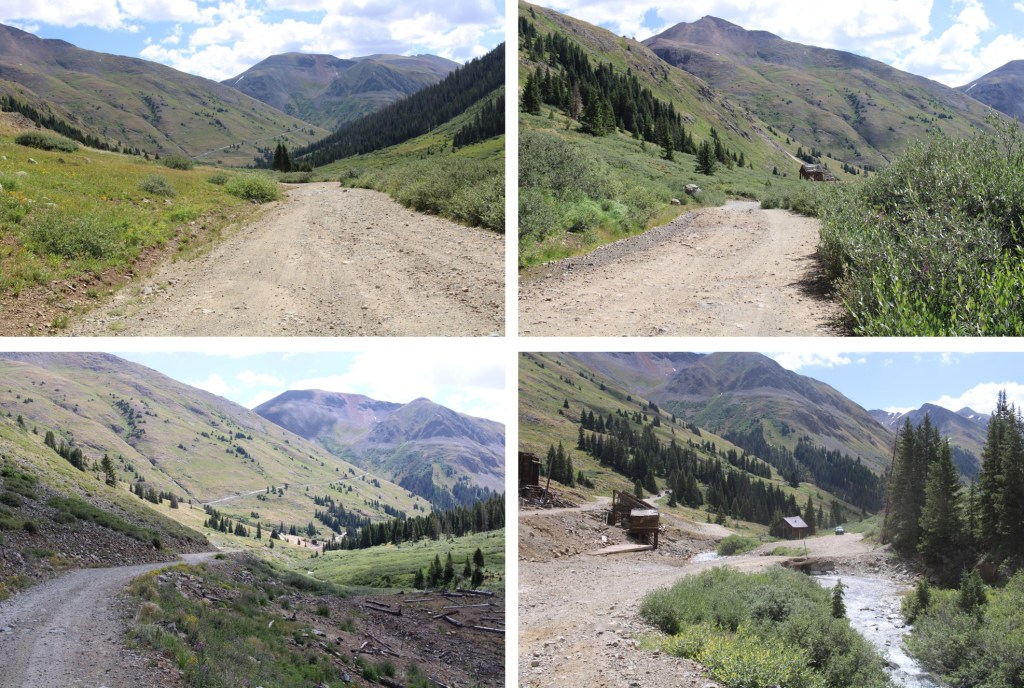
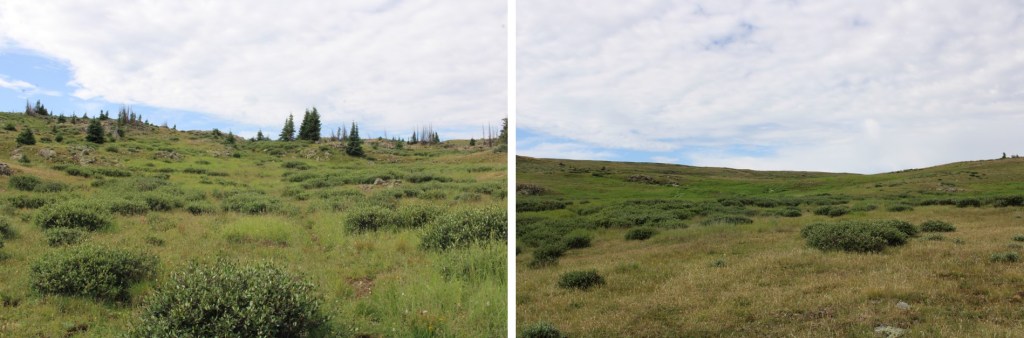
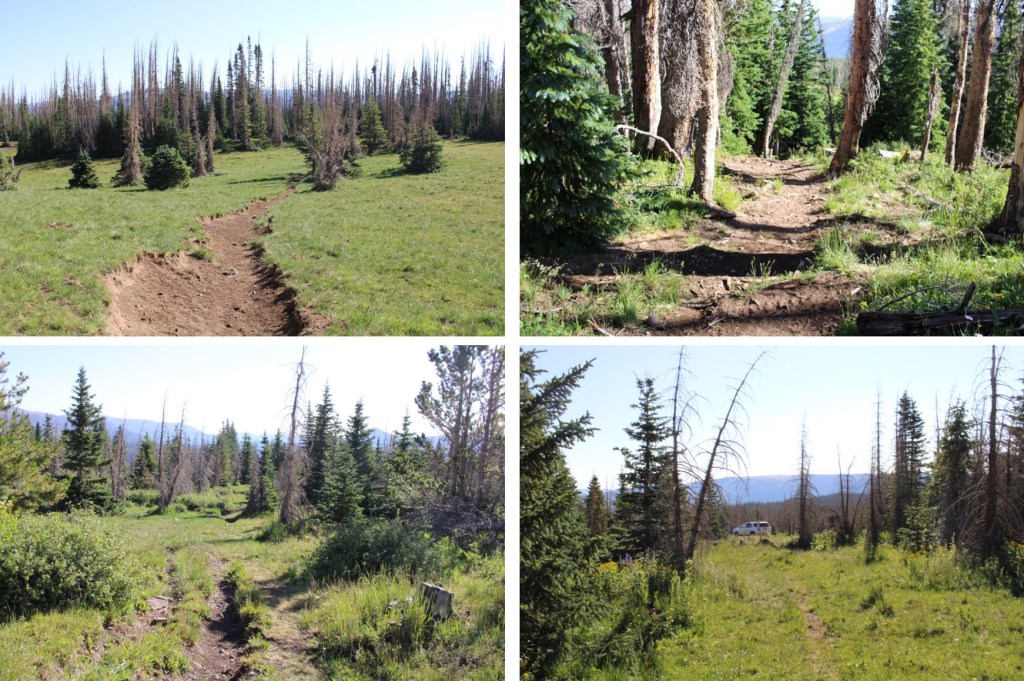
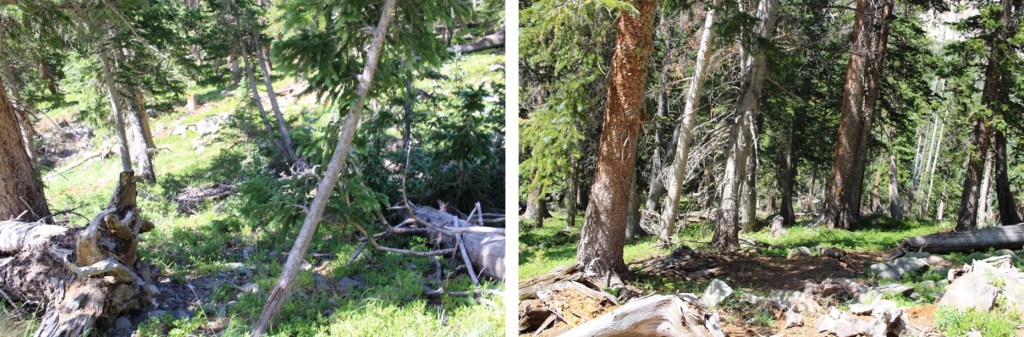
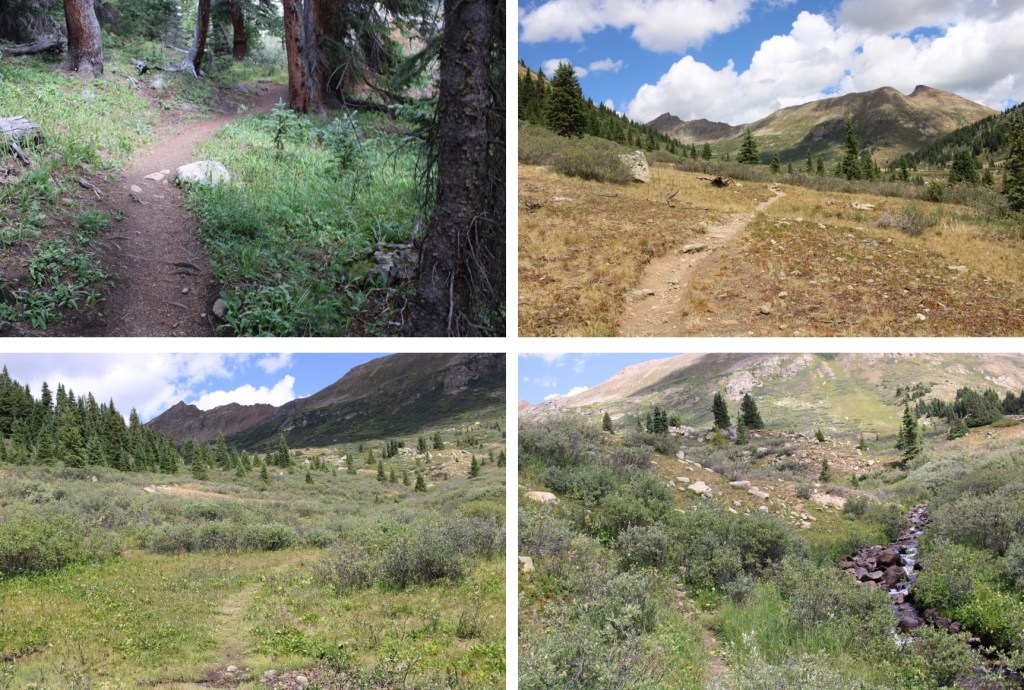
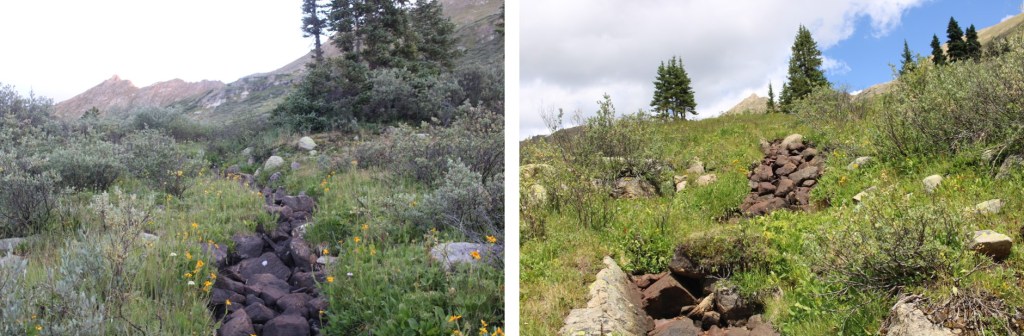
While there was no trail in the basin, I was easily able to follow dried up creek beds through the willows.  Staying on the dry rocks kept me mostly away from the willows, and became a great path to follow.

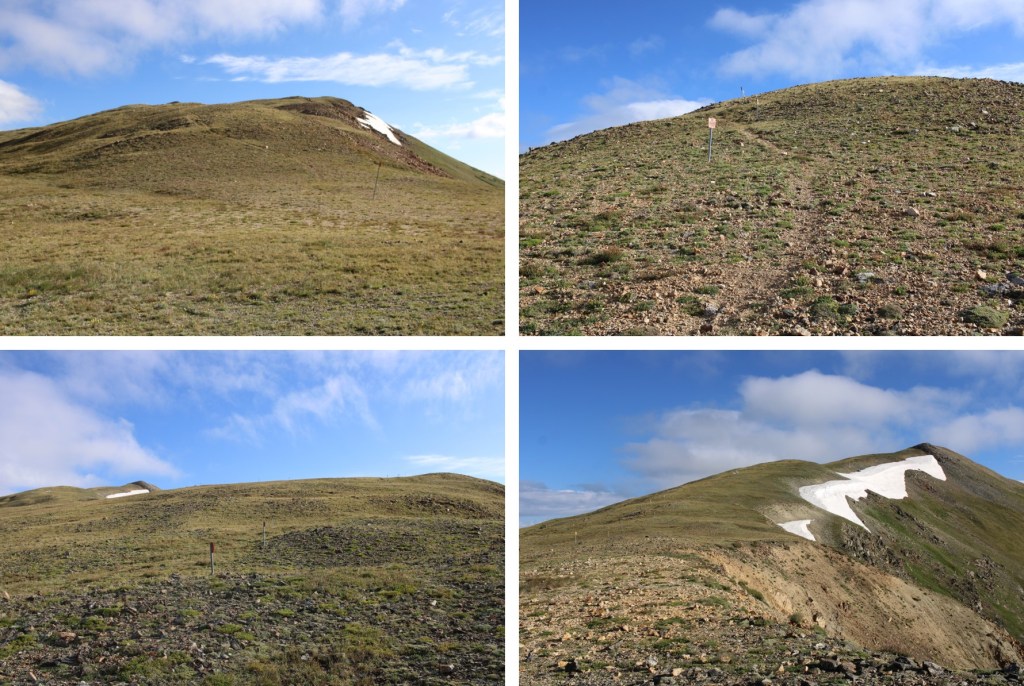
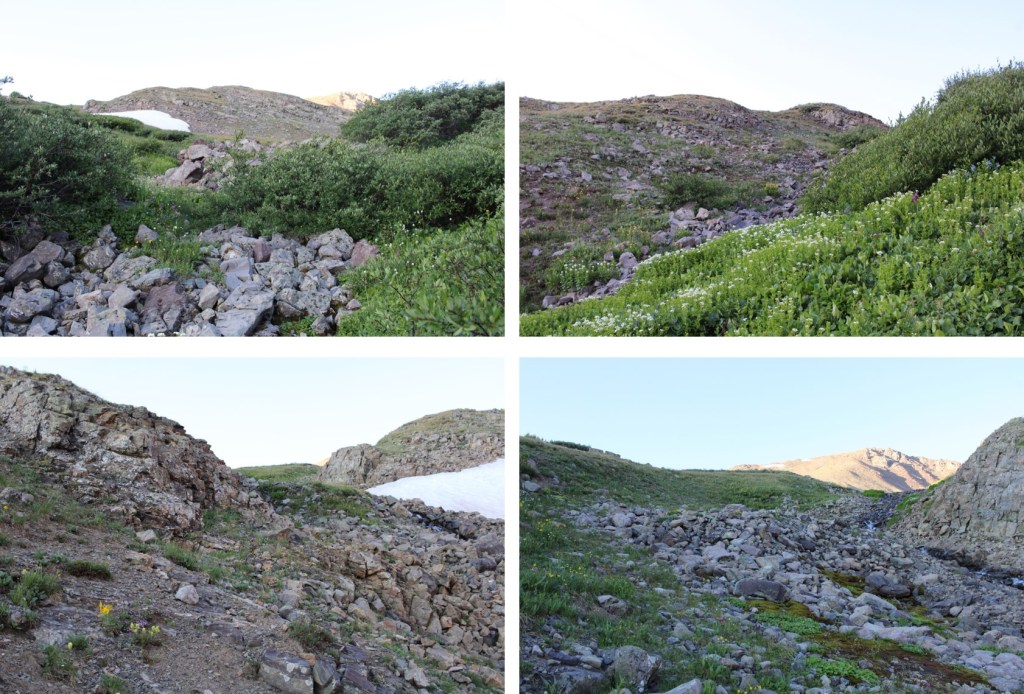
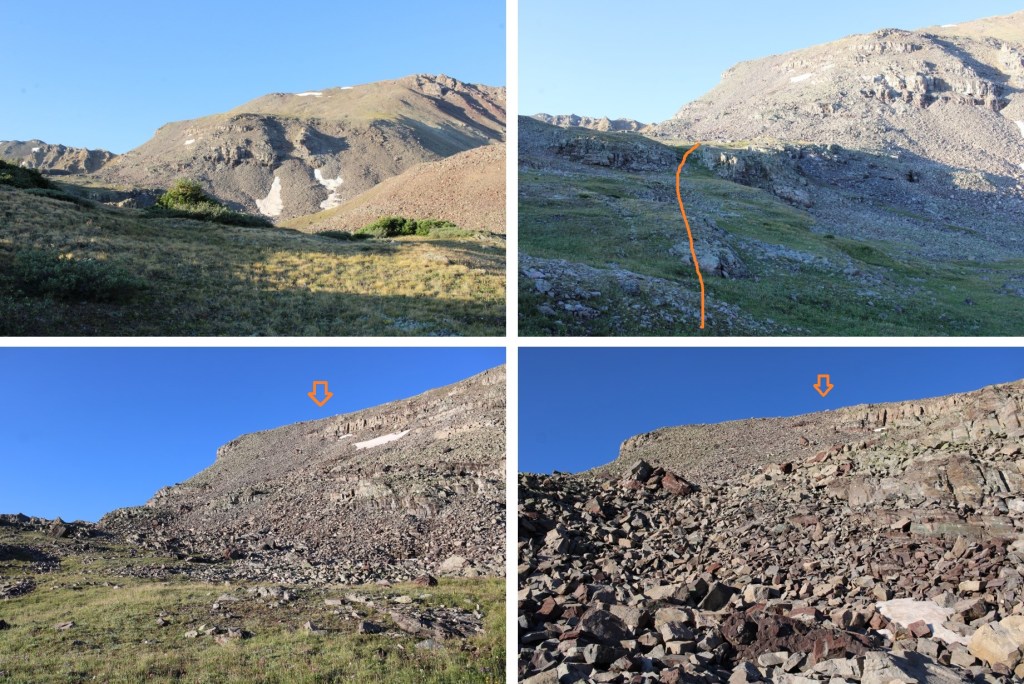
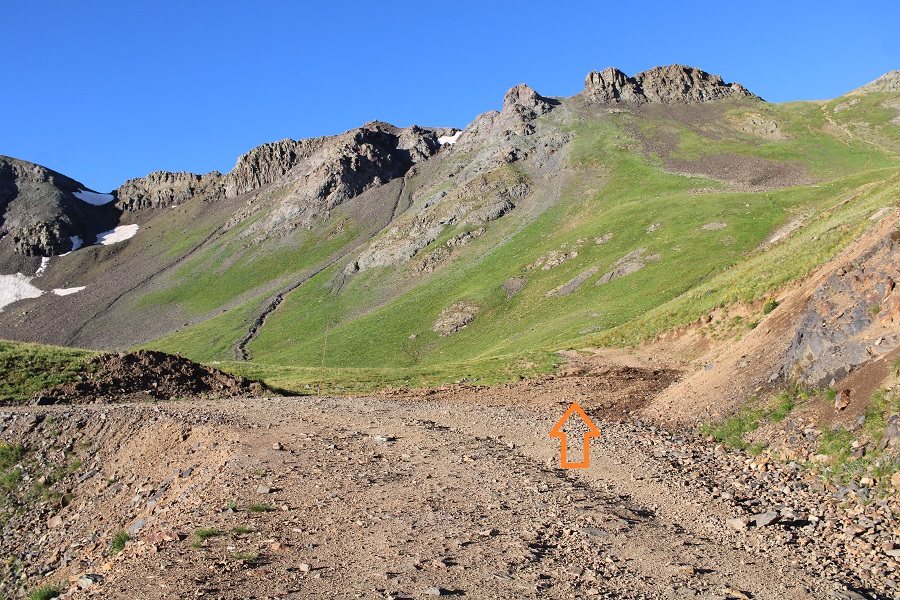
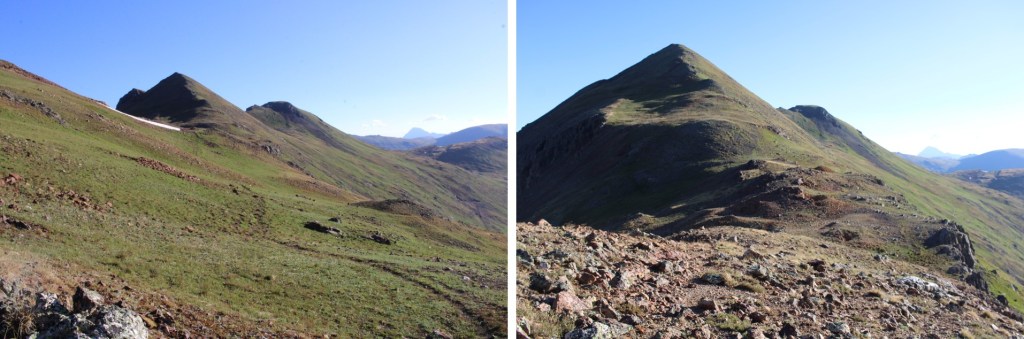
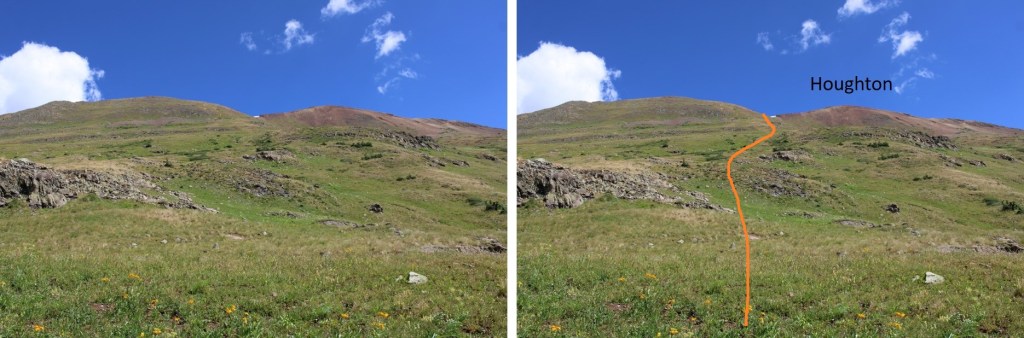
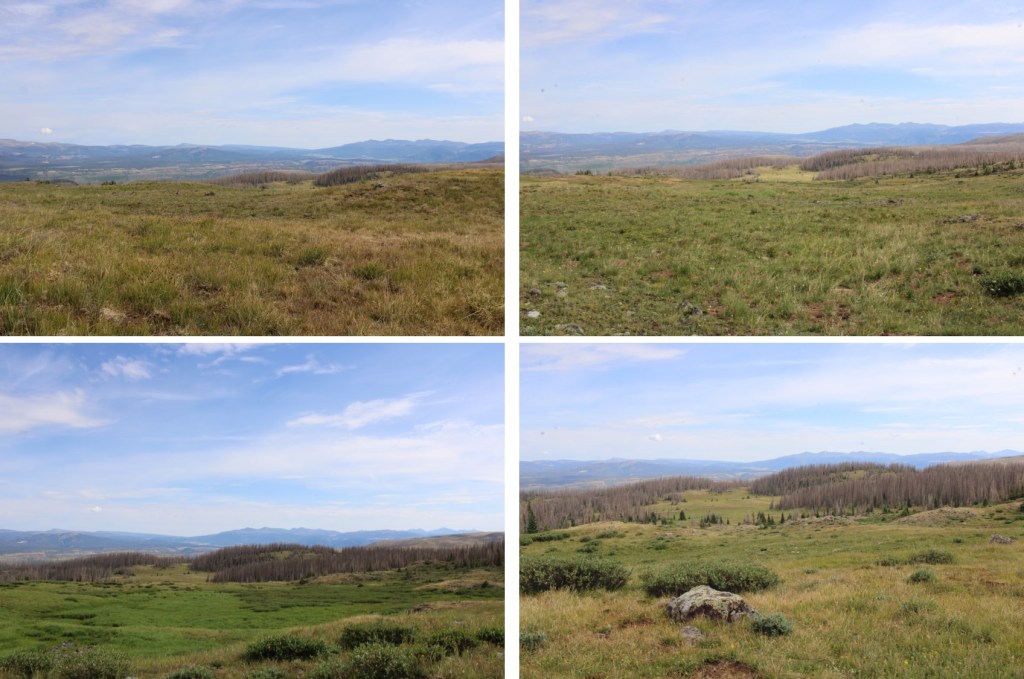
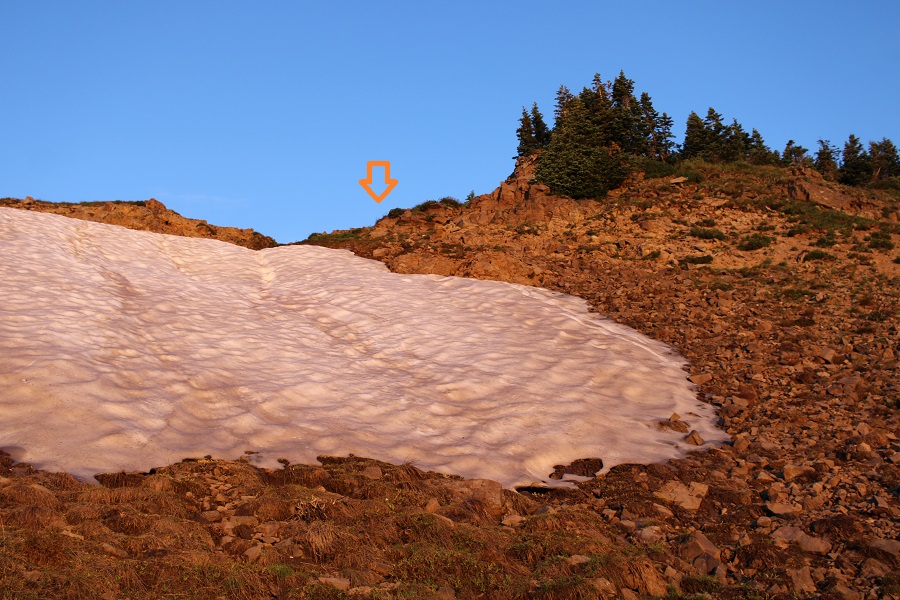
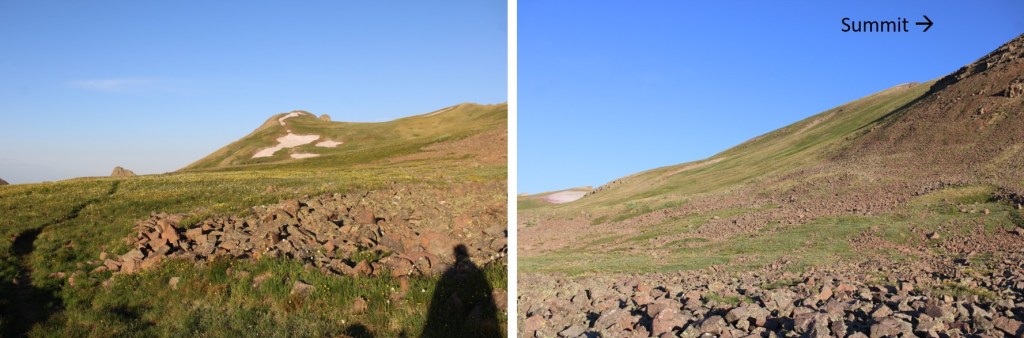
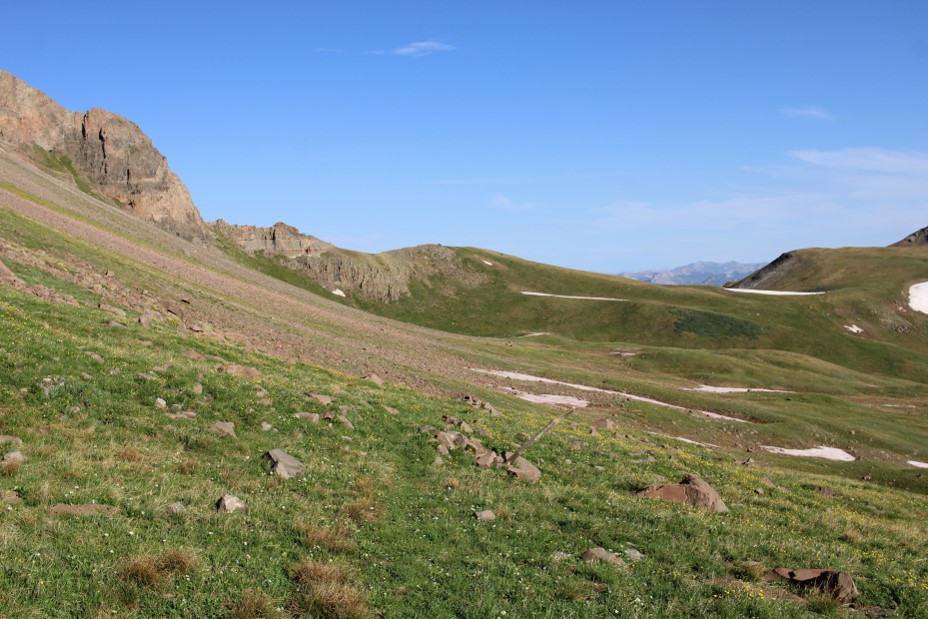
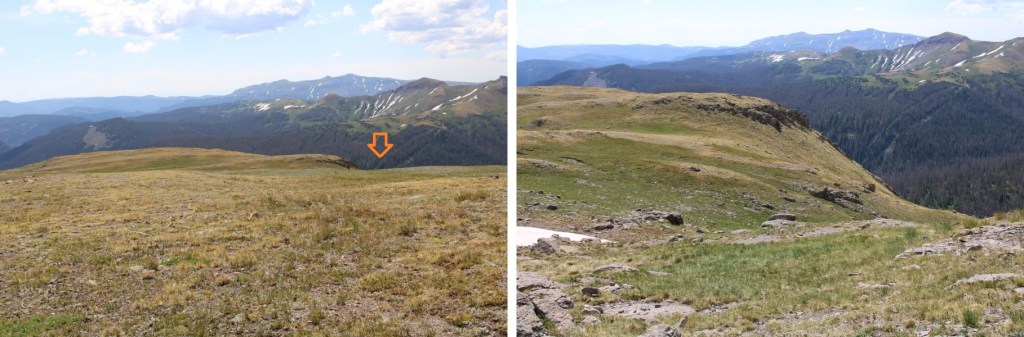
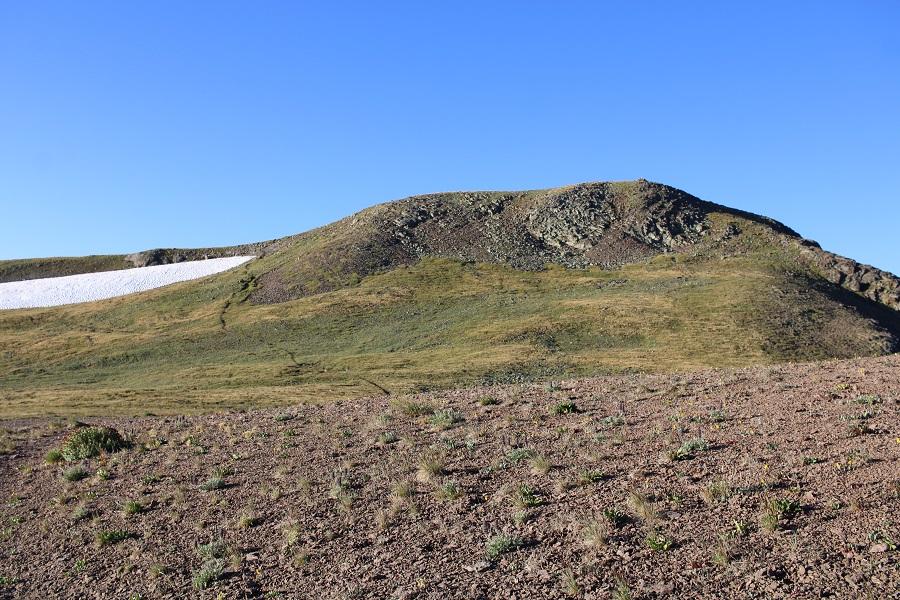
Once I got past the willows, I aimed for the ridge.  Specifically, this boulder first.

After making it to the boulder, a game trail picked up and took me to the ridge

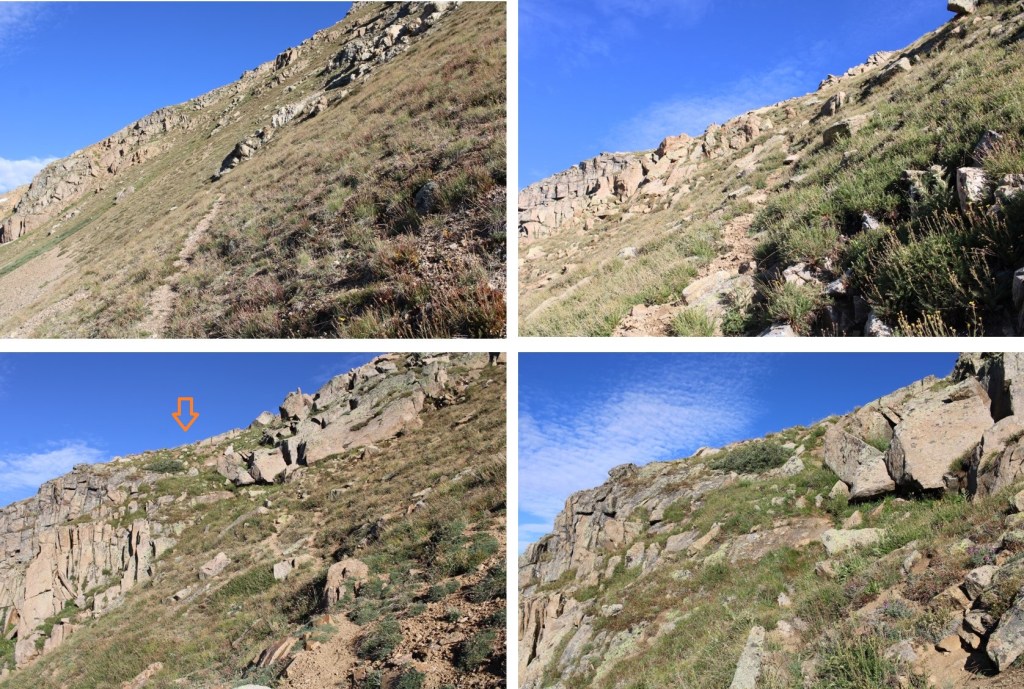
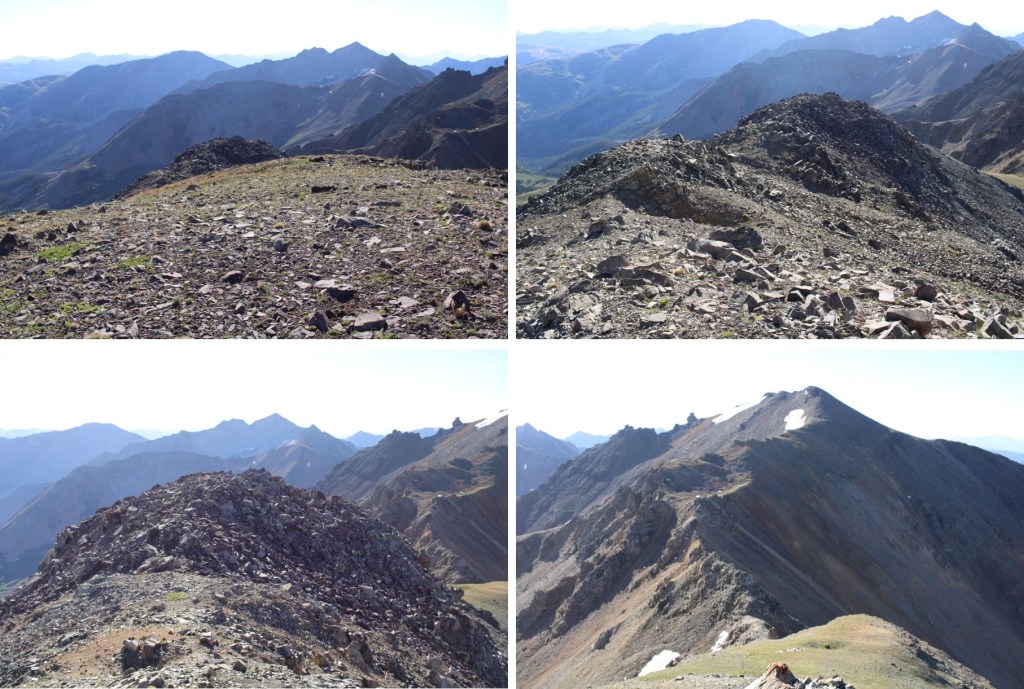
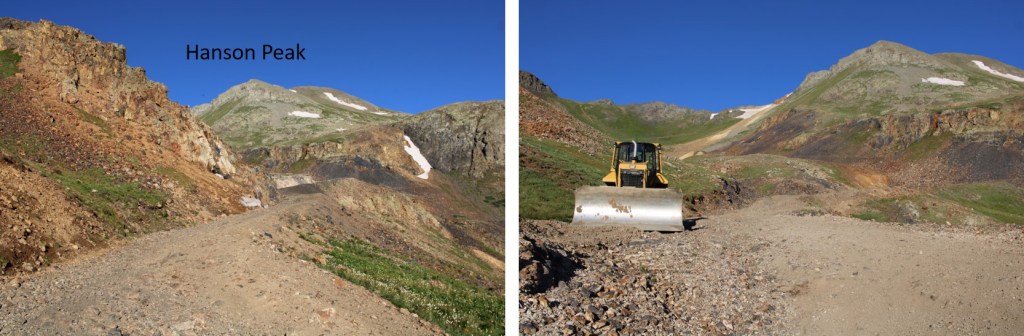
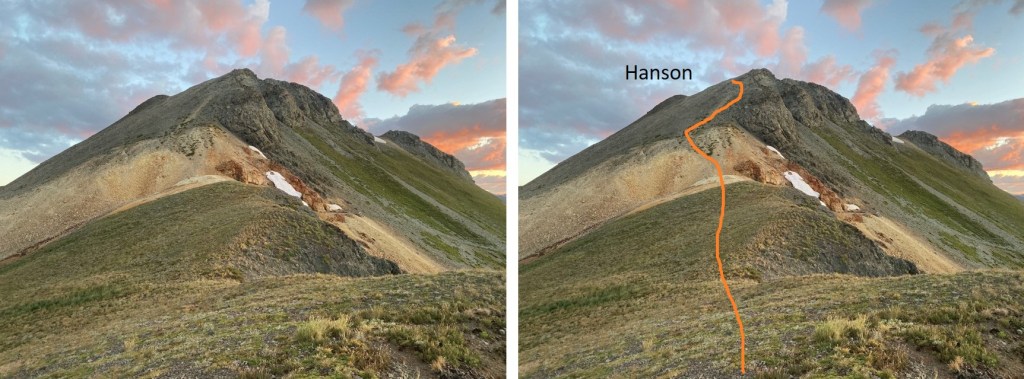
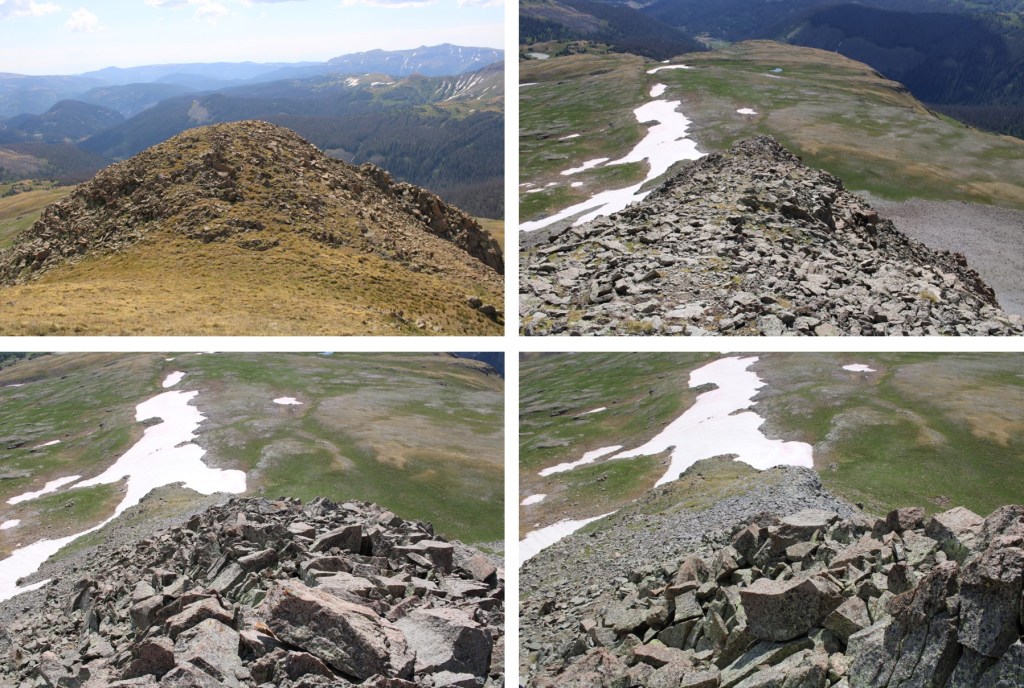
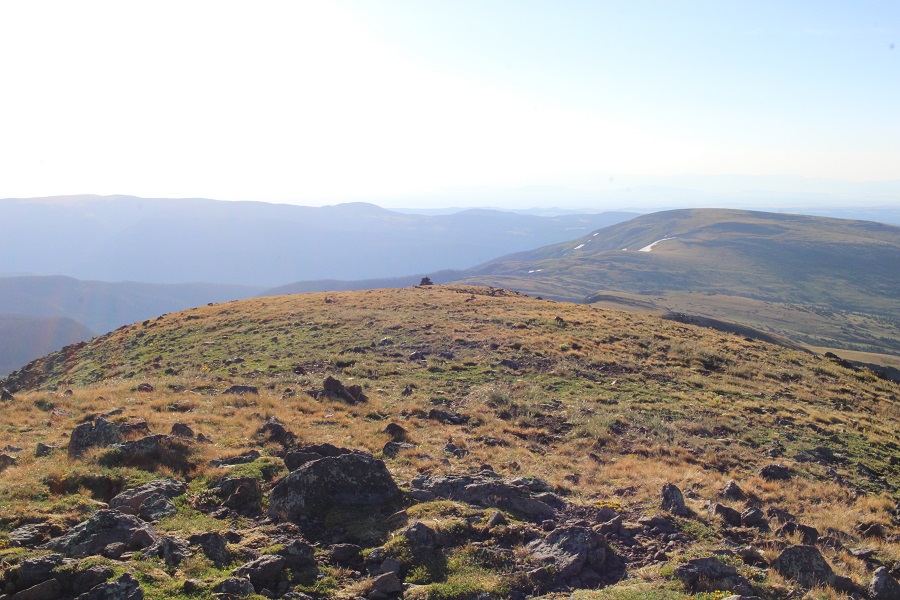
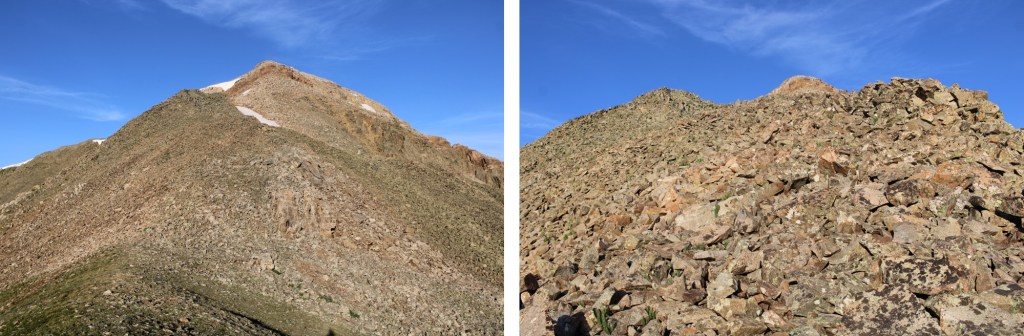
Once making it to the ridge, I turned right, and followed it northeast to the summit.  This was all class 2.

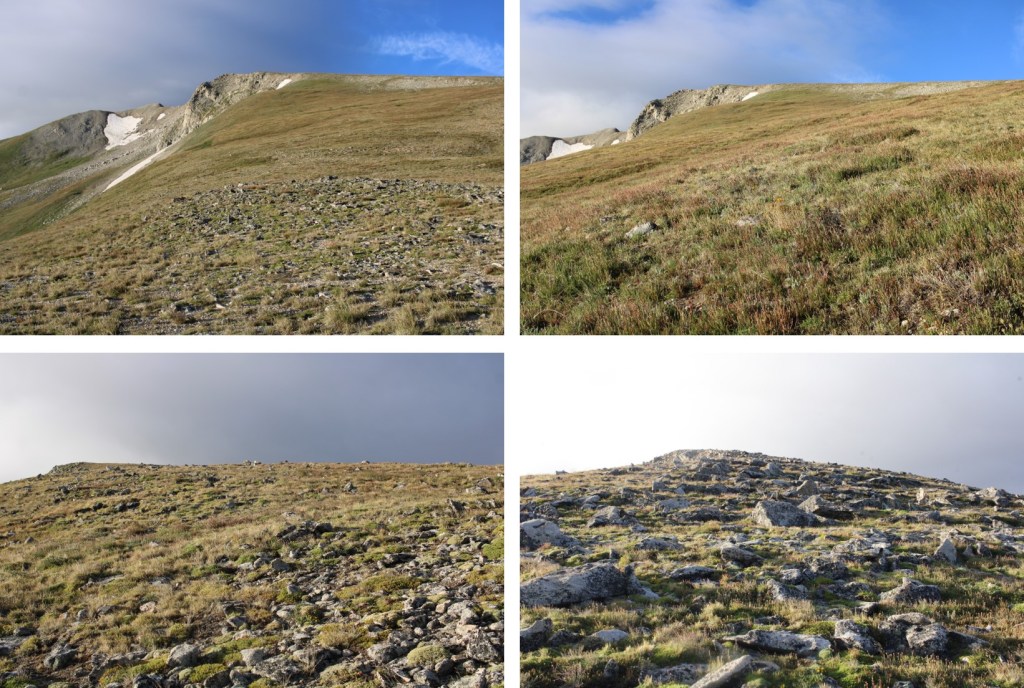
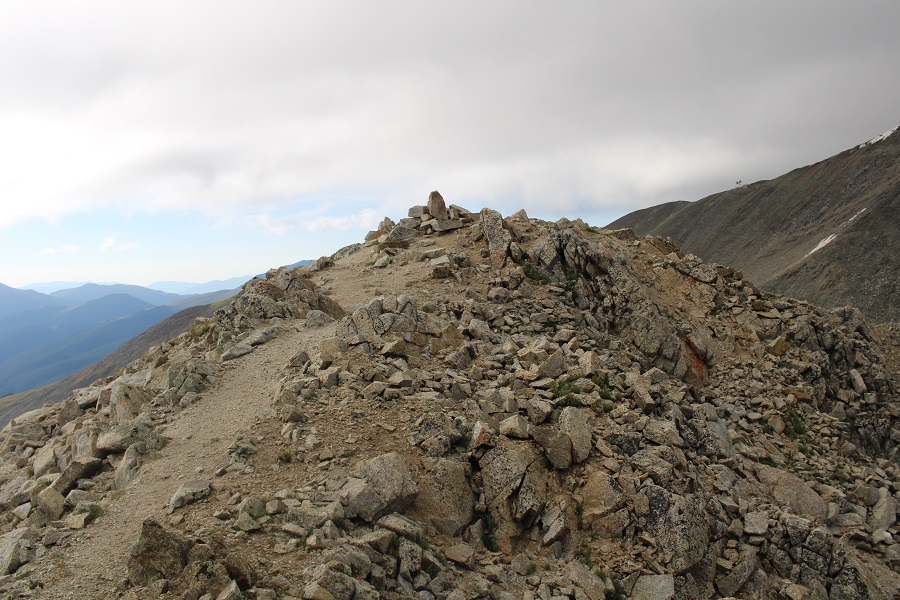
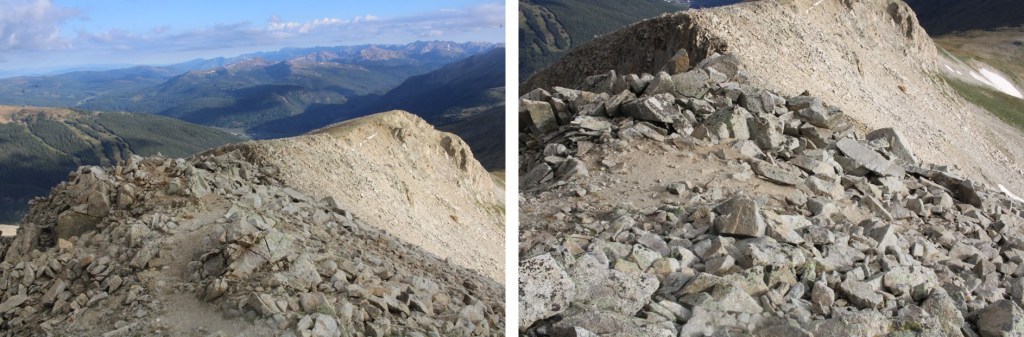
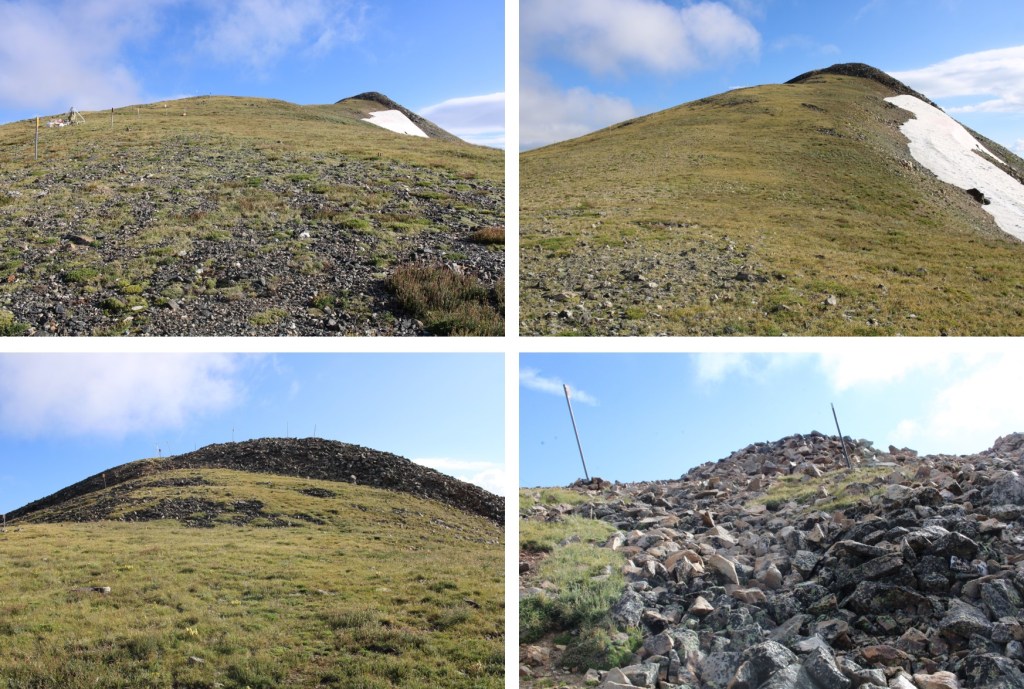
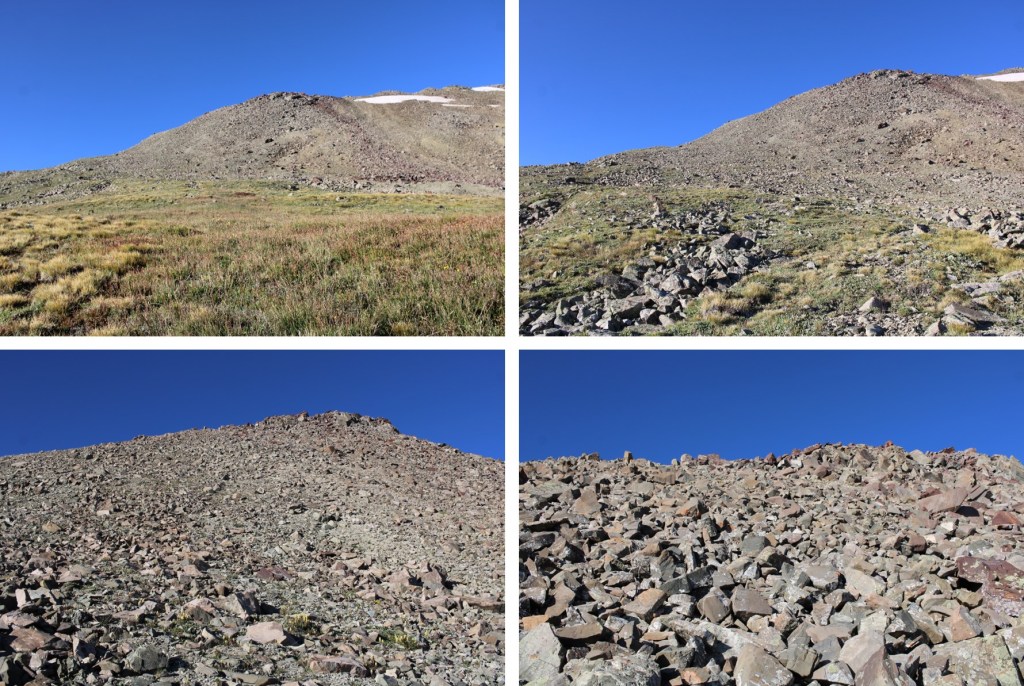
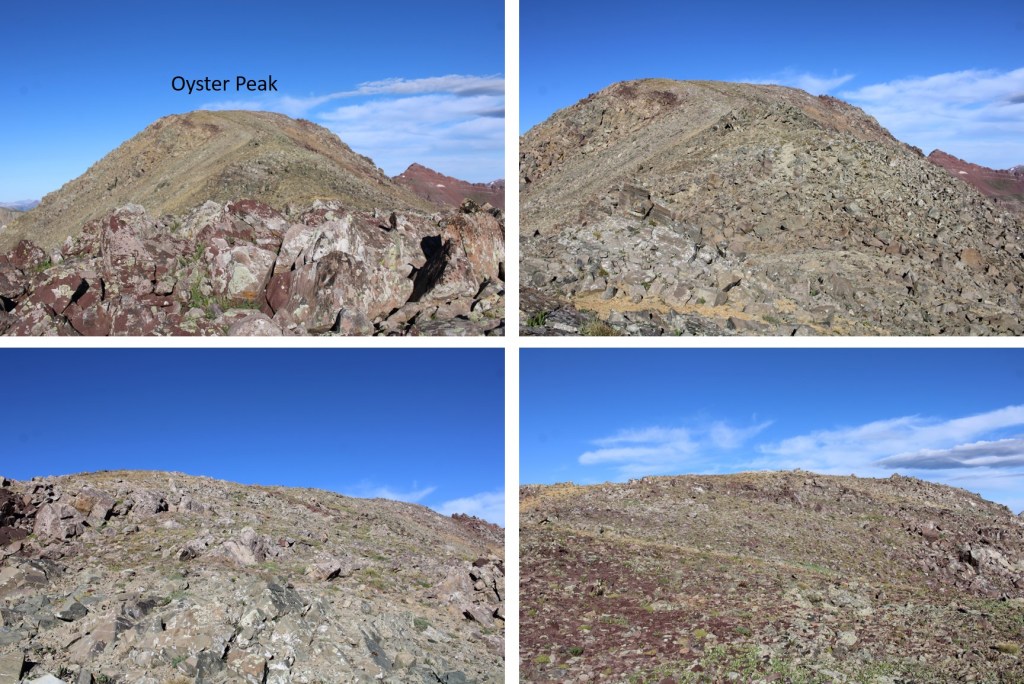
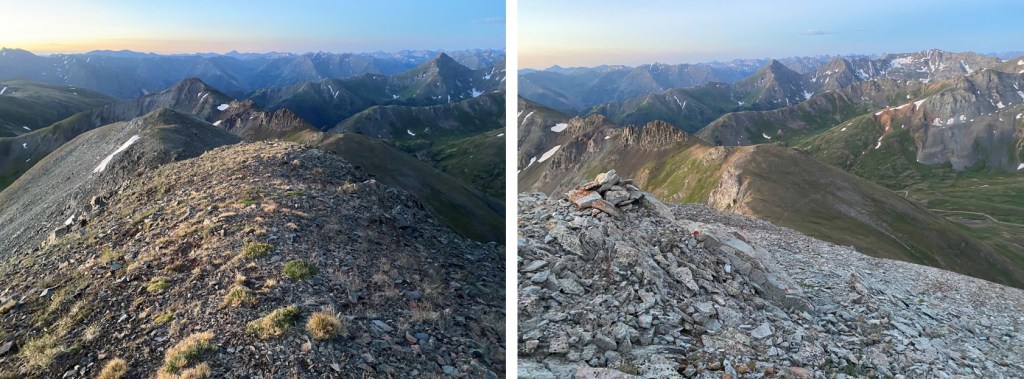
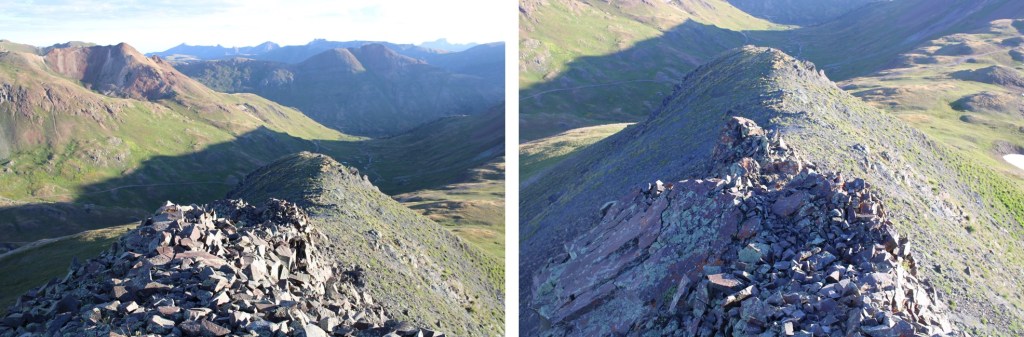
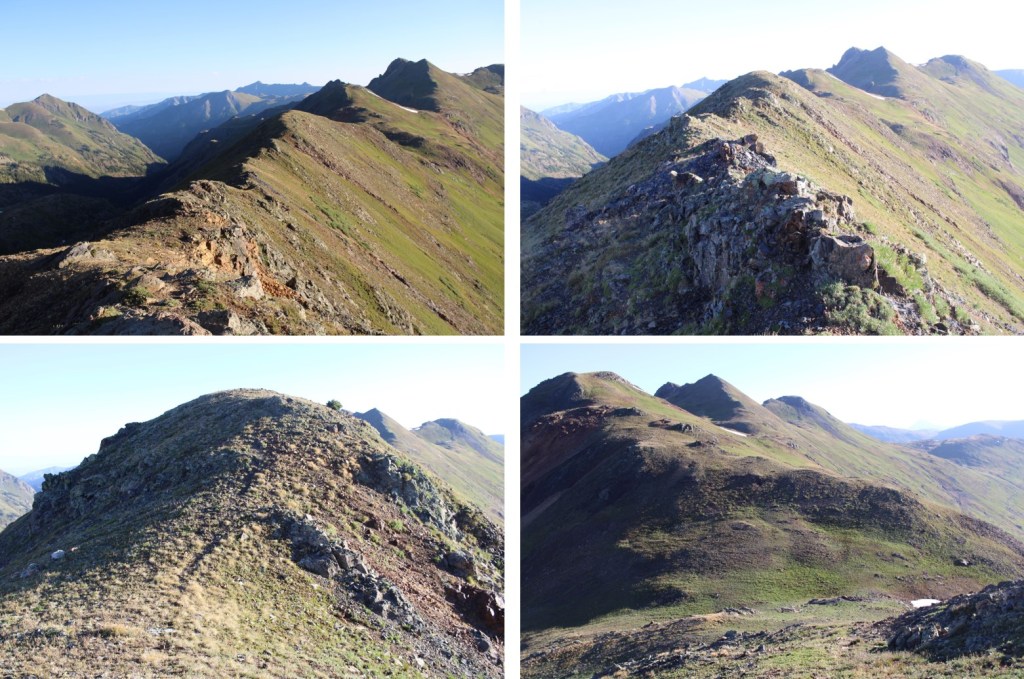
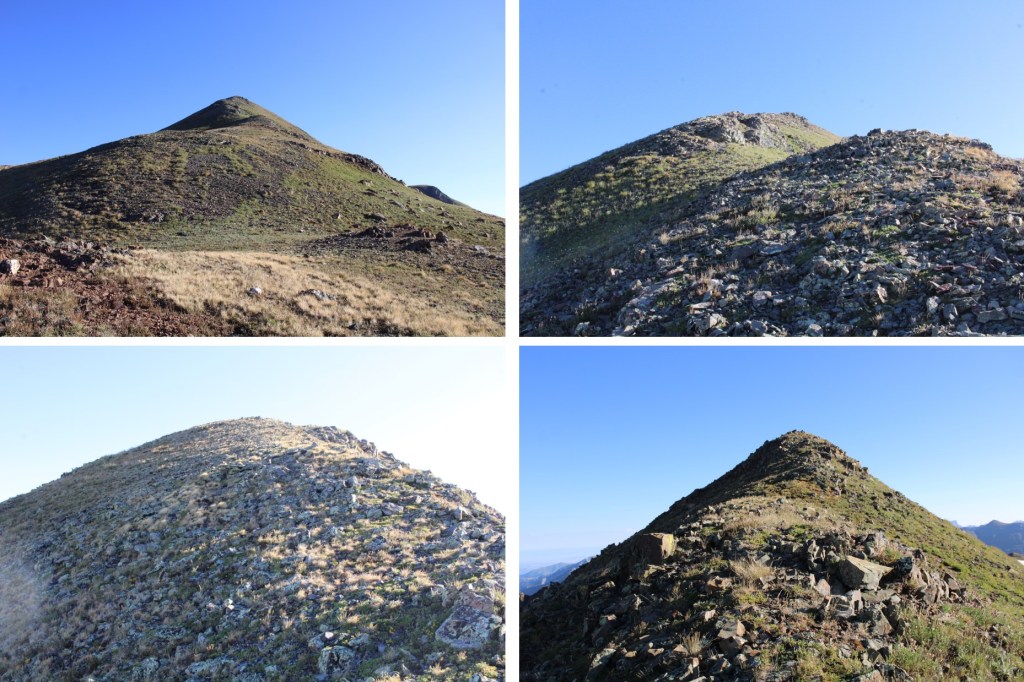
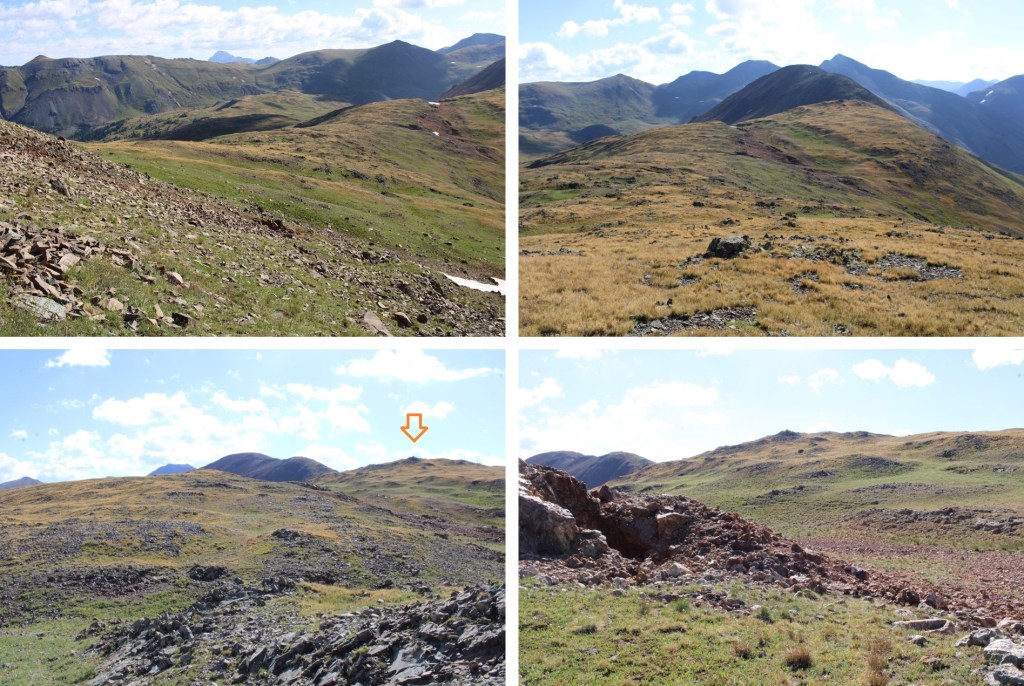
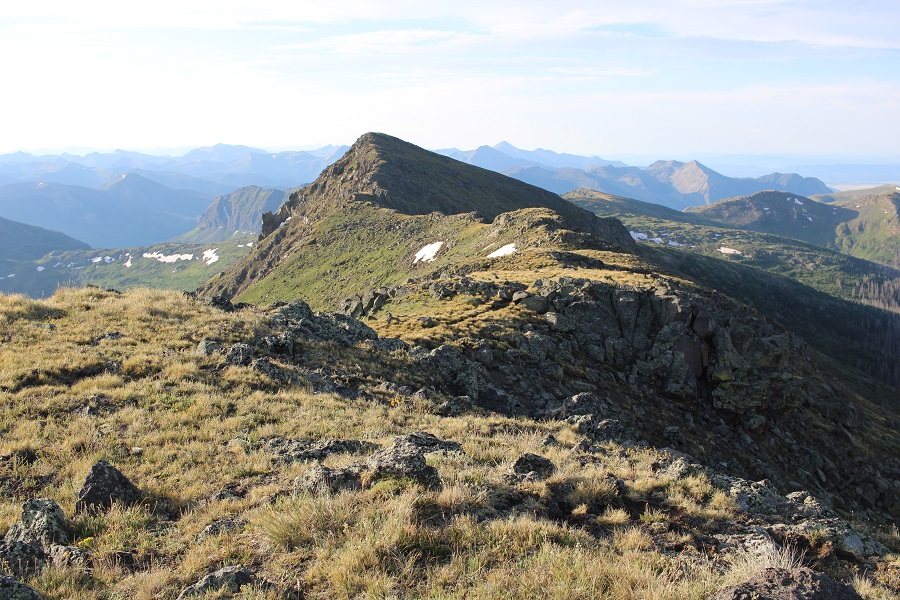
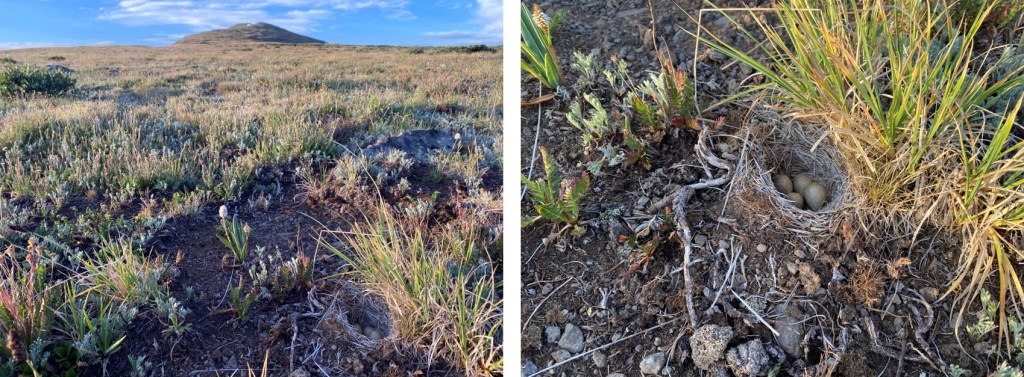
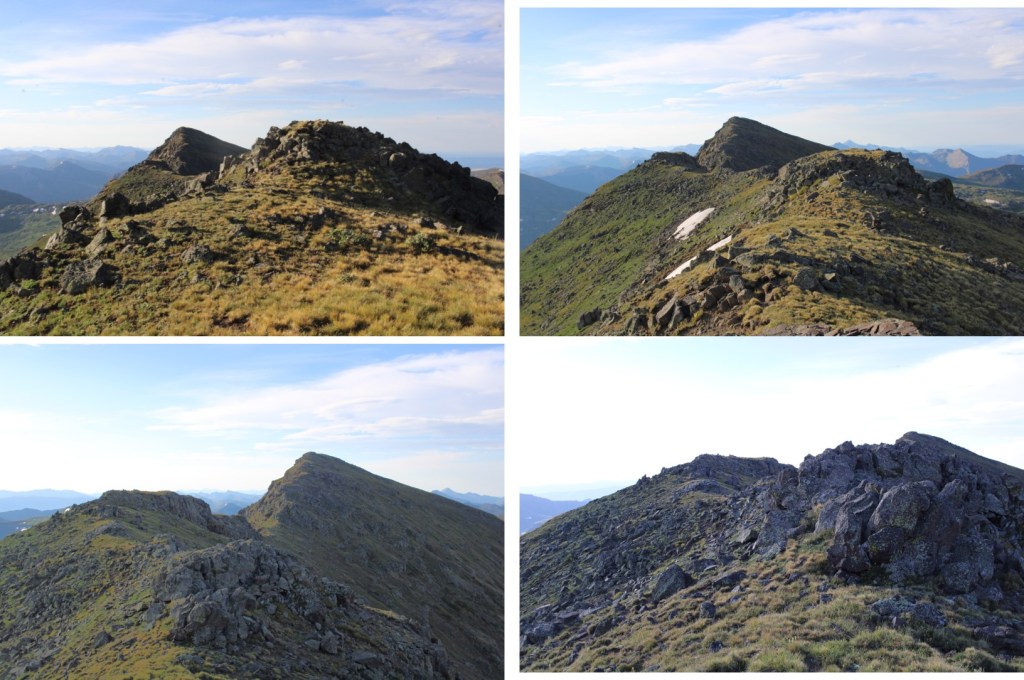
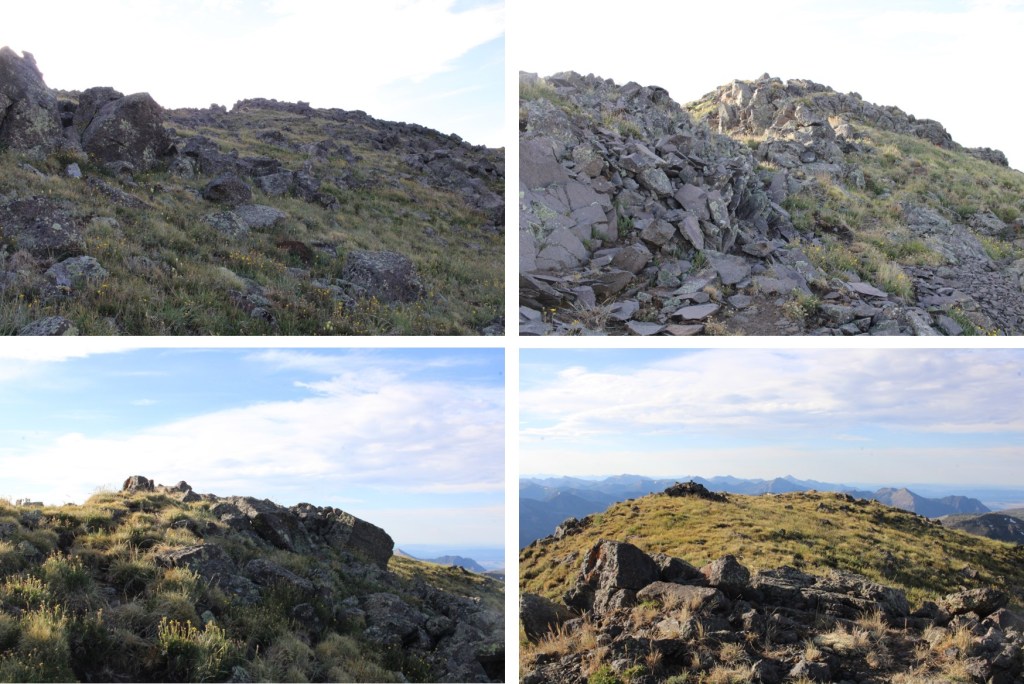
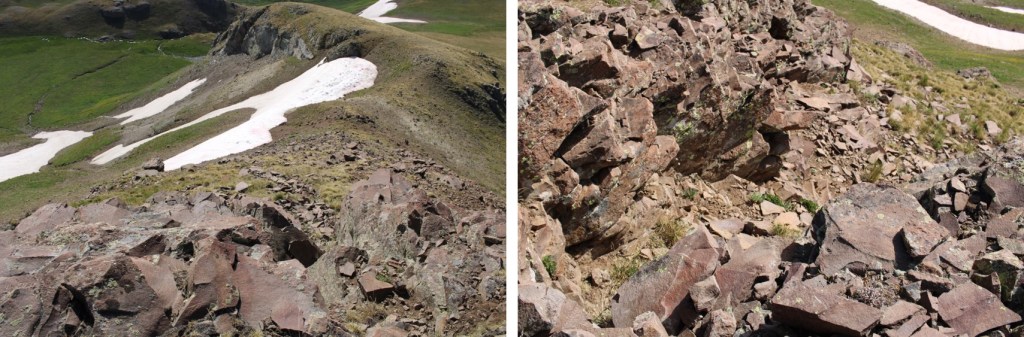
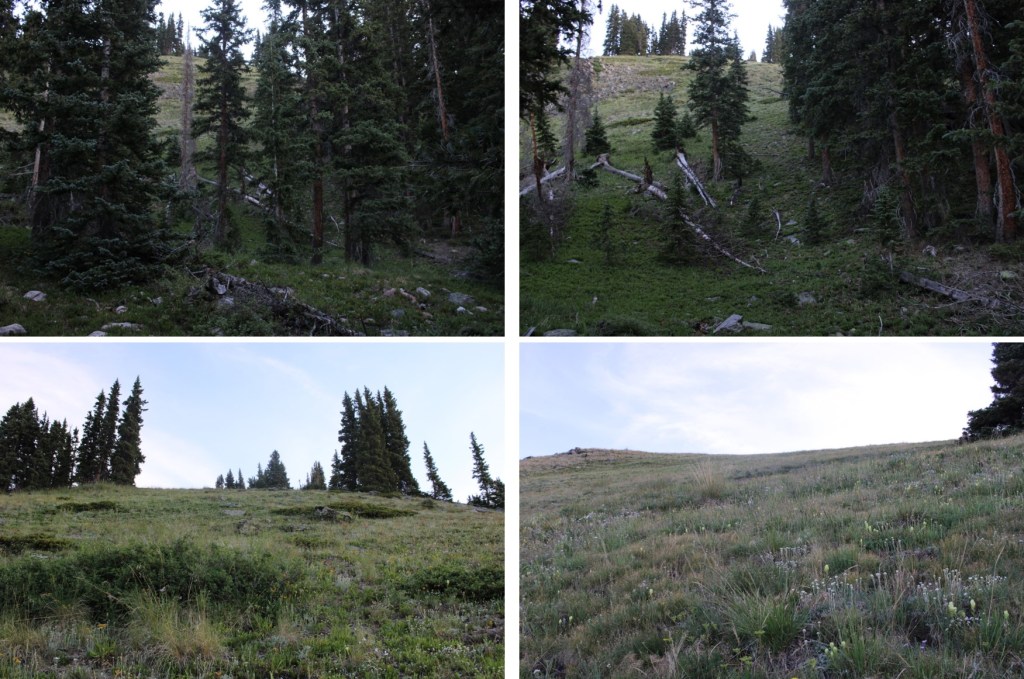
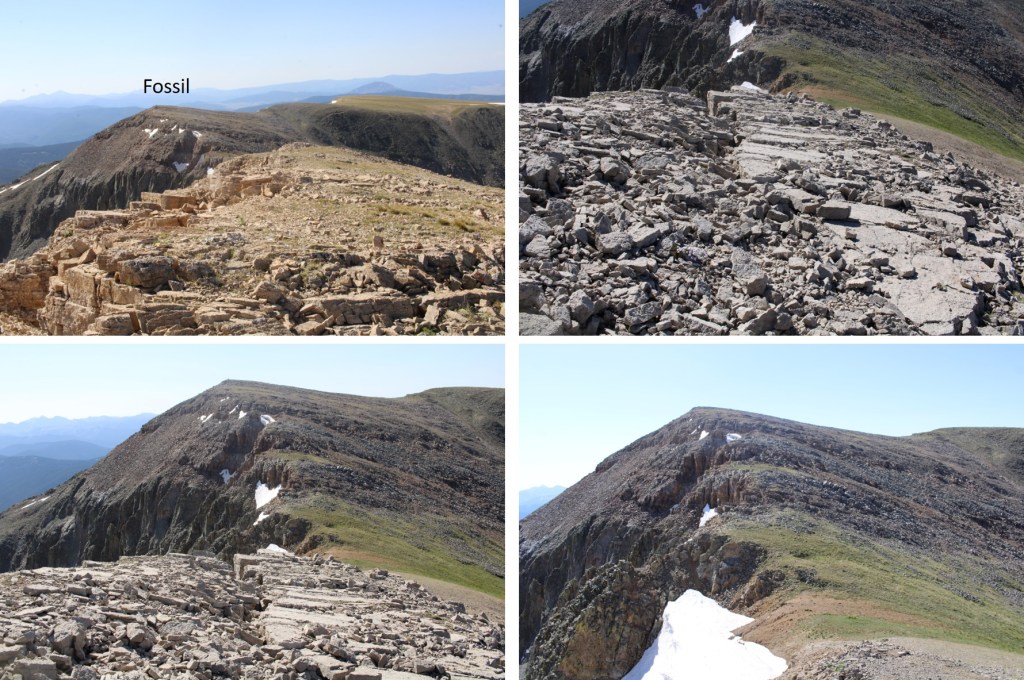
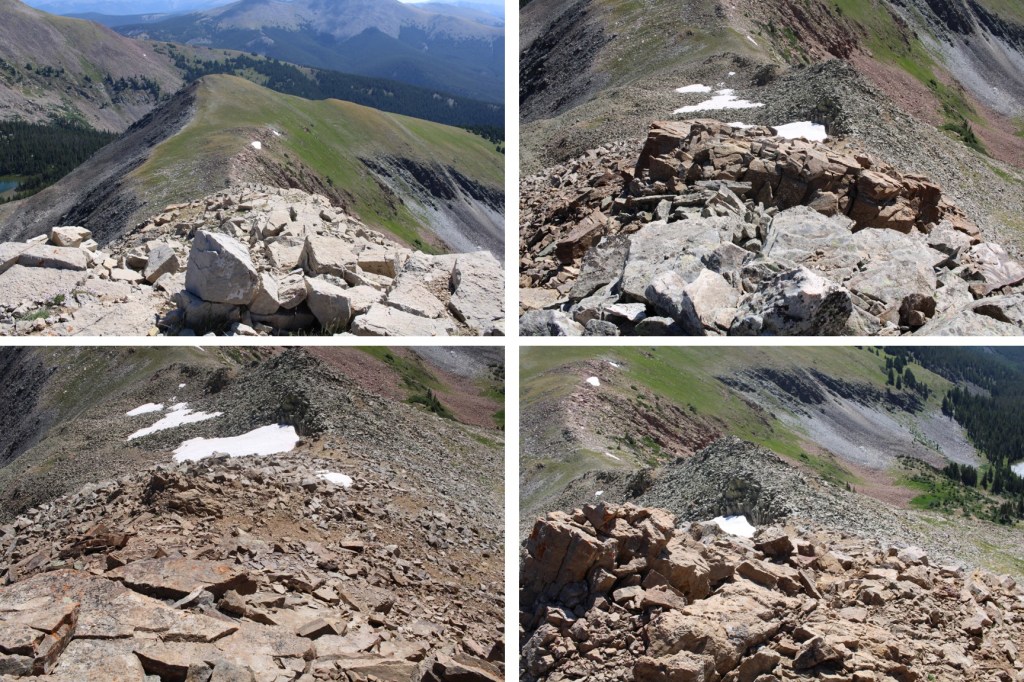
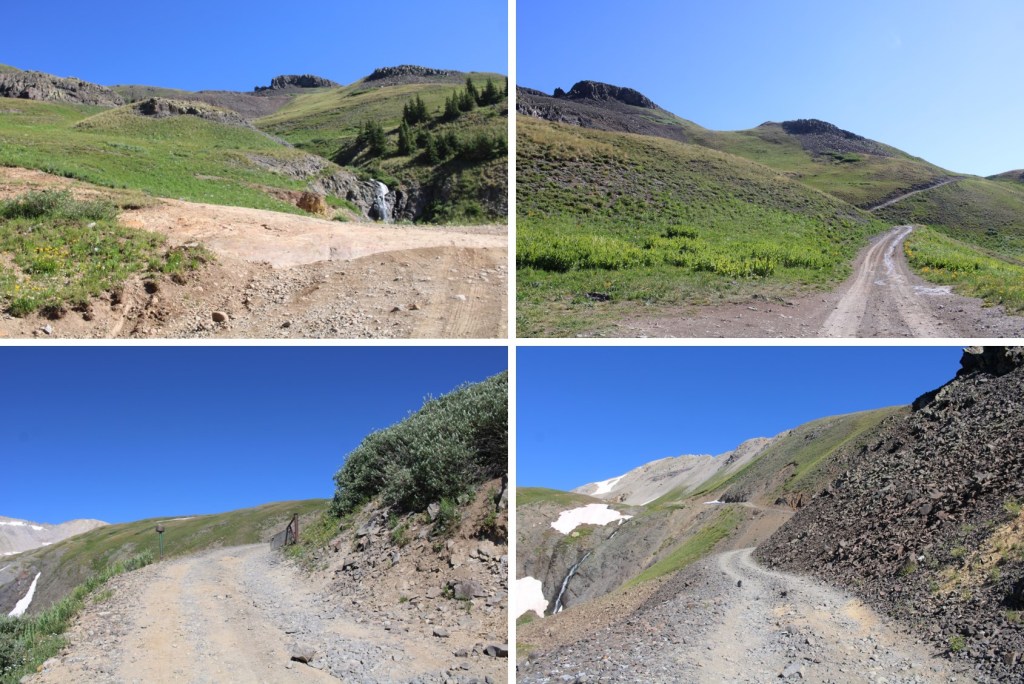
Here are some pictures of this short ridge

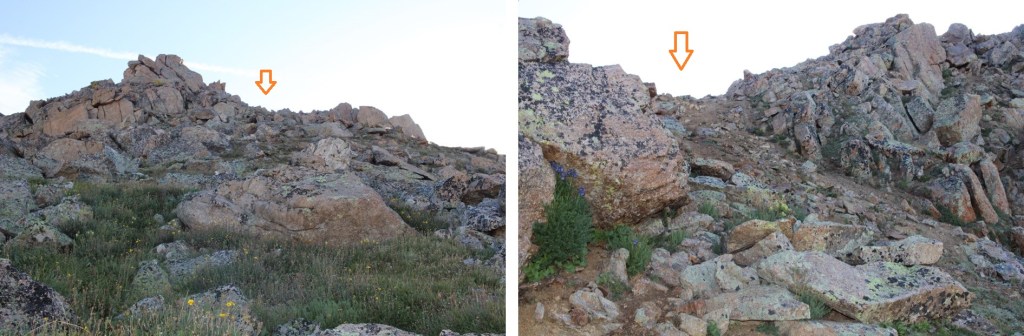
 I turned right at the top of the small gully, and walked to the summit

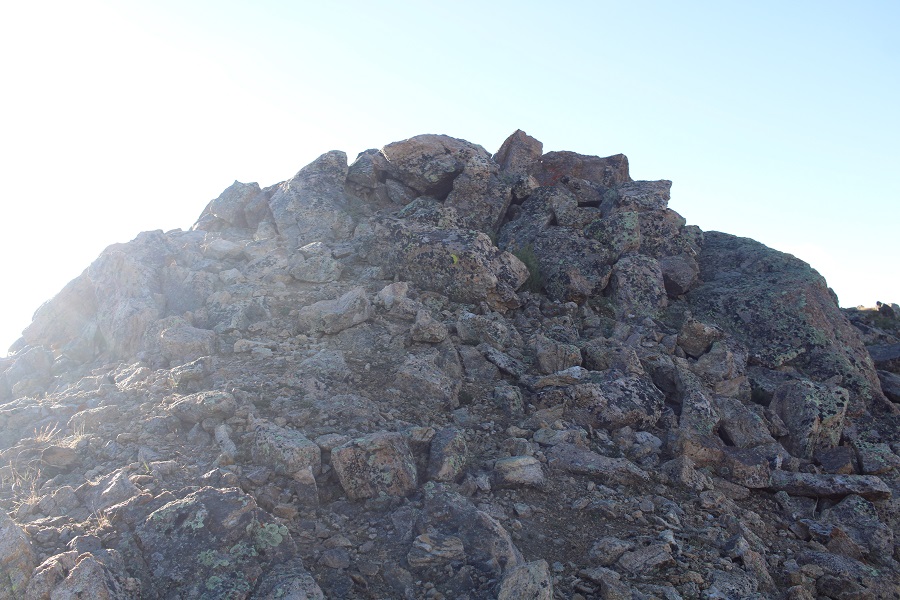
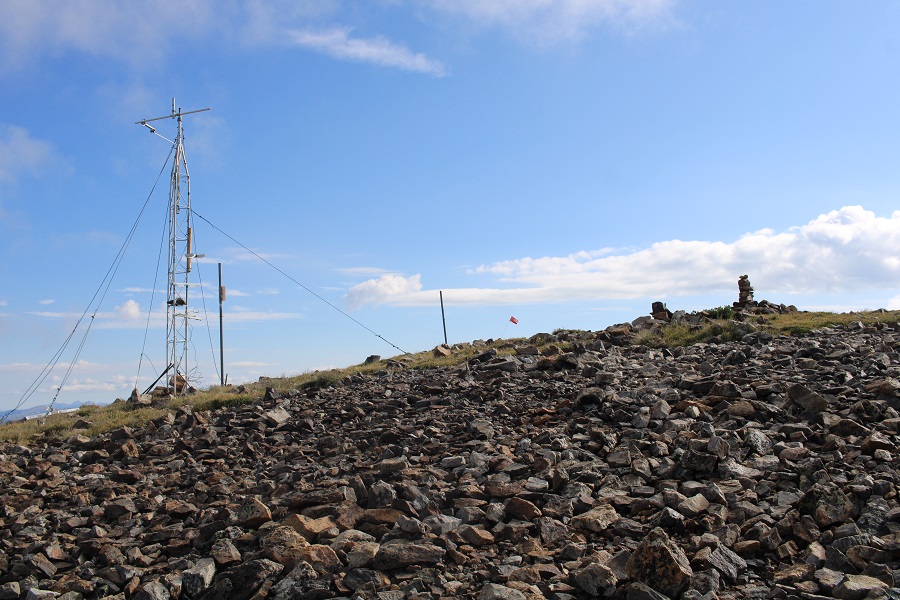
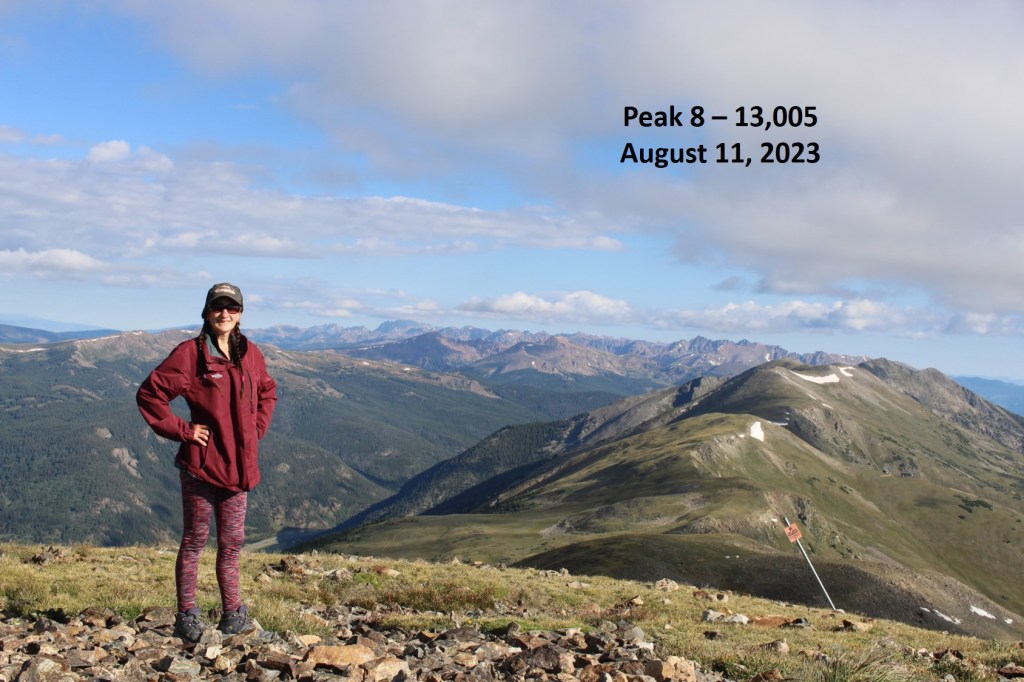
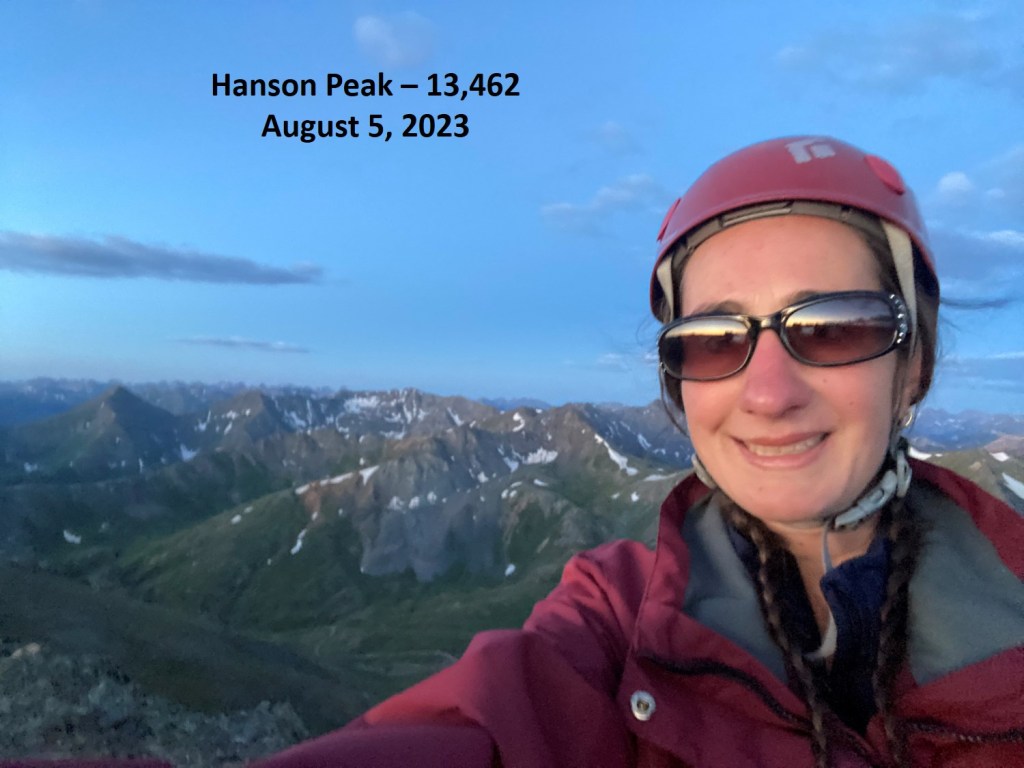
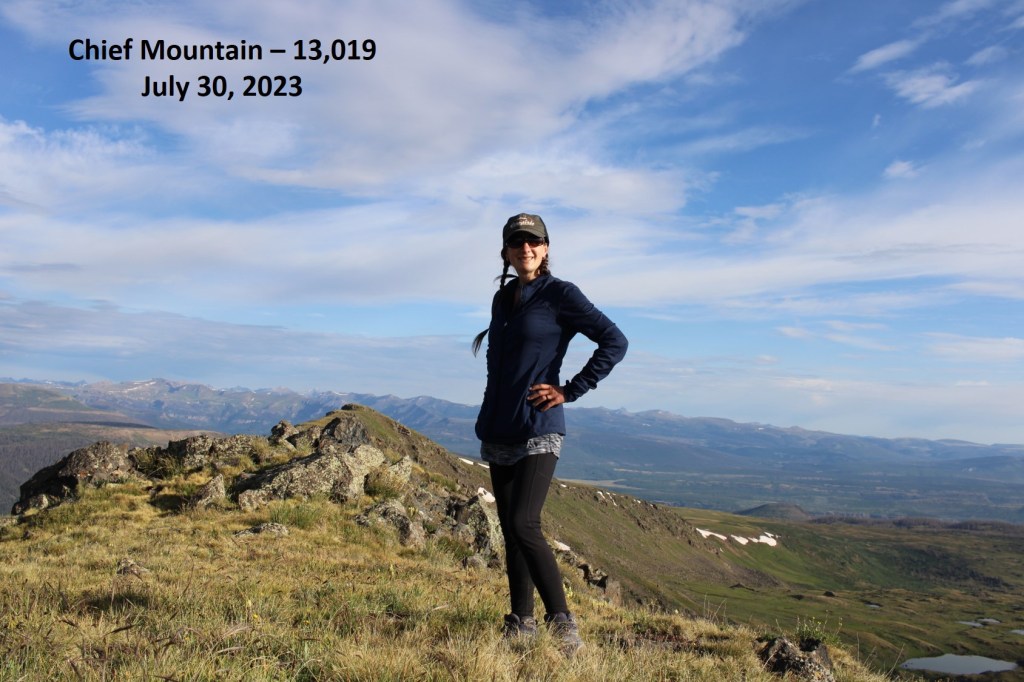
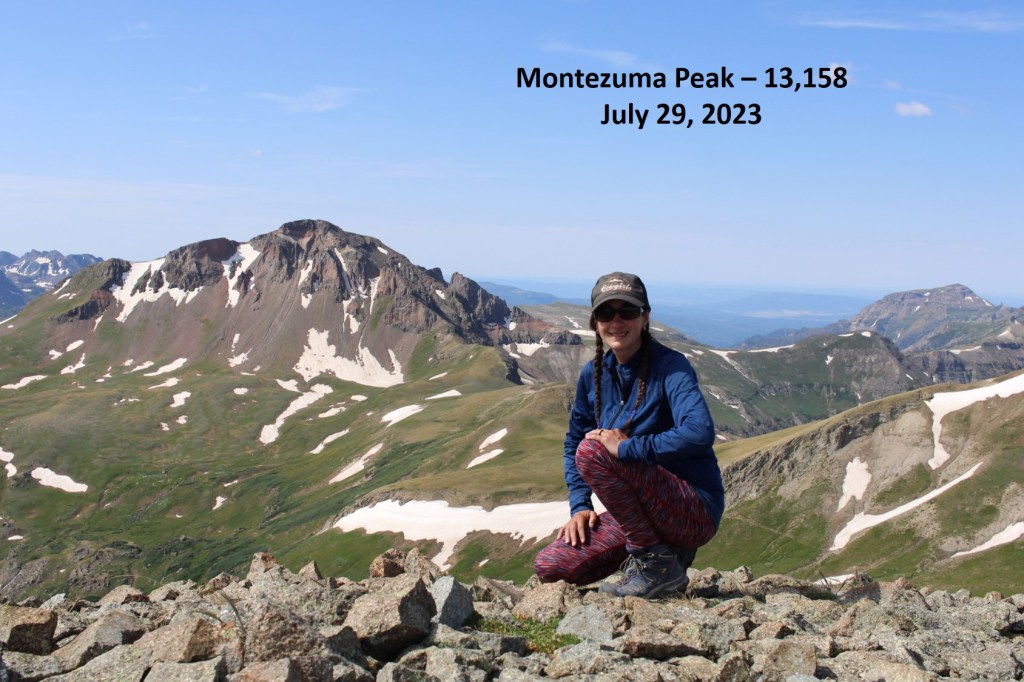
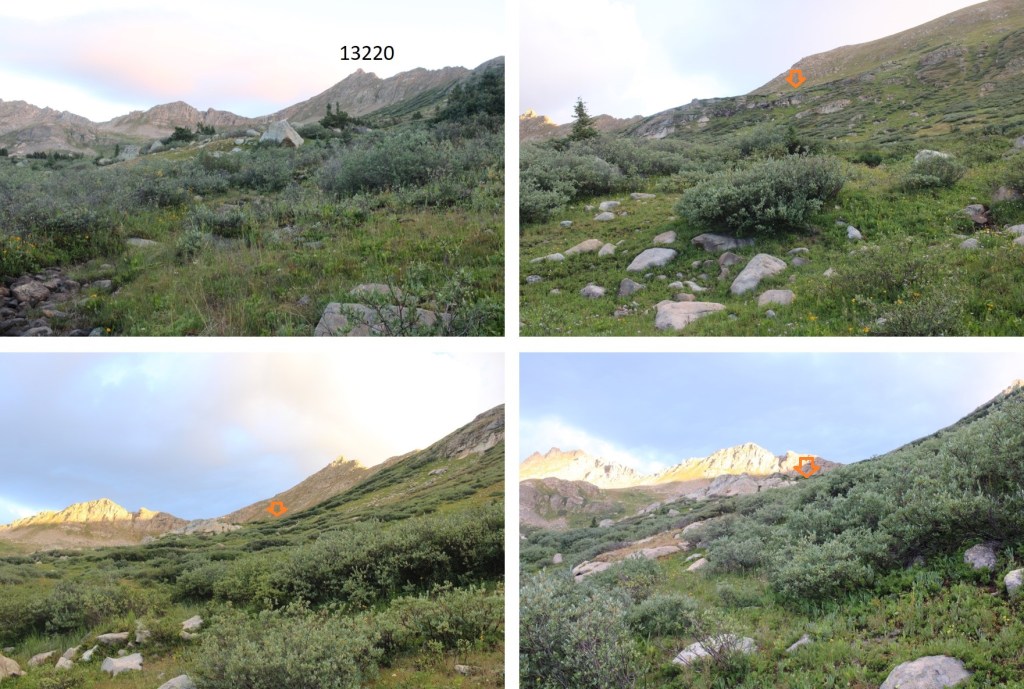
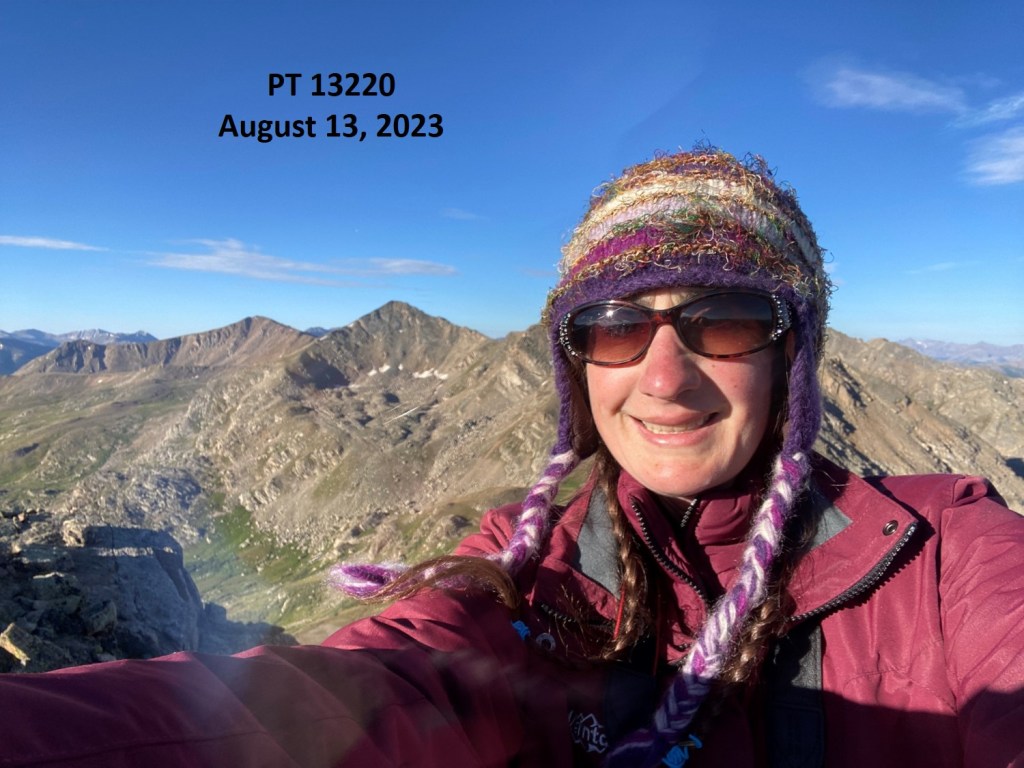
I summited PT 13220 at 7:45am

PT 13320:

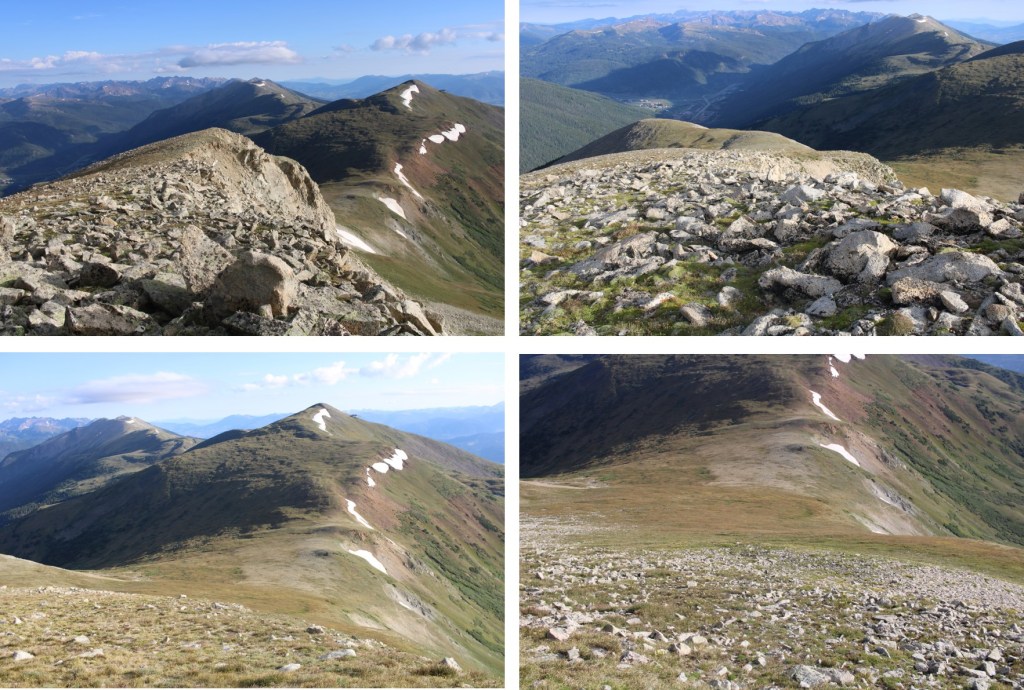
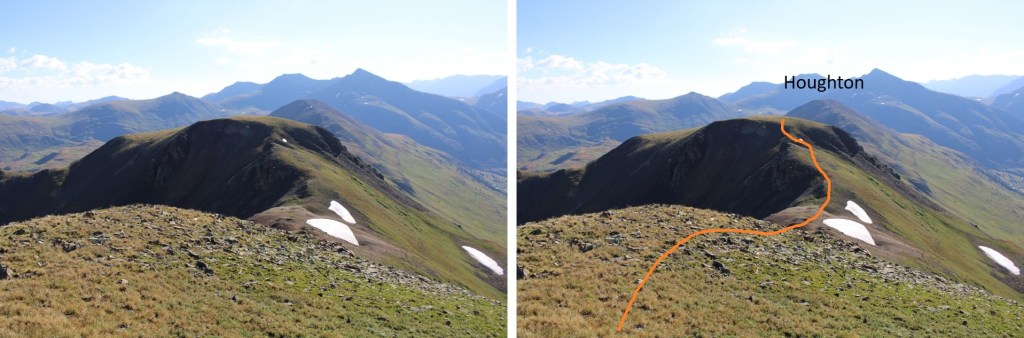
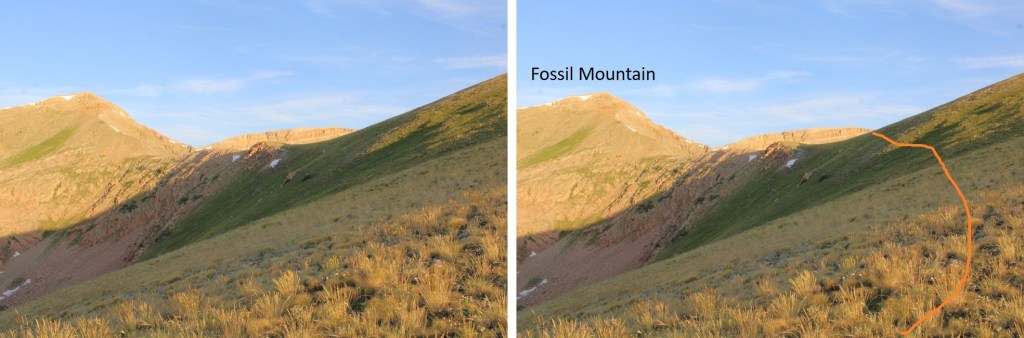
PT 13291 was to the northeast, but to get there I was going to retrace my steps down the ridge first.  I headed back to the ridge.

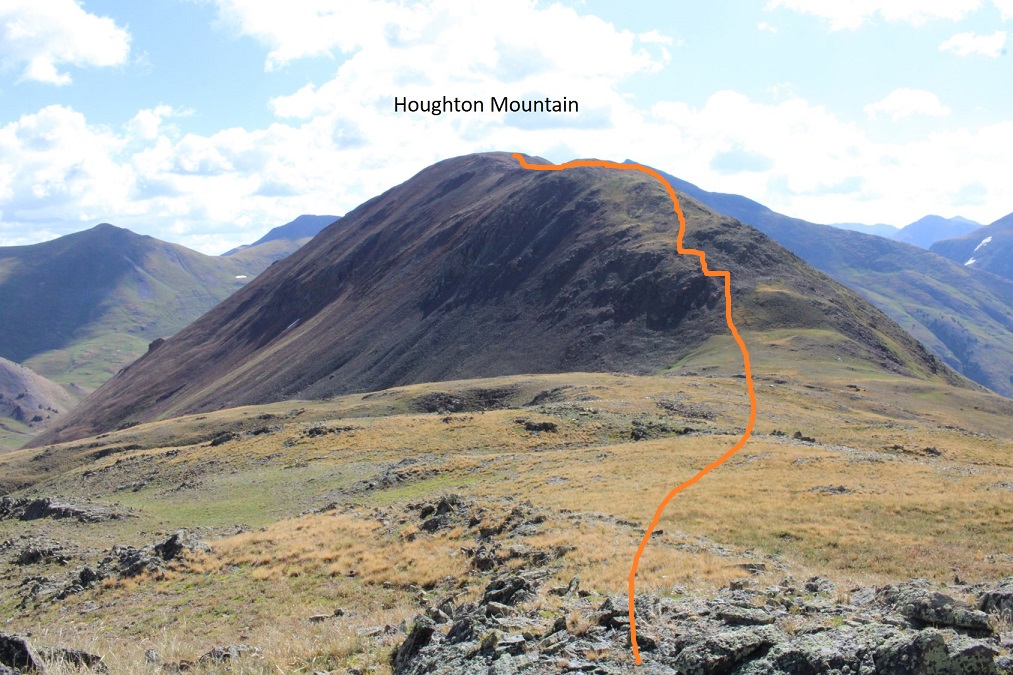
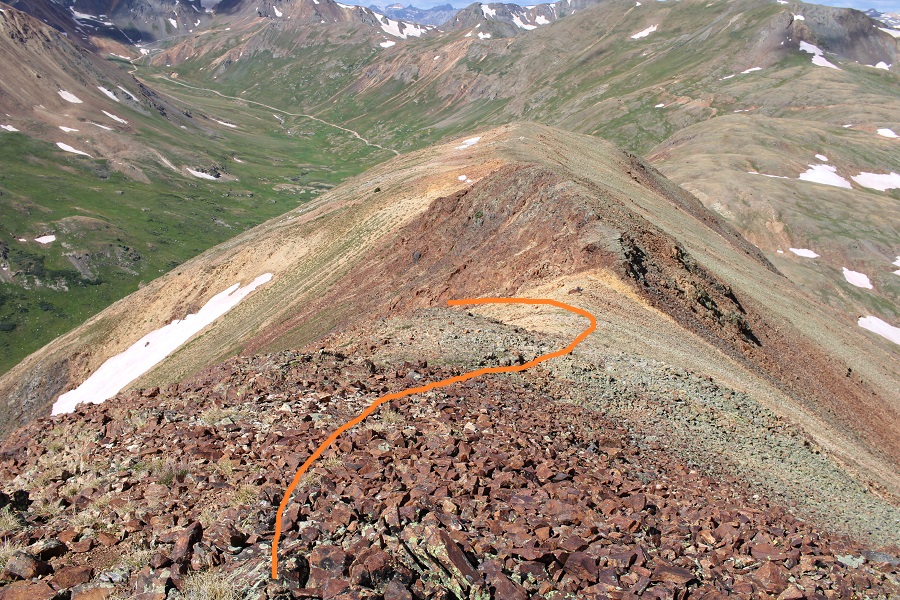
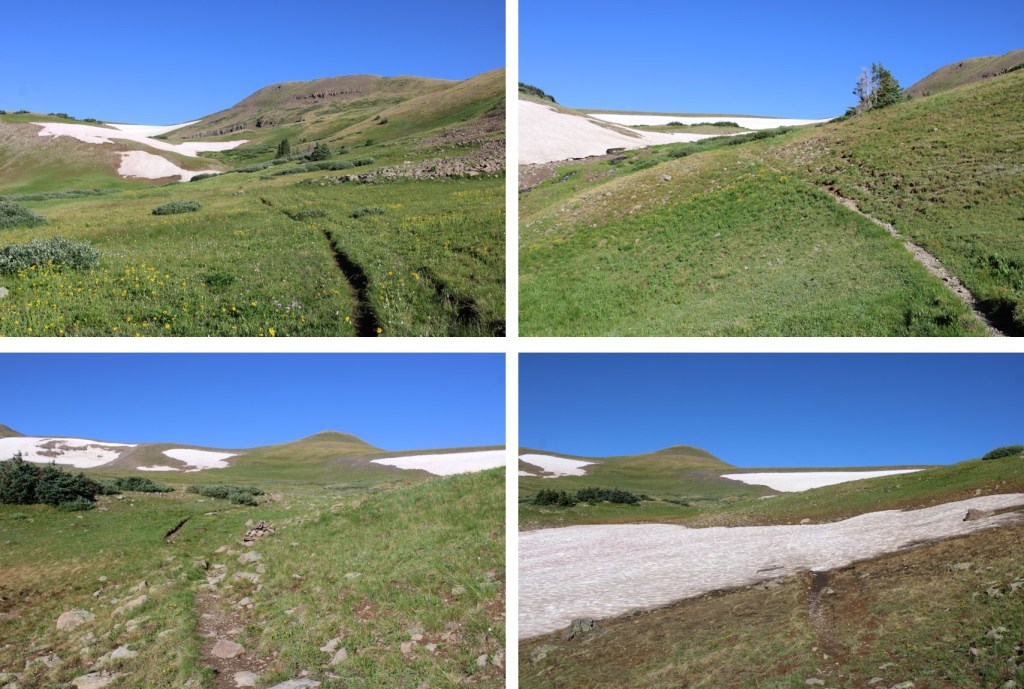
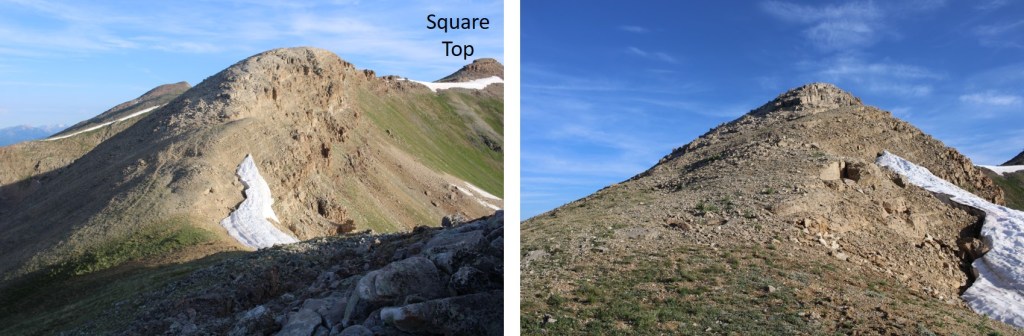
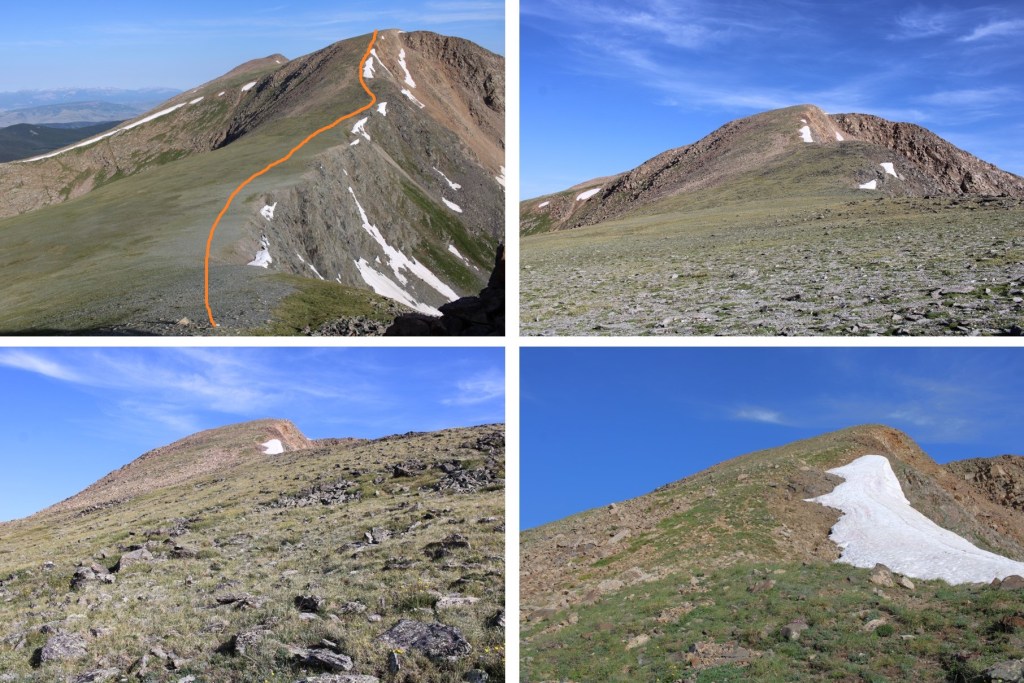
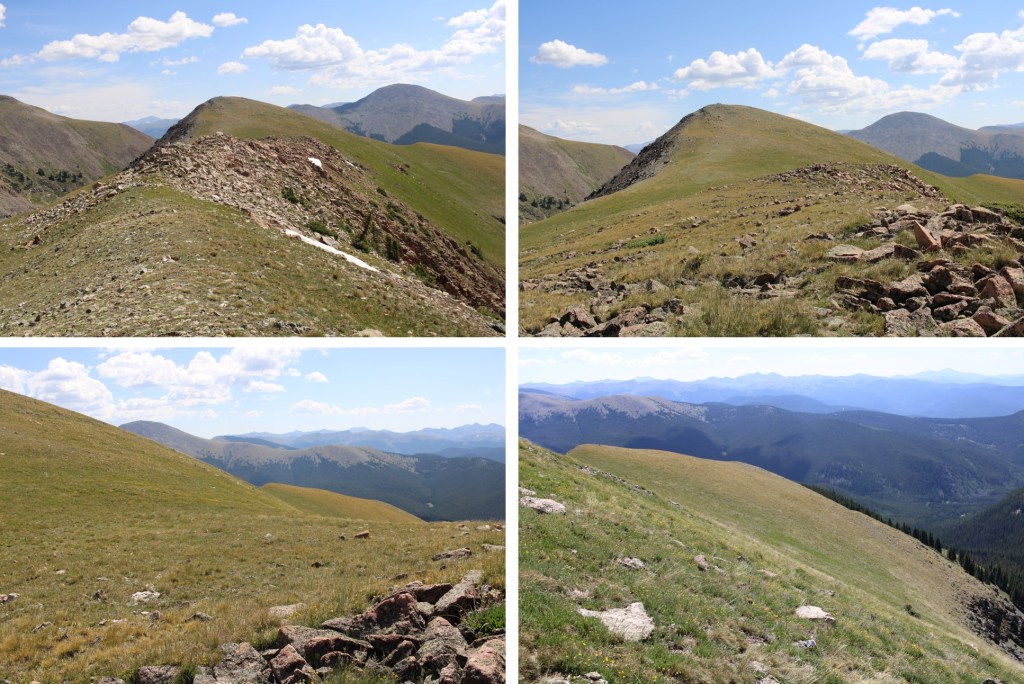
I picked up the game trail again, and skirted the rocky section that was on my left, and re-gained the ridge on a grassy slope.  Here’s my overall route

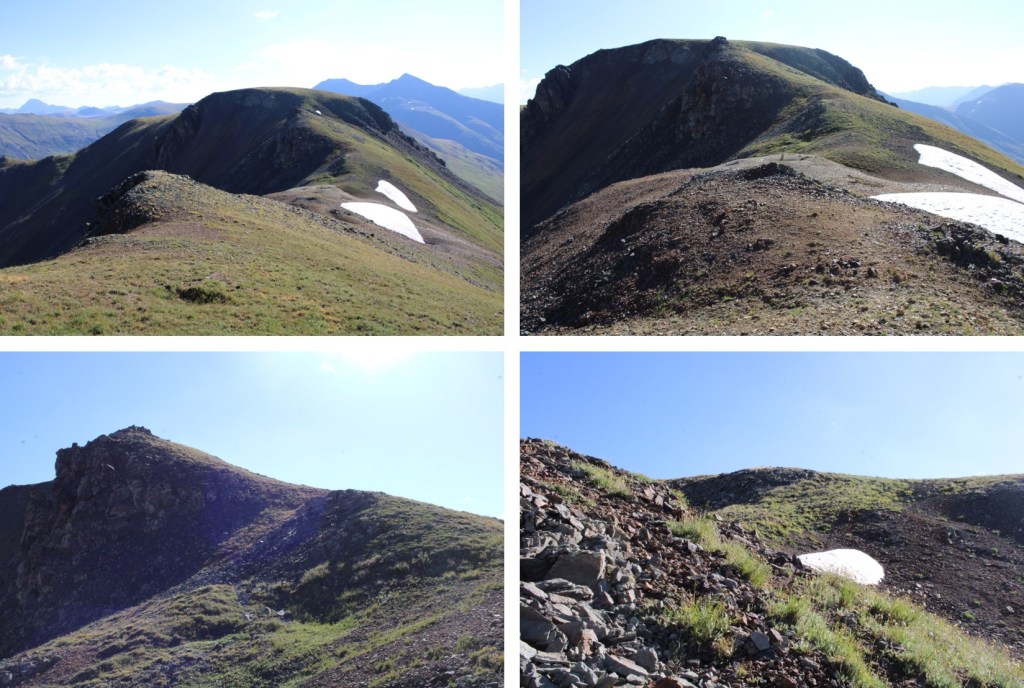
Once on the ridge again, I skirted this rocky section to the right.  Resist the temptation to ascend any higher until you get to the tundra and it will stay class 2.  Otherwise, you can go up the rocks at any point for some class 3 or 4 fun.

Now it was a class 2 stroll along the ridge as I headed east.

When I got to this point I put on my microspikes, turned right, and dropped down to navigate the formations.  This was class 2+, but the loose scree and exposure added a layer of fun.

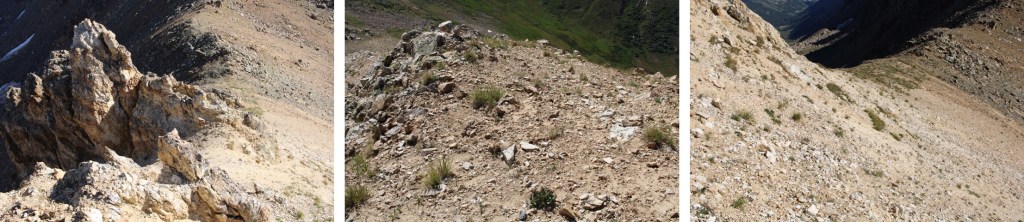
This was my next obstacle.  My first thought was to go right up the center of the gully, but I ended up scouting around and found it was much easier, and still class 2, to skirt around and gain the ridge from the right side.

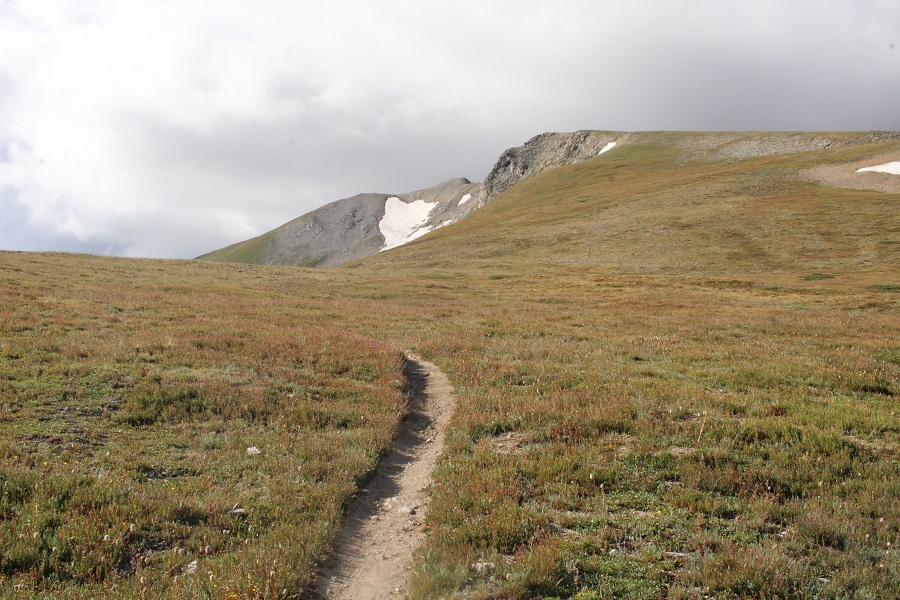
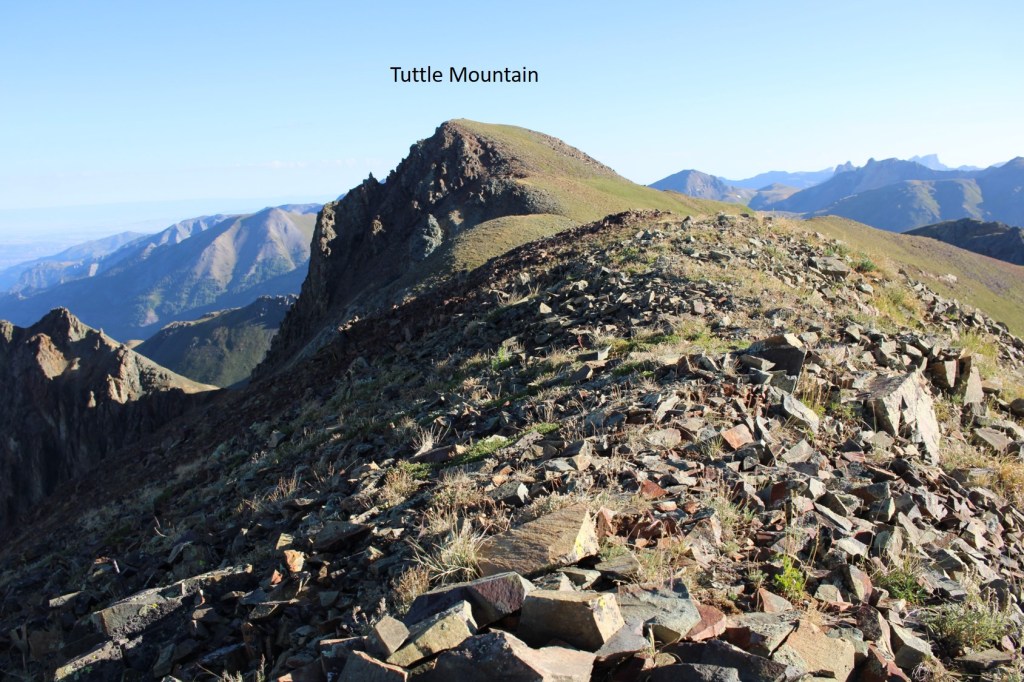
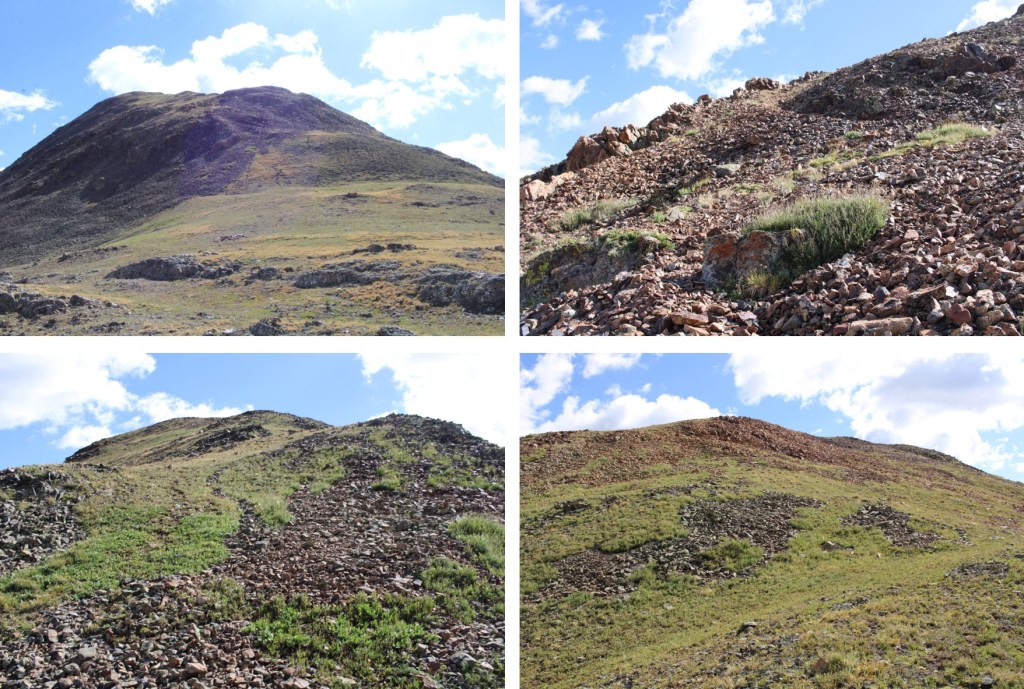
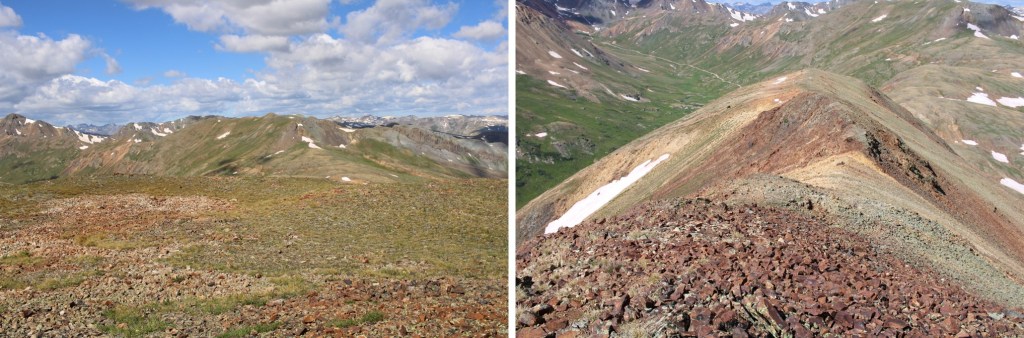
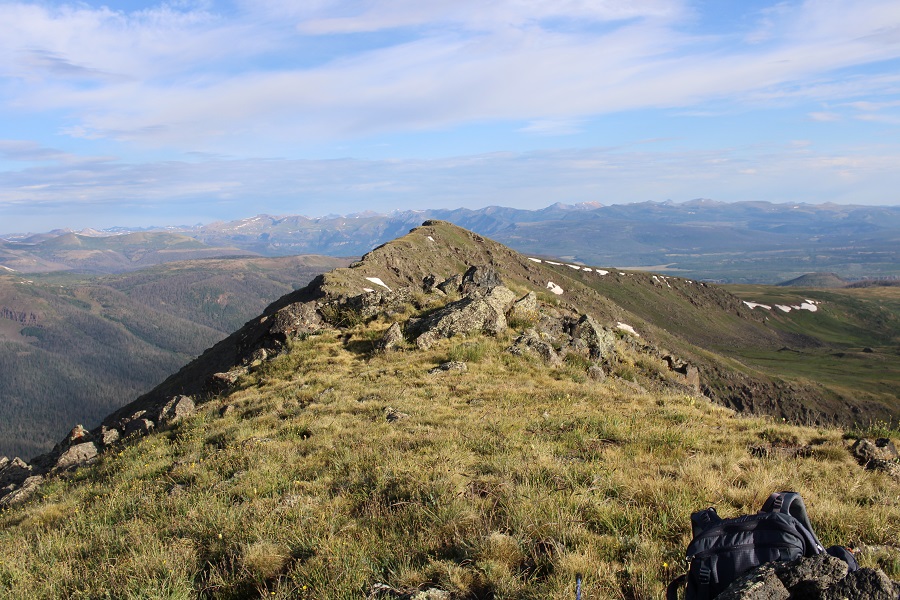
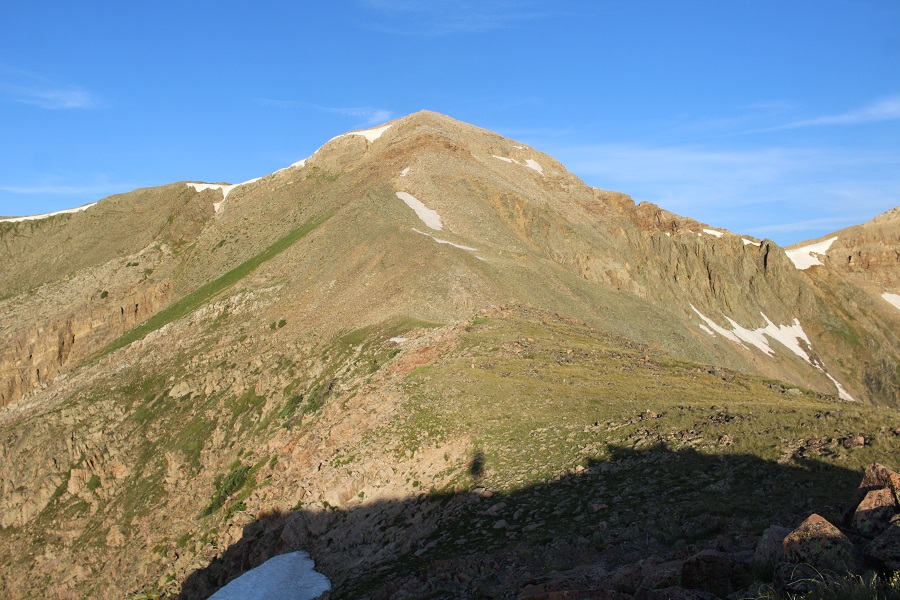
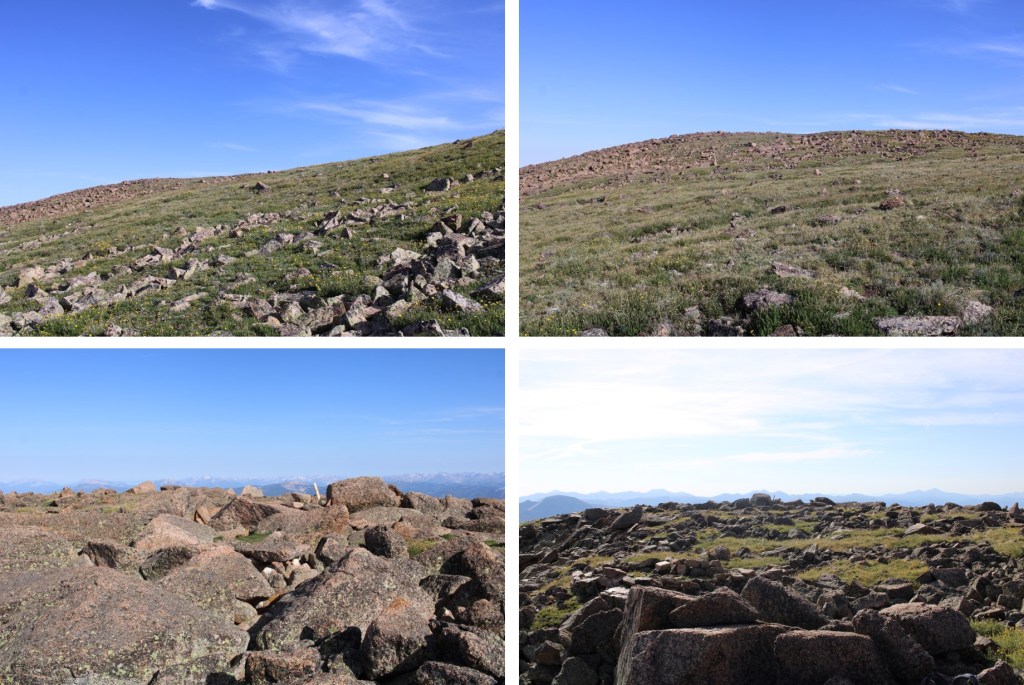
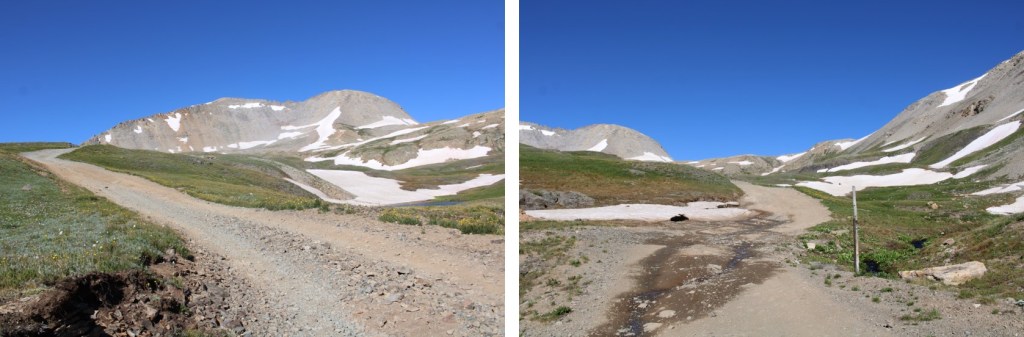
Back on rocky tundra, I now followed the ridge direct north.  This was all class 2.

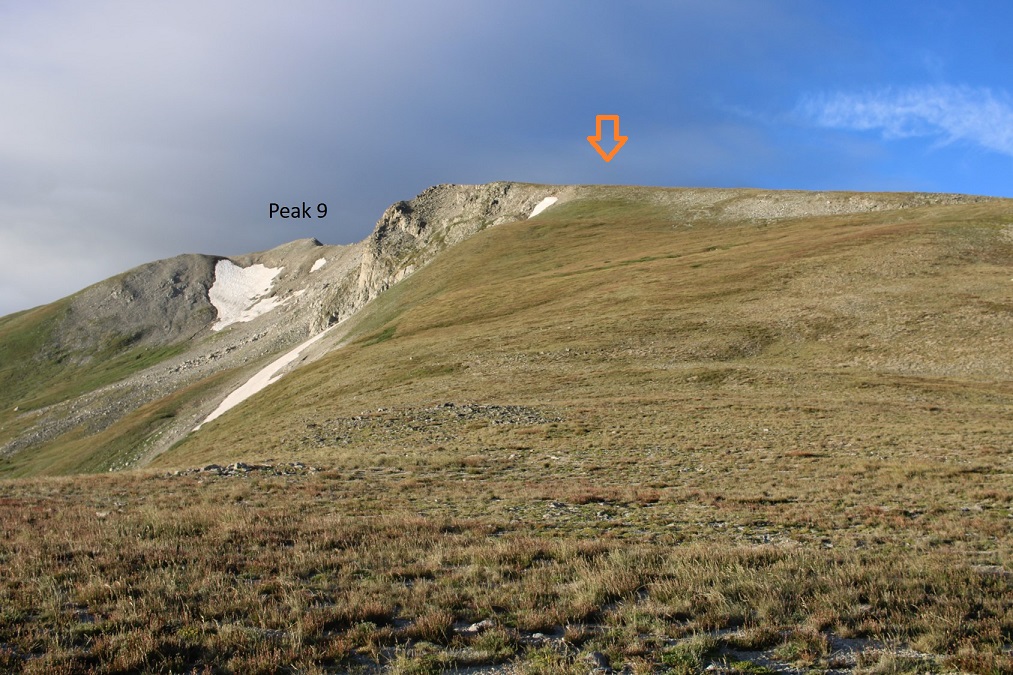
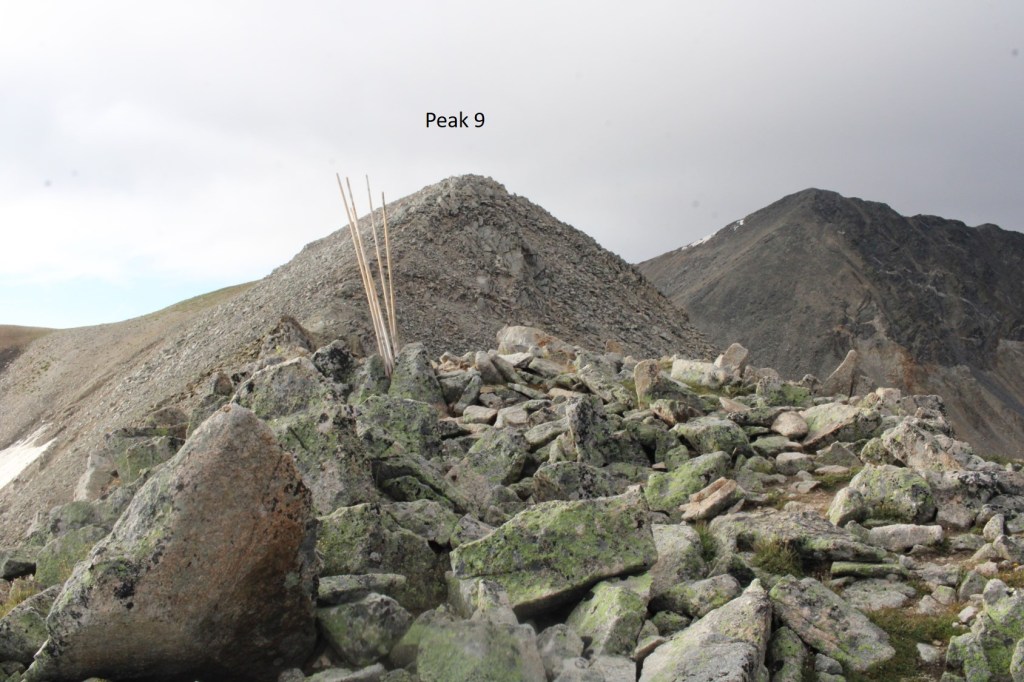
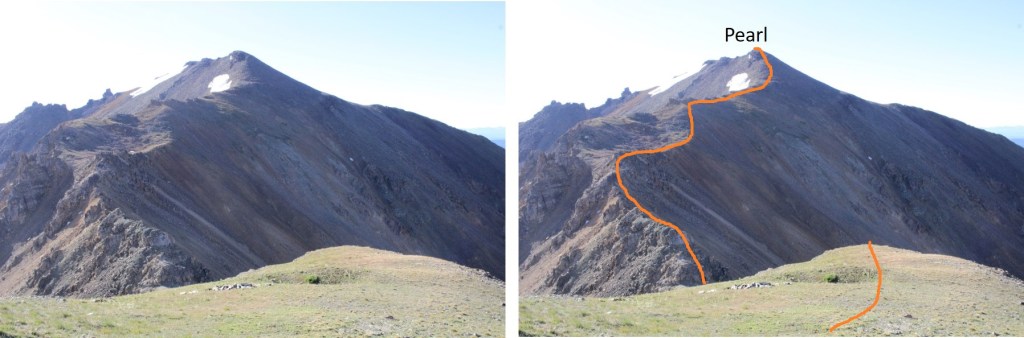
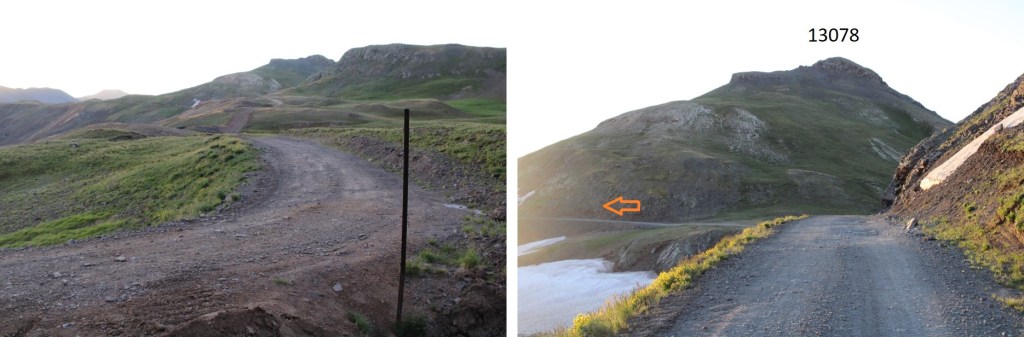
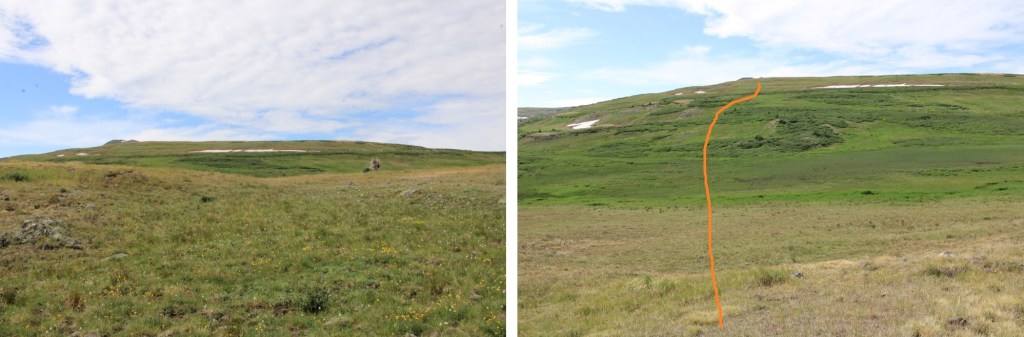
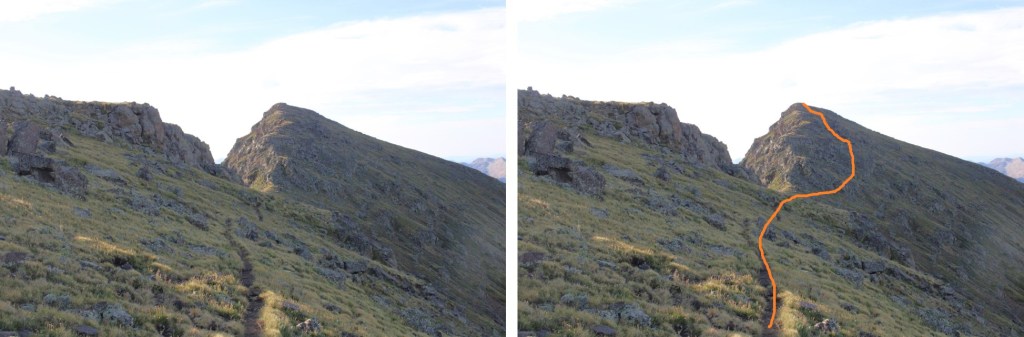
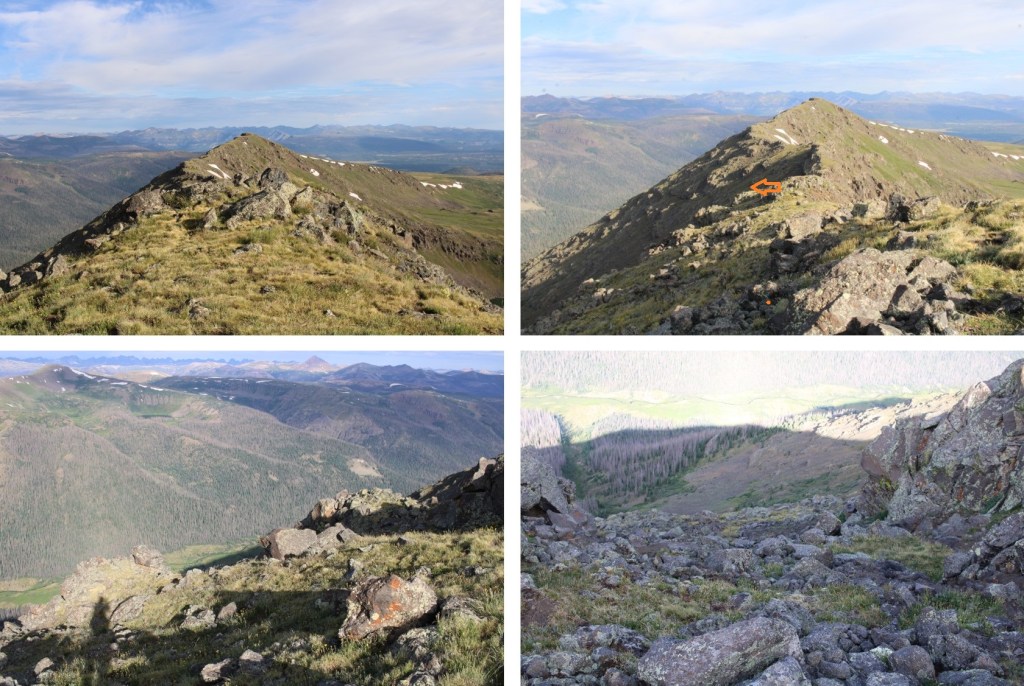
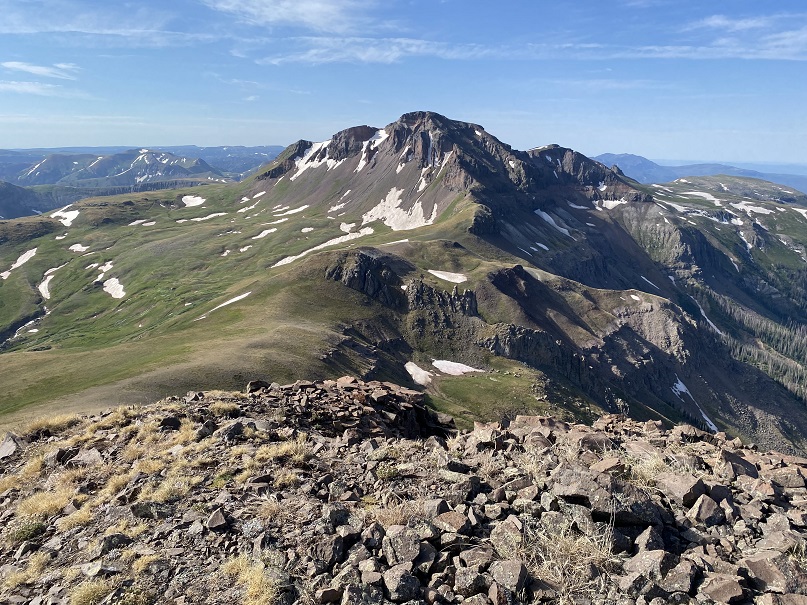
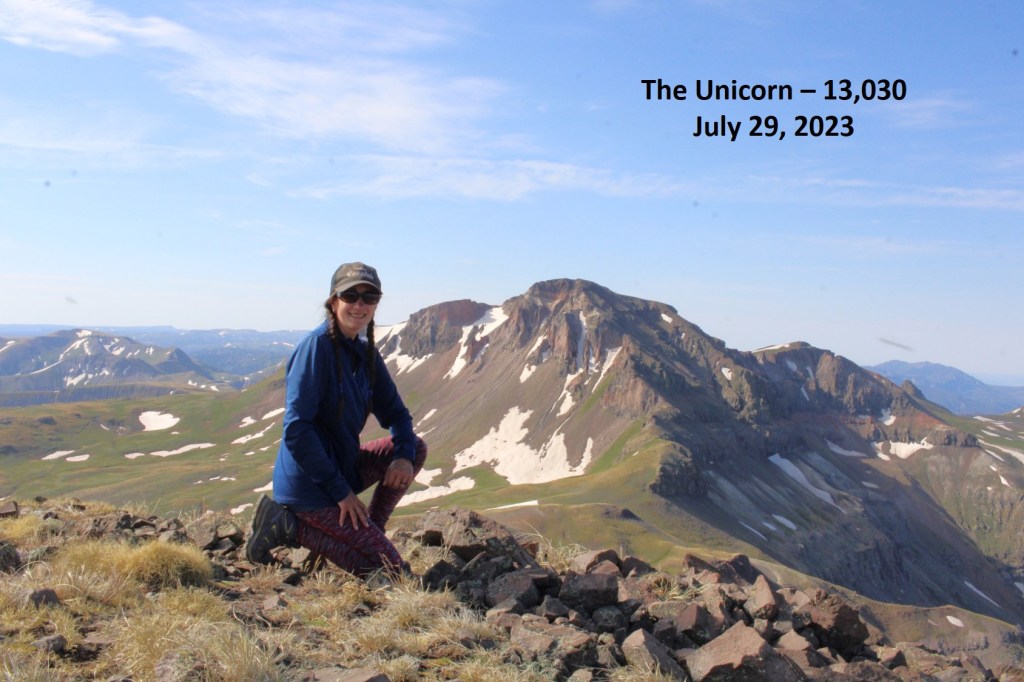
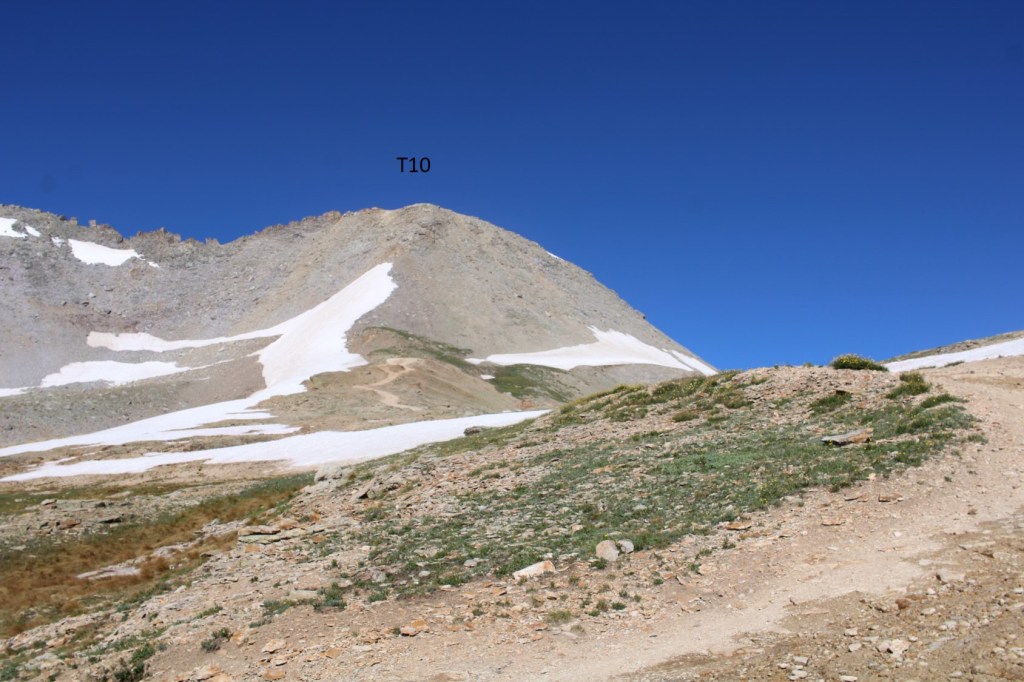
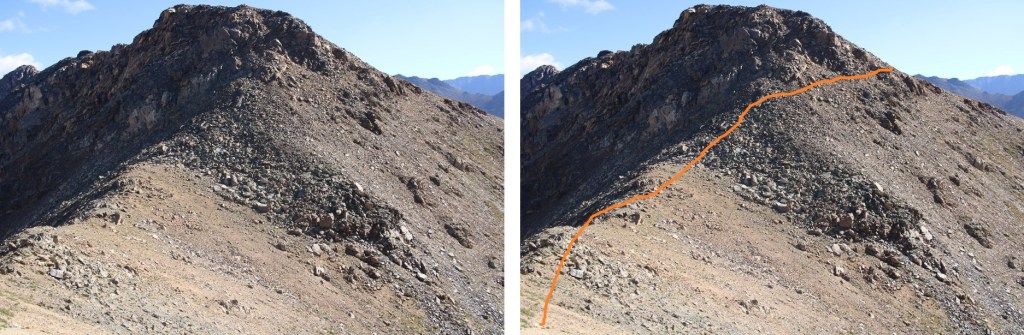
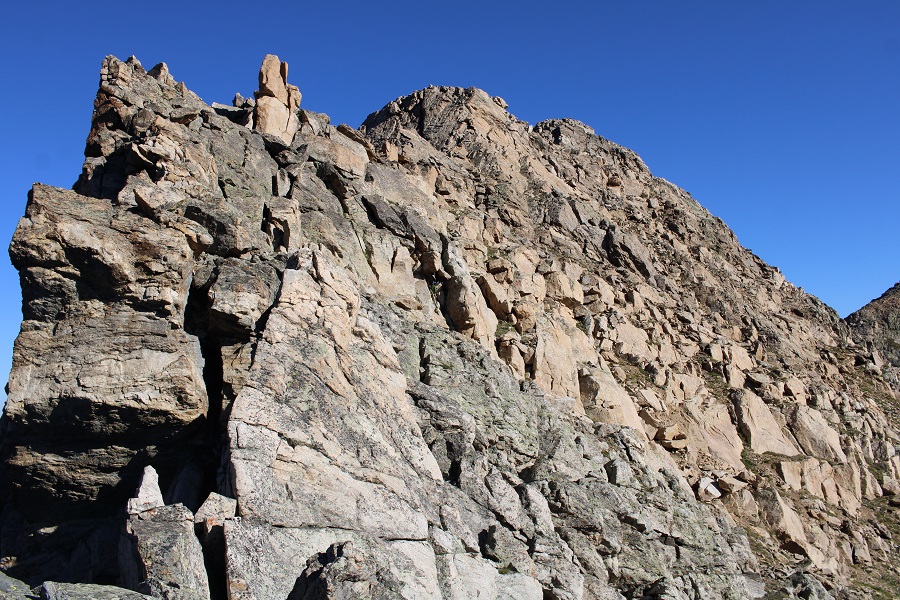
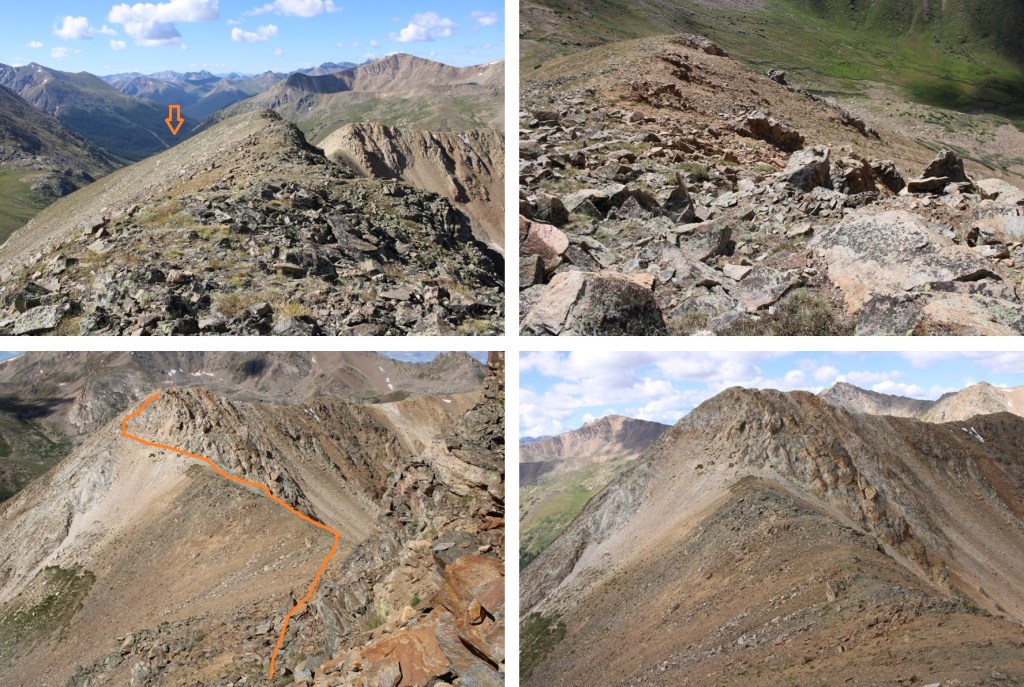
At the top of the ridge I got my first good view of PT 13291.  Unfortunately, the first day I was here I had to stop at this point due to time constraints and an impending thunderstorm.  It sucked to turn around, but it was something I had to do. 

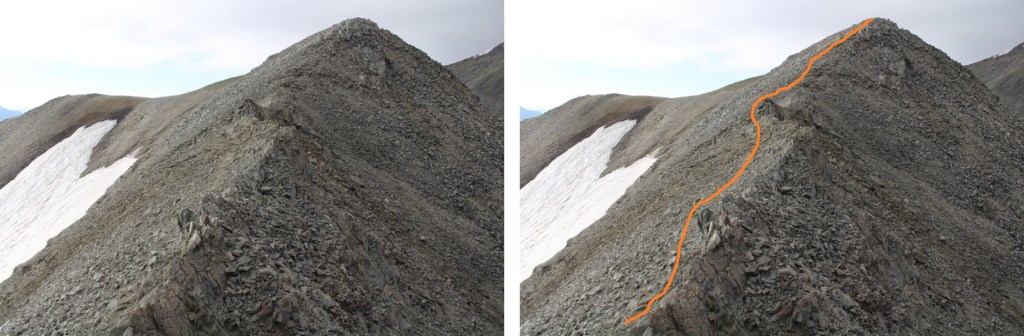
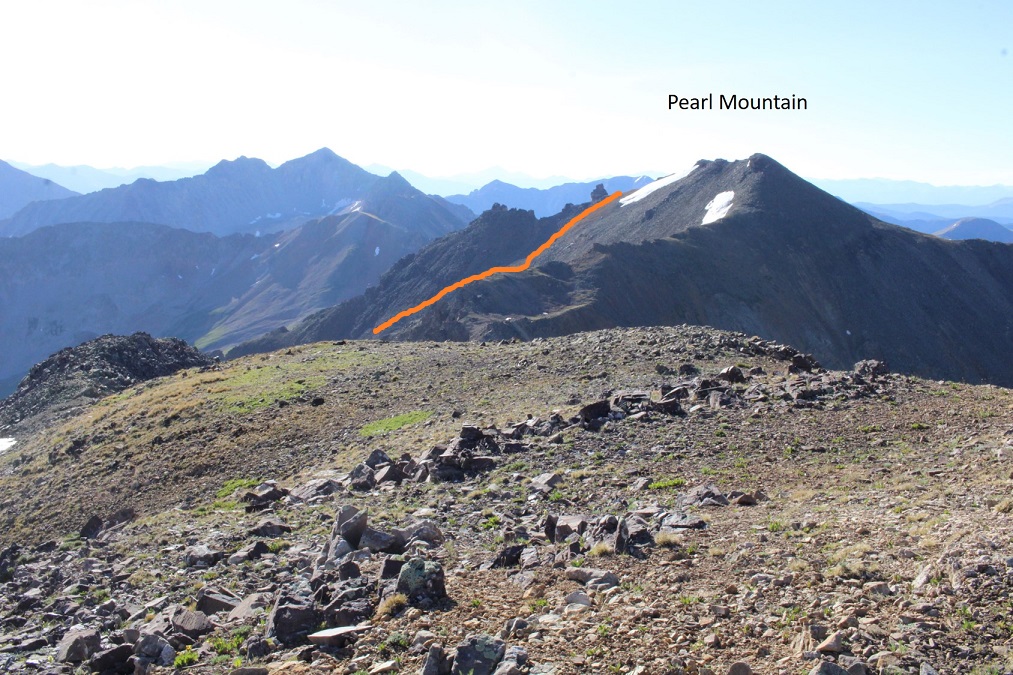
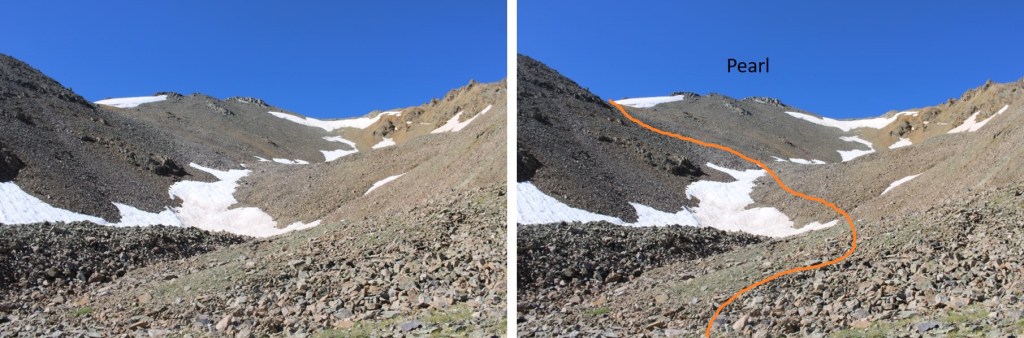
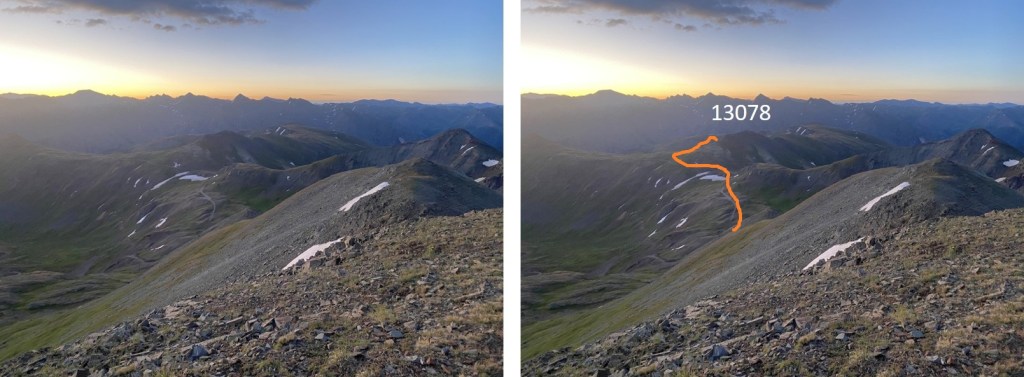
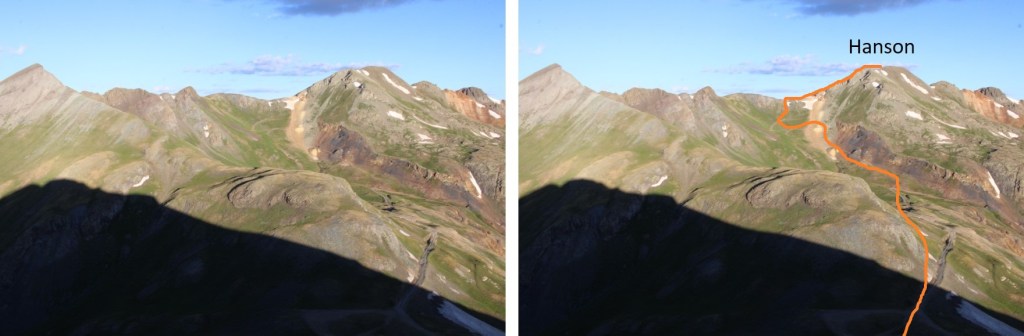
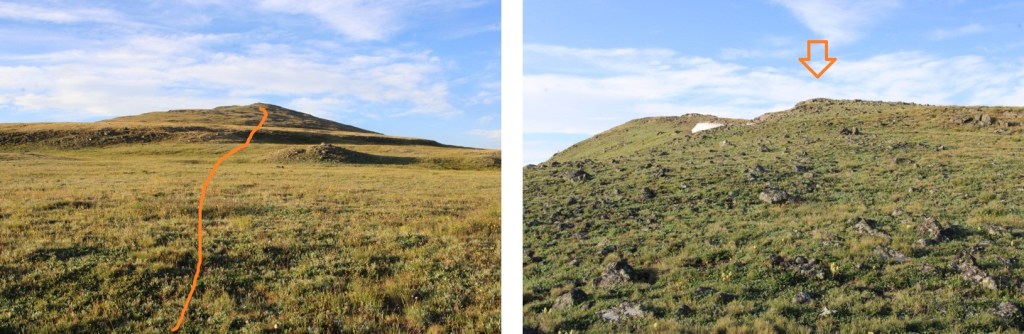
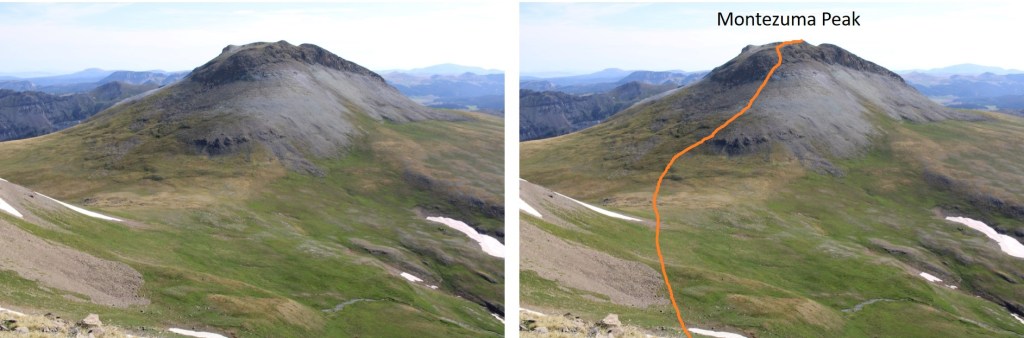
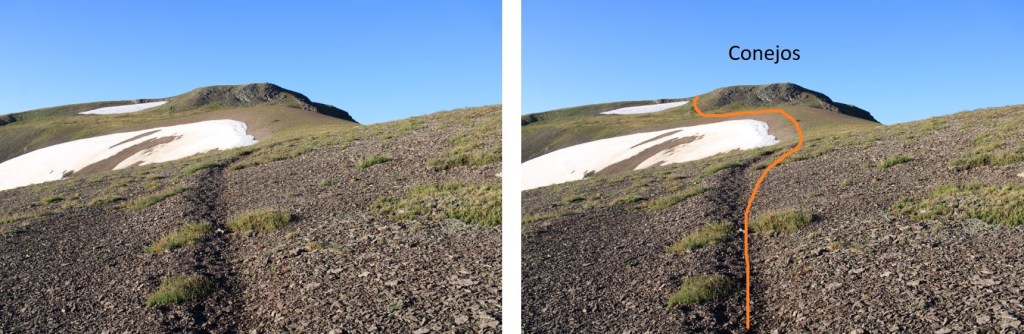
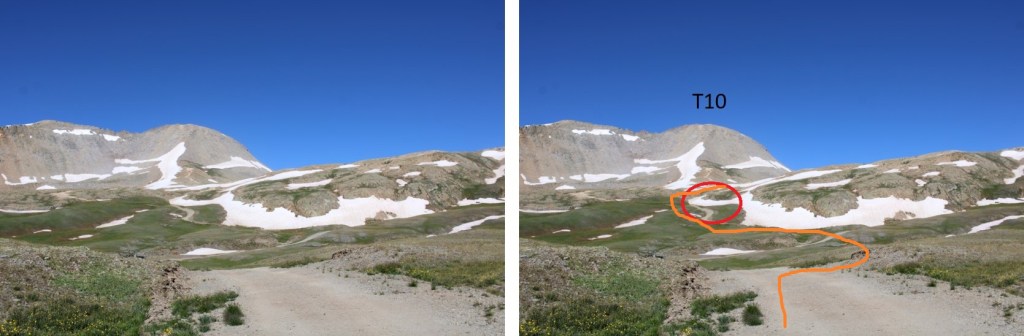
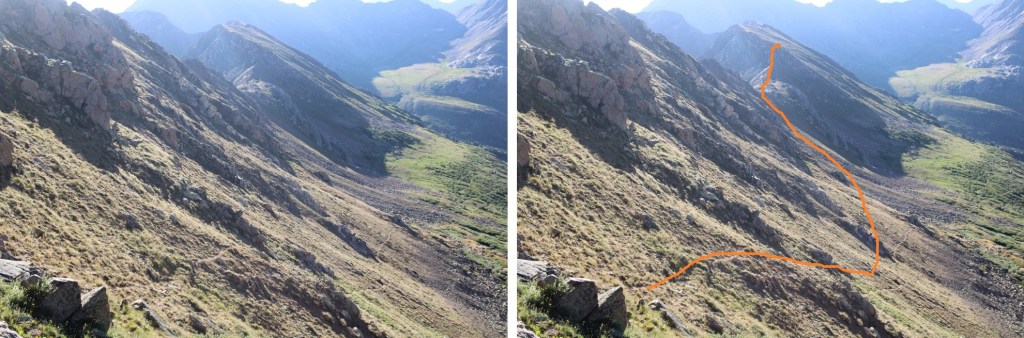
The next time I was here, two days later, this is the overall route I took to get past the steep rock in front of me.  Also, this is a good time to put on your helmet if you haven’t already done so. 

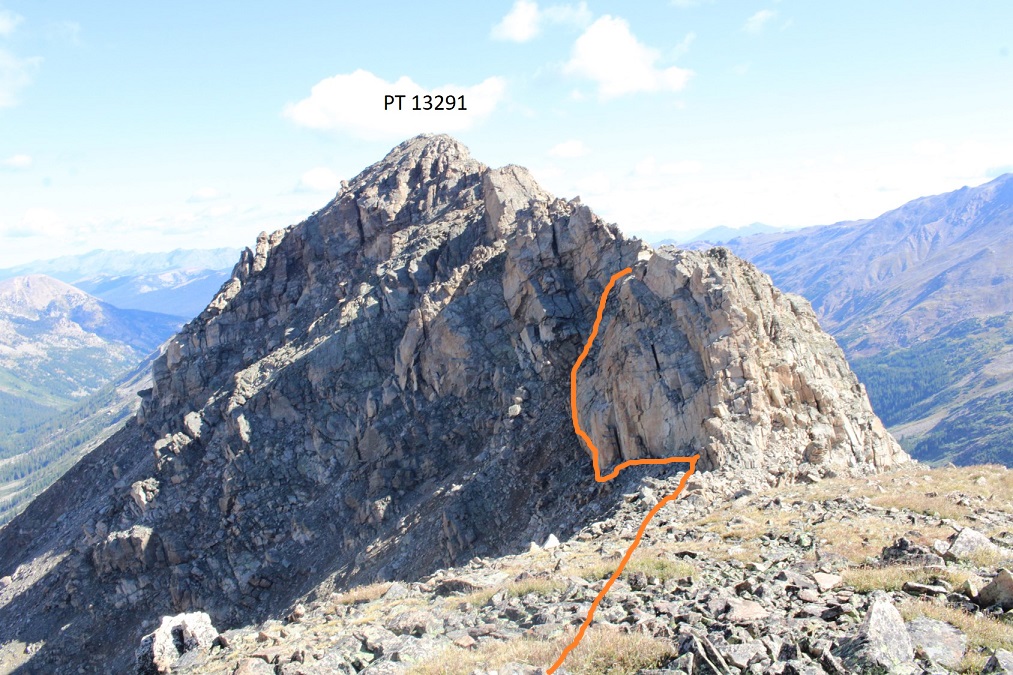
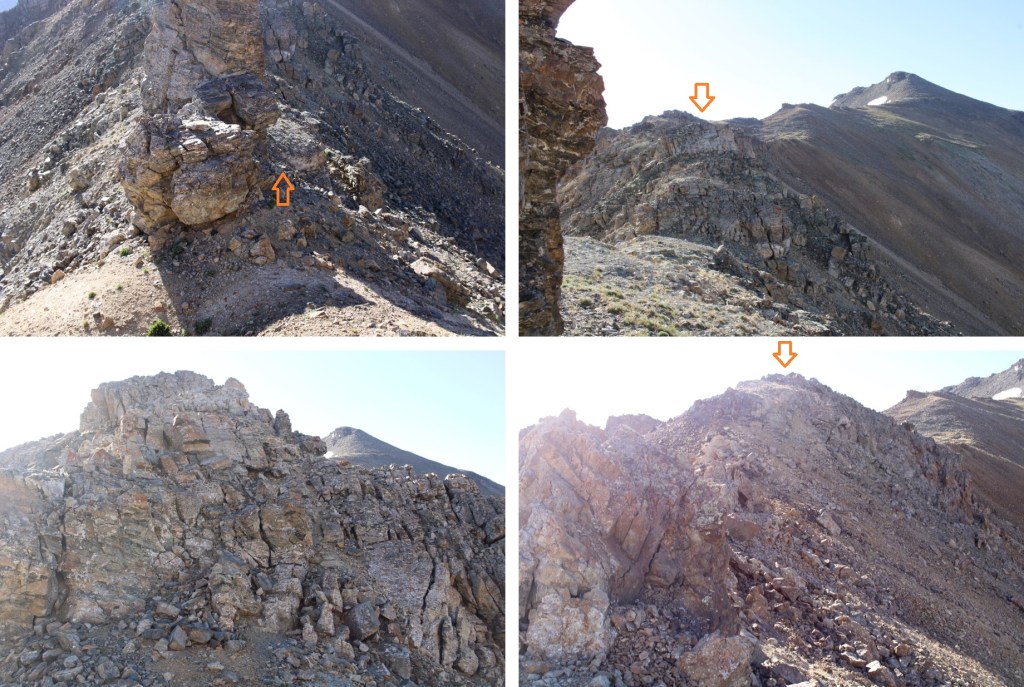
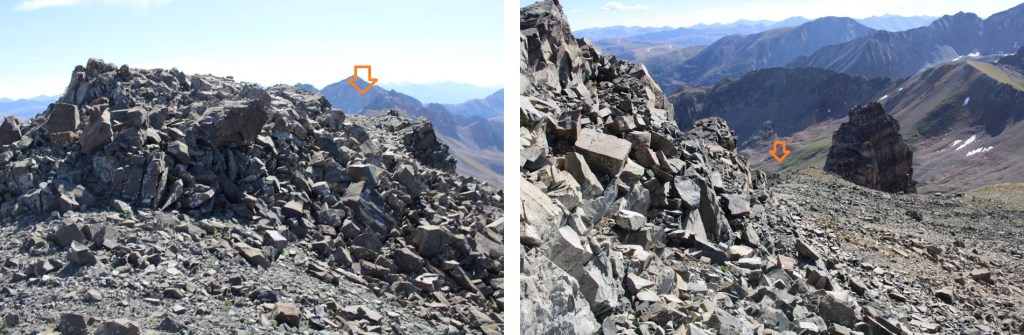
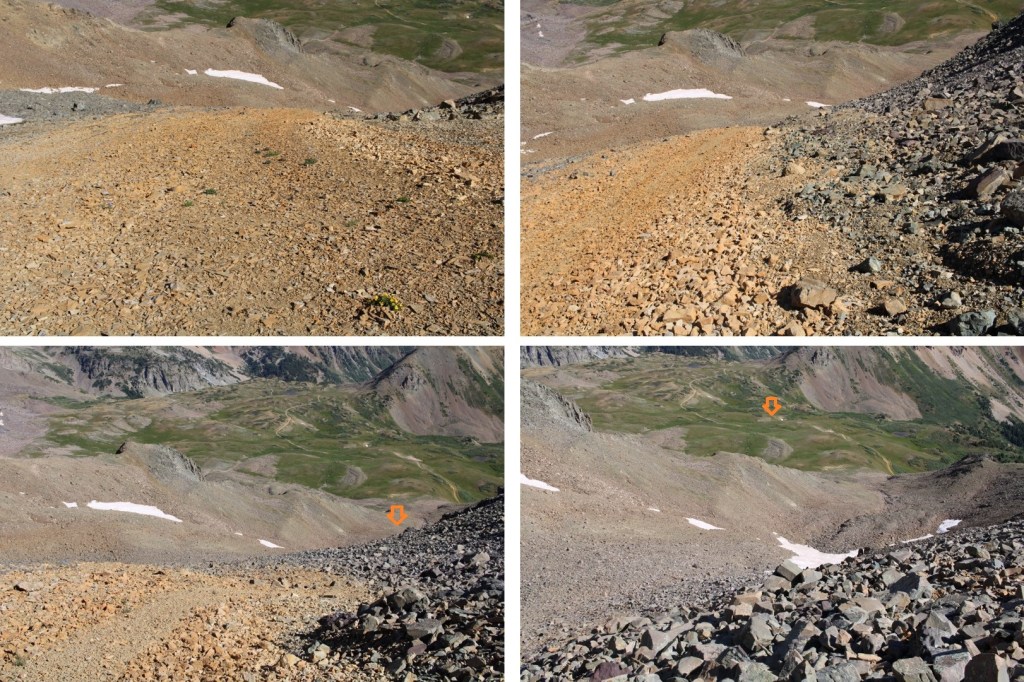
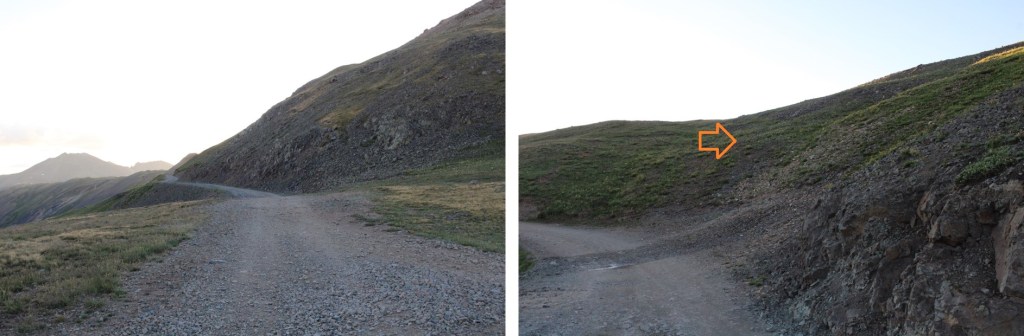
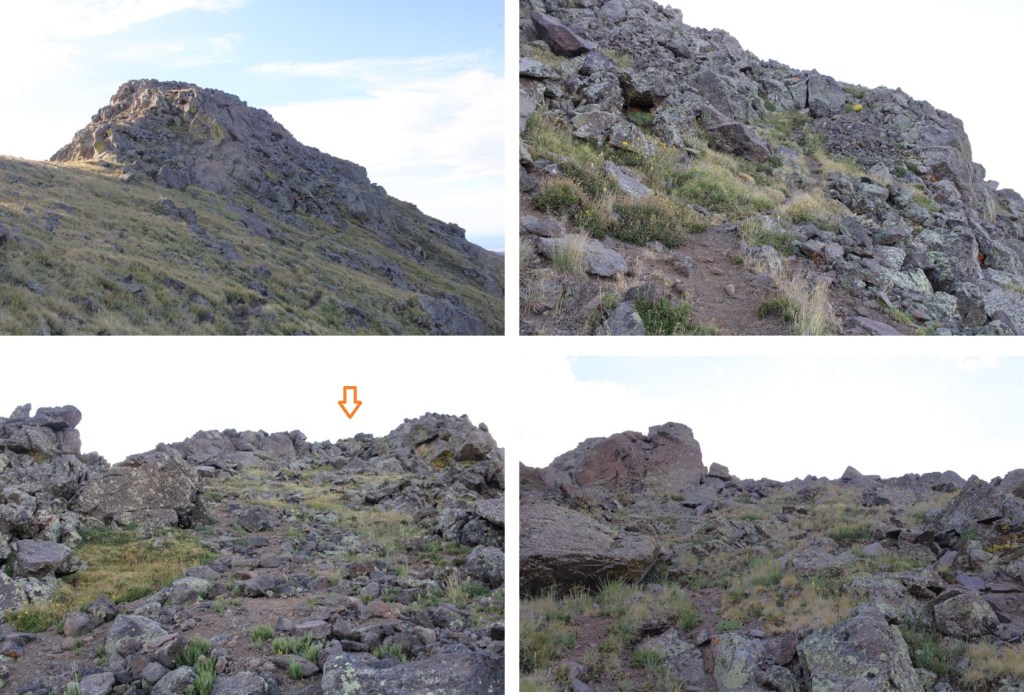
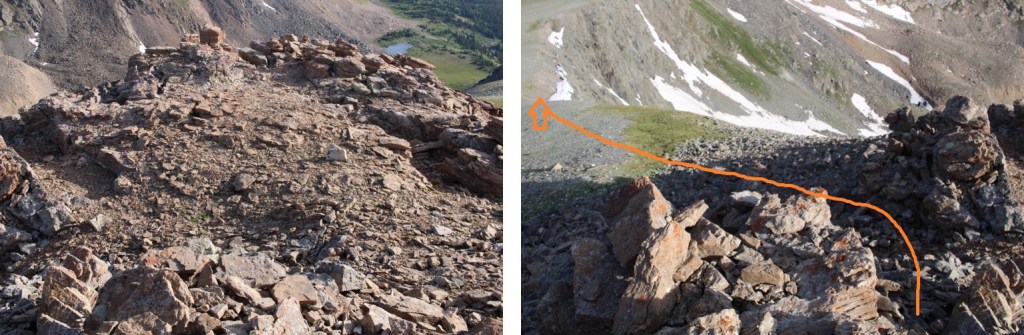
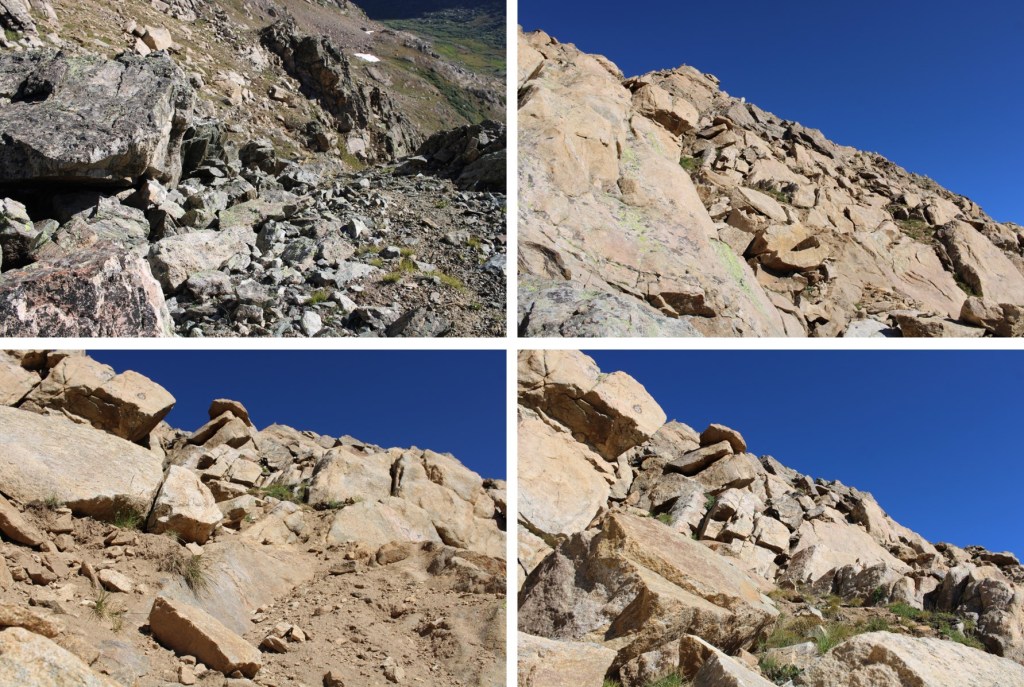
This looks loose and fraught with exposure, but the route is actually pretty solid and wider than it looks from a distance.  I started out rock-hoping on stable boulders, then descended west about 100 feet, staying as close as I could to the rock wall, to the base of a gully

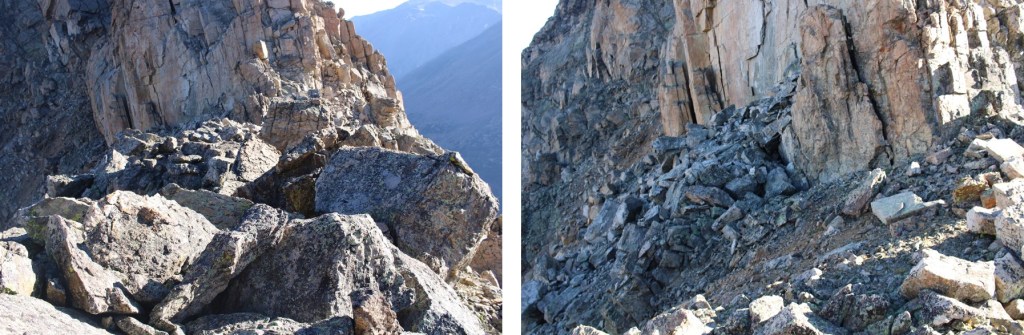
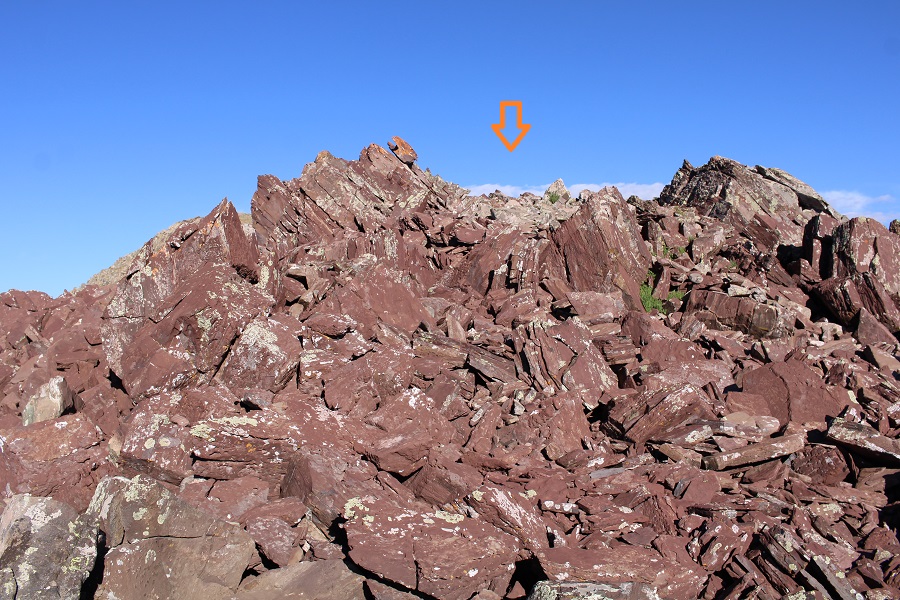
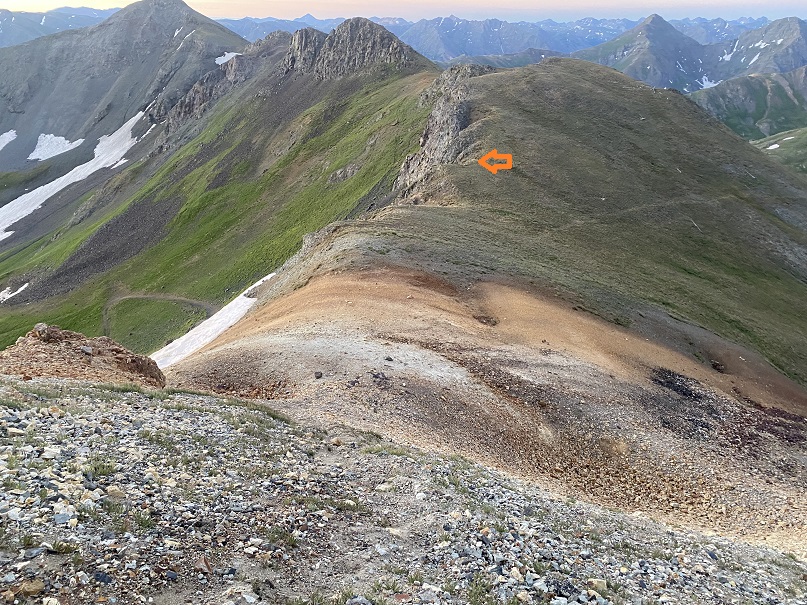
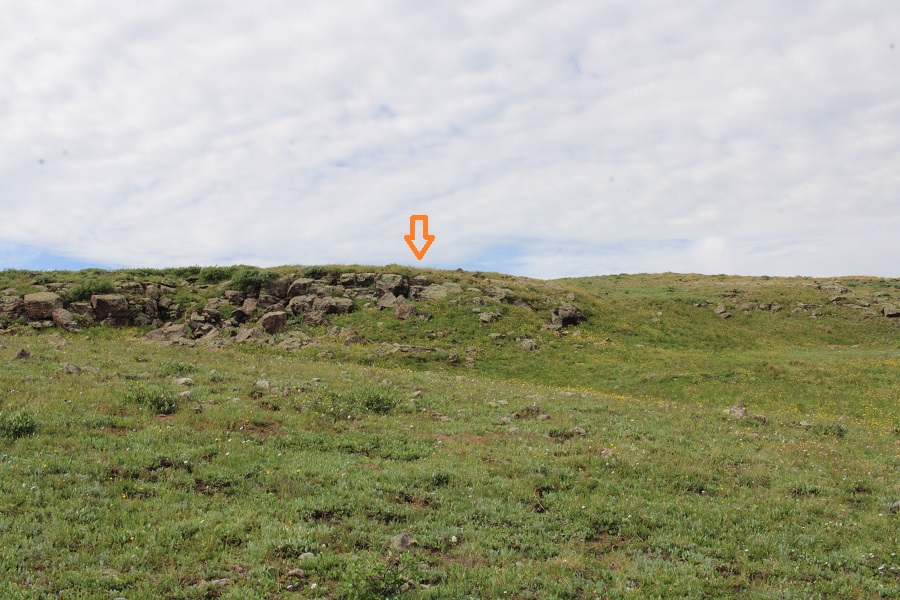
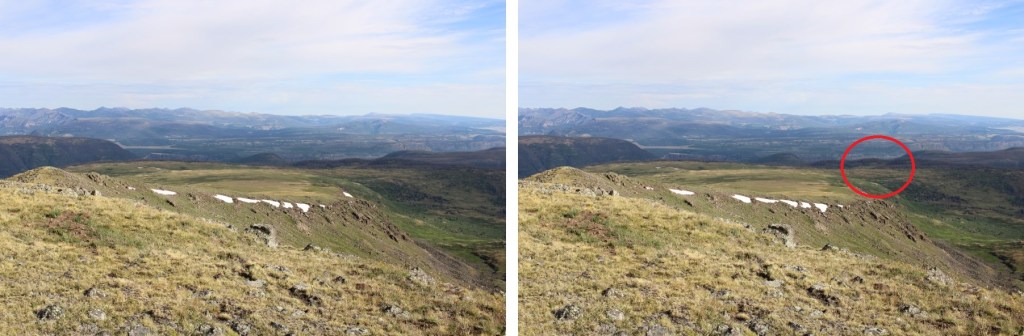
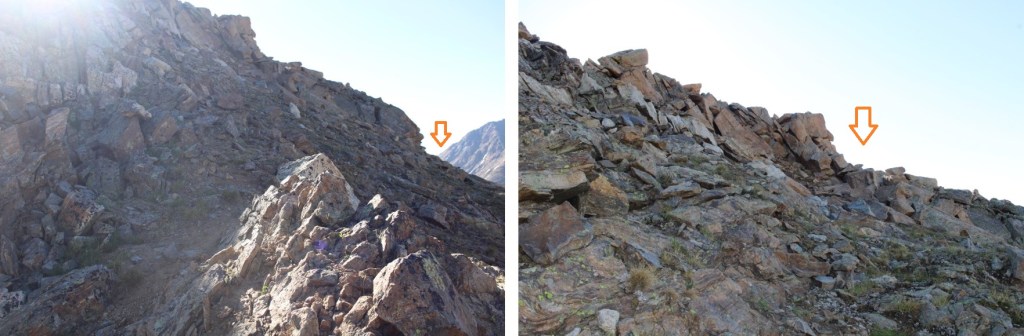
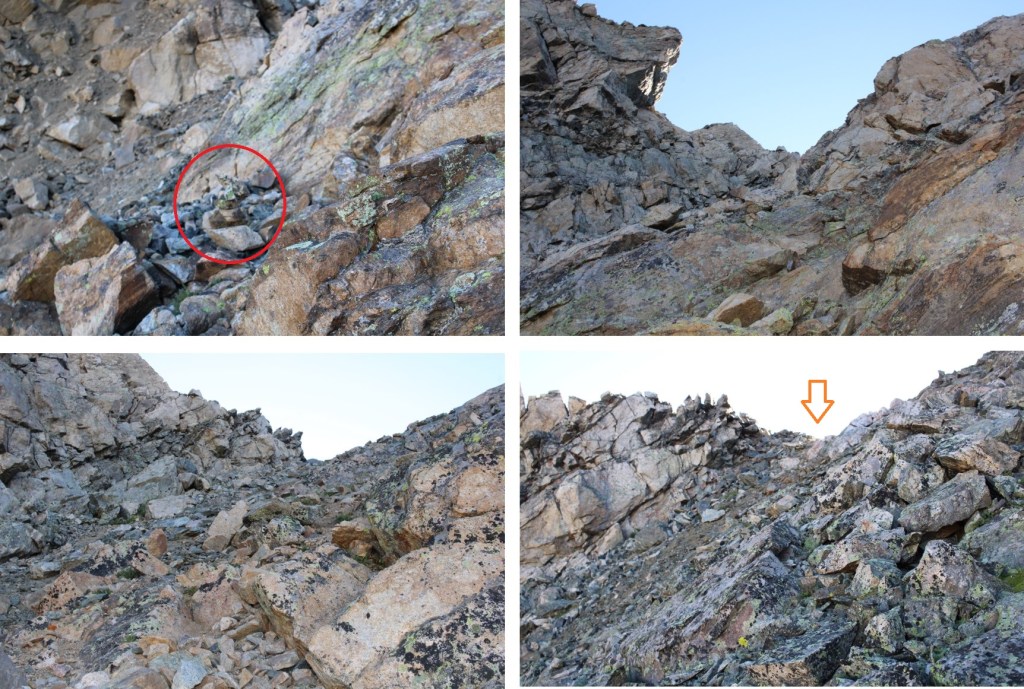
At the base of the gully, I turned right and ascended the 100-foot gully.  Climbers left was extremely loose, but the right side was steep but stable rock.  I chose to stay on the stable rock.  There is a cairn (circled) at the base of the gully, indicating where to ascend.

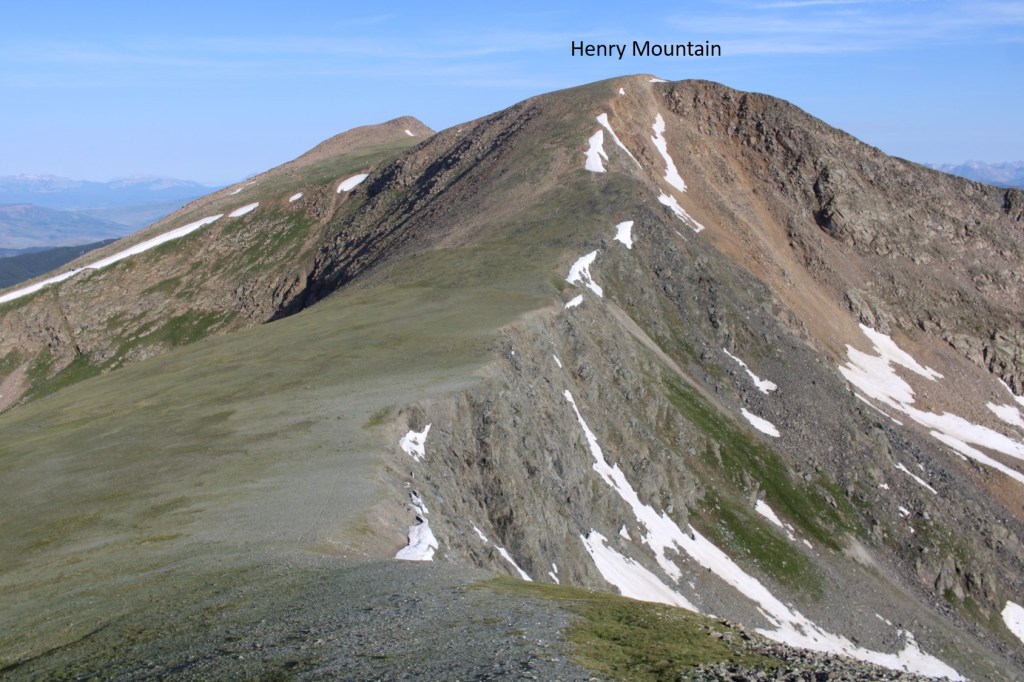
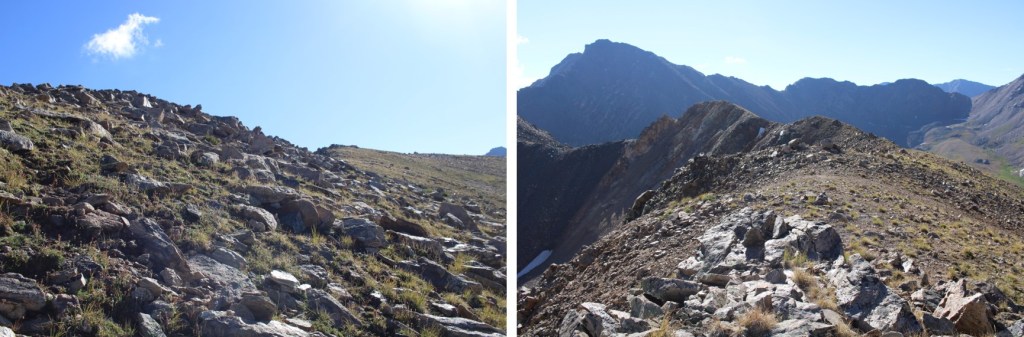
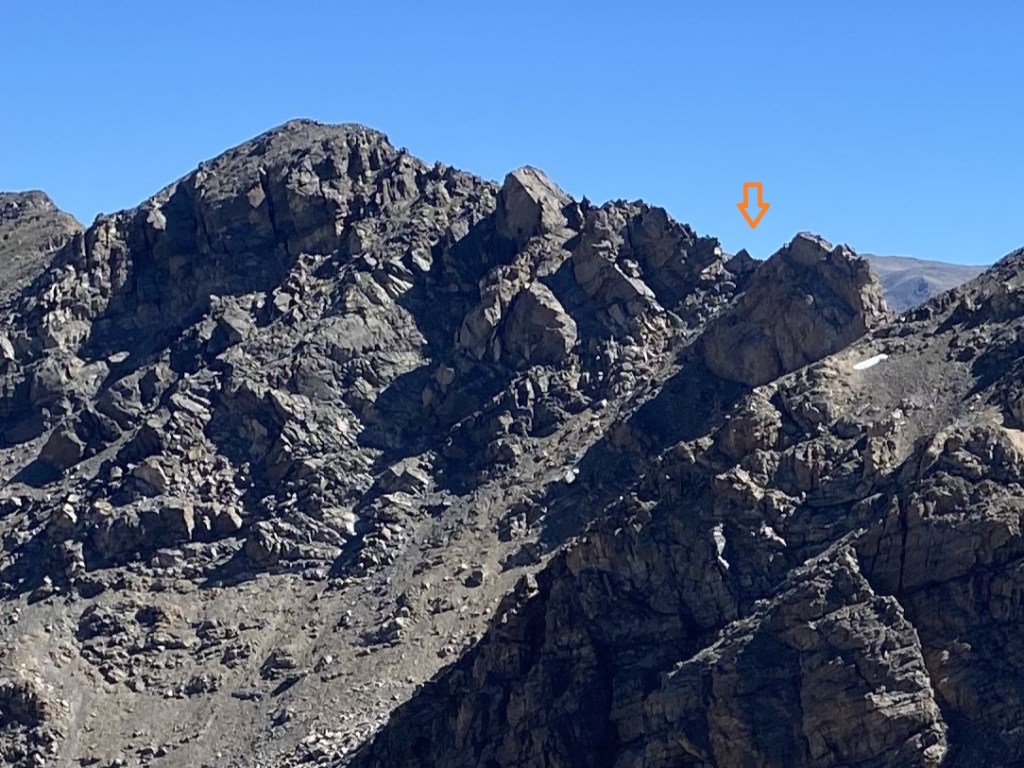
Here’s a view from 13220 of the gully I went up to access 13291.

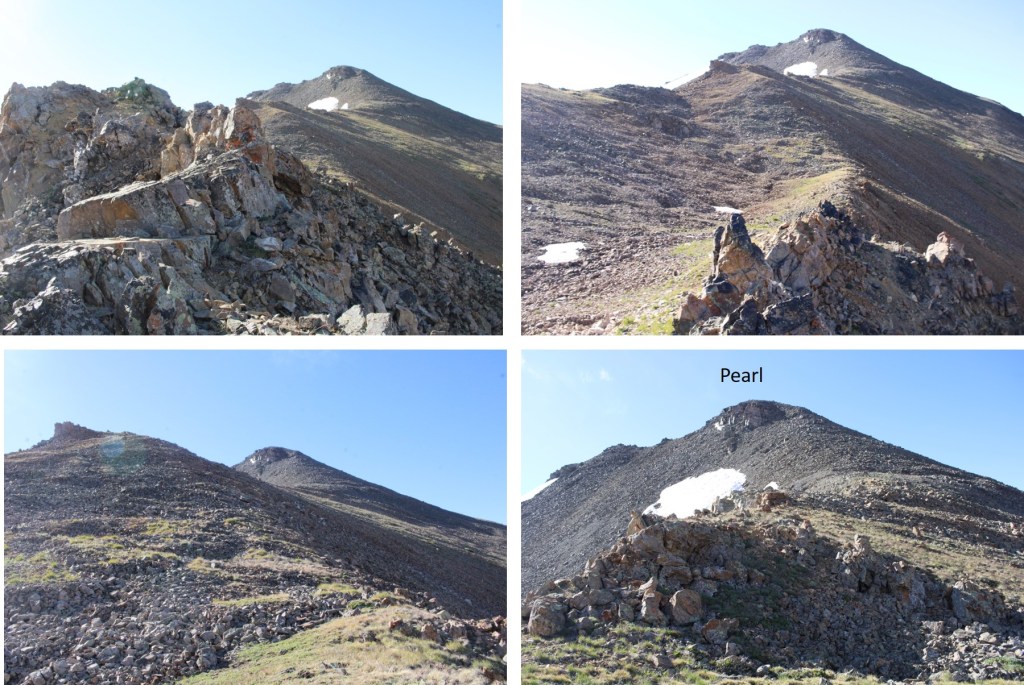
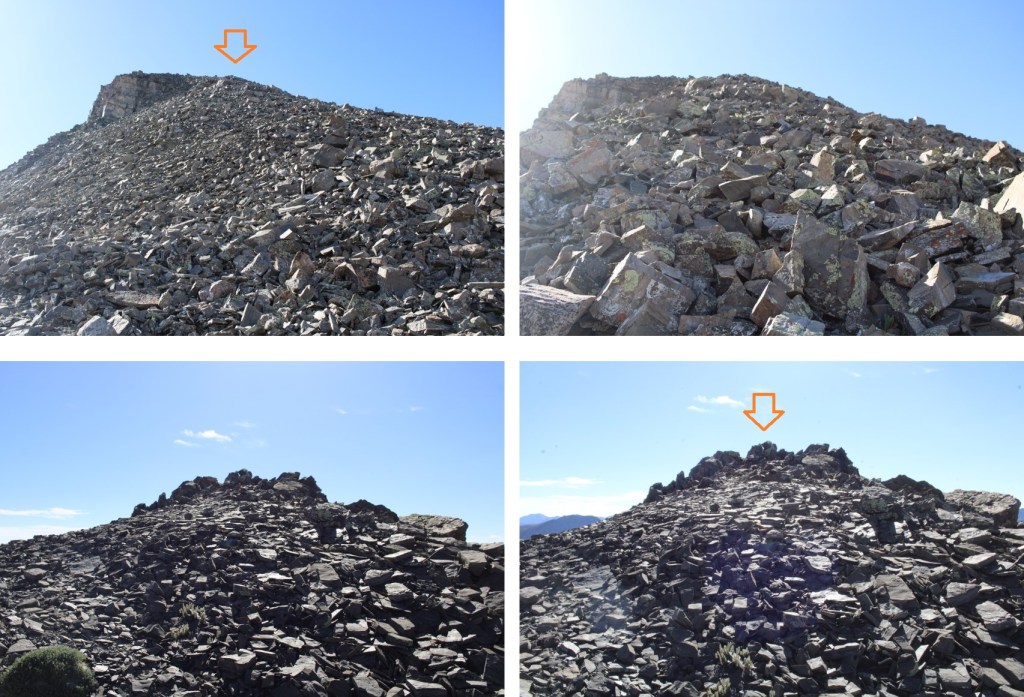
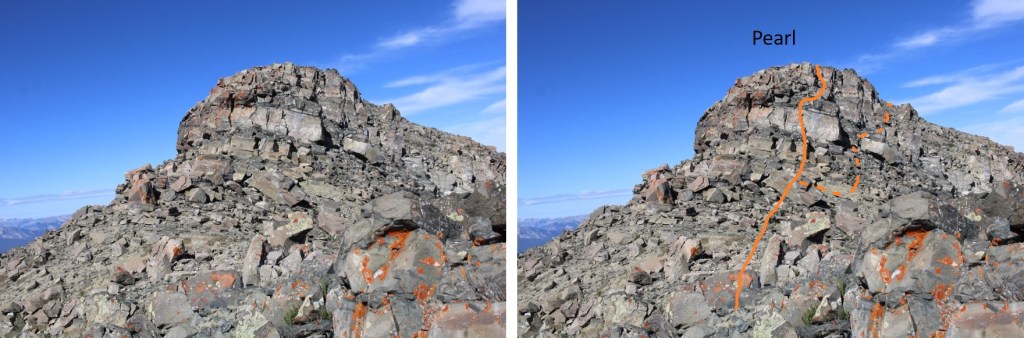
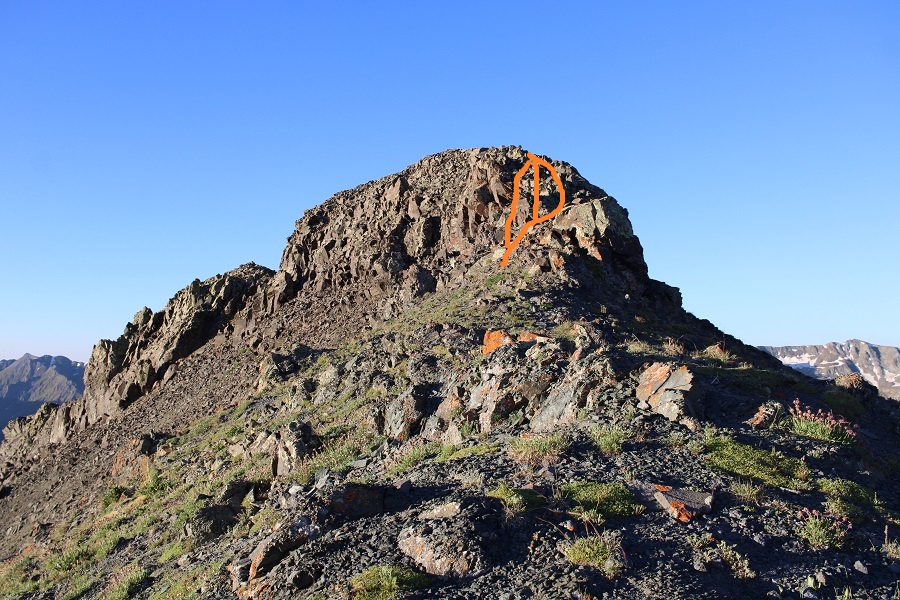
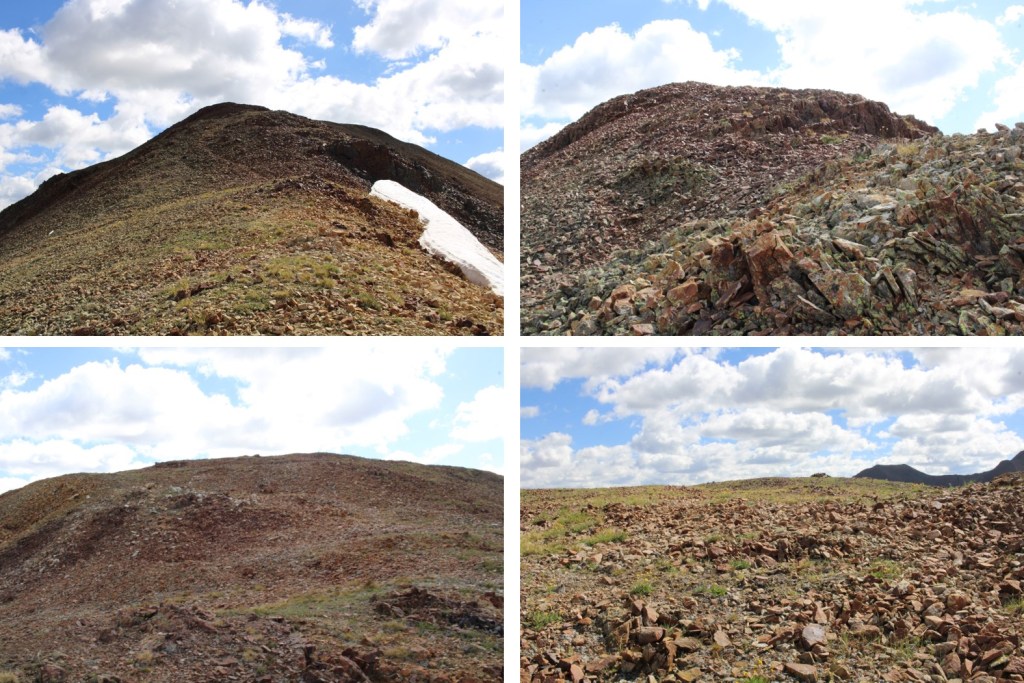
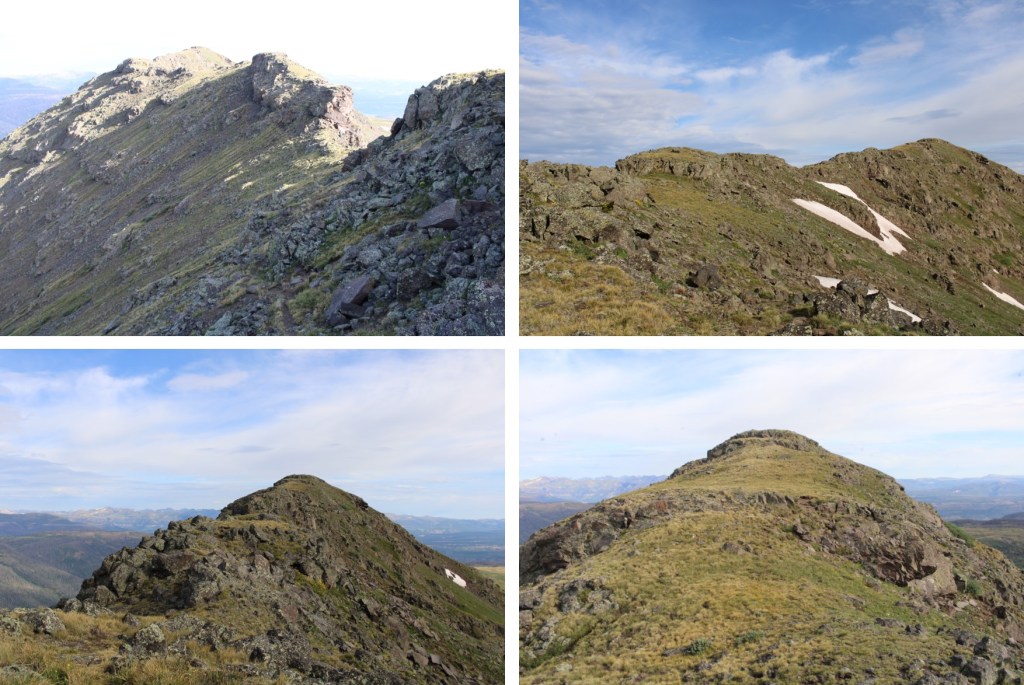
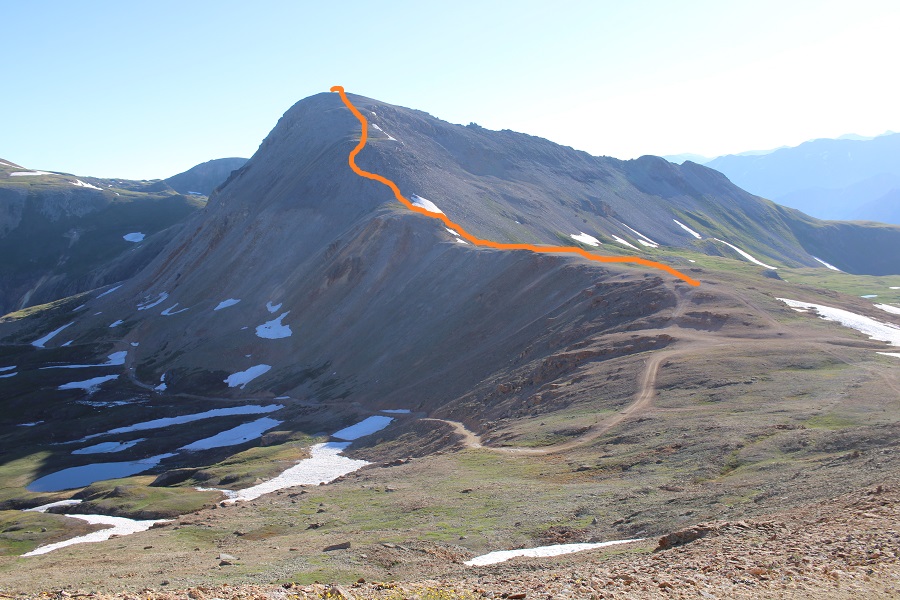
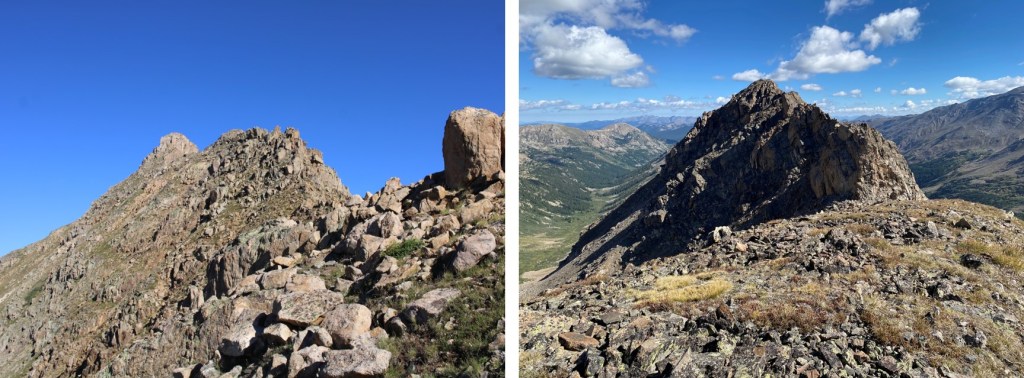
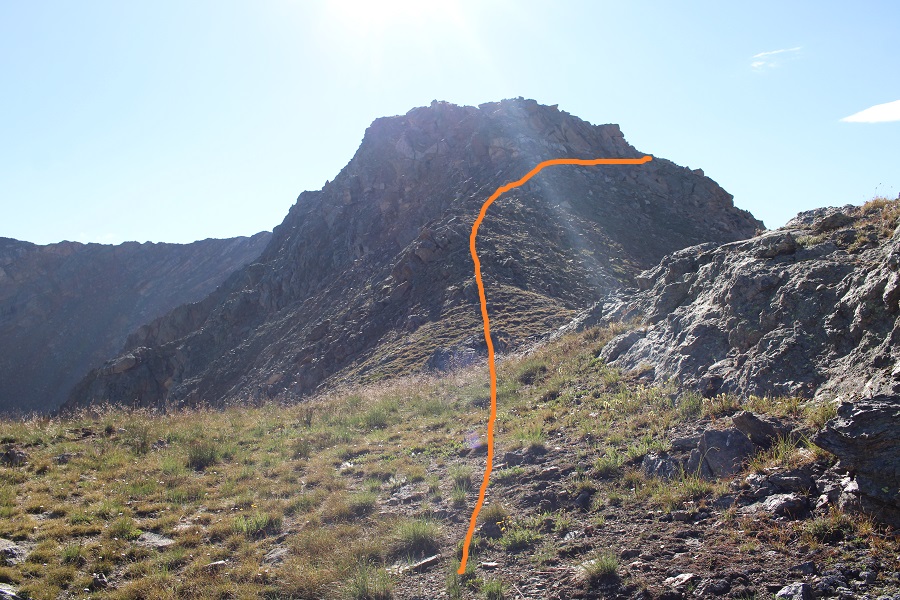
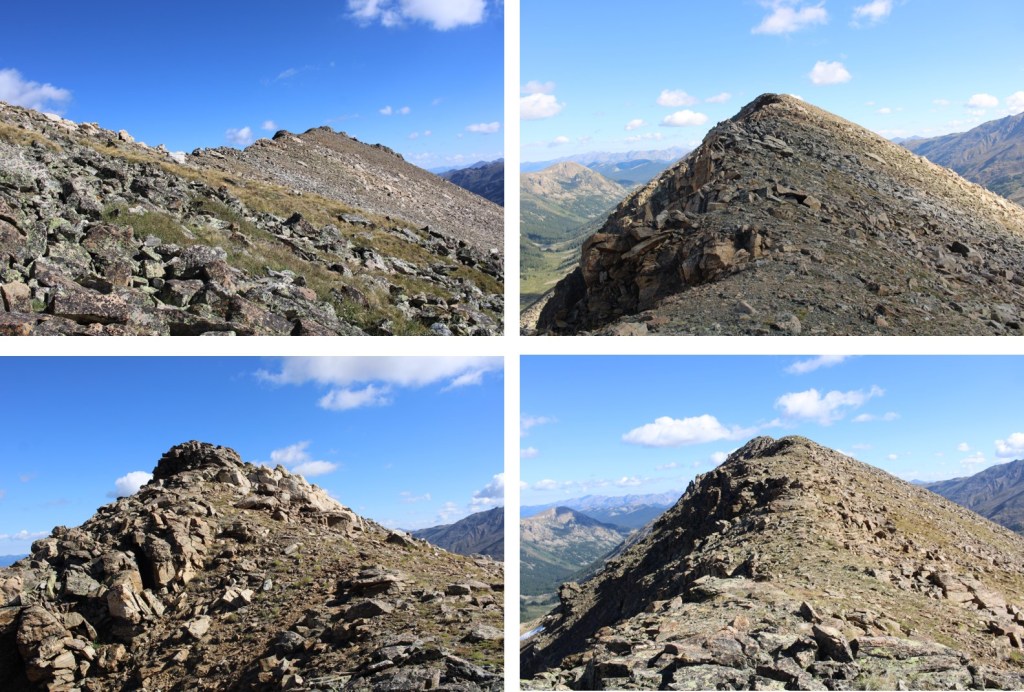
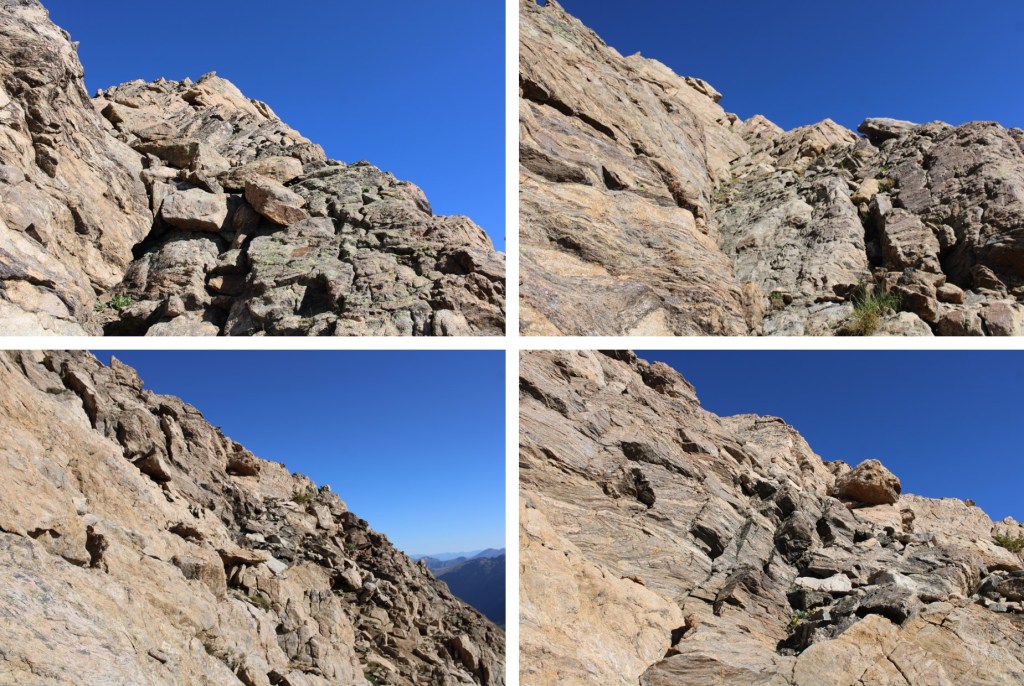
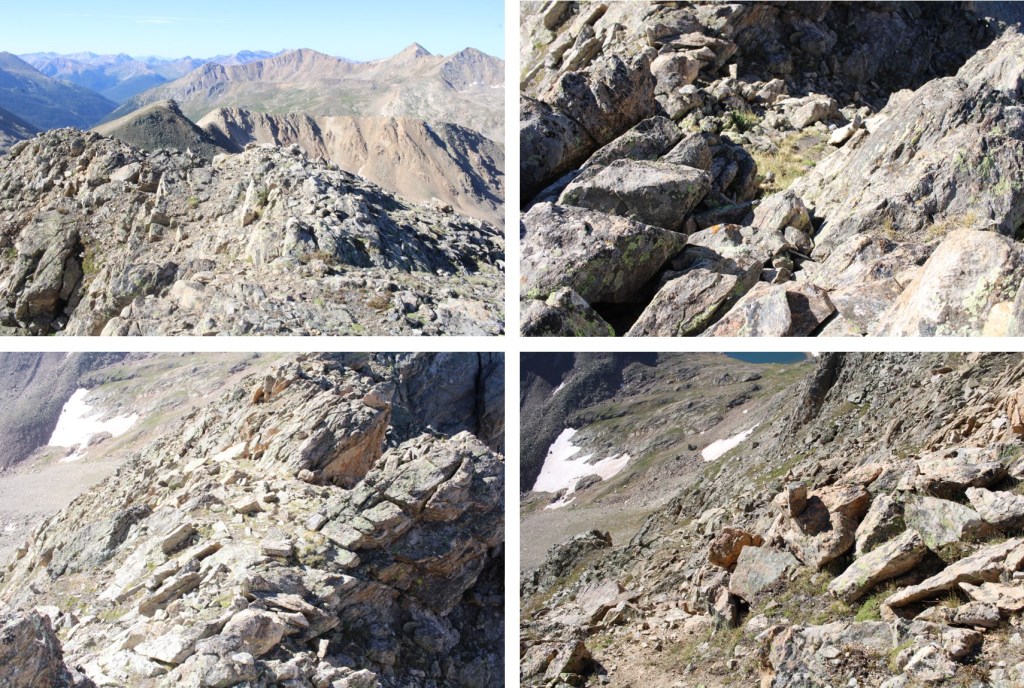
Now for the fun part!  It was time to scale the east side to the summit.  This is choose your own adventure.  I stayed on the east side the entire time.  The ridge proper looks like it goes at class 4.  I stayed more to the east while climbing.

This is the overall route I took, dropping down about 25 feet, aiming for a break in the rocks, and then heading up the east side, keeping it mostly class 3, but once again, it’s choose your own adventure.

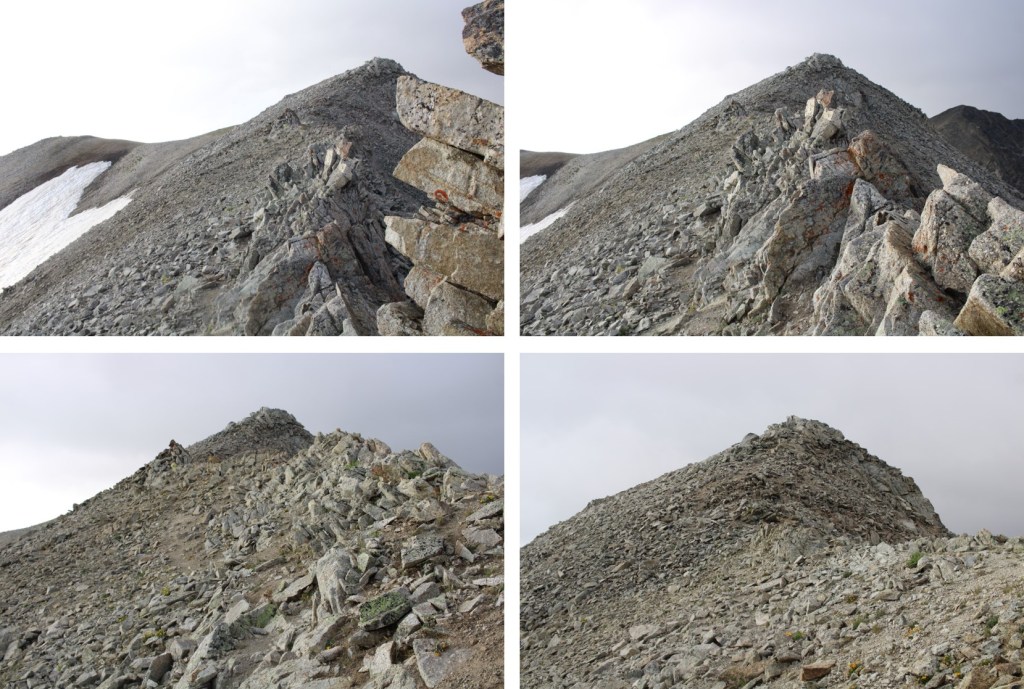
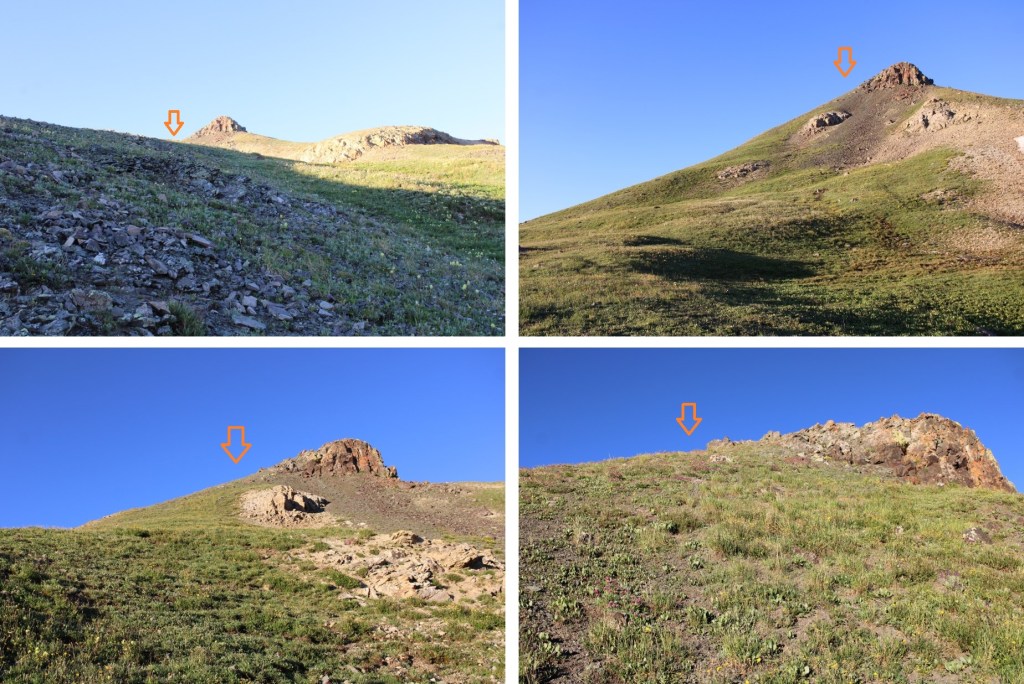
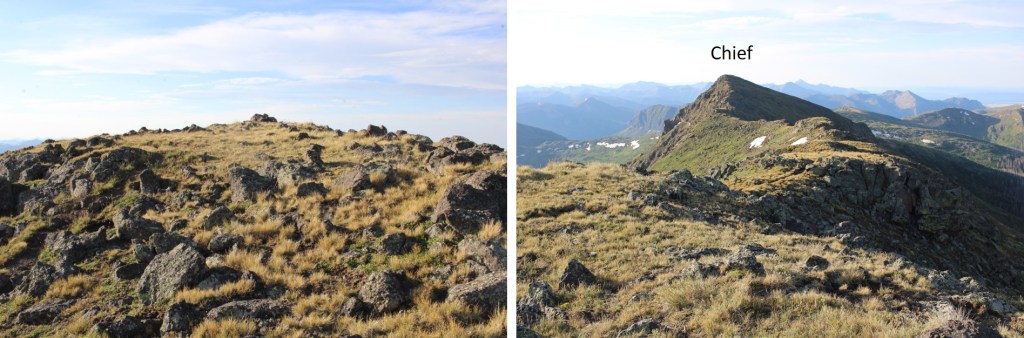
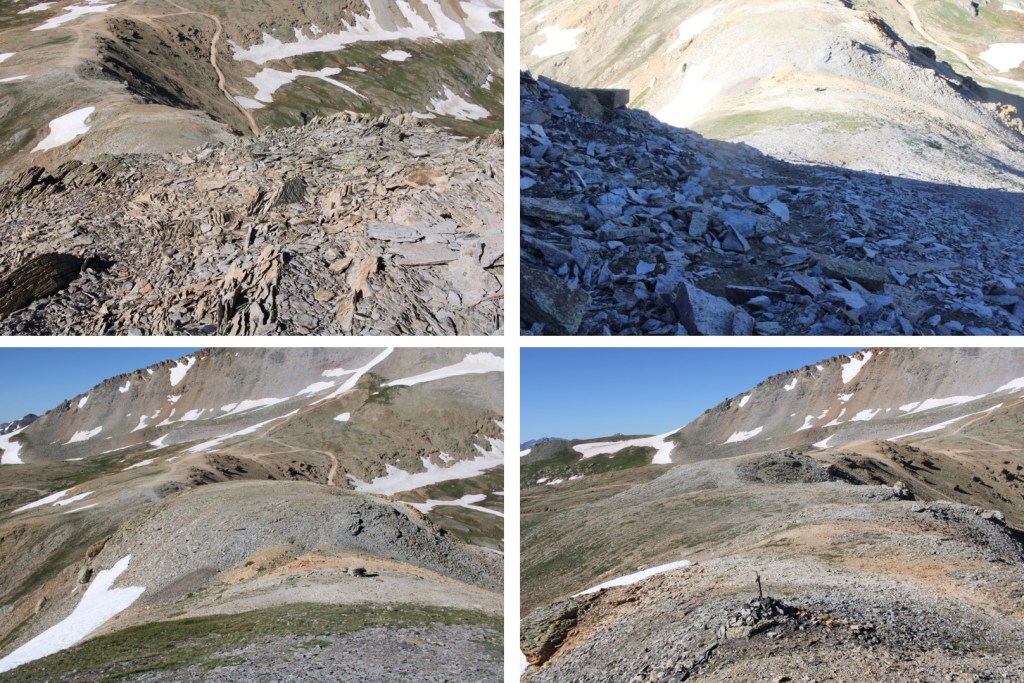
Here are some pictures of the terrain to the summit.  I dropped my pack to make for easier climbing.  It also made it easier to find my way back, as I just aimed for my pack below.

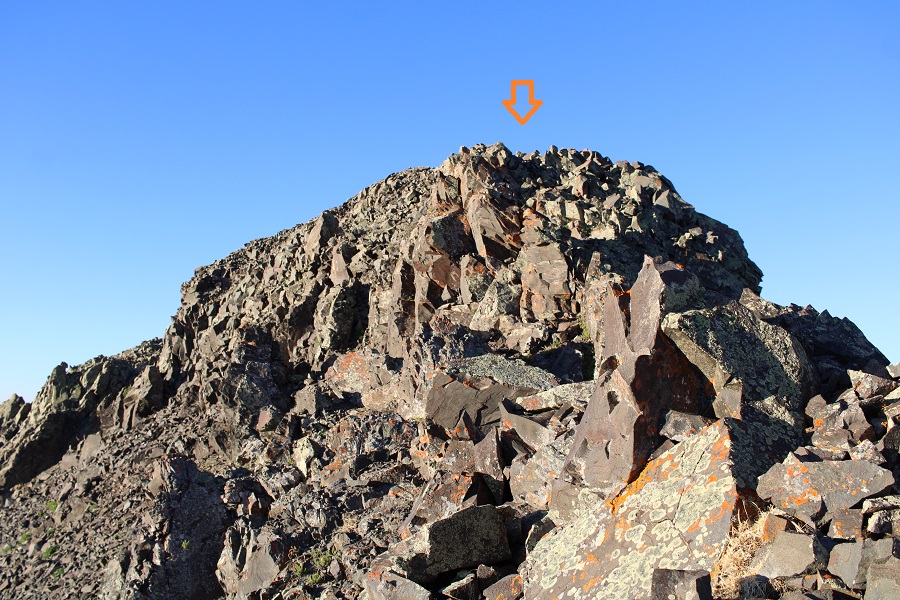
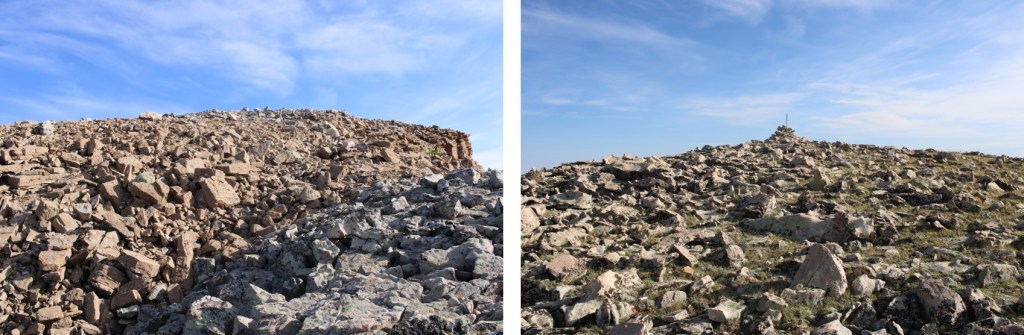
Now the summit was in sight.  There was a short class 4 chimney to climb with solid hand/footholds.

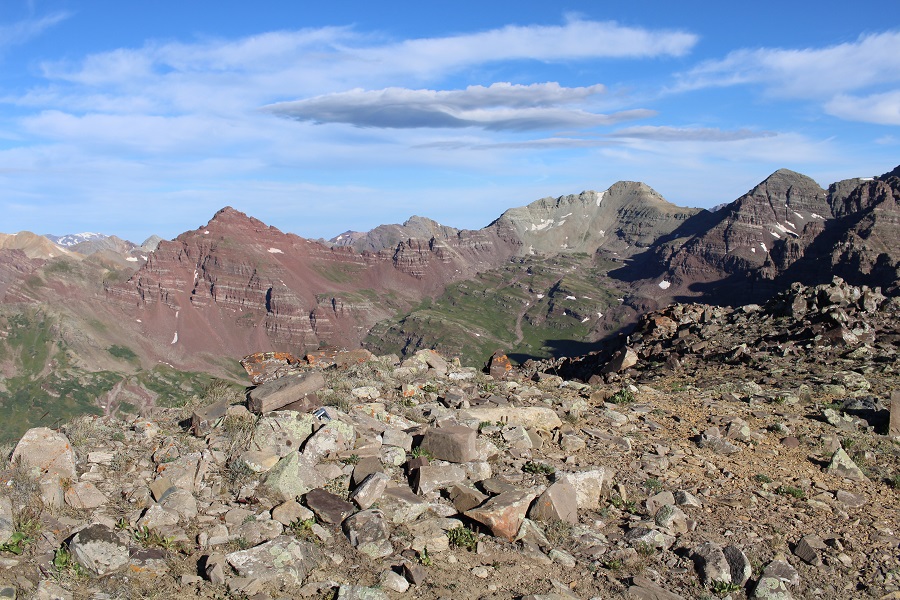
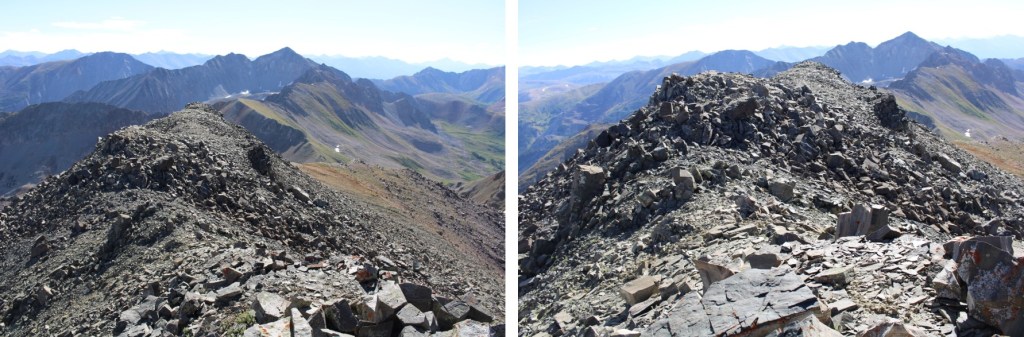
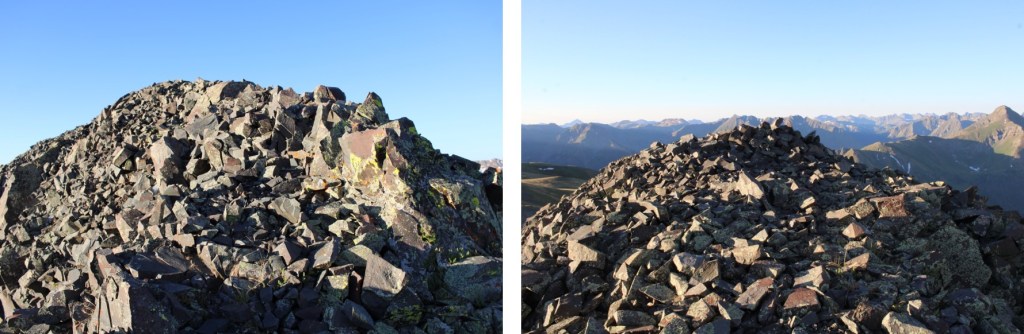
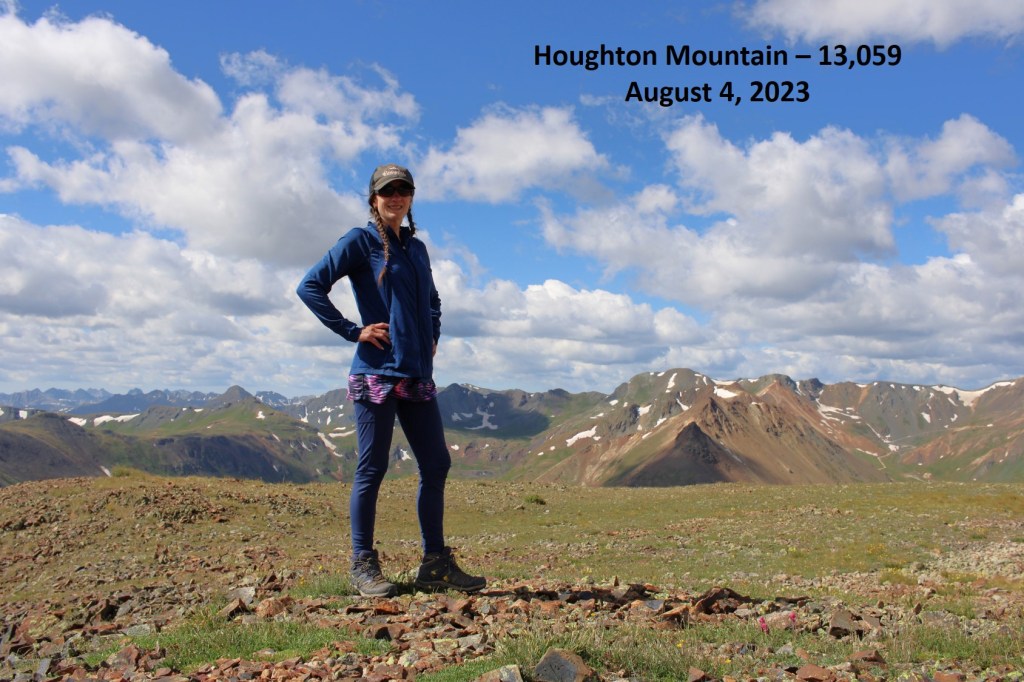
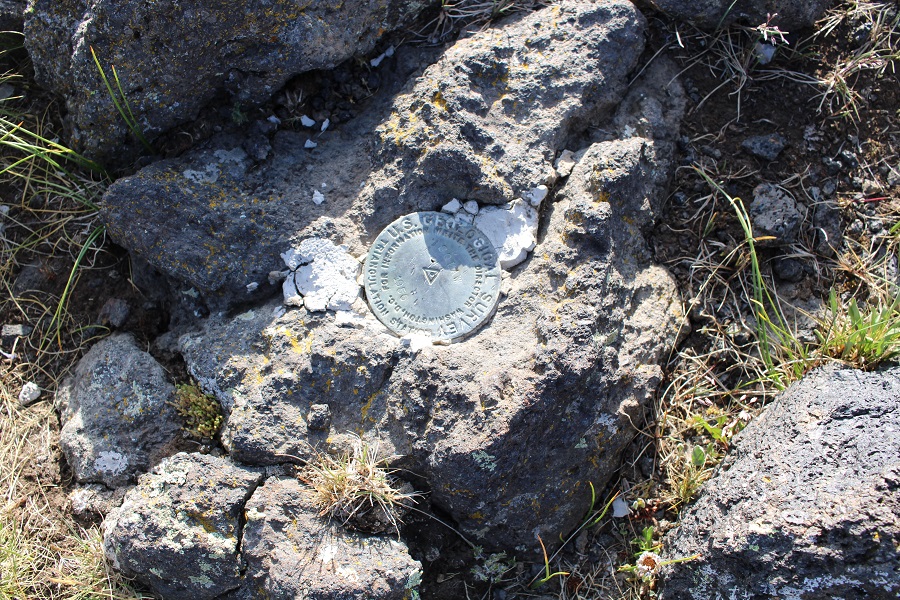
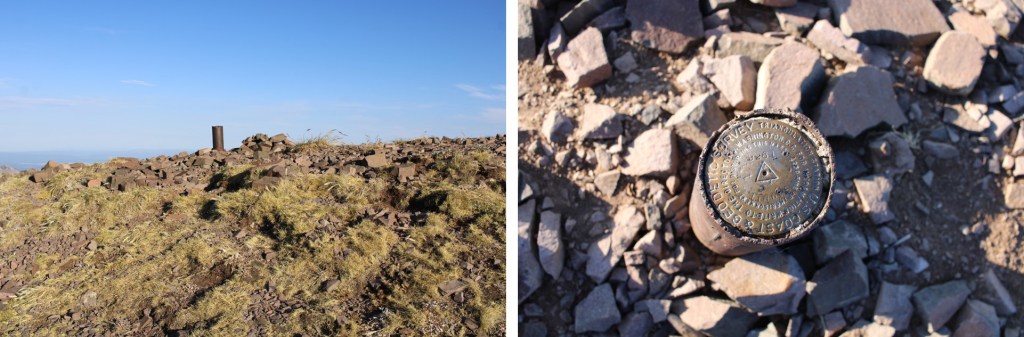
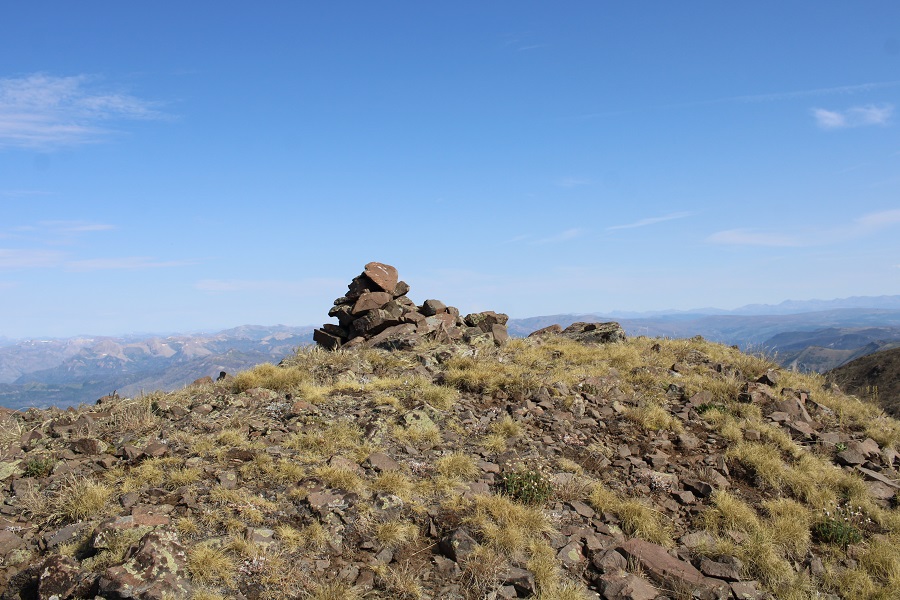
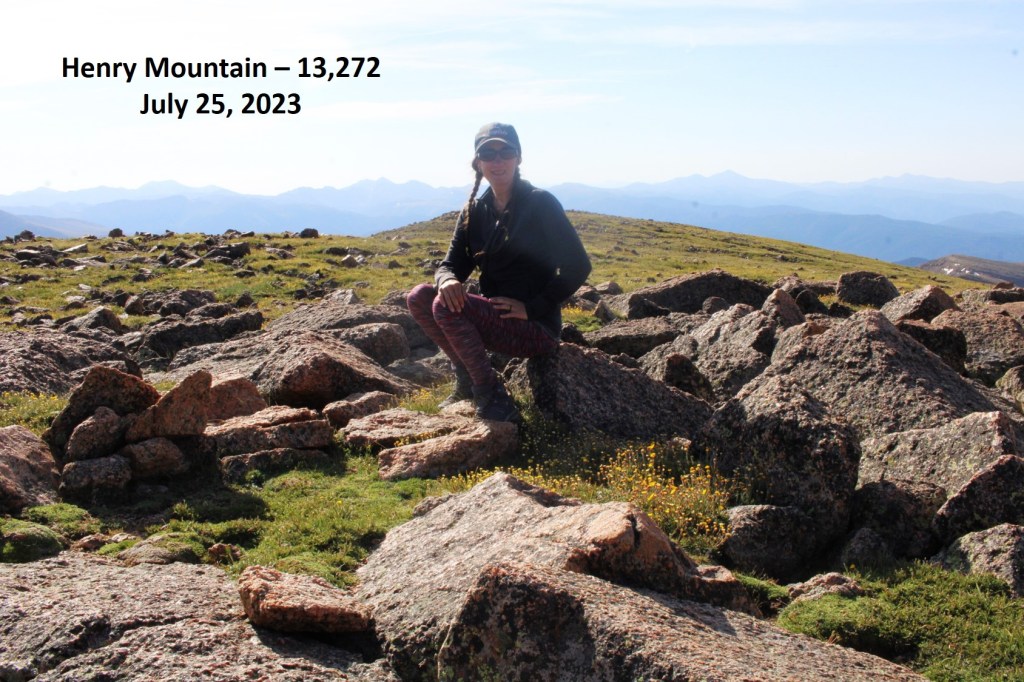
And then a rocky walk to the summit.  There was a summit register, but it was closed so tight I couldn’t open it.
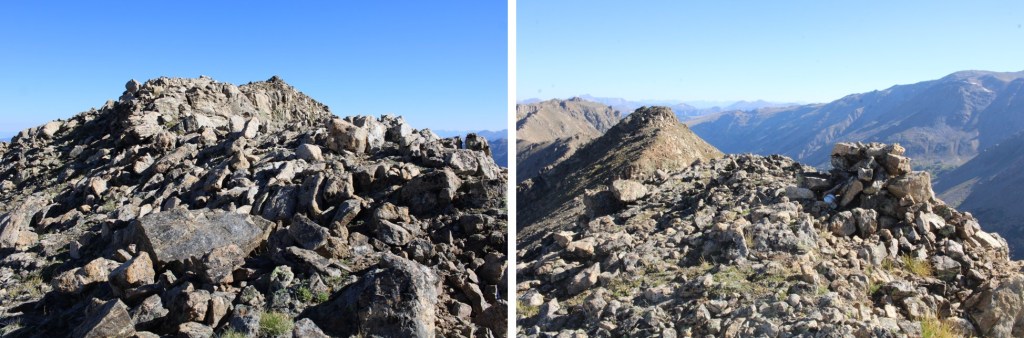
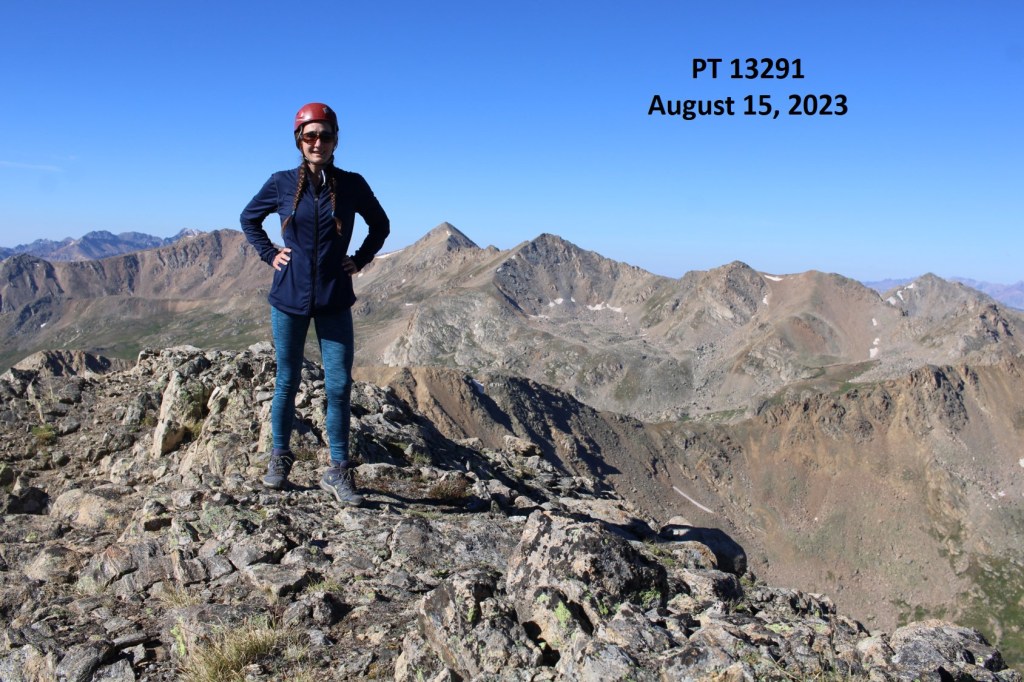
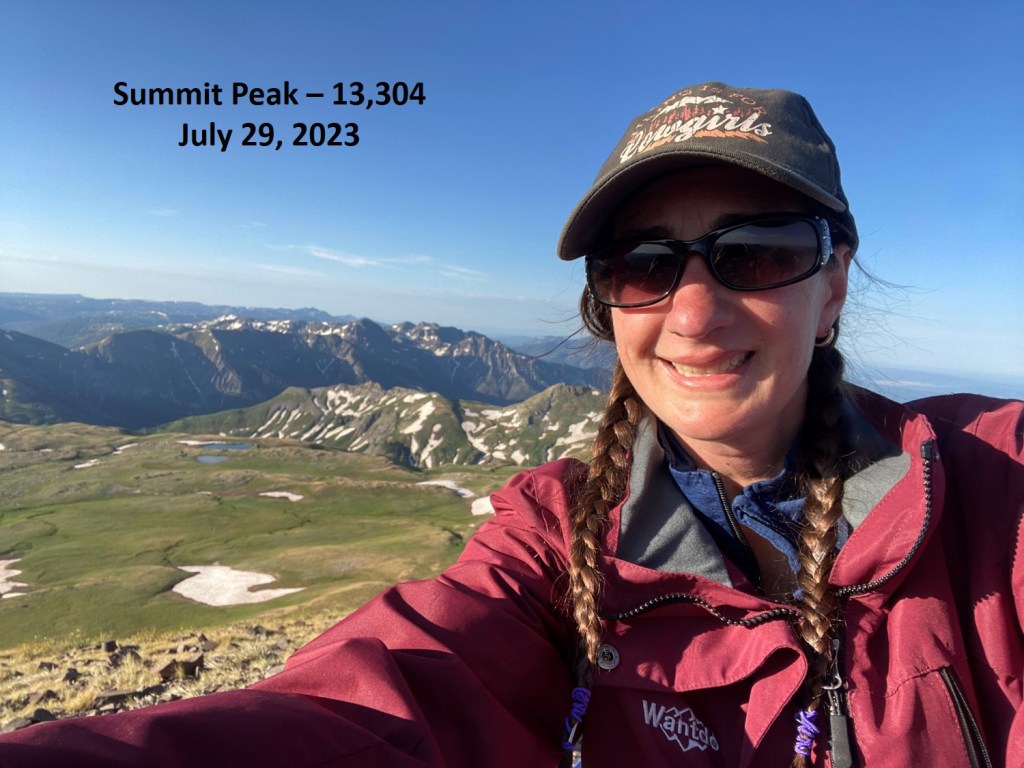
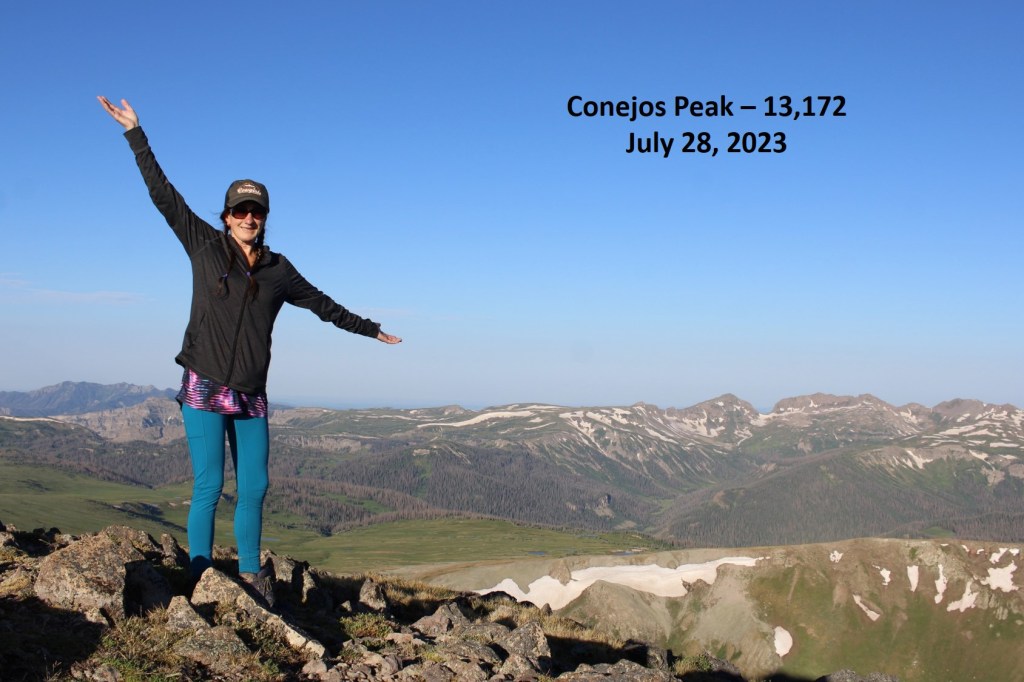
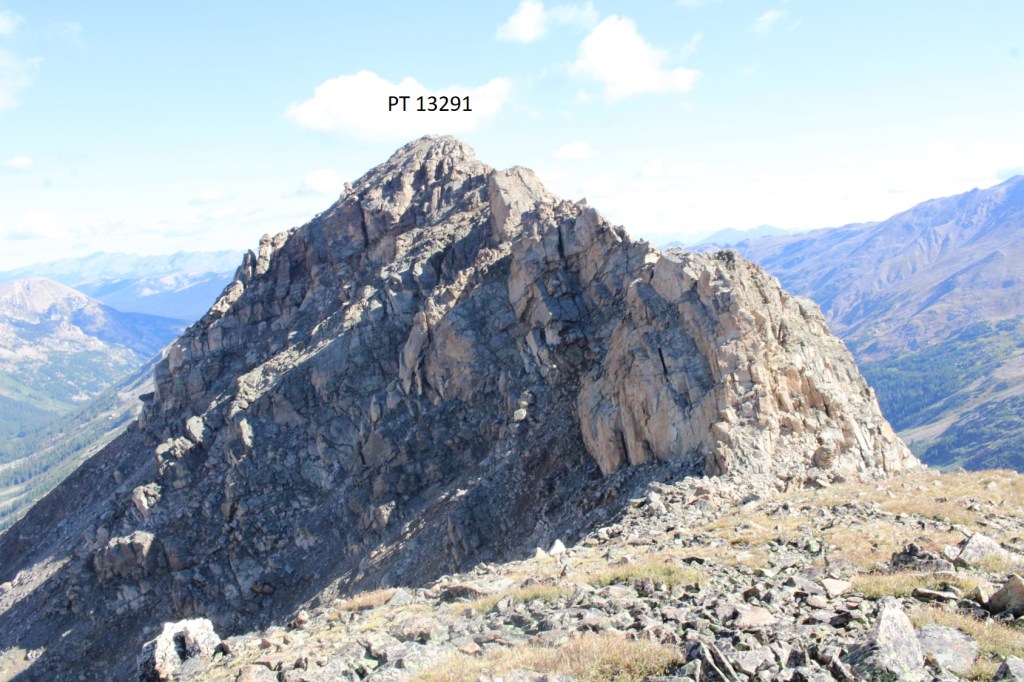
PT 13291

Now to head back down.  I descended the chimney, and headed back towards my pack. 

Then it was up to the gully, down the gully, and around the west side to head back to the saddle. 

Back up to the ridge

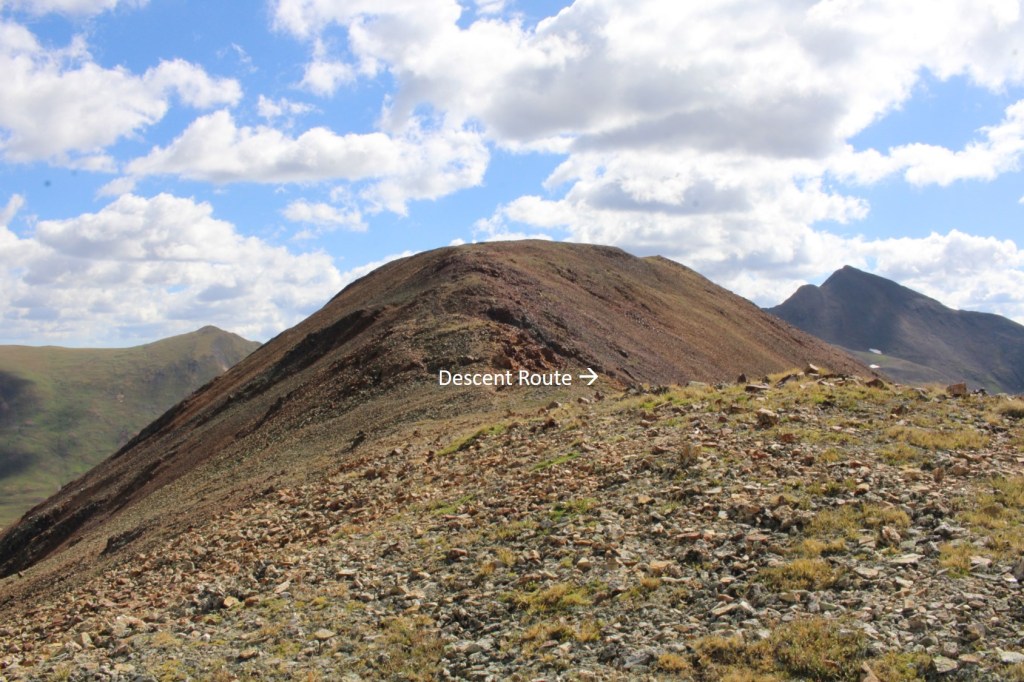
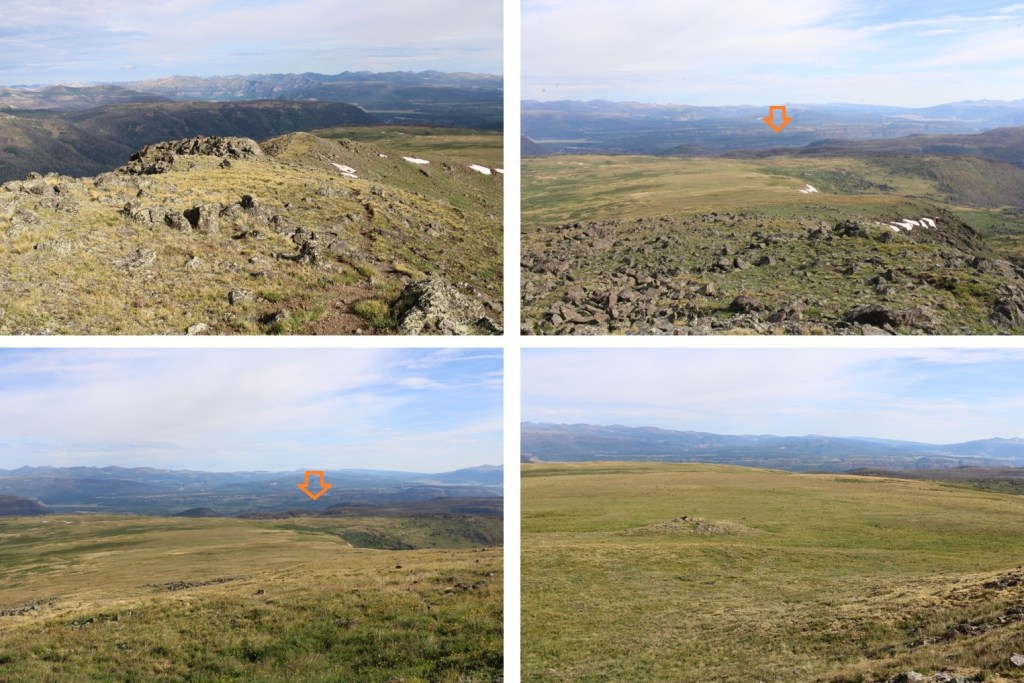
And then I followed the ridge, descending it to the left, and curving around the south side.  It’s a good idea to have your microspikes on for this part. It’s class 2+, but the rocks are loose and the angle is steep.

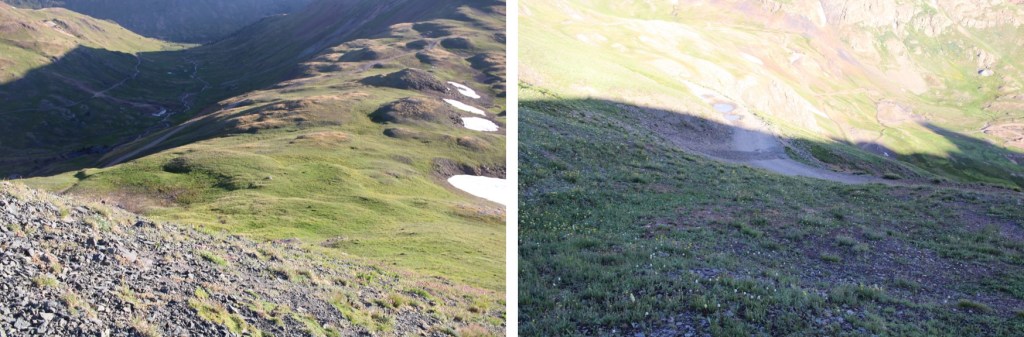
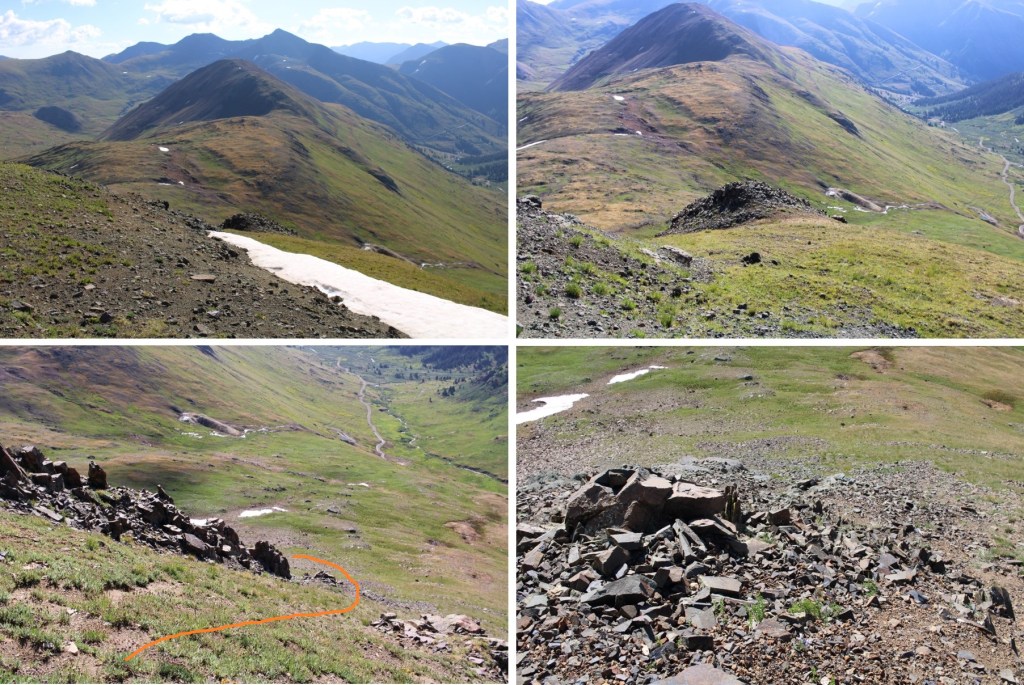
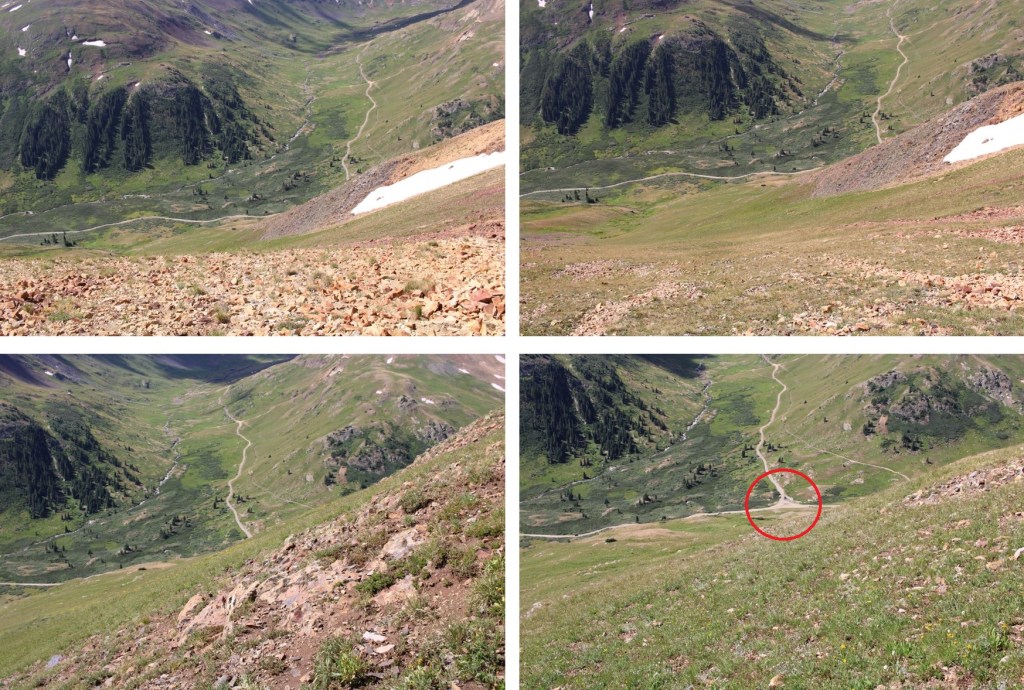
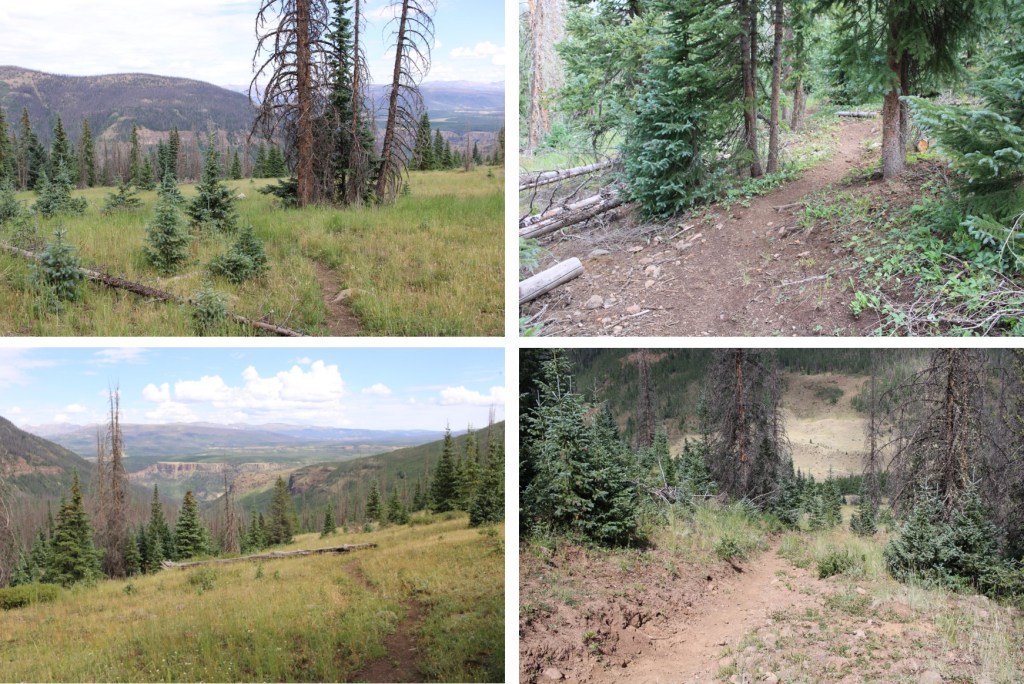
I followed the ridge until I made it to just before where I’d accessed the gully from 13220.  Instead of heading down that way, I descended south into the basin below.  This was the same way I’d ascended earlier that morning.  This would be a good option if just doing 13291. It’s class 2, and led me into the basin.  I aimed for the thinnest section of rock below. The entire time I was hiking down, I was looking for the dry creeks that led me in, knowing they’d eventually bring me back to the creek crossing and the trail.  They were easy to spot from above.

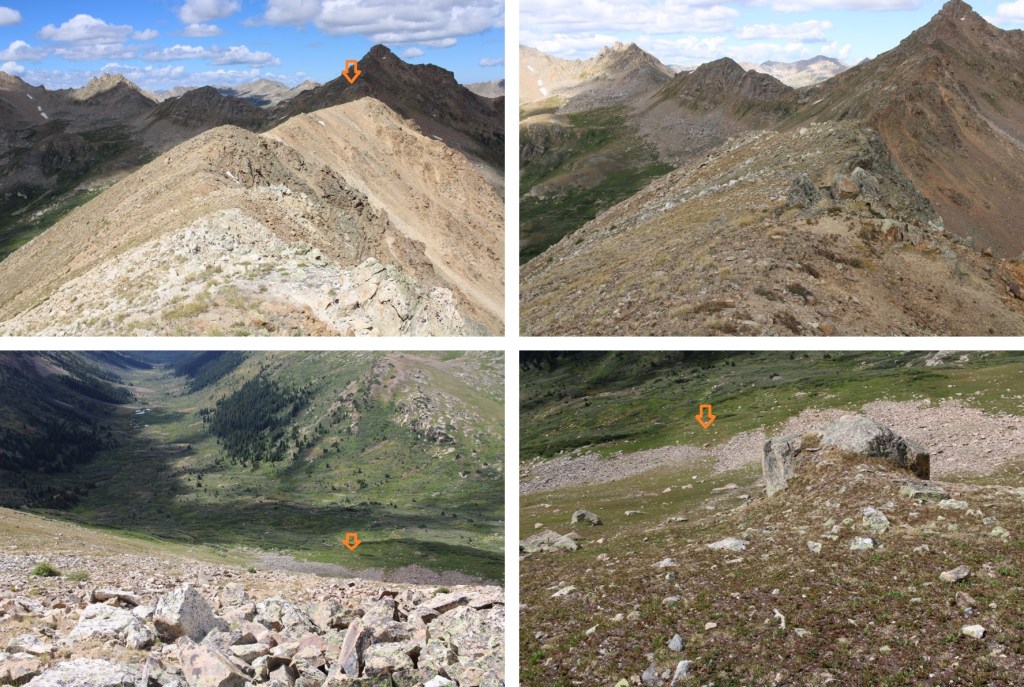
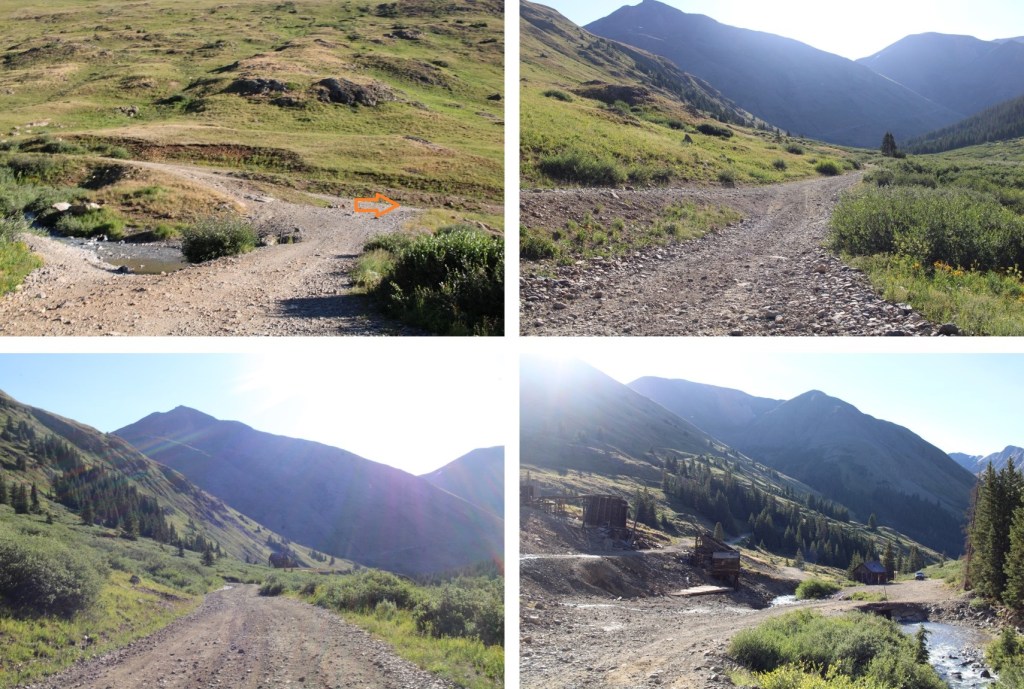
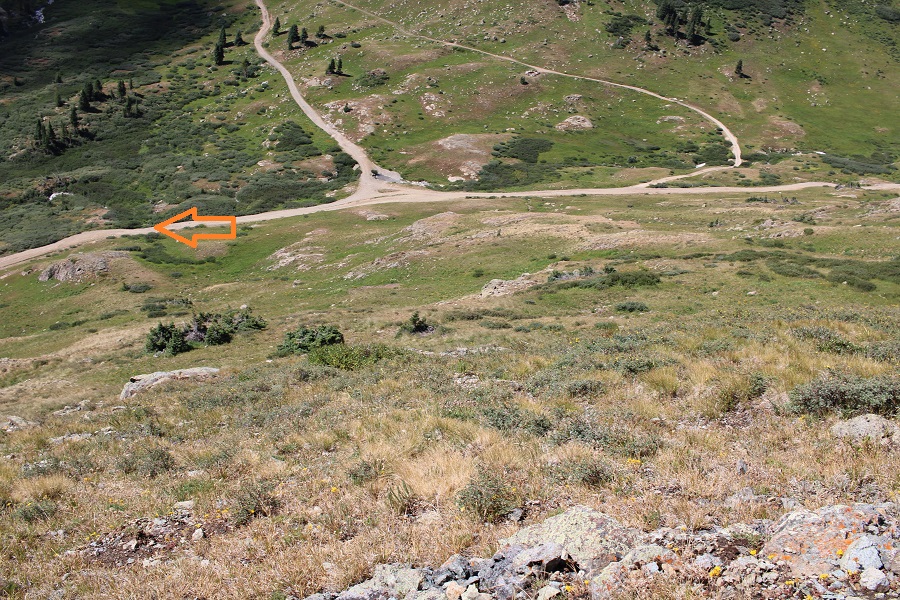
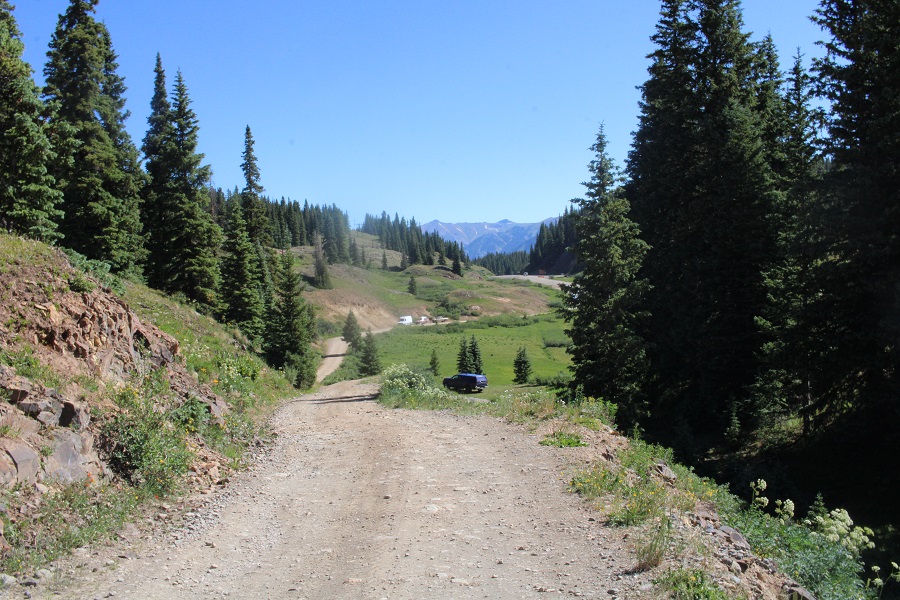
Once in the basin, I followed the dry creeks to the trail

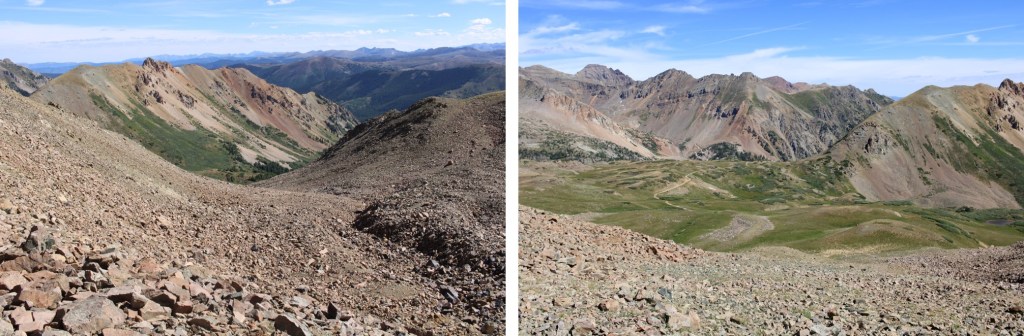
Here’s a look back on my route down from the ridge (and how I hiked in that morning). Taking the dry creeks keeps you away from most of the willows.

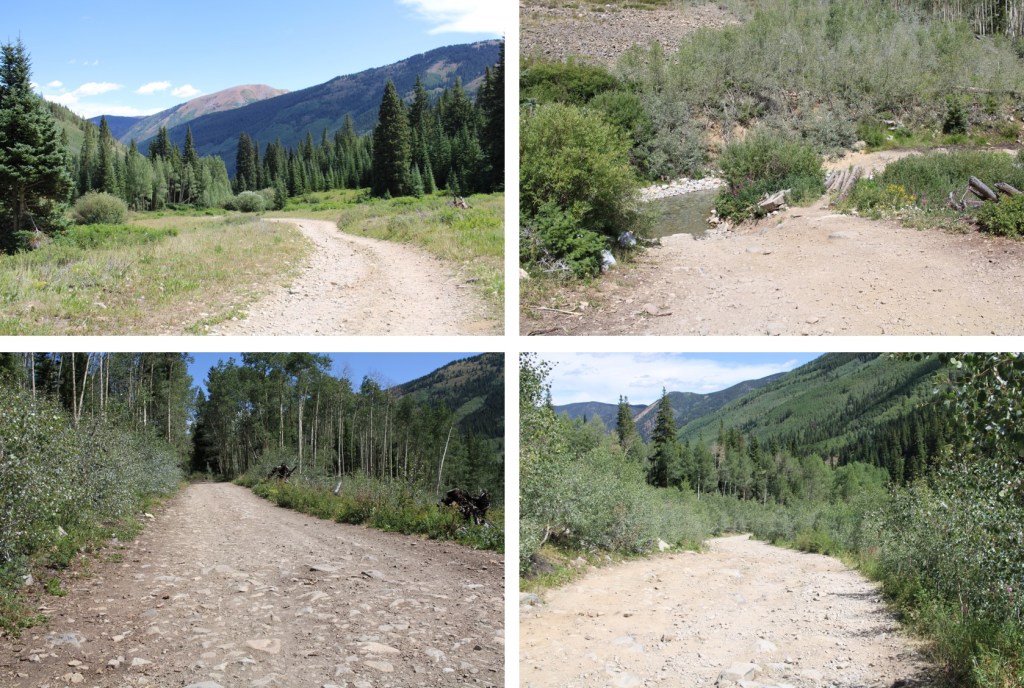
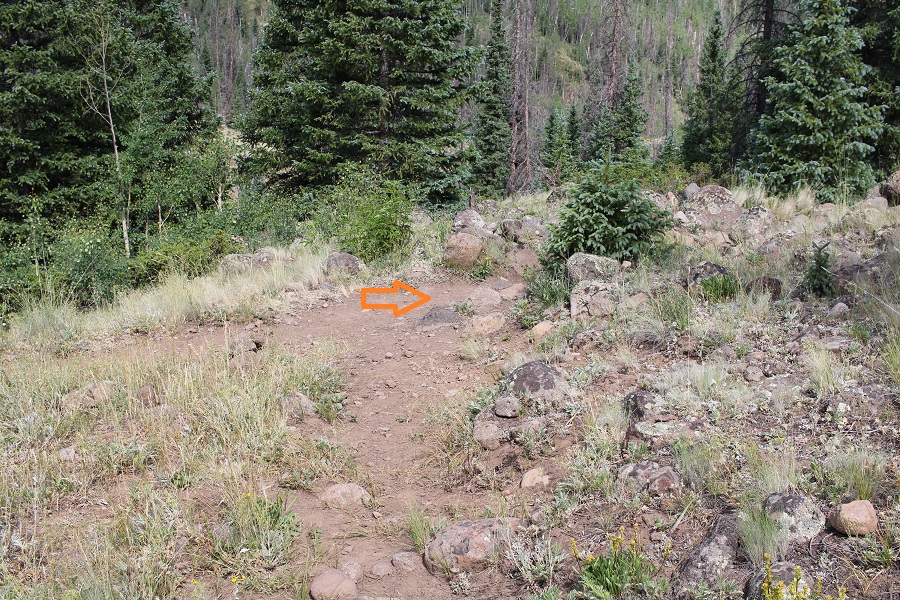
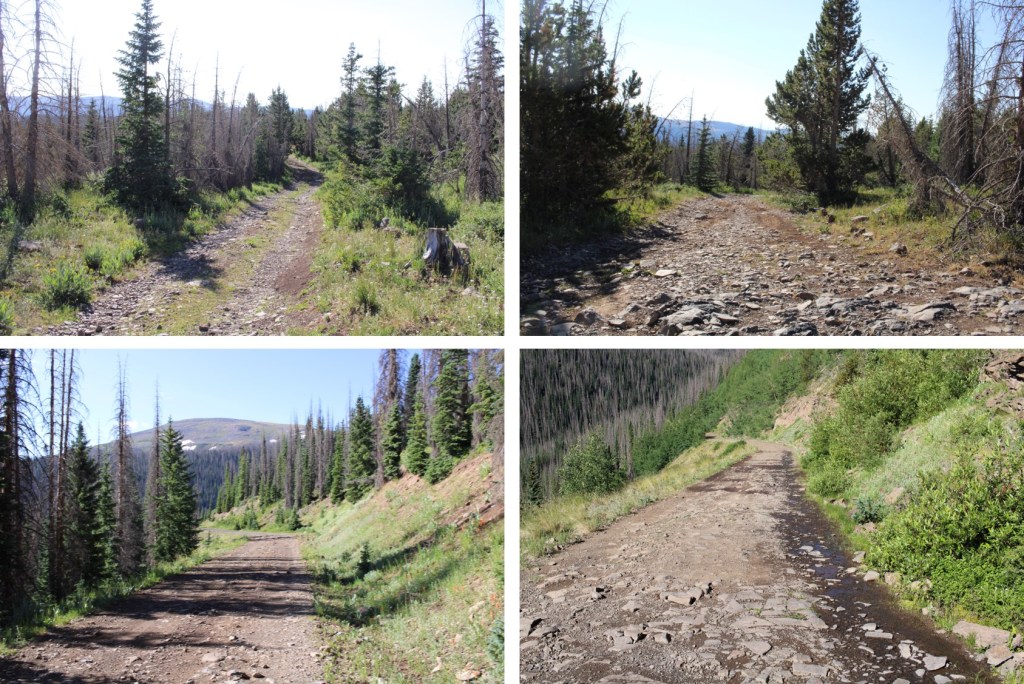
Back on the trail, I followed it south back towards the trailhead

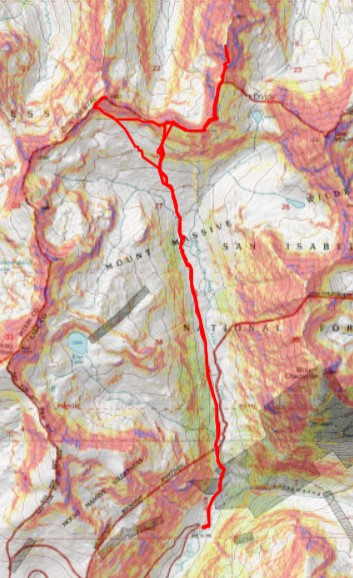
Doing the math by combing my two days of hiking, the total for the route in one day should be about 11.89 miles with 3560’ of elevation gain.

On to the next trailhead!

Peak 9 – 13,207 and Peak 8 – 13,005

RT Length:  10.7 miles

Elevation Gain:  4038’

After quite a long wait at the Eisenhower Tunnel I made it to the Far East Lot at Copper Mountain and was on the trail at 5am.  The lot has enough room for hundreds of vehicles, if not more.  The trail starts near the construction area, at the south end of the lot

I crossed a bridge over Tenmile Creek, and the trailhead was directly on the other side

I was following the Colorado Trail.  This was a class 1, easy to follow trail all the way up to the Peak 9/Peak 8 saddle. 

After hiking for 2.3 miles, I came to the Colorado Trail/Wheeler Trail junction.  At this point I continued straight, on the Wheeler Trail

This trail took me above treeline, to the Peak 9/Peak 8 saddle.

From the parking area, it was 3.7 miles to the saddle.  From the saddle the hike became class 2, and I gained around 800 feet to the summit, but it was an easy 800 feet.   I turned right, and headed south up to the ridge on tundra

Once on the ridge I turned left, and followed a slight game trail southeast

The last bit of the hike to the summit can look overwhelming at first, but it can be kept at class 2.  I thought of it as similar terrain to the “16 Golden Stairs” on Pikes Peak Barr Trail, but much shorter (maybe 30 feet or so to deal with).

I dropped down to the left of the ridge, and took a game trail to the summit.

I summited Peak 9 at 7:30am

Peak 9:

It was starting to snow lightly, I’d forgotten my gloves, and I could see sunshine on Peak 8 so I turned around and headed back to the Peak 9/Peak 8 saddle. 

Here’s a look at that rocky section on the way back

Back at the saddle, I headed north, and gained about 600’ to the top of Peak 8.  This was a simple trek to the summit, as I just followed the “Ski Area Boundary” signs.  At times, there was a game trail to follow. 

There was a lot of junk left on this ridge.  It looks like when they put in the posts for the ski area boundary signs, they left their tools behind.  There was also an emergency station, with litters and first aid supplies for injured skiers.

The route to the summit was obvious

I summited peak 8 at 8:30am

Peak 8:

This peak gets a lot of traffic.  There was a wind break with a summit register box filled with old school IDs and medical cards.  Someone had even left a small tube of sunscreen inside.

After leaving a card of my own, I headed south back to the saddle

At the saddle I turned right, and followed Wheeler Trail back to the Colorado Trail

Then I followed the Colorado Trail back to the trailhead

I made it back to the trailhead at 10am, making this a 10.7 mile hike with 4038’ of elevation gain in 5 hours.

On to the next trailhead!

Oyster Peak – 13,316 and Pearl Mountain – 13,379

RT Length: 11.44 miles

Elevation Gain: 3923’

I drove past the town of Ashcroft, and right onto the 4WD dirt road that leads to Pearl Pass.  I stopped at about 9800’ at dispersed campsite #3.  There are 9 total, with signs asking you to only camp in the designated areas.  All first come.  Sites 1 and 2 were taken, so I parked in site 3. 

Here are a few of the other sites.

I was up and on the trail at 5am the next morning.  I followed the 4WD dirt road southwest, towards the Pearl Pass/Montezuma Mine junction.   About a mile into my hike I saw a bear on the trail (it ran away before I could get a picture) so those bear warning signs aren’t a joke. 

At 10200’ I crossed Castle Creek on a log bridge, and continued on

After hiking for 2.5 miles I came to the Pearl Pass/Montezuma Mine junction and went left towards Pearl Pass Road.  There are places to park here as well, and if you have a stock 4WD you should be able to make it to this point.   After this junction it’s modified, lifted (etc.) 4WD only.

I continued on this road as it headed south.  Water from streams above ran down the road.

After hiking for 3.6 miles, and at 11800’ of elevation, I left the road to ascend west, up a game trail through a ravine

This gave me my first good view of Oyster Peak

This is a choose your own adventure route to the ridge.  This is the route I took, keeping it all class 2 (although it was steep at times)

The route was rocky, and most of the rocks were not stable.  Here are some step-by-step pictures to the ridge.

Once on the ridge I turned right, and headed north towards the summit.  This was all class 2.

I summited Oyster Peak at 8am

Oyster Peak:

It was very windy on the summit, and a cold wind for August.  I turned around and looked southeast, at Pearl Mountain

It’s also good to note the descent route from this angle

I continued southeast, towards the Oyster/Pearl Saddle.

Here is my overall route up to Pearl Mountain.  I was able to keep this mostly class 2, with just a few easy class 3 moves, mostly sticking to the ridge.  There were a few spots with exposure, made interesting by the 40mph winds. 

I went left at the end of the ridge to make it to the saddle

Here’s the route up the ridge.  It’s easier than it looks.

The rest of the hike is class 2, on what is loose, rolling rocks.  There are a few game trails through the rocky sections

I summited Pearl Mountain at 9am

Pearl Mountain:

I continued following the ridge east, to an obvious orange gully.  This part of the ridge was sketchier than the first part.  In retrospect, I made some things class 4 when they could have been class 2, but the class 3 stuff was class 3, no way around it.  I stayed straight on top of the ridge

Here’s looking BACK at Pearl, the way I descended was class 4 (solid line) but when I looked back I noticed I could have descended on the dotted line, making it class 2

For the last bit of the ridge before the gully I dipped to the right, to keep it class 2

The gully is obvious, as it’s orange.  I had a small patch of snow to get through first.  I had the brilliant idea to glissade the 10 feet of snow.  This worked perfectly, except when I hit the bottom I ran into a good 8 inches of sticky mud I hadn’t expected.  I was stuck in the mud for a minute until I could pull my boots out.

Ok, now to head down the gully.  I was so glad I was going down this instead of up.  It was seriously steep.  It starts out as scree and ends with microwave sized rocks.  You can see Pearl Pass Road in the distance.  That’s what I was aiming for once I got out of the gully.

Here’s looking back up the gully

My route down the gully

And now back to the road

Back on Pearl Pass Road, I followed it north, back to the trailhead

I made it back to my truck at 11:45am, making this a 11.44 mile hike with 3923’ of elevation gain in 6 hours, 45 minutes

When I made it back, I was surprised to find another vehicle in my dispersed camping spot.  It was especially curious because the next three campsites were vacant.  I’ve been sitting here for the past 3 hours putting together this trip report, and they still aren’t back yet.  Edited to add:  About half an hour later I went to put my computer away, and their car was gone.  I never heard them leave. I’m not sure they knew I was here either.

On to the next trailhead!

Hanson Peak – 13,462 and 13,078

RT Length: 11.42 miles

Elevation Gain: 2913’

I parked at the Animas Forks Historic Site near Silverton.  A couple of notes:  the 4WD road in is 4WD, and it’s crowded!  The site however, is pretty cool.  Lots of stuff to see here, and you can go inside the structures (even the 2 story ones). 

There are plenty of spaces to park.  I chose one, and was on the trail at 3:20am

I followed the 4WD road that started to the northwest of the historic site, leading towards California Gulch

I followed this road west for 1.25 miles, to the Placer Gulch/California Gulch junction

At the junction (no signs) I turned left and headed south towards Placer Gulch

I followed this 4WD road south until I’d hiked a little over 4 miles.  It led me to Gold Prince Mine, zig-zagging up the hillside as it went (orange arrow).

This part was tricky in the dark, but at 12615’ of elevation, there’s a side road that goes further up to another mine.  I took that road southwest. 

Here’s an overview of the route I would take to the ridge, using mainly a mining road, then finding a grassy shelf that led to a short class 2+ gully.

Here are some step-by-step pictures of the route to the ridge.  Once I left the dirt road, I put on microspikes, and kept them on until I made it to the summit and back down to where I’d put them on.

Once on the ridge, I turned right and headed north towards the summit (eventually turning into northwest as I followed the ridge).  I was able to follow game trails to the summit (there are a few of them, pick your favorite depending on conditions and ability).

This was a bit loose, lots of chossy scree.   The actual summit is to the northwest, but going straight up this choss will get you to an easy ridge to traverse to the summit

I summited Hanson Peak at 5:45am, and got to watch the sunrise

Hansen Peak:

From Hanson Peak I could see my next objective, PT 13078, to the southeast.  Notice how the road goes very close to the peak?  I was going to need to get back to that road to summit.  I also didn’t summit this peak the way most people do, but instead took the NE slopes.  I found this to be much gentler terrain.  Here’s an overview of how I summited PT 13078

To get there, I was going to need to make my way back to the 4WD road, so I re-traced my steps back to the ridge

This is where I exited the ridge and descended back down to the mine.  I made myself a tiny cairn (seriously tiny, no more than 5 inches high, but I knew it was there) so I’d know the right gully to take.

Then it was back down to the mine, and back to the road

Back on the road, I turned right and followed it east until I was at 12750’  Here’s a visual of where I started my ascent up 13078

And some step-by-step pictures

From here I could see the actual summit of 13078.  I followed the ridge south to the actual summit. 

There was one short easy class 3 move, and there were three options to do this move to gain the summit.   

I chose to go straight up on the way in, but took a sideways route down.  Here are some of the available options, all easy class 3

Then it was a quick, class 2-rocky ridge walk to the summit

I summited PT 13078 at 6:50am

PT 13078:

Here’s an overview of the route from Hanson Peak, much of this done on mining roads

 I descended the same way I ascended, downclimbing that short class 3 section and heading back to the 4WD dirt road.

Back on the dirt road, I followed it back to the California Gulch/Placer Gulch Junction, past a lot of abandoned mines and mining equipment. 

I turned right at the junction, and headed east 1.25 miles back to my truck

I made it back to my truck at 8:20am, making this a 11.42 mile hike with 2913’ of elevation gain in 5 hours.

On to the next trailhead!

Tuttle Mountain – 13,208 and Houghton Mountain – 13,059

RT Length: 9.63 miles

Elevation Gain: 2935’

I parked at the Animas Forks Historic Site near Silverton.  A couple of notes:  the 4WD road in is 4WD, and it’s crowded!  The site however, is pretty cool.  Lots of stuff to see here, and you can go inside the structures (even the 2 story ones). 

There are plenty of spaces to park.  I chose one, and was on the trail at 5:45am, after it had stopped raining. 

I followed the 4WD road that started to the northwest of the historic site, leading towards California Gulch

I passed a couple of mines in the dark.  Apparently, the crows weren’t happy I was there.  Nothing spooky about this at all.

Crows:

I followed this road east for 1.25 miles, to the Placer Gulch/California Gulch junction, and continued straight towards California Gulch

I continued following this trail through California Gulch for a total of 4 miles, all the way to California Pass.  This was an easy-to-follow 4WD dirt road, that passed a few abandoned mines.

At California Pass, I left the road and followed game trails north along the ridge.  This is a class 2 ridge, and easy to follow

Also, I heard coyotes

I could also see both peaks from here, Tuttle and Houghton

Here are some pictures of that class 2 ridge and the game trails

About halfway across the ridge I took a game trail to go straight towards the peak

Then I ascended this class 2 ridge to the north, leading to a false summit

It was a quick hike to the actual summit

I summited Tuttle Mountain at 8:15am

Tuttle Mountain:

Looking northeast, I could see Houghton Mountain.  Before descending to the saddle, I’d go over this hump, then southeast for a bit to avoid some rock outcroppings. 

Here’s my route down to the Tuttle/Houghton saddle, first heading southeast to avoid the rocks

Then crossing northeast towards the saddle, and up the ridge to the summit.  This is my overall route to the summit of Houghton.  If you like cool rocks, plan to spend a lot of time in the area circled in red.

These are the rocks from Tuttle I was trying to avoid, and the route I took down

Now to head over to Houghton.  This was mostly a class 2 ridge hike through rocky, rolling tundra, littered with a bunch of mines.  It was also choose your own adventure on a wide ridge.  I was aiming for where the orange arrow is pointing.

Oh, and here is a picture of one of those cool rocks I was talking about

For the rest of the hike to the summit of Houghton, there are slight game trails to follow through both the tundra and eventually scree.  I just kept heading northeast, staying to the ridge

Once you see the change from tundra to rocks, notice the top of this gully.  It will be the decent route.

The last push to the summit was rocky, but there were game trails to easily follow

I summited Houghton Mountain at 10am

Houghton Mountain:

Now to head back down.  I retreated the same last rocky section southwest

Then turned left, and descended a gully to the south.  This is an easy, tundra filled gully, just be careful, as there are scree rocks here that have tumbled from above and are loose on the grass (but no scree)

To make this easier, I aimed for the California Gulch/Placer Gulch junction, since it was easy to see (circled in red). 

From the junction, here’s the route I took down from Houghton Mountain

At the junction I turned left, and followed the road east back to Animas Forks

I made it back to my truck at 11am, making this a 9.63mile hike with 2935’ of elevation gain in 5 hours 15 minutes. 

On to the next trailhead!

Chief Mountain – 13,019

RT Length:  16.82 miles

Elevation Gain:  4261’

I arrived at Thirtymile Campground the night before, and slept in my truck at the hiker trailhead.  Knowing this was going to be a hot day I wanted to start early.  I was on the trail at 3:30am.  The trail starts to the south of the parking area, and if you get there in the dark it can be difficult to locate.

There is a register and information board at the true trailhead.  There are two trails here, I took the one that goes to the left, the Squaw Creek Trail

This is an easy to follow, class 1 trail.  I followed this trail, over a bridge crossing Squaw Creek, and paralleling Squaw Creek itself, for 2.3 miles.  This trail has a lot of ups and downs, which wasn’t bad at the beginning of my hike, but made the hike out in the sun miserable.  Here are some pictures of the trail

After hiking for 2.3 miles, I crossed a drainage pipe, and about 50 feet to my left was another trail (difficult to see in the dark).  There used to be a cairn here, but someone tipped it over.

Now on the Fern Creek Trail, I followed it southeast towards treeline.  This was still a class 1 trail, and easy to follow.

I crossed a creek, and continued on through a rather large gulch.  The trail begins to fade here, but as long as you stay to the left of the willows, you should be able to find a trail.  In the early morning hours I saw a mama moose with her baby munching on the willows. 

As soon as I was truly above treeline (which felt like forever) the trail ended.  With no real landmarks to work with, I headed south.  I saw a ton of elk in this area, and would for the rest of the hike.  I’d estimate I saw about 200, ranging in groups from 5 to 30 at a time. 

I kept heading south, still with no visual landmarks, and eventually came to a marshy area and a hill to ascend.  This was muddy and wet, and choose your own adventure.  I navigated the willows and made it to the top of this hill/

From here I got my first good view of Chief Mountain.  I’ll save you the heartache I had when I found out this was the actual peak

The good news was now I had a good visual of where I was headed.  I continued south, towards the obvious ridge. 

This was an easy tundra stroll, but be careful:  Just as you don’t want to step on wildflowers while hiking on the tundra, you also need to be careful of other things on the ground.  Like bird nests

I made it to the top of what looked like the summit, only to find another summit further to the south.  It was an easy ridge hike to that next point.

I made it to the top of this point, and even though there was a cairn at the top and a summit marker, I discovered it was a false summit.  This is the actual summit of Chief Mountain.

No worries though, the entire route is class 2.  There are solid game trails to take for most of it.  Here’s the overall route I took.

I started out by heading straight along the ridge, and took the obvious game trails when I saw them.  They were filled with tracks from all the elk I’d seen earlier.

Here’s the final push to the actual summit. There’s a good trail here, and several options for an ascent route.  There are at least 3 different class 2 what I could only call minor gullies that go to the summit. Choose your favorite and have at it.

At the top I turned right, and headed southeast to the summit

There was a summit marker here as well

I summited Chief Mountain at 7:50am

Chief Mountain:

Looking back at that last point on the ridge, it looked very similar in elevation to where I was now. 

Time to head back.  I descended to the west, heading back to the game trail

Then followed the game trail back to the ridge

From here, it’s really important to get a visual of where you’re headed.  Sure, you’re going to head north on the tundra, but look for a meadow in the distance, surrounded by trees, and keep aiming there.  It will help keep you from getting off route.

I saw more elk on my way down.  They had been enjoying themselves on the little patch of snow when they were alerted to my presence, and ran away.

Elk:

Now to trudge through the marshy-willow area

And head back to the Fern Creek Trail

Now the Fern Creek trail should be easy to follow, back to the Squaw Creek Trail

I turned right at the Squaw Creek Trail, and followed it back to the trailhead. 

I made it back to my truck at 11:30am, making this a 16.82 mile hike with 4261’ of elevation gain in 8 hours.

On to the next trailhead!

Summit Peak – 13,304, The Unicorn – 13,030, Montezuma Peak – 13,158

RT Length:  10.18 miles

Elevation Gain: 3534’

I parked the night before at the Summit Peak Trailhead and had the whole place to myself until I left the next day. 

The 2WD dirt road in is in good condition, with plenty of areas to pass other vehicles.  I got plenty of sleep, and was on the trail at 5am the next morning. I figured this trail would be easier to take clockwise, as in the dark it would start on an actual trail.  This was good thinking, but the ‘trail’ was more of a game trail that I lost and found repeatedly.  After the hike was over, I concluded this would still be the better way to go, and you’ll see why later. The trail starts at the south end of the parking area, immediately crossing a bridge over Treasure Creek and following Treasure Creek Trail 710.

The trail quickly went through a flower filled meadow, and then headed south, through an open gate and open meadow.  Here the trail was easy to follow, even in the dark.

After hiking for 1.3 miles, I came to a cairn, turned right, and headed north up what was supposed to be Treasure Creek Trail.  It was a faint trail for a bit, but it was easy to lose. 

As I was hiking on this trail, I came across a rather fluffy ptarmigan.  In fact, I almost stepped on her, and would have if I’d already put my flashlight away.  I stopped for a second, and told her she could stay put and cover her babies if I could go around her.  As soon as I said this she exploded.  She jumped up into the air, and no less than 12 ptarmigan chicks cascaded out in all directions.  A feather bomb had gone off, and I felt bad for her.  A few seconds later I could hear her calling to the chicks, and watched them all make their way back to her.  Sorry mama, but nesting in the middle of a trail, even a small trail, is a bad idea. 

I continued through a faint trail that at times was a great trail, littered with flowers and pine trees

At 11600’ I turned left again, and headed west to treeline, still following a ‘trail’.  I was headed to the right. (Both arrows point to the same place)

This was easy to ascend, and the snow avoidable

After ascending, a fairly decent trail led me south, towards the Continental Divide Trail, which skirted the south side of Summit Peak

From here it was a steep tundra hike to the summit.  This is choose your own adventure, without many obstacles. This is the route I took.

There was as summit marker at the top

I summited Summit Peak at 7:30am

Summit Peak:

From the Summit I could see The Unicorn and Montezuma to the north

It was a beautiful day on the summit, and there was cell reception, so I spent some time there before turning around and heading back to the Continental Divide Trail.  The route back down was straightforward

Back on the Continental Divide Trail, I followed it around the north side of Summit Peak.  There were trail markers to show the way, which was a good thing because the trail was faint

Here’s an overall look at the route to The Unicorn.  There was snow on the trail in places, and it was curious there wasn’t a trenched trail over the snow, considering this is the Continental Divide Trail, and I’m sure tons of others must have been through this area already this year.

And some step-by-step pictures. 

As I was doing this traverse, I could hear, but not see a herd of elk.  I wasn’t sure where they were in the basin, but they sure were being loud, so I figured there were a couple dozen of them.  Here I left the trail, and it became a class 2 hike, with just a short section (no more than 10 feet) of easy class 3 climbing up a sort of chimney.

I summited The Unicorn at 9am

The Unicorn:

To the northeast I could see Montezuma Peak.  This was my overall route to get there.  It was all class 2, except for a brief period of class 2+ scree as I ascended the ridge.

This is also a good view of how I descended from Montezuma and made it back to the trailhead

I descended the short chimney

And then I headed northeast, towards Montezuma, being careful to avoid the snow fields in the way

And now to climb the west face of Montezuma.   It was steep, but mostly class 2 until just before gaining the ridge, where it was 2+, and choose your own adventure on the scree/talus.

After gaining the ridge I turned right, and headed east towards the summit of Montezuma

I summited Montezuma Peak at 10am

Montezuma Peak:

Here’s looking back at the route from The Unicorn to Montezuma

There were a ton of bees at the summit, so I didn’t stay long.  I turned and headed east, down the ridge.  This is a class 2 ridge (seriously).  I just stuck to the ridge proper and had no trouble descending.  Here’s my overall route down the ridge

Then I headed southeast

I planned on descending this grassy gully

As I was descending, I finally saw the herd of elk I’d heard earlier in the day.  I sat on a rock for 10 minutes, just enjoying watching them.  Some were resting in a circle, others were grazing, and two mamas were watching their babies enjoying a patch of snow.  I hated to disturb them, but I had to get going.  As soon as the wind shifted, they could smell me, and they were off.  There were tons of signs they’d bedded down for at least a few nights there in the past few days.

Elk:

Once they were off I continued descending.  When I made it to the bottom of the gully I turned left, and headed east along the plateau

At the end of the plateau, when I came to the trees, I turned right and descended south towards the creek.  This was a lot of bushwhacking through downed trees and flowers and grasses that were as tall as I am, but I just aimed for the creek.

When I reached the creek, I stayed about 30 feet from it’s banks, and followed it (and game trails) southeast back to the trailhead.  It’s important to stay above the creek because there are waterfalls to avoid.

I made it back to my truck at 11:30am, making this a 10.18 mile hike with 3534’ of elevation gain in 6.5 hours.

On to the next trailhead! 

Conejos Peak – 13,176’

RT Length: 9.87 miles

Elevation Gain: 2183’

This wasn’t my first attempt at Conejos Peak.  I was actually here much earlier in the season, doing my best to establish a new winter conditions route.  I was obviously off the main trail, and around 12,500 (my lucky elevation for finding cool stuff in the mountains) came upon this:  An elk skeleton from last season.

So, I did what anyone else would have done in that situation:  I severed the skull from the spine, strapped it to my backpack, and hiked it back to my truck. 

The deadhead fit perfectly into the back of my Tacoma.  I drove it home, and when I opened the back of my topper I could see dozens of maggots, and there was an awful smell.  Apparently, what looked like a pretty clean skull still had grey matter inside, along with maggots taking care of the issue.  I’d kept the skull attached to my backpack, which was now covered in those maggots and grey matter (Yay!  New backpack!).  I threw away the backpack and decided to use my outdoor fire bucket and boil the skull to begin the cleaning process, and get rid of all those maggots. 

Of course, I told other people about my find, which was longer tip of nose to end of antler than I am tall, and I was warned there might be rules against taking it and bringing it home.  Afraid I’d unknowingly done something illegal, I called up the Colorado Department of Wildlife, and asked them if I could keep the deadhead.  They asked me a couple of questions, like where I found it and on what date, then gave me the all clear to keep it.  The DOW employee who helped answer my questions was named Chad (the only Chad at the office), so I named the deadhead Chad.  I’m currently working on mounting it (I’m thinking mountains in the background), and I’ll post a picture to my IG when it’s done. 

Ok, on to Conejos Peak. 

The road to the trailhead is easy 4WD.  Here are some pictures of the more ‘difficult’ spots.  Side note:  on my way down a rancher had hauled a horse trailer up to the top, so it’s doable if you’re a good driver. 

I parked about 1.5 miles below the Tobacco Lake Trailhead at the trailhead for 720 for a couple of reasons:  I wanted the extra elevation gain, and the last time I was here there was snow on the road further up and this was where I’d parked.   I really liked the size and location of the site at 11,180’. 

There are other sites to camp further up, near the actual trailhead.

I spent the night at the trailhead, had a buck stick his head inside the back of my topper to say hi, it rained, and I saw a pretty cool rainbow.  I was on the trail at 5am, following the road up to the actual trailhead. 

There was a register at the trailhead, which I signed, and I was on my way.  The trail to Tobacco Lake is class 1 and easy to follow.  The only issue I had was the smell: ranchers are grazing cattle in the area, and they all seem to have diarrhea.  The trail was littered with it, and since it had just rained, it was still wet.  Here are some pictures of the trail to Tobacco Lake.  One thing to note:  there are willows to navigate.

Tobacco Lake kind of sneaks up on you, and you can clearly see Conejos Peak from the lake.

I skirted the north side of the lake, and came upon a rocky area.  There was a big cairn here indicating the trail.  I followed that trail west.

From here on out the trail goes from class 1, to class 2, to following game trails, but there are enough cairns to help you find your way.  Here’s the overall route to the ridge:

And some step-by-step pictures.  There are a lot of different ways to gain the ridge (I’m guessing due to melting conditions from winter), but the route is obvious in summer conditions.  You’re aiming for the orange arrows. 

Once on the ridge I turned left, and followed it south to the summit

The summit is to the west of the trail

I summited Conejos Peak at 7:15am.  There was excellent cell service, so I stayed up there for a bit and answered some emails. 

Conejos Peak:

Time to head back the way I came.  I turned and headed east, back to the trail

Here’s my overall route back to the lake, following the ridge north, and then descending back into the basin by heading northeast

Once at the lake and the stream crossing, I turned left before the stream and followed the trail east back to the trailhead

I signed out of the trail register, and followed the road back to my truck

I made it back to my truck at 9am, making this a 9.87 mile hike with 2183’ of elevation gain in 4 hours.

On to the next trailhead!

Henry Mountain – 13,272, Fossil Mountain – 12,764 and Square Top Mountain – 13,007

RT Length:  10.96 miles

Elevation Gain:  3927’

I started from Gold Creek Campground outside of Ohio City.  The road in was an easy 2WD dirt road, that led me to a dispersed campground maintained by volunteers.  There are about 5 sites, with vaulted toilets.  I didn’t feel right using the empty campsites, as I wasn’t really camping, but sleeping in the back of my truck, so I parked at a dispersed site directly across the road, near the trailhead, at about 10,050’.  Also, it was quieter, as a family with two small children and rather loud dog were staying in the campground.  There was a makeshift corral for horses there as well.

I was on the trail at 5am the next morning. The trail starts at the north end of the camping area. 

I followed Trail 532 northwest for 2.5 miles to Mill Lake.   This is an easy to follow, class 1 trail the entire way to the lake.

There is one junction early on that isn’t on a topo map, but it’s well marked.  Just keep going towards Mill Lake.

At Mill Lake you can clearly see Fossil Mountain.  The easiest way to get there is to turn right, and head northeast through the trees until you see the ridge.  It’s a short (100 yards at most) hike to get there, and the bushwhacking is easy.

The route will be easily visible.  There are rock ledges if you go to far left or right.  You want to take the tundra northeast until you make it to the ridge, and then turn left and follow the ridge west. Here I gained 850’ of elevation in .75 miles

Here’s looking at the last bit of the route to the ridge. There’s no need to hike all the way to the top of this little bump in the ridge, as it isn’t ranked.  I skirted it and headed towards Fossil Mountain.

Now the hike became fun.  The ridge goes at a class 2 scramble until the base of Fossil Mountain, then becomes an easy class 3 scramble to the summit. 

Here’s the overall route I took

And some step-by-step pictures

I went straight up and over this large rock formation.  It was easy class 3.  You can go to the right to get around it, but you’ll be met with loose talus and a gully. 

I summited unranked Fossil Mountain at 7am

Fossil Mountain:

From the summit of Fossil Mountain, looking to the northeast you can see the other two peaks I was headed for today, Square Top Mountain (unranked), and Henry Mountain

It was a straightforward ridge hike to get to Square Top Mountain, where I pretty much stayed on the ridge.  There were some easy class 3 moves, and at times I needed to dip to the left or right.  The rock is very loose in areas, and very stable in others, so basically it keeps you on your toes.  I lost about 180’ of elevation going to the Fossil/Square Top saddle.  Here are some pictures of the ridge to Square Top Mountain.

From the saddle, here’s looking up at the path towards Square Top.  The first half was on tundra, and then the rocks began

It was here I noticed a small herd of elk.  I stayed where I was until they noticed me, then watched them watch me as they ran away.

Check out the herd of elk:

Ok, continuing with the ridge.  This part looked difficult, but I found it was easy class 3 if I just kept to the ridge. 

Now to summit Square Top Mountain.  This was relatively simple, as there were several options.  I went up the gully nearest me (and down the one on the other side).  The rocks here were loose, but the angle was light.  

After ascending the gully, I turned left and easily walked to the summit

I summited Square Top Mountain at 8am

Square Top Mountain:

Looking to the northwest I could see Henry Mountain

I descended Square Top Mountain to the northwest, and hiked on tundra to the summit of Henry.  There were some very faint fame trails here I utilized.

As I came to the top of the ridge, I was greeted by 4 mountain moats.  Usually, mountain goats are pretty tame and just watch me.  These ones did for a while, but as soon as I got out my camera and they could hear the shutter snap, they took off.  Well, three of them did, the other one stood and looked like he was ready to fight, but then turned and followed the others

The summit of Henry Mountain is to the northwest, so I headed northwest towards the obvious highpoint on more tundra

I summited Henry Mountain at 8:40am

Henry Mountain:

This was an out and back hike for me, so I turned around and retraced my steps back to Fossil Mountain

Here’s the overall route I took, skirting Square Top this time

And some pictures of that rocky ridge between Square Top and Fossil

Then down to the Fossil/Square Top saddle

And up the ridge, back to the summit of Fossil. This part was class 2

At the summit of Fossil Mountain I was greeted to 4 ptarmigans on the summit cairn.  They actually led me for a bit down the trail.

I descended Fossil Mountain to the northeast, staying directly on the ridge.  Here’s the overall route.  Note where I entered/exited the trees, as it kept me on tundra and avoided the rocky sections and brought me back to Mill Lake.

Here’s looking at that easy class 3 section down the ridge. Once again, I stayed directly on the ridge and kept it easy class 3

Then back towards the tundra

As soon as I came to the first group of trees on the tundra I turned right, and headed down towards the lake

After a quick bushwhack in the trees, I could see the lake and a trail below

I followed the trail around the east side of the lake, back to Trail 532, and then followed that trail back to the trailhead

I made it back to my truck at noon, making this a 10.96 mile hike with 3927’ of elevation gain in 5 hours.  Please, note, I spent a lot of time admiring the wildlife and looking for cool rocks.

On to the next trailhead!

Trico Peak – 13,321

RT Length: 8.78 miles

Elevation Gain: 2844’

My stats here are going to be off (to be explained later).

I arrived at the Black Bear Pass trailhead the night before, excited to find a good camping spot near the road, at about 11,100’.  If you drive a little further up, 100 yards or so, there are a few more sites. 

I parked, read, ate dinner, and fell asleep early.  I was on the trail at 5am the next morning.  The trail follows 4WD dirt road 823 for 3.3 miles to Black Bear Pass. A stock 4WD can make it to the pass, but be mindful it’s a narrow shelf road at times, with few places to pass other vehicles.  Here are some pictures of the road.

After hiking for 1 mile I came to the junction for Prophyry Basin and Black Bear Pass.  I went right, towards Black Bear Pass.

And continued on, towards Mineral Basin.

There was a little snow to contend with in getting to Black Bear Pass, so I went left to avoid it.

To my left I could see T10, which hadn’t been on my list for today.  However, looking at it now, it looked doable from this side, so I headed over there.  There seemed to be several viable routes.  At the grassy area I put on my microspikes, and headed up.  The first 150 feet or so were straightforward, and then the choss hit.  Terrible, terrible choss that gave way as I ascended.  I was creating rockslides both above and below me, which included not only scree and choss, but also microwave plus sized rocks.  Nothing was stable. It looks like the route changes every time someone attempts to go up or down.  I got cliffed out several times, backtracked, and tried different ways.  Finally, I knew while I could have made it up, I wasn’t going to recommend this route to anyone (someone’s going to get seriously injured or die), so I might as well head back down.  I made it about 100 feet from the summit before turning around. Please don’t attempt this route unless you have great balance and are good with floating and falling talus and boulders (none of the rocks were steady. None of them, and many fell with the scree).  For me, this was outside of my choss-safety zone.

Ok, so from Black Bear pass, I headed northeast, with Trico clearly visible.

This was actually a straightforward and easy route.  There’s a faint trail you can’t see from below, that will get you all the way to the summit.

Here are some pictures of the route

Once I gained the ridge, this was the overall route to the summit

There was a faint trail here as well.

I summited Trico Peak at 8am (still wearing my helmet from T10)

Trico Peak:

I took advantage of the bluebird day and 2 bars of LTE service at the summit, and stayed for about half an hour, calling people and answering emails. 

Then I was on my way back down to Black Bear Pass.

Back at Black bear Pass I turned left, and followed the road 823 back to the trailhead, avoiding the small section of snow along the road.

I made it back to my truck at 10am, making this a 8.78 mile hike with 2844’ of elevation gain in 5 hours, along with a lot of route finding on T10, and spending a half hour on the summit of Trico.

On to the next trailhead!