Little Horn Peak – 13,143 and Fluted Peak – 13,576

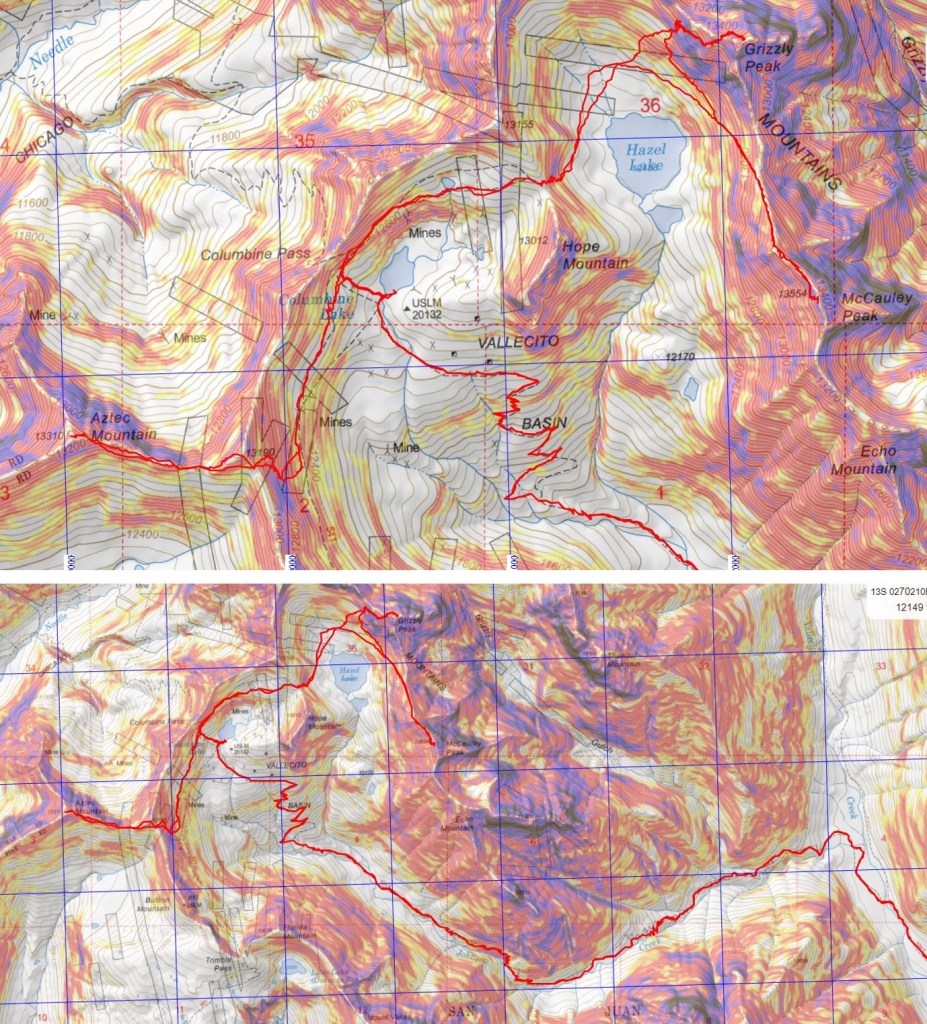
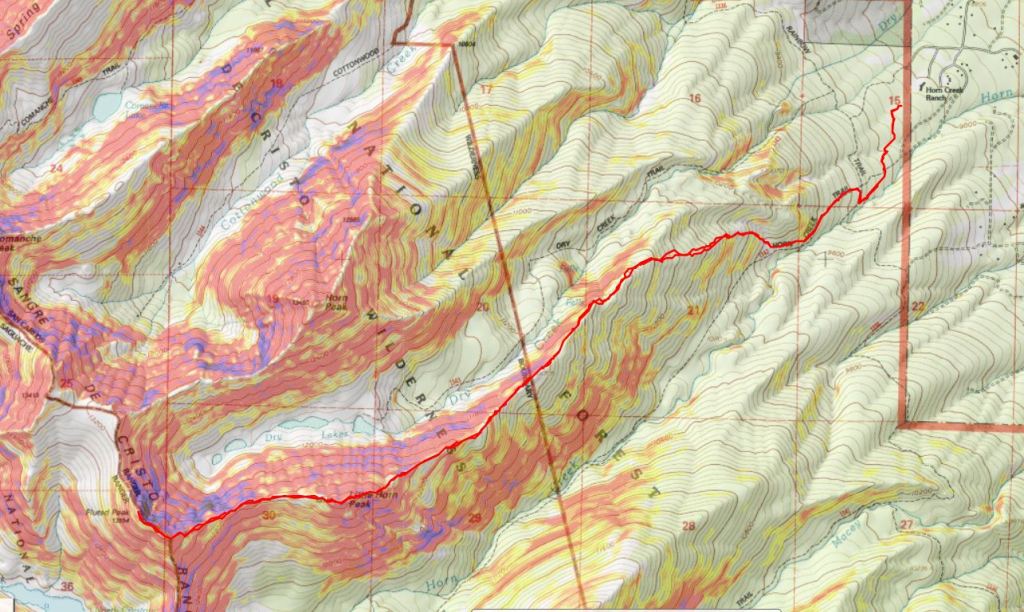
RT Length:  12.35 miles

Elevation Gain: 5504’

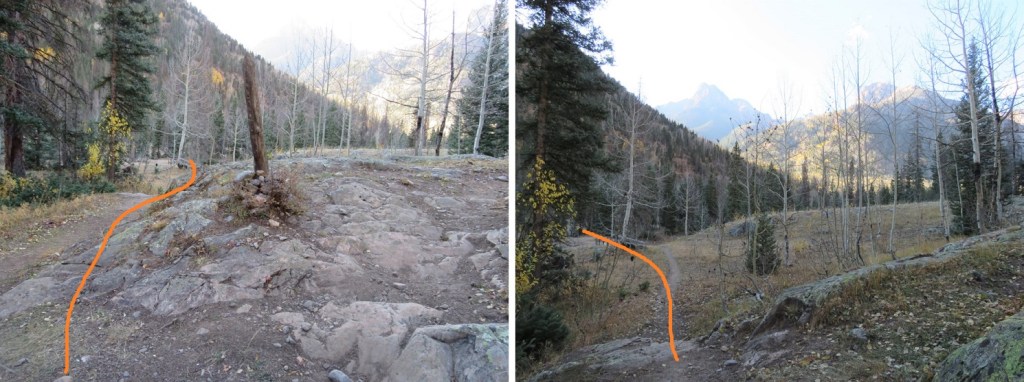
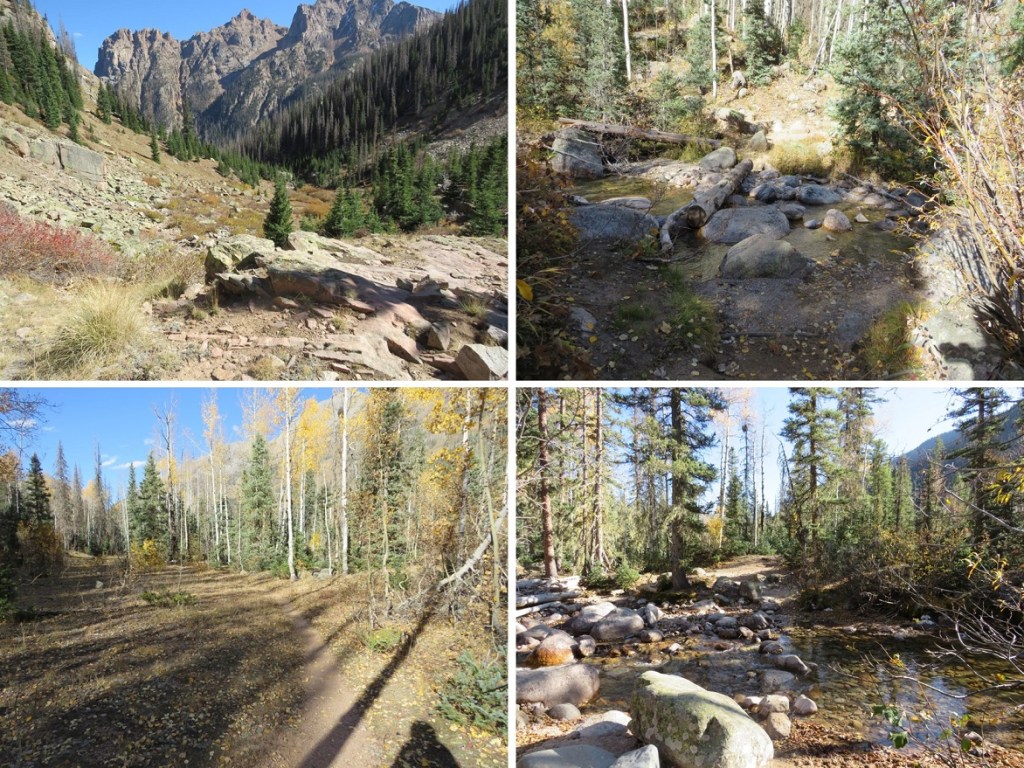
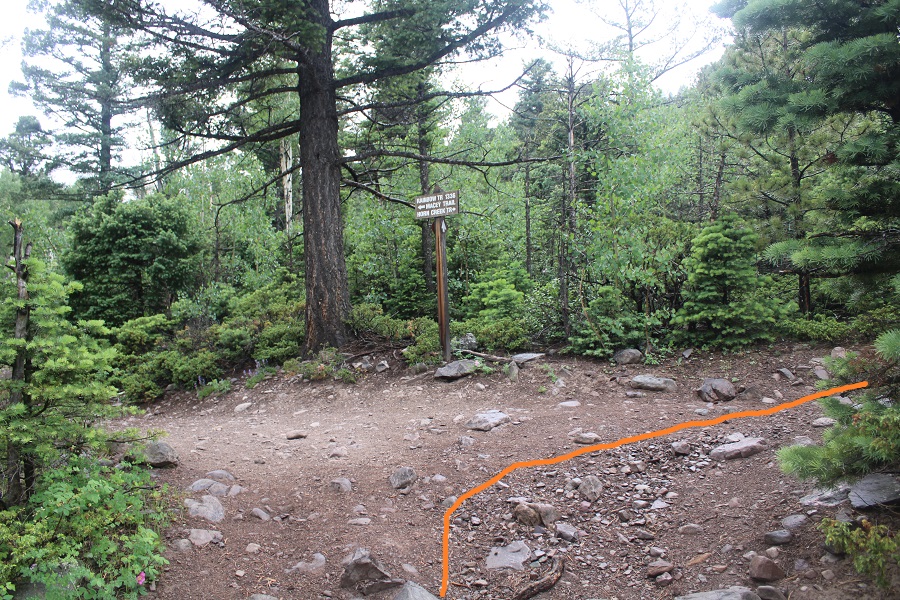
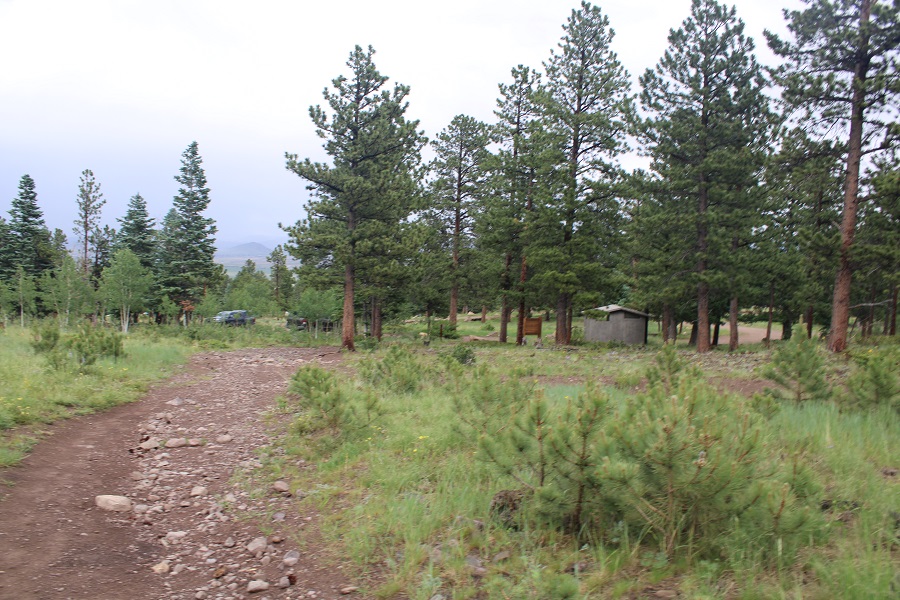
I parked at the Horn Creek Trailhead, the only vehicle in the lot.  I’m always surprised at how few people take advantage of the free dispersed camping sites we have in Colorado, especially ones like this with a bathroom.  Eager to summit and get back to treeline before the incoming storm, I gathered my gear and was on the trail at 4:30am.  The trail starts by following the Rainbow Trail southwest for just over half a mile

Then I turned right onto Horn Creek Trail

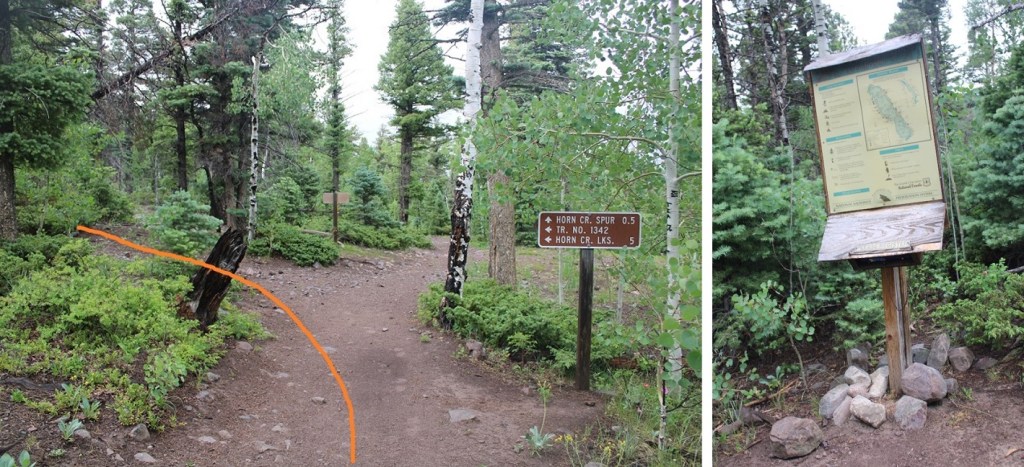
I followed Horn Creek Trail for a short distance, about a tenth of a mile, before turning left at the junction towards Horn Creek Lakes.  Here there’s a register, that looks to be kept up.

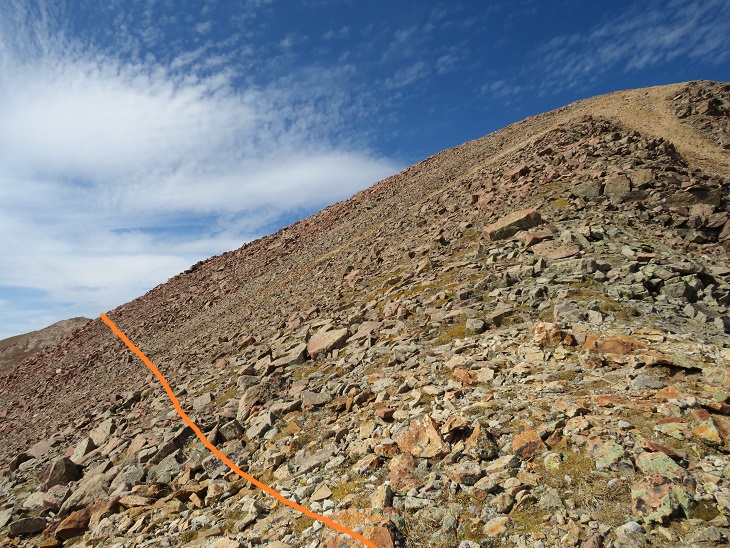
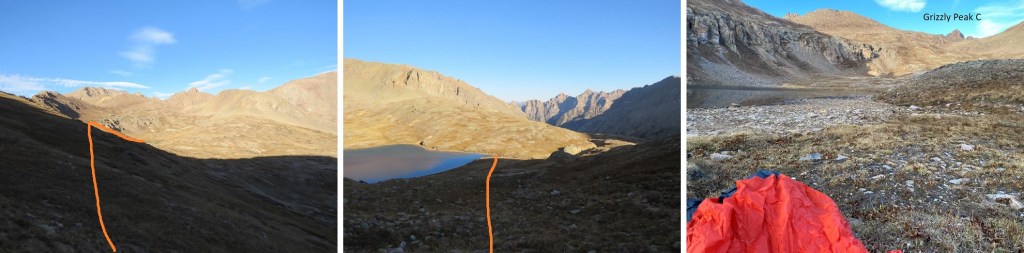
I stayed on this trail for half a mile, before leaving the trail at 9590’ and heading north and then west up the ridge.  There is no trail here.  I left a small cairn to indicate where I left the trail, but I don’t expect it to be there long, as it was small.

Route finding here can be a bit tricky, but the goal is to gain the ridge.  I did this by heading west, through the pine and aspen trees.  Every once in a while, I’d come across a game trail.  They all fizzled out however.  This area is easy to navigate, as there aren’t too many downed trees.  I was able to avoid most of them.

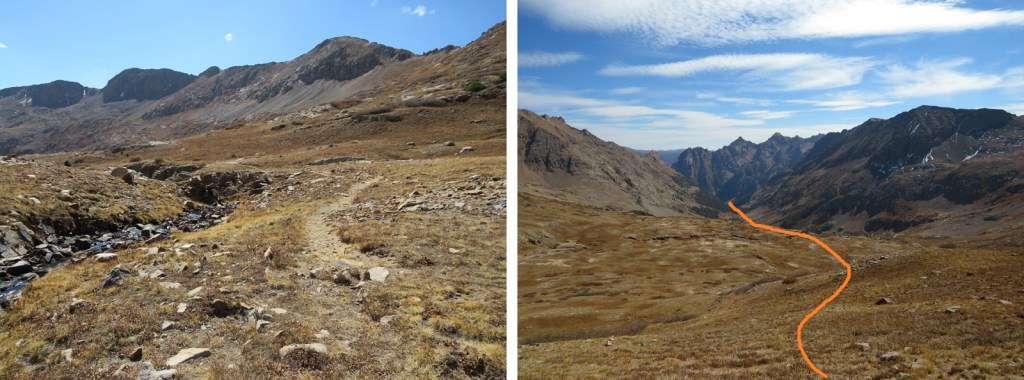
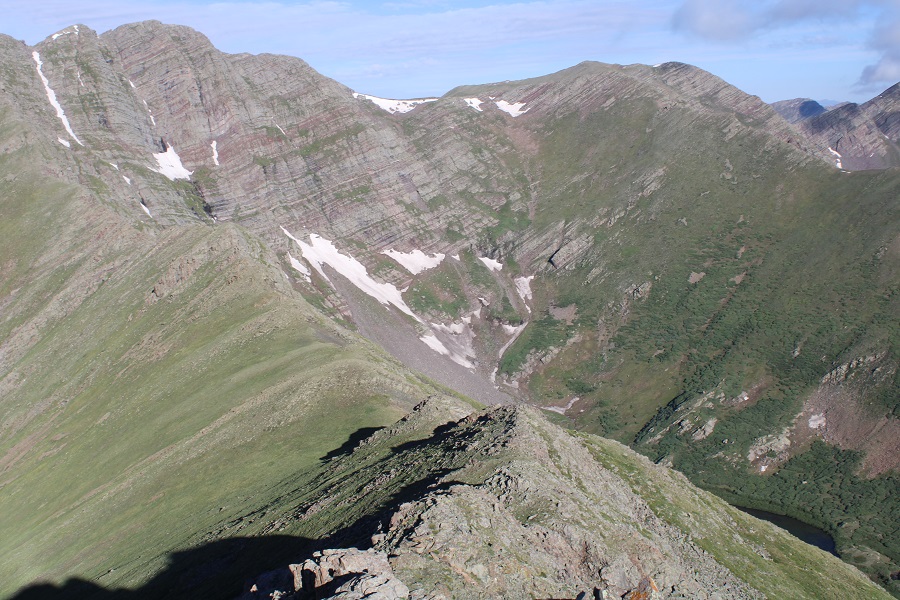
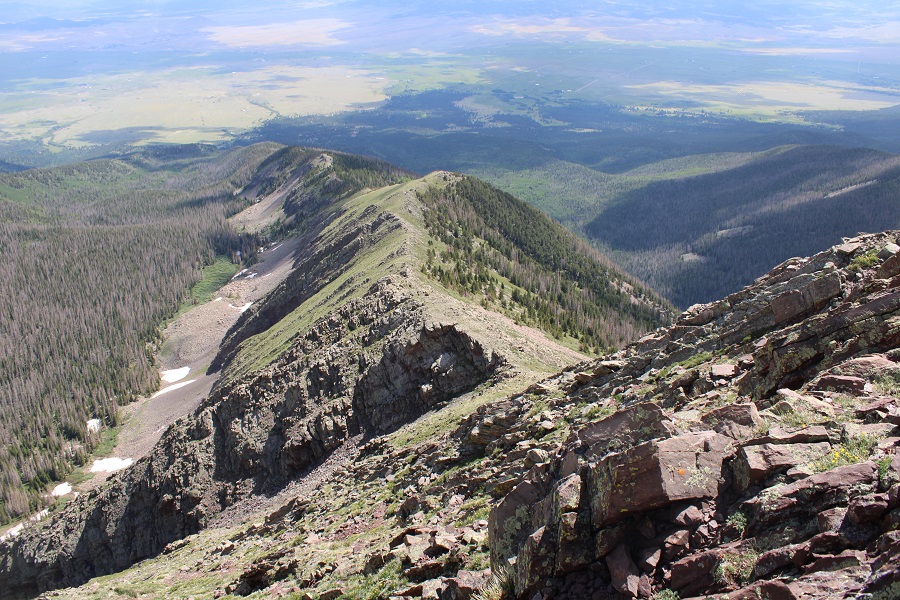
Once I was on the ridge, I followed it southwest to treeline.  This is a long ridge, and it seemed to take forever to make it to treeline.  Here’s my first glimpse of Little Horn Peak

Like I said, this is a long ridge

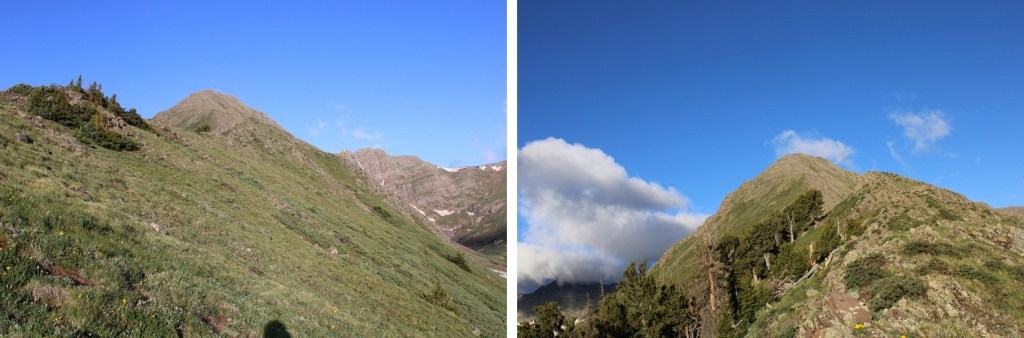
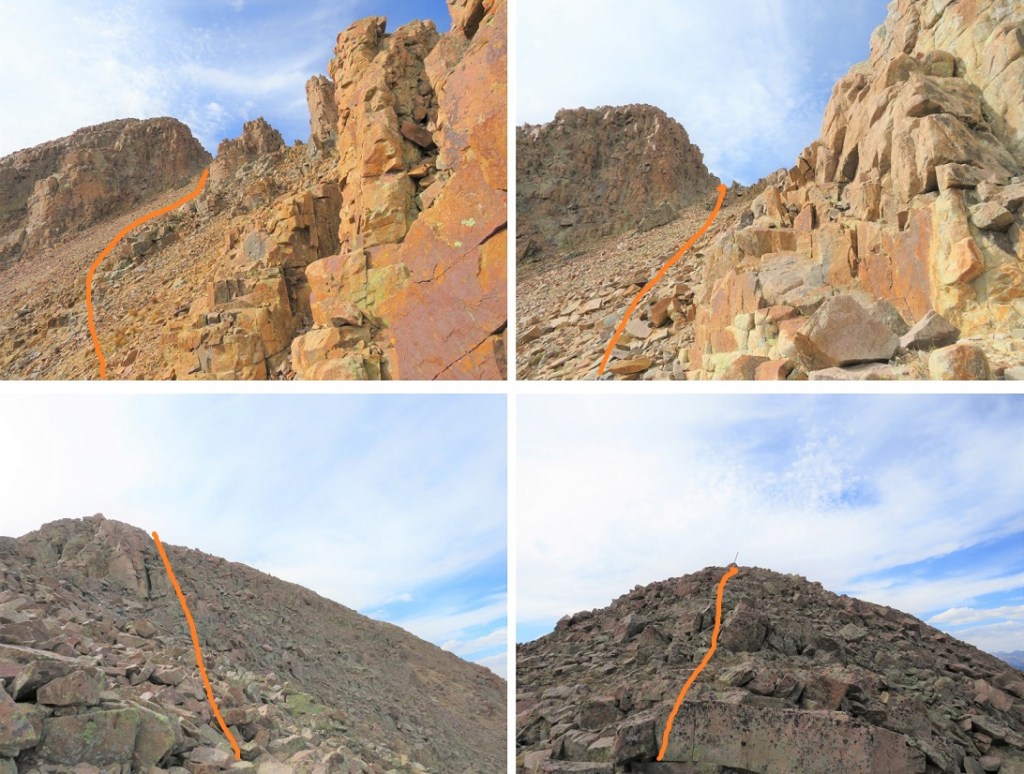
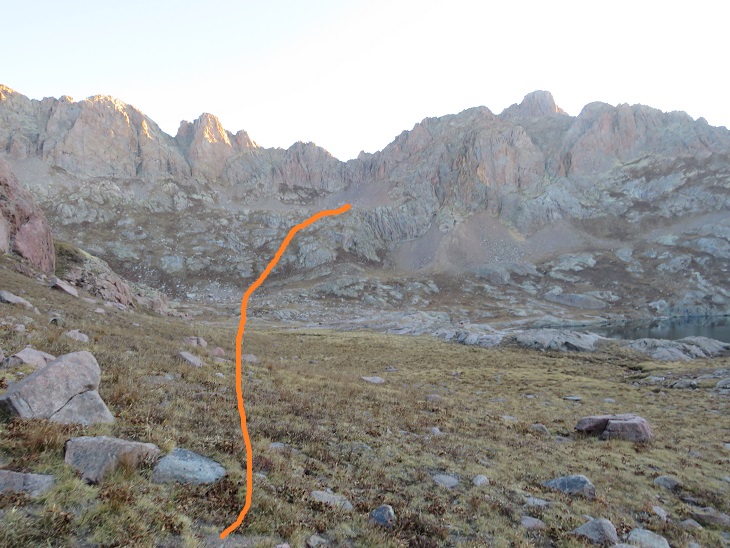
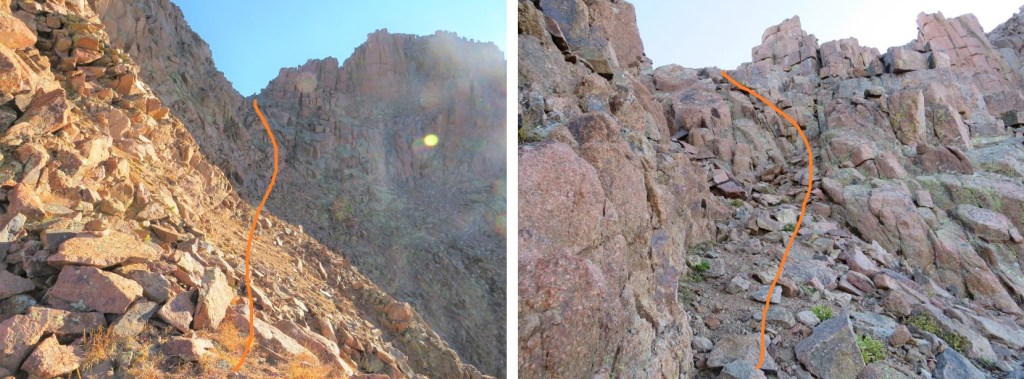
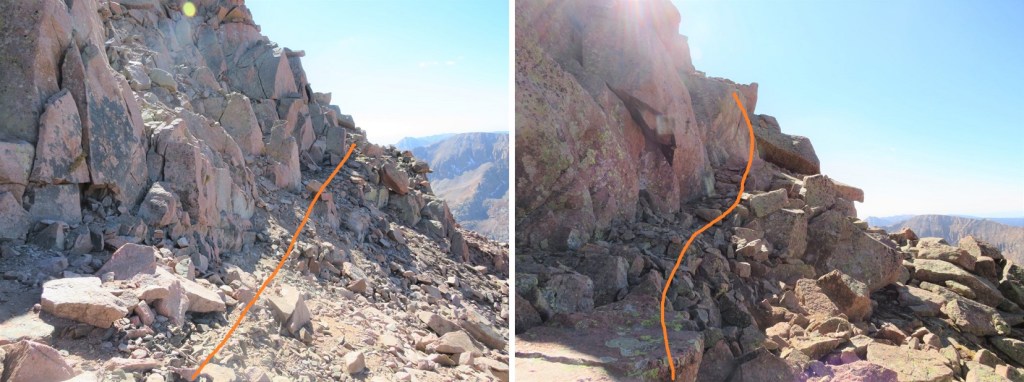
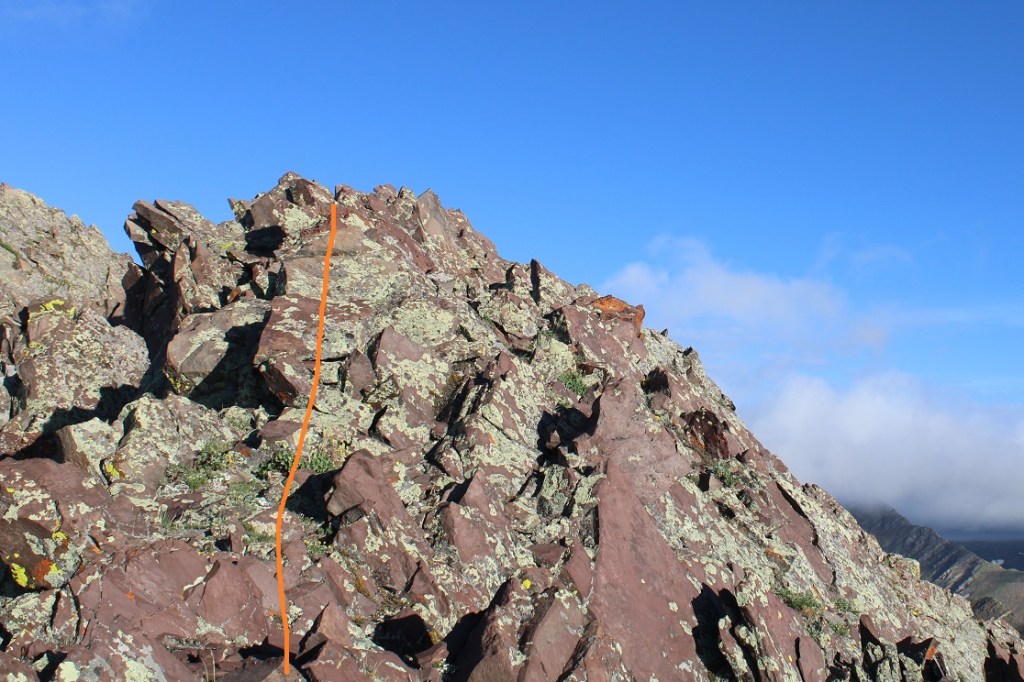
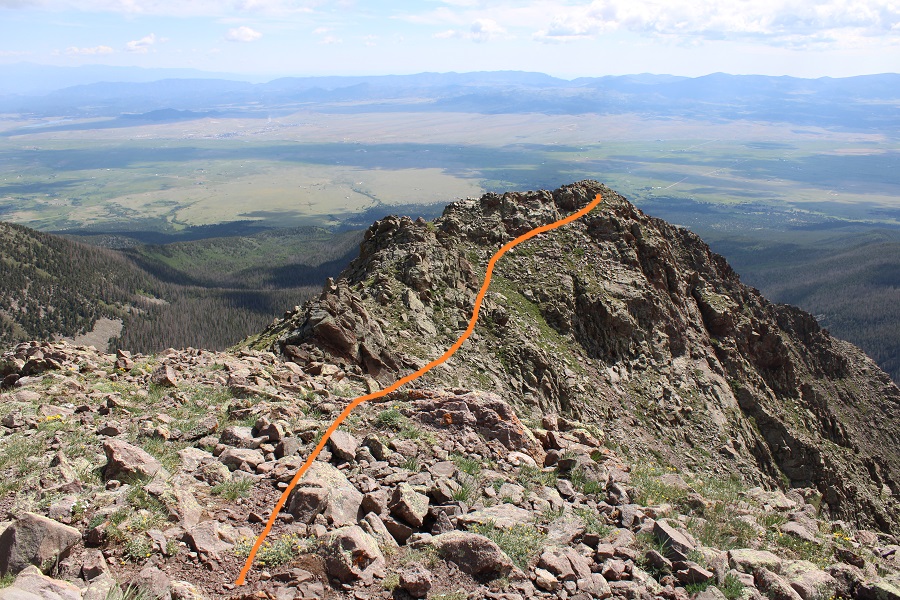
The class 3 fun starts at the top of the ridge, which is a false summit.  From here you can see Little Horn Peak’s true summit

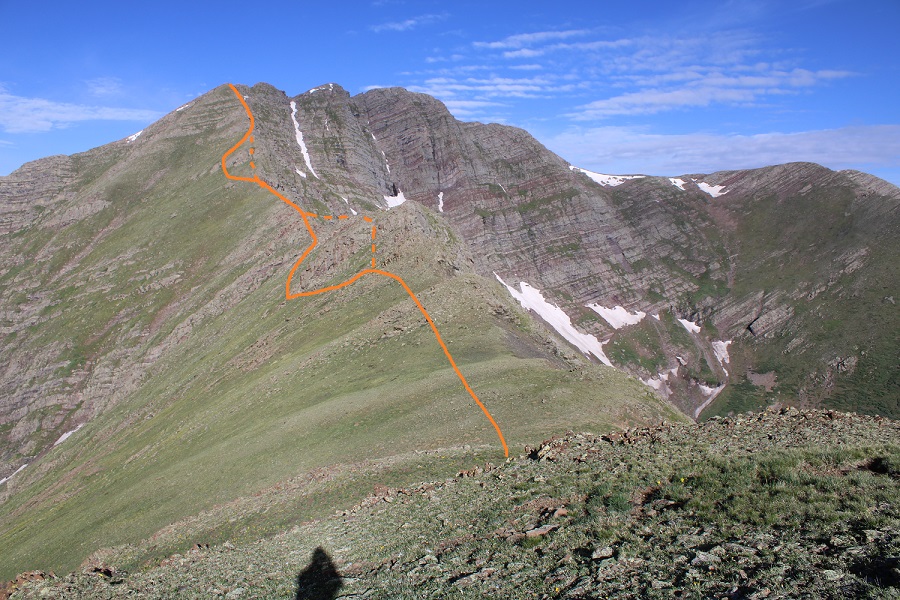
My trekking pole isn’t collapsible, so I left it at the start of the class 3 section, put on my helmet, and started heading straight over the ridge.  The class 3 section is consistent for another half mile to the summit. 

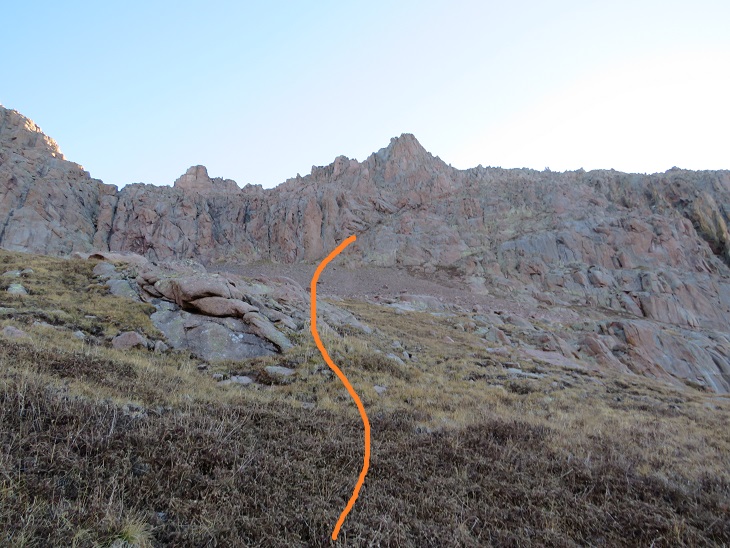
Start out by going straight over the ridge.  There is some exposure here. 

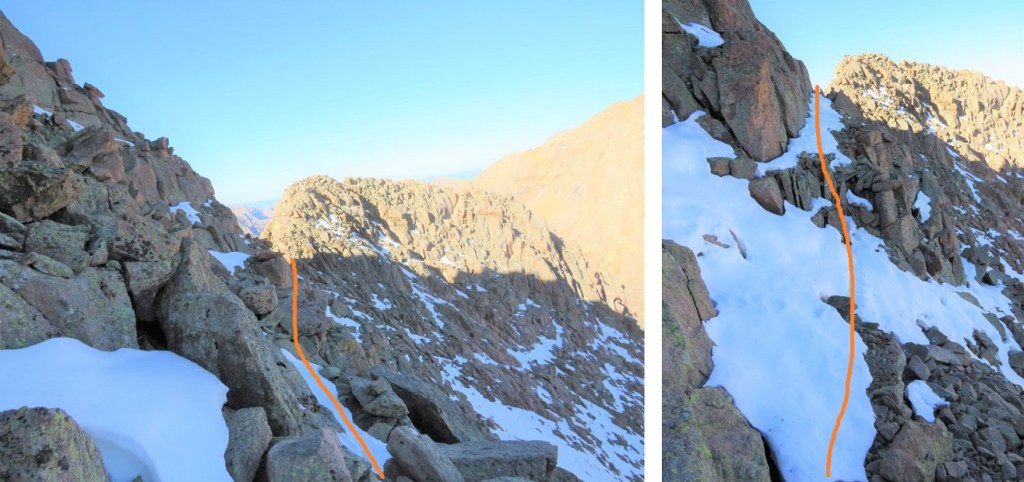
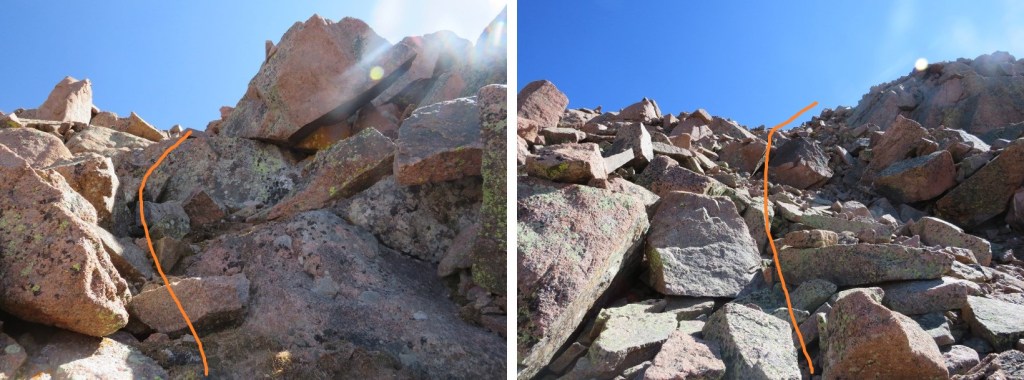
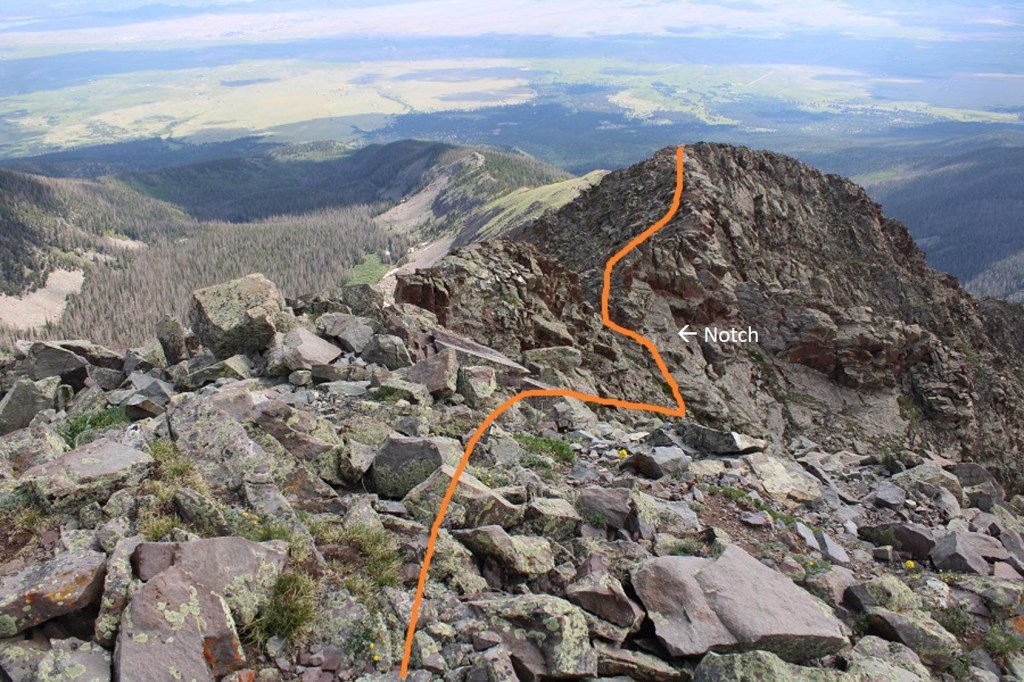
Then you’ll dip down to the right.  Look for a notch, go through it, and now you’re on the left side of the ridge. 

Go up the gully and cross back over to the right side of the ridge

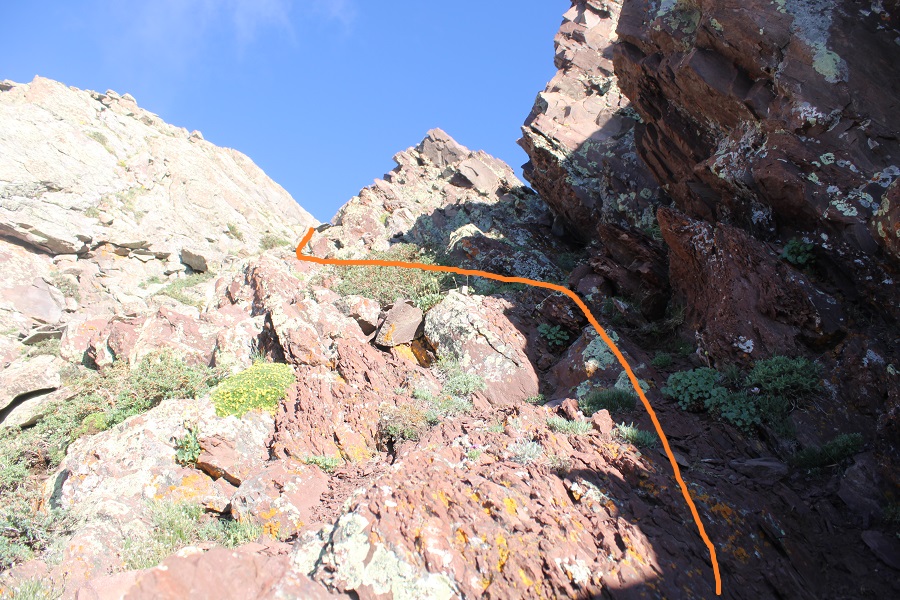
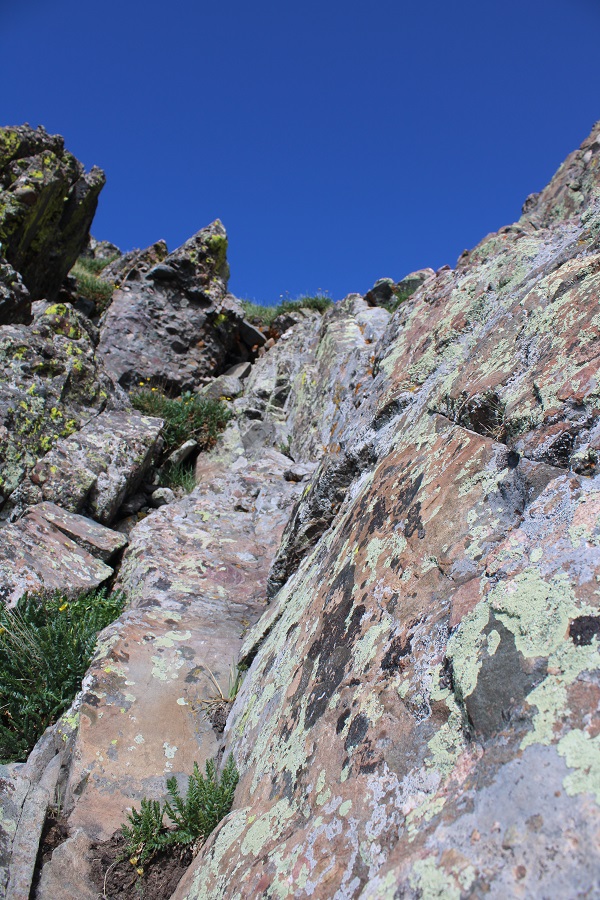
There’s a section of rock to upclimb.  This was difficult class 3 / easy class 4 (and much more difficult and committing on the way back down later in the day).  

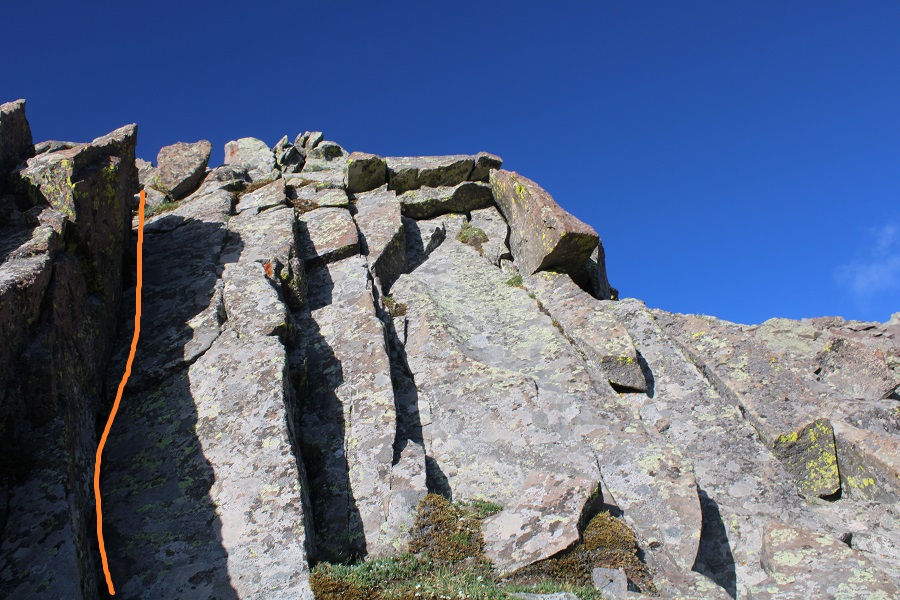
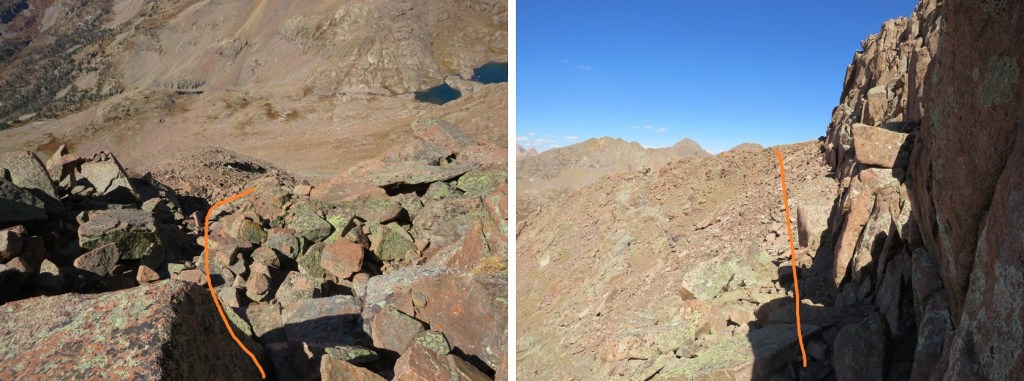
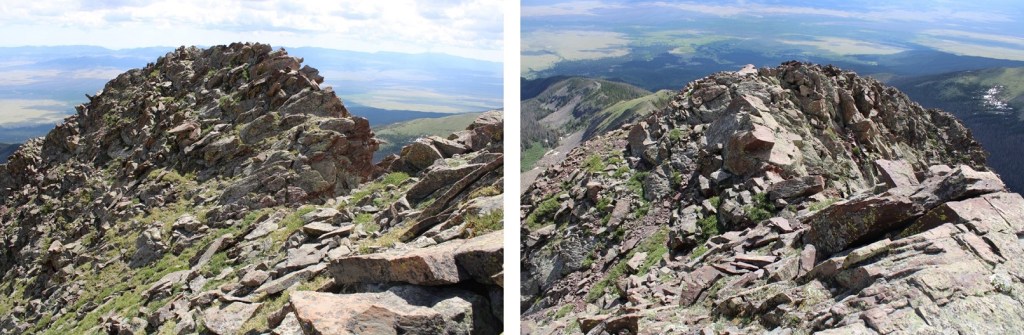
From the top of this section I could see the summit.  I stayed on the left side of the ridge from this point on, staying on class 2 terrain.

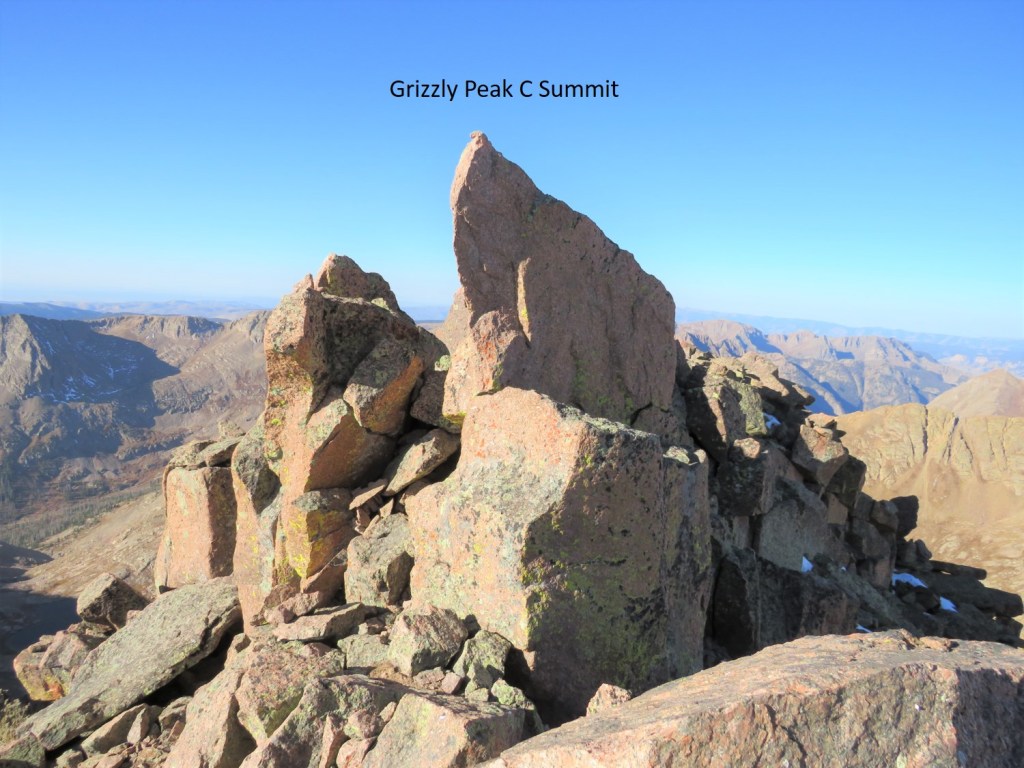
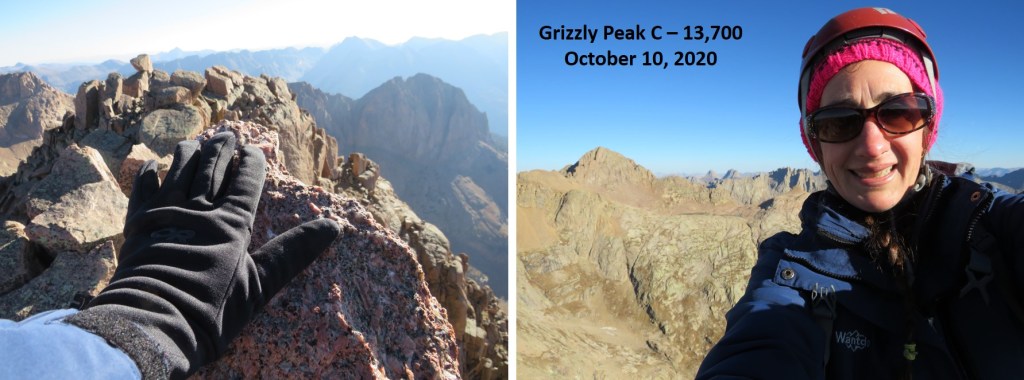
I summited Little Horn Peak at 7:45am

Little Horn Peak: 

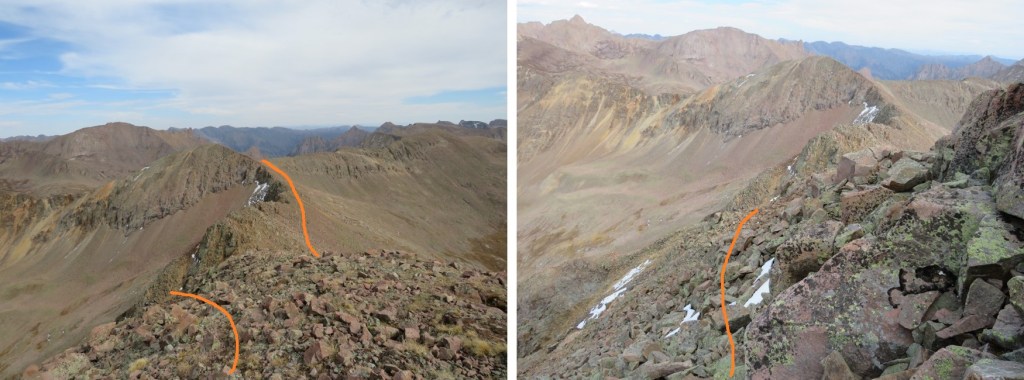
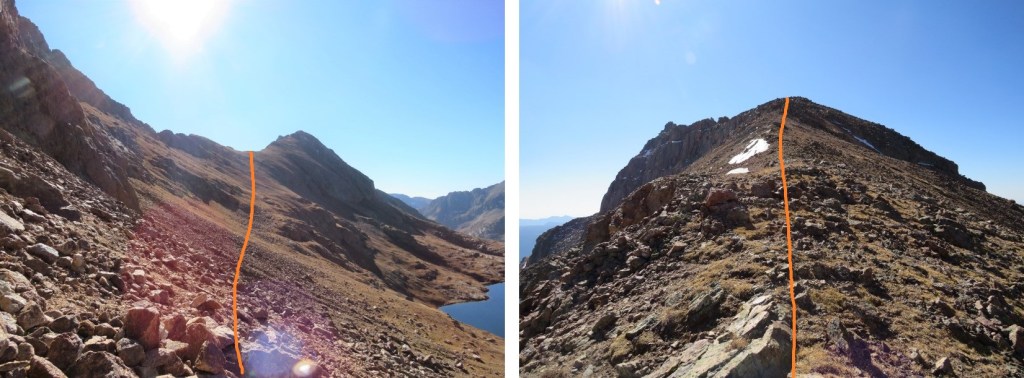
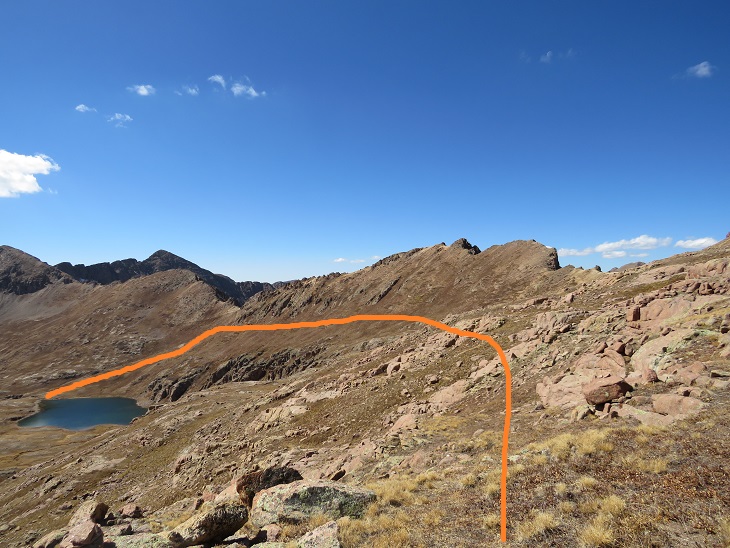
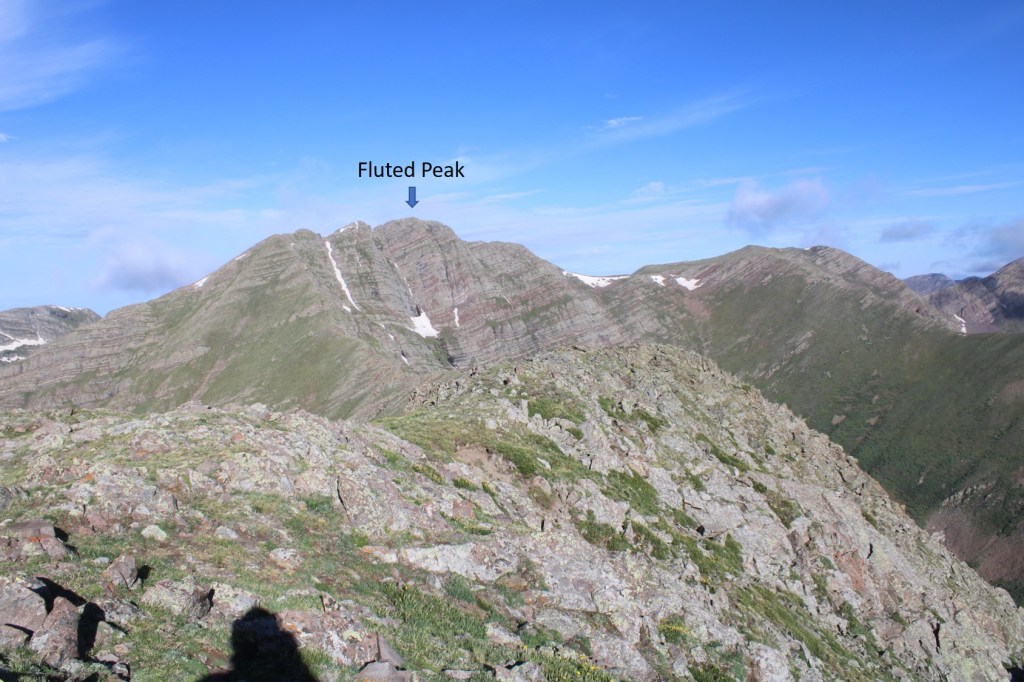
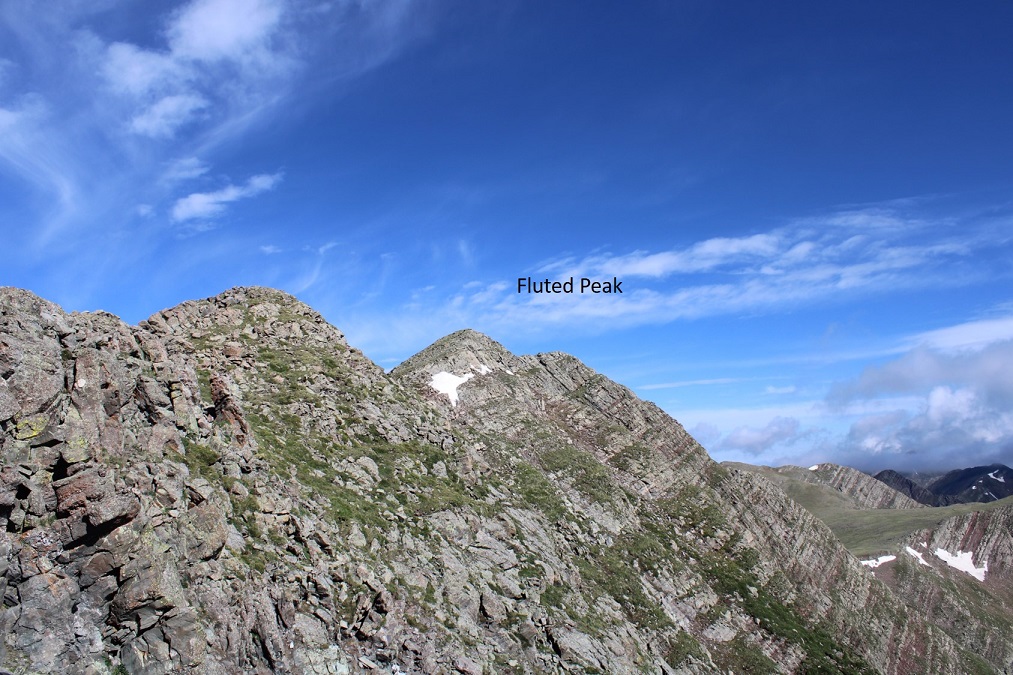
That was it for the class 3 section of the hike.  The ridge over to Fluted Peak is class 2 (with the option to go up a class 3 chimney, but it’s avoidable).  Here’s Fluted Peak to the west.

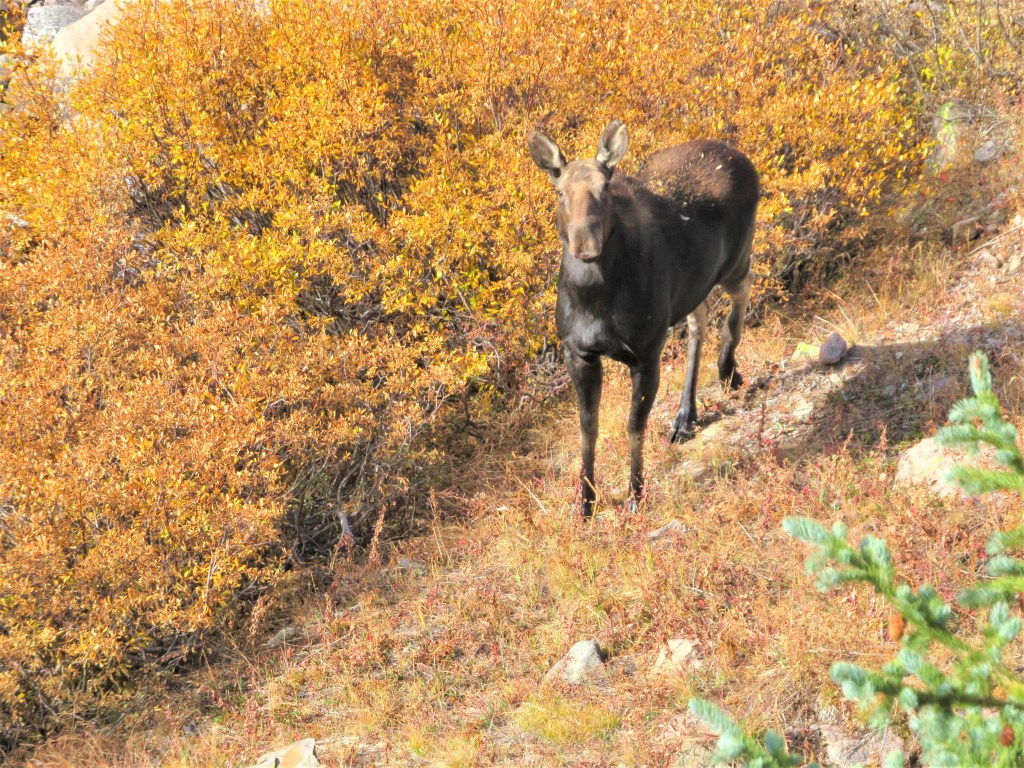
This was a simple ridge hike to the saddle.  You can’t see them very well in this photo, but there was a mama bighorn sheep with her baby walking up the ridge.  The baby couldn’t have been more than a month old.

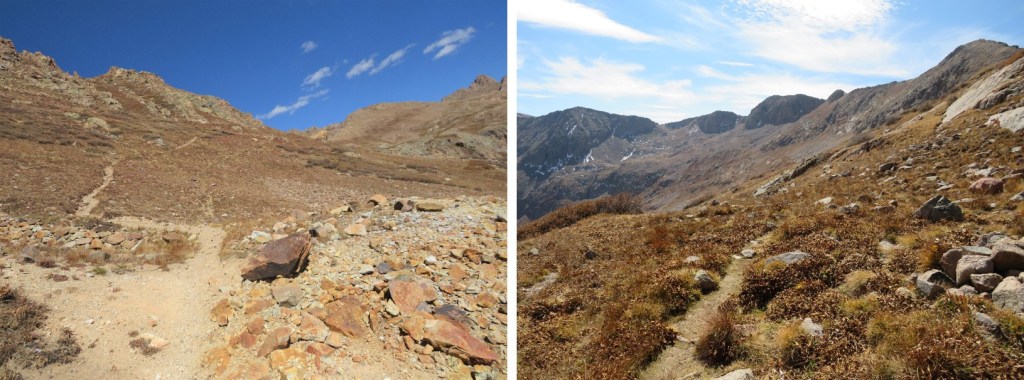
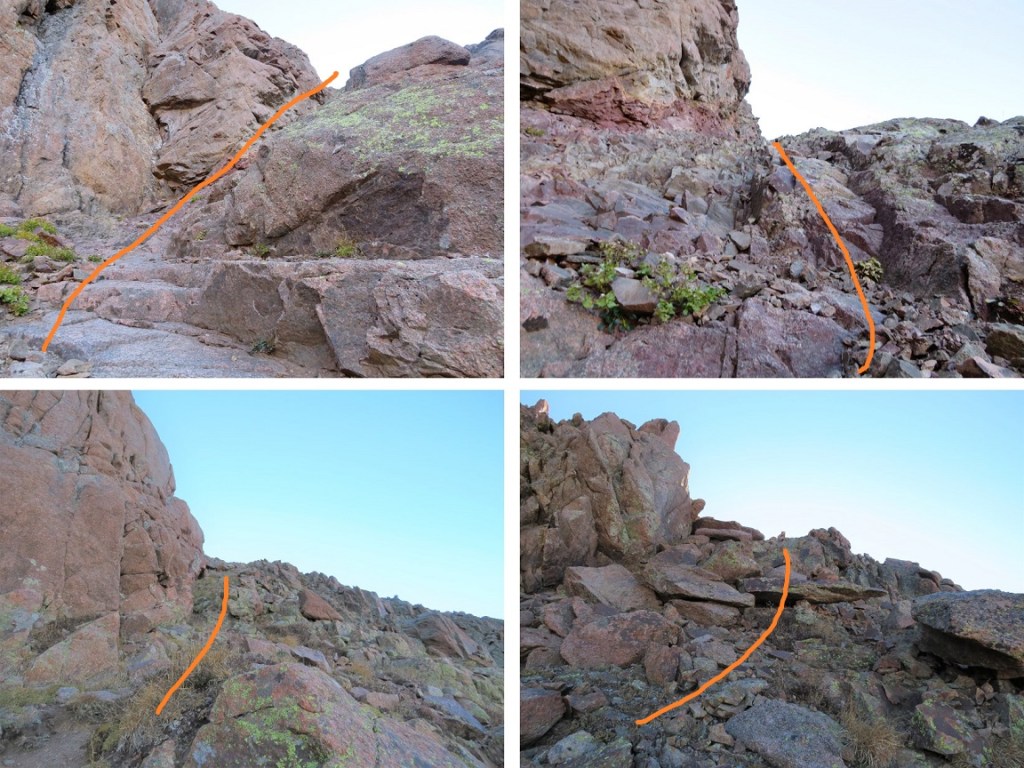
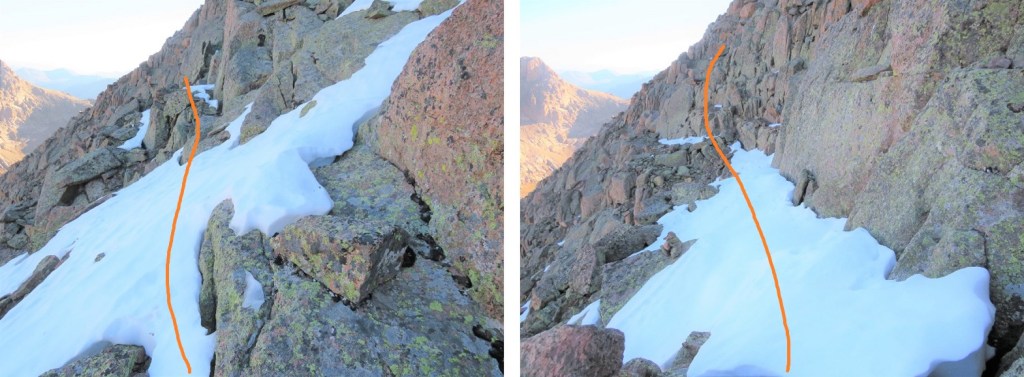
From the saddle, here’s how you keep this a class 2 hike (dotted lines show the class 3 route)

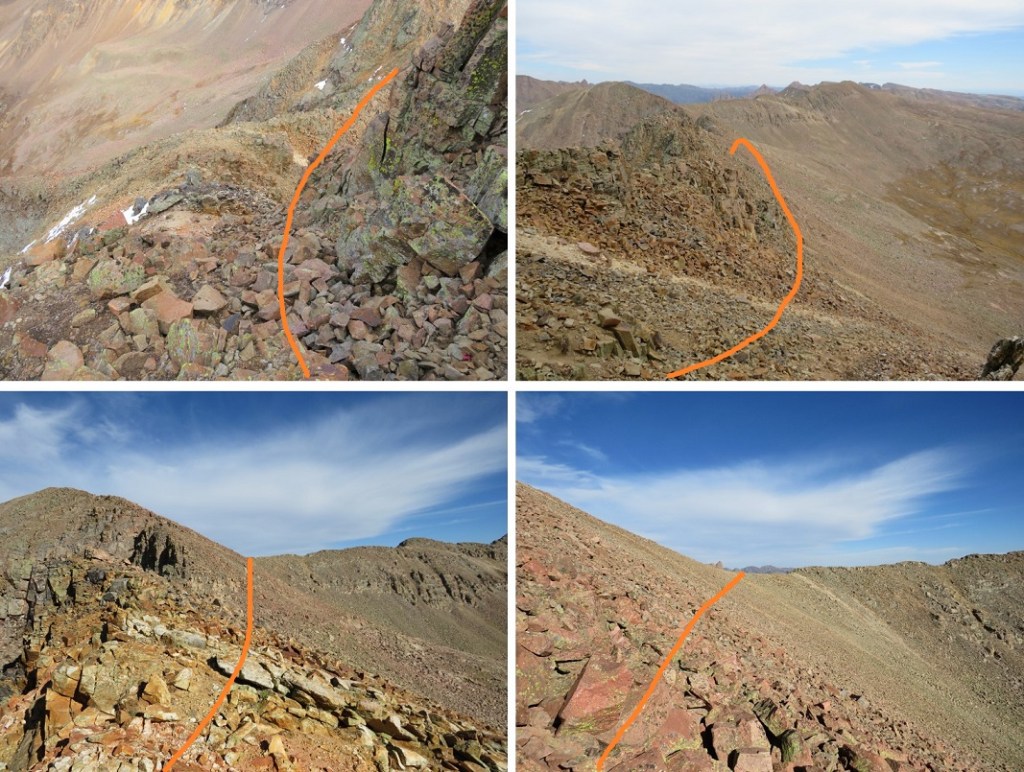
Here’s the first obstacle (class 2 solid, class 3 dotted):

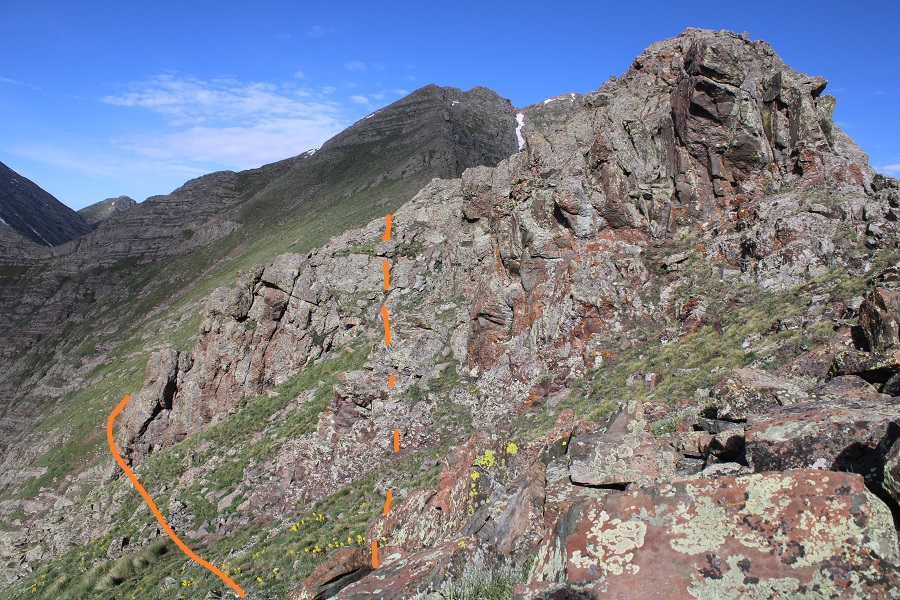
And the second (class 2 solid, class 3 chimney dotted):

Here’s that chimney up close

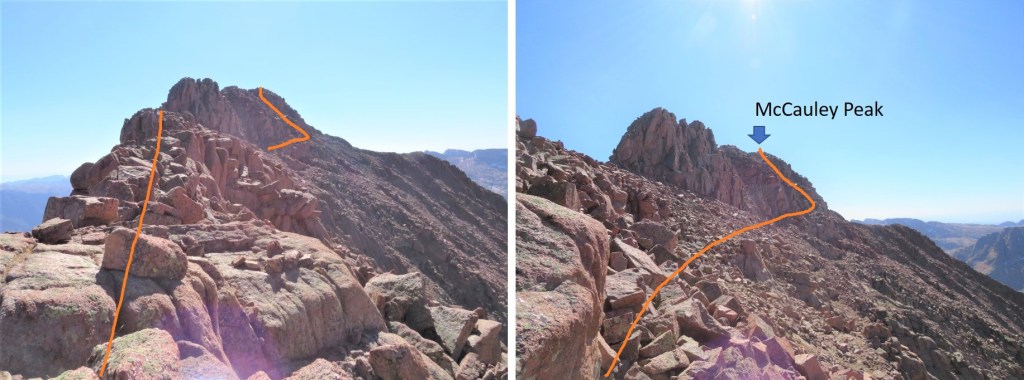
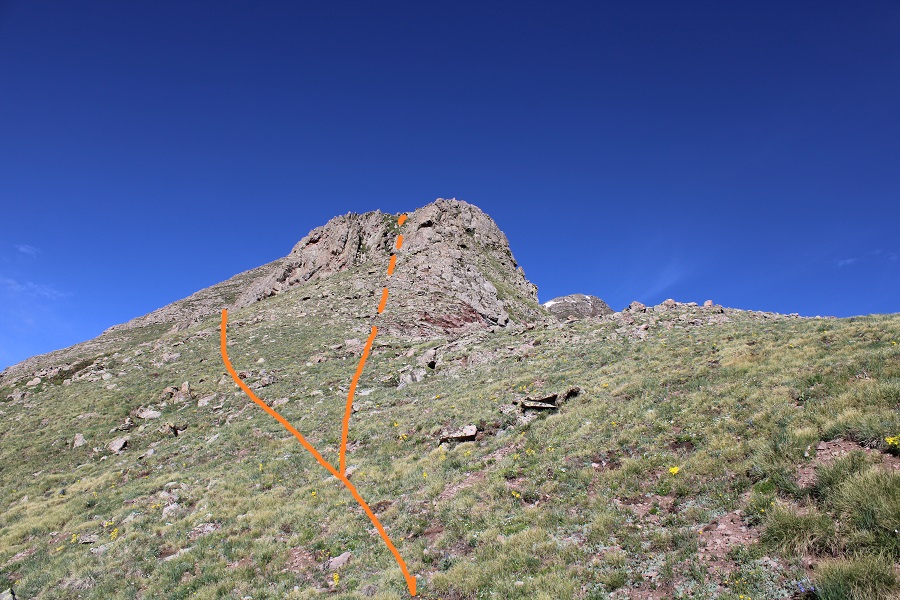
After the chimney, it’s straightforward class 2 to the top of the ridge to the first false summit. 

Fluted Peak is actually here

There are two quick false summits to go up and over

And then the final summit

I summited Fluted Peak at 9am
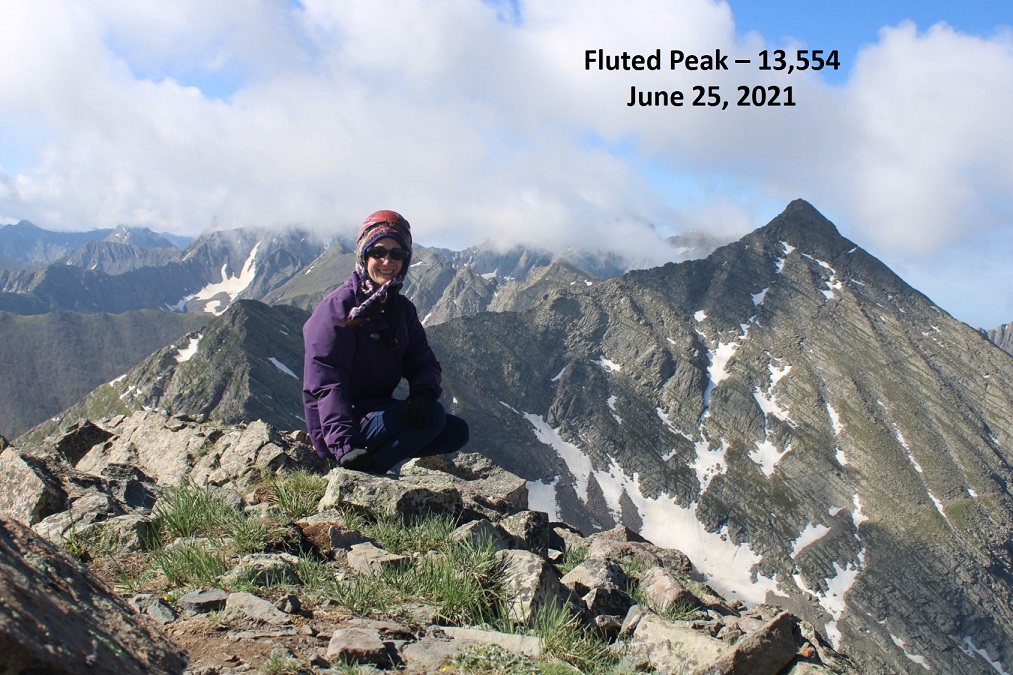
Fluted Peak: 

The clouds were coming in fast, so I decided to re-trace my steps and head back to Little Horn Peak (I’ve already summited Horn Peak, so there was no need to make this a loop today).  I headed back to the ridge

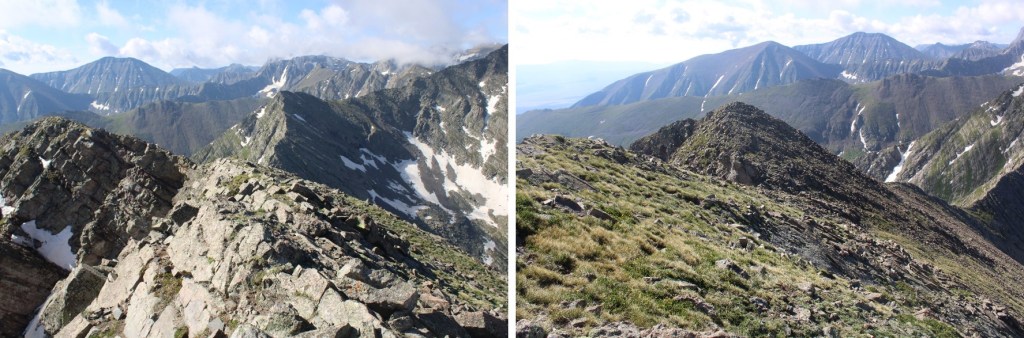
Here’s a picture of Little Horn Peak from the Fluted Peak Ridge

It all stayed class 2 until I made it to the summit of Little Horn Peak

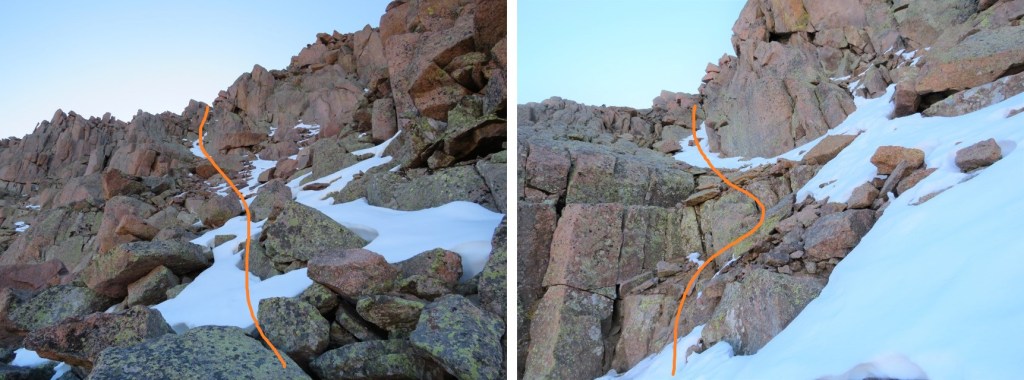
From there It was class 3 again until I made it to the ridge.

Here’s a closer look at that notch

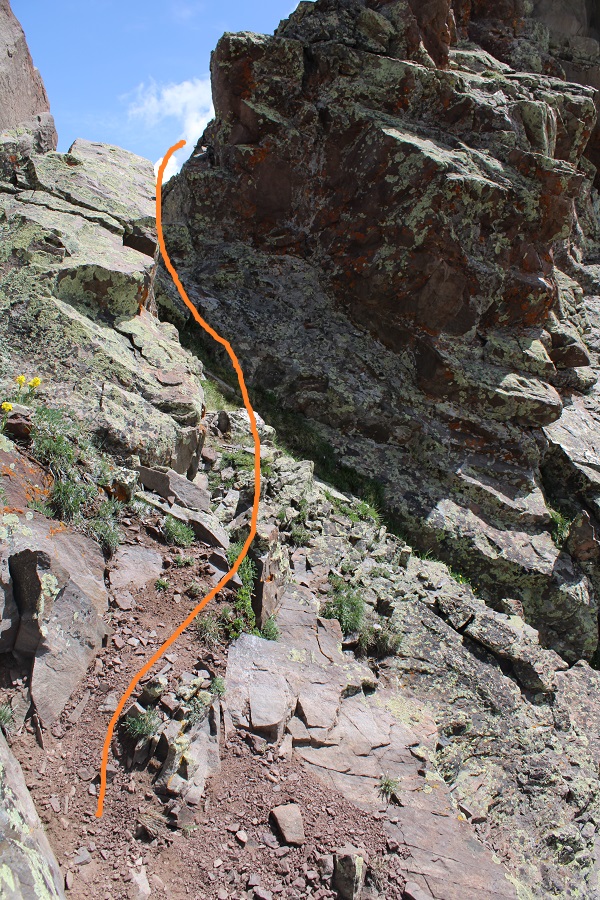
And the last bit of scrambling to the ridge

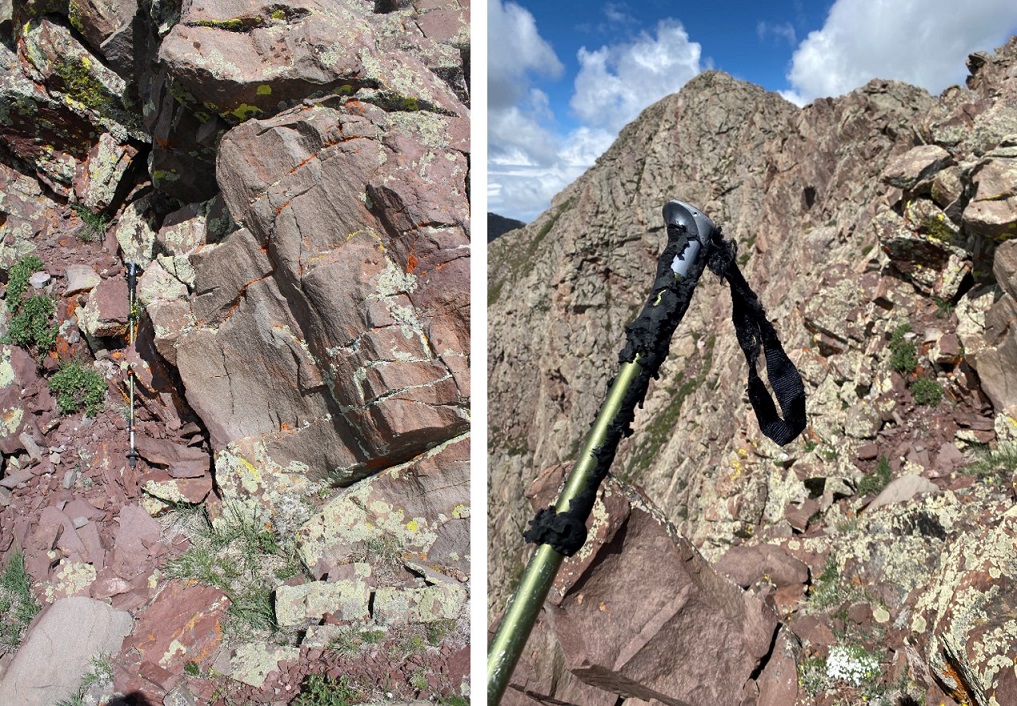
I made it to the ridge and looked around for my trekking pole.  It wasn’t where I’d left it.  Instead, it was about 15 feet away, at the entrance to a marmot burrow. I picked it up and found some marmot had turned it into a snack.  Just adding more photographic evidence to prove the case “Marmots can’t be trusted with trekking poles”.

I sighed, took off my helmet, and headed back down the ridge (yes, I brought the trekking pole down). 

Once back at treeline I turned back for a last view as it started raining. 

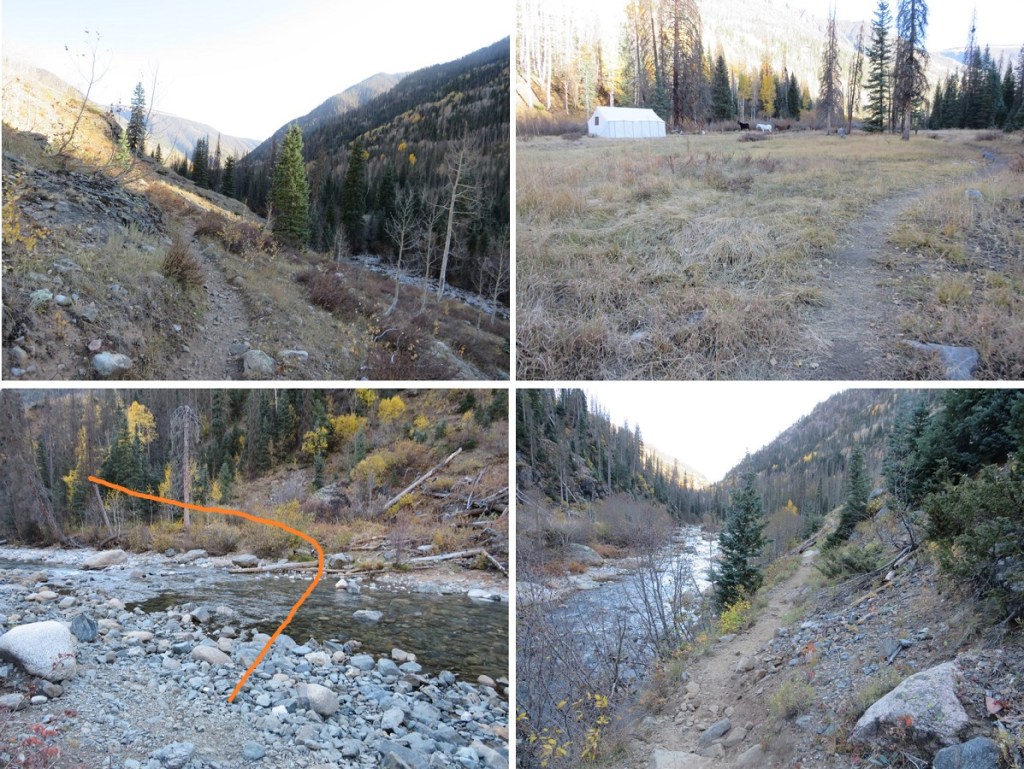
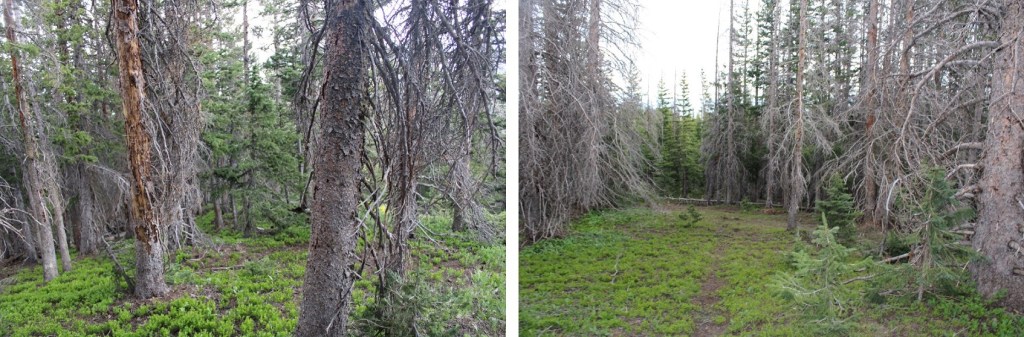
The rain quickly turned to hail and I had to put my camera away. Here are some pictures of below treeline, in-between bouts of rain/hail. I just kept descending northeast, and when the ridge ended I continued east towards Horn Creek Trail.  Once again, I’d pick up game trails and then lose them.   A little advice:  you should be able to hear Horn Creek flowing below you to your right if you’re going in the correct direction.

Back on the trail I followed it to the trailhead.

I made it back to the trailhead at 1pm, making this a 12.35 mile hike with 5504’ of elevation gain in 8.5 hours.  That had been a fun day of scrambling!

I dried off and headed to the next trailhead.  When I got there it was still raining, so I decided to make dinner inside the topper of my truck.  I finished, cleaned up, and was sitting down to write notes in my journal when I heard a loud “BANG!” 

I looked up, and the back window to my topper crumpled and broke into thousands of pieces.  I honestly thought I’d been shot at, and turned around but didn’t see a bullet hole anywhere.  Next, I gingerly opened the window, crawled out of the truck and took a look around:  no one in sight (but it was still raining). 

I assessed the damage, and realized I needed to take care of this asap, so I put on gloves and cleaned up all the broken glass I could, still getting some small slivers of glass embedded in my fingers.  Next, I drove to where I could get cell reception, and found the nearest place that would be open the next day to fix the broken glass was 5 minutes from my home, and 6 hours from where I was right now.  I sighed:  It looked like I had a long night ahead of me. 

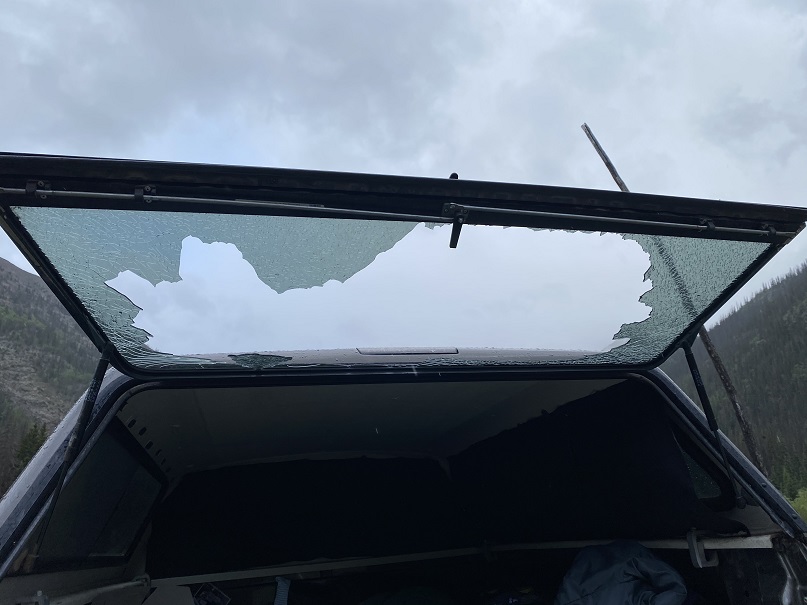
It turned out the auto glass store couldn’t help me, and told me to go to where I’d originally bought the topper.  They couldn’t help me for another 4-6 weeks (and $600), but referred me to another glass shop that didn’t open until Monday.  So, a quick trip to Walmart to pick up some duct tape and a tarp and I was able to create a makeshift door that does nothing to keep animals/intruders out, but has done a decent job keeping out the rain.  I’m still not sure why the window broke:  I was told sometimes there’s just a flaw in the glass.  That sounds bogus, but I’m getting a new one soon anyway, and I’ve learned not to get windows in my next topper (I don’t use them anyway).  I’m actually more upset I lost out on two days of hiking. 

Aztec Mountain – 13,310, Grizzly Peak C – 13,700, McCauley Peak – 13,555

RT Length:  49.5 Miles (CalTopo) 42.61 Miles (Strava)

Elevation Gain:  9166’ (CalTopo) 13428’ (Strava)

Day 1:  Approach, Columbine Lake, Aztec Mountain

After quite a long drive I made it to the trailhead around 9pm.  Just before Vallecito campground there’s a sign indicating trailhead parking is to the left.  I parked, and was surprised I had cell service.  There were several horse trailers in the parking area, and a few vehicles. 

I tried to get some sleep, but my nap earlier in the day had lasted longer than it was supposed to (my alarm didn’t go off, and 30 minutes turned into 3 hours).  So, I read a bit, made a few phone calls, and got to bed later than anticipated.  I was up and on the trail at 2:30am.  The trail starts at the northeast corner of the campground. I started and ended the hike in the dark.  Also, I had my new camera with me, and was interested in how the pictures from today would turn out.

This is a class 1 trail that goes north without any junctions, so it’s difficult to get lost/off track.  I crossed the first two bridges (there are actually 3 if you consider the one that leads you out of the campground but doesn’t cross Vallecito Creek), but made it to the third bridge while it was still dark.  I couldn’t see across the river, and I didn’t want to cross without a visual, so I laid out my sleeping pad and took a nap for 30 minutes until it got light enough for me to see, then I put on my sandals and crossed the river.  I’m glad I waited until daylight:  crossing wasn’t too difficult, the water only went up to my knees, but there were pockets/pools where I could have sunk in the water much, much further.  My advice is to cross this creek (river?) in the daylight.

I continued hiking along the class 1 trail, but the stream crossing was causing me to have a Raynaud’s attack.  Surprisingly, it was in my hands and not my feet.  I kept pumping my fingers and balling my hands into fists, willing them to warm up and stop burning (yes, I realize that was a juxtaposition).  My fingers burned for another 2 hours. I should have stopped and warmed up some water to revive them, but instead I continued hiking until I came to the Vallecito/Johnson Creek Junction.  I made it to the junction after hiking for 10.3 miles, and continued left (west) towards Johnson Creek

This led me over the 4th bridge, where I continued heading west, up into Vallecito Basin. 

Just as I entered the Vallecito Basin I came across a moose. She was just as surprised to see me as I was her.  She was the size of a horse, adorable, and reminded me of a puppy dog, but I gave her space.  After the initial inquisitive look she gave me she pranced off to the trees and watched me timidly as I hiked away.

I continued on, up a thousand or so switchbacks, through the Vallecito basin to Columbine Lake.

It took me 18.5 miles to make it to Columbine Lake.  I made it there at 1pm and decided to sit and take a break for a while.  It was here I realized my biggest mistake of the weekend:  I didn’t have any chapstik.  My lips would be burning until I made it back to the trailhead (and especially after each shot of whiskey).  I snacked on a packet of tuna, filtered some water, and considered my options.  I’d wanted to hike Grizzly and McCauley today, but I didn’t think I had enough time to make it back before the sun went down behind the mountains.  I need to be in my bivy before the sun sets, so this was a serious concern for me.  But I wasn’t tired yet.  I decided instead to leave my large pack here, take just what I needed in a small pack, and summit Aztec Mountain this afternoon instead. 

Here’s an overall view of the route I took to the ridge to Aztec Mountain, as seen from Hope Pass the next day

From Columbine Lake I turned and followed the trail northwest towards Columbine Pass, then turned left when it hit trail 541 (no signage, and in fact I had to wing it for a bit as the trail didn’t quite go through, but it was obvious from below where the trail was and I just aimed for it) and headed south.

I followed trail 541 for .7 miles, and then left the trail and aimed for this grassy area.  My goal was to gain the ridge, and this seemed the best place to do so, as I could see a path on tundra/scree up to the ridge.  After hiking up and down this is the route I’d recommend to ascend the ridge.

The terrain here is steep, and it was slow going, but I was able to ascend the ridge

Once on the ridge I was at a bit of a saddle.  There is no need to head right (north) to gain this point, as it’s not ranked and you’ll just need to head back down anyway.  Instead, skirt the point by heading west.

This will bring you to the ridge that will lead you to Aztec Mountain.  This ridge doesn’t ‘go’.  Staying low is the better option here.  Here’s an overview of the path you’ll want to take

Staying low keeps this class 2.  The final gully is easy to access, and the final scramble to the summit is straightforward

I summited Aztec Mountain at 3:15pm

Aztec Mountain: 

Here are some pictures of the way back down to Columbine Lake

I was chasing the sun, trying to make it to the lake before the shadow of the mountain made it there and cooled everything down.  Between the shadow and I it was pretty much a tie, so I gathered my gear and hiked a bit further into the sunshine and set up camp for the night.

I made it back to Columbine Lake at 5:15pm, satisfied with my choice to hike Aztec Mountain today instead of Grizzly and McCauley.  I was spending the night at 12,300’, with a great view of Columbine Lake.  I went to dry out my feet but my sandals were still wet from this morning (I’d forgotten to take them out and place them in the sun when I left for Aztec).  I ate dinner, filtered some water, heated the water in my jetboil and filled my Nalgene with warm water for the night.  I looked around for my extra pair of socks but couldn’t find them, so I guess my feet weren’t going to dry out tonight.  I placed the water bottle at my feet and looked at my tracker:  it said I’d done 20 miles today.  Not bad.  I snuggled up in my sleeping bag and bivy and looked over at Grizzly Peak.  I thought about the approach tomorrow, jotted some notes down in my journal, put on all the clothing I had with me, and called it an early night. 

It was a long night.  A long, cold night.  I was warm in my bivy and sleeping bag.  Halfway through the night I felt something sniffing my ear.  Seriously. It felt like a dogs’ muzzle and startled me awake.  From inside my bivy I flailed my arm at it, unzipped my bivy, and looked around.  There was no moon but the sky was bright with stars.  I could see the mountains and the lake and rocks and tundra, but no animal.  It hadn’t made a noise when I’d touched it, but I’m guessing it was a fox or a coyote with an ear fetish.  The air is thin at 12,000’.  A few hours later I woke up, noticing breathing was more difficult than usual.  To breathe better I quickly opened my bivy to get in a few gulps of air.  Not only did this not help with my breathing, but when I put the bivy back over my head the condensation from my breath had turned to ice.  Wonderful.  Note to self:  don’t unzip the bivy. 

Day 2:  Grizzly Peak C, McCauley Peak, Descent

The morning couldn’t come soon enough.  Just before first light I re-heated the water in my water bottle, packed my gear and was on the trail with just the essentials, leaving my big pack at the lake.  I took the same trail I’d taken to summit Aztec, but at the junction with trail 541 I went right and followed the trail towards Hope Pass. Here’s an overall view of the route from yesterday’s hike

This part of the hike was on a nice trail, and when there wasn’t a trail there were great cairns.  From Hope Pass I got a good look at Grizzly Peak C, and the route I wanted to take to gain the ridge.  Here’s the overall route I took, aiming for a gully and rock rib that ascends the mountain

I didn’t descend to Hazel Lake, but instead stayed high, aiming for the grassy slopes below Grizzly’s ridge.  There are several ways to do this

From there I aimed for the obvious gully/notch/access point (not sure what to call this?)

This gully/notch/rib is easy to follow to the ridge.  Stick close to the wall and follow it southeast as it hugs the mountainside.  It starts out as class 3 but after the initial solid gully it becomes class 2.  I was pleasantly surprised to find cairns here.

Here’s the last bit to gain the ridge.  Aim for the notch (there are cairns here too).  The last part of this is class 3.

I went through the notch and found snow on the other side.  This wasn’t unexpected, as I’ve spent the past 3 weekends in this area and knew north facing terrain was holding snow.  What was unexpected was the amount of snow, and how it all lined the trail.  It ranged from non-existent to 3 foot drifts, and from bulletproof to sugary.  What’s important for the reader to know is there are multiple ways to summit Grizzly Peak, and tons of cairns to prove it, so I was able to get creative these last 250’ or so to the summit.  I rock hopped where necessary, kicked in steps, and created trenches to get to the summit, always heading up and east.  Here are some highlights.

The last bit to the summit was luckily snow-free, and class 3-4 (the chimney was class 4)

As I made it to the summit I wasn’t sure if the true summit was left or right.  I went right and luckily chose correctly (there was a summit register beneath this point).

I summited Grizzly Peak at 9:15am.  I know some of you are wondering, did I did I sit at the top of the summit point?  The answer is no.  The point was too pointy to sit directly on top of, but I did climb up the summit boulder, sat on it about a foot from the point and touched the top, so I’m calling it a summit.  You can sit wherever you’d like.  I also didn’t take the video from the point, as I do a 360 degree video and wasn’t about to attempt turning in a circle while standing on the point. 

Grizzly Peak C: 

Time to head back down. I down climbed the chimney and headed back, retracing the steps I’d left in the snow to the notch

I made my way back down around the side of the mountain to my entry point

My next objective was McCauley Peak.  I could clearly see the line I wanted to take, up the grassy slopes to the Grizzly/McCauley saddle.  Staying high didn’t cliff out, but there was one class 4 downclimb required in the area circled in red.  If this scares you, you can just go lower initially (the dotted line) and re-gain elevation.

I gained the saddle and headed south along the ridge.  This was all class 2

From the top of the ridge I could see the rest of the route.  There were cairns here indicating I should go low, but the route was no more than class 3 sticking to the ridge.  Here’s an overview of the route I took

The summit is actually the southernmost point.  I rounded the west side of the mountain and found a gully to ascend (note:  all gullies here ‘go’).

There was one class 3 move and then it was all class 2 to the summit

I summited McCauley Peak at 11:30am

McCauley Peak:

It was a beautiful day!  The predicted winds never materialized, so I stayed a little longer on the summit than usual.  Then I headed back down the gully and over the ridge

Here’s the overall route back to Hope Pass

And the route from Hope Pass back down to Columbine Lake (and my stashed gear)

I made it back to my gear at 1:30pm.  I mulled it over, and decided instead of sleeping here tonight I was just going to hike as far back as possible, stopping along the way if need be (there are tons of camping spots along this trail).  I consolidated my gear and was on my way back down the basin towards those thousands of switchbacks.

Back down to Vallecito Creek and its bridges (or lack thereof).  This was much more enjoyable in the daylight.  I was able to appreciate the creek and its depth, and even saw dozens of trout swimming in the deeper pools.

I followed the class 1 trail back to the trailhead, following the creek, and passing a hunters’ camp along the way.  The mules said ‘hi’ as I trekked by.  There were no people to be found.

The whole way back I was prepared to stop and camp, but I was making great time so I just kept going.  I mean, I really, really needed that chapstik.  About a mile from the trailhead my camera stopped working.  It wasn’t until I made it back home I realized the battery had somehow fallen out.  This was weird because the door was still closed, and I only realized it was gone when I opened it to take out the flash card. Luckily I have a spare.  I made it back to the trailhead at 8pm, and found my extra pair of socks sitting nicely in the passenger seat.  I have very different numbers for my stats looking at CalTopo and Strava.  I usually go with CalTopo for numbers for consistency sake, but I’ll just leave these here for you to decide which are more accurate, along with a few topo maps of my route.