I’m not gunna lie, this was my third attempt at T10. I’d attempted it twice earlier this year, when there was too much snow to access from the Three Needles side, and another time when I felt the terrain was too loose on the Trico side. Both times I’d made it to within 100 feet of the summit, but called it for safety reasons. Also, I’d been in the area, took a bunch of pictures, and I had a plan. I wanted to make this a class 2 hike in a different way. Spoiler alert: I was unable to make that happen. Sorry folks, T10 is class 2D/2+ (both mean steep scree, and honestly, I’d much rather climb a class 3 peak) from Black Bear Pass, sketchy class 3 from the Three Needles side.
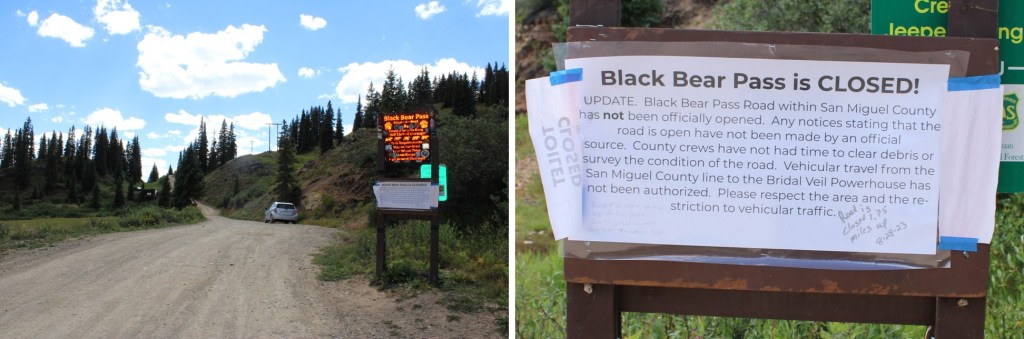
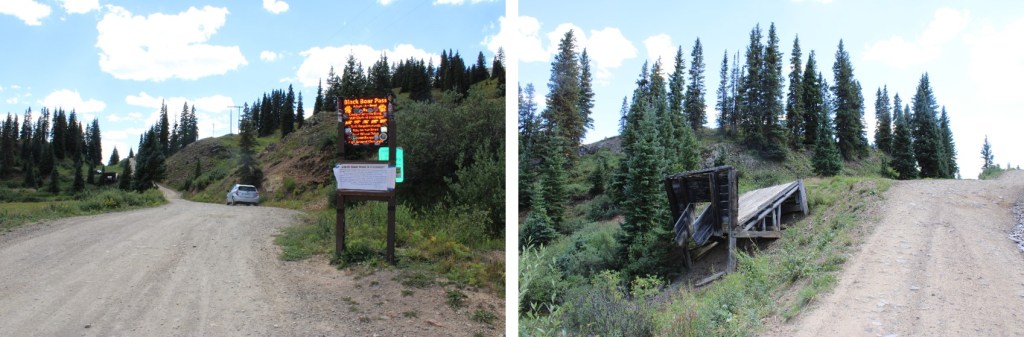
I was parked at Red Mountain Pass, which had a sign indicating Black Bear Pass was closed to vehicular traffic. Now, a 4WD vehicle can make it to the pass from this side (it was open when I was here in July of this year) but they’ve closed the gate, presumably from difficulties on the other side of the pass, because this side was and has been clear to go.
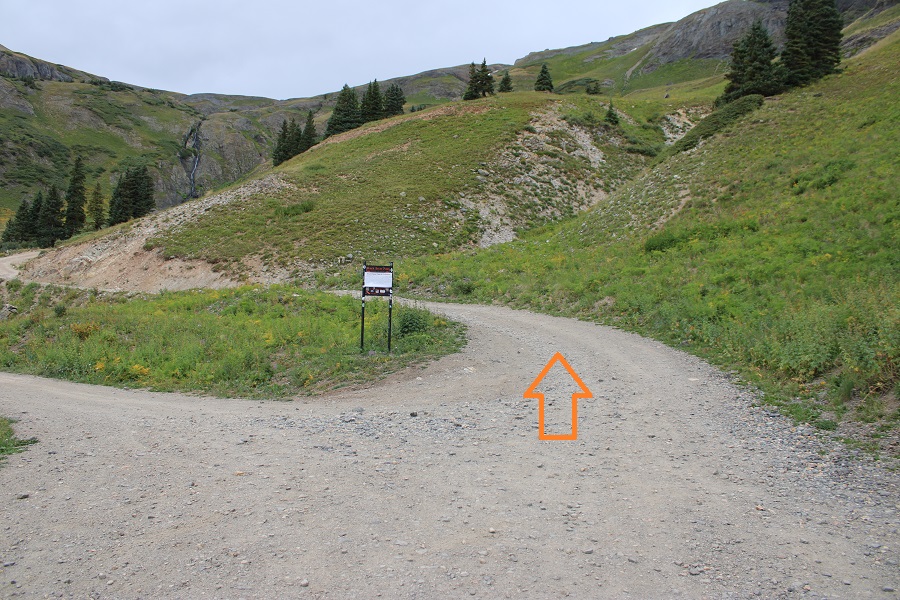
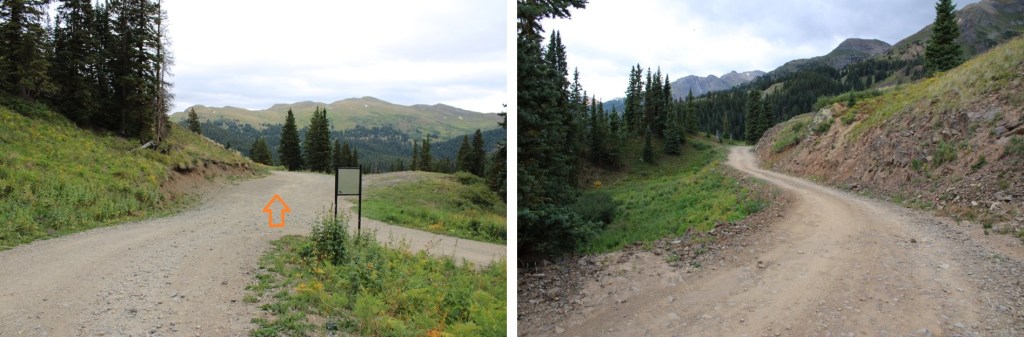
I and on the trail at 5:30am. I took 4WD 823 to the Black Bear Pass/Prophyry Basin junction.
I quickly came to the Black Bear Pass/Prophyry Basin junction and continued straight towards Black Bear Pass
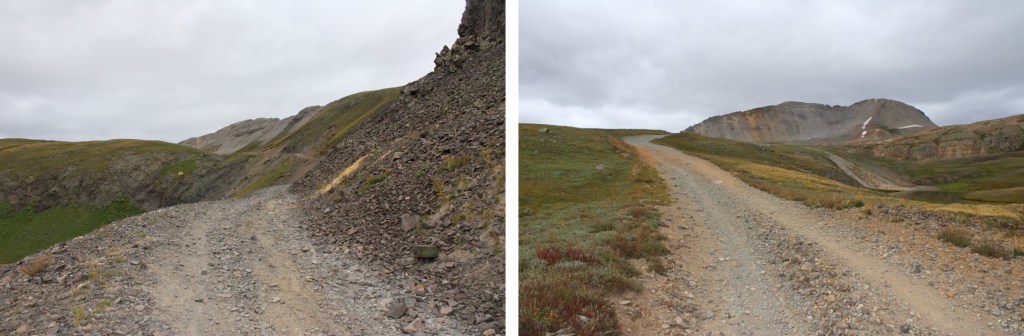
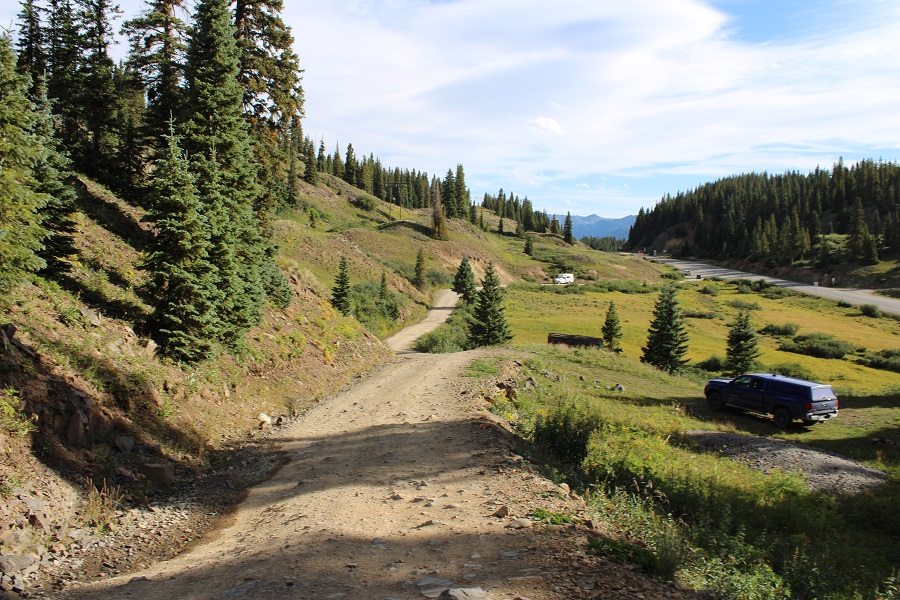
Although steep at times, a standard 4WD should be able to make it to the pass if it were open
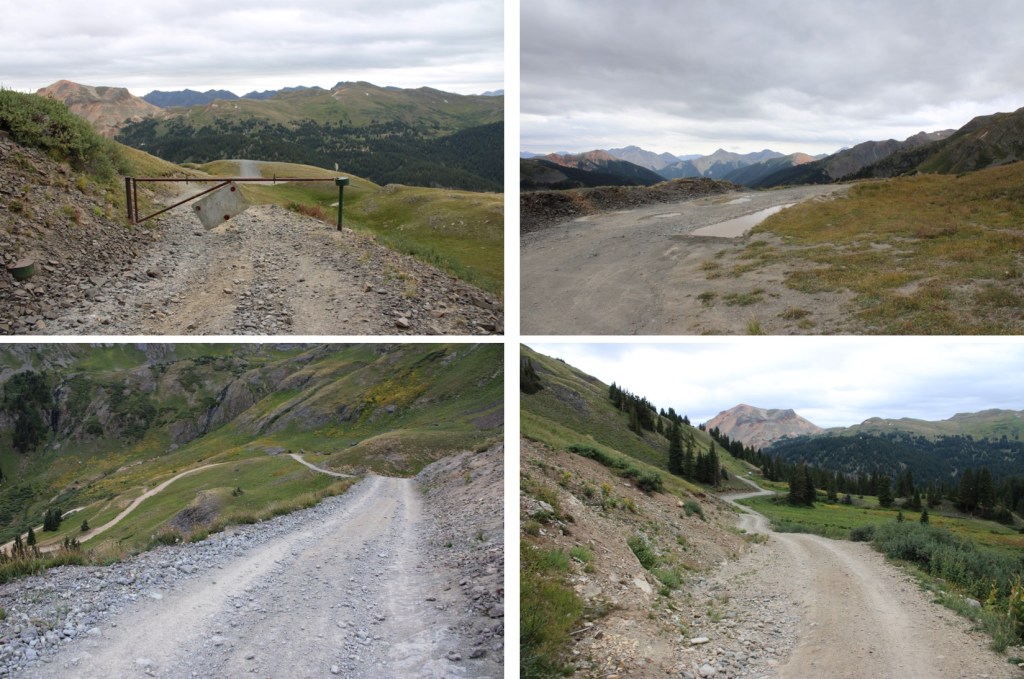
The pass was indeed closed to vehicular traffic.
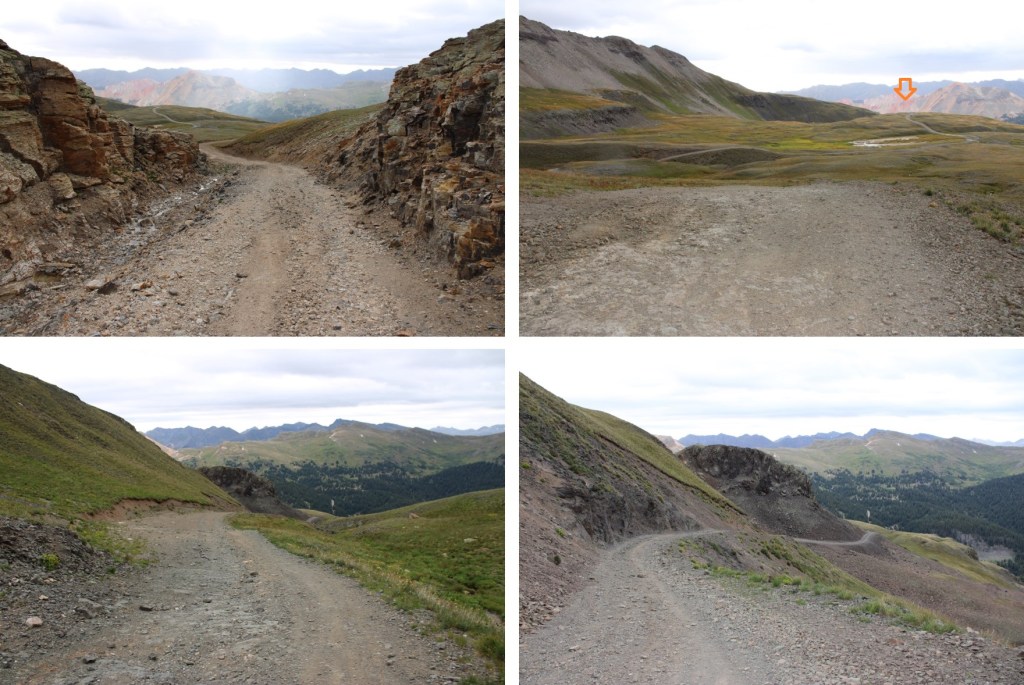
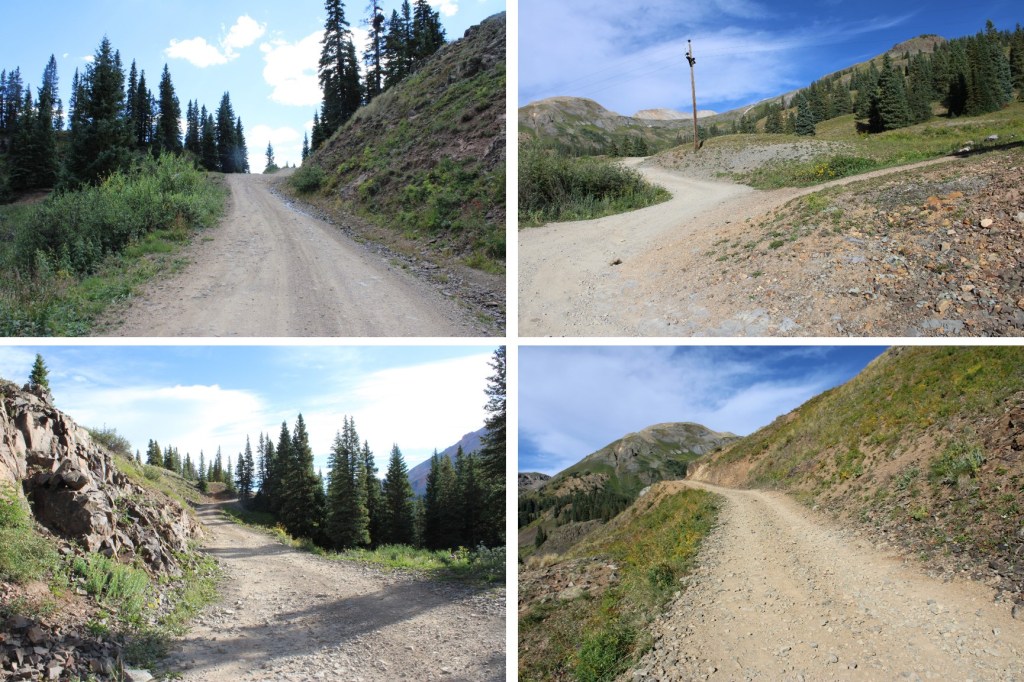
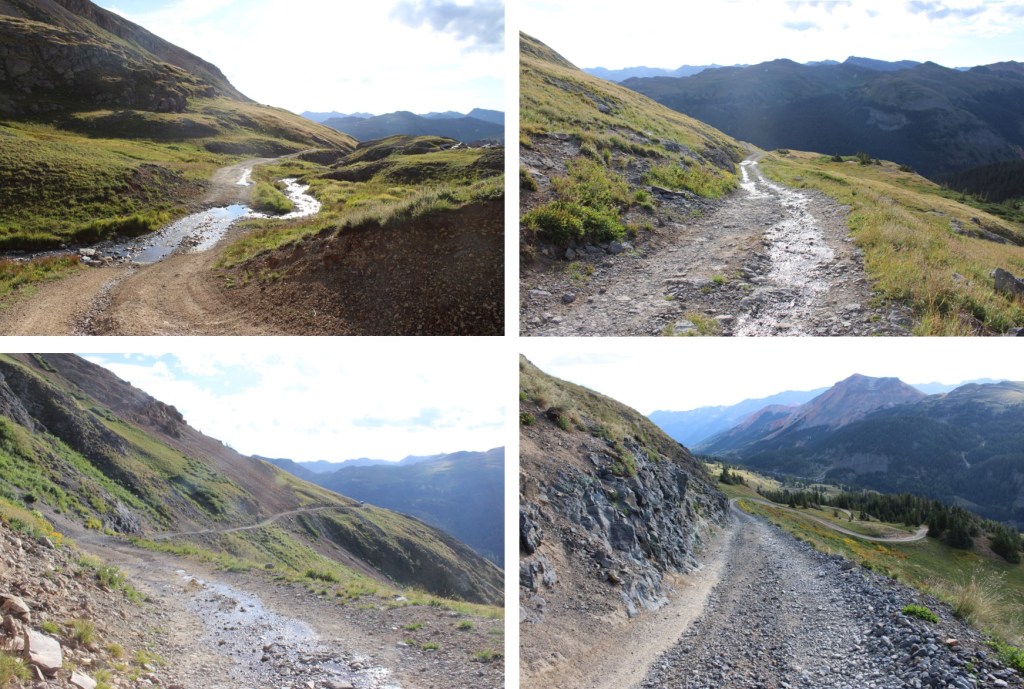
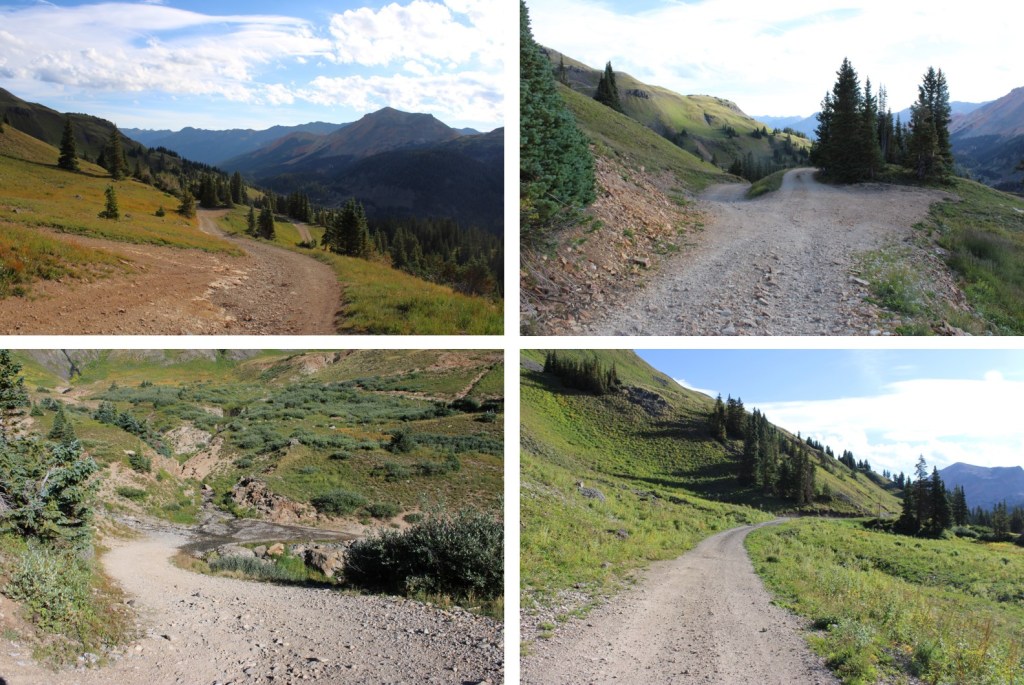
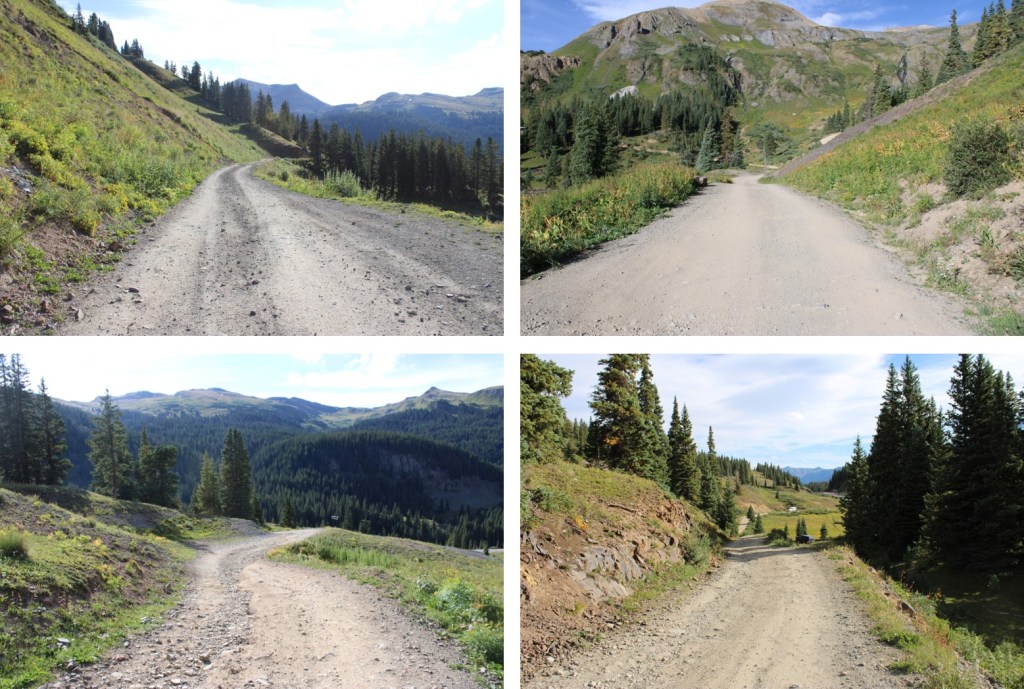
I walked around the closure and continued towards Mineral Basin.
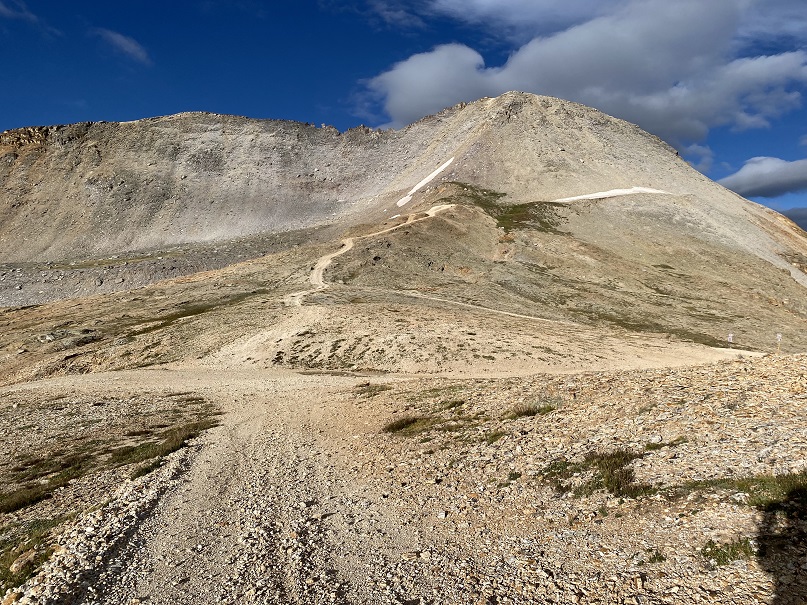
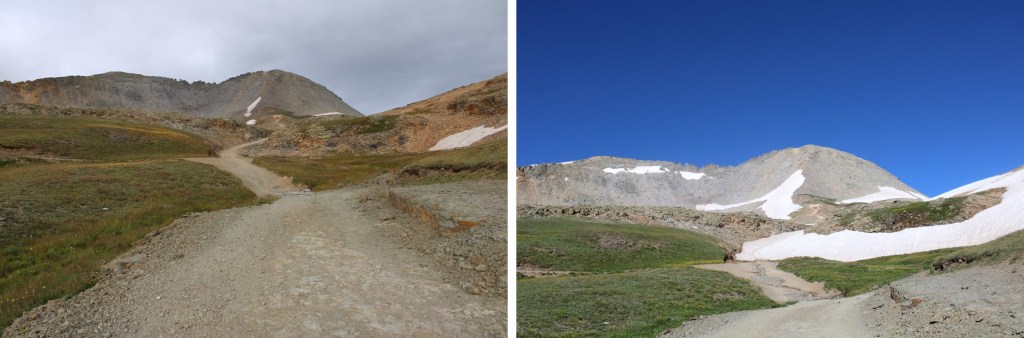
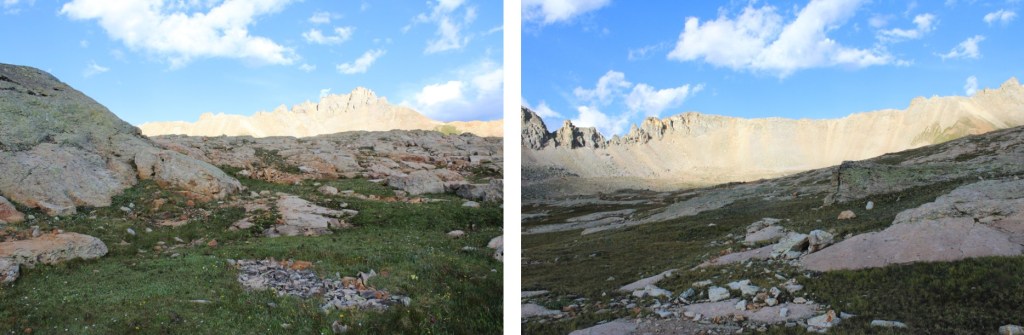
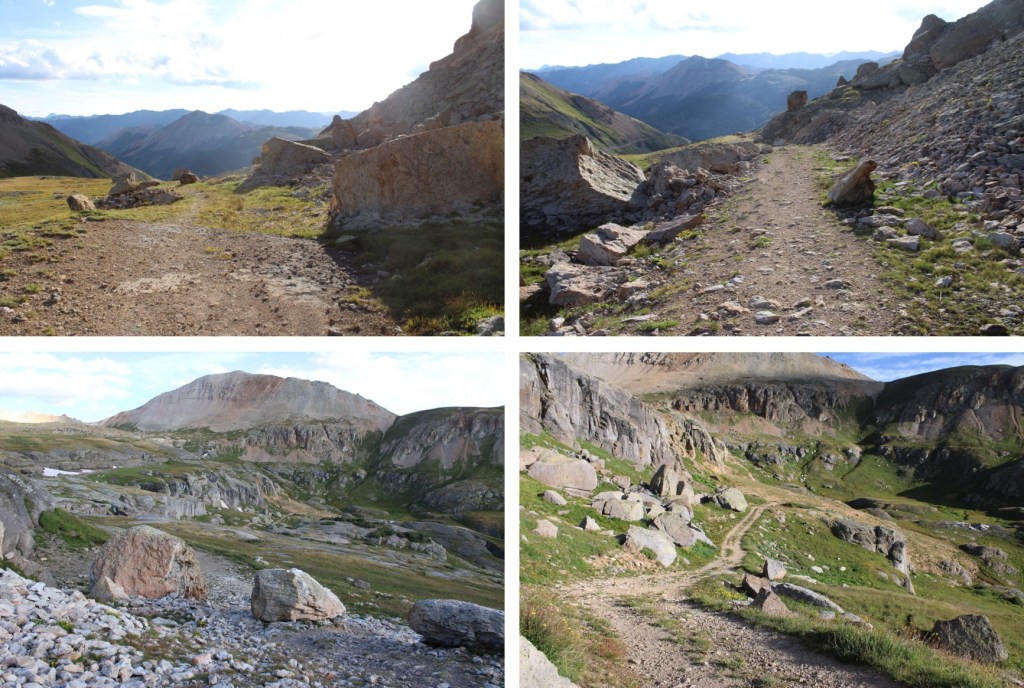
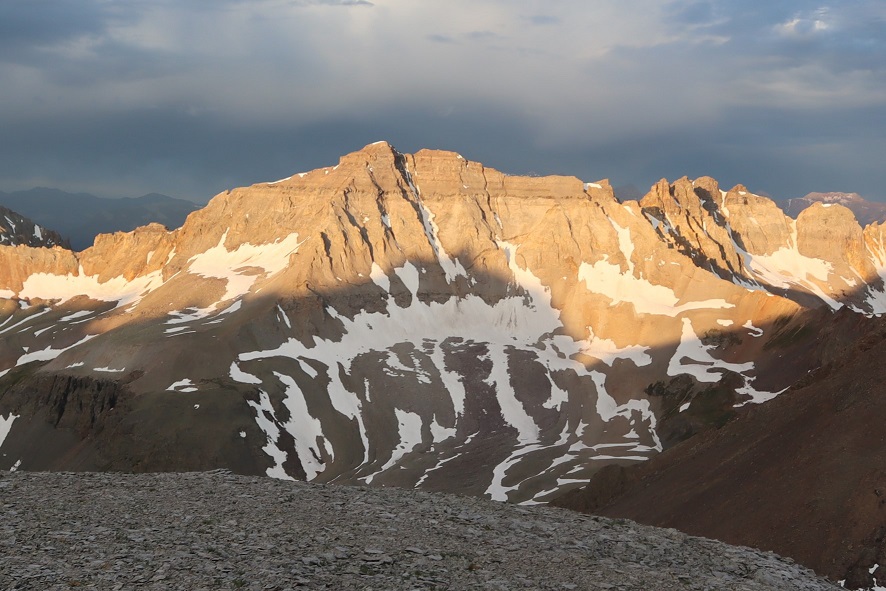
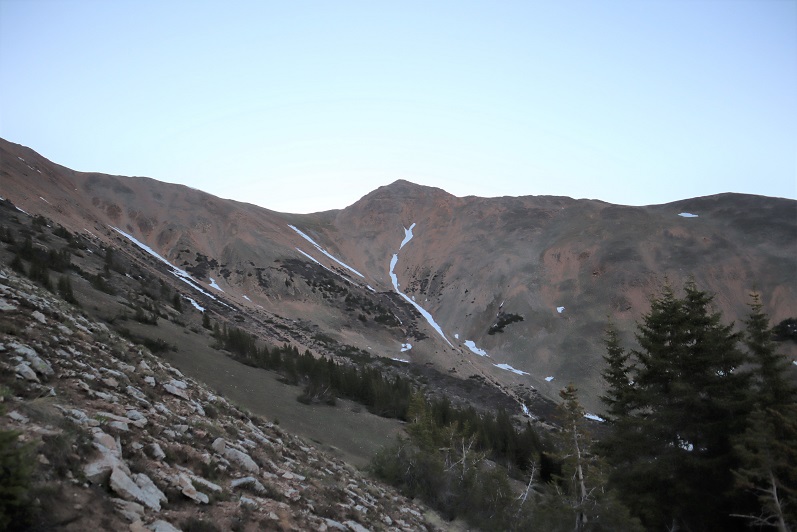
The road continues through Mineral Basin all the way to Black Bear Pass. I could now see T10
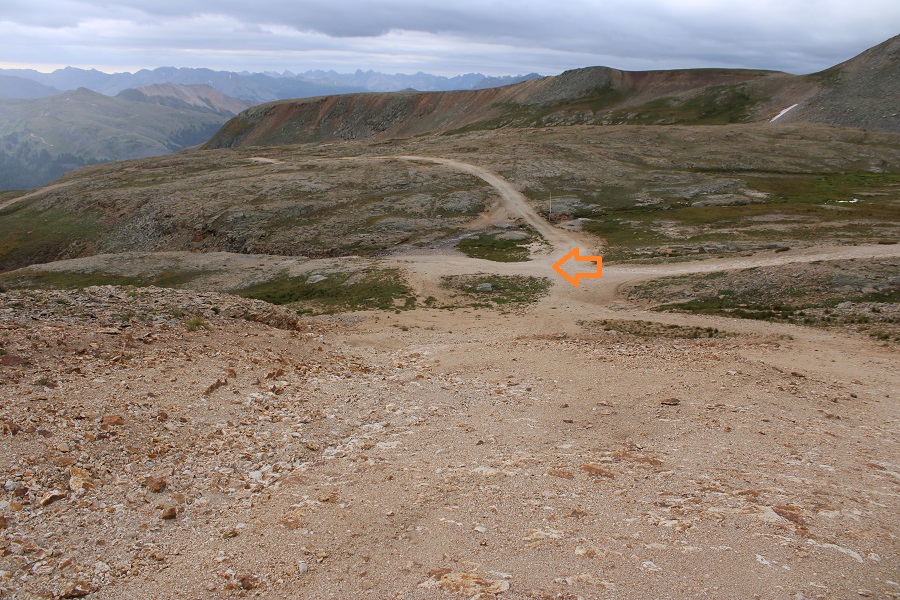
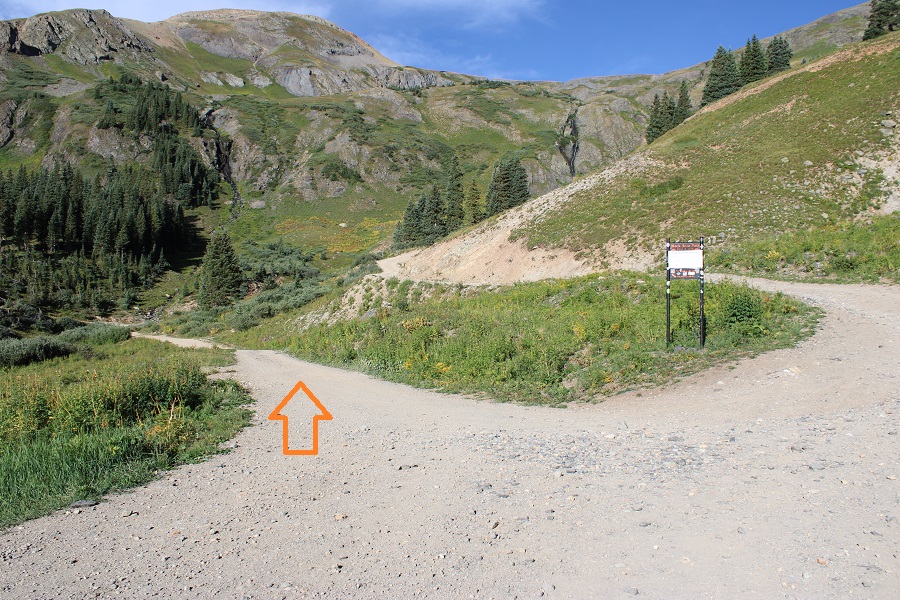
The road splits before the pass, but both roads circle back to the same place. I’m assuming the road to the left is for when there’s still snow on the main road, as there was late July of this year.
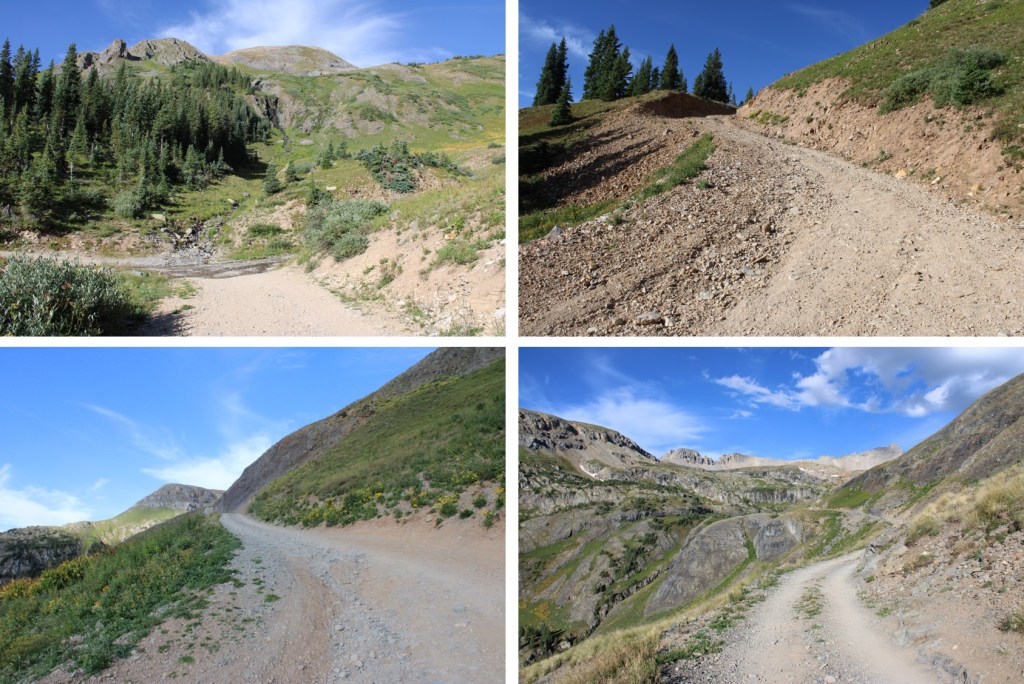
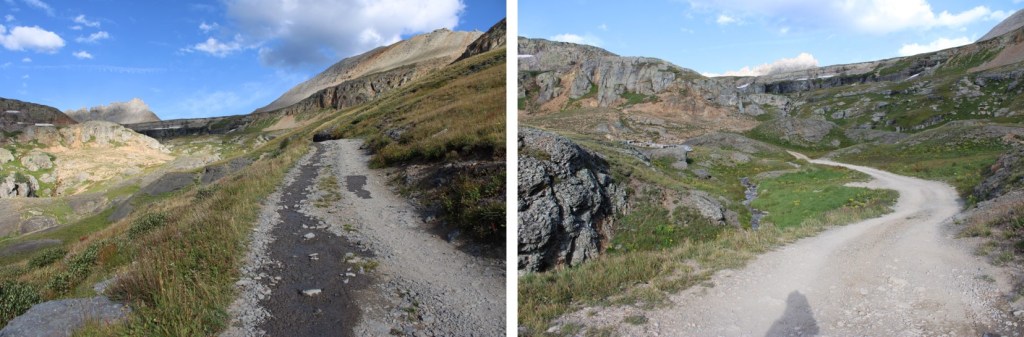
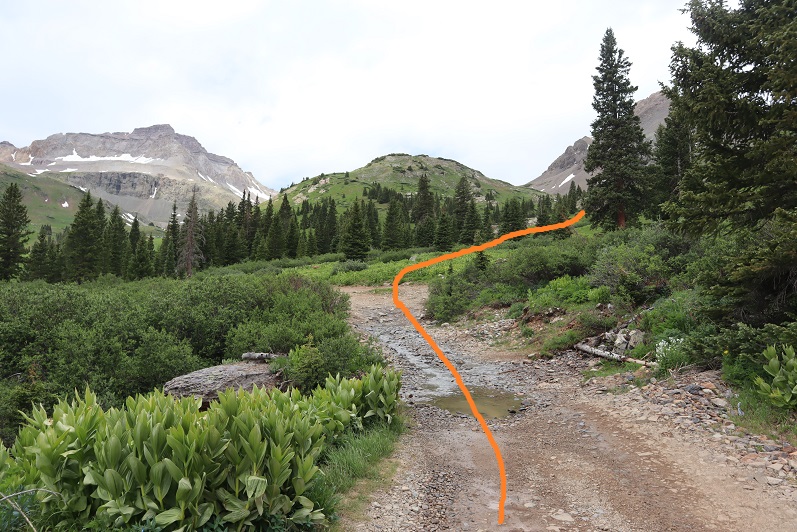
There is an obvious road that goes all the way to the base of T10
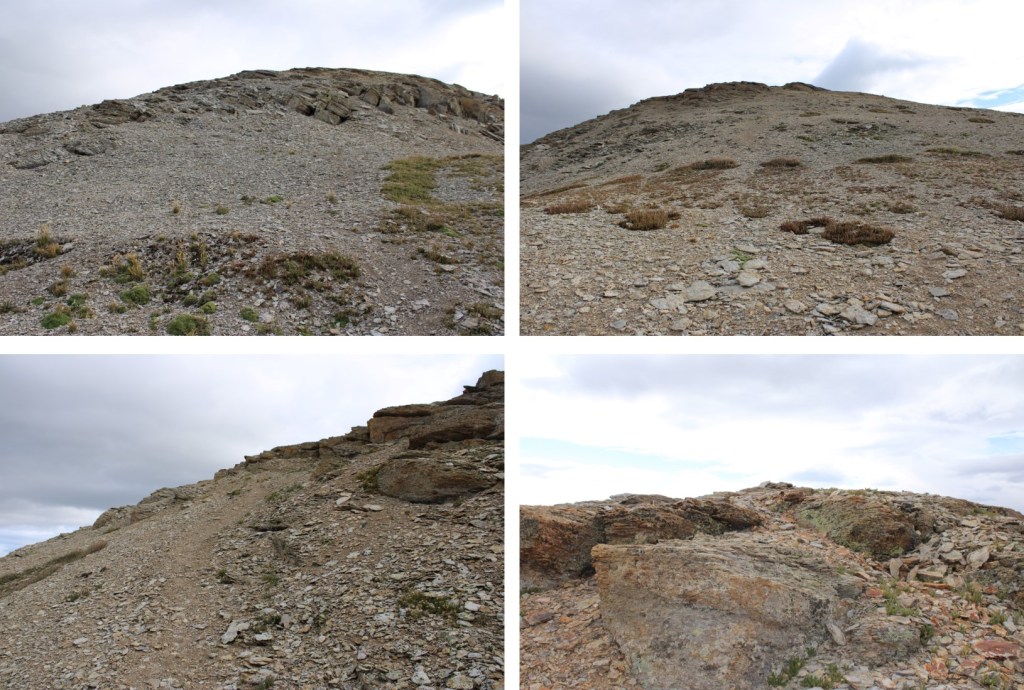
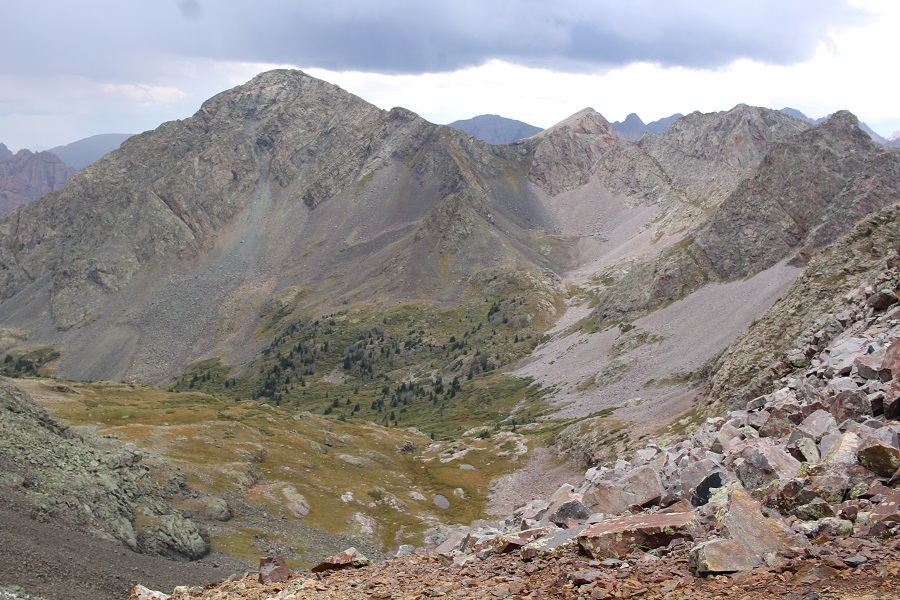
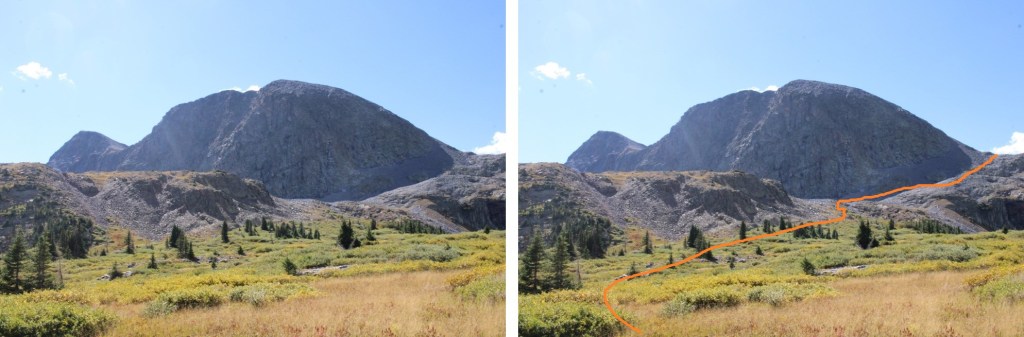
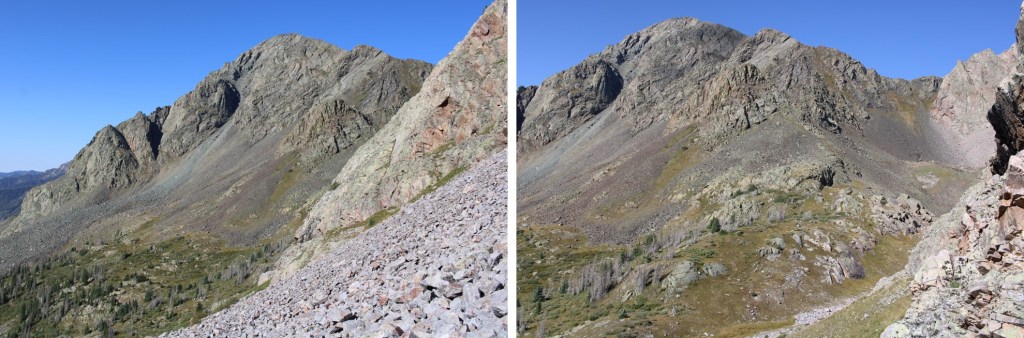
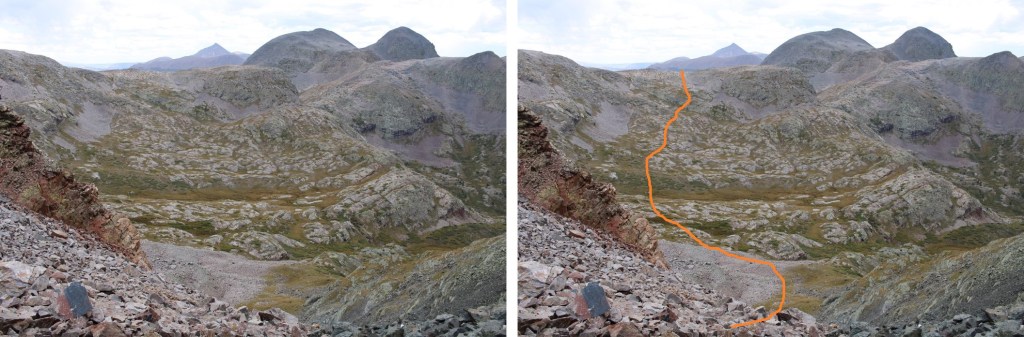
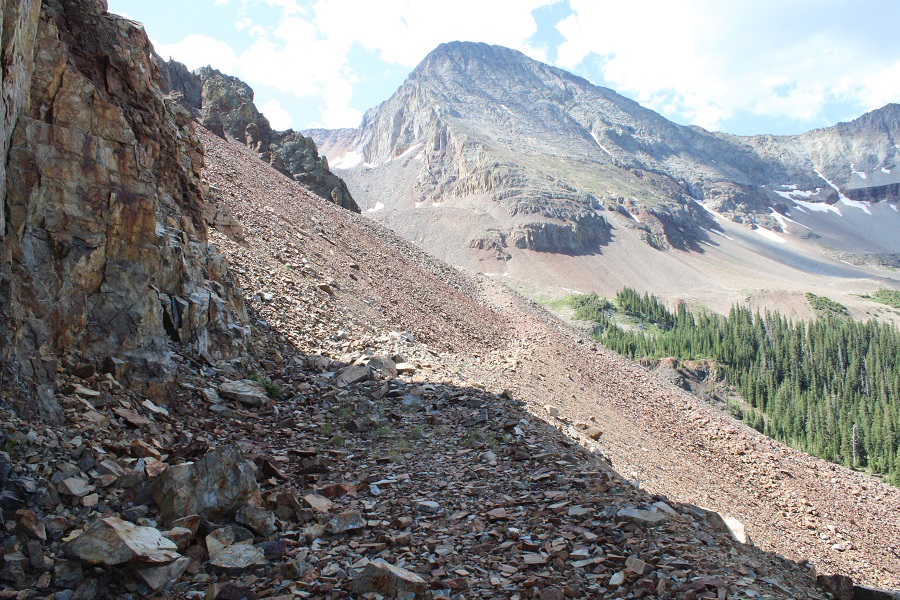
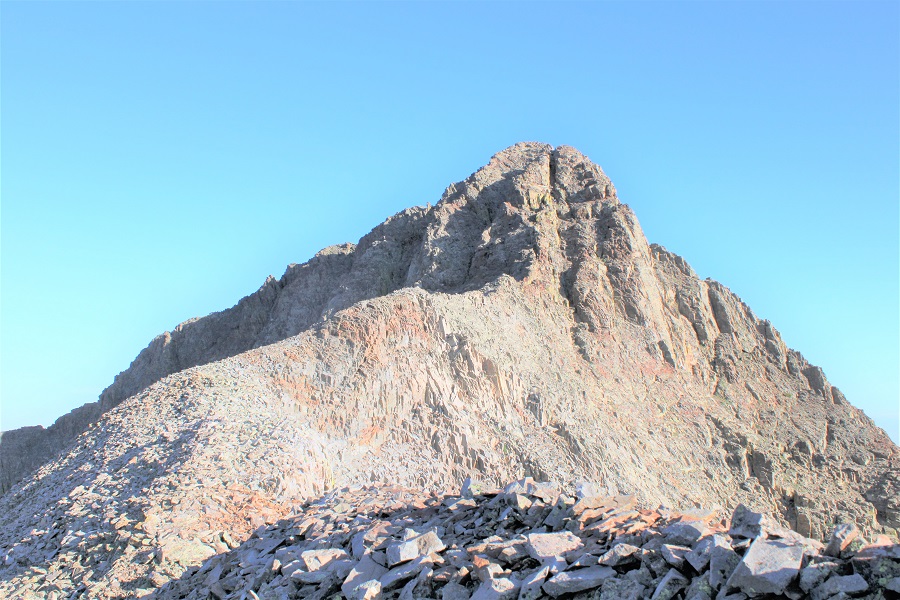
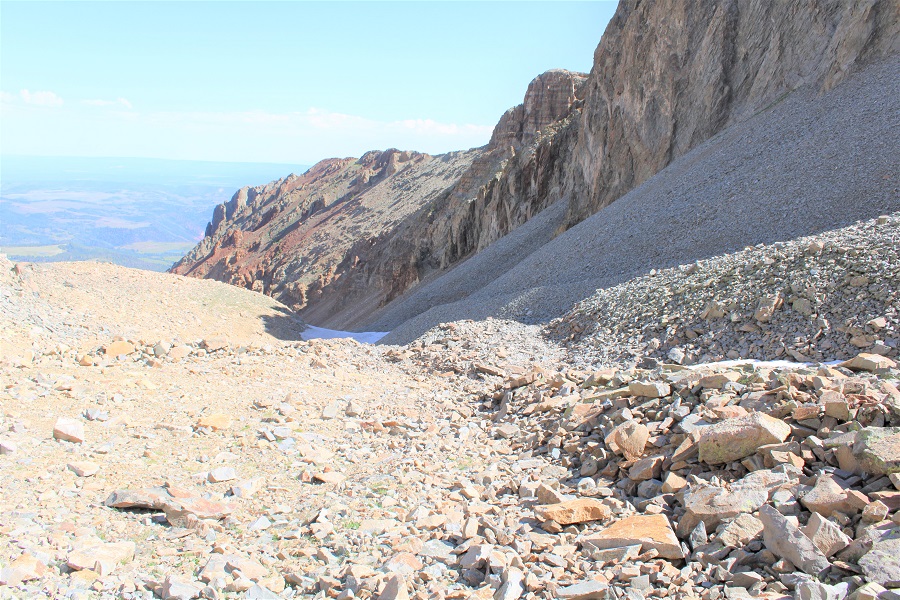
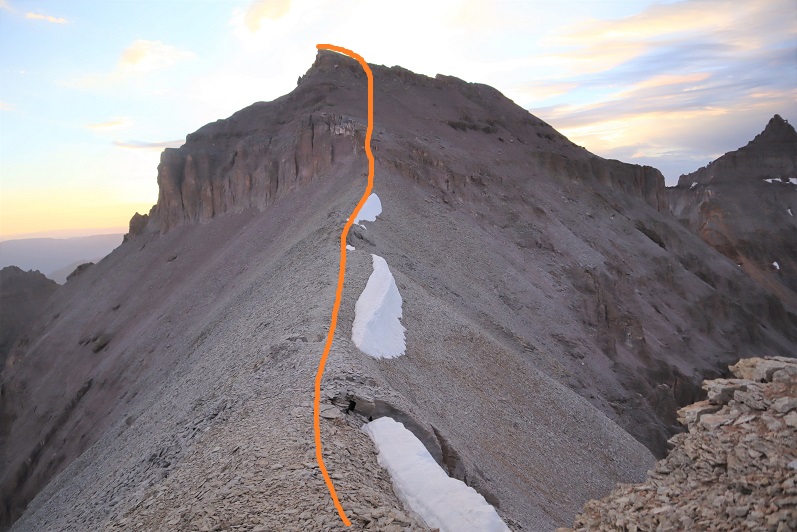
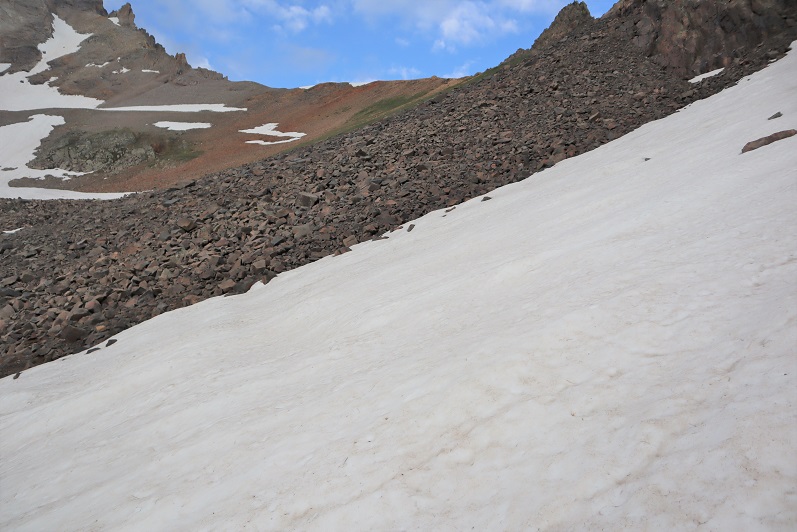
At the end of the road I sat down and strapped on my helmet and microspikes, and looked at the route up.
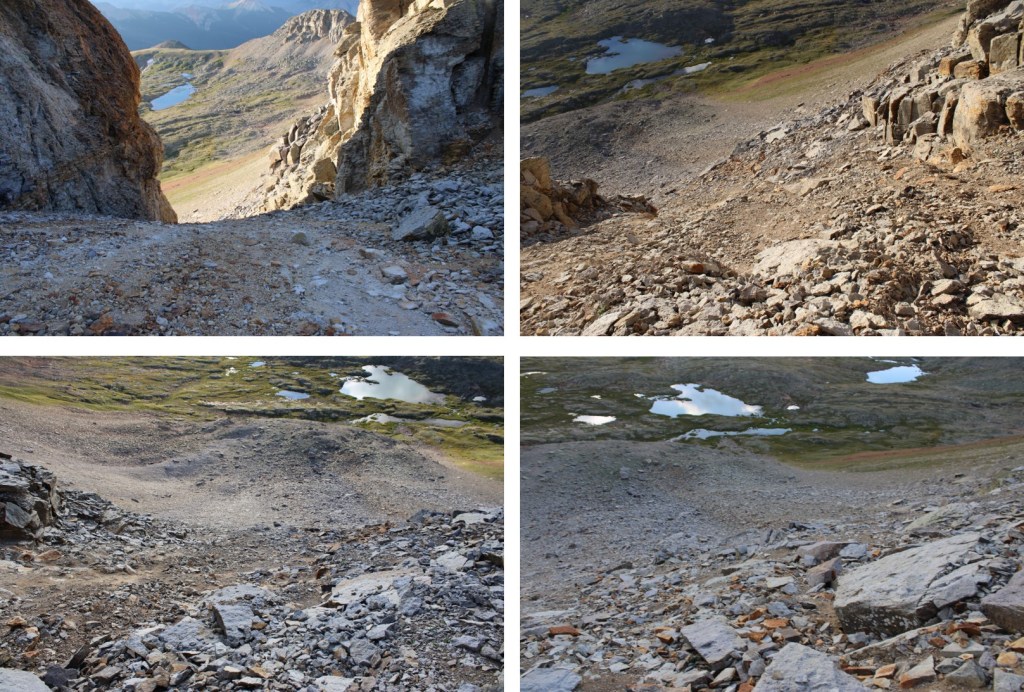
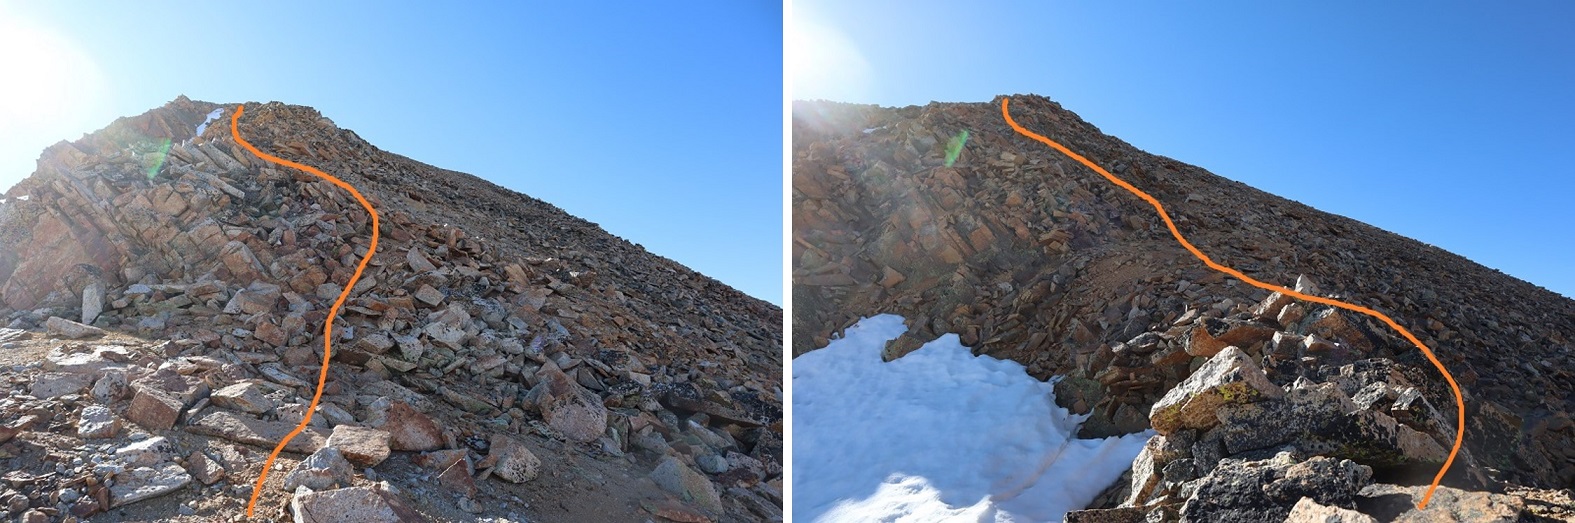
Last time, I’d gone too far to the right, and the terrain became too steep to climb. This time I stayed more to the middle.
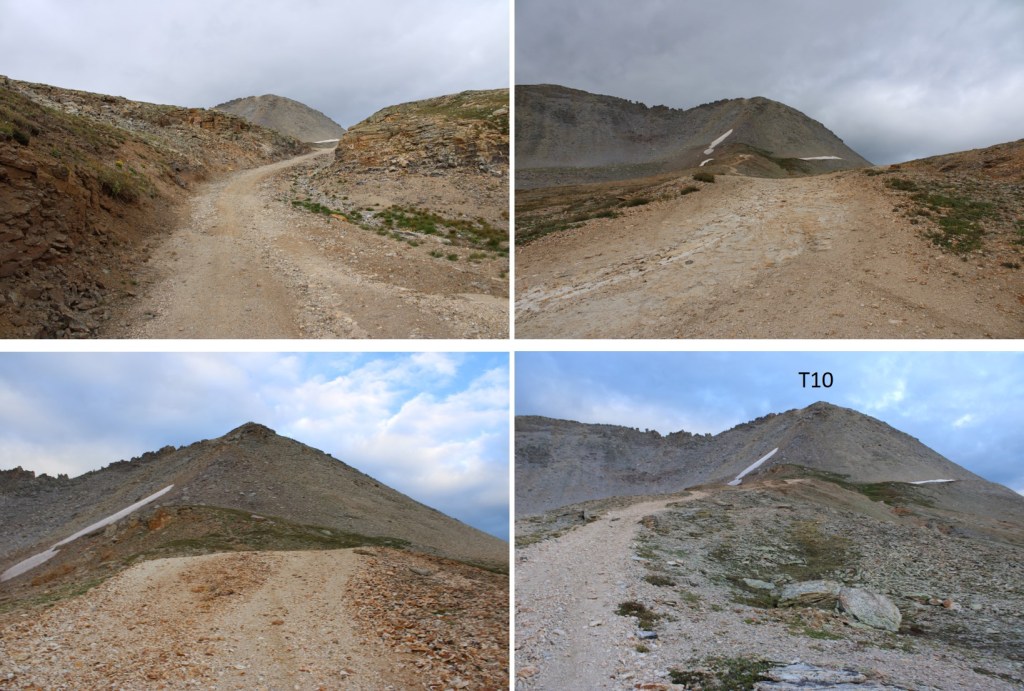
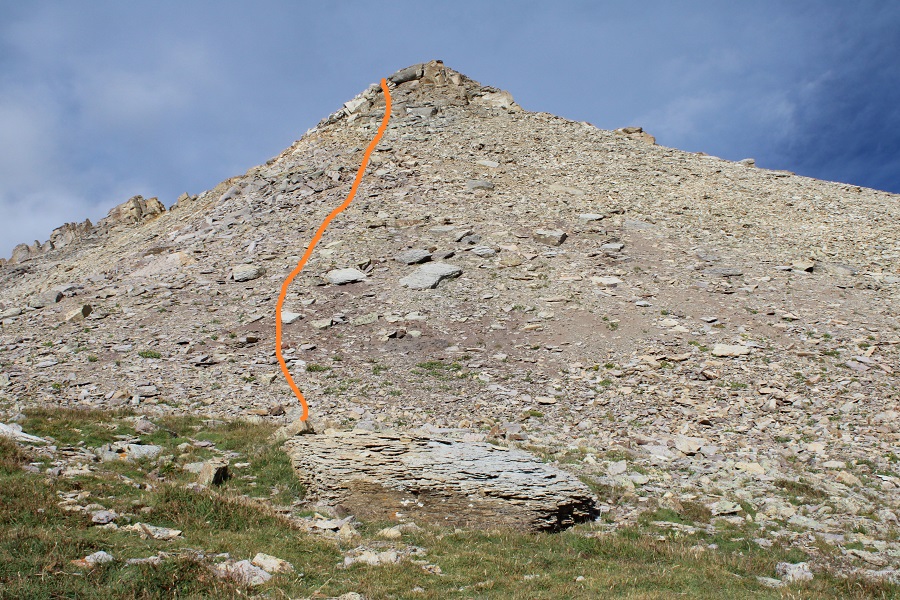
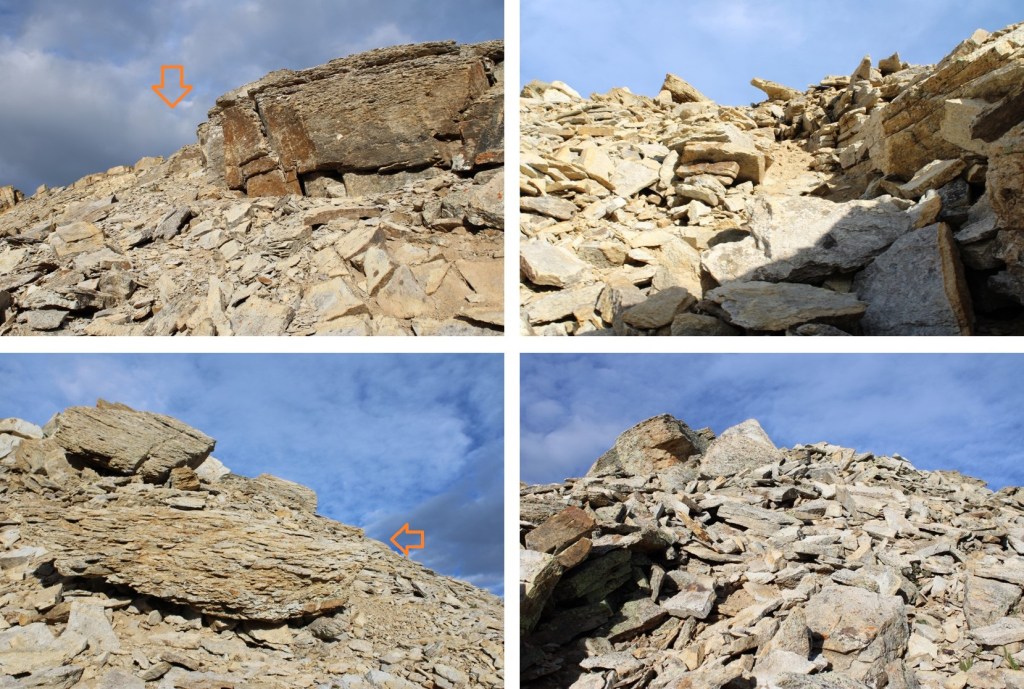
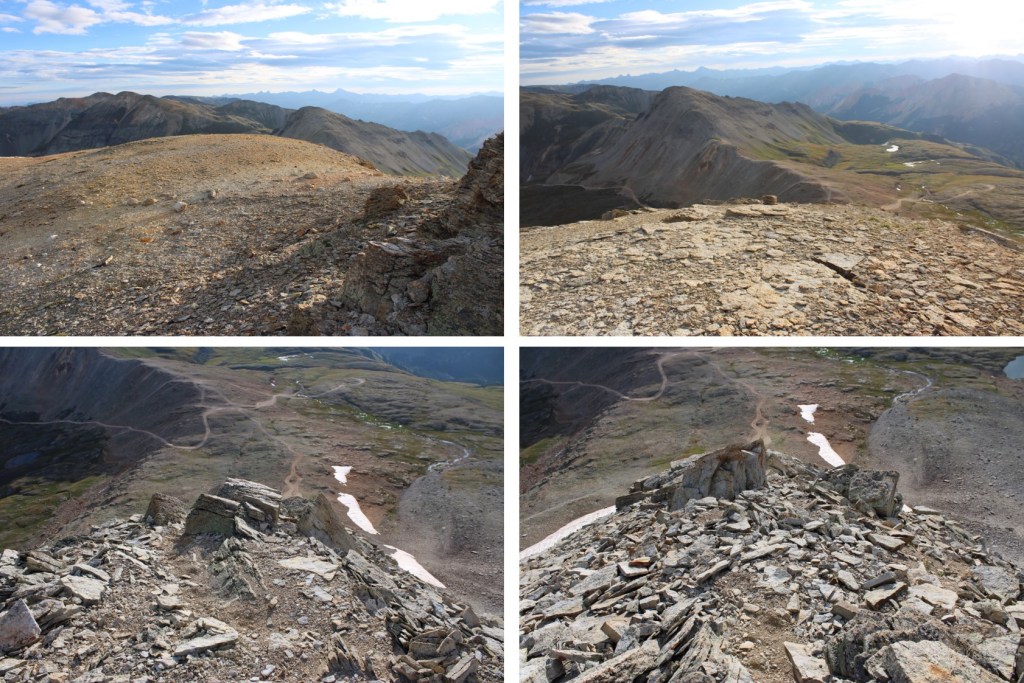
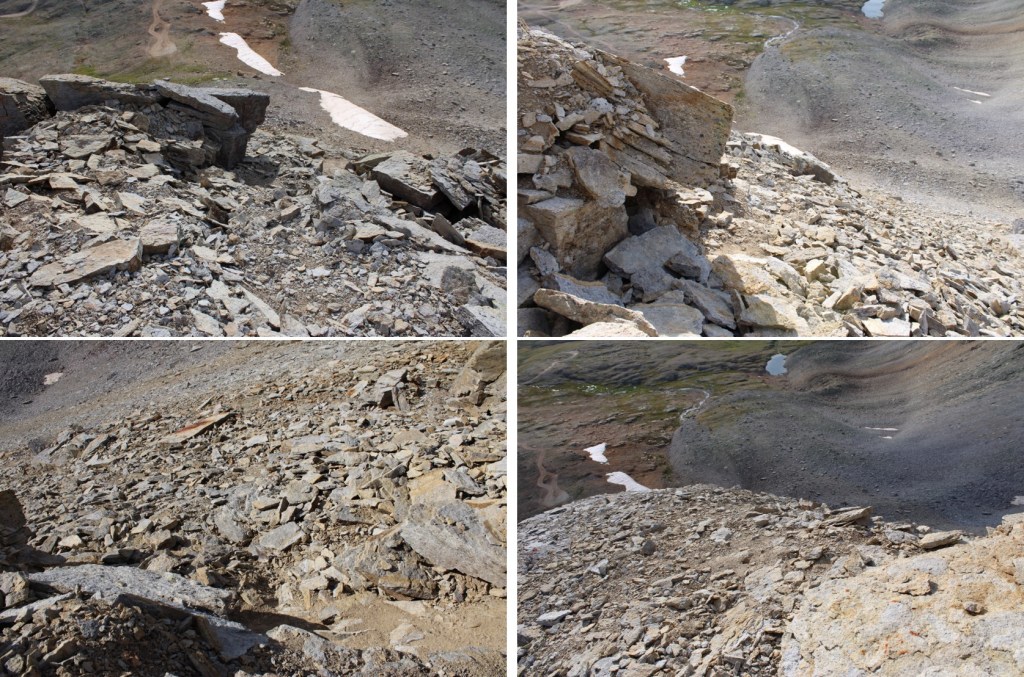
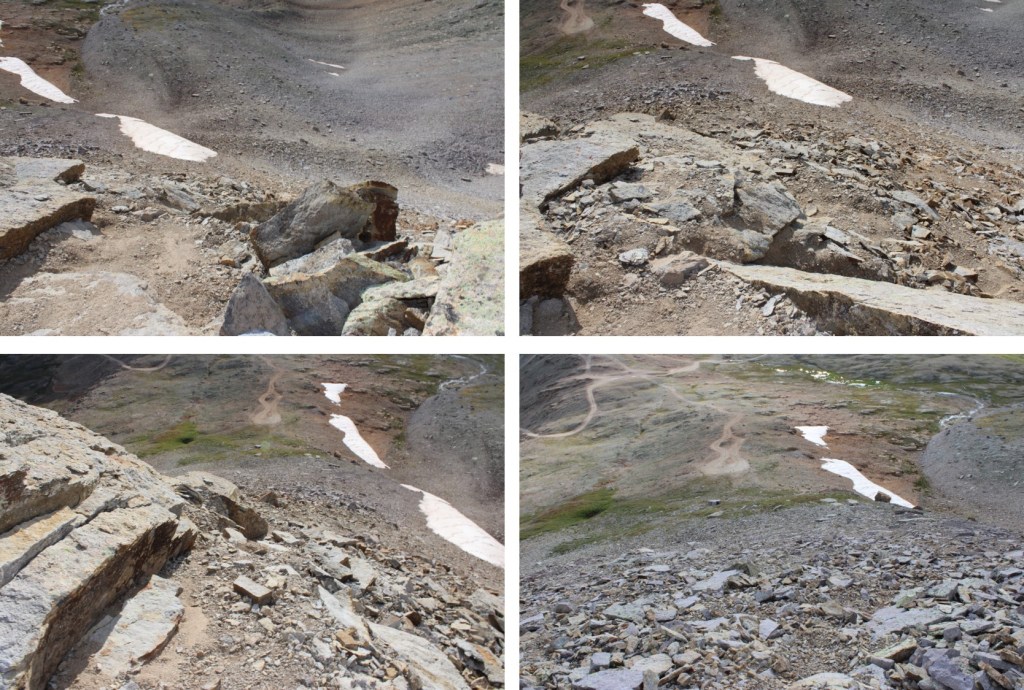
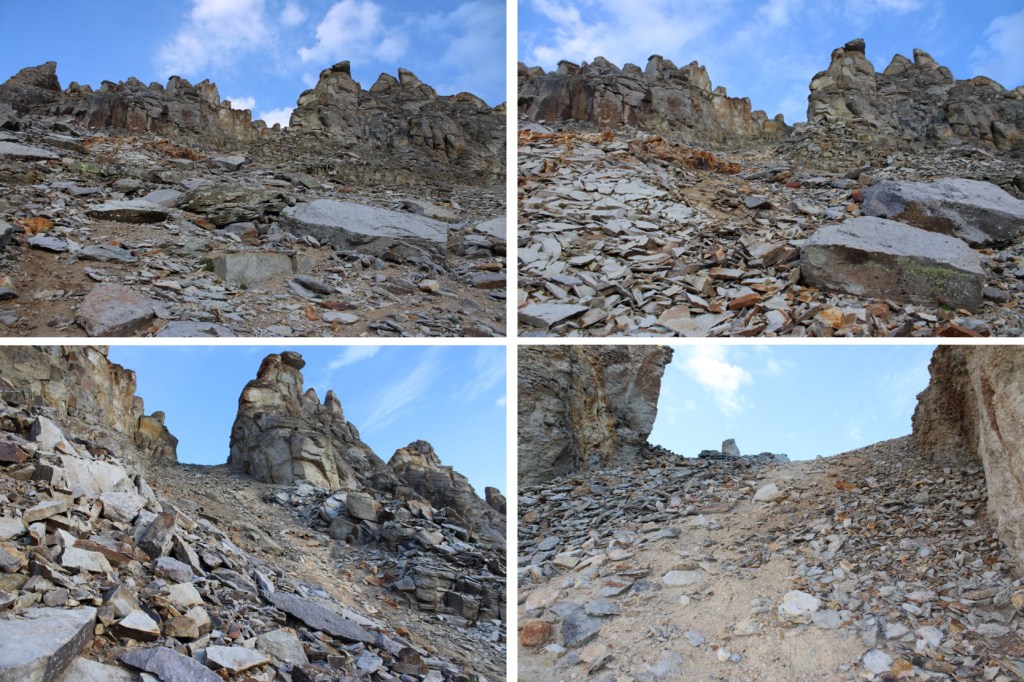
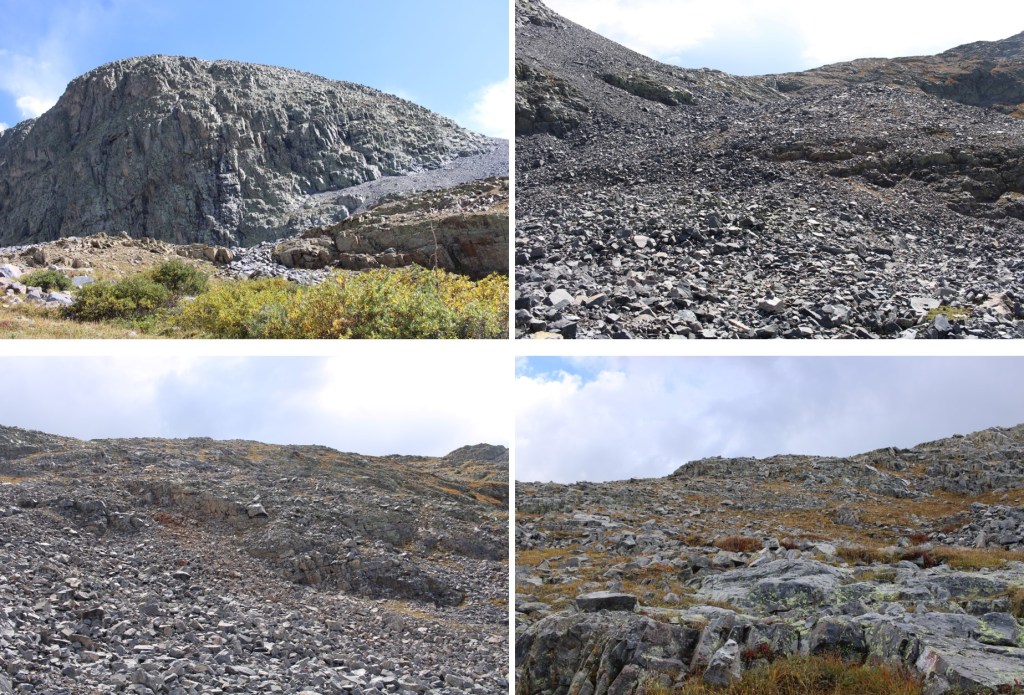
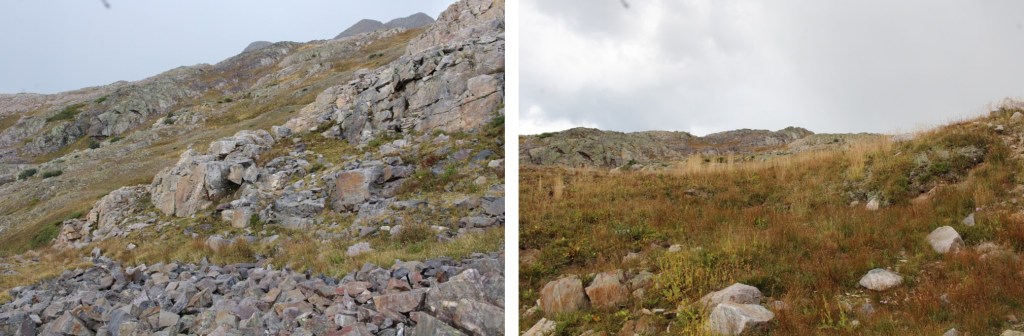
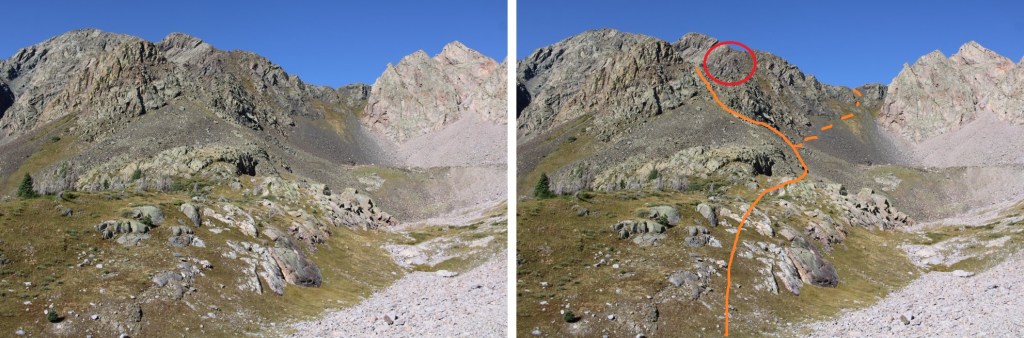
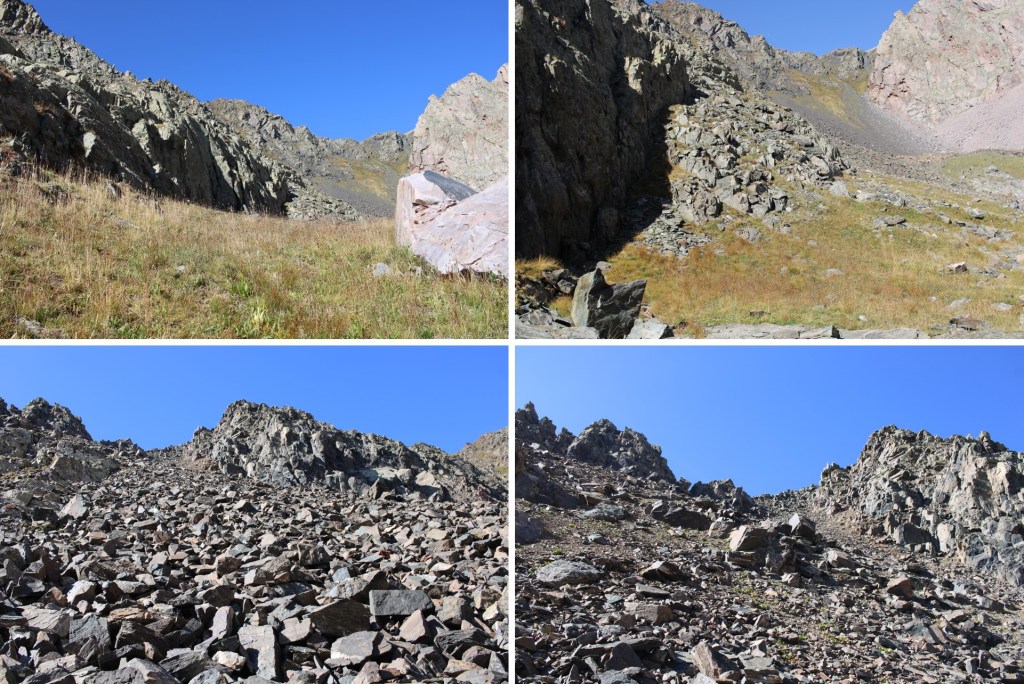
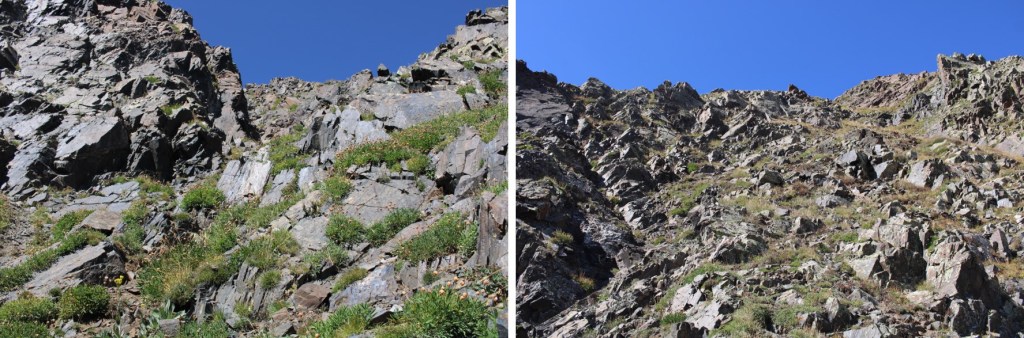
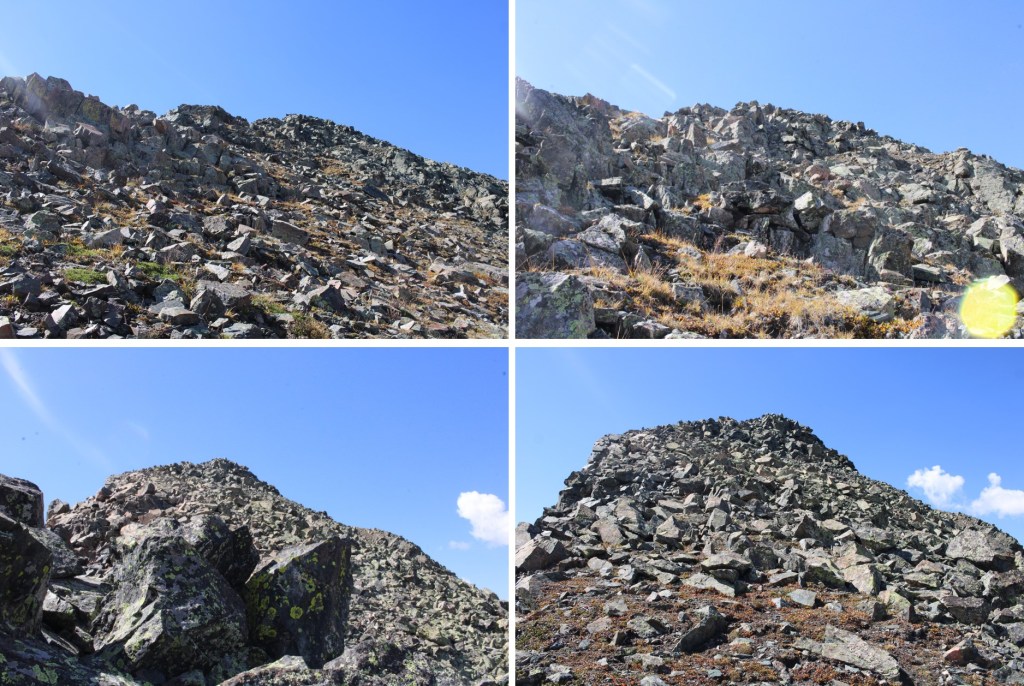
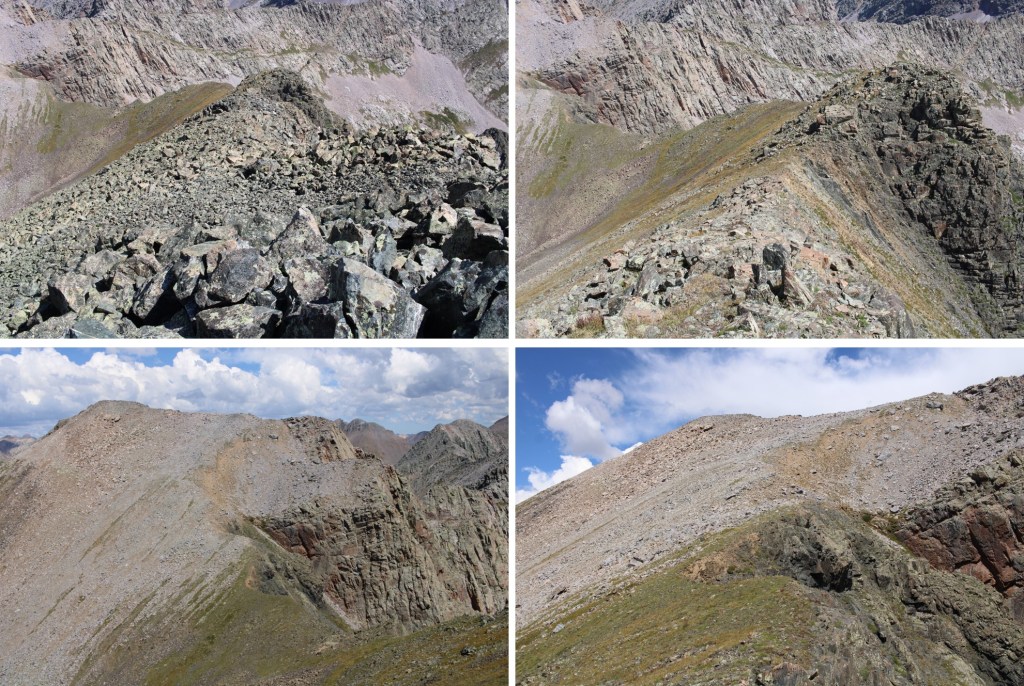
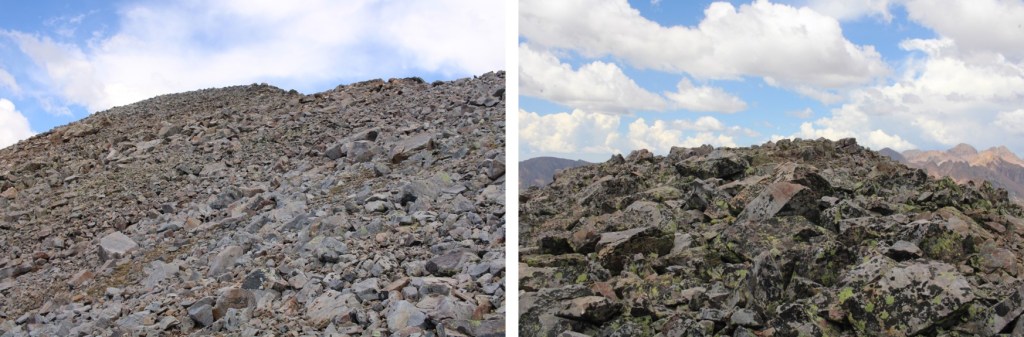
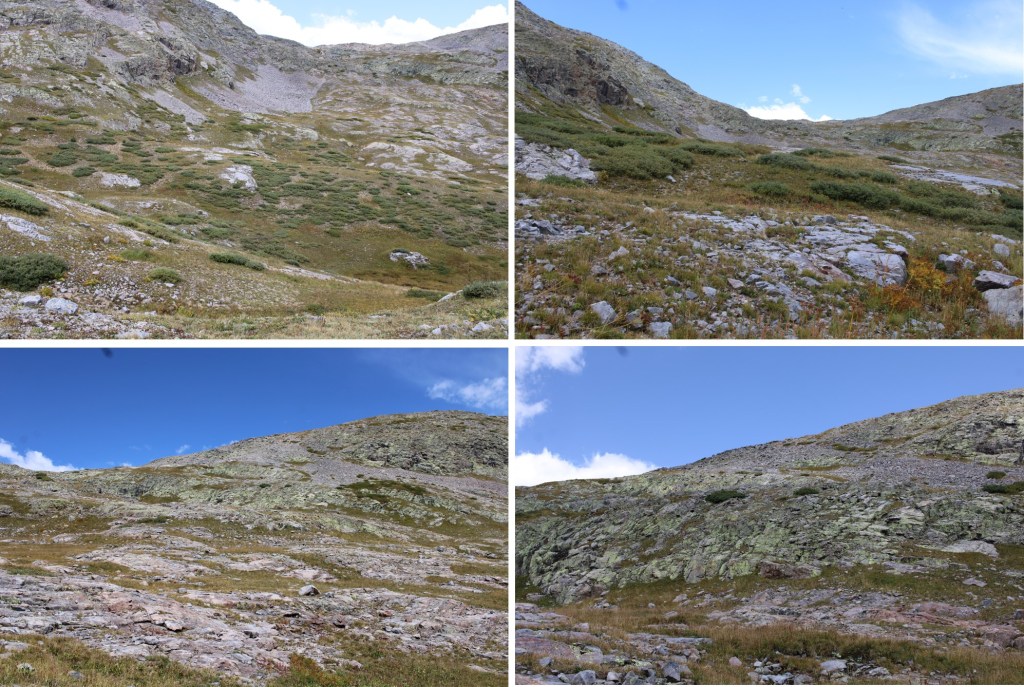
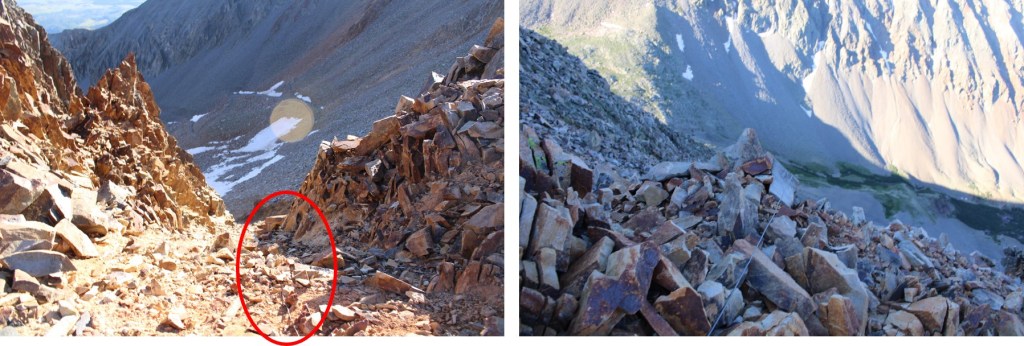
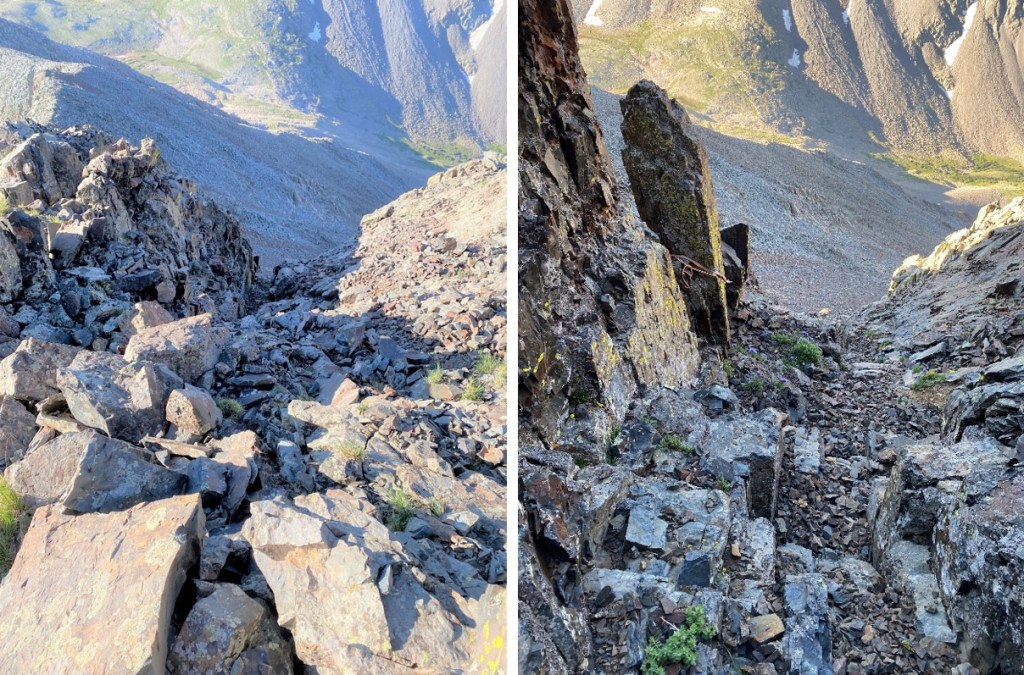
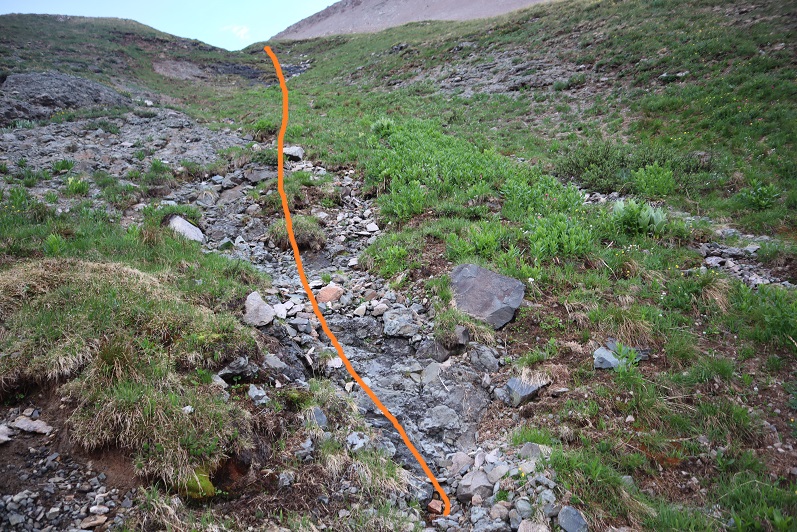
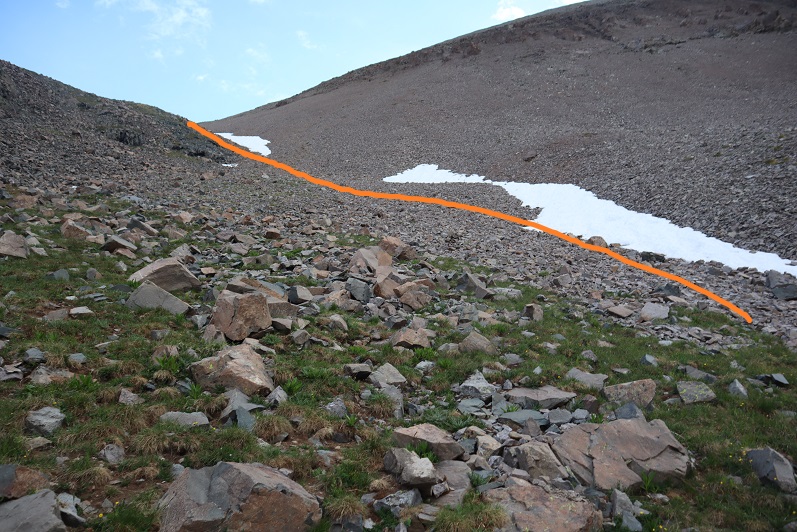
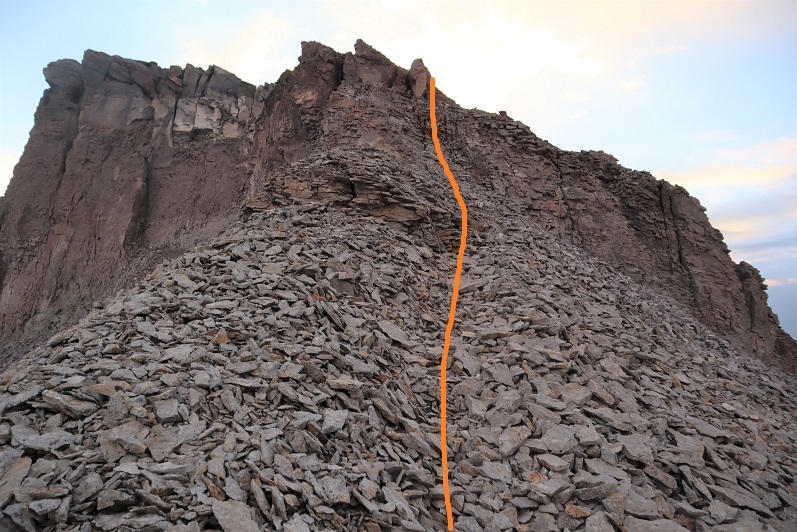
There were tons of game trails here, which most likely weren’t game trails at all but runouts from the snow. The rocks were not stable, no matter what size they were. Lots of scree here as well. Here are some pictures of my route up T10. Be forewarned, it looks like the rocks shift every year. Some large rocks were in a different place than they were 2 months ago.
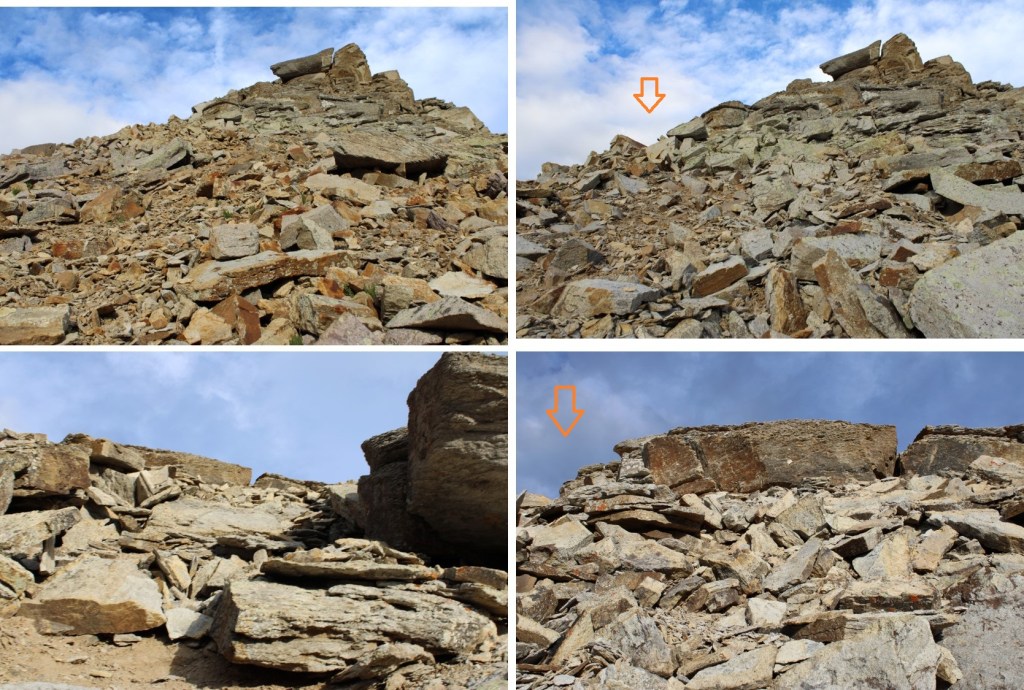
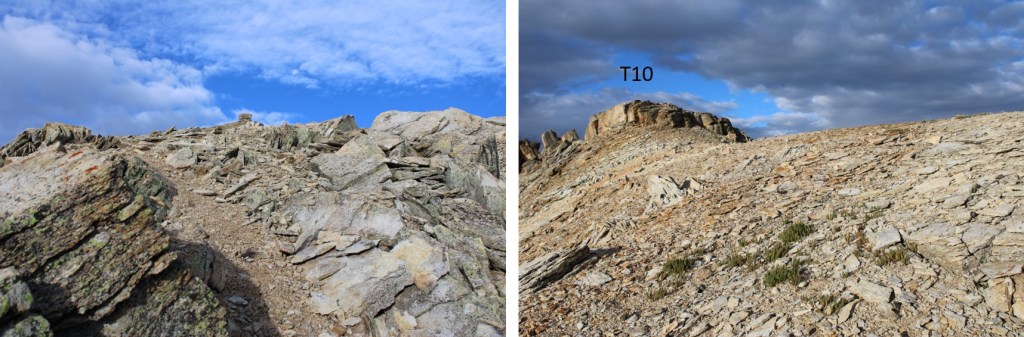
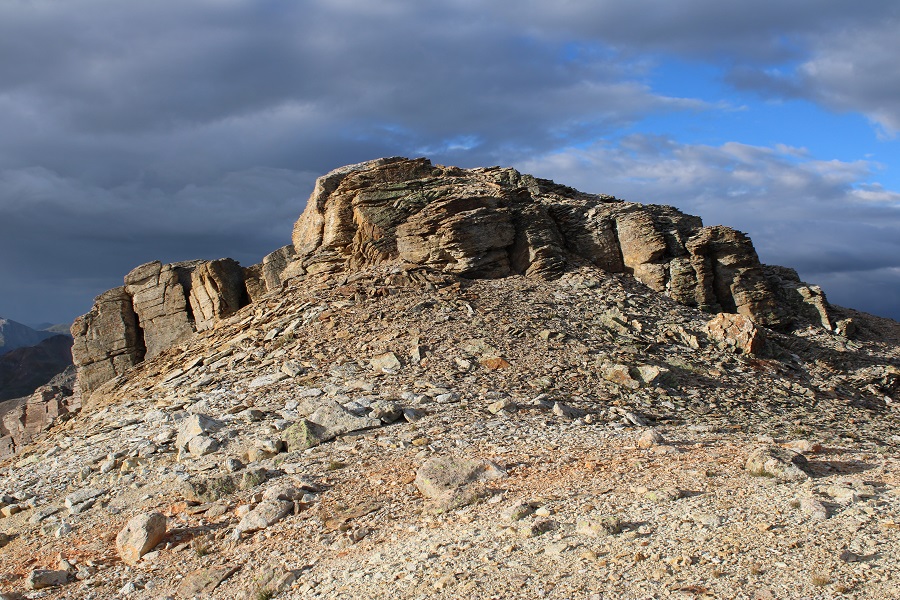
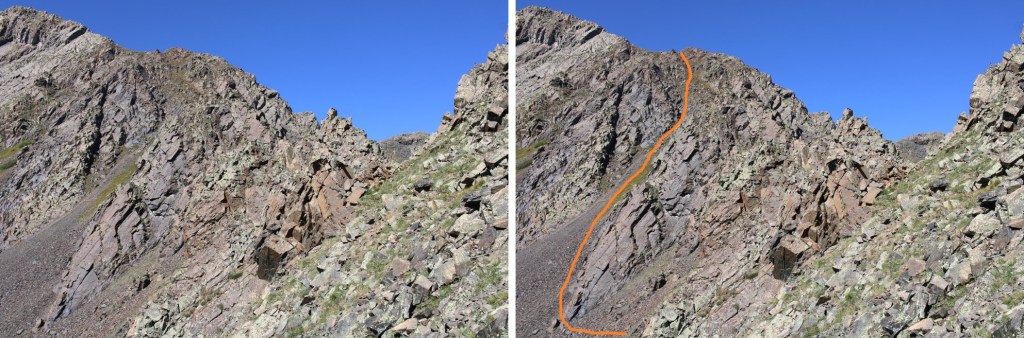
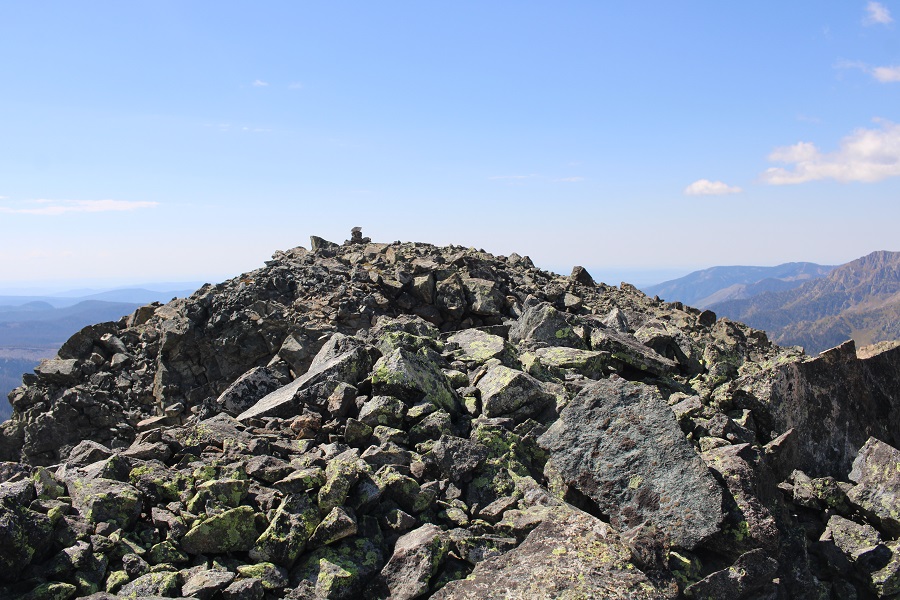
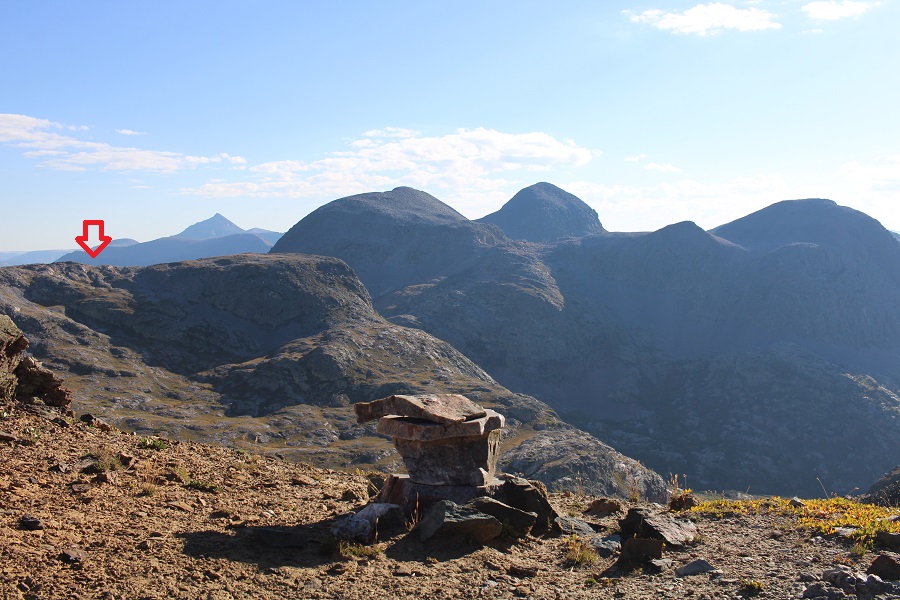
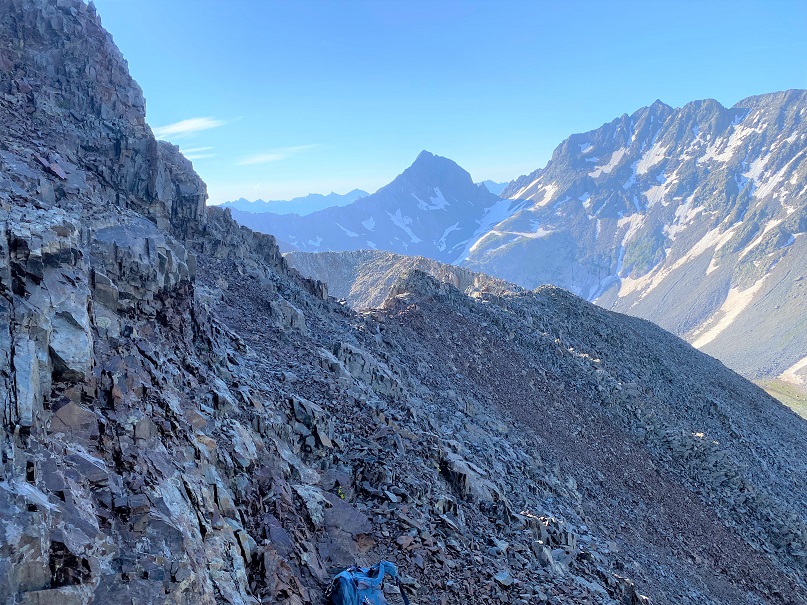
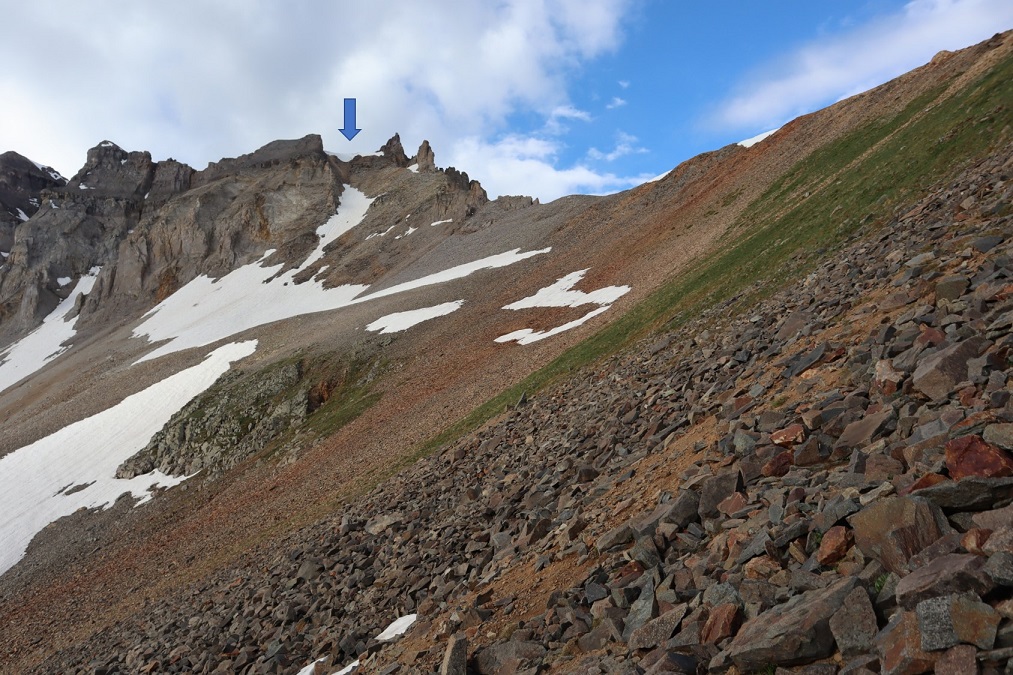
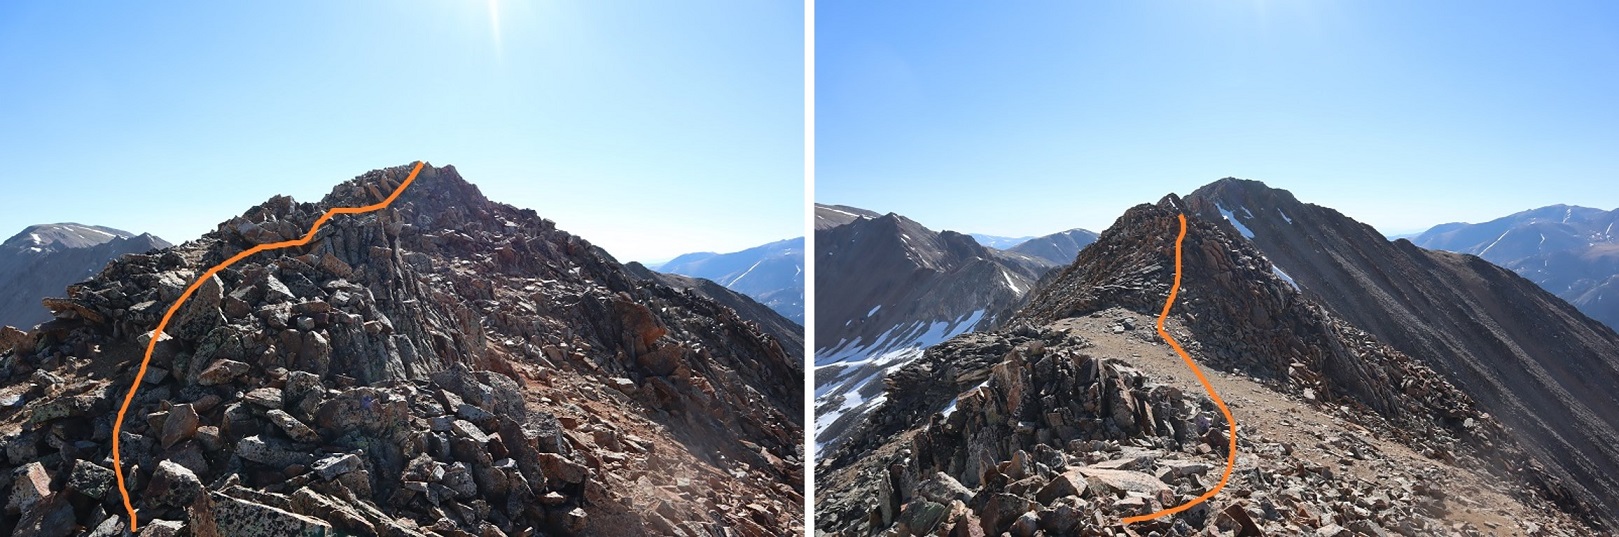
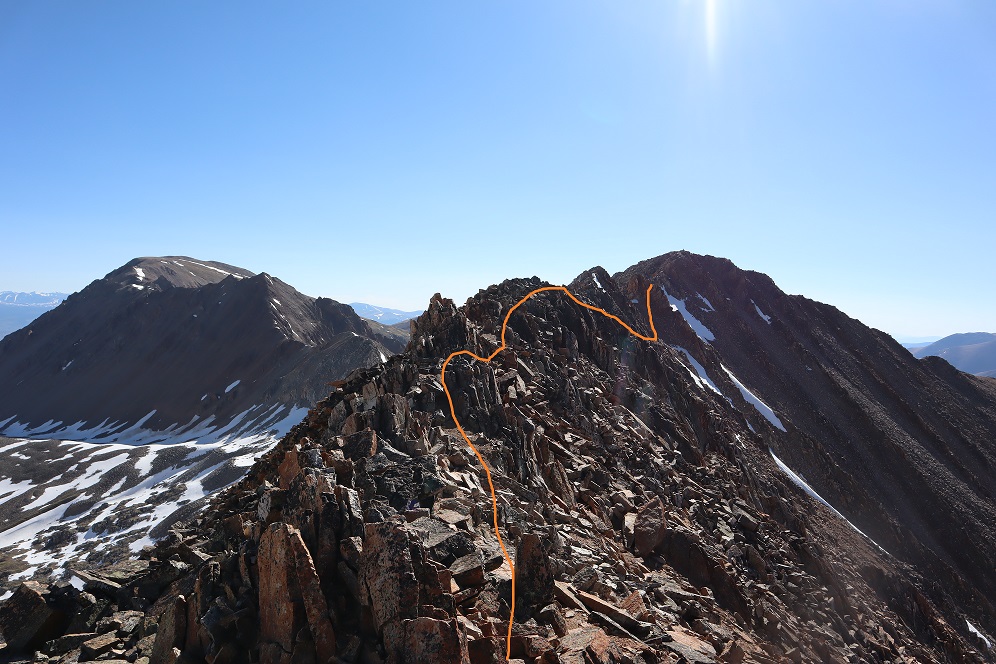
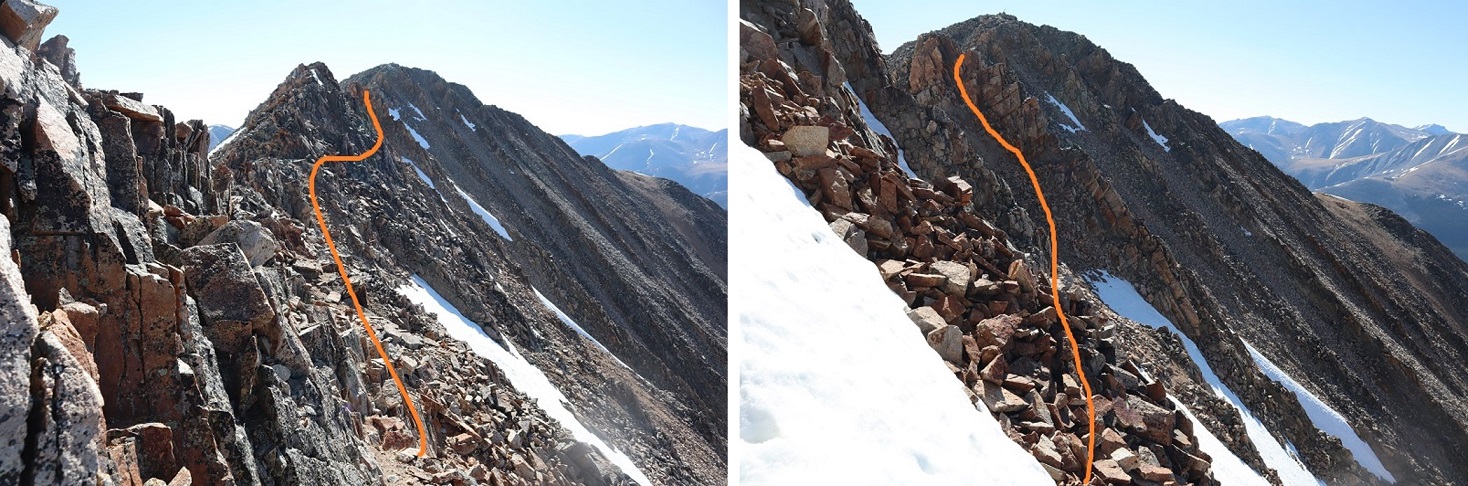
Once on the ridge the summit was clear.
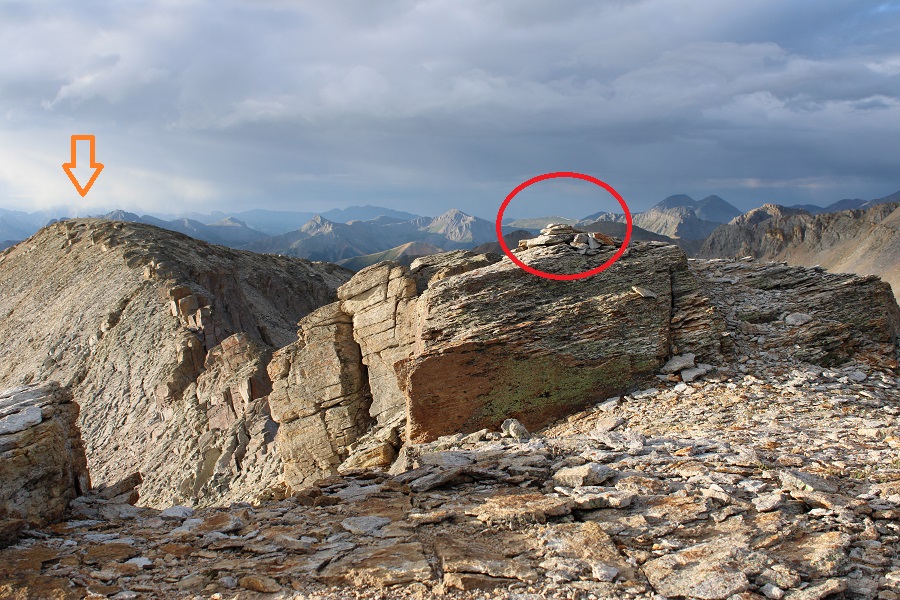
Here you can see the ‘other’ 13477 to the left and the summit cairn circled)
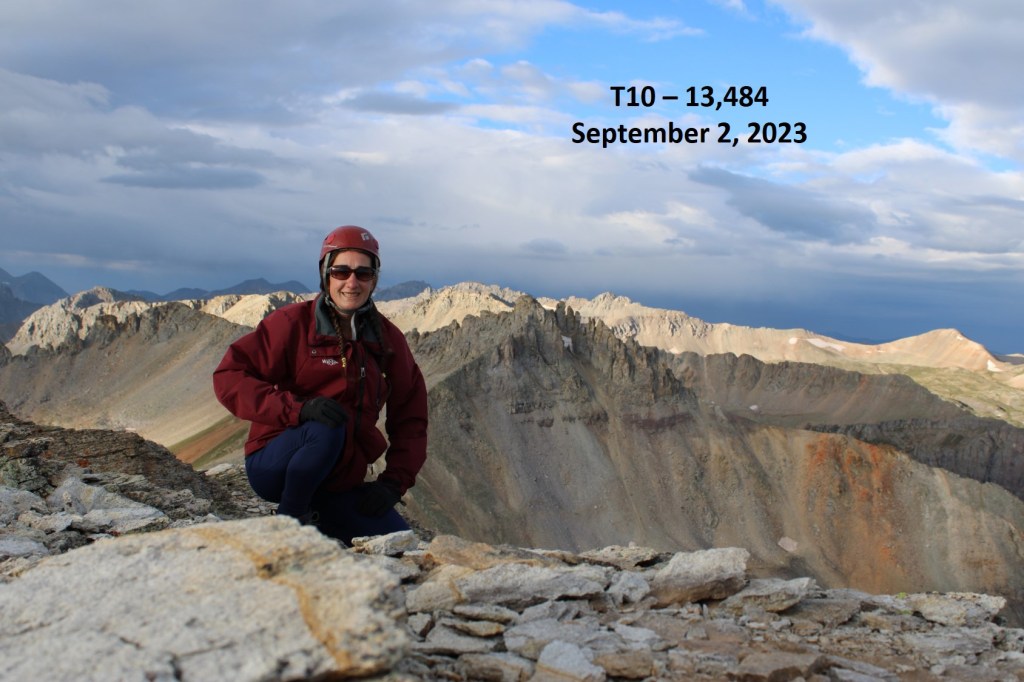
I summited T10 at 7:30am
T10:
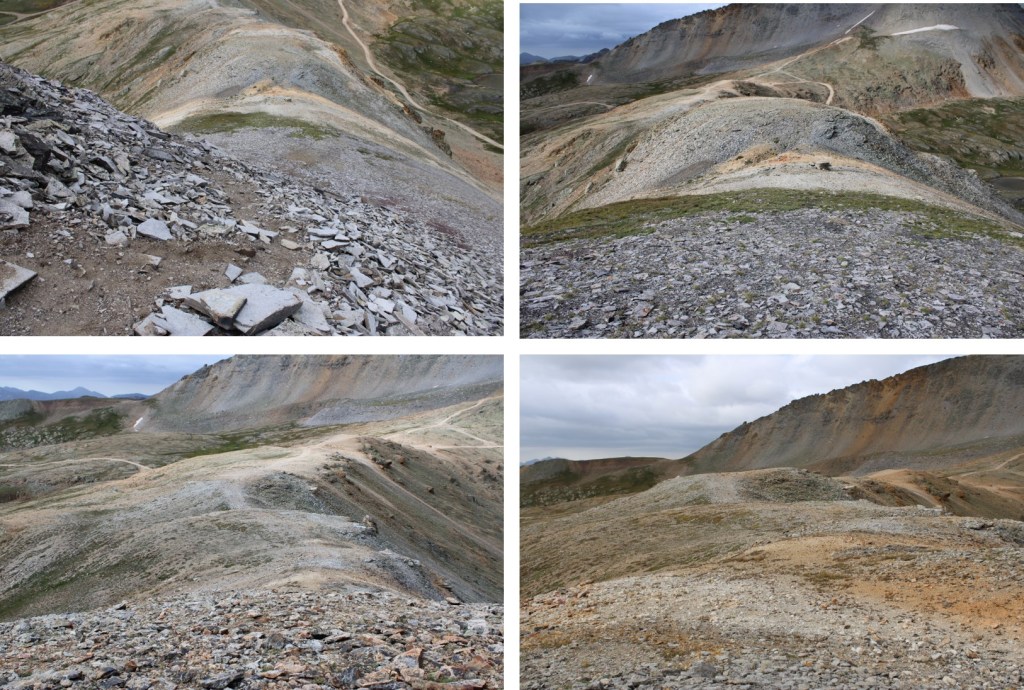
There was a storm coming in, so it was windy and cold. I didn’t stay long, and instead headed back down towards Black Bear Pass the way I’d summited
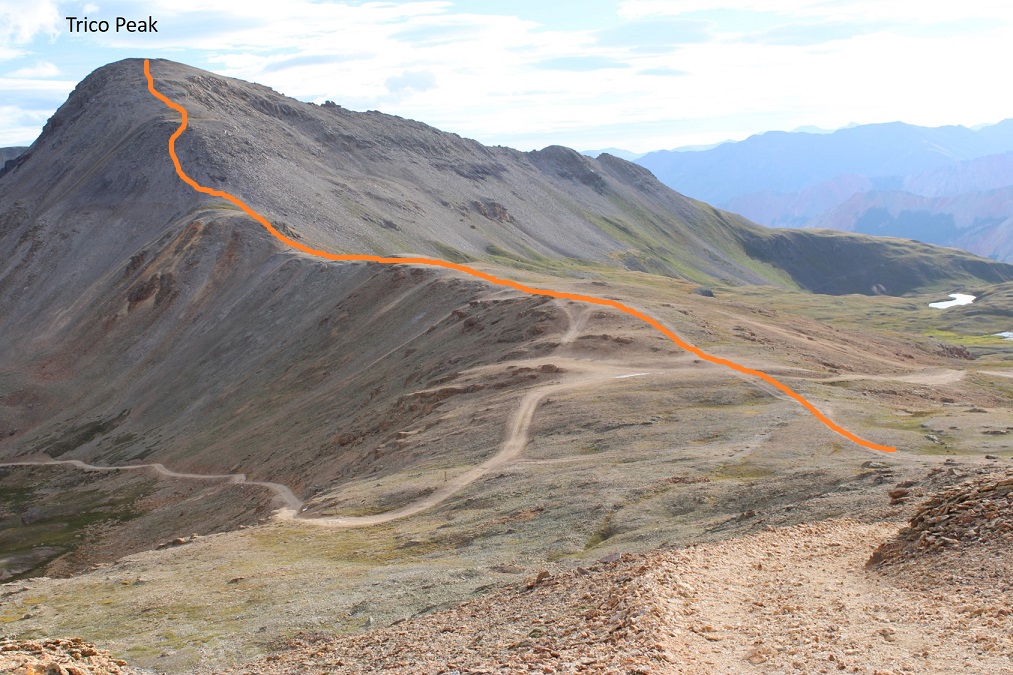
Back down on the road, I looked over at Trico Peak, and around at the weather.
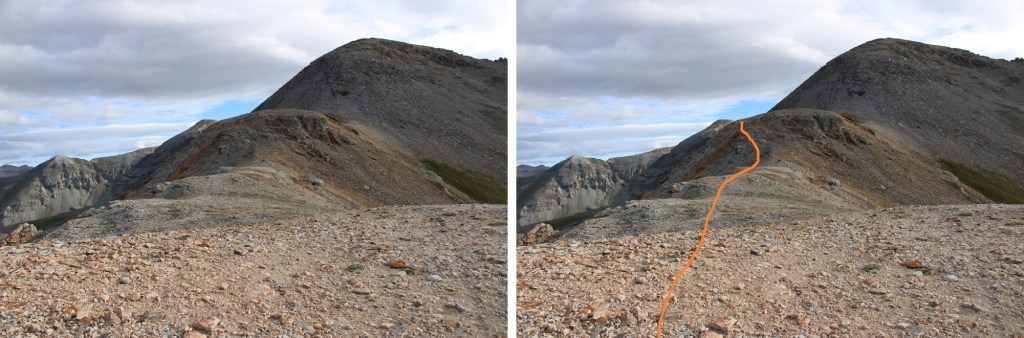
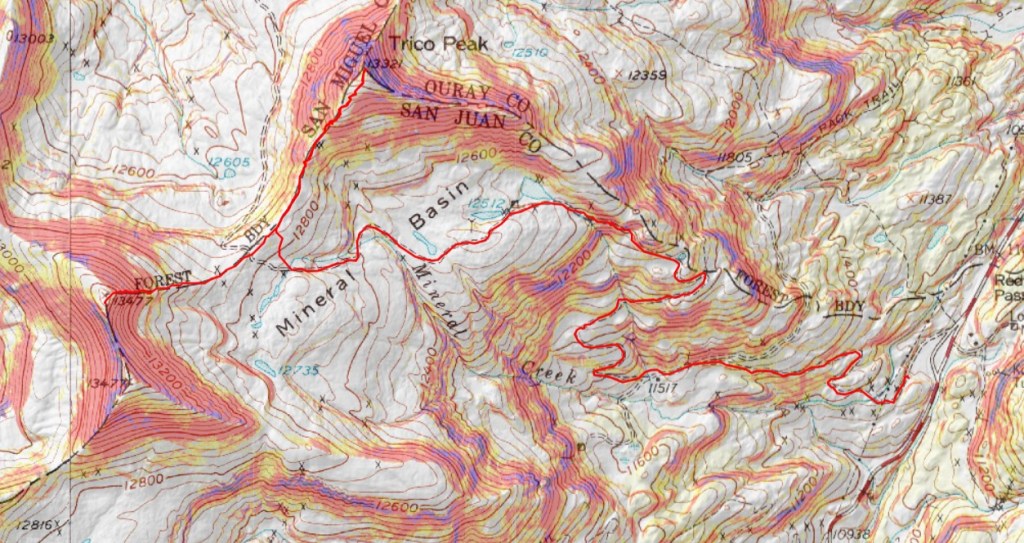
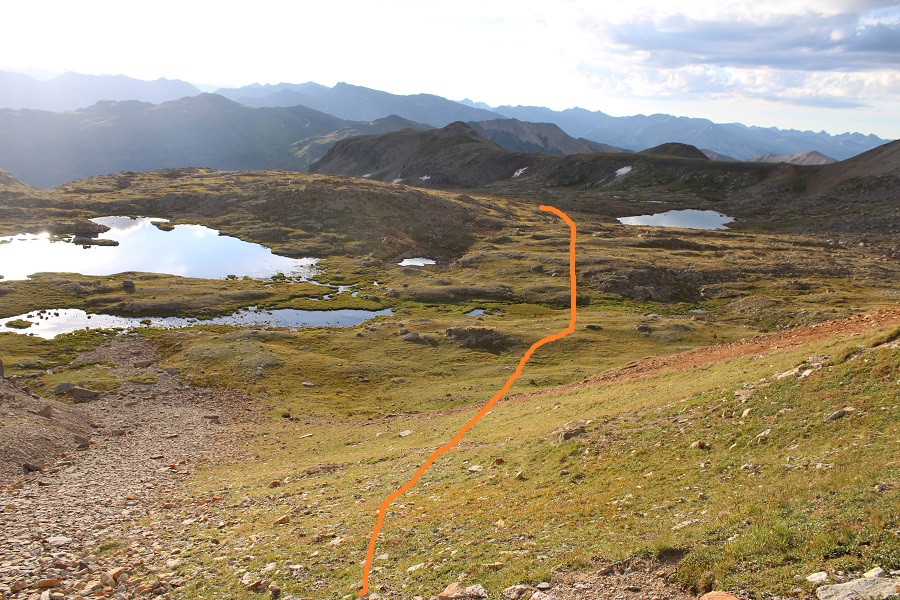
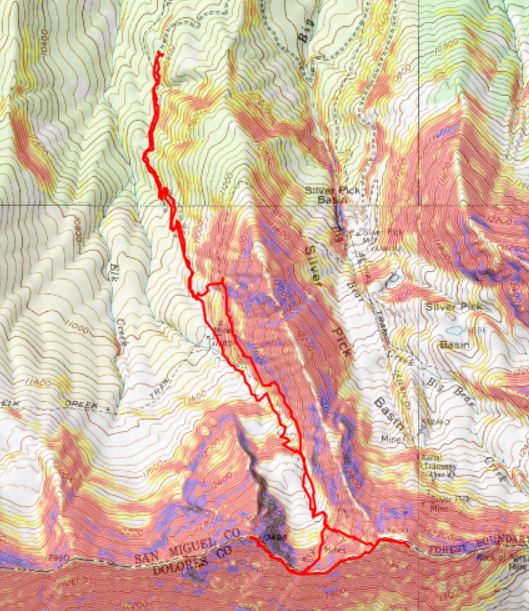
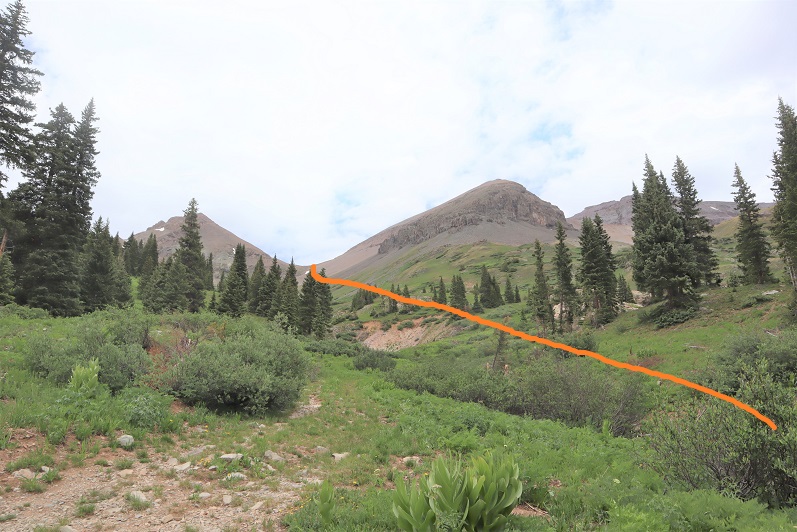
It had been sprinkling off and on, and the wind was fierce, but I knew from the last time I did Trico it was a quick and straightforward hike. I decided to go for it. This is the overall route I took
After the road ends, there is a game trail that goes pretty much all the way to the summit, keeping Trico Peak class 2.
I summited Trico Peak at 8:20am
Trico Peak:
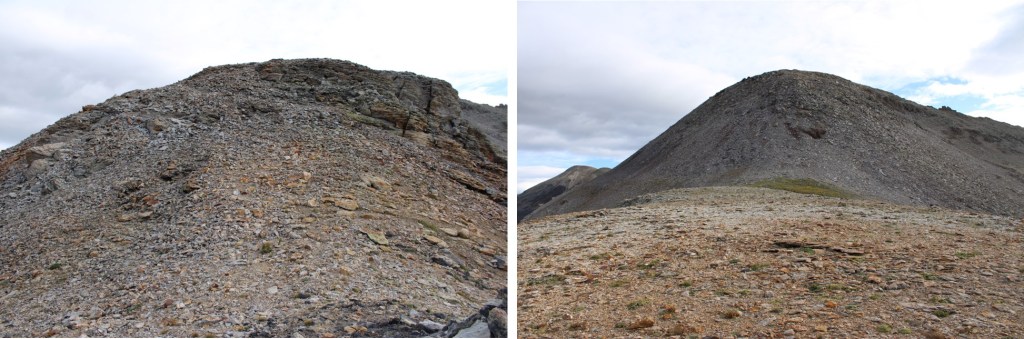
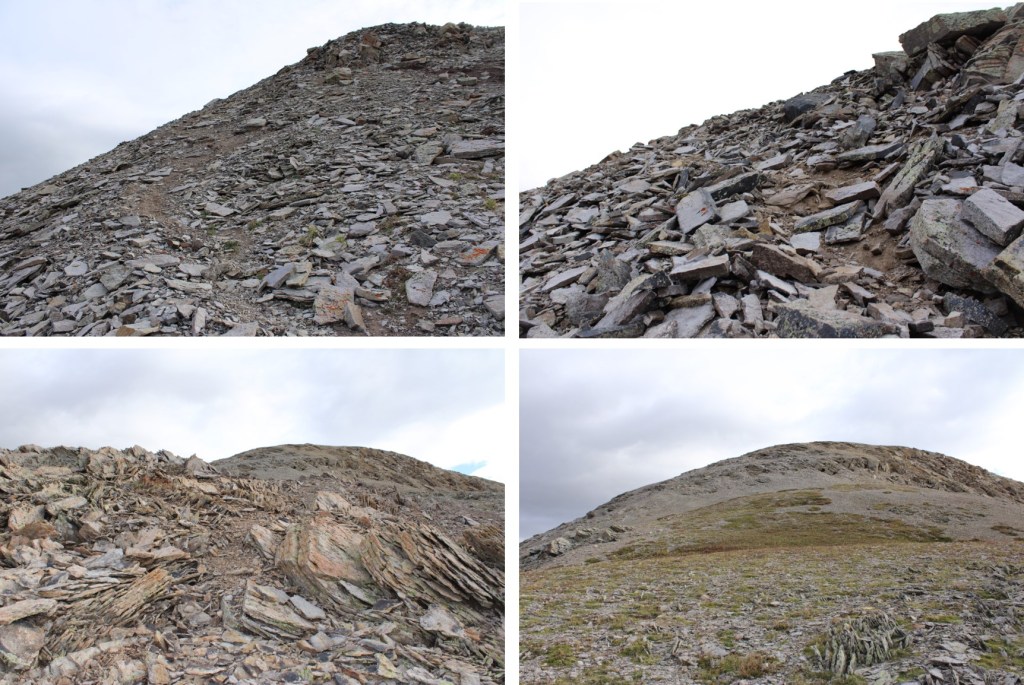
I’d made it, but the wind was fierce, and I could see storms all around me. I jogged back down to the pass, stopping only a few times to take pictures of the route
Back on the 4WD road, I turned left and followed it back down Mineral Basin to Red Mountain Pass
I made it back to my truck at 9:30am, making this a 9.52 mile hike with 3260’ of elevation gain in 4 hours.
I drove up the night before, and parked at Red Mountain Pass. There’s a dispersed campsite you can see from the road that I like, so I parked there. There are a few more sites further up.
Knowing the area was supposed to get rain and storms starting at 9am, I was up and on the trail at 4:30am. I followed Road 823 to the junction with Black Bear Pass.
At the junction with Black Bear Pass, I turned left and followed Road 622 through Porphyry Gulch
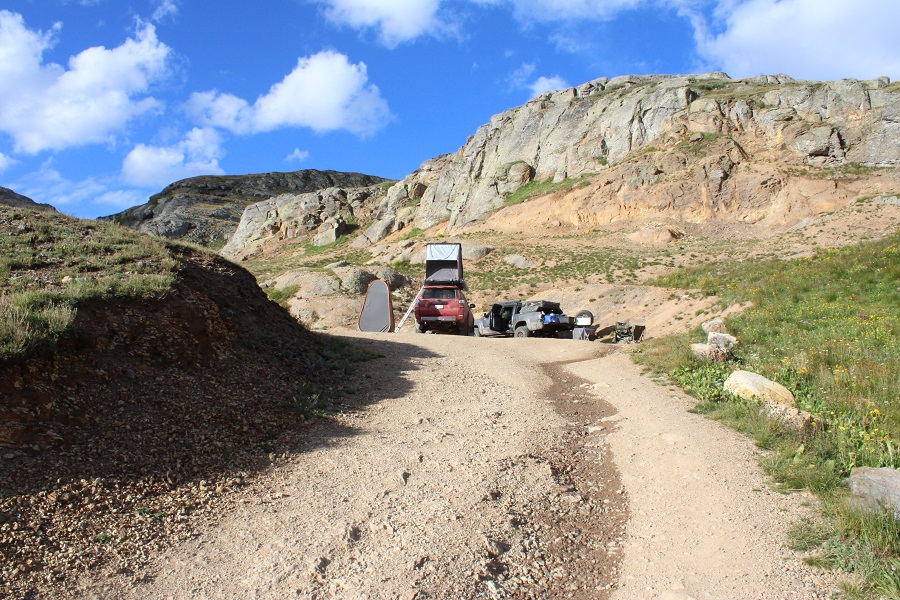
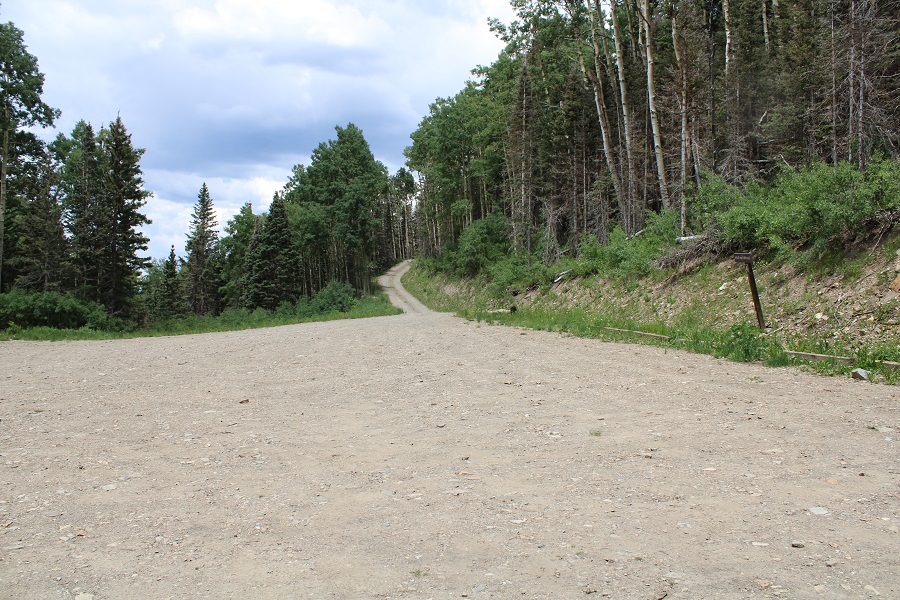
It was 2.6 miles from Red Mountain Pass to the upper trailhead, on an easy 4WD shelf road with few passing areas. When I got to the upper trailhead, I was surprised to find someone had set up camp in the upper parking lot/turn around area. Normally, there’s room for 7 cars here, but these people took up at least 4 spots. When the ant train of 4WDs come up later today, they are not going to be happy.
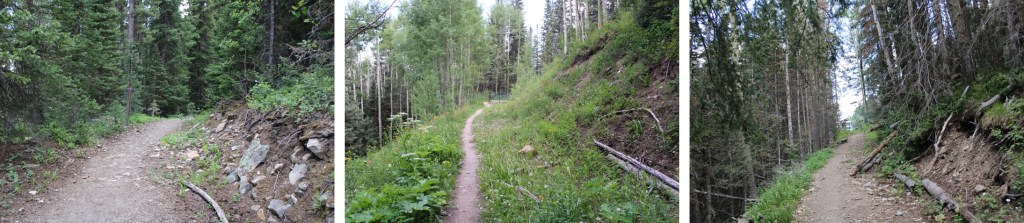
The trail starts to the left of the parking area, and is initially well defined.
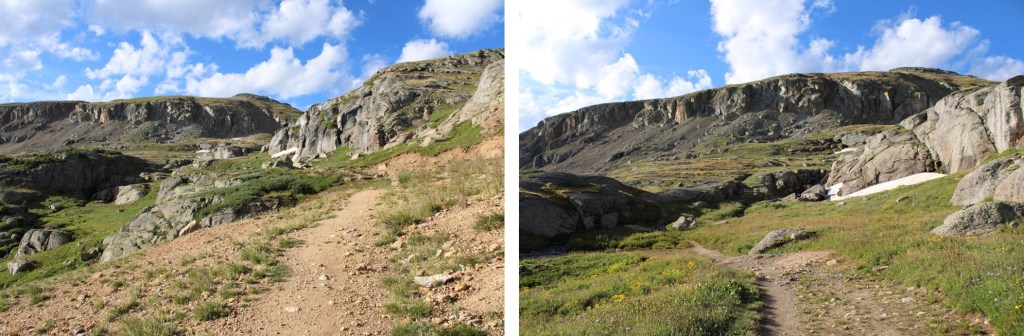
In the dark, the trail was difficult to find for a bit. I was aiming for these rocks
Just behind these rocks, a nice trail picks up to the right, and brings you to Bullion King Lake.
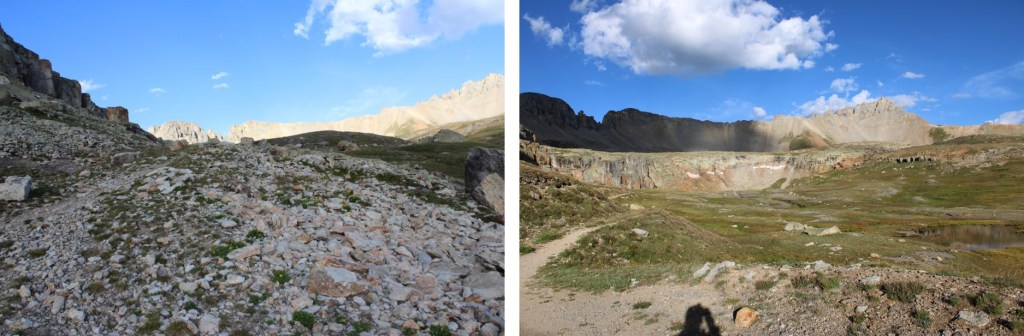
Here’s where the trail ended. I skirted the lake to the right, and started heading northeast into Porphyry Basin
There’s no need to climb all the way to the top here. I skirted to the left, and continued heading northwest. If you look around, you’ll see remnants of old mining equipment and structures in the area, but they’re all flattened at this point.
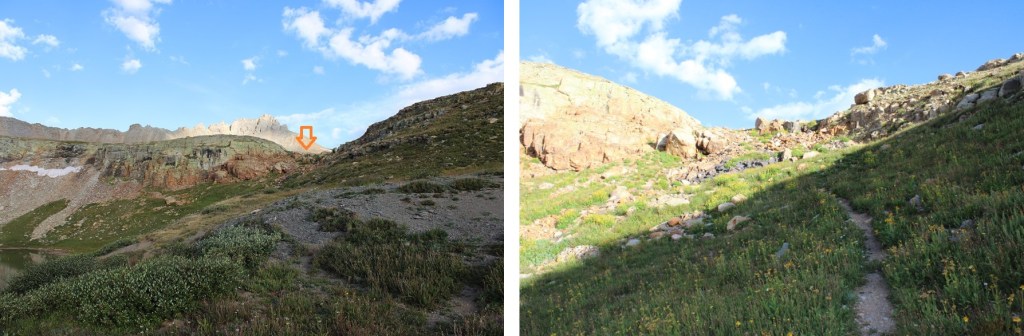
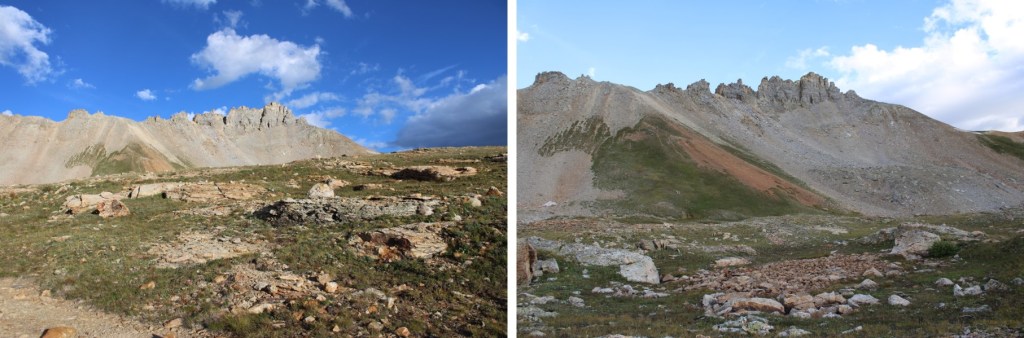
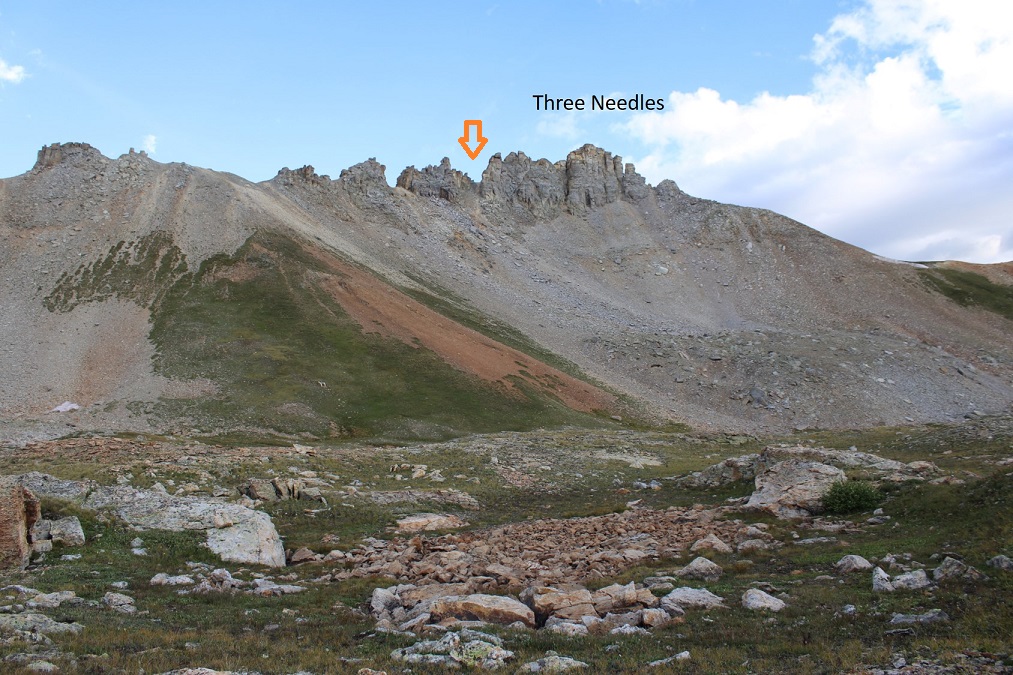
Here is where I strapped on my helmet and microspikes. I could clearly see Three Needles in front of me. I went straight up this gully.
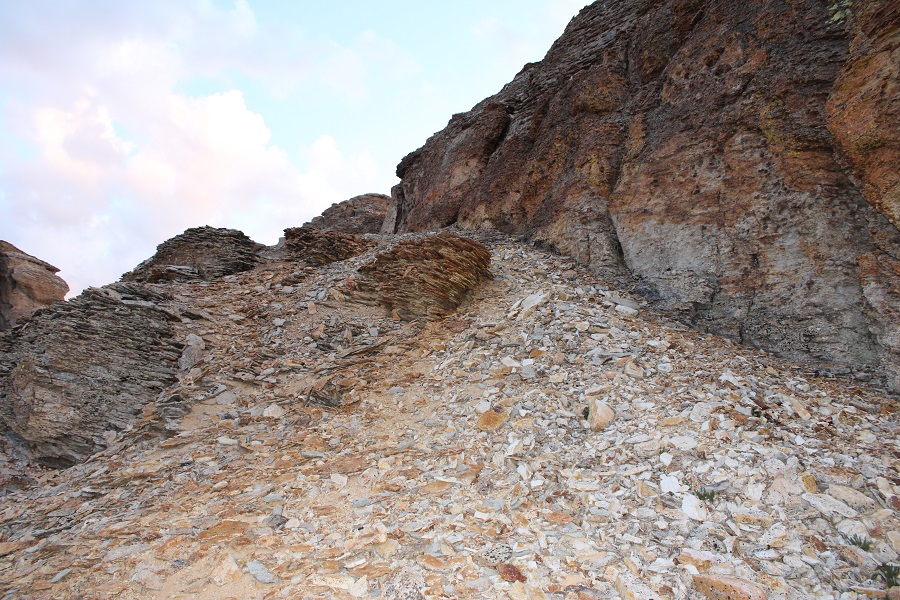
The gully was full of shale and scree. It was loose, and hard to get stable footing. I was glad to have on my microspikes. It looks like the terrain shifts every year, as well as every time it rains. Towards the top there are game trails, but they were more needed down below. Here are some pictures of the gully
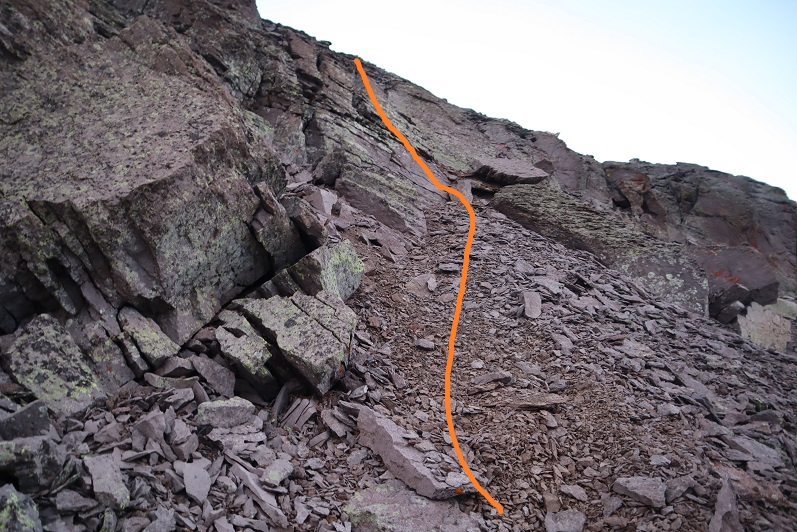
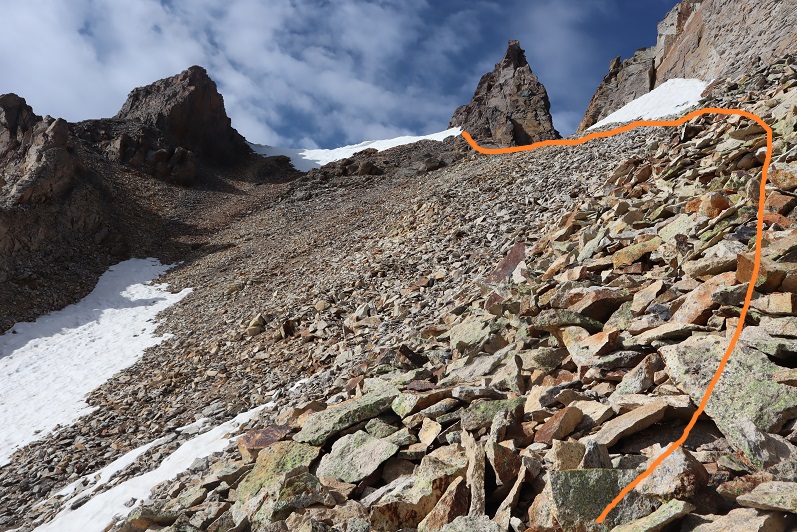
At the top of the gully, I turned right, and followed the scree
I was headed here
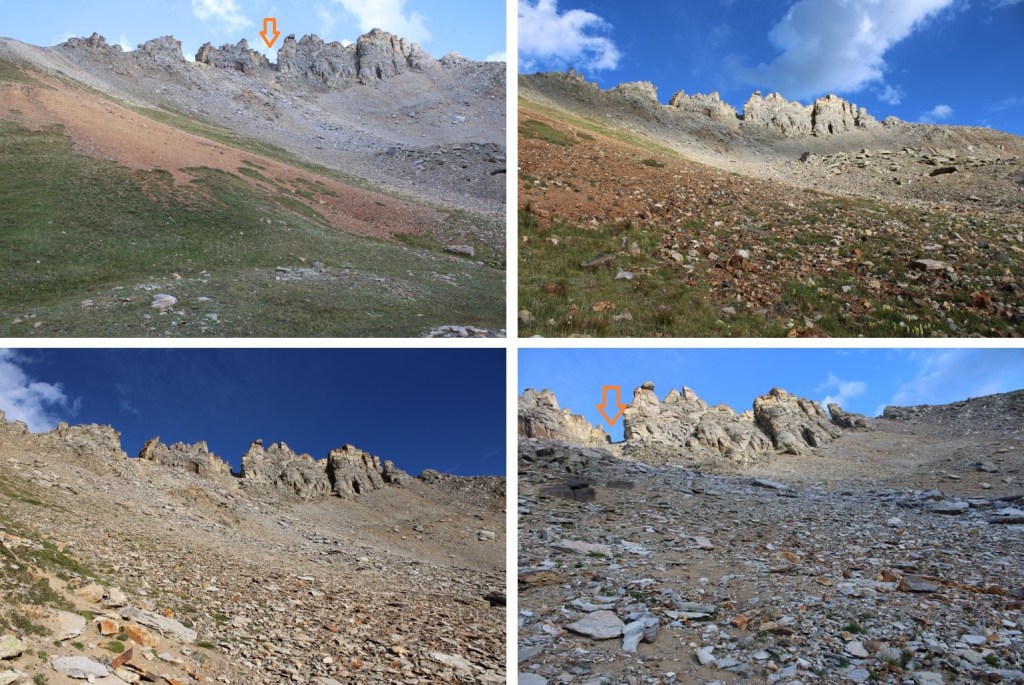
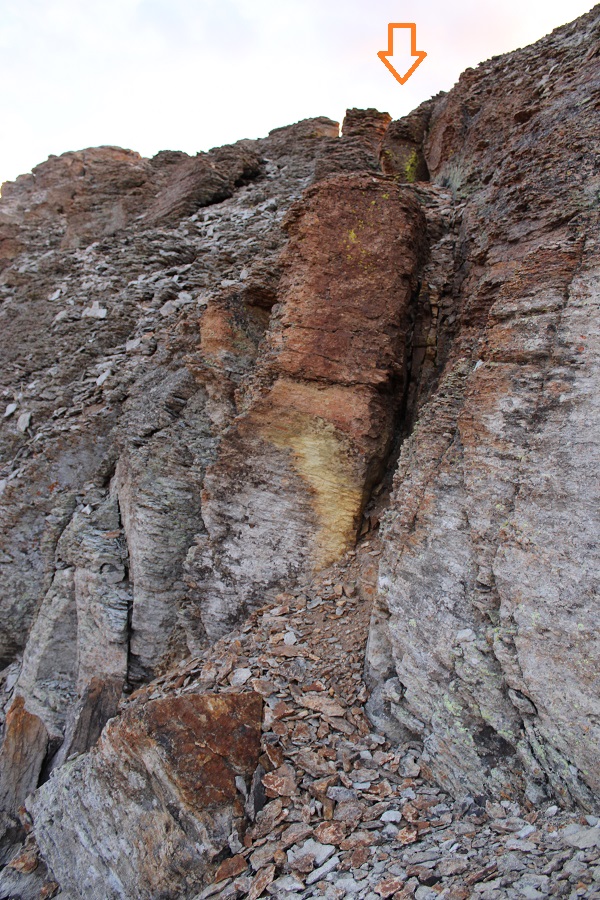
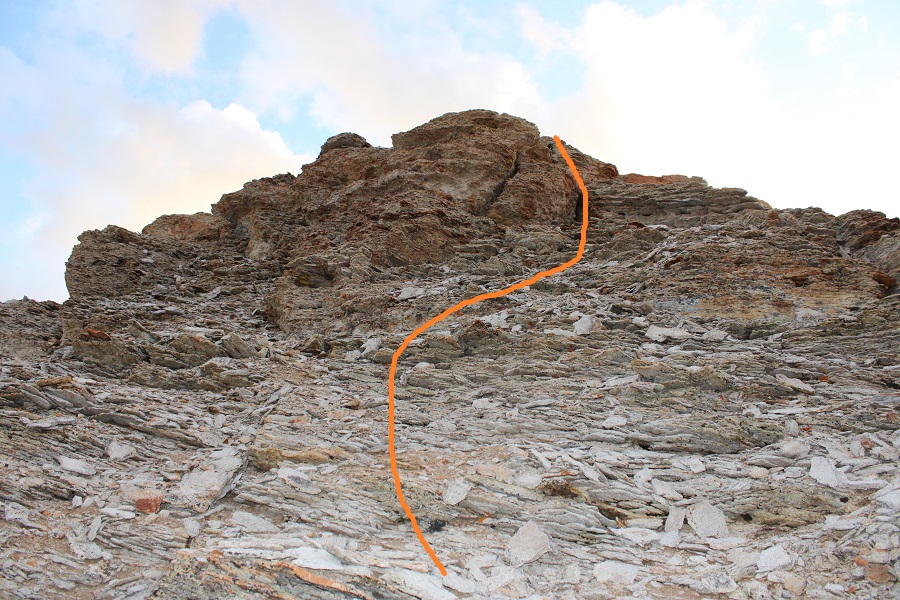
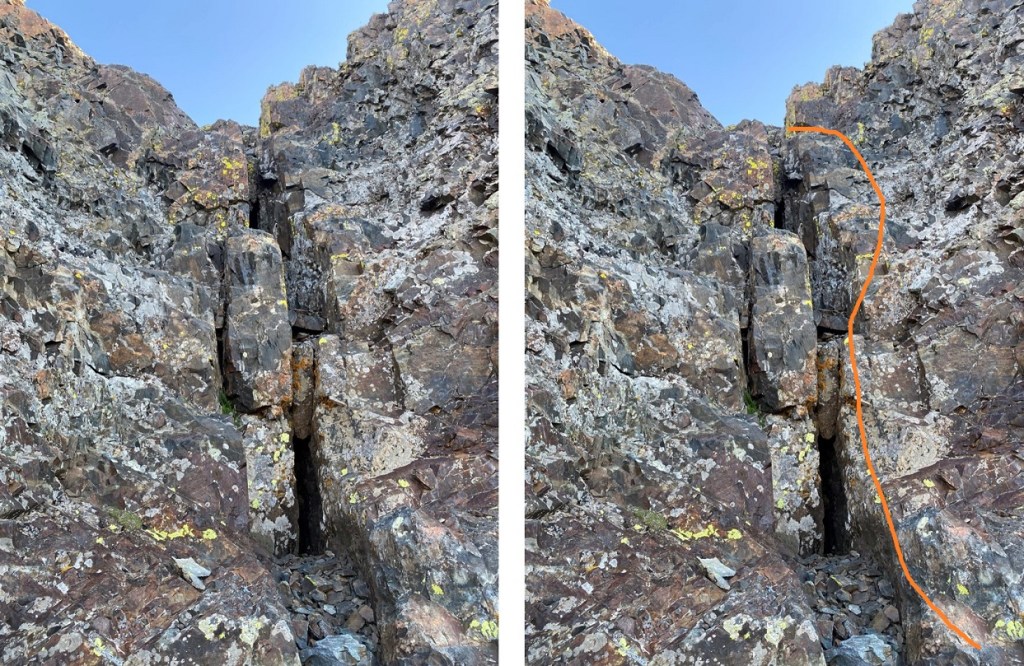
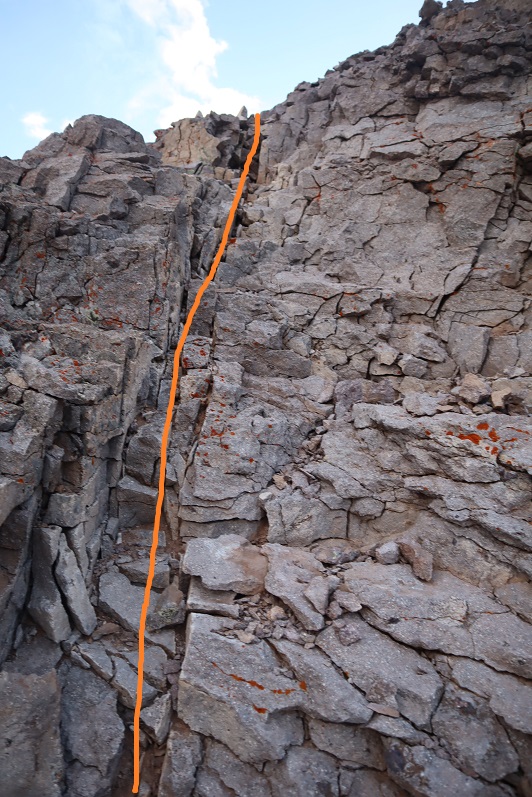
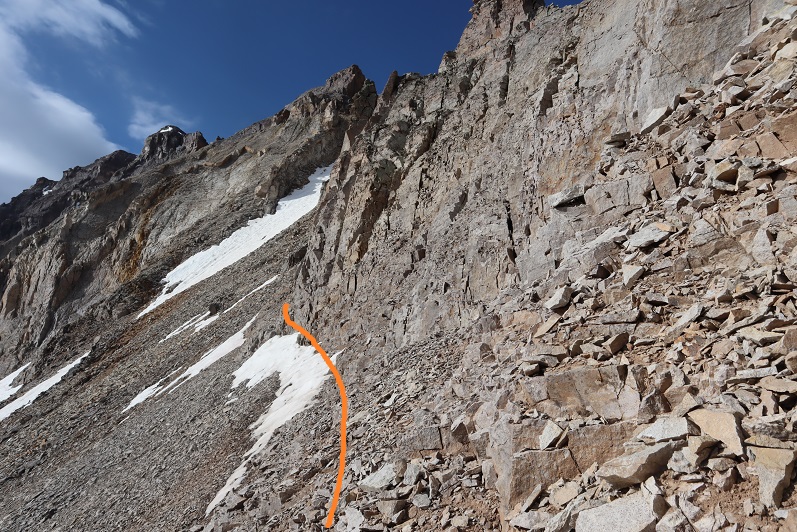
I looked for a weak point to ascend, and found this chimney. I didn’t climb up the chimney, but you certainly could
Instead, to the right of the chimney I found a narrow ledge. Yay! Being short is finally working out for me when it comes to scrambling! I climbed up to the right of the chimney, they traversed left to the ridge.
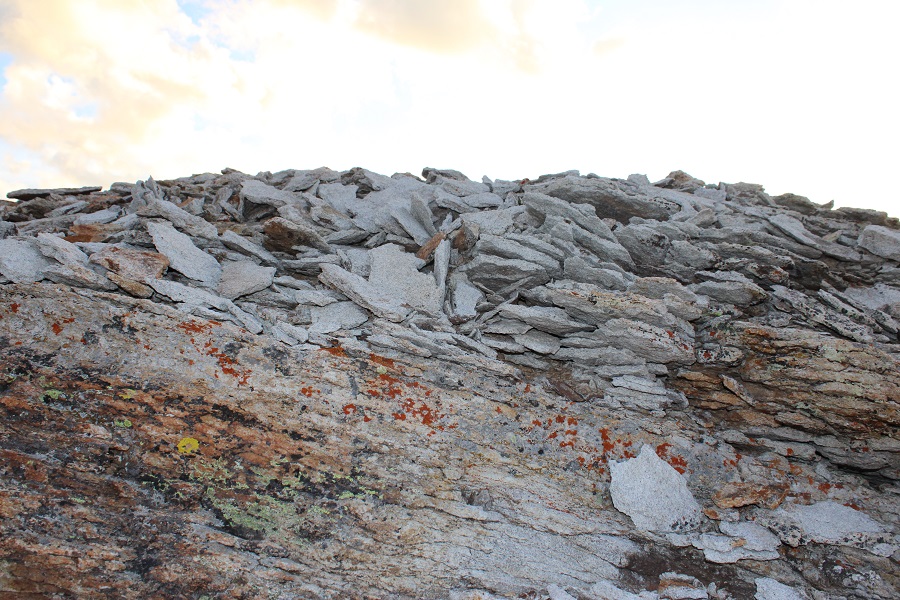
The ridge was short but full of kitty litter and talus. It never got worse than easy class 3, but it was loose.
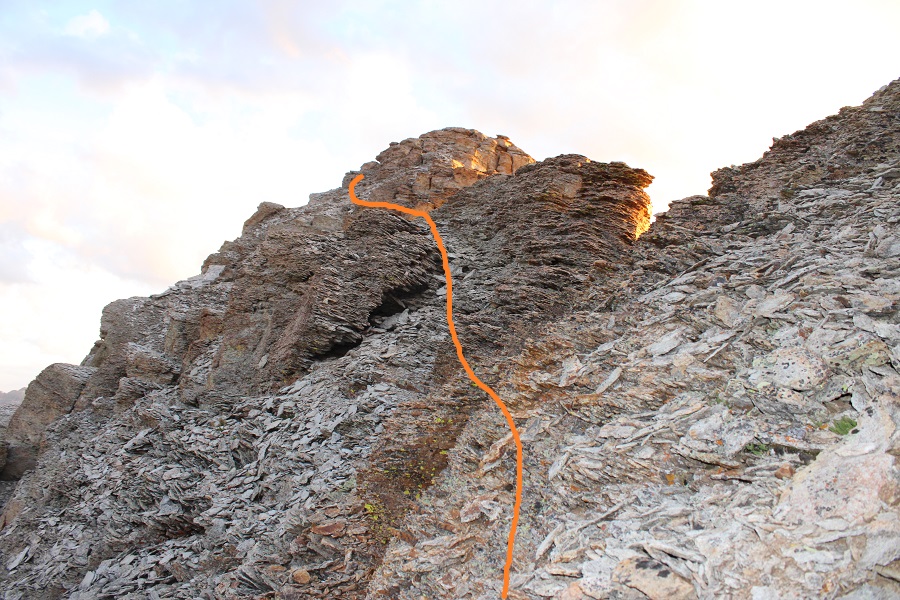
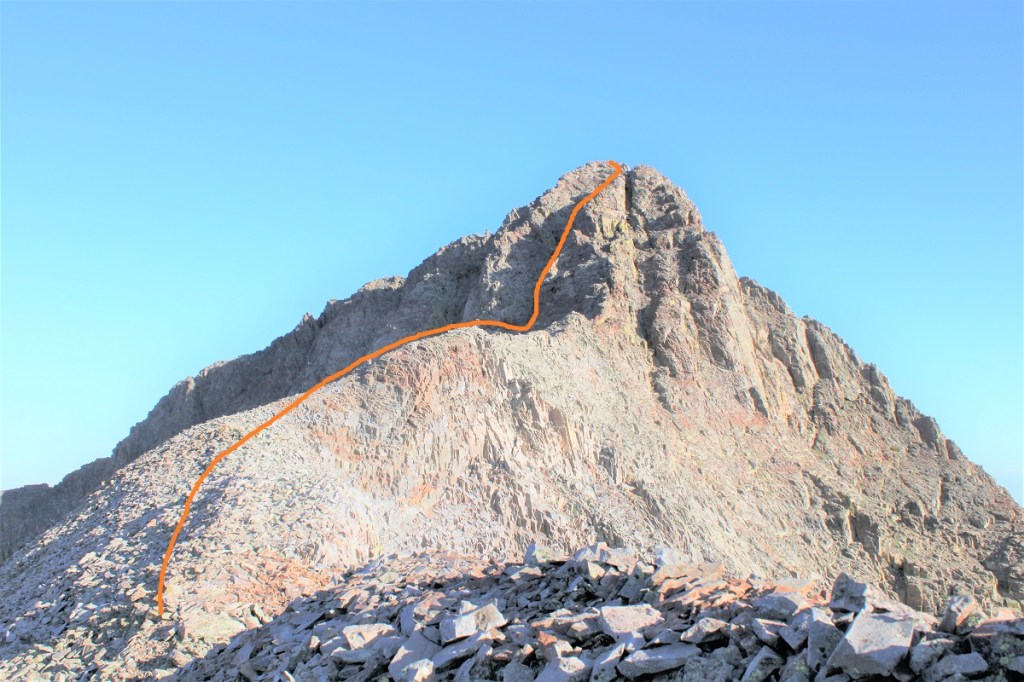
This is the overall route I took to the summit
And some step-by-step pictures
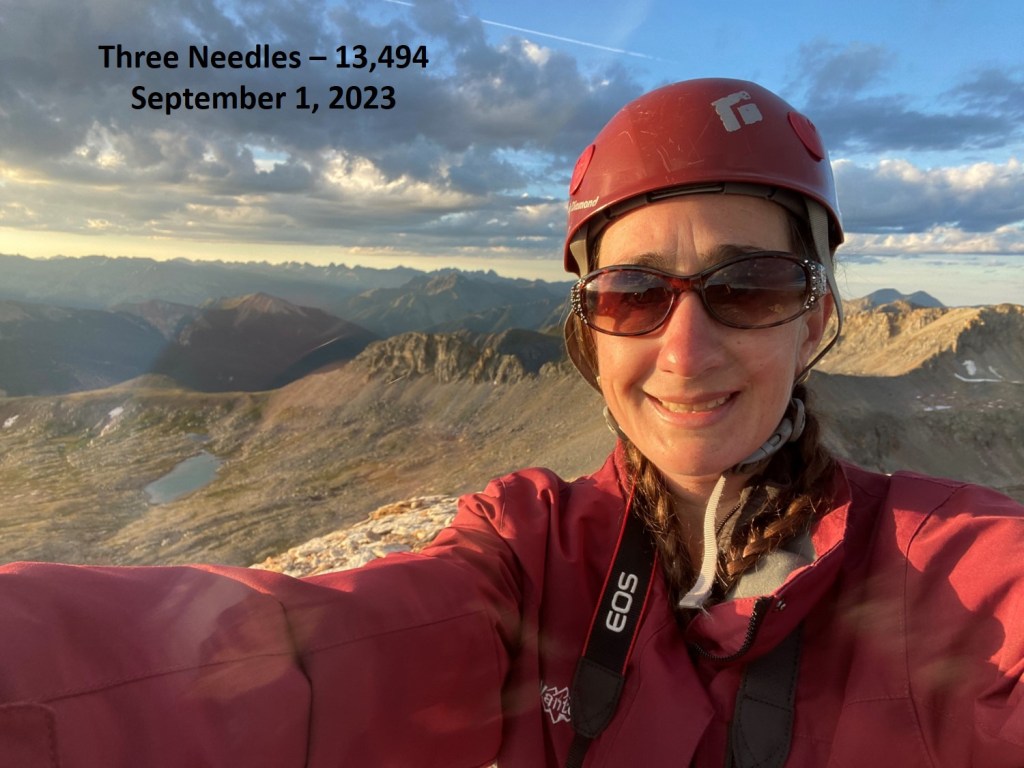
I summited Three Needles at 6:45am
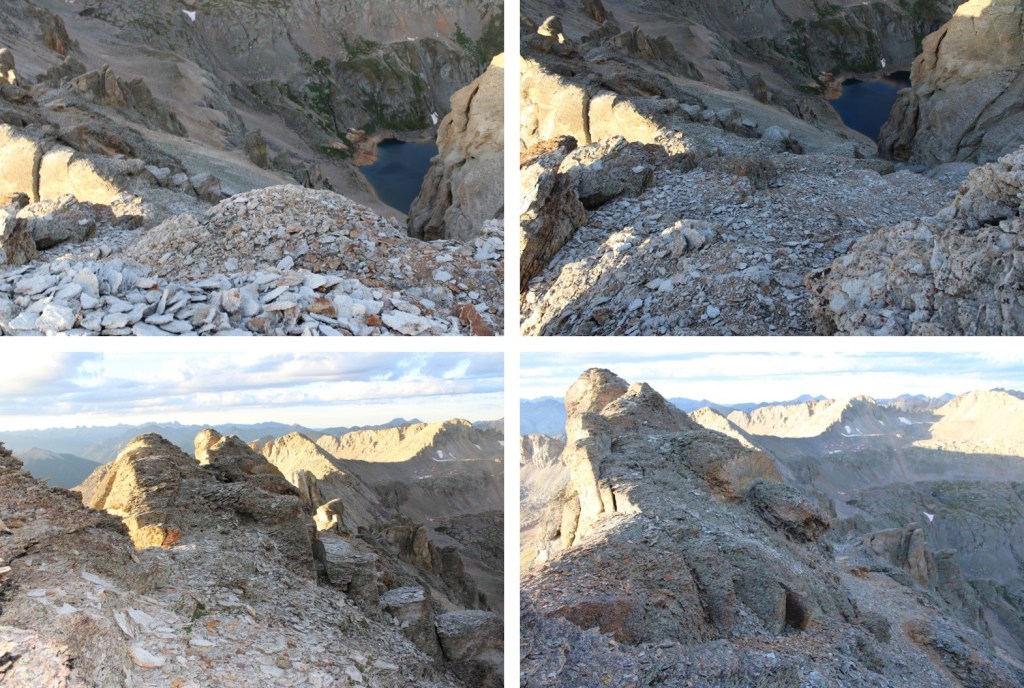
Three Needles:
I had cell service, so I checked the weather, and even though I could see dark clouds and virga in the moonlight this morning, it looked like the weather had been pushed back until later in the day. So I decided to sit on the summit for a bit, and enjoy the cell service and sunrise.
This was an out and back hike for me, so I retraced my steps to the access gully
Once again, I did not descend the chimney, but ducked under a rock ledge to the left, then headed down
At the bottom of the chimney I turned left, and headed back to the access gully
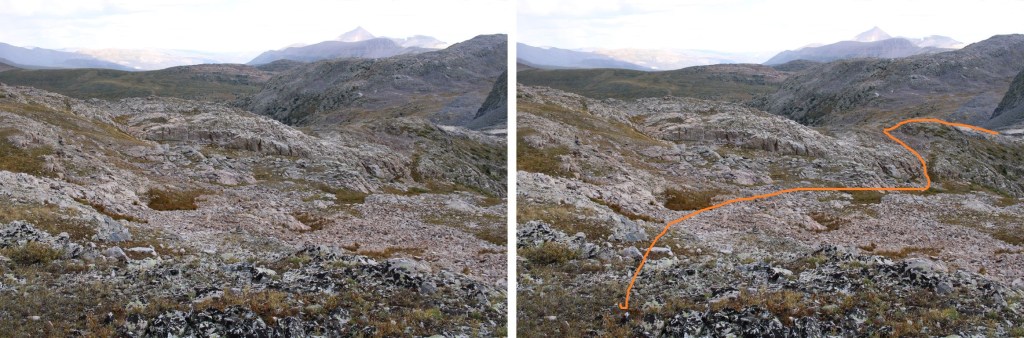
From the top of the gully, I could see my route out of the basin
The gully was much easier to navigate heading down, but still very loose.
Now to make my way back to Bullion King Lake
And pick up the trail on the other side that lead me back to the 4WD road
Back at the upper trailhead, I followed the 4WD road back to Red Mountain Pass
I made it back to Red Mountain Pass at 9am, making this an 8.82 mile hike with 2420’ of elevation gain in 4.5 hours.
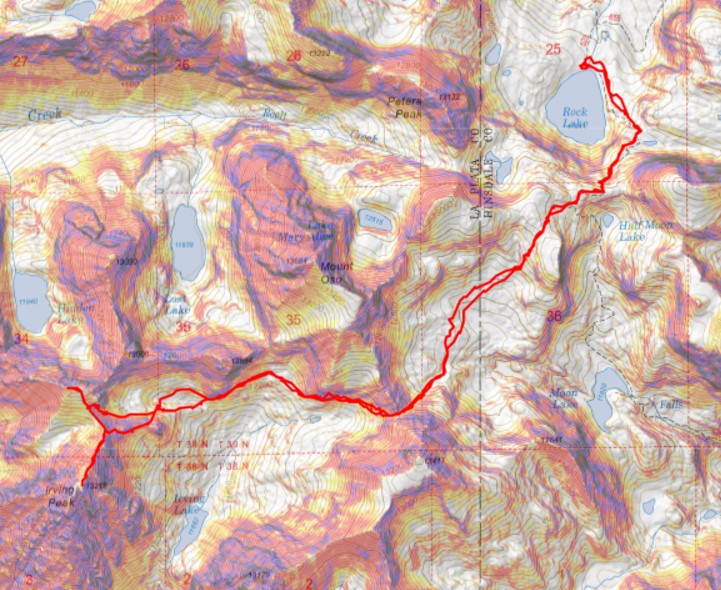
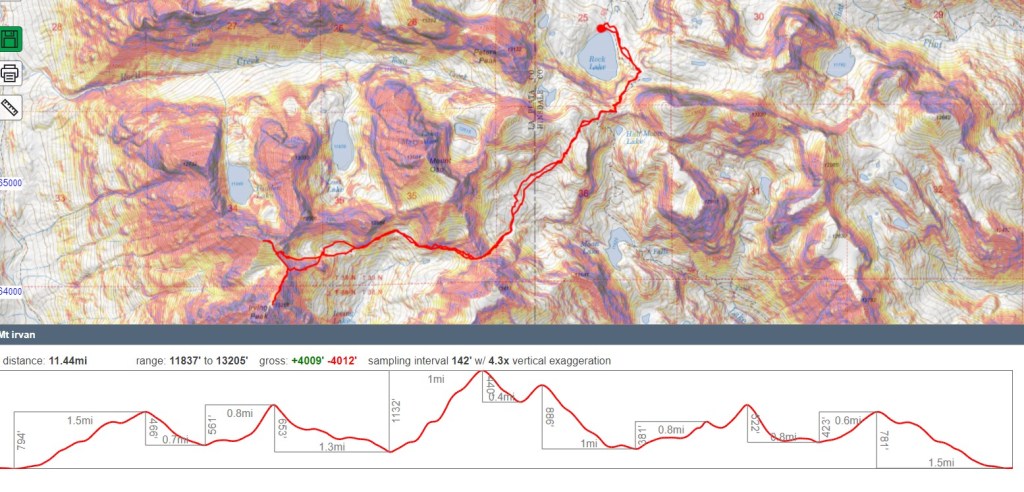
This trip report starts at Rock Lake. For instructions on the approach to Rock Lake, as well as the drive to Beartown from Silverton, click here.
Since I was already at Rock Lake, at around 11850’, I made it a late start and was on the trail at 6am. I was in the camping area directly in front of the lake, and from there I headed south towards the pass.
There is a trail that picks up on the east side of the lake, that will take you all the way to the pass on a class 1 trail
It’s rocky, but there is a well-defined trail here with cairns
At the top of the pass I headed southwest, following the cairns as they descended a bit. The trail goes on to Half Moon Lake, but I didn’t want to go there, so after descending down a small gully I changed directions, and gained the ridge to the west.
I spent a lot of time putting cairns in this area to help with navigation, but as long as you gain the ridge, the next part of the route will be obvious.
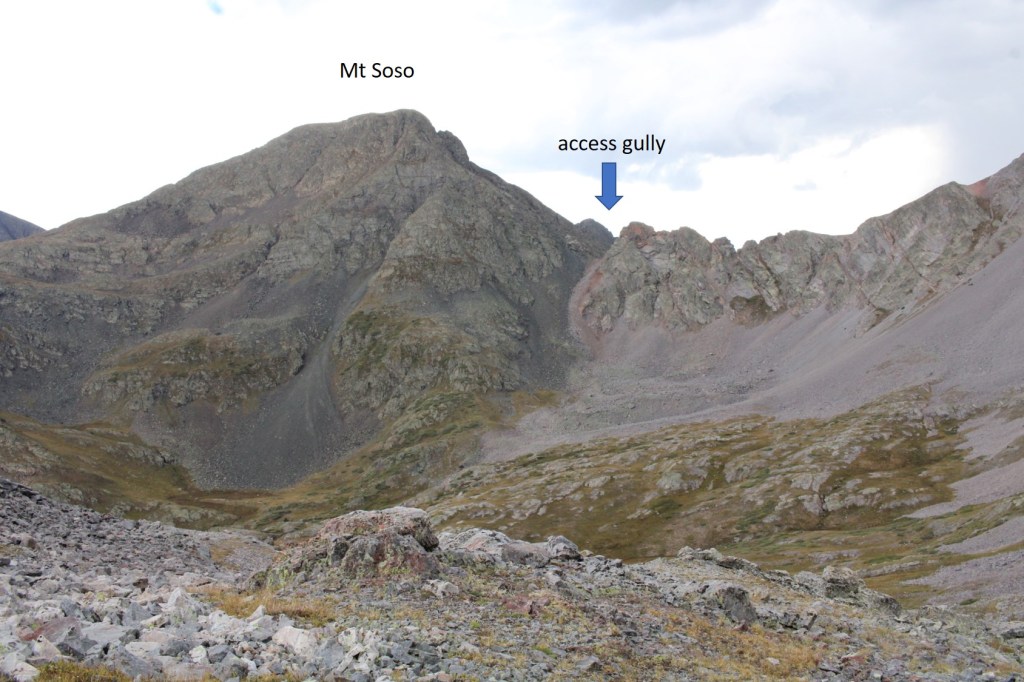
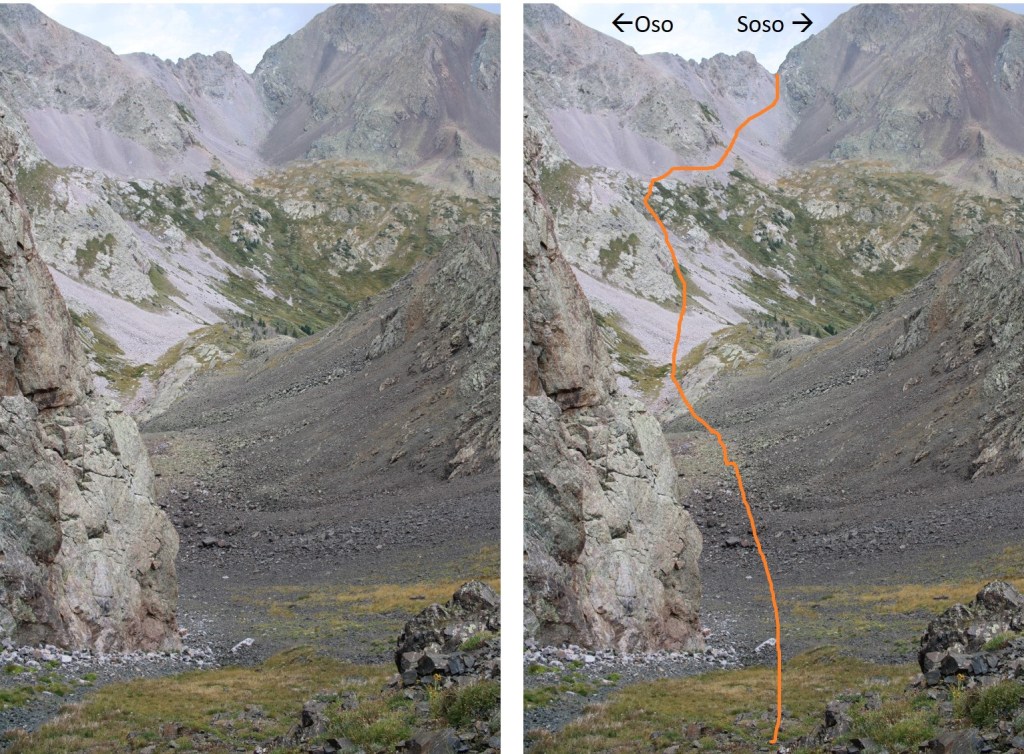
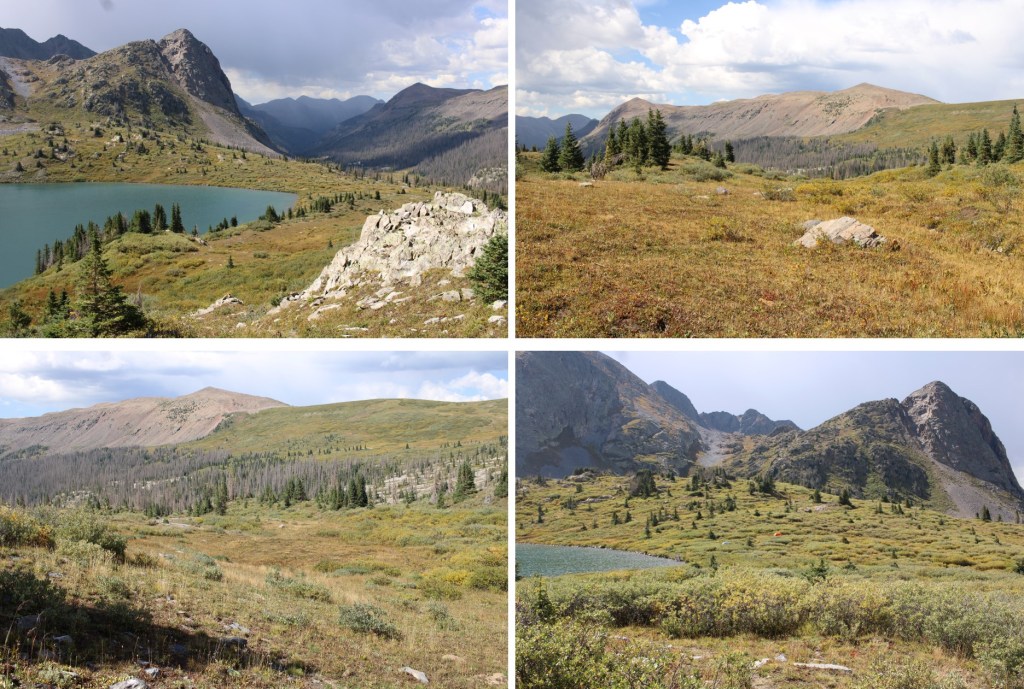
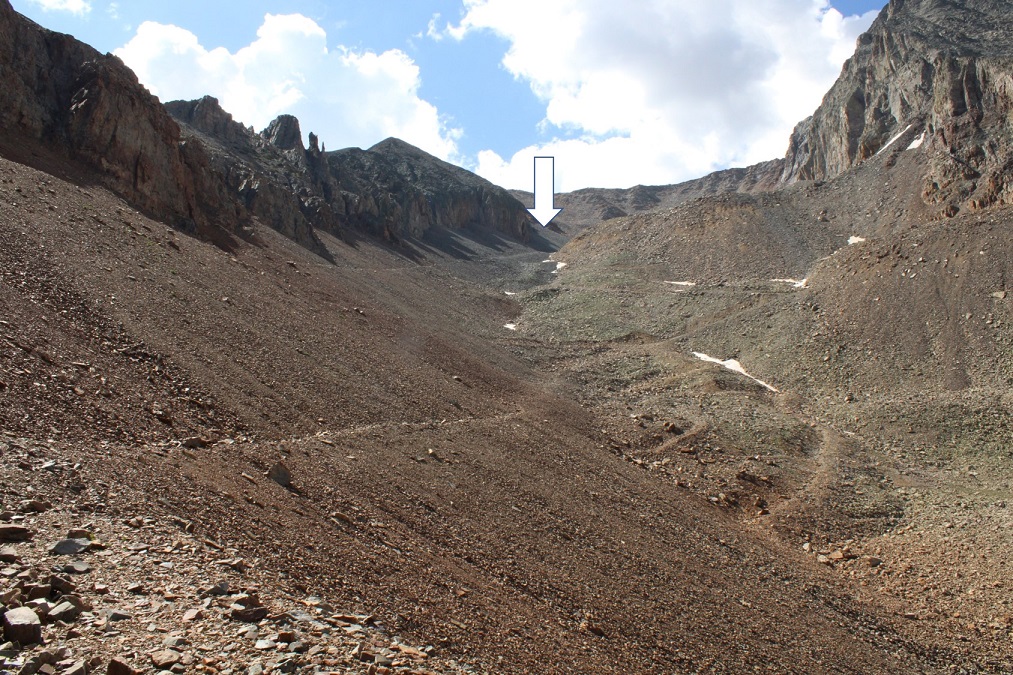
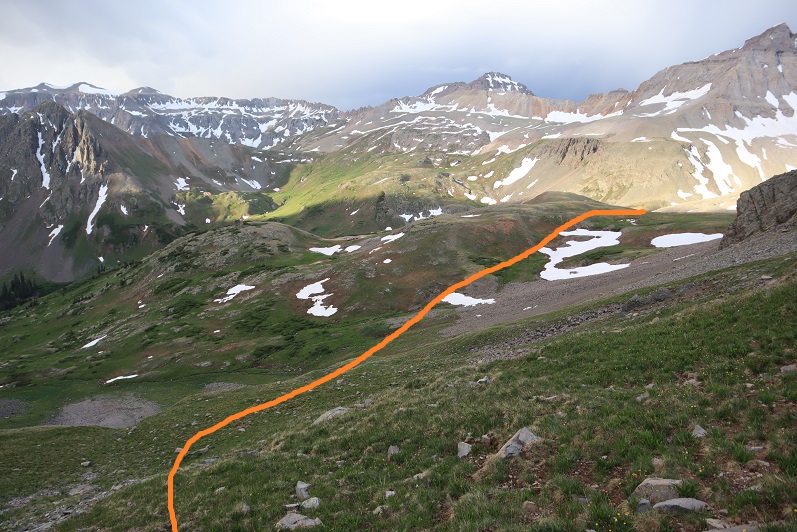
From the top of the ridge, I could see Mt Soso, and the gully I would need to climb to access the next basin, where Irving and North Irving were.
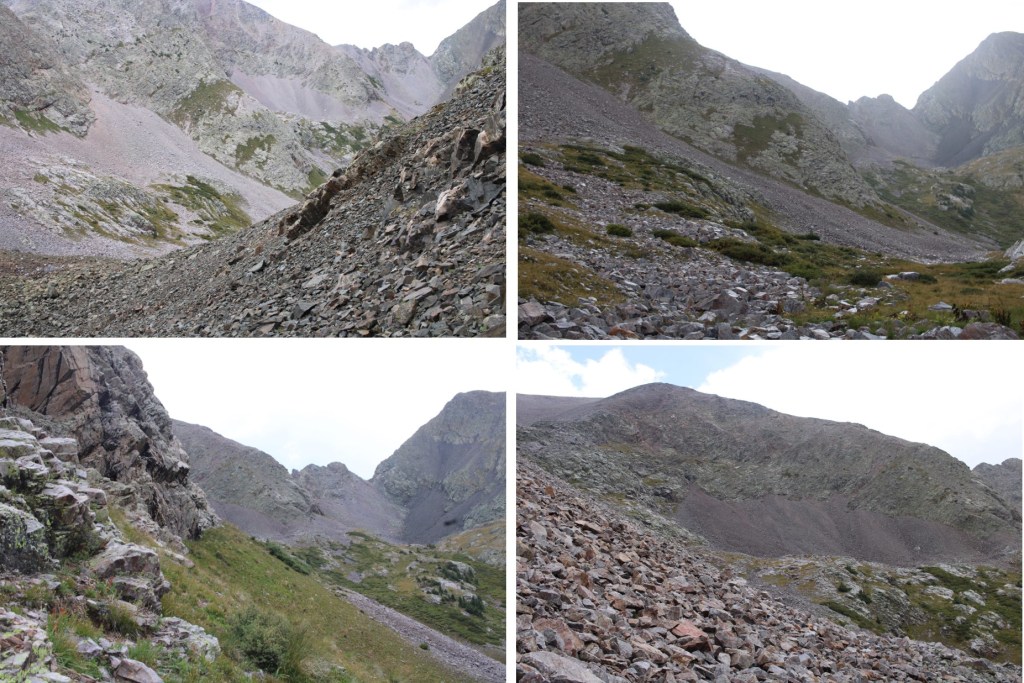
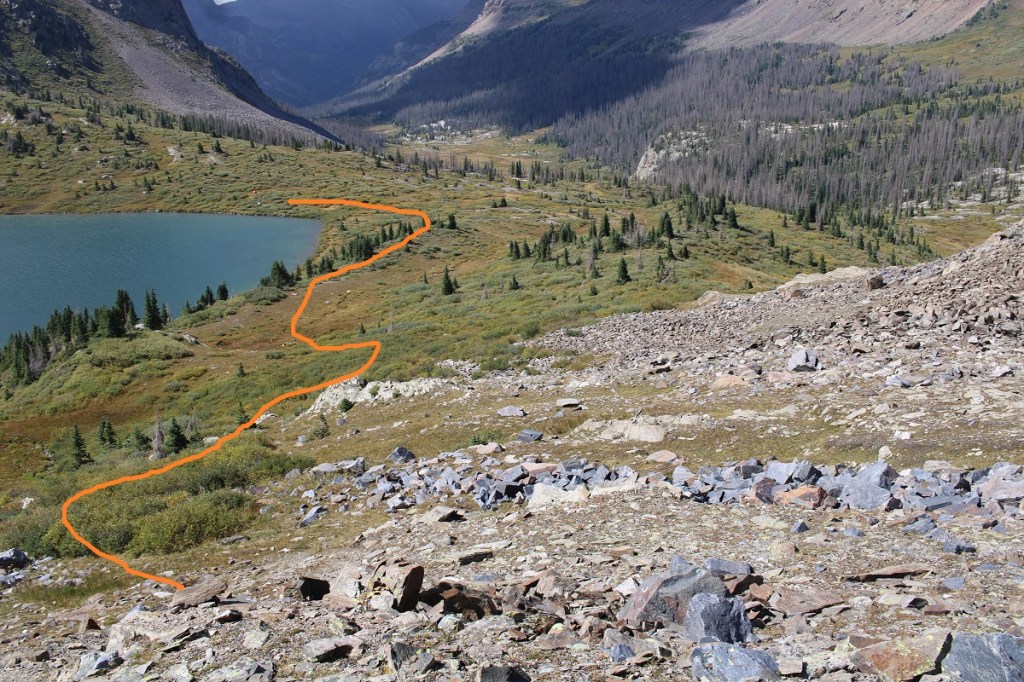
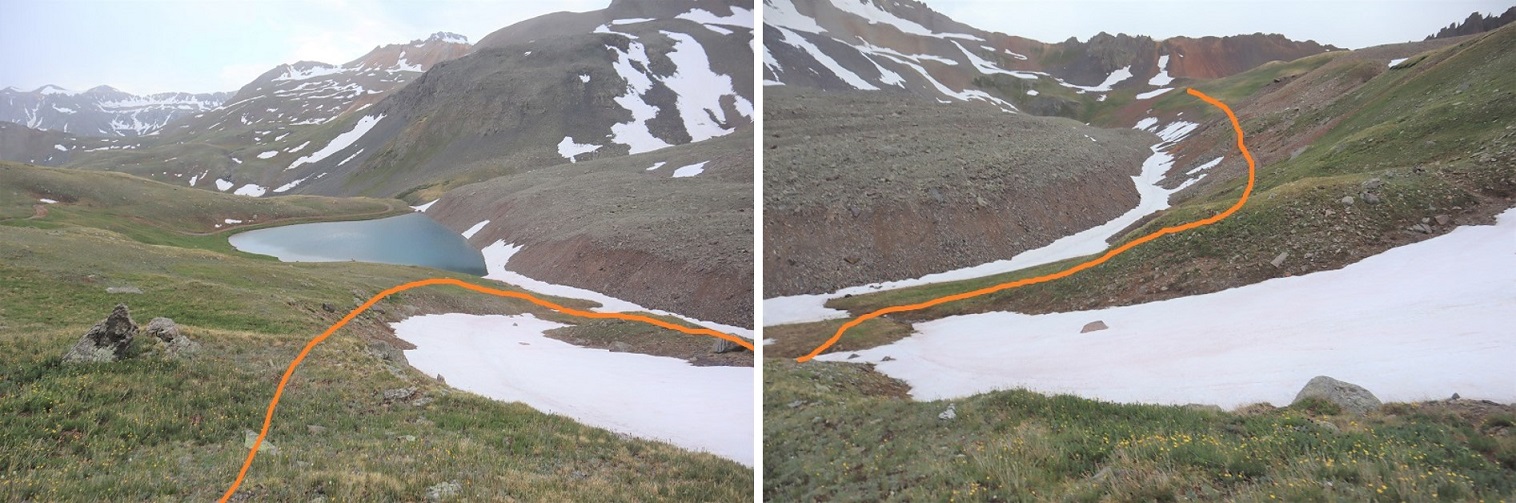
This is the route I took to get to the gully. There are a lot of small ponds in this area, and marshy areas. I found I could skirt the water to the north, and then easily access the gully
I first had to descend 450’ into the basin (I stayed high, as you can descend much further if you take a different/lower route), and then re-ascended 560’ up the gully.
The gully really wasn’t that bad to ascend
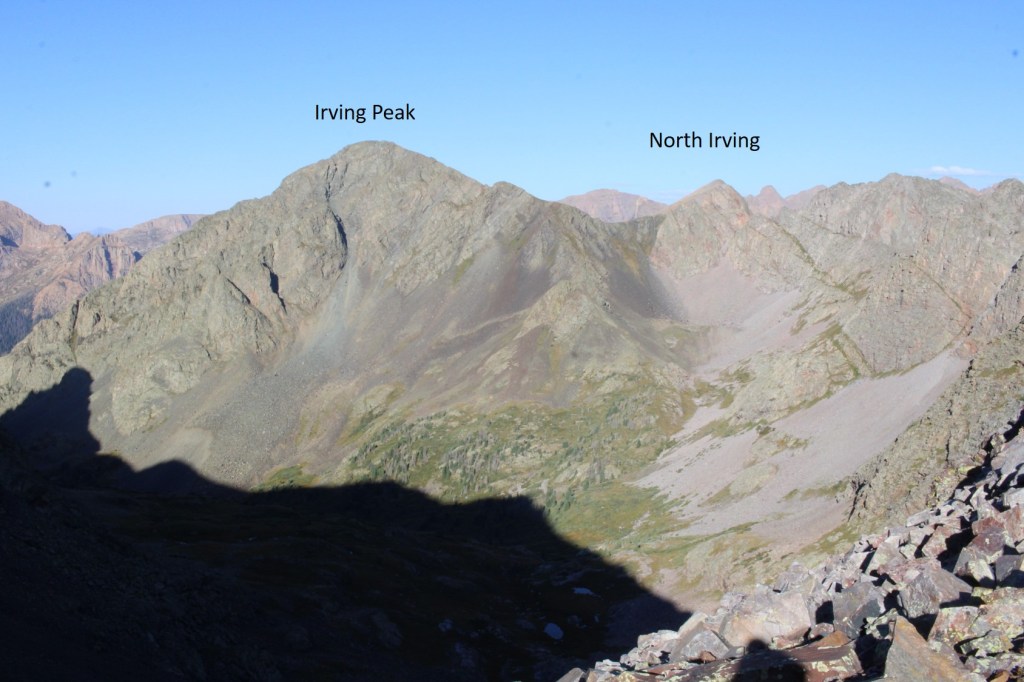
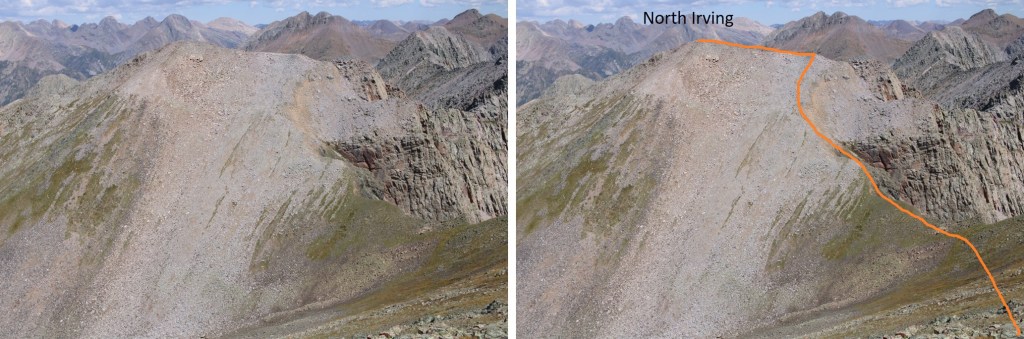
At the top of the gully, I could see Irving Peak and North Irving.
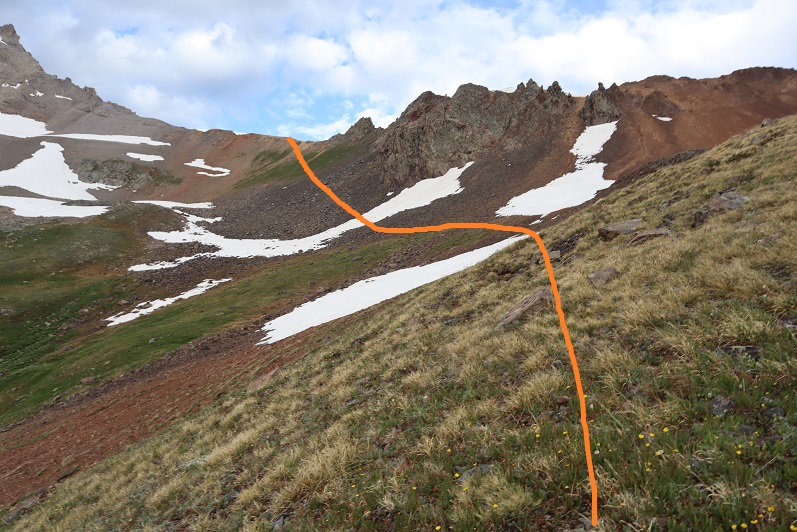
I had a clear visual of how I wanted to ascend, and descend to get there. This is the overall route I took. I stayed high, losing about 650’ of elevation, and paralleled the mountainside at around 12300’ to get to the base of Irving Peak. The dotted line is my descent route off North Irving (more details later).
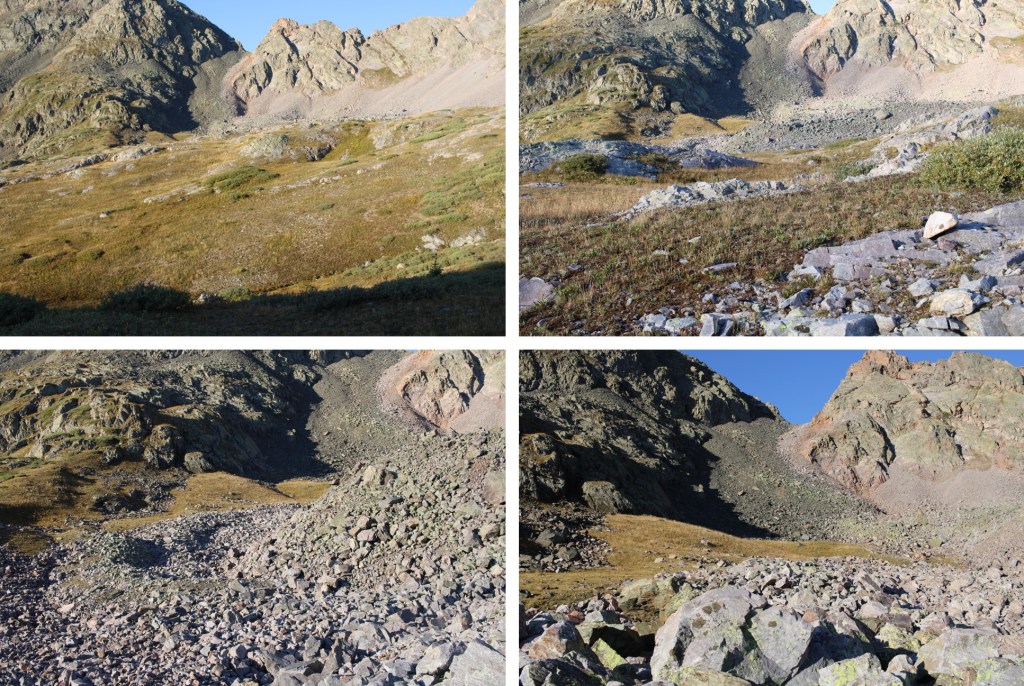
Here are some close up pictures of the route
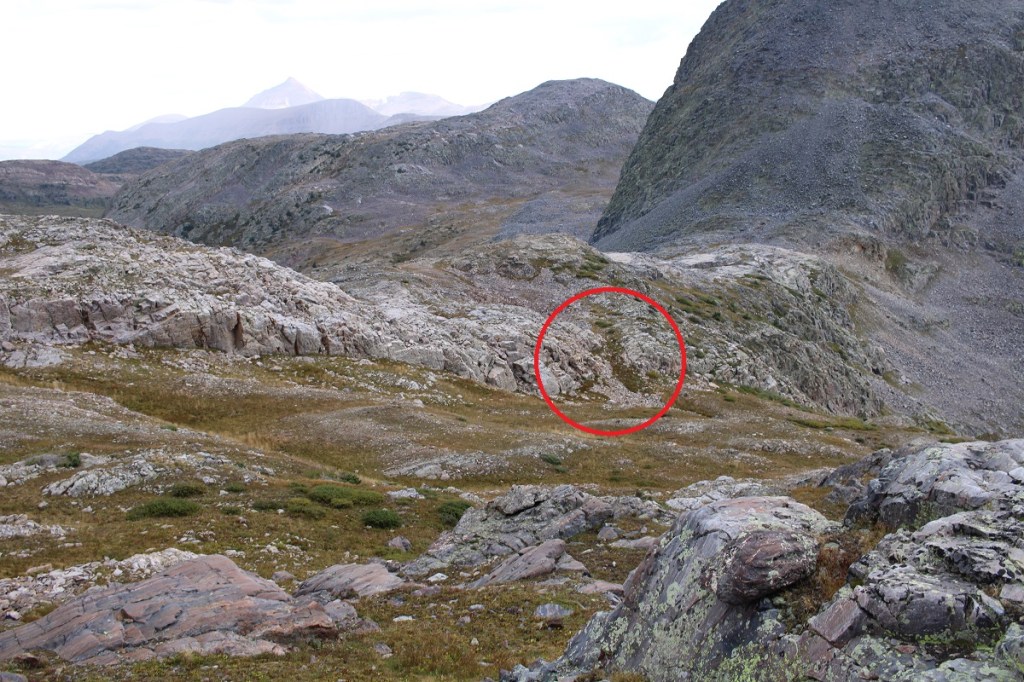
When I made it to the bottom of Irving Peak, I had a few options. I decided to head up the gully to the left, but this meant I’d need to descend about 50 feet on the other side and then regain the ridge. Now is also a good time to note my decent route from North Irving. If I were to do this again, I’d choose the same route. The gully I took down would not have been fun to upclimb. The area circled in red is what I was trying to avoid, as it didn’t look like it ‘went’.
Here are some pictures of my route up to the ridge (all class 2+)
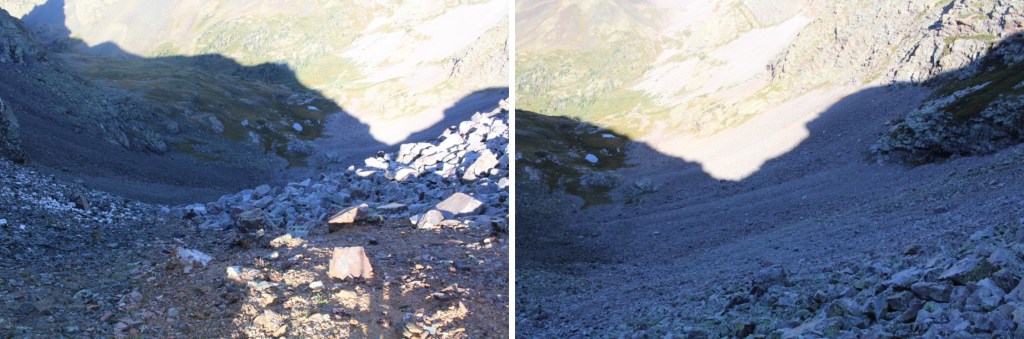
And once on the ridge, the area I dropped down to avoid, and then regain the ridge
Some step by step pictures avoiding the rocks and accessing the gully
The gully was at worst class 3
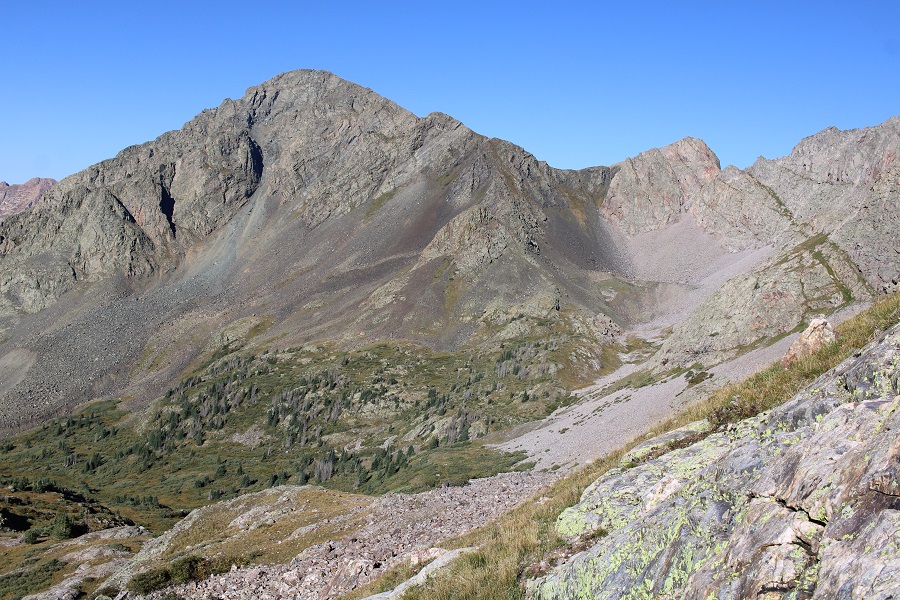
At the top of the gully, here’s looking back on my route from the pass
I turned left, and followed the rocky ridge southwest to the summit of Irving Peak. This was a class 2 scramble
I summited Irving Peak at 11:15am
Irving Peak:
Now to head over to North Irving. This was a class 2 hike northeast down to the saddle, then 240’ of elevation gain as I followed the ridge northwest
I summited North Irving at 12pm
North Irving:
There was a storm coming in, so I quickly made my way back down towards the Irving/North Irving saddle.
There are several gullies you can take down. I took the second one, circled here in red. I do not regret my choice.
Once out of the gully, I retraced my steps back the way I’d come, to the Oso/Soso saddle
From the Oso/Soso saddle I aimed for the ridge to the northeast, losing and then regaining elevation.
From the top the view can get a little confusing, because there are a lot of rocks. Here’s the route:
You’re aiming for this gully, which will have cairns that will lead you back down to Rock Lake
There is a trail here that will lead you back to the lake
Notice there are a lot of campsites in this valley area as well
I made it back to Rock Lake at 3:30pm, making this an 11.44 mile hike with 4009’ of elevation gain in 9 hours.
I’d already been away from home a few days before this trip, so I stopped at Ouray Hot Springs to get in a quick workout and a shower (they only charge $4 for a shower, which might be nice if you’re hiking around Ouray and want to freshen up every few days). The only downside? The parking was terrible, even on a weekday in the morning.
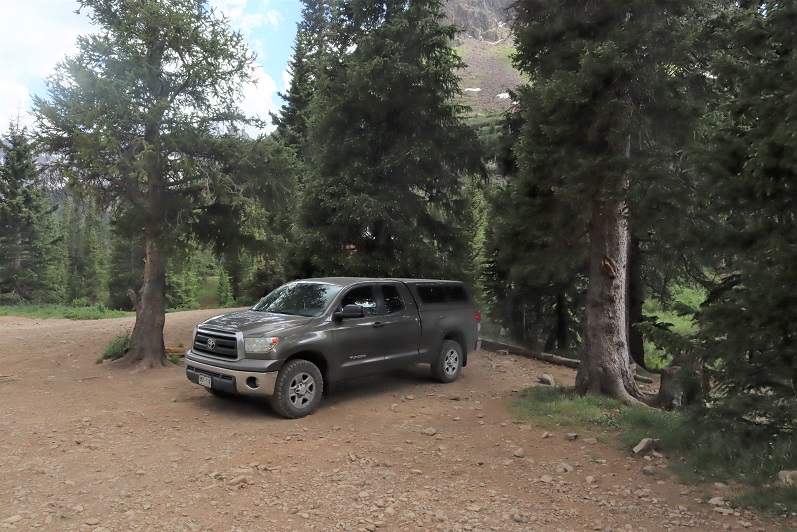
After cleaning up I drove to the Rock of Ages Trailhead. The drive in was a bit bumpier than I remembered, but also fun, because I was seeing what Miles (my new Tacoma) can do. He handled the stream crossing and ruts in the 4WD road without needing to be put into 4WD.
I made it to the trailhead and was the only one in the lot (another good thing about arriving on a Thursday).
I walked around for a bit, and immediately realized the mosquitoes were going to be a problem. I’ve ordered a topper for Miles, but it’ll take up to 3 months to get here, so until then I’m sleeping in the back seat of the cab (It’s a tight fit but luckily I’m small). I made the decision to get to bed as soon as possible. I ended up waking up several times during the night because I was so warm, but at least waking up ended one of my nightmares: a dream about sharks in a swimming pool swallowing children whole.
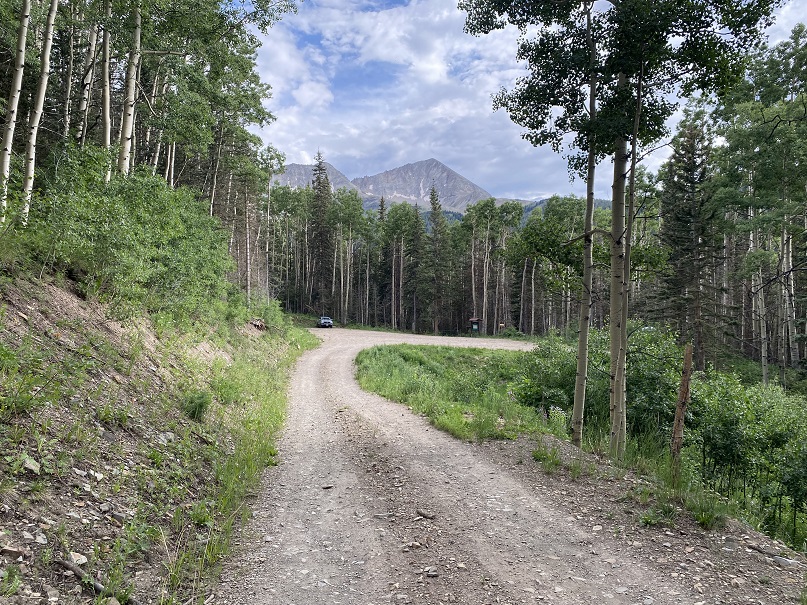
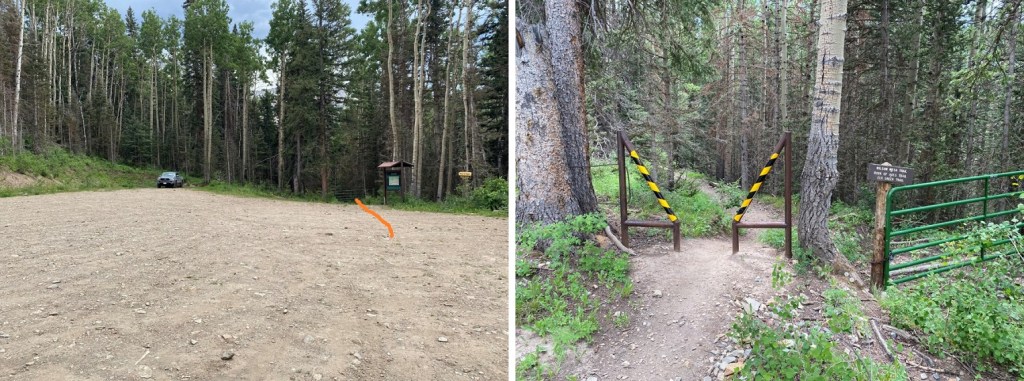
Ok. So, I woke up and was on the trail at 4:15am. The route starts at the south end of the parking area, and follows a well-defined trail south.
I quickly came to a gate, and walked around it.
Next, I saw this sign to my right, and continued on the trail
I followed the trail to treeline.
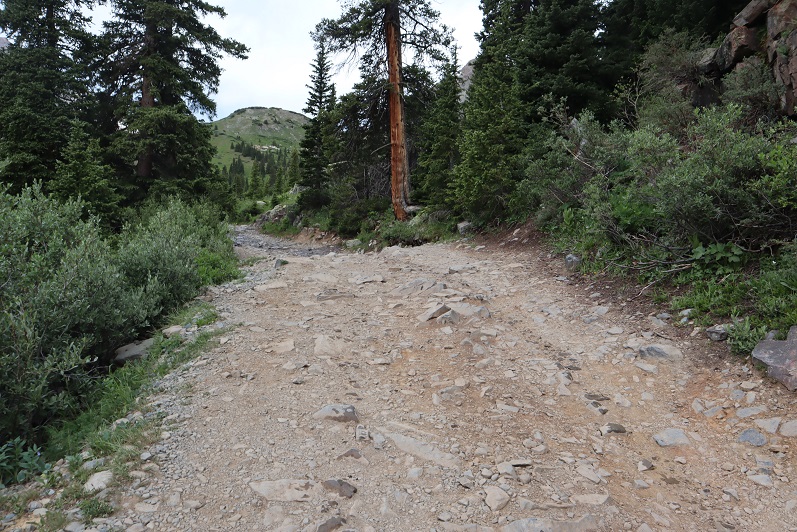
Shortly after making it to treeline I came to the Elk Creek Trail junction. From here there are several options, but your main goal is to make it into the basin. You can follow Elk Creek Trail and lose some elevation, then follow a faint road into the basin. Or, you could continue along the Rock of Ages trail and eventually hook up with the 4WD road that enters the basin from above (a bit chossy, but I chose to take it on the way out). On my way in it was dark, I couldn’t see any of these ‘routes’, and I chose to just head straight into the basin.
If you take the mining road, here’s what the entrance looks like from the Rock of Ages trail. It’s about half a mile past the Elk Creek Trail junction, on your right.
If you take the upper road, this is what the junction from the trail to the road looks like
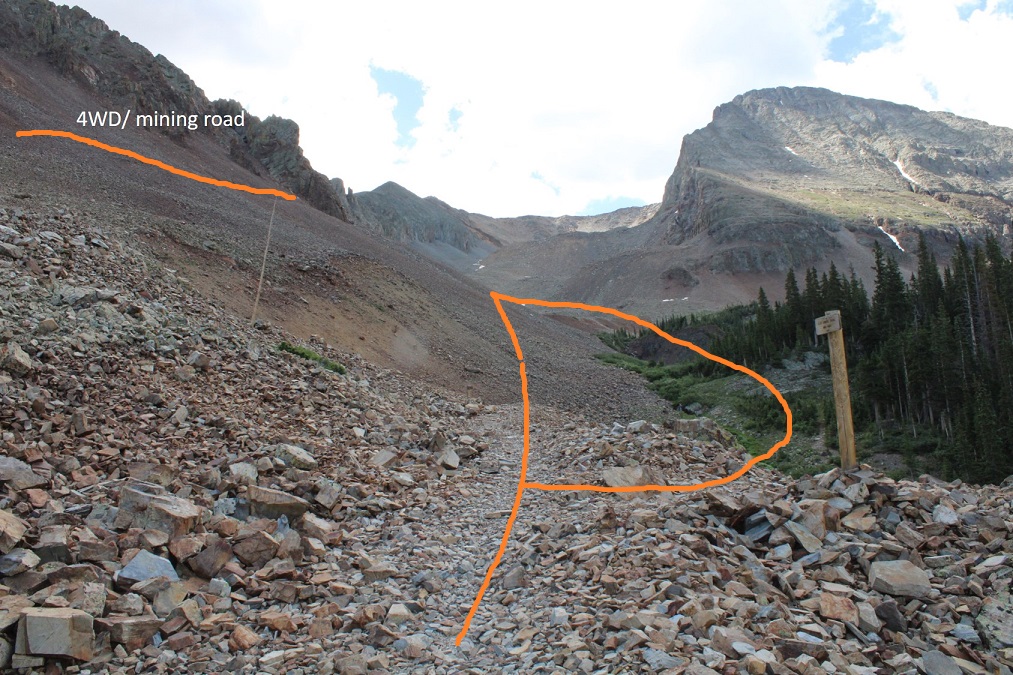
In any event, I made my way into the basin. Here are the routes. To the left you can see the mining road, and to the right you can see the abandoned dirt road. They both lead to the same place. (On my way in I didn’t see either of these roads and just headed south through the basin).
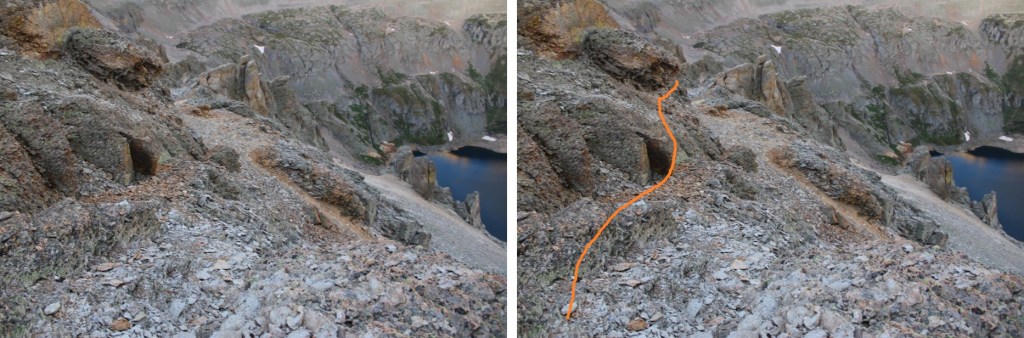
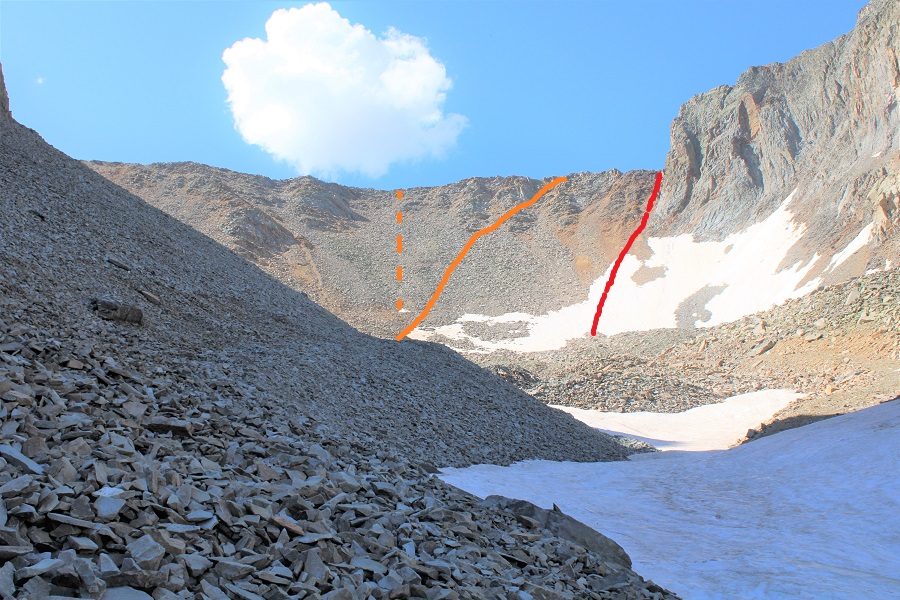
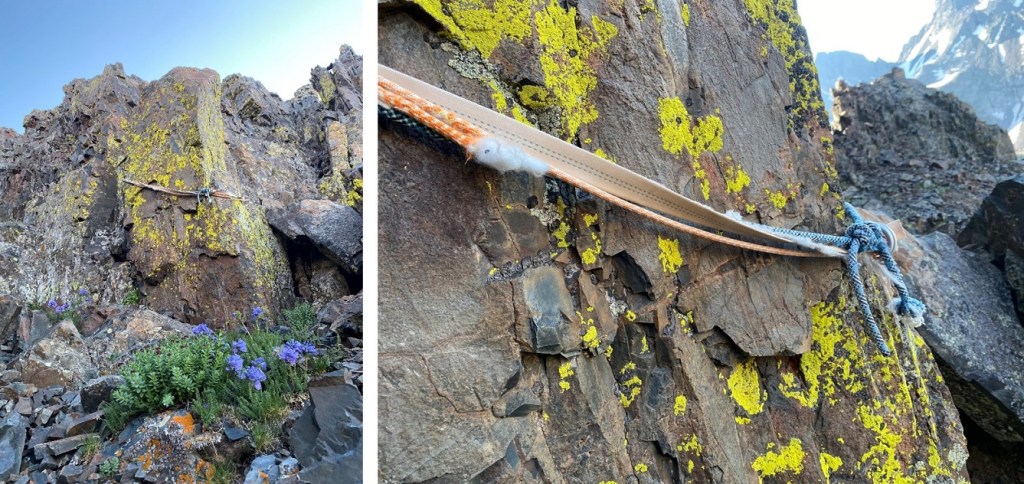
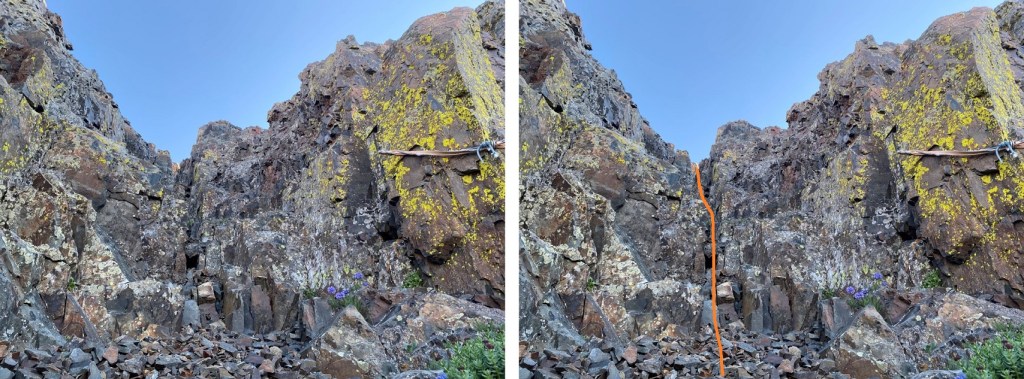
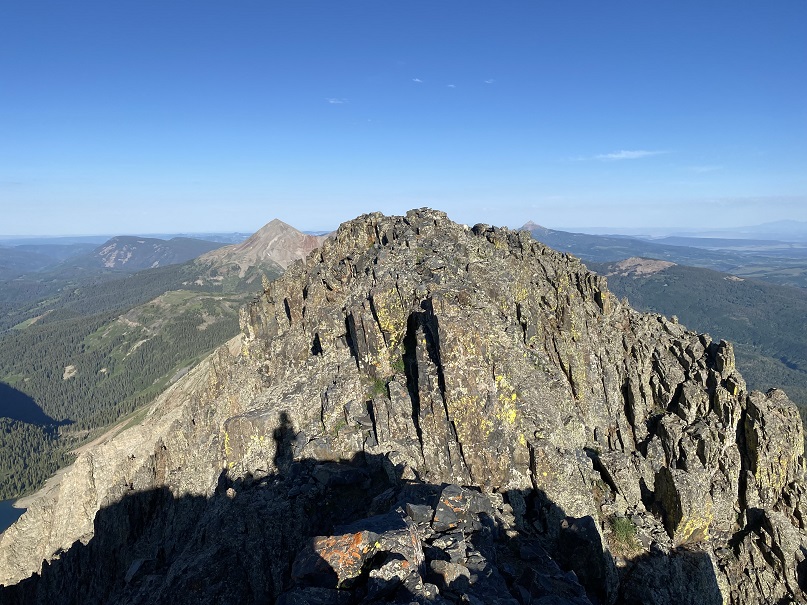
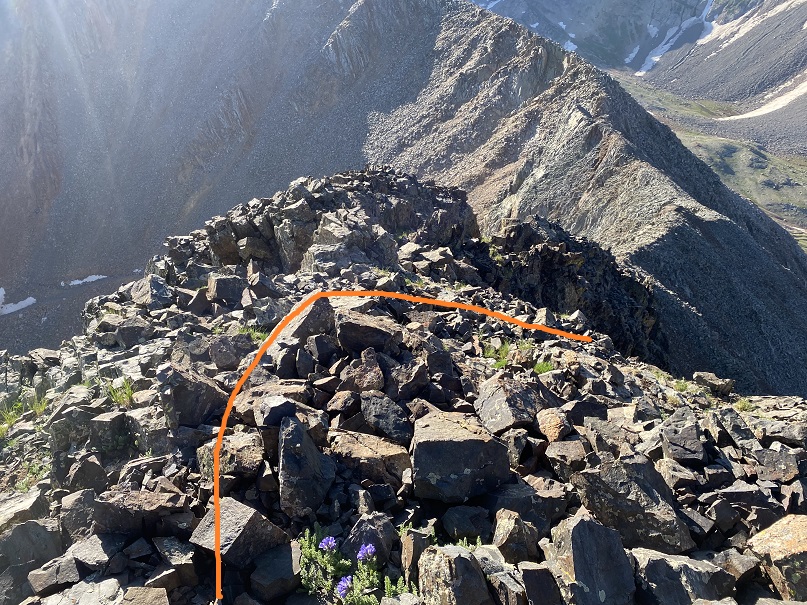
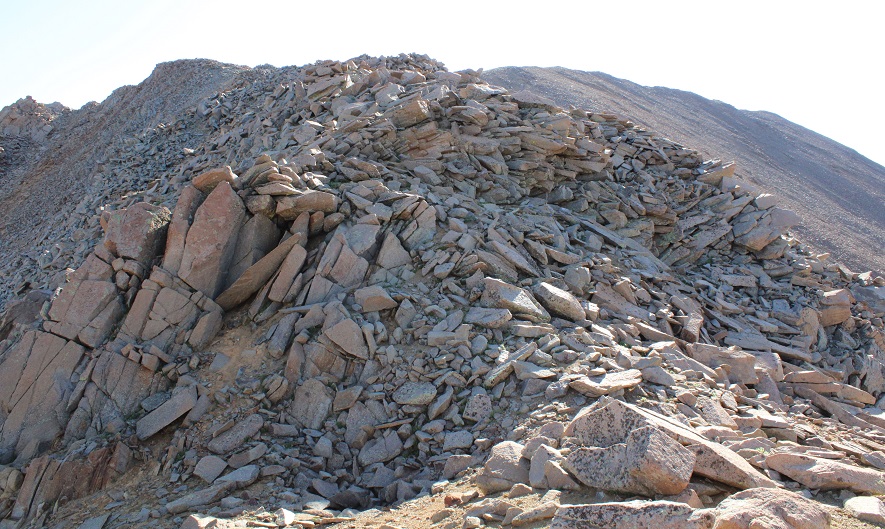
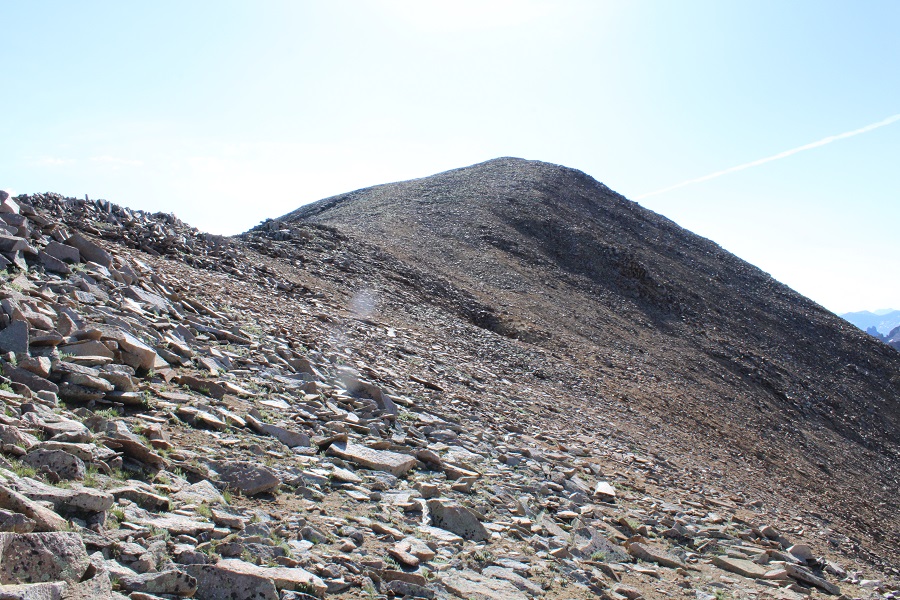
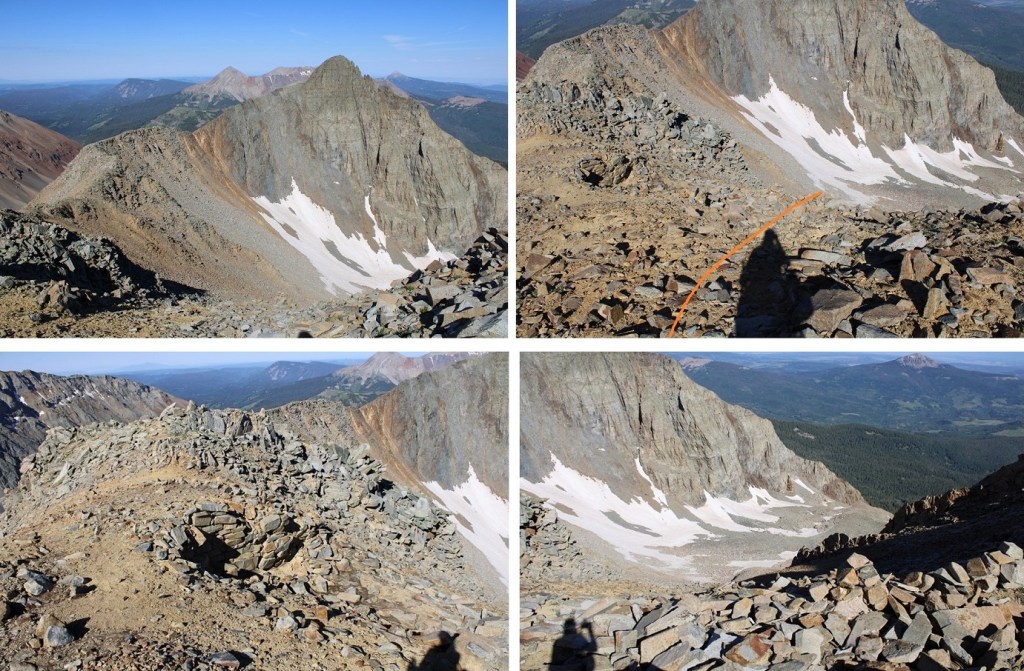
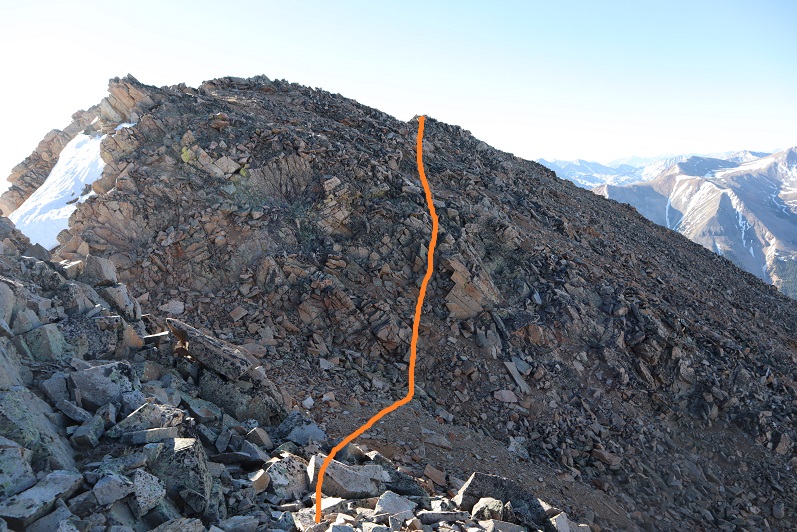
Once in the upper basin you want to gain the ridge. This sounds easier than it turned out to be. It’s “choose your own adventure”, and on the way up I chose wrong. I ended up getting into some class 4 scrambling, which was unnecessary. It’s my advice to do PT 13540 first, and gain the ridge to the left (southeast). However, all areas here ‘go’, if you’re willing to do some scrambling. When I made it to the ridge I found thick wire cording going where the red line is (I’m guessing that could be used as leverage if needed: it wasn’t moving anywhere). I ascended via the orange line. The dotted orange line is probably a better route. The best route is my descent route (pictured later).
I’ll spare you the scree-y and large-loose-rocky gully details of ascending the ridge. Once on the ridge I turned right and followed the ridge southwest towards Fowler. The ridge was all class 2
If you haven’t already, now is a good time to put on your helmet. Here’s a picture of that cable I was telling you about. It goes up and over both sides of the saddle.
Here’s an overall view of the rest of the route to summit Fowler.
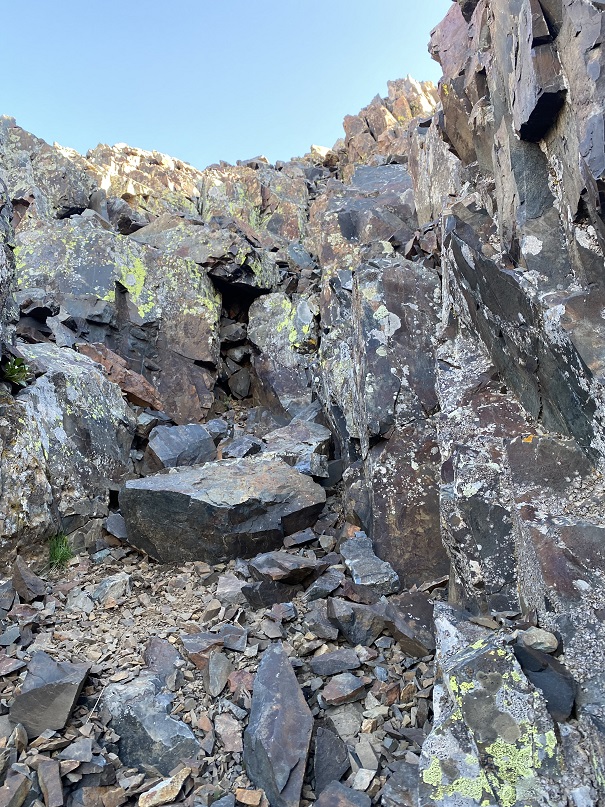
And step by step: It started out chossy as I ascended the ridge
I made my way to the gully to the left/middle. This area had more solid rock, but it was littered with scree/rubble. At the base of the gully I took off my pack and decided to go up with just my cell phone (and a summit register in my pocket, just in case).
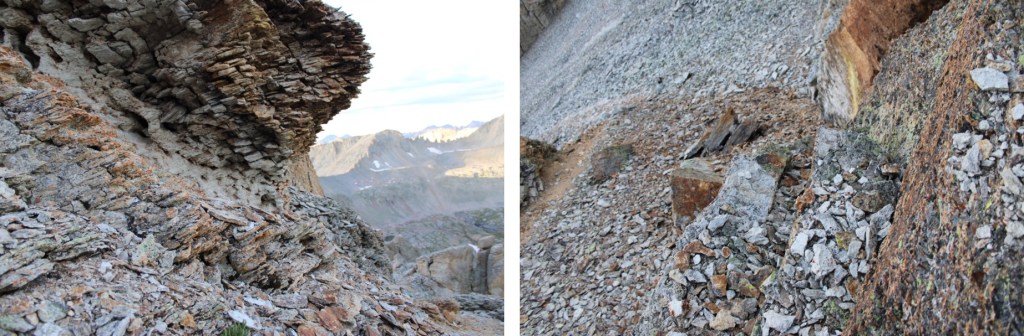
This is the class 4 part of the climb, and lasted for about 120 feet of vertical gain. I started by going straight up the gully. Here’s my route:
Step 1: ascend the chimney. I went to the right of the chimney, and found adequate hand/foot holds.
Step 2: Once above the chimney I stayed to the center of the gully. This is also where I saw an anchor set up (circled in red).
If you decide to rappel here, bring a new anchor, as this one looks like it’s been here for a while, and what’s been added to it doesn’t look recent either.
Step 3: From the anchor I continued straight up the gully (still class 4)
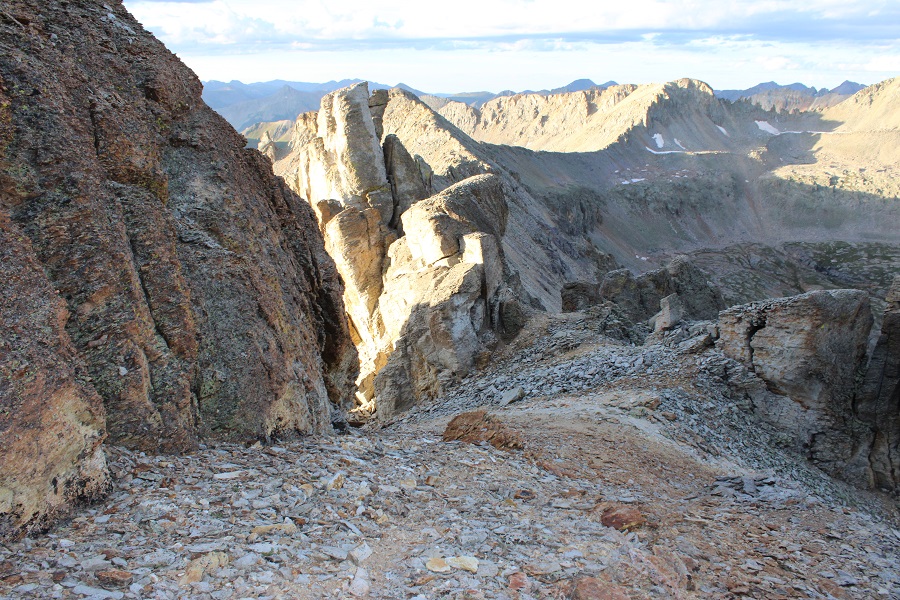
Step 4: Here’s a view of the last bit of the gully, before topping out. This felt class 3
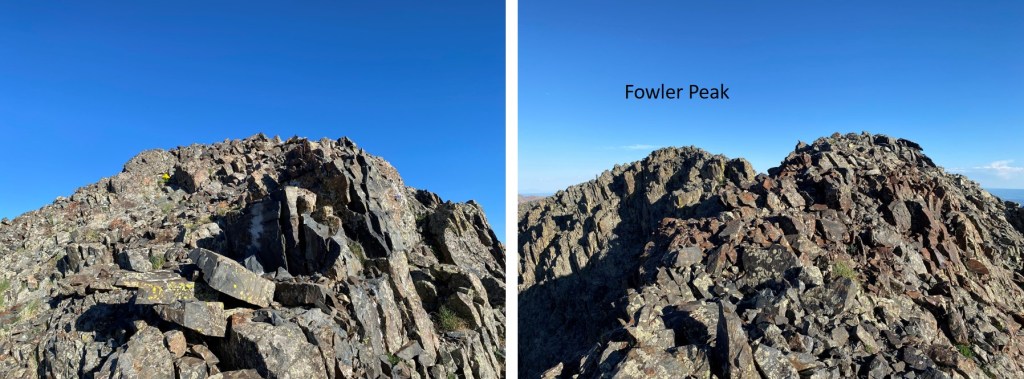
At the top of the gully I turned left and headed towards the summit. It was a bit of a false summit, but all class 2/easy 3
I summited Fowler Peak at 7:45am
Fowler Peak:
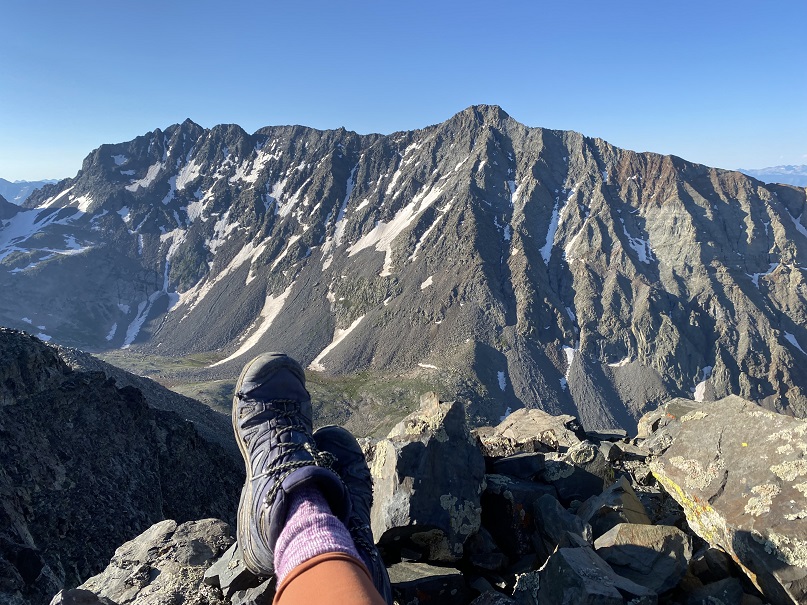
I sat and enjoyed my views of the Wilson/El Diente Traverse for a few minutes before heading back.
There was a summit register, but it was one of those tube ones. It hadn’t been closed properly and all the papers inside were wet, so I left it and also added a new register with dry paper to write on. And a new pencil. Here are some pictures of the trek back to the saddle
Back down the gully
To my stashed gear and back to the ridge.
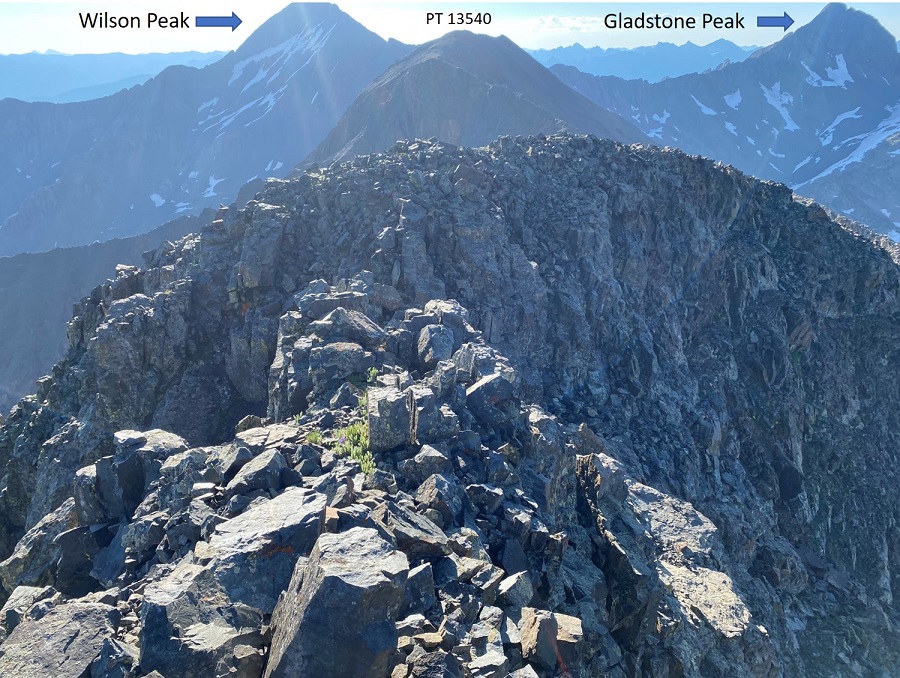
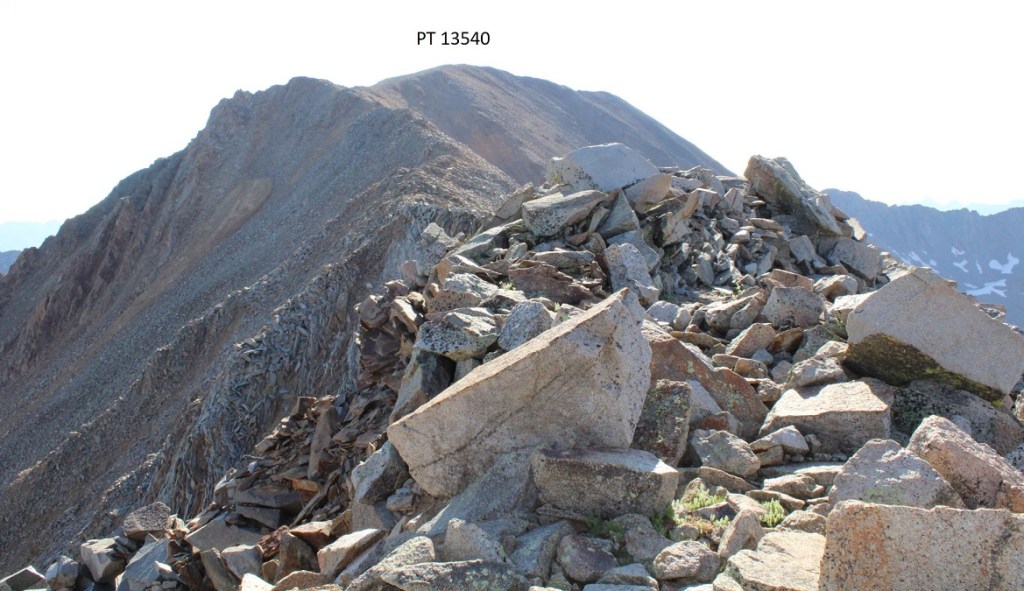
I followed the ridge over to PT 13540. This was a simple ridge hike, if a bit loose. Lots of rocks here. I stuck mostly to the ridge the entire time, only dipping to the right a few times when necessary.
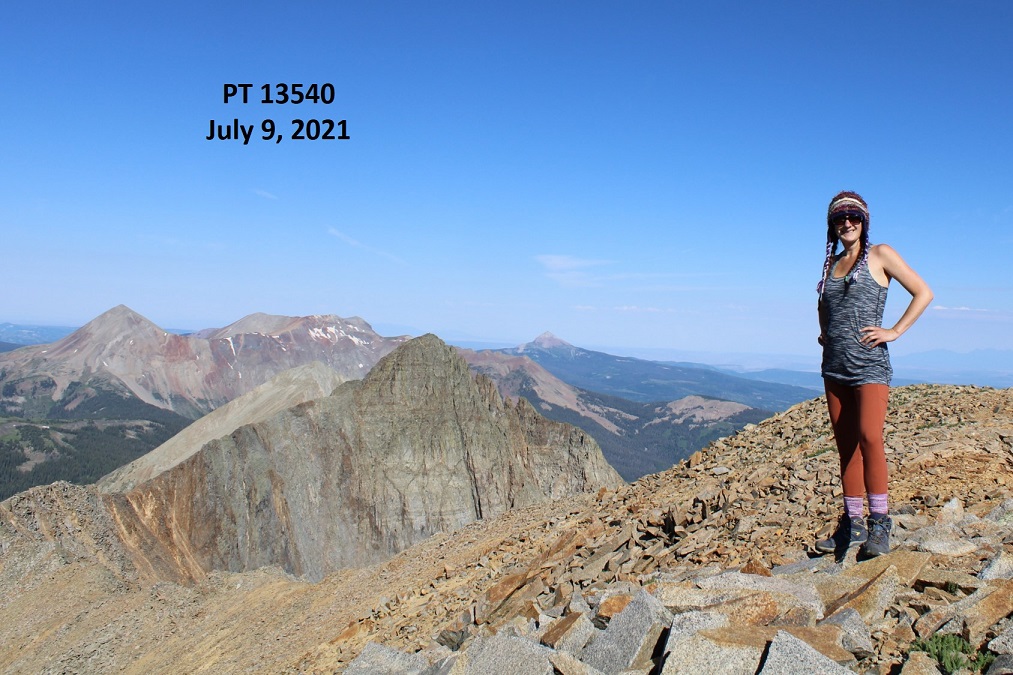
I summited PT 13540 at 9am
PT 13540:
I worked my way back towards the Fowler/PT 13540 saddle
Once at the saddle there was what looked to be a boarded-up mine. In fact, it looked like everything here had been blown up at some point, except this area, which was strategically filled with large rocks (but may have been blown up too). I passed it and headed northeast back to the old mining road
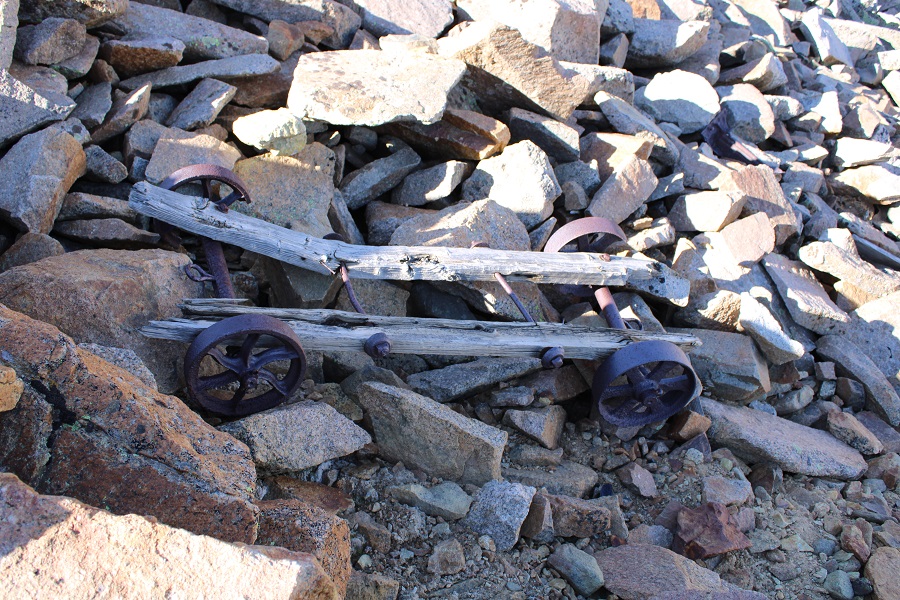
This area was steep, and I did some scree surfing, but it was much easier to navigate when compared to the route I took to ascend the ridge. I saw tons of mining trash here: lots of old cans and pieces of mining equipment, most of which were in small pieces, all made out of cast iron. This was the most intact item I came across
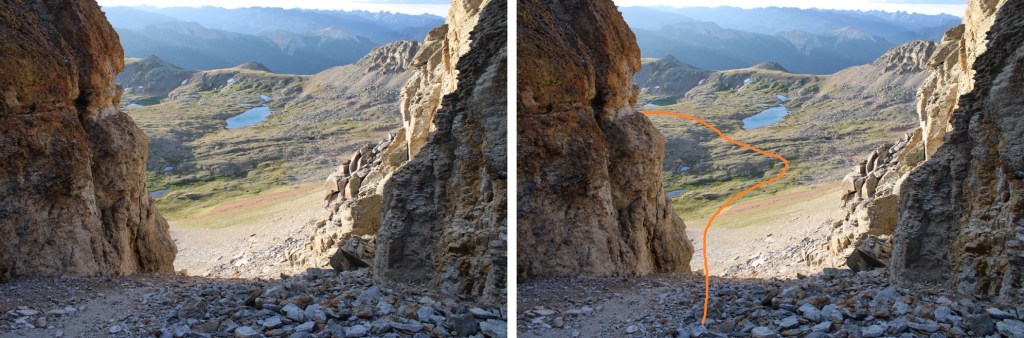
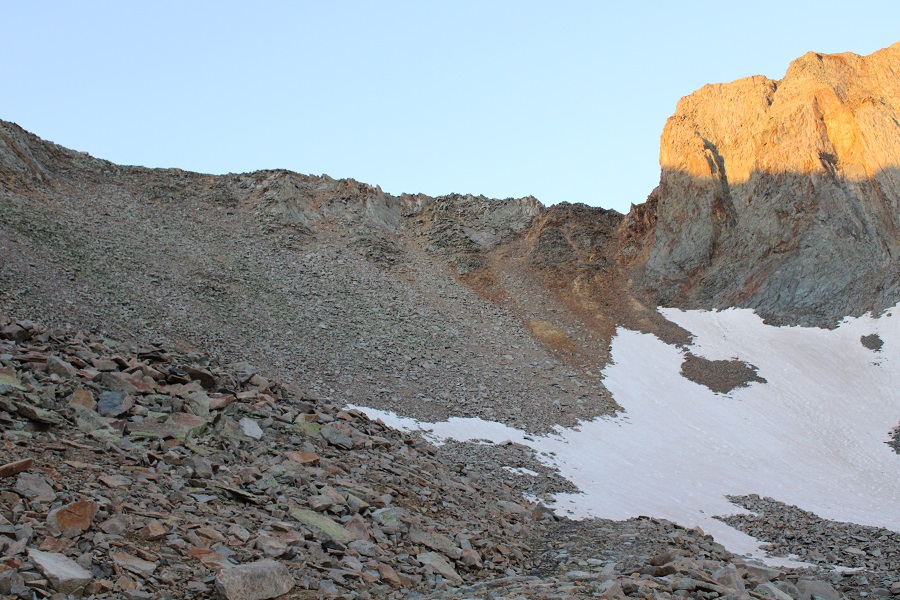
Here’s the route I took down from the ridge (I’d recommend ascending this way as well)
Once back on the road you once again have options to exit the basin. You can stay high, to the right/east, and follow the old mining road, or you can stay low and left/west, and follow an old dirt road.
Here’s a better look at both roads. Both take you out of the basin, and back to Elk Creek Trail / Rock of Ages trail (If you take the mining road all the way to the Rock of Ages trail, turn left and follow it to the Elk Creek Trail junction, and then continue following the Rock of Ages trail).
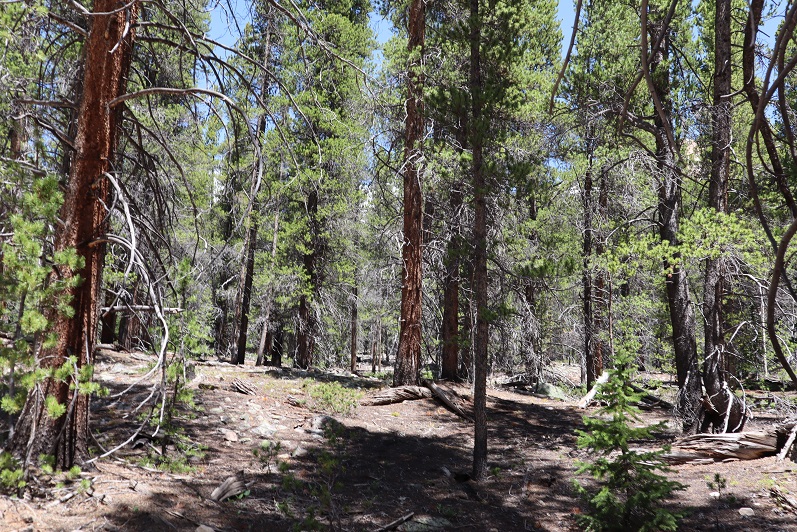
Once back on the trail I followed it through the trees northwest, back to the trailhead.
I made it back to my truck at 11:15am, making this a 10.53 mile hike with 3985’ of elevation gain in 7 hours.
It was still early, and quite warm, and the mosquitoes hadn’t magically disappeared overnight. I had a friend meeting me here at 6pm to hike Wilson Peak tomorrow, so I’d planned on staying at the trailhead until he got there, then heading to bed. I’d brought a lot of things to do, but they all required sitting down, and once I did that the mosquitoes swarmed me. It was like one would find me and sing its song to its friends and there’d be dozens to shoo away.
If I was outside I needed to have a jacket on, but it was hot! I tried sitting in my truck with the air conditioning on, but that wasn’t going to work for 7 hours straight. It was kind of funny watching the mosquitoes (and flies!!!) swarm my truck: they seemed to know I was in there with the air conditioning on.
So, I entertained myself for the next 7 hours by reading. I got out my current book (On the Road by Jack Kerouac) and read while steadily walking around the trailhead in circles. Continuously moving seemed to keep the mosquitoes at bay. Luckily, the trailhead has a large parking area and I was the only one there. Every few hours I’d take a break in my truck, and then get out and read again. I would have started a campfire to shoo the bugs away, but they’re currently banned. I can’t wait to get the topper on my truck! It would have solved the mosquito/heat problem.
I’m kind of liking this ‘work from home’ thing that’s been going on for the past few months. Today I had a zoom meeting I attended at a Starbucks and then I was off to the Yankee Boy Basin (which I considered an appropriate place to spend the 4th of July weekend). The road to Yankee Boy Basin is easier than I remember. It’s only 4WD for the last mile or so. There’s a little bit of exposure but the road is plenty wide enough to pretend it’s not there.
I arrived at the trailhead and backed into a spot near the bathrooms (P.S. bring your own TP).
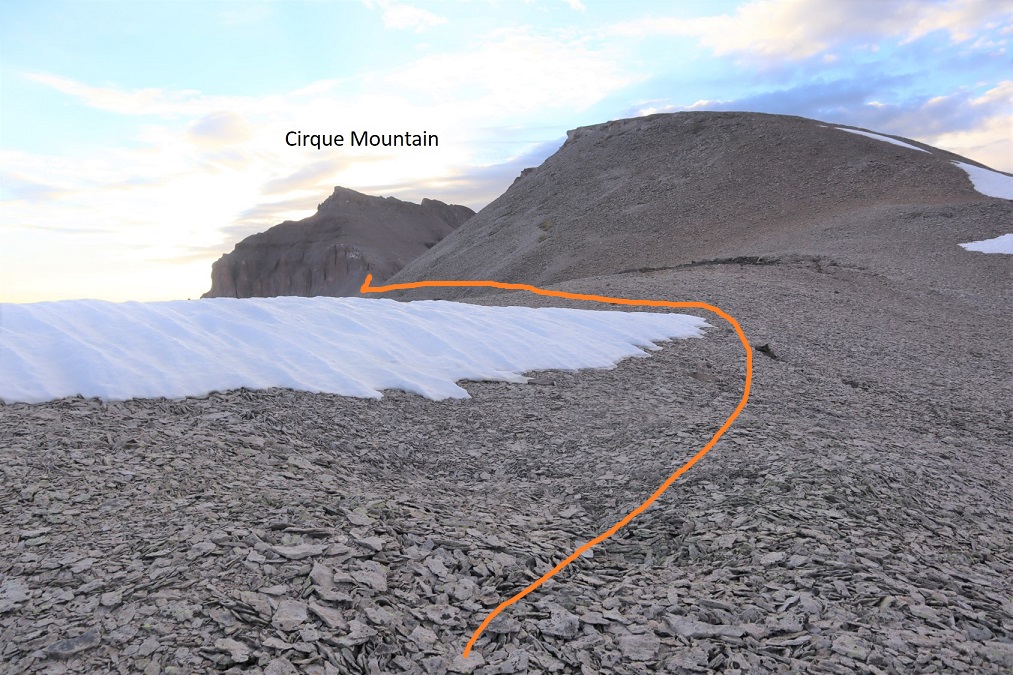
I got out and took a look around at the route I intended to take while it was still daylight. I was pretty sure I wanted to hit Cirque Mountain first, and then cross over to Gilpin Peak. Everything is different in the dark and a good visual in the daylight is helpful.
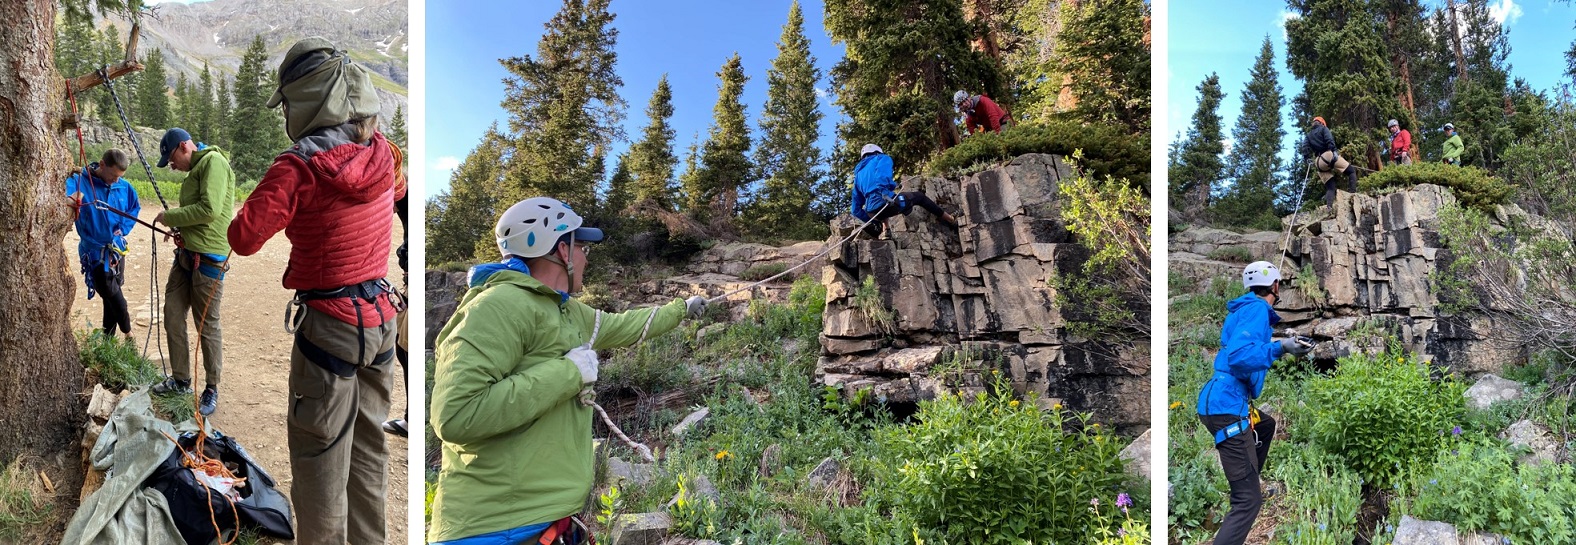
While I was looking around I heard a couple talking about Mt Sneffles. I went over to ask if they’d seen any snow on Cirque Mountain/Gilpin Peak while hiking. They were staying the night at the trailhead too, climbing Teakettle in the morning. We struck up a conversation and ended up exchanging beers and candy and 14er stories and caps full of whiskey. About an hour later two more of their friends showed up and we huddled around my truck as it rained a bit. When the rain stopped, they went over their gear and practiced some rappelling. They allowed me to tag along. I ended up calling it a night really early (I get up at 3am to work and get tired early in the evening). I’m sure I forgot to say it, so I’ll say it now: It was really nice getting to meet you all! Also, I will never be able to hear the word ‘traverse’ again and not say it twice @climbingcue, @dwoodward13, @hikesingeologictime, & @tallgrass!
I woke up at 3:30am, hit snooze once because I was really warm in the bed of my truck. I was ready to go a little before 4am. Tallgrass came to say goodbye and good luck. I was still groggy (I don’t wake up until about an hour into a hike). Thanks for the beer Tallgrass! I started by following the 4WD road northwest.
After hiking for almost half a mile I turned right and followed the small ridge up to the saddle of Kismet and Cirque.
The trail eventually narrowed and I went up a low flowing waterfall type gully
And then followed the scree filled gully to the saddle. All snow was avoidable.
At the saddle I turned right (east) and followed the ridge. Note, the point on the right isn’t a ranked peak. It’s easily bypassed by a trail to the left. I climbed it on my way back just to get in some added elevation and for the views.
I picked up my pace here because it looked like I could make it to the summit for the sunrise. Wow, that part of the hike hadn’t taken as long as I’d anticipated.
There was some choss and a chimney to climb. I put on my helmet and worked my way up.
There was some route finding for the last little bit as well as some easy scrambling
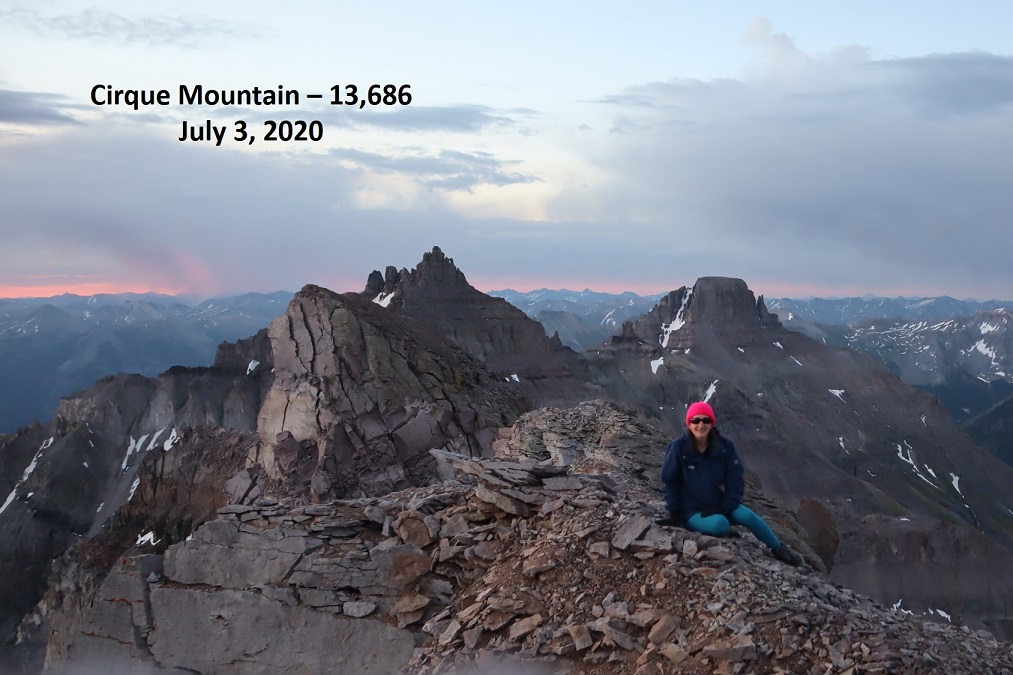
I summited Cirque Mountain at 5:45am
Cirque Mountain:
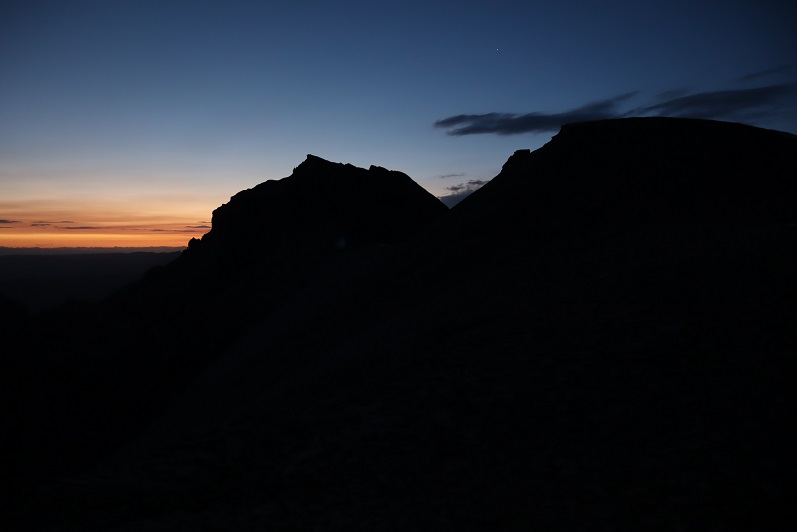
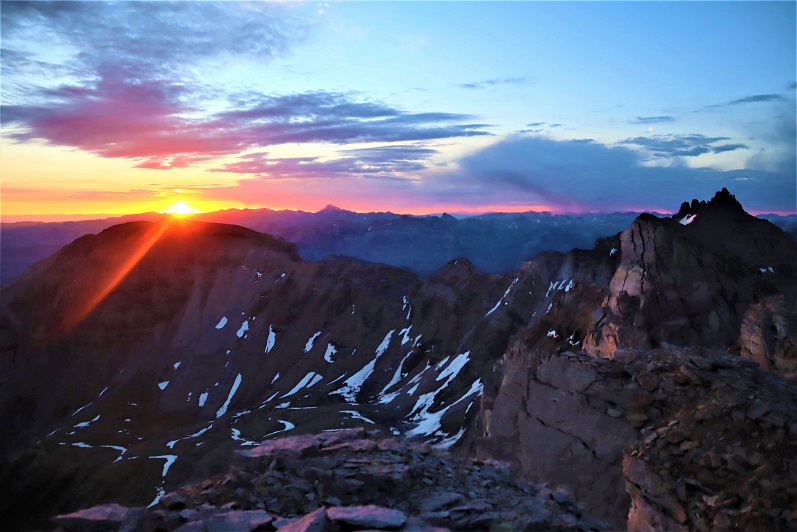
I made it a few minutes before sunrise and decided to stay to enjoy the show. It didn’t disappoint.
I also had some great views of Teakettle and Potosi to the southeast
I headed back the way I’d come, and decided to summit the small point and then head back down the gully
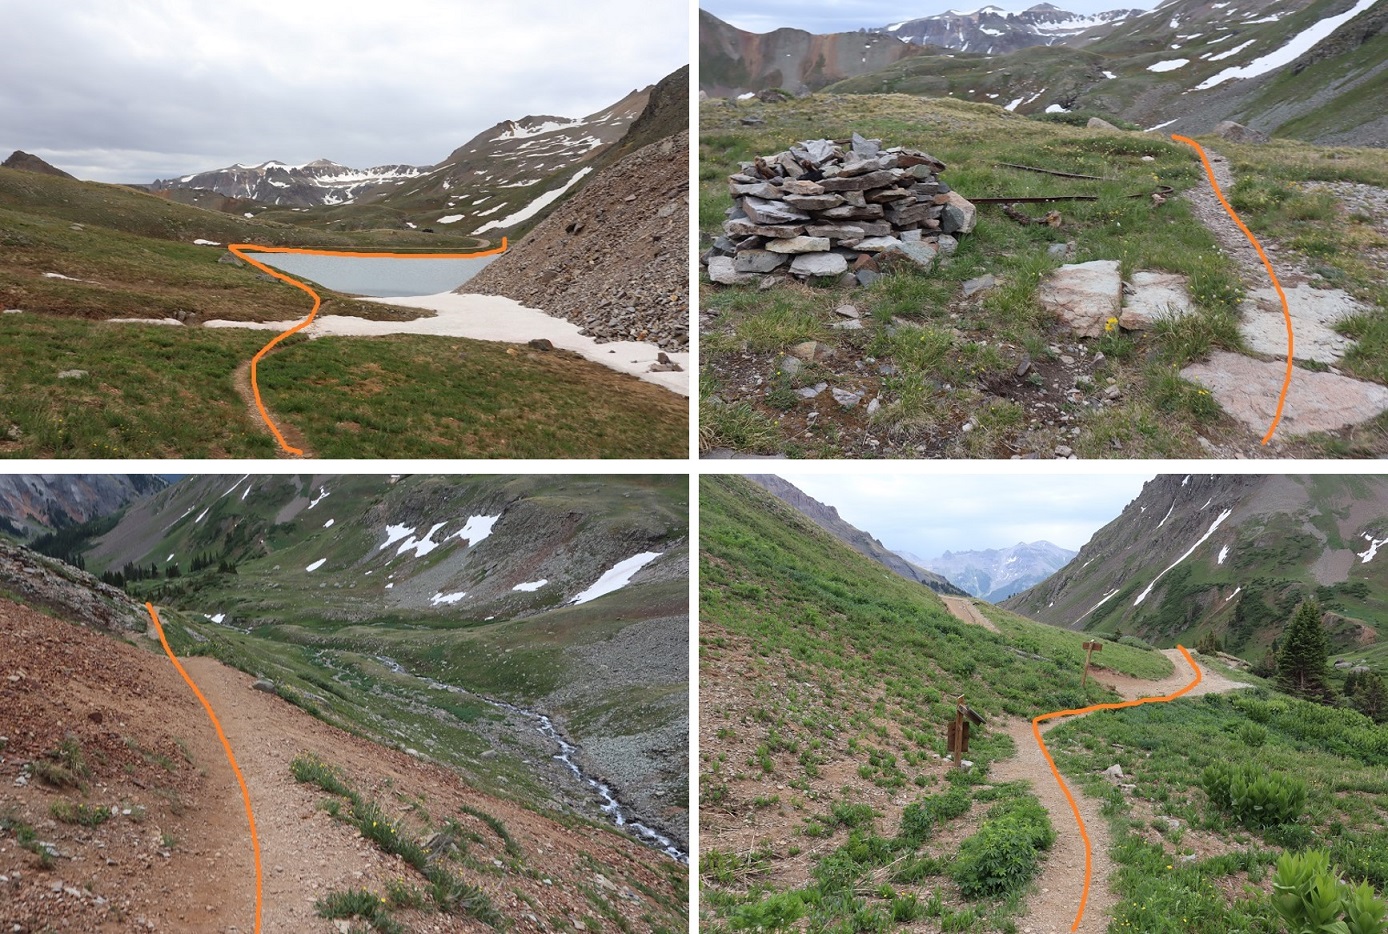
I didn’t go all the way down the gully. Instead when I hit tundra I turned right and headed west until I reached a small pond.
At the pond I hooked up with the Wrights Lake Spur trail and followed it until the first switchback.
Right about now it started to rain. I looked back on Teakettle and thought about my new friends hiking up there. I hoped they were staying dry.
The trail was an easy to follow, class 1 trail. At the first switchback I left the trail to continue heading west towards the saddle. There was a little bit of snow to contend with here so I put on my microspikes and walked across.
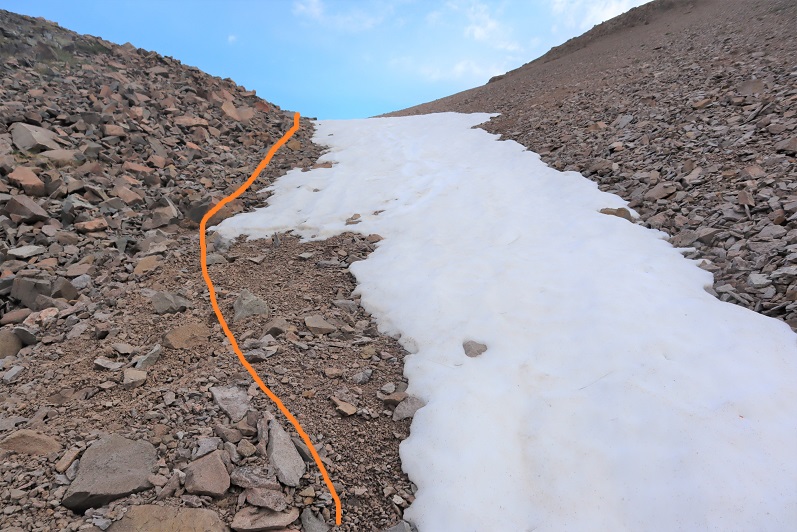
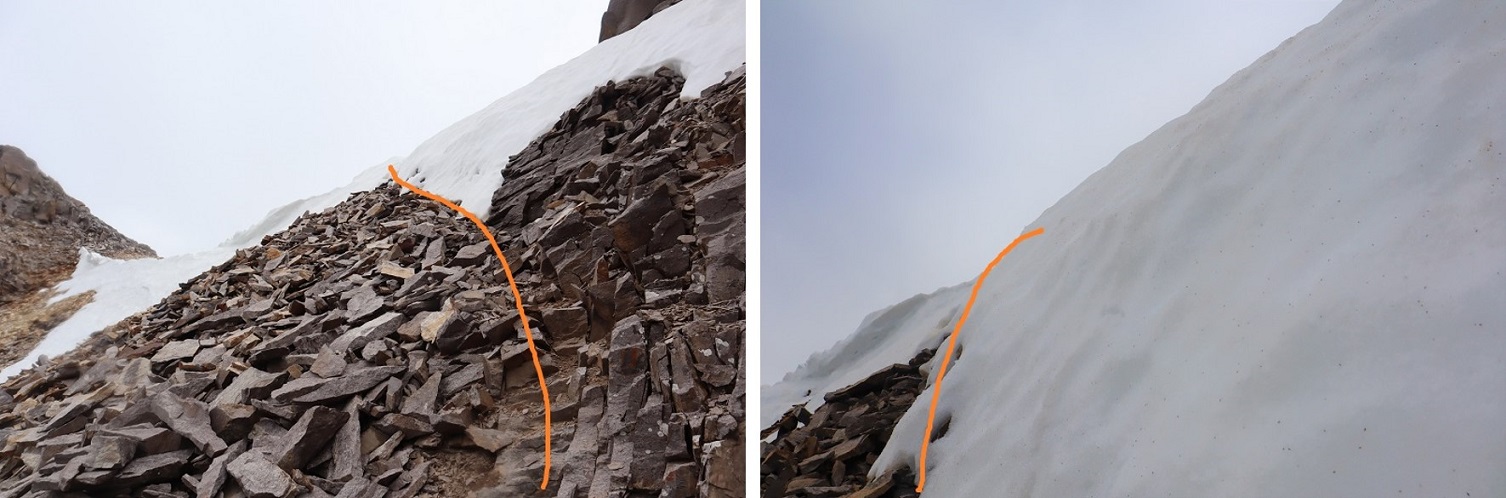
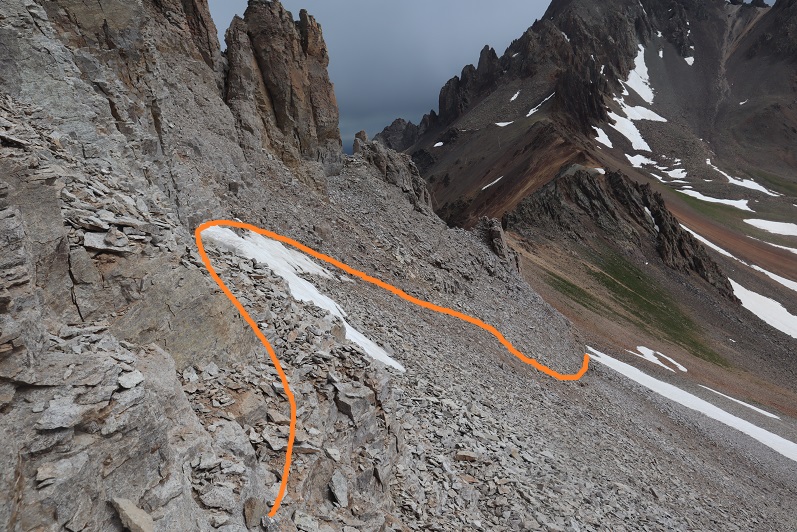
At this point I could see there was a gully I’d have to ascend that was still holding a little bit of snow at the top
Once on the saddle I followed it south. On the ascent I made the wrong choice and tried to ascend directly up the gully. This got me onto very loose, chossy terrain and took me longer than necessary to figure out. The rocks were the size of toasters and none of them were stable. Large sections would move below me at a time, taking me with them. On my way down I found a better route, so I’ll describe that route here.
From the ridge, dip down to the left to go around this first obstacle
Next, hug the area where the snow meets the rock. I’m pretty sure there’s an actual trail here under the snow
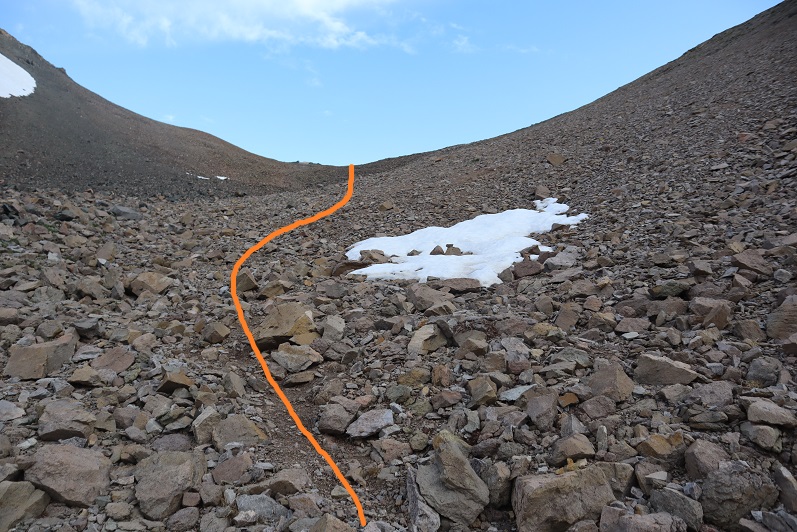
From here I’d wanted to ascend directly up the gully. DON’T DO THAT. Instead, try to make it as close to the ridge as you can
At the small saddle there was snow to contend with (a lot more snow than the pictures suggest). Glad to have brought my ice axe and crampons (something I do on every hike I don’t have beta on) and got to work kicking in steps and climbing over the snow. There was probably 30 feet worth of work to do over the snow at its narrowest point.
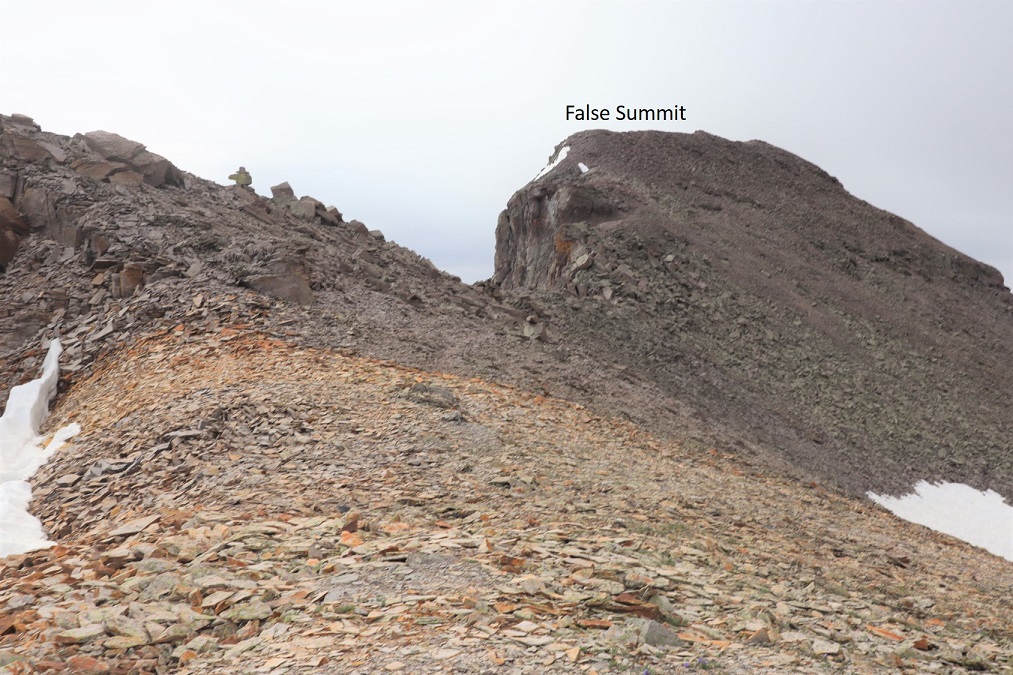
At the saddle I sat down to take off my crampons. From here it was a short trek to the summit, after first going over a false summit. This was all class 2, but I kept my helmet on.
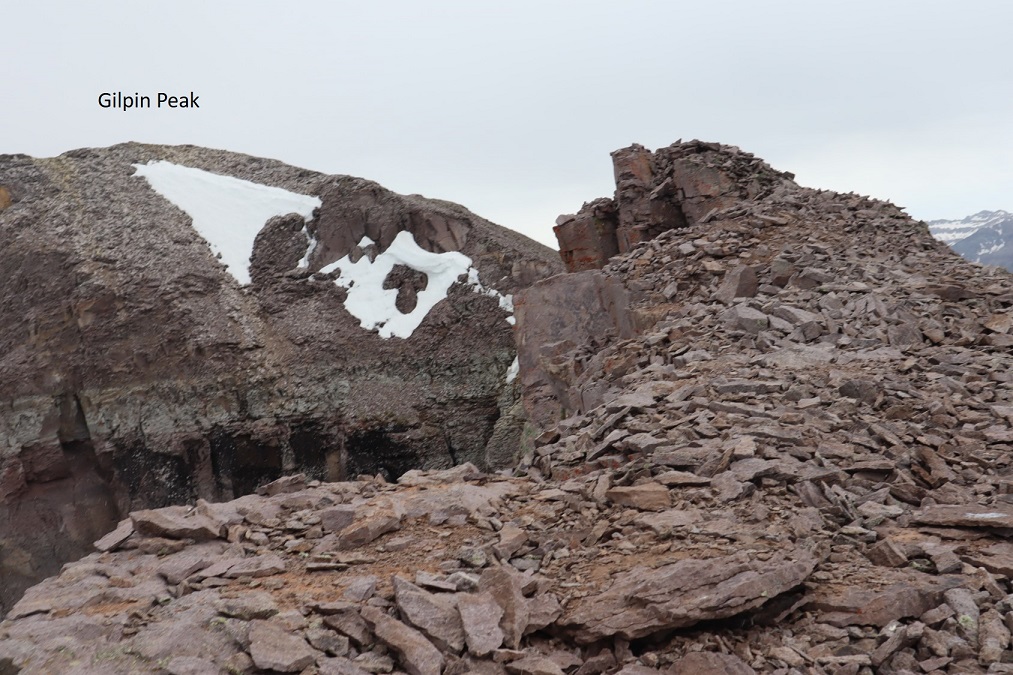
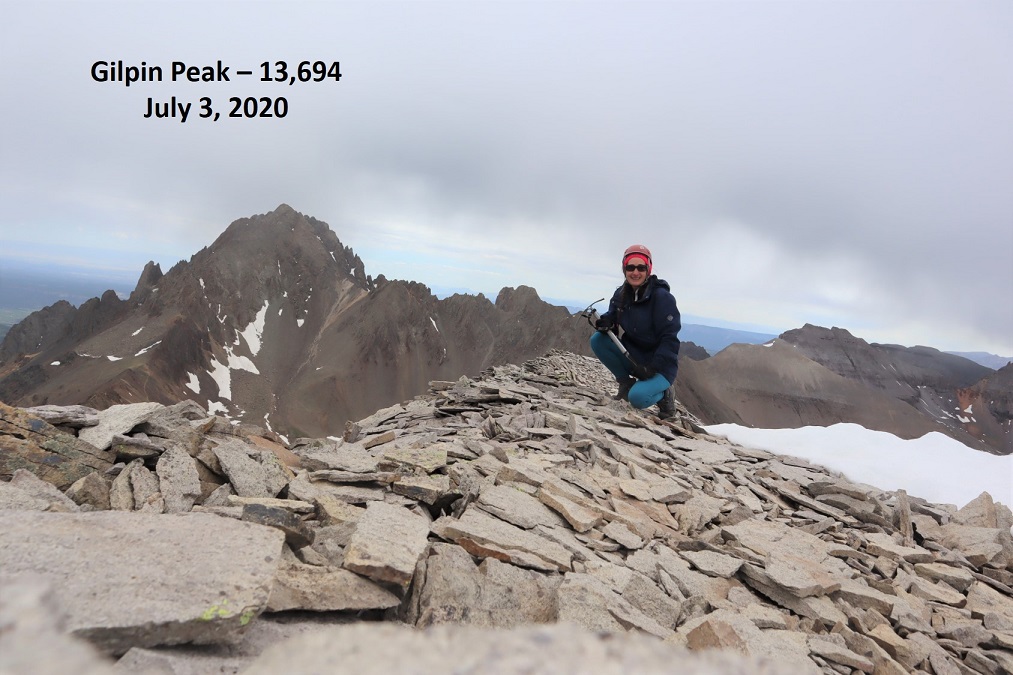
I made it to the summit of Gilpin Peak at 9:30am. It was lightly snowing.
Gilpin Peak:
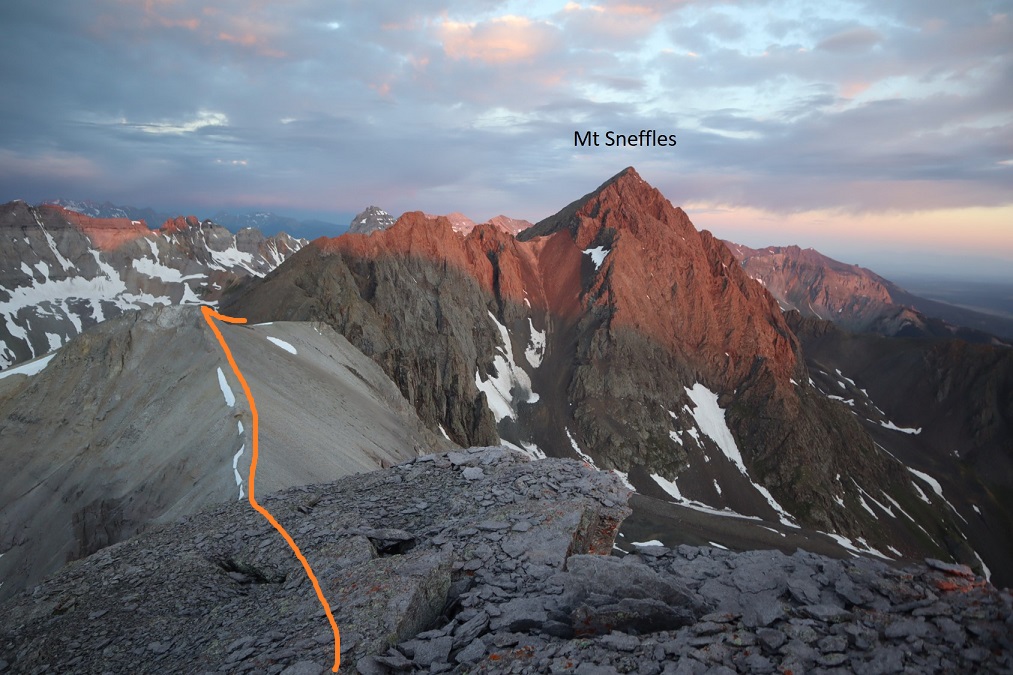
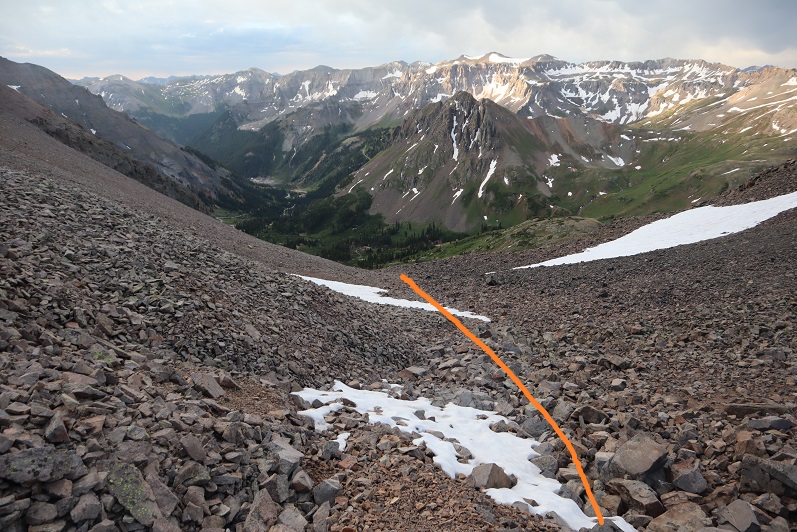
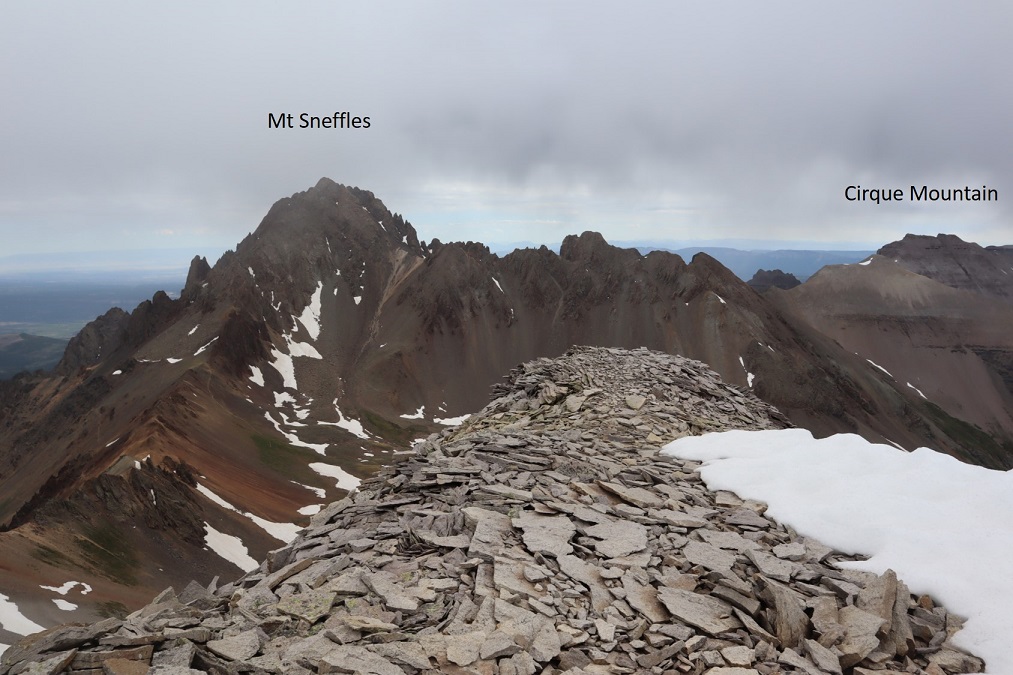
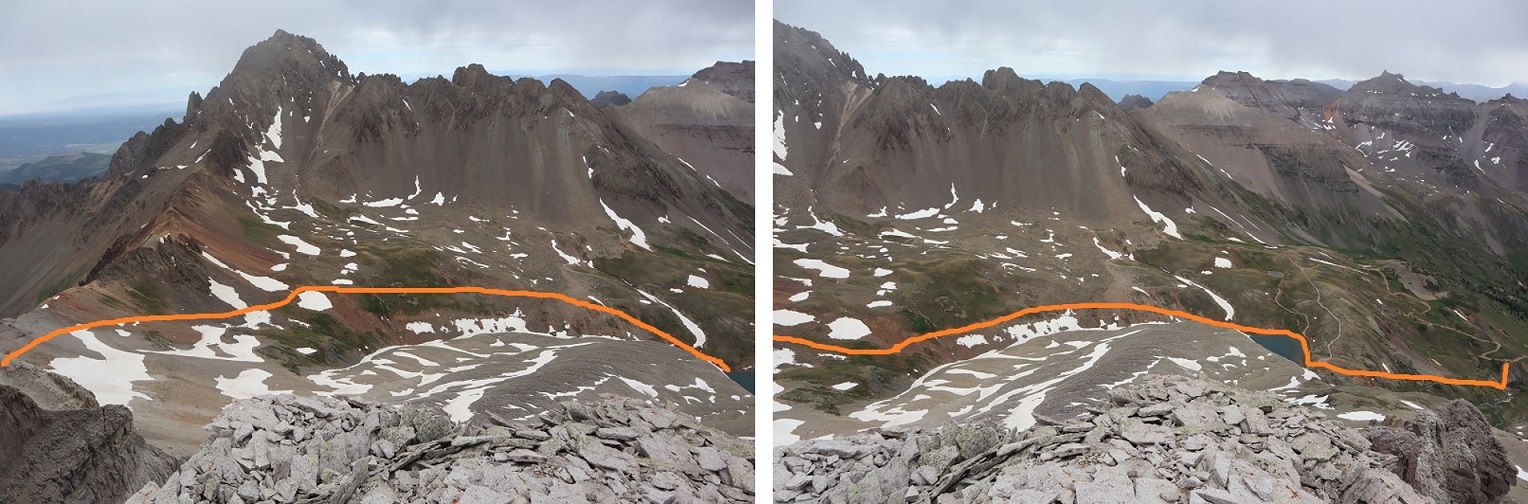
Here’s a look at the route I took out the basin from the summit
I turned and headed back over the false summit and headed back to the saddle
Because I’d already kicked in steps I made the decision to put on microspikes instead of crampons to go down the snow. This was a bad idea, but I didn’t realize it until I was already too committed. I made it down the snow safely, but I was shaking as I did so: crampons provide much more stability than microspikes (duh) and I wasn’t very stable on the downclimb. I relied a lot on my ice axe.
Here’s looking at the ridge back down
I re-crossed the snow below, this time without traction: I boot-slid my way across much of the snow.
I made it back to the trail and there was a family standing there, waiting for me. There was a mom and dad and grandparents with 6 kids who all had to be under 10 years old. They’d been watching my descent, and the father asked if I would show the kids my gear (crampons, helmet, ice axe). The kids were fascinated with the equipment, and proudly told me they were hiking to the lakes. I wished them luck and was on my way.
After making it to the pond I followed the class 1 trail above Sneffles Creek until I made it to a road, and followed the road back down to my truck.
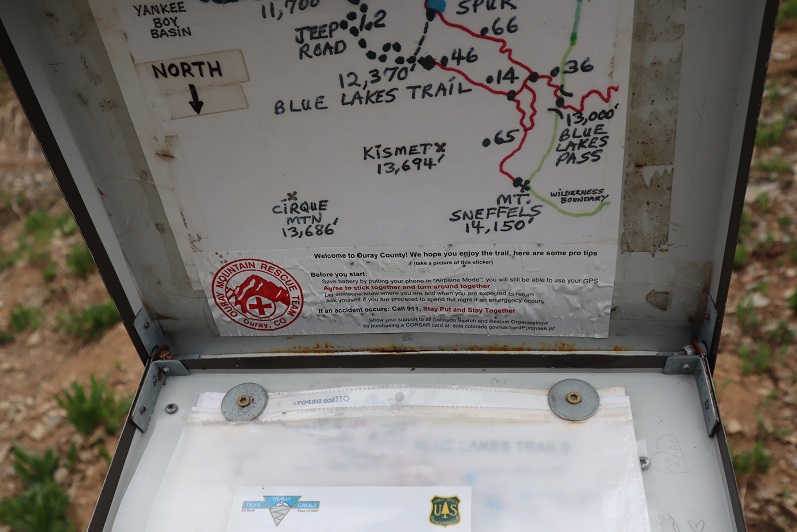
Just before making it to the road I passed what I thought was a trail register. I opened it and found one of the most confusing maps ever! Not only did it not correspond with the visual direction of the peaks, north was at the bottom. This map is going to get a lot of people lost.
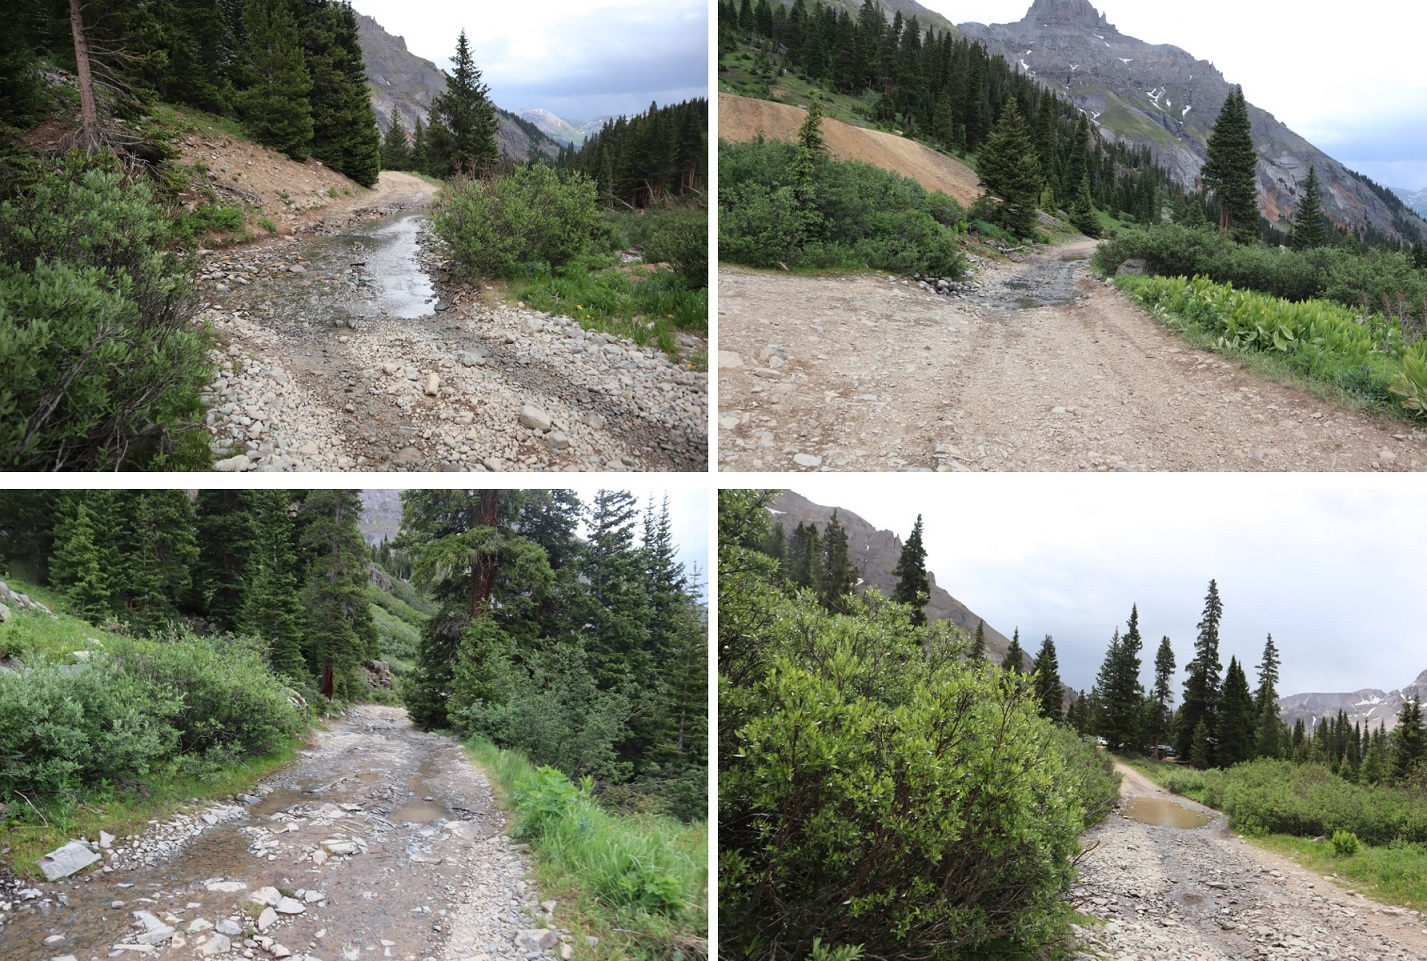
I passed a jeep that had gotten stuck. Everyone pitched in to get her un-stuck.
It was easy to follow the 4WD road back to where I’d parked my truck
I made it back to my truck at 11:15am, making this an 11.1 mile hike with 4382’ of elevation gain in 6 hours, 15 minutes.
I still had plenty of time left in the day, so I decided to drive to the next trailhead and attempt another mountain.
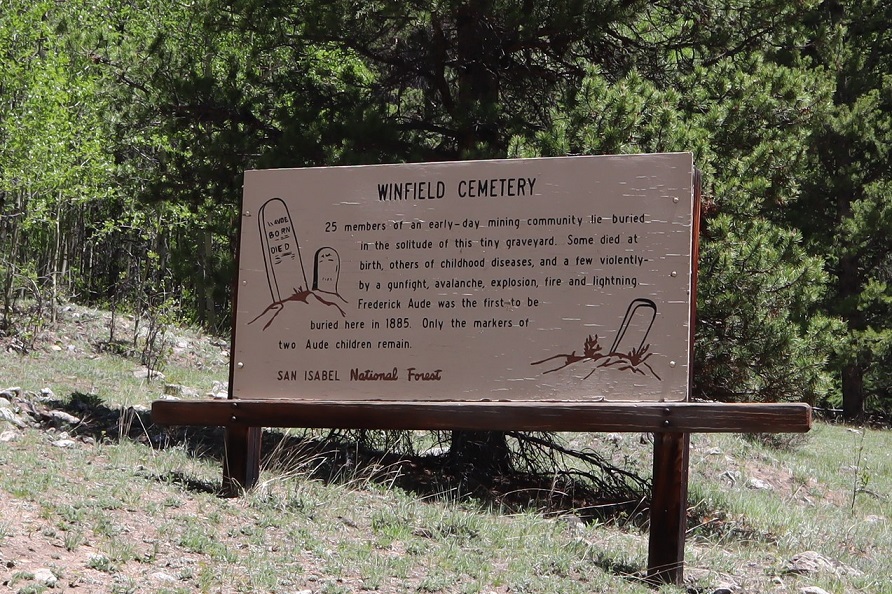
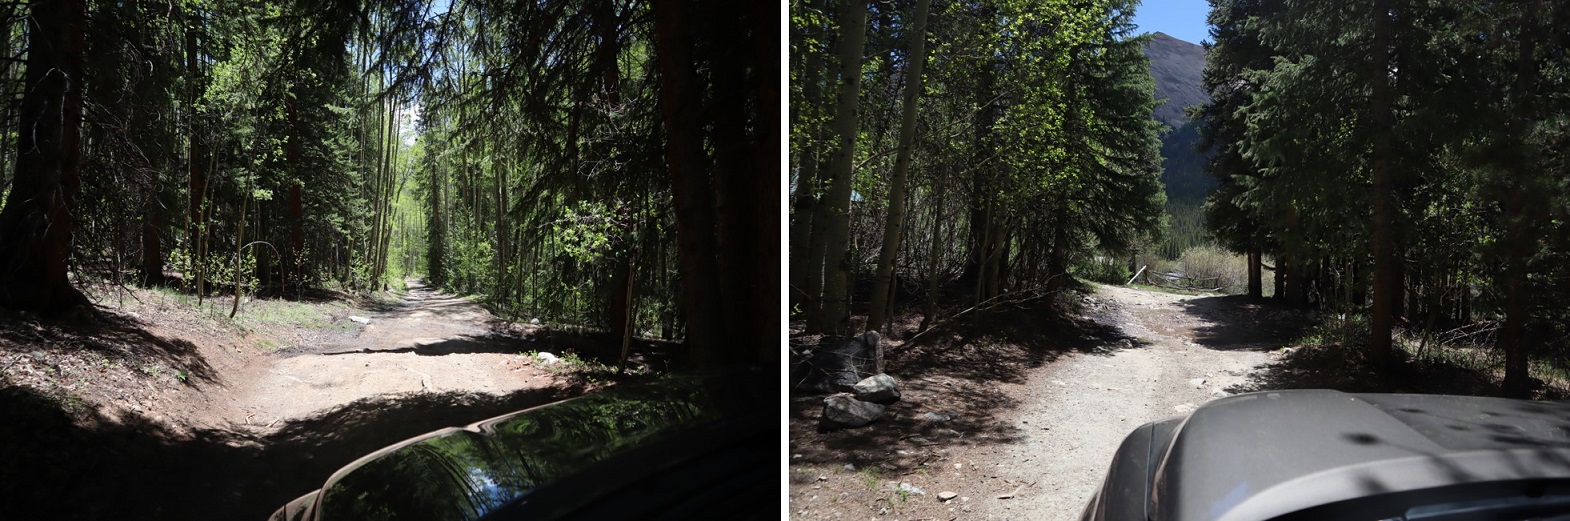
There’s currently a curfew in place in Colorado Springs, so the beginning of the drive felt a bit ominous: I didn’t see any other vehicles on the road until I made it to the freeway, and even then there were very few vehicles compared to normal, even for 1am, and even when compared to being quarantined. I’d stopped for gas the day before so I didn’t need to stop at all this morning. With less people out I felt like I saw more wildlife: 4 foxes and a dozen or so elk. I made it to Winfield around 4am and decided to take the easy 4WD dirt road a little further, past the cemetery to some dispersed camping spots .85 of a mile from Winfield. You can park at Winfield and it won’t add more than 2 miles to this hike.
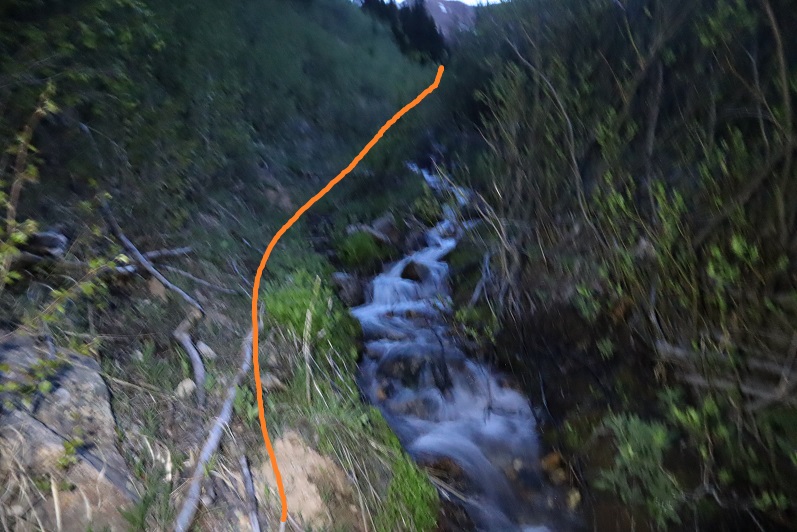
Looking at a topo map, I wanted to follow Grey Copper Creek to begin. After finding a dispersed parking spot I headed northwest in the dark, following game trails, zig-zagging in what felt like I was in a horror movie until I hit the creek. The creek was easy to find because there’s been a recent avalanche in the area. This also made the creek easy to follow (after initially climbing over some downed trees).
I crossed the creek and stayed on the west side, startling a porcupine as I went. There are new game trails starting here that parallel the creek.
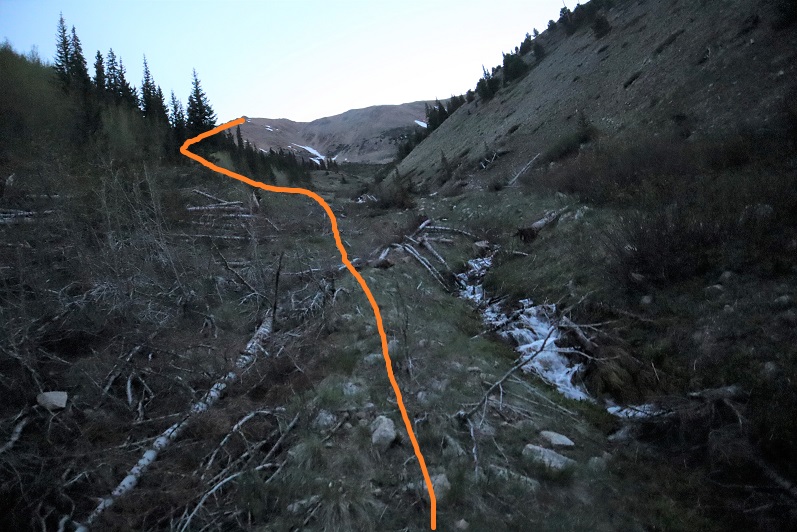
There are a few ways to summit Mt Blaurock: You can follow the creek until it ends and continue climbing until you make it to the Blaurock/Ervin saddle, or gain the south ridge and follow that route. There was still some snow in the gully so I decided to take the south ridge route.
There is no special point to gain the south ridge. I turned and headed west after a little over a mile of hiking, aiming for the ridge
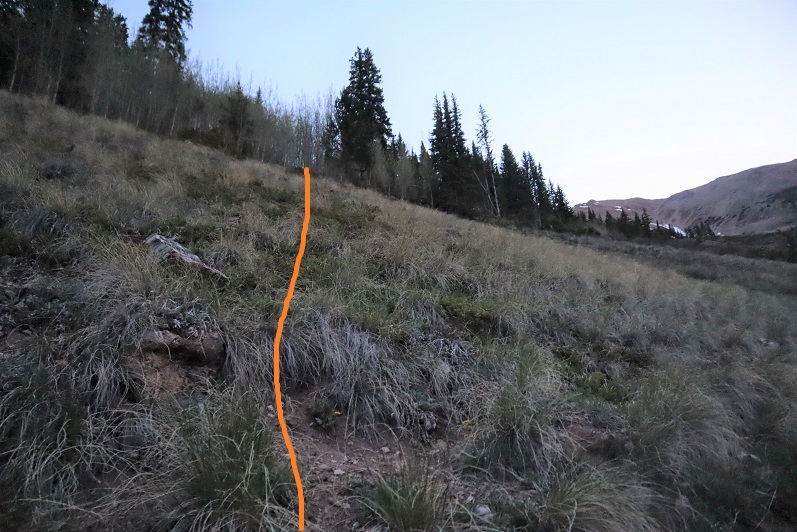
From treeline it was easy to see the route, following the ridge northeast
The first part of the ridge is an easy stroll on tundra
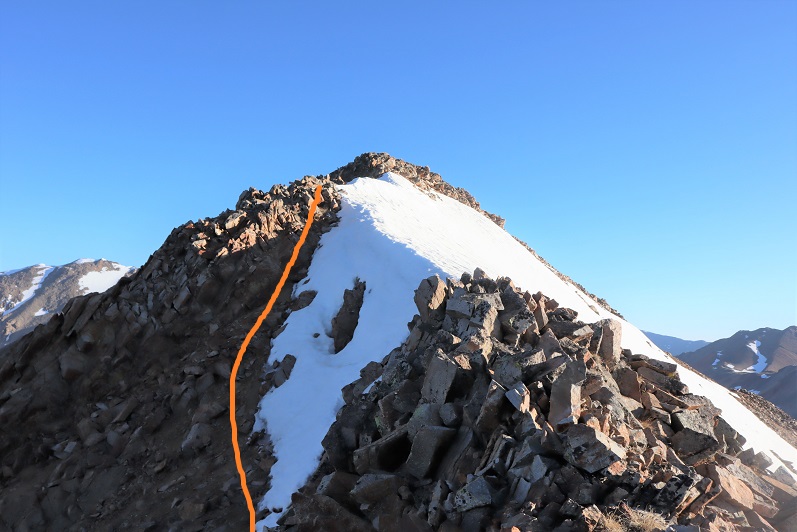
Once the tundra ended the loose rock began and didn’t quit until the hike was almost over and I was back at the avy area. I’d call it rotten rubble, or choss most of the way. I rounded the first bump in the ridge to the left, climbed straight over the second, and then took a gully up to the top. There is some loose rock here.
Here’s a look back down to this point
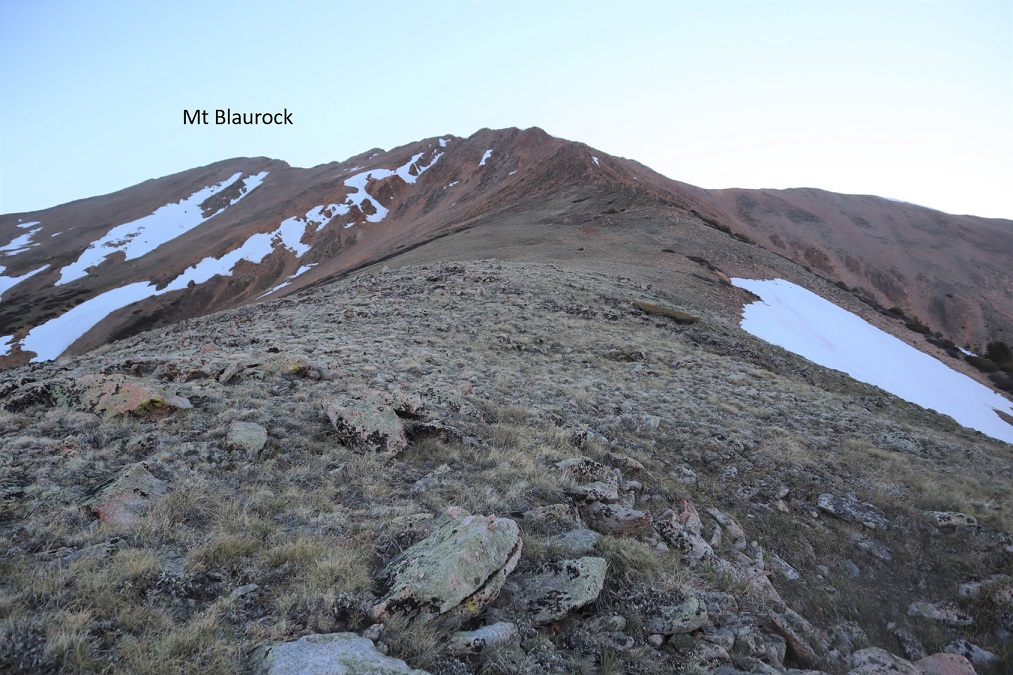
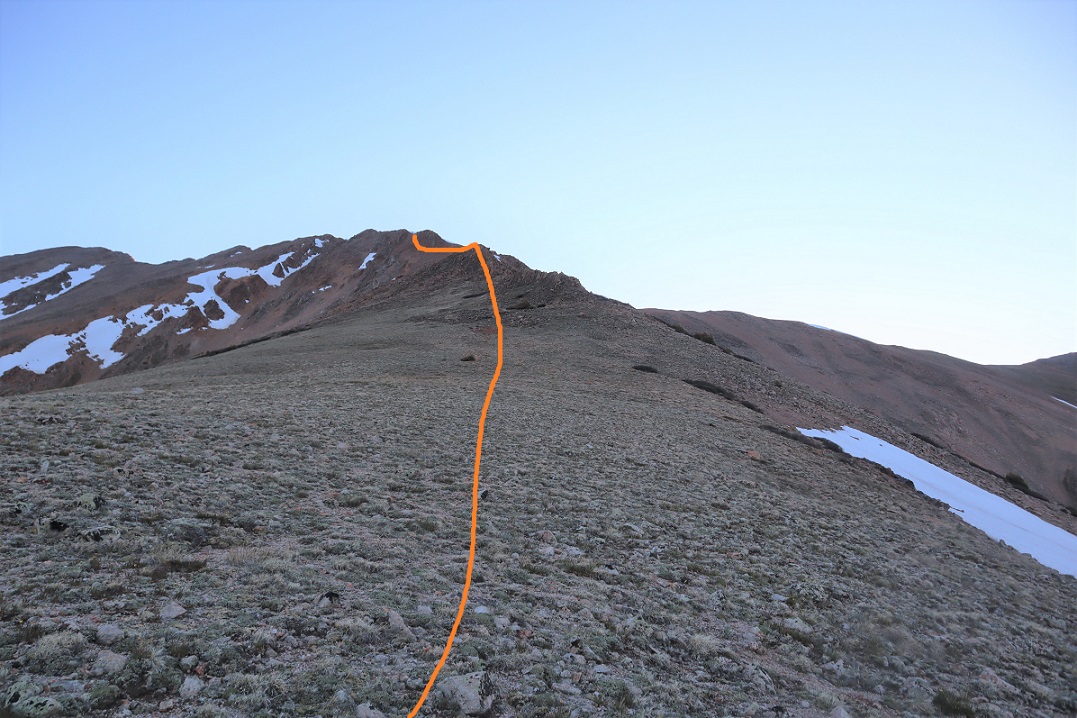
Turning left (northwest) I dipped down to the left a few times to avoid snow and unnecessary ridge crossings
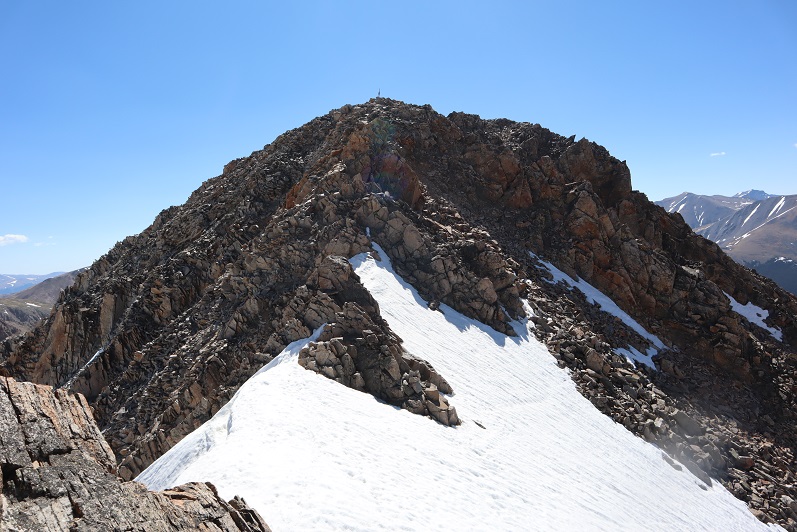
Of course, the summit is the furthest ‘hump’ on the ridge
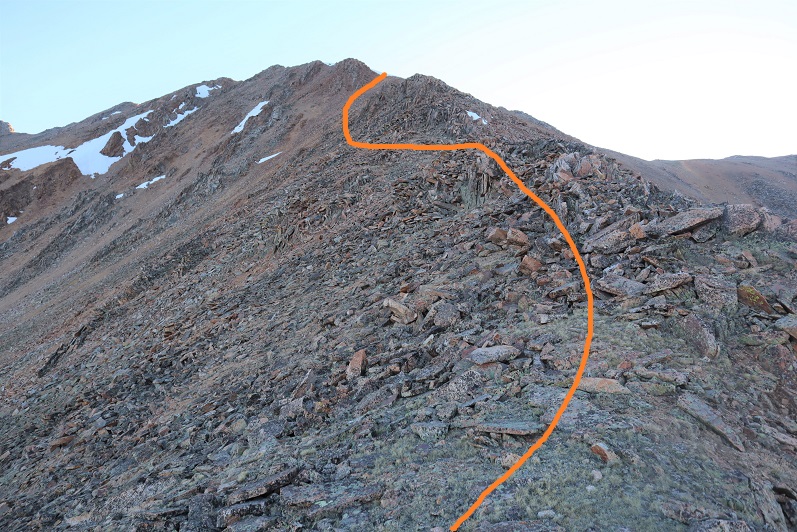
I followed a small, rock filled gully to the summit
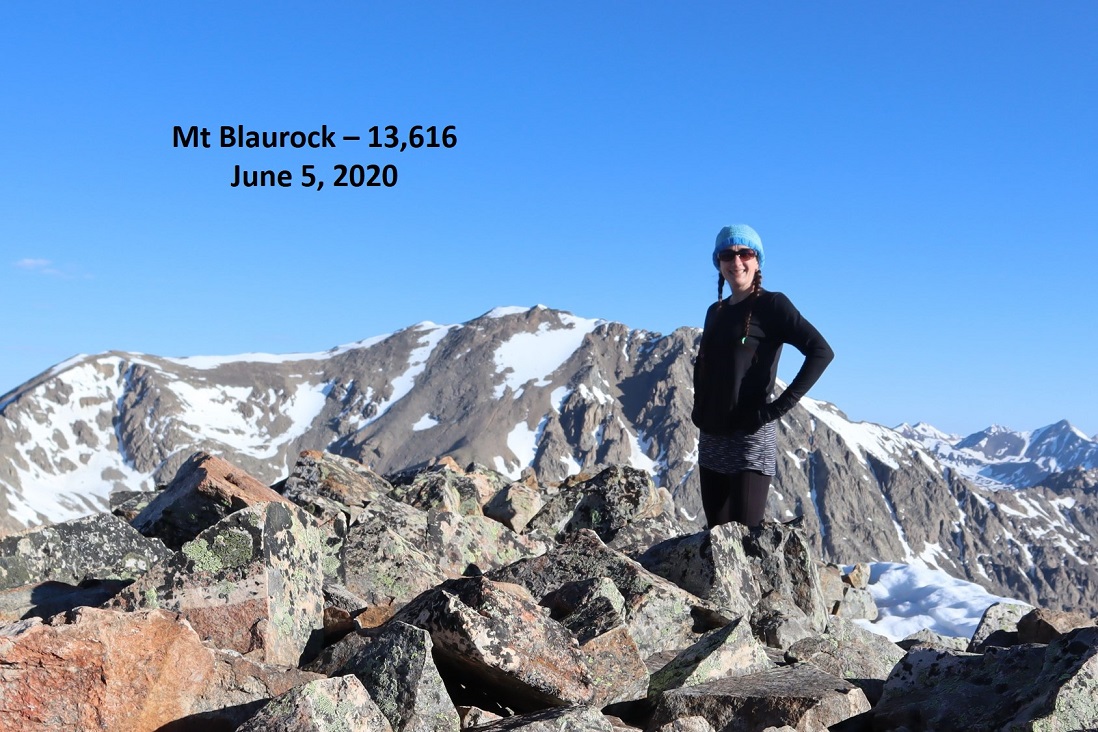
I summited Mt Blaurock at 7:30am
Mt Blaurock Summit:
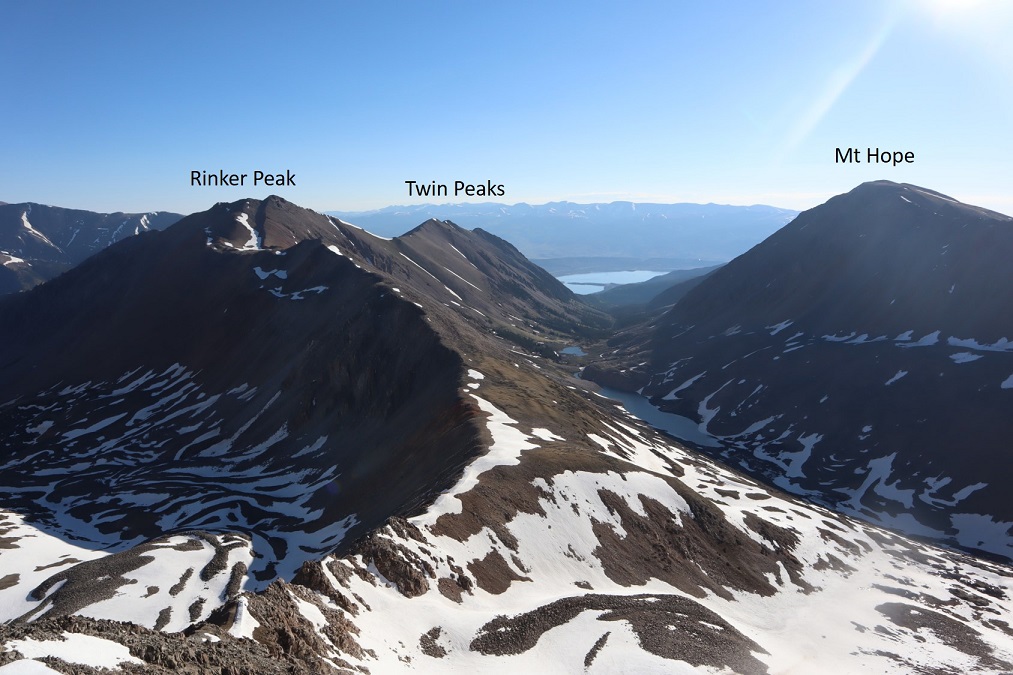
There are some great views of surrounding peaks, a few of which I visited last week;
I headed back over the ridge on the same path I took in:
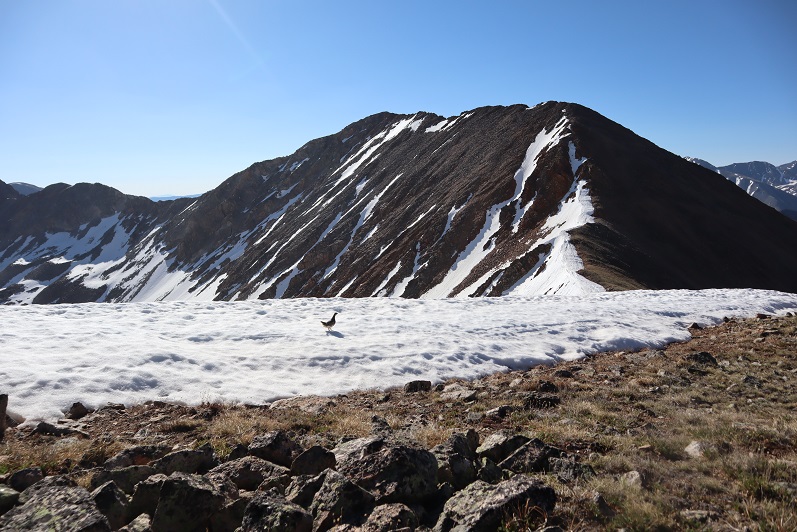
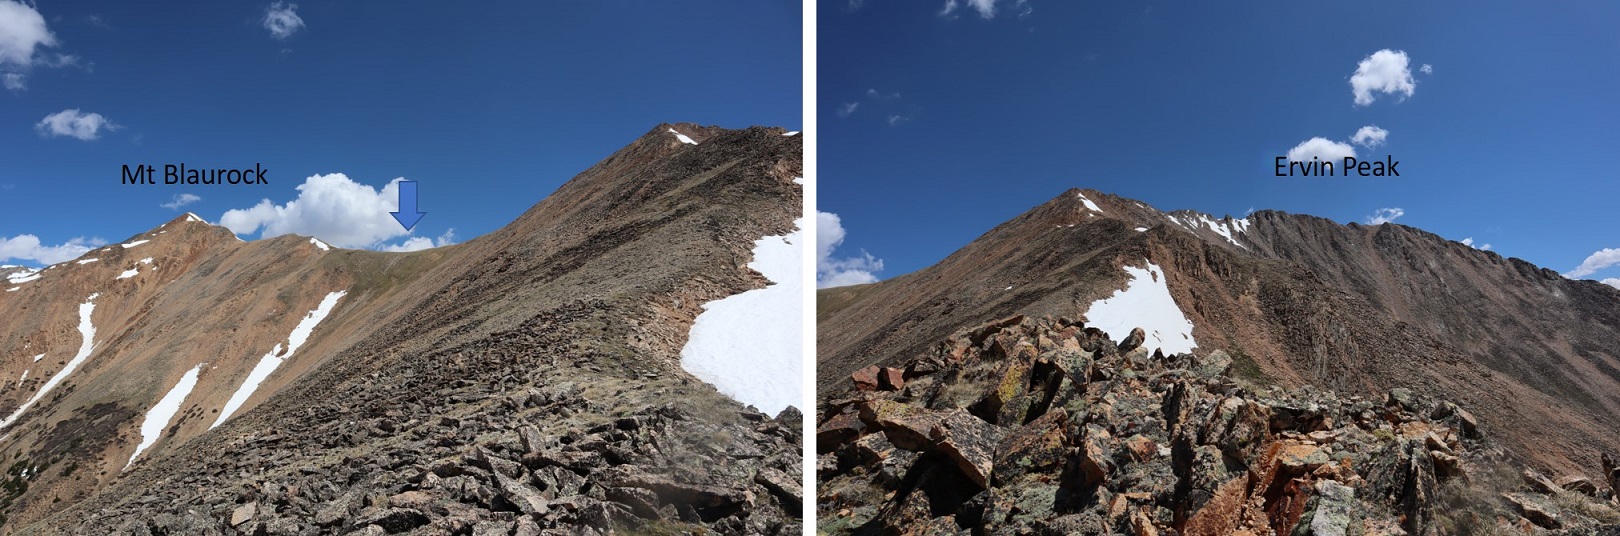
Here’s looking down at the traverse between Blaurock and Ervin Peak. The hike down to the saddle from Blaurock is easy
I met a nice ptarmigan along the way
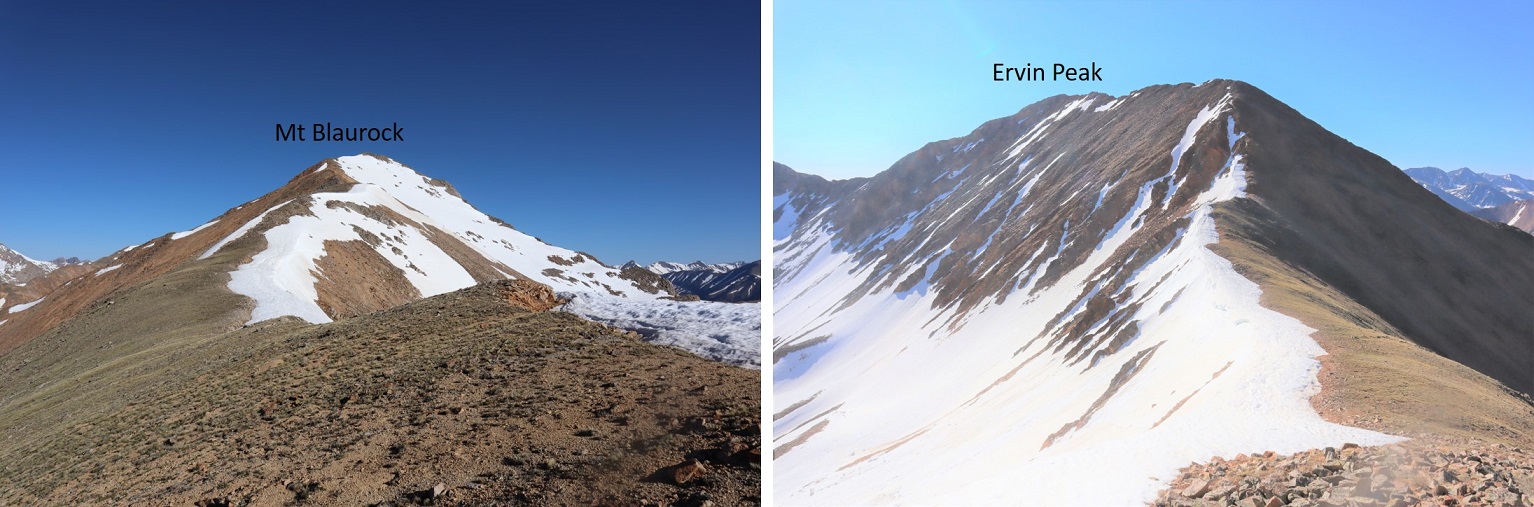
Here’s a look from the saddle of the ridge to Blaurock and Ervin
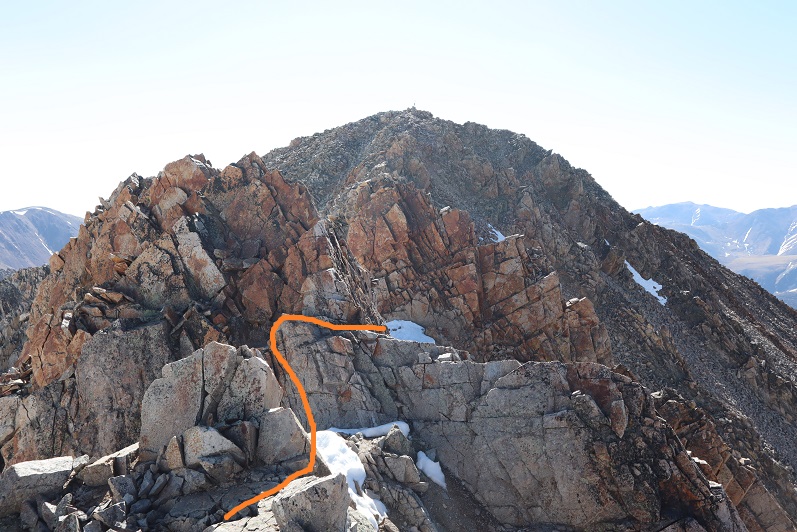
This is where it gets tricky. Here’s the route I took to avoid the snow:
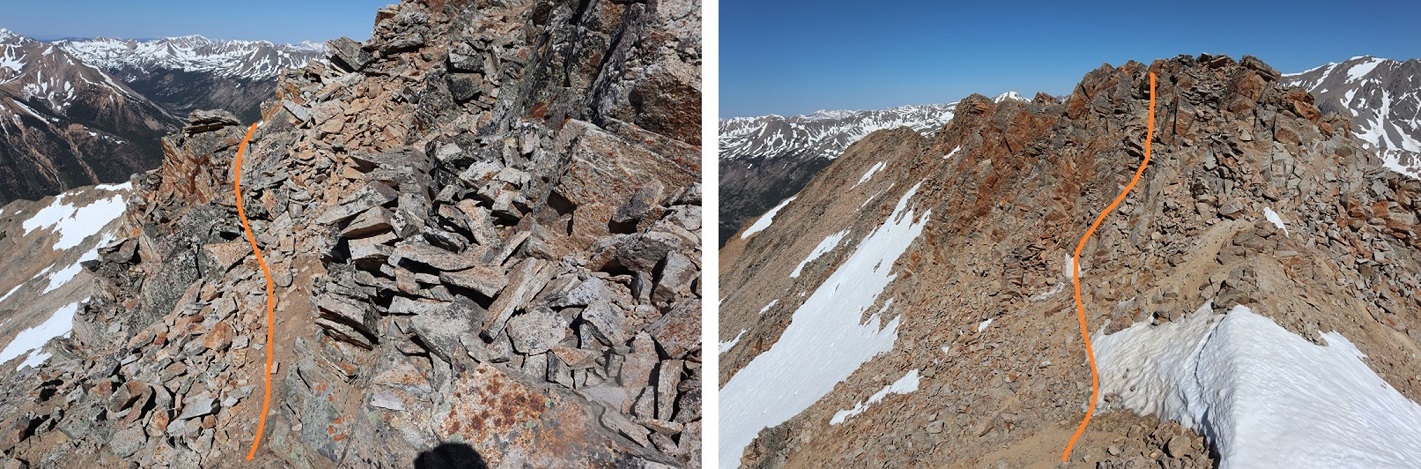
It looks like there might be a class 2 path here along the right (south) side, but with the snow in key areas I wasn’t able to take that route. There was snow in this section, turning the rest of the hike into class 3 on loose rock. I had one rock the size of a microwave fall while I was testing it. Luckily, I was just testing and didn’t have any weight on the rock. It scared me though. A helmet would be a good idea. Note which areas actually “go”: The dirt gullies here make it look like there are trails where there are not. Here are pictures of how I navigated the ridge. This took quite a bit of careful route finding.
This is actually easier than it looks. Class 3, and I placed a cairn here so I’d remember how to get back (there are a lot of drastic drops in this area).
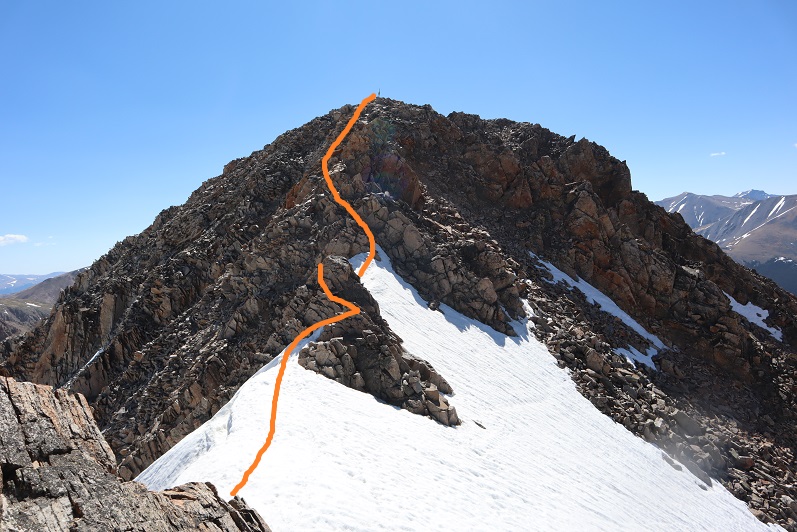
The last hurdle was unavoidable snow just before the summit. I tested the snow and honestly considered turning back. The snow was slippery and a fall would have took me a long way. In the end I strapped on my crampons and got out my ice axe, glad I’d brought both. I traversed these two areas (about 40 feet each) gingerly.
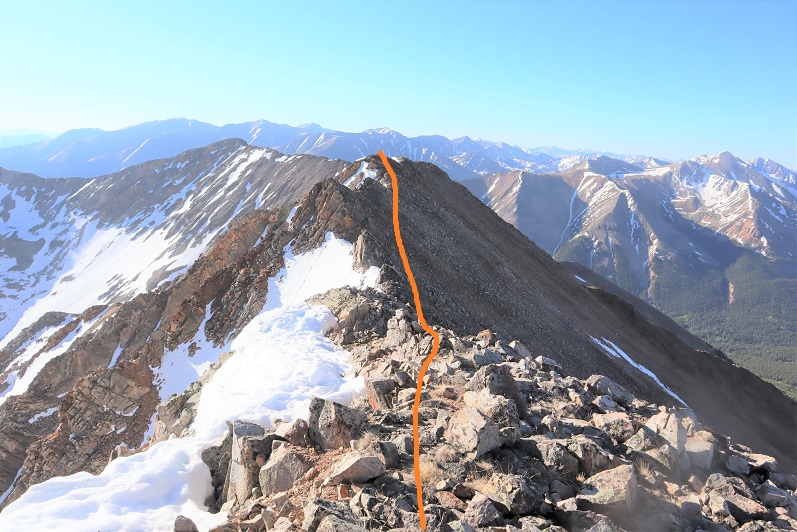
The last bit up to the summit was full of loose rock but was straightforward
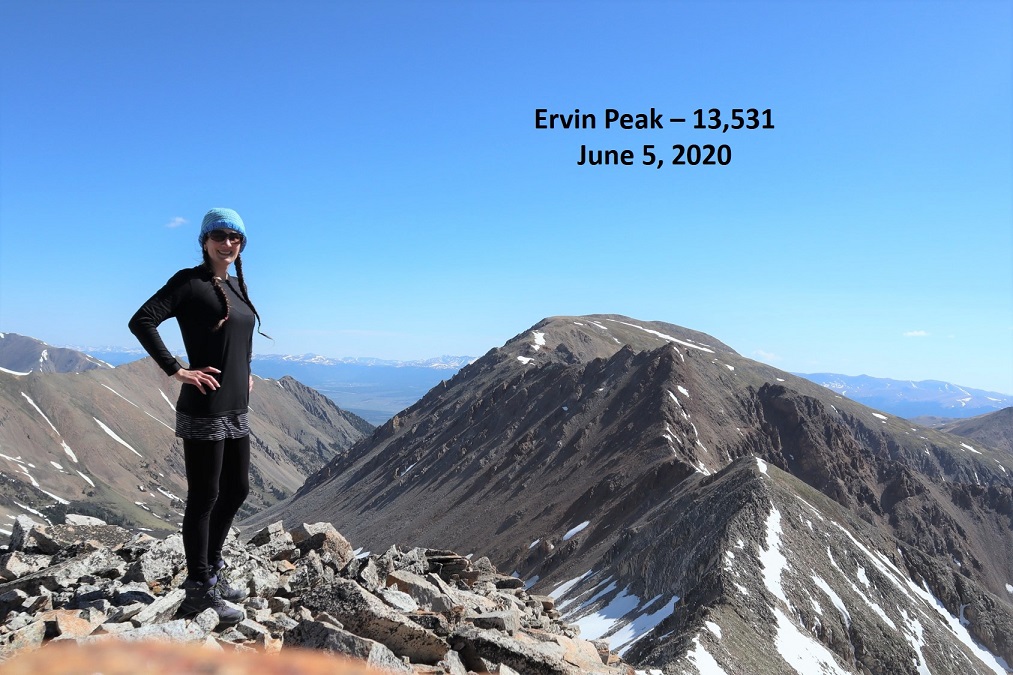
I summited Mt Ervin at 9:30am (that’s Mt Hope in the background)
Ervin Peak Summit:
I didn’t stay long on the summit. The day was warm and the snow was melting fast: I wanted to cross the snowy areas as quickly as possible to avoid slipping. I turned around and headed back the way I’d come.
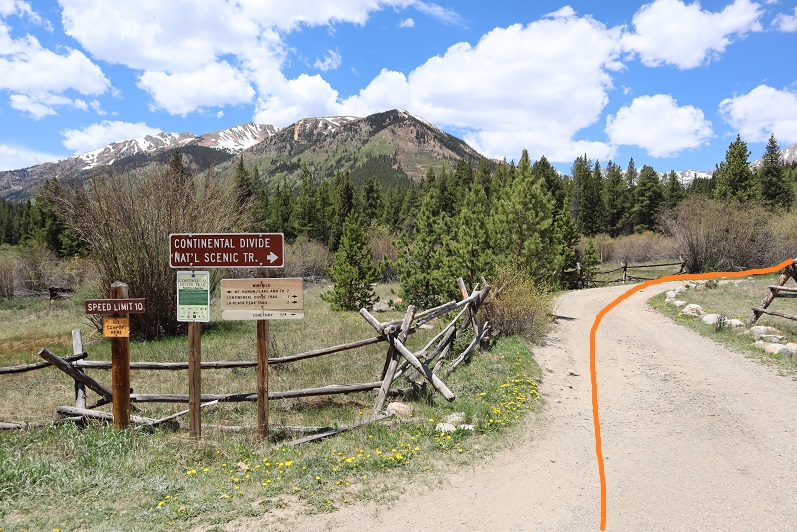
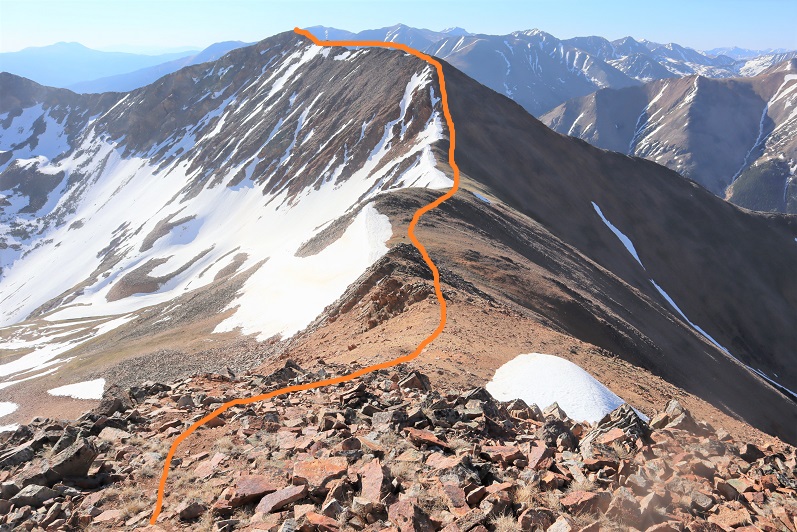
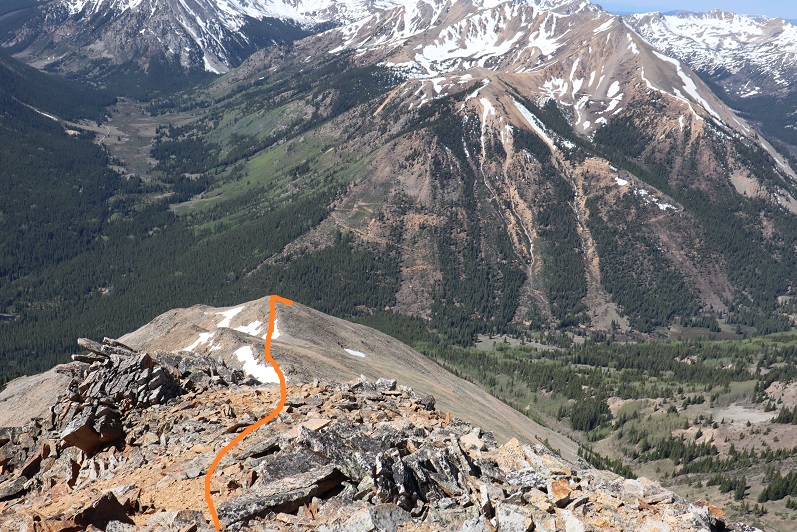
I was making this a loop, so when I hit the westernmost part of the ridge I turned and headed southwest down. This ridge was easy to navigate but full of loose, rolling rocks. It was slow going because I had to be careful with foot placement. This ridge kind of turns right as it goes. Here’s a hint: If it’s daylight, just keep heading towards the switchbacks that you can see in the middle of the picture below.
From about halfway down the ridge here’s looking back at Mt Blaurock and Ervin Peak. The blue arrow points to where you could hike from the landslide area straight to the saddle instead of taking the ridges up and down
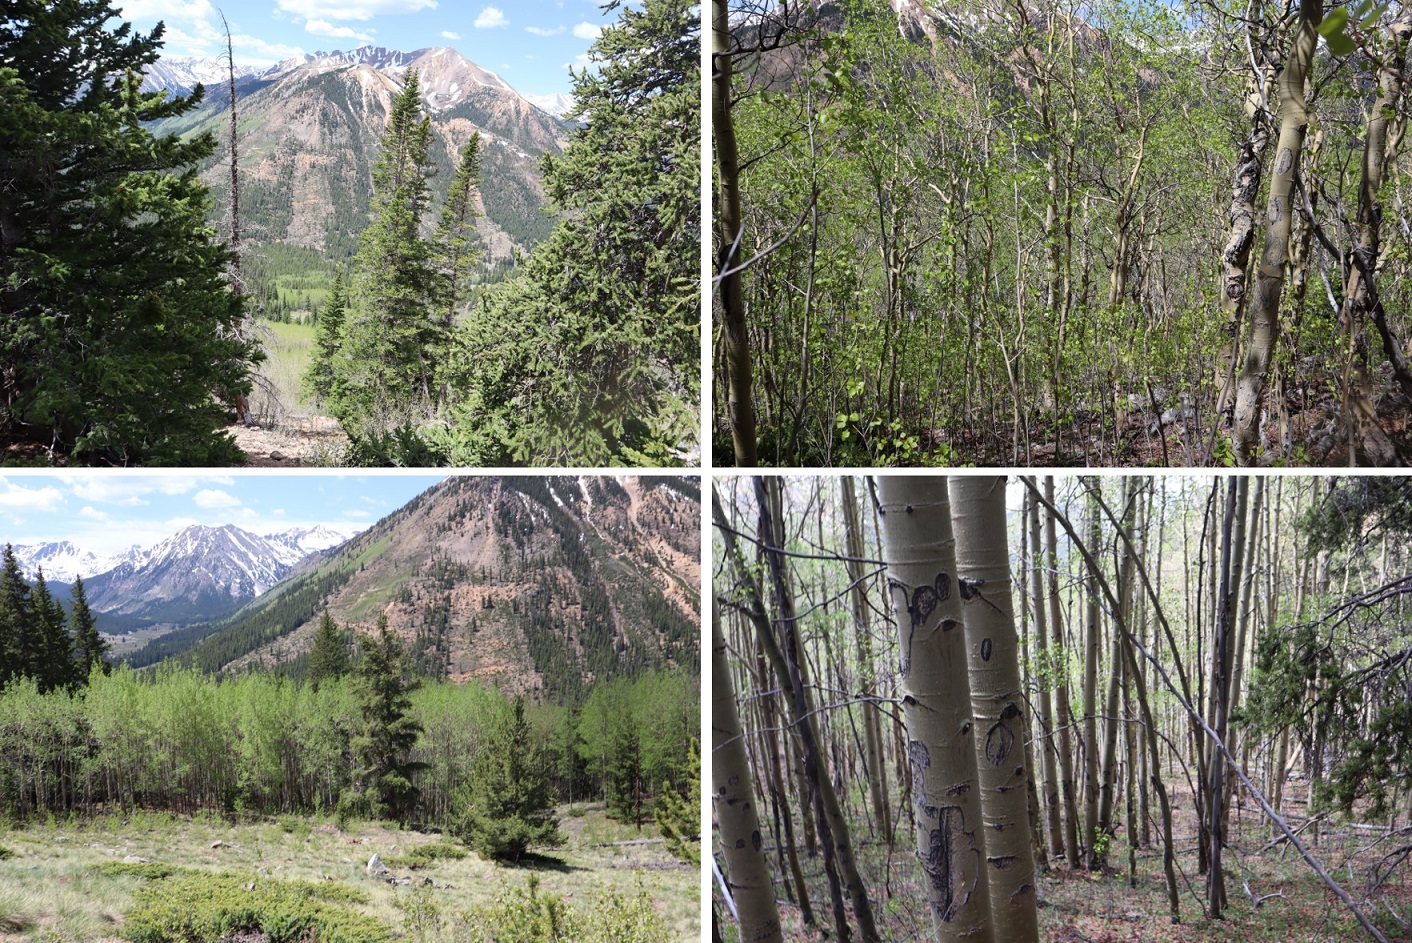
Here you can see you want to meet back up with the landslide area, and that to do so you’ll be bushwhacking through dense aspen. I could still see the switchbacks, but only just barely and only because the aspens aren’t completely full of leaves yet.
There were enough game trails here to follow not to make this too difficult. It would have been easier if I were 2 feet tall though, because those trails go under logs and through brush.
I made it back to the landslide area, took a picture of it in the daylight, and turned and headed south towards my parking space.
I made it back to my truck at 12pm, making this a 6 mile hike/climb with 3821’ of elevation gain in 8 hours, most of it spent route finding and watching for rolling rocks.
Here’s a picture of the saddle, should you choose to ascend that way
When I got home and started jotting down notes I realized today I’d hiked my 145th unique 13er, as well as my 145th unique bicentennial. Pretty cool!
Also, it’s time to retire my hiking boots, as they are no longer waterproof. They almost made it a year….