Click on a menu, or use the search feature to access hundreds of trip reports. Contact me if you'd like more information about a hike, or a GPX file
Author: Laura M Clark
Laura has summited over 500 peaks above 13,000' solo, including being the first woman to solo summit all of the Colorado 14ers, as well as the centennials. After each hike, she writes trip reports for each one and publishes them on her blog, which is read by fans all over the world. Author of Wild Wanderer: Summiting Colorado’s 200 Highest Peaks, which is available to purchase on Amazon.
This was my second attempt of Clark Peak. On the first attempt I’d been unaware there was a creek crossing, and the creek looked too high for me to safely cross in the dark. A storm was coming in later in the day, so waiting for daylight hadn’t been an option. I’d turned around and done another peak instead. This time I was prepared (or so I thought) for the creek crossing. Also, please don’t make the same mistake I did crossing the creek…
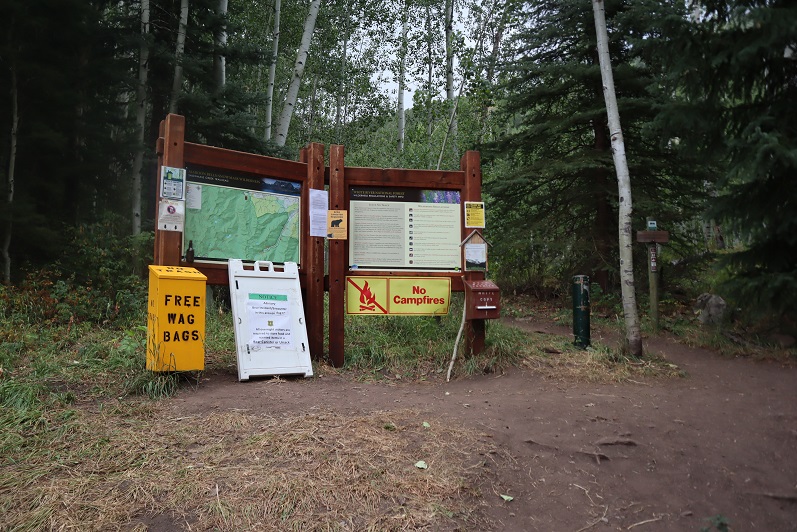
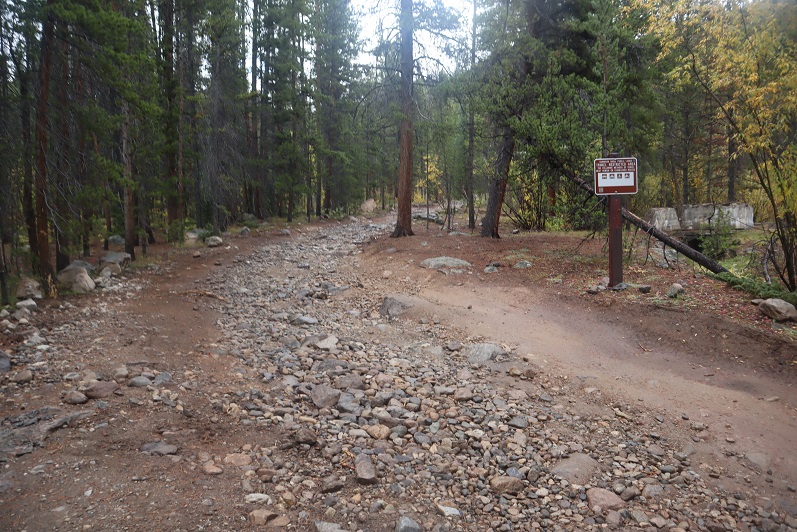
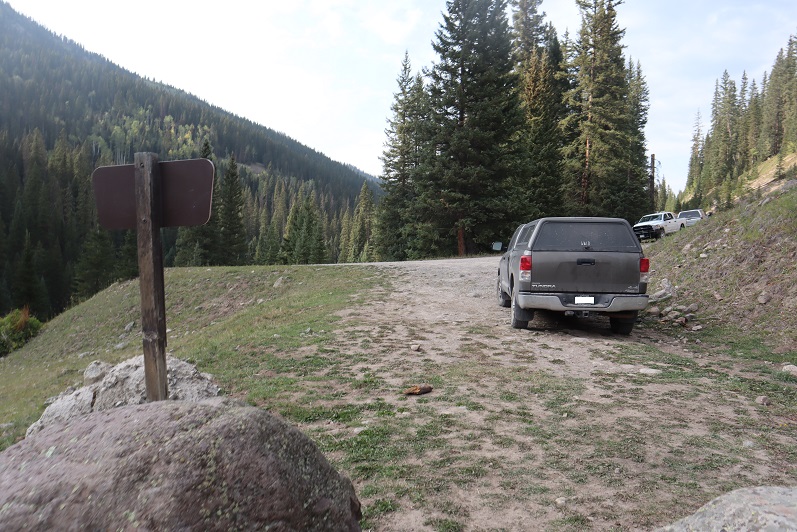
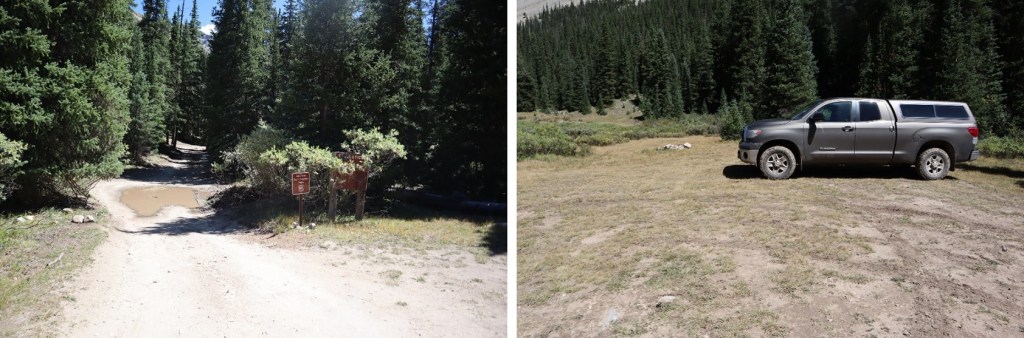
I drove to the trailhead the night before and got a few hours sleep before staring on the trail at 5:45am. The trailhead has space for about 20 vehicles, and good signage
I started off following the Maroon Snowmass Trail south, and then southwest. I went through two unlocked gates
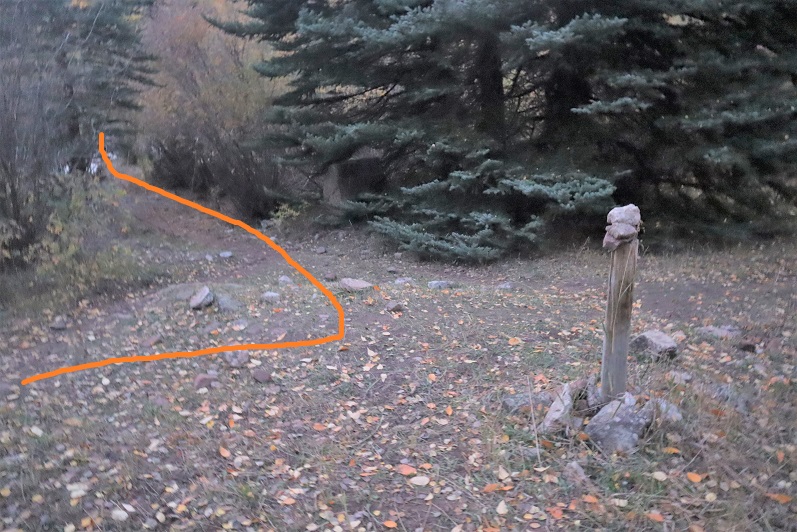
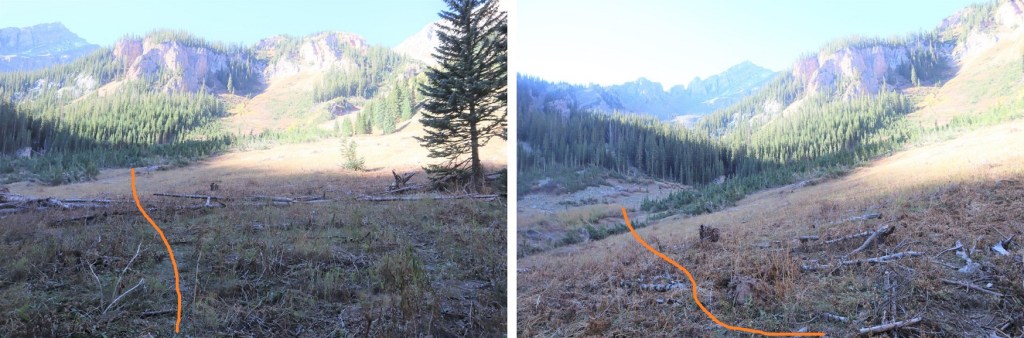
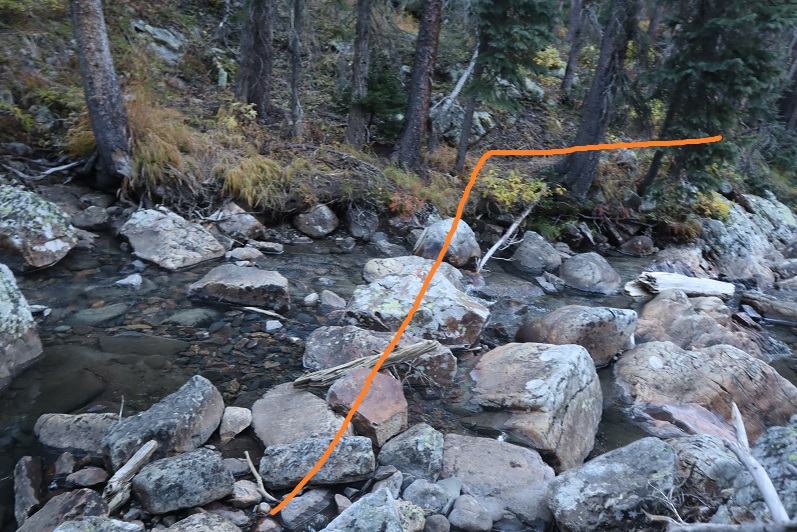
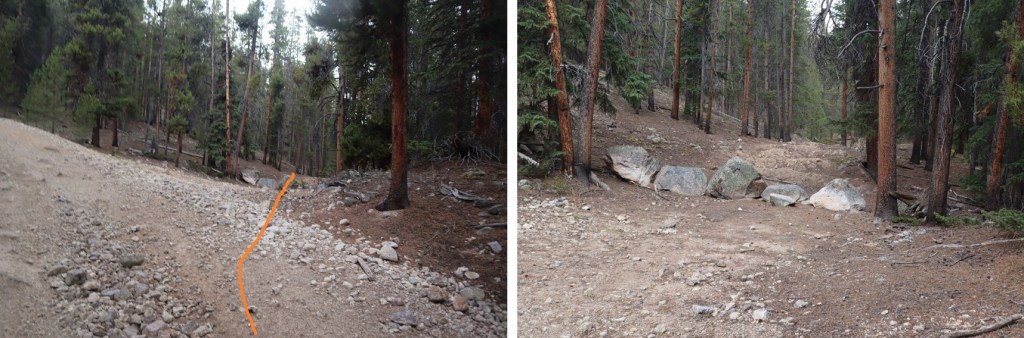
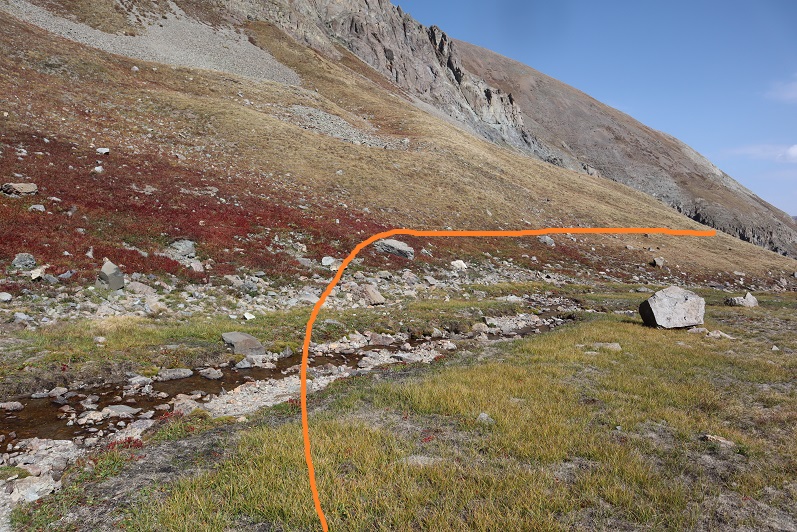
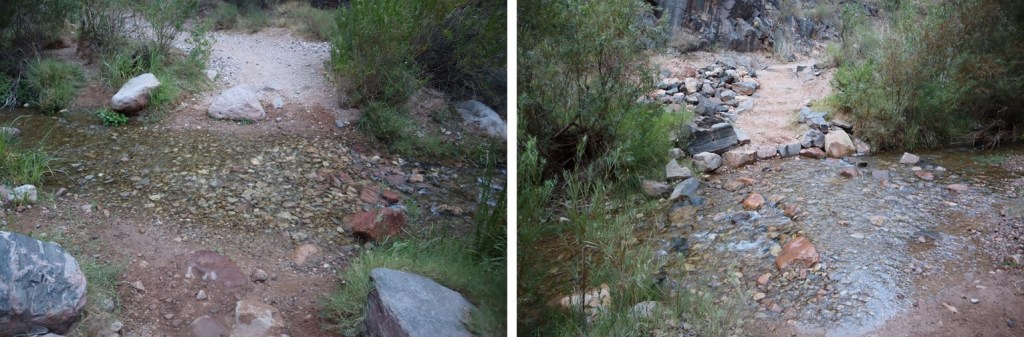
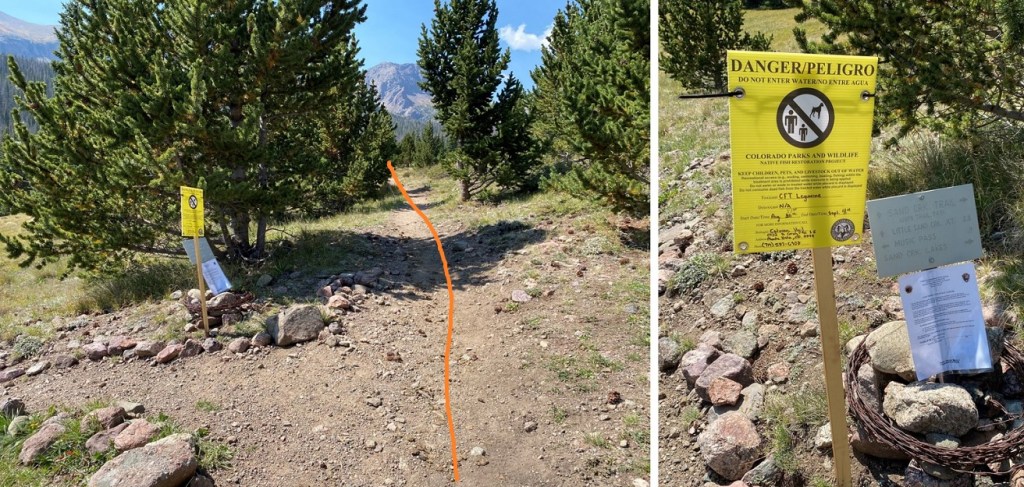
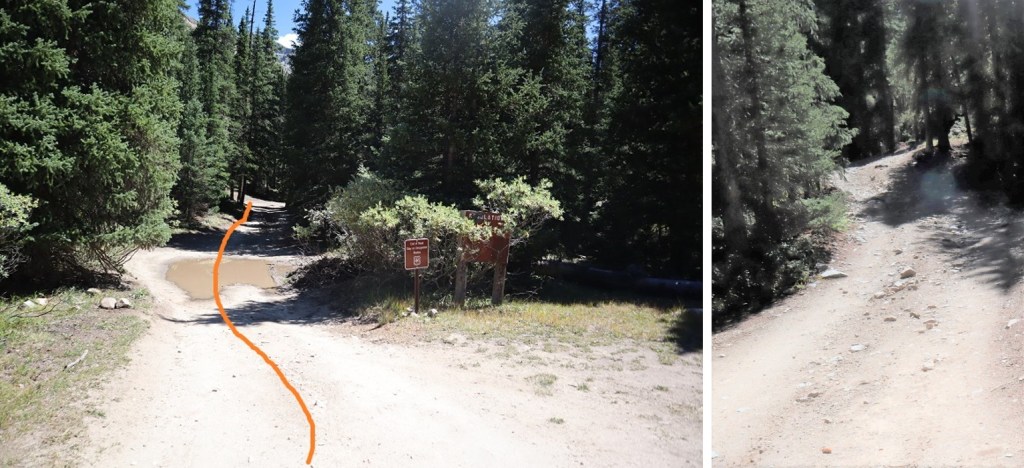
And shortly after the second gate there’s an unmarked side trail that leads down to cross Snowmass Creek. However, after my last failed attempt I’d done more research, and was told I’d gone too far last time and to look for an easier crossing earlier. So I did. I ended up crossing the creek and then running into Beaver Ponds about 20 yards long. I was able to gingerly cross them, stepping through a thin layer of ice while doing so. I picked up a faint trail on the other side, which brought me to the actual trail, where I noticed last time I’d indeed been in the correct area. Hmph. So I’d done all that wading in cold water for nothing. Here is where you should cross:
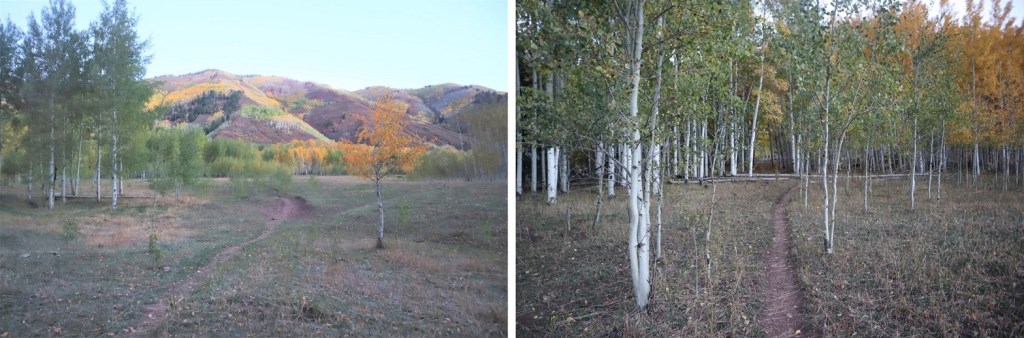
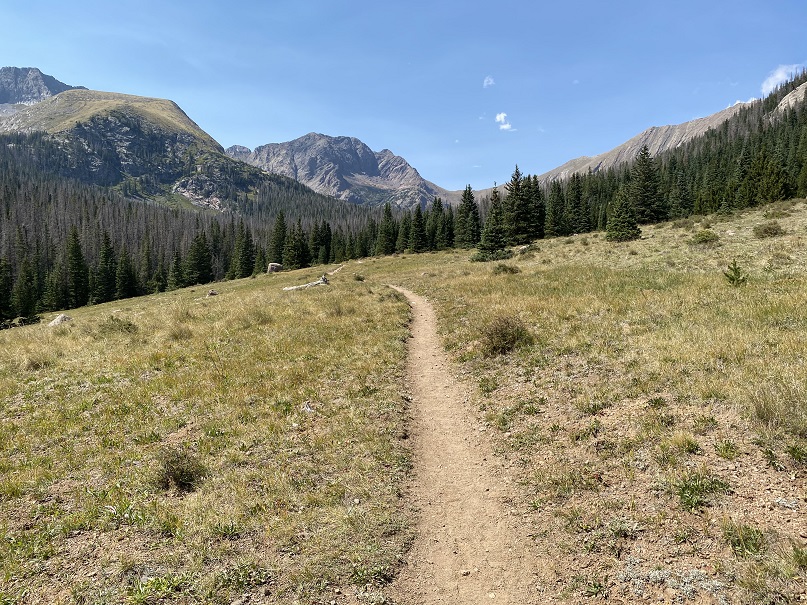
Doing so will bring you to the West Snowmass Creek Trail. A well-defined, class 1 trail.
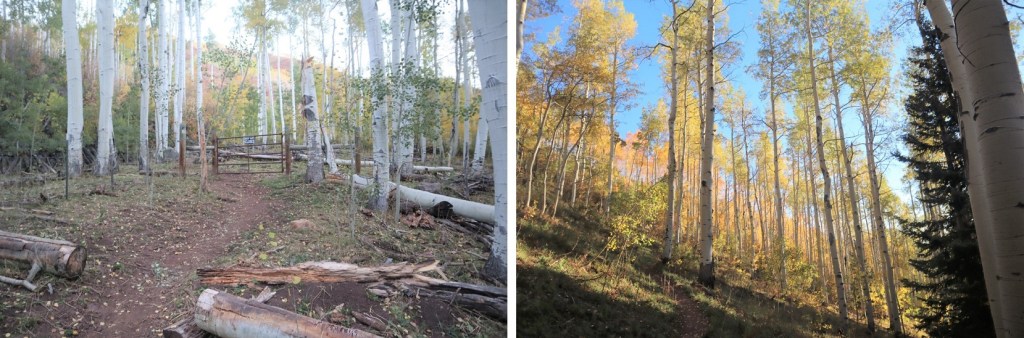
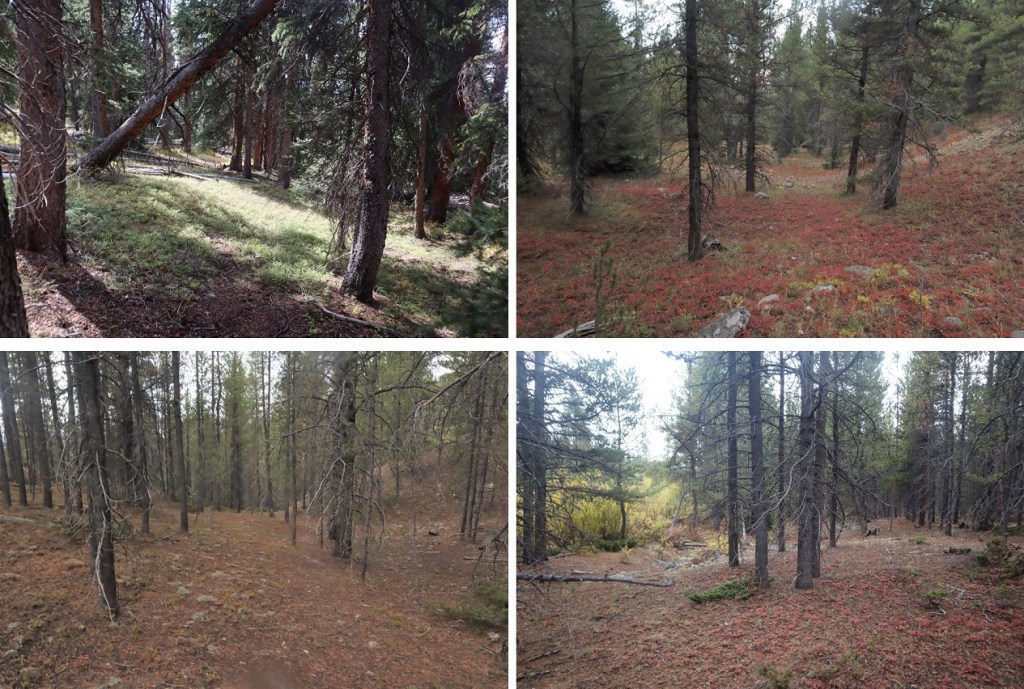
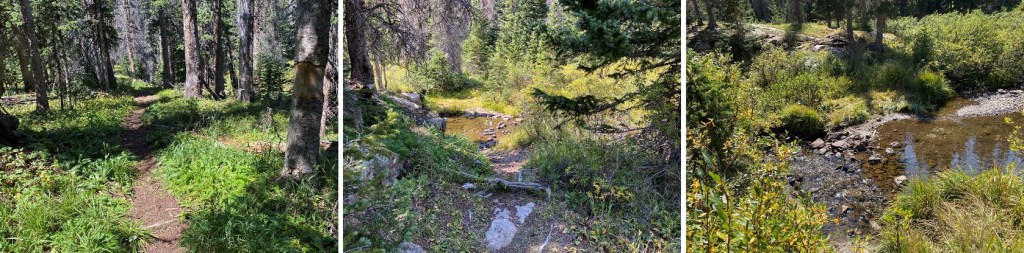
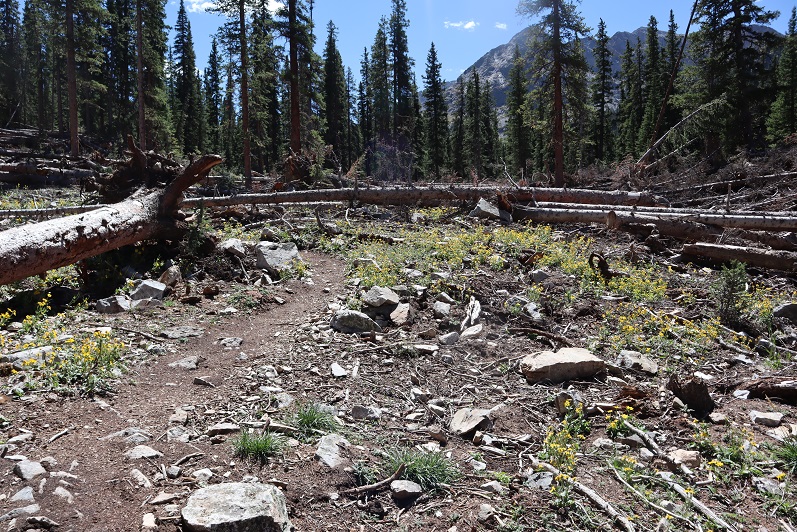
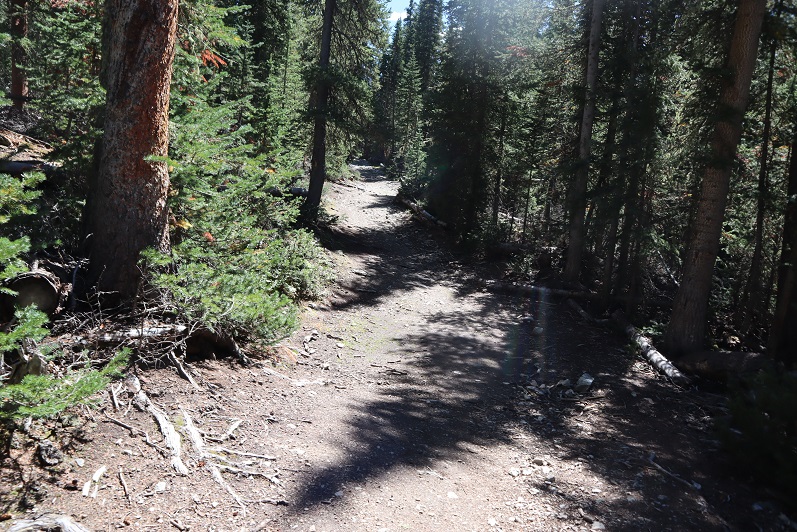
The trees were absolutely beautiful! It was still early morning, so these pictures aren’t the greatest, but the trees had me daydreaming.
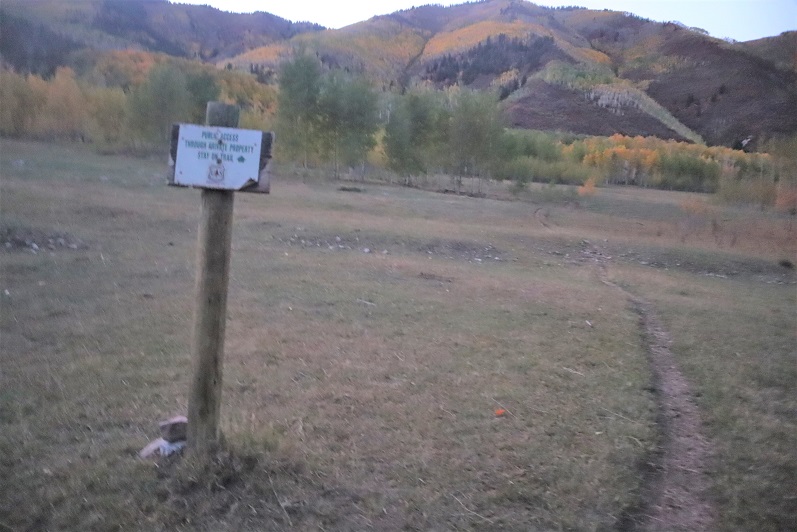
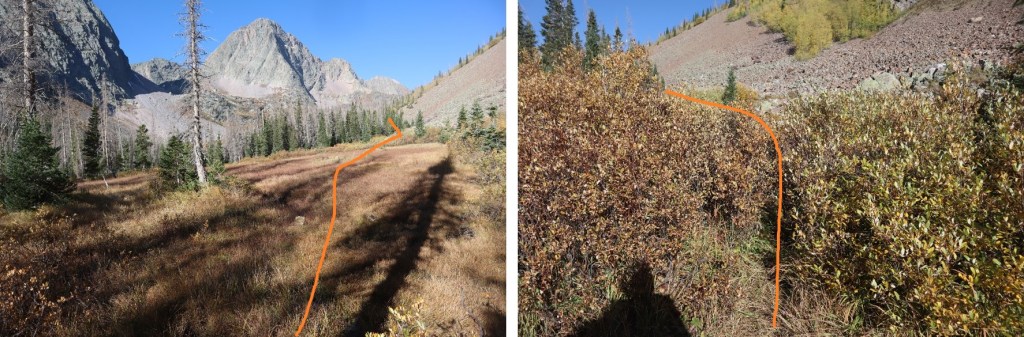
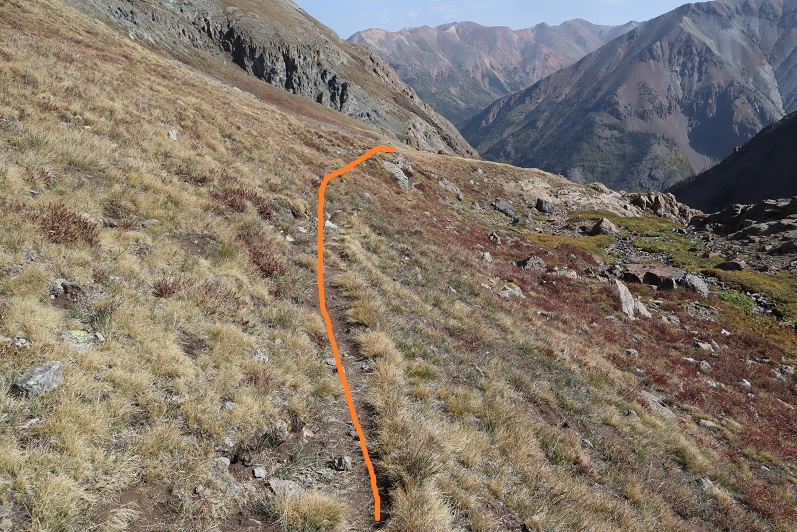
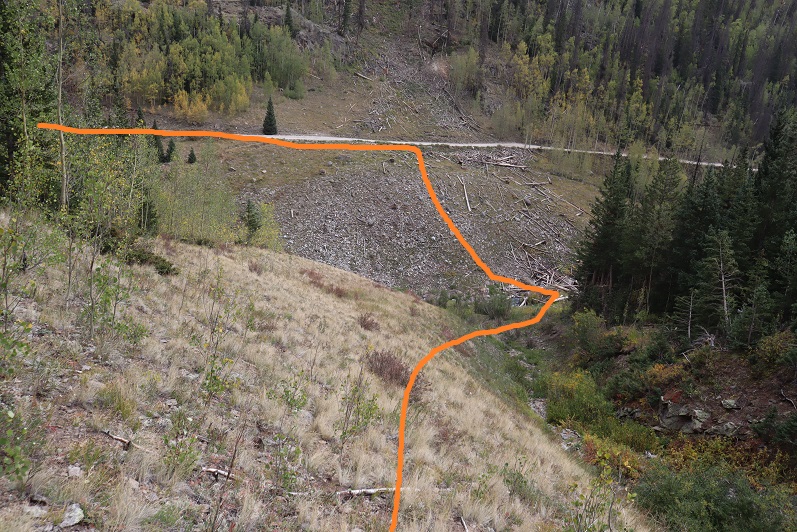
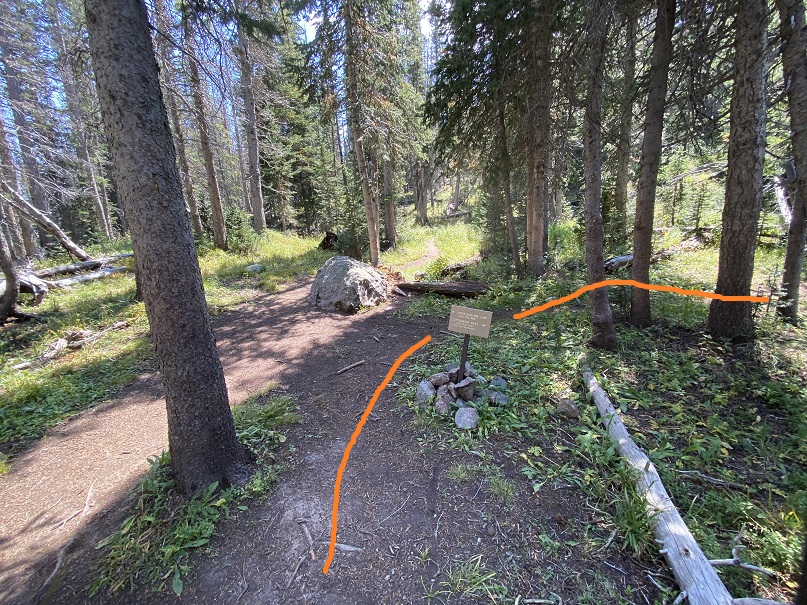
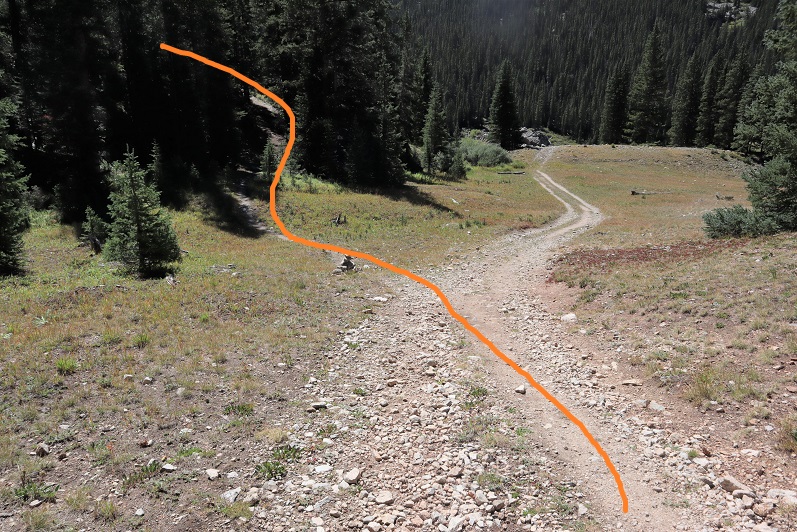
This is where I made my second mistake of the morning: I missed the cutoff. The cutoff comes after hiking for just over 4.5 miles. It’s an obvious junction you can see if you’re not looking up at the trees. And cows (there were cows in the meadow). I ended up hiking quite a ways past this junction, just following the trail. It wasn’t until I realized I was switchbacking and I wasn’t supposed to be that I noticed my mistake. This mistake cost me well over a mile and added about 1000’ of elevation to the hike. Here’s where you turn left
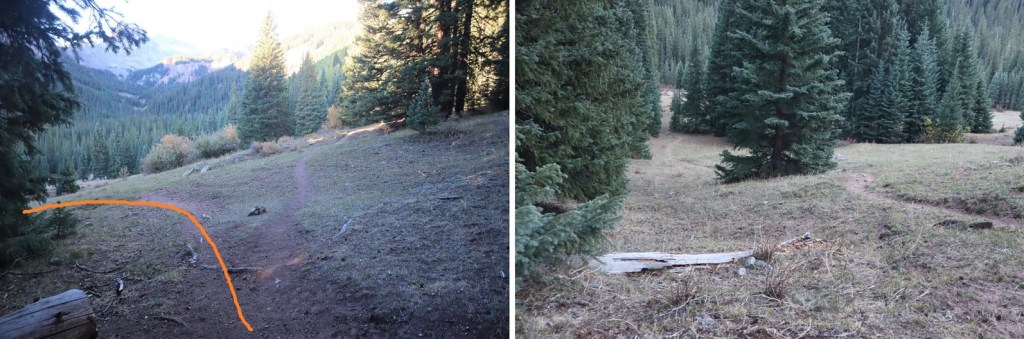
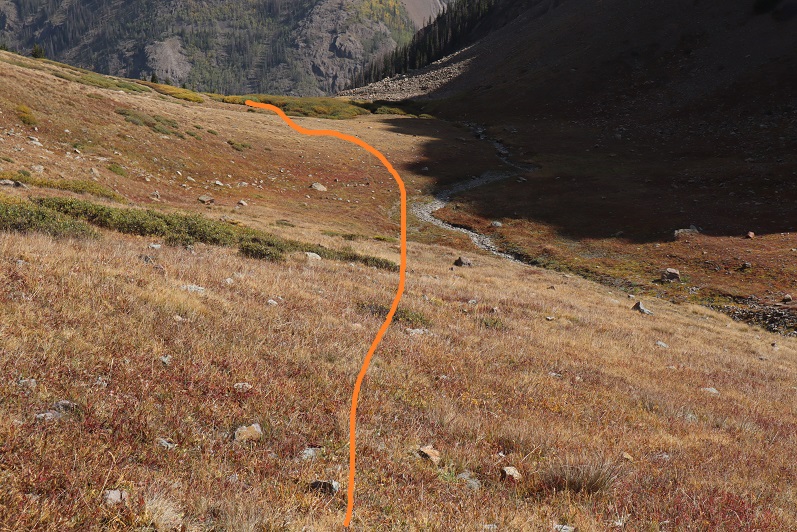
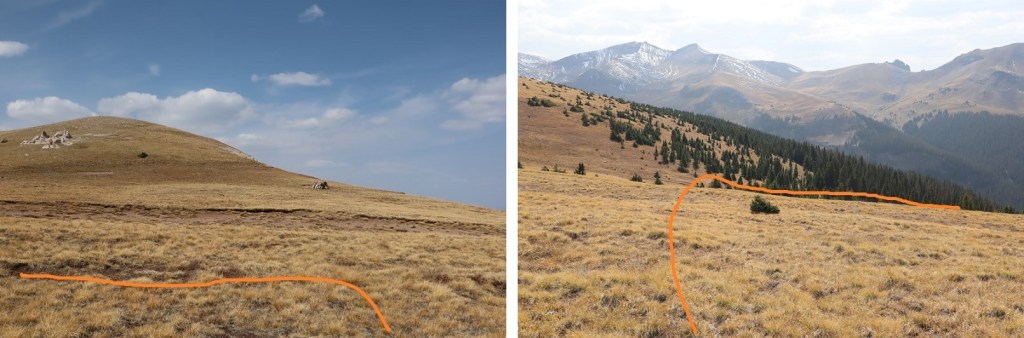
After hiking a few dozen yards south the trail abruptly ends. When it ends, turn right and head west towards the hillside. A trail will pick on the hillside.
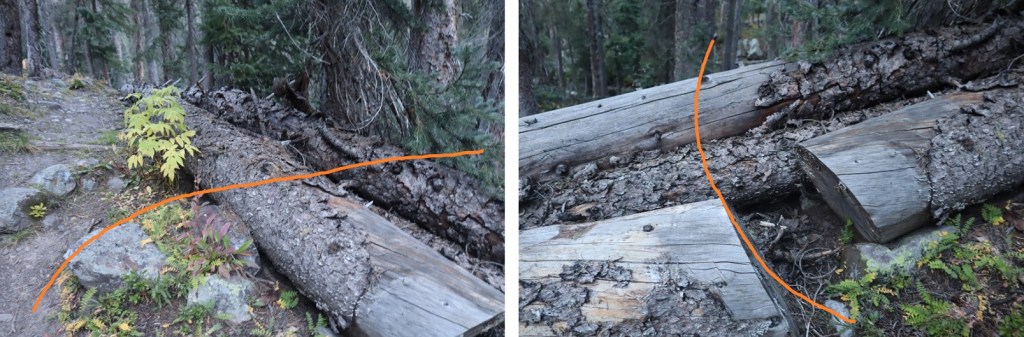
Here’s where I made my third (and final) mistake of the morning: When you see the path split in two, take the higher one (the lower one is a cow trail that leads you through gooey mud then ends).
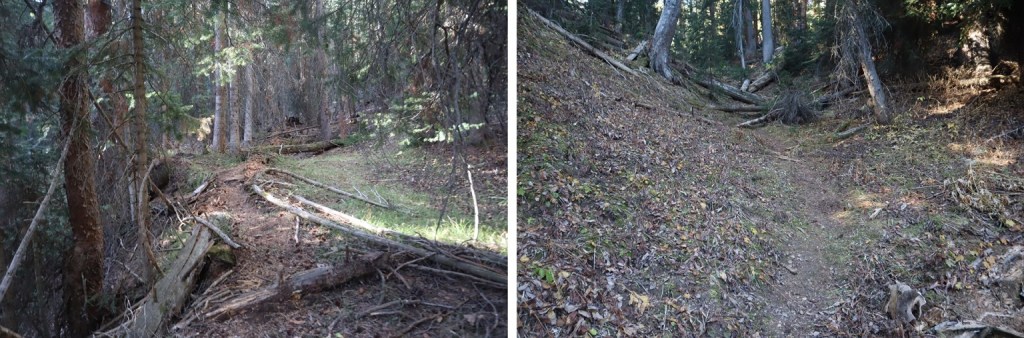
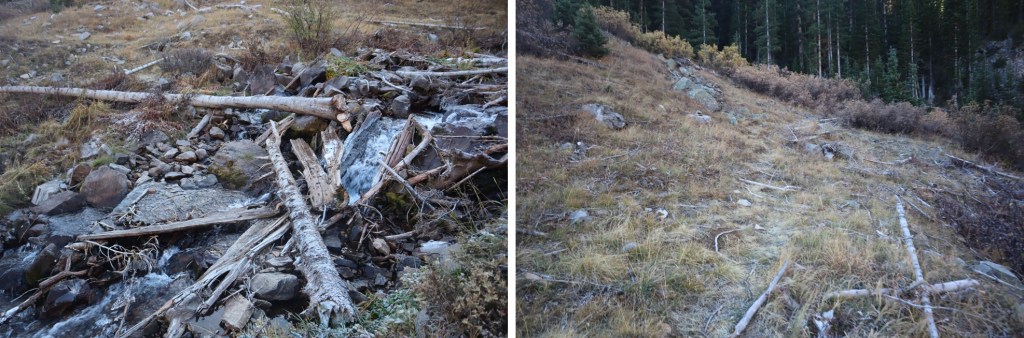
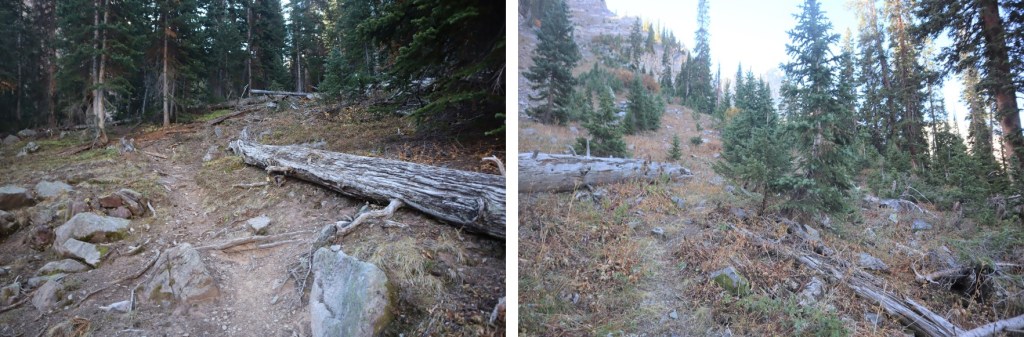
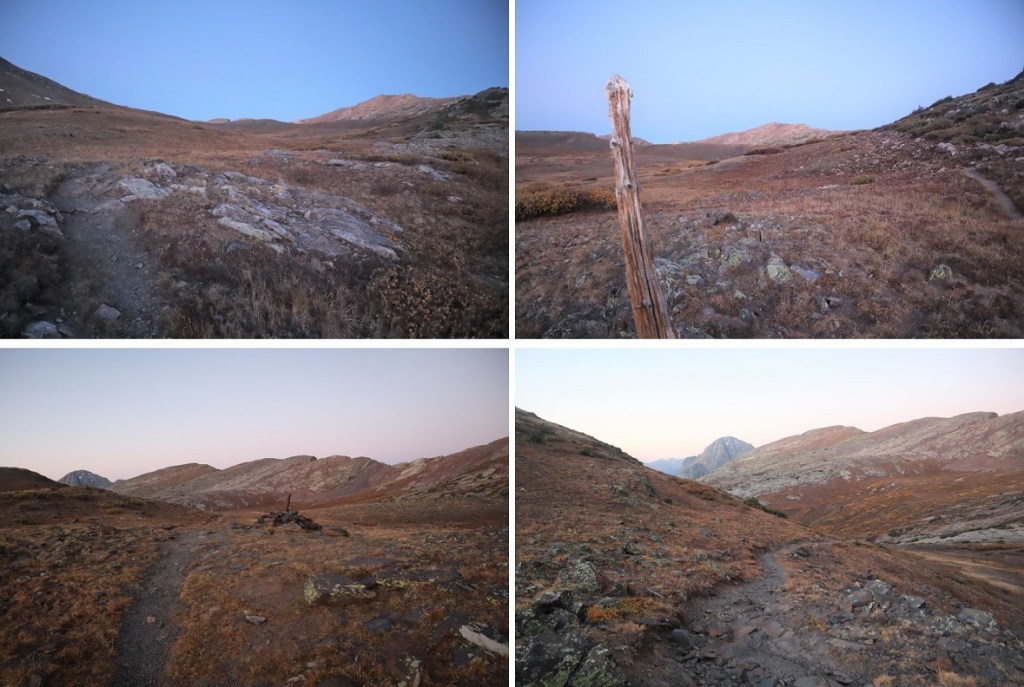
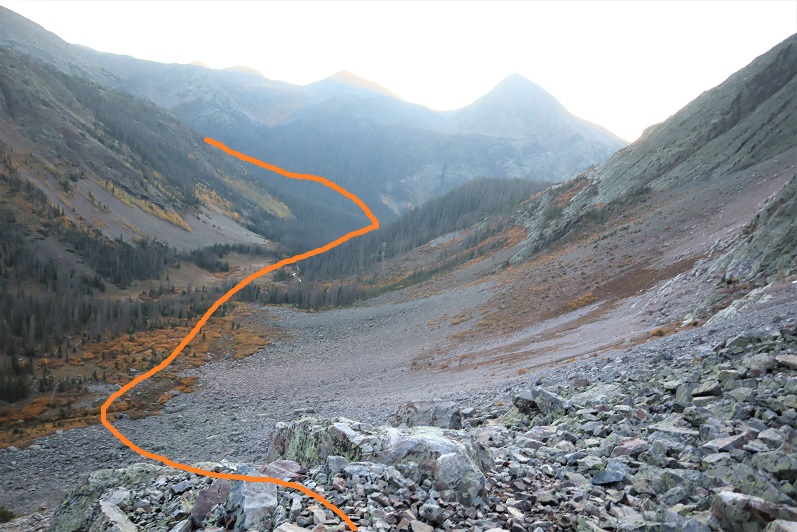
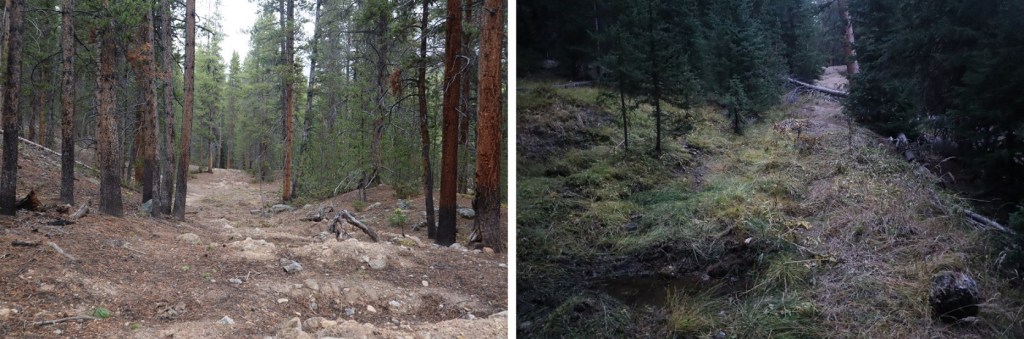
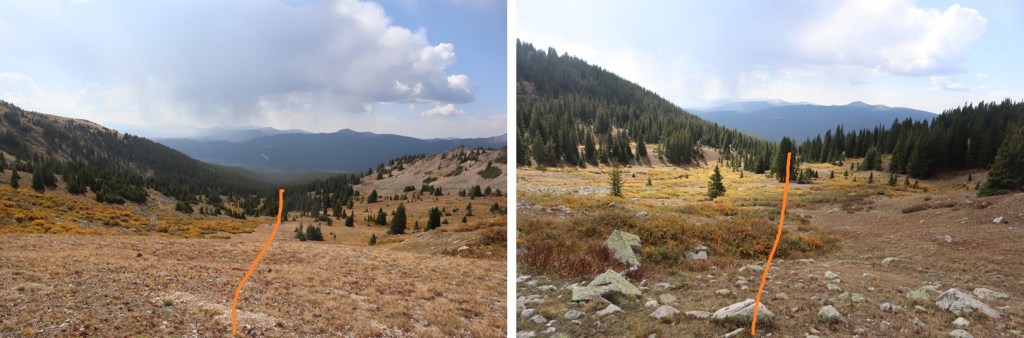
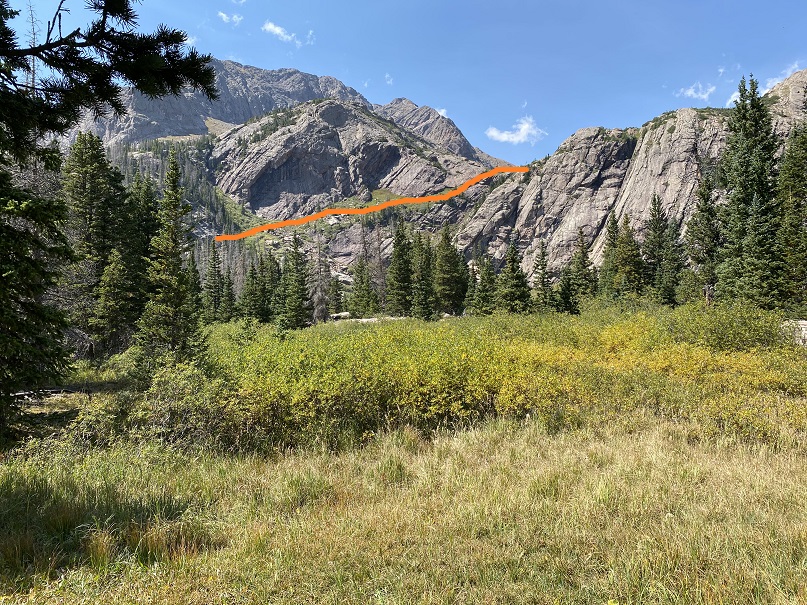
From this point on the trail becomes faint. At times I questioned whether I was on an actual trail at all. It will parallel West Snowmass Creek, and stay high. Here are some photos:
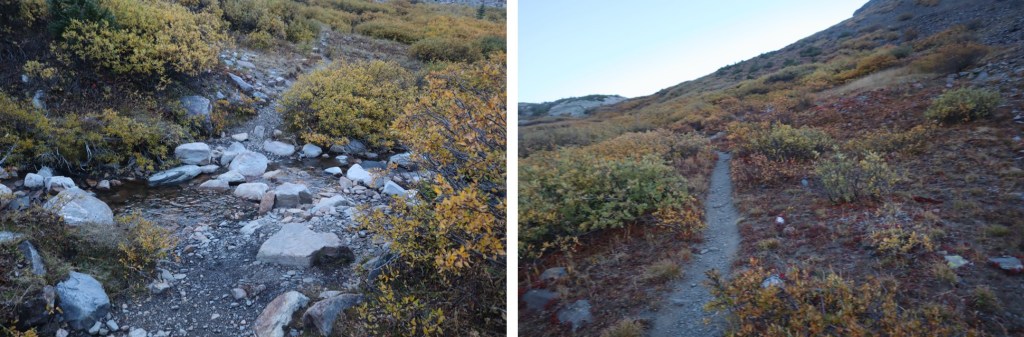
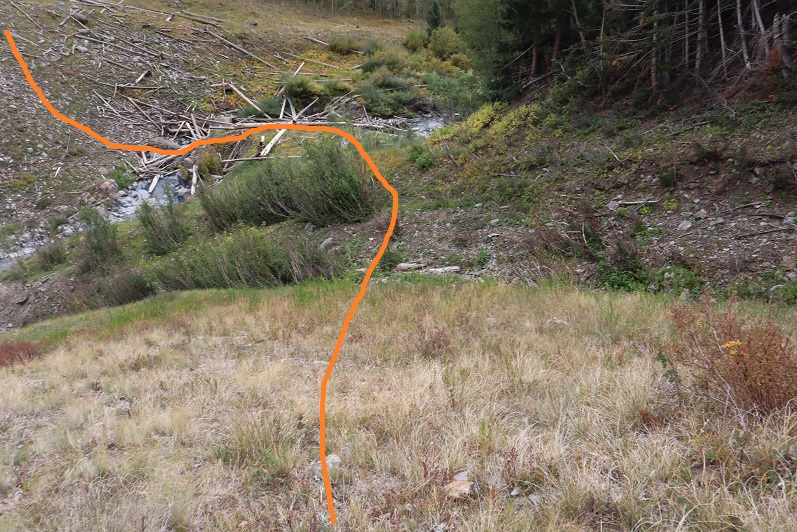
I came to a clearing and headed southeast, crossed West Snowmass Creek, and once again picked up a trail.
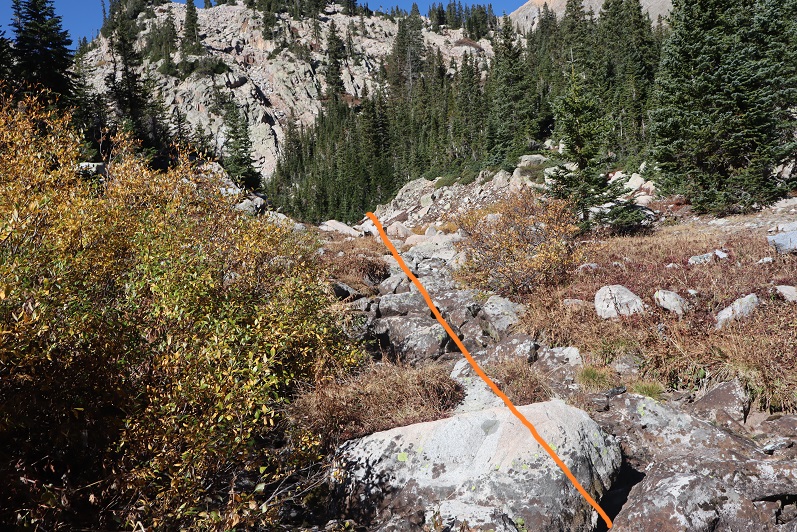
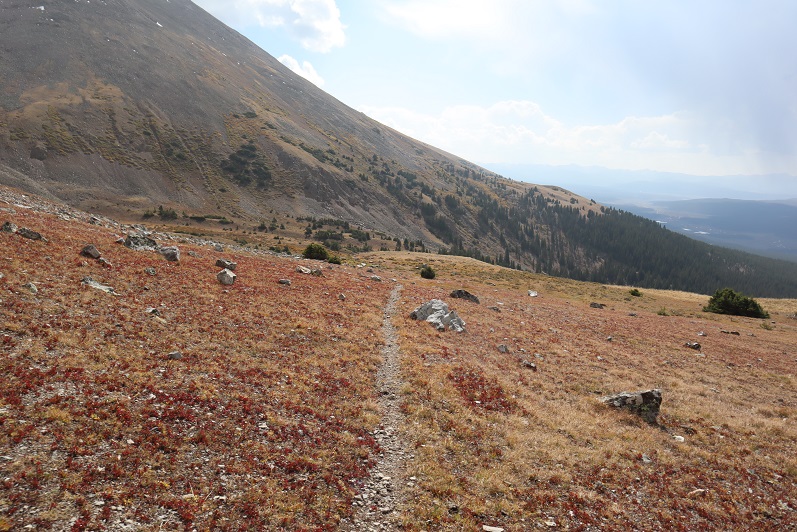
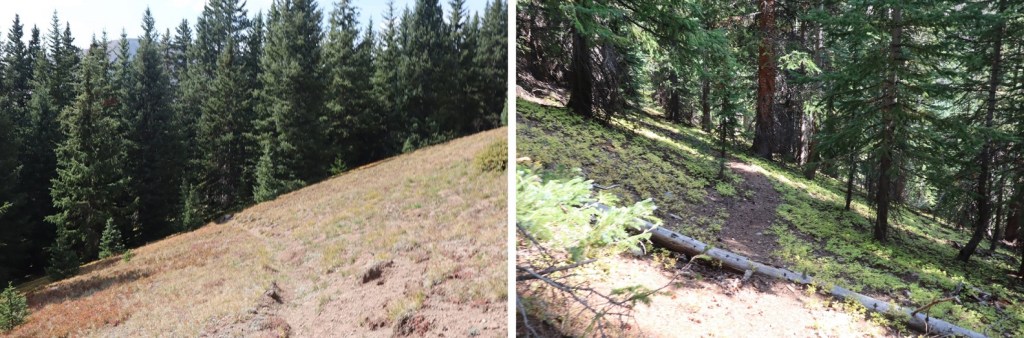
I took this trail to treeline, where it ended. I put pink surveyor’s tape on a tree so I’d know where the trail picked up on my way back.
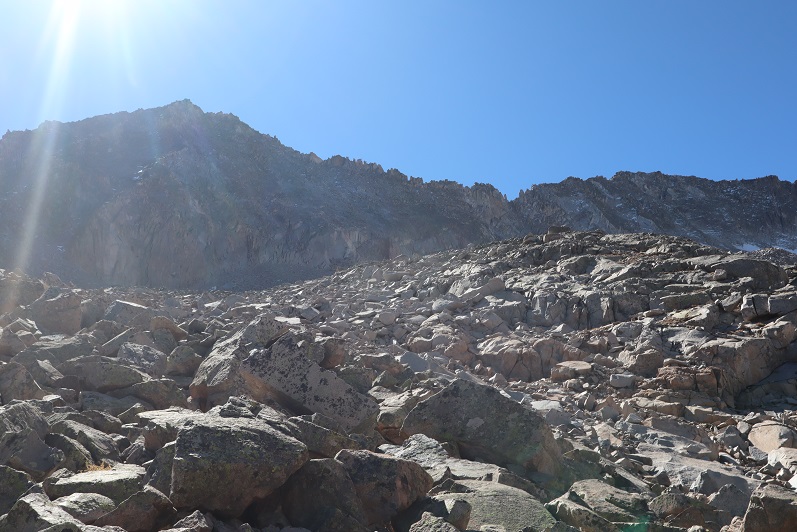
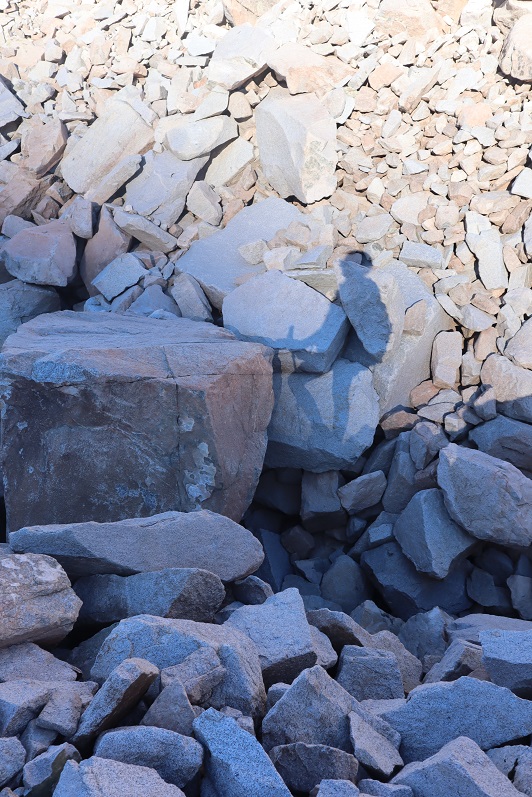
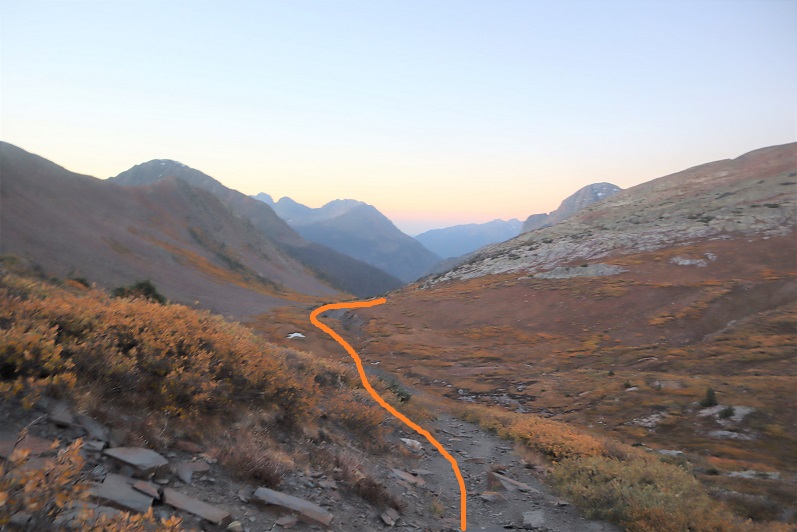
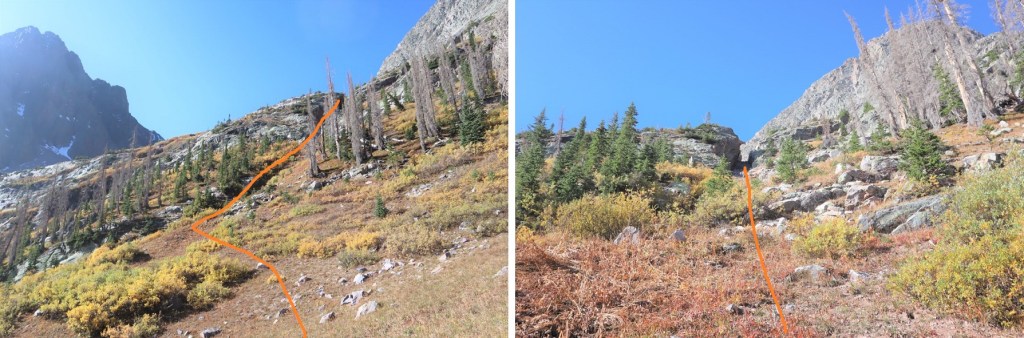
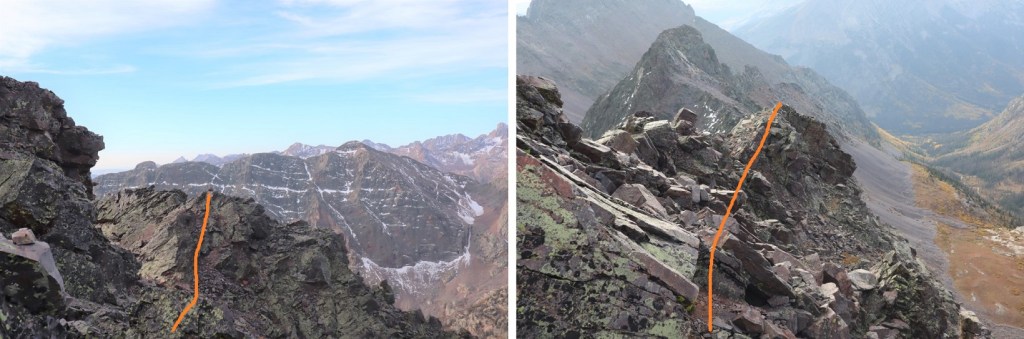
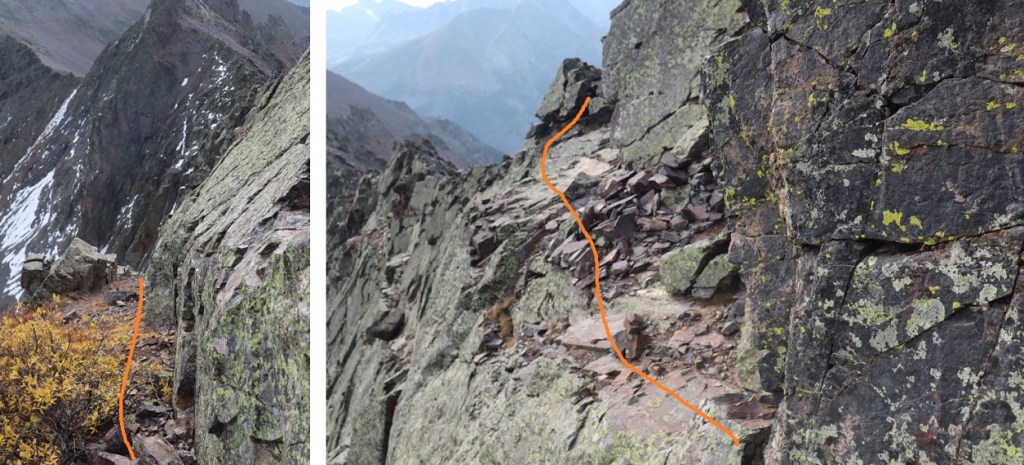
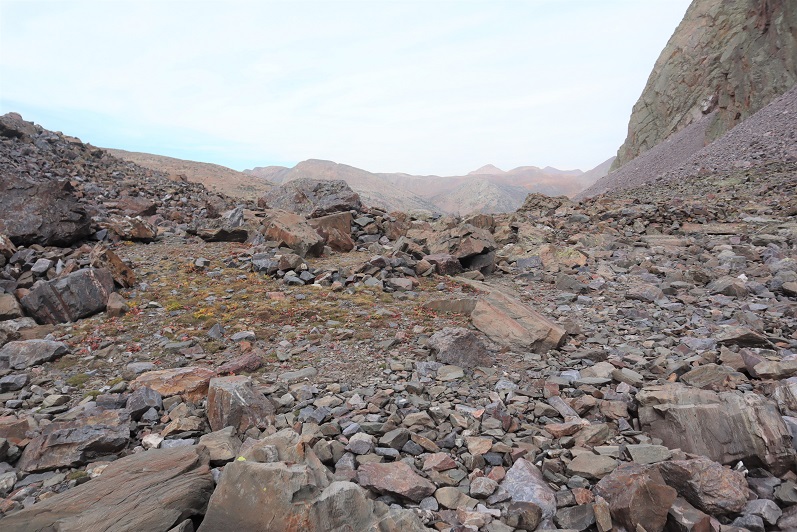
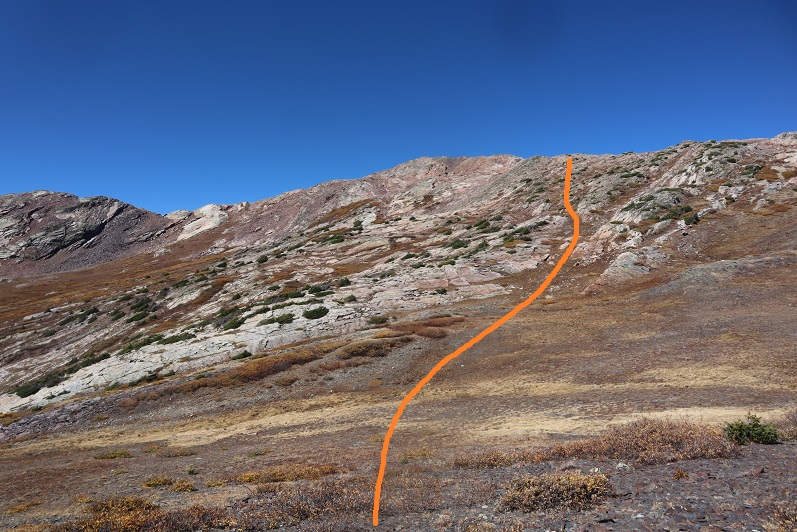
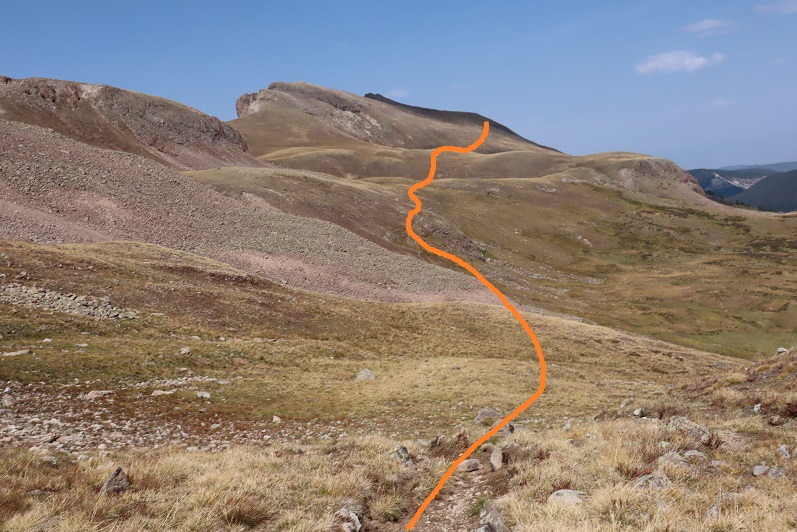
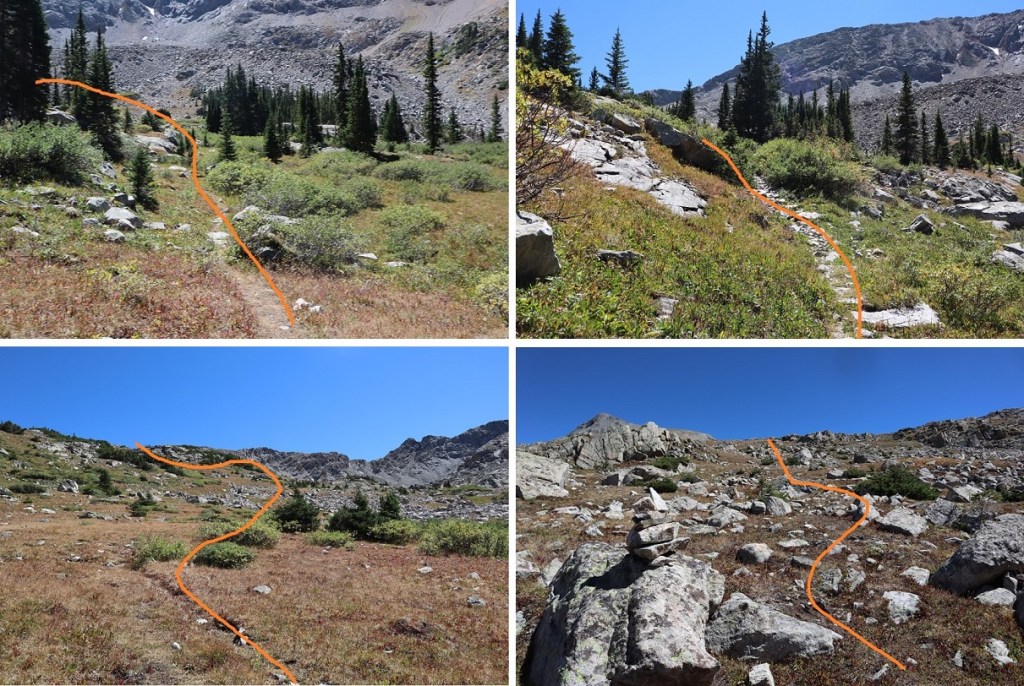
From here the rest of the hike was full of rocks and boulders. I headed southwest
I lost a little bit of elevation before gaining it again
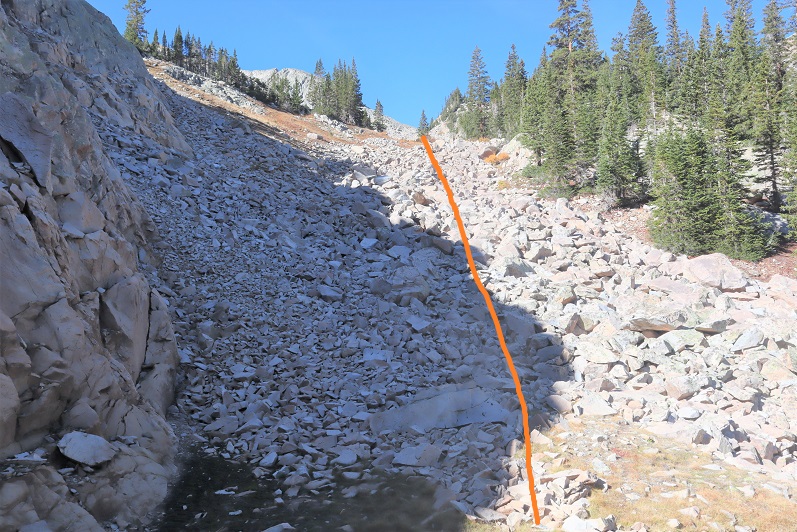
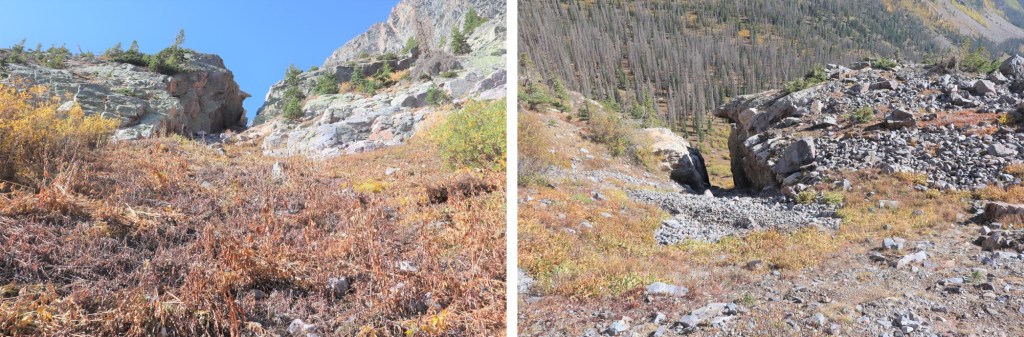
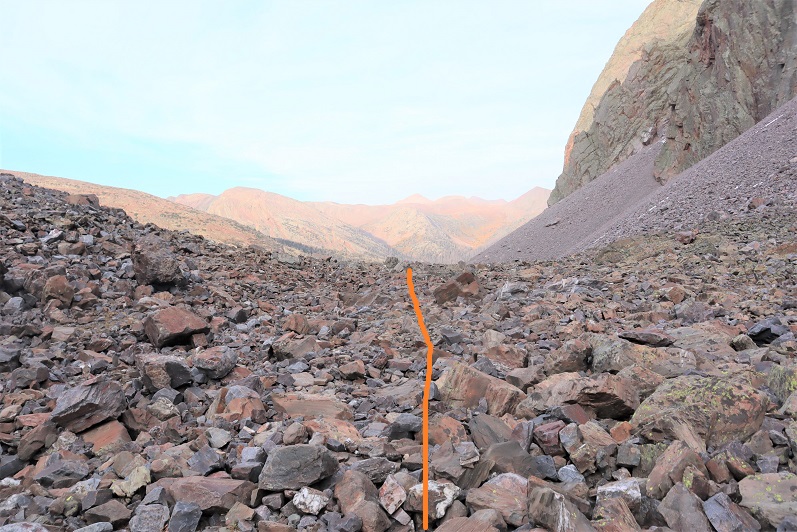
Rock-hopped up this drainage
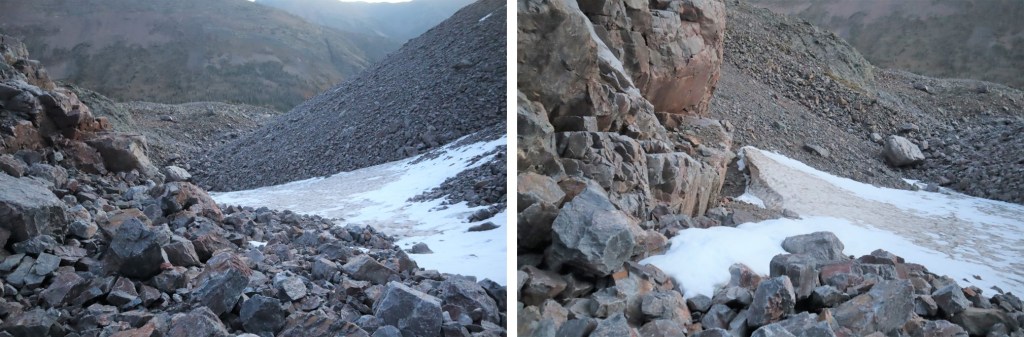
Followed the creek for a bit until it ended
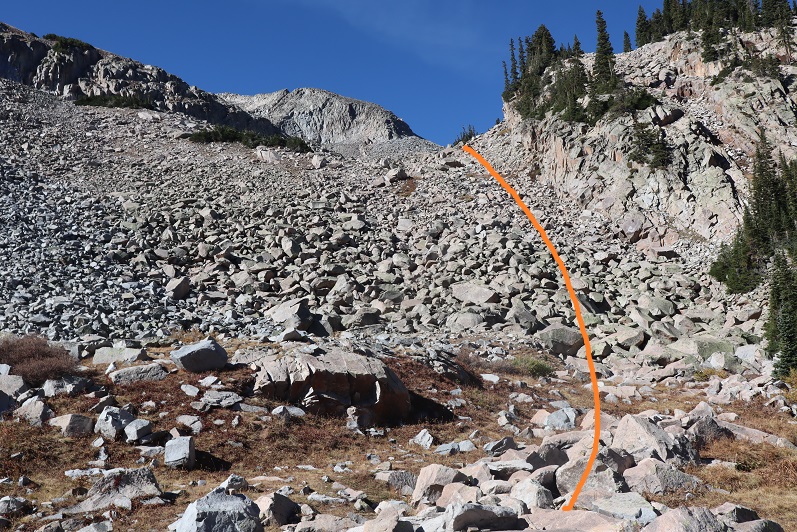
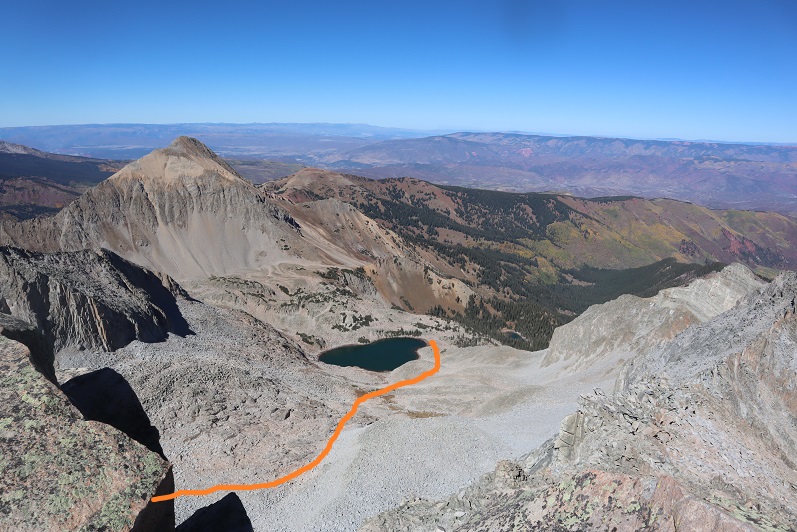
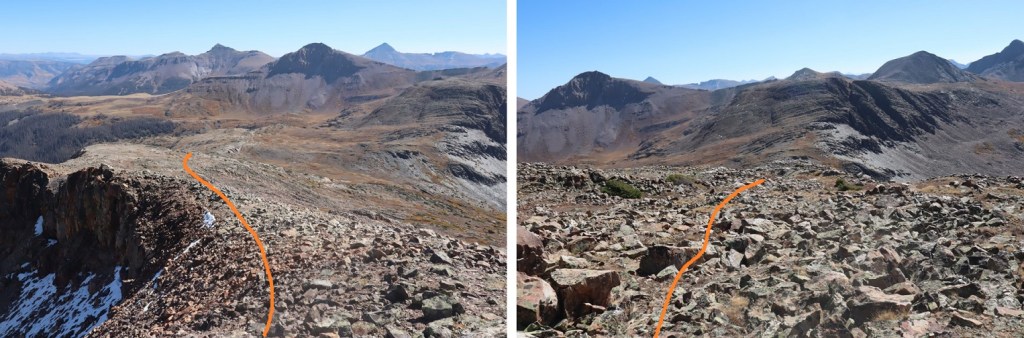
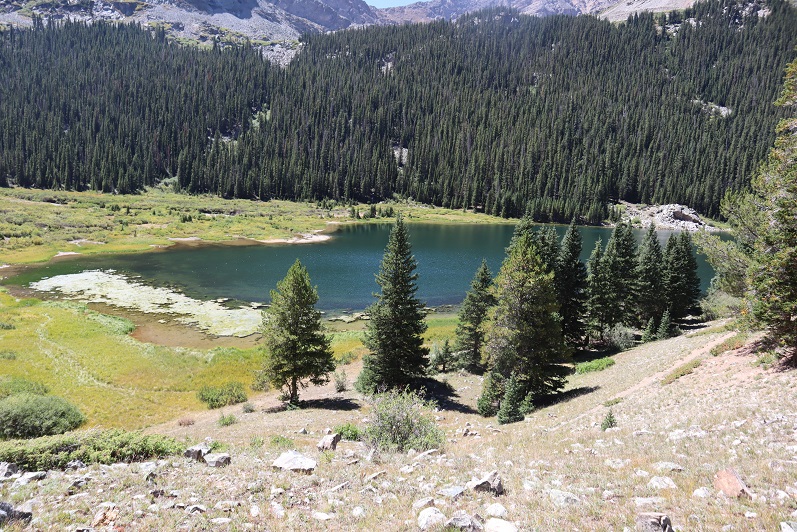
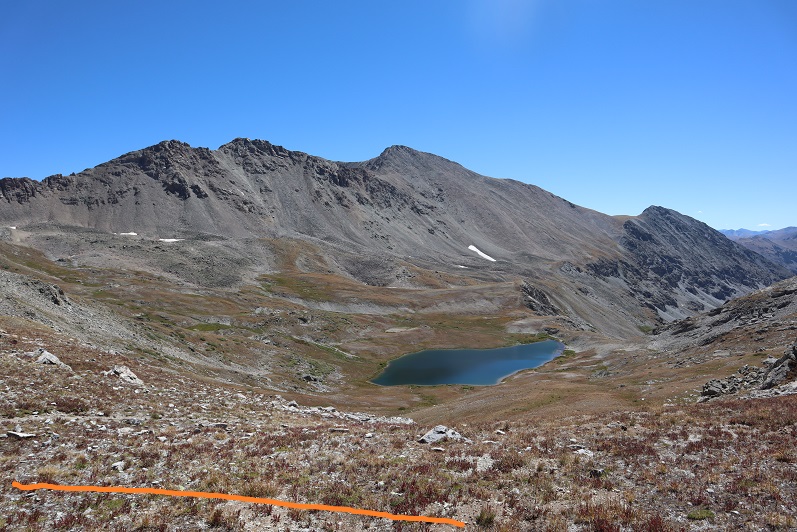
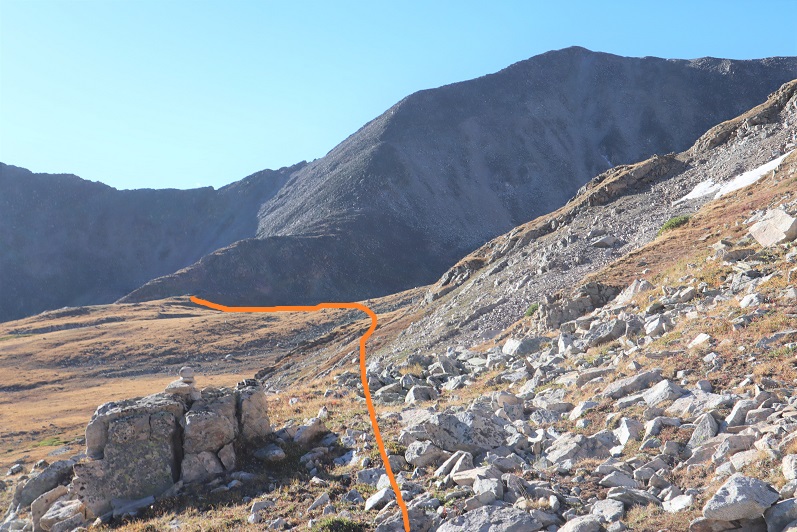
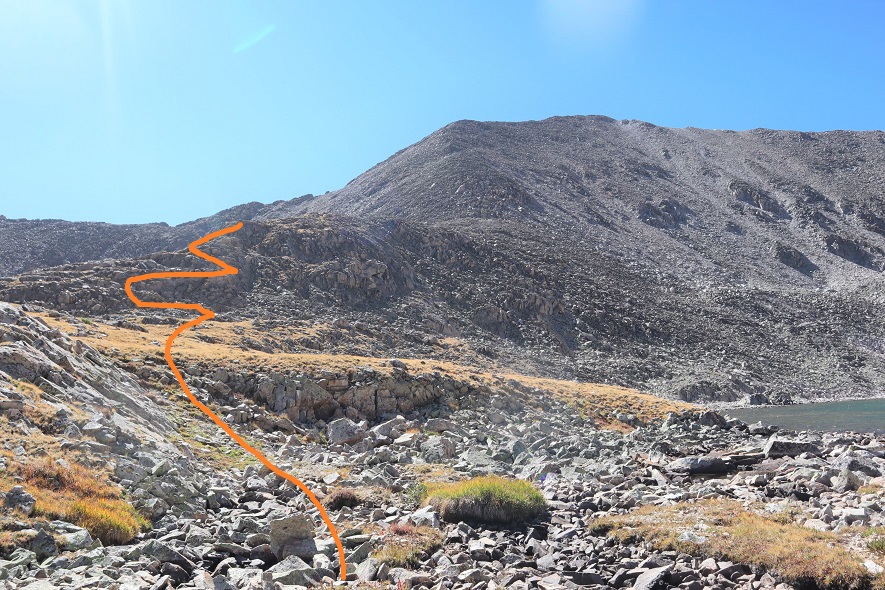
Ascended another drainage and at the top turned left to skirt Moon Lake
This basin never seems to end! I just kept heading southwest
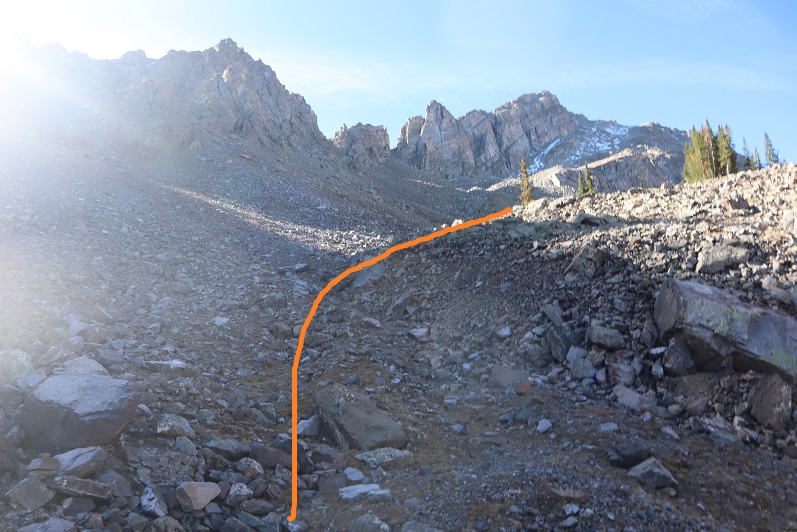
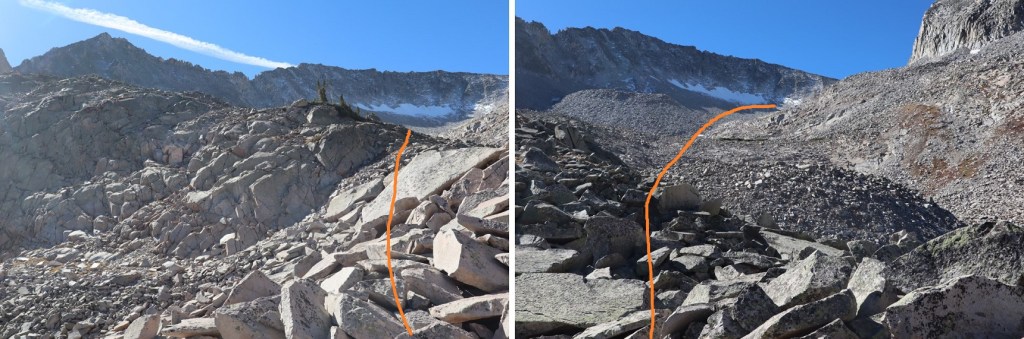
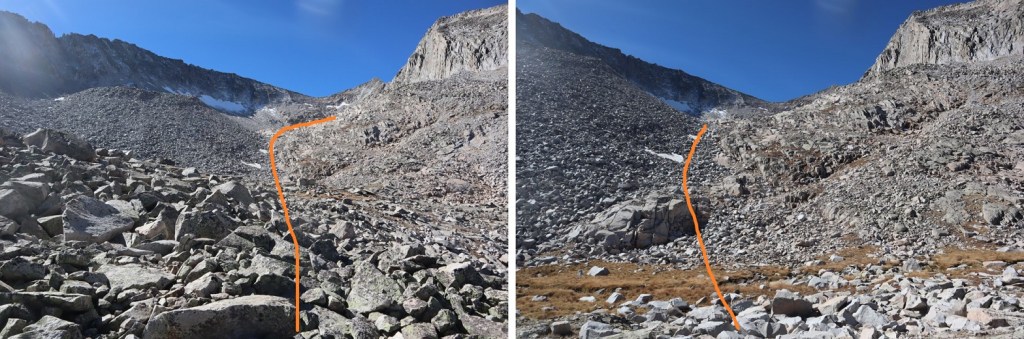
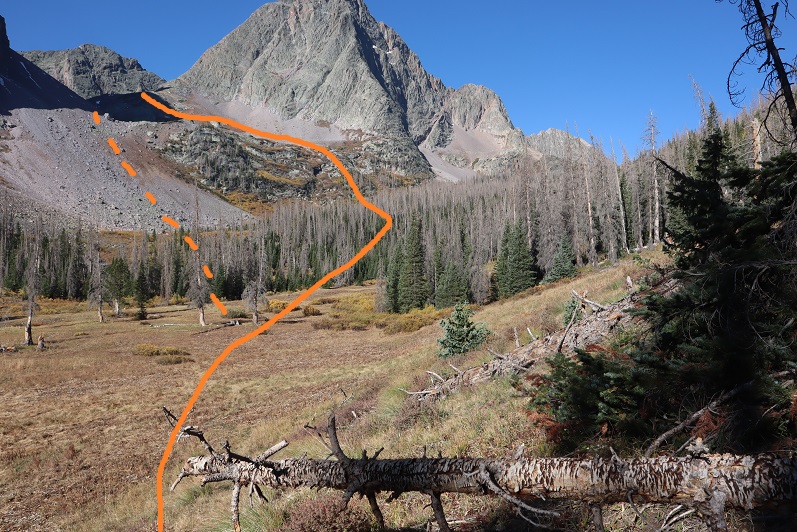
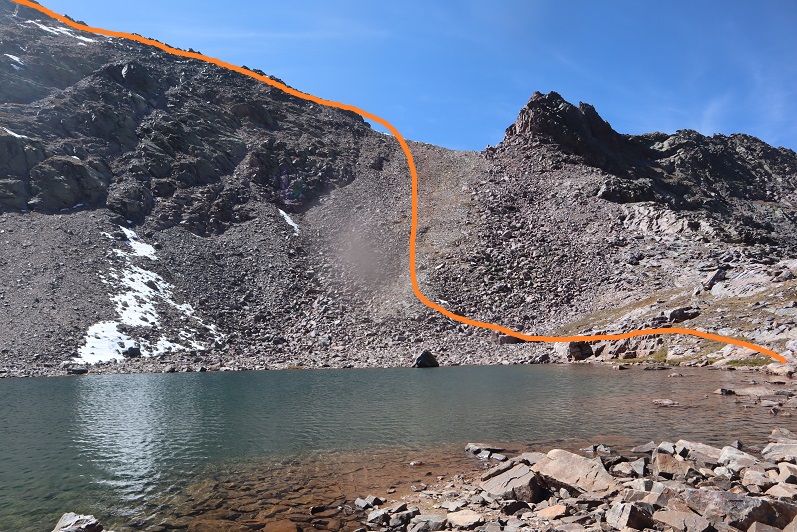
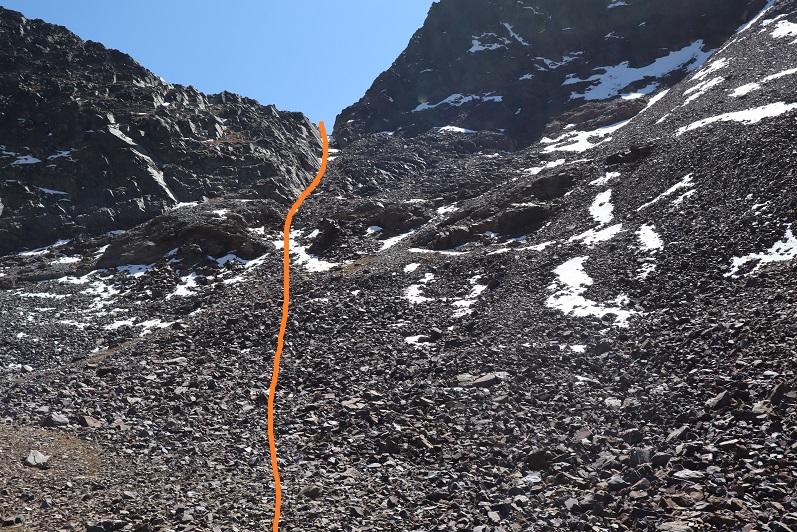
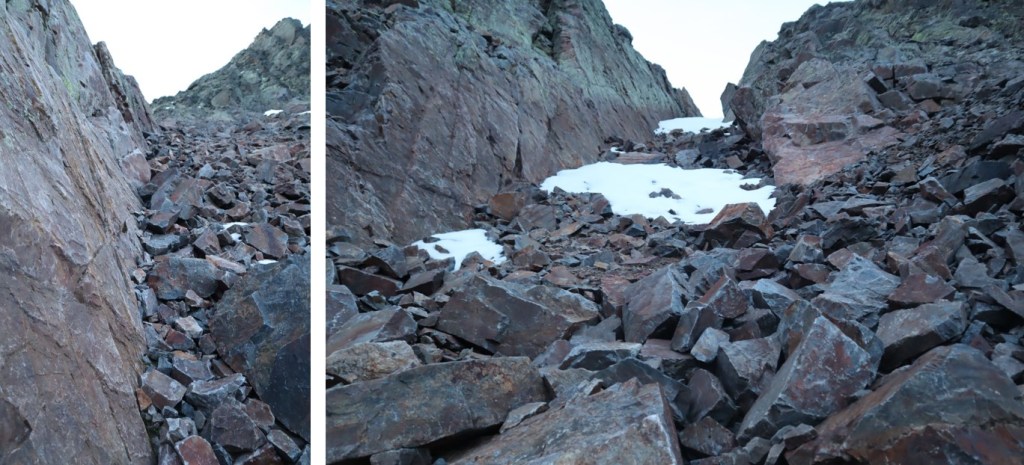
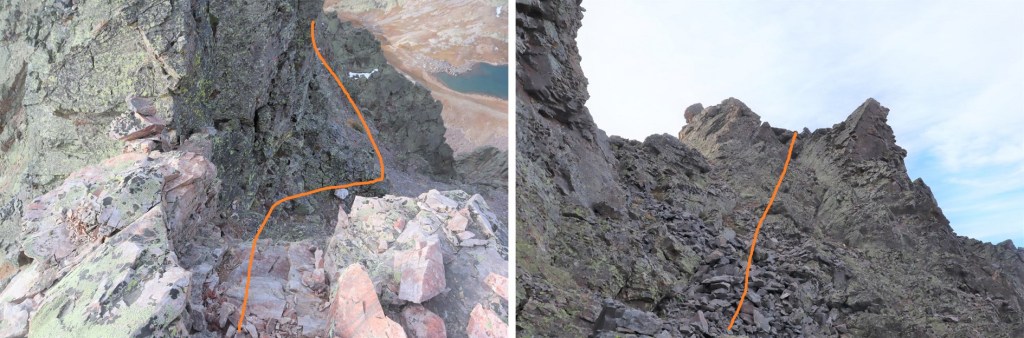
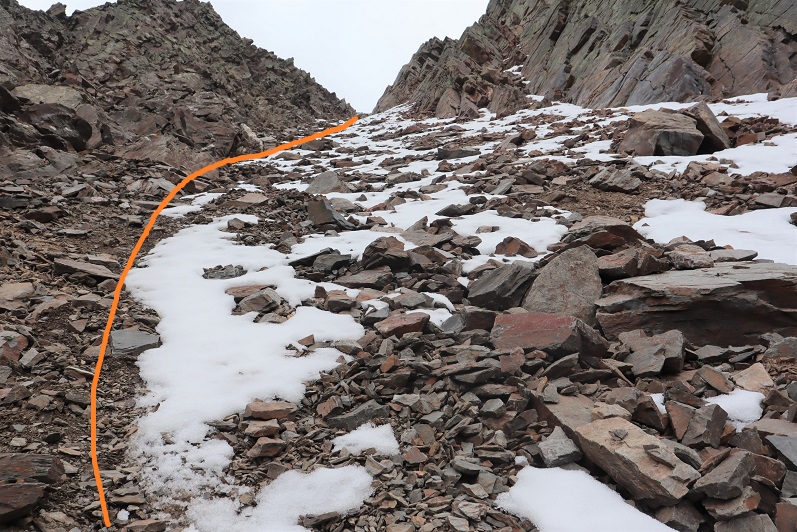
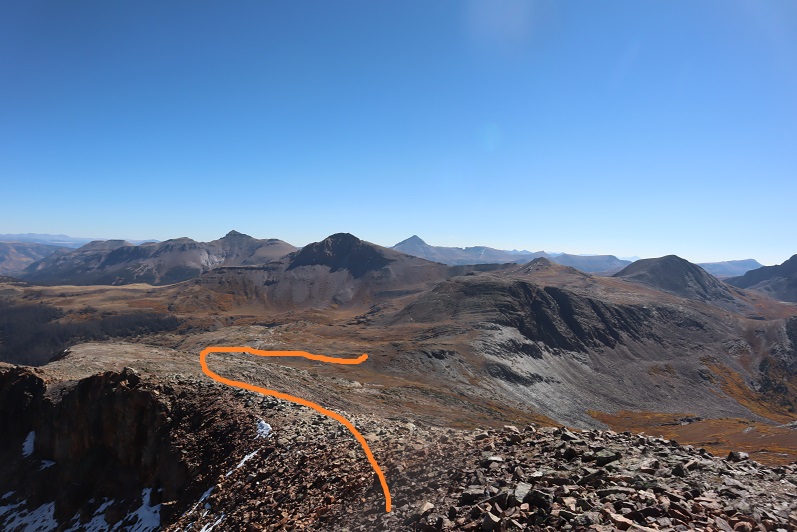
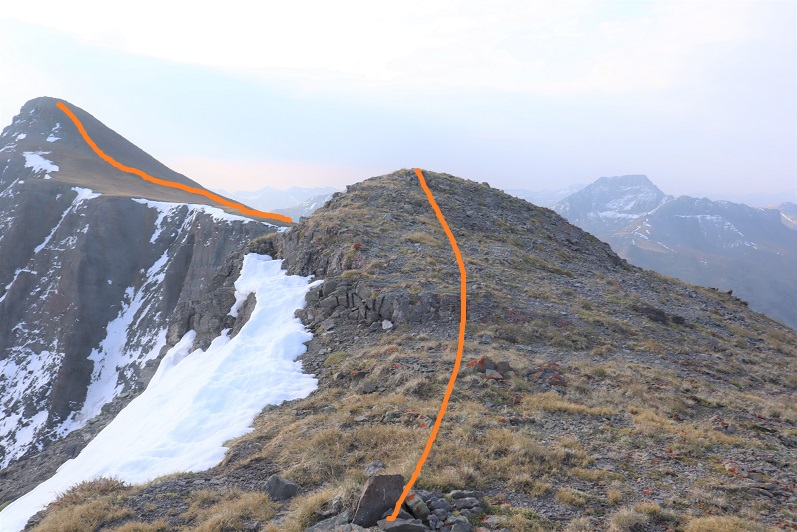
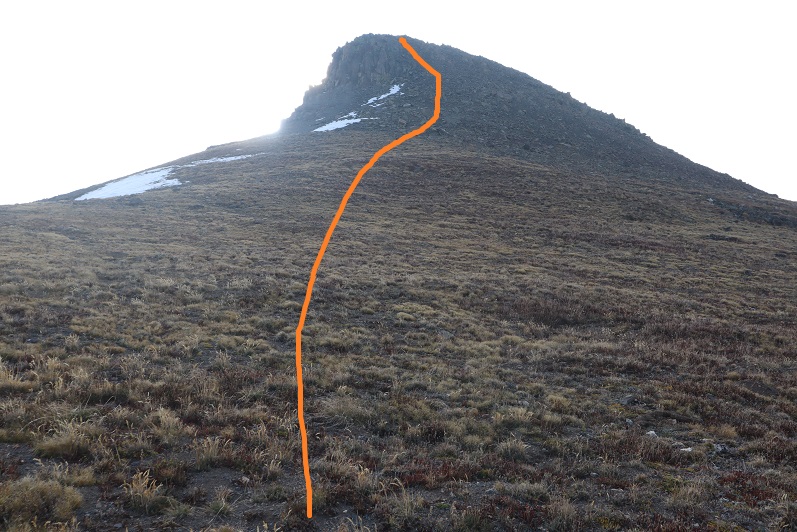
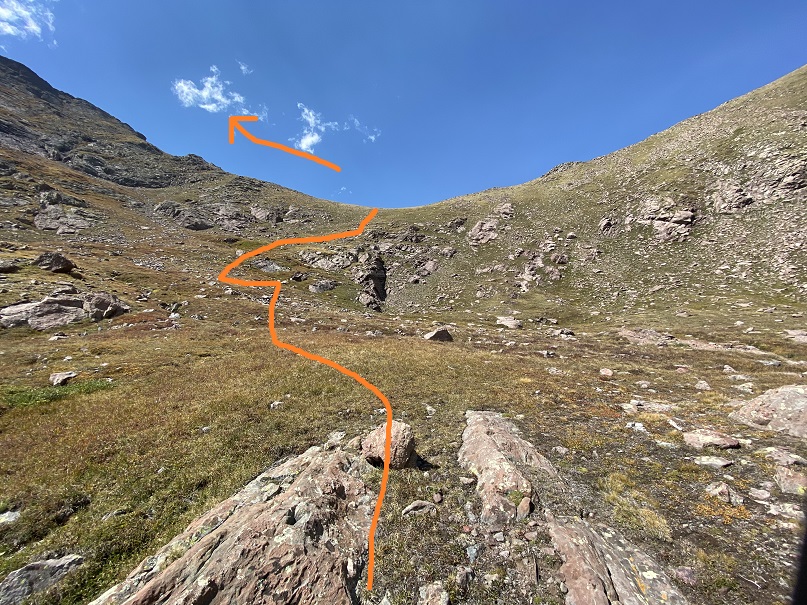
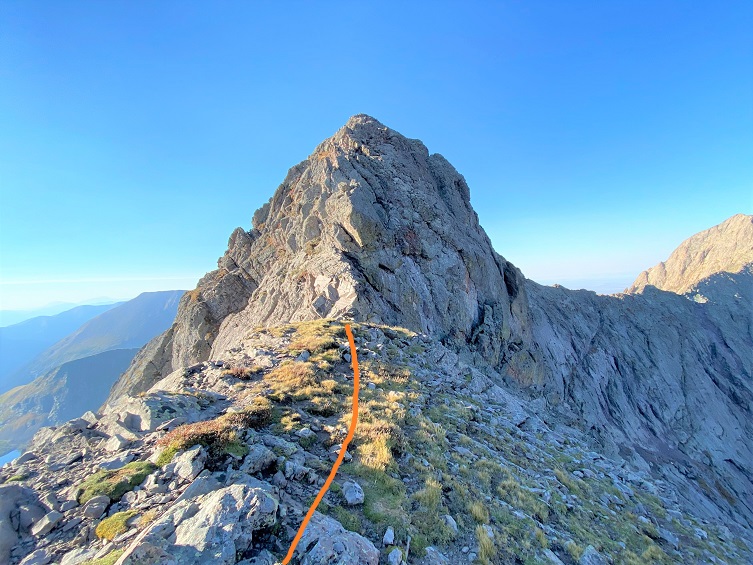
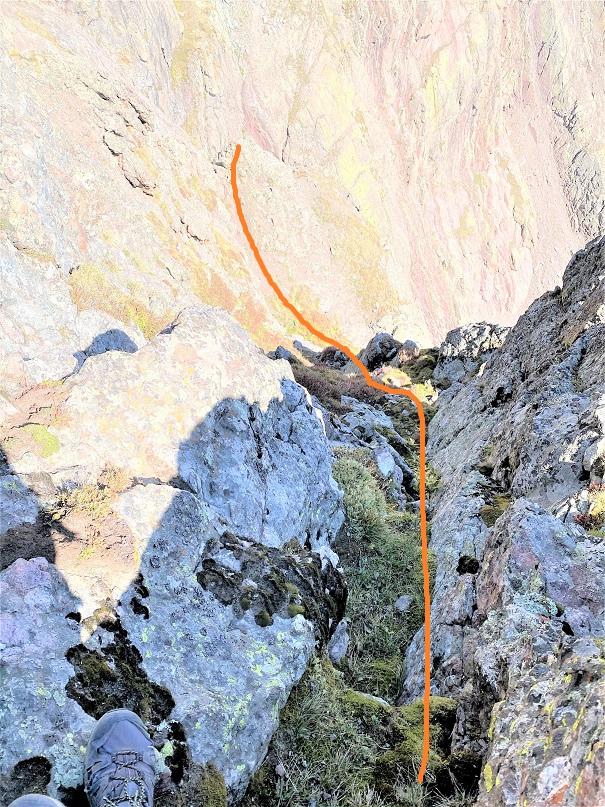
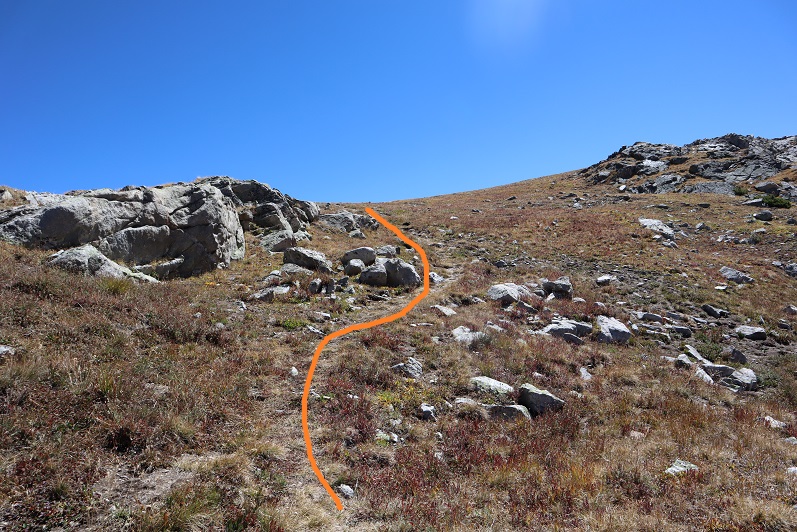
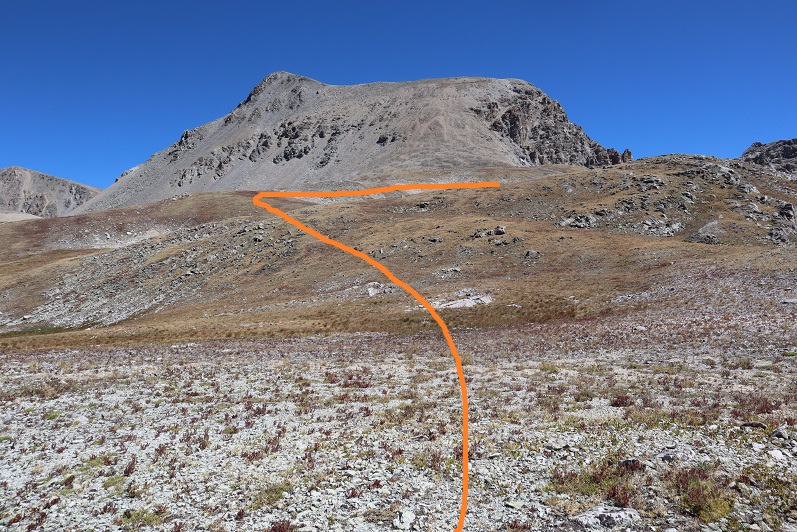
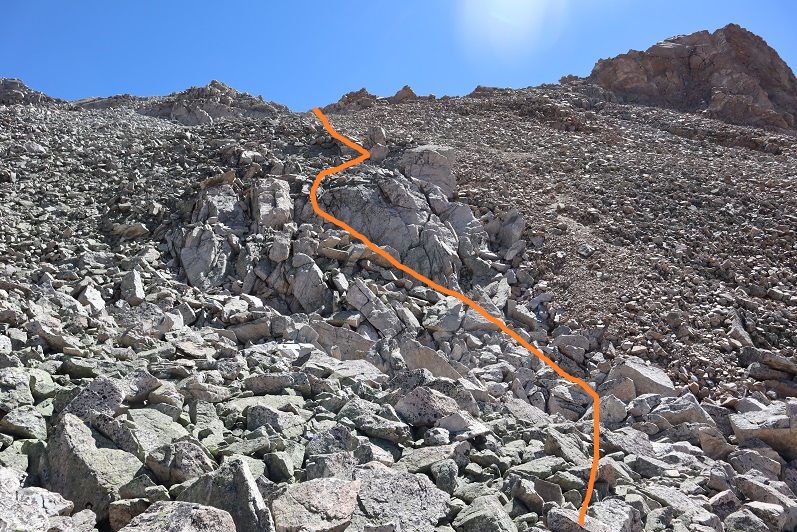
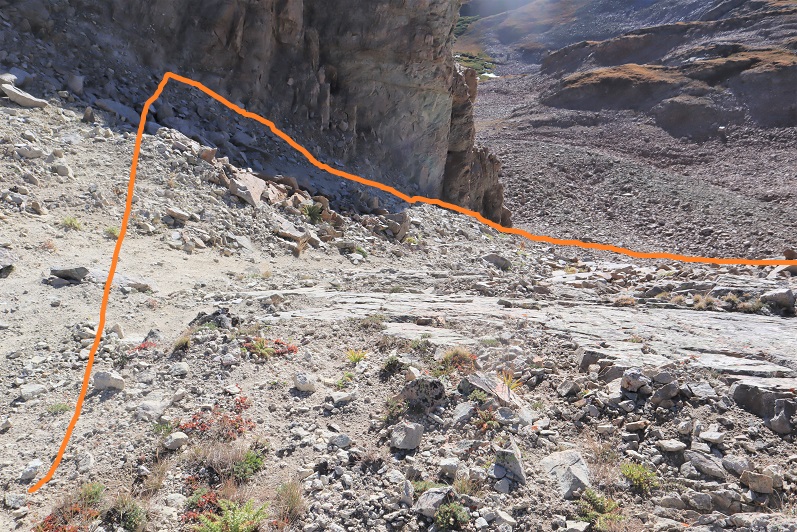
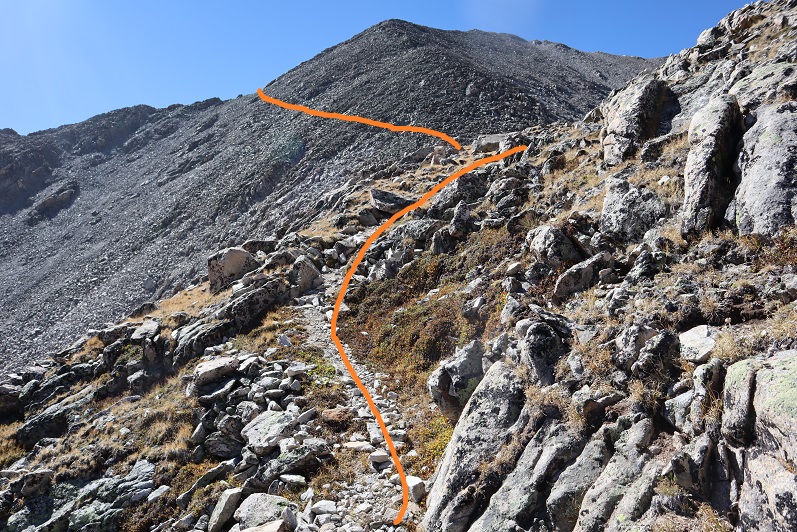
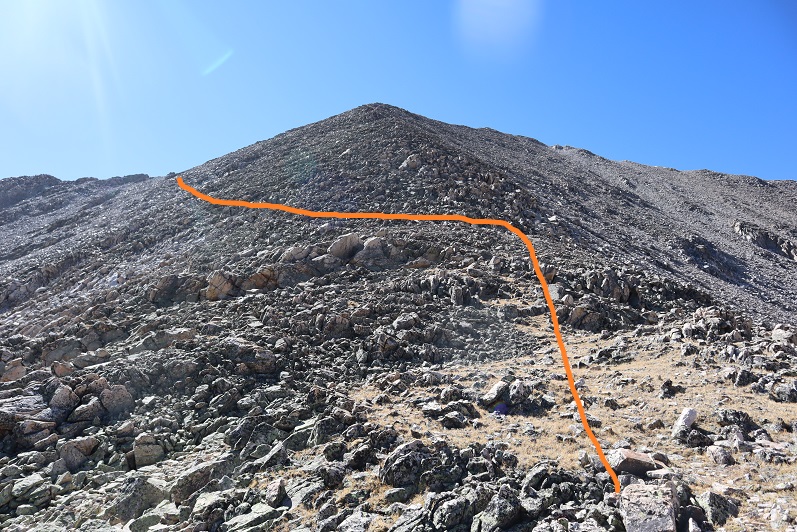
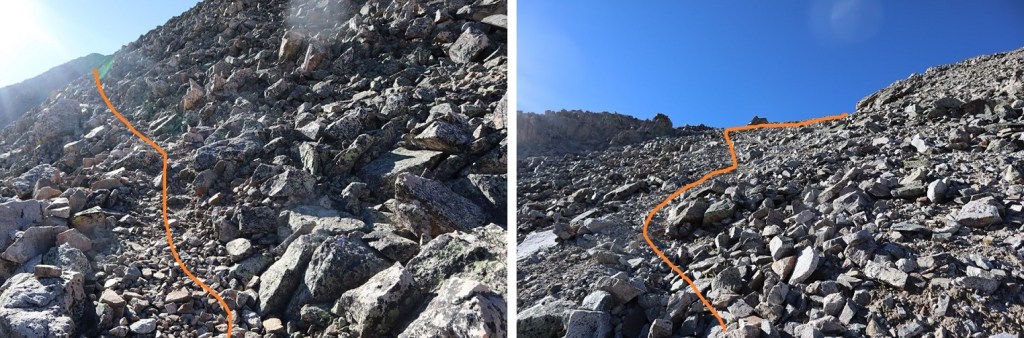
At the end of the basin it was time to gain the ridge. I stayed right of the drainage.
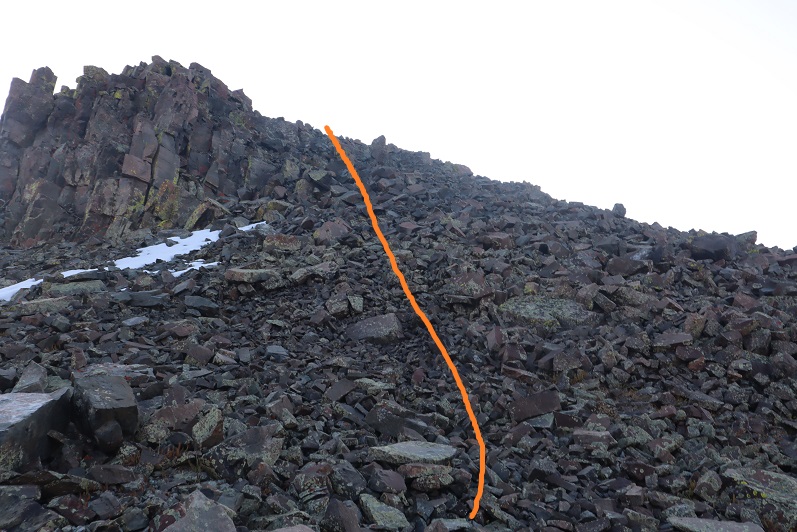
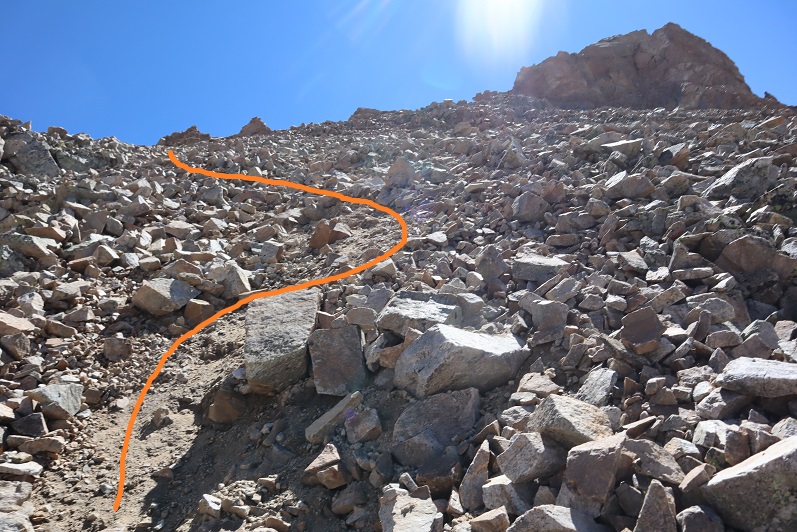
This was mostly class 2, but towards the end became class 3 to avoid the snow
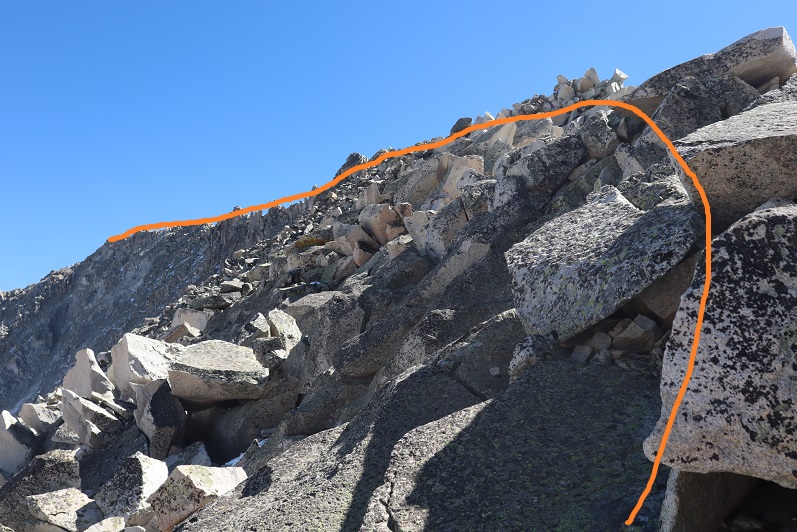
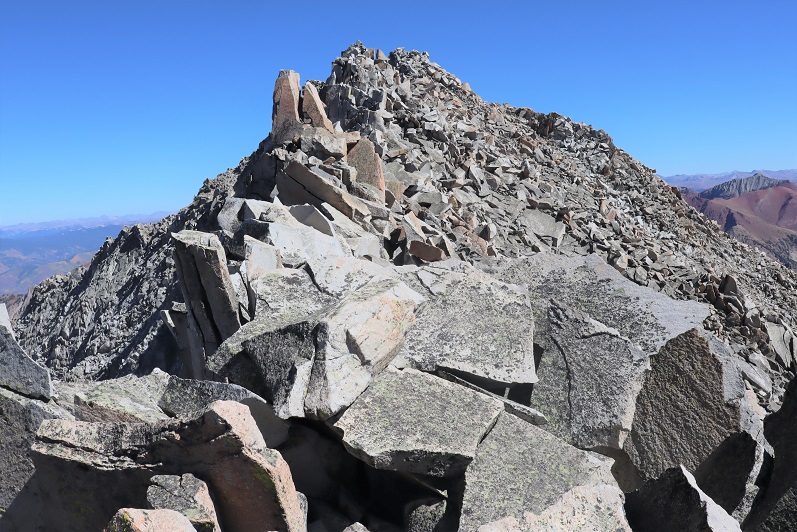
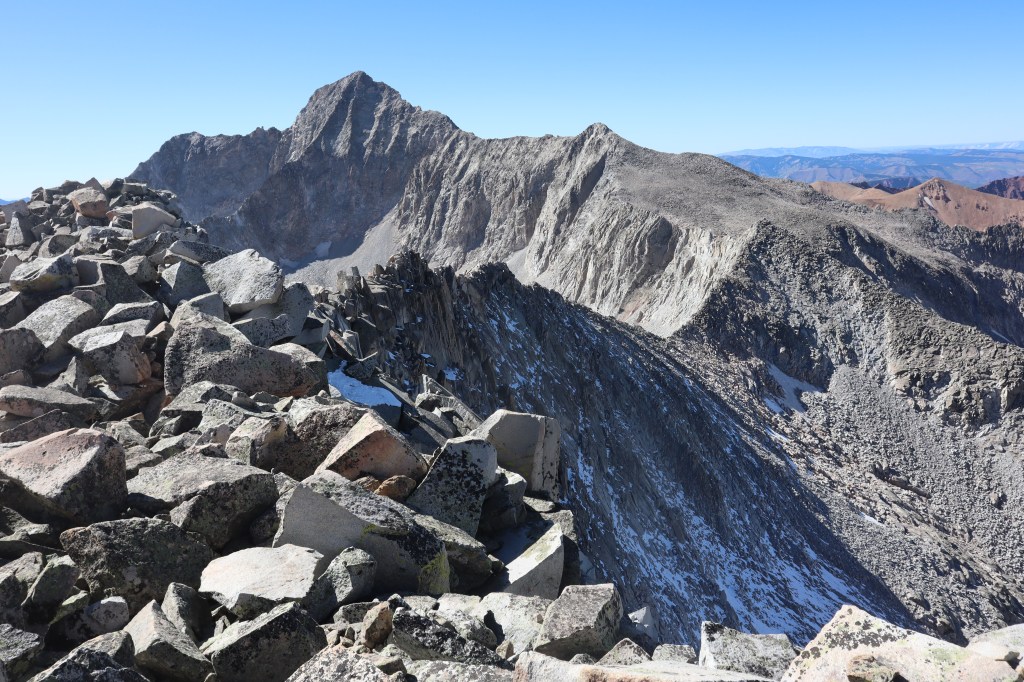
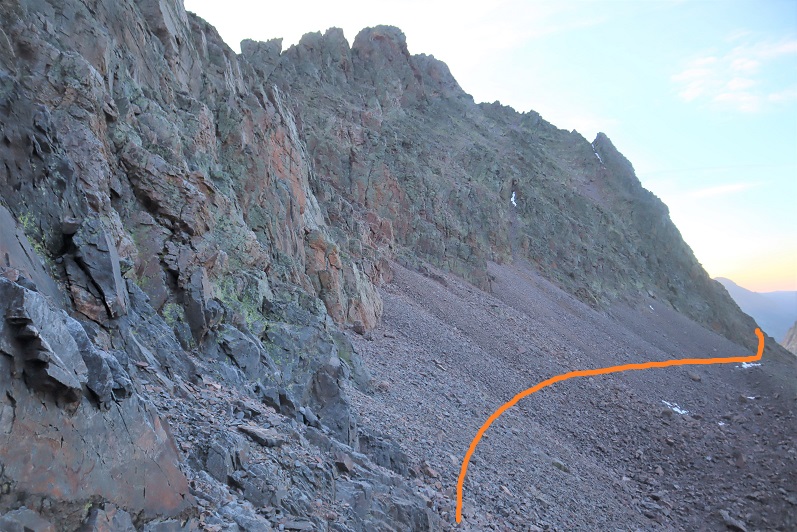
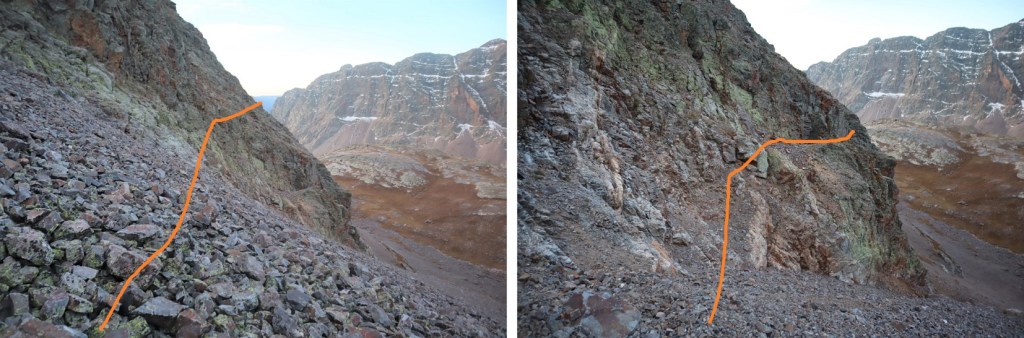
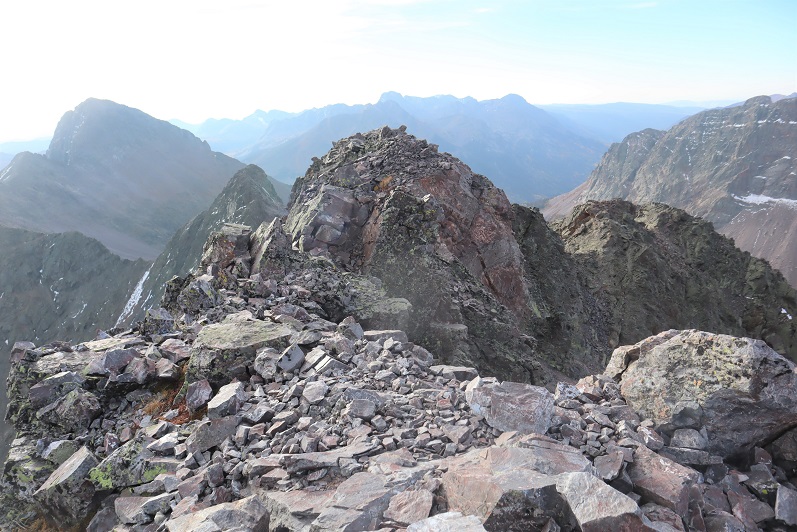
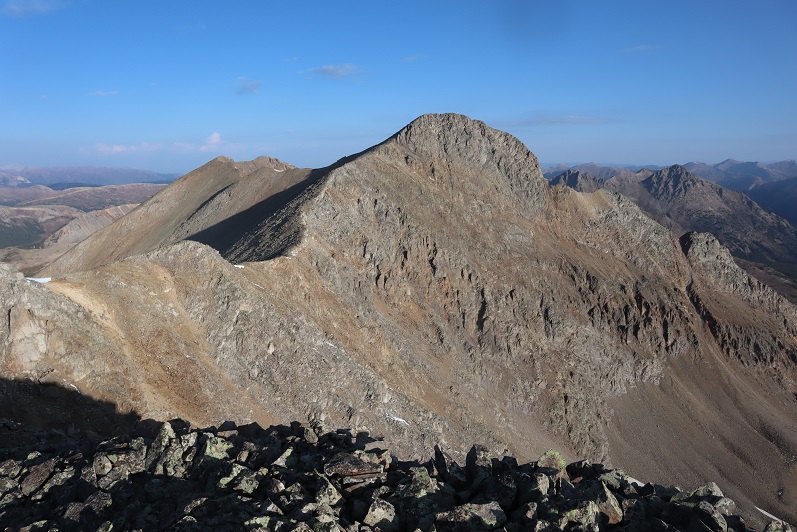
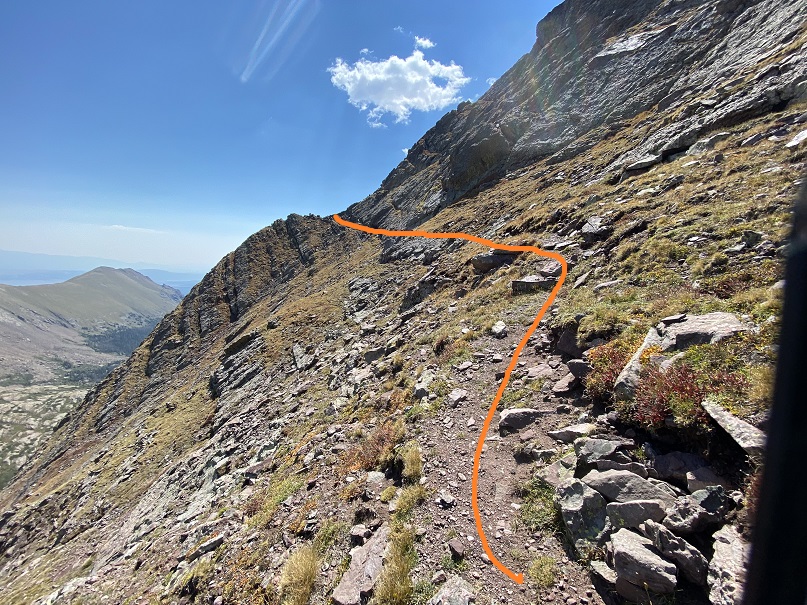
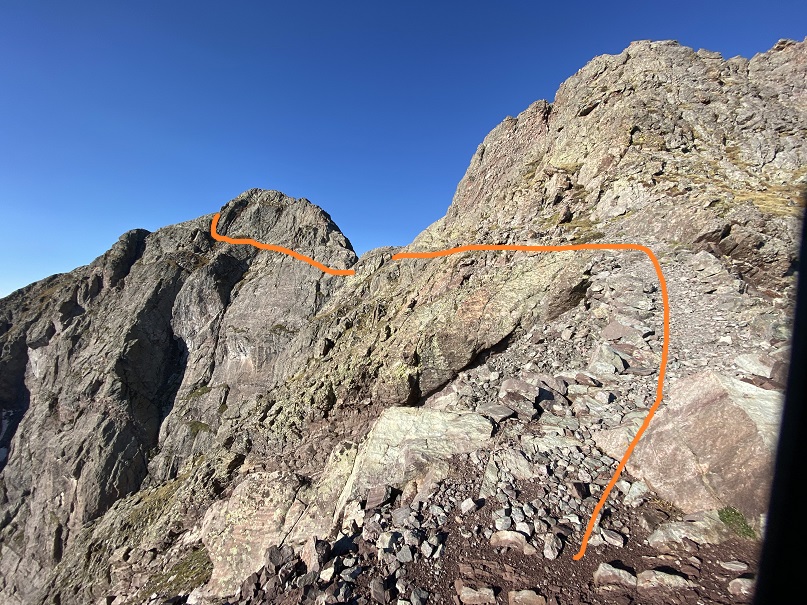
Once I gained the ridge I turned left and followed it to the summit.
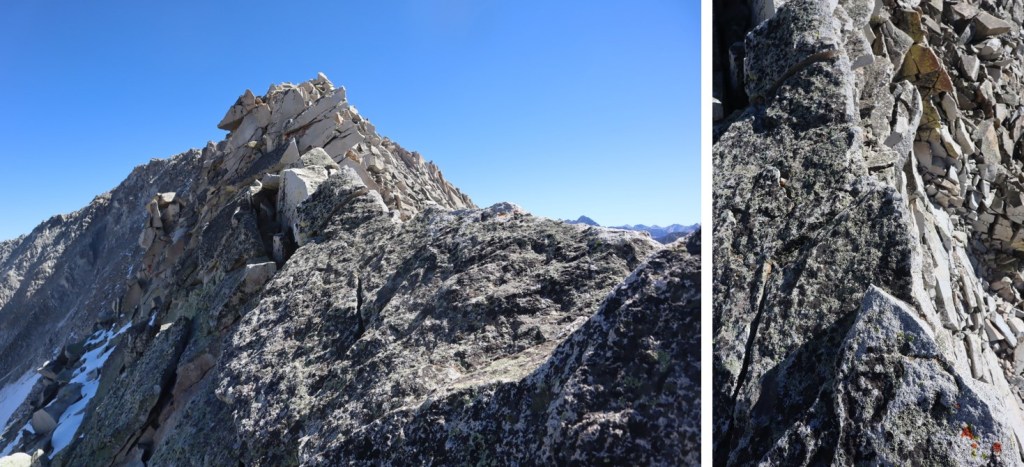
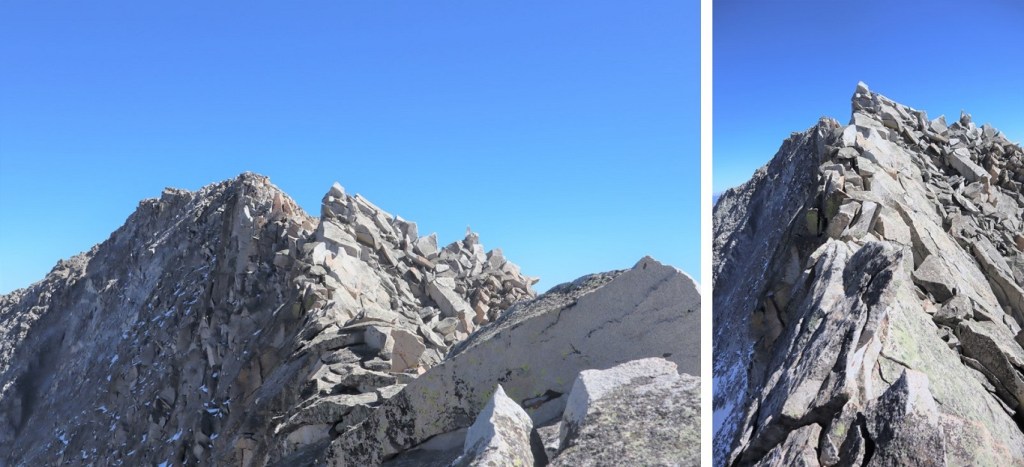
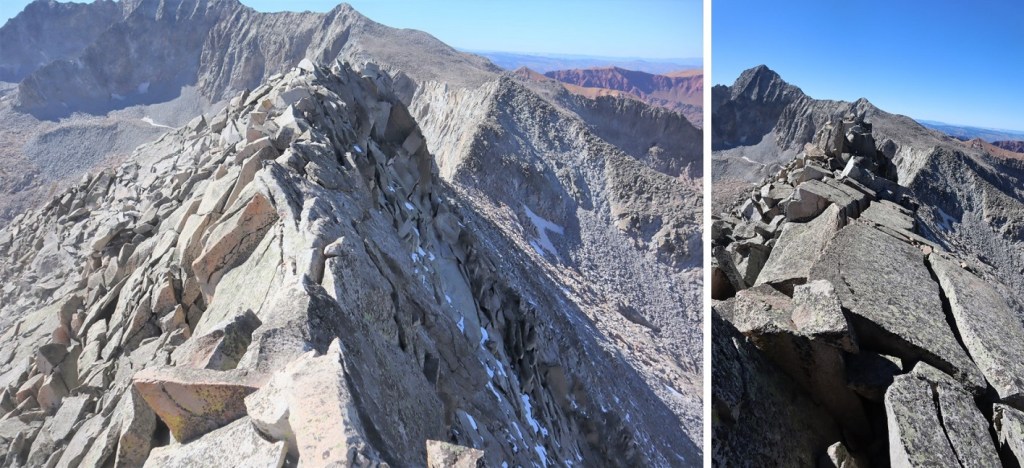
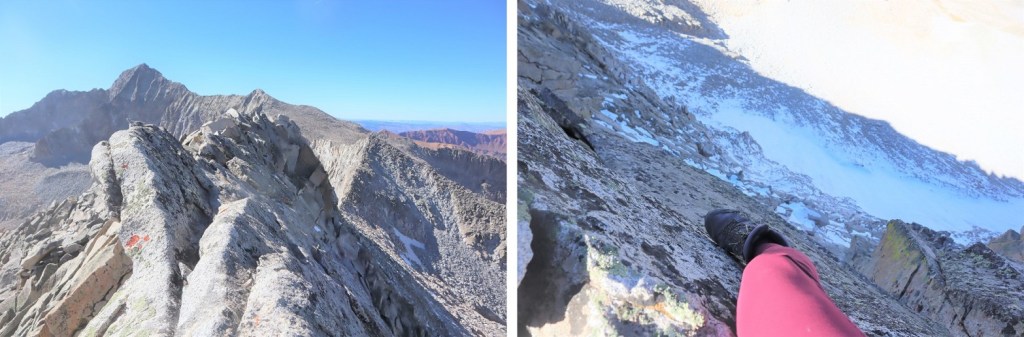
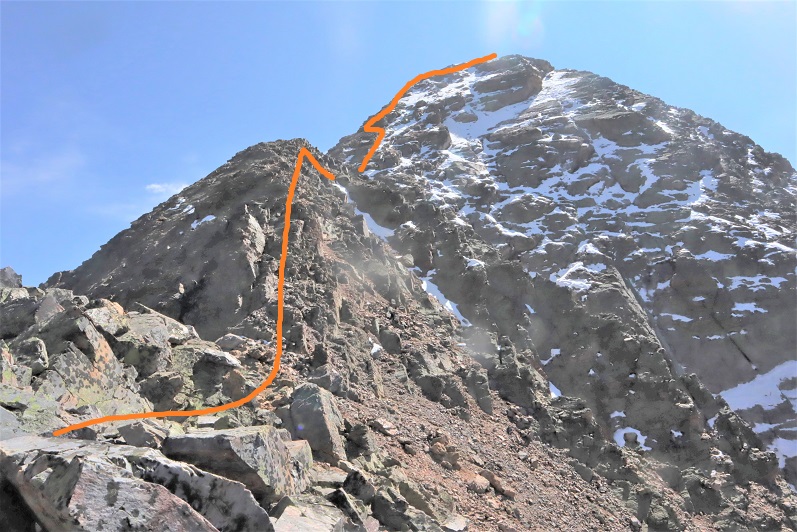
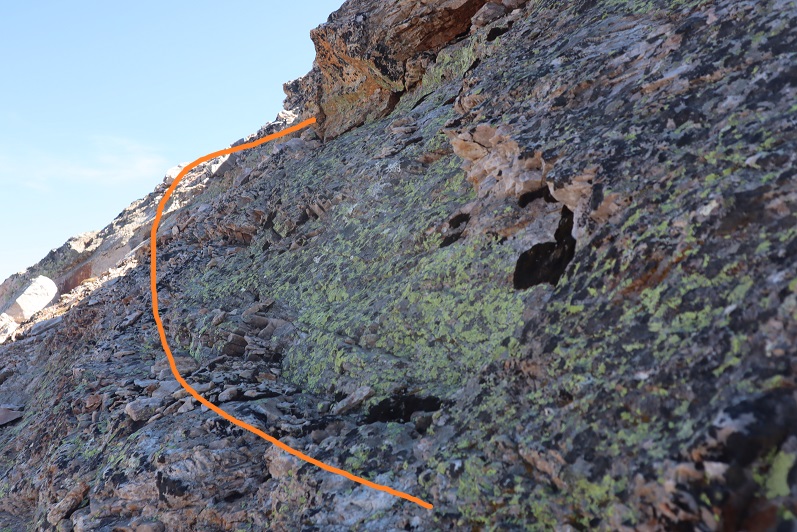
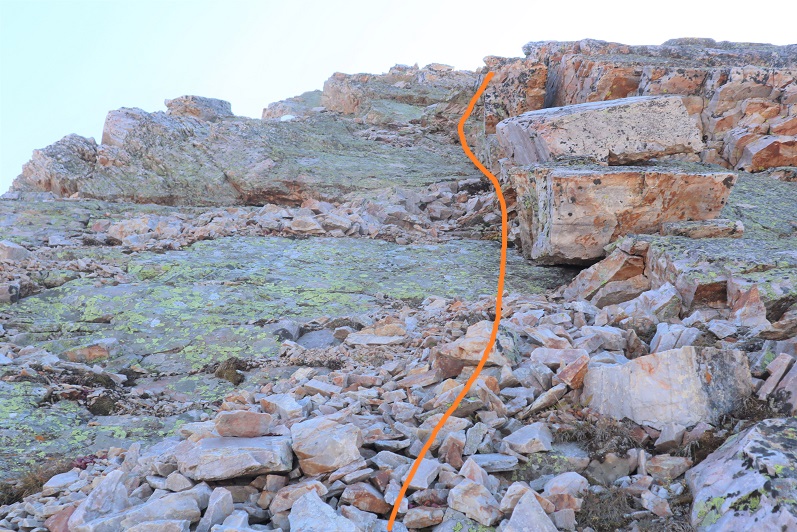
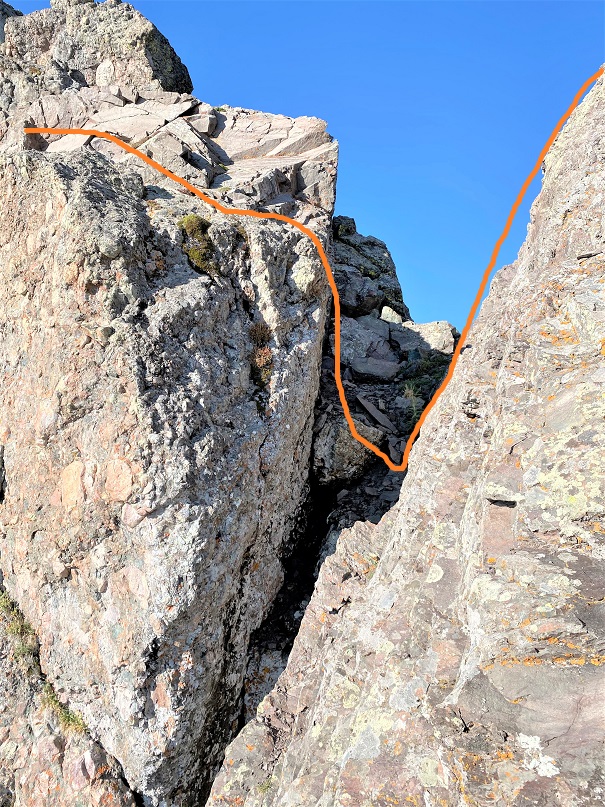
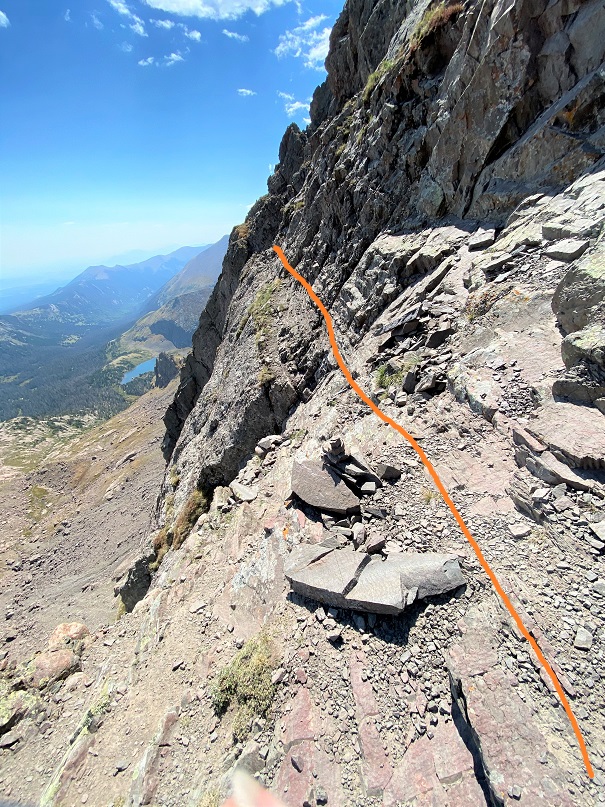
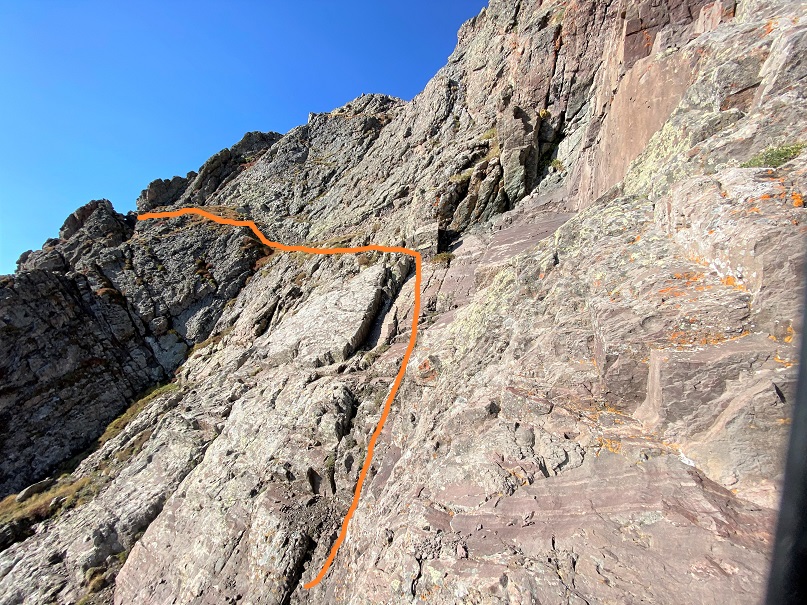
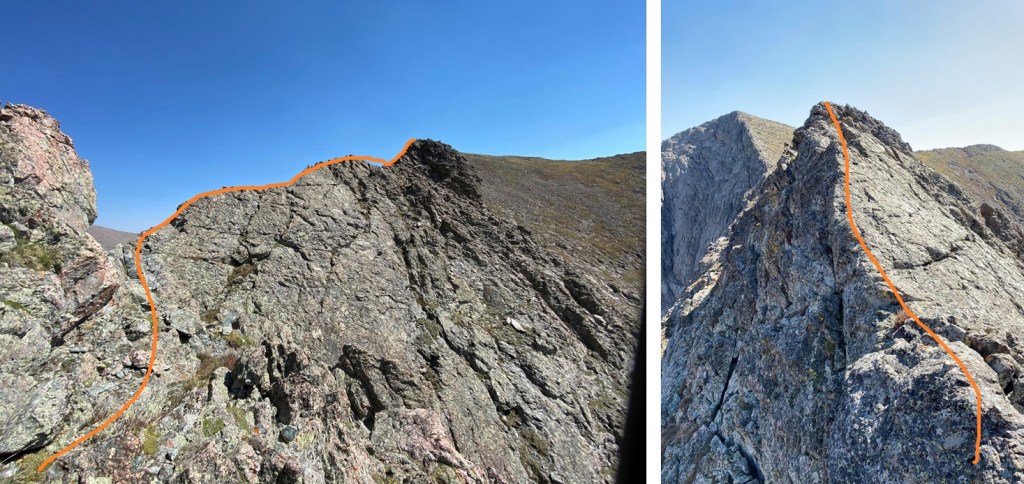
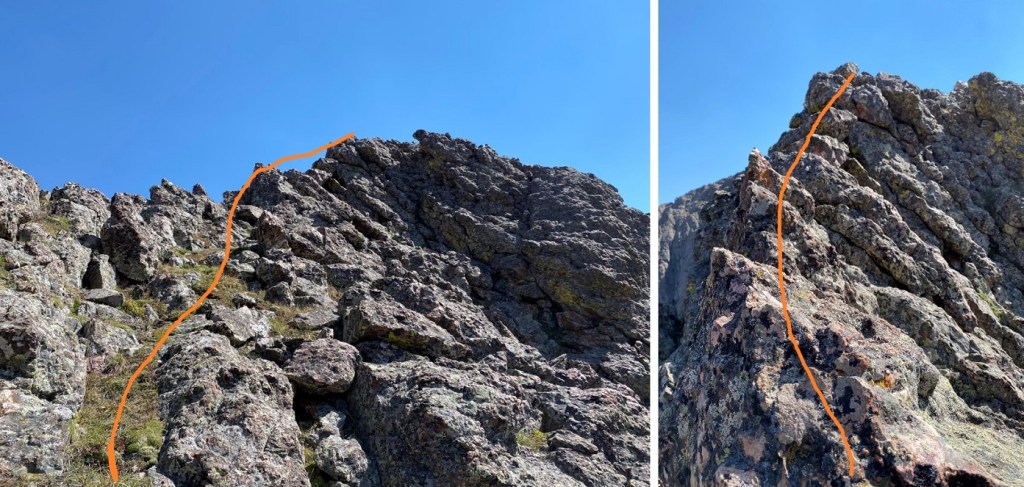
Ha! That’s an oversimplification. I did indeed follow the ridge. The ridge proper goes all the way to the summit. However, it’s a fun scramble to get there, with a lot of exposure, and more than one knife edge. If you did Capitol Peak and it left you wanting more, this is the peak for you! Here are some highlights:
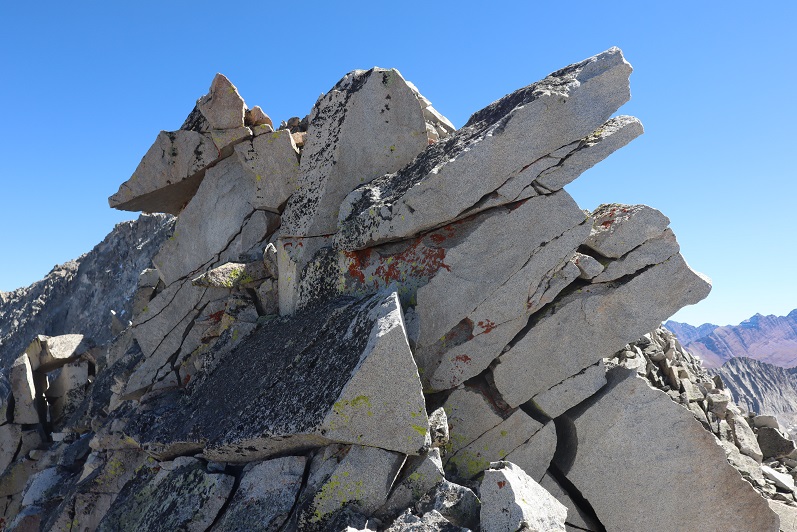
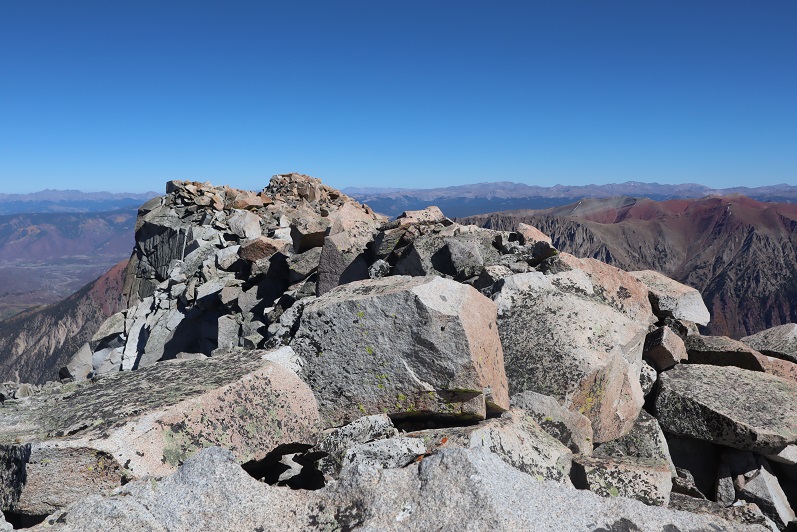
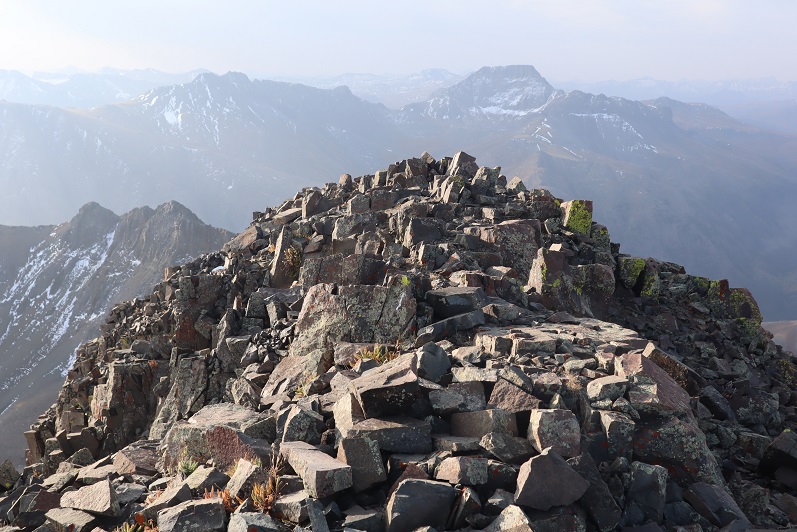
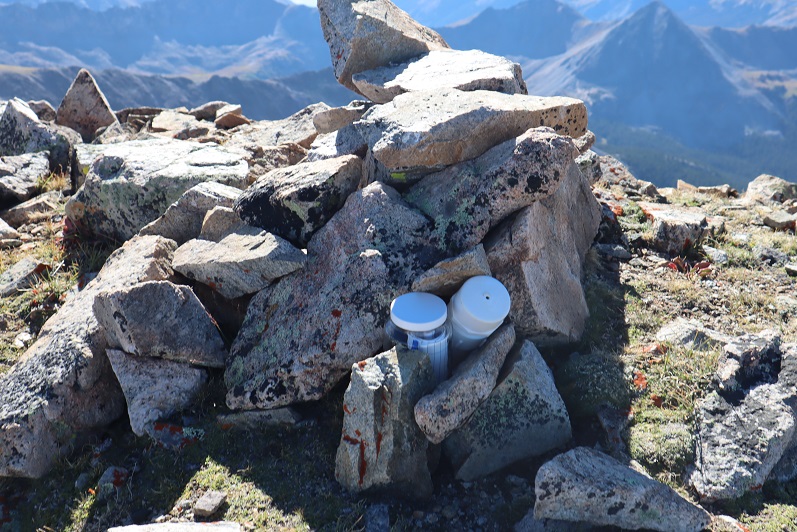
I summited Clark Peak at 2:25pm
Clark Peak:
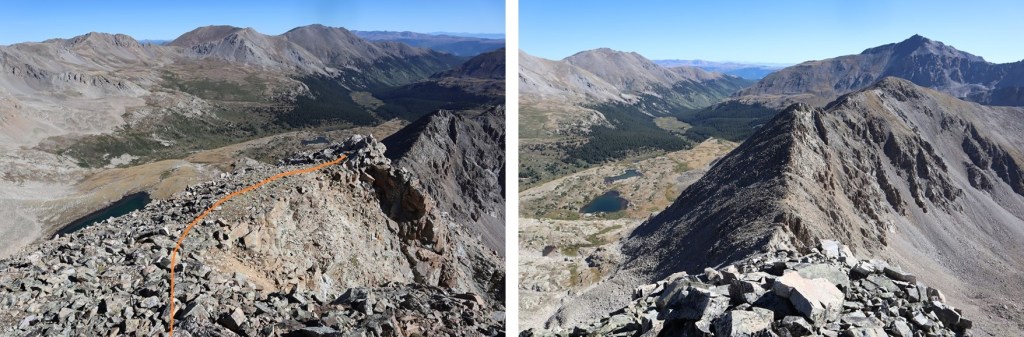
There were some great views of Snowmass and Capitol Peak, and check out the ridge looking back!
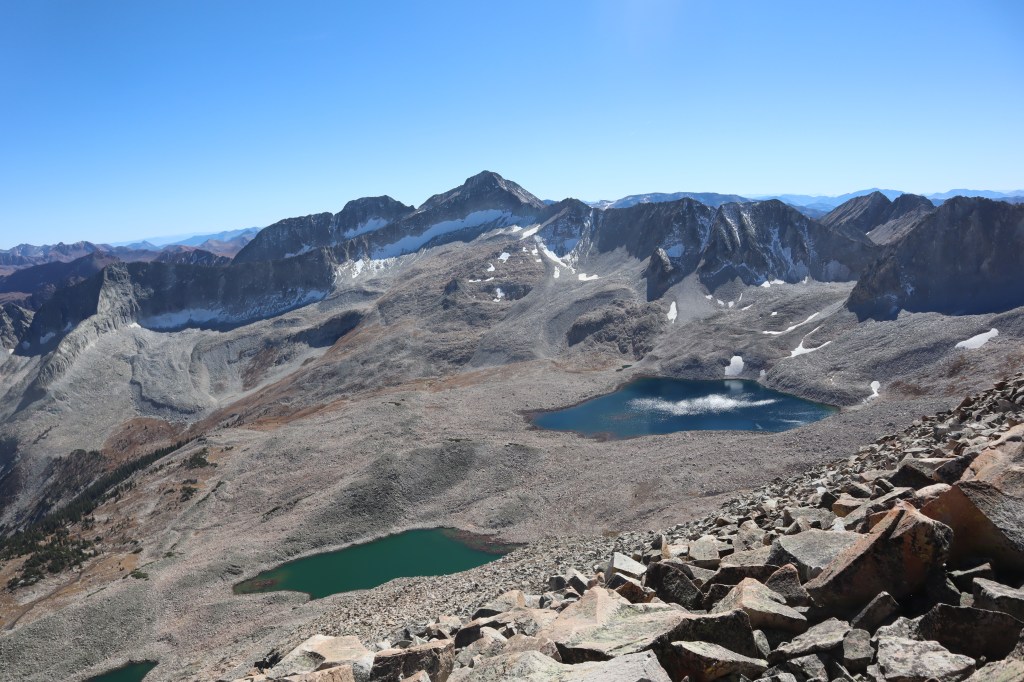
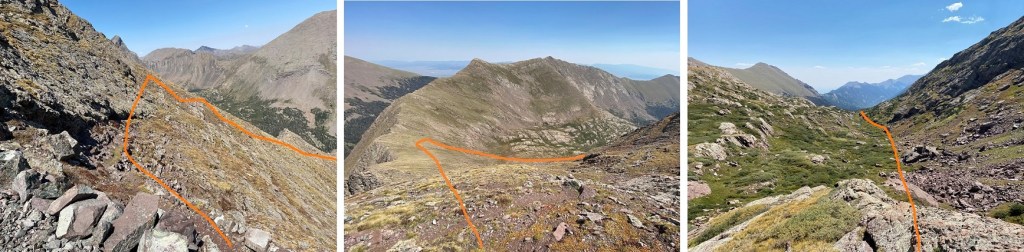
Here’s looking back on the way in through the basin and around Moon Lake
Here are some pictures of the ridge on the way back. I had fun with the exposure here
At the saddle I turned right and headed back through the basin
Skirting Moon Lake to the east and back to the trees
Next profile pic?
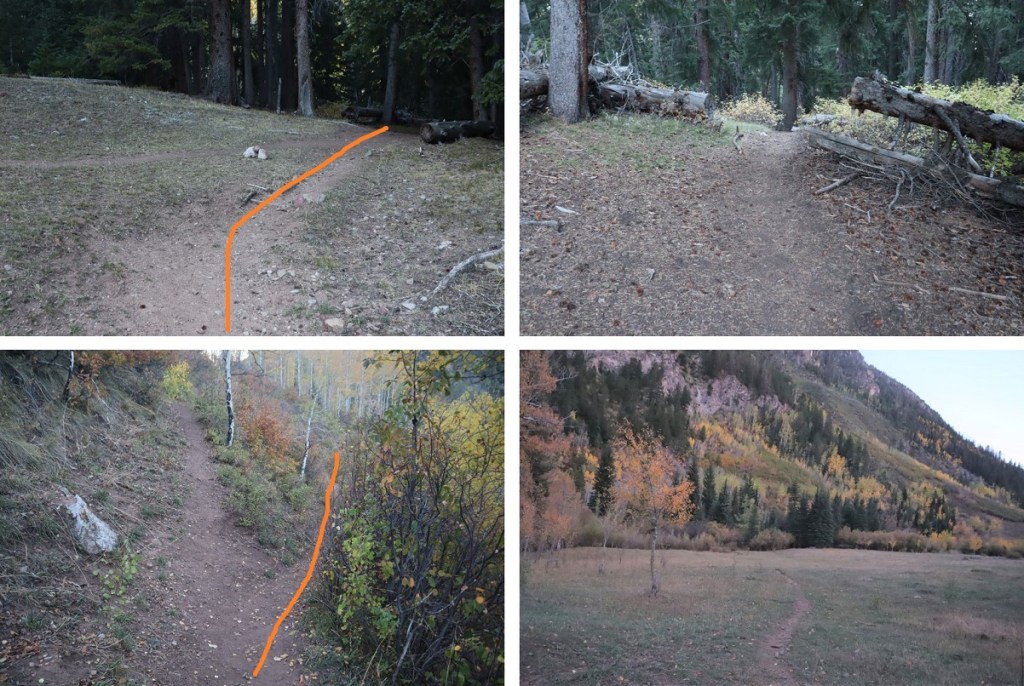
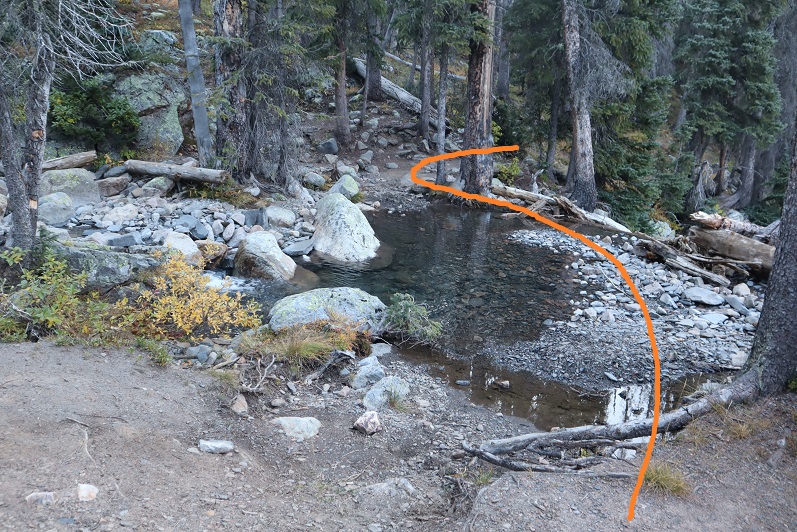
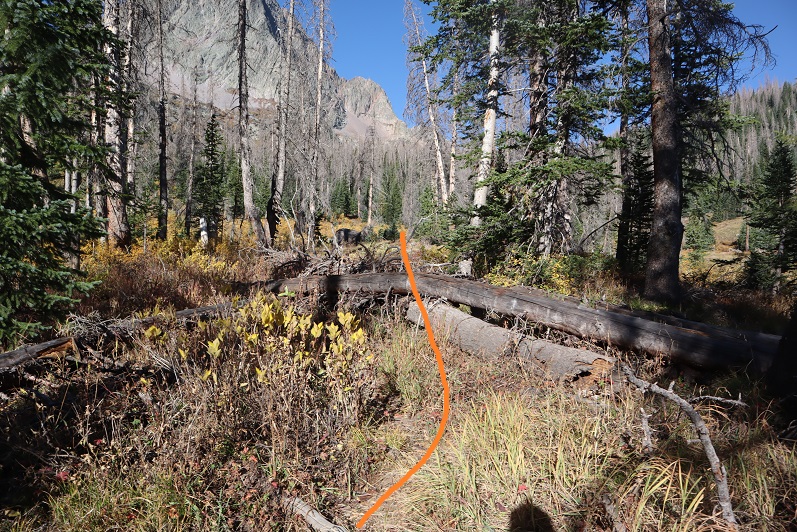
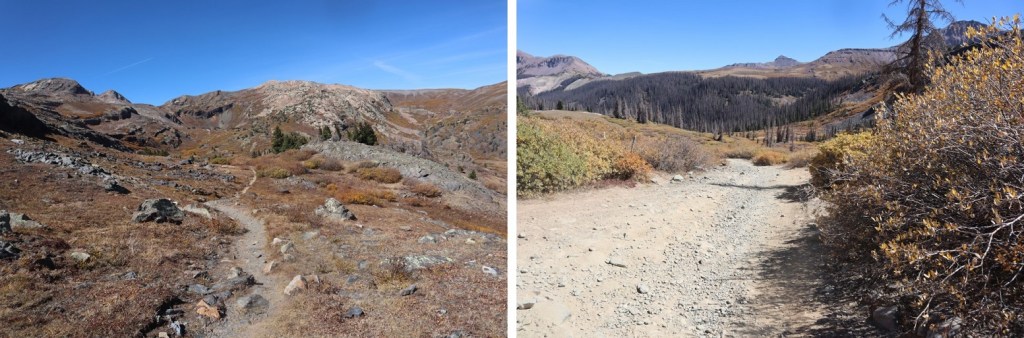
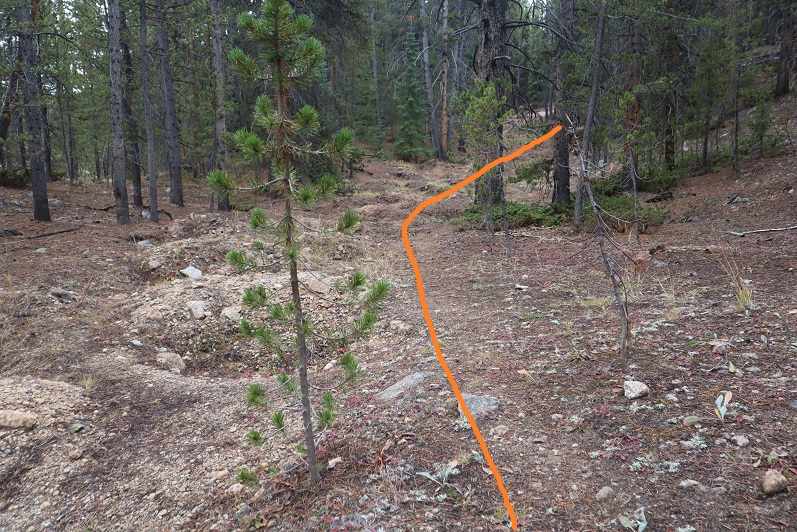
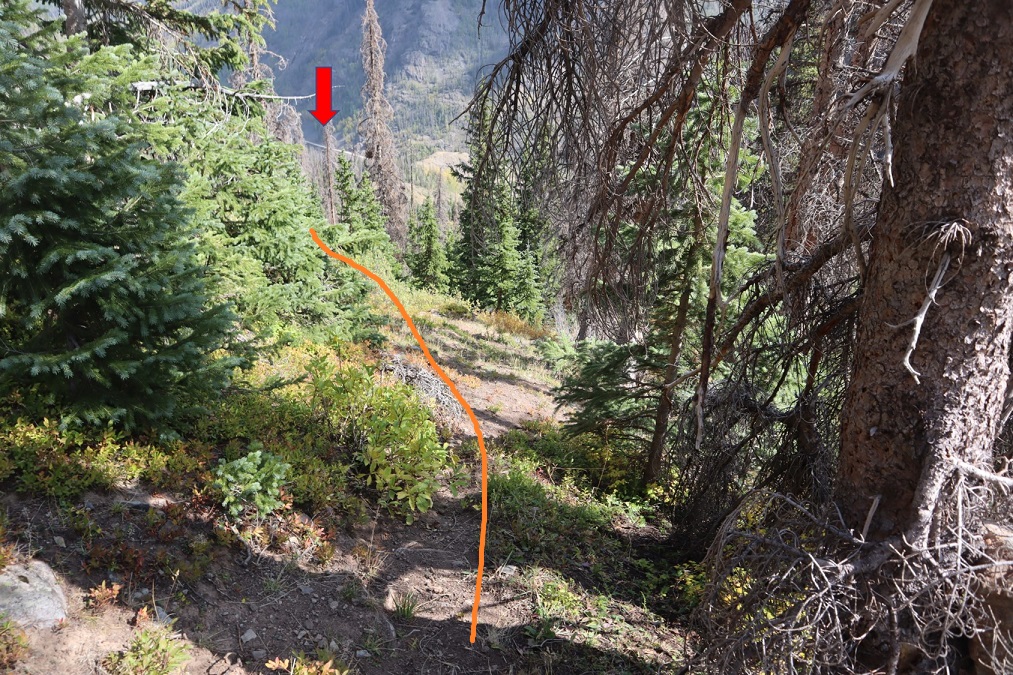
Once at treeline I picked up the trail again. After crossing West Snowmass Creek I headed for the trees. The trail picks up again in-between these two trees
Here are some pictures of the trail back down. As I was hiking, I heard a faint bugle. It didn’t sound like a normal elk call: it sounded close but faint. Usually when I hear an elk bugling it resonates, it’s crisp, and I can hear it from far away. This didn’t seem loud enough for being so close. As I reached the meadow I noticed a hunter sitting beneath a tree. I raised my hand to silently say hi, he did the same, and I continued back to the trail.
I kept picking up my pace. Due to this morning’s route finding errors this hike was taking me much longer than I’d anticipated. It was quickly getting dark, and I wanted to get back to cell service so I could call my daughter and tell her I was ok, just running late. I ended up using a flashlight for the last two miles of the hike. Here are some pictures from the rest of the way back to the creek.
I crossed the creek and took Maroon Snowmass Trail back to the trailhead
I made it back to my truck at 8pm, making this a 25.26 mile hike with 6619’ of elevation gain in just over 14 hours.
I’ve put off these peaks because I was a bit anxious about the drive in from Silverton, but the weather was perfect and they’re on my list, so off I went. After a Girl Scout meeting where we sewed masks (I have a girl working on her Gold Award who did an awesome job leading the meeting), I drove 8 hours to the Hunchback Pass trailhead. Along the way I saw a moose. And let me tell you, this is why they don’t call it “moose in the headlights”: they really don’t care. I sat there for a bit watching her, and then just drove by. She munched on willows as I passed.
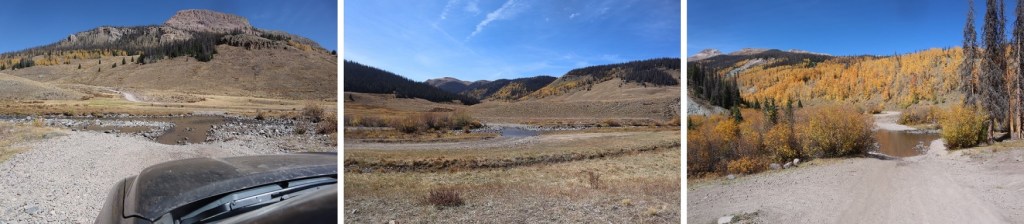
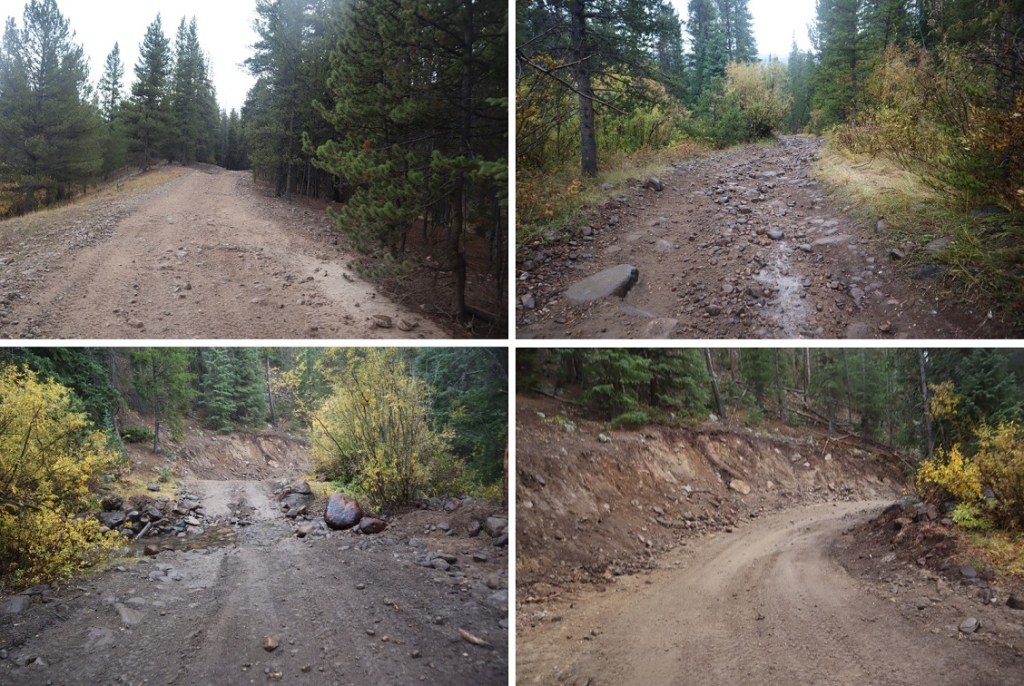
The drive in on the dirt road was underwhelming. I have no idea what I’d been worried about? It took me an hour and a half, and was actually quite pleasant. These pictures are from the way out, but it was just as easy to drive both ways. I never had difficulty passing others, and 4WD was only needed once or twice. This is actually one of the better 4WD roads I’ve done this year, and if weather permits, I’ll be back again next week. Here are some pictures from the drive in
And the Rio Grande river crossings (easy in late September)
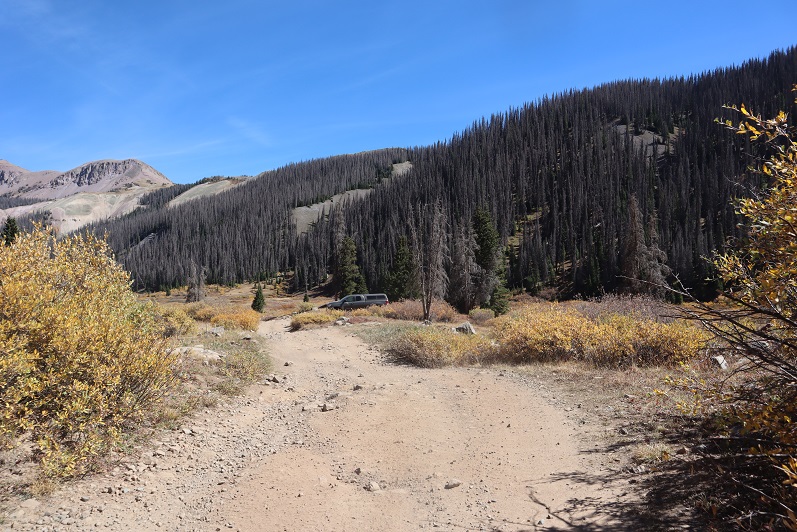
I found a place to park much sooner than I needed to. I’m not sure why I stopped here except it was dark and I was tired and it was a good spot, but I could have continued driving another mile to the trailhead and been fine. I parked, slept for half an hour (I’d been up for 24+ hours, and needed the rest) and was on my way at 5:30am.
Since I’d parked along the road I followed the 4WD road for 1.3 miles before turning left onto Trail 813. There was room for 2 vehicles to park at the trailhead. There’s a trail register here, but nothing official.
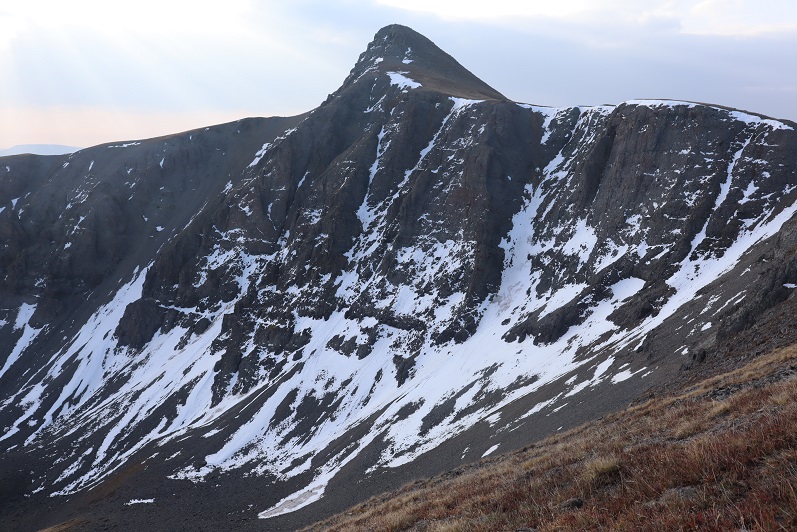
I followed the class 1 trail as it curved up and over and then down hunchback pass. As I was hiking the sun rose, and I got a good look at Hunchback Mountain. I didn’t have a topo for it, but it looked doable. I’d file that one away and maybe attempt it on the way out.
From the top of Hunchback Pass I hiked for 3.4 miles and lost almost 2000’ of elevation as I followed the class 1 trail down the mountain, crossing small creeks and navigating through willows.
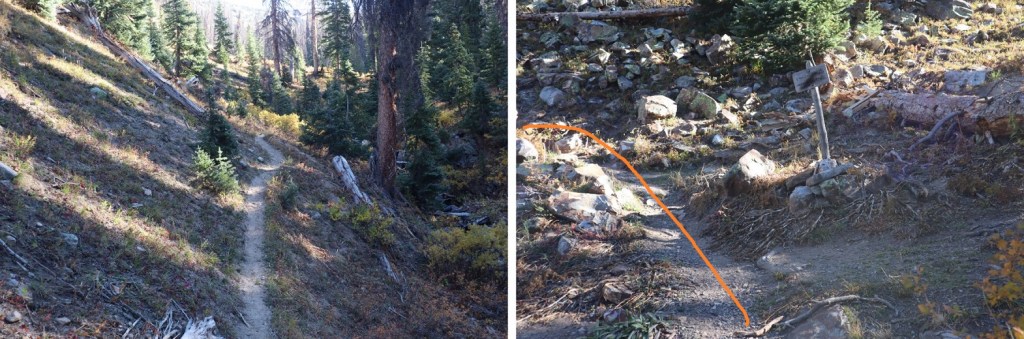
Stay straight at this sign/junction
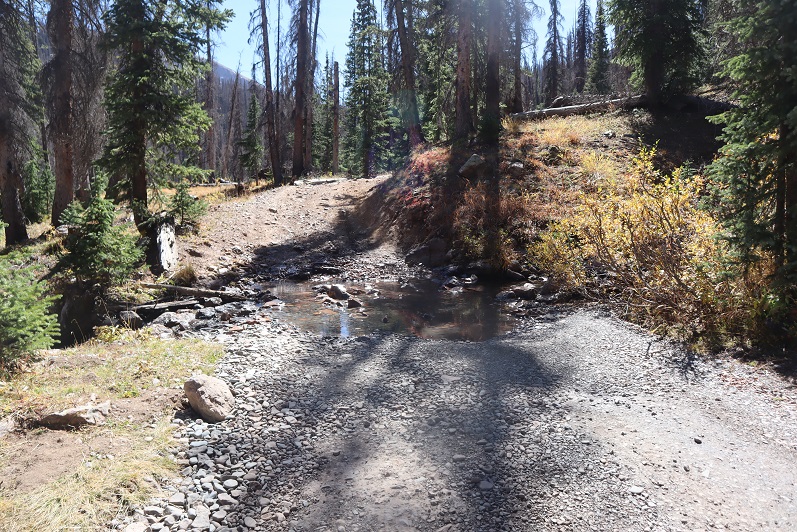
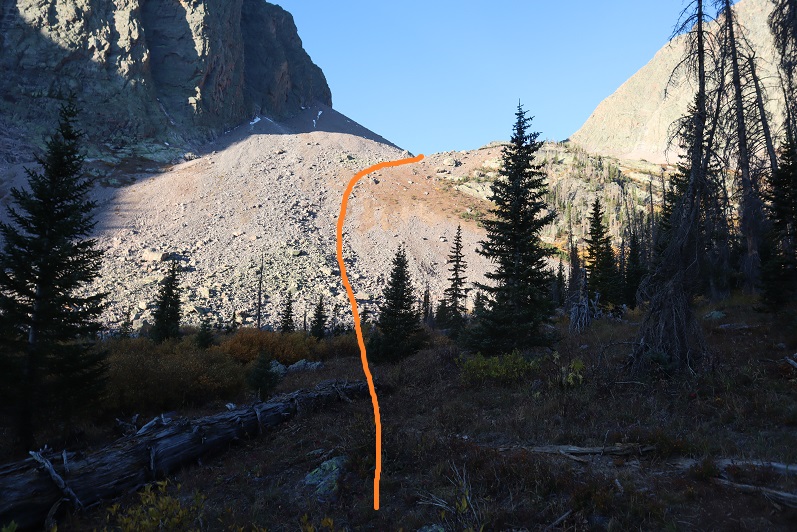
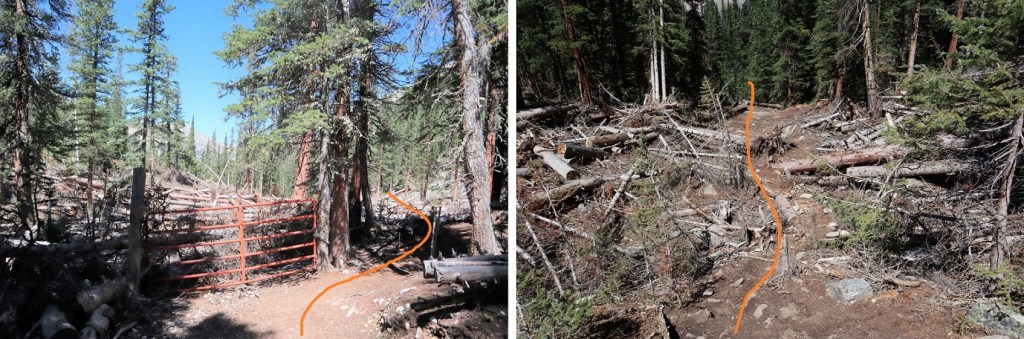
I missed the initial turnoff and had to do some route finding (because there is no official turnoff). However, after hiking for 3.4 miles there are some logs on the right side of the trail, split in half, and a waterfall. There are waterfalls all along this trail, so don’t just look for a waterfall, but look for the split logs. Leave the trail here and head west.
From here you’ll quickly come to an easy creek to cross and a waterfall. This is Nebo Creek. You can camp here, and it’s worth spending a little time enjoying the area.
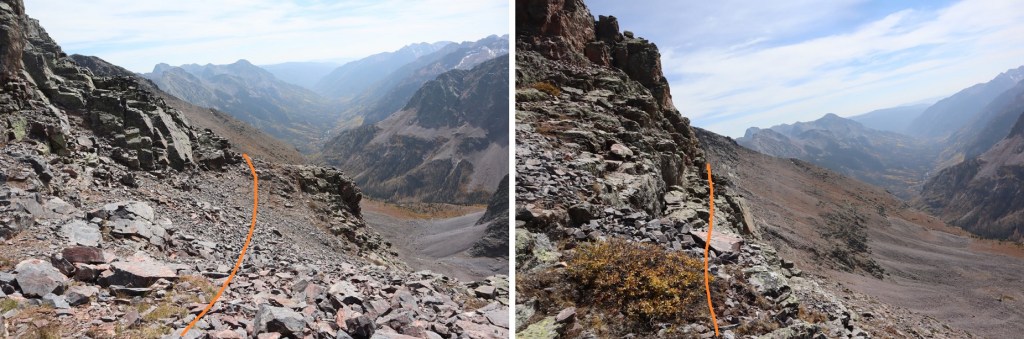
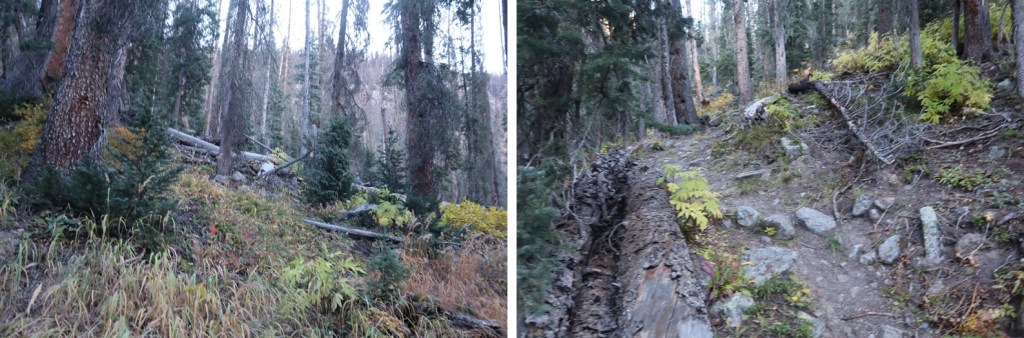
There is no clear trail here, but there is a bit of a game trail. Several in fact. They all go to the same place, so follow stormy creek by heading west, stay north of the creek for better terrain. Here are some pictures.
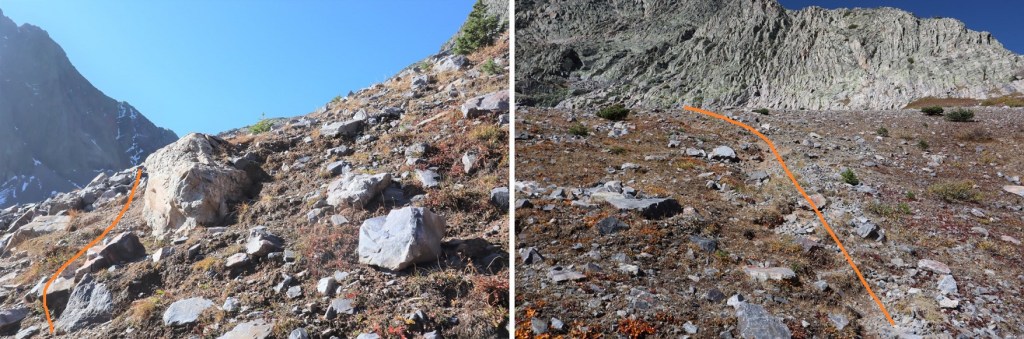
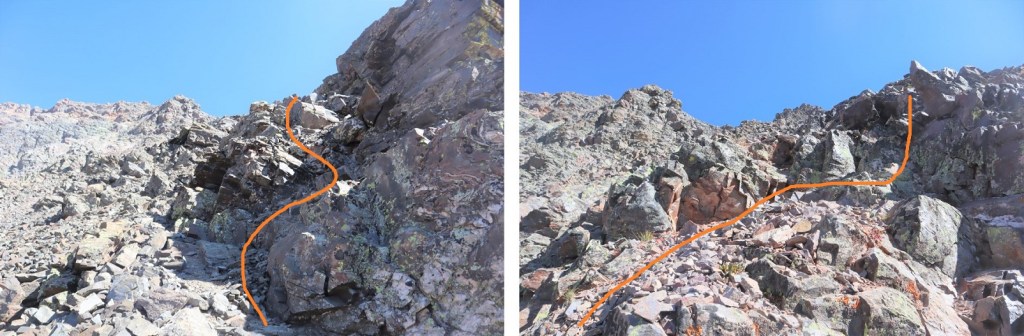
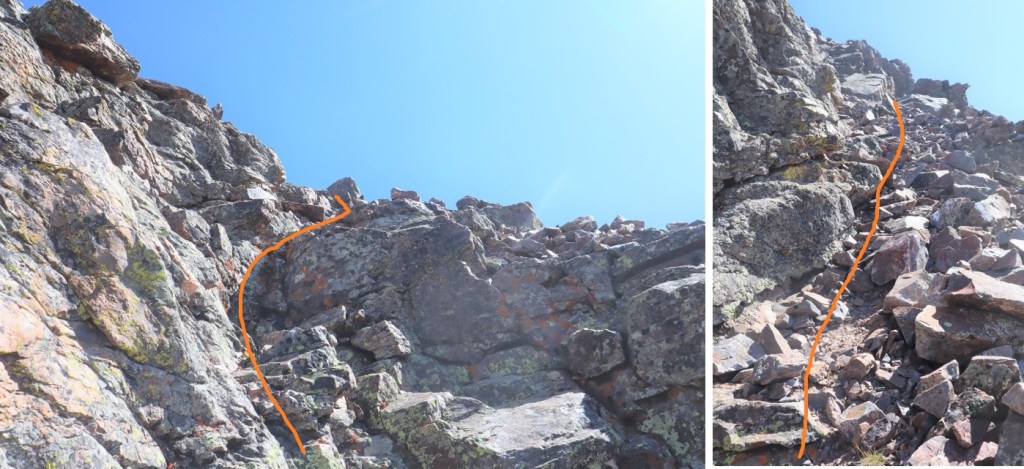
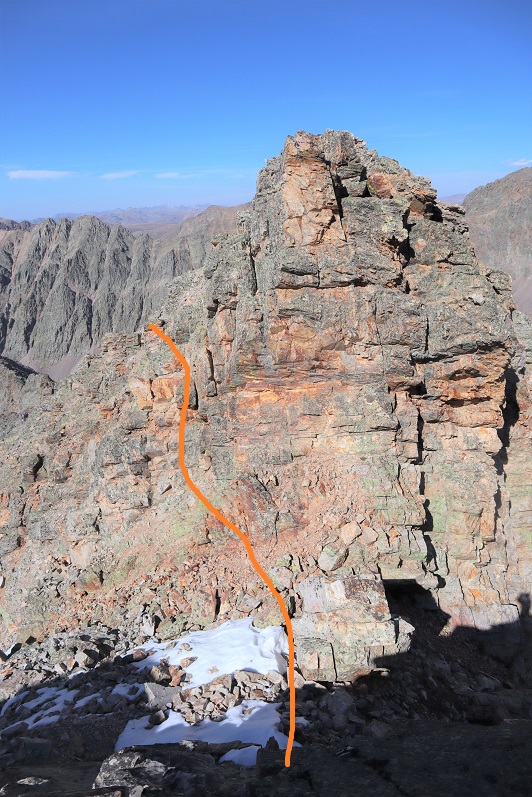
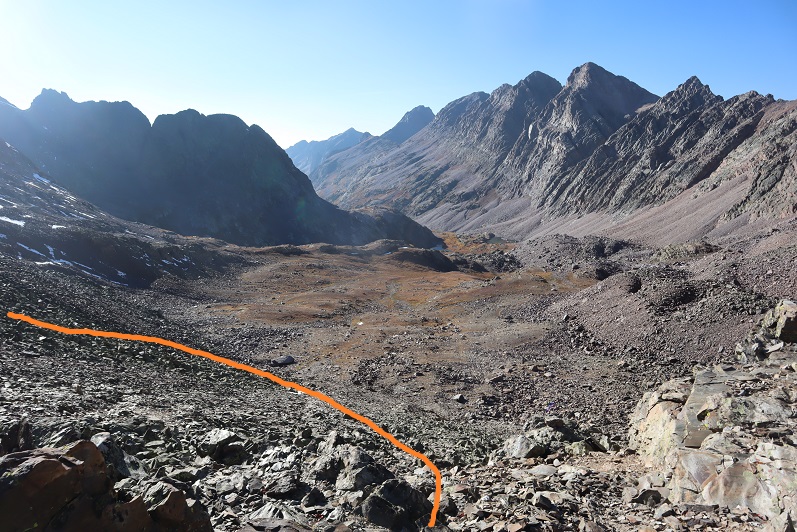
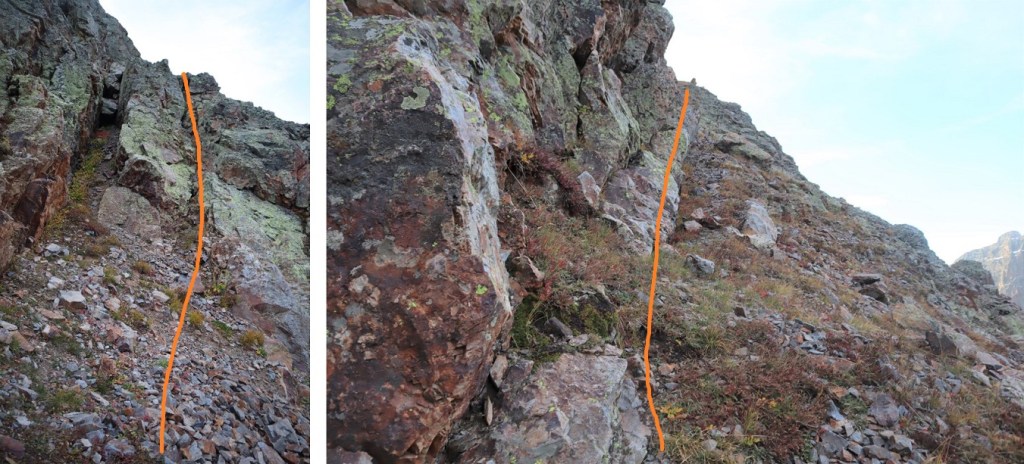
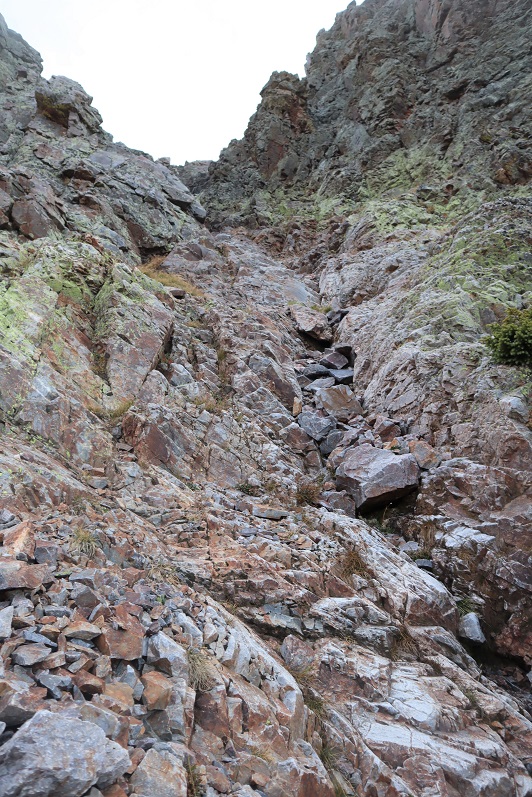
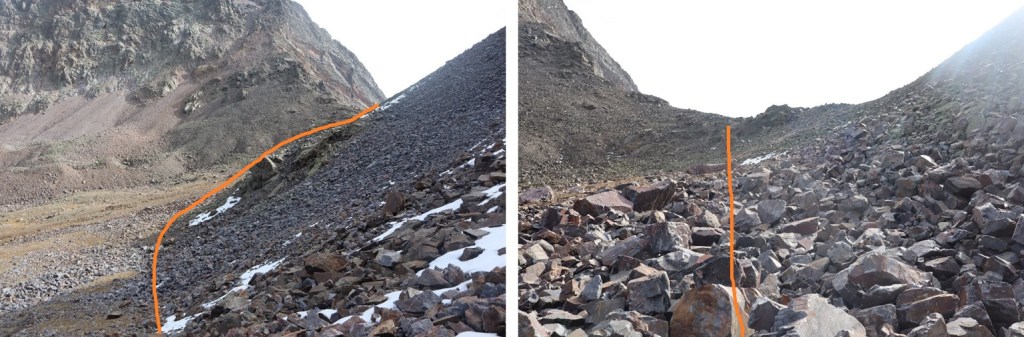
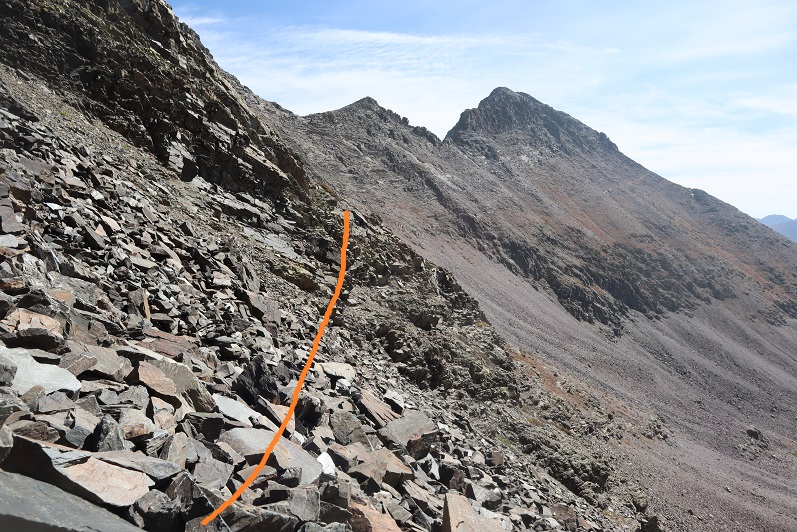
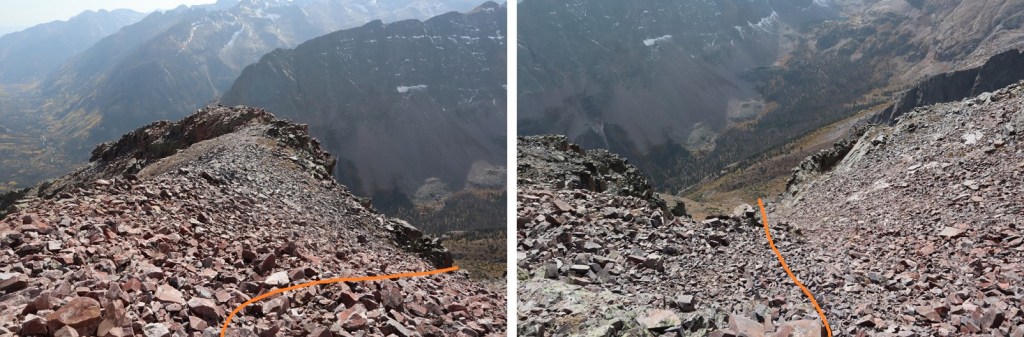
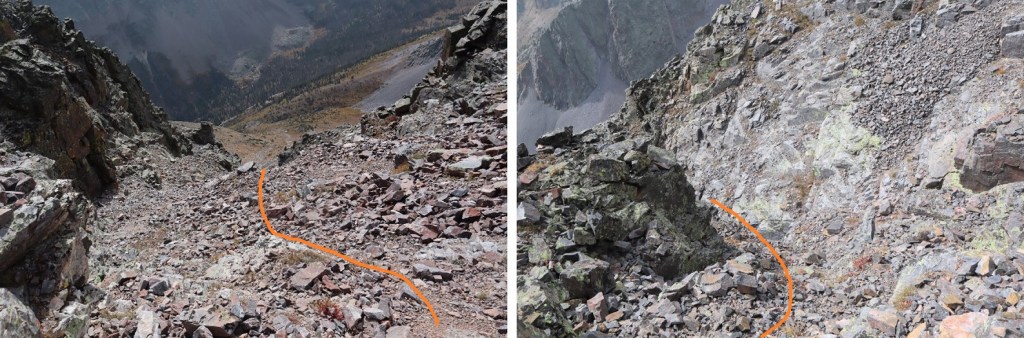
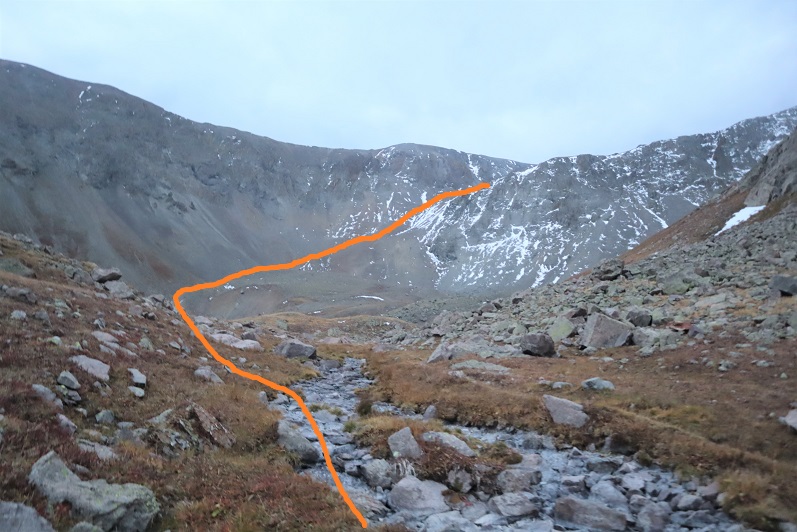
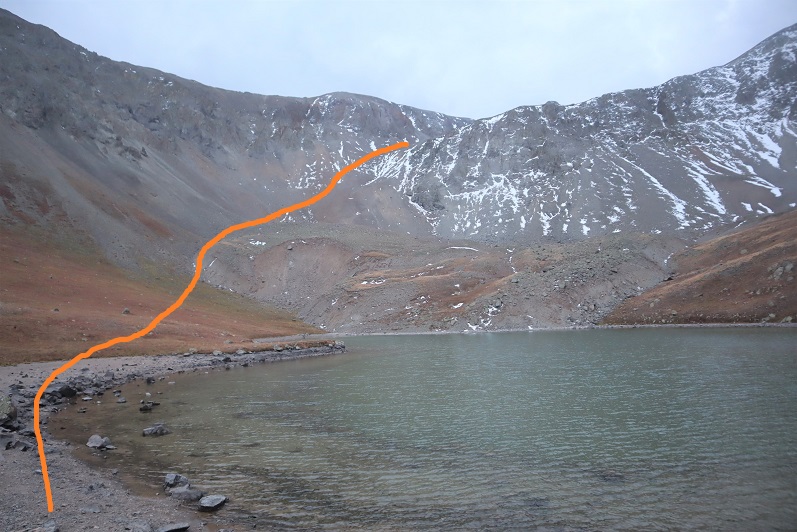
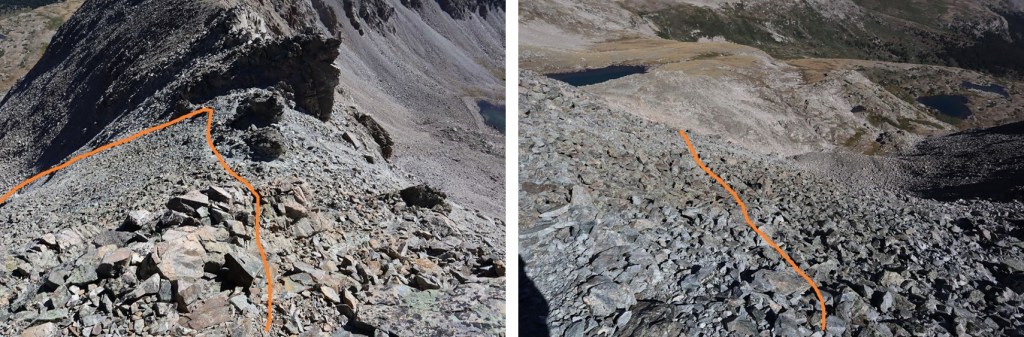
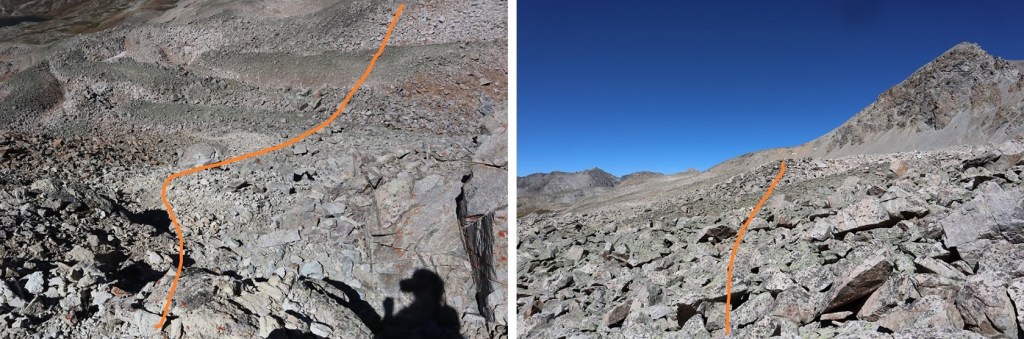
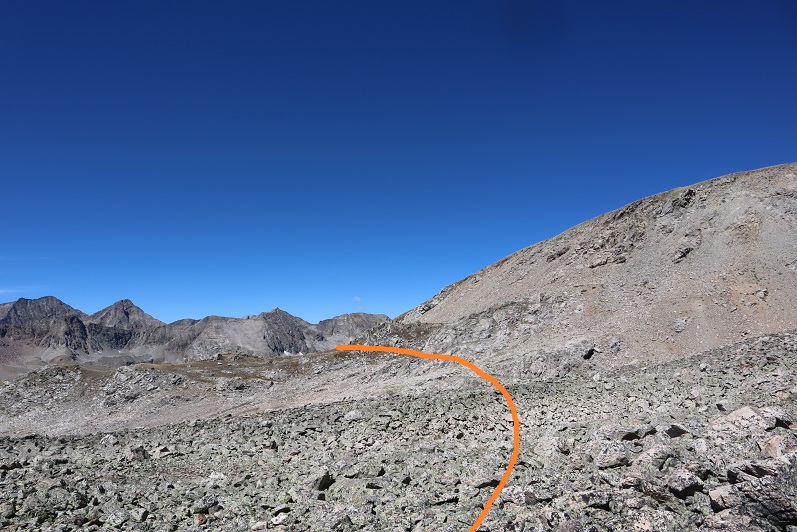
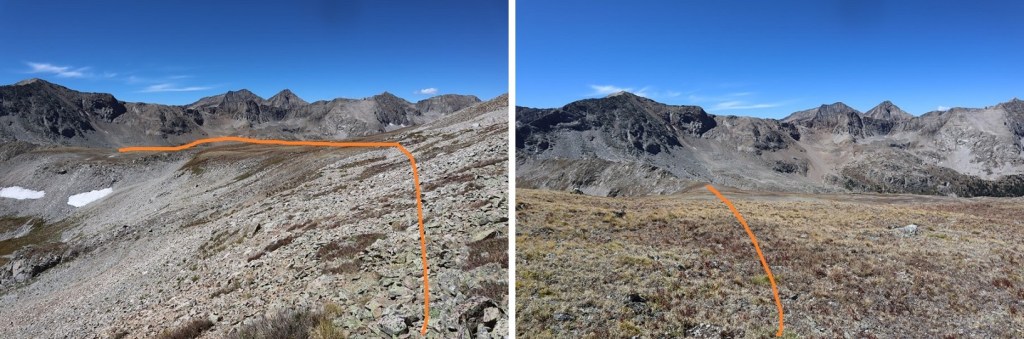
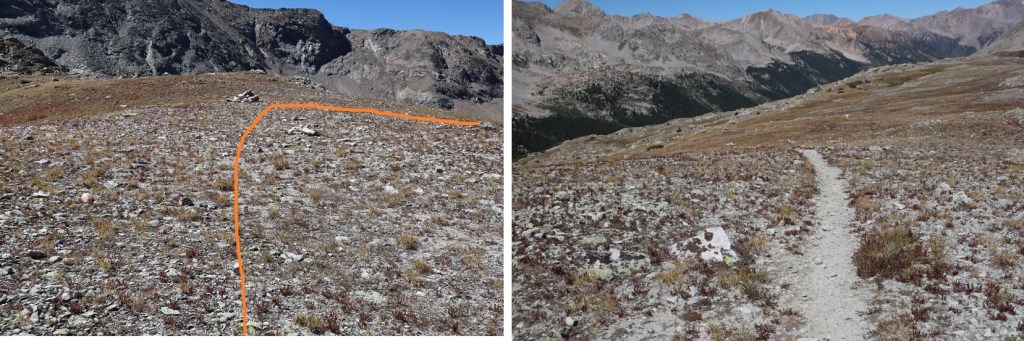
I headed west for just under 2 miles. I believe the standard way to enter the basin as it leads to Lake Silex is to use the obvious scree/rock filled gully (dotted line). I didn’t do this, and I’m glad I didn’t (I did take it down and was disappointed, as it seemed more trouble than the way I took up). Instead, I went further west, found a different, smaller gully by the rock/grass/willow filled slopes, and ascended that way. Here’s an overview
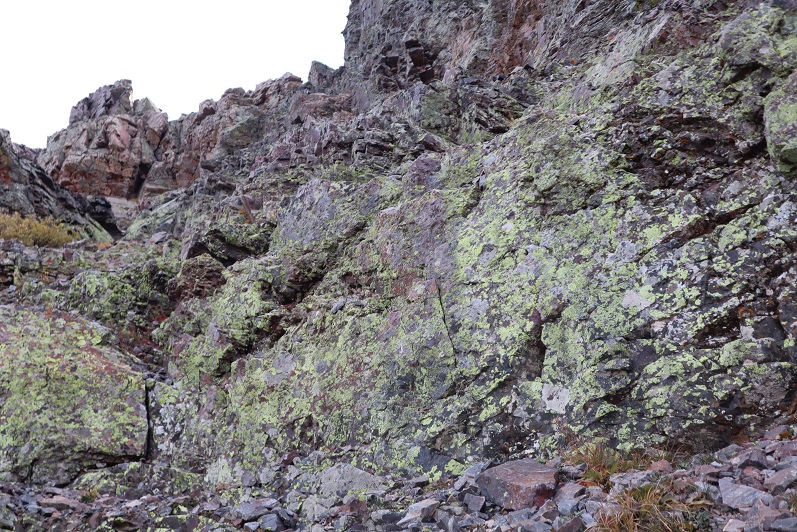
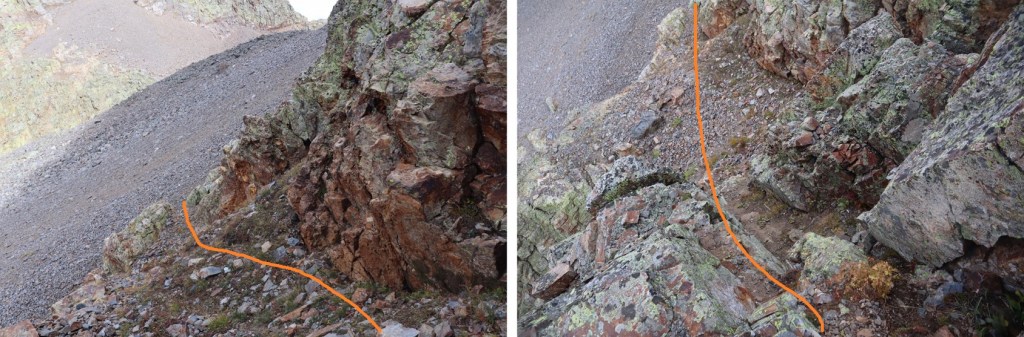
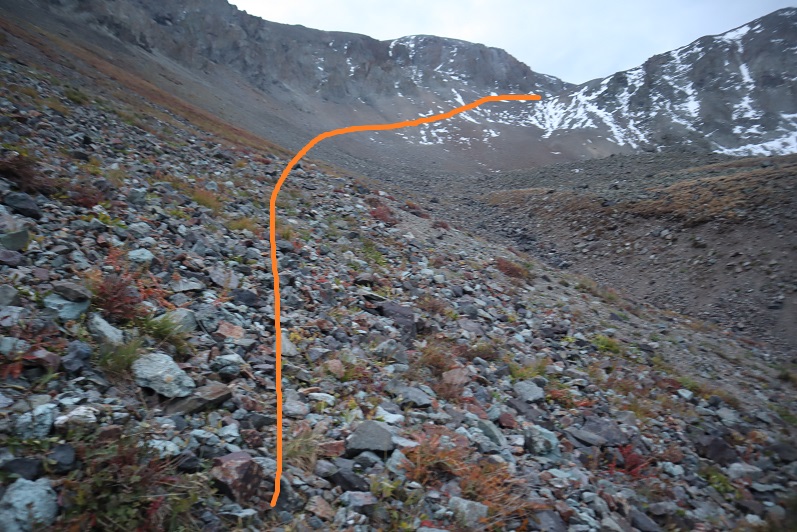
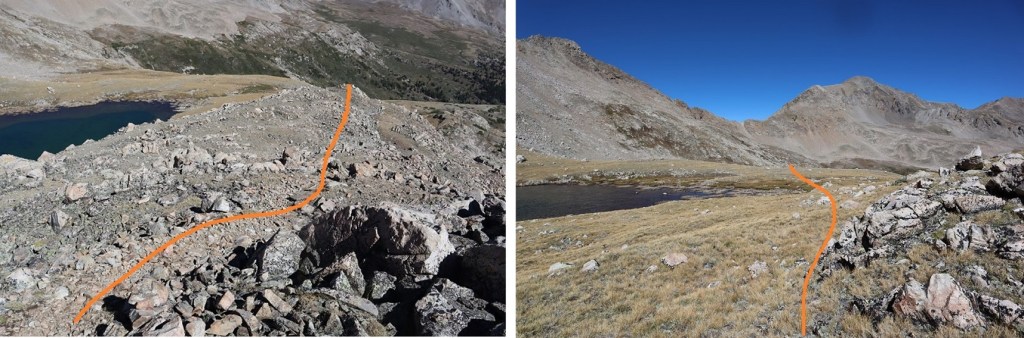
And step by step
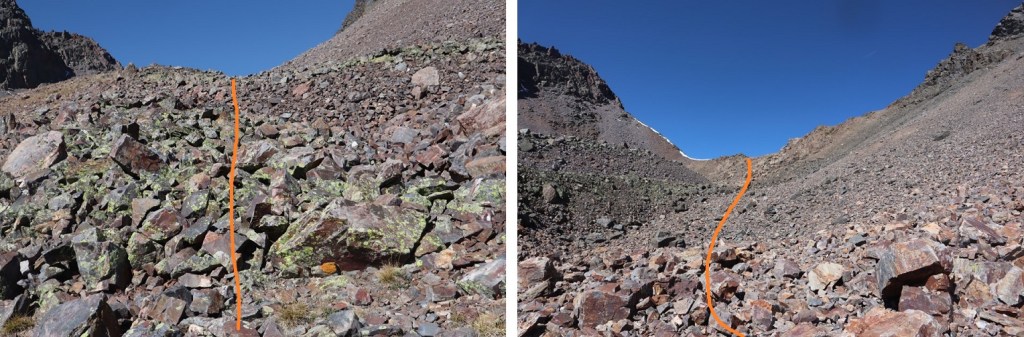
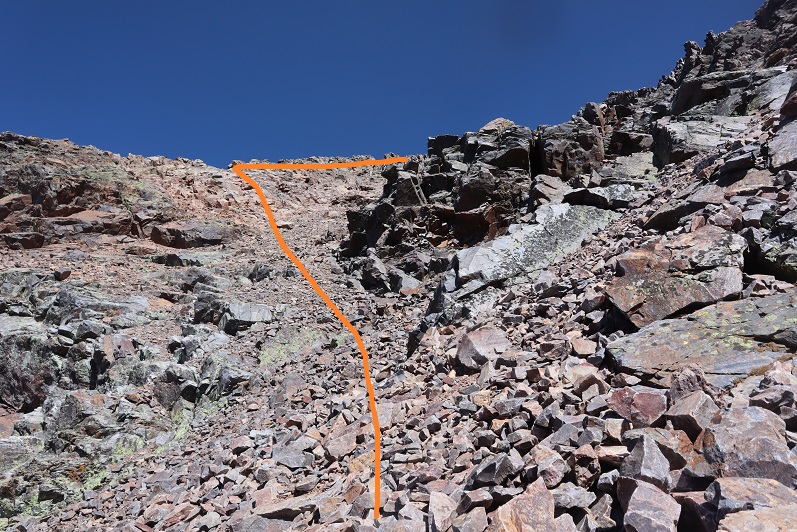
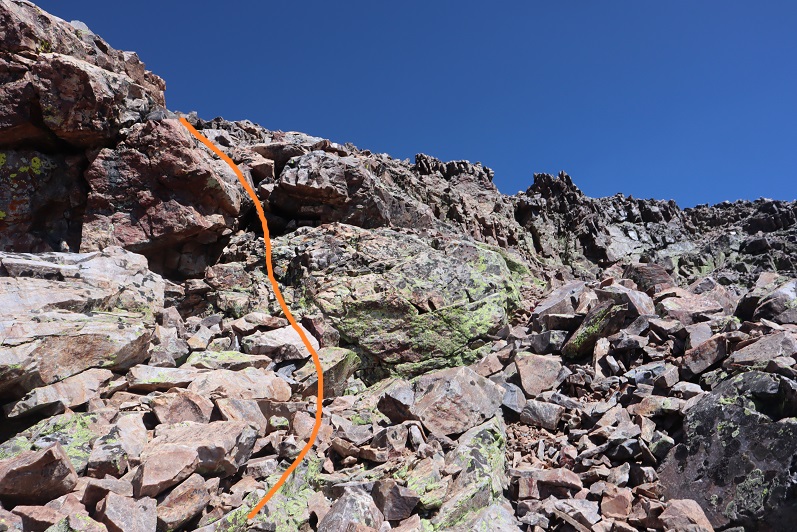
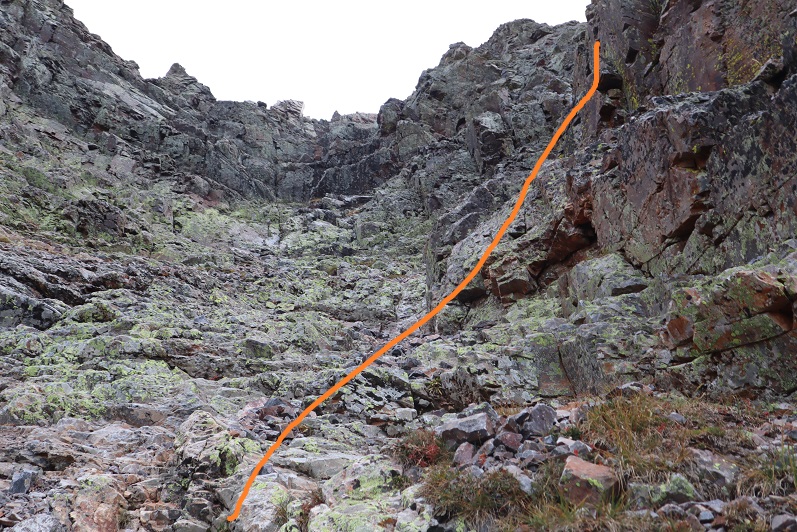
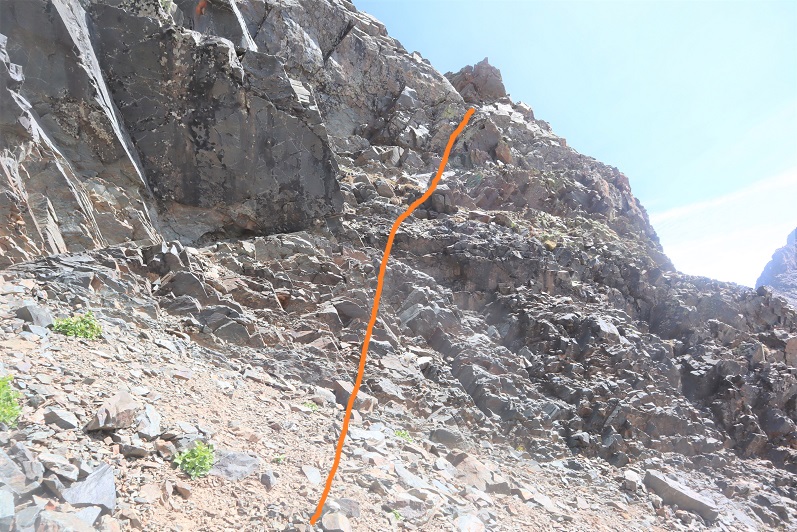
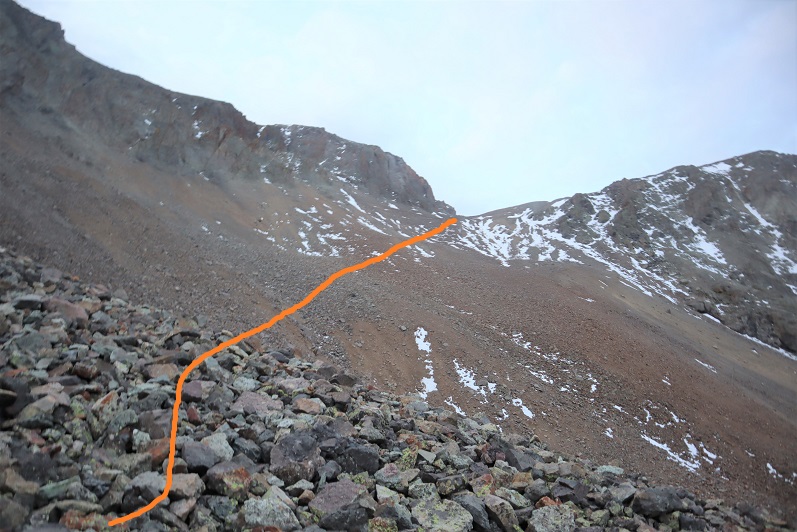
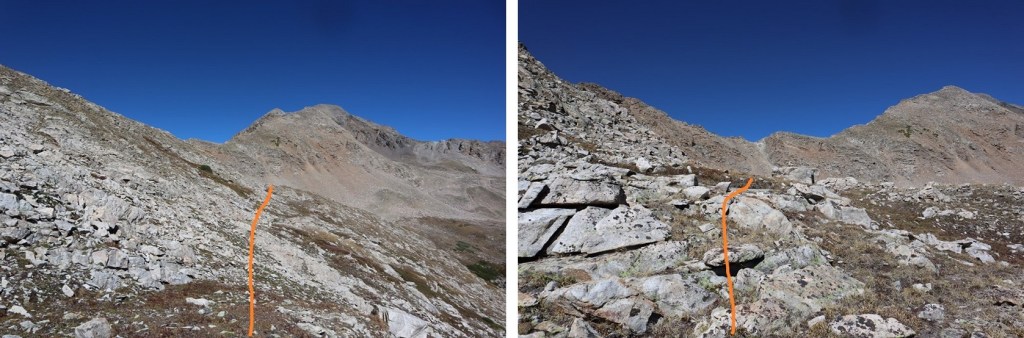
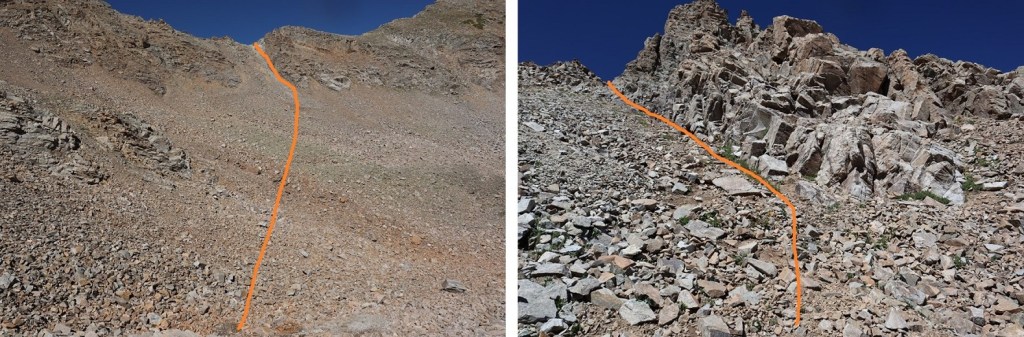
I was able to follow game trails the entire way, and even saw some cairns in areas. At 11500’ I turned left and headed south, then southwest up the side of the mountain, aiming for this narrow gully.
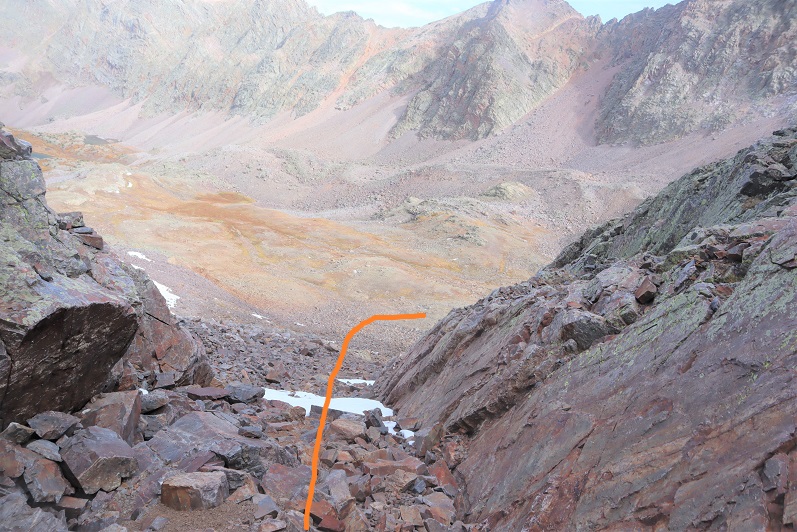
Here’s looking up into the gully, and back down from the top. The rocks here were solid and it was an easy climb
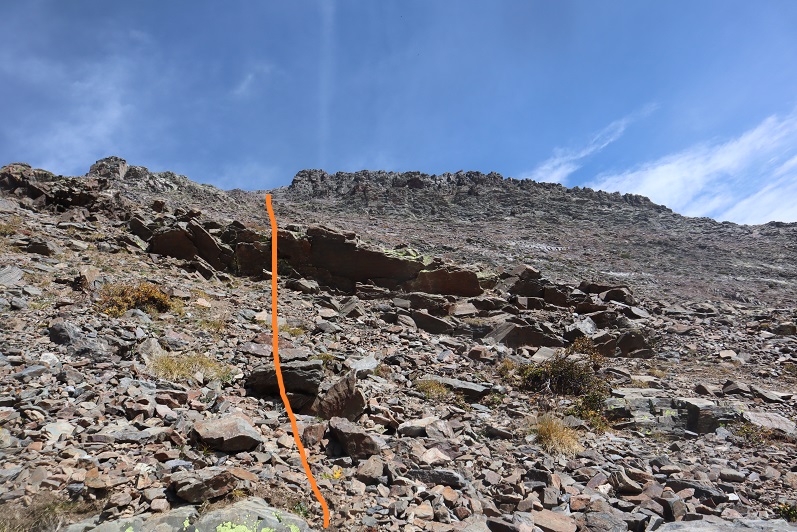
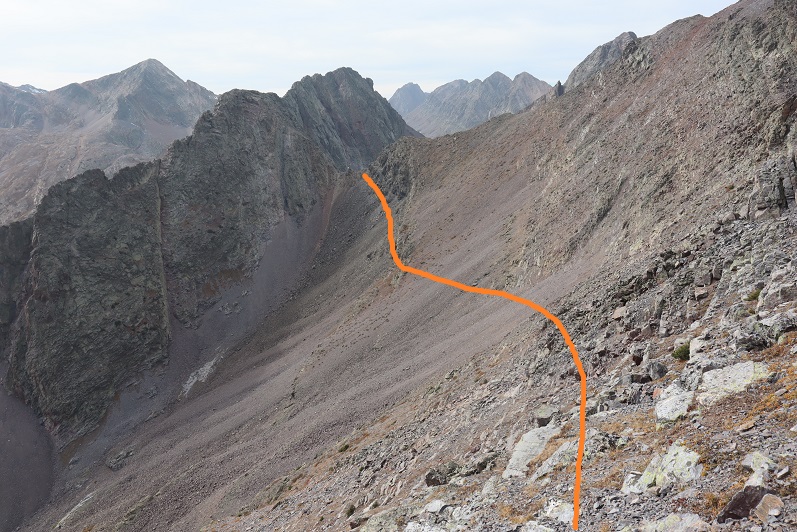
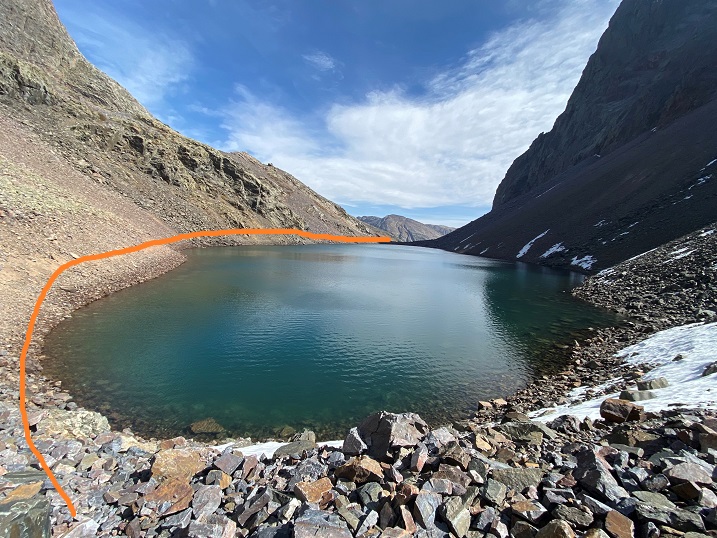
From the top of the gully I still had a ways to go. I headed south, and then west, curving high along the side of the mountain. I wasn’t headed to Lake Silex today, but instead to the pass, so staying high was helpful.
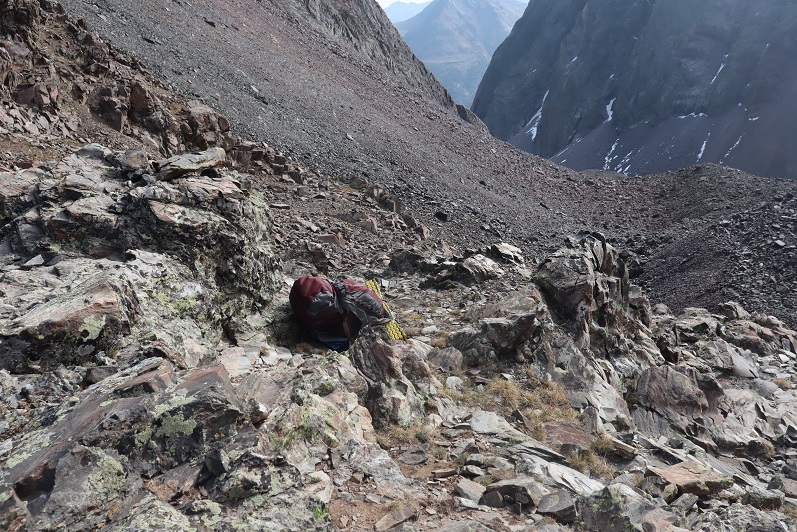
After rounding Lake Silex I headed up the rocky gully to the pass at 12800’
It took me 10 miles to make it to the pass. I took off my gear and took a break. I ate a packet of tuna (I’d forgotten to eat breakfast) and decided to leave my large pack here and just take some water and a first aid kit in my small pack for the rest of the day. Before I left, I filled my water filter up with snow and laid it out in the sun, hoping it would melt so I could filter it later.
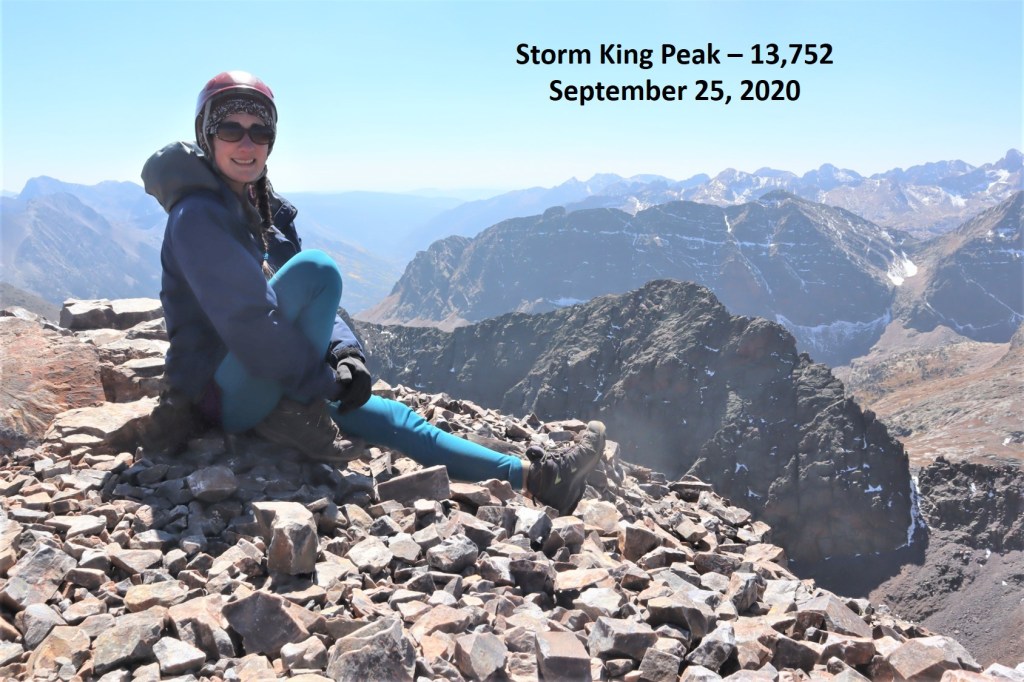
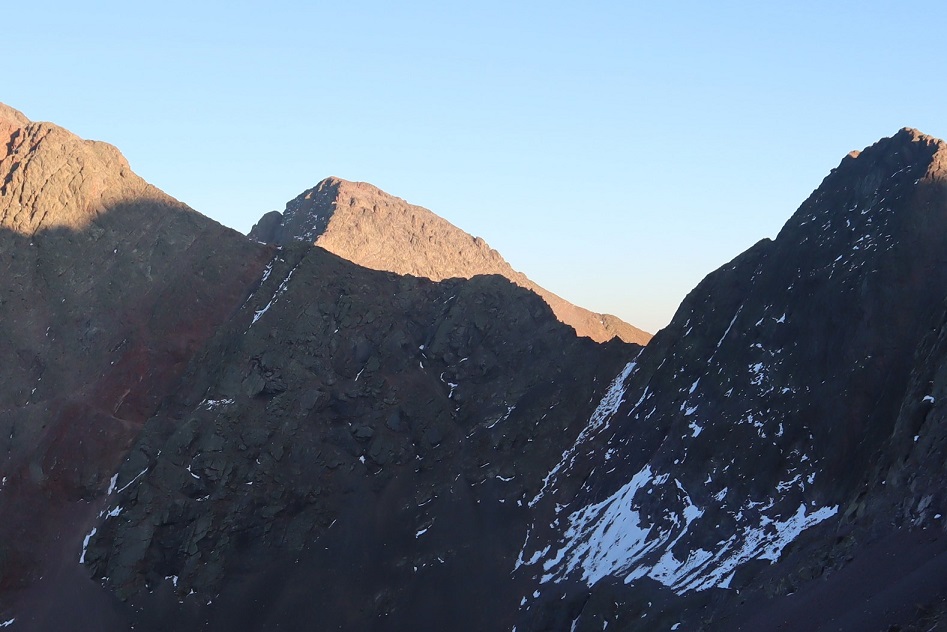
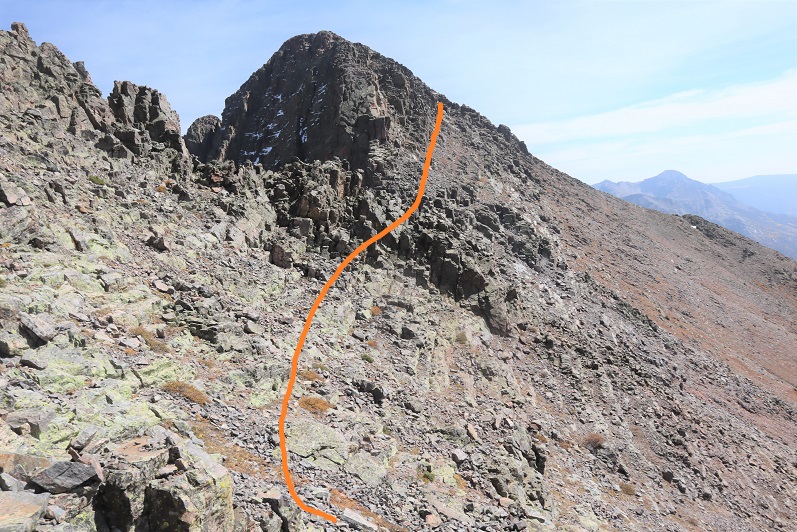
First up: Storm King Peak. Here’s a view of the overall route from further down the pass below later in the day.
And a view from the pass
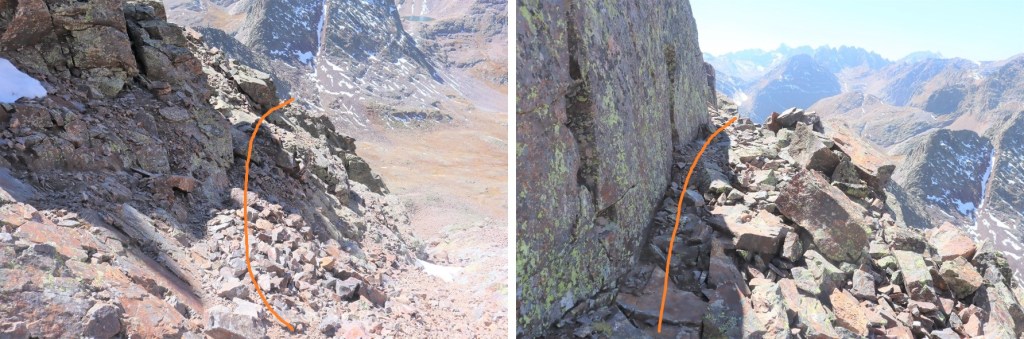
I did some scrambling, following the ridge north east. There really is no established route here, just pick your line. It shouldn’t be harder than class 3
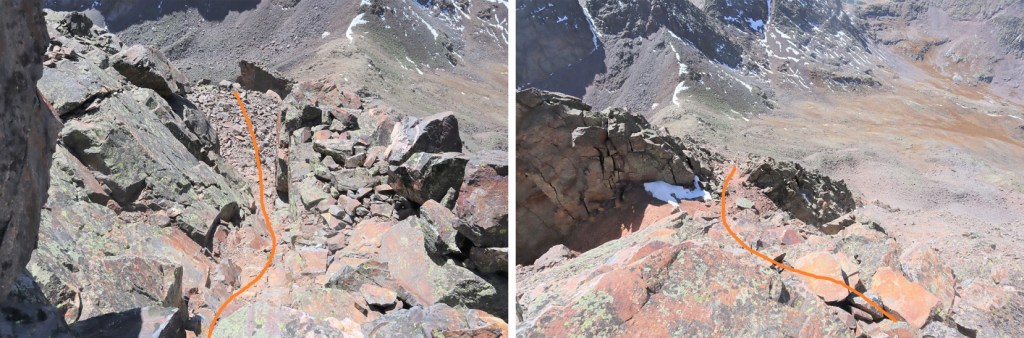
At 13430’ there’ll be a small dip, and an obvious place to cross the gully
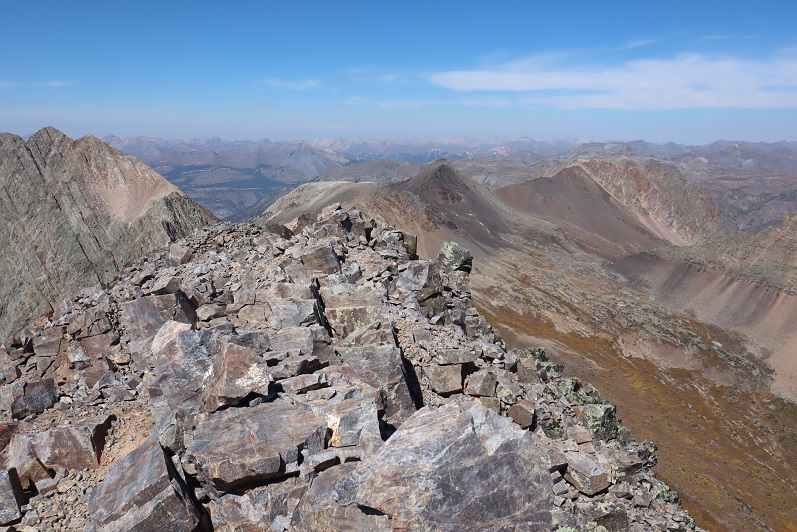
After crossing the gully, I headed north along the ridge. The peak is just to the left
I summited Storm King Peak at 12:25am
Storm King Peak:
Here’s the route back down to the pass
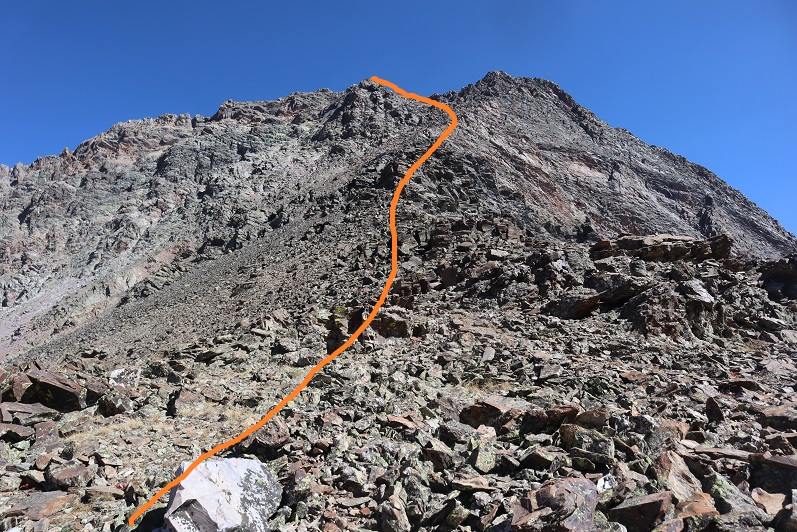
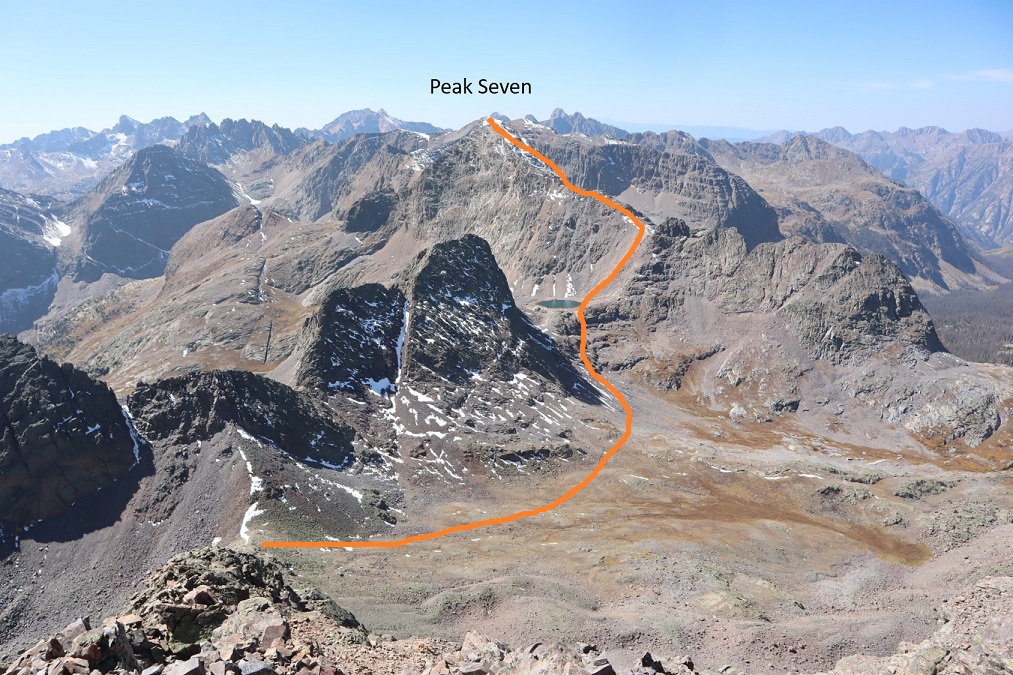
From the pass my next objective was Peak Seven. I headed west, losing about 300’ as I descended into the basin, and then headed back up towards Peak Seven. Here’s an overall look at the route
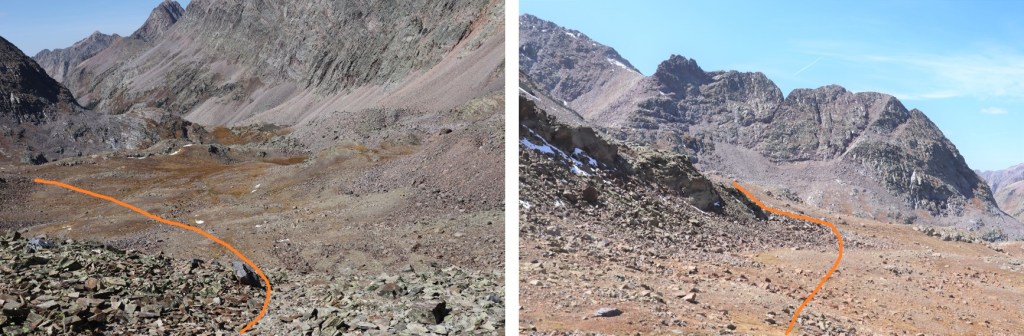
This was pretty straightforward. Here are some step by step photos. First, I entered the basin and then rounded the side of Peak 8
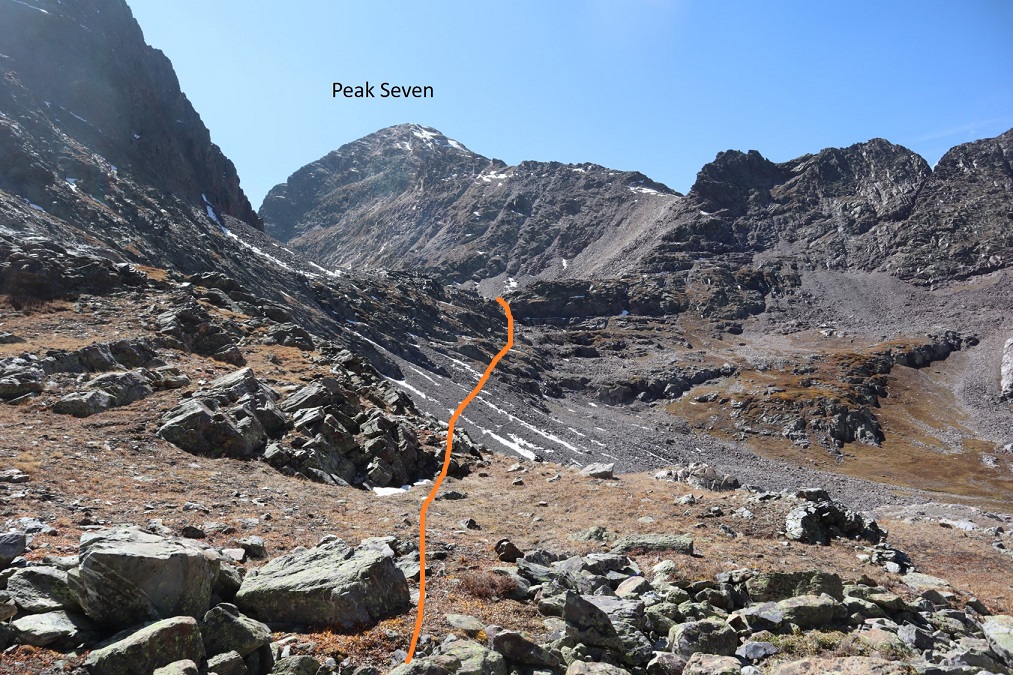
There were a few game trails here. I stuck high, and then aimed for a gully that would bring me to the pond underneath Peak Seven
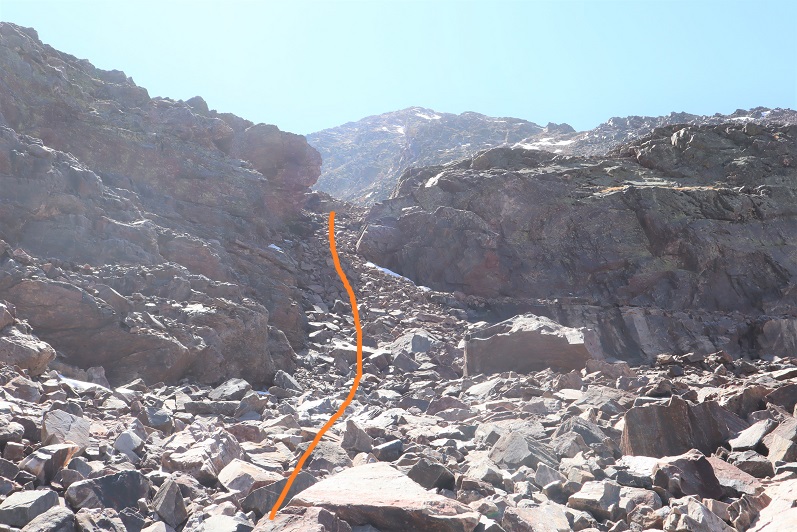
From the pond I turned right and headed west up the gully
Once I’d gained the ridge I headed south. There was some scrambling here, and due to the fact there was snow on the normal route I had to get a bit creative. Instead of going up the face I stuck to the left and avoided the snow, and had some fun class 3/exposed scrambling instead. Here’s the basic route
There was a nice, airy game trail that led me to some rock slabs, which I used to ascend
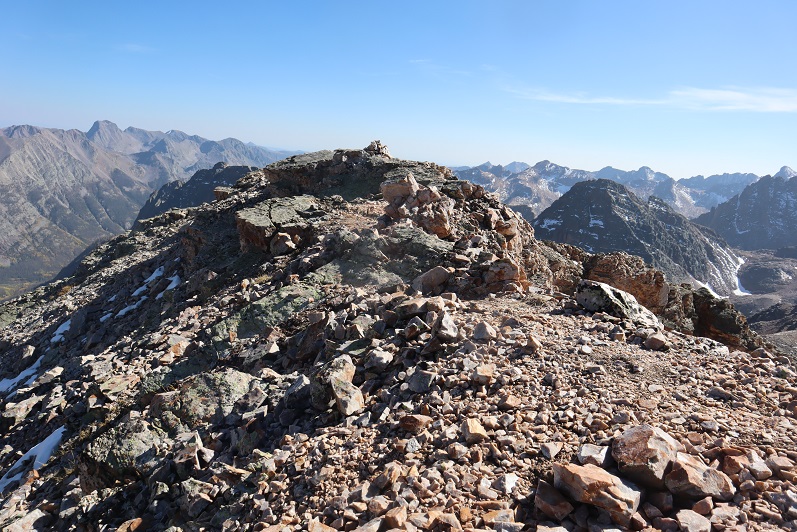
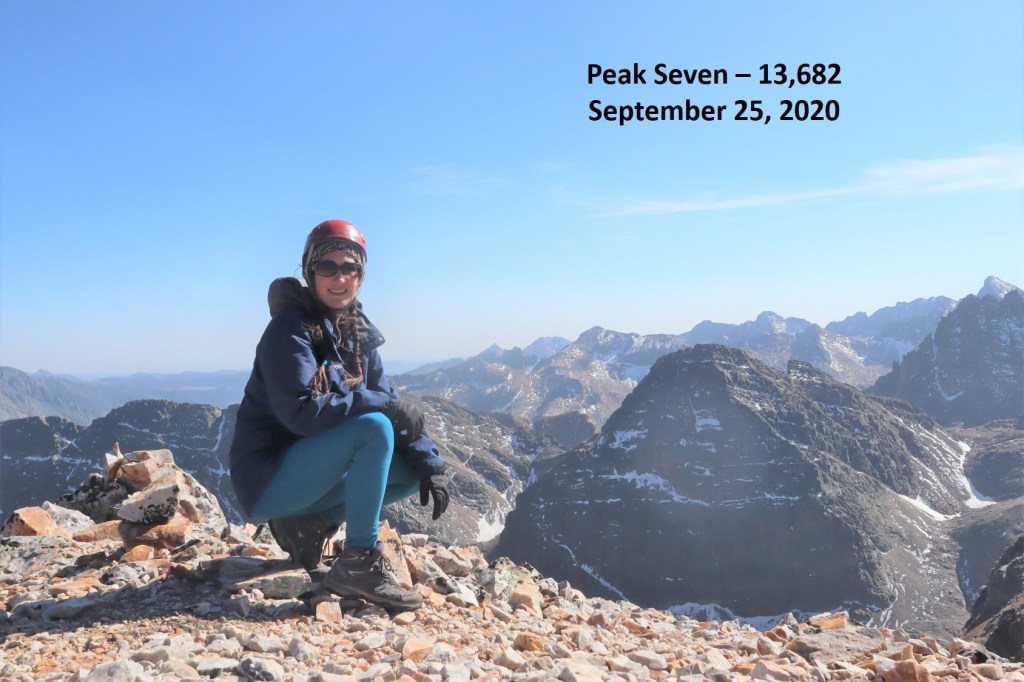
I summited Peak Seven at 3:10pm
Peak Seven:
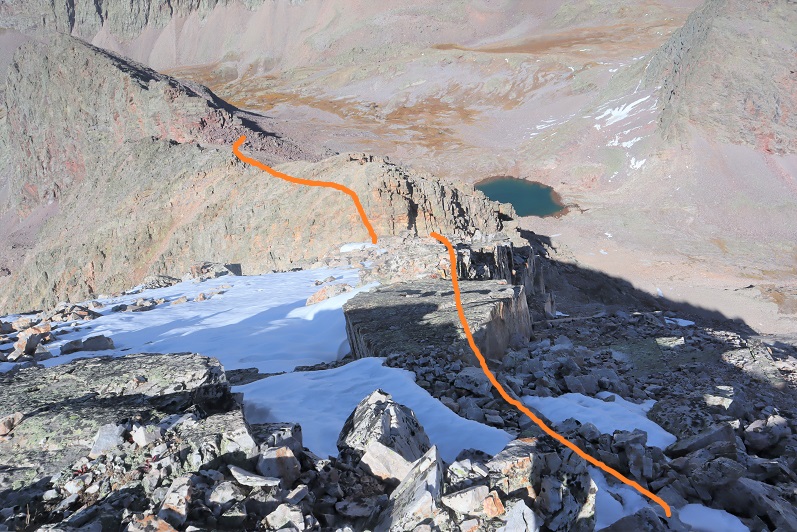
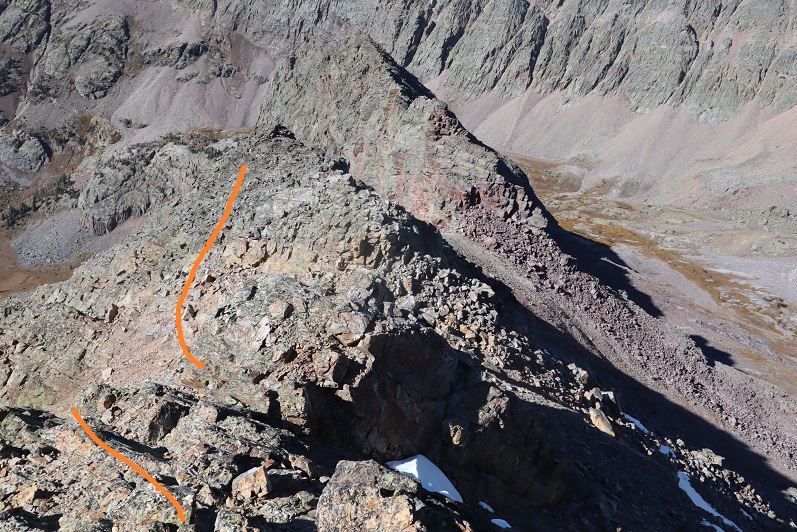
Heading down Peak Seven was just as fun as heading up. Here’s the way back to the saddle
From the saddle I hiked back down to the lake, and made my way over to the south side of Peak 8, intent on attempting Peak 9 today as well.
However, as I rounded the corner to Peak 8 I noticed the sun was already starting to set behind Peak Seven. It’s fall, and the days are short. Looking at the hike ahead, I knew I wouldn’t be back to my gear before dark. I have Raynaud’s, and I need to be bundled up and in bed as the sun goes down. I sighed and retraced my steps back to where I’d left my gear at the pass. Once I got there, I’d do some thinking. Here’s the route from the top of the gully of Peak Seven back to the pass.
As I made my way back to the pass I noticed a gully in between Peak Eight and Peak Nine. It looked like it went.
I filed that away and kept hiking to my gear
As I hiked, I strategized. I could hike back down to the lake to set up camp, but right now I was really upset about not getting in Peak Nine today as well. The approach was a lot for one peak, and I really didn’t want to drive/hike in all this way in the future just for Peak Nine at a future date. Maybe I could get it tomorrow morning? I got out my topo map and the route I’d passed on my way to/from Peak Seven indeed looked like it went, but I was a little worried about the snow. Luckily, I’d packed spikes. I decided to sleep on the pass tonight (at 12,830’) and attempt Peak Nine first thing tomorrow.
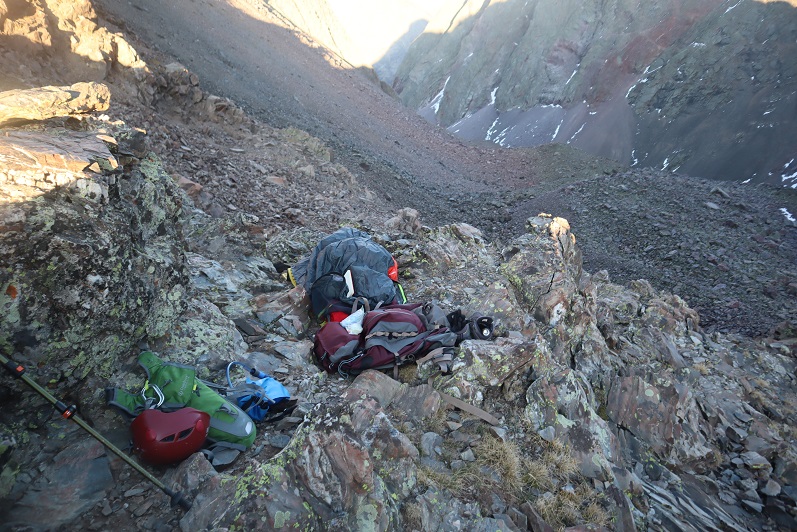
I made it back to the pass and looked for a place to spend the night. I didn’t have many options, and all of them were rocky. And windy. Time to set up camp. Check out my bivy for the night. Side note: it’s hard to dry out your feet when it’s windy and cold. I ended up putting dry socks on and wearing my sandals.
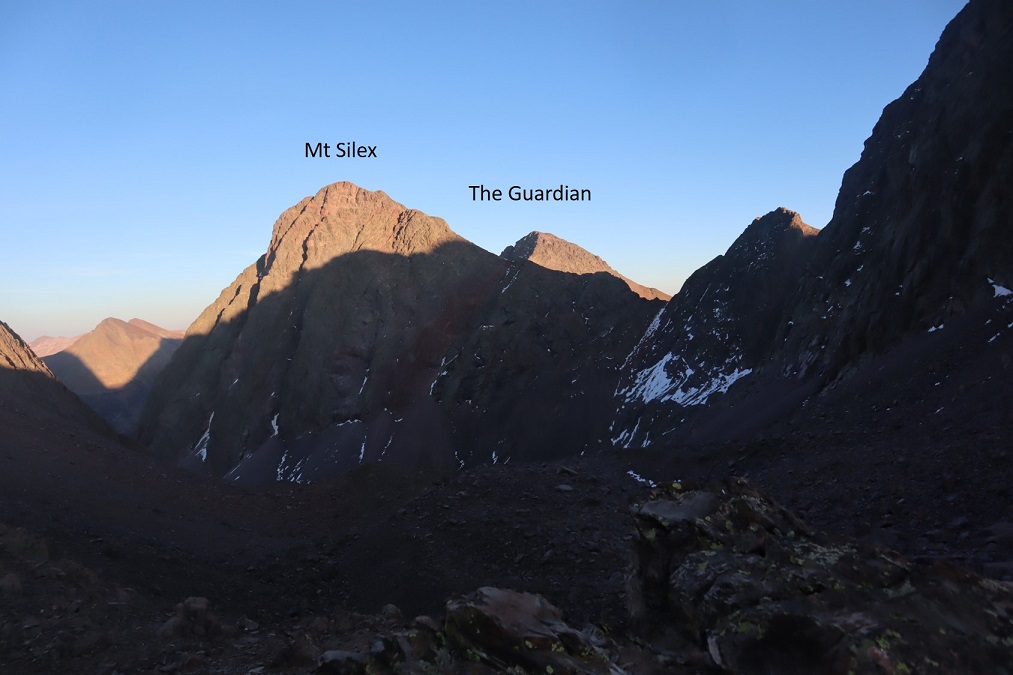
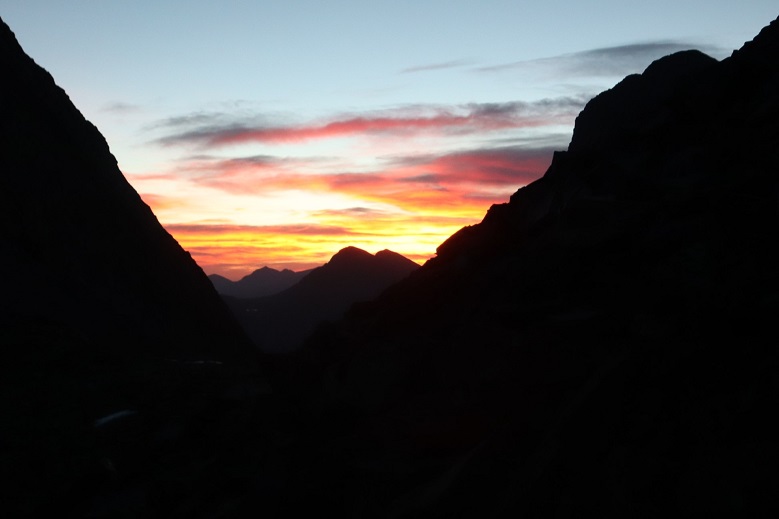
As the sun started to set I filtered some water (glad I’d thought to melt snow now that I wasn’t camping at the lake), jotted down some notes, and had dinner (a handful of peanuts and 4 or 5 slices of dried mangoes: eating while hiking makes me nauseous, so I probably only get in 500 calories in an entire backpacking weekend). Oh, and a couple shots of whiskey. That adds calories. I set up all my gear so in the morning all I’d need to do was put away my sleeping bag and bivy (important when you have no function of your fingers, which I won’t in the morning cold), watched the sun set, and poured over topo maps for two other of tomorrow’s peaks: Mt Silex and The Guardian
Anyone else think it looks like The Guardian is wearing a mask?
I set my alarm, bundled myself up in all my clothes, gloves, hat, etc. and went to bed. It was a windy night but my bivy did its job. I woke up at 5:30am and it was still pitch-black outside. I watched a few shooting stars and re-set my alarm, knowing getting outside of my bivy with this wind/cold would be a bad idea. By 6:30am it was just starting to get light. I enjoyed the sunrise tucked inside my layers, and then as quickly as possible put away my bivy and sleeping bag and bundled my gear together. I was going to attempt Peak Nine with just my daypack today as well (which I’d pre-packed last night), so I left my large pack on the pass and started out.
Day 2: Peak Nine, Mt Silex, The Guardian
I started off the same way I’d headed towards Peak Seven yesterday, heading down the pass, but when I saw the access gully for Peak Nine I turned left (south) and up
I’d been a bit worried about the snow, but it wasn’t a nuisance. Most of the gully was dry. I didn’t need to put on traction to kick in steps in the snow, and it didn’t cause me to slip. There was only about 20 feet or so to deal with.
I was excited when I made it to the top of the gully to find I was in the perfect spot to continue the hike. I stayed high and aimed for the ridge. Note: Here it became very windy. The wind didn’t stop all day.
At the end of the ridge an obvious cairn trail picks up.
It will lead you up a class 3-4 chimney and then around the mountainside.
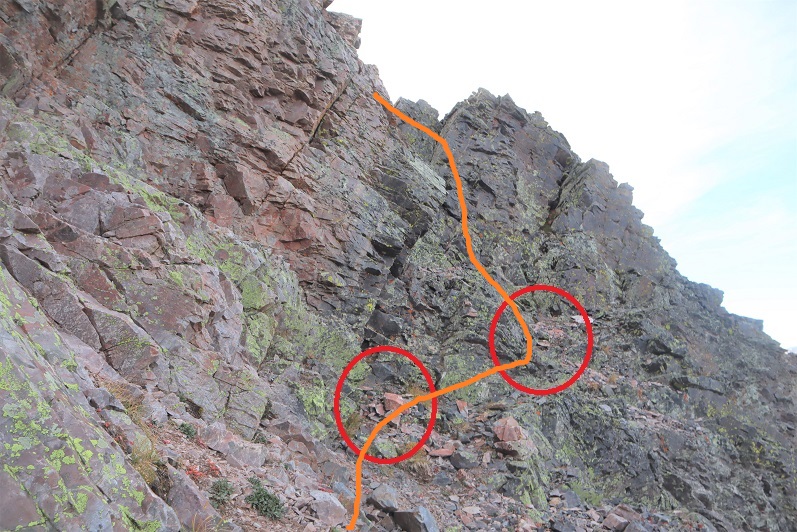
You have the option of taking the gully or the ridge. I took the gully up, the ridge down. The gully takes some route finding and I found it to be class 4. The ridge is easily and highly cairned. Here’s the entrance to the gully. I don’t think there’s a way to cliff out, but there are tons of options to ascend. Just keep heading northeast
Here are some photos from inside the gully
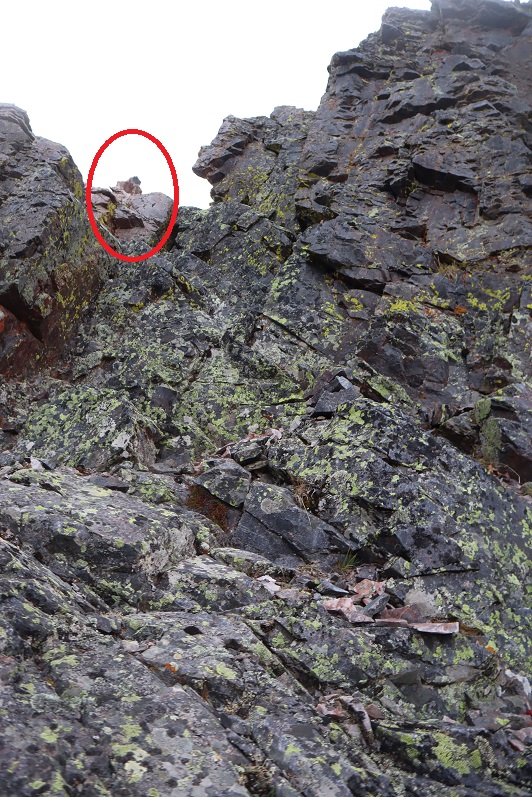
If you keep heading northeast you’ll hit a wall. There will be cairns in the northeast corner of the top of the gully that lead you both to the exit route back down the ridge, and to the summit.
These cairns will take you to the ridge, which if you follow northwest will take you to the summit
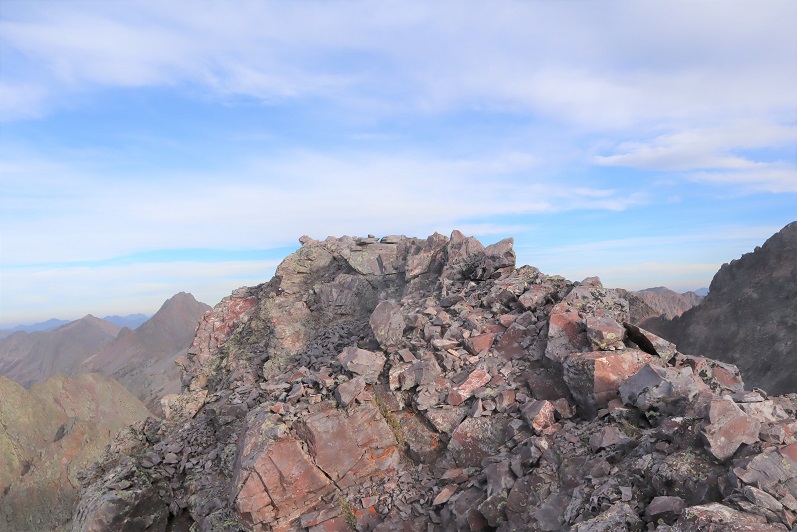
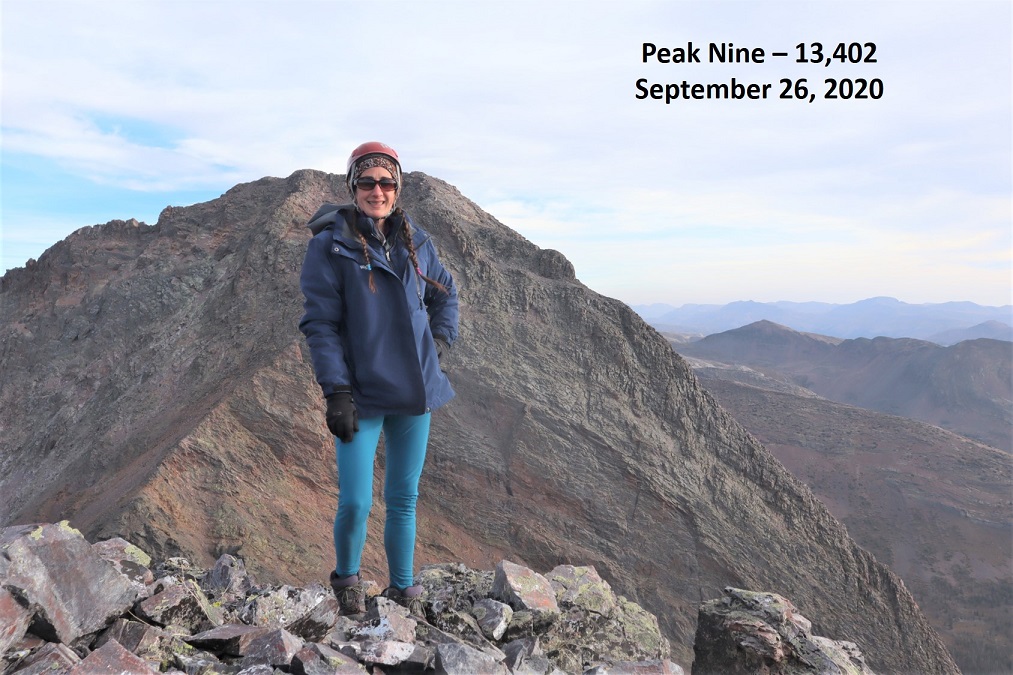
I summited Peak 9 at 8:25am
Peak Nine:
Here’s looking down the gully from the summit. Here you can see you can pick your route but need to head to the northeast corner to gain the ridge
I’m not gonna lie, I didn’t want to head back down the gully. I’d known there was a ridge route when I’d ascended, which kept me going up, but the class 4 moves were bordering on class 5, and I felt safer taking the ridge down. Here are some pictures of the very well cairned route down the ridge. I followed the ridge southeast the way I’d come, dipped down a bit, then found the cairns that led me back up to the ridge
I then followed the ridge
Dipping down to the left once, then staying to the right for the rest of the ridge
The ridge led me to a short gully. I took it southwest
And this brought me back to the trail I’d hiked in on.
I followed it back to the chimney, climbed down
And aimed for the gully I’d hiked in through
I used my kicked in steps from this morning to descend, then made my way back to the pass and my gear.
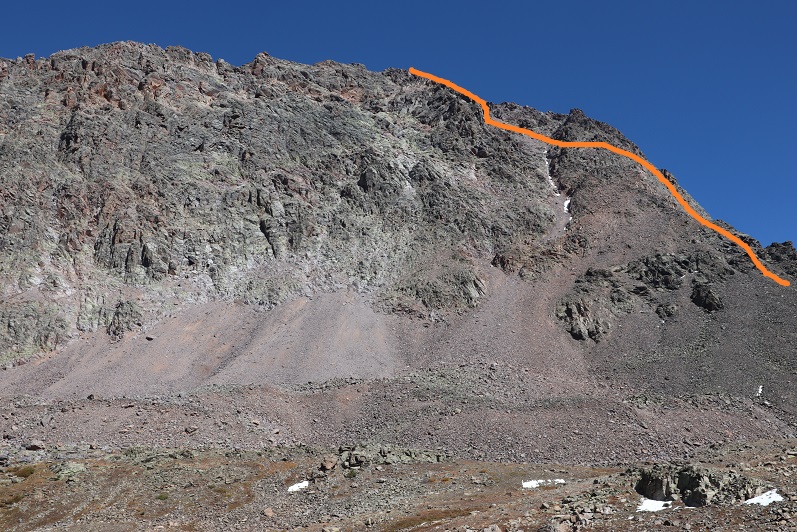
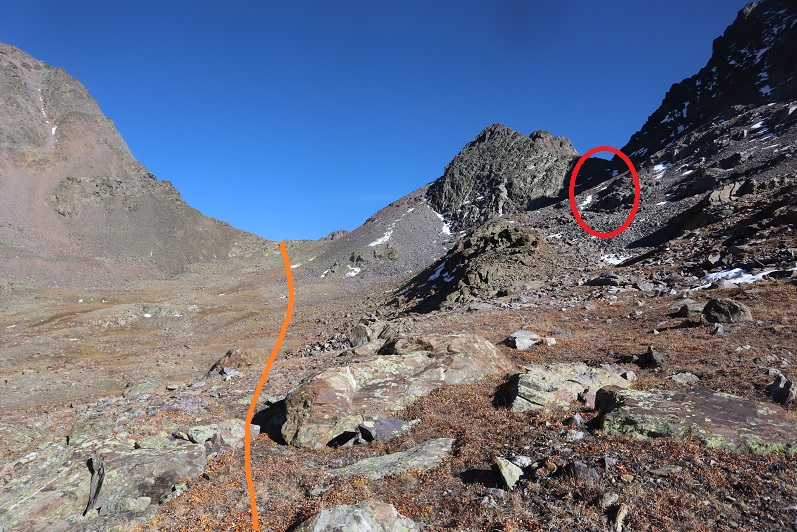
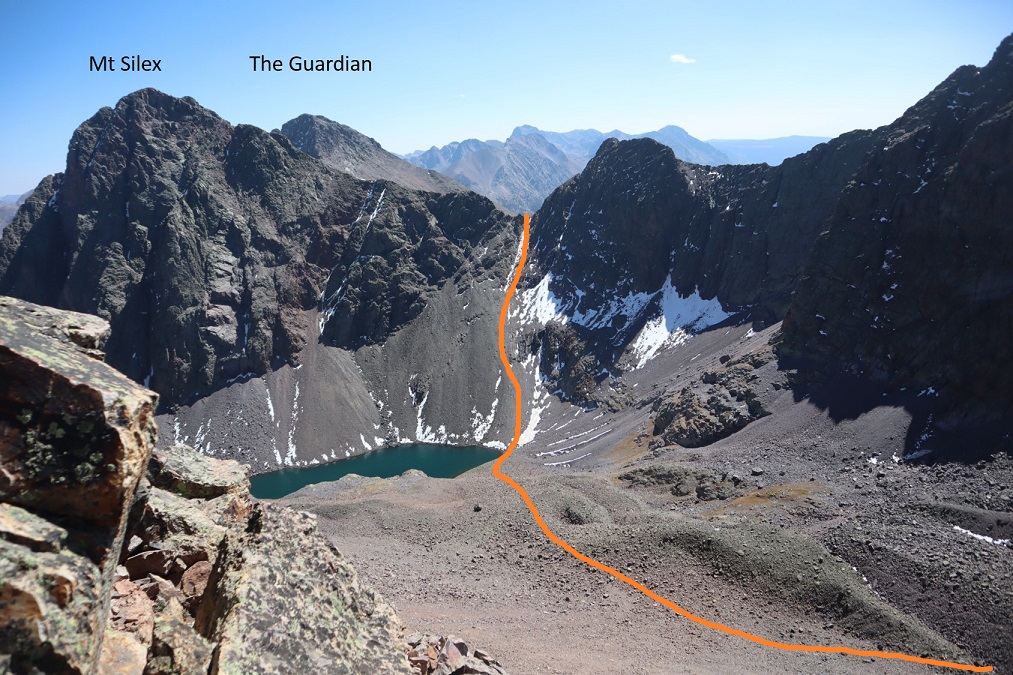
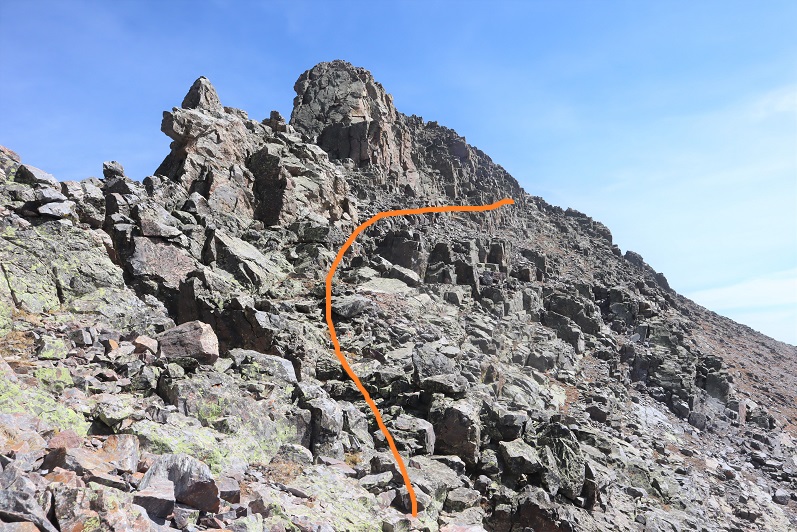
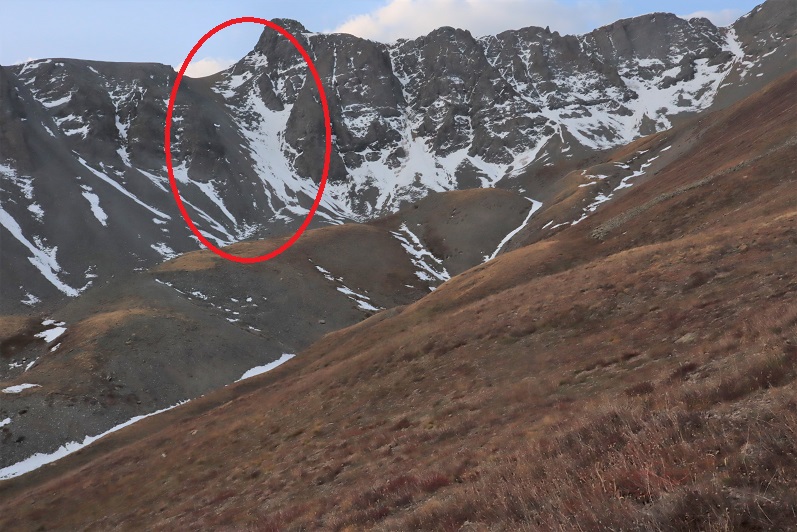
I sat at the pass and had a packet of tuna and looked at the time. It was still early, so I figured I had plenty of time to hike Mt Silex and The Guardian today as well. I gathered my large pack and set off for Lake Silex below. I was a bit worried about the access gully (circled in red). The snow looked to be covering the entire last part of the route, and I wasn’t sure I’d be able to get up the gully.
I dropped my large pack at the lake. It was now 11am, so the sun wouldn’t be my friend as I ascended the gully: it would be shining in my eyes the entire time. Here’s an overview of the route I took from the pass, down to the lake, and up the gully
When I got to the gully the snow wasn’t as bad as it had looked from down below. I was able to avoid most of it by sticking to the left
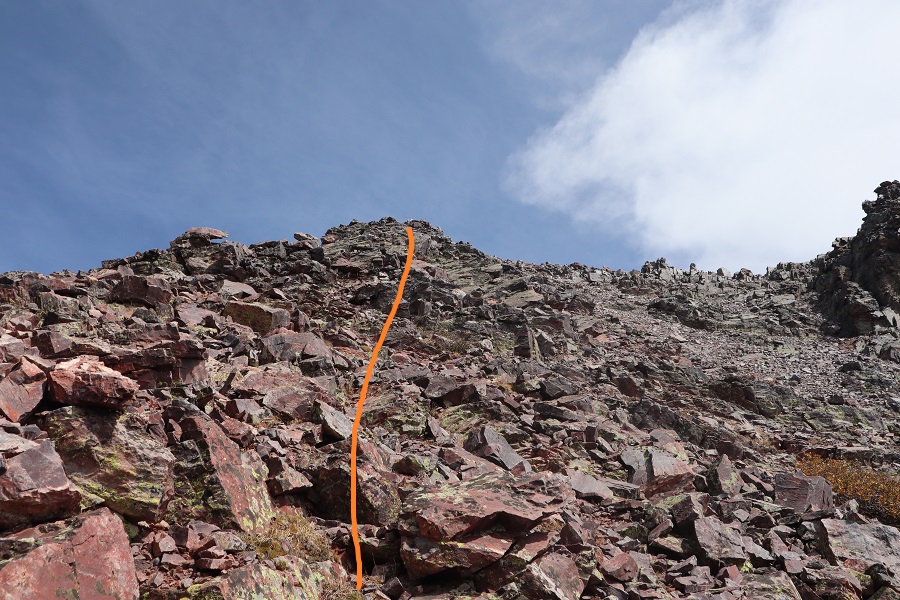
Here’s an overview of the route I took to summit both Mt Silex and The Guardian and back from the top of the gully
I started out kind of low, but my advice is to gain the ridge as soon as you can and follow it to the summit. I took more of the gully route, which made things more difficult than they needed to be. Here’s my route
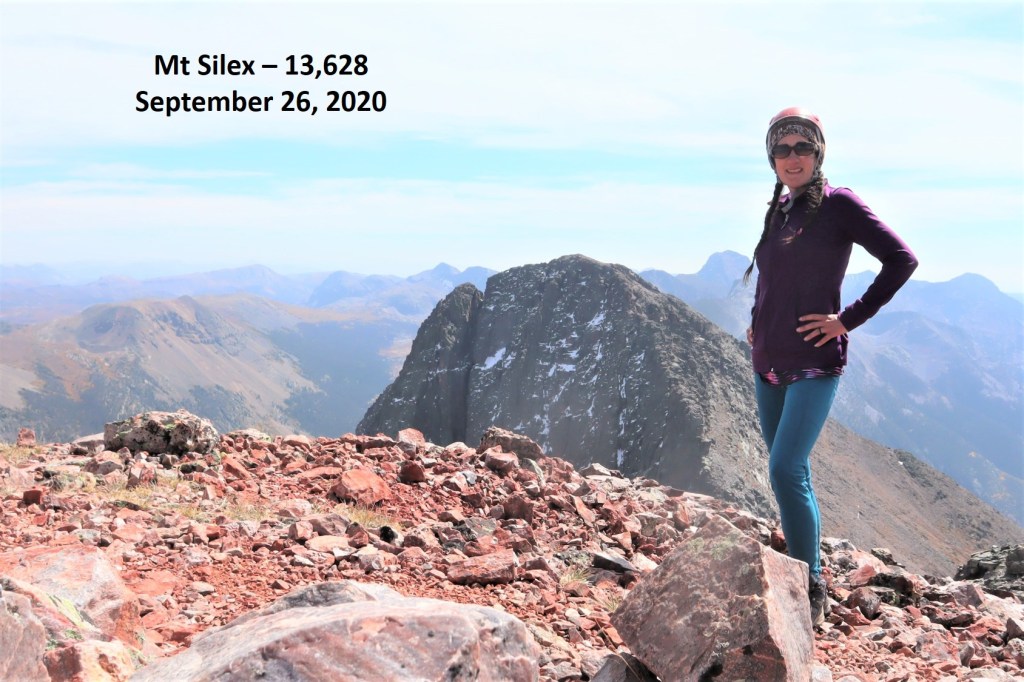
I summited Mt Silex at 12:55pm
Mt Silex:
Here’s a look back down the ridge I’d just hiked up
Now to head over to The Guardian. I went back down the gully, and hugged the side of the mountain
Then I stayed high and worked my way southeast
Here’s step by step.
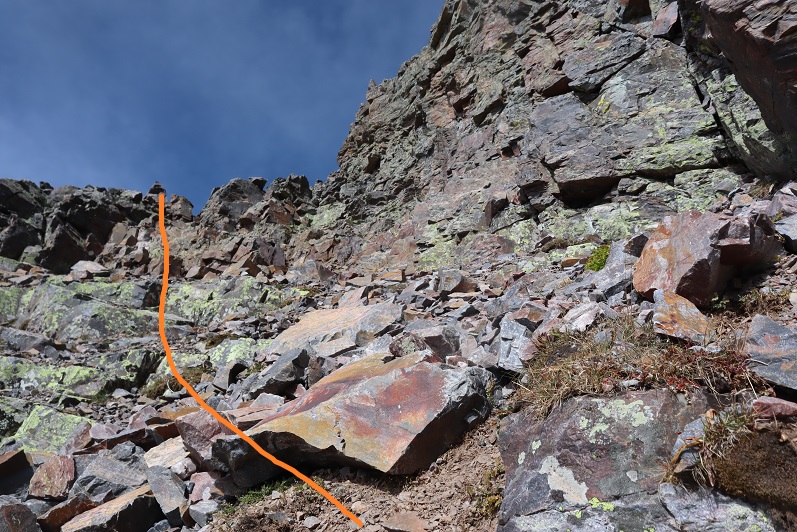
At around 13400’ I came to a gully, turned and headed northeast to the summit. The climbing here was class 4, and seemed to get sketchier as I went.
At the top of the gully was a well-cairned summit ridge
Here’s a look back down the gully
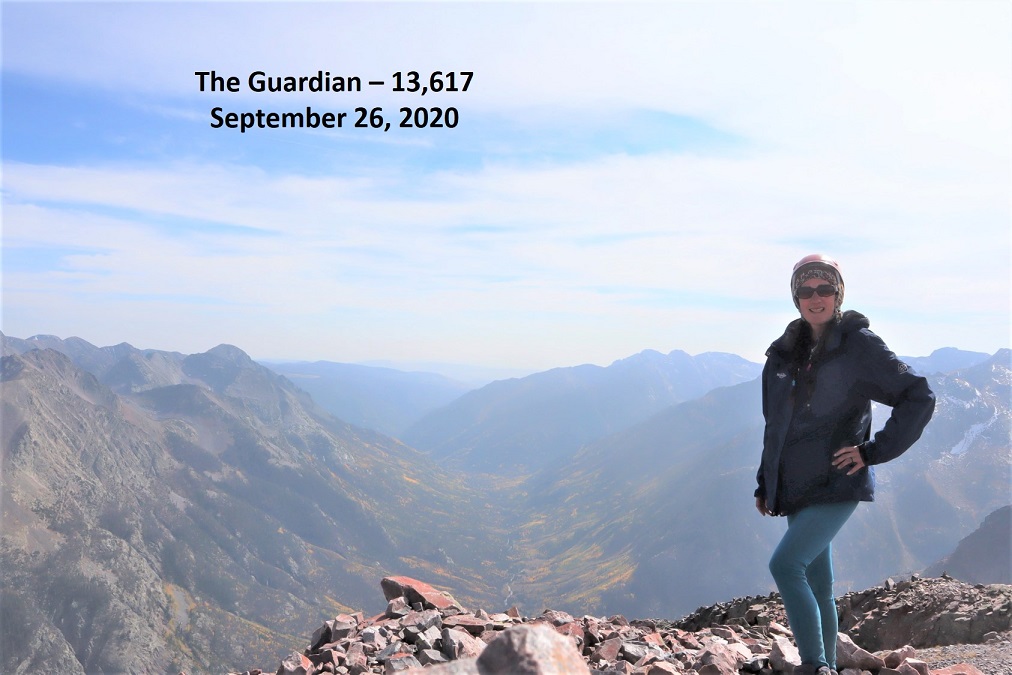
I summited The Guardian at 2:55pm. The views were a bit hazy due to the smoke from the fires
The Guardian:
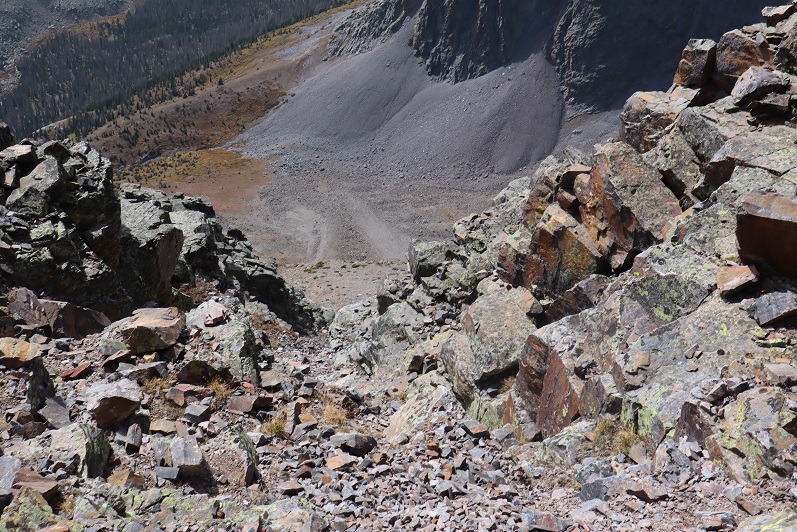
As I’d summited, I noticed an easier gully I could have accessed to summit if I’d hiked just a little further southeast. I decided to take that gully down. It’s scree filled and I scree surfed down. This is class 2.
At the bottom of the gully I turned right
I had a great view of my route back to the gully that leads back to Lake Silex. It’s important to stay high here, as it does cliff out a little below. Here’s my route
Here’s a look back at the route down from The Guardian, staying high to avoid the cliff bands
Back at the top of the gully here’s looking at my route back to Lake Silex. I hiked down to the lake, gathered my gear, and went around the north side of the lake, looking for a spot to spend the night.
At the northeast side of the lake I found a set of 3 windbreaks and picked the most well-constructed one to spend the night.
I set up my gear inside a windbreak built in-between two large boulders. It was well made, but the wind was so intense the barrier wasn’t doing much to keep out the wind.
I filtered some water from the lake, ate dinner (my last packet of tuna, a handful of peanuts, and a few shots of whiskey) and made it an early night.
The wind howled all night long. It was intense, but my bivy once again did its job.
Day 3: Descent, Hunchback Mountain, Hunchback Pass
I woke up the next morning, gathered my gear, and was off at 7am. I followed the gully northeast towards Stormy Gulch.
There was still some snow left in this gully from last winter.
I made my way down the scree and back Stormy Gulch
I much preferred the way I hiked in rather than this scree hike out. Here’s looking back on the scree slope
I picked back up the faint trail and followed it east
The waterfall seemed a good place to stop for a bit. I sat on a log and relaxed for a few minutes before the long hike back up to Hunchback Pass. Once again, this would be a great camping spot.
I crossed Nebo Creek and quickly found the trail.
I followed the trail north past treeline, keeping a steady pace as I still had one more peak to climb and didn’t want to get too tired too quickly. I filtered water one last time and took frequent breaks just because I could.
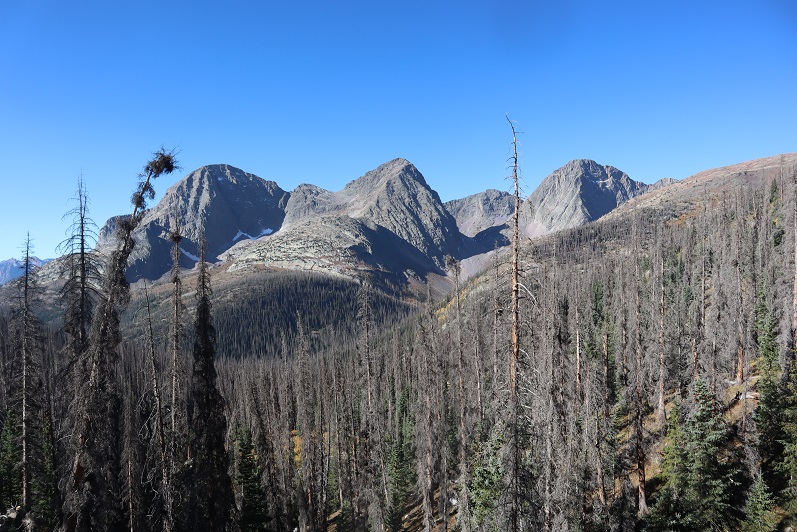
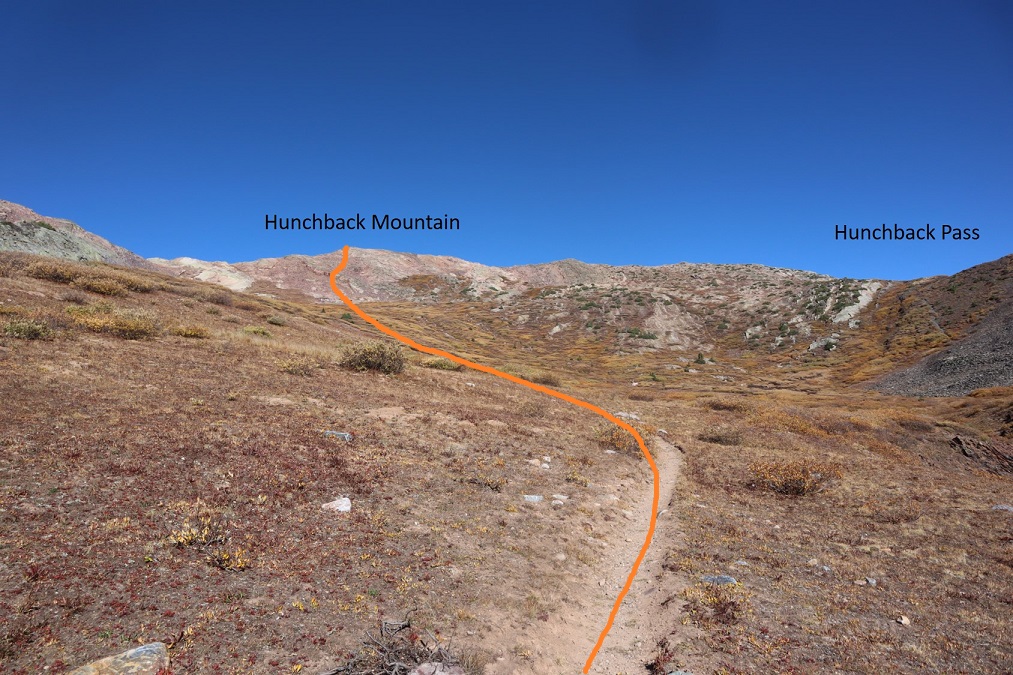
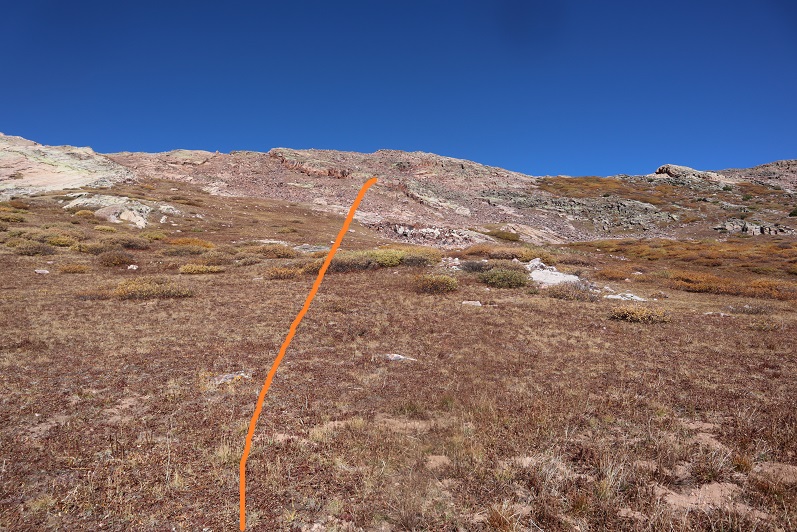
Once above treeline I had a great view of Hunchback Mountain. Here’s the overall route I took to the summit
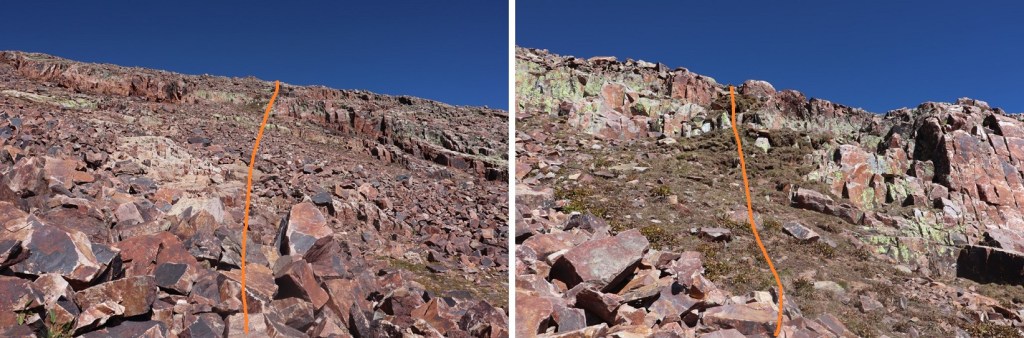
And step by step, all class 2. Sometime during this part of the hike I lost one of my gloves. It was really windy, and I suspect it was blown out of my pocket. Time for a new pair of gloves. I left the trail and aimed for a small grassy area near a band of rocks
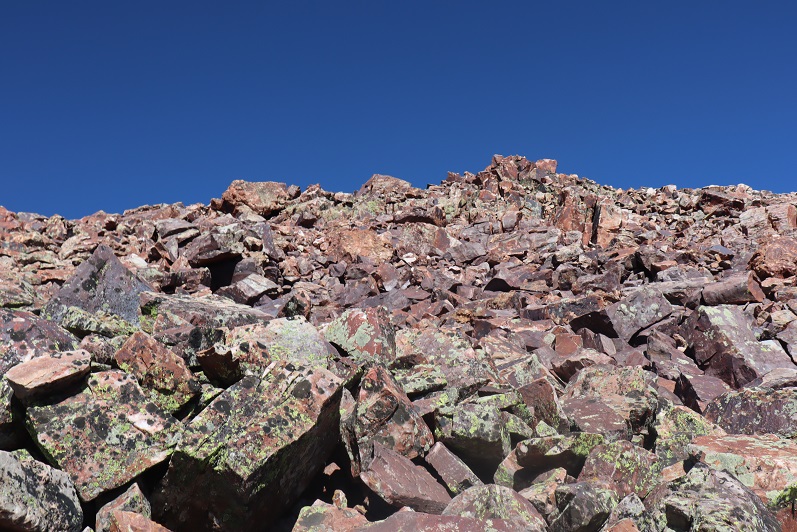
After the grassy area the terrain became rocky. I aimed northwest (note, this is a false summit)
Here’s a view of the summit of Hunchback Mountain
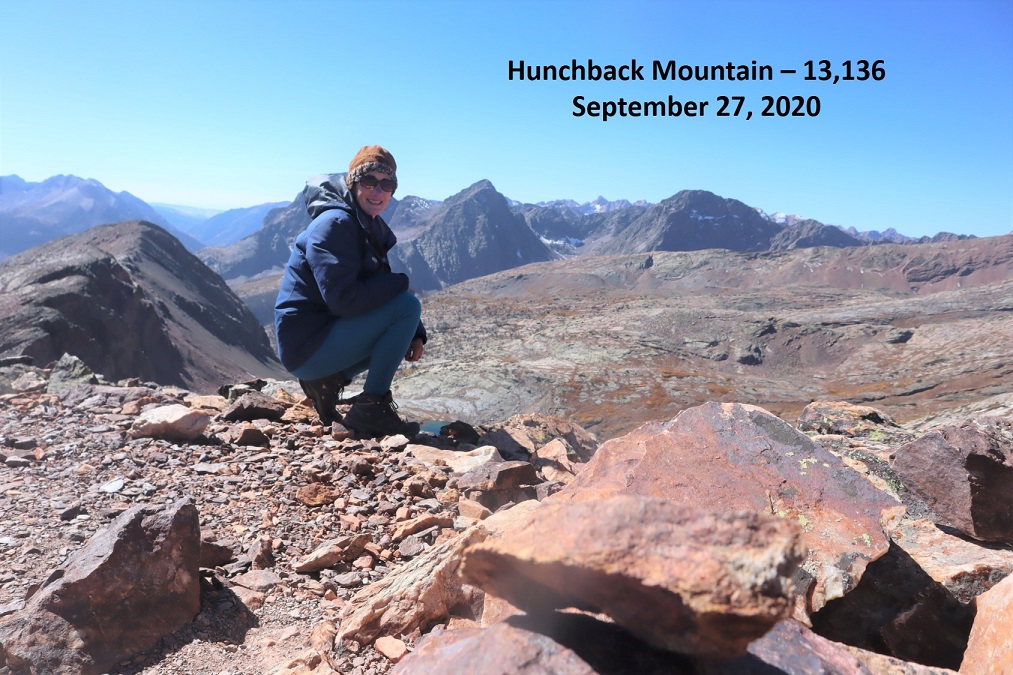
I summited Hunchback Mountain at 11:15am
Hunchback Mountain:
I spent some time on the summit, getting a good look at some 13ers I wanted to attempt next weekend if the weather held out. I figured out which route I wanted to take next week, and then it was time to head towards Hunchback Pass. I just followed the ridge east until I reached a tundra/willow filled gully, then followed the gully back to the trail.
Here’s looking back on my descent
Back on the trail it was an easy hike back down to my truck
I made it back to my truck at 1pm. This was a 3 day hike, with 39.49 miles and 11981’ of elevation gain according to CalTopo, 28.9 miles and 19042’ of elevation gain according to Strava. I’m not sure why the big gap in elevation gain/mileage, but to remain consistent I always use CalTopo data.
From Tellurium Creek Road. There is no real trailhead for this hike. A good place to park is at the junction between 742 and 584, and to start out following 584 north. The rest of the road is 4WD, but is really better suited for an OHV. There also isn’t a good place to park further up. I did not park at this junction but should have. Instead I drove up the 584 road and after about a quarter mile decided I loved my truck too much to continue. There are some really big rocks. My truck could have made it further (I didn’t know it at the time, but I’d already driven the worst part) but I decided instead to find a place to park between some trees and hike the rest of the road.
From my parking spot I followed the 4WD road for a mile before turning right onto a closed road. In the dark I missed the turnoff, but in daylight it’s obvious, marked by large rocks closing the road to vehicle traffic.
This is an old mining road that switchbacks up the side of the mountain. They really don’t want you driving on this road: as if the rock barriers weren’t enough, they’ve mounded the road as well. It’s still easy to follow.
The road passes the Enterprise Mine
And switchbacks a few more times up the mountainside before heading to another mining claim. I took two more switchbacks after the Enterprise mine, and then left the road to head north up the mountainside.
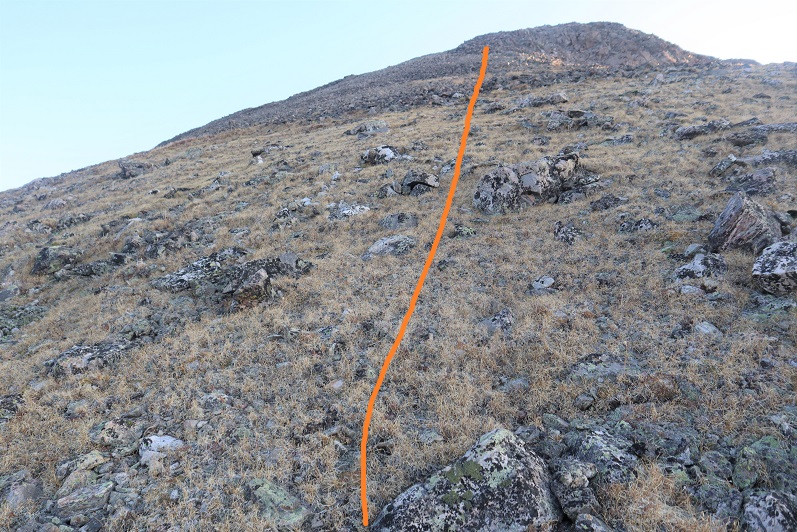
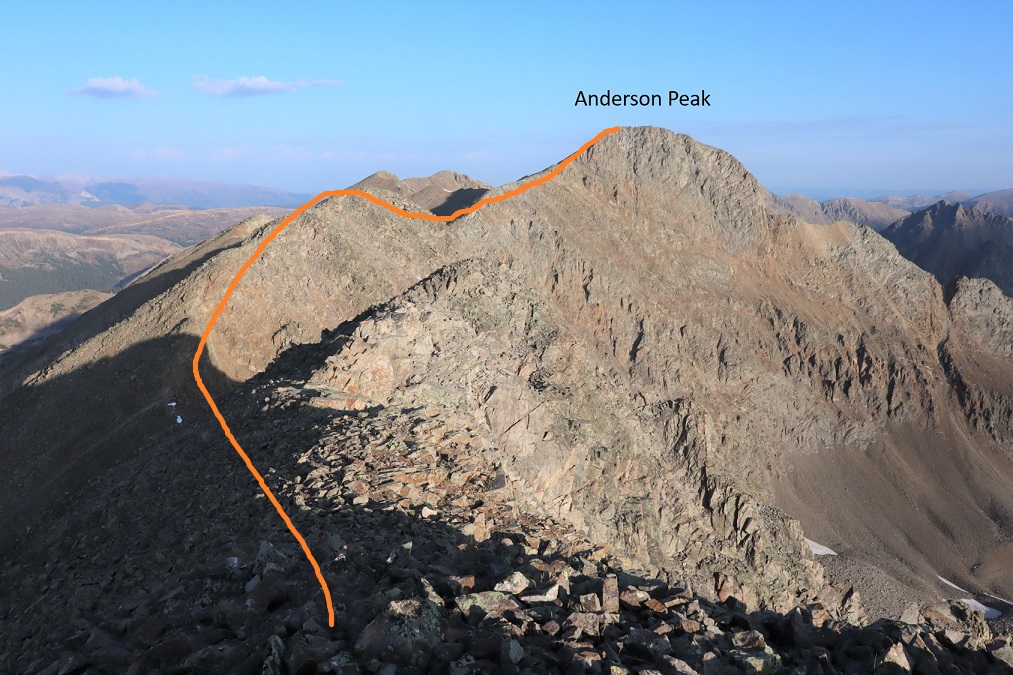
Once I’d gained the ridge I turned left and followed the ridge northeast.
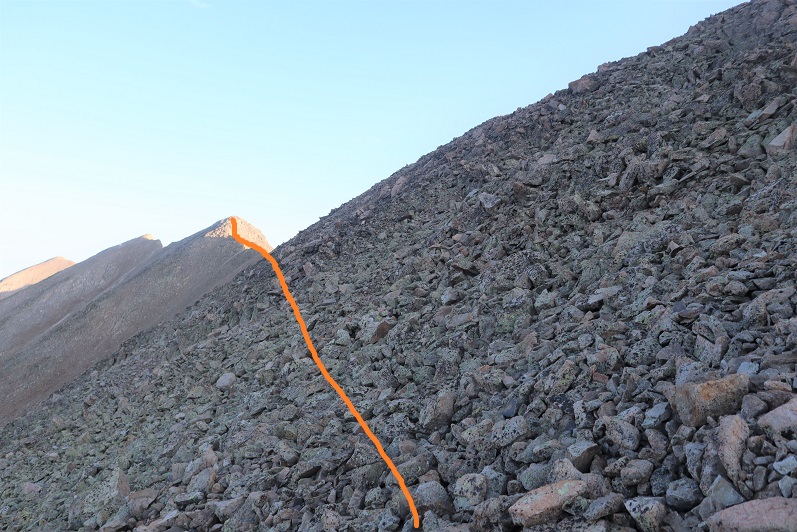
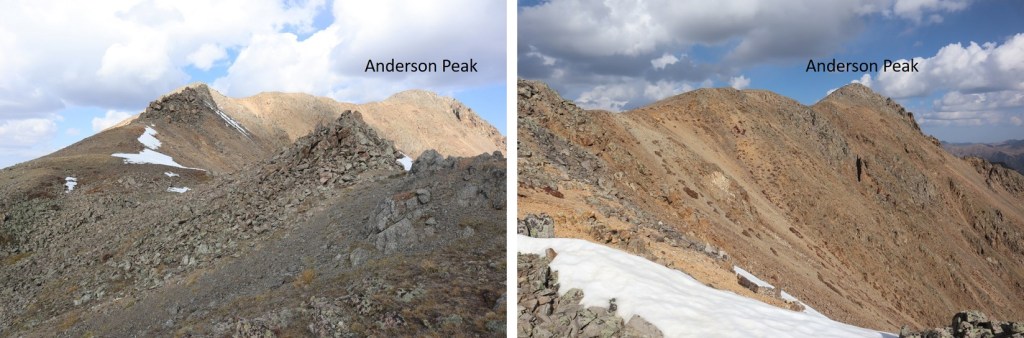
From here on out this is a simple ridge hike, but there are a lot of false summits
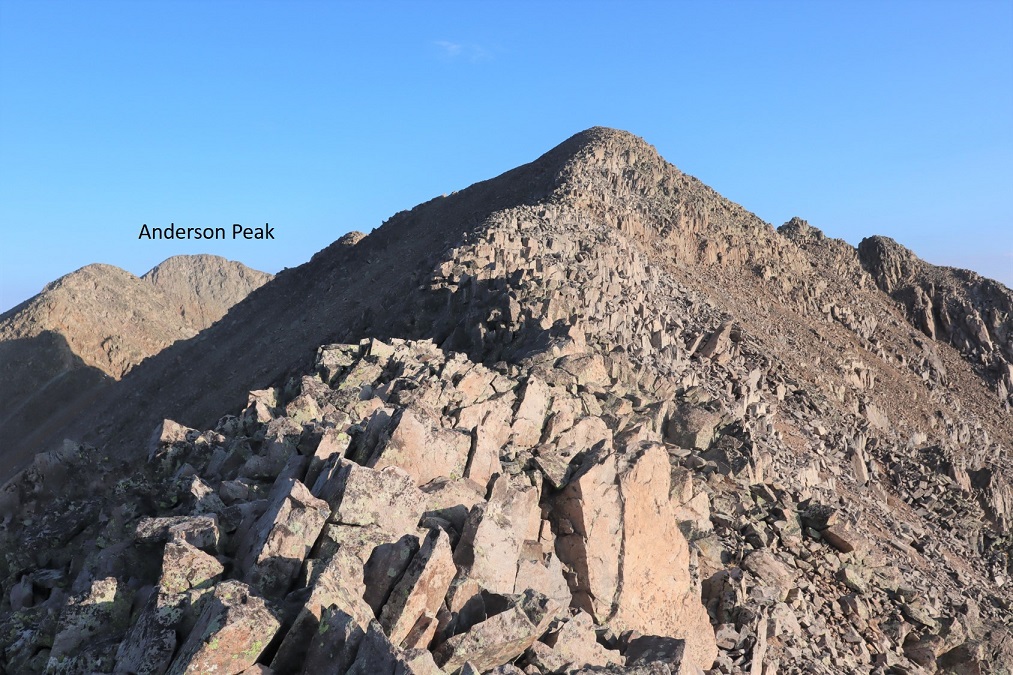
Here’s the actual summit of Anderson Peak
It’s a long but straightforward, class 2 ridge walk to the summit (with a lot of small ups and downs)
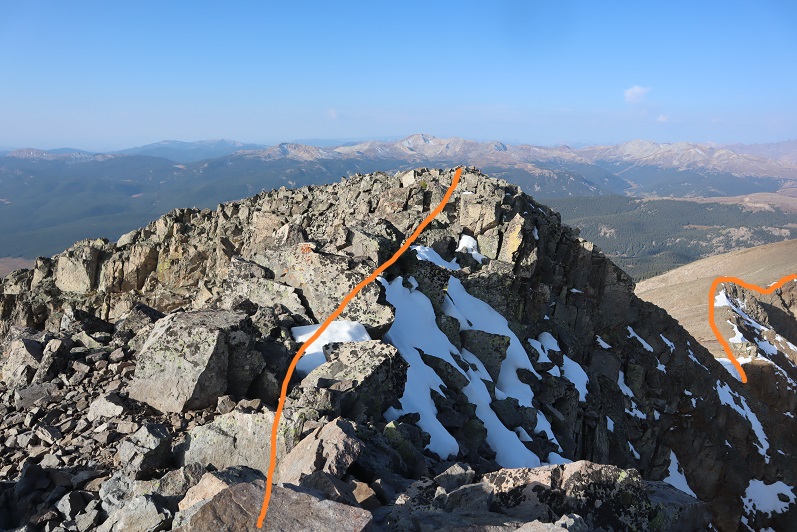
For some reason I saw an anchor set up on the ridge? I’m not sure what the reason is, considering this is all class 2 and it’s not near the summit.
Here’s the last bit to the summit. Notice how blue the skies are?
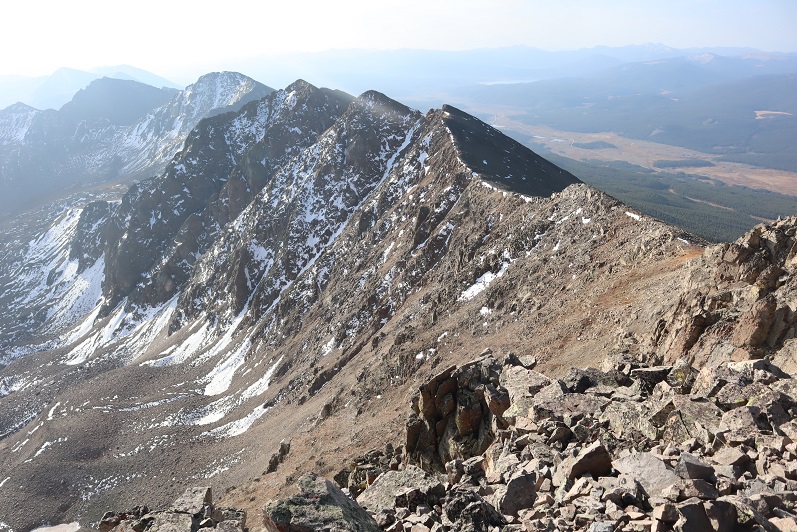
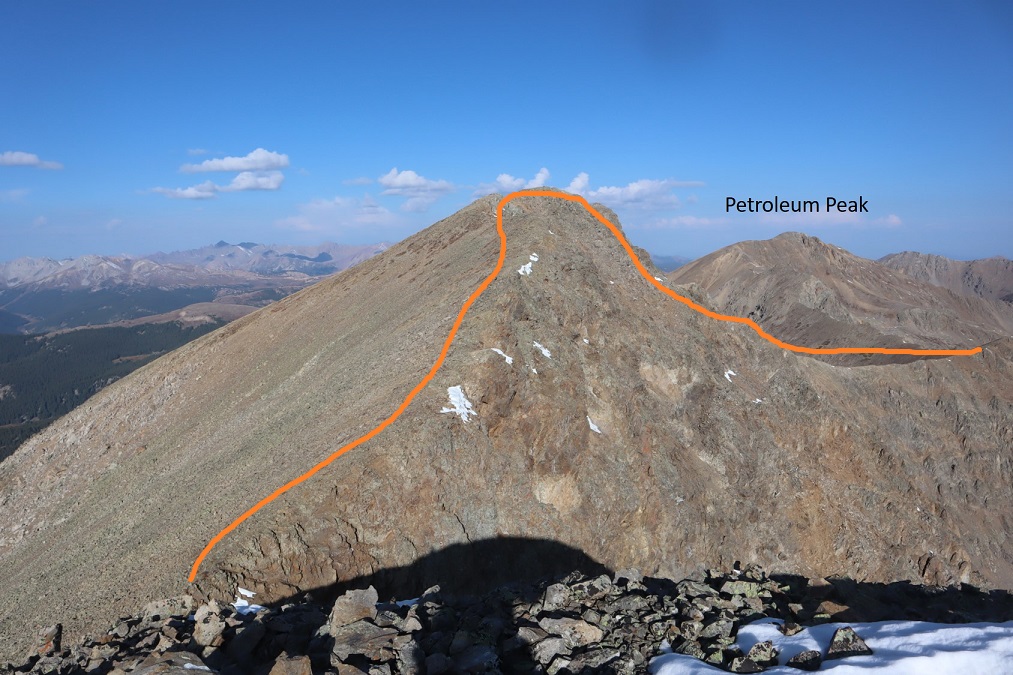
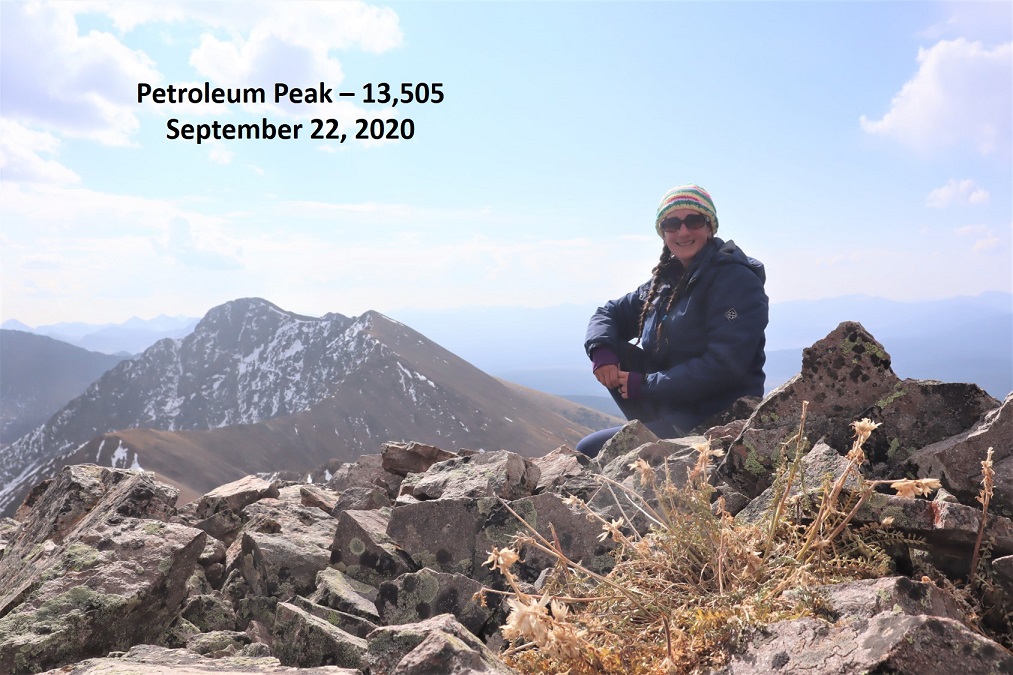
I turned around and continued following the ridge that led to Petroleum Peak
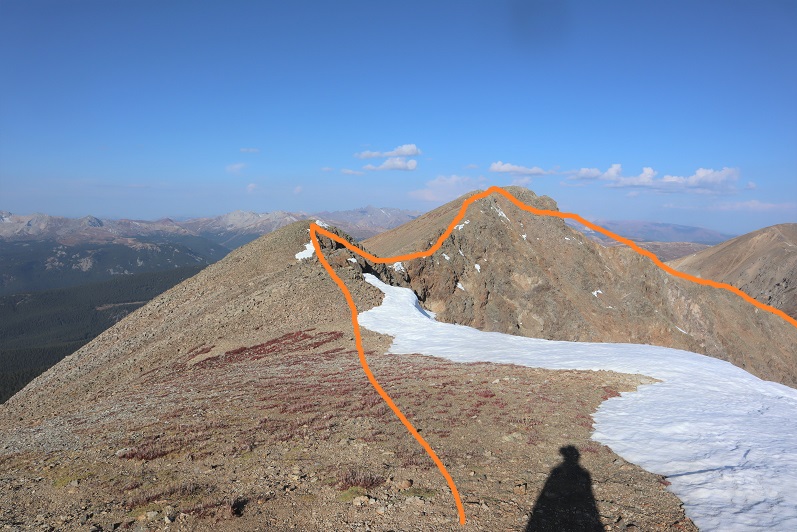
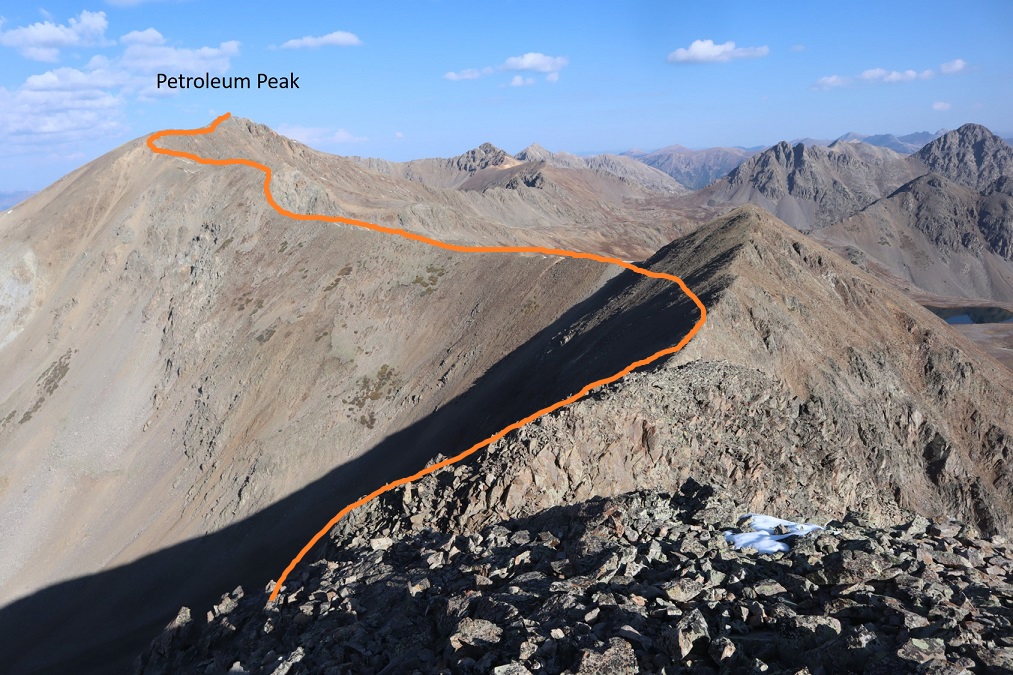
Here’s an overview of the route
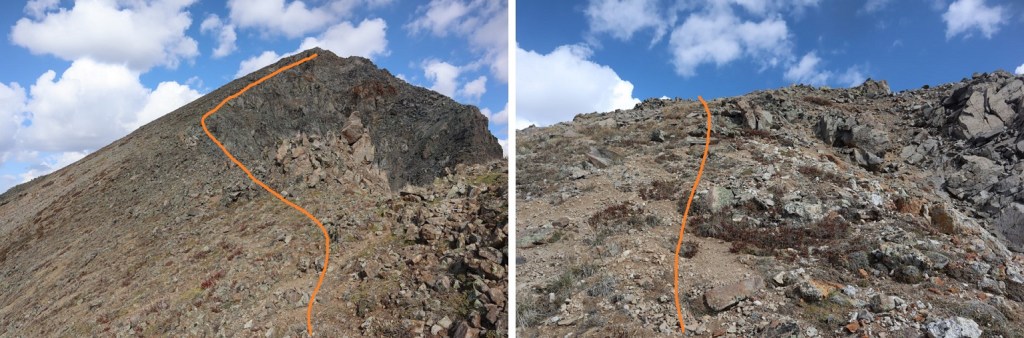
And step by step, all class 2. Notice the increasing clouds?
Getting up this section was a little steep, but still class 2
I stuck to the ridge the entire way
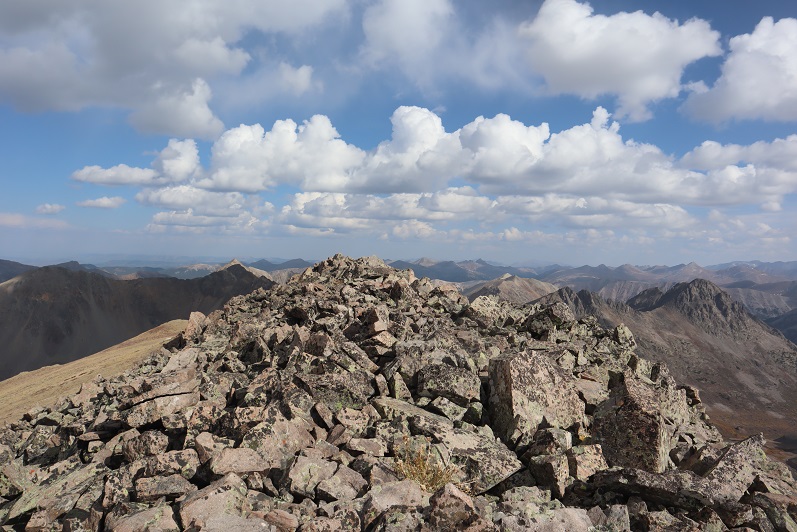
The summit was long and it was difficult to tell where the actual summit was. I walked all along the ridge and found the summit cairn/register further to the north.
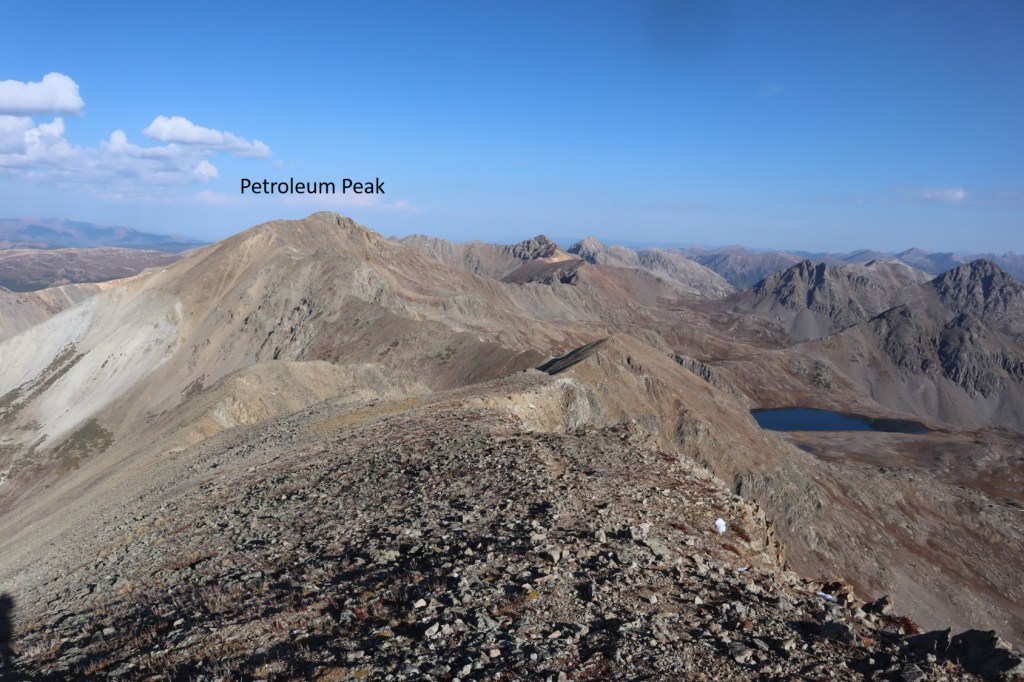
Here’s a look back at the route from Anderson Peak over to Petroleum Peak
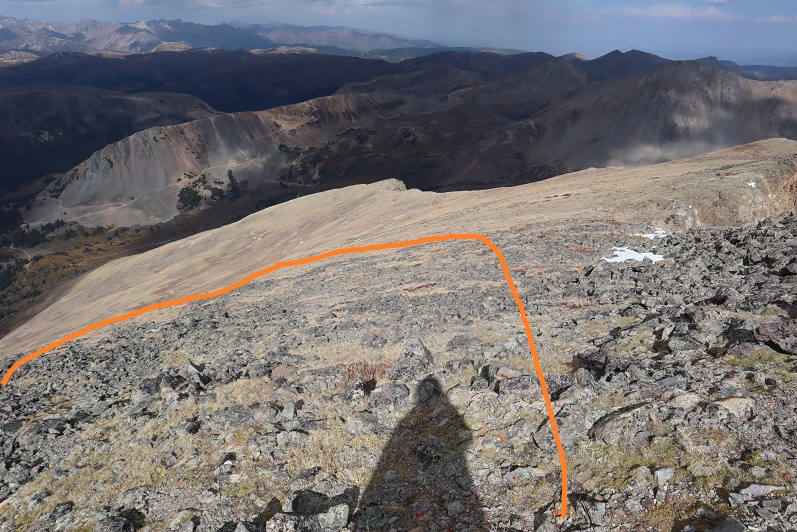
It wasn’t lost on me the clouds were increasing at a rapid rate. It wasn’t even 10:30am yet, but the forecast predicted a 20% chance of thunderstorms after noon. It looked like they were going to happen, and I wanted off the mountain as soon as possible. I continued following the ridge north to avoid rock hopping, then turned and followed the mountainside as it curved south.
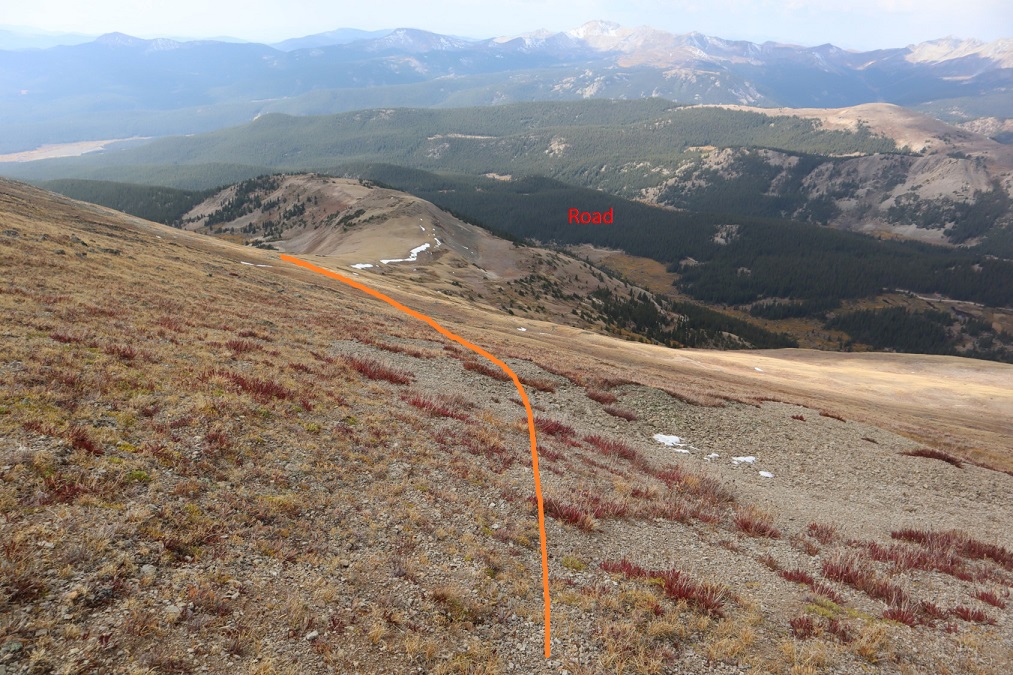
Now, I could have just aimed for the road and taken that back to my truck, but where’s the fun in that? Side note: If you’re not good with route finding off trail, aim for the road.
Oh, and those clouds I’d been worried about? Around 10:30am it started snowing! Wow! That had happened FAST! I put my camera away during the worst of it, but it wasn’t too bad, just unexpected. Mostly graupel and small flakes.
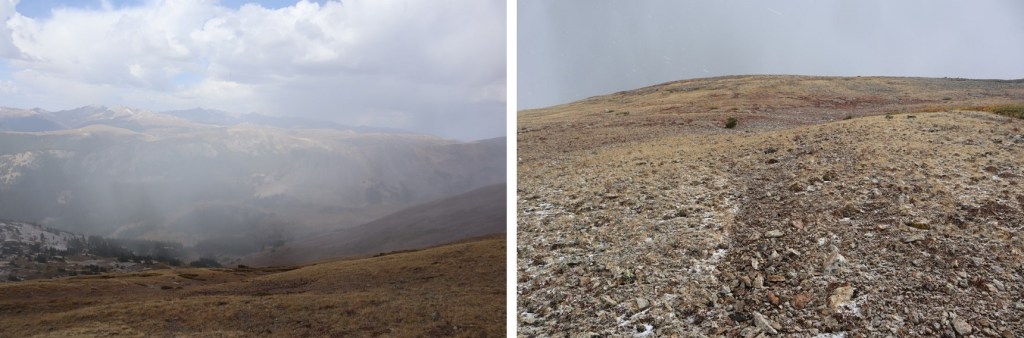
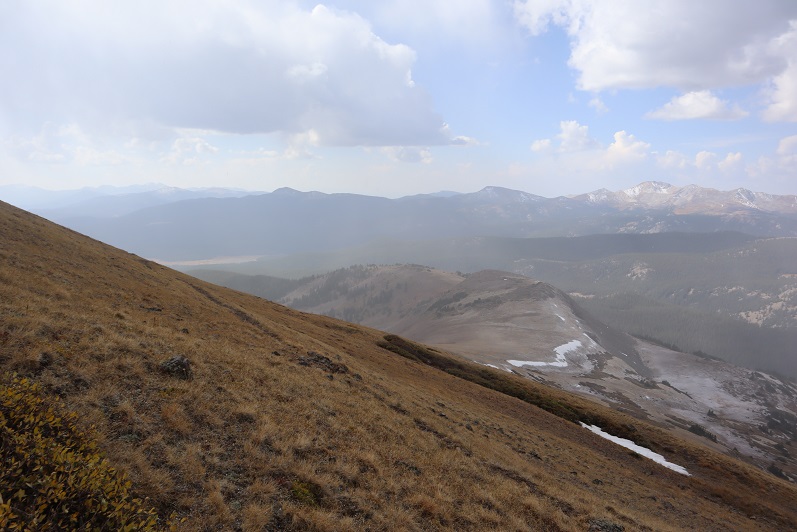
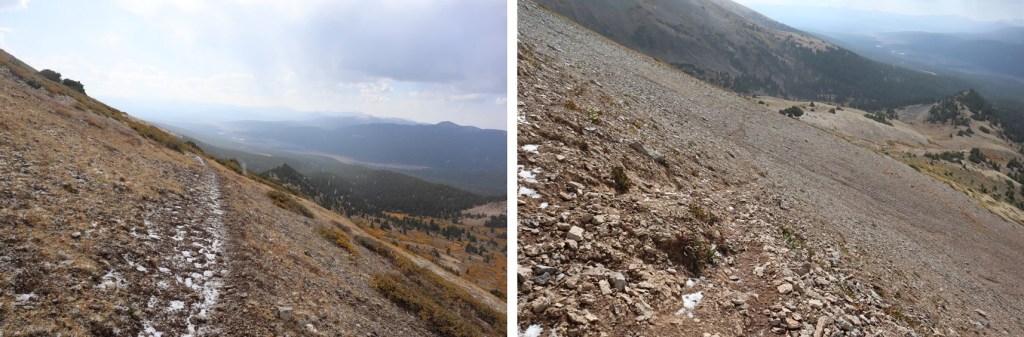
I continued curving around the side of the mountain until I came to a well defined game trail, then followed that to a basin.
Once in the basin the trail ended. I turned right and followed the drainage 2.5 miles. There is no trail here, but if you stick to the creek you will eventually make it to the road you hiked in on. The brush can be thick at times, there are some willows to contend with, but it’s easy to stay near the creek. Eventually you’ll want the creek on your left, but feel free to navigate back and forth as needed.
Eventually I made it back to the bumps in the dirt that told me I was back to the destroyed 4WD road
And took the road a short ways southeast to 584 and back to my truck
It rained lightly the rest of my way out.
I made it back to my truck at 12:15pm, making this a 12.14 mile hike with 4624’ of elevation gain in 6 hours, 45 minutes.
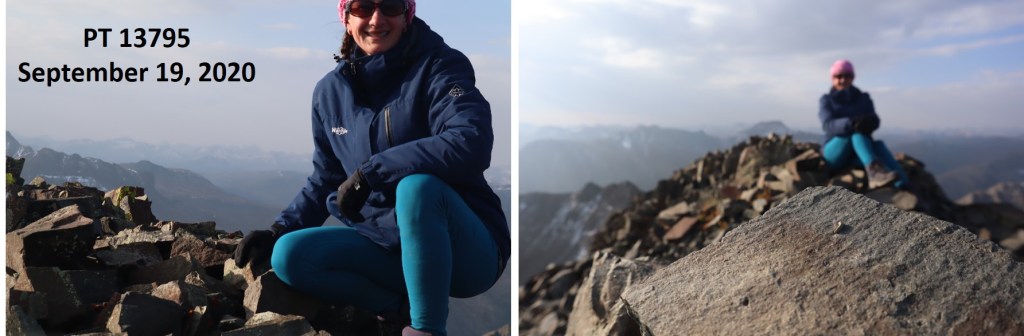
To finish off my birthday weekend I wanted to hike two more 13ers, which would bring my total to 200 unique Colorado 13er summits. I chose these peaks because we’ve recently had our first snow and I’ve attempted this peak before and turned back due to snow/conditions. If I wanted to get PT 13795 in this year I was going to have to do it soon.
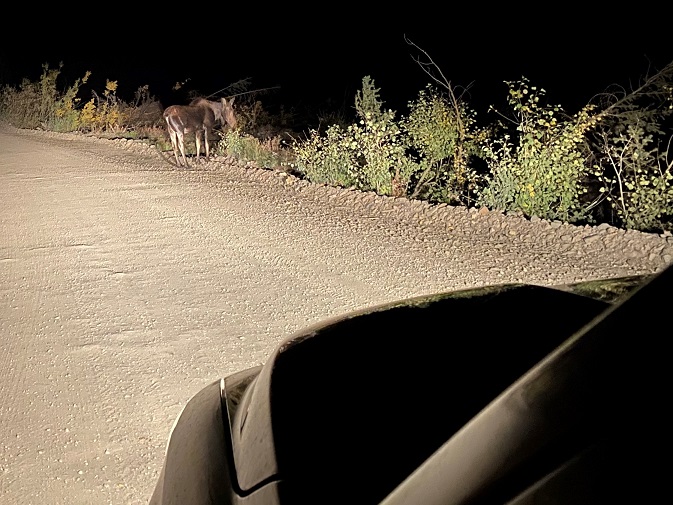
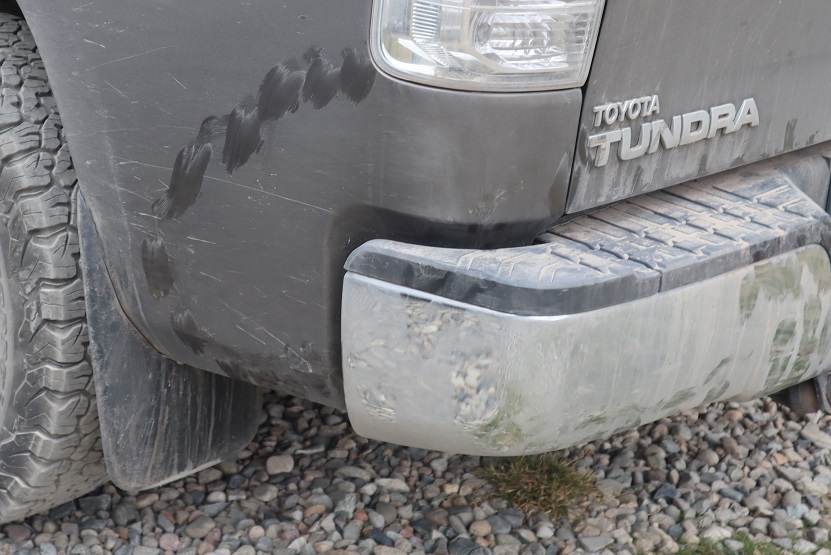
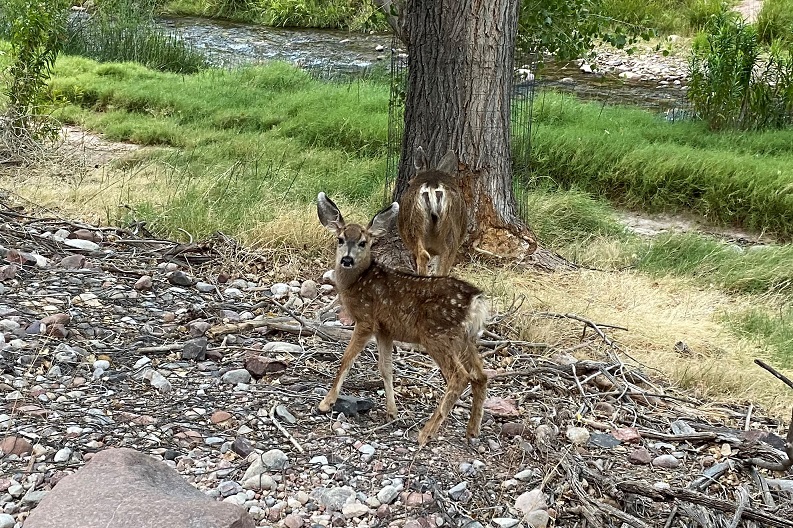
I drove down to the Grizzly Gulch/Silver Creek Trailhead and didn’t make it there until after dark. The parking lot was packed, there were several tents set up, and tons of campers enjoying campfires. In short, it was loud and everyone seemed to be enjoying themselves. I parked, fired up my jetboil and made my birthday dinner of cup noodles and mashed potatoes. As I ate dinner, I made some notes from the days climb, then got ready for bed. There are clean bathrooms at this trailhead (no toilet paper though). As I came back from the bathroom I ran into a rather large deer licking my truck. I tried to shoo it away but she wouldn’t budge, so I carefully made my way into the back of my truck while she continued licking my bumper. On a positive note, by 9pm the entire trailhead was silent and everyone had gone to bed, so I had no problem falling asleep.
I awoke to 32 degree weather and a layer of frost on top of my sleeping bag. Looks like I’m going to have to start winterizing my topper. Since it was cold I put on my puffy as well as my windbreaker, knit hat and gloves, and was on the trail at 5:15am.
I started out by heading west, following the same trail as Handies Peak. If you’re reading this I’m going to assume at this point you’ve summited Handies Peak and I won’t go into detail about the initial approach. If you’d like to see the approach I’ve written it up from my failed attempt of PT 13795 last year.
I followed the Grizzly Gulch trail through the woods and past treeline. After hiking for 2.5 miles I turned left and headed southeast towards an upper basin. There was a faint trail here
Once in the upper basin I came to a lake. There were two tents set up, so I tried to be quiet as I passed. I skirted the lake to the left and headed towards the gully that would bring me into another basin.
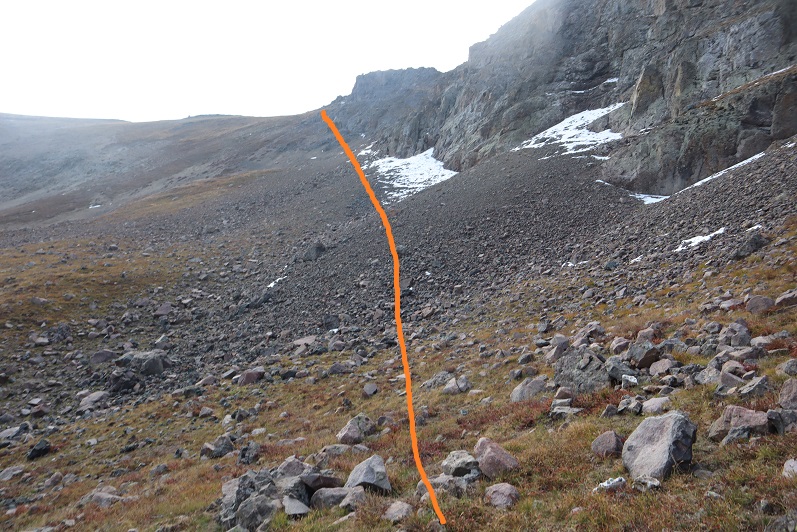
Ascending the gully beyond the lake was class 2+. The scree here was awful: I’d take one step forward and slide backwards. I actually used my ice axe and trekking pole here for stability, glad the sand was wet from the recent snow. There was no trail, so I just aimed southeast and tried to avoid the snow (it was bulletproof by the way).
Once in the upper basin I had a few options. I’ve read trip reports where hikers have used the gully to the left, but I’m not a fan of gullies. In fact, I consider ‘gully’ to be a 4 letter word. I took a look at the gully and said “nope”. Instead I took the ridge to the right. This was an easy hike on tundra, and should be the standard route.
Here’s a look at that gully I didn’t want to ascend
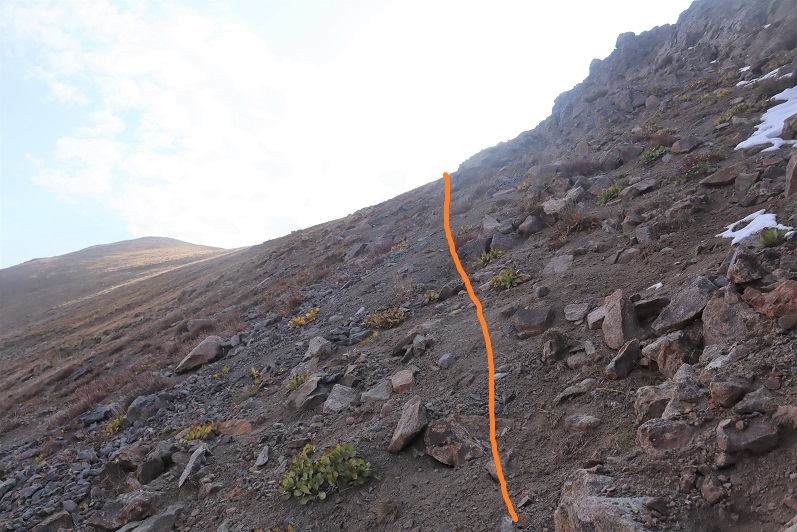
Just before gaining the ridge the tundra gave way to rock
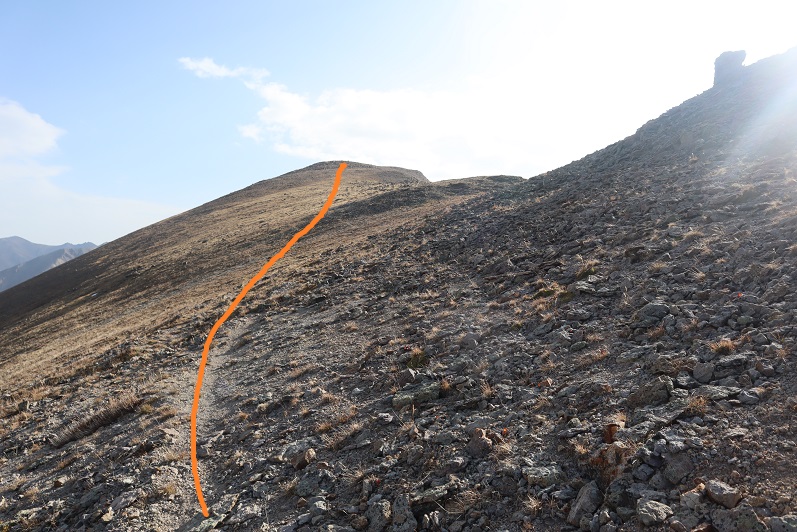
At the top I turned left and headed southeast for an easy tundra stroll towards PT 13795
The last push to the summit was rocky, but stayed class 2
The summit was rocky as well
I summited PT 13795 at 8:20am. I only took 2 photos, and when I got home they were both terrible (oh well).
PT 13795:
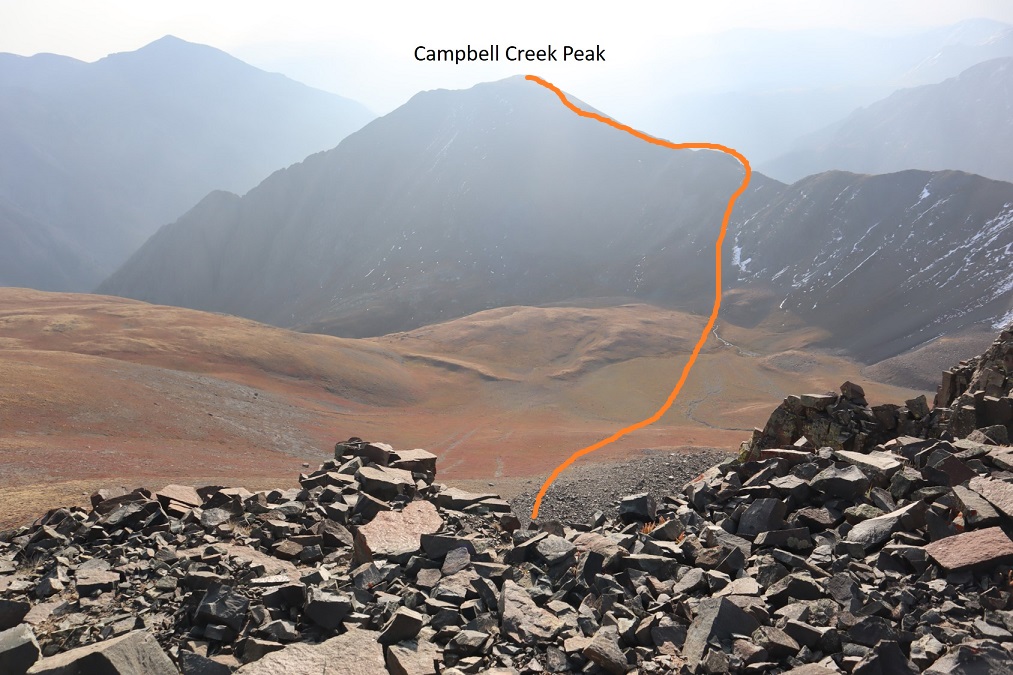
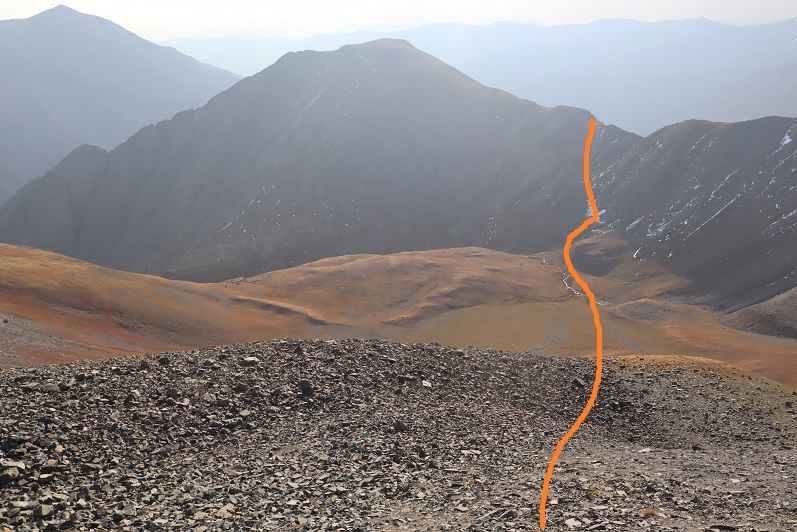
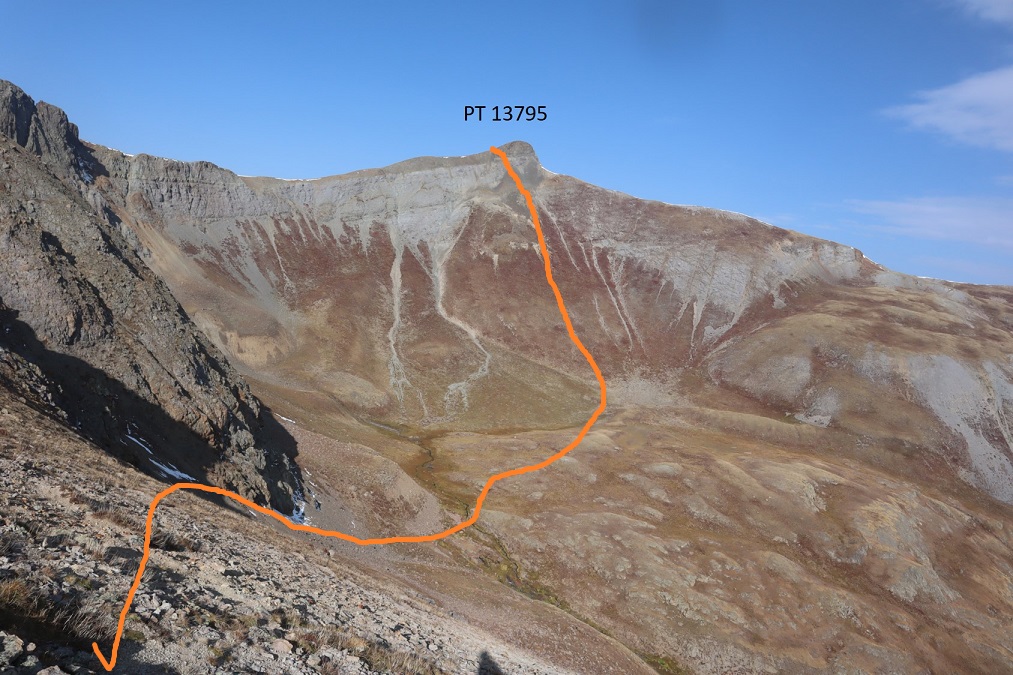
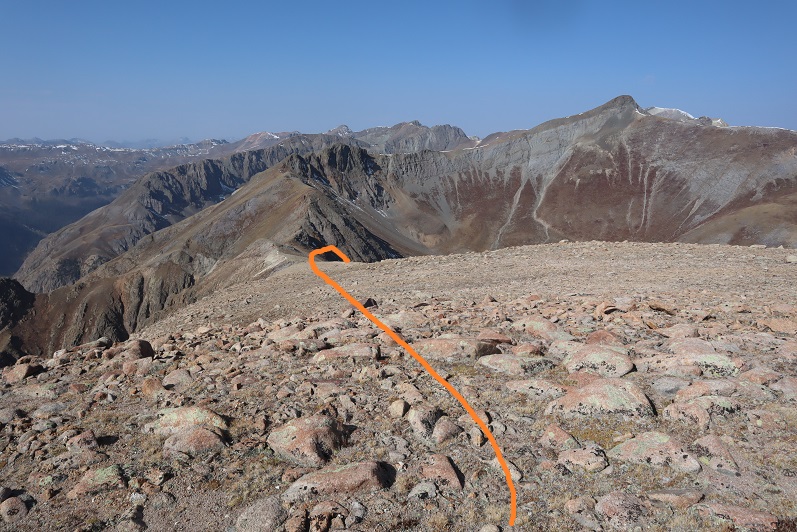
It was really hazy due to the fires, so I had a hard time getting a clear view of Campbell Creek Peak. I’d heard the ridge between PT 13795 and Campbell Creek Peak didn’t ‘go’ so I was going to need to drop down into the basin and ascend another gully. That gully didn’t look too bad. Here’s the overall route I took
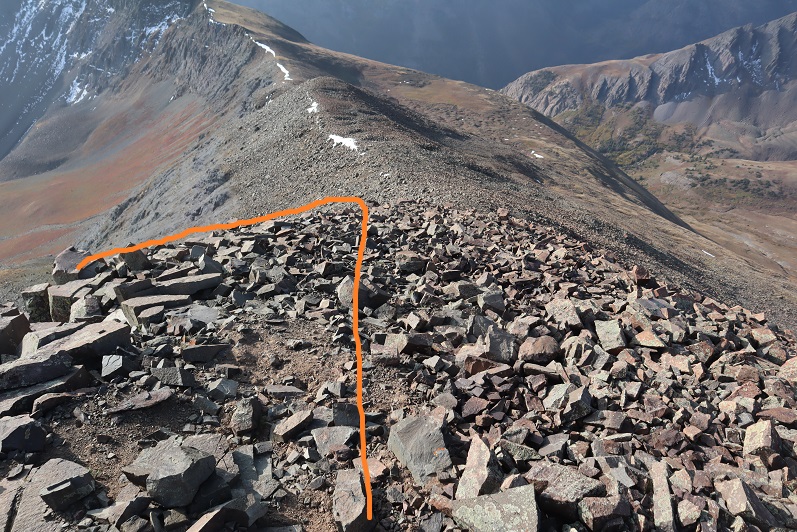
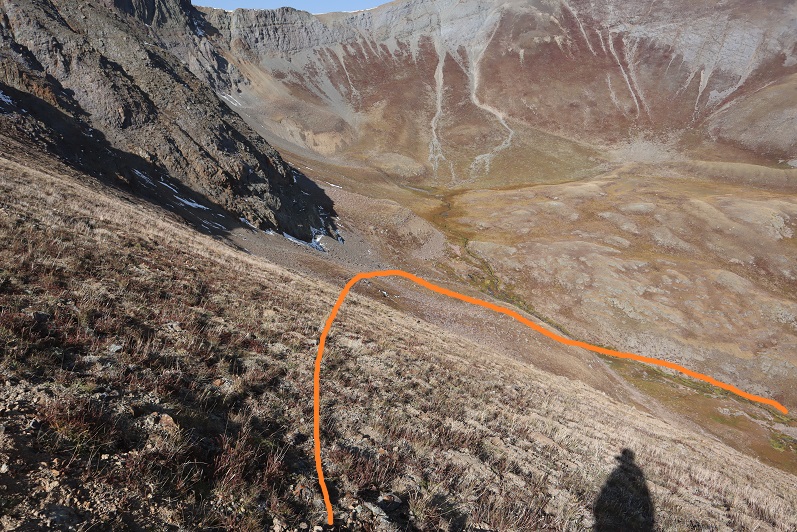
First heading south to avoid the class 3-4 section directly below the peak, and then east towards the basin
I just aimed for the stream, and then stayed to the left of the rock to gain the ridge
Here’s a look back at the route I took down from PT 13795 (it’s not as steep as it looks, but I was glad I’d hiked down this and not up)
I followed the ridge northeast to the summit of Campbell Creek Peak
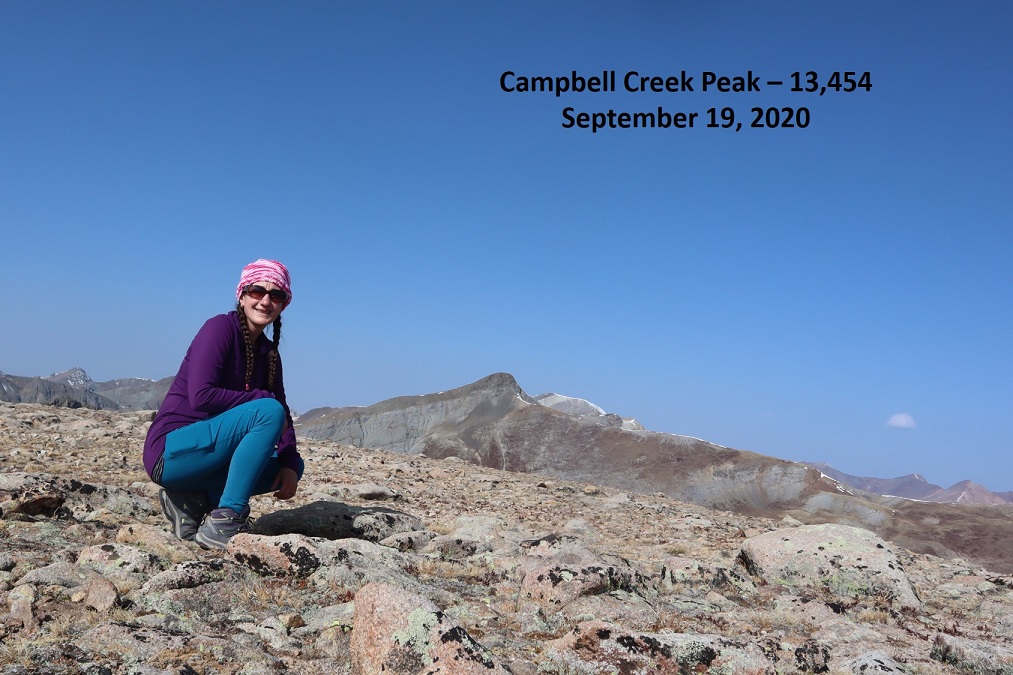
I summited Campbell Creek Peak at 9:45am
Campbell Creek Peak:
After summiting I turned around and headed back down the ridge and into the basin.
Once in the basin I turned right and followed Campbell Creek north. I crossed the creek towards the end of the basin and picked up a faint game trail
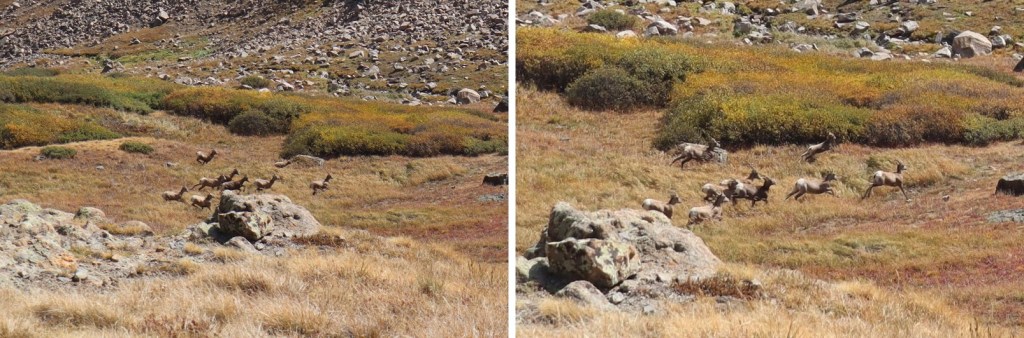
It was here I saw a herd of Bighorn Sheep. They also saw me and quickly bounded away.
The game trail I was on kept disappearing and reappearing, so I decided to just follow the creek out of the basin
This led me to a large patch of willows. I followed game trails northeast through the willows, around the side of the mountain
From here on out there was a lot of bushwhacking and route finding involved. Luckily, I could see CR 30 in the distance, so I just kept traversing the side of the mountain, heading northeast and aiming for the road, slapping willows, bushes, and branches out of my way as I went.
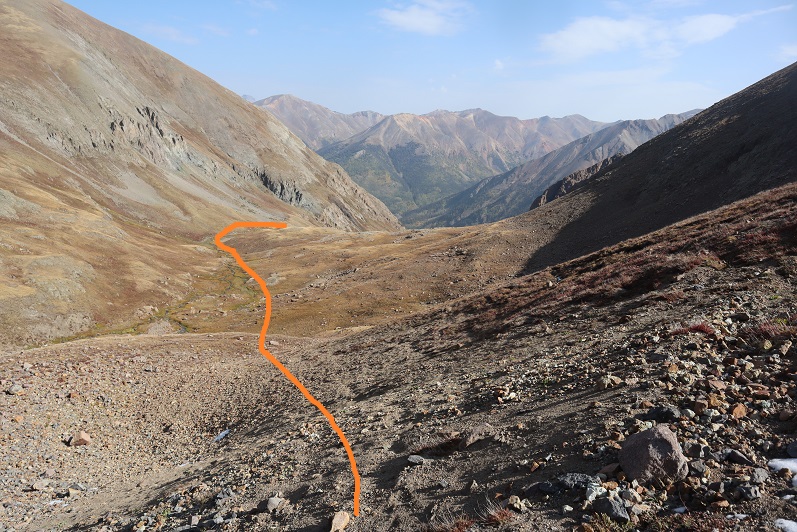
Eventually I came to a gully and followed it own to the Gunnison River, crossed the river on avalanche debris, and followed the road a mile back to the trailhead.
Here’s a look back at the gully I came down
I made it back to my truck at 12:30pm, making this a 11.29 mile hike with 4559’ of elevation gain in 7 hours 15 minutes.
Oh, and I didn’t get a picture of the deer licking my truck, but there were obvious signs it had when I got back and saw it in the daylight.
Campbell Creek Peak was my 200th unique 13er. Not a bad way to end a birthday weekend!
Ah, the thrill of changing plans. I like to check off a bucket list item for my birthday, usually involving a lot of effort or planning and mileage. I was supposed to do the Rim to Rim Grand Canyon hike for my birthday, and due to COVID and the shuttles not running so my boyfriend was going to be my shuttle driver (with the east gate closed it’s now a 5 hour drive from one rim to another). However, last week I broke up with my boyfriend. After the breakup I gave myself a day to wallow, and then came up with a plan B (Plan C was Rim to Rim to Rim). In the end I wasn’t able to hike Rim to Rim on my birthday, but I was able to find someone to shuttle my truck a week earlier (in exchange for a photo shoot along the way at both Horseshoe Bend and Ouray Via Ferrata… to be featured in his next book). So instead I hiked Rim to Rim on September 12, and decided for my birthday I’d try to get in a long hike somewhere in the San Juan’s.
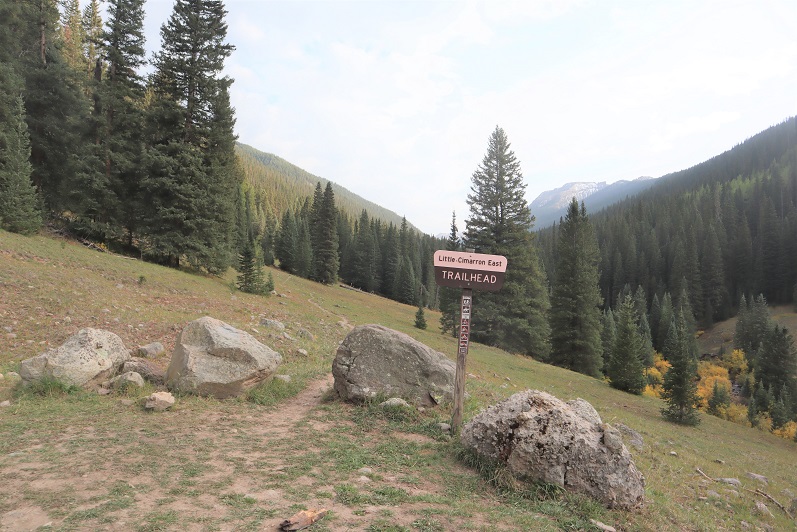
After birthday dinner with my daughters I drove to the Little Cimarron East trailhead and parked for a few hours sleep. This is a 2WD drive on a dirt road. There was space for 2 vehicles at the trailhead, but it looks like you can park along the road as well if needed. Side note: This trailhead is much preferred to the Nellie Creek Trailhead approach. Hands down.
I got in a few hours sleep and was on the trail at 4:30am. This is a class 1 trail (at least until the first stream crossing) that looks like it used to be a 4WD road.
After the stream crossing there’s a junction. Continue straight.
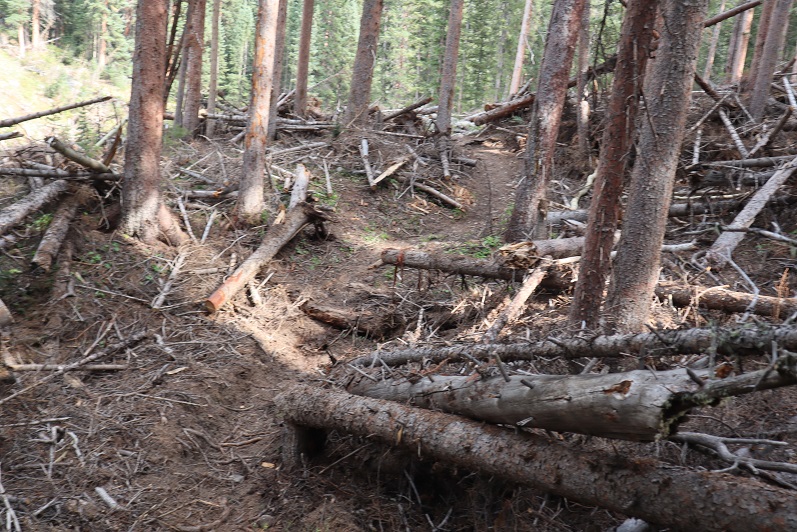
The trail goes through an avalanche area but a clear path has been established.
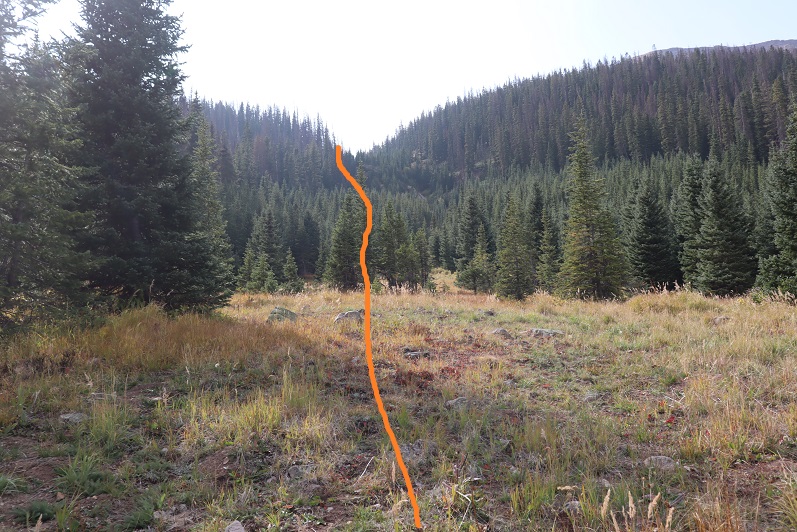
After hiking for 5 miles (exactly) I came to a small meadow. Here I left the trail and headed west, staying to the left of the gully, but following it up.
I eventually picked up a faint trail. There were a lot of game trails in the area, so I kept losing then re-finding the trail.
When I hit treeline I crossed the gully and headed left and northwest up the side of the mountain
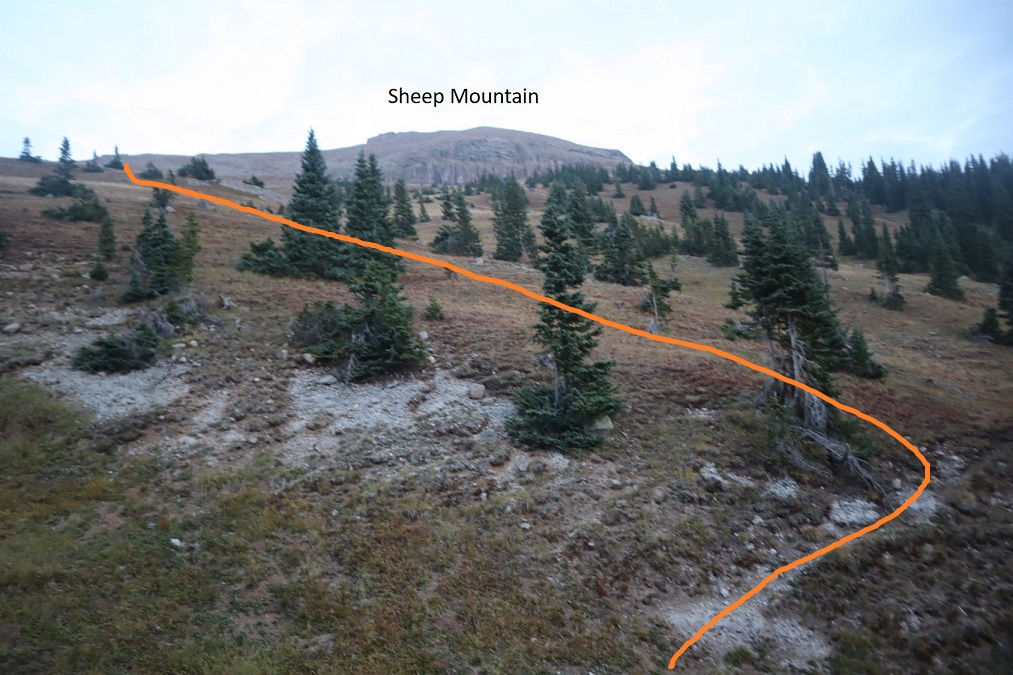
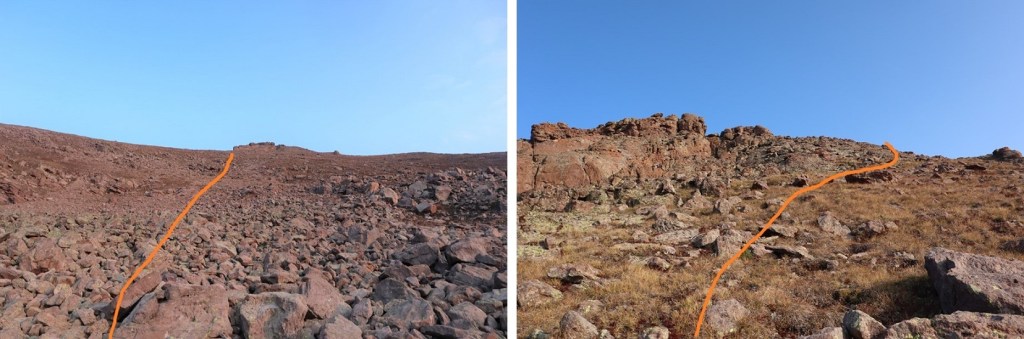
The rest of the hike to the summit of Sheep Mountain was fairly straightforward. Here’s the route I took, staying to the left of the cliffs
Once on the ridge I skirted the rocks to the right to keep this class 2
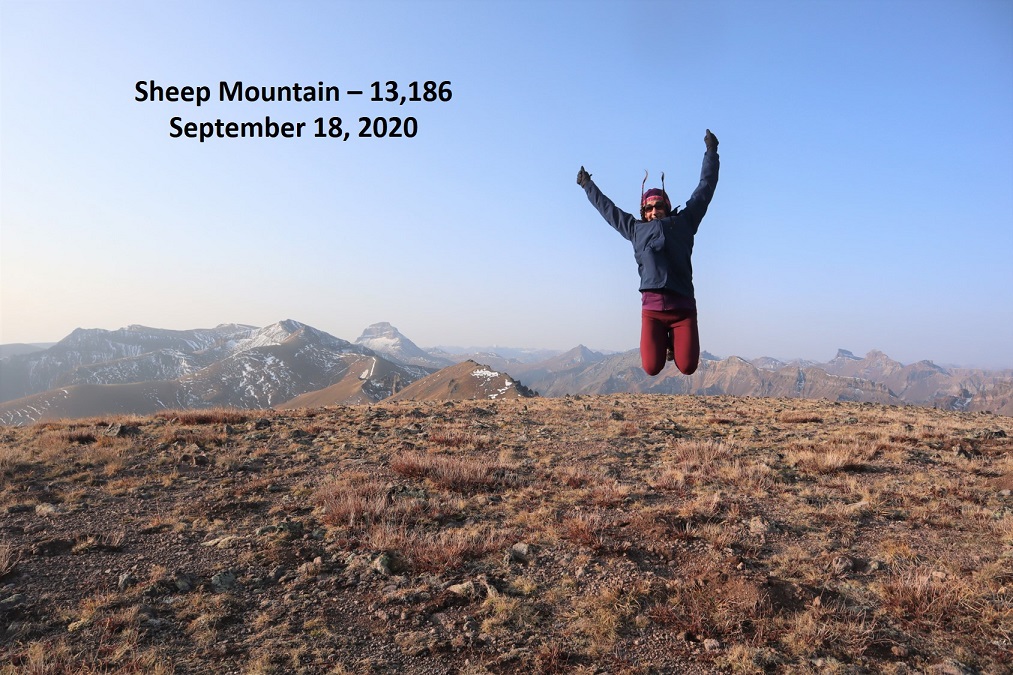
I summited Sheep Mountain at 7:55am. The summit was wide and flat and it was my birthday, so I decided to jump for the photo.
Sheep Mountain:
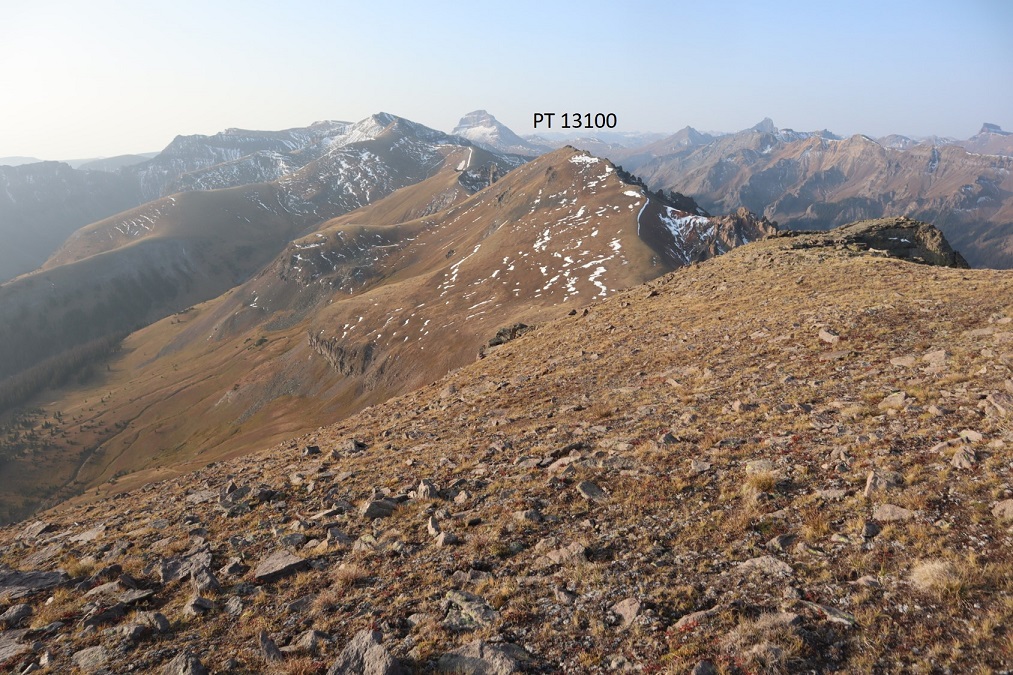
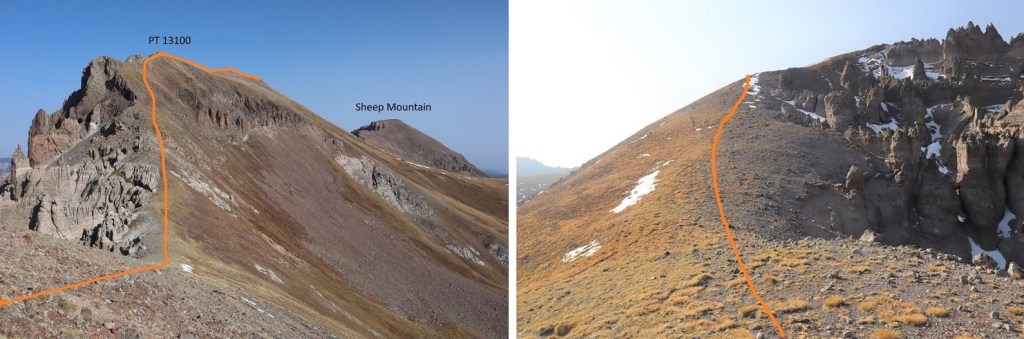
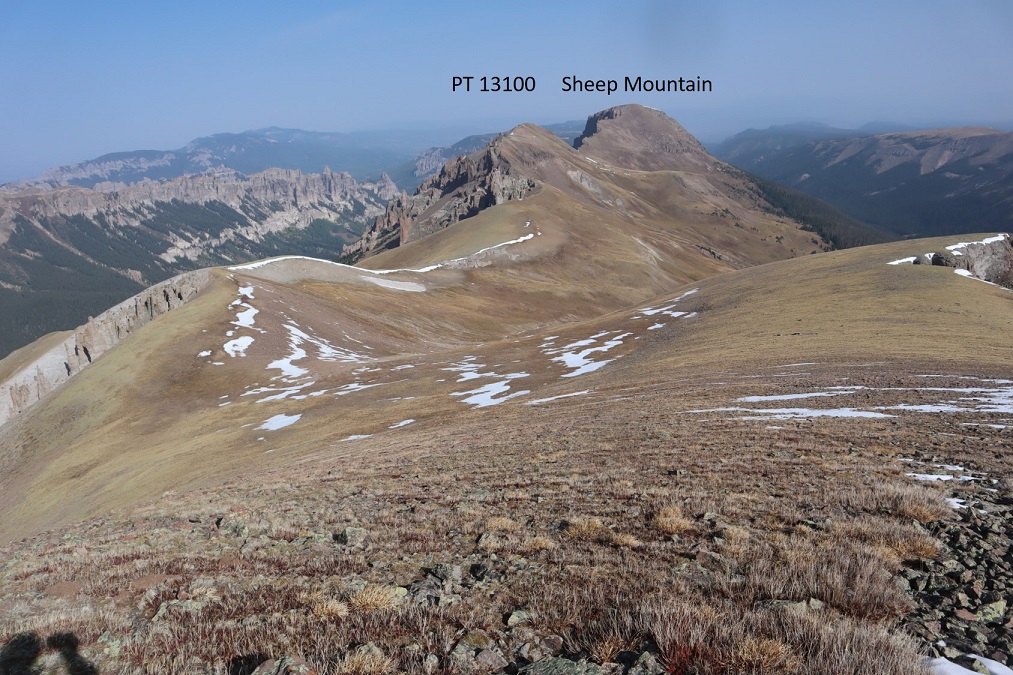
I was making this a ridge hike today. Next on the agenda: PT 13100. I turned and followed the ridge south
This was an easy class 2 ridge to follow. As times I stayed left to avoid rocks.
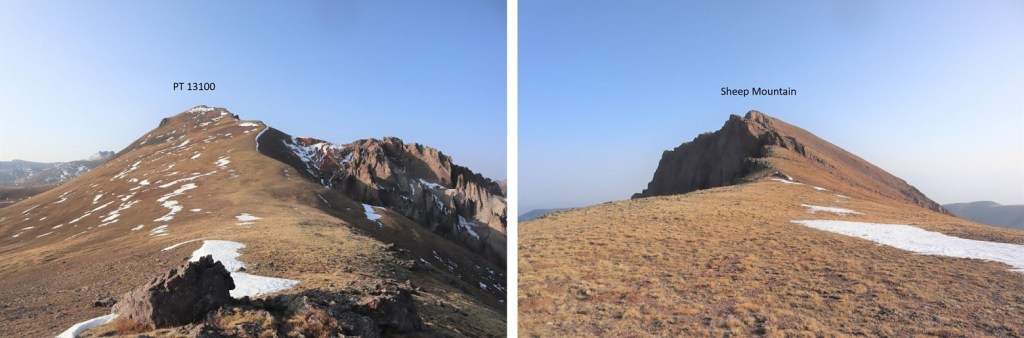
From the saddle, here’s looking up at PT 13100 and back at Sheep Mountain
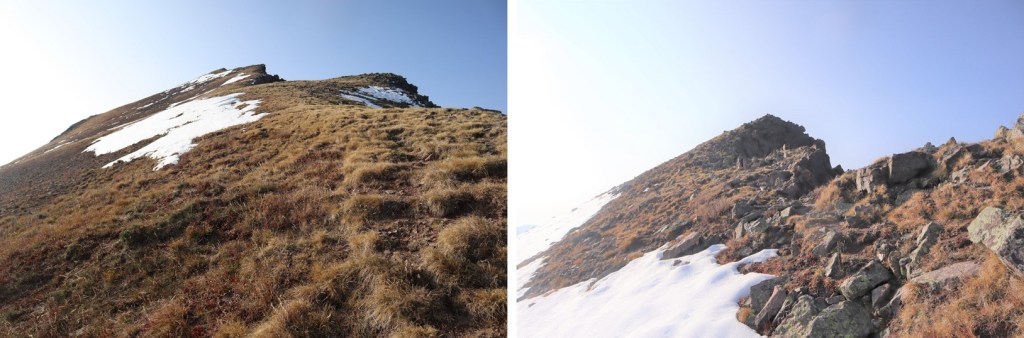
It was a simple ridge hike up tundra until the very end. Then the terrain became rock and it was difficult to tell where the actual summit was, so I followed the entire ridge. I spied a cairn and I considered the cairn the summit.
I’ve circled the summit cairn in red (although the rock outcropping certainly felt/looked the same height)
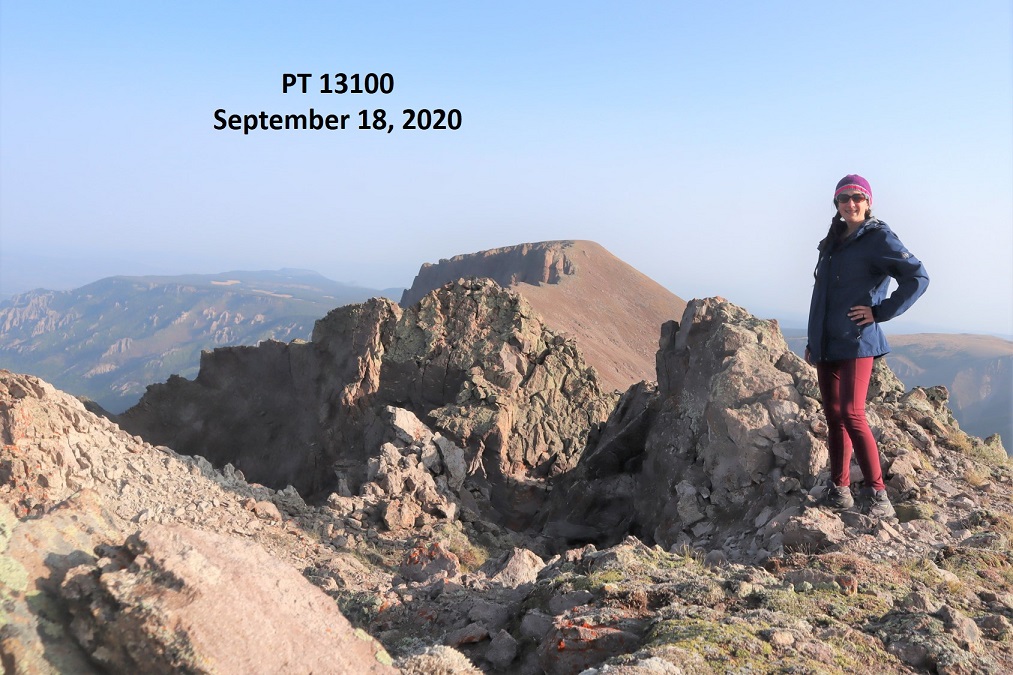
I summited PT 13100 at 8:50am
PT 13,100:
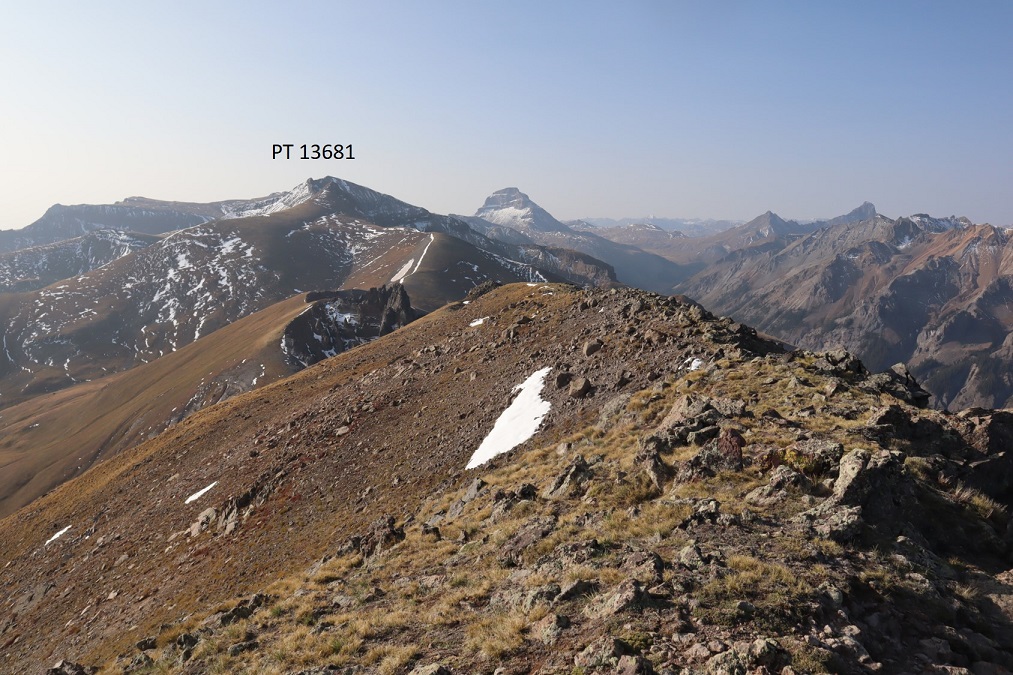
Next up was PT 13,681. Once again, I followed the ridge south
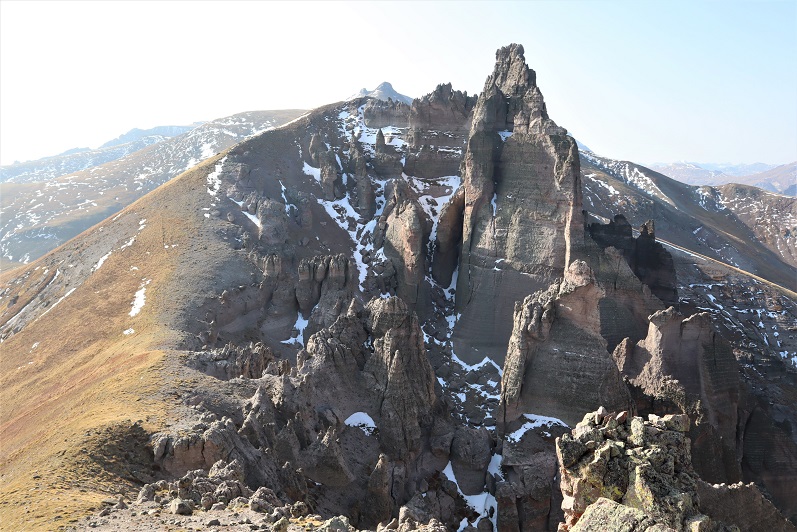
The volcanic ash towers at the saddle were pretty cool!
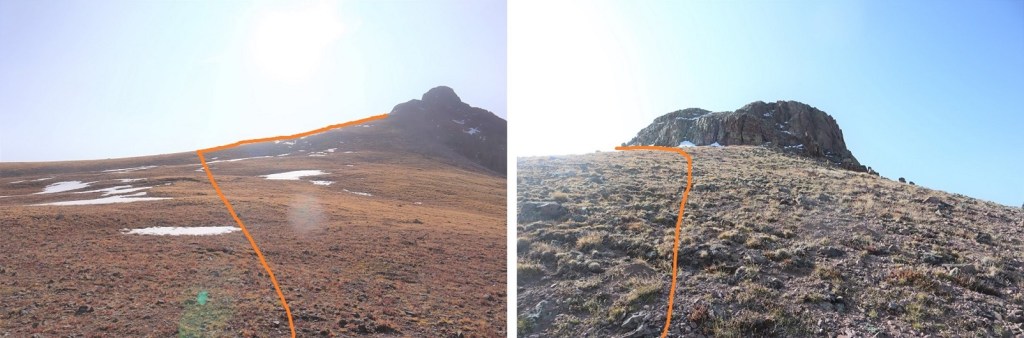
From the first saddle, here’s looking back at PT 13100 and Sheep Mountain, along with my route, and a look up the ridge
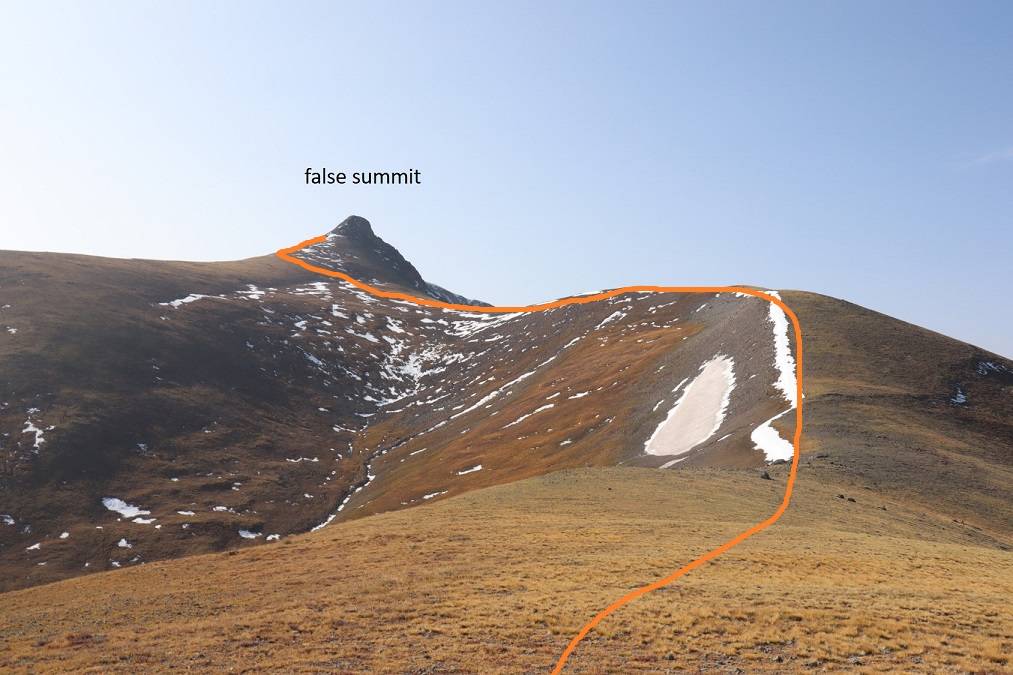
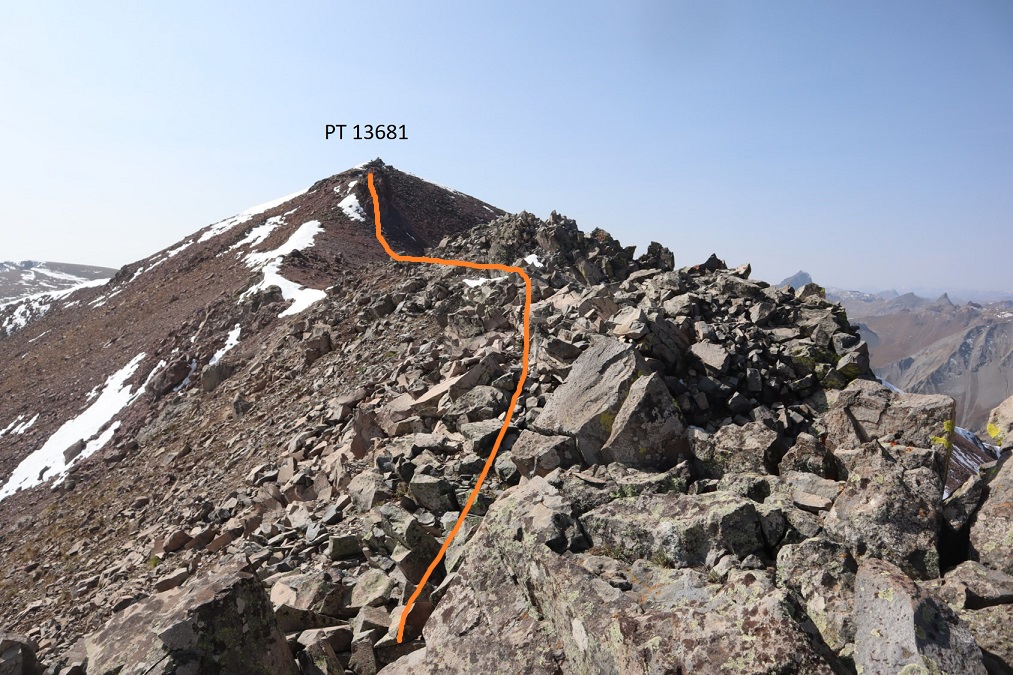
I followed the ridge to the false summit of PT 13681
When I made it to the ridge, instead of climbing the false summit I stuck to the left, keeping this class 2
Here’s a look back from the ridge
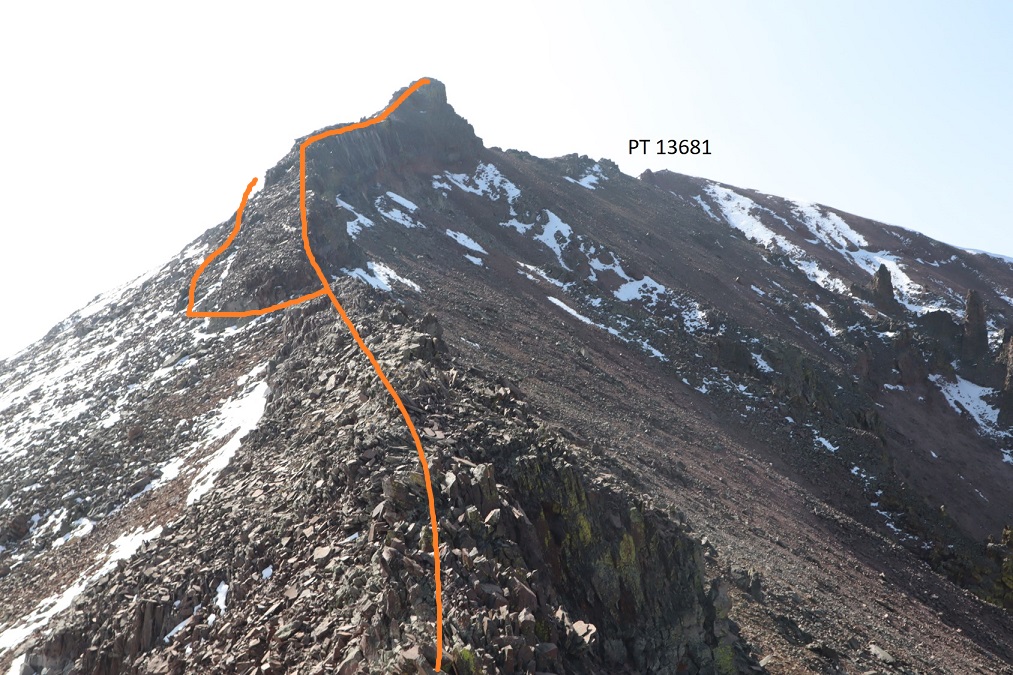
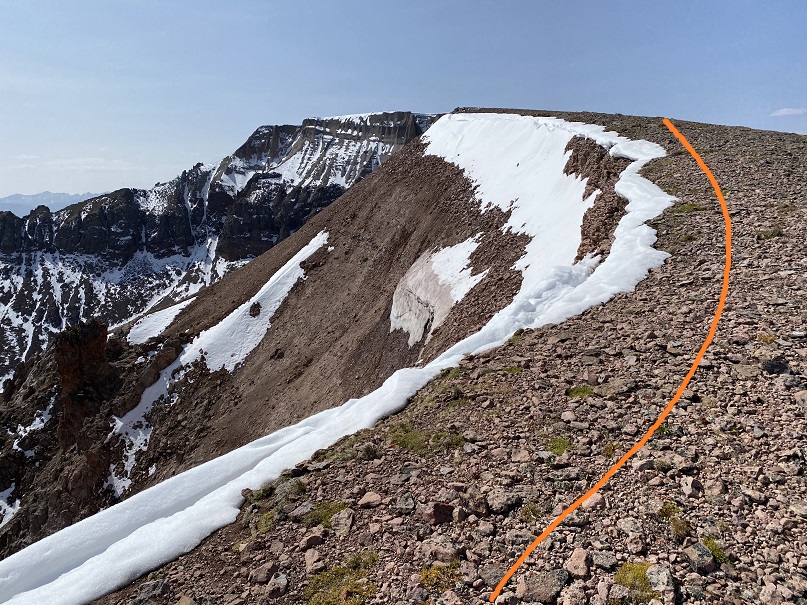
After skirting the false summit to the left I could see PT 13631. I stayed low until I made it to the saddle, and then stuck to the ridge until I hit the second false summit
From the saddle, here’s looking back at how I skirted the bump
From here I took the ridge straight up and over, making this class 3. You can keep it class 2 by going to the left and skirting the ridge. They both end up in the same place.
A view from halfway up the ridge
If you go over the ridge, this is the downclimb (still class 3, not as bad as it looks)
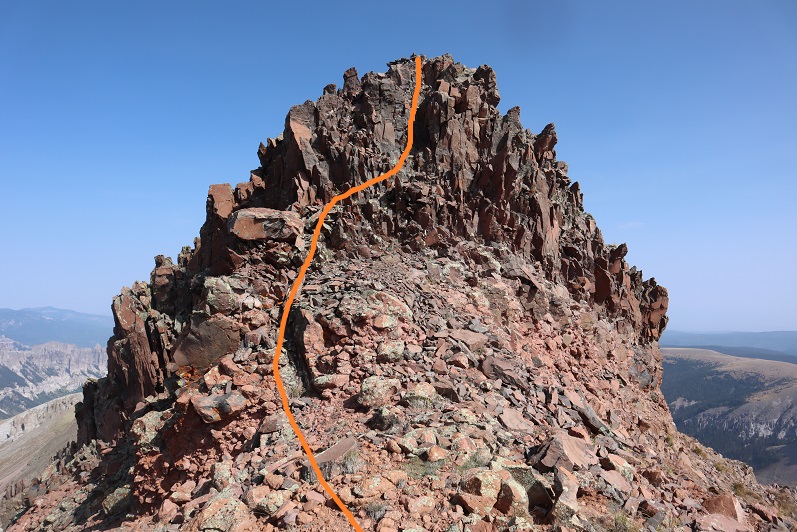
And here’s the rest of the class 2 route to PT 13681
I summited PT 13681 at 10:45am
PT 13,681:
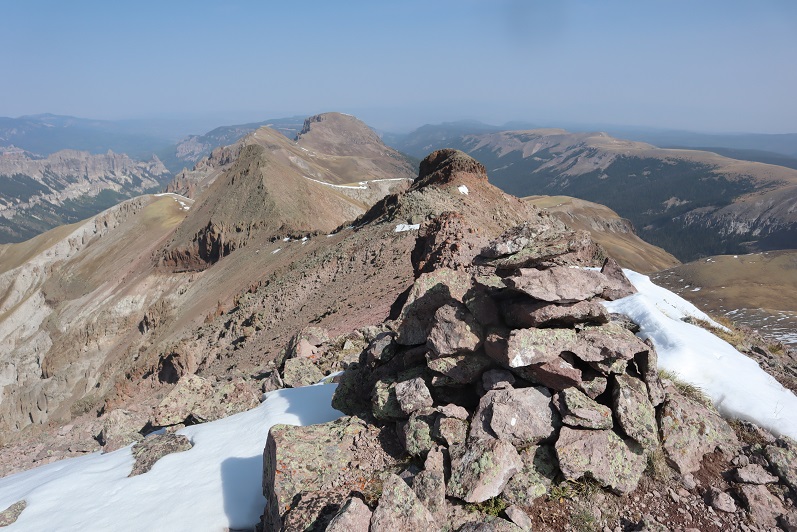
Here’s a look back on the route so far
And a look at the route to Silver Mountain. The rest of the way was a simple tundra ridge walk
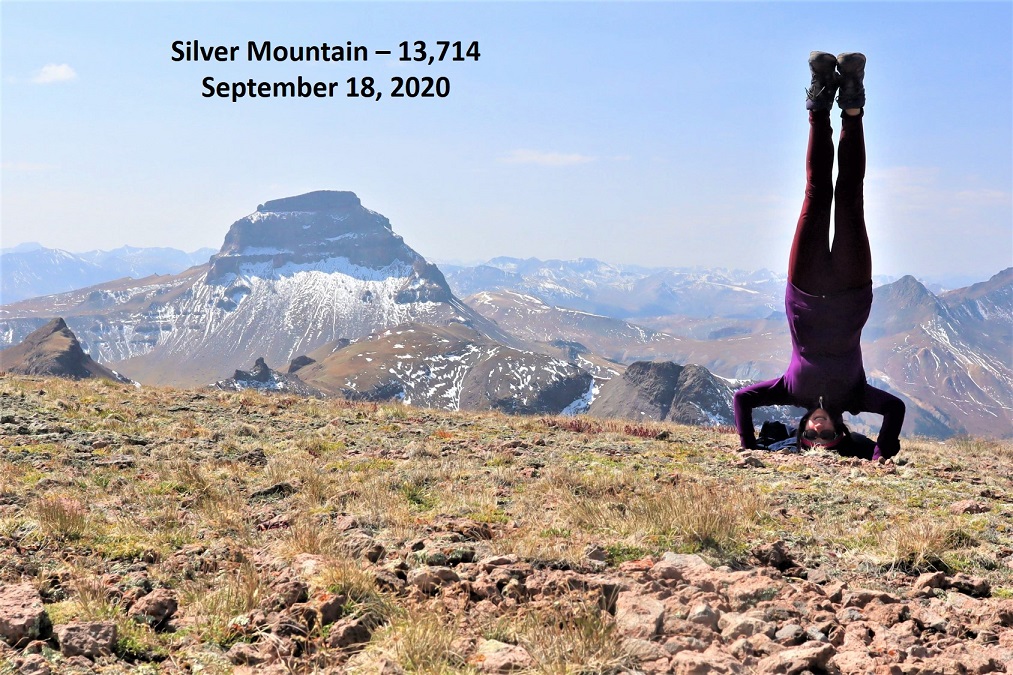
I summited Silver Mountain at 11:35am, and since it was my birthday (my 40th!) I kept my tradition of standing on my head because I still can. Also, this is harder than it sounds, as I had to set up the automatic timer, get far enough away from the camera and then actually do the headstand before the camera took the picture.
Silver Mountain:
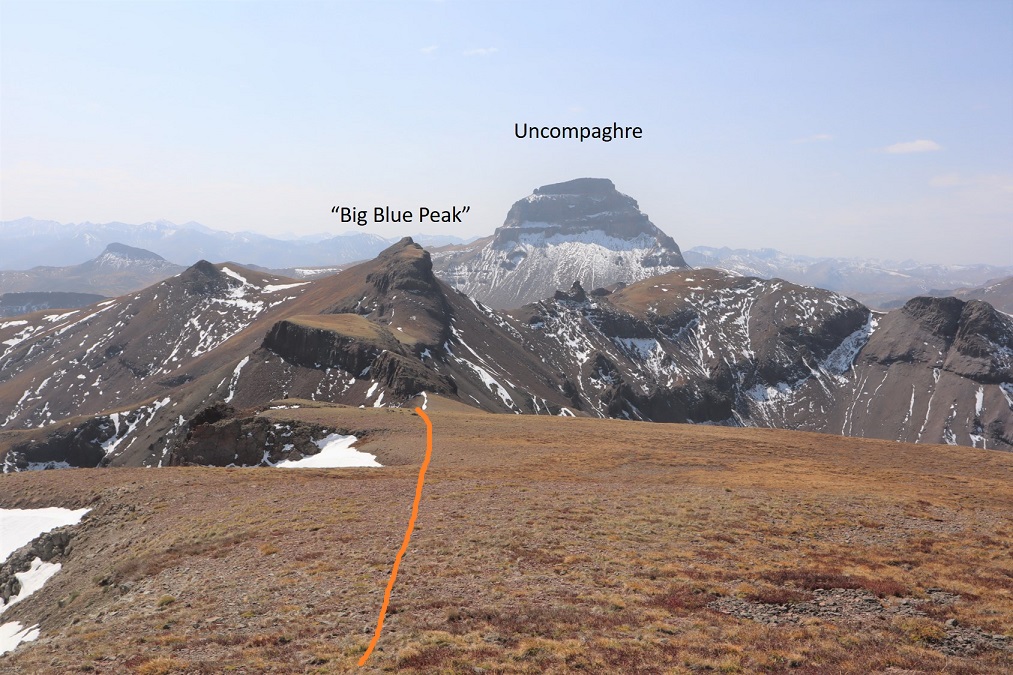
Now to head back down. I had several options, but chose this one because it looked easier on a topo map (it most likely wasn’t). I continued south along the ridge to the Silver Mountain/Big Blue Peak (unranked) saddle.
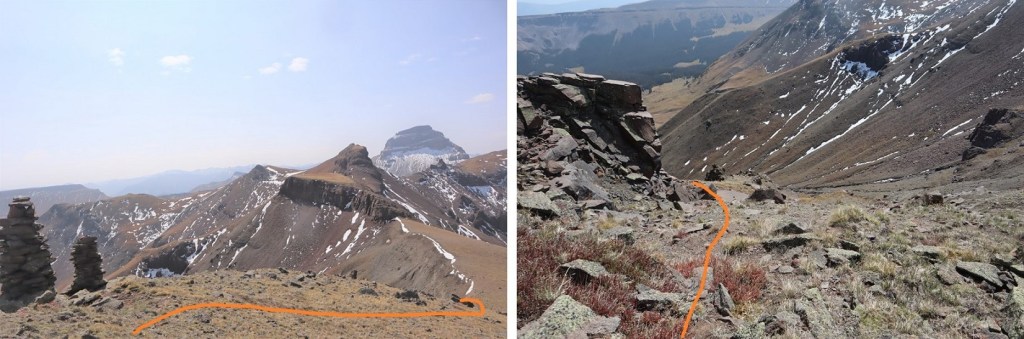
After passing the two large cairns, I continued a bit further down, turned left, and headed east down the gully
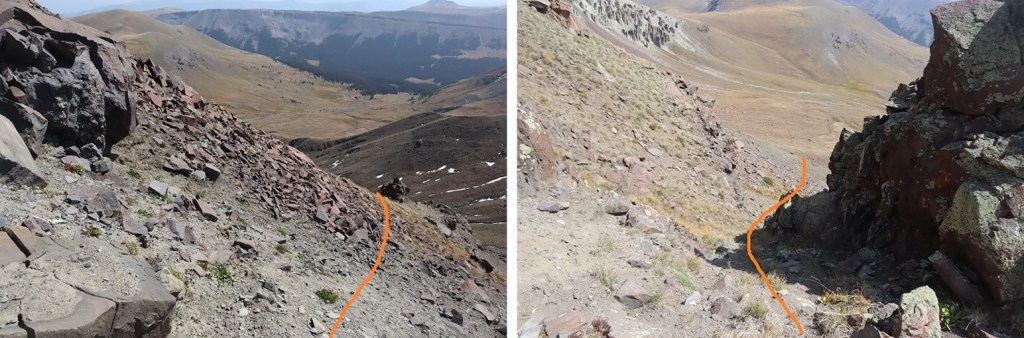
My goal was to link up with the Fall Creek Trail. Here you can see it to the right. However, I didn’t want to lose too much elevation, so I took a game trail up high to the left (they both link up on the other side of the hill). I lost just over 1000’ of elevation here, and gained under 200’ by staying high to the left.
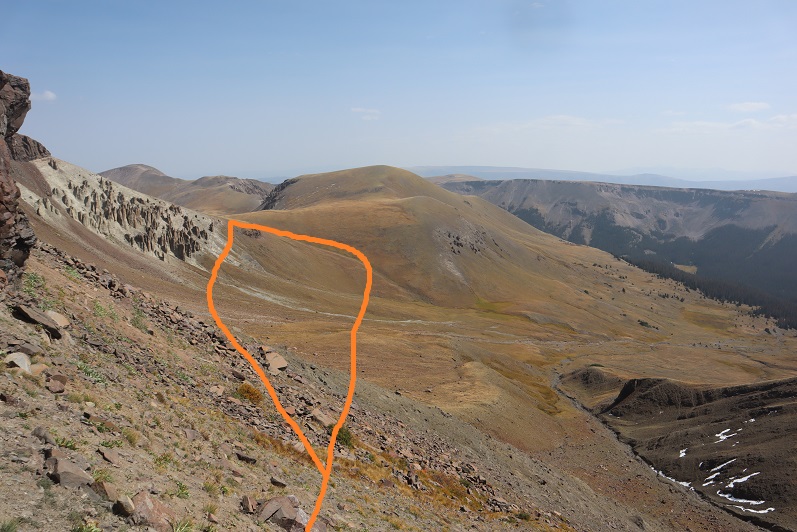
Once at the top of the hill I figured my elevation gain was over for the day. Boy, was I wrong! I dipped down once again, losing another 400’ of elevation, only to gain another 500’ of elevation to make it to the next ridge. I was following the Fall Creek Trail, then switched as I stayed high on the Little Cimarron Trail, but this trail doesn’t look like it gets used much by people. There are many game trails in the area that parallel this one, and they make route finding frustrating at times. Here’s the overall route:
Once I’d regained the ridge it was a nice 2 mile tundra walk on a fairly visible trail. Side note: It’s hunting season, and the elk are bugling. Advice to hunters: Practice using your bugle call BEFORE trying it in the wild for the first time. I heard some pretty funny noises coming from what were obviously hunters and not elk.
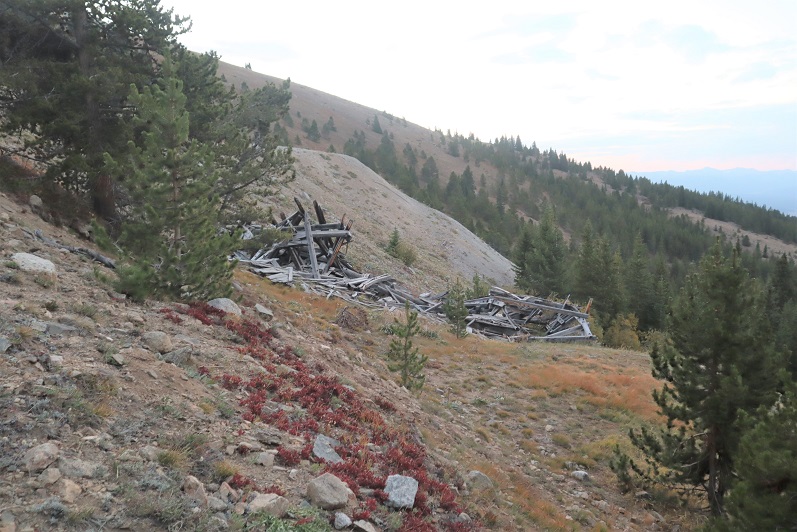
At exactly 2 miles of mesa walking, and just before reaching this old shack I turned left and headed west. Here the trail pretty much ended. There were 2 cairns in the area (which surprised me, the first I’d seen all day), so I just kept aiming for the valley below, where I knew I’d pick up with the trail I’d hiked in on.
I had a good view of the path I’d taken up to Sheep Mountain that morning
Gradually, the Little Cimarron Trail became more visible, as I followed it towards the creek below.
I crossed the Little Cimarron River (more of a creek now)
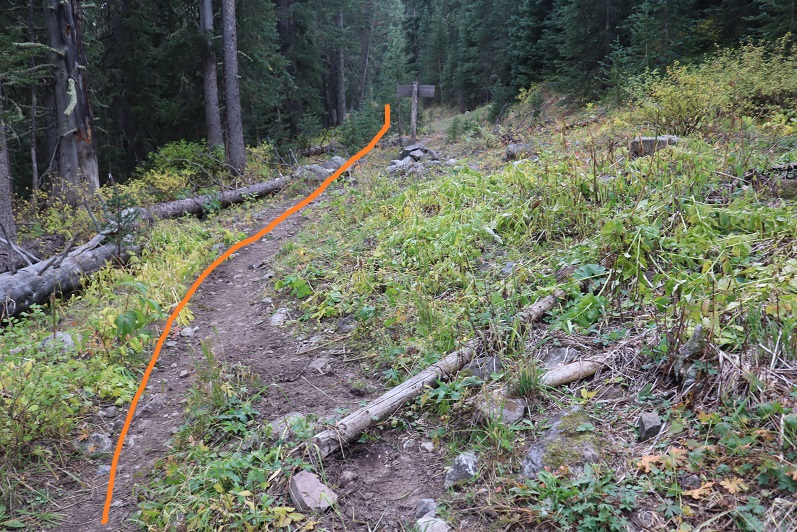
And headed north, easily picking back up the trail
I stayed right this time at the junction between the Little Cimarron Trail and Little Cimarron East Trail, crossed the stream again, and followed the trail back to my truck. Along the way I saw a dad holding a rifle and two daughters, both under 10 years old, sporting camo and bright orange hunting hats. They were the only other people I saw all day. The girls had big smiles, and looked thrilled to be camping/hunting with their daddy.
I made it back to my truck at 5pm.
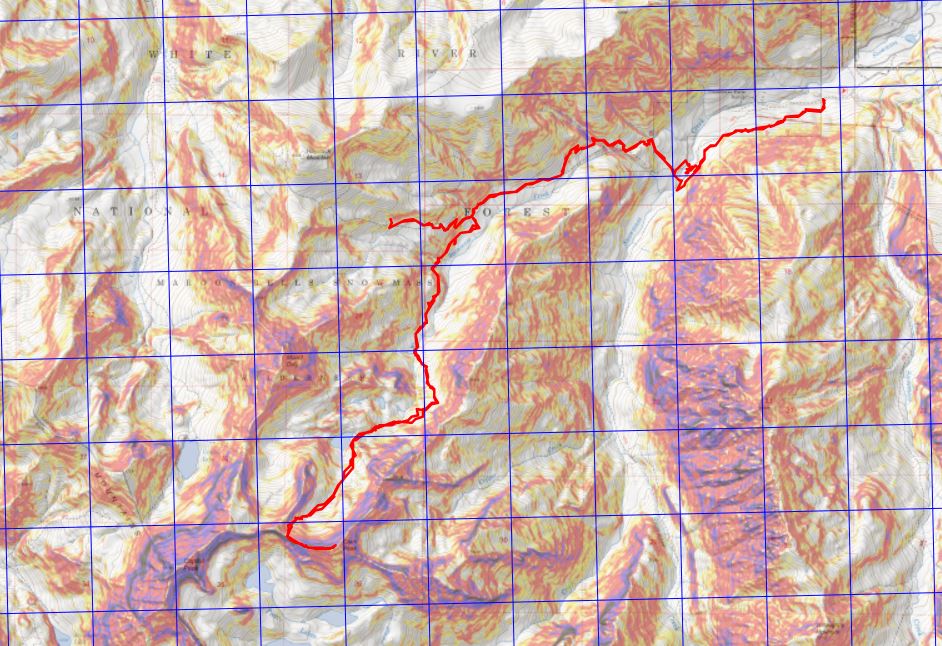
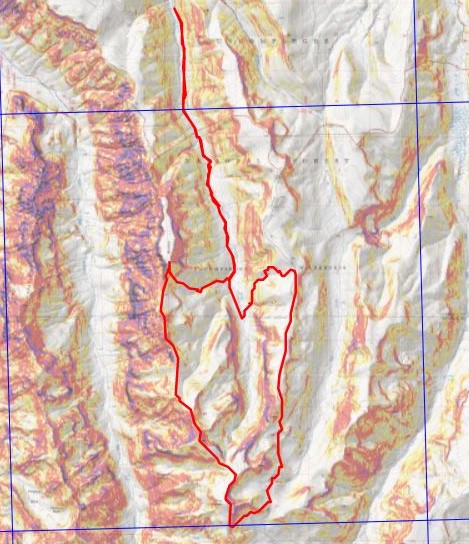
This was a 25.26 mile hike with 6689’ of elevation, completed in 12.5 hours. Here’s a topo of my route.
Not a bad way to celebrate my 40th birthday! On to the next trailhead!
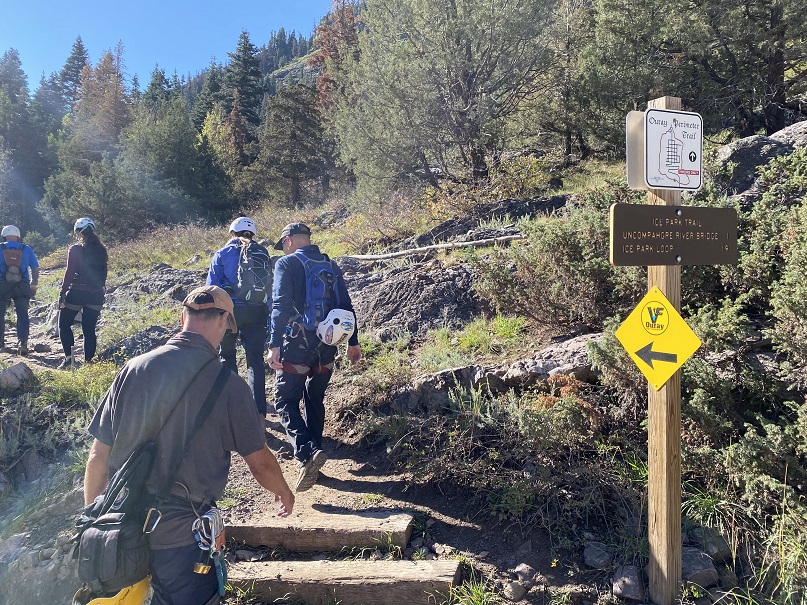
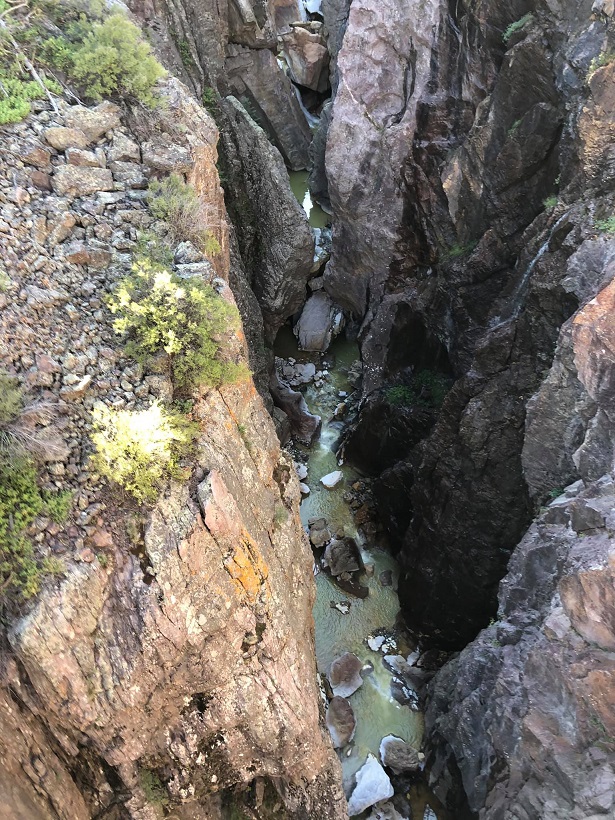
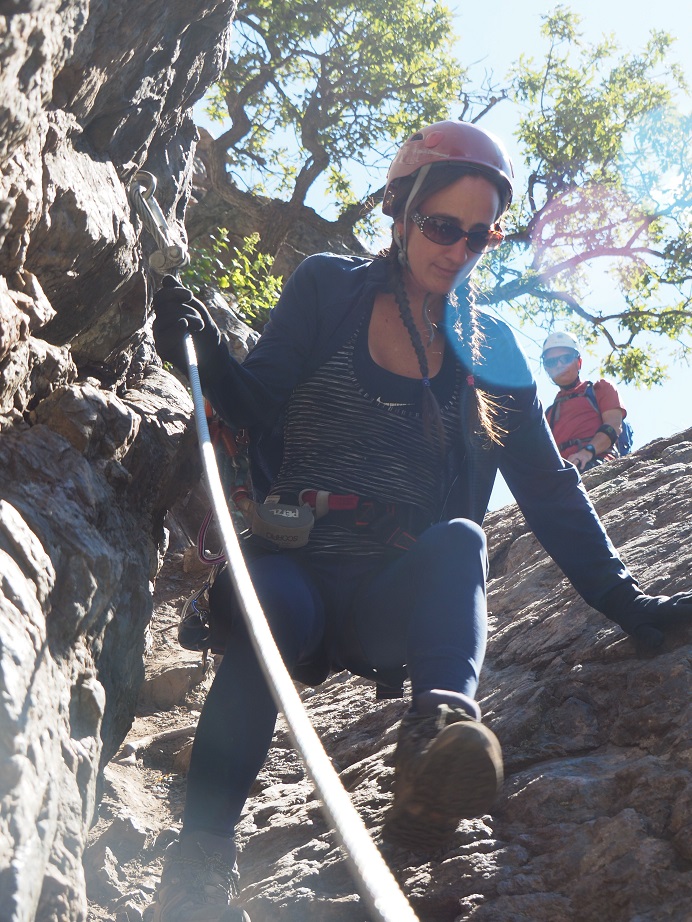
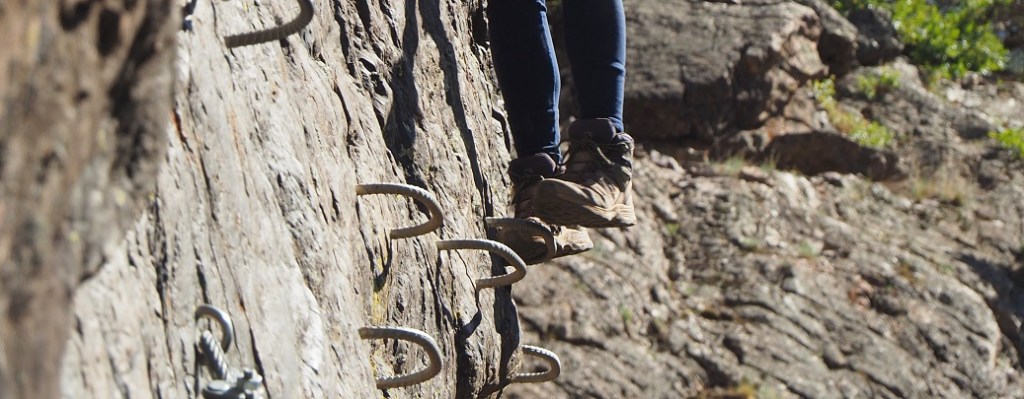
Have you ever done a Via Ferrata? If not, you totally should! This side trip worked nicely into our weekend plans, but to be honest, I was a little worn out by this point. Driving the entire weekend took longer than expected and due to some noisy dispersed campers I didn’t get a lot of sleep the night before. We met the team at the Box Canyon Trailhead at 9am and hiked up to the staging area.
This was an unguided climb, but there was still someone at the entrance to make sure we had all the proper gear (closed toed shoes and helmet… looking at you Eric). We’d stopped and rented lanyards but had our own harnesses and helmets. Important signage:
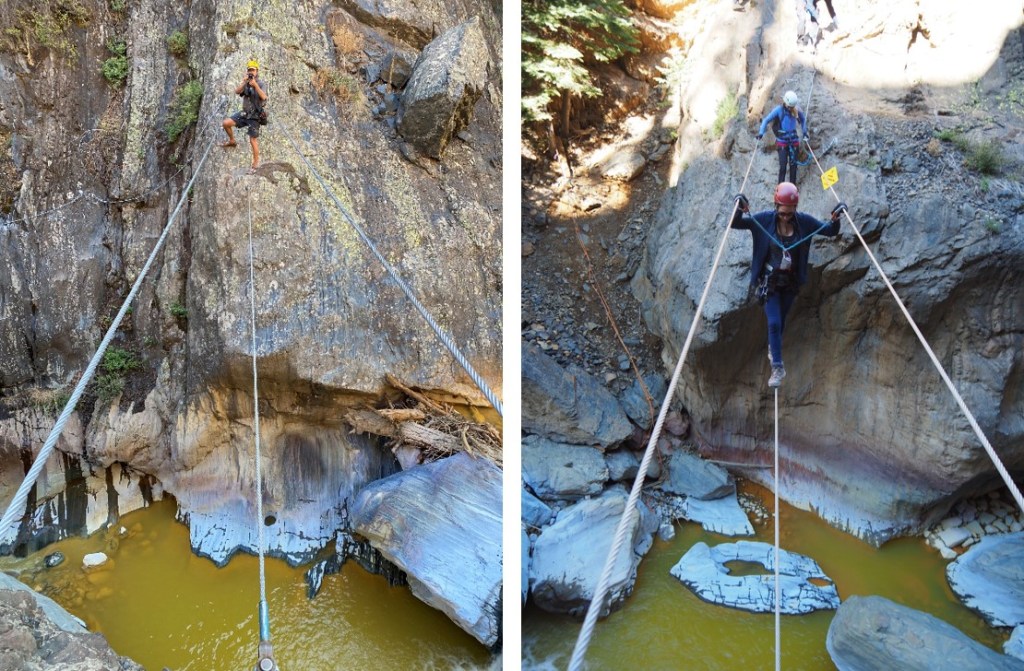
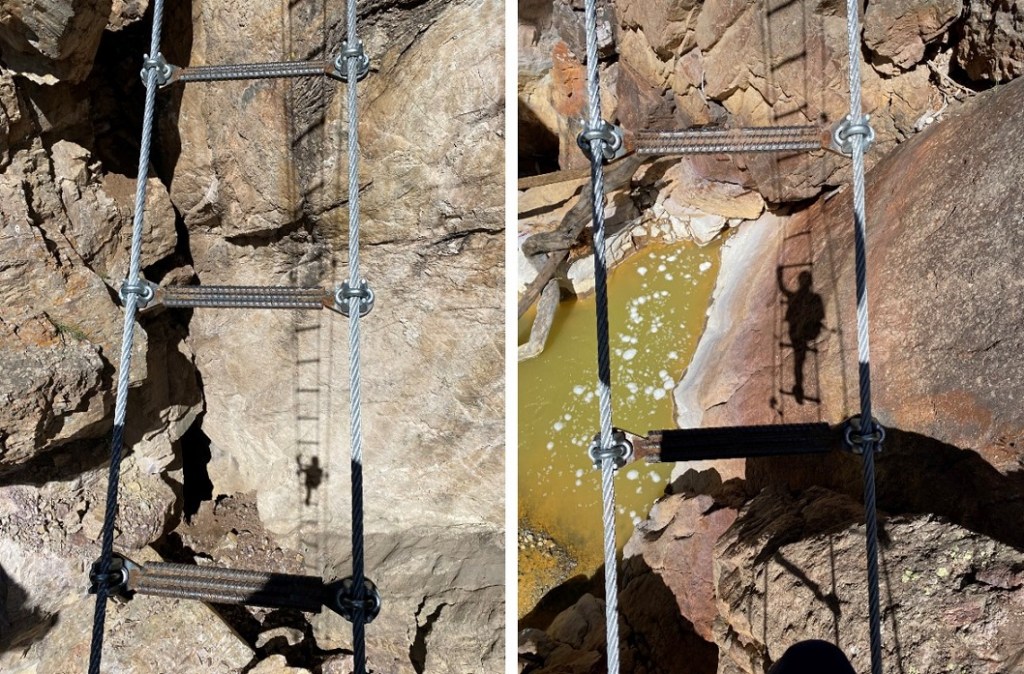
Eric went first to take pictures, and I went second. The course started with a wire bridge (and ended with one too).
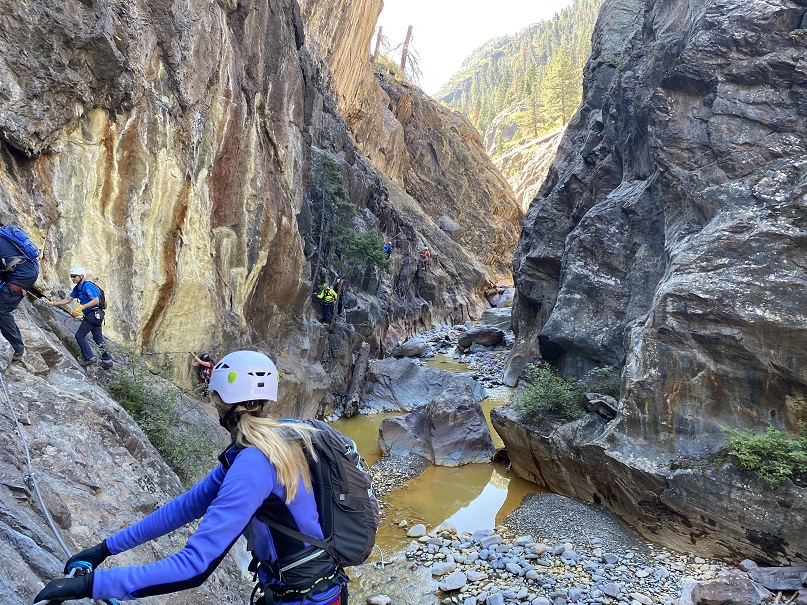
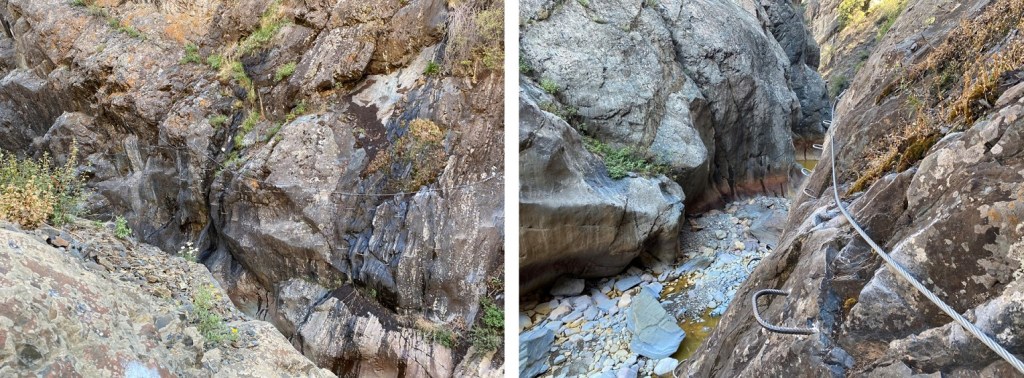
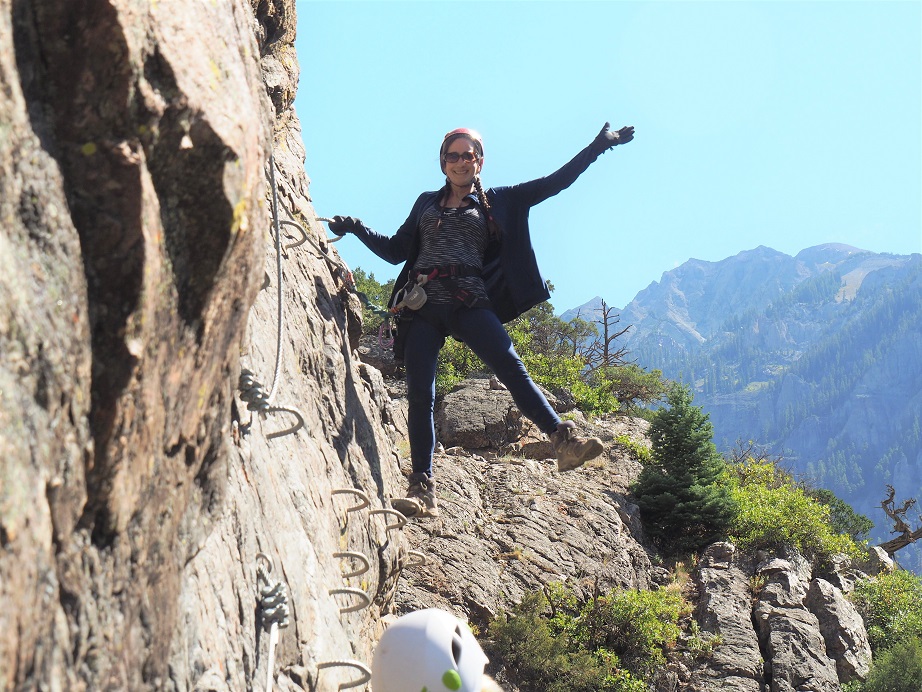
Then there was a lot of traversing, up and down and sideways. We were clipped in the entire time, so no worries if we were to fall (we didn’t fall). Here are some pictures of the course
It’s a long way down
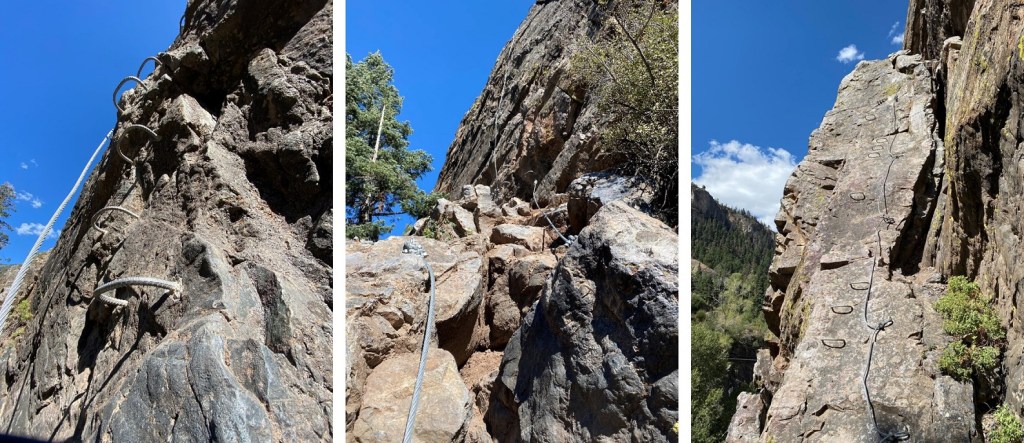
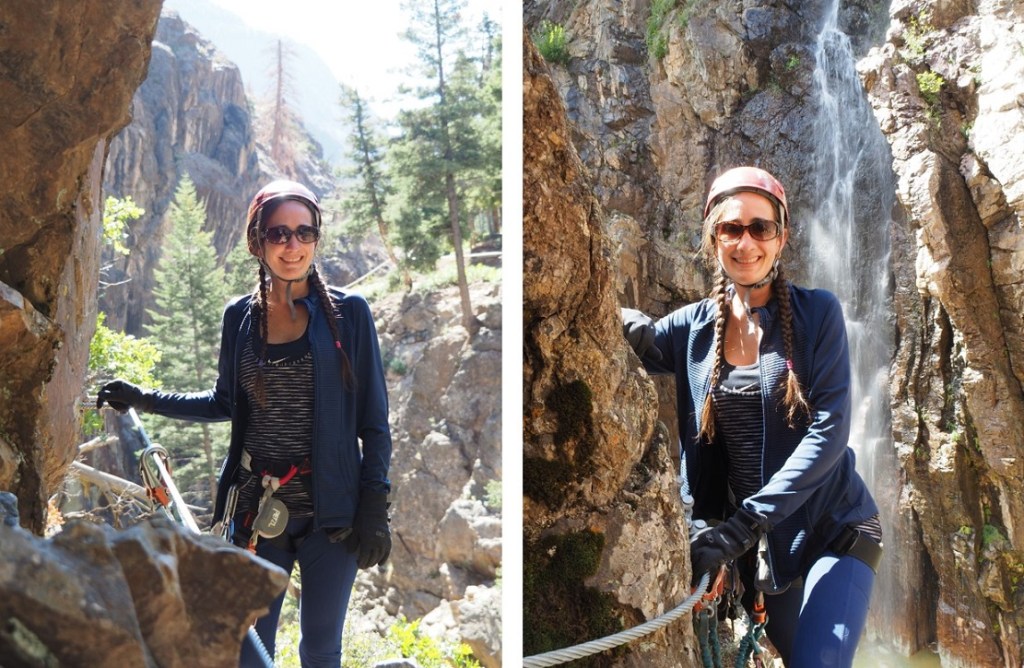
More route pictures
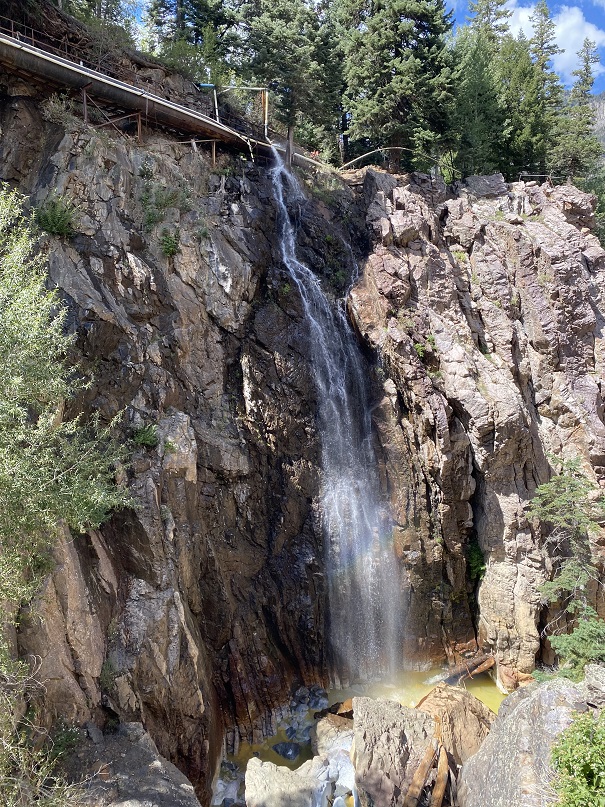
There’s a waterfall they use for ice climbing in the winter
Some fun shots…
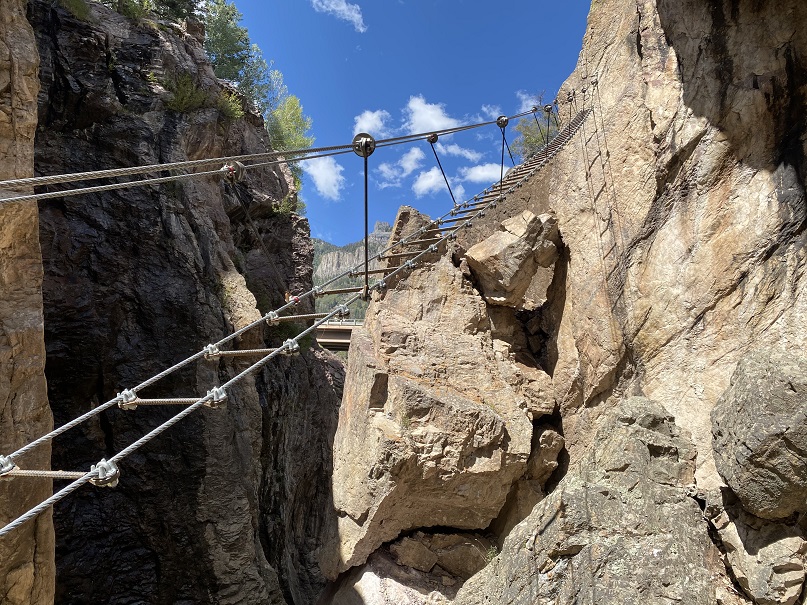
And the rope bridge at the end
All in all it was a great day. It ended a few hours later than it probably should have (the course took 4 hours instead of 1, due to the photo shoot) but I was still able to make it home by about 7pm. To find out the new water heater was leaking gas. Ha! What a way to end the birthday celebration weekend.
This hike has been on my bucket list since I’ve had a bucket list. About 18 months ago I made a reservation to stay at the North Rim, and figured I’d do this hike for my 40th birthday. Well, COVID happened and my reservations were cancelled and they stopped the shuttle service between rims. I was bummed, and for a while wasn’t sure what I should do. Then I got a topper on my truck and everything changed: I can now sleep wherever I want, so I didn’t need those North Rim reservations anymore. All I needed was a willing shuttle driver.
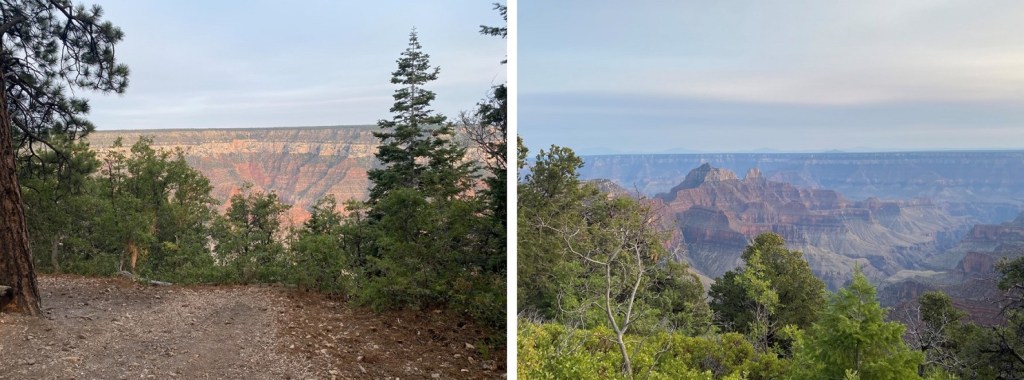
At the last minute I was able to get Eric to be my shuttle river, and we were off. After a full day of driving and a side trip to Horseshoe Bend, we made it to the North Kaibab Trailhead. We did a little exploring, ate dinner (Subway) and met some of the other hikers in the lot. In my opinion, the views from the North Rim aren’t as good as the views from the South Rim.
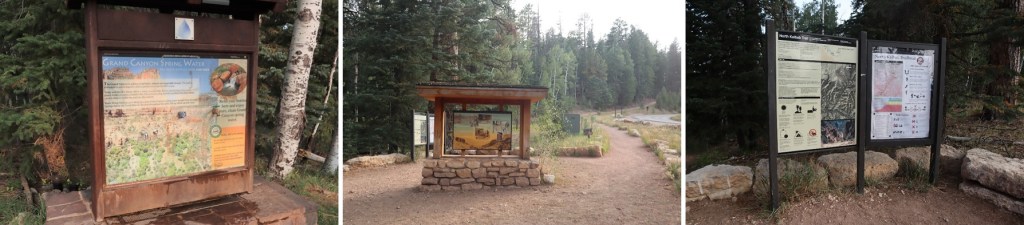
Here’s what the trailhead looks like. There’s a lot of signage and free water. All of the water spigots were turned on, so water wasn’t a problem on this trail. However, since this is the Grand Canyon I brought extra water anyway.
The trail starts at the south end of the parking area. I took a picture of it before I went to bed because I knew I’d be starting this hike in the dark
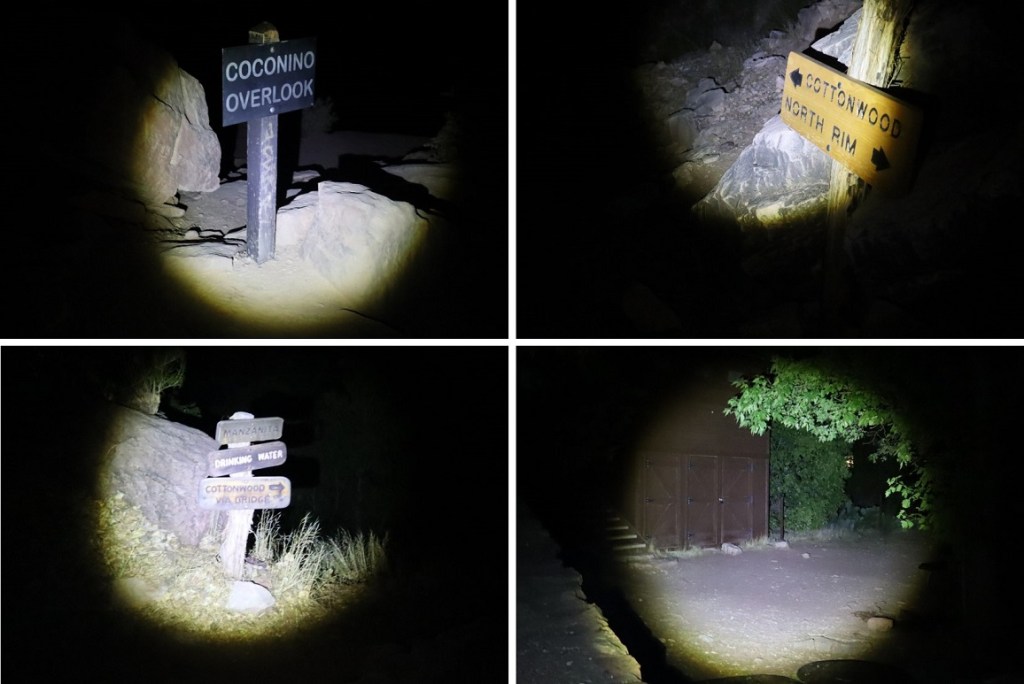
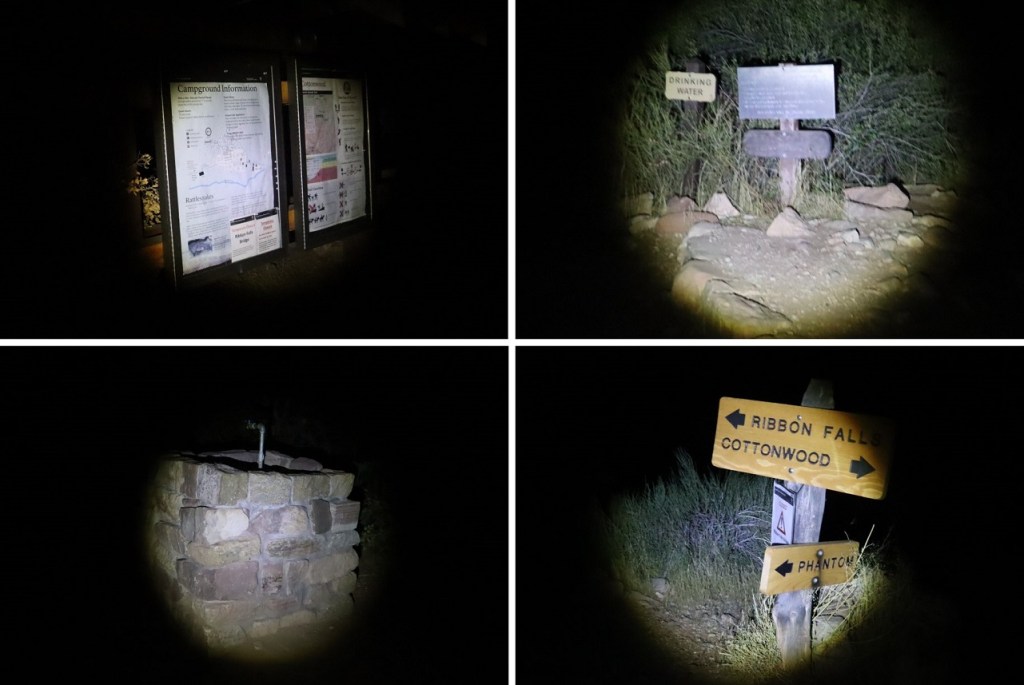
I made it an early night and was on the trail by 1am. I’d initially wanted to wear a hat that said “Happy Birthday” on it, but it was way too cold for that: 25 degrees at the North Kaibab Trailhead at 1am. I put on my jacket and gloves and was off. This trail is extremely easy to follow, even in the dark. Here are a few pictures from along the trail in the dark.
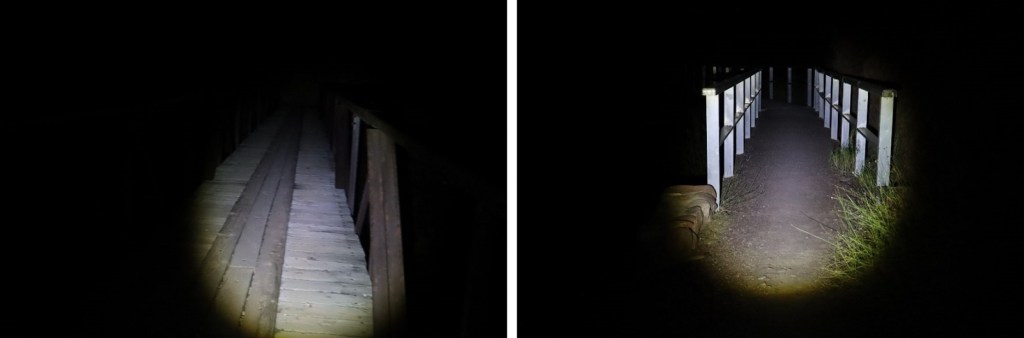
Initially I hiked down into the canyon, and once there crossed from side to side on several bridges. There was water flowing under the bridges, and I saw quite a few bats.
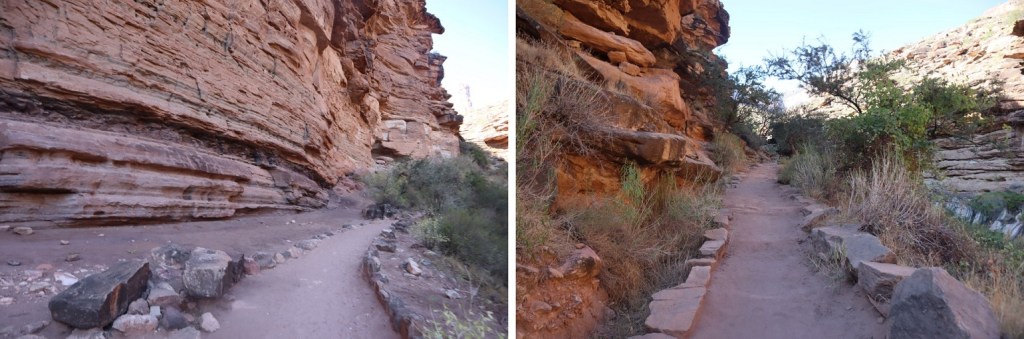
It started to get light around 6am. Much of the trail looked like this once down in the canyon
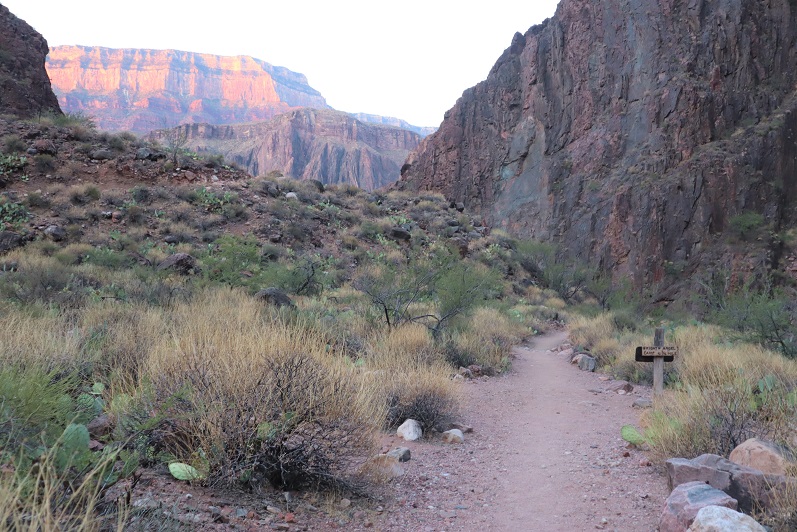
Finally, I saw a sign indicating I was close to Phantom Ranch
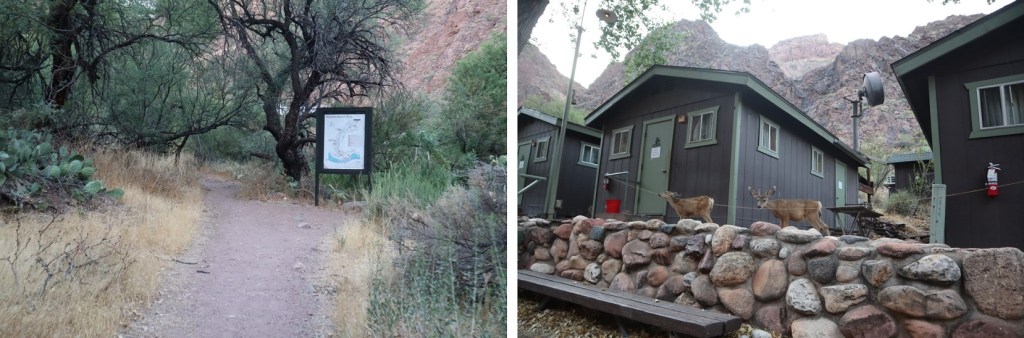
I made it to Phantom Ranch around 6:30am, after hiking for 5.5 hours and 16.5 miles. There were dozens of neat little cabins set up, and deer in the area who couldn’t read the ‘no trespassing’ signs.
I was a bit tired, but I didn’t want to sit down. I hadn’t had a drink of water all day, but figured now was a good time to start. I made my way around the cook house and found the water spigot. I drank half my water bottle and filled it back up again.
While I was there the camp cook opened the door (wearing a mask of course) and asked if I was hiking thru. He then offered me a small carton of orange juice, which I gulped down. He also offered me an orange, but I declined. He was a very nice man. I also heard someone comment on how good the breakfast had been. I may just try to schedule a trip down here one day (maybe with a Rim to Rim to Rim?). Here I took off my outer jacket and put on mu “Birthday Girl’ ribbon.
I passed through Phantom Ranch and saw the mules ready for their day. They looked very well groomed and well fed. There was also place to ‘vote’ on your favorite Grand Canyon experience. I thought that was kind of cool.
I continued hiking past the tent campsites. Only 2 were taken, and I’m sure that was due to COVID as well.
Here I saw a doe and baby deer. They were directly on the trail and let me pass withing 2 feet of them.
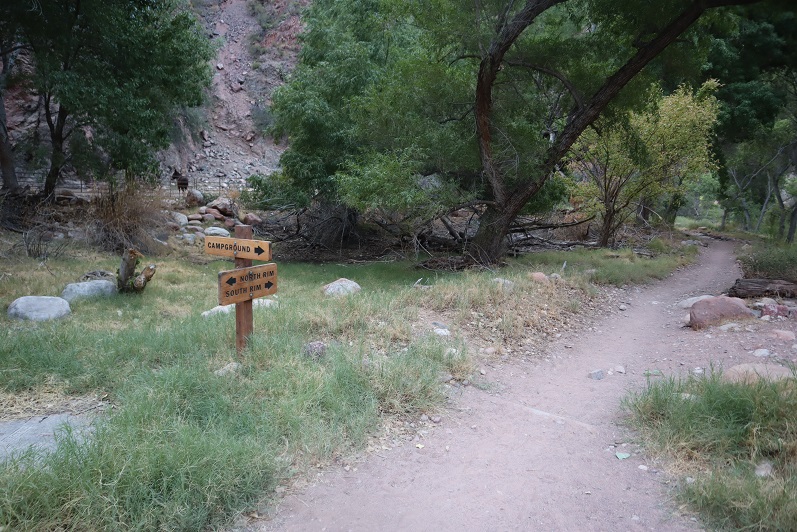
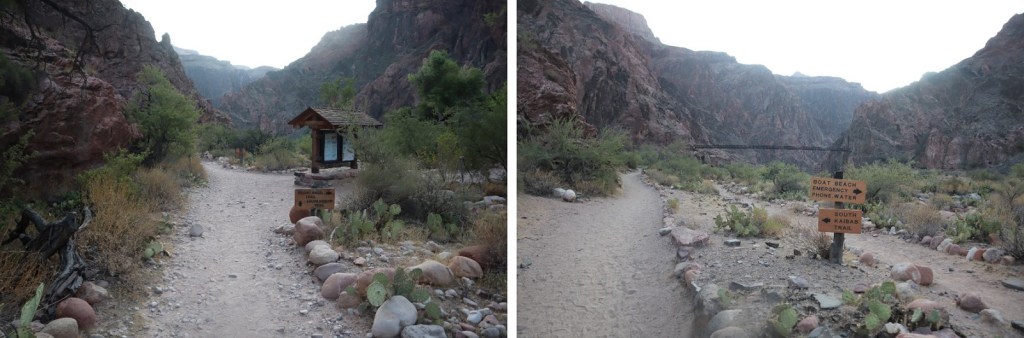
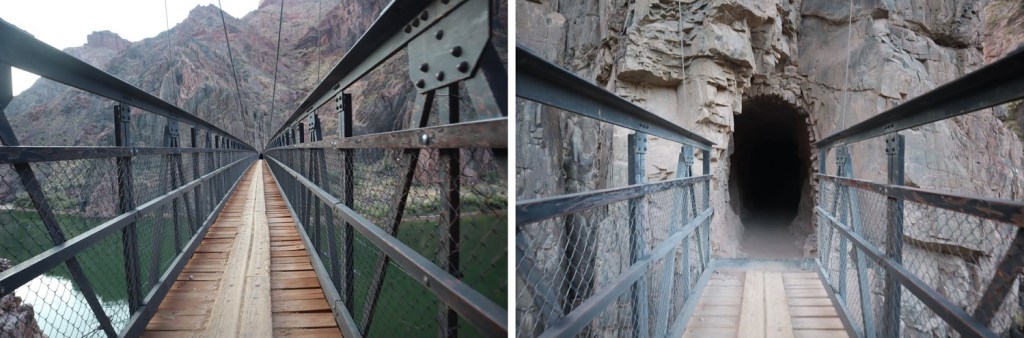
I’d been told via facebook groups the bridge to Bright Angel Trail was out, and to take the bridge to the South Kaibab Trail instead. Indeed, signs at the trailhead corroborated this information, so I took the further bridge across the river.
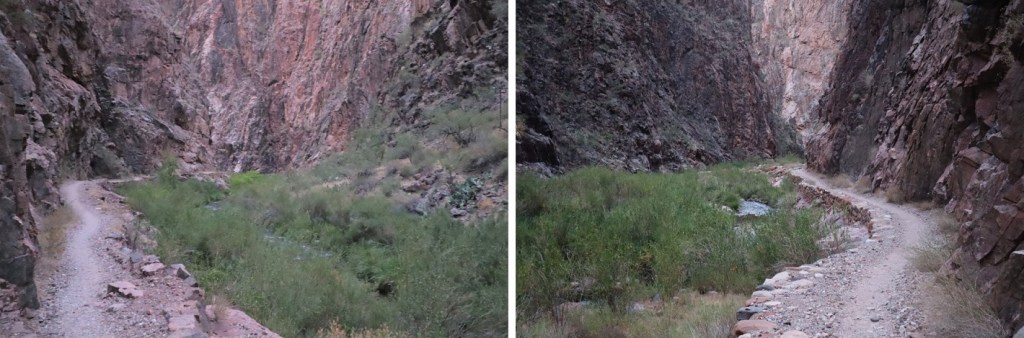
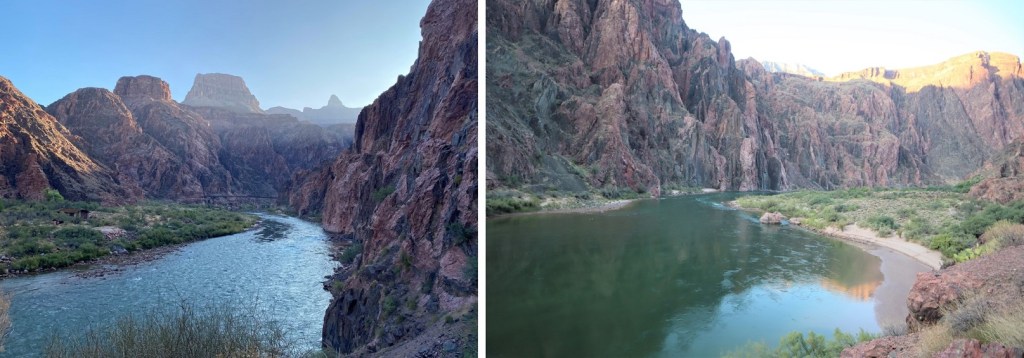
This ended up adding a few miles to my trip, but since this was a long hike in the first place I didn’t really mind. I crossed the bridge, went through a tunnel, and then followed the River Trail to the Bright Angel Trail. I was glad I was doing this in daylight so I could enjoy the view of the river.
As I hiked, I saw the Mule Train start their day from across the river
And as I passed the Bright Angel trail, I was surprised to see the bridge was open! I’d made that detour for nothing! Oh well, at least I got in some extra miles.
From here it was all up, starting gradually
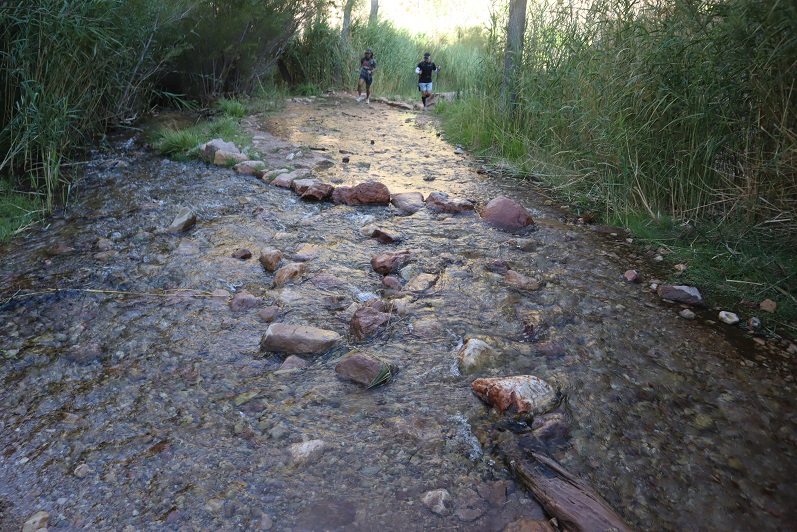
The trail had several small stream crossings
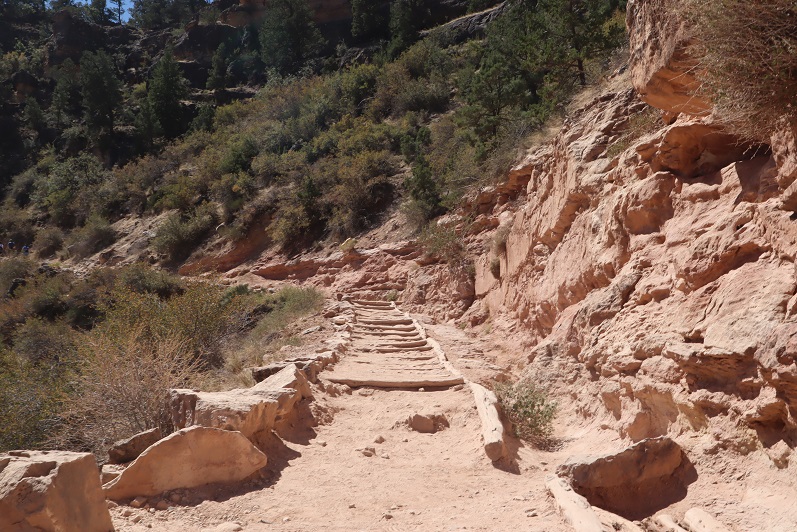
The trail was still very easy to follow. Here’s a look back
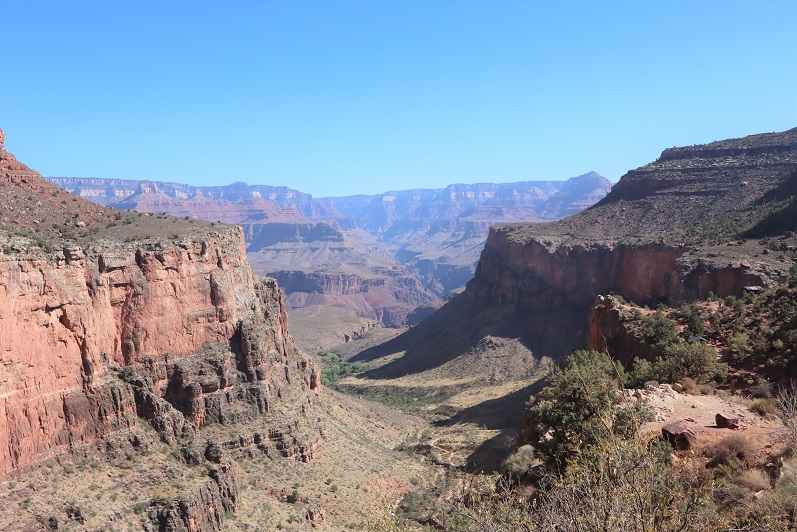
While the trail was easy to follow, it also didn’t feel like I was gaining any elevation. The rim always looked the same distance away
Water on the trail
One good thing about starting so early and hiking in the morning were the shadows. This kept me from getting too hot. I’d definitely recommend starting either late at night or super early in the morning (before 2am)
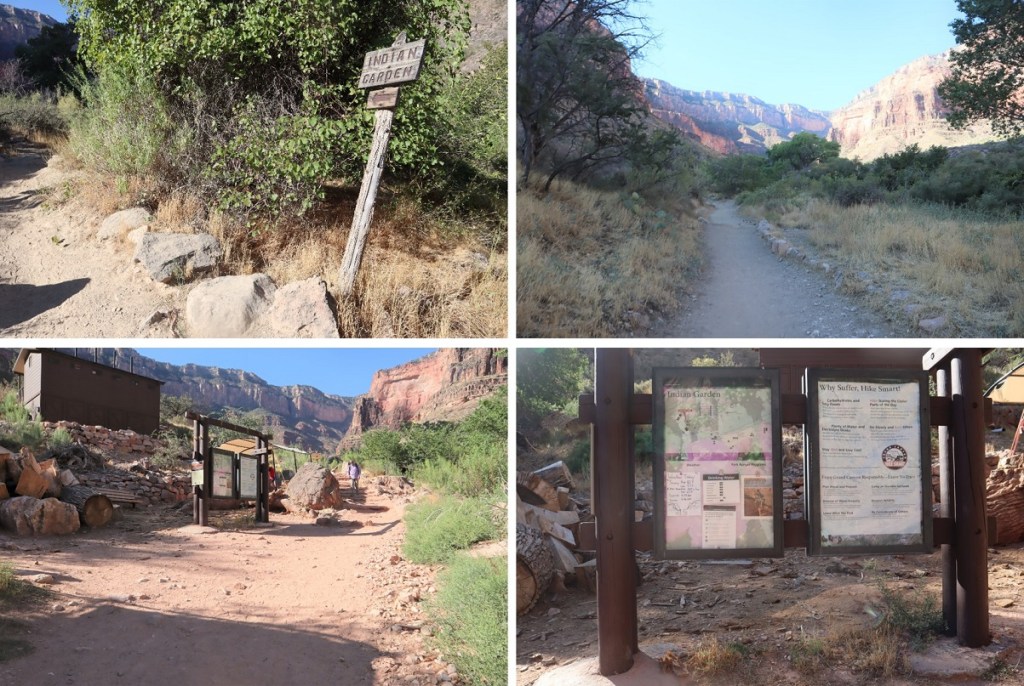
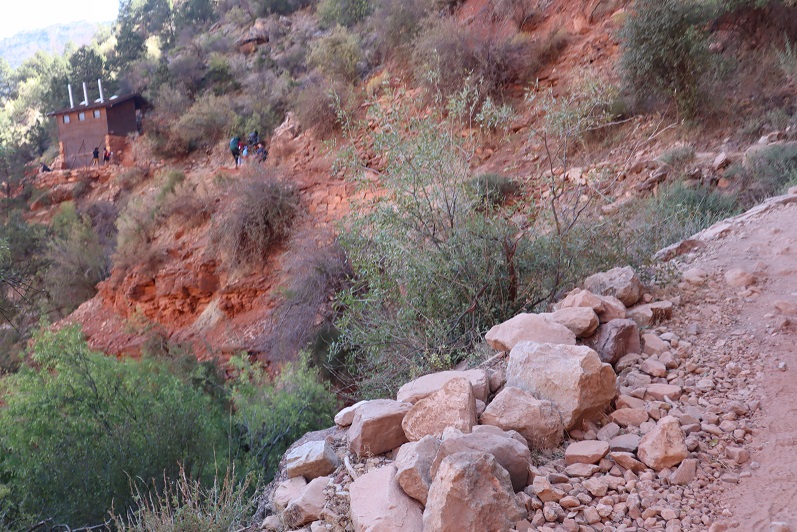
Indian Garden was kind of neat. I filled up my water bottle here, and found someone’s cell phone (and was able to return it to them).
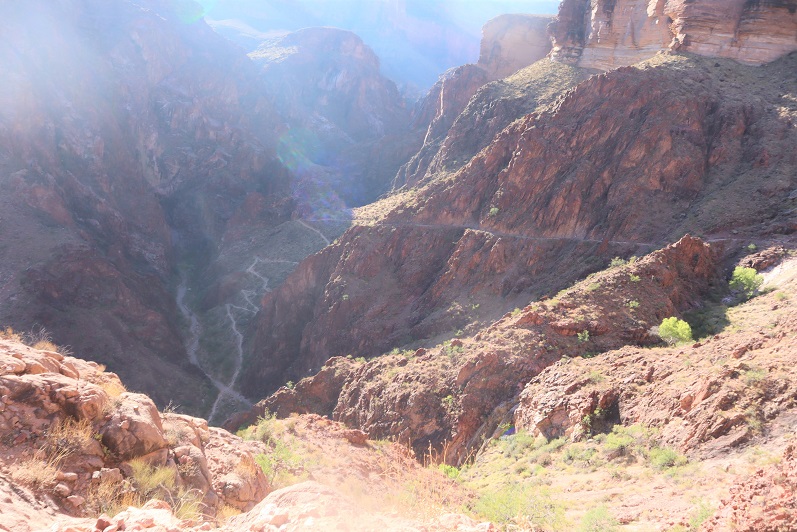
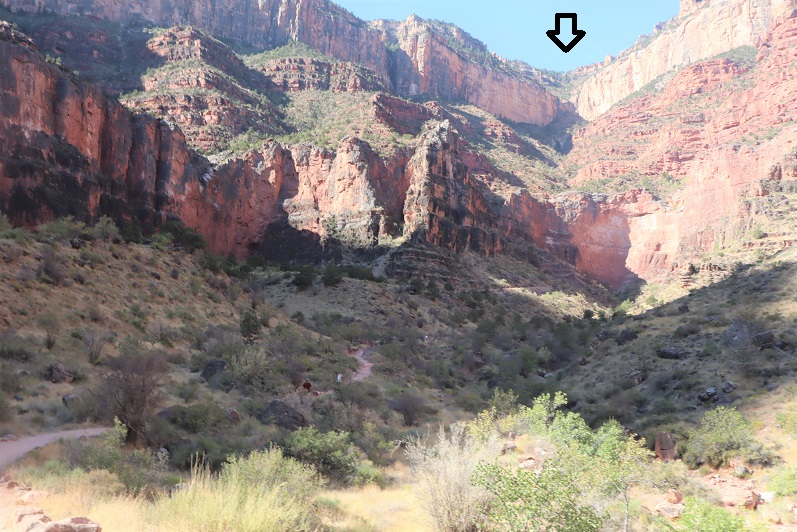
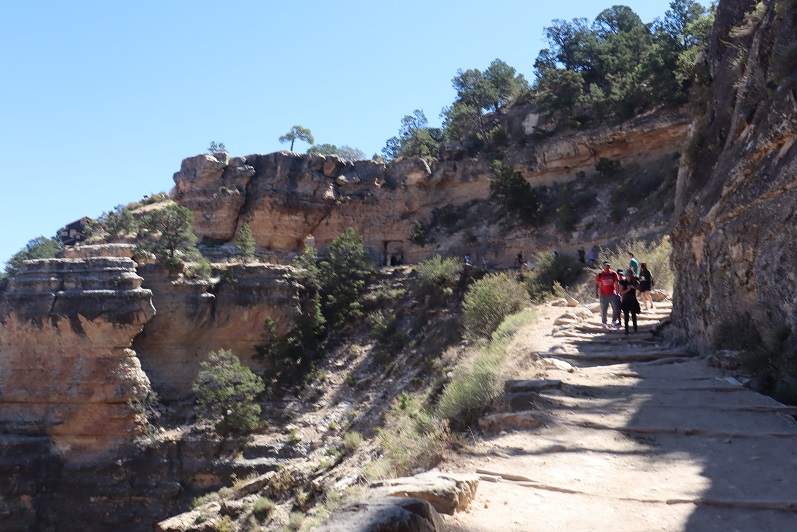
From here there was a sign stating it was 4.5 miles to the South Rim. With this news I was ecstatic, and after filling up my water bottle I took off towards the rim. The trail is easy to follow, but difficult to see from below. The trail actually goes to where the arrow is pointing (eventually, after many, many switchbacks).
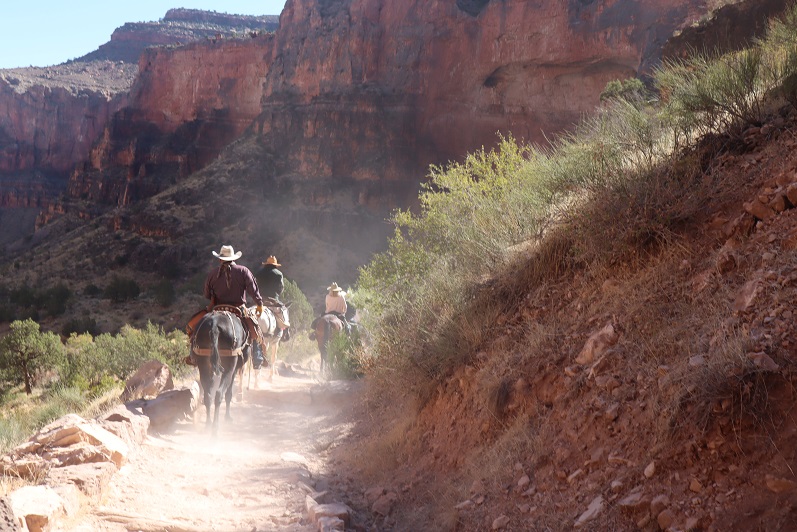
I passed a mule train, and one of the riders asked me why I was smiling. I told him it was because I was almost done with the hike (little did I know the rest of the hike would still take a few hours). They all wished me a Happy Birthday!
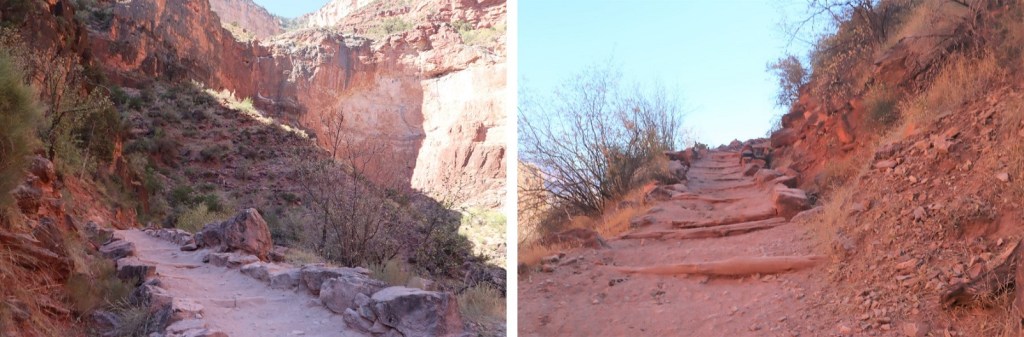
I continued along the trail for what seemed like miles
Imagine my surprise when I made it to the 3 mile rest area. I thought for sure I’d already hiked 3 miles past Indian Garden, but apparently, I’d only hiked 1.5 miles.
That rim just wasn’t getting any closer! The sun was starting to heat the trail up
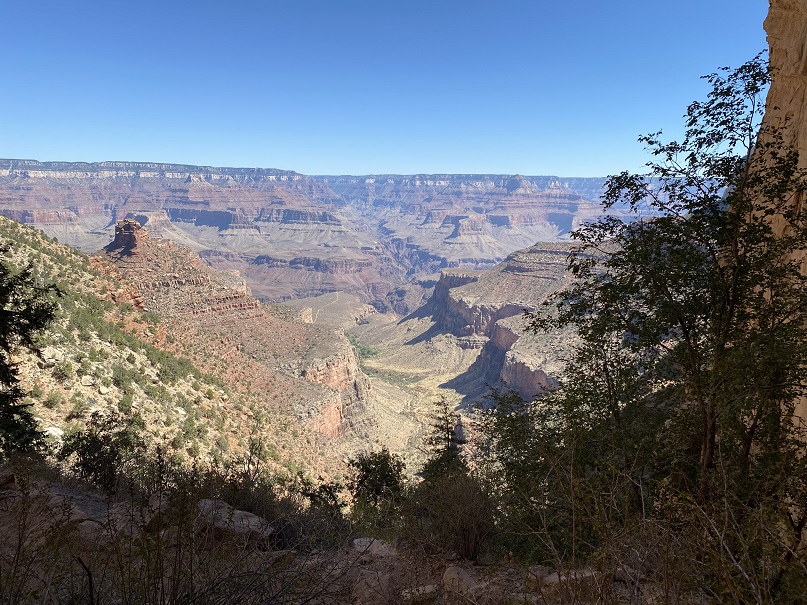
I had a beautiful view of my path to this point however
Around the 2 mile point I saw a park ranger talking to everyone on their way down. He was trying to get them to understand hiking back up was going to be more difficult than their hike down. The people he was talking to had a hard time believing if it took them 3 hours to get to Indian Garden it would take them 6 to get back to the South Rim. I had no trouble believing him. The 1.5 mile rest area seemed to take forever to reach as well. In fact, the last 5 miles were one long trudge uphill
I started seeing more and more people, especially near the rim. I was hot, tired, and sticky, and the people hiking down were still fresh. I was huffing at this point. They looked at me like I was insane, but I just kept trudging on.
I made it to this sign and saw Eric
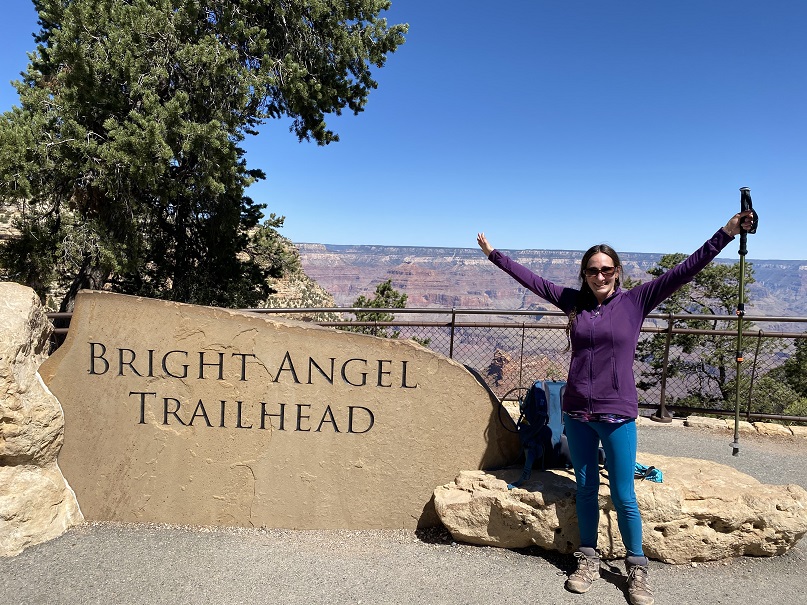
He’d seen me from above and decided to join me on the last little bit of the hike. He was encouraging and seemed excited to see me. I made it to the Bright Angel trailhead at 11am, took off my pack, and took some pictures. It was close to 100 degrees (a 75 degree difference from my start at the North Rim).
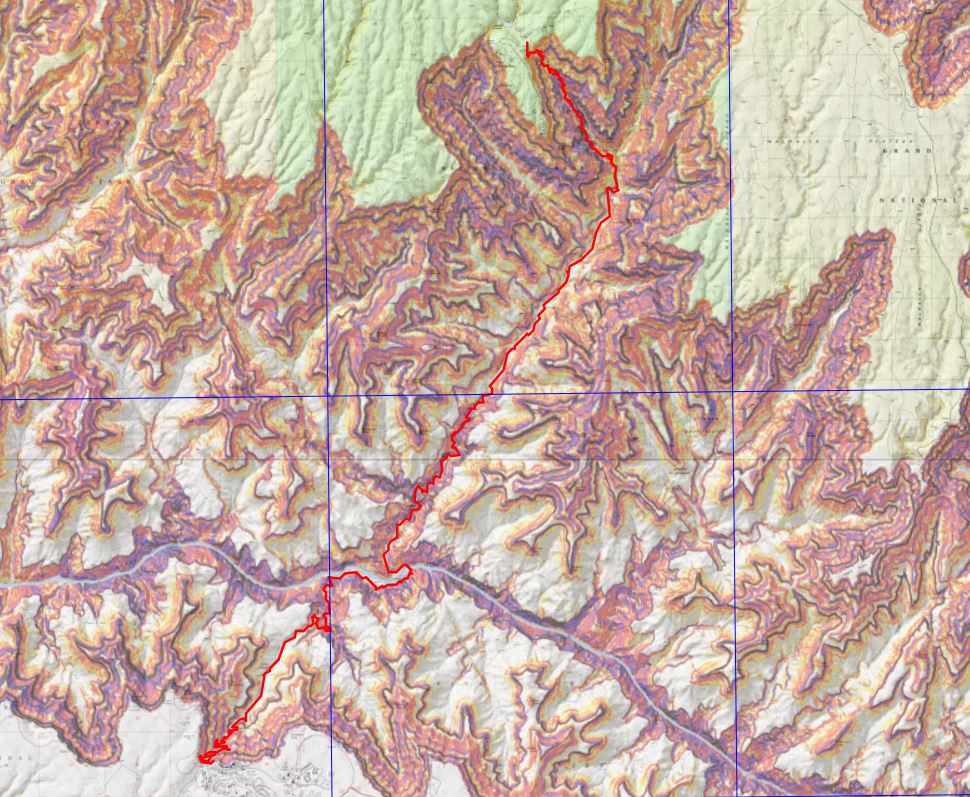
I hiked from the North Rim to the South Rim in 10 hours. Bucket list item checked off. Happy 40th Birthday to me! Check out the topo!
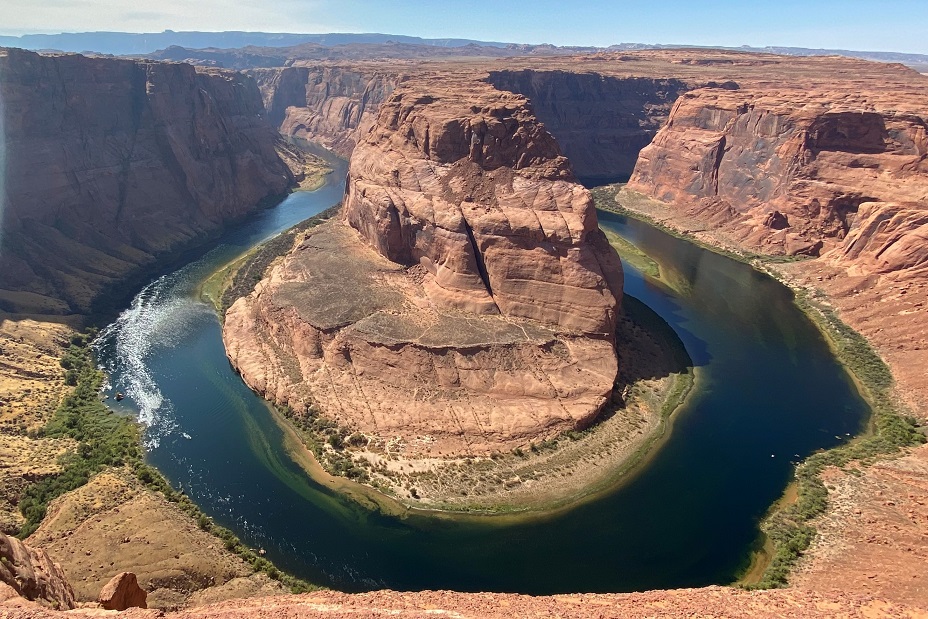
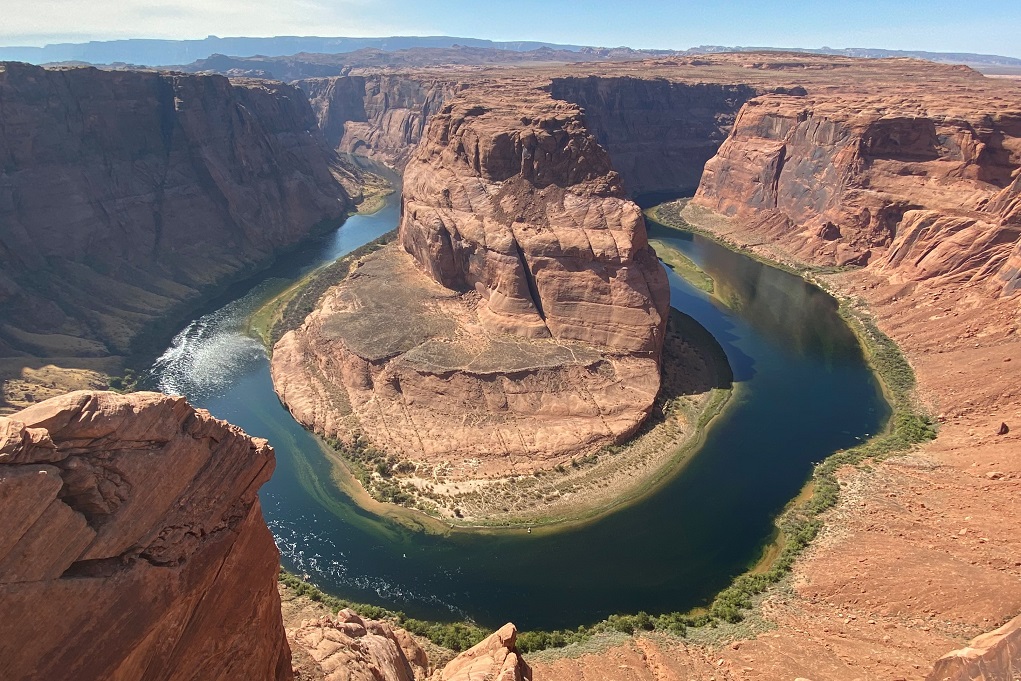
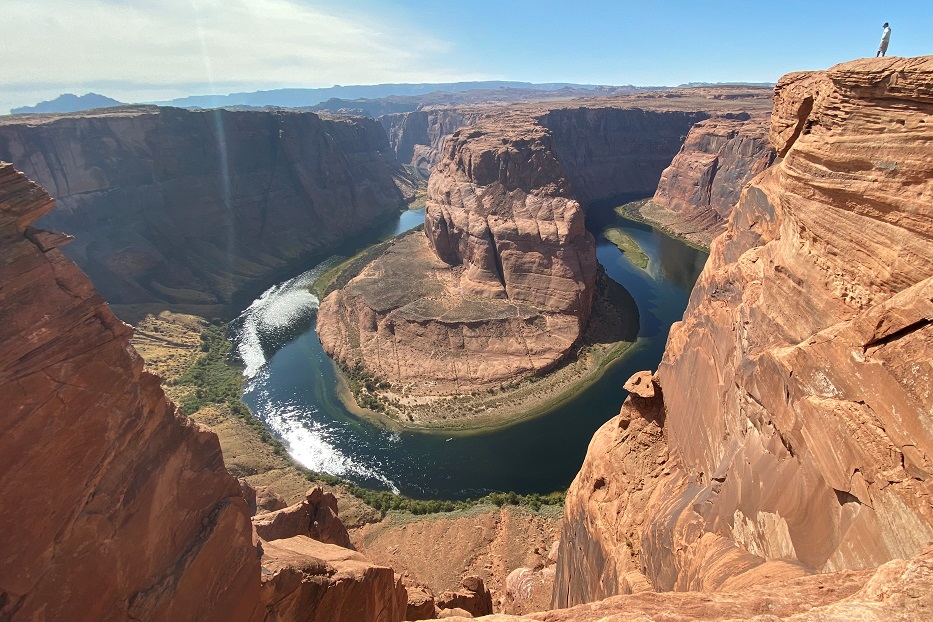
What a fun and unexpected side trip! We were on our way to the Grand Canyon for my birthday Rim to Rim hike, when Eric mentioned we were close to Page, Arizona, and Horseshoe Bend. To be honest, visiting Horseshoe Bend has always been on my bucket list, but I wasn’t quite sure where it was. I had no problem taking a mini side-trip to see it.
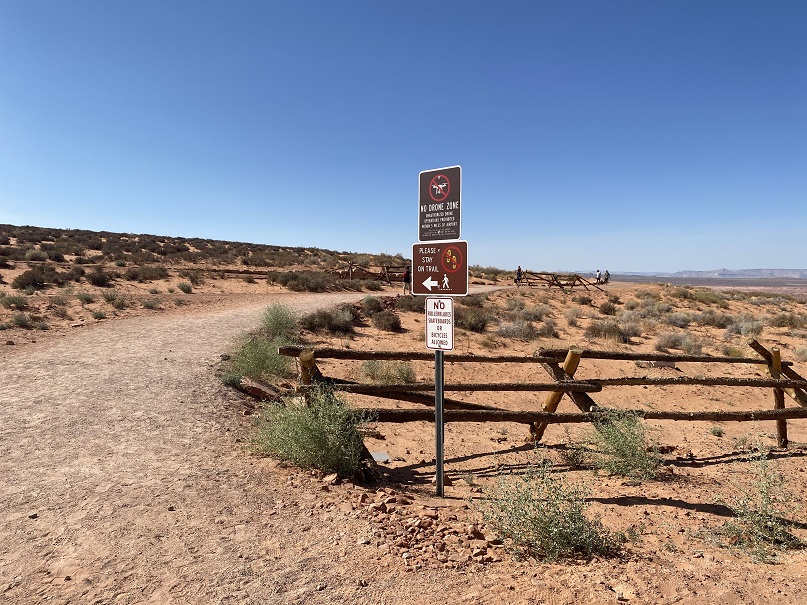
They’ve done some improvements in the past two years to the place. Now you need to pay to get in ($10) and park in a large lot. Then there’s a three-quarter-mile walk on a nice path to get to the overlook.
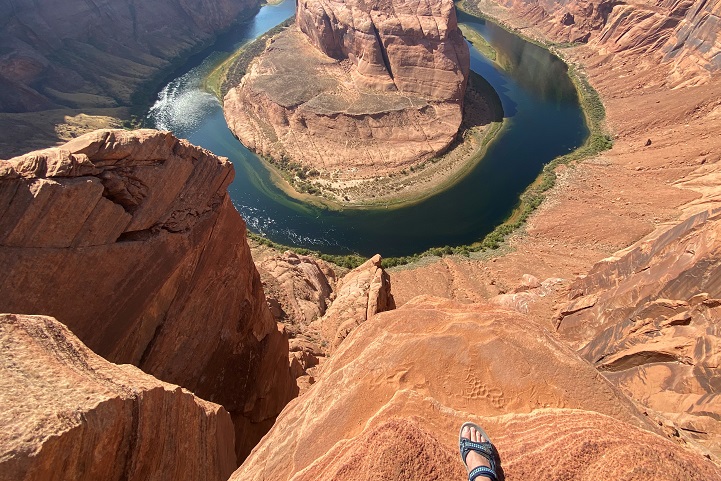
It was a nice day, no more than 80 degrees outside, so the walk was an easy one. You kind of come right up onto the bend without noticing in, and then, wham, several hundred feet drop into the river
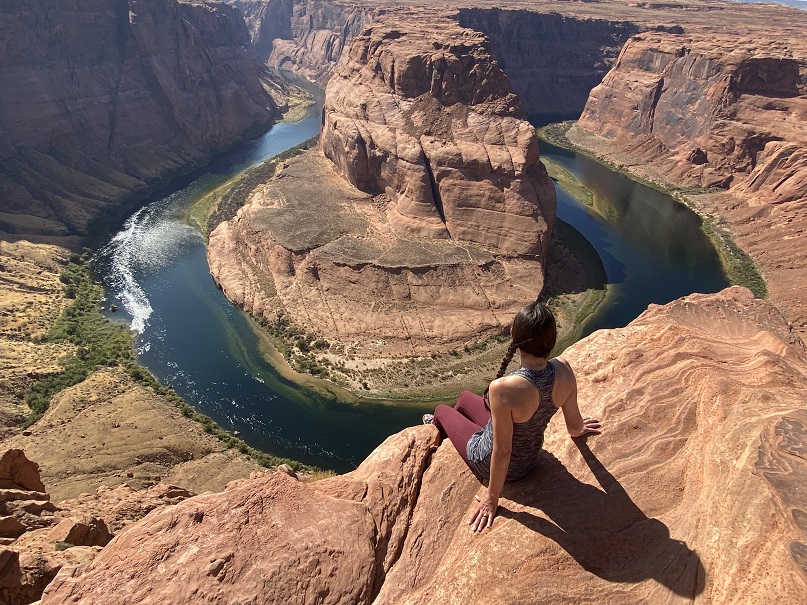
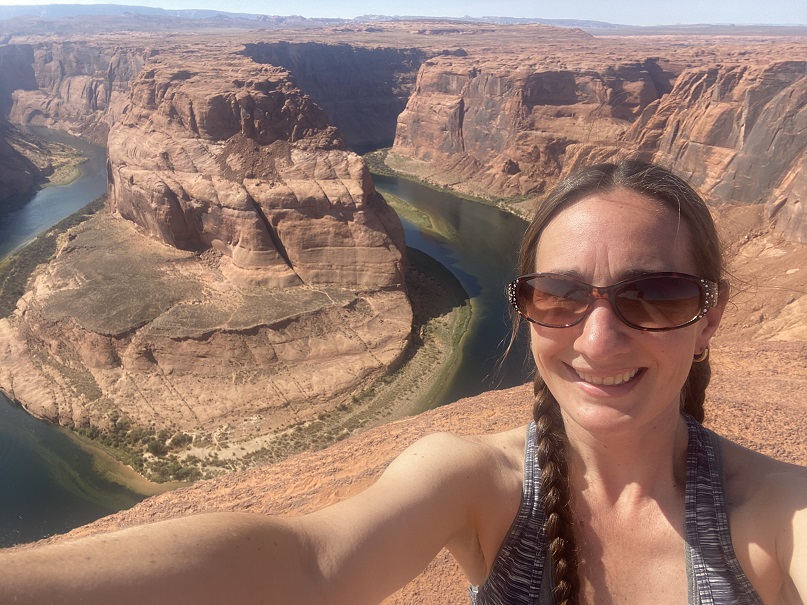
Wow! This was so cool! I took some video of Eric, he did his adventure speaker thing, and he took some pictures of me.
Of course I did the shadowselfie and selfie thing
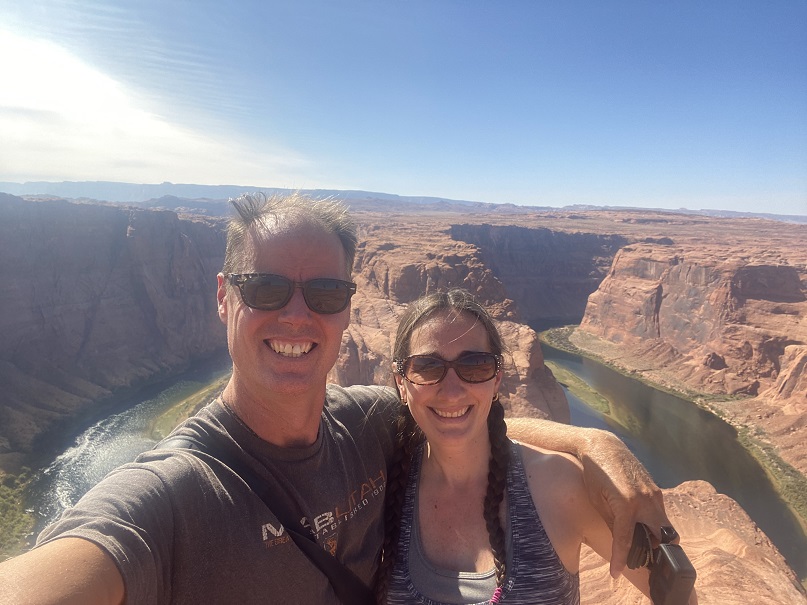
And Eric and I got a selfie together
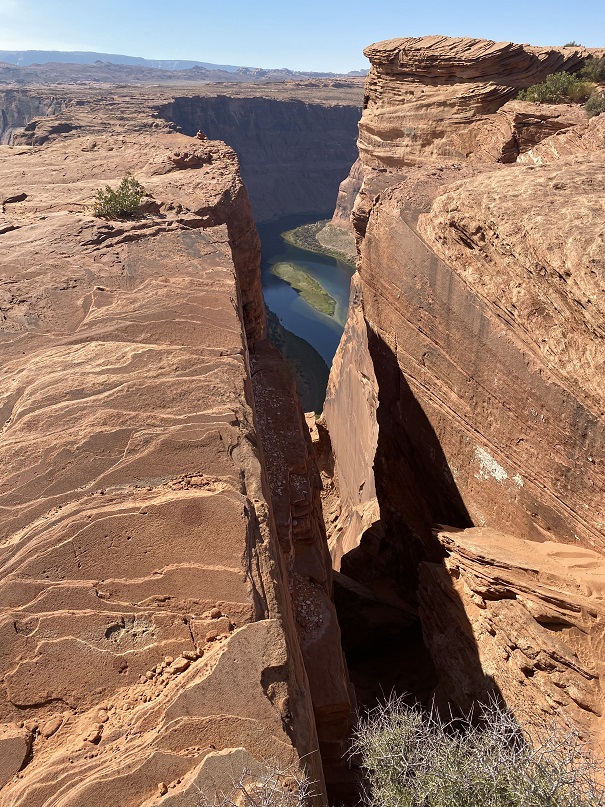
Here’s the jump I took videos/pictures of Eric jumping across. Even though the rock was grippy, I felt my legs were too short for the attempt. Sorry, no pictures of the jumsp (they’re on his camera).
There were actually quite a few people there for a Friday September day (September 11) but it wasn’t difficult to get in a good picture, making it look like you were the only one there.
Ok, now we’re off to the North Rim to prepare for tomorrow morning’s hike!
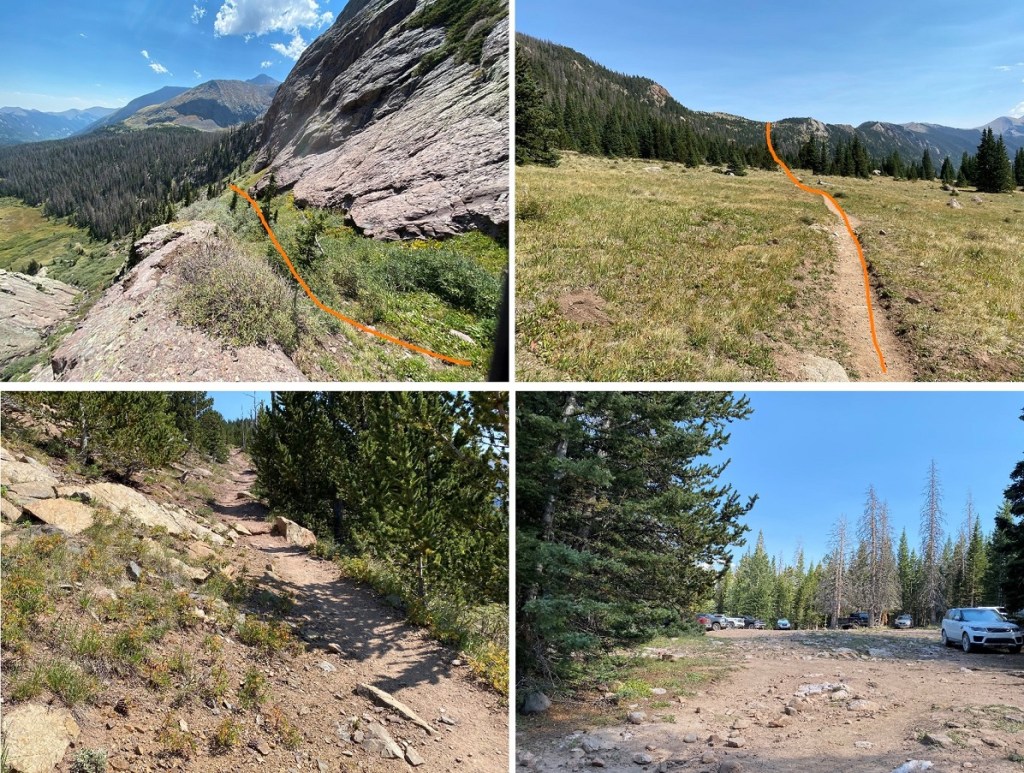
We go family camping with the Girl Scouts every Labor Day weekend, and every Labor Day weekend I spend one of the 4 days hiking. I left the campsite at 1am, intent on driving up to Music Pass trailhead early in the morning when there weren’t any other vehicles on the narrow 4WD road. Just my luck, around 3:30am I ran into a rather large Ram 3500 truck, carrying a trailer in the bed, coming down the road. It took us about 20 minutes to find a way around each other. Luckily, I only had the one truck to pass. The trailhead was full of trucks however (lots of hunters). It was earlier than expected so I took a quick nap and was on the trail at 5am.
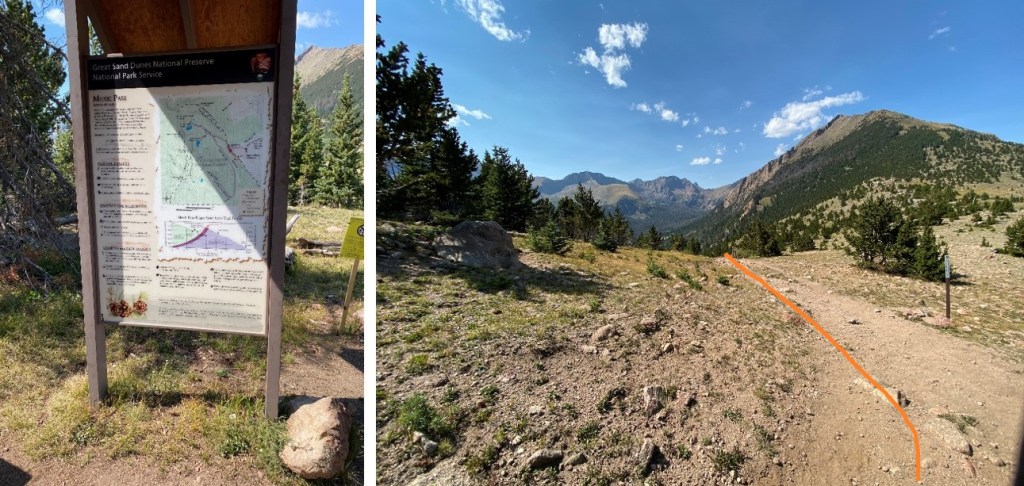
The trail starts at the west end of the parking area, and heads west.
There’s a trail register shortly after the trailhead.
The trail here is easy to follow
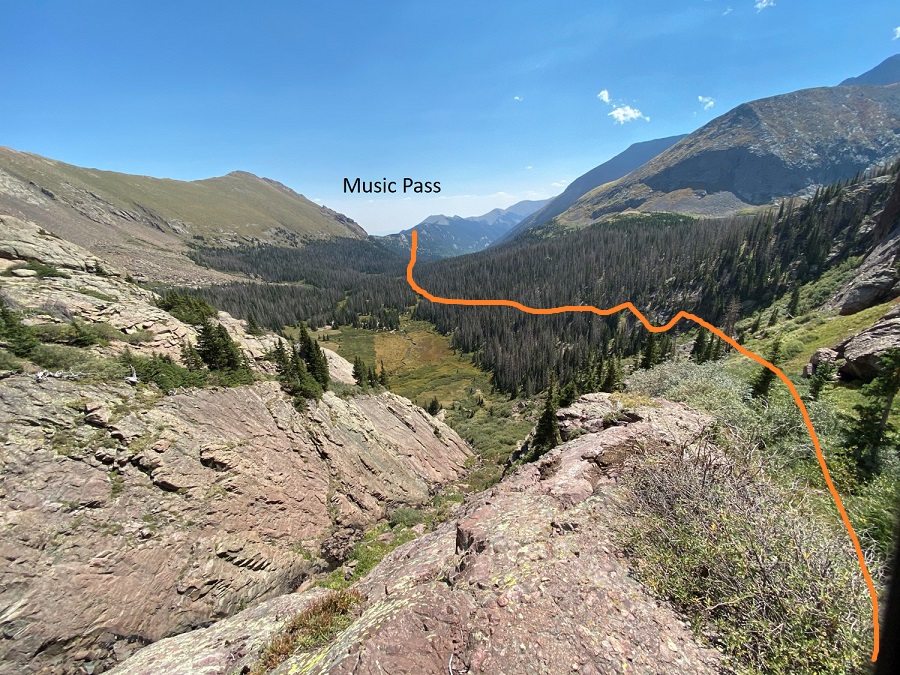
I made it to Music Pass after hiking for 1.25 miles, and realized I’d forgotten my camera (so, sorry, selfies with my iPhone once again today). There’s an information sign here, and another trail register. Last time I opened this register 50 moths frantically flew in my face, so this time I left it closed.
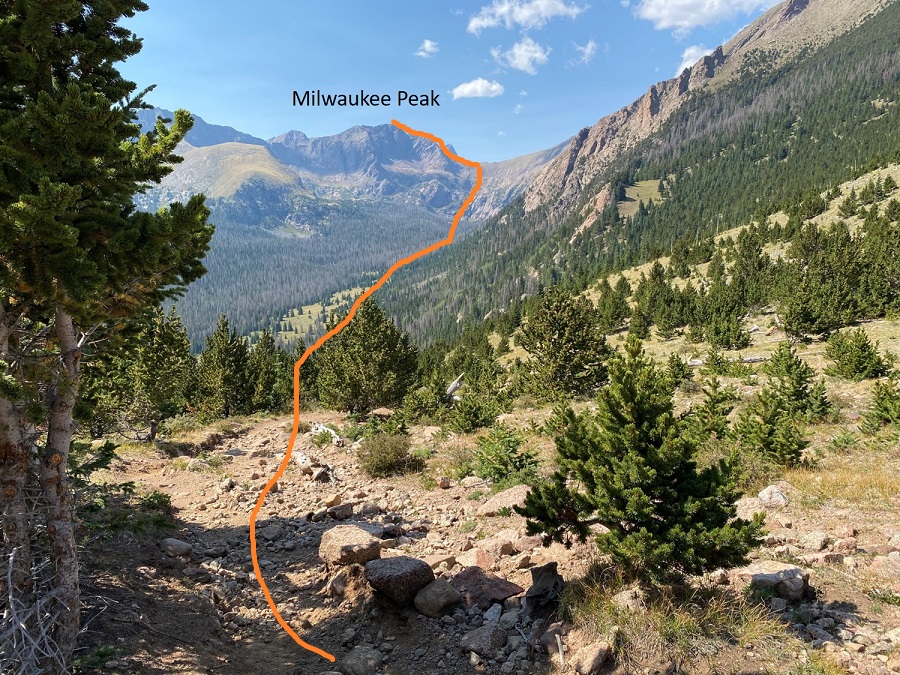
From here I followed the trail as it lost 450’ of elevation and headed northwest along Sand Creek Trail 1337. Here’s an overview of the route towards Milwaukee Peak
And step by step, first descending into the basin. I continued straight at this crossing. Note, there were signs saying not to enter the water, as they were being treated to remove all fish from the drainage.
I followed Sand Creek Trail
Staying right at the second junction
Crossing a stream at 11420’
The last junction I came to was for Upper Sand Creek Lake and Cottonwood Pass. I turned right and headed towards Cottonwood Pass
The trail continued through the basin. Eventually I was going to have to find a grassy ledge and follow it to an upper basin. Here’s that ledge I’d be aiming for
But before that I had to make my way across several small streams
There was evidence of the fish kill in the streams, as well as tons of dead worms; and bear tracks
I came to a sign that said the trail ended, and told me to follow the cairns. The cairns were extremely helpful, but I did get lost crossing the final stream. I couldn’t figure out where to do it, but it was obvious on my way back. If you (like me) aren’t able to completely follow the cairns in the dark, cross the stream and head northwest up the side of the mountain and you’ll eventually hit the trail, as it will become obvious.
The trail weaves through the forest towards a grassy ramp that leads to the upper basin
Once in the upper basin the trail ends, but there are many great cairns that will lead you to the saddle. The ‘trail’ stays to the left.
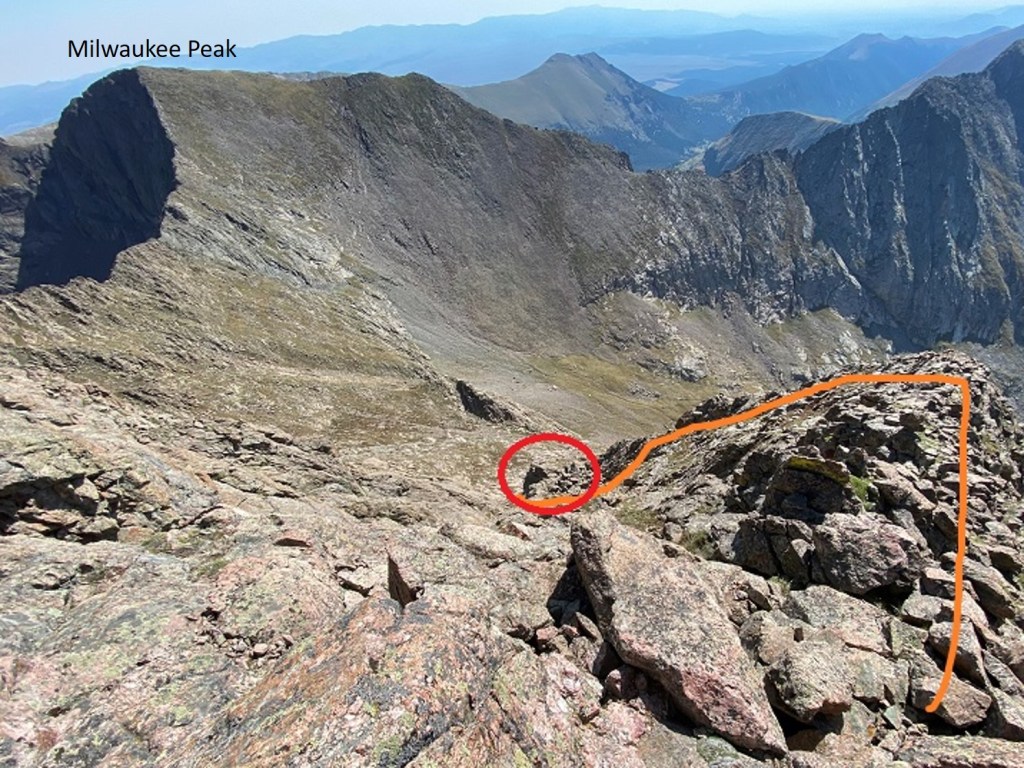
At the end of the basin the goal is to ascend to the saddle. There are cairns that will get you there. This is the basic route
At the saddle the trail picks up again. I turned left and headed southwest along the trail, rounding the north side of Milwaukee Peak. Here’s an overview
And from the ridge, rounding the corner
Once I’d rounded the corner the real fun began. Now’s a good time to put on your helmet if you haven’t already.
Here’s an overview of the rest of the hike
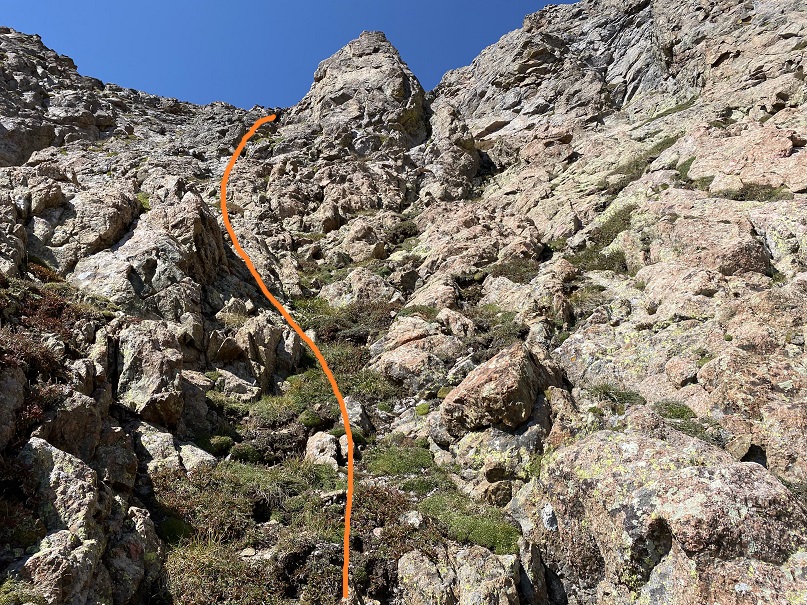
And step by step. Here’s the first big obstacle. I went down here
And came to a notch with a class 4 rock to climb. This isn’t more than 8-10 feet high. There are plenty of hand and foot holds here. Make sure to ascend to the left
Here’s another look at the notch from a different angle. This is how you want to ascend/descend
Once past the notch there was a narrow ledge to traverse, with a large drop off. I was toe-heeling it across this area and leaning into the mountain. This would not be a fun place to slip.
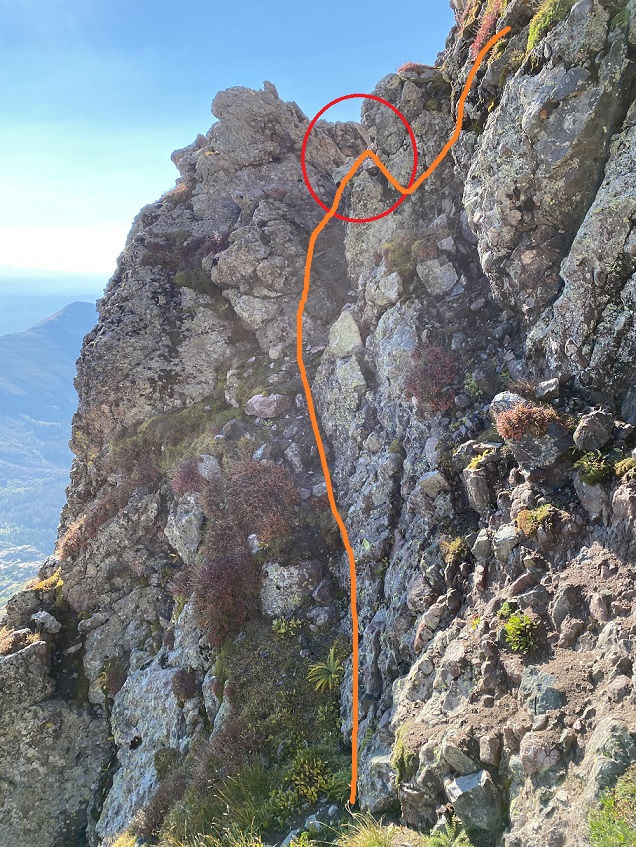
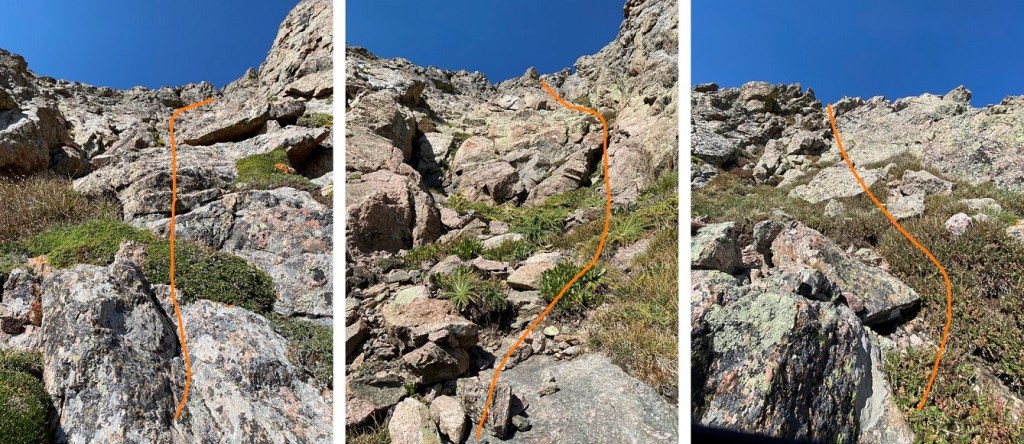
Next, I aimed for this notch (stop at the notch, don’t go past it)
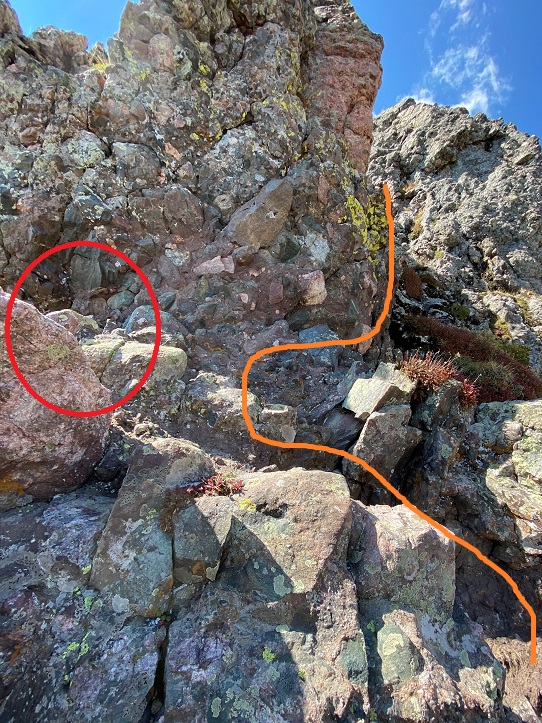
At this notch there’s a boulder a couple feet wide blocking the path. It’s easy to hop over, but don’t. This is your indication to ascend the gully. I’ve circled where the is rock in red
Here’s another view. In this picture the rock is circled on the left, and this is how you enter the gully
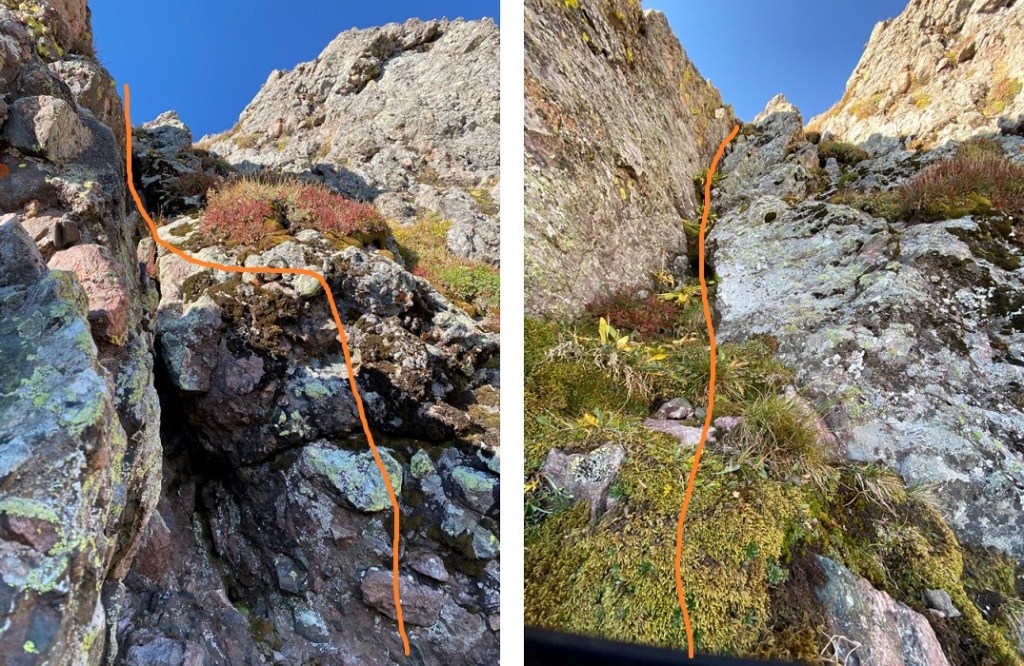
Here’s what the gully looks like
And here’s topping out of the gully
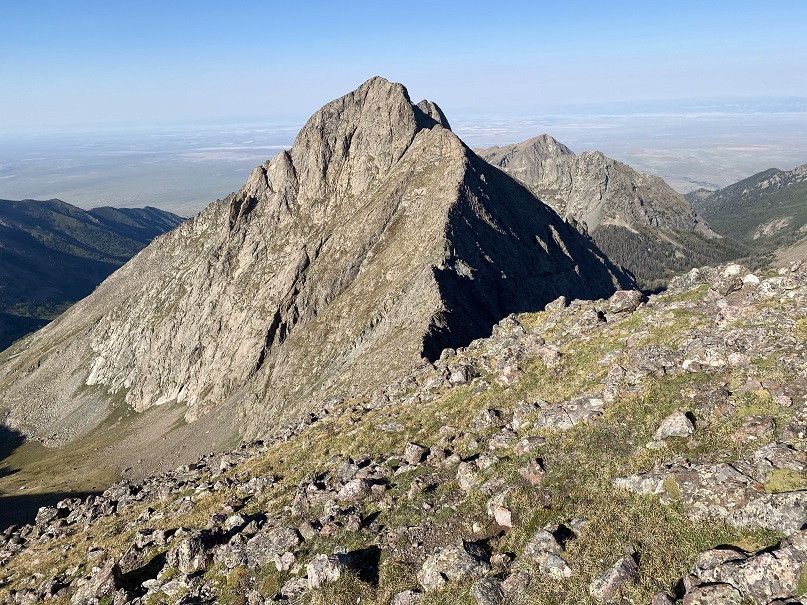
From there it’s an easy (if airy) traverse to the summit. I summited Milwaukee Peak at 8:55am
Milwaukee Peak:
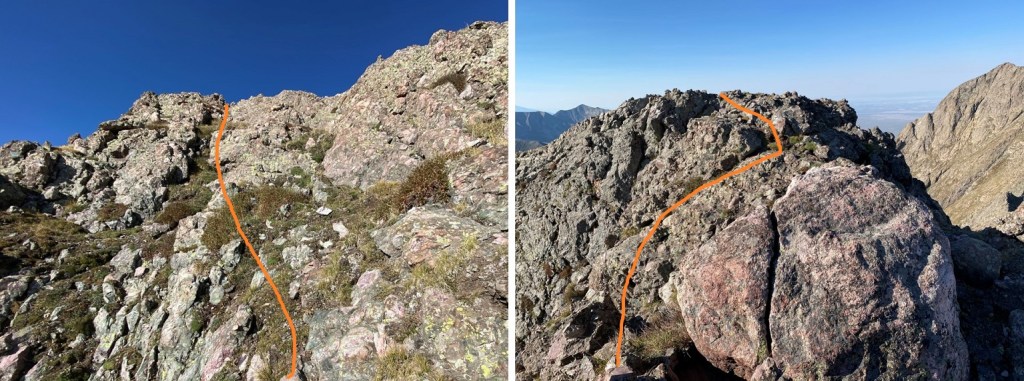
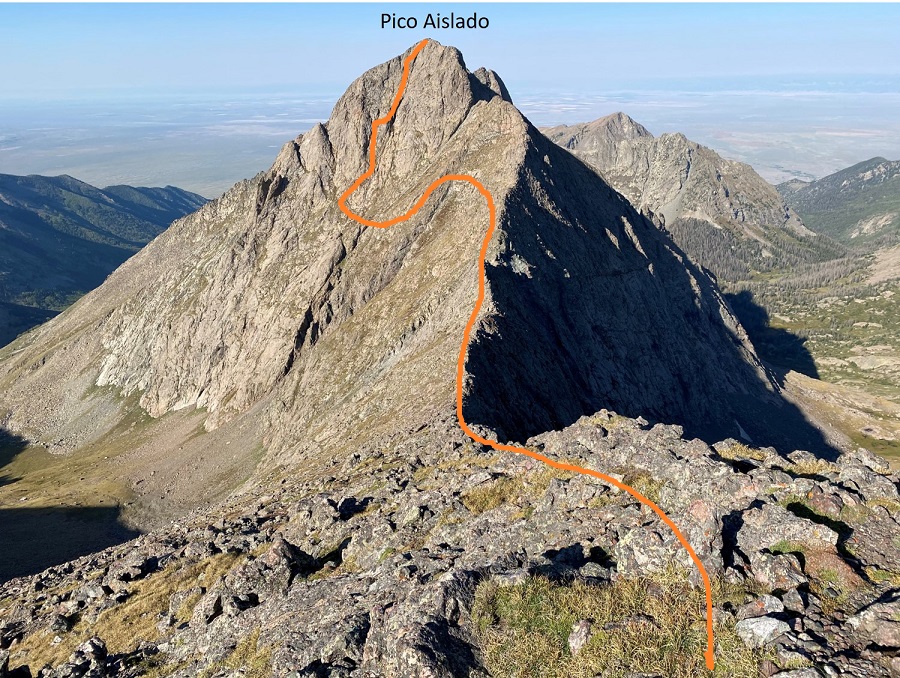
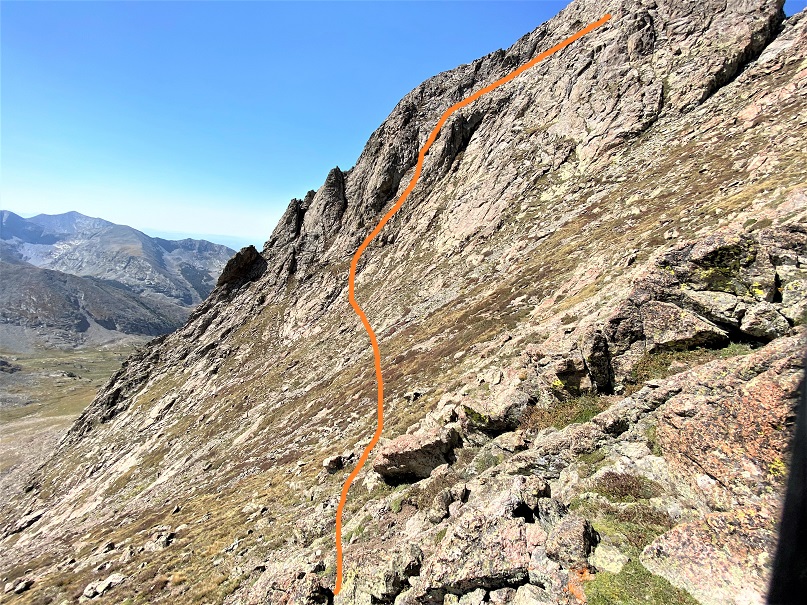
From the summit of Milwaukee here’s the route over to Pico Aislado (which means ‘Isolated Peak’ in Spanish).
In the beginning I could just stick to the ridge (better pictures of some of the obstacles here on the description of the way back, but they all stay at class 3). There were some ups and downs but nothing too difficult. At the ‘saddle’ this is the path I took, staying low, keeping under the rock line. There’s no need to stick to the ridge here, as you’ll end up losing elevation later.
Take note of the ‘cairn’ I’ve circled here. You’ll be aiming for it later. (It’s not actually a cairn, but it’ll look like one from below).
I came to the last gully on this side of the mountain, turned right, and kept to the left as I ascended.
I kept aiming for where that circled ‘cairn’ was. As soon as I found it, I turned right and followed the ridge to the summit
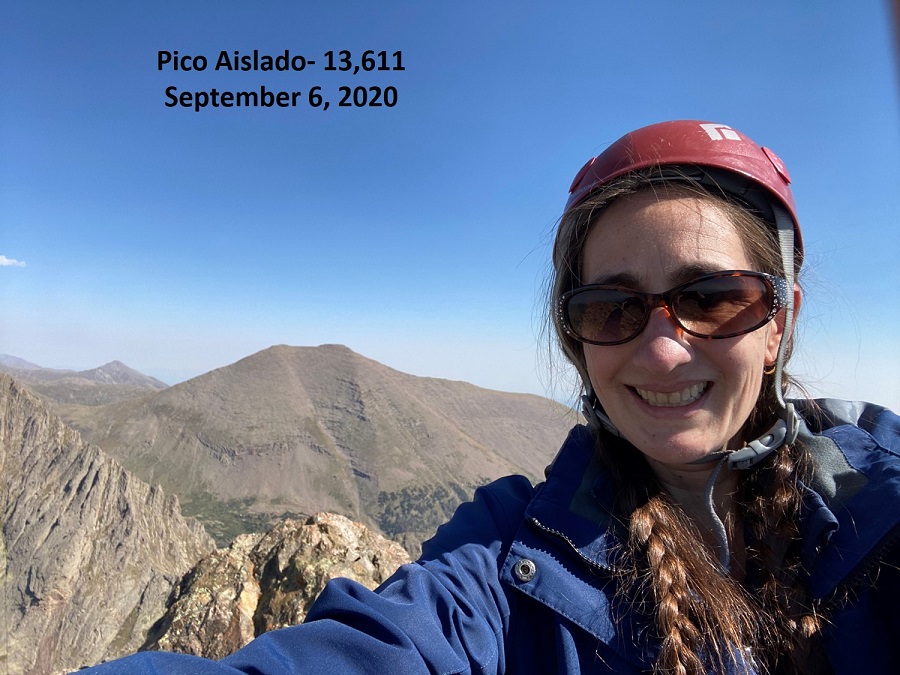
I summited Pico Aislado at 10:30am
Pico Aislado:
I headed back the way I’d come, following the ridge to the ‘cairn’ (circled in red) and then the gully back down
I felt the gully was easier to go down than up
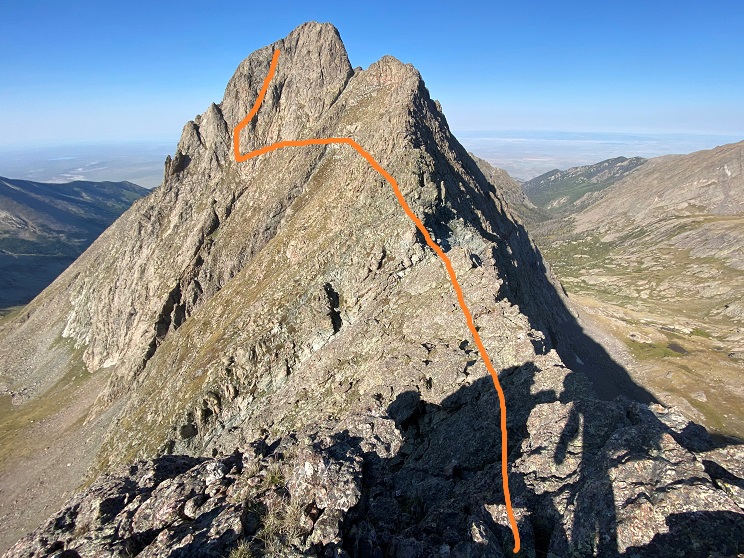
Here’s the route I took back to Milwaukee Peak
There were two difficulties on the ridge back. The first reminded me of the knife edge on Capitol, but with less exposure. I probably could have descended to avoid this, but what’s the fun in that? I went straight up and over
The next obstacle was this class 3 rock formation. Once again, straight up and over
Then it was an easy ridge hike back to Milwaukee Peak. I summited and headed left (northeast) to descend
Back down the gully
Down the mountain to the notch, which was much easier to downclimb than upclimb
And back down the ridge to the saddle, and through the upper basin
Here’s an overview of the route to Music Pass
And some pictures of the class 1 trail out. The 450’ of gain up the pass isn’t that bad.
I saw no less than a dozen hunters in the area after gaining Music Pass, all with bows and arrows. Some were knocking on trees, others were making calls, and some stood guard with binoculars. I’d seen bear tracks, marmots, and pikas, but besides that not another animal all day. I made it back to my truck at 3pm, surprised to see Strava hadn’t logged my route, so sorry, no detailed topo this time. The hike took me 10 hours to complete. I also guestimated on the elevation gain by looking at other reports. I took my mileage off my iPhone (which stated 13.7 miles, 195 floors, and 36,864 steps). Time to finish my weekend of camping! All of my girls are seniors in High School now, so this will be our last Labor Day campout.
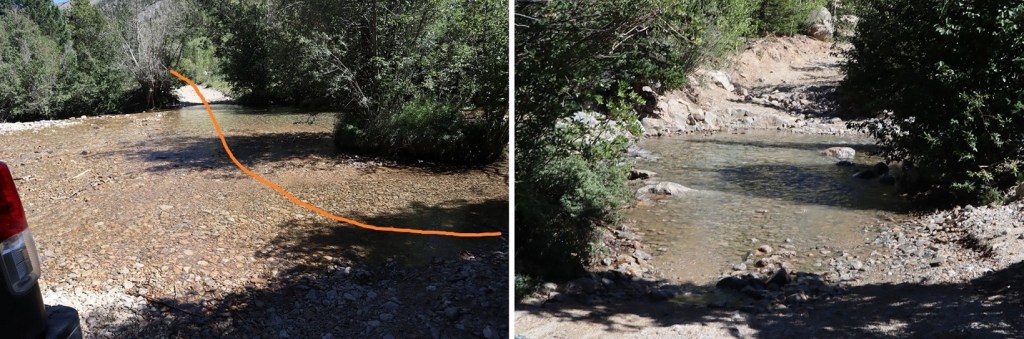
The creek crossings to get to the Rockdale Trailhead were easier than I’d anticipated. 6-8 inches of water weren’t difficult to pass (it’s now September in a lower snow year). In the dark the willows and water made navigation fun. Colorado pinstriping indeed.
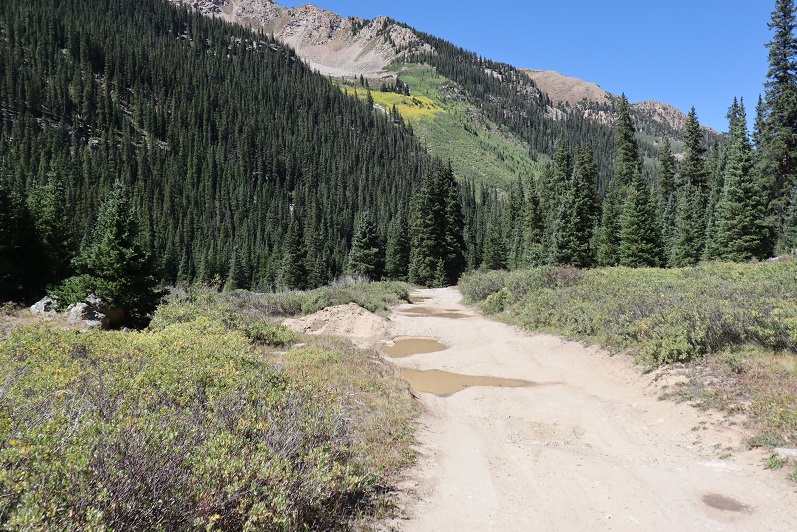
There were only two stream crossings, just at the beginning of the 4WD road, but tons of short ups and downs and puddles. I drove slowly and I’m pretty good at navigation, but still managed to hit the underside of my truck a couple of times (I have a stock Tundra). This picture is from one of the easier areas of the drive. Most of the difficult areas have tree cover, making pictures difficult.
At 10880’ there’s a sign that says the road ends (even though it looks like it goes further). There are several large camping sites here. I parked my truck and got out my gear
I was on the trail at 5am, following the 4WD dirt road south.
After hiking for .3 of a mile I came to the ‘old’ parking area, now covered by an avalanche. There’s a nice trail through this if you stick to the left.
After the avalanche area the 4WD road picks up again
After hiking for .75 miles total I came to the junction of the trail and the road. Both ways go around the lake. I chose to go up and over the hill
Giving me a good look at Cholsey Lake
And then I followed the trail back down the hill and into the basin.
This is a class 1 trail that heads south through pine trees, willows, and some small creek crossings
At around 3 miles of hiking the trail started turning left, curving southeast. Here the trail became faint, but there were plenty of well-constructed cairns to guide the way up to the pass at 12,500’. Off to my left I saw a huge bull elk, bounding away.
At this point the trail was now gone, but I had a great view of Pear Lake. Pear Lake wasn’t where I was headed however. I turned left and followed the ridge northeast, staying as high as possible.
My goal was to aim for this gully. There are a lot of ups and downs here, so I tried to stay high.
Here’s the path I took, step by step, to get to the gully
The safest way to approach this gully is to start out by going left around this boulder, and then straight up, following the scree trail
There are a lot of loose rocks here, the kind that cause rockslides, so watch your footing.
The top of the gully put me at 12,860’. Now it was time to head back down, staying as high as possible, but still losing about 300’ of elevation as I traversed my way over to Magdalene’s ridge. Here’s an overall of the route I took
And step by step: First, down the gully. The most stable area is to stick to the left, near the rock
Then I headed southeast, staying high
The rocks give way to tundra. I kept aiming for the ridge
Keeping Silver King Lake to my right, I made it to the base of the ridge. Here there’s a cairned trail that picks up and will lead you to the summit. It starts by zig-zagging up and around the first ledge
Then following the well cairned trail to the saddle
It looks like the trail has been covered in rockfall in areas, but the cairns help to stay on course
Once at the saddle I turned right and followed the ridge southwest
There are several social trails up this ridge, but I was able to summit by sticking to the ridge proper, keeping this class 2
I summited Magdalene Mountain at 9:40am
Magdalene Mountain:
There are 2 summit registers here.
Time to head back the way I came. First, down the ridge
Once at the saddle I turned left and followed the trail back down the mountain
Here’s an overview of the route back to the pass
And step by step:
Here’s looking back up at the gully. Once again, I stayed north to ascend
From the top of the gully, here’s the overall route back to the pass
And step by step. Down the gully and across the rocks
Staying high
Then taking the plateau back to the pass, where the trail picks back up again
I turned right at the cairns and headed back down to the basin
I looked longingly at the ridge that connects Pear Peak with PT 13517. I really wanted to do that ridge today. It was an absolutely perfect day, but I was short on time, as the drive in had taken longer than expected. I had to get back home and finish working for the day. Oh well, it will be a fun adventure in the future. Here are some pictures of the route back down. Spirits high, I rather enjoyed the hike out.
Back to the lake and up the hill
Past the avalanche area
And back to my truck. I made it back to my truck at 2pm, making this a 15.32 mile hike with 4074’ of elevation gain in 9 hours