West Trinity Peak – 13,765, Trinity Peak – 13,816 & East Trinity Peak – 13,745

1

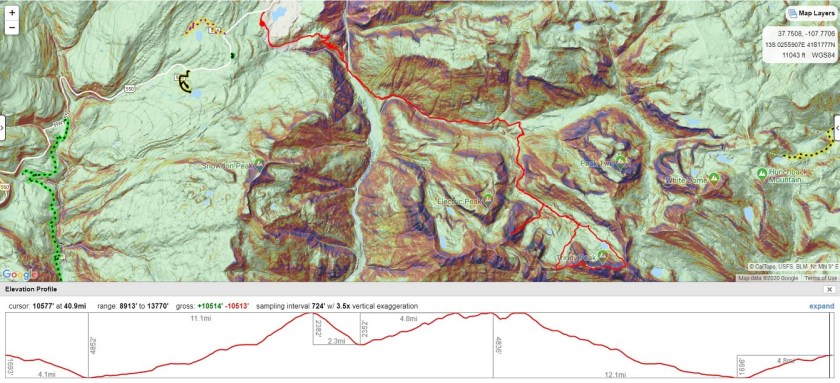
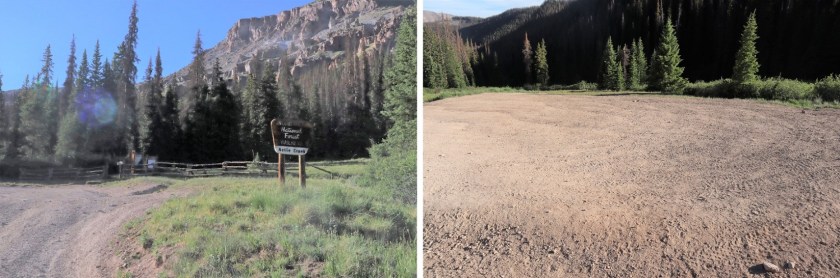
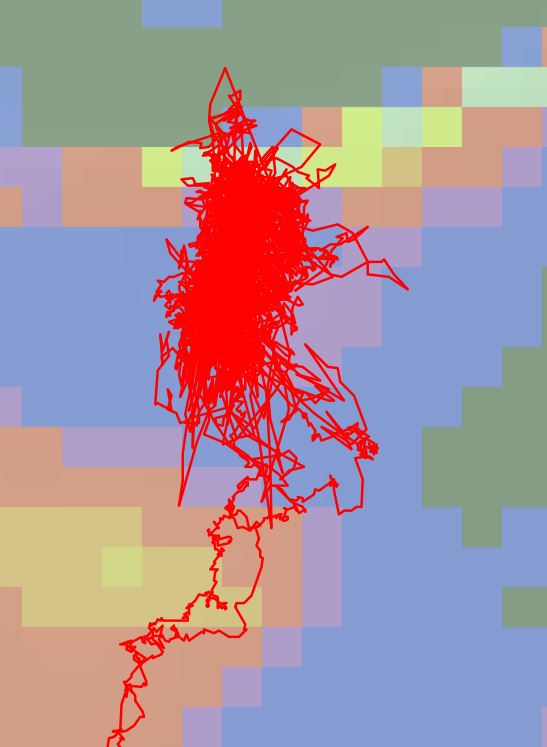
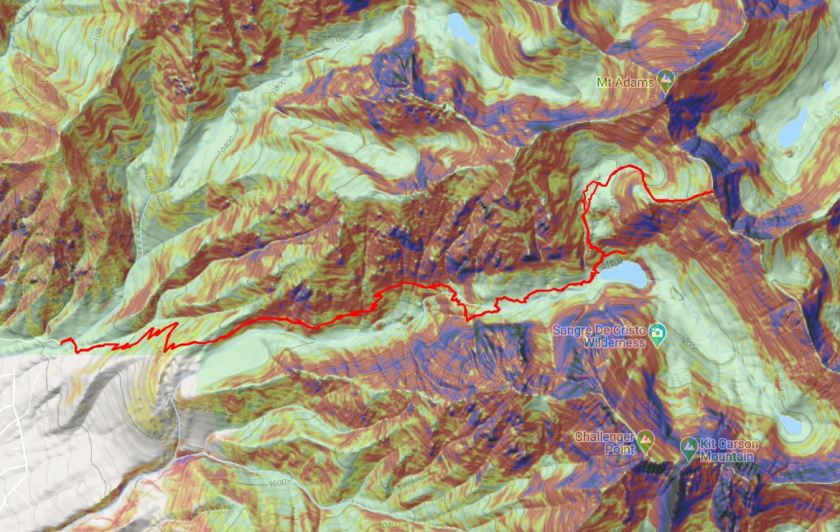
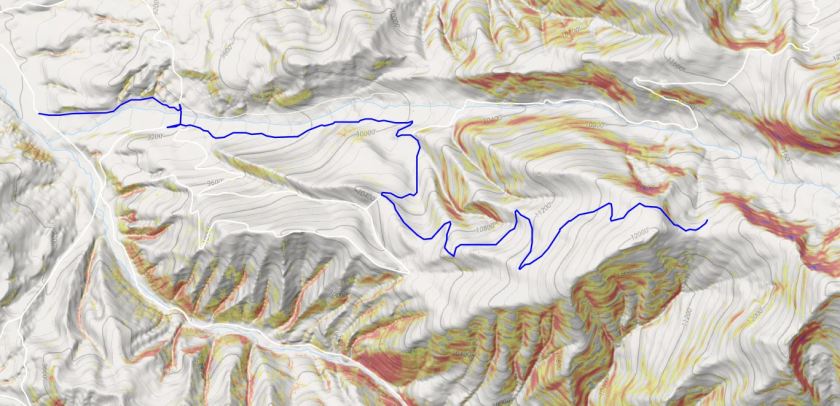
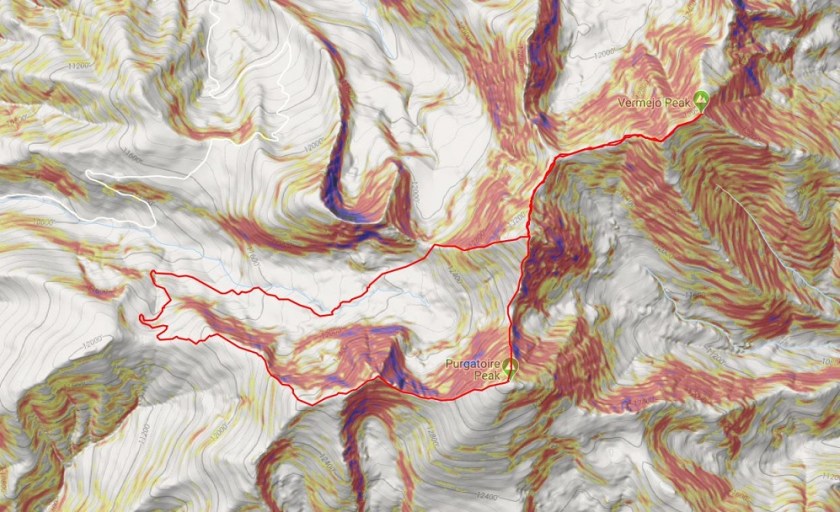
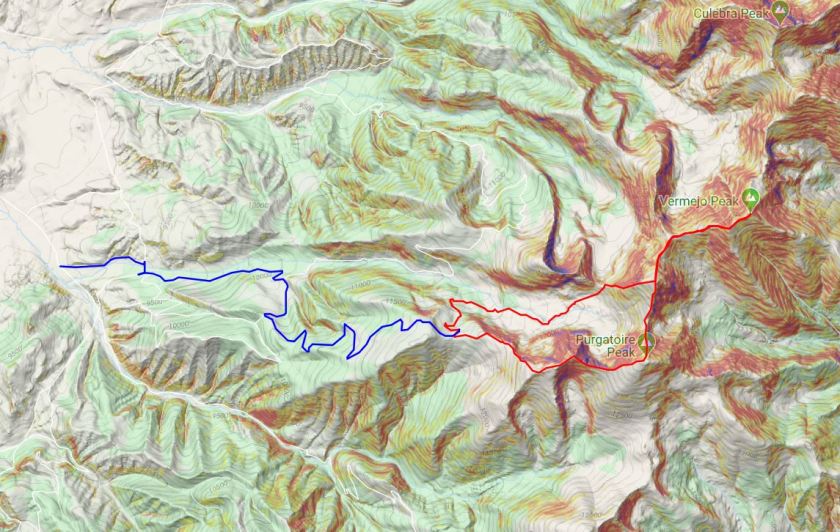
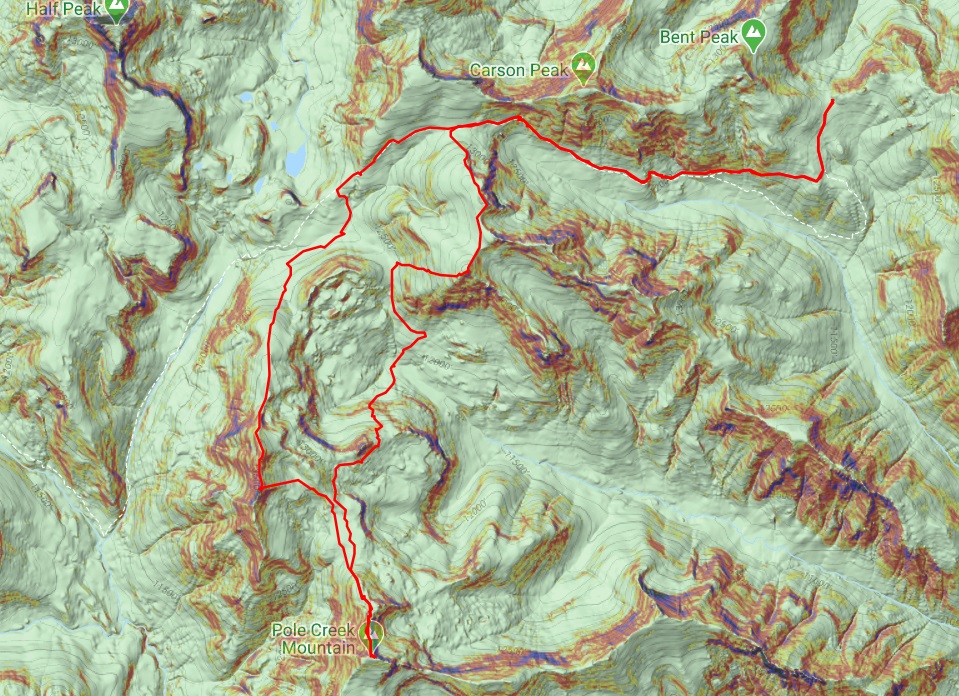
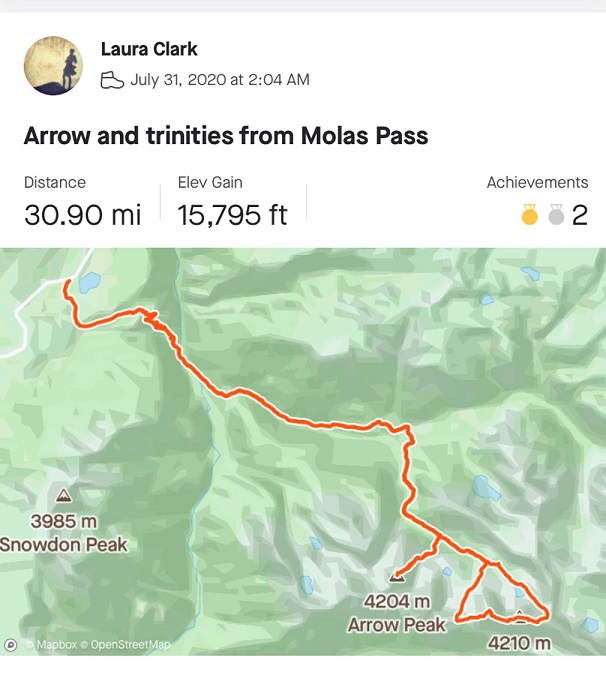
* I did these peaks with Arrow Peak as a weekend hike.  CalTopo put the entire route at 41 miles, 10511′ of elevation gain, Strava gave me 30.9 miles and 15795′ of elevation gain. Either way, it was a good workout (see photos at end).  Approach directions can be found here.

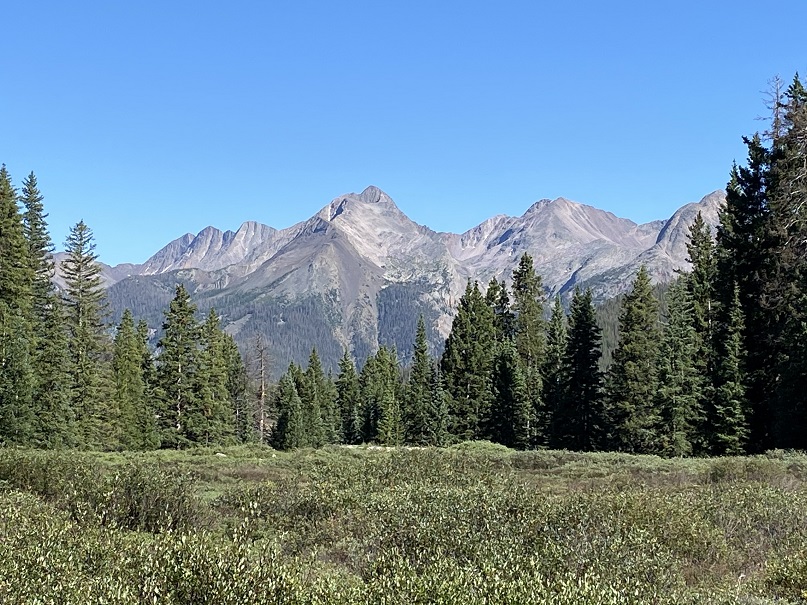
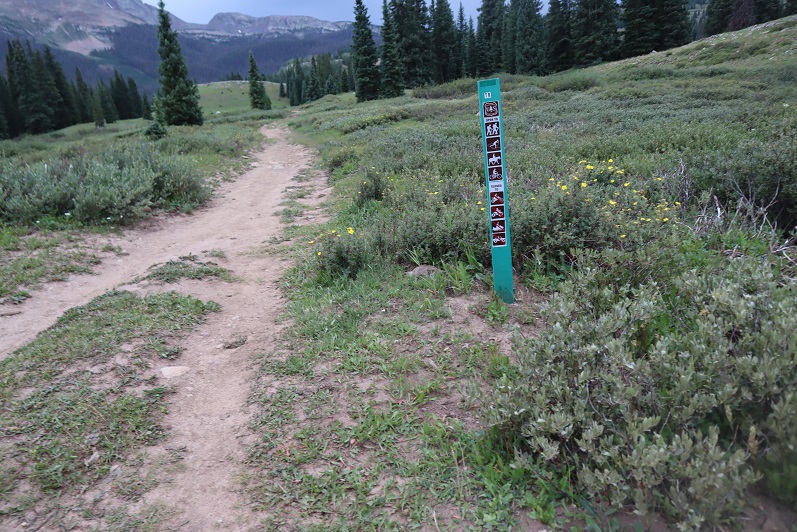
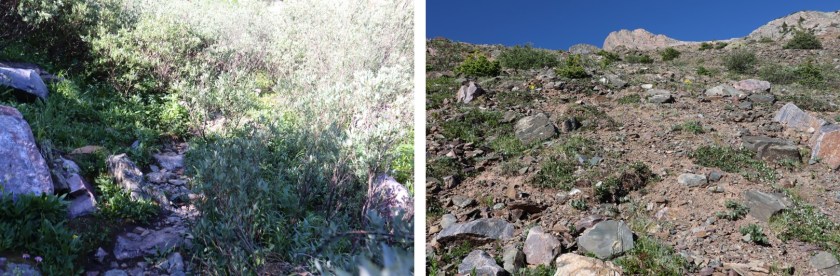
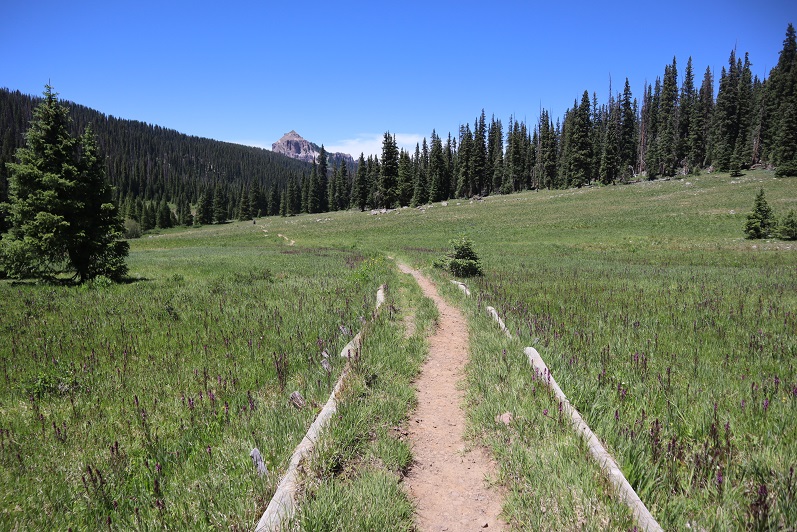
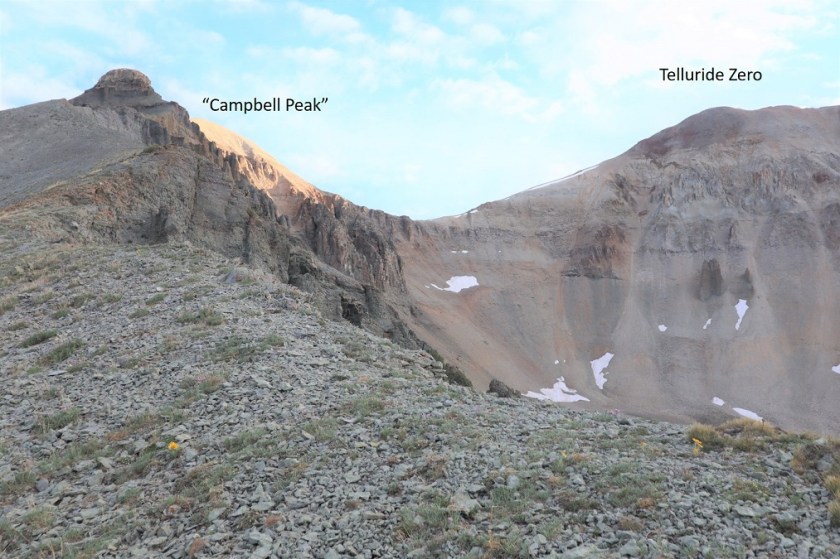
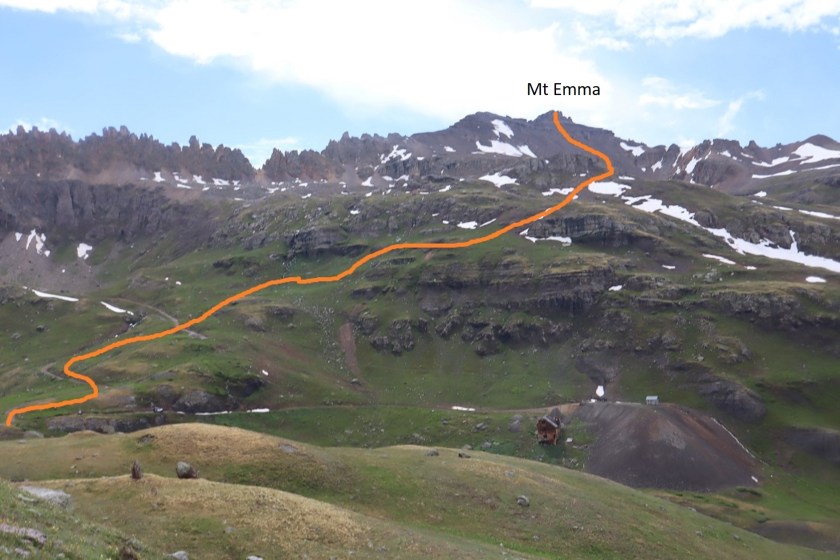
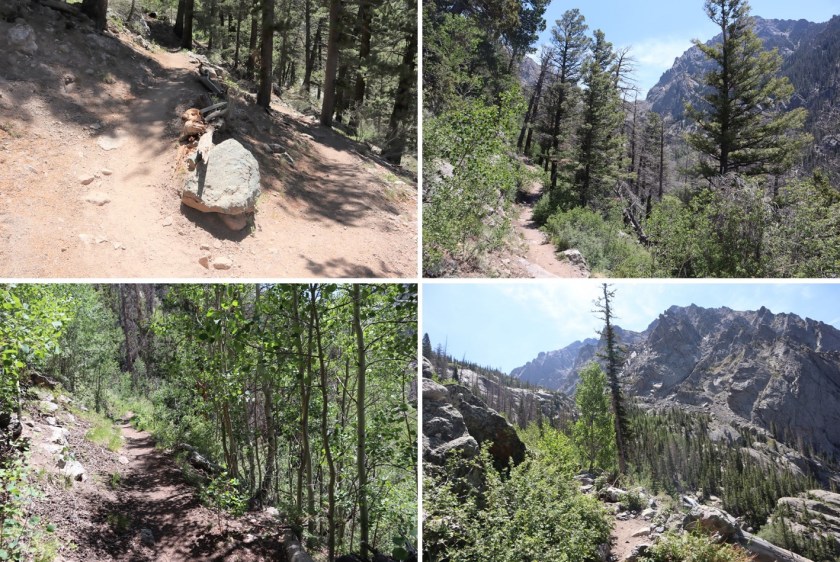
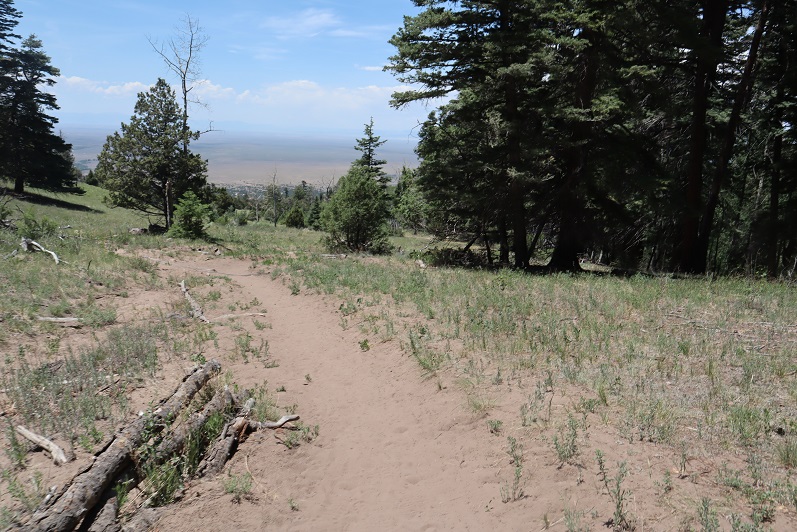
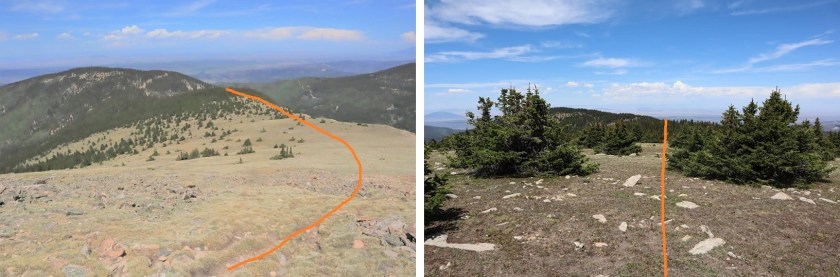
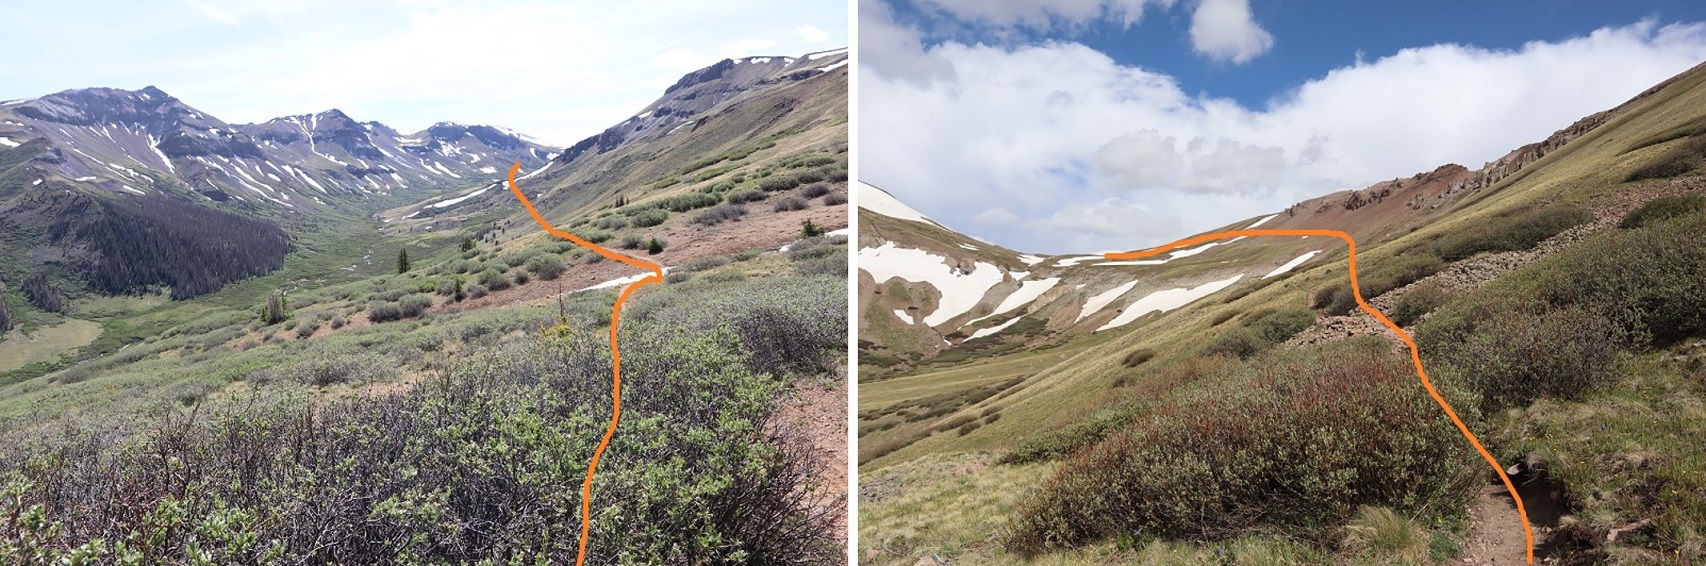
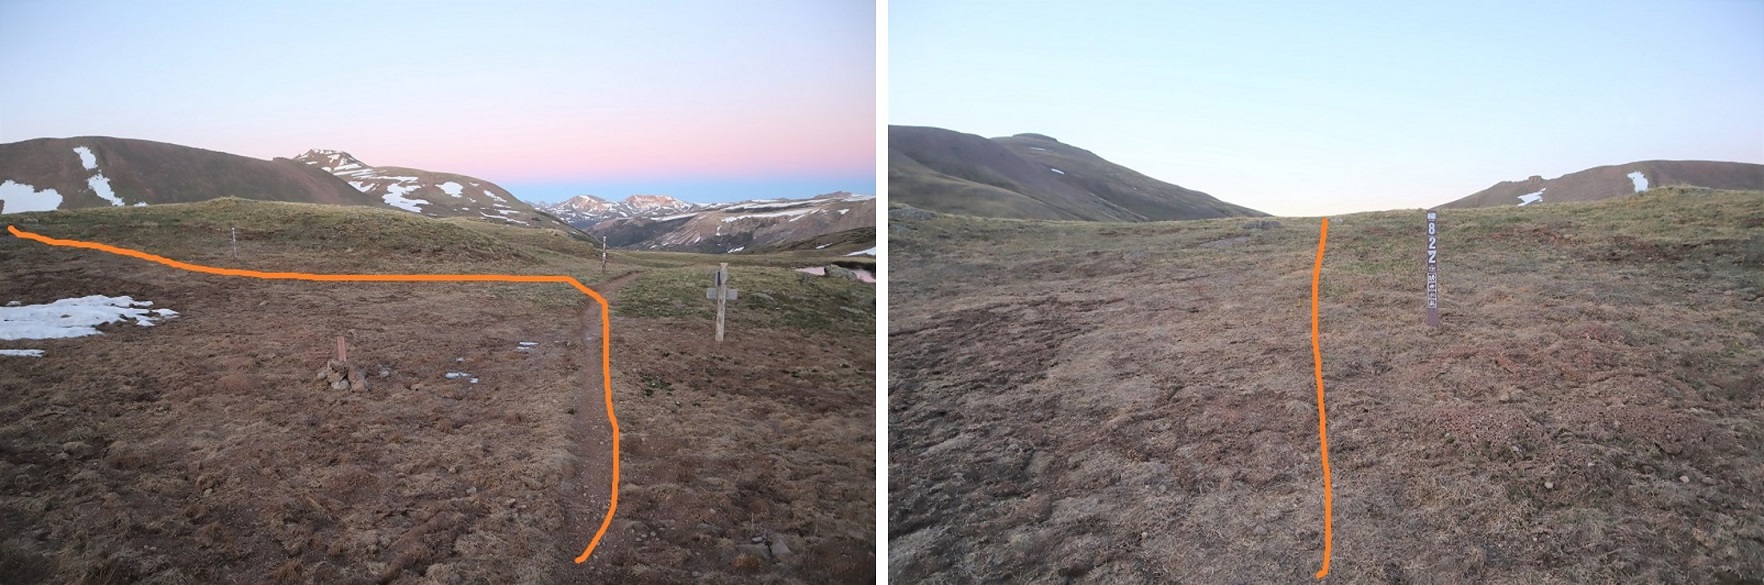
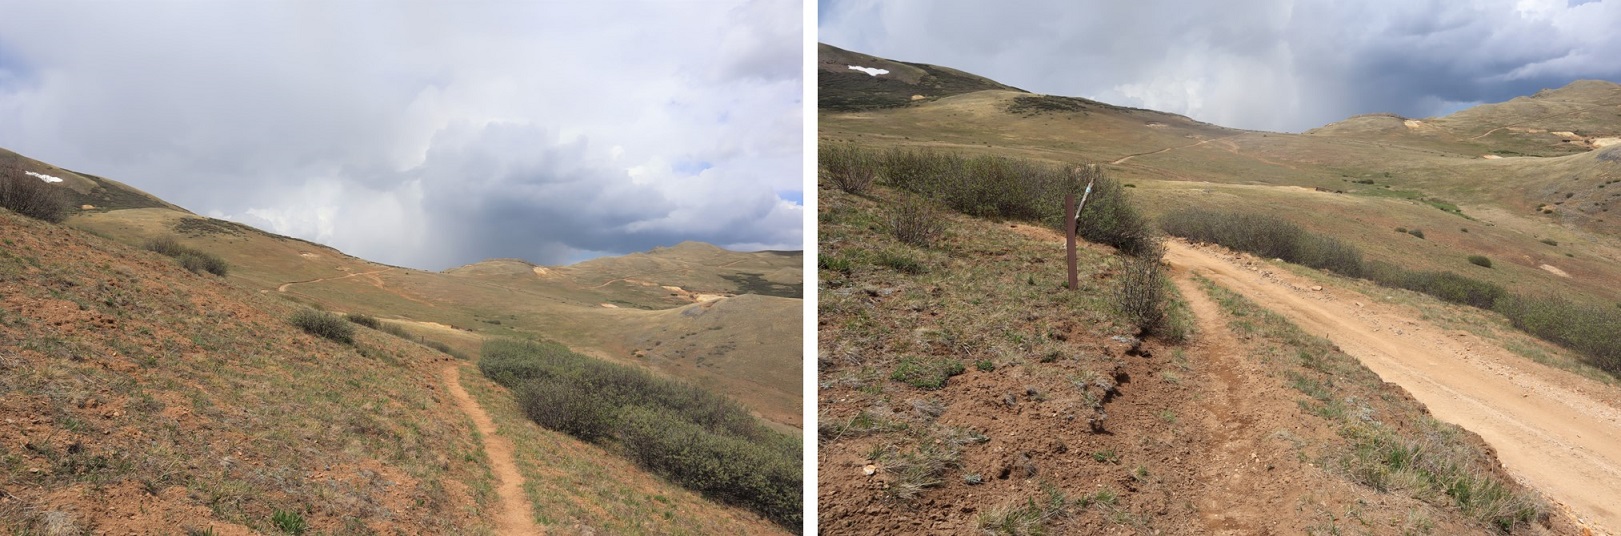
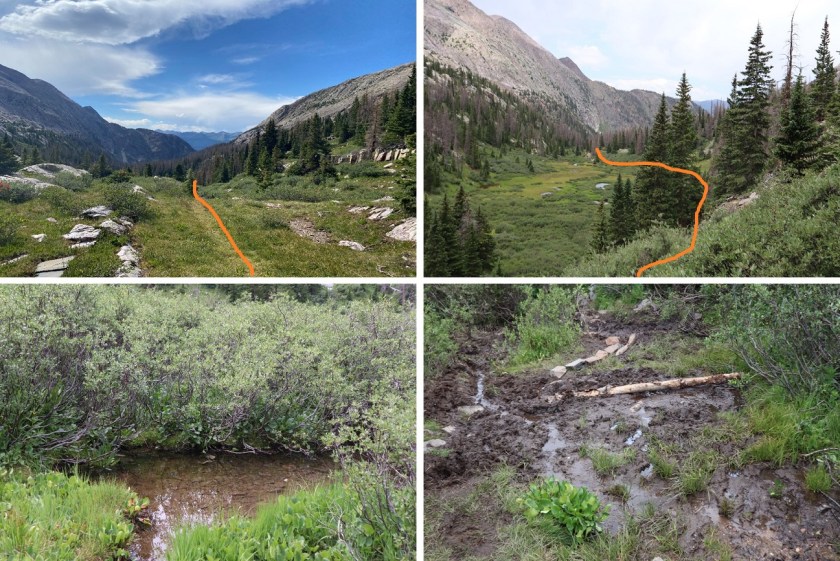
After hiking Arrow Peak I decided to get a look in the daylight at the approach to the Trinities.  I continued southeast along the same trail I’d hiked in on until I came to the area where I was supposed to begin the ascent up to the Trinities

2

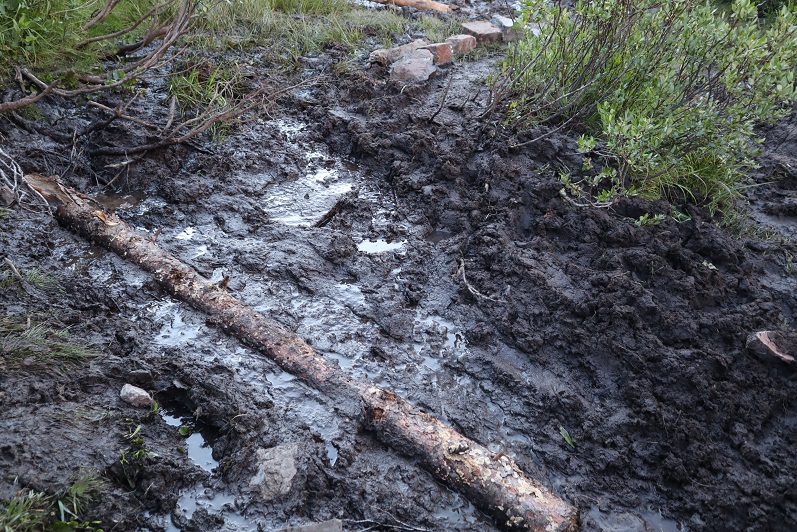
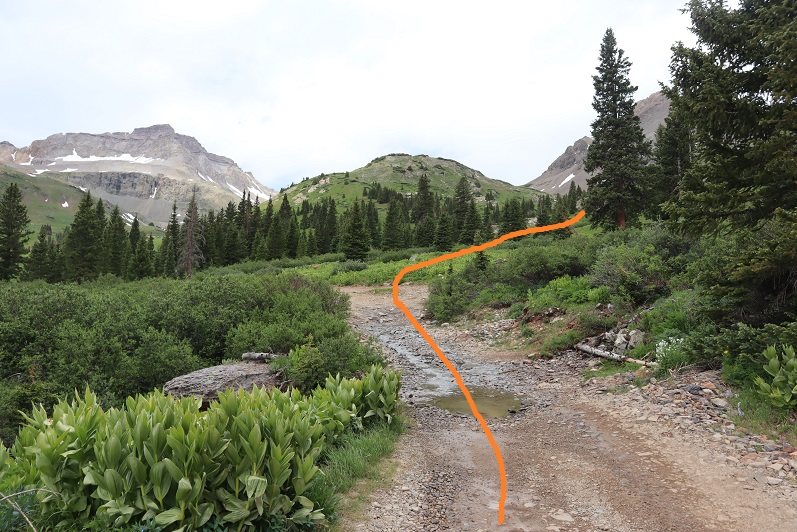
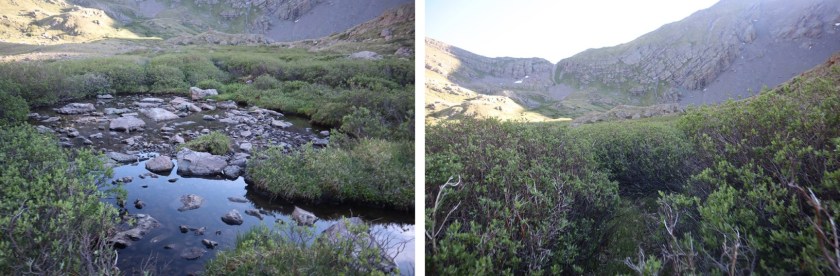
However, when I got there I noticed there wasn’t a place to set up camp, and the area had a lot of water.  I couldn’t find a good place to cross the water without getting seriously wet.  I did not want to start a hike early in the morning wet and cold.

3

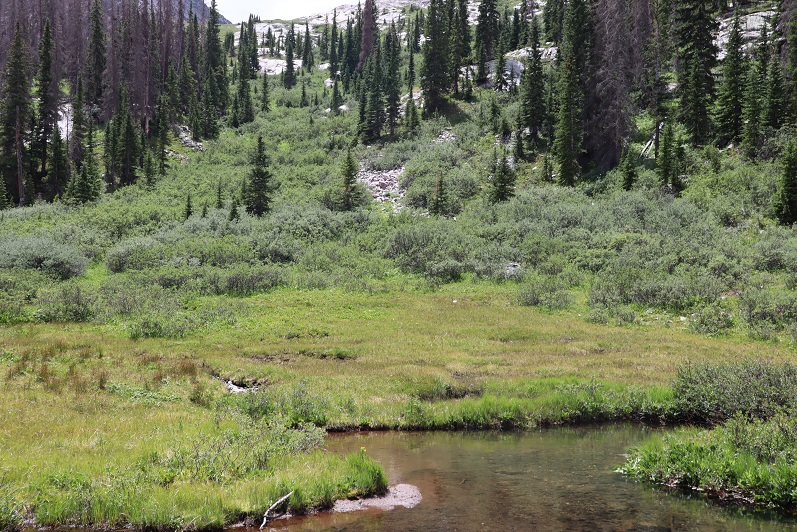
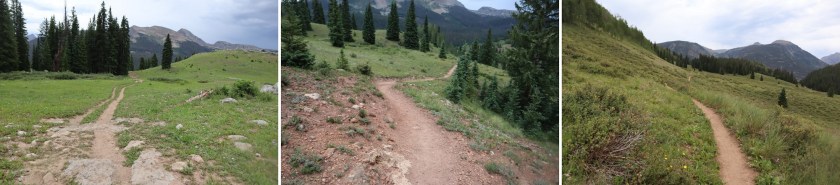
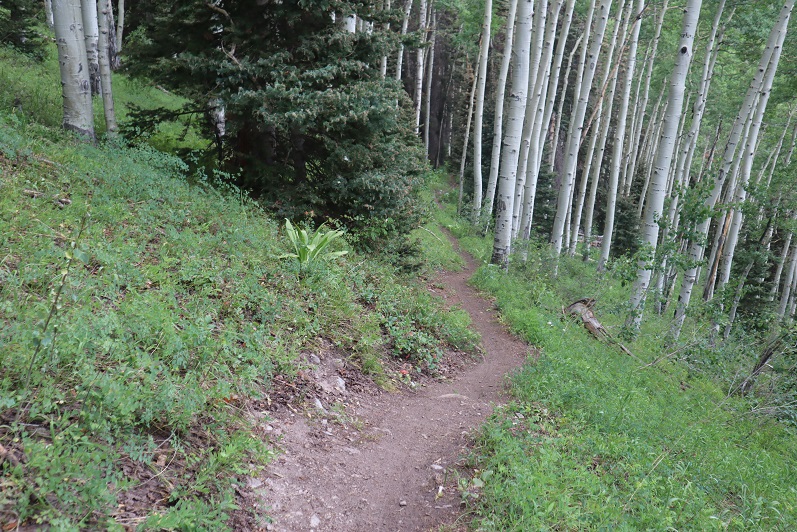
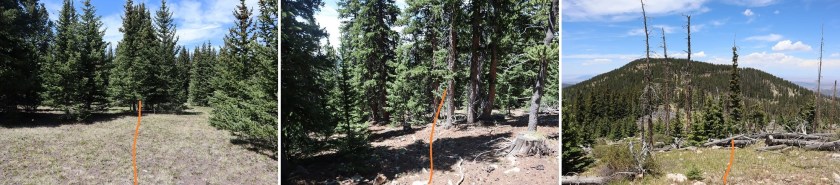
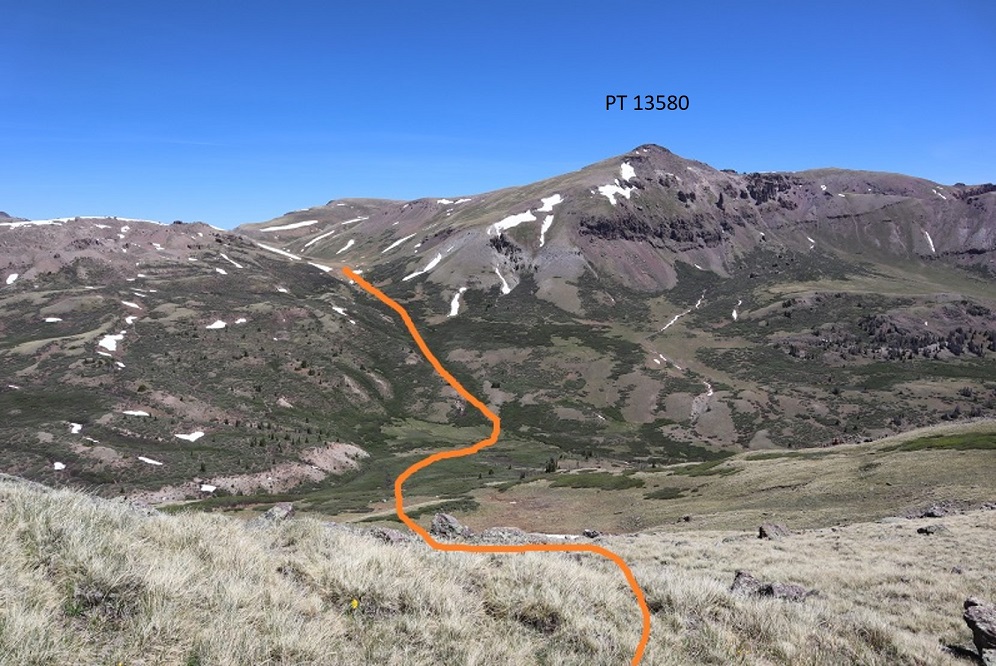
I thought about the route for a minute, went through some pictures I’d taken earlier in the day from Arrow Peak, and decided to continue along the trail for a bit to see if I could find a better spot to set up camp, and a better entry point. This hike is a loop, so I just continued heading southeast.  The trail became more and more faint as I hiked along

5

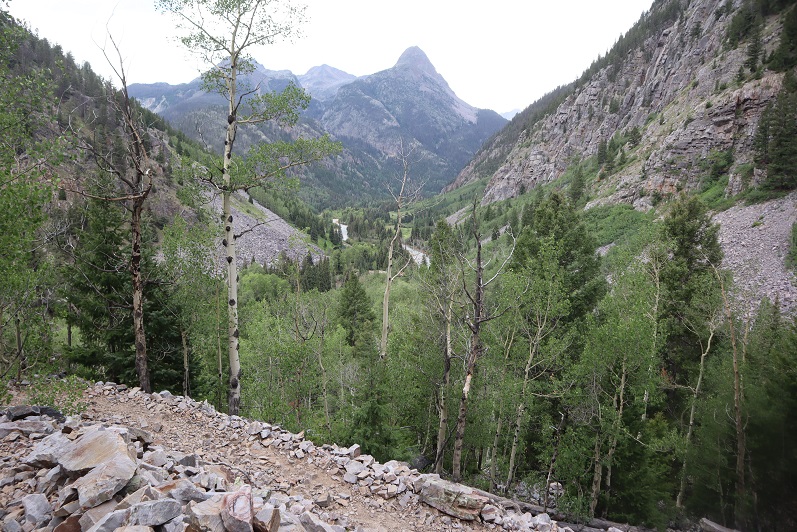
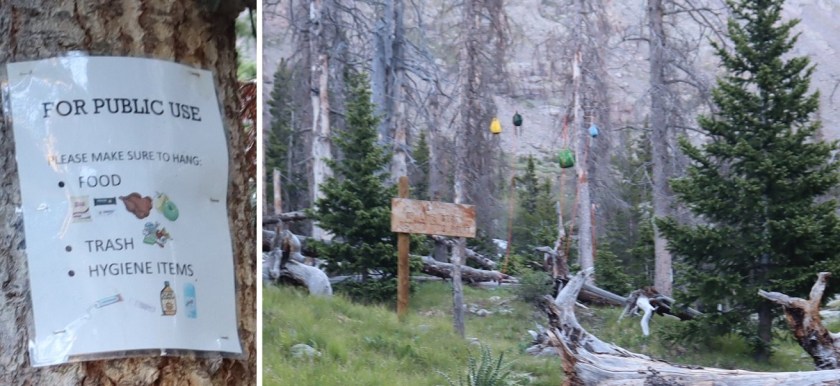
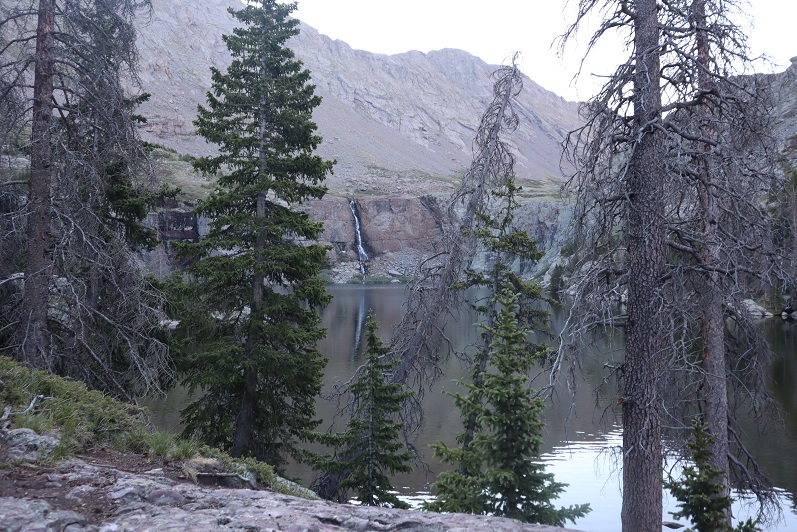
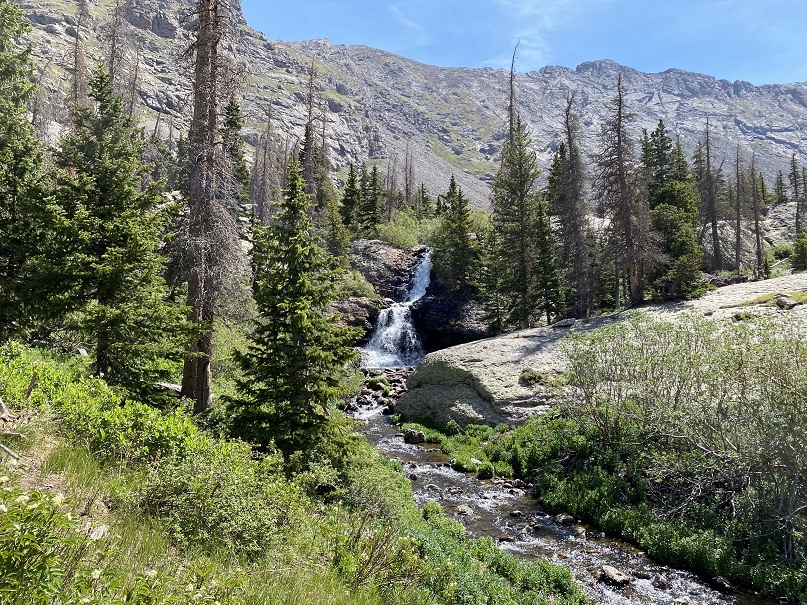
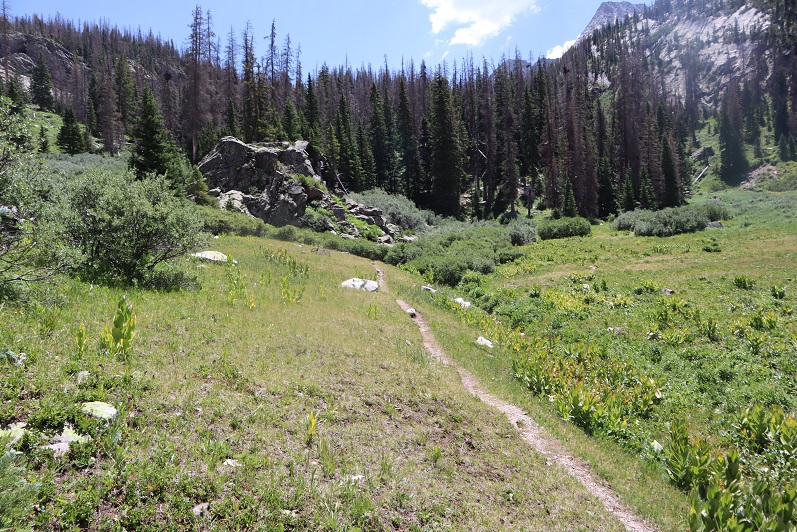
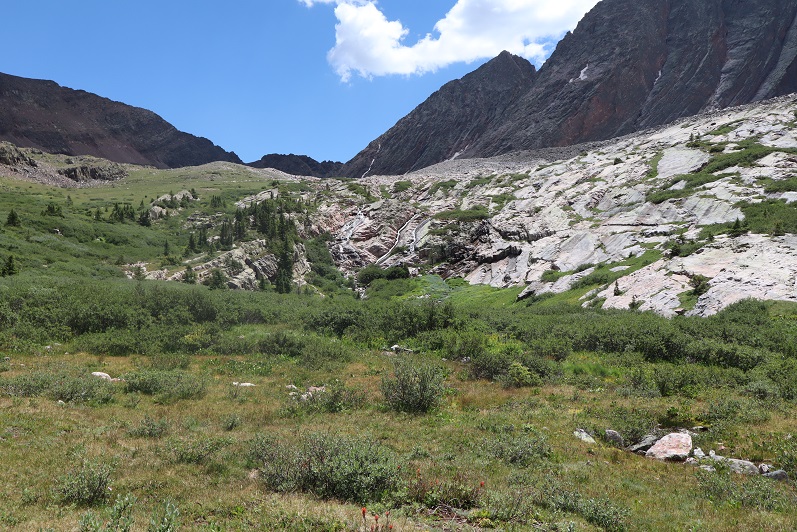
After hiking for a mile and a half I came to the area I intended to spend the night at 11,970’.  There were waterfalls here, a creek, willows, and a few trees.

6

I set up a bivy under a tree, filtered some water, ate an early dinner, and jotted notes down in my journal.

7

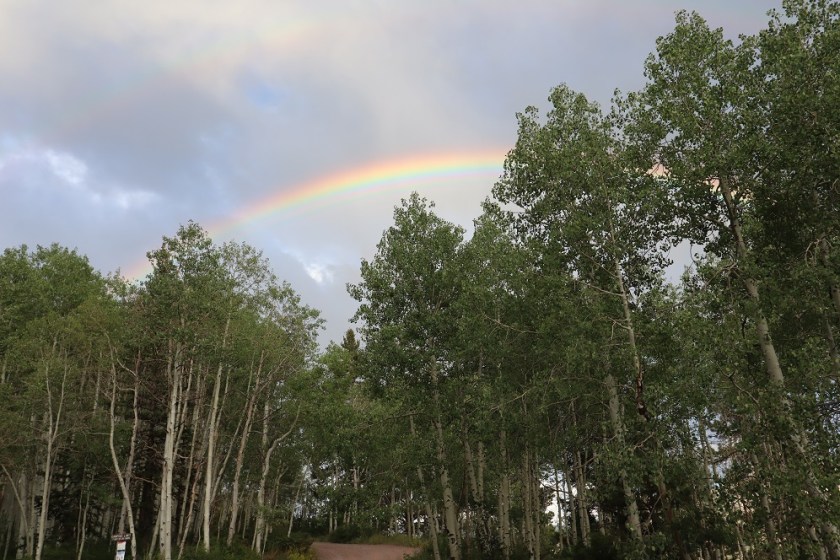
There was a 20% chance of rain today, and wouldn’t you know it?  It started to rain.  Also, the clouds looked like they were going to attack me.

8

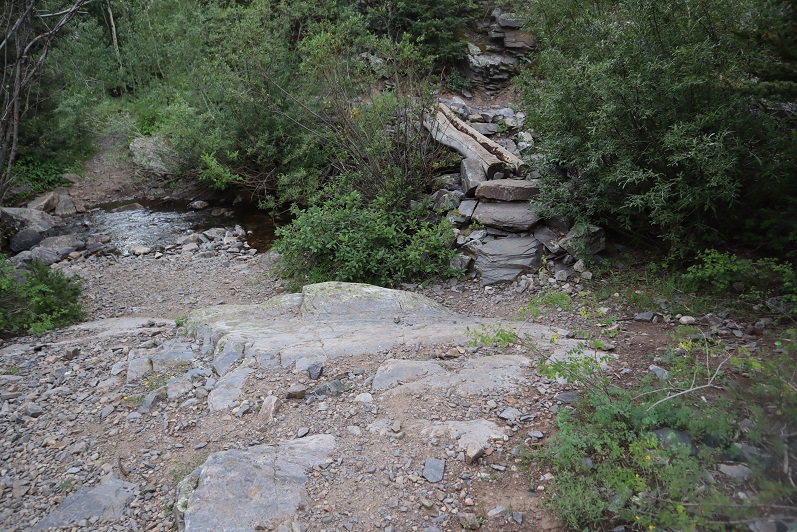
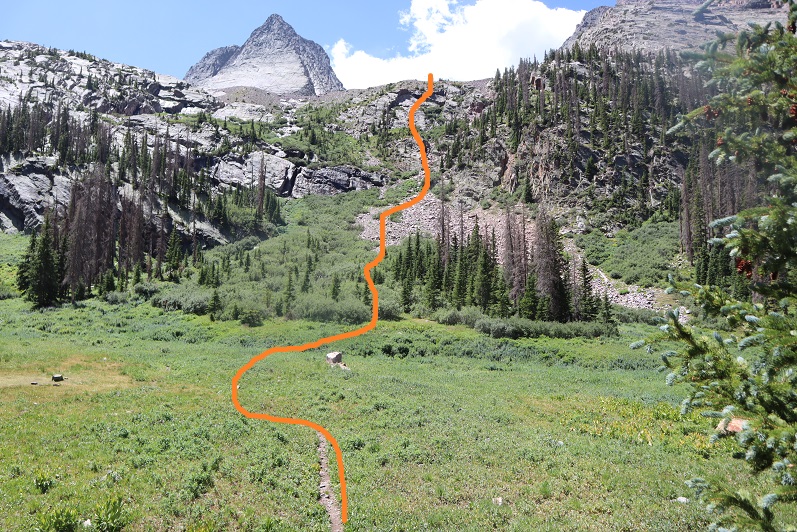
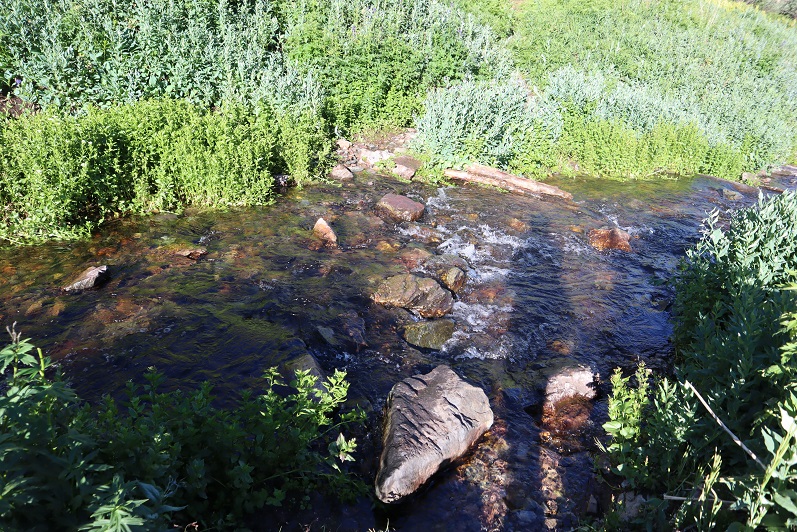
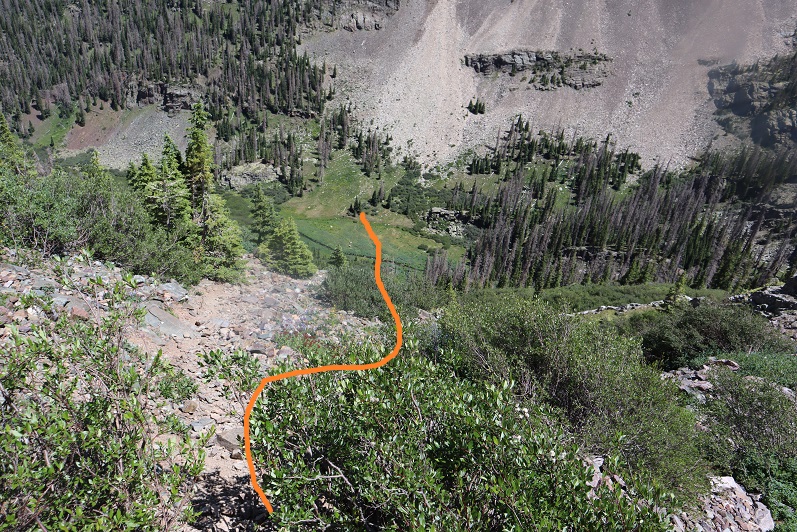
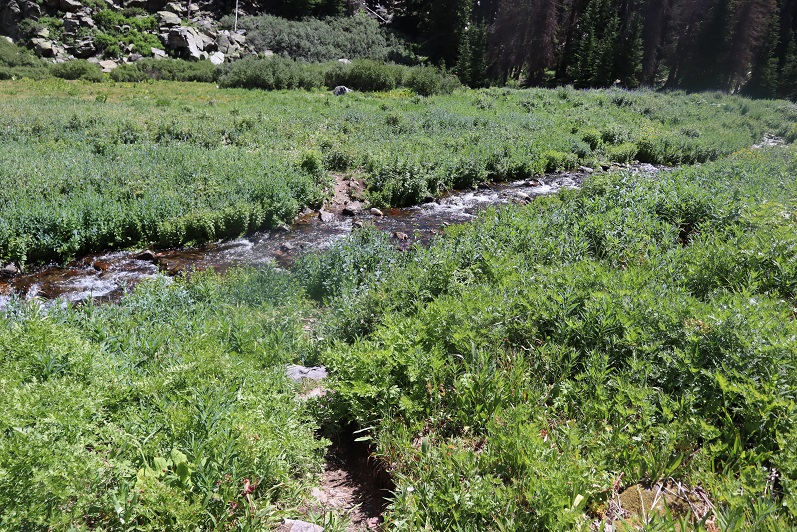
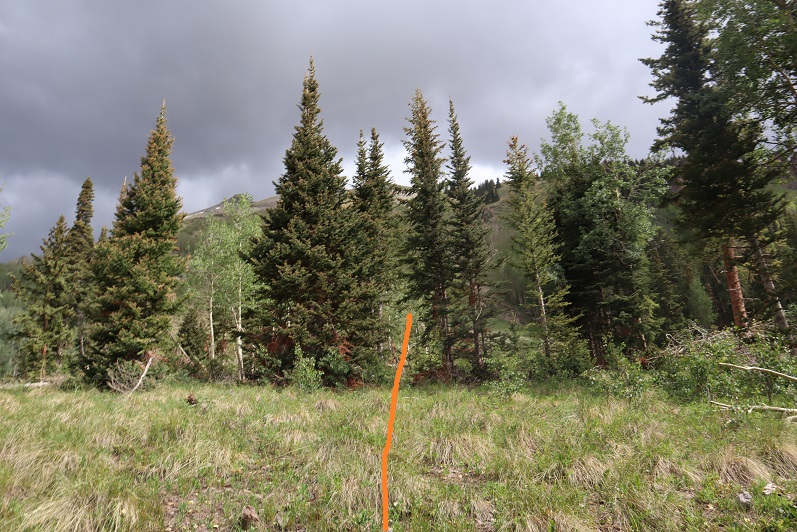
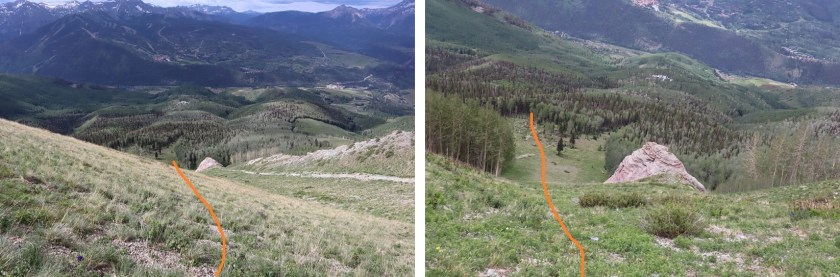
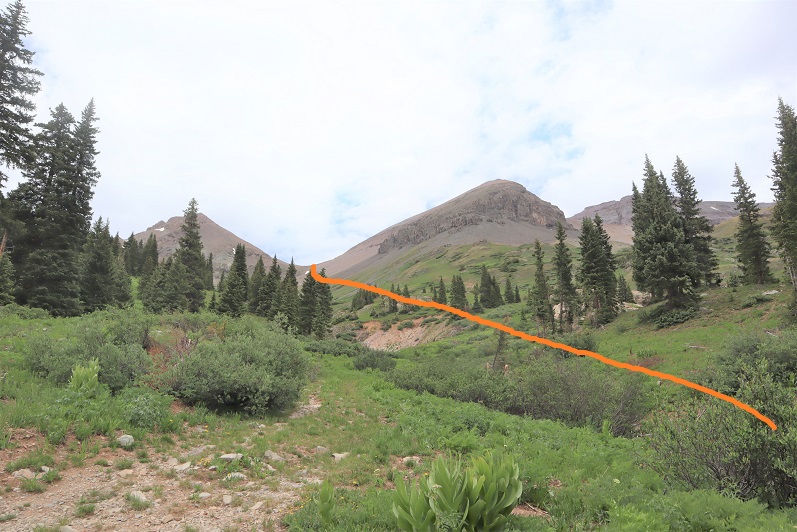
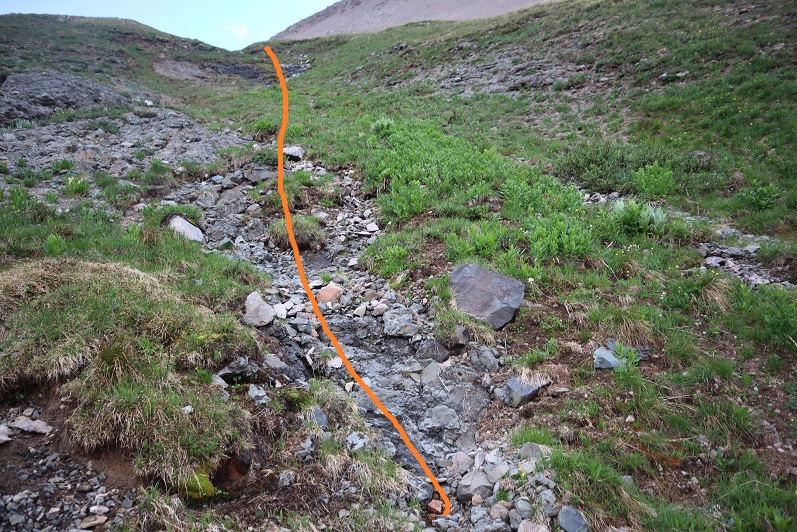
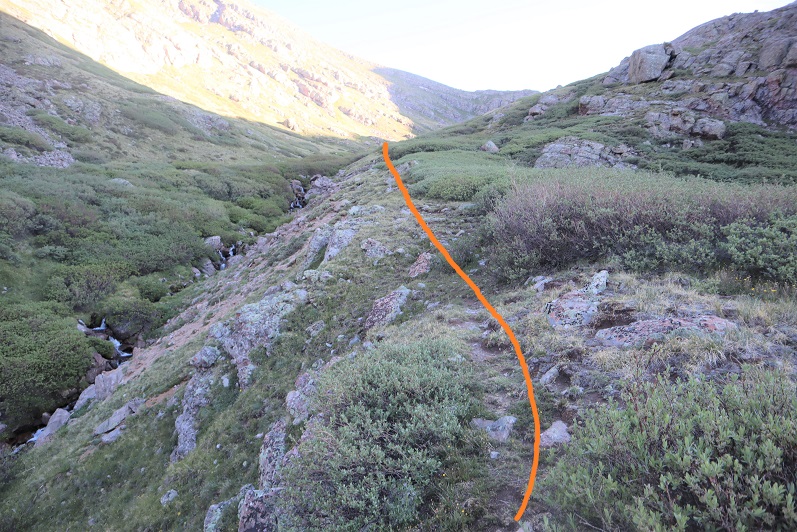
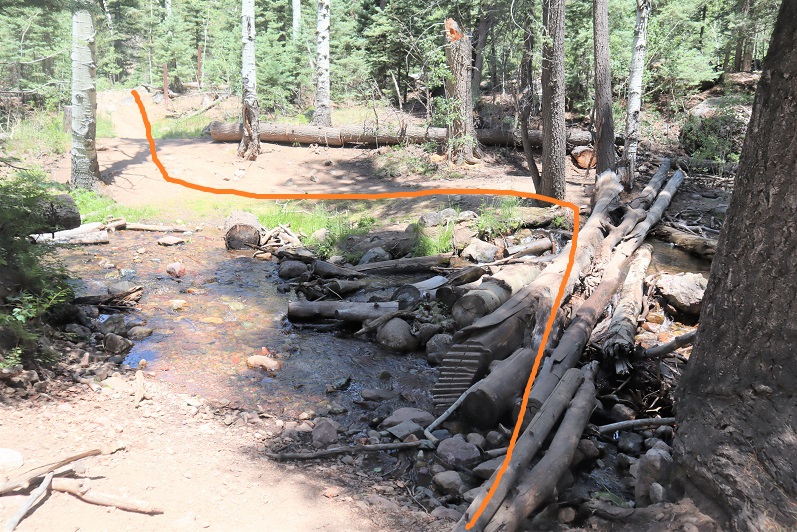
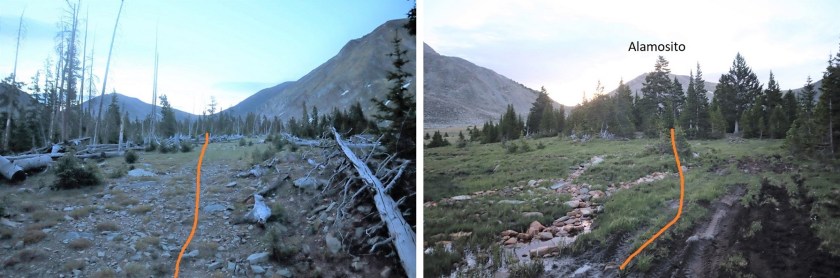
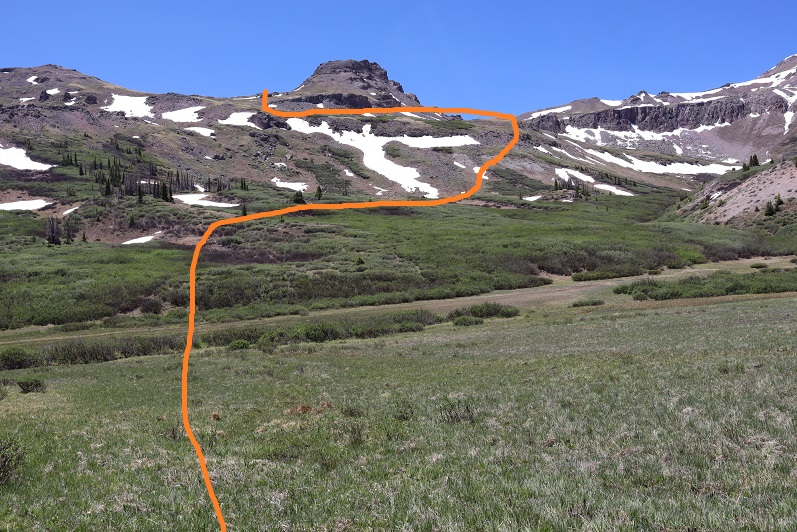
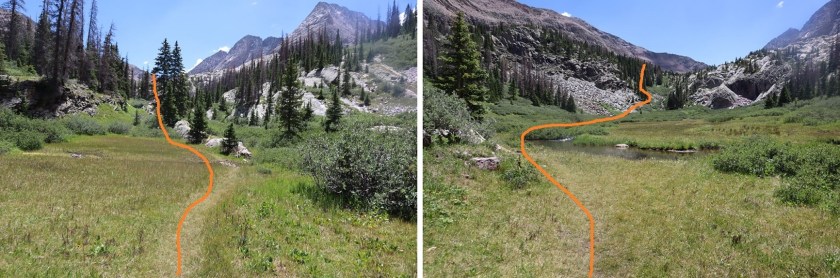
Luckily the rain stopped and I decided to head over to the creek again.  This creek looked much easier to cross then the marshy area, but in the interest of not needing to change out of my hiking boots and into my sandals tomorrow morning (thus eliminating unnecessary gear) I decided to build a rock bridge over the creek.  I put on my water sandals and got to work.  It was my intention to hike up this side of the mountain and connect with the proper trail once in the basin.  I wasn’t 100% sure the route ‘went’ but it seemed like a better option than ascending from below.  I figured it this didn’t work I’d turn around and start with East Trinity instead, and get wet on my way out.

9

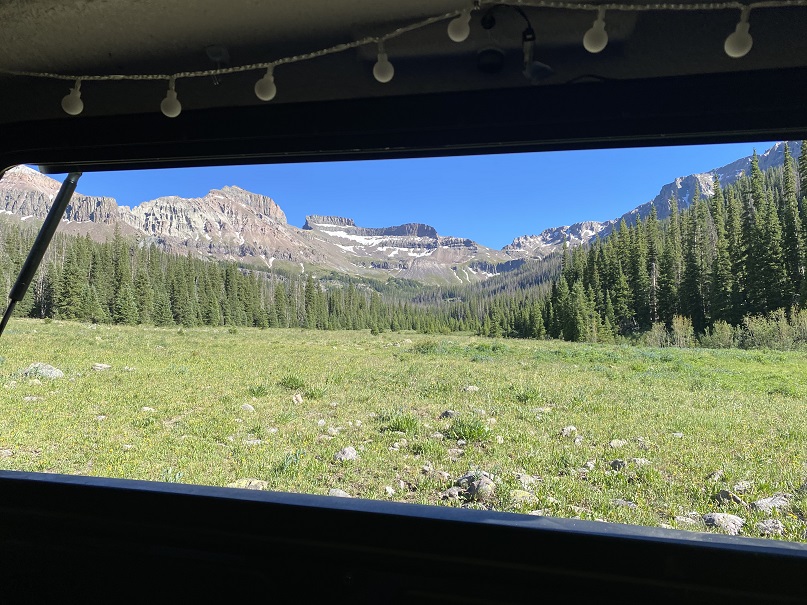
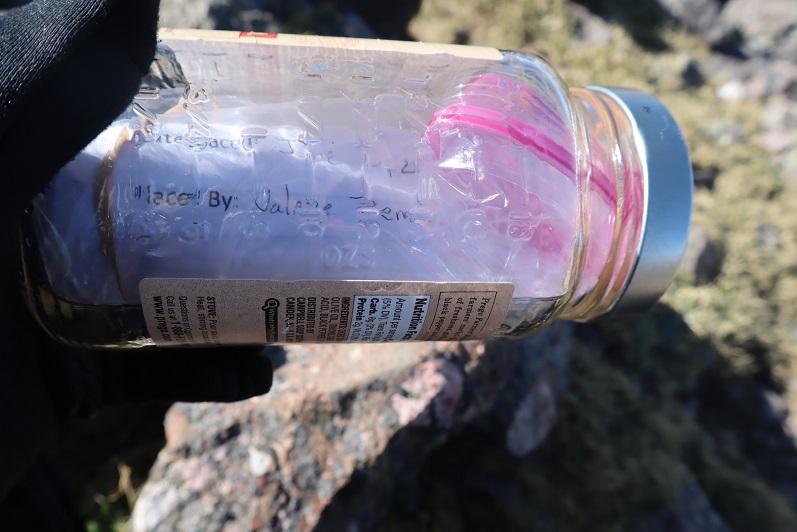
When I was done making the rock bridge it was still too early to go to sleep.  There wasn’t much to do so I relaxed, enjoyed the view, and broke out the whiskey.  Before the day was out I had about 16oz of whiskey (I knew because I’d placed it in a marked sports bottle.  Also, I have a high tolerance for alcohol and don’t get hangovers so this isn’t out of character for me).  I saw a group of hikers come over the pass and head towards me.  They were doing Vestal tomorrow and were looking for a place to camp for the night.  I told they they’d have better luck near the approach and they were off.  Not long after that I went to bed.  It was still early, but it had been a long day. Whiskey puts me to sleep.

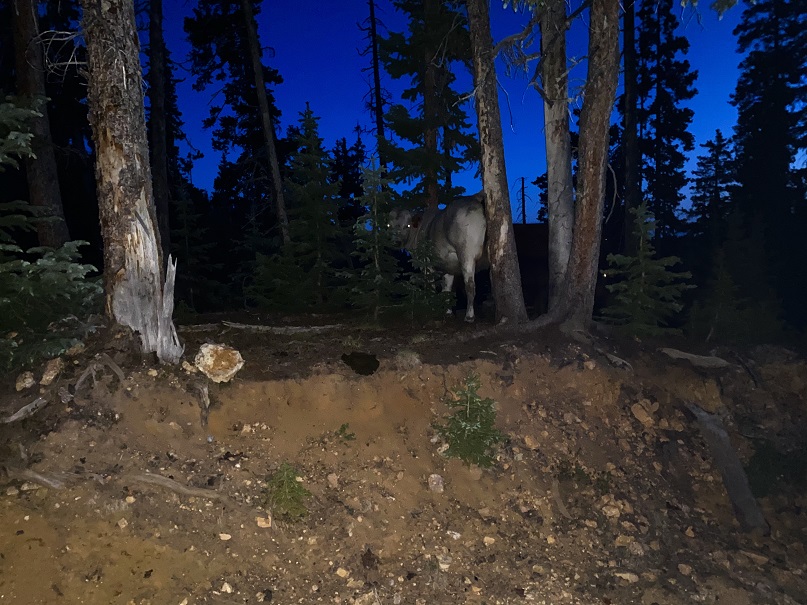
I woke up well before my alarm.  It was still dark out but there was a full moon and I could see the mountains clearly.  I saw shooting stars and thought to myself how lucky I was to be here right now.  I was actually warm (that’s rare for me when I backpack) and I didn’t want to get up.  I also didn’t need to for a while.  I watched clouds come in and started to worry:  there was a 40% chance of rain after noon today and I didn’t want to get stuck in the rain while on the traverse.  I’d heard from other hikers yesterday it took about 8 hours to complete.  I did some math in my head and decided to get up and get going.  The last time the weather had said 40% chance of rain after noon I got caught in a thunderstorm at 9:30am.

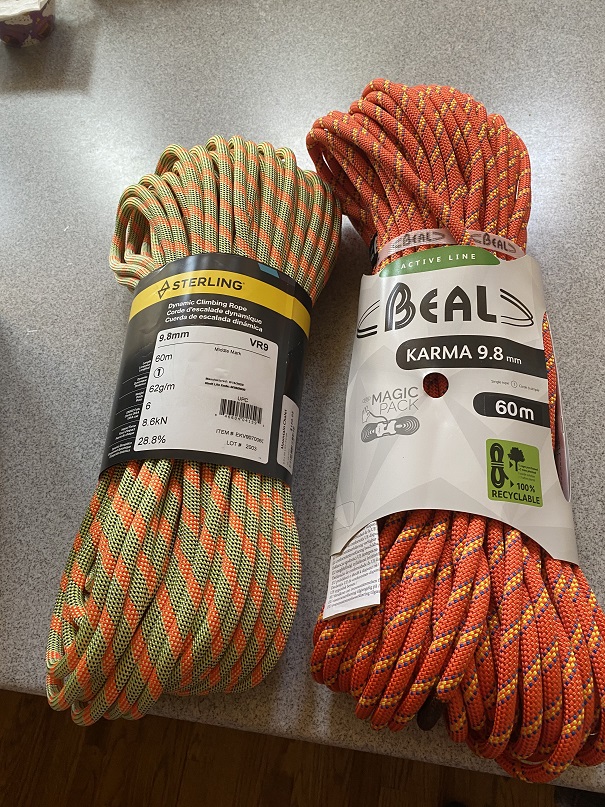
I’d prepped most of my gear last night, so this morning all I had to do was roll up my sleeping bag and put away my bivy sack and ground cover.  I filtered some more water and I was off.  (side note:  I’ve had the same water filter since 1998, and wouldn’t you know it, they’ve improved since then?  This week I bought a gravity bag water filter, and it’s AMAZING!  I can fill my entire water bottle in 2 minutes, and since there’s a lot of water in the area I convinced myself to drink as much as possible this weekend. Normally I don’t drink while hiking, but this weekend I filled up my Nalgene 3 times!)

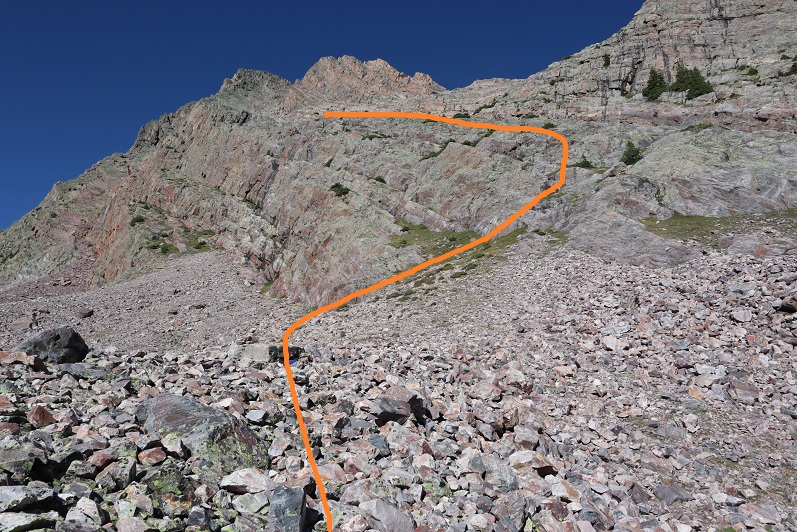
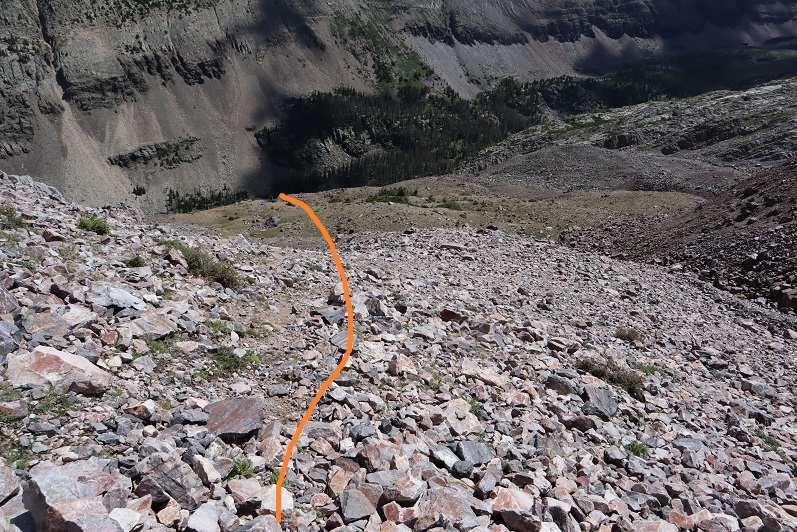
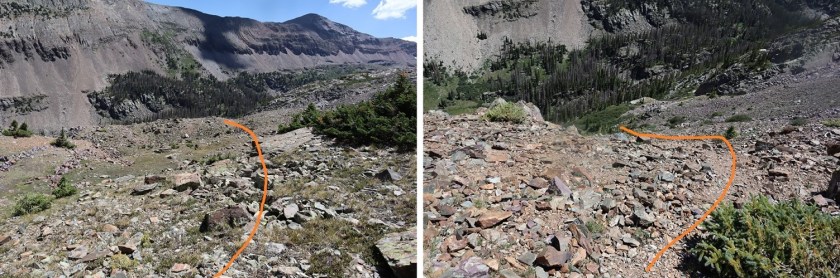
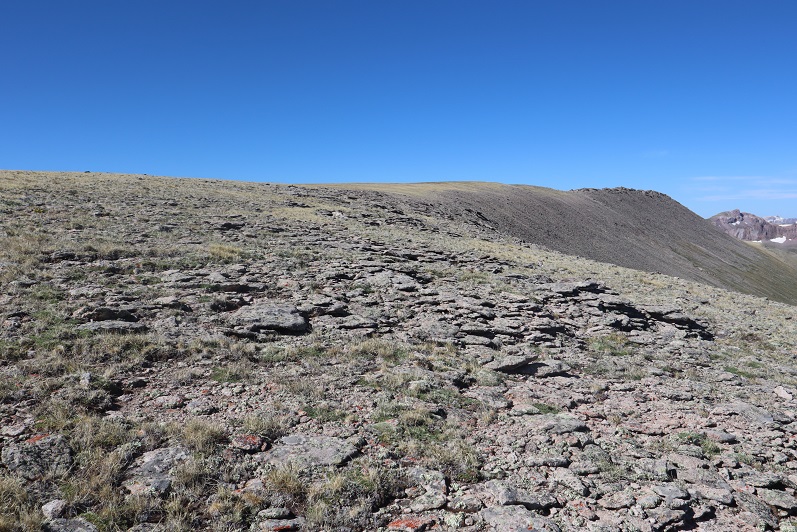
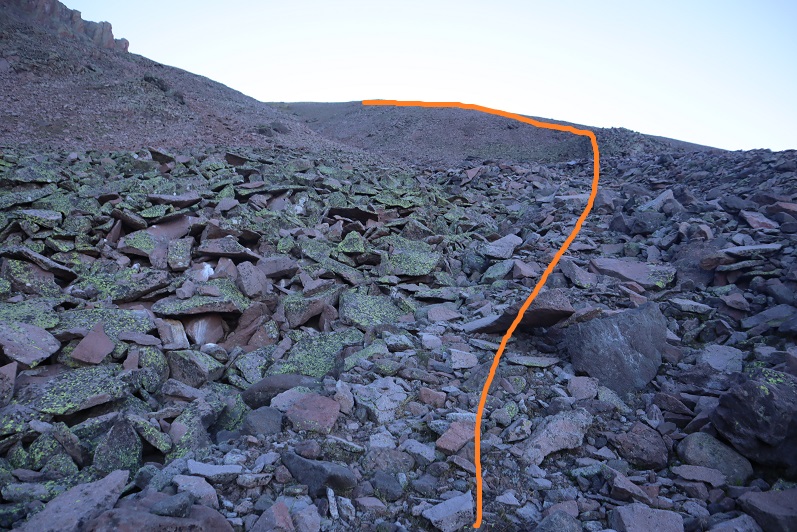
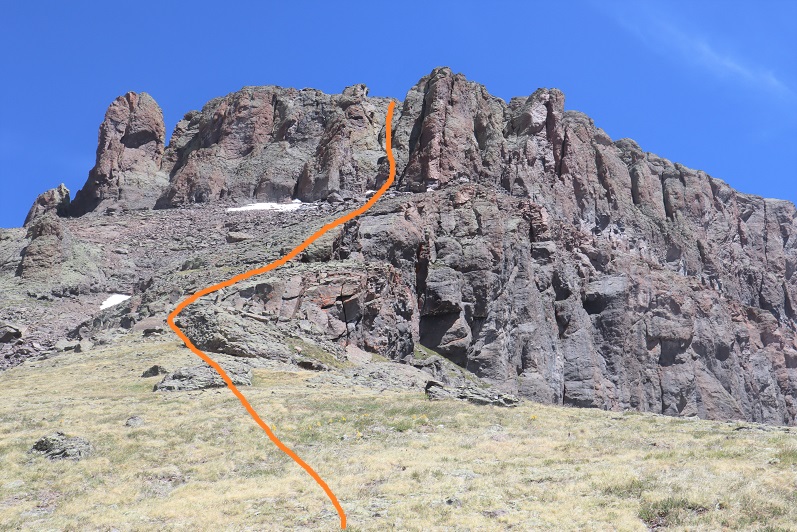
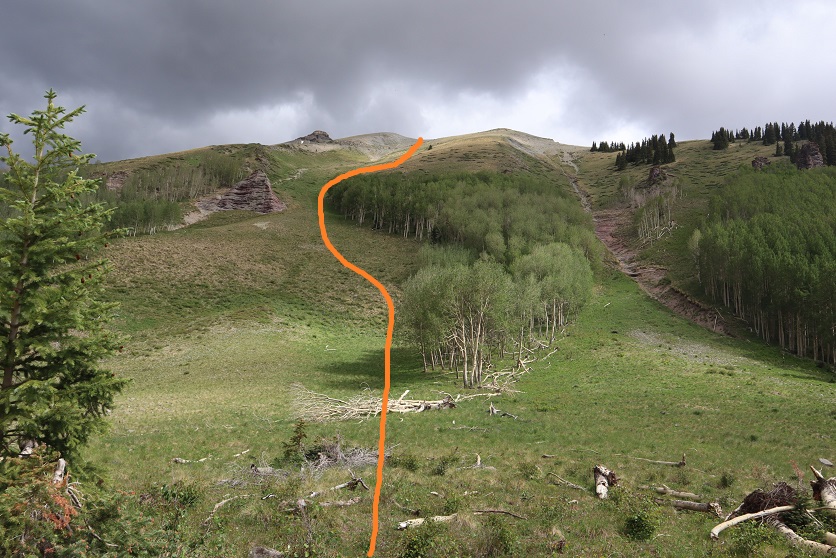
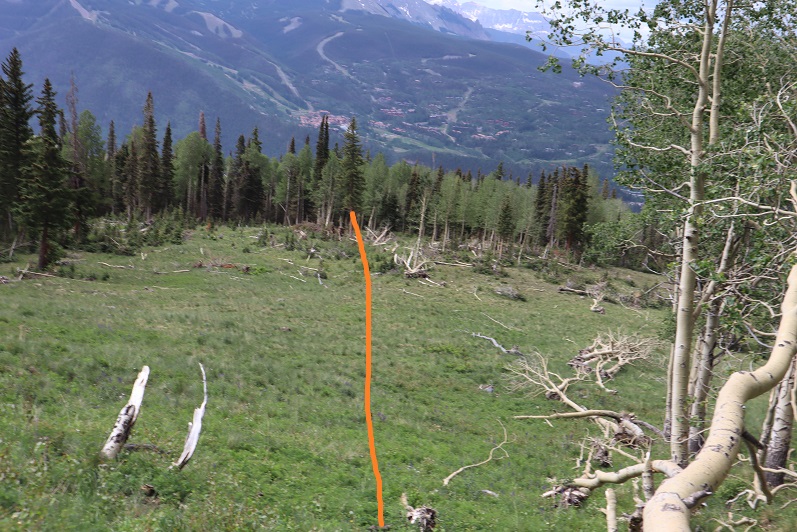
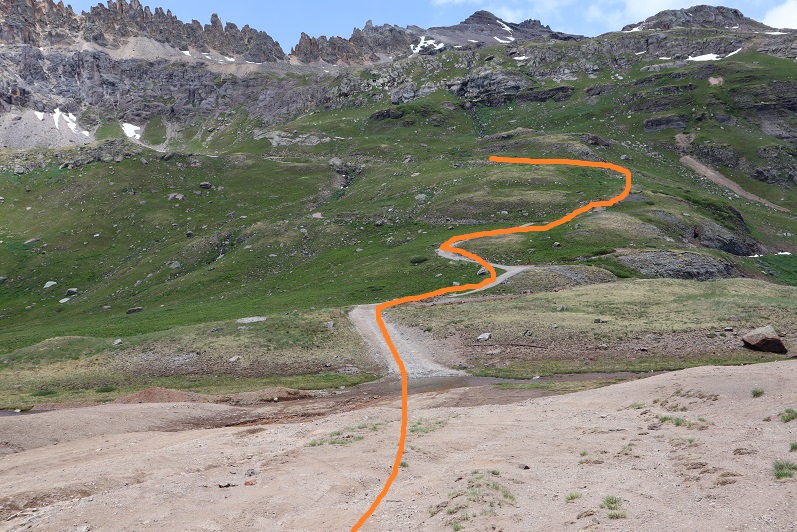
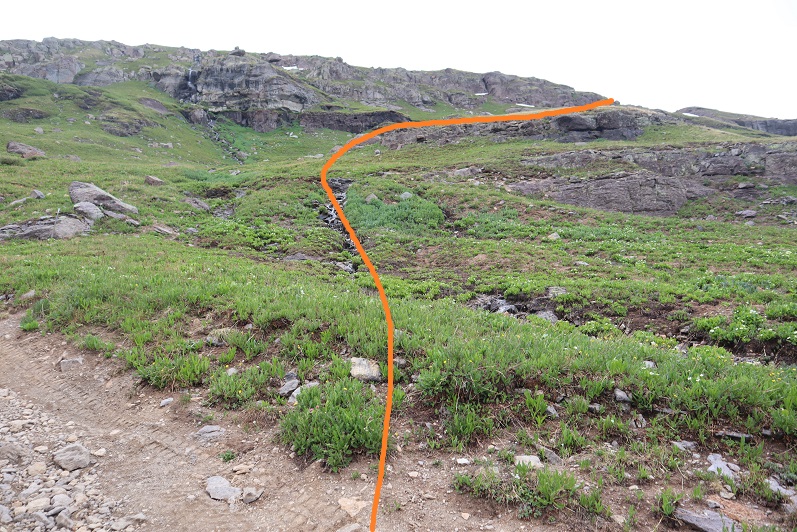
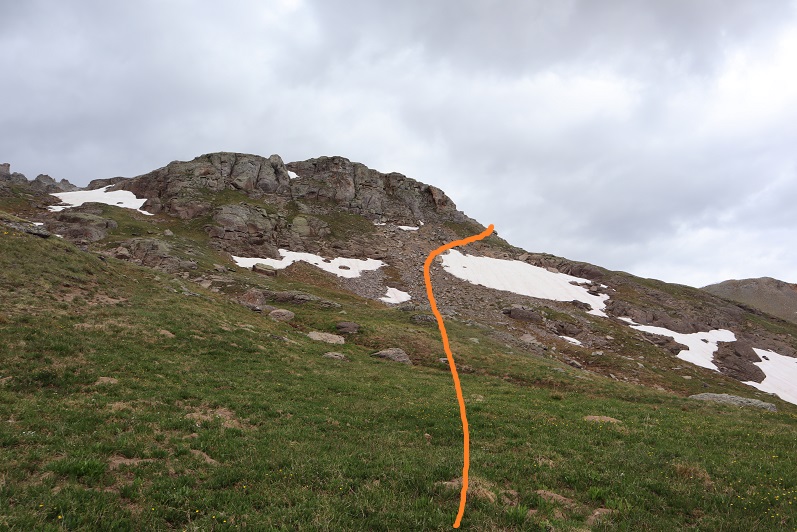
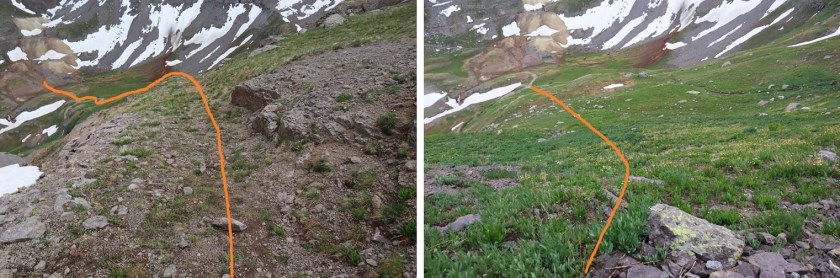
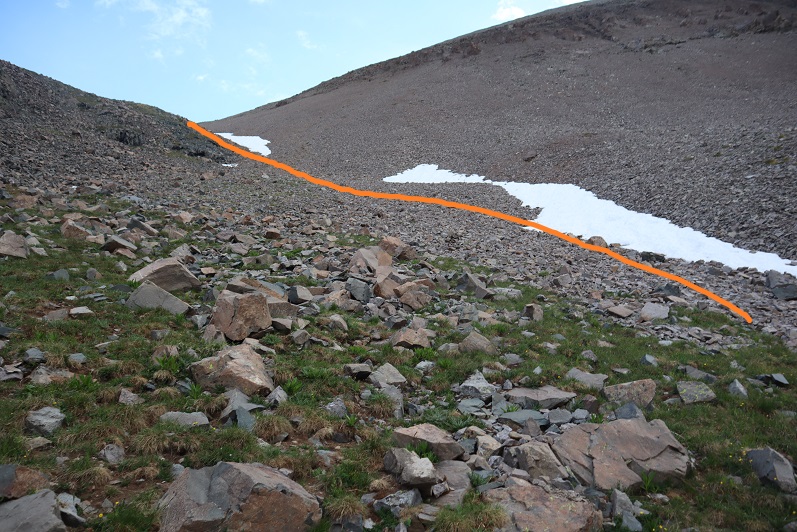
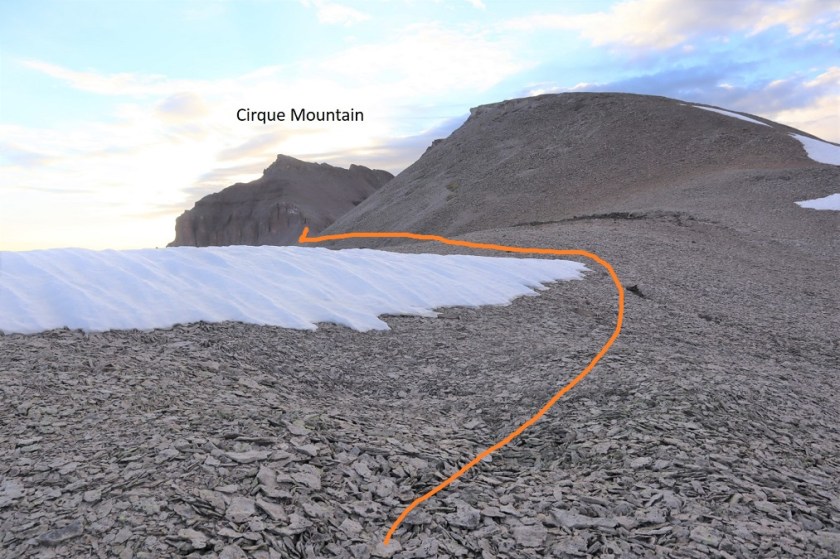
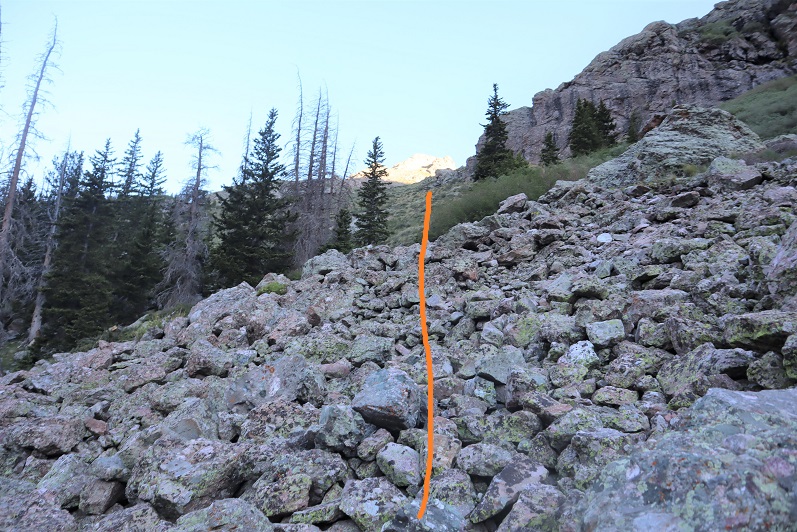
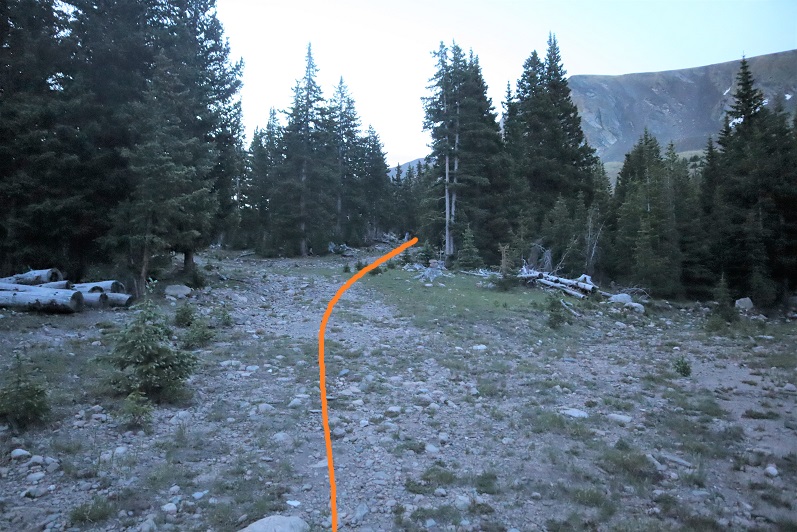
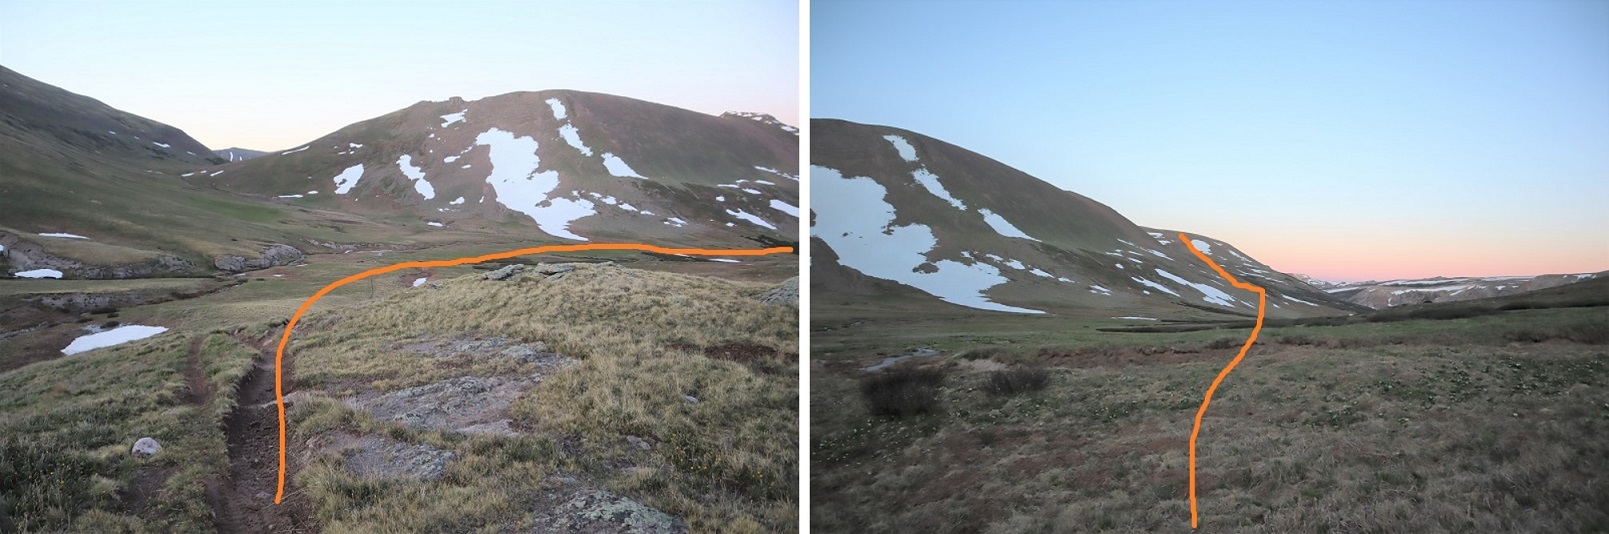
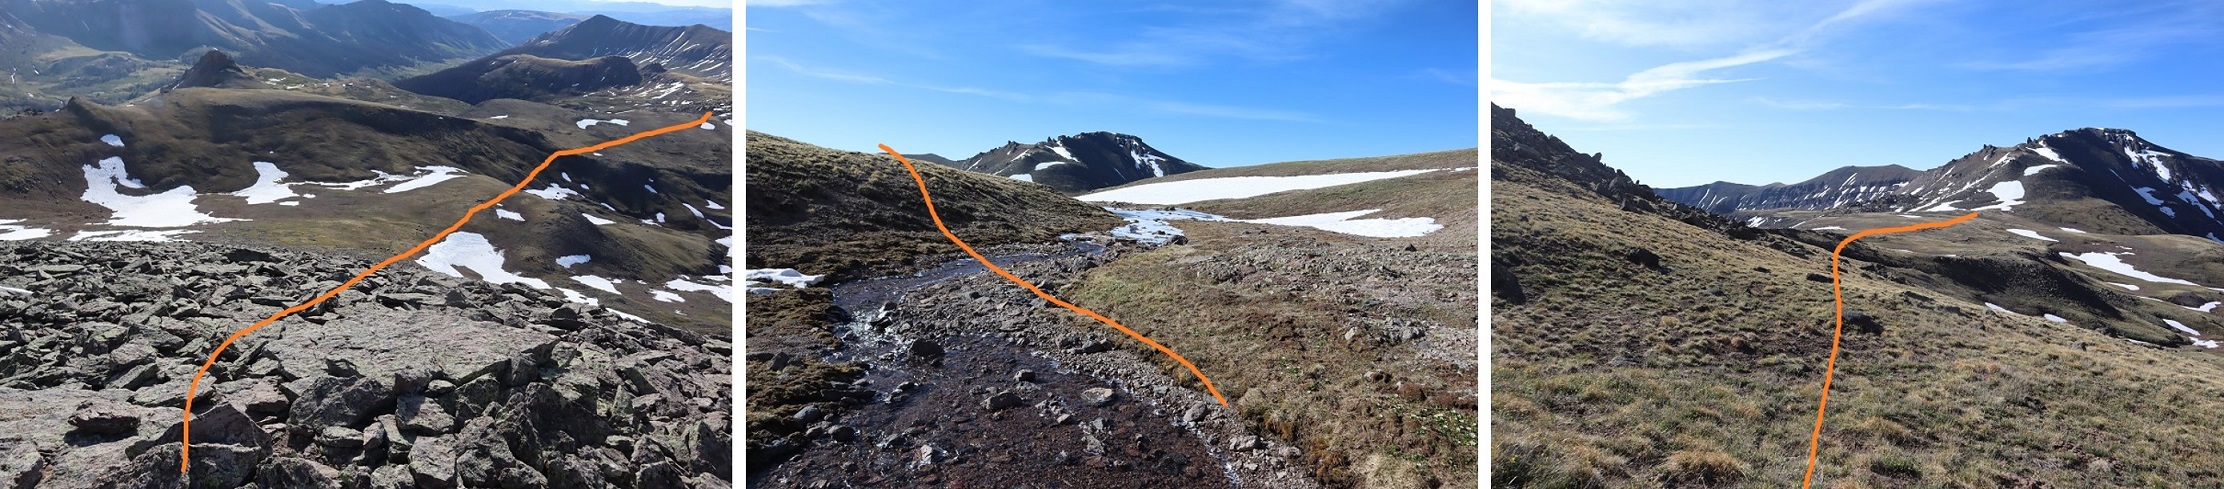
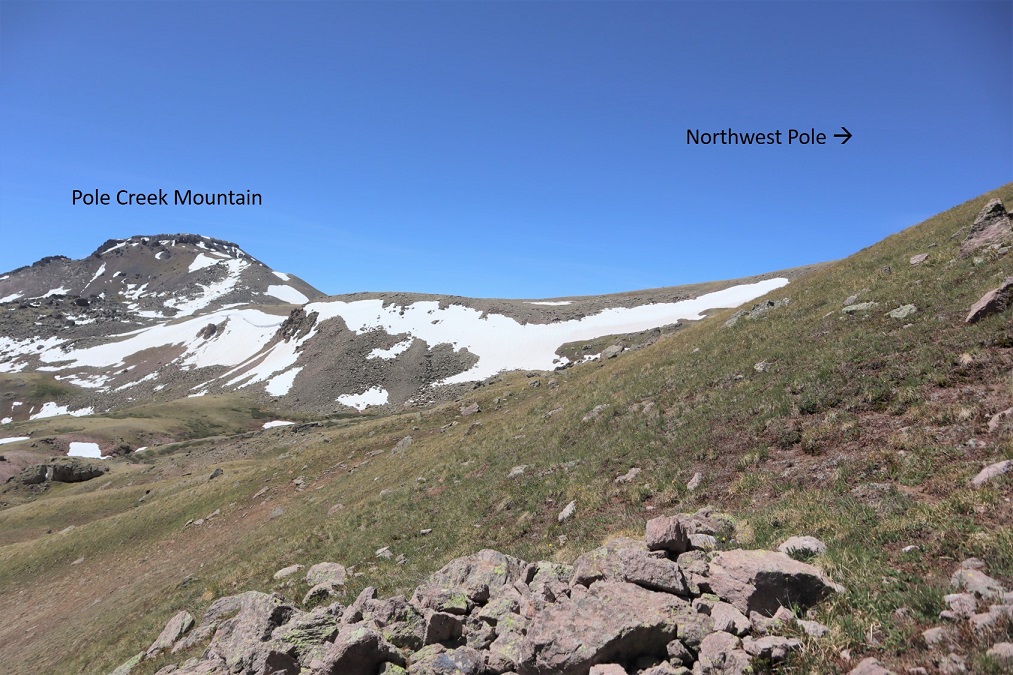
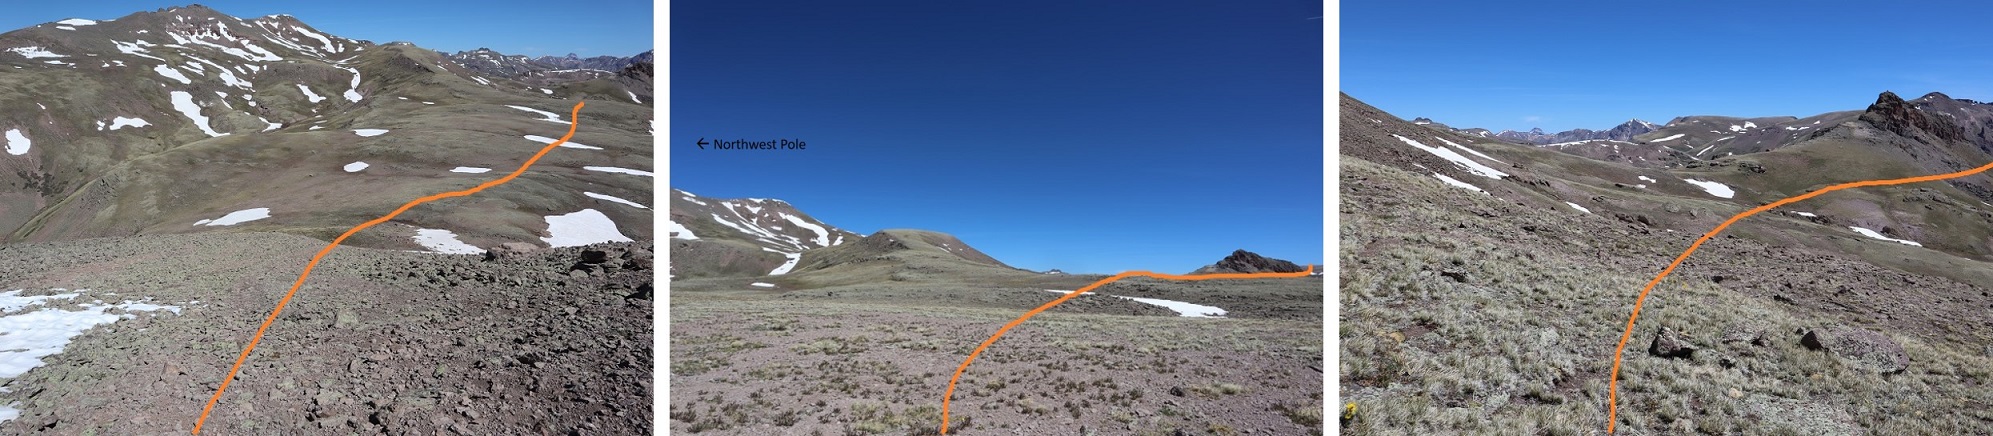
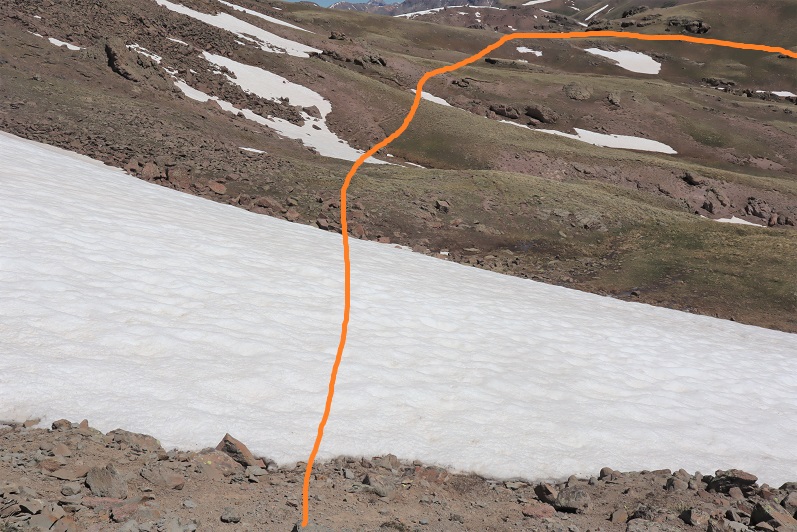
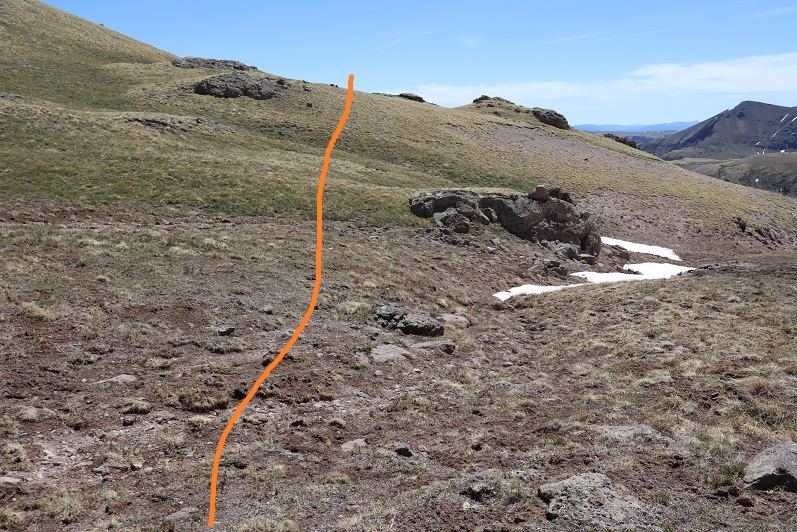
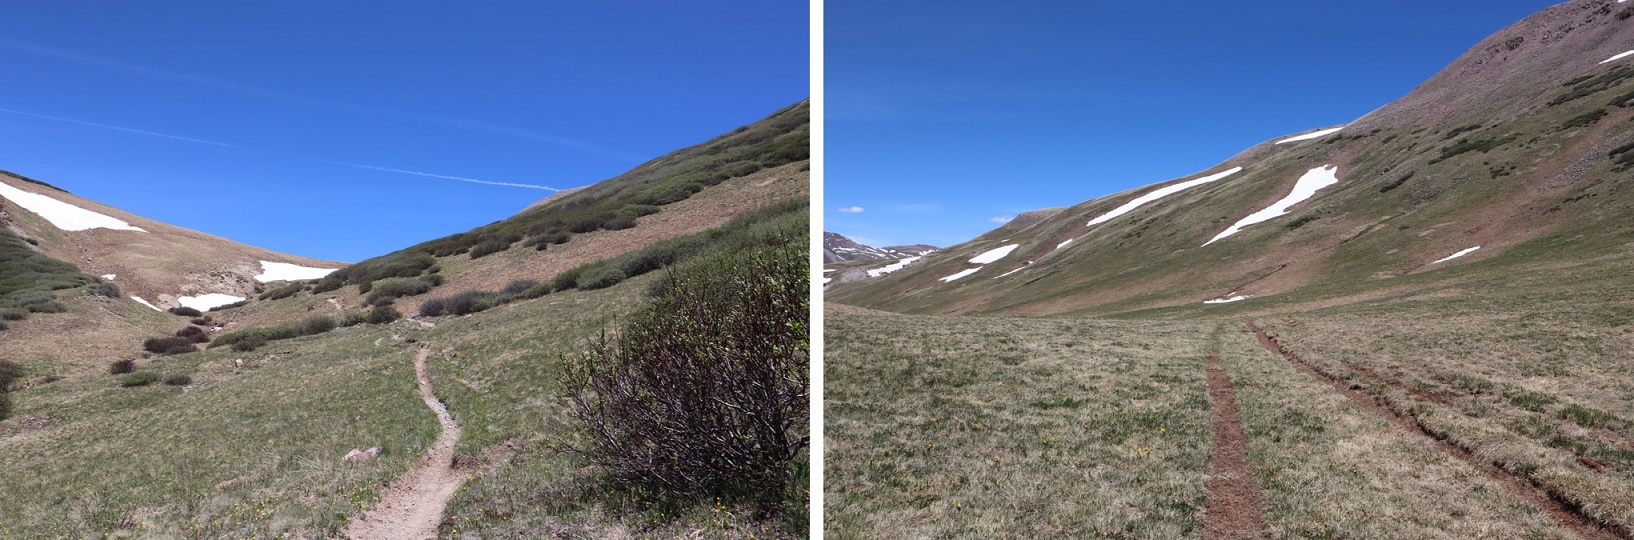
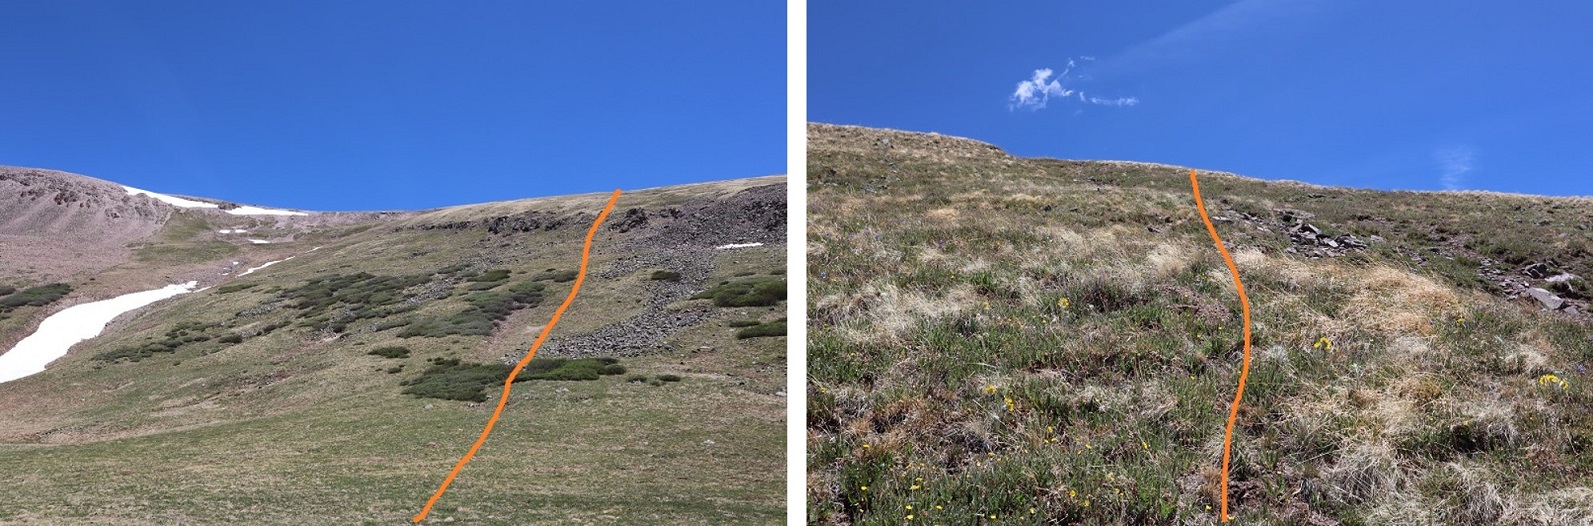
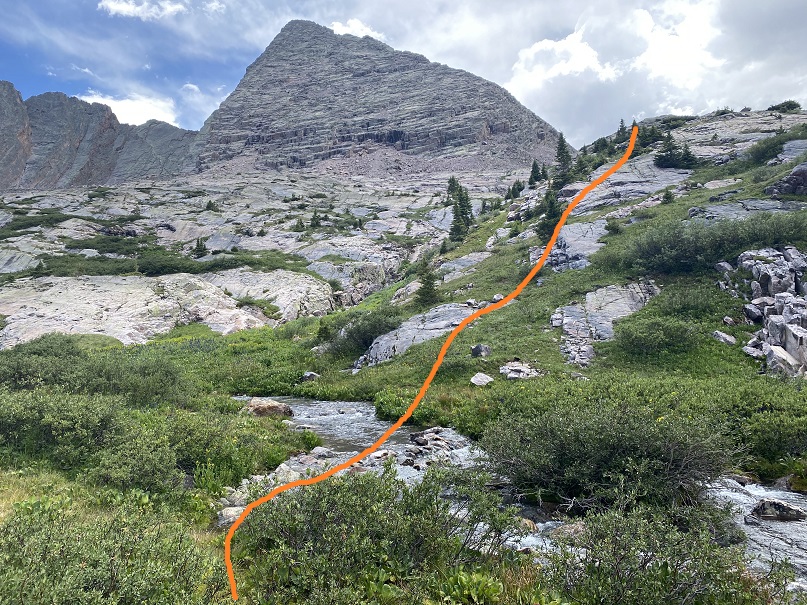
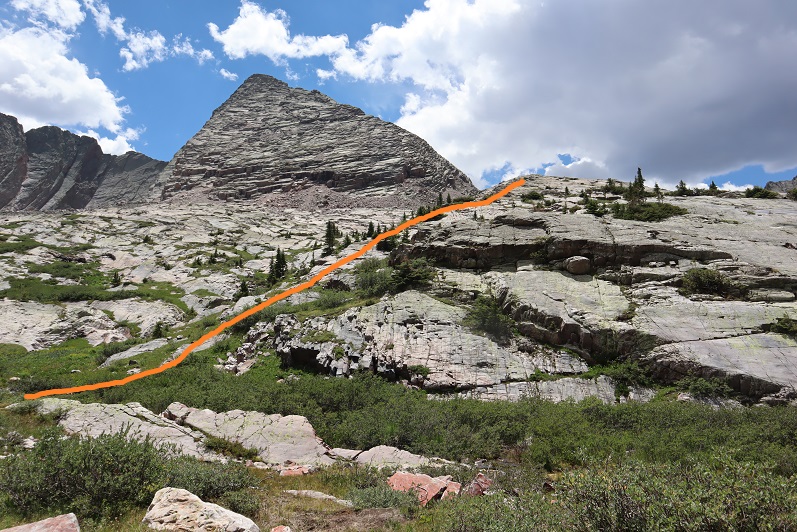
It was just beginning to get light out when I set off at 5am.  I hiked straight up the side of the mountain, and when I reached the top I was thrilled to see my idea had worked:  the route easily connected with the trail (there wasn’t a trail exactly, but the routes lined up and I was now going in the right direction).

10

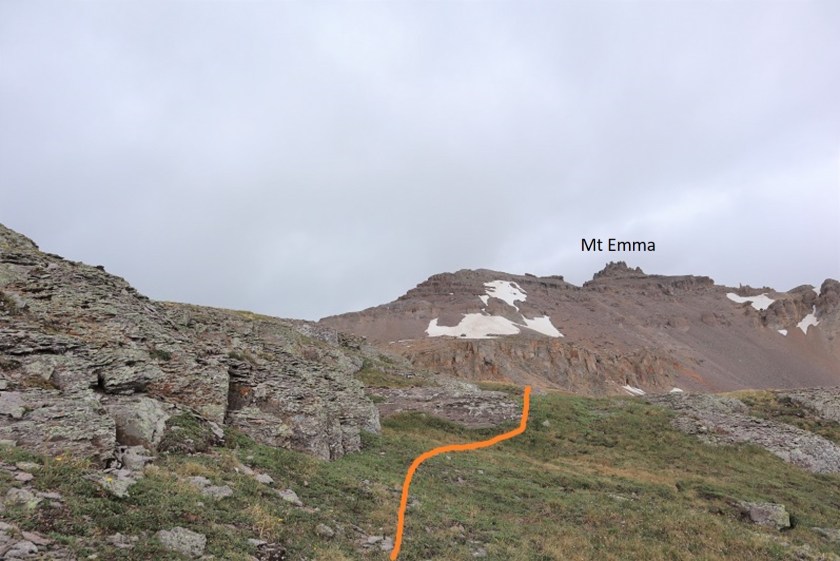
There were several headlamps already shining on Wham Ridge.  Looks like they got an even earlier start than I did.  Smart.  I was a little worried about the cloud cover. I could see rain in the distance and the clouds were forming fast.  I told myself I’d keep going until I felt uncomfortable.  I didn’t feel my real point of no return would come until I summited West Trinity and decided to either head back or continue on for the day.

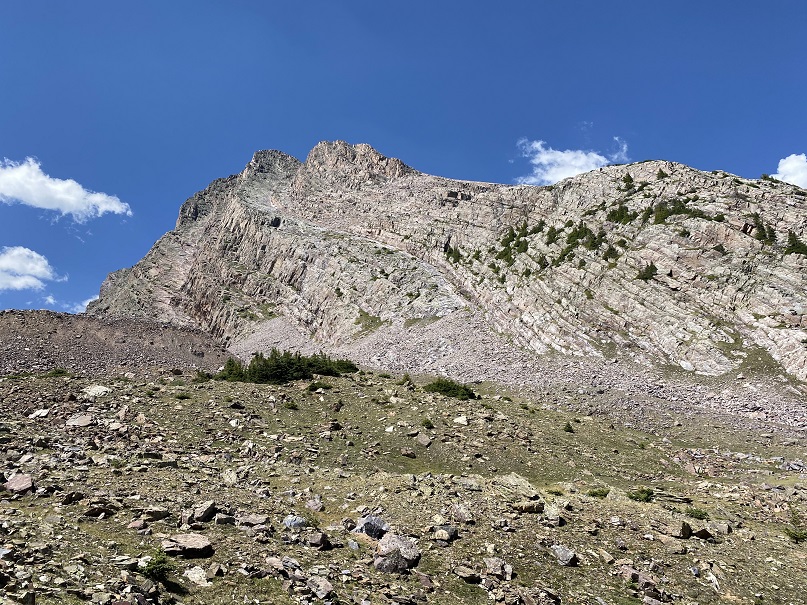
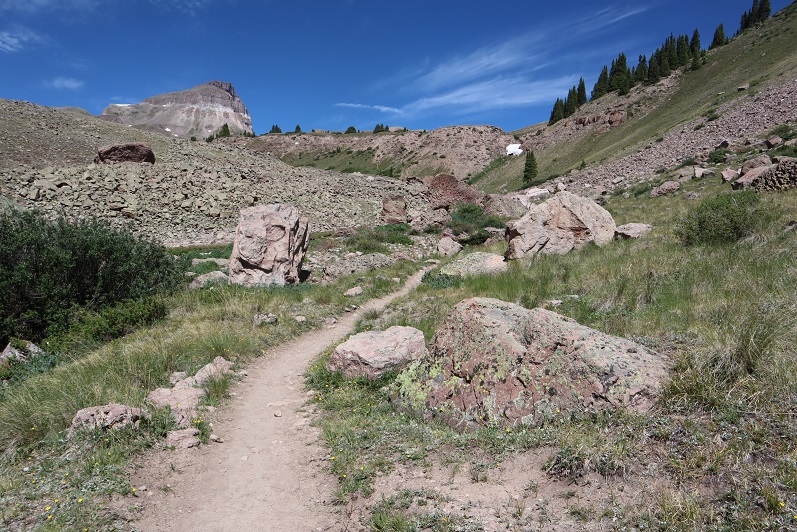
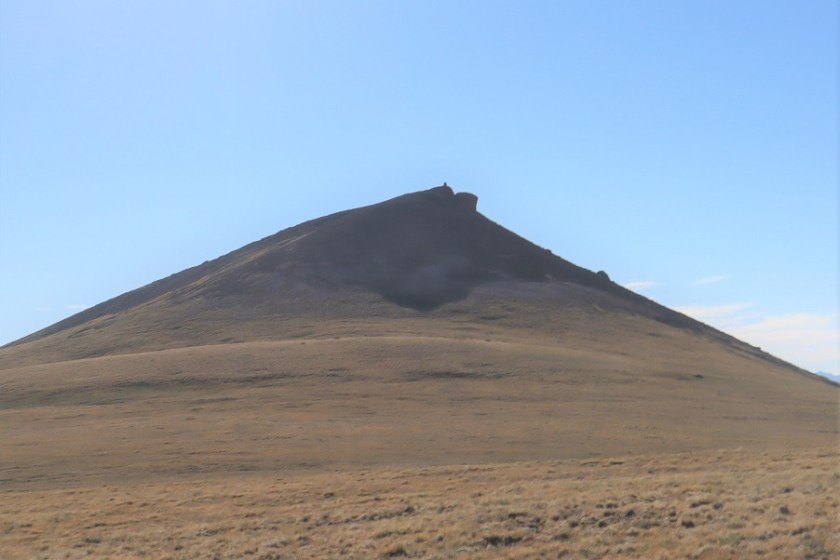
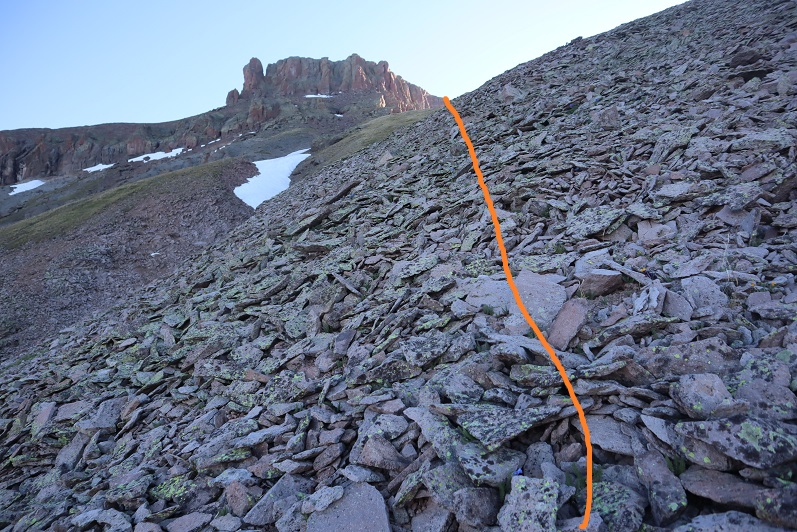
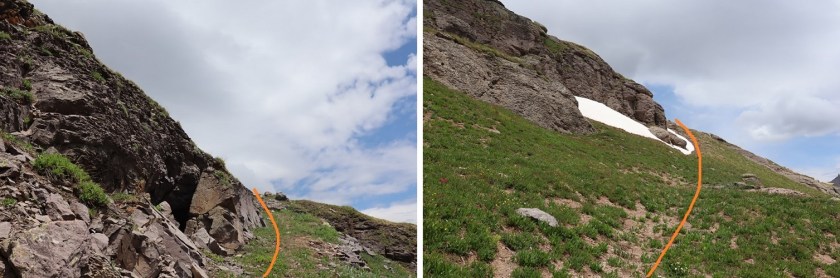
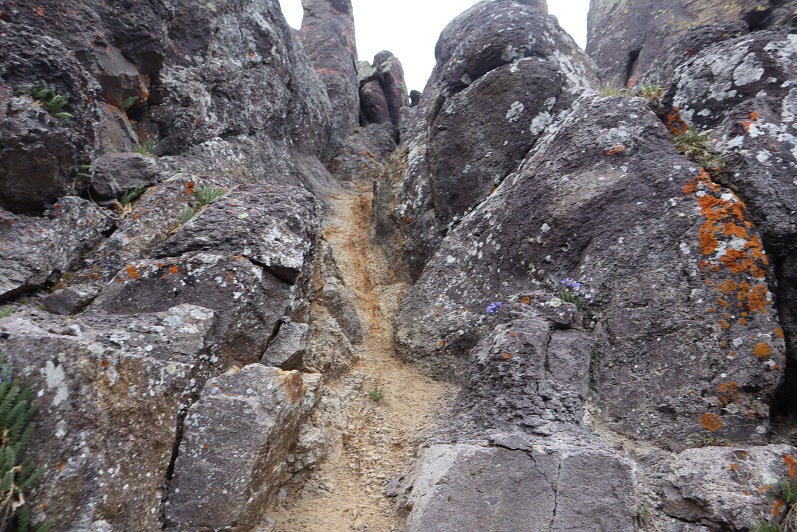
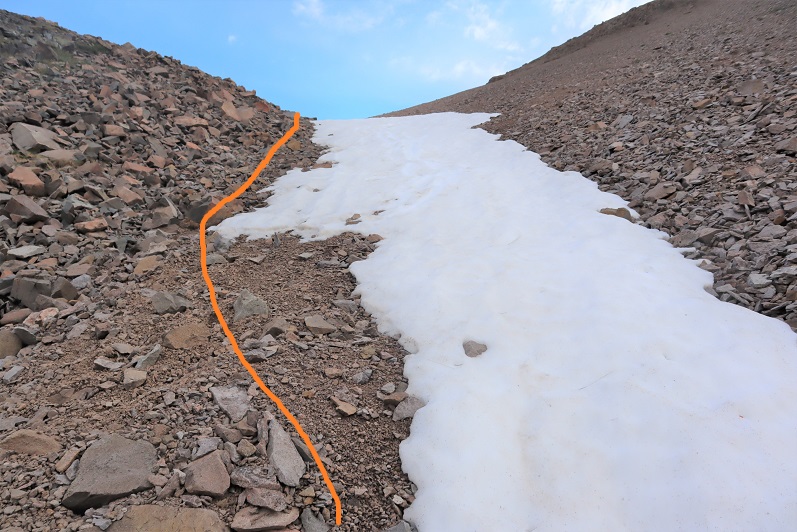
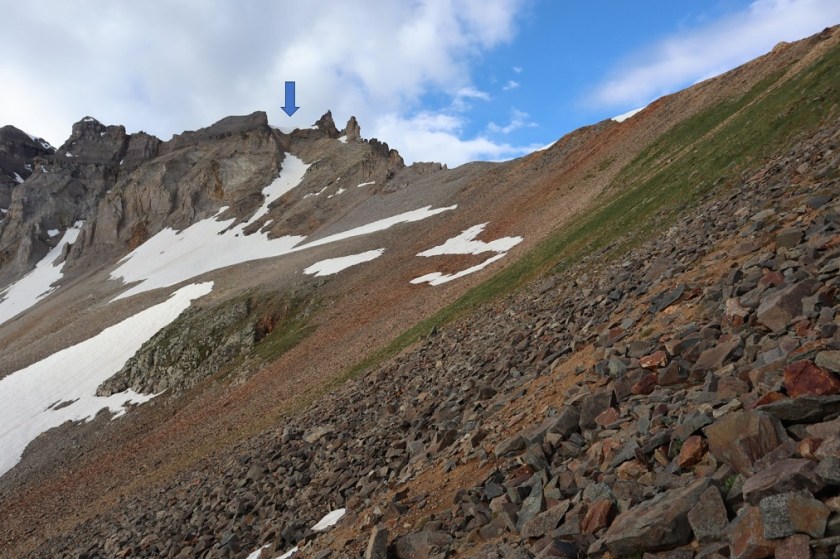
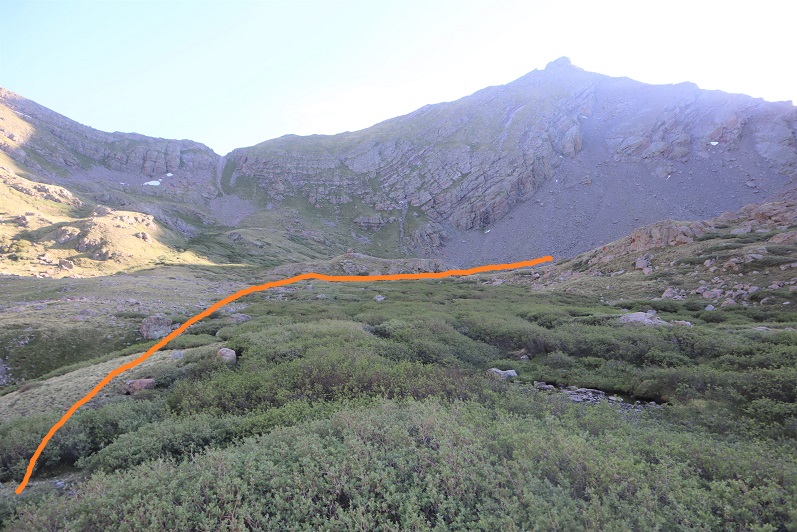
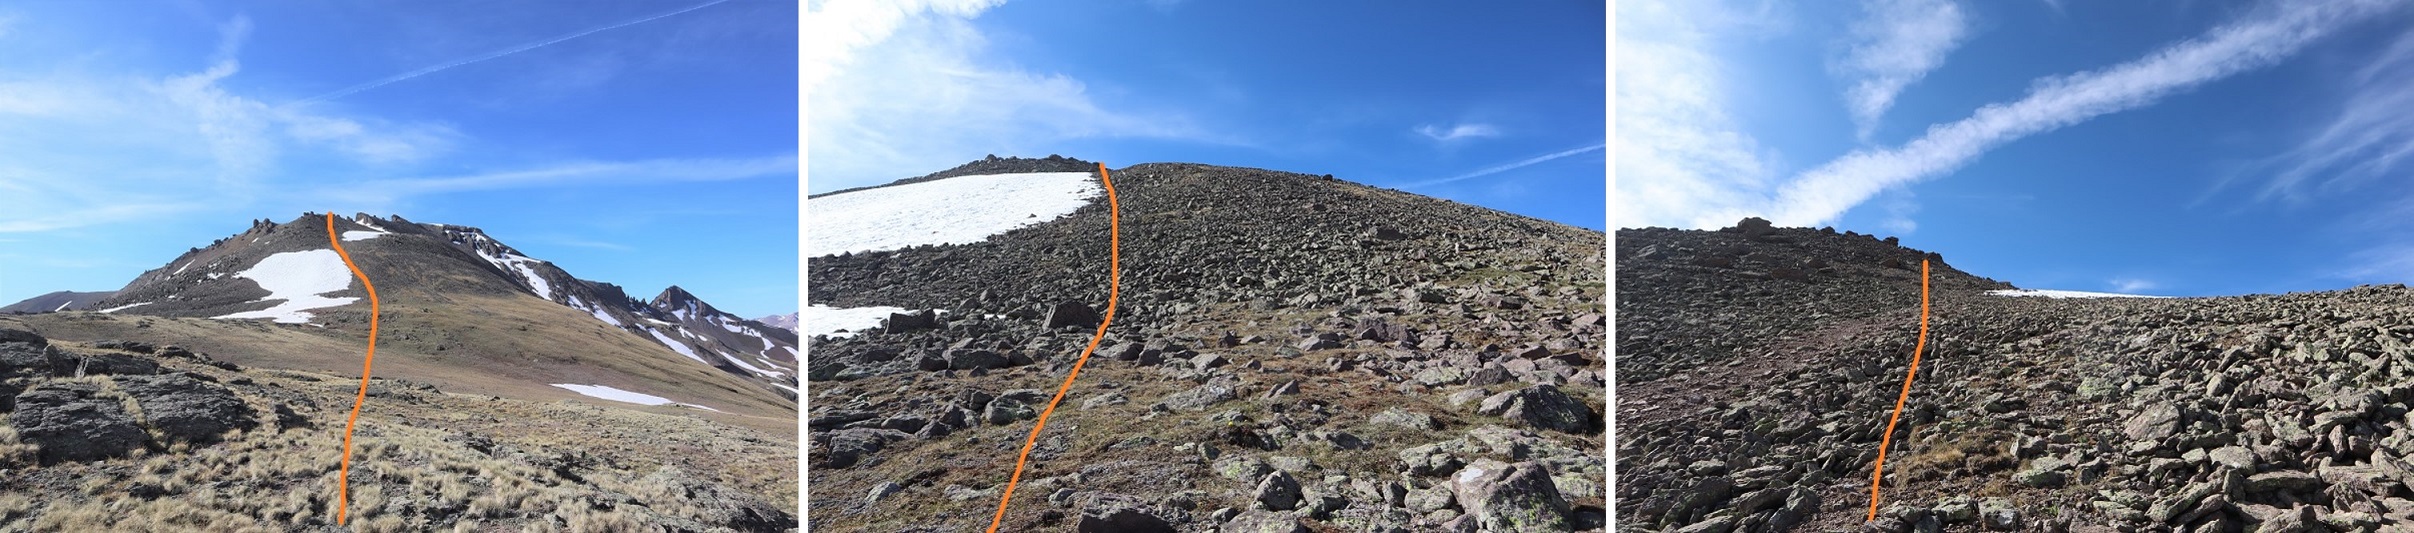
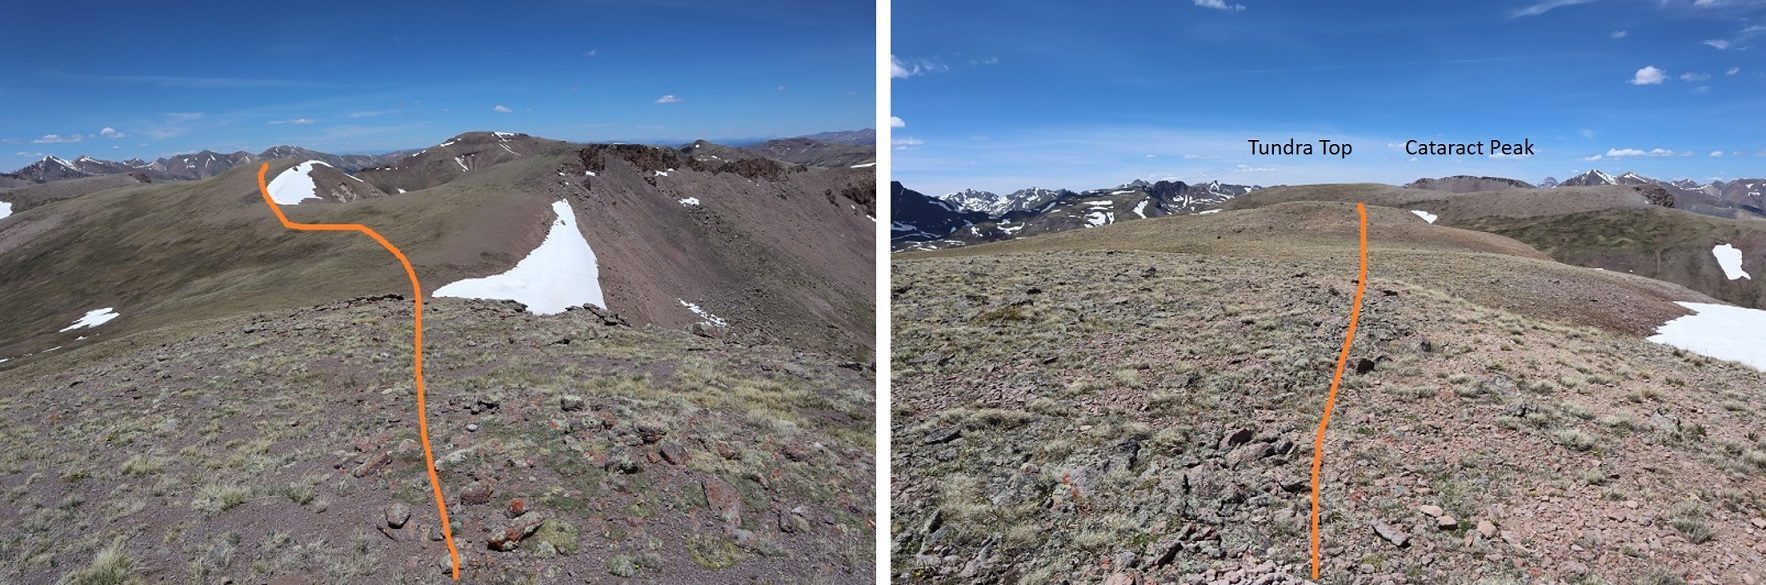
I dipped down a bit into the basin and headed south towards the ridge.  There seemed to be a couple of options to ascent the ridge.  I chose the gully directly in front of me.

11

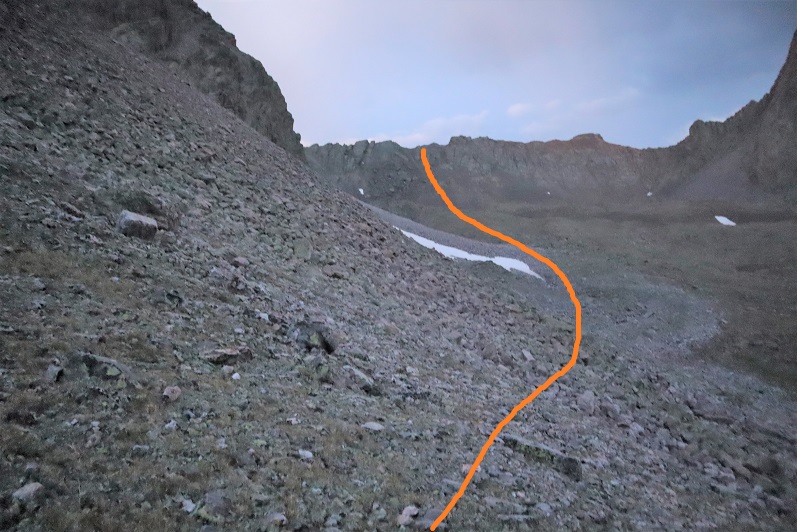
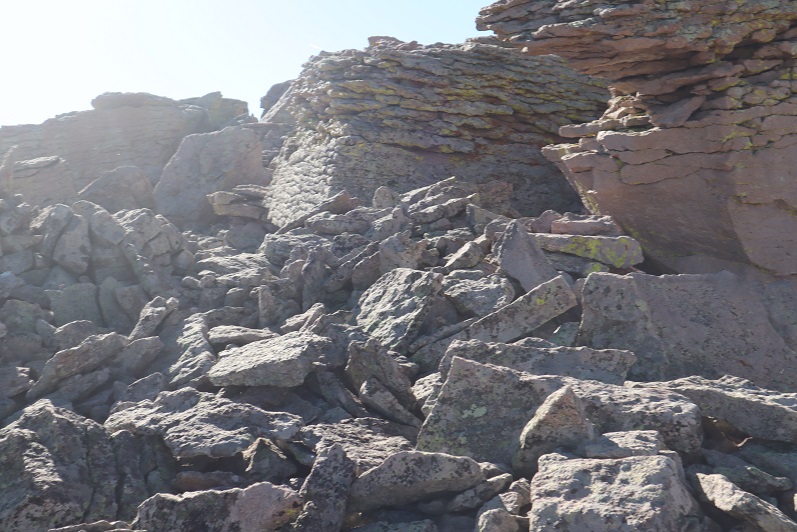
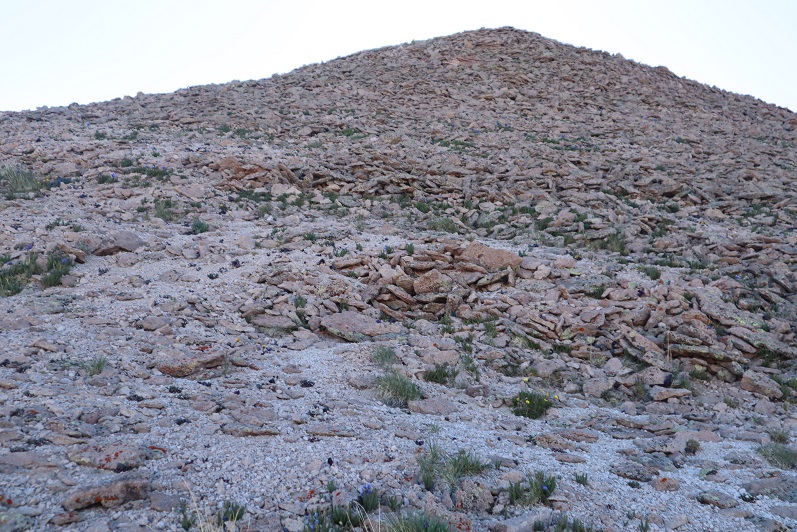
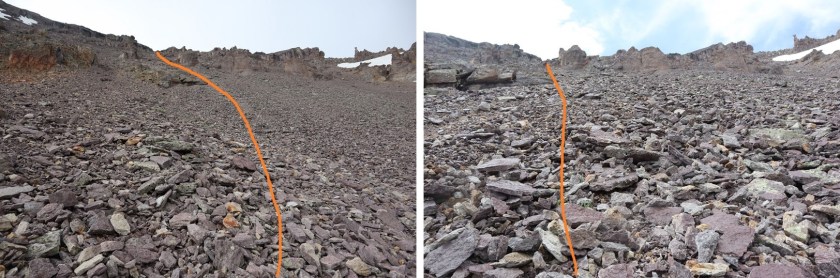
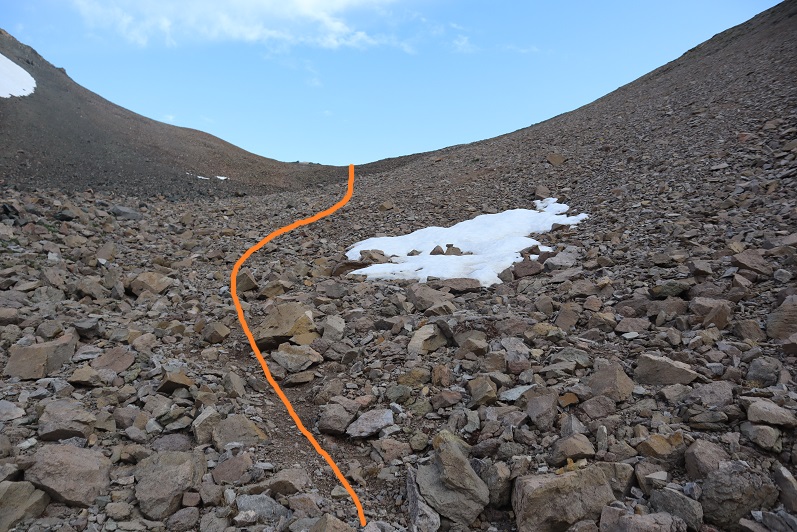
The gully started out with large boulders and ended with scree.  I took it slow and kept an eye on the weather.

12

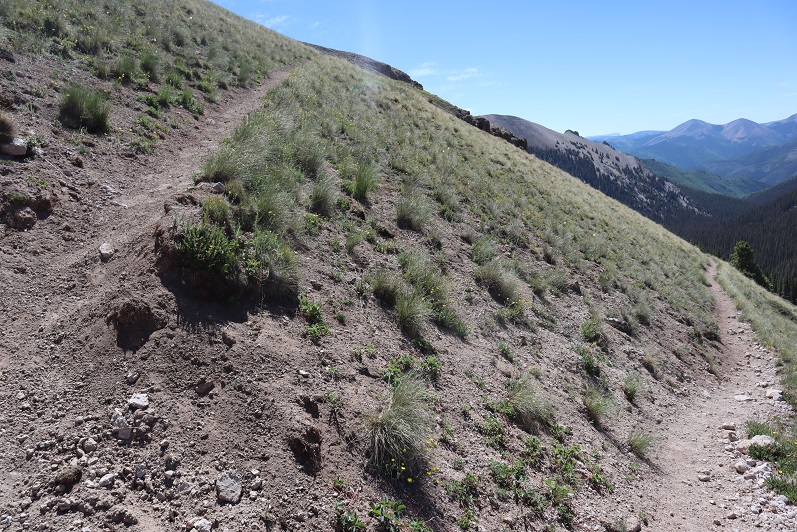
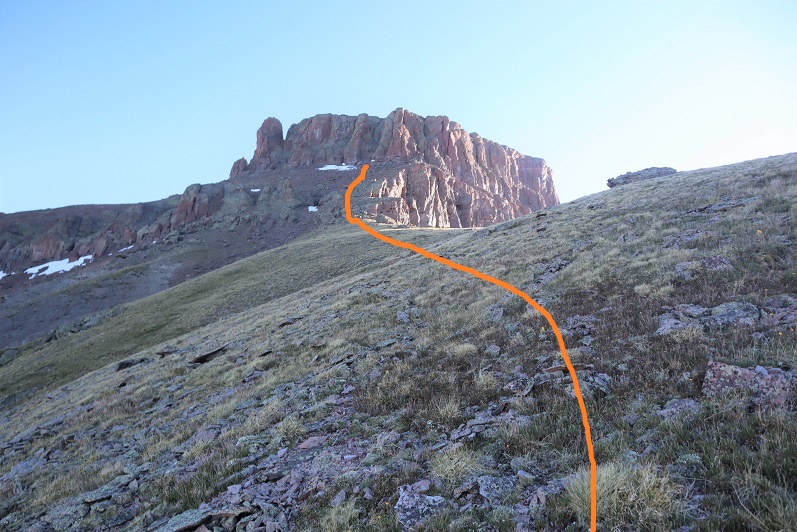
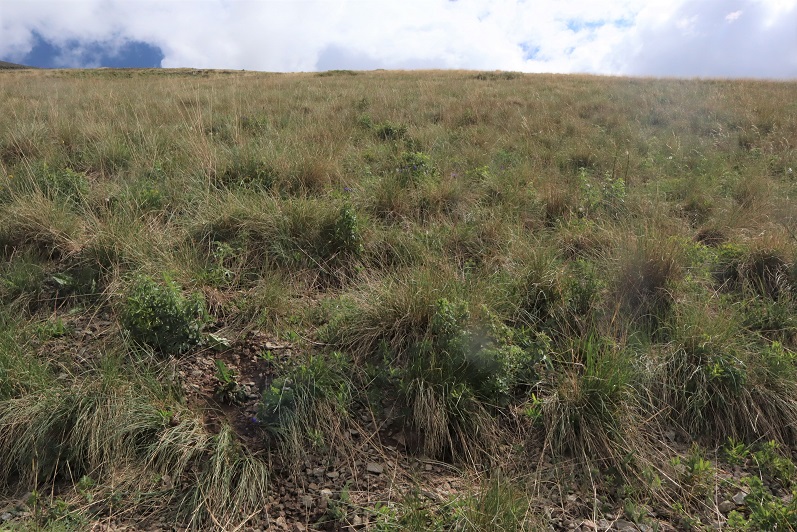
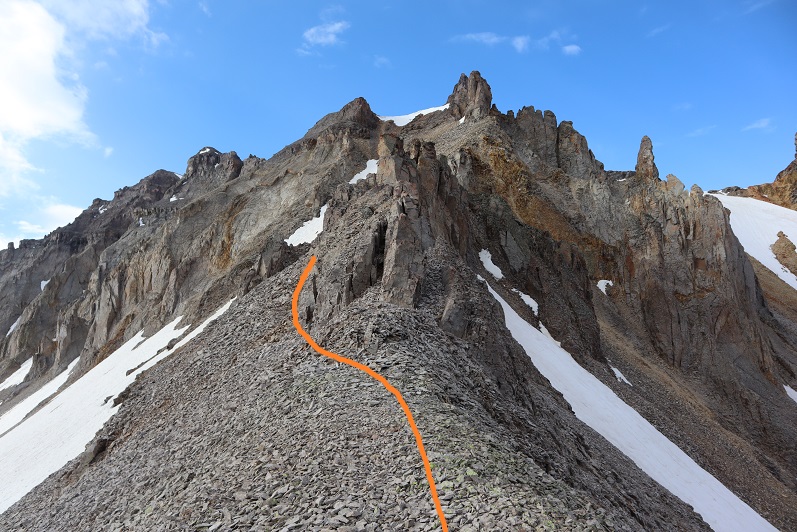
At the top of the gully I turned left and headed east to the saddle.  This was a very simple trek that followed a faint trail behind the ridge.

13

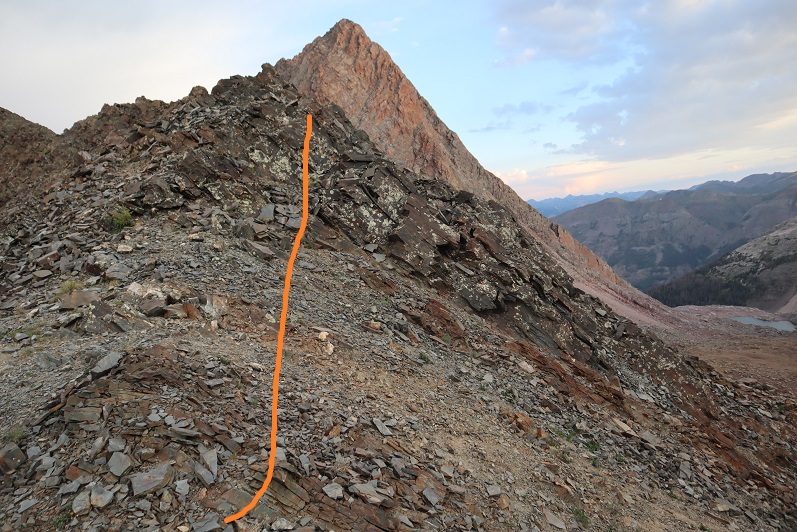
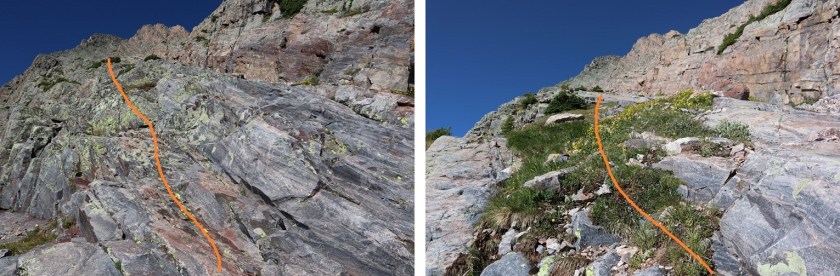
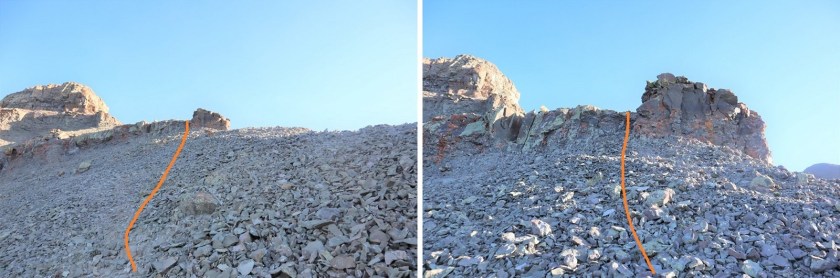
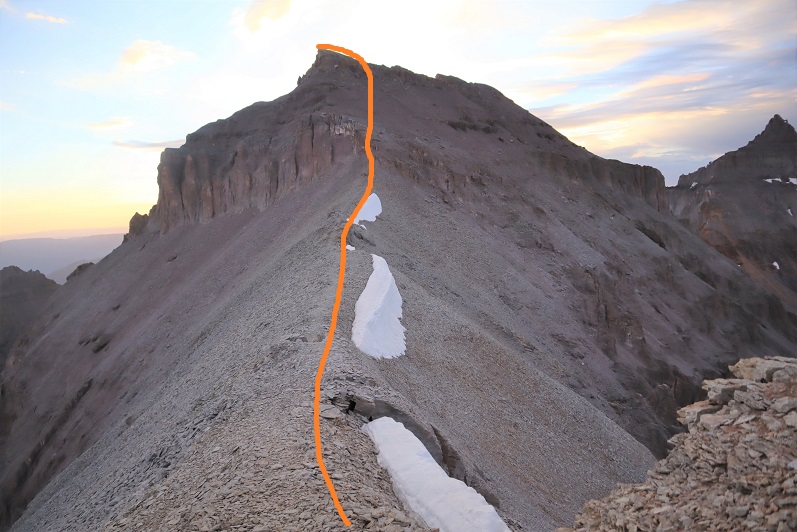
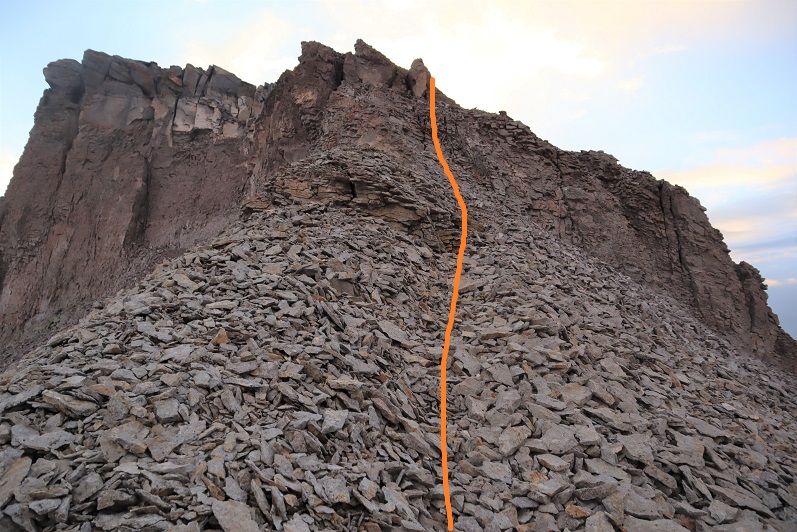
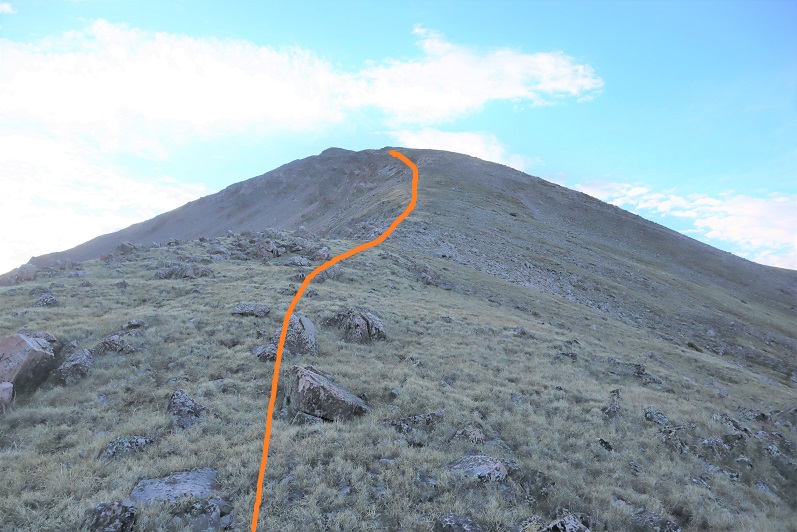
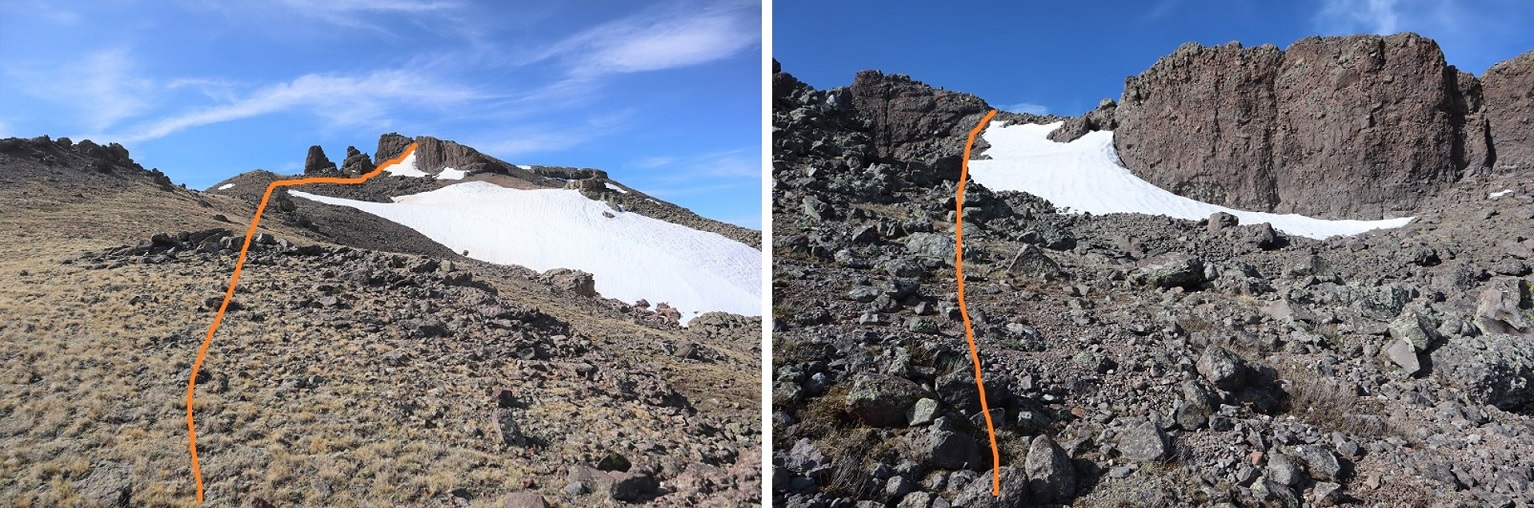
The first part of this trek was simple and straightforward as I hiked up the ridge

14

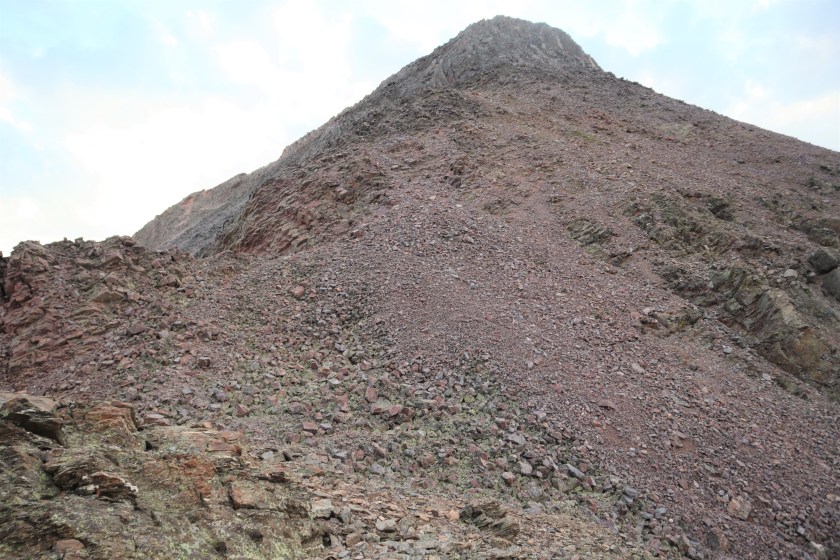
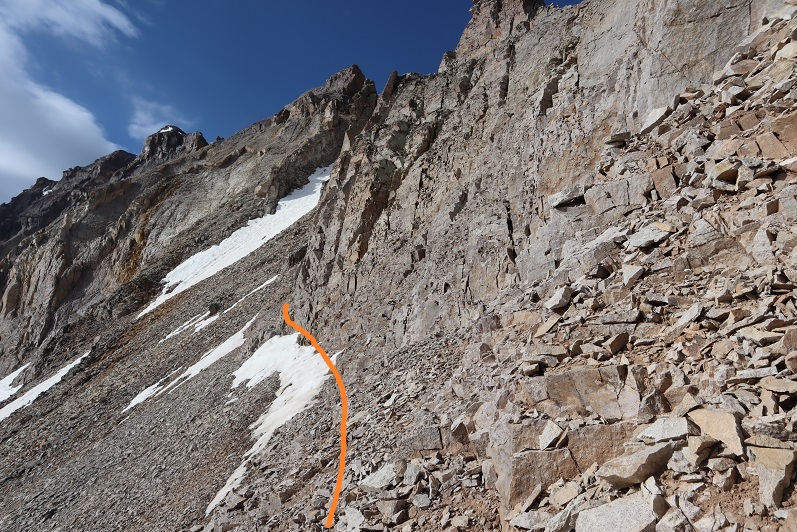
Then it became more tricky.  There were no cairns here.  I stayed on the south side of the mountain and continued climbing east. I encountered a series of class 4 gullies and took them up.  There were several gullies and they all seemed to ‘go’.  (Side note:  when I got home I pulled up 4 different GPX files of this route and none of them lined up in this area, so it seems there are several ways to climb this part).

15

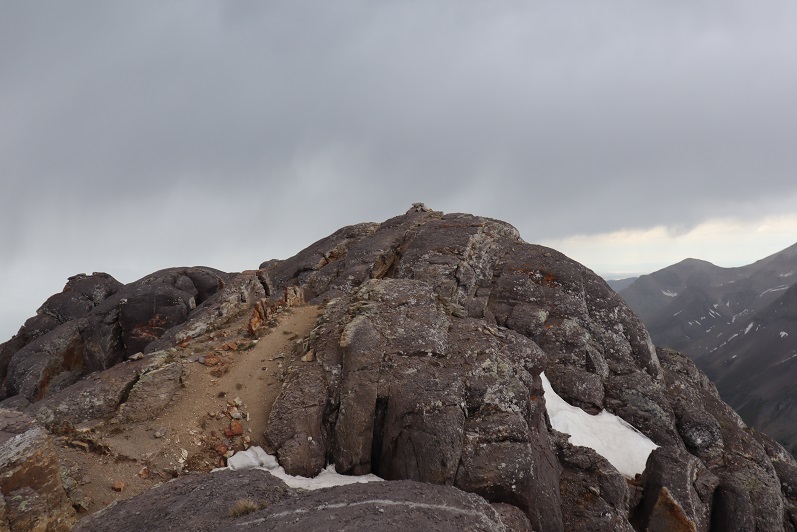
The gullies eventually brought me to the ridge, which I followed to the summit

16

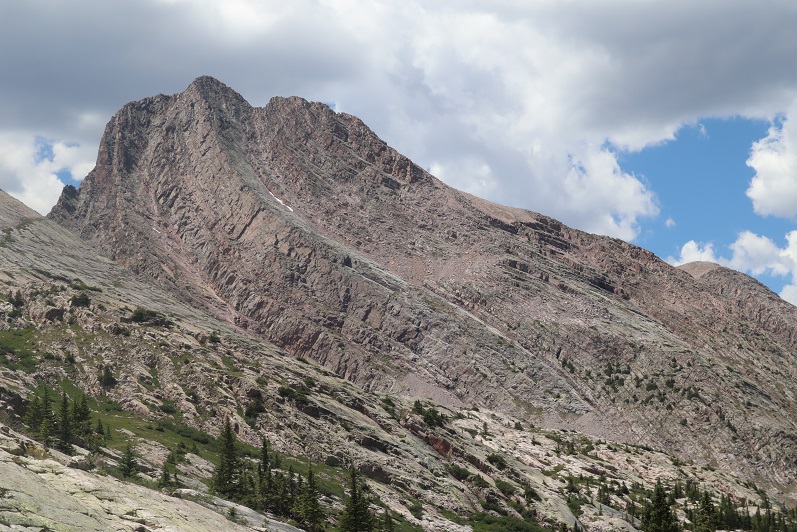
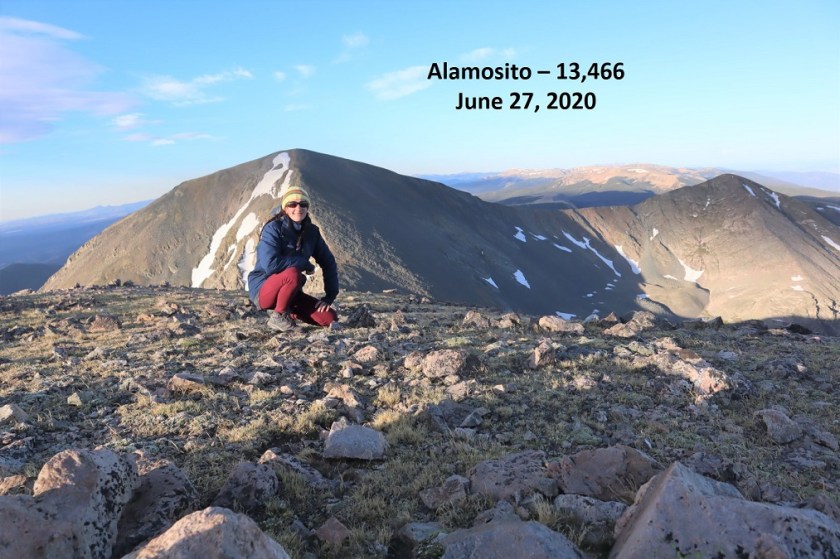
I summited West Trinity Peak at 8am
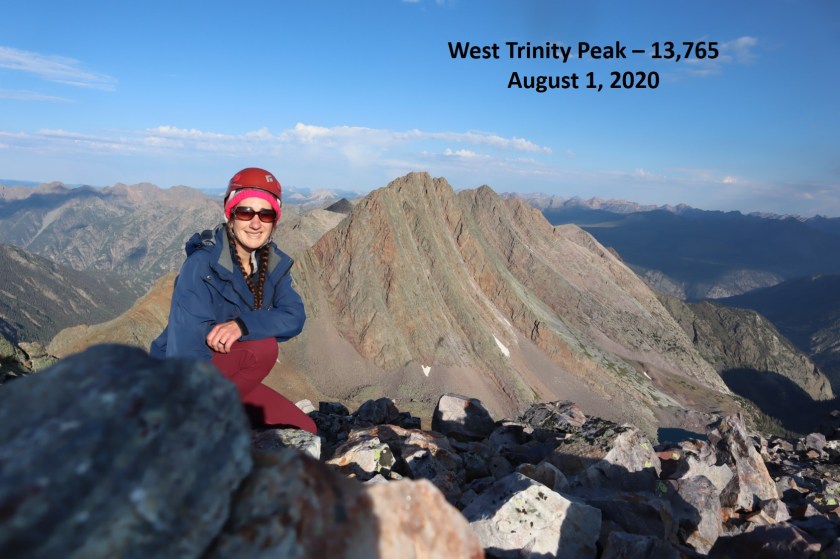
17

West Trinity Peak

The weather looked like it would hold so I made the decision to continue towards Trinity Peak (also, I didn’t want to downclimb those gullies!  Definitely do this traverse west to east if you’re not a fan of downclimbing gullies, as the gullies don’t quit and you’d have to downclimb every one of them heading east to west).

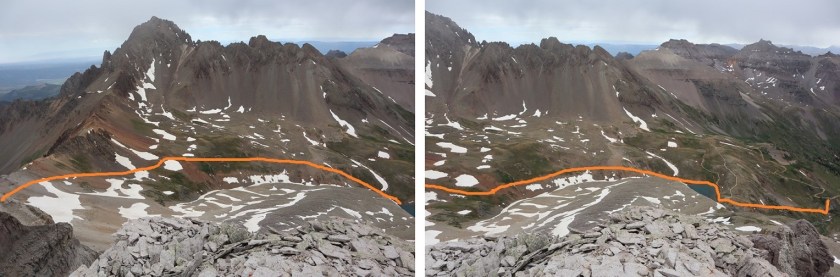
I continued southeast towards the West Trinity/Trinity Saddle

18

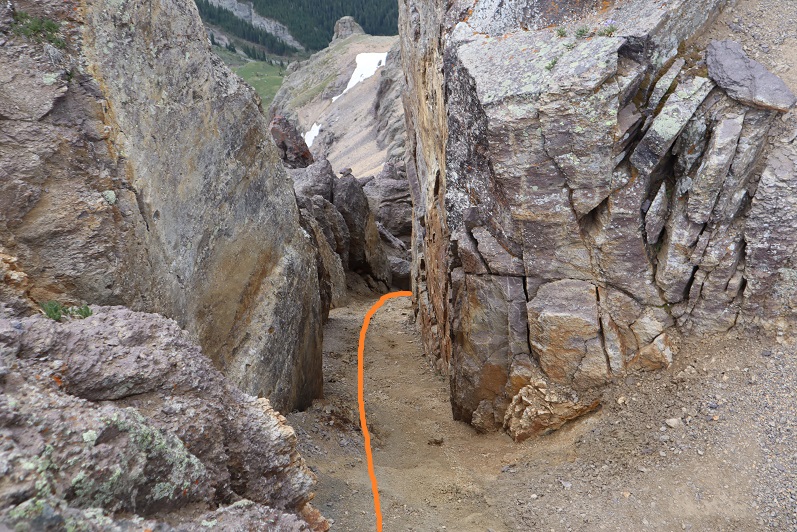
Instead of following the ridge, take the gully down.  It’s class 2 and leads you to the saddle.  You won’t be losing any unnecessary elevation.

19

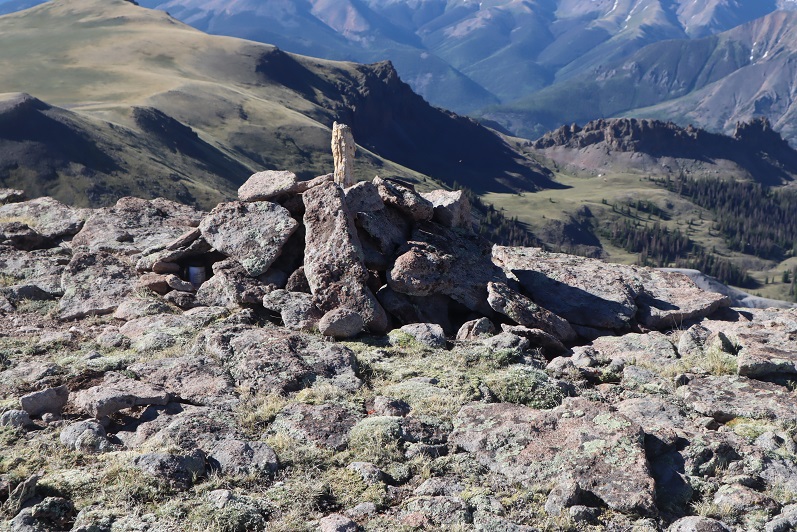
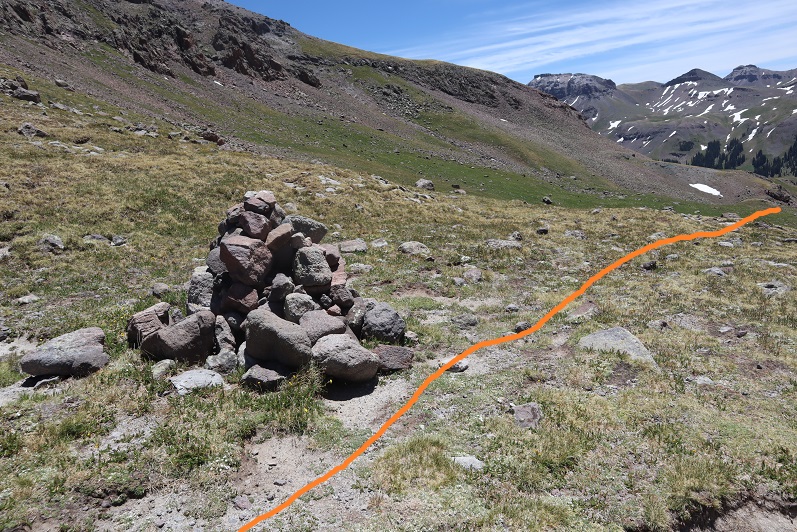
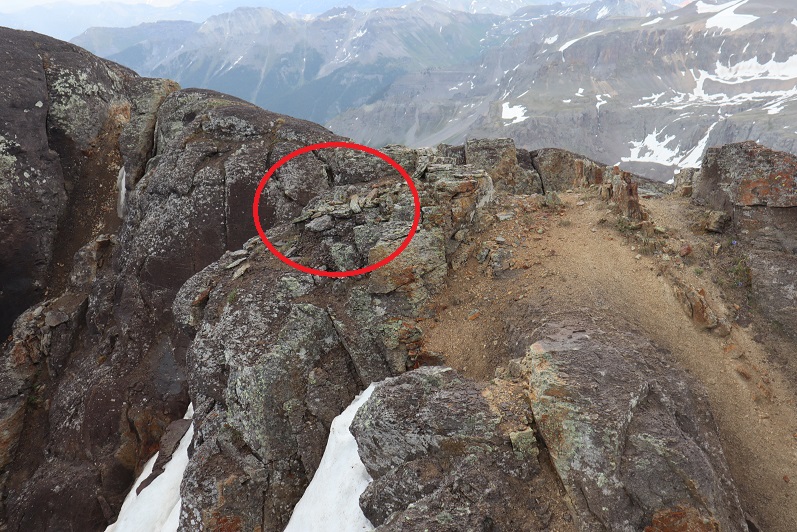
Interestingly, there were cairns between West Trinity and Trinity Peak.  This is interesting because they would have been useful elsewhere, but were only present for this short section.

20

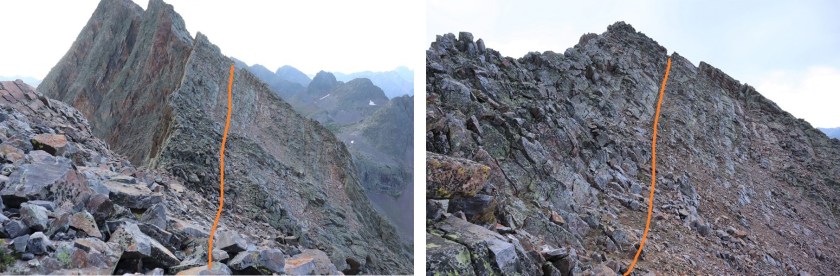
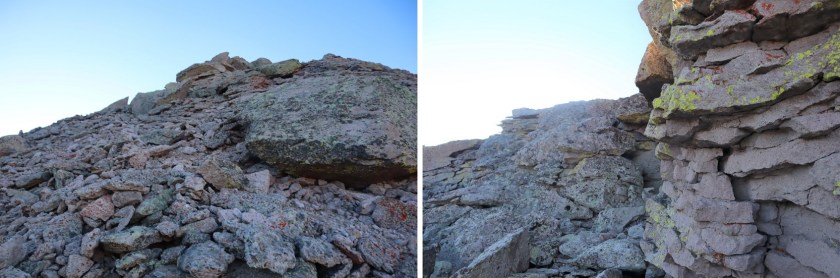
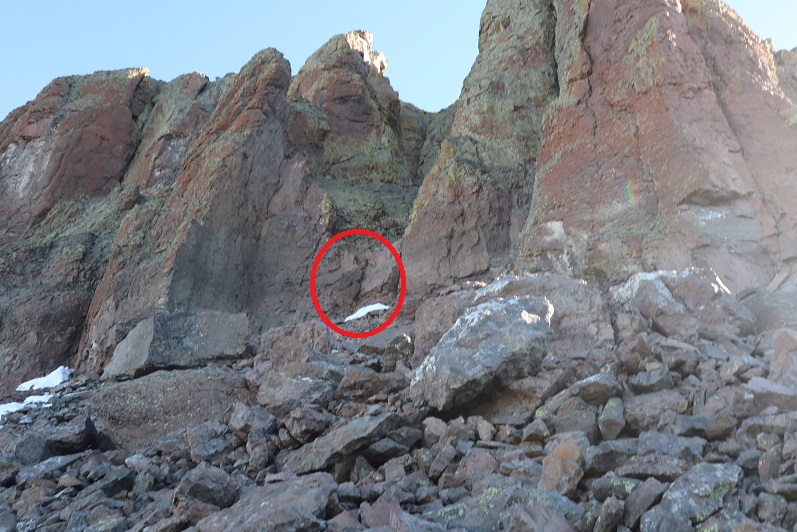
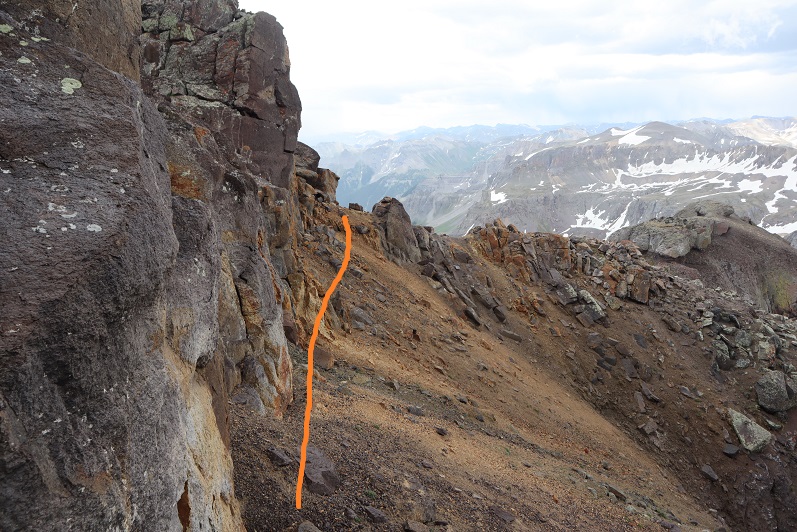
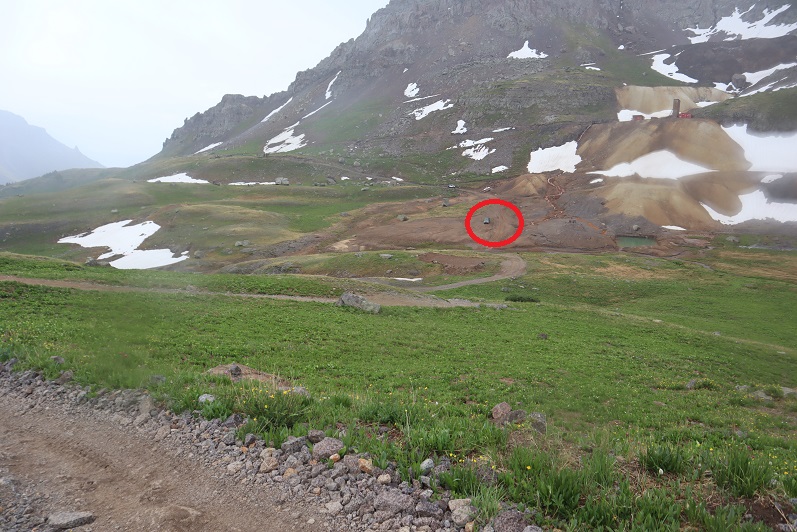
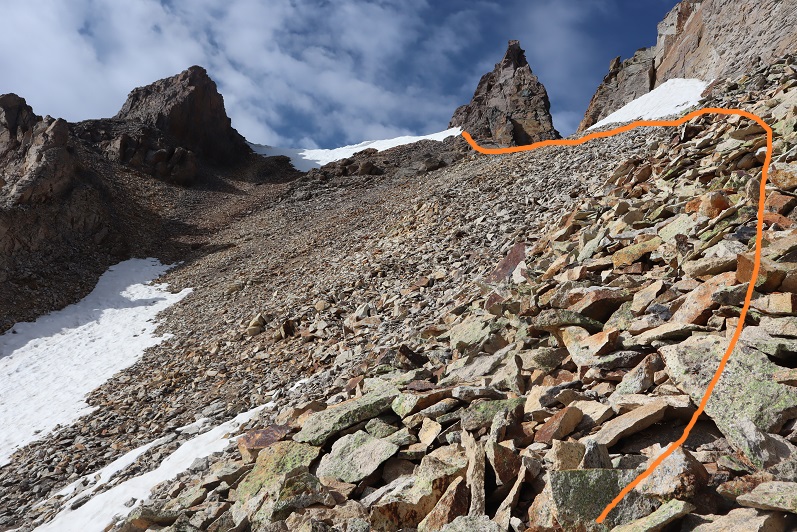
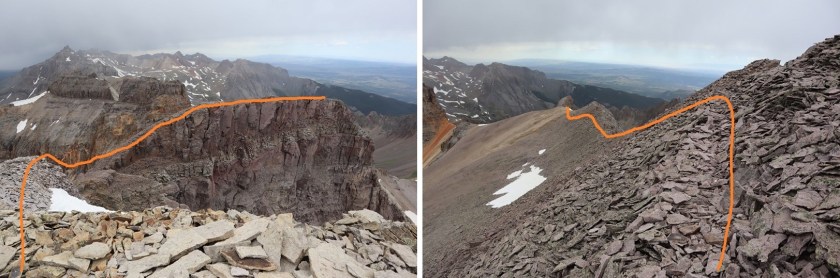
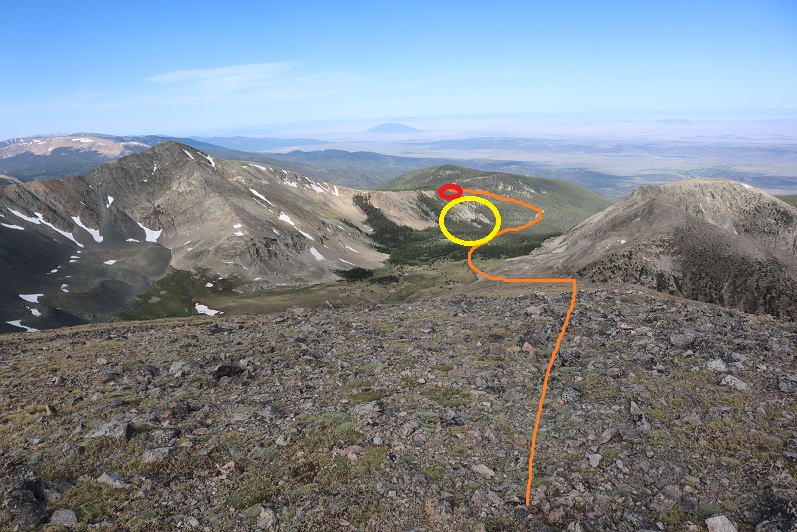
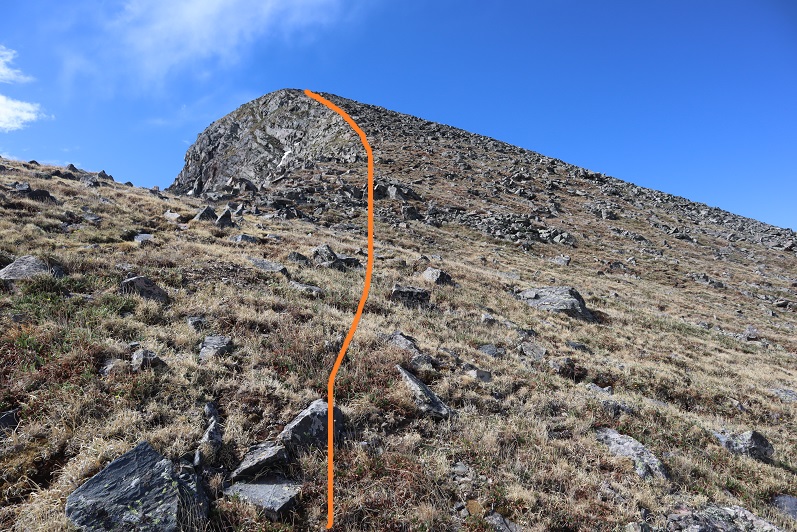
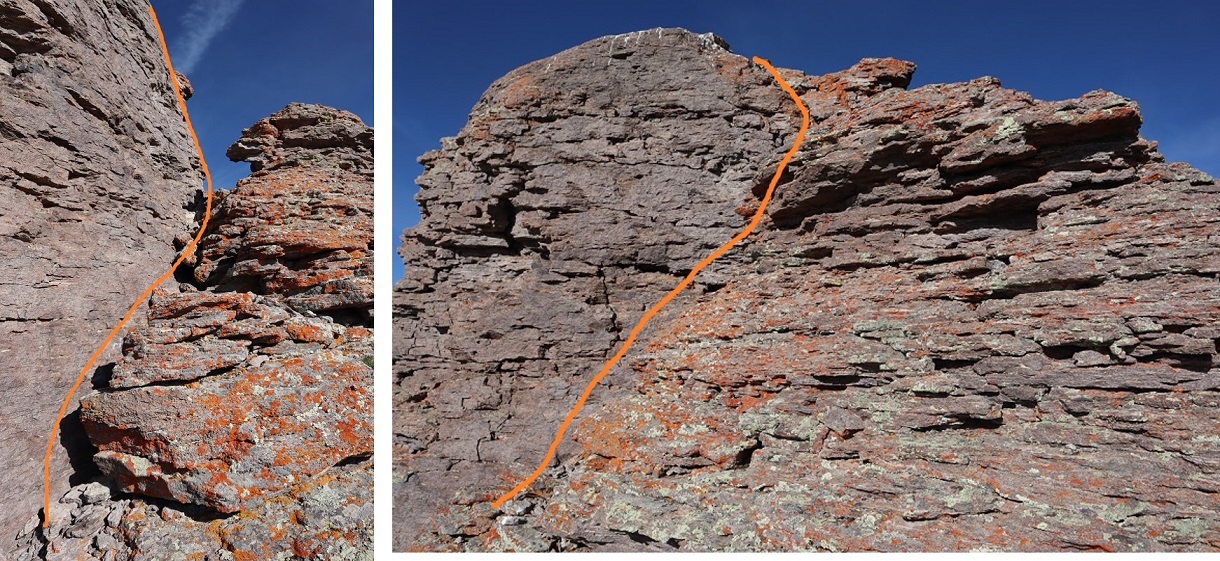
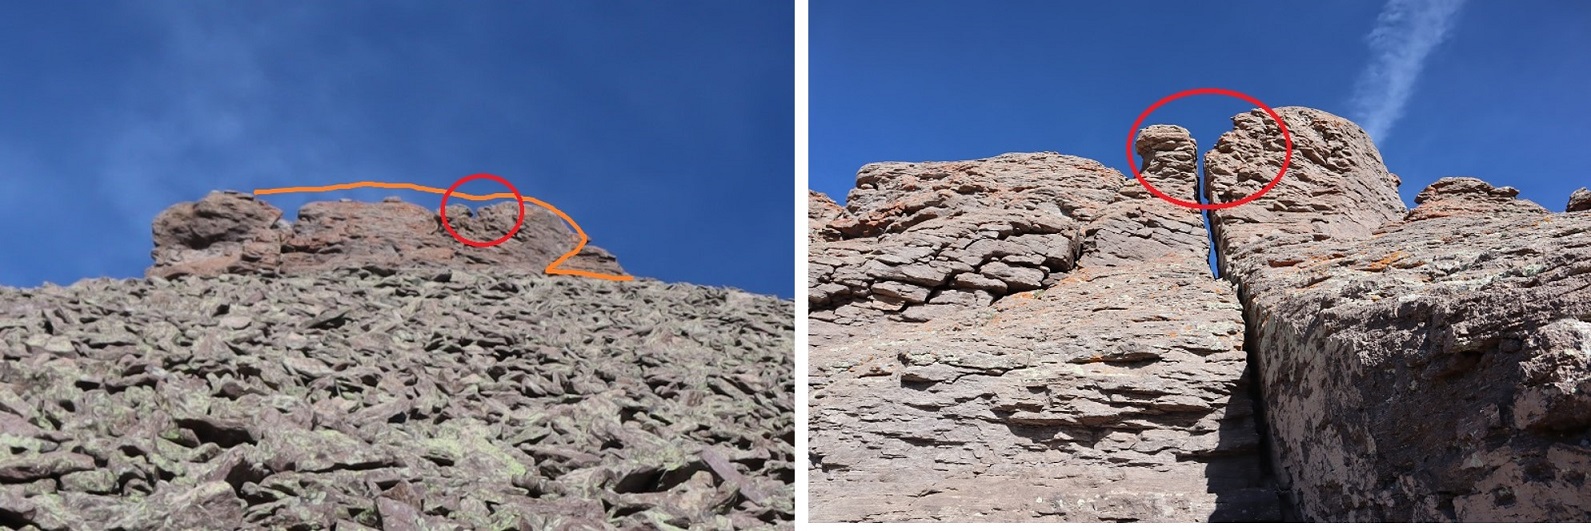
Don’t stick to the ridge, but follow the cairns as they skirt the south side of the mountain

21

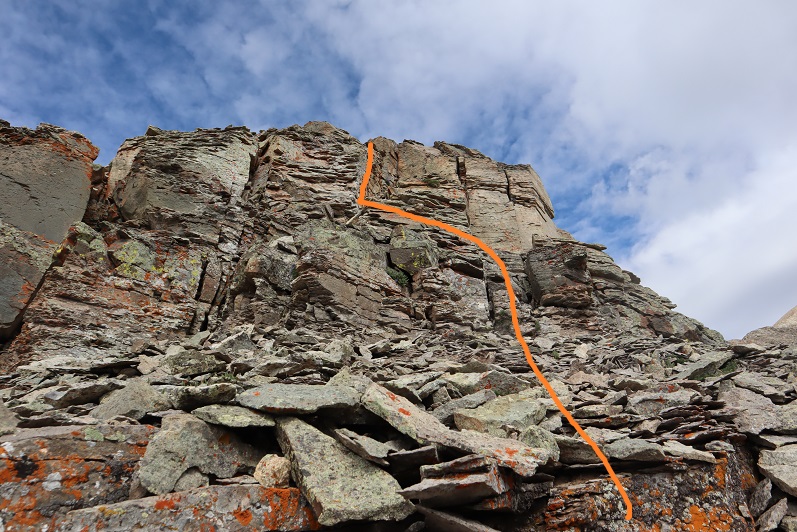
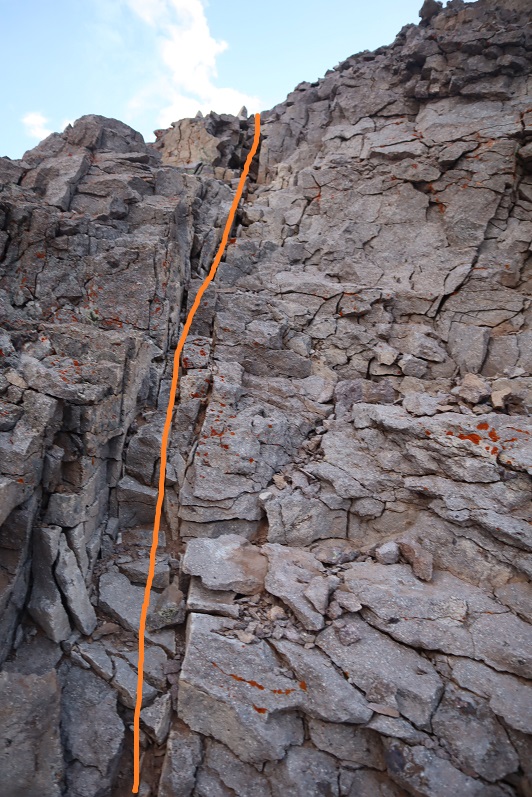
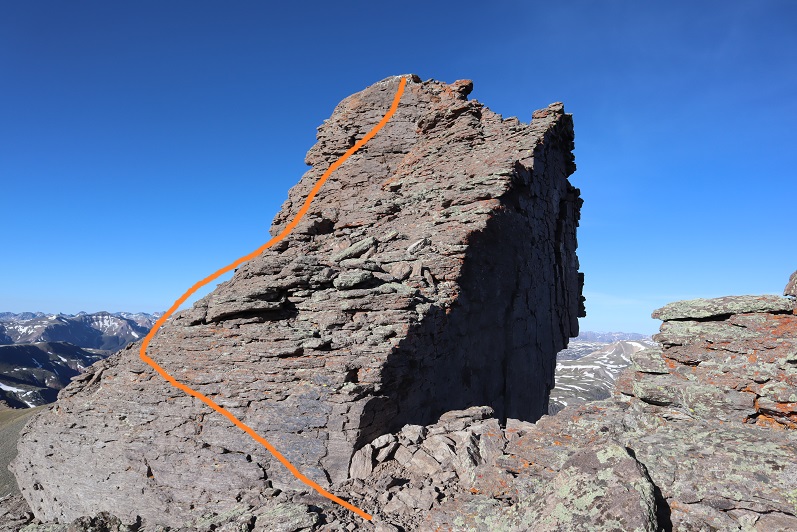
The cairns (circled in red) were very helpful here

22

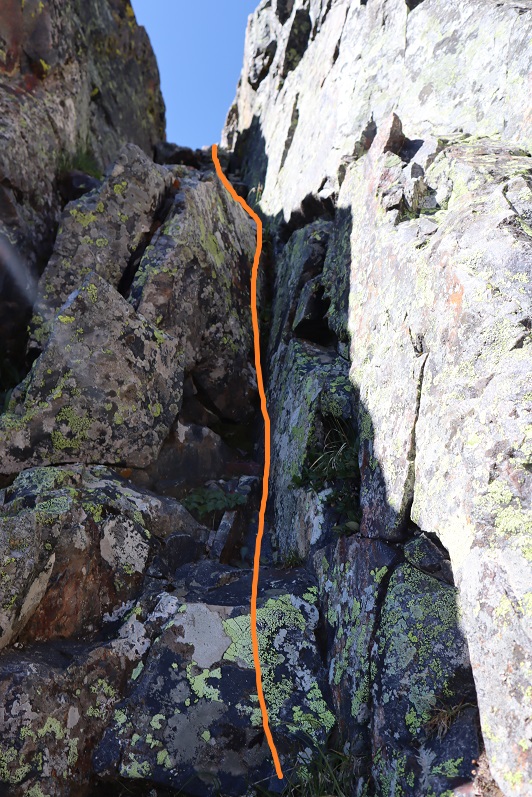
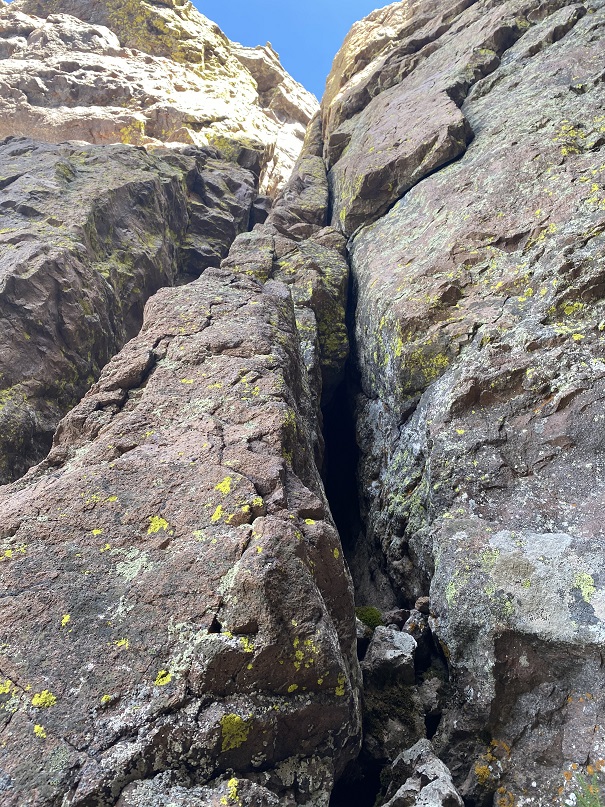
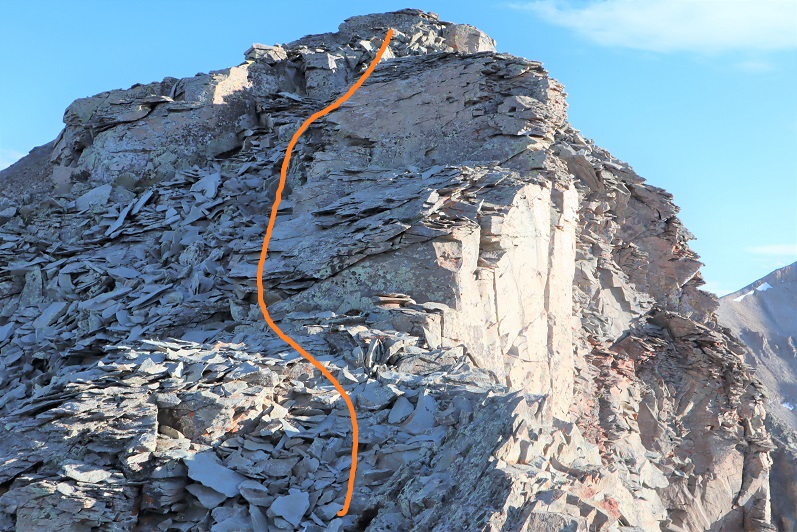
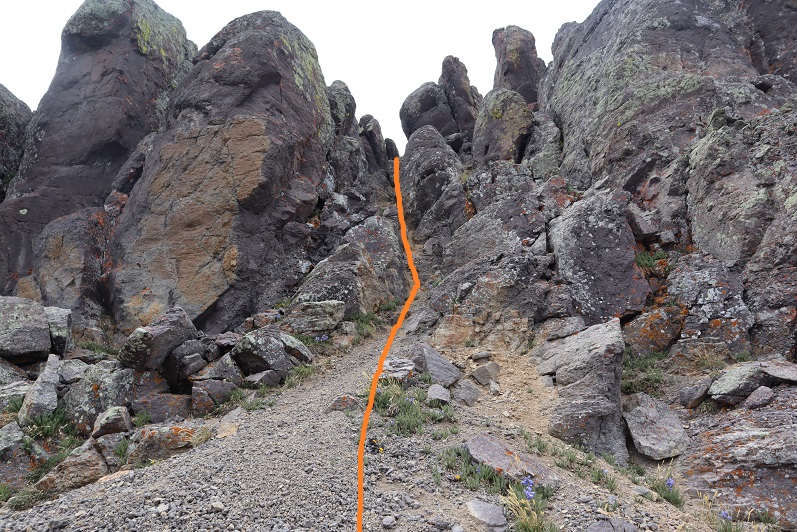
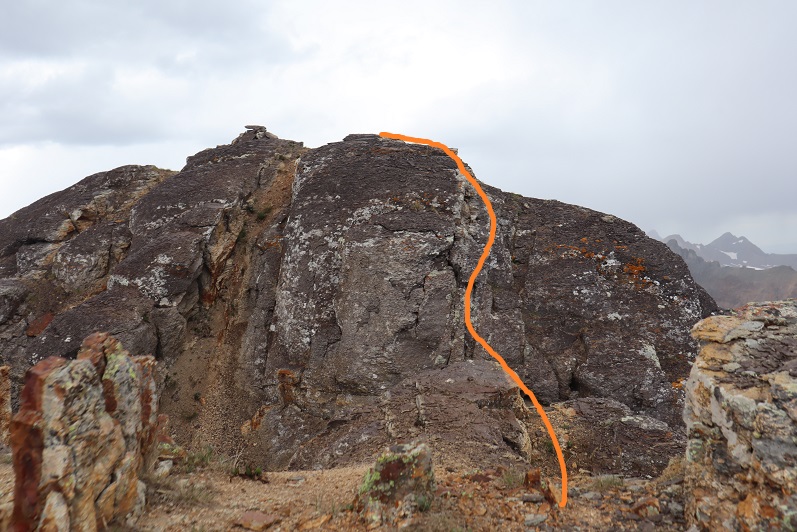
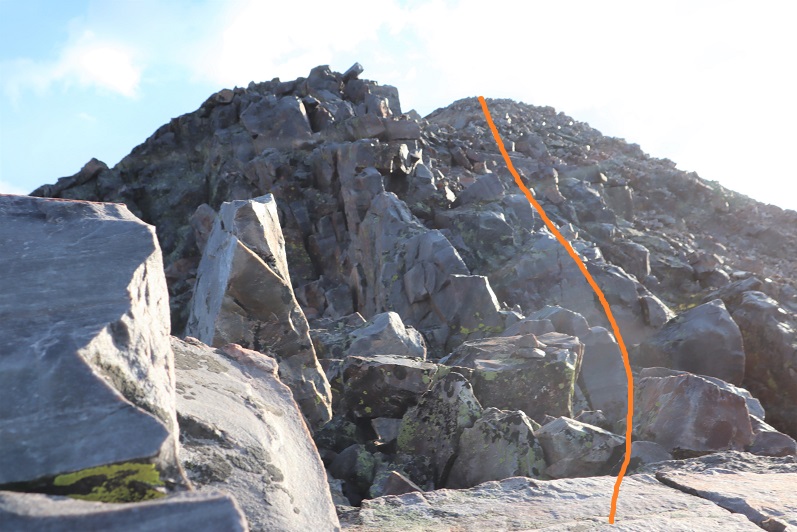
They led me to a class 4 chimney.  Climbing today seemed extremely easy.  It was really nice to just hike with a flimsy drawstring pack instead of my normal backpack.   The difference in my climbing ability was amazing.  I wasn’t off center and pulling myself up was a breeze.

23

At the top of the chimney you’ll want to keep heading right towards the ledge, but DON’T DO THIS!!!  I did, and I can tell you that ledge is super scary (but doable if you hug the ridge:  there’s less than a foot of space to walk on and not much room when the boulders bulge out).  However, you’ll need to do it twice because it doesn’t go anywhere and cliffs out.

24

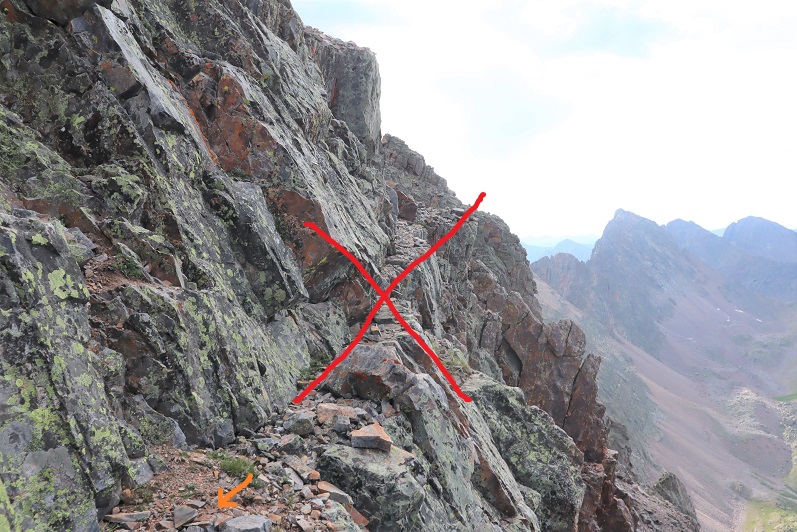
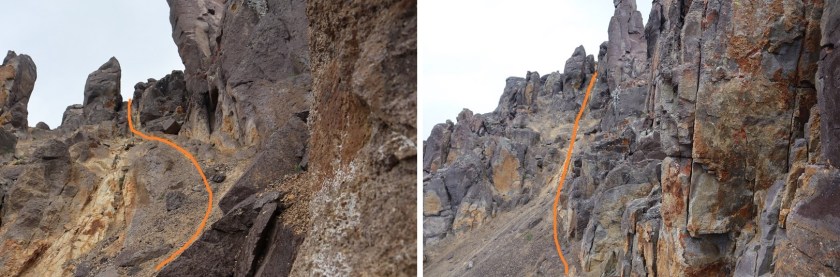
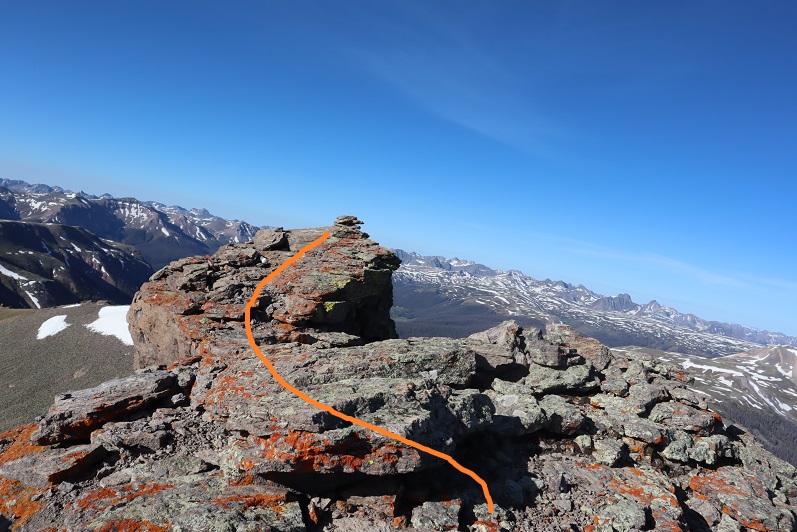
Instead, go left and you’ll once again find cairns that will lead you north and then east to the summit

25

I summited Trinity Peak at 9:25am.  It took less than an hour and a half to get from the summit of West Trinity to Trinity.
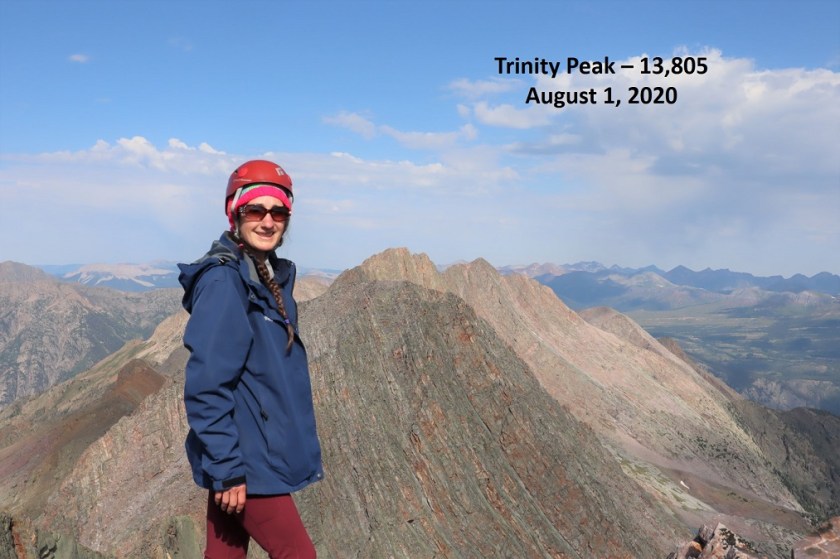
26

Trinity Peak

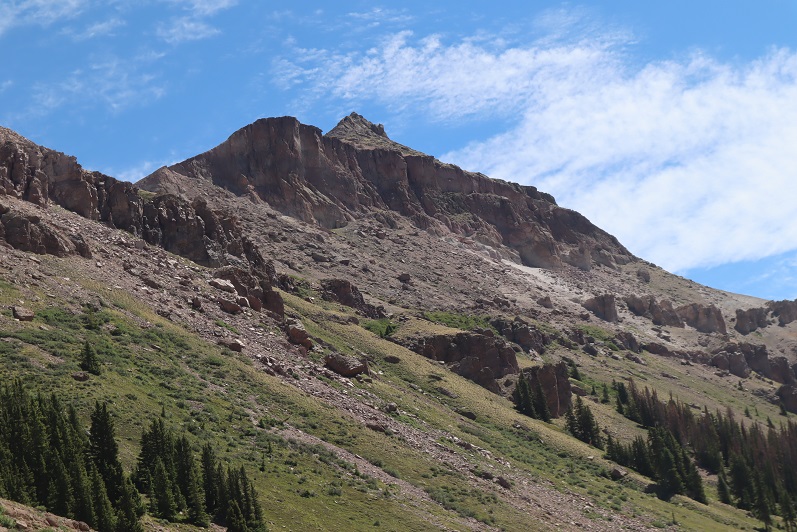
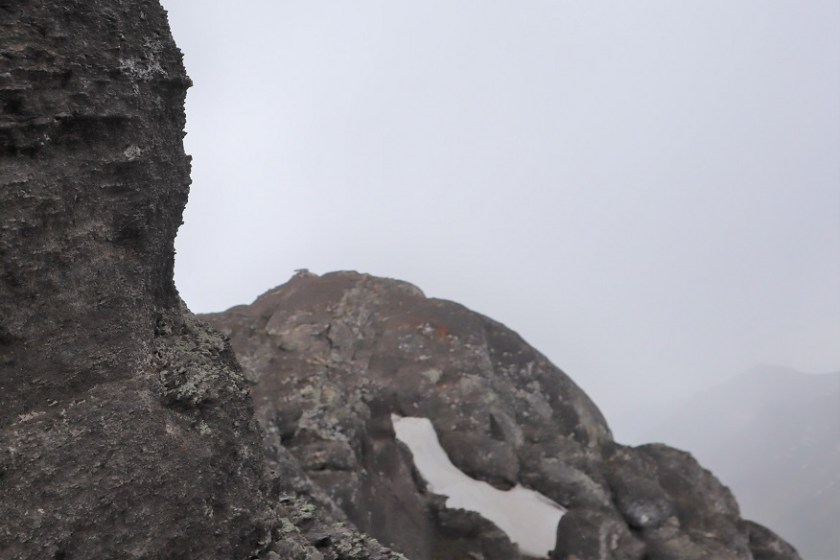
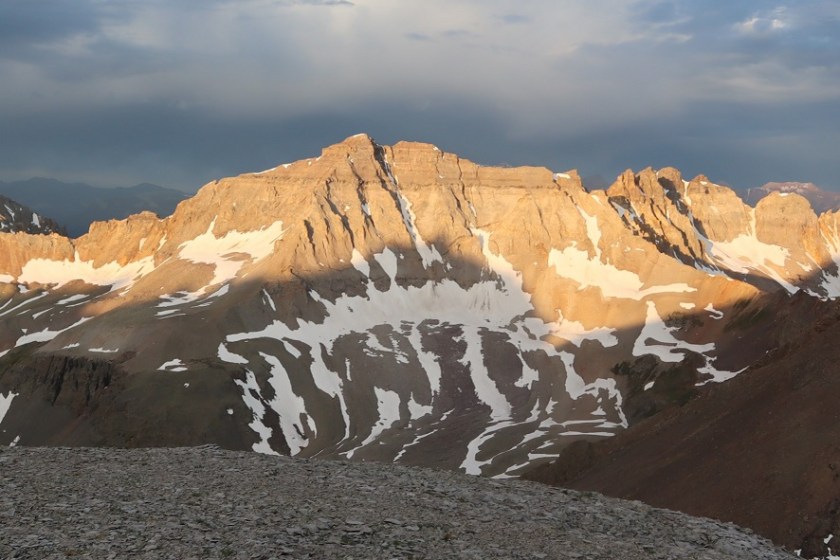
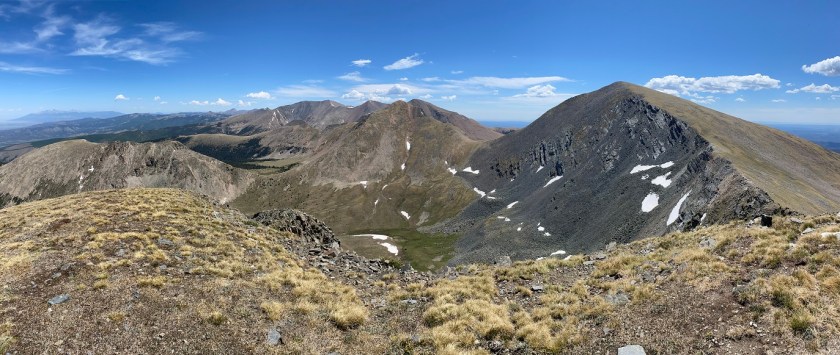
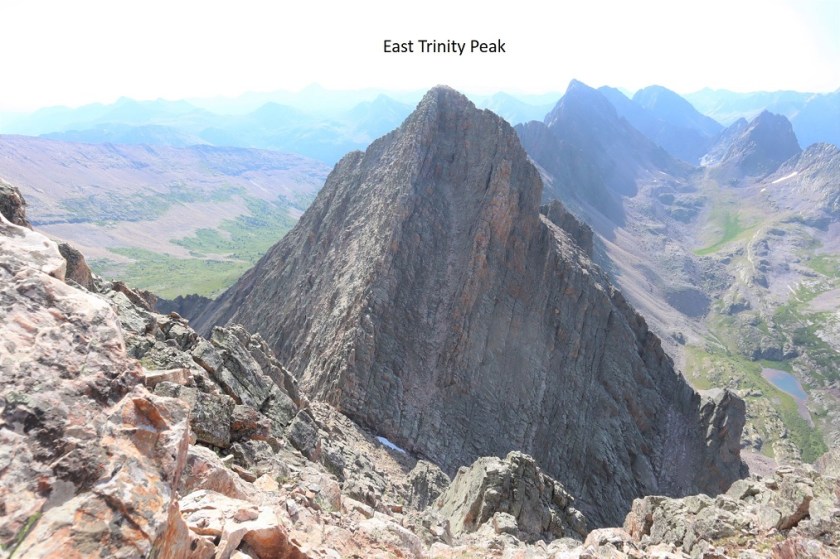
Here’s a look over at East Trinity Peak

27

28

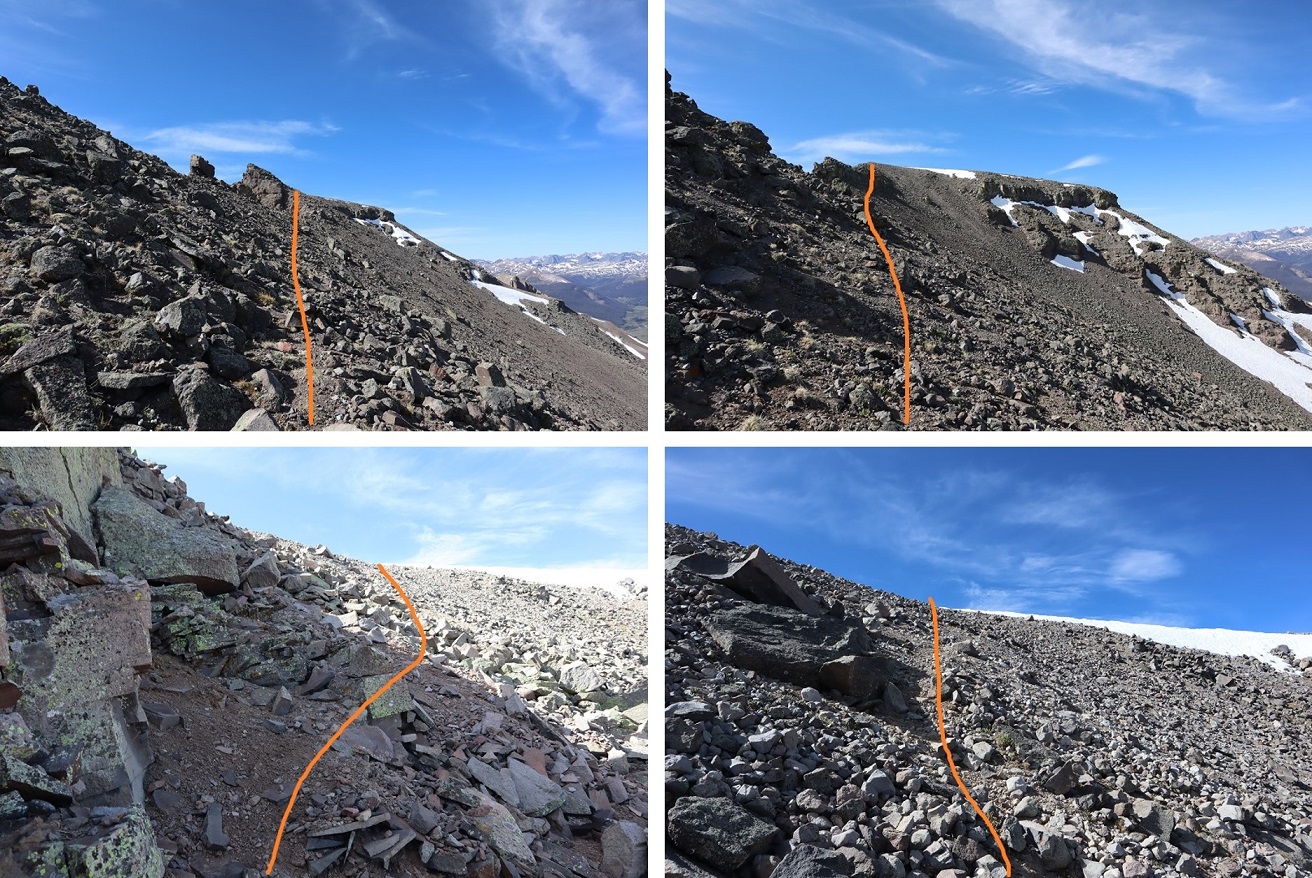
I took the gully down to the saddle of Trinity/East Trinity

29

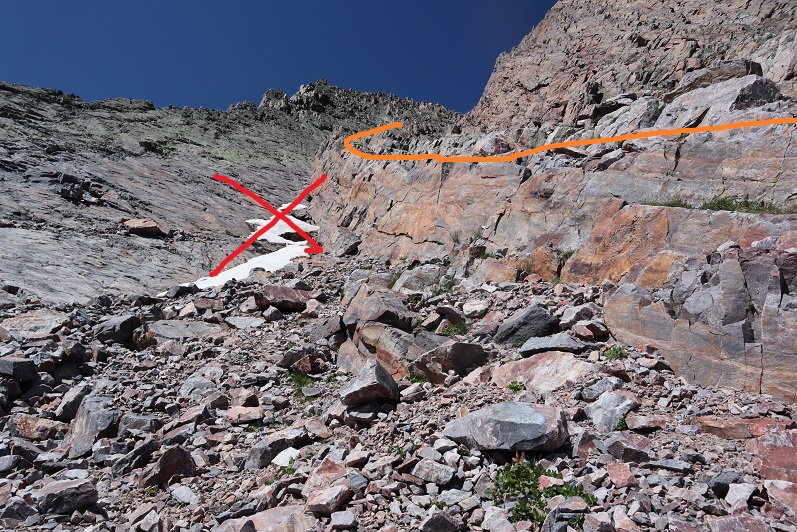
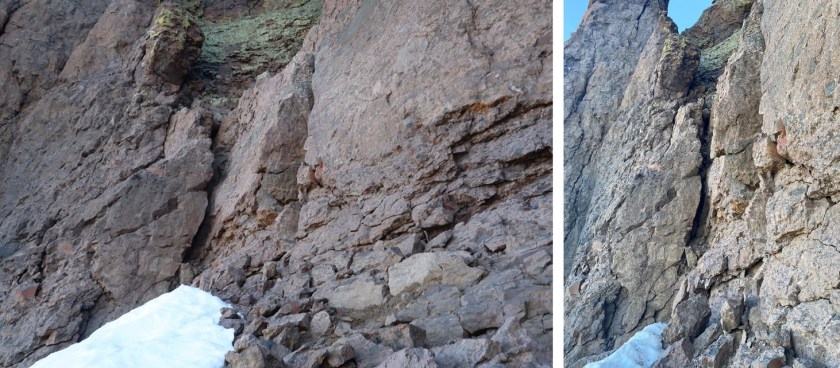
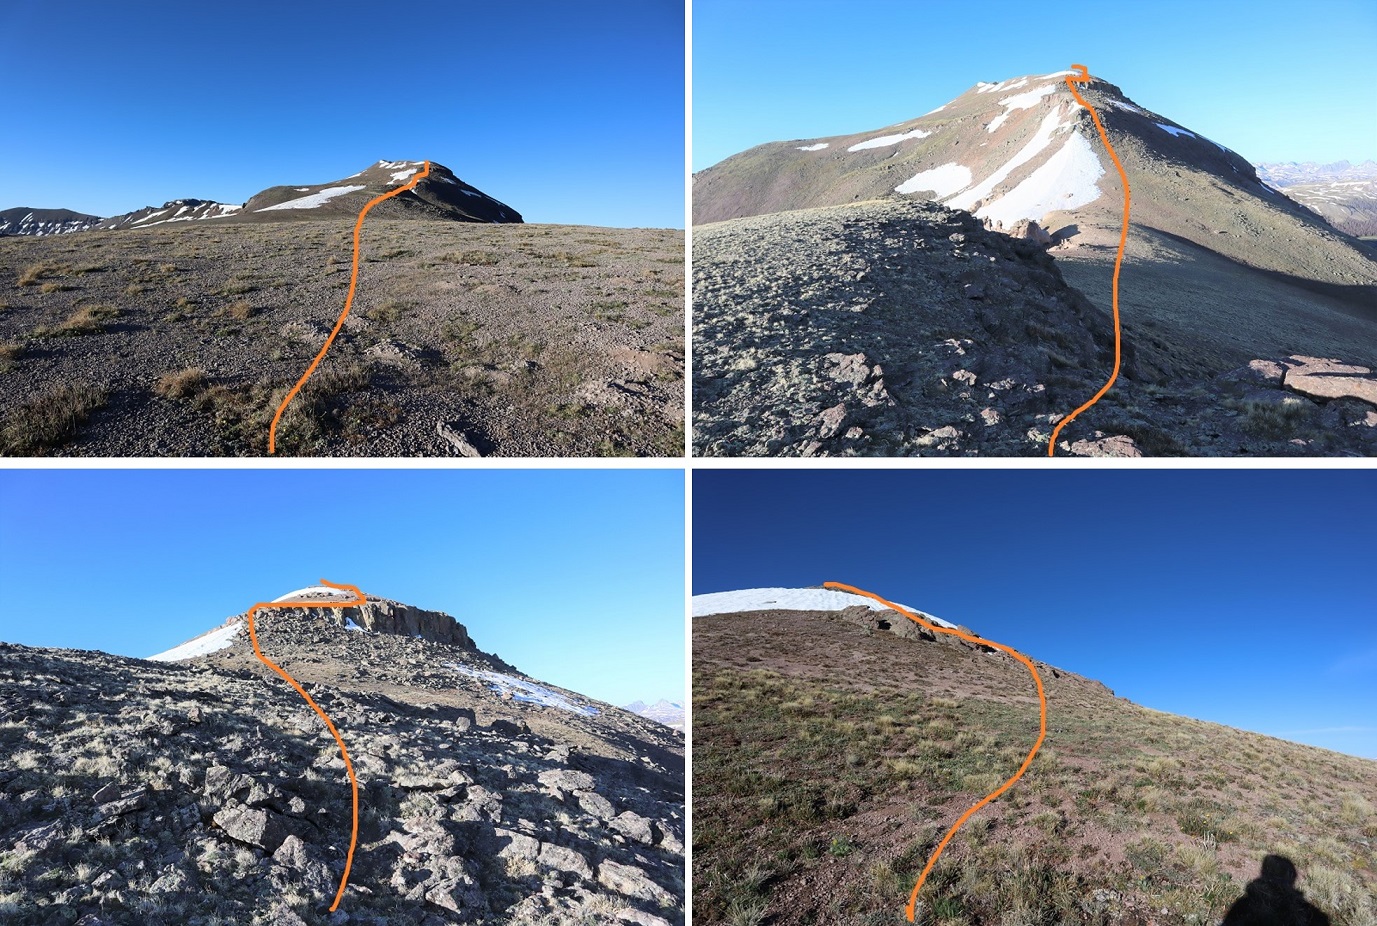
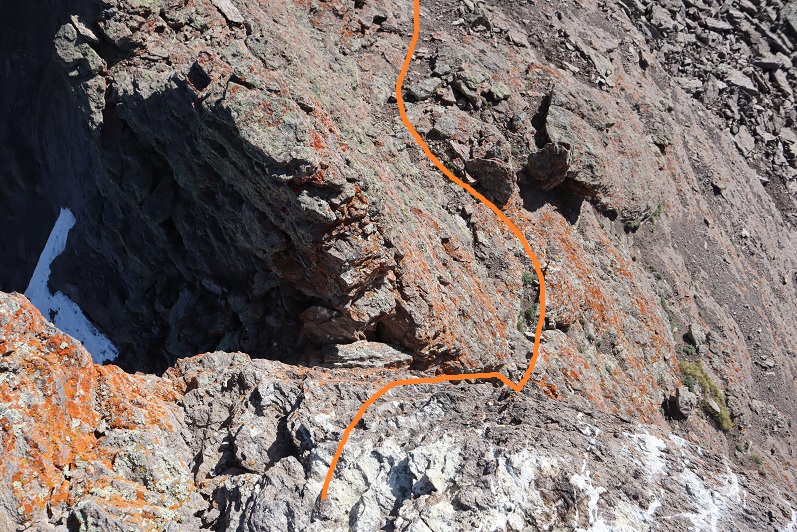
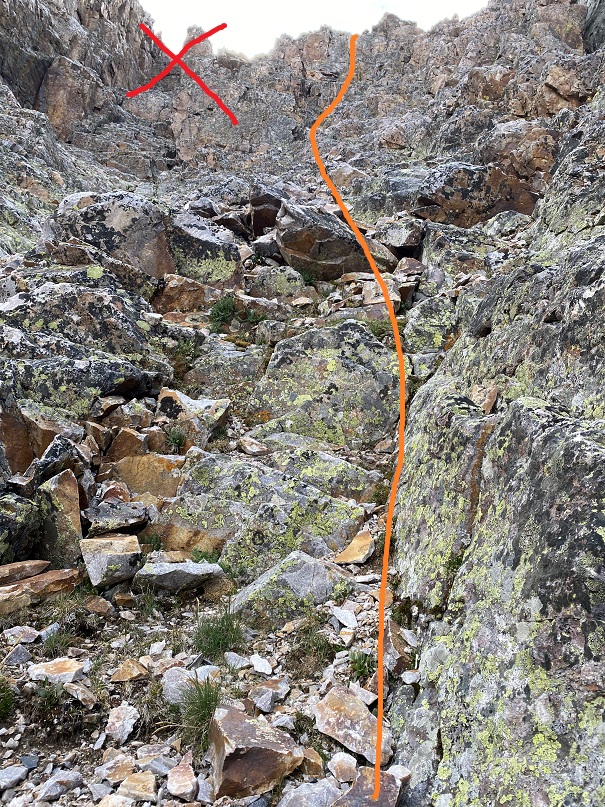
The entire time I was descending I kept my eye on East Trinity, looking for the best way to ascend.  It looked to me like the best option would be to keep towards the center until the end, where I wanted to summit towards the left to avoid any difficult traverse there may be if I topped out on the right (side note:  there didn’t appear to be any difficulties if I’d chosen to summit to the right instead).  You can’t see it in this picture, but at the very top there are two chimneys to the left.  Take the one on the right (I cliffed out about 10 feet from the summit and had to retreat and find a different route).

30

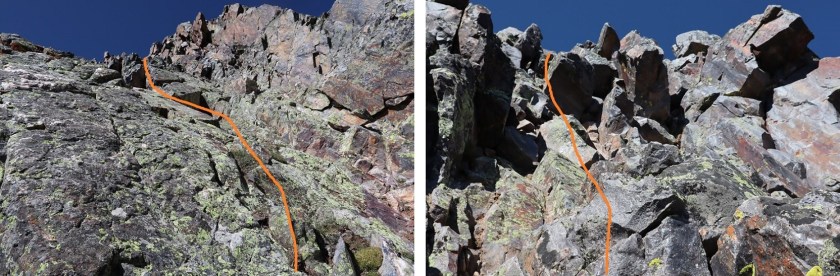
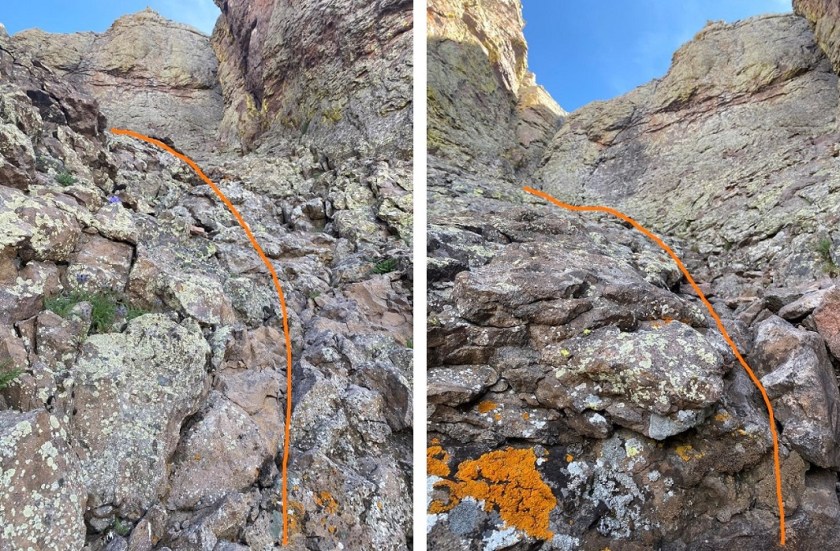
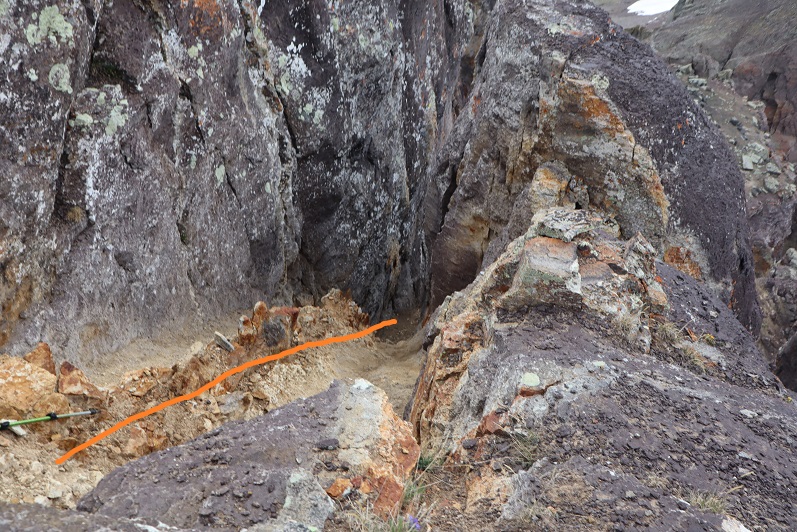
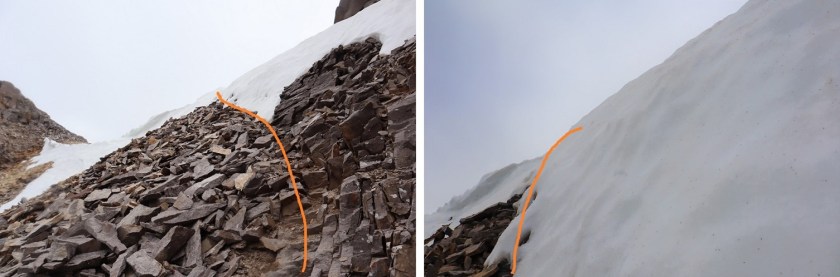
At the saddle there was a gully to cross before heading up

31

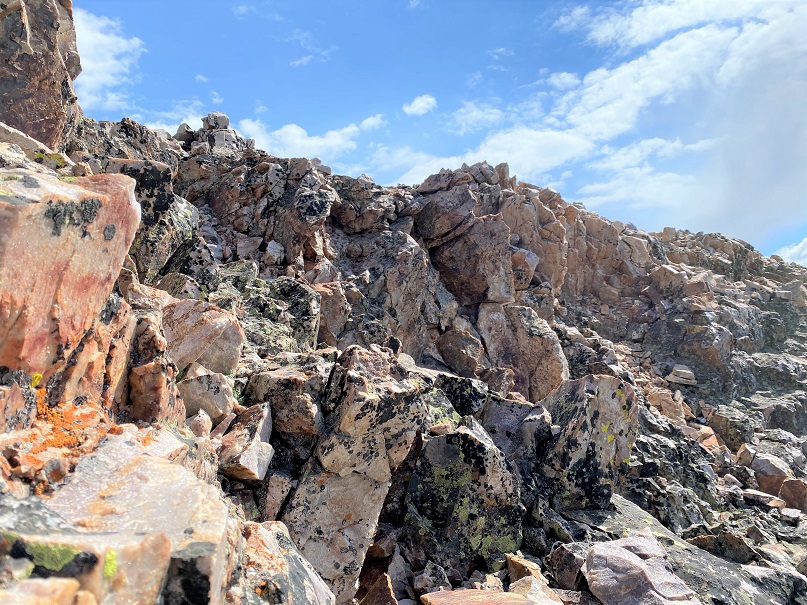
Once inside the gully the rock was surprisingly stable, but there were a lot of large rocks that were easy to kick down, so if you’re hiking with a partner be careful not to dislodge rocks.

32

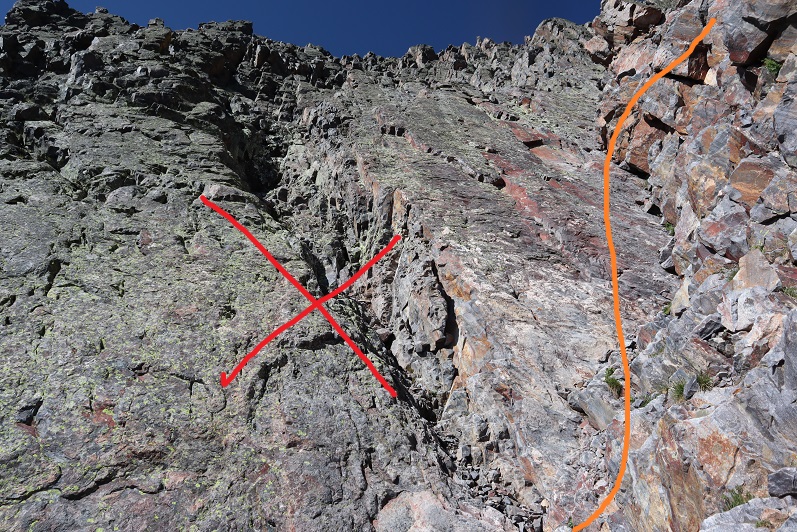
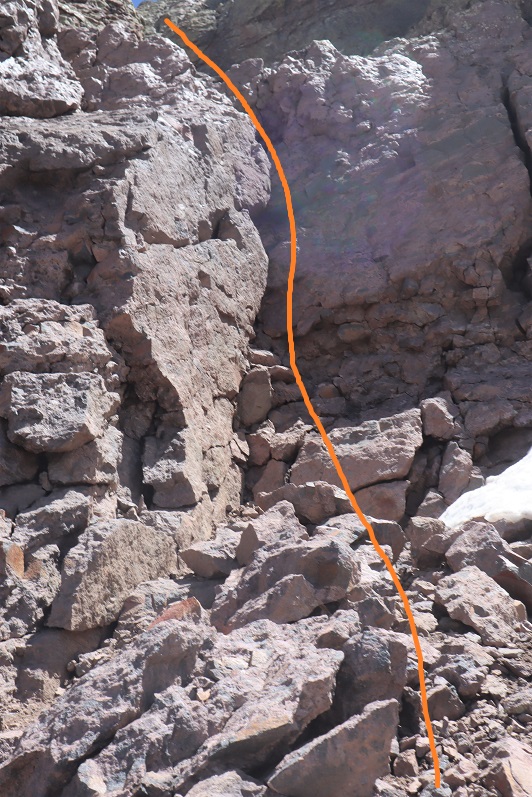
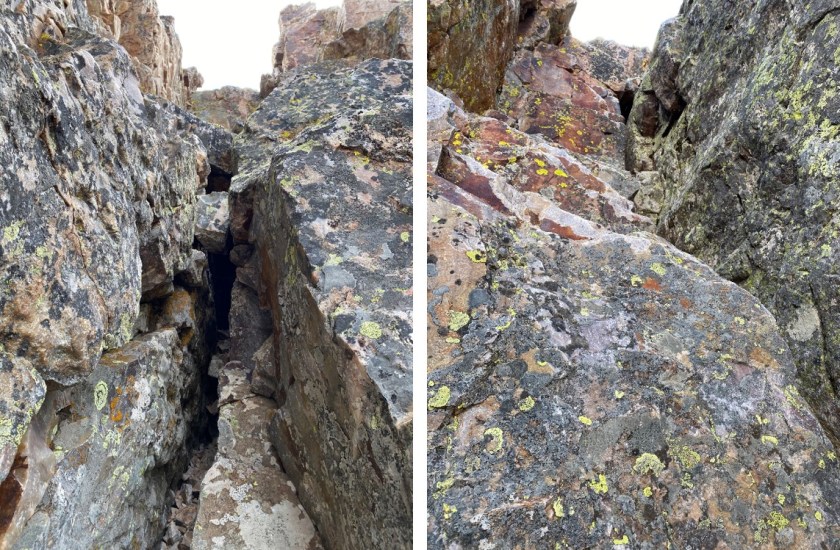
The only time I had trouble was when I got towards the top.  Like I said before, stick to the left, and then choose the gully to the right.

33

This was class 4 climbing.

34

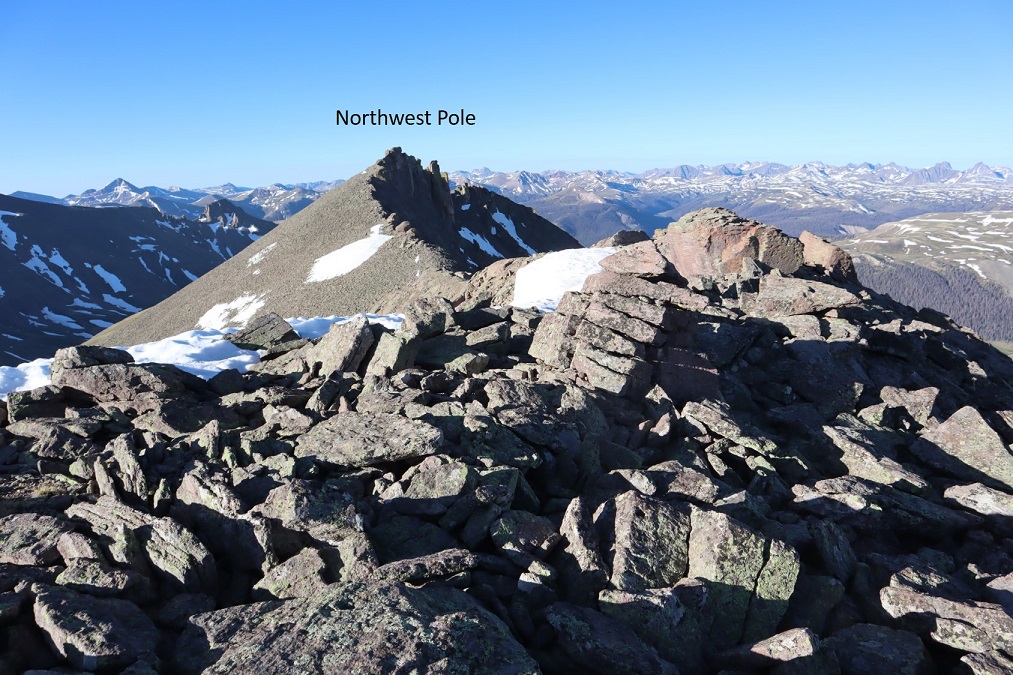
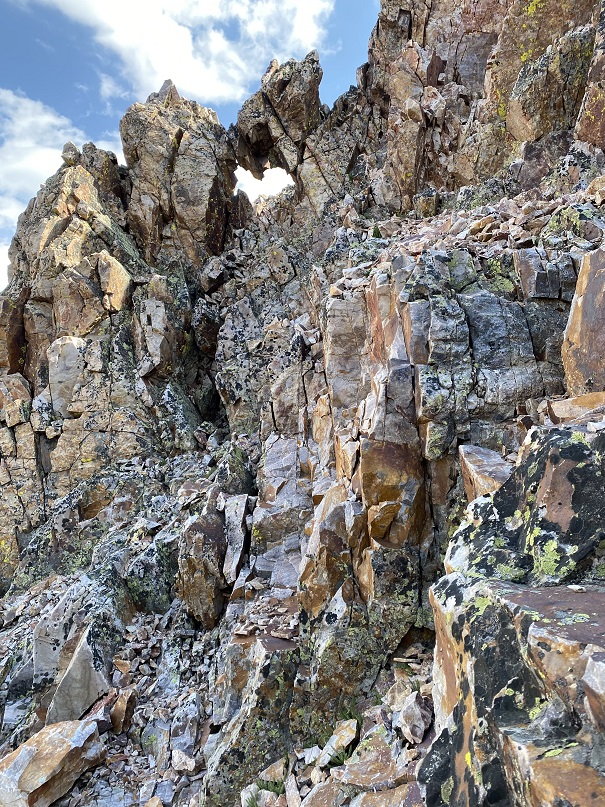
To my left I saw another ‘kissing camel’ formation.  The cool thing about this one is it includes a heart

35

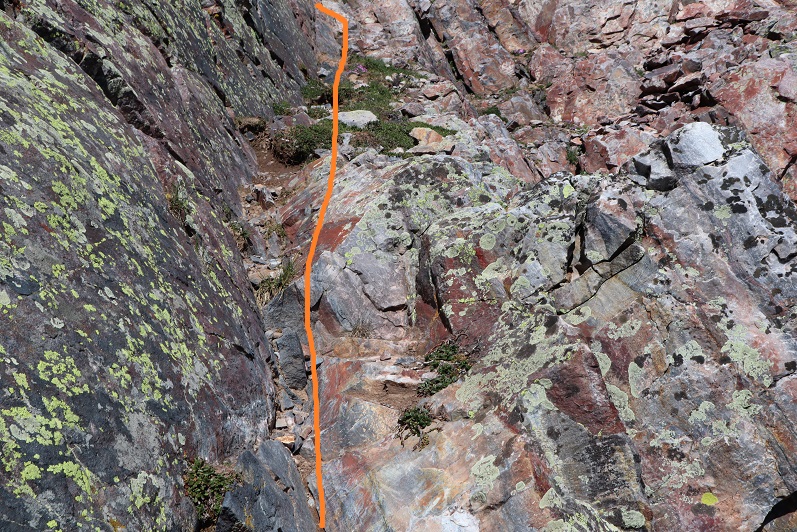
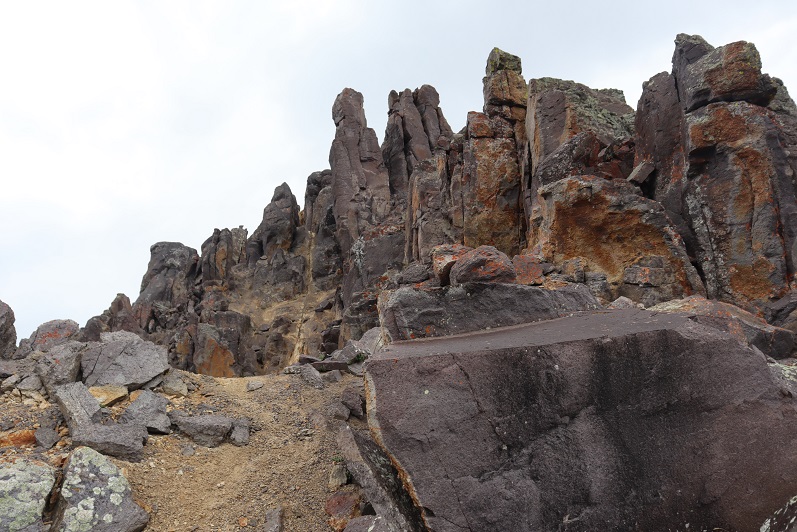
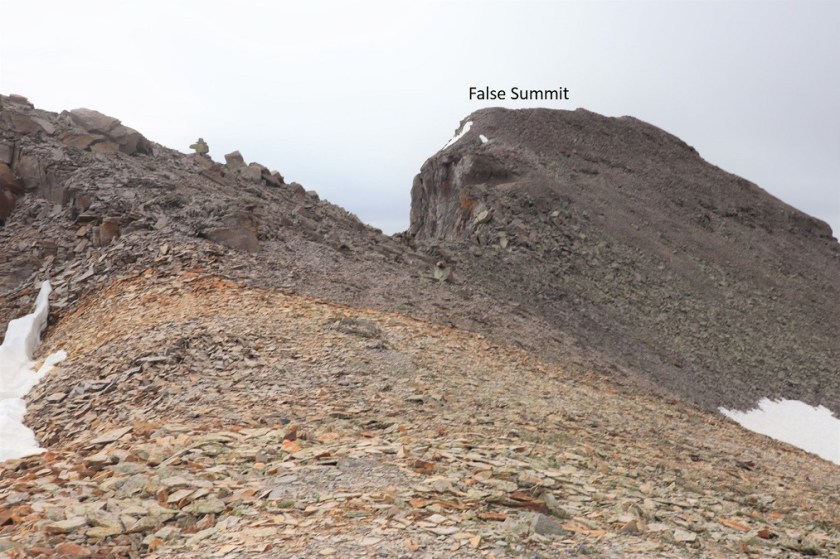
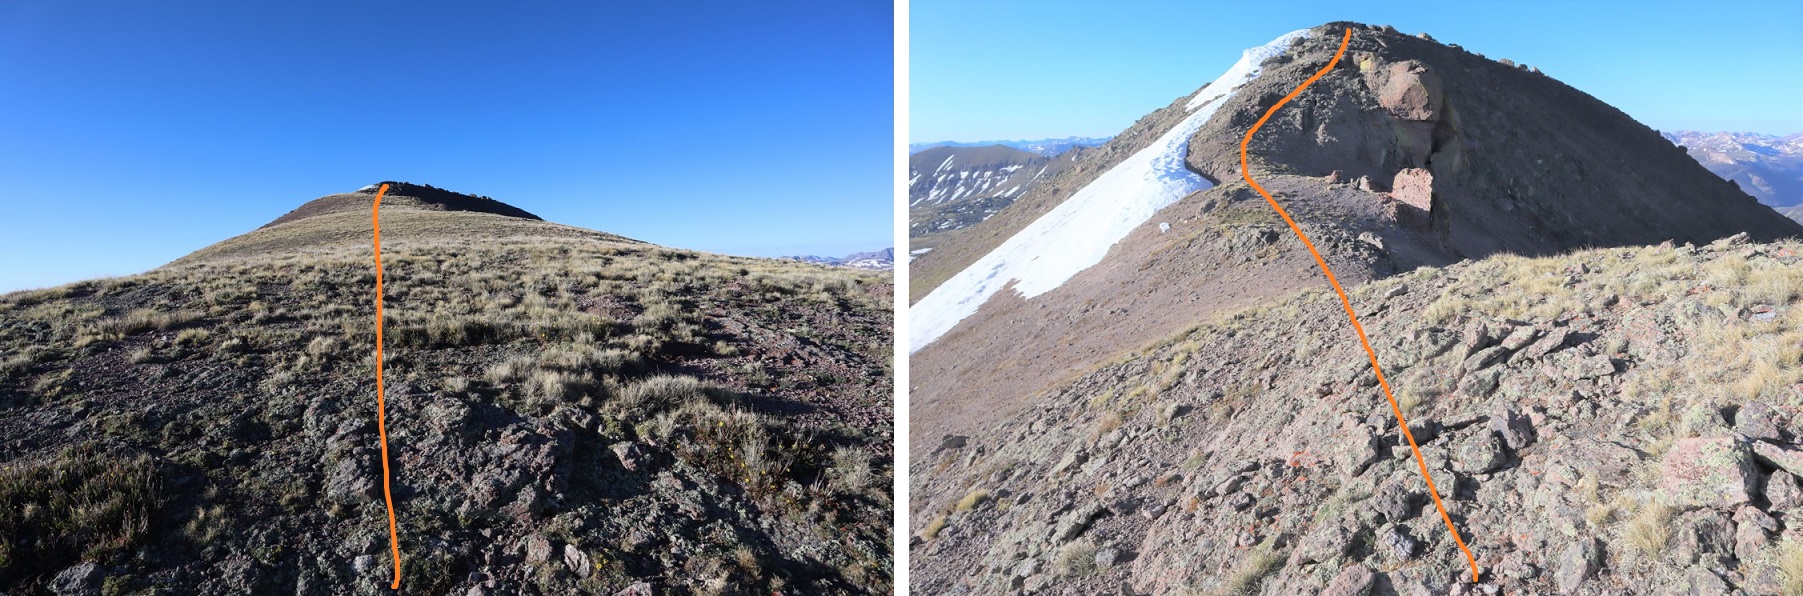
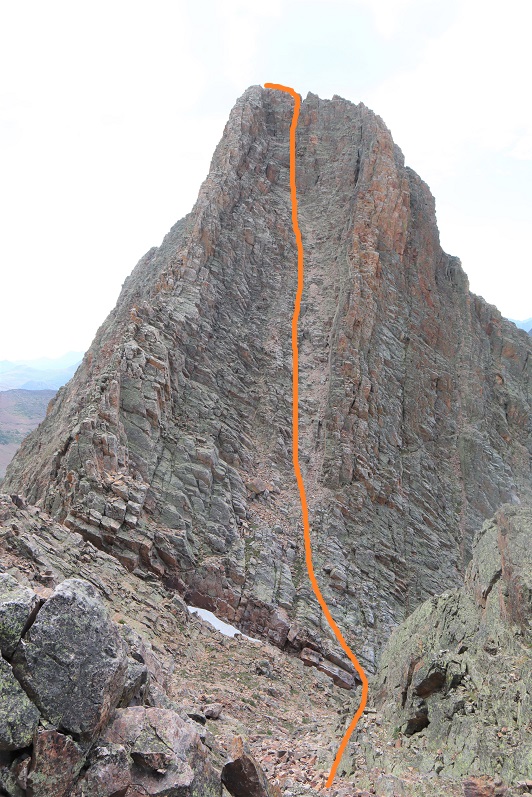
After taking the wrong route, cliffing out and backtracking, I headed a little more south and found an area I could climb and make it to the ridge

36

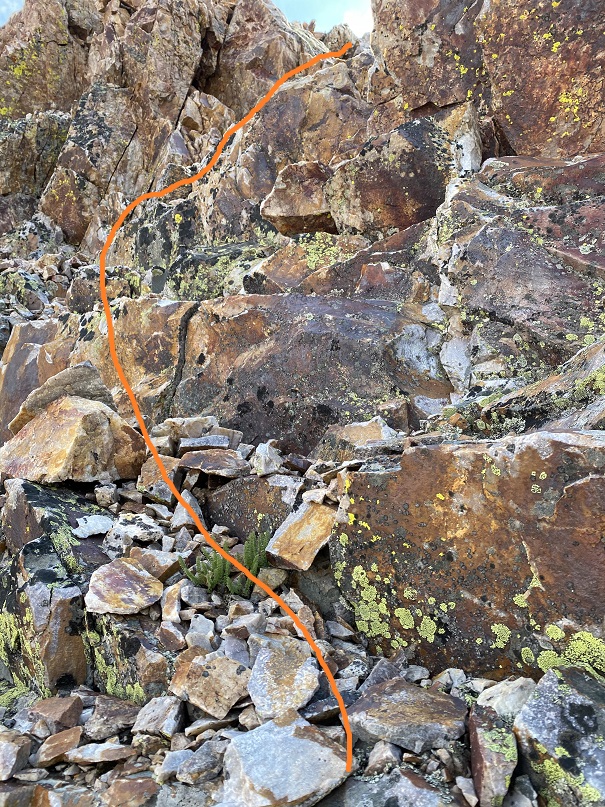
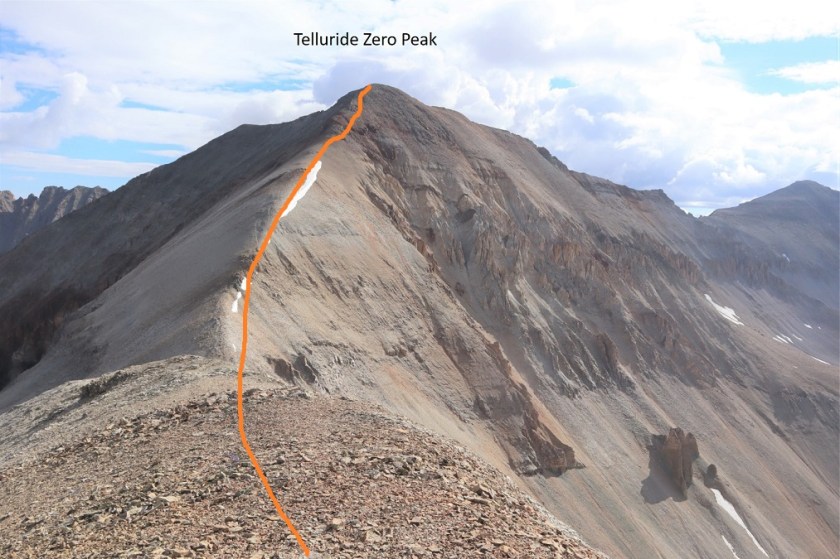
I was thrilled when I topped out and could see the summit an easy hike away!

37

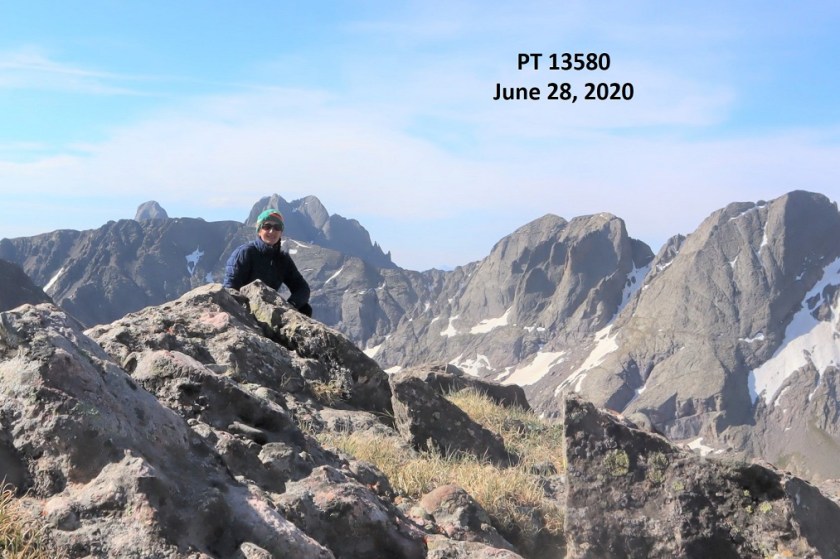
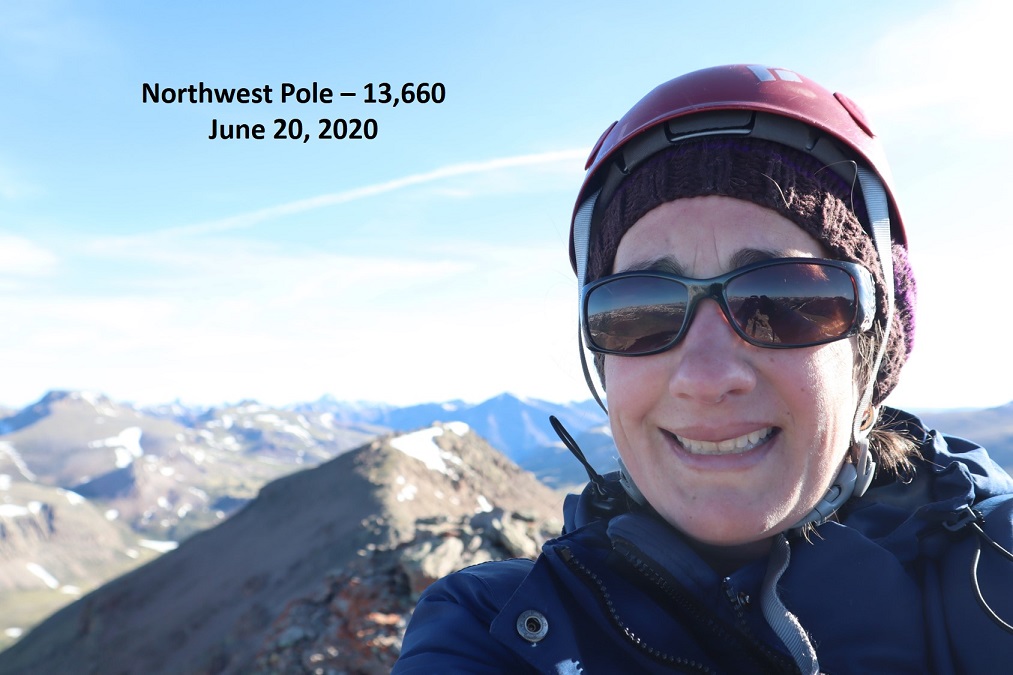
I summited East Trinity Peak at 10:30am. It had taken me less than an hour to make it to East Trinity from Trinity.
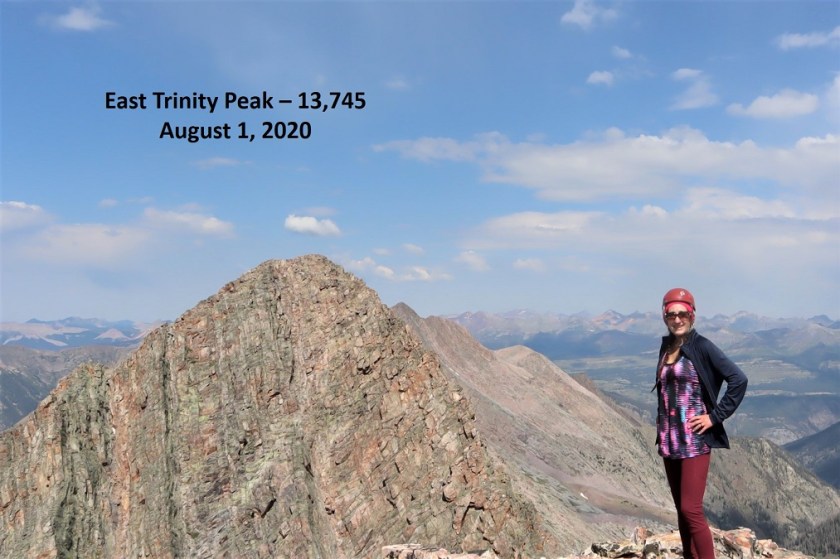
38

East Trinity Peak

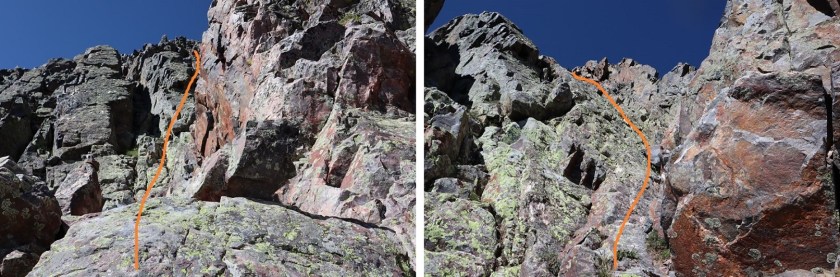
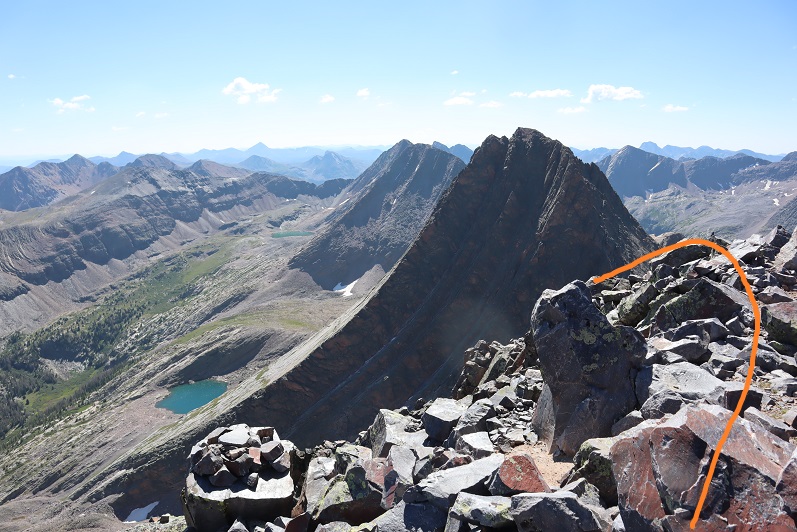
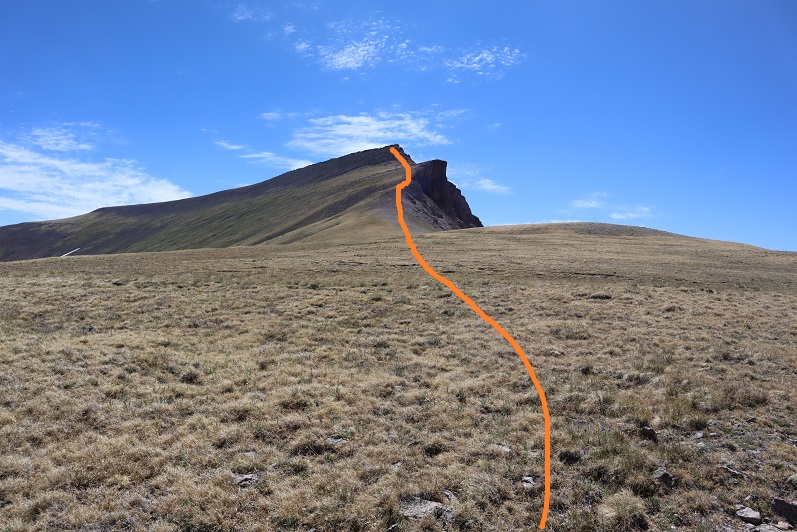
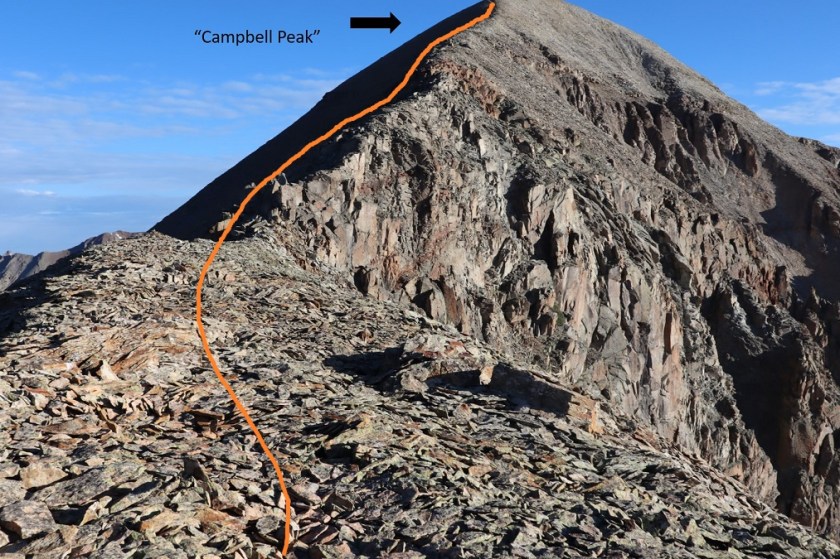
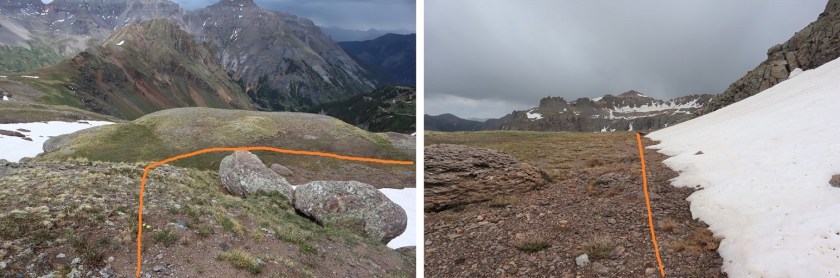
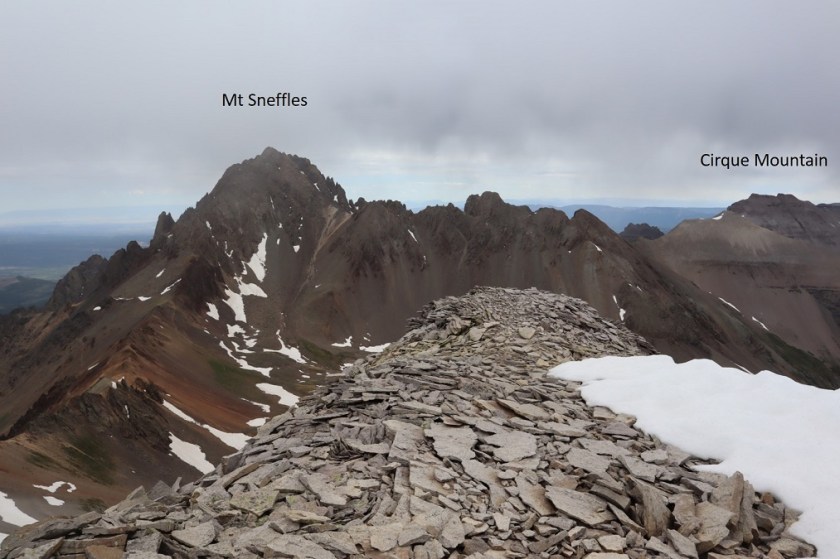
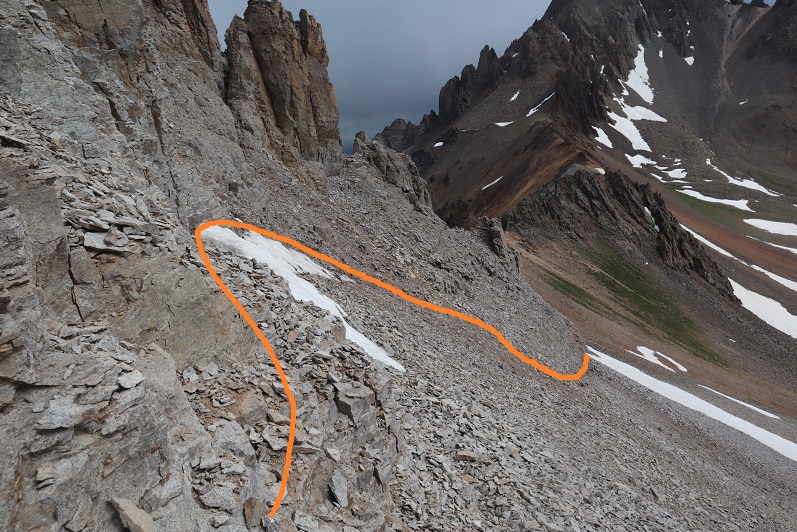
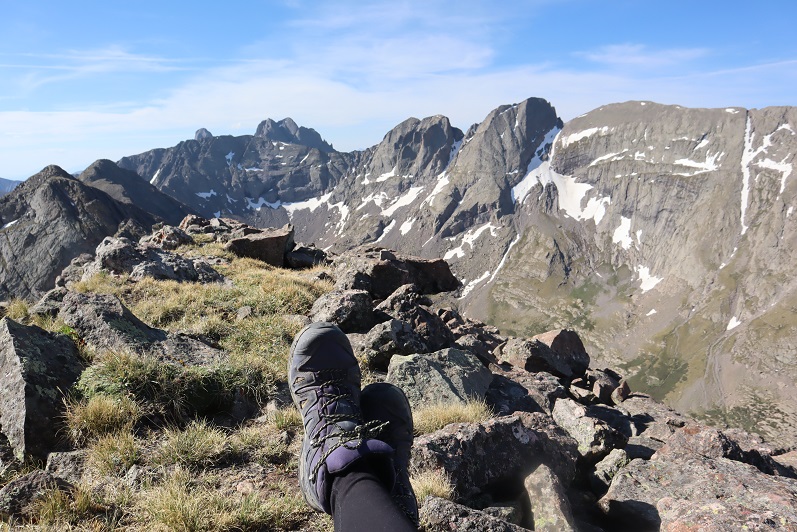
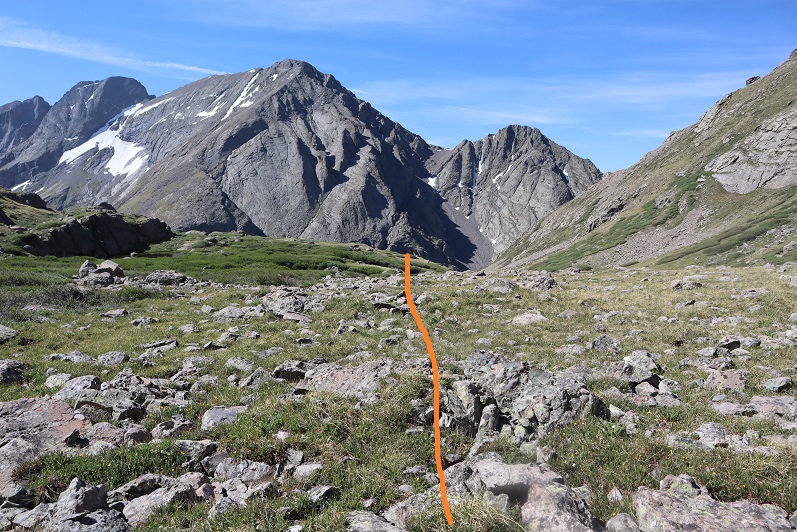
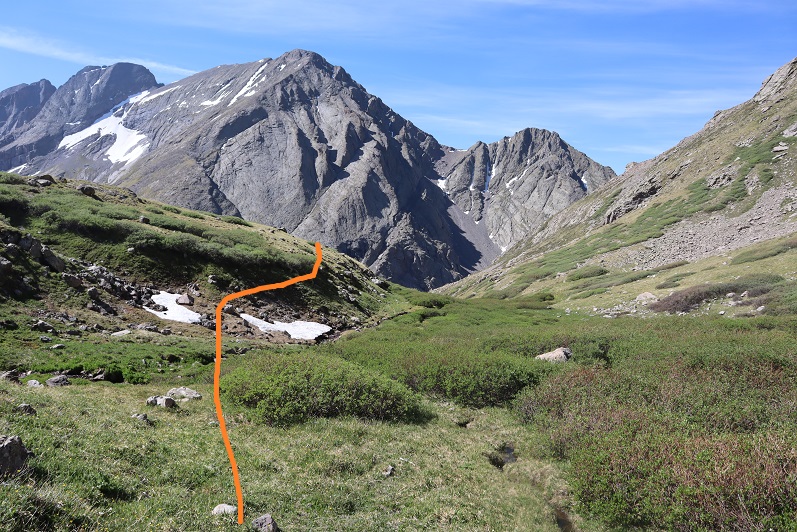
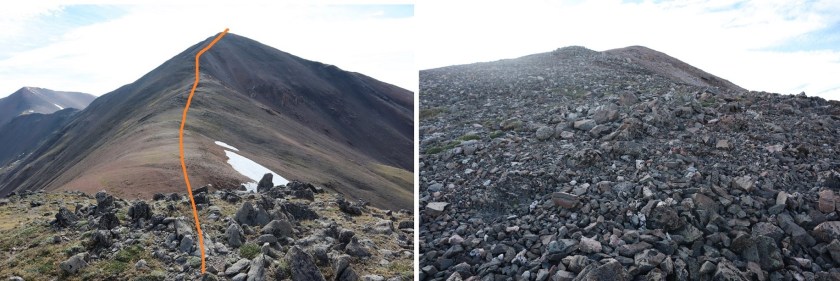
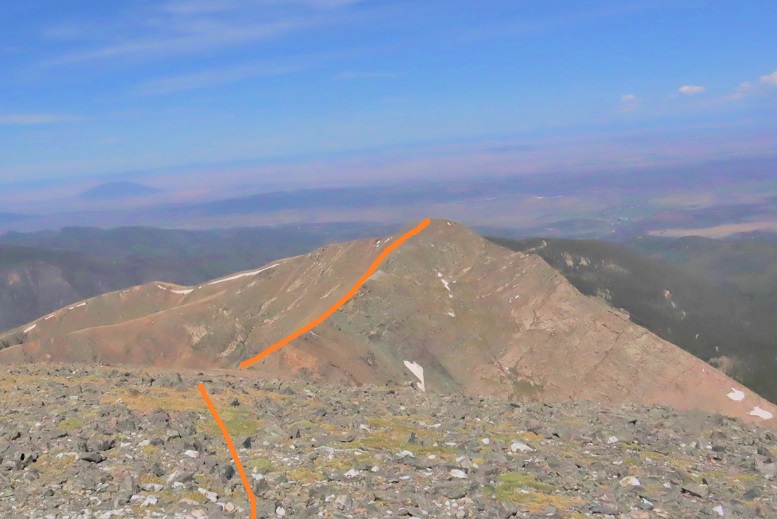
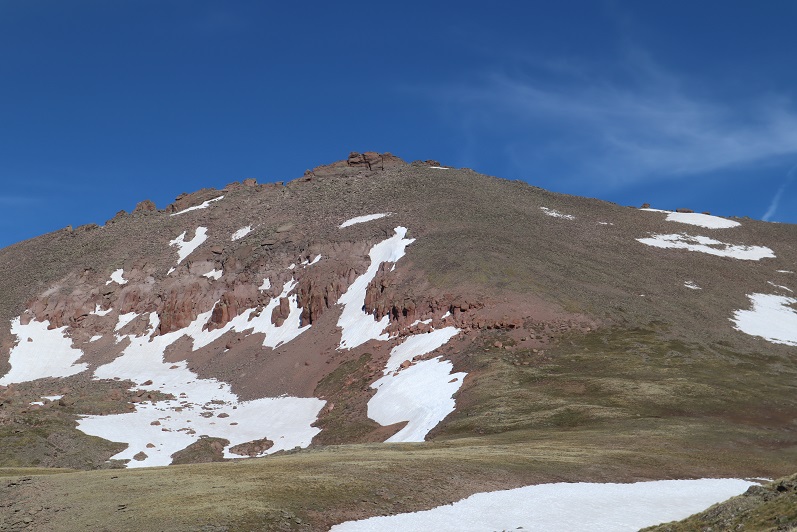
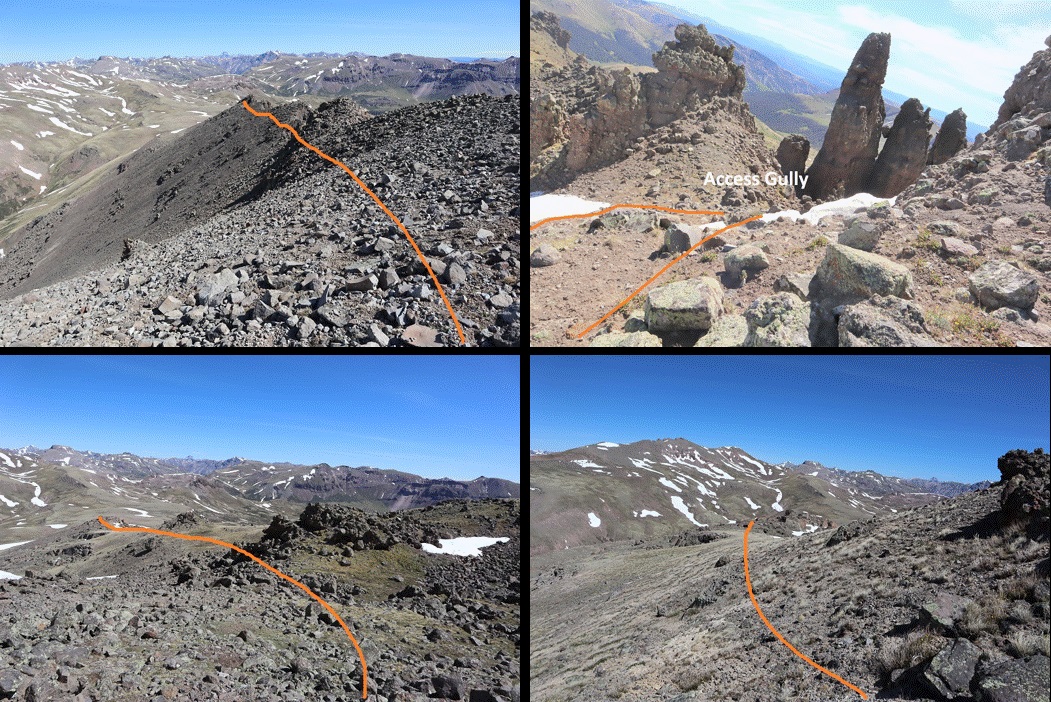
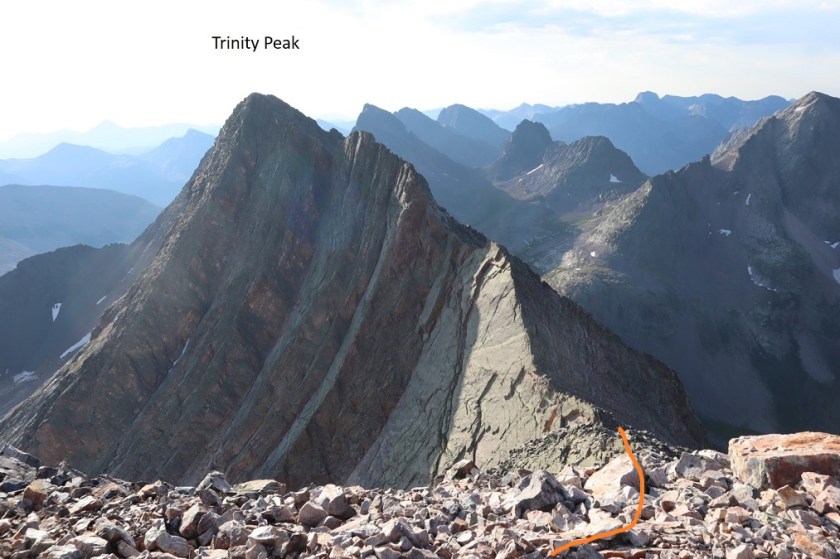
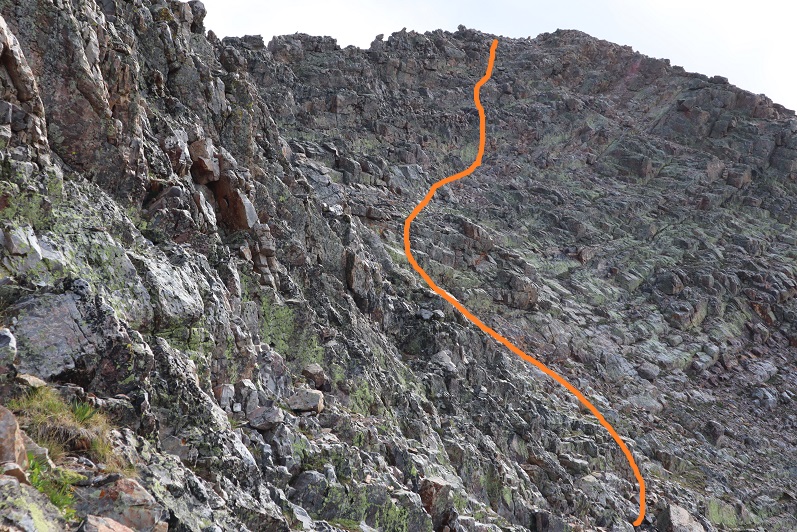
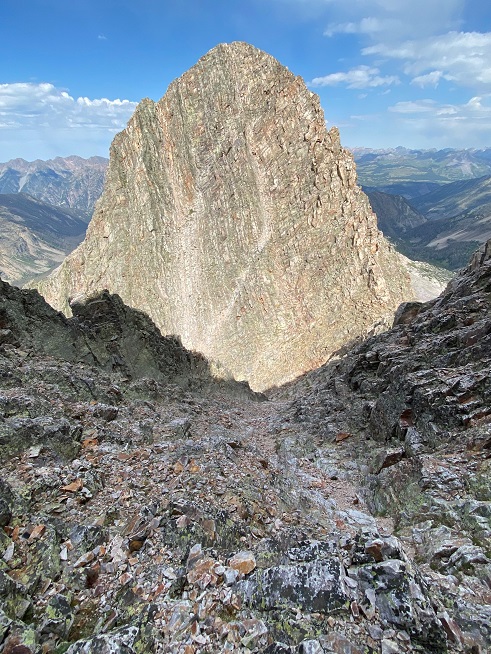
Here’s a look back at Trinity Peak.  I was talking with someone on my hike out who told me she’d attempted the traverse a few years ago, but couldn’t find a way to summit Trinity Peak.  They’d ‘missed the peak’.  If you’re unable to find the access points, or want to keep this part of the hike class 2 (or easy class 3), just make your way to the Trinity/East Trinity saddle and hike back up the gully to summit Trinity Peak (shown below)

39

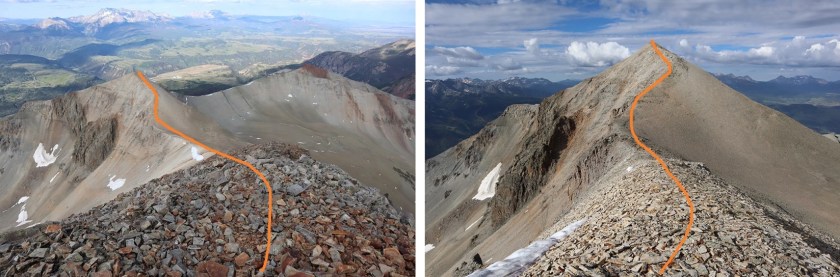
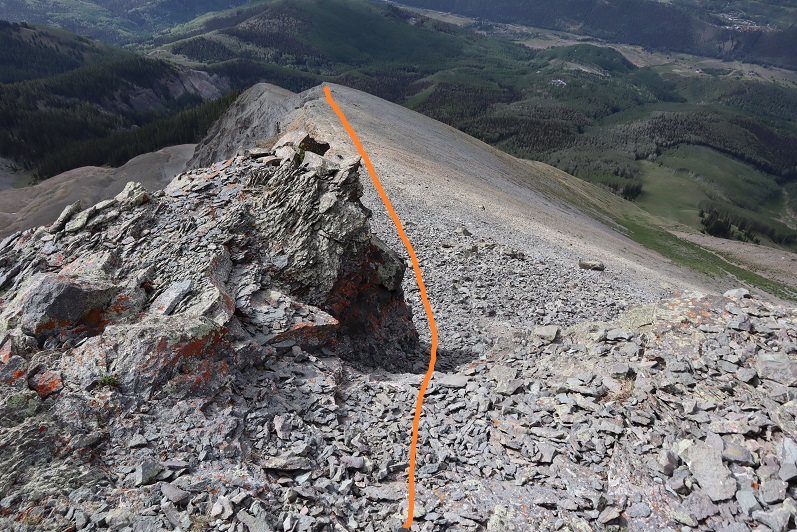
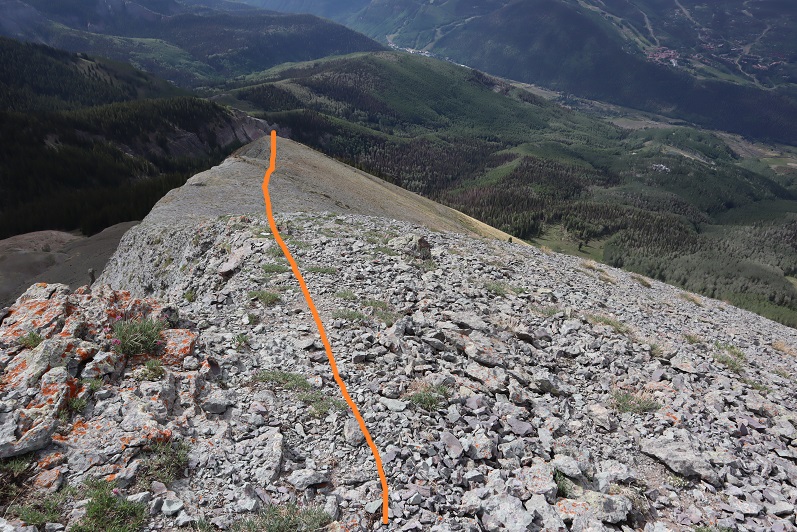
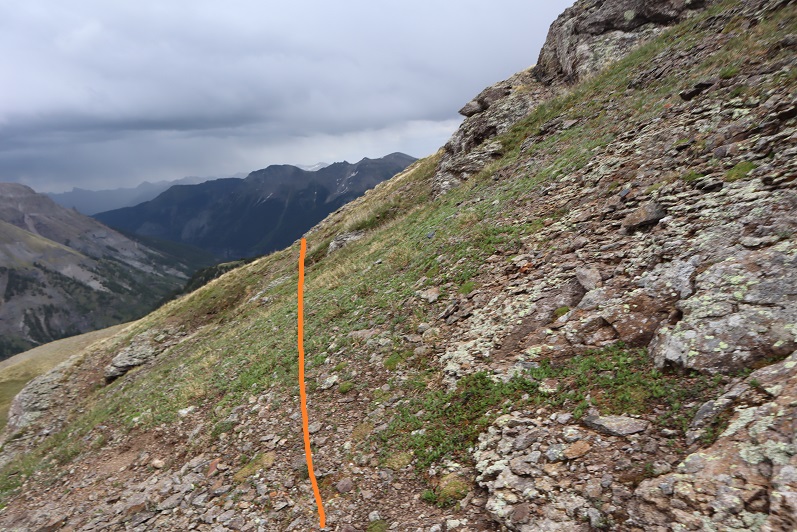
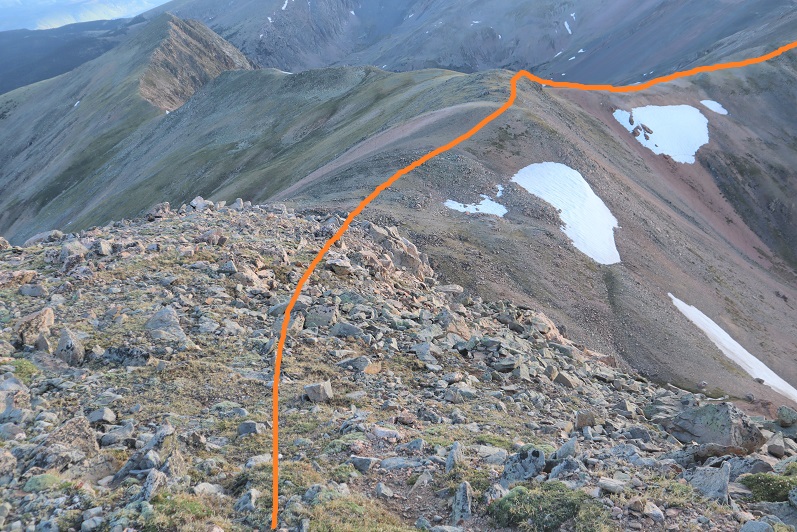
Time to head back down.  The ridge down from East Trinity was straightforward.

40

With a couple of surprisingly steep sections

41

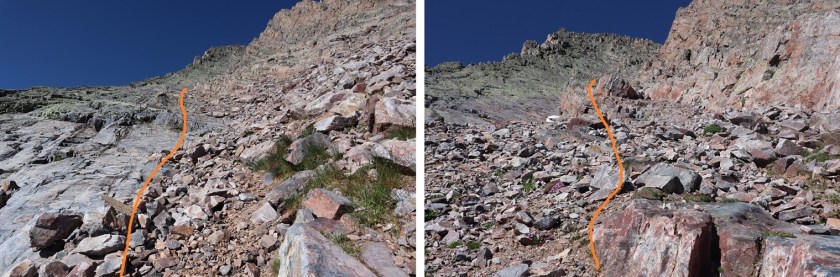
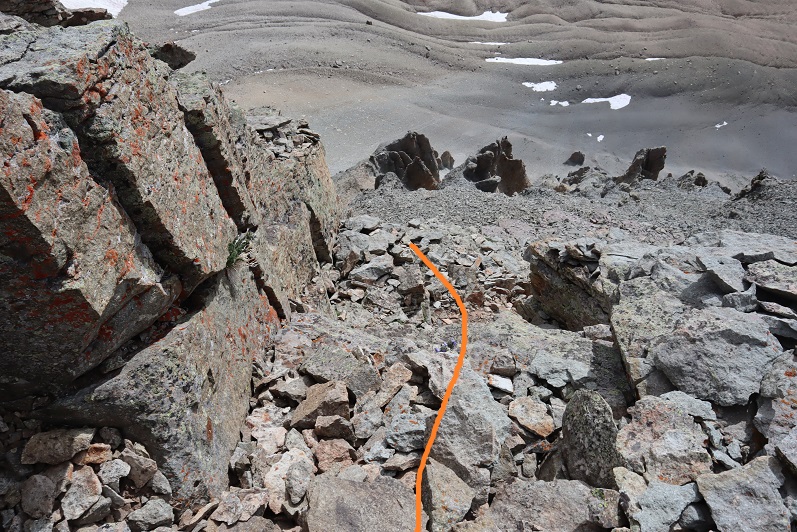
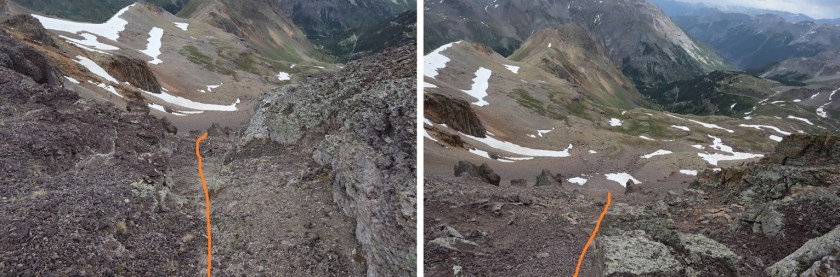
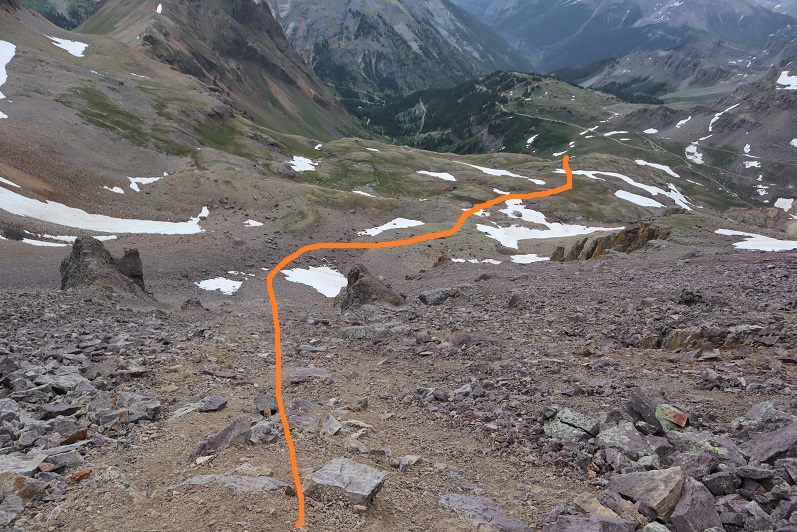
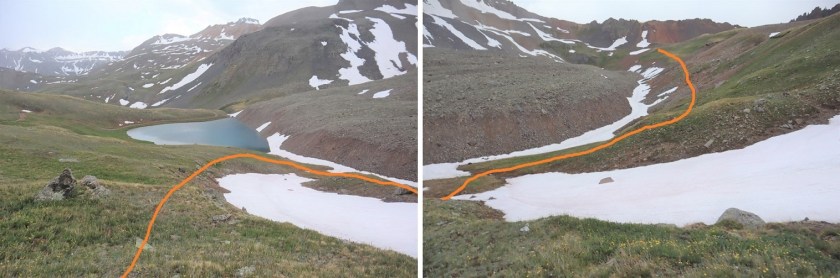
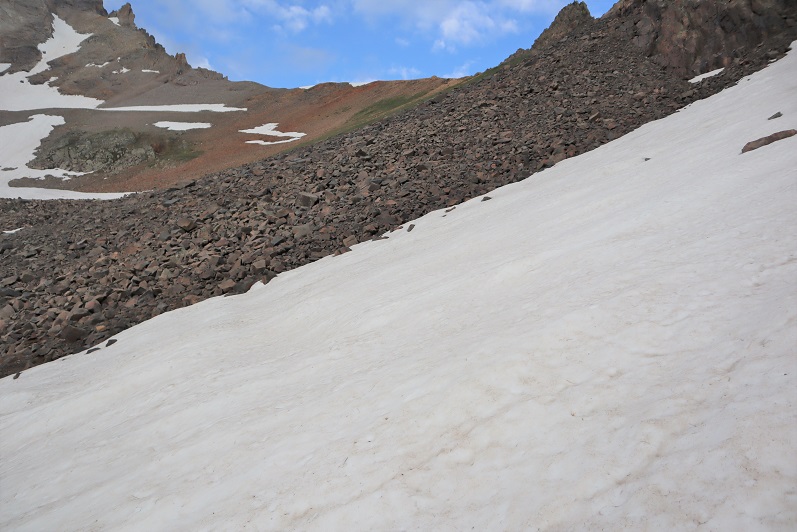
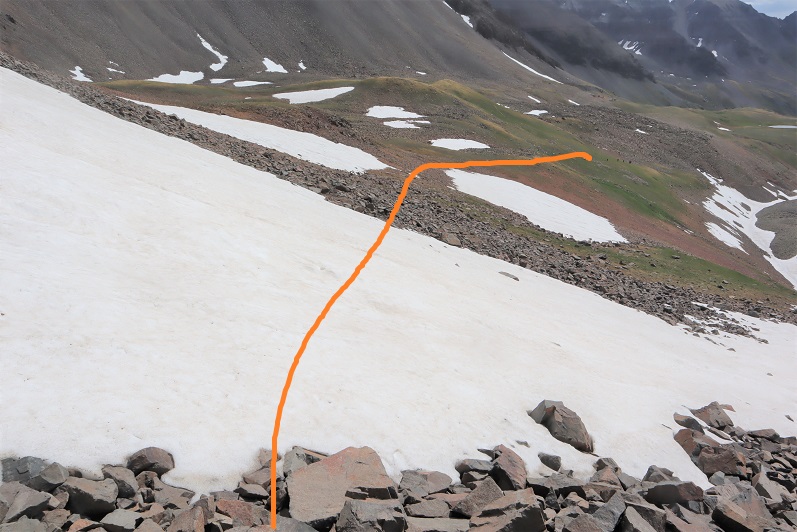
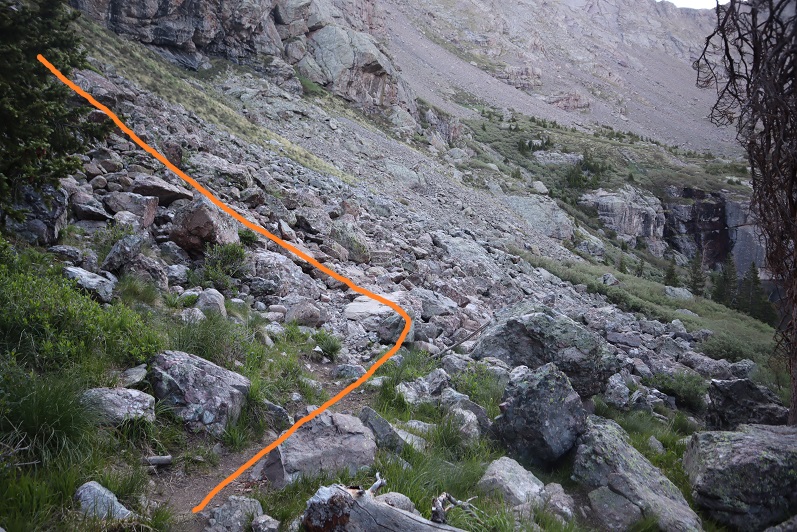
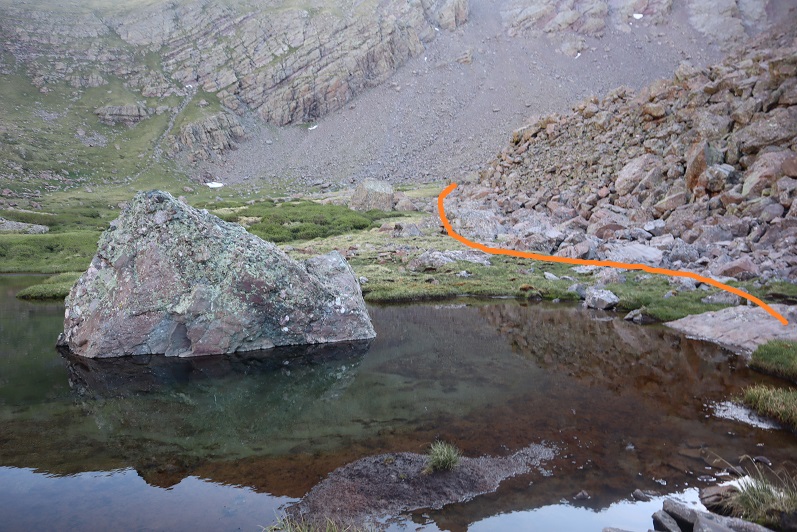
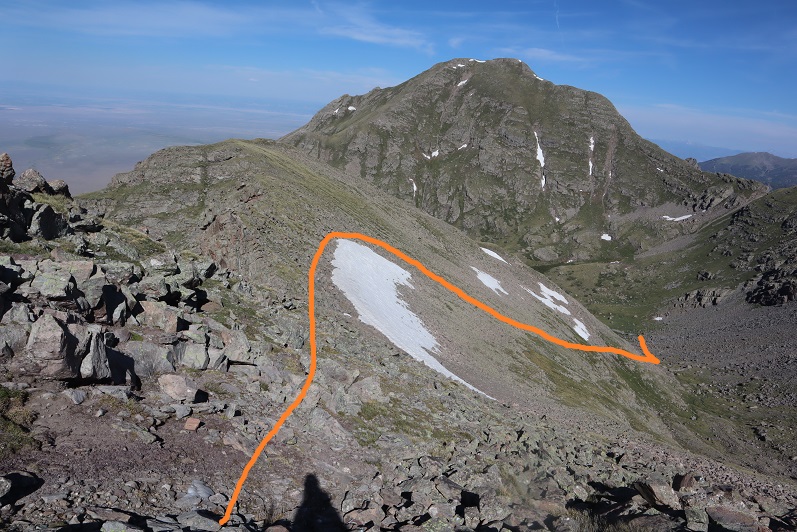
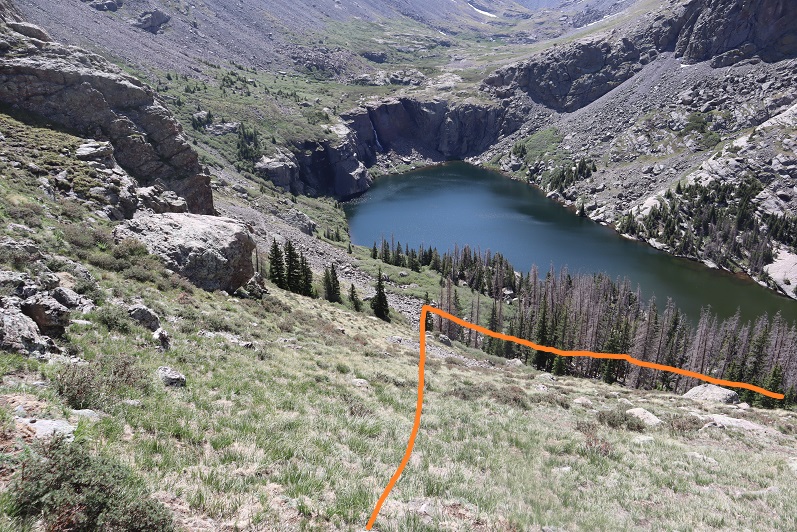
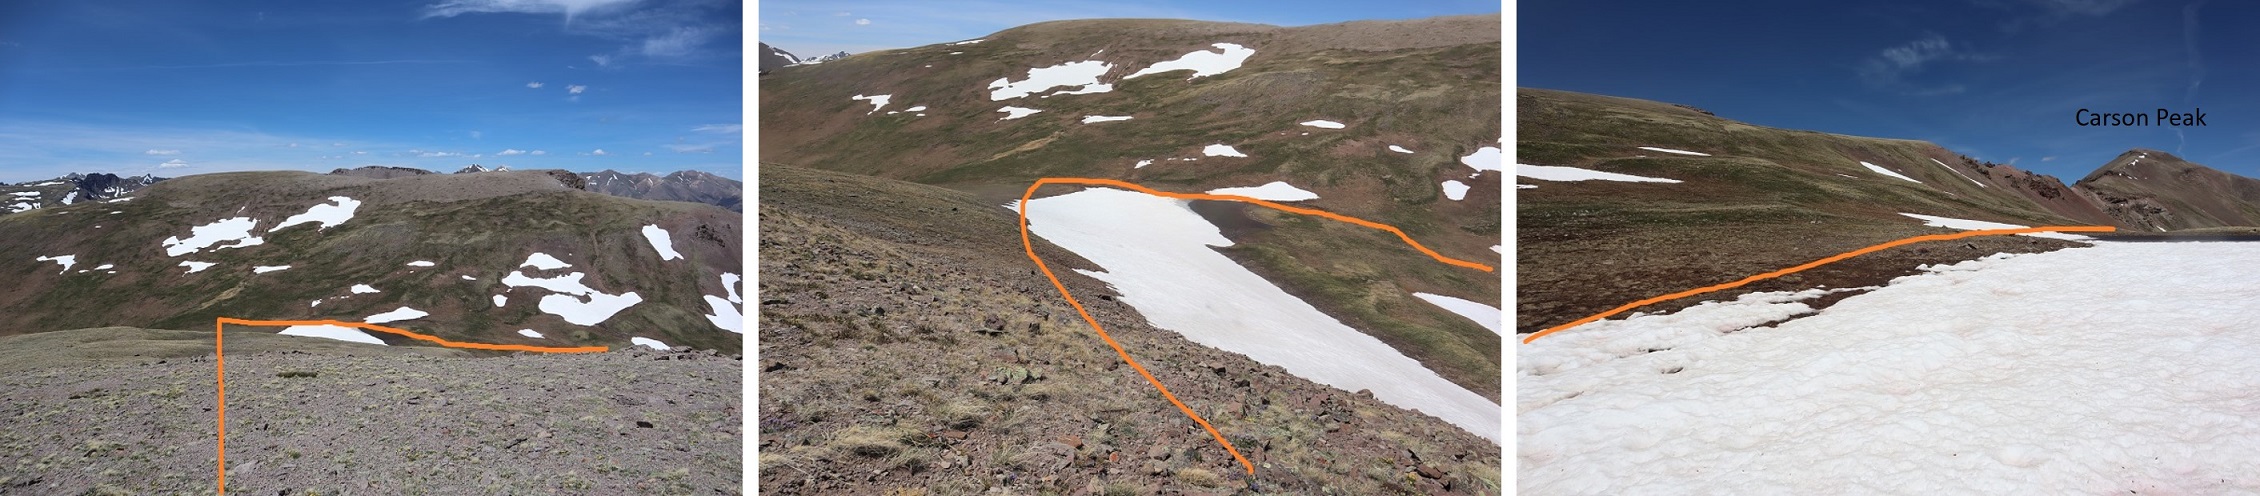
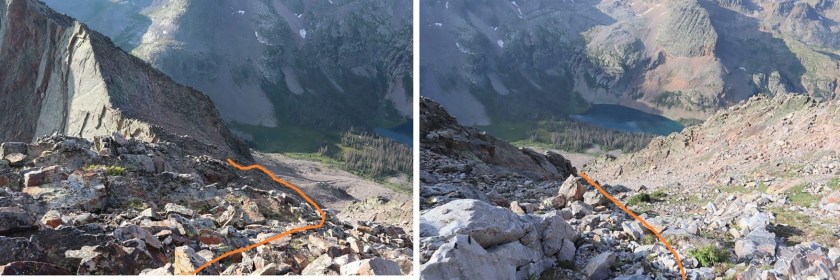
I made it to the saddle and scree-surfed down the gully to the lake

42

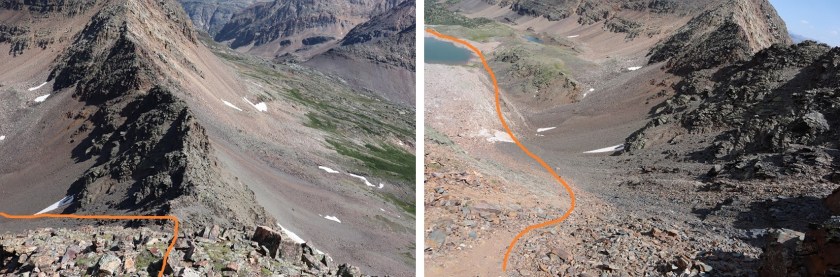
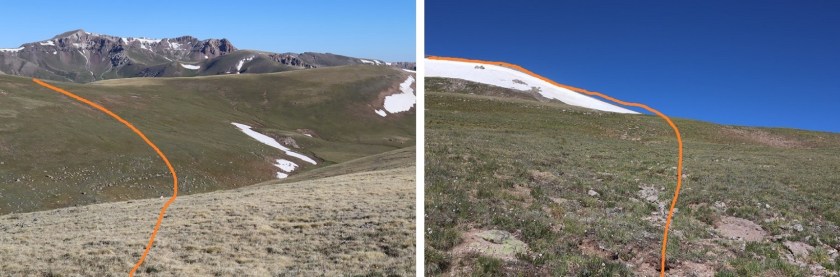
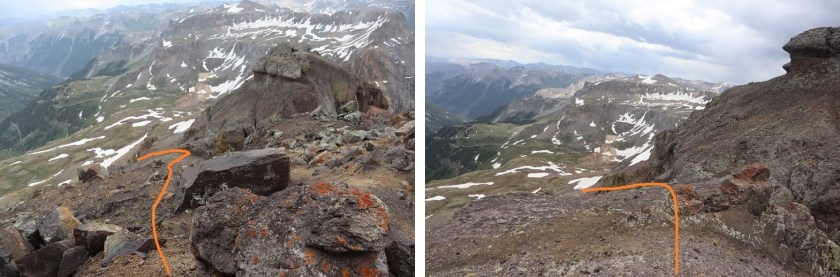
I skirted the right side of the lake and headed back down to my camping area

43

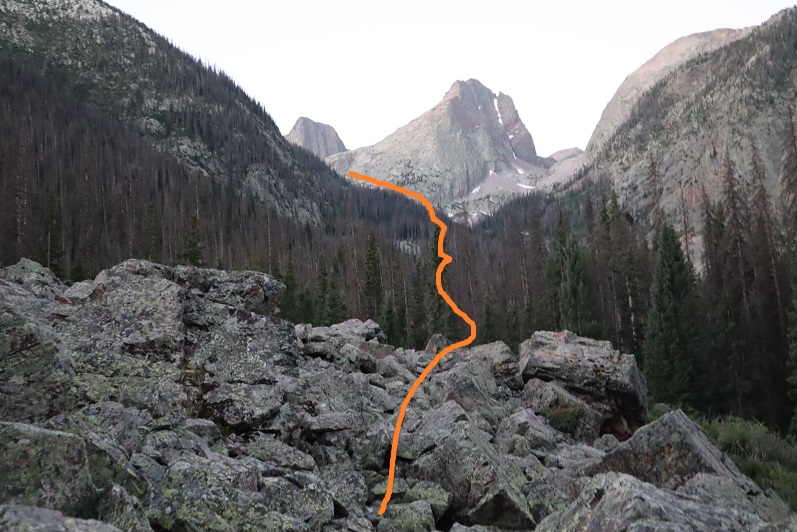
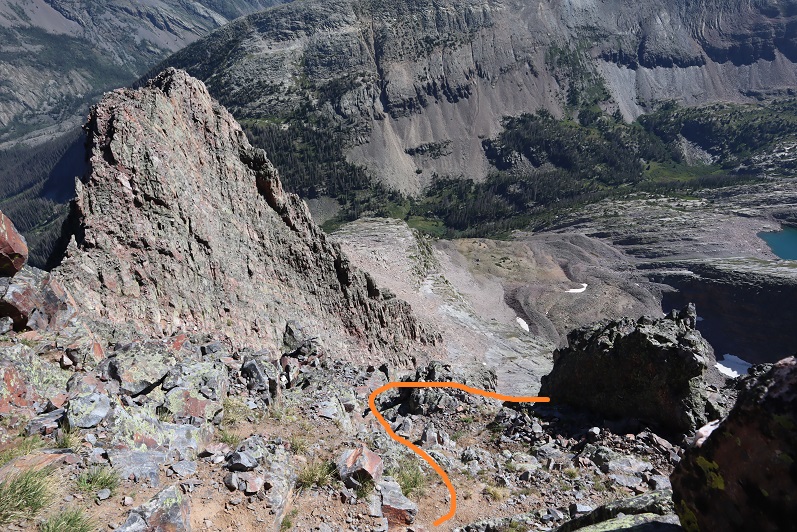
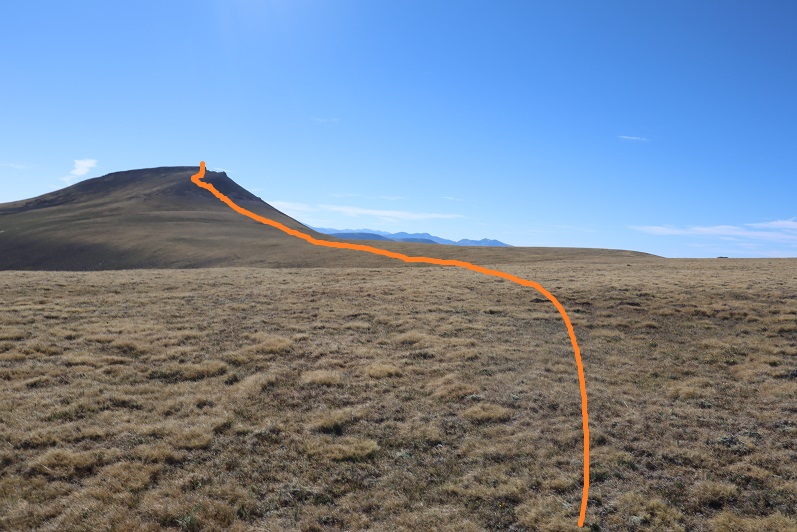
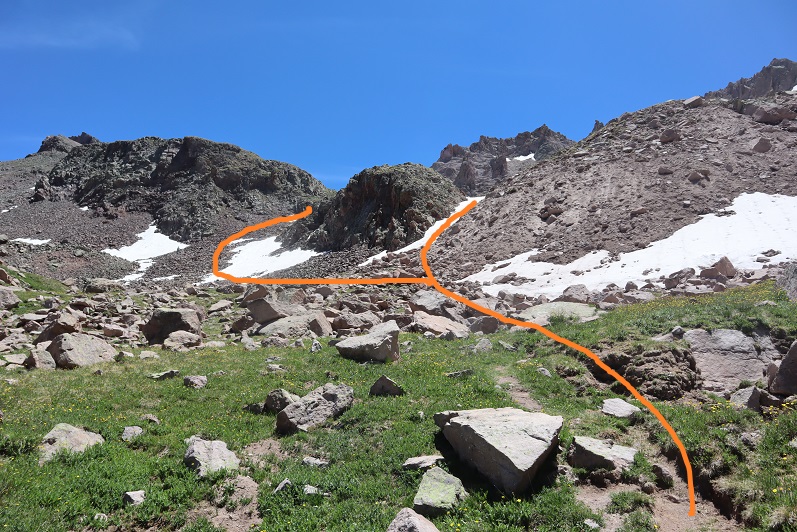
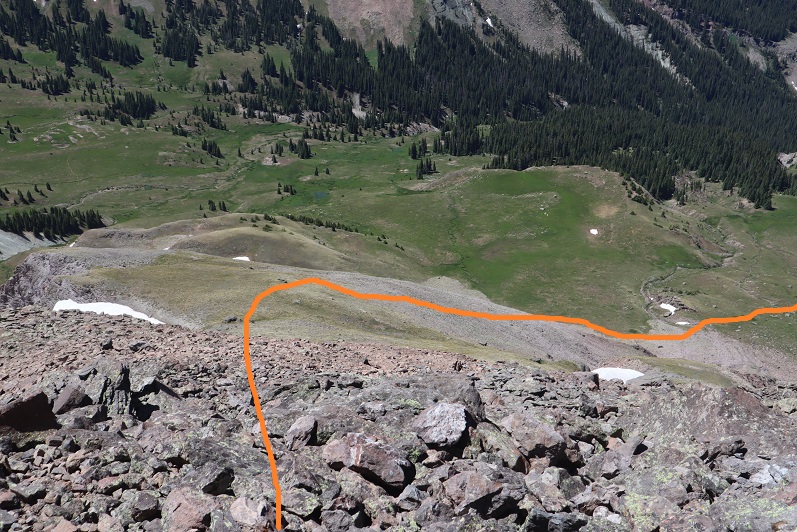
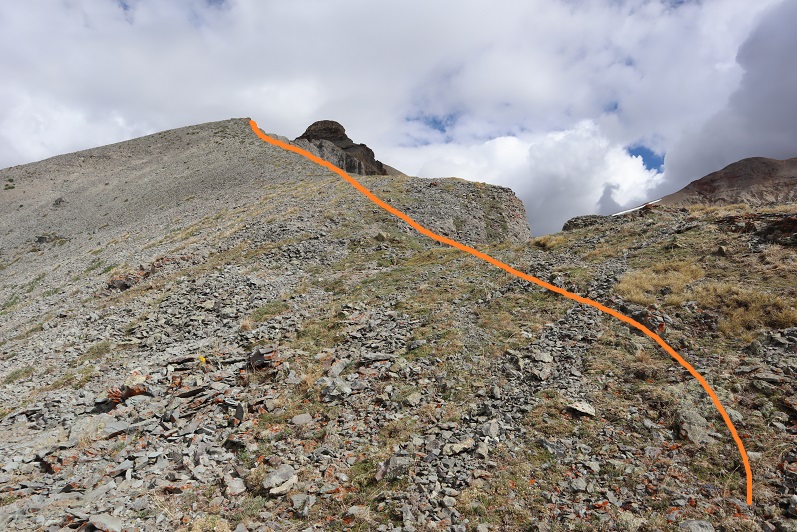
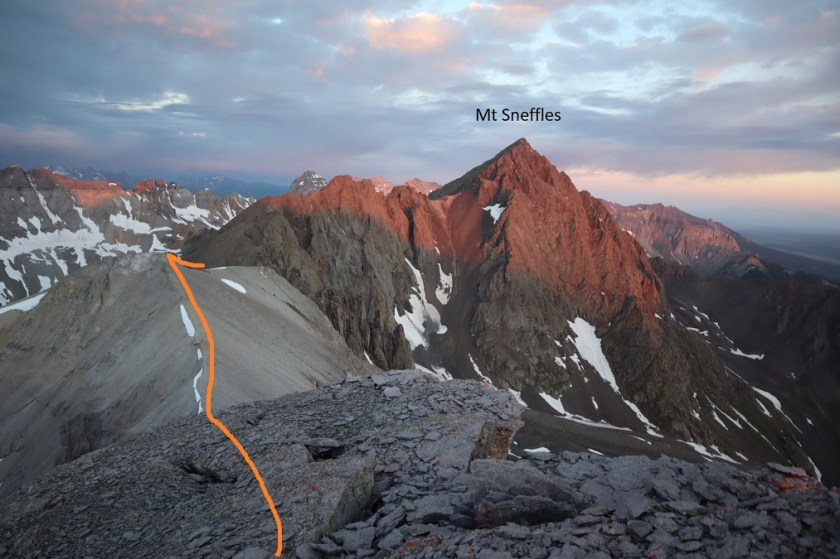
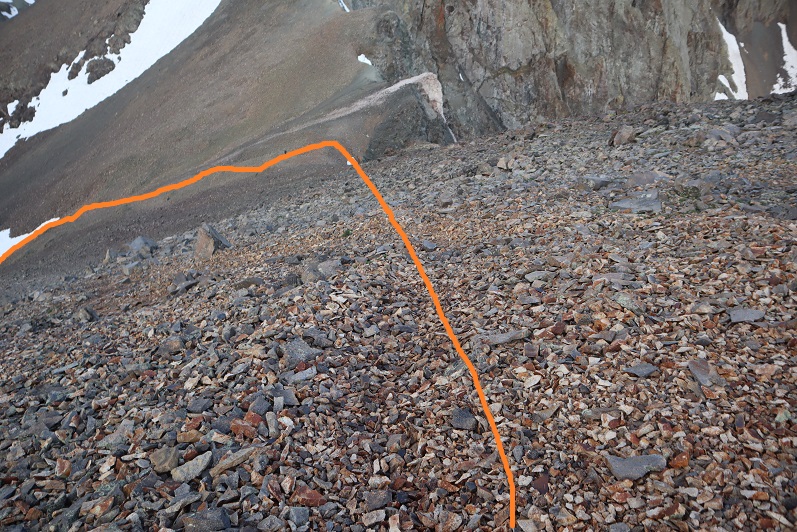
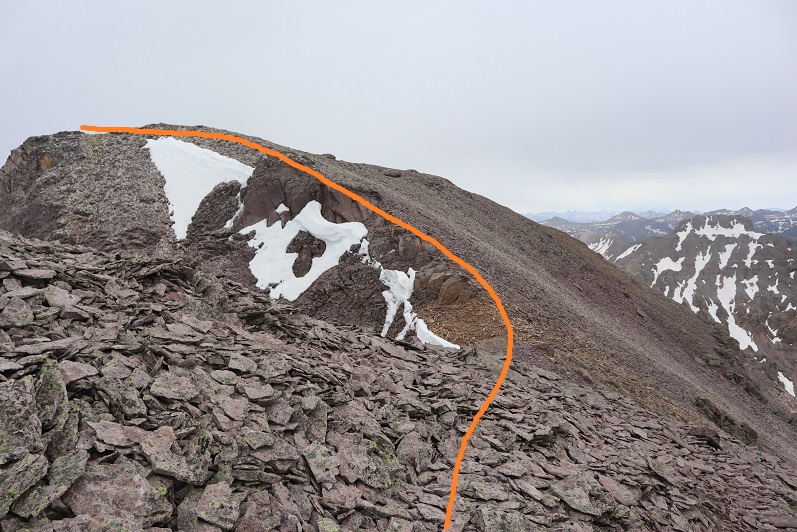
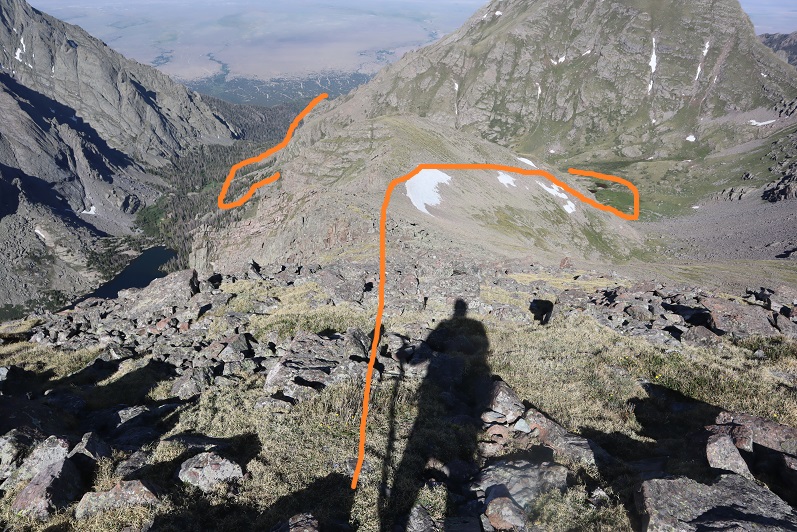
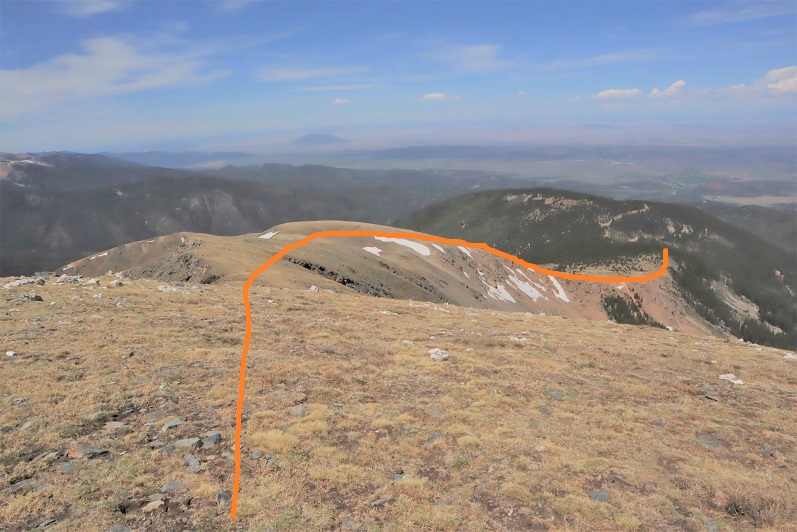
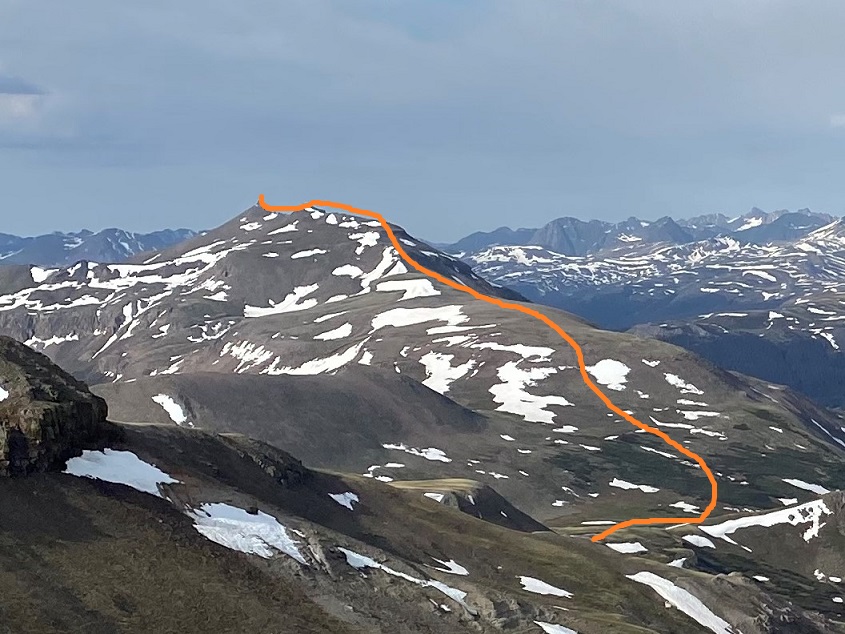
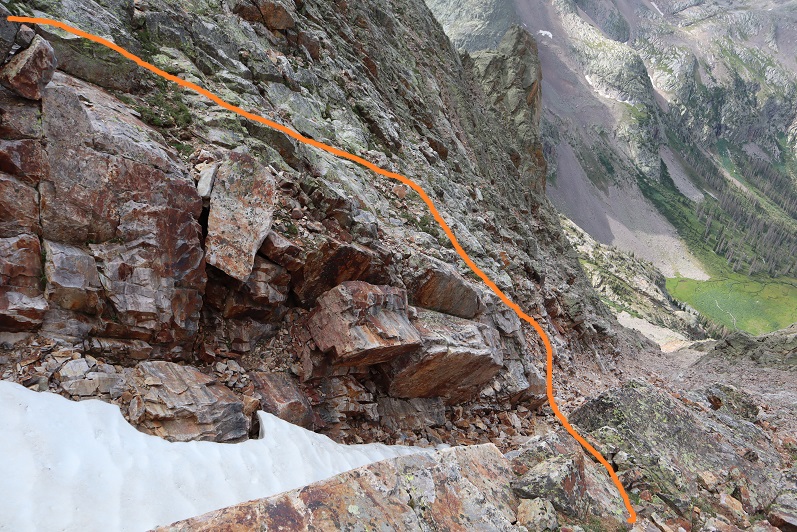
Here’s a look back at the route I took down from the East Trinity ridge

44

I made it to my stashed gear at 11:22am.  The traverse had taken me just under 6.5 hours to complete.  Notes on the traverse:  It’s very committing, there’s a lot of route finding, and I felt in the route I took there were a lot of class 4 moves.  I got a lot of good scrambling practice in, and honestly wish I would have attempted this traverse earlier:  I felt like I leveled up in my class 4 climbing skills, and I was deliriously happy with this hike.  And the weather had held!  Woot!

I filtered some more water, took off my shoes to air out my feet, and ate a couple of sliced mangoes (my first food of the day:  I get nauseous when I eat and hike but figured I needed some calories for the way out).

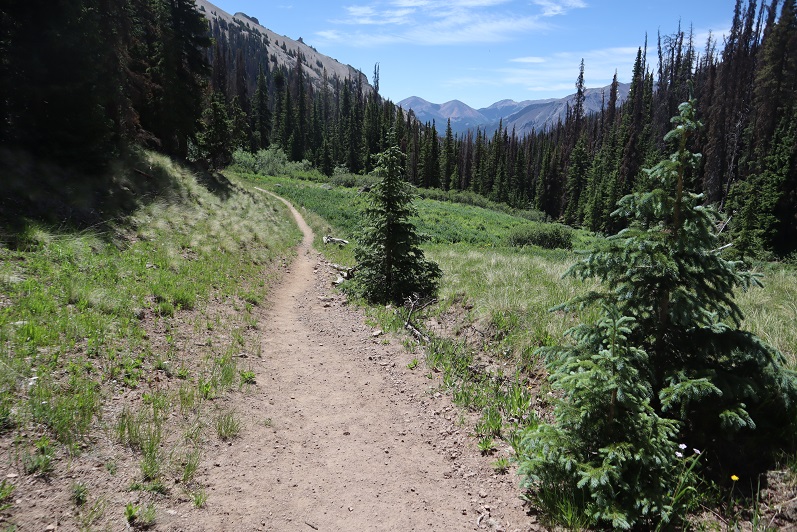
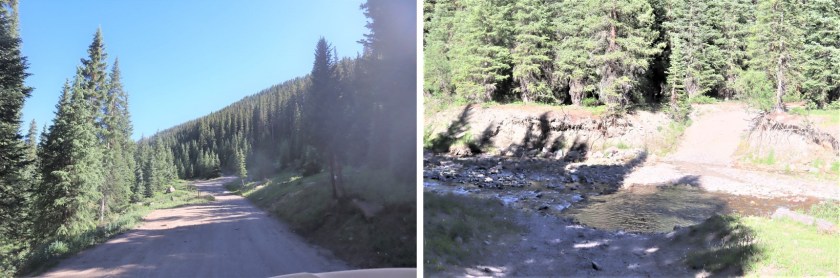
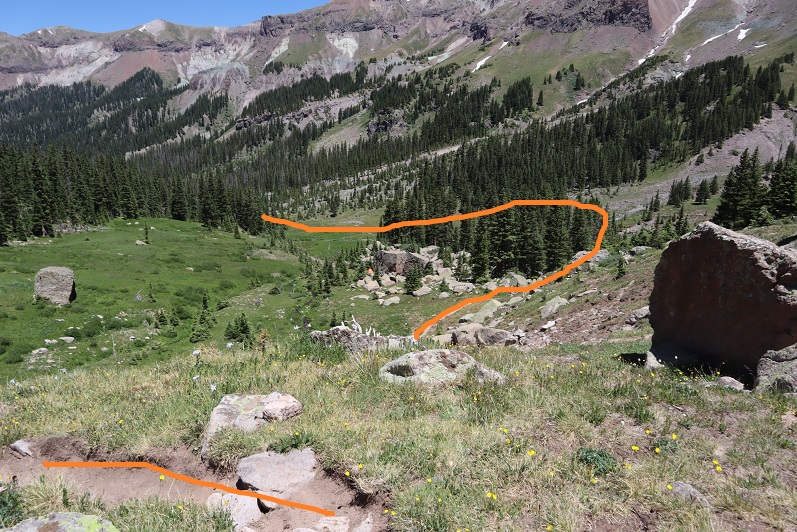
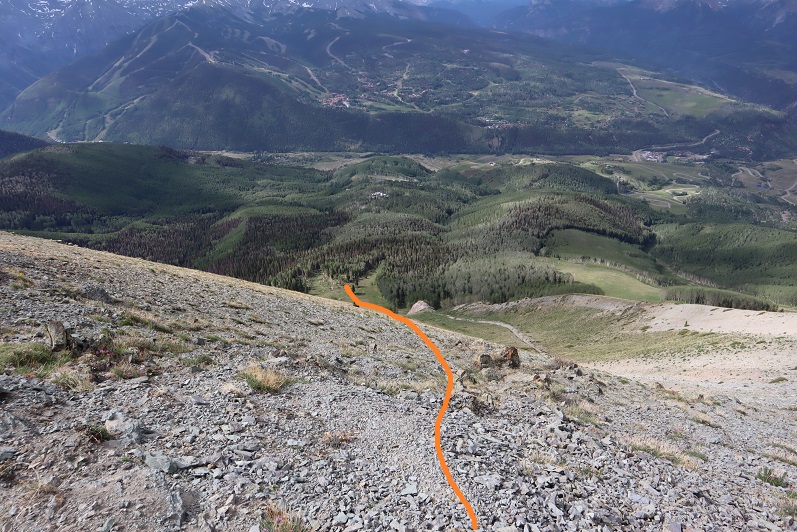
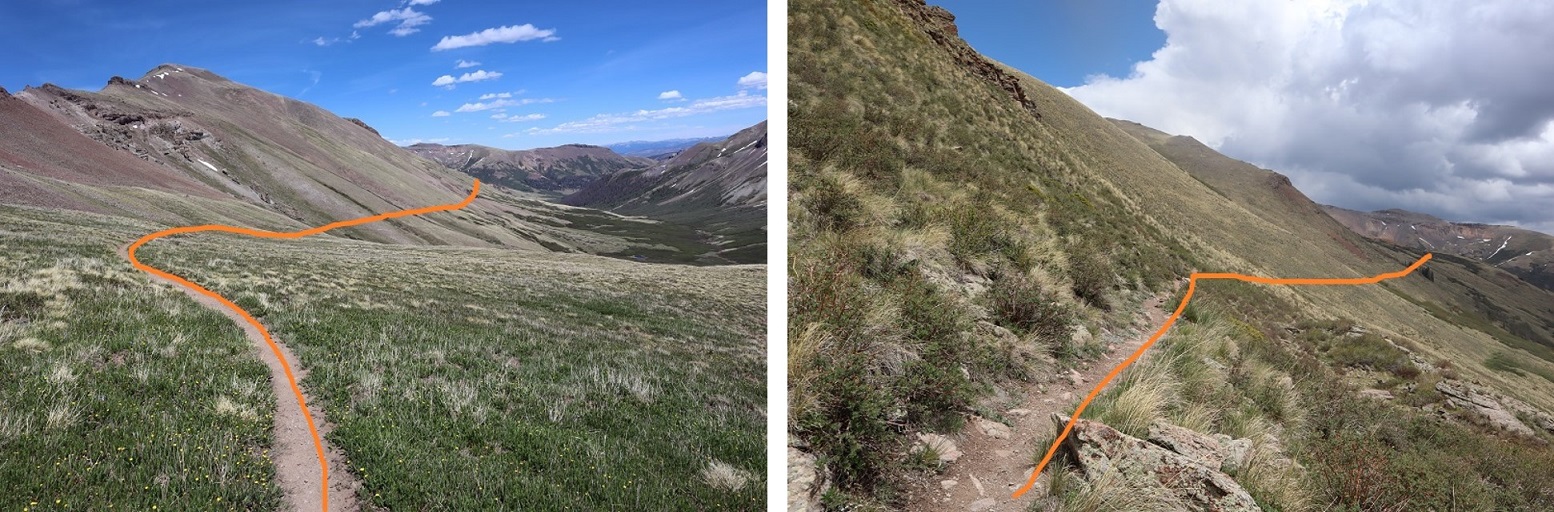
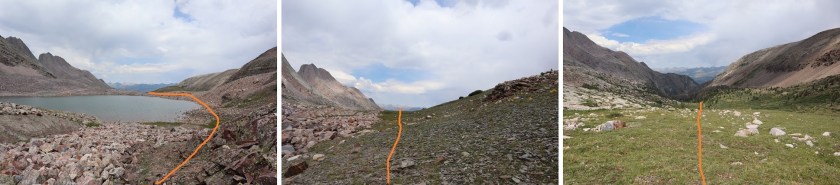
Time to head out.  I found a stick that made a great trekking pole to replace the one I’d lost yesterday and headed out the same way I headed in, after about a mile of wading through willows and water to find the trail.

45

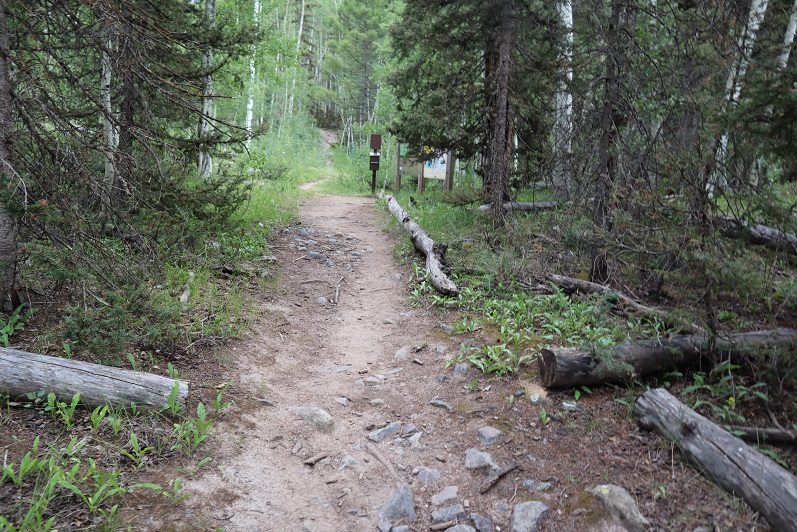
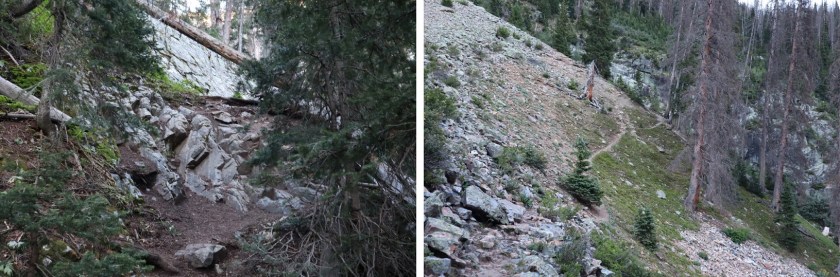
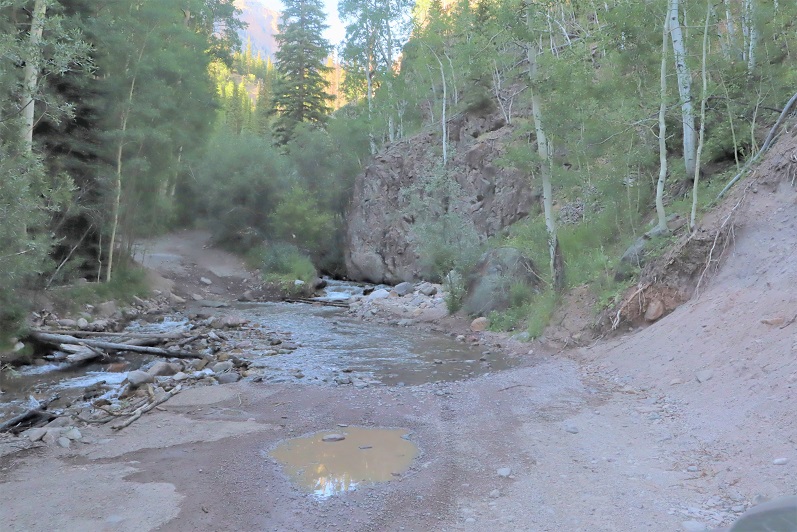
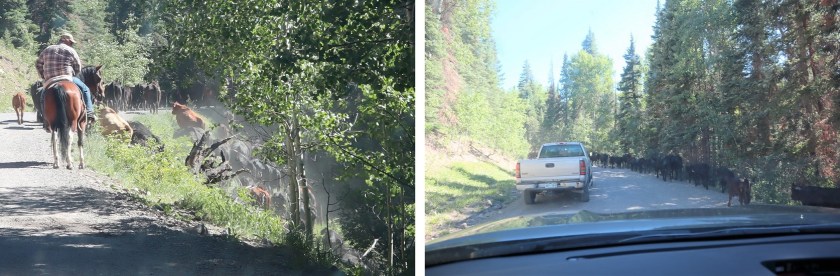
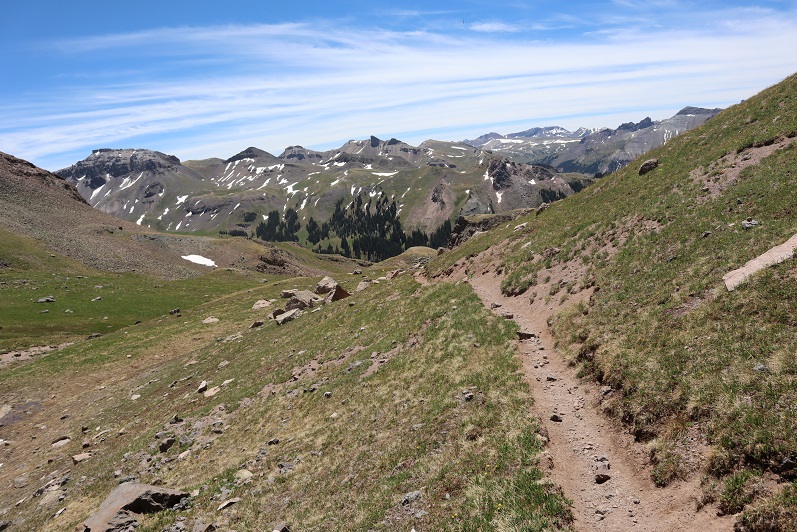
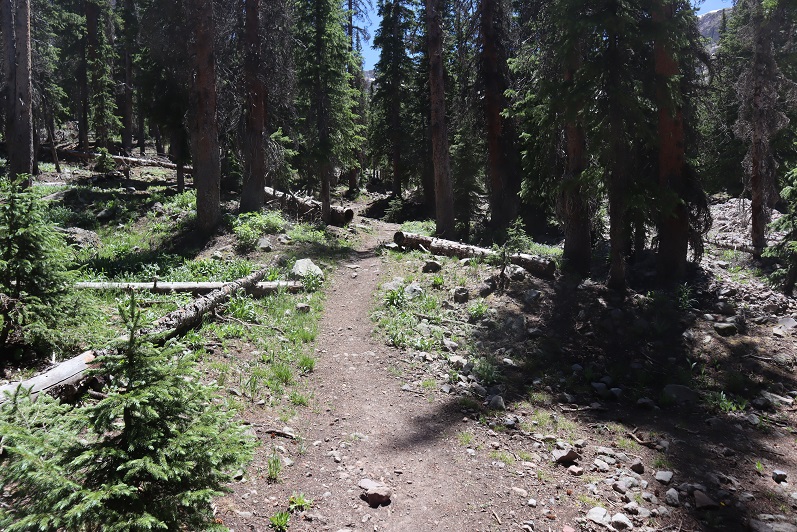
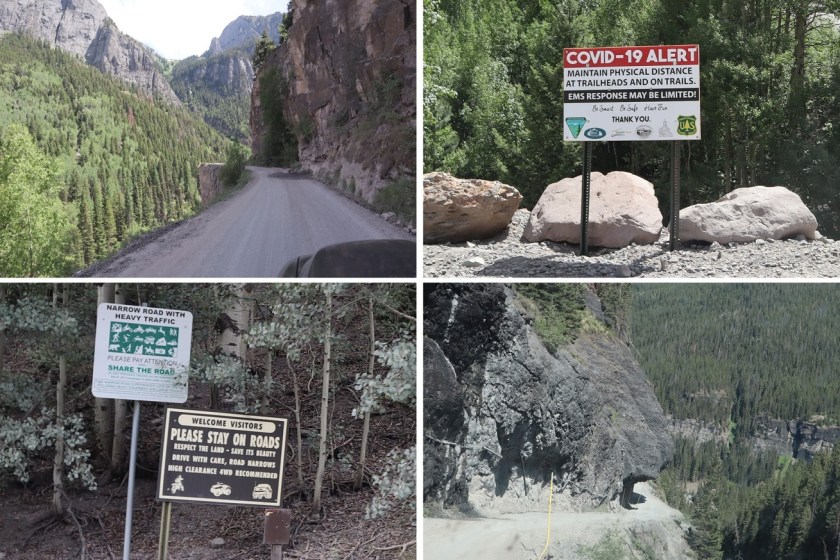
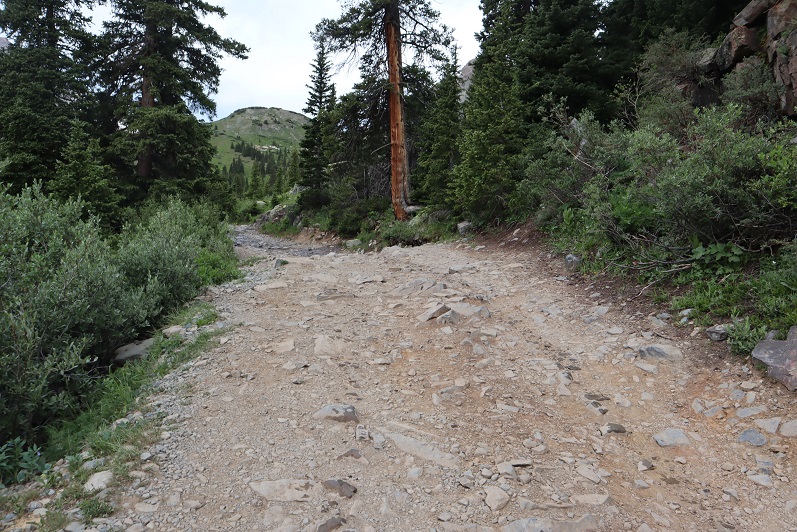
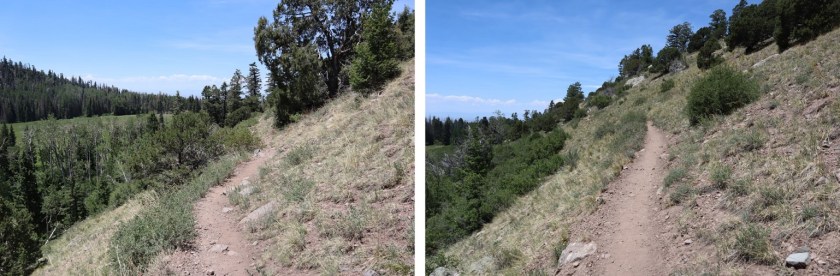
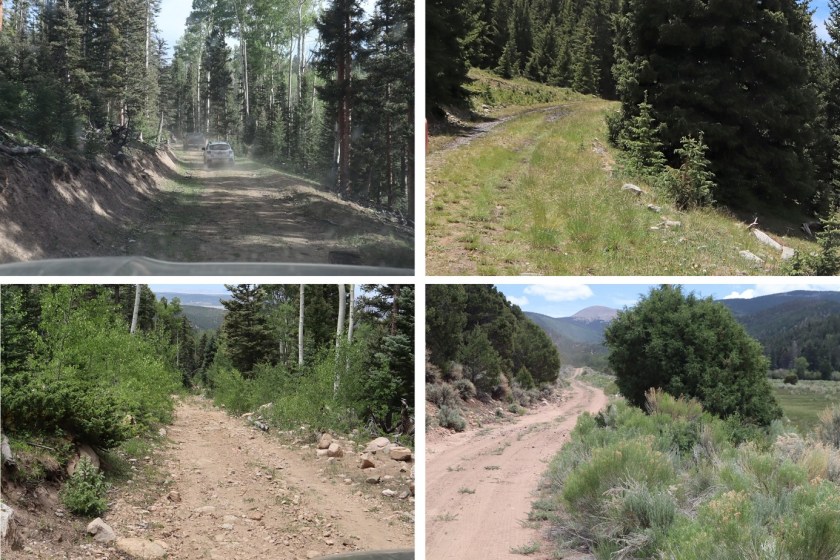
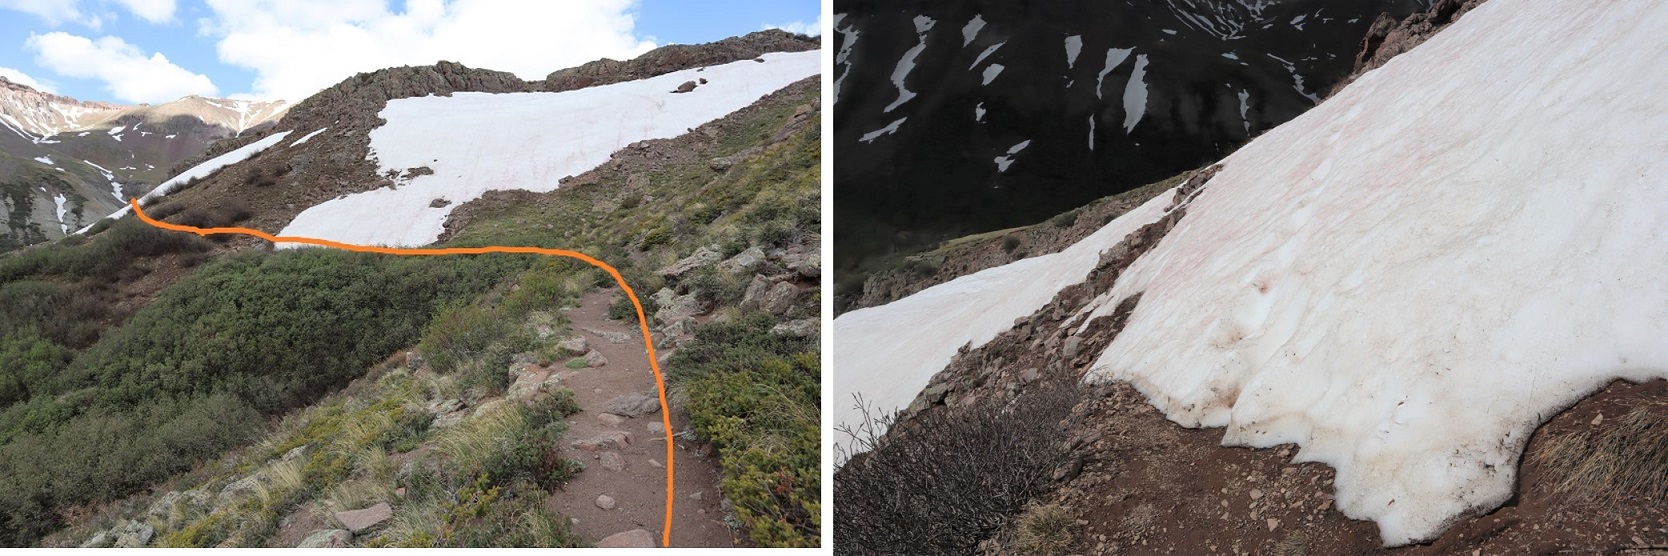
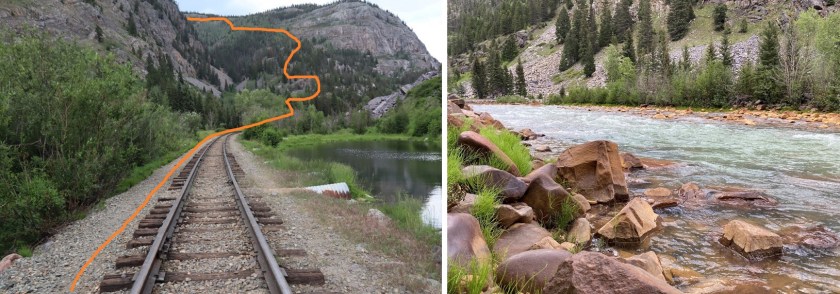
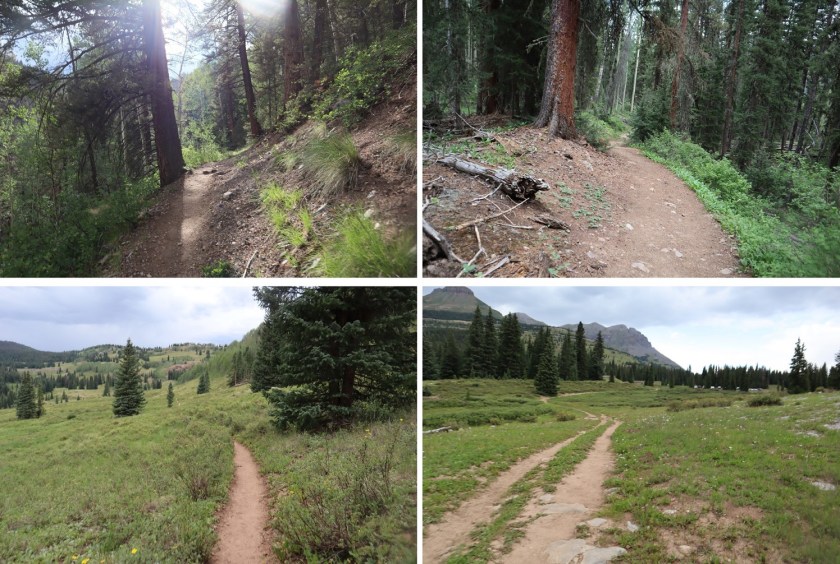
Connecting back up with the class 1 trail that would lead me to the beaver ponds, through the avalanche area, straddling the creek and bringing me back to the Animas River. I saw a ton of people on the trail, and talked to every one of them.

46

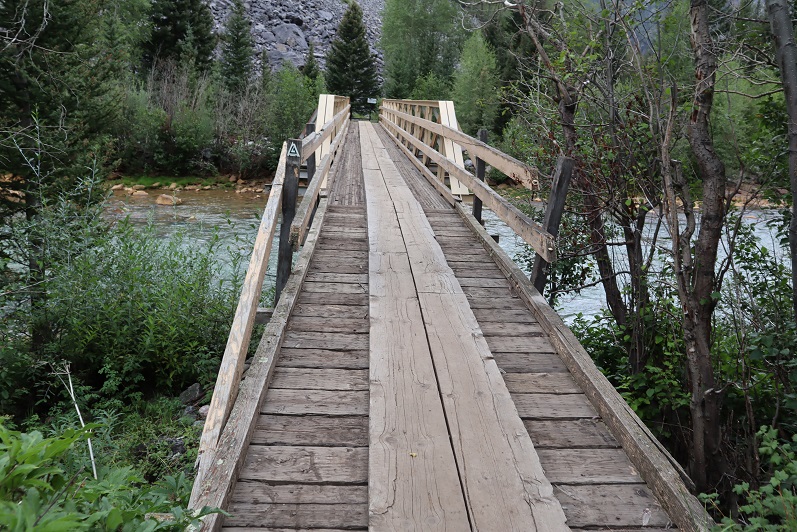
Once at the river I crossed the bridge and sat down for a while to rest before tackling the 4 miles and 1700’ of elevation gain back up to Molas Pass.  I took off my shoes and soaked my feet in the river, filtered more water, and tried to eat a packet of tuna (I ate half).  There were CT hikers across the river from me.  They shouted and asked if I minded if they bathed.  I’ve been there, and I didn’t care.  They seemed overjoyed at the idea of a bath, and I wasn’t going to deny them that gift.

47

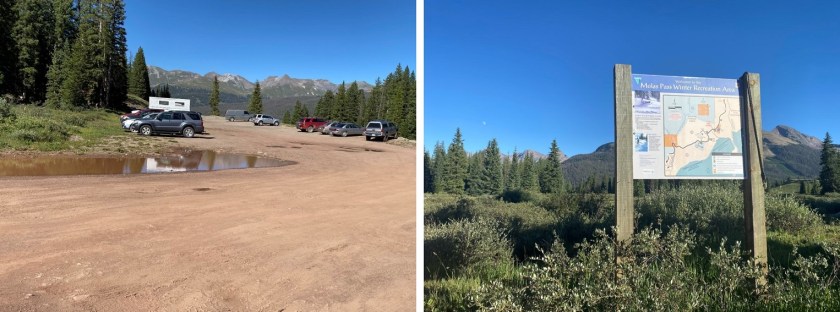
There were mosquitoes and fleas here so I didn’t stay long.  I packed my gear back up and started switchbacking up the mountain to Molas Pass

48

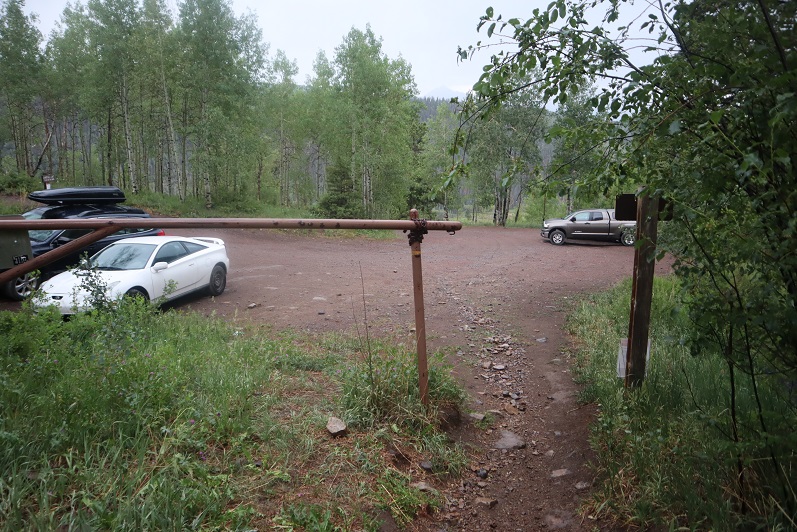
I left my newfound trekking pole at the information sign and made it back to my truck at 6pm.  It had taken me about an hour and  45 minutes to hike those 4 miles and 1700’ from the river.  I got different mileages/elevations from Strava and CalTopo for my triup, so I’ll leave those here.

49

50

In the end, I was thrilled I’d decided to hike today!  Sometimes it’s really difficult to get started, but once I’m going I’m really enjoying myself, and the sense of accomplishment I get from summiting peaks and challenging myself is amazing.

Also, I’ve done this approach as a day hike (with Vestal) and this time backpacking for Arrow and the Trinities.  For me a day hike is absolutely the way to go:  The extra weight made the trek in and out so much more tiring than it needed to be.  Long days don’t bother me.  Everyone’s different, but I much more enjoyed the hike in and out from Vestal than I did this time.


Arrow Peak – 13,817

1

* I did this as part of a 2 day hike, so my mileage and elevation gain aren’t included here.  CalTopo says my mileage to the top of Arrow Peak was 15.23 miles.

My son is in the Air Force and came home for some unexpected leave.  I haven’t seen him in over a year, so I was thrilled to spend the past couple of weeks with him.  This also meant it’d been a few weeks since I’d done any serious hiking, so it was so nice to get out hiking again this weekend.  I drove to the Molas Pass trailhead and parked the night before the hike so I could start early the next morning. I’ve done this approach before for Vestal Peak, so I already knew what to expect.  I drove in, parked, and walked around a bit to stretch my legs after that 6.5 hour drive.  It was a beautiful day, and I kind of wished I could just start hiking now.

2

Here’s a look at the peaks from the trailhead

3

There’s limited cell service at the Molas Pass Trailhead.  Unfortunately, I saw evidence of two separate vehicles having their windows smashed.

4

I spent an hour or two in the back of my truck relaxing, looking at topo maps, and eating dinner.  I saw another hummingbird fly by, so the record held of seeing a hummingbird at every trailhead I’ve slept at so far this year.  I went to bed and was up and on the trail by 2am.  The trail starts at the south end of the parking area.

5

From there the trail is easy class 1 all the way down the 4 miles and 1700’ to the Animas river, and back up to Vestal Basin (9.6 miles total).

6

7

Just before the river there’s a creek crossing

8

Then a solid bridge across the Animas River

9

Then I followed the train tracks (very briefly) and took the obvious trail up to the Vestal Basin.

10

At 4.7 miles there’s a trail register (a trail register that’s legit:  it actually looks like they track the pages here)

11

Note:  I crossed this area in the dark, and it seemed as if I needed to use the log to make this part of the trek.  In the dark the rocks didn’t look close enough together to cross.  So instead of taking the rocks across I sat down and scooted across the log until I made it back to the trail.  On my way back I realized I was wrong:  take the rocks 😊

12

The avalanche area was much easier to pass this year than last year:  there are triple the amount of surveyors’ tape markings in the area.  However, I still managed get off track at the last and final crossing.  I wanted to stay high on the ridge and in the dark couldn’t locate any more tape.  I should have stayed lower.

13

At the beaver ponds I took a right behind the boulder by first going through two logs onto an unmarked trail (it seems counter intuitive, but it’s the correct path), and followed the rocks until I once again caught up with the trail.

14

I followed the class 1 trail up to Vestal Basin.

15

16

There are willows to contend with here, and water, which equals mud. Prepare for your shoes to get muddy (or throw rocks/sticks down to walk over the muddy areas)

17

There is a really good campsite in the Vestal Basin, just where you turn off to hike both Vestal and Arrow Peak.  I stashed my pack here behind a tree, filtered some water, and packed only what I needed in a small sack before heading up and tackling Arrow Peak.  Here’s the route to the upper basin

18

The creek crossing was easy.  I took off my shoes but didn’t need sandals

19

There’s a semi-well defined trail to the upper basin, through willows to begin with, and then scree.

20

In the willows I lost one of my gloves.  I realized it about 50 feet after I’d lost it, but wasn’t in the mood to go back and get it (I didn’t want to re-gain any elevation today if it wasn’t absolutely necessary).  I hoped it would be there when I went back.  There’s a cairn at the top to indicate the upper basin.  Here’s an overview of the route from there.

21

Note: For some reason I thought Arrow Peak was class 2, so I didn’t do much research on this peak.  Luckily, I’d brought my helmet, because this is definitely class 3 and requires some route finding.  The first objective is to find the access area to the rib that will lead you most of the way up.  There’s a cairn indicating the way. Aim for the greenery, head up and right, then left.  I stashed my trekking pole at the entry point and headed up, as it was obvious I’d be doing scrambling from this point on and a pole would just get in my way.

22

It looks more difficult than it is.  The rock is solid and grips nicely. Be sure to pick the largest rib (it’s obvious and is a good 50+ feet wide)

23

I followed the rib as is ascended

24

There will be a point where the rib will become more prominent.  Stay right.  It looks like going left may be doable to go left later in the year, but at this point (July 31st) I opted to go right and that worked well (avoiding the snow).

25

It’s hard to tell in the picture below, but I’m following the rib.  There’s a point where it’s hard to tell if you go left or right (circled in red), but you go left here and then right.  If you look closely you’ll find cairns here indicating the way (they’ll be above you).

26

Going left you’ll see a gully on your left.  It looks doable (and probably is) but it’s easier to ascend by going right.  This is pretty well cairned.

27

Going right will lead you to a short ledge

28

at the end of the ledge go left (following the cairns) and then head northwest up some serious class 3-4 climbing to the summit.

29

30

31

I reached the summit at 10:15am, after 15.27 miles and just over 8 hours of hiking

32

Arrow Peak:

The trek down was much easier than the trek up, as it was easier to see the cairns and I already knew which direction I was headed. Here are the basic highlights:

33

34

35

Back down to the ledge, then following it to the right and then left (the cairns are very helpful here)

36

37

And then following the ridge back to the basin, sticking to the solid rock whenever possible because the scree was slippery and the rock was stable (but would have been slippery in the rain)

38

39

40

I made it back down to the basin, and check it out:  someone (or a marmot) stole my trekking pole!  I looked all around for it and was unable to find it.  I had passed about 10 people on the way up/down, so it could have been one of them, but that would’ve been poor form and not cool, especially since I talked with all of them and they seemed super nice, so I’m assuming it was an animal.  From the basin there’s a trail back down to the camping area

41

42

Someone had found my glove and made it super easy to find by sticking it on a branch right in the middle of the trail.  Thank you!!! (they’re expensive gloves…).  Then it was a quick creek crossing and I was back at my gear.

43

Total mileage will be with my Trinities Report, but the mileage from Molas Pass, up to Arrow, and back to the camping area where I’d stashed my pack was 17.71 miles according to CalTopo, 12.7 miles according to Strava (to be discussed in my next trip report:  gotta love app discrepancies).  Here’s a picture of the route from my camping area the next day (without route markings)

44

Here’s the CalTopo of the entire route, including the hike the next day up the Trinities.

45

Nellie Peak – 13,106 and East Nellie Peak – 13,091

1

RT Length: 13.72 miles

Elevation Gain: 3833’


Wow, the 4WD road to Nellie Creek is much worse than I remember!   It’s absolutely 4WD from the turnoff, all 4 miles to the trailhead, with 2 creek crossings. Have I mentioned I love my truck?

2

3

I made it to the trailhead, which was empty. There were a few dispersed campers in the area however, taking shade beneath the trees.

4

The trailhead was also very much in the open, so I turned around and drove a short distance and parked my truck in a narrow parking spot under the trees, just off the road. There were mosquitoes all around, so I ate dinner in the back of my truck, jotted down notes and checked my topo map for tomorrow.   I decided to go to the trailhead to take a look around and get a visual for the start of tomorrow’s hike. There was a couple with a dog standing in front of the trail maps when I arrived. Their dog charged at me, barking loudly. The couple seemed surprised and apologized for their dogs behavior. That dog barked all night long.

I walked back to my truck, took care of a branch that had been scratching the roof of the truck like a critter trying to get in, and read for a bit before turning out the light.

If you couldn’t already tell by the tone of this post, from the time got to the trailhead I wasn’t ‘feeling it’. This rarely happens to me, and I was thinking maybe I need a short break from my goals? Or maybe expand them a bit? I love to hike, but today I couldn’t seem to get myself out of bed to start. I blame it on yesterday’s failed attempt on Coxcomb, which put my training into a different perspective.

Also, I was still worried about the injured horse. My mind had a lot to think about and I couldn’t turn it off. I finally started on the trail at 4:15am.

The trail starts at the north end of the parking area and follows a well defined, class 1 trail.

5

6

After hiking for 1 mile I turned right at this sign and switchbacked up the side of the mountain

7

After hiking for 2 miles I made it to the top of the pass

8

It was still dark at this time, and I knew I needed to descend a couple hundred feet. The trail seemingly ended and it took me a while to figure out which way to go, but there is an actual trail here that picks up again after about 50 feet of absence. In the daylight it wouldn’t have been an issue. I finally found it and descended in to the basin. And descended, and descended, and descended. I looked at my altimeter, concerned I’d lost too much elevation. At this point I’d lost 800’, and I could tell I’d need to lose several hundred more before starting to gain elevation again. The sun was starting to rise and I still didn’t have a good visual of the peak I’d intended to climb. I still wasn’t ‘feeling it’ and didn’t like the prospect of gaining 1000’+ at the end of today’s hike after climbing up gullies (I’m not a fan of gullies). I decided to call it and turn around. I headed back up towards the pass. I’d much rather get my elevation gain in the beginning of the hike, rather than at the end. However, I wasn’t done hiking for the day; just changing my plans. When I made it back to the pass I turned and headed east up the side of Unnamed PT 13106 (which I later found out is nicknamed Nellie Point, so that’s how I’ll refer to the peak. Names are better than numbers IMO).

9

This was mostly a tundra hike until the end, when the tundra turned into very large rocks.

10

These rocks were fun to navigate, kind of like a maze with large obstacles to go around. All class 2. My mood improved dramatically and I was excited to be out adventuring.

11

12

There were several large cairns on the long summit. I wasn’t sure which one was the actual summit until I found a summit register inside one of the cairns. It was kind of in the middle of the summit area (which was about a quarter mile long).

13

14

Nellie Peak:

From the summit of Nellie Peak I continued following the long summit northeast. There was still some leftover snow here from winter, which didn’t pose a problem at all.

15

While on the ridge I scared a Ptarmigan mother and her chicks (they scared me too, as I didn’t notice them until the mother squawked). Immediately the chicks dispersed and the mother pretended to be injured, leading me away from her babies. I kept telling the mother I didn’t want anything to do with her or her chicks, but unfortunately she was leading me exactly in the direction I needed to go. She did a wonderful, if unnecessary, job leading me away from her babies. When she felt I was far enough away she flew back in their direction, chirping to gather them all together again.

16

Ptarmigan:

From the summit ridge I could see East Nellie Point, but getting there isn’t as easy as it initially looked.

17

I followed the ridge almost to the saddle and then turned and headed east, losing 600’ of elevation. Luckily this part of the hike was mostly on rolling tundra and wasn’t too taxing.

18

Once at the bottom I was able to avoid the small pond/creek and ascend the hillside towards East Nellie PT.

19

This was still rolling tundra, and there were even game trails in the area (and tons of elk tracks). At the top of the tundra hill I had about a quarter mile of tundra to walk through to the final summit push (if you could call it that).

20

21

The final push to the summit was rocky and there was no trail, but it was straightforward

22

There was a large cairn just before the summit

23

The actual point of this summit was difficult to tell as well. Once again I knew I was at the summit when I found the summit register stashed inside a cairn

24

25

26

Summit Photo:

27

East Nellie Peak:

Here are some photos from the hike back down. I decided to make this an out and back hike, retracing the steps I took to get here from Nellie Pt.

28

The tundra can be vast. Luckily, I could keep Uncompaghre Peak in my view most of the time, and just kept heading towards that 14er.

29

I also had a good view of Silver Mountain (my original choice for a summit today). With this view I could see there was still snow at the top of the access gully, so it had been a good idea for me not to attempt that peak today because the snow was unavoidable and I’d left my ice axe in my truck (I had my crampons). I was feeling better about my choices.

30

I hiked down to the valley and then back up to the ridge

31

I followed the ridge back to Nellie Point

32

33

34

And back down to the pass

35

And the class 1 trail that leads you back to the trailhead

36

37

38

39

The trailhead now had several vehicles

40

Also, I came to the conclusion it’s impossible to get a bad photo of Uncompaghre

41

I made it back to my truck at 11:15am, making this a 13.72 mile hike with 3833’ of elevation gain in 7 hours. Obviously, I made this hike more difficult and added more elevation than needed, but in the end I was happy with today’s hiking change of plans. In fact, I wished I’d have made the choice to change routes earlier. Any day above treeline is a good day. The 4WD road was easier to navigate driving down than it was driving up.

Here’s a topo map of my route

42


Coxcomb Peak (attempt) – 13,656

1

RT Length: 17.4 miles

Elevation Gain: 5544’

NOTE:  I’ve since summited this peak successfully.  that trip report can be found here.

I told myself as soon as someone posted a successful summit for either Coxcomb or Peak 15 I’d attempt it as soon as the weather was good (they’re my last 2 class 5 bicentennials). A conditions report was posted for Coxcomb where the couple summited but the woman had to be belayed up. I’ve done several class 5 peaks solo, and I’ve talked to two men who’ve done Coxcomb solo, so I felt confident I could summit this peak solo as well.  Now I’m not so sure.

The weather was perfect and I had the day off. The only problem? I needed 2 60 meter ropes for the final rappel, and I only had 1 50 meter rope. I went to REI and Mountain Chalet and bought 2 new ropes (REI only had 1, but on the positive side I got to use my dividend).

2

Then I spent the afternoon practicing my double fisherman’s knot. That’s how you tie two ropes together so they don’t come undone.

3

Confident I had the knot down, I wanted to practice rappelling with the two ropes, and I also wanted to break them in before using them for the first time in a scary situation (yes, a 175 foot rappel is committing, and can be scary, especially if you haven’t rappelled all season). I decided to go to Red Rock Open Space to break them in.

4

Success! I practiced setting up the anchor, tying the ropes together, and rappelling on easy terrain at least 9 times to break the ropes in. Yes, they were heavy to carry, and coiling them was no fun, but everything went smoothly. The weather forecast for the weekend was phenomenal: sunny skies with no chance of rain. I decided to drive to the trailhead the next afternoon and attempt Coxcomb peak the following day.

Most of the drive in to the trailhead was on a 2wd dirt road.

5

Then all of the sudden I came upon stopped vehicles along the road. A rancher was moving a herd of cattle, and the first vehicle in line didn’t feel comfortable driving alongside the moving herd so he decided to stop and park his car until the herd had moved (despite the rancher continually waving him on: the cattle would have been fine if he’d just drove slowly past). I wasn’t in a hurry so I wasn’t too bothered by the extra time spend sightseeing cattle. A lot of the other drivers were though.

6

The last 2 miles to the trailhead were 4WD and included a fun creek crossing.

7

I made it to the trailhead, parked my truck, and got out and took a look around.

8

I wanted to get a visual of the route for tomorrow’s hike. I took some pictures of the trail entrance, trail register, and the way I wanted to head out tomorrow. Then I ate my dinner, did a little knitting, and generally enjoyed the view as I relaxed in the bed of my truck.

9

The next morning I was on the trail at 4:40am, armed with my helmet, harness, 3 climbing ropes (2 60 meter ropes and one 30 meter half rope) and my climbing shoes. My pack was completely filled, and I’m guessing it weighed 40lbs. I only took the essentials.

The trail starts at the east end of the parking area and heads south.

10

I followed the class 1 trail for 2 miles until I came to a steep section

11

12

At the pass the trail diverged into two and then kind of ended. I could tell I just needed to get around the small outcropping. I decided to go up right and descend on the left on my way back down. Both sides were easy.

13

14

The trail picked up again after I climbed this area.

15

After 3.3 miles of hiking I came to the top of the pass.

16

From here I continued following the class 1 trail, losing 400’ in elevation as I went

17

18

At the bottom of the pass I left he trail and headed east

19

My goal was to gain the ridge and follow it to the base of Coxcomb Peak

20

The ridge was full of loose talus

21

22

The talus eventually gave way to a little bit of tundra

23

Then I came to a rocky class 3 section

24

Which brought me to the base of the crux of Coxcomb. Wow! The approach had been much easier than expected. The entrance to the climb starts at the small gully. I’ve seen a few reports on how to climb this area, and every report rated the difficulty different. Some gave it class 3 (it’s NOT class 3, but there could have been a rock slide since that person posted conditions), some gave it class 4, and some class 5. The couple that summited last week said this was the most difficult part of their climb.

25

I walked up to the gully and tried to devise a plan. I decided to put on my climbing shoes and just go for it. I tried to ascend, but there just weren’t enough foot/hand holds. I tried and tried and tried. Then I tried ascending to the left but those rocks are loose and kept crumbling in my hands. I wasn’t about to put any physical weight on them.   I tried the gully again, and then the rocks to the left again. I spent over an hour trying to figure this problem out! If I were only a few inches taller this wouldn’t have been an issue. Hmph. I sat down to think. Here’s a close-up of the gully

26

All I needed were a few more footholds. That’s when it came to me: there were rocks all around! I’d just fill the gully as far as I could and use those rocks as stepping stones. I dropped my pack and spent the next 45 minutes or so filling the small gully with rocks. I even put in a chockstone for a handhold. When I felt I’d done enough I tried climbing a few feet to see if the rocks were stable. Success!

27

I put my pack back on and started to climb but my pack was heavy. It made me top heavy and I couldn’t pull myself over. Drat! I sat back down to think. I could see a rappel set up at the top of the gully. I decided to take my 30 meter short rope, attach it to my backpack and my harness as well, leave my backpack below, and climb up the gully without gear. Then I’d use the rope to pull up my pack. If I wasn’t able to pull my pack up I knew I could just rappel back down with the sling already in place and the rope I’d attached to my harness (I was glad I’d brought the 3rd rope!).

I looped the rope around the straps of my pack, attached the other end to my harness, and easily climbed up the gully. Success! Wow, I felt great! That had been the crux of the route for the couple who were here last week, so I now felt confident I’d be able to make this summit. I hauled up my pack, which took quite a bit of upper arm strength and balance not to fall back down the gully as I was lifting the pack up.

28

I coiled up my rope, attached it to my pack, and continued on. The next section was class 3, and only lasted about 50 feet or so

29

This brought me to a class 4 section I had to upclimb. I was able to do this wearing my pack

30

I’d made it to the base of the chimney area, also rated class 4.

31

From my research I’d learned to take the ‘easier’ chimney to the left. Um, this did not look easy! I spent a lot of time determining if I was even in the correct area, and backtracked a little just to make sure. Yep, this was it. I decided to just start climbing. Boy, was this tiring work! My pack made climbing so much more difficult, but I wasn’t giving up. I made it about half way up the chimney and wasn’t able to stem with my pack on. I decided to retreat and try again.

32

Taking off my pack had worked last time, so I decided to try that again. I rigged the rope the same way I had last time and started up. Wow! This was so much easier! I made it about ¾ of the way up the chimney when the hand/foot holds gave out. This was definitely difficult class 4 (if not class 5). The pictures I’d seen of others climbing this part made it look so much easier! They looked like they just walked up this section. They’d been roped in, and about a foot taller than I am, but still, it didn’t seem fair. From here I just needed to stem for about 20 more feet which would put me in the upper gully, and then I’d need to exit via the right side. The problem? I couldn’t see any anchors set up, or even any places to set an anchor, and without a visual of the last part of the gully I didn’t feel comfortable committing to this part of the climb, not knowing if I’d be able to rappel down. I knew if I went any further I would not be able to climb back down, so rappelling was my only option. It was here I made the decision to call the climb for the day. I just didn’t feel like I could commit to continuing on without putting myself in unnecessary danger. I kept thinking how infrequent this mountain is climbed and how I’d be stuck for weeks, if not months (or longer) if I wasn’t able to downclimb.

Note: On my drive home I came up with the idea of tying all my ropes together, carrying an empty pack up, and then hauling the ropes up behind me. The only downside to this scenario is if the ropes got caught on something while I’m trying to haul them up (a very real possibility). I need to do more research and find out if there is a sling set up in the gully, or if I just need to commit. Also, I need to practice stemming in a climbing gym with a full pack. That’s not going to be easy…

Here’s how far I made it up the chimney.

33

I made it back to my backpack and set up a rappel to head back down. At least I was getting some use out of my 60 meter ropes today.

34

Here’s a picture of the route

35

I rappelled back down, changed back into my hiking boots, and retraced my steps back down the ridge and back to the trail.

36

37

38

I followed the trail back up the pass, cursing the weight of my pack the entire way

39

40

As I was coming back down I noticed blood along the trail, and a few guys with horses down below.

41

I made it to the bottom of the pass and the oldest man there talked with me for a bit (he looked like a grandpa out with his grandsons). He wanted to know if there was more snow further along the trail. The blood I’d seen had been from one of his horses: it had spooked on the rocks and snow and flipped over backwards when it lost its footing. It had injured its hoof. I was confused as to why they were even contemplating continuing on? They had an injured animal! The man agreed with me and I’m pretty sure he decided to head back.   A little further along the trail I met up with a woman who said when the group had passed by their campsite earlier this morning one of their horses stepped on their dog (the horseback riders horse stepped on the horseback riders dog) and caused an awful commotion. And one of the boys had lost his jacket. So the group wasn’t having a great day.

Here’s my route back down the mountain to my truck

42

43

44

45

The entire route down I ruminated on the days experiences and tried to think if I could have done anything differently. I also considered the need for a climbing partner on this route: someone taller than me who could belay me from the top. This idea doesn’t sound appealing, but it is the safest option. In the end I decided I needed more stemming practice, and I need to actually speak with people who’ve accomplished this route.

I made it back to my truck at 2:40pm, making this a 17.4 mile hike with 5544’ of elevation gain in 10 hours. Here’s a topo of my route

46

And just for fun here’s a close-up of my problem solving skills. I worked this problem for a long time!

47

When I pulled up my gpx file I found I made it to 13,560’, which means I was less than 100 feet from the summit when I turned back. Ouch. On to the next trailhead!


“T0” – Telluride Zero Peak – 13,739 & Campbell Peak (UR) – 13,213

1

RT Length: 12.06 miles

Elevation Gain: 5417’


After climbing Mt Emma I drove from Yankee Boy Basin to Telluride and parked at the Eiler Creek Trailhead. There were already a few cars there when I arrived, and two more drove up and parked before the day was out. This was a busy 4th of July weekend!

2

After today’s hike and lightning scare I decided to check the weather again for tomorrow’s hike. The forecast indicated a slight chance of rain beginning at 10am, with thunder beginning at 1pm. OK, so I needed to be below treeline by 10am to avoid the rain. Thunder/Lightning shouldn’t be a problem. I set my alarm for 3:30am. As I was going over topo maps for tomorrow’s hike my friends from yesterday drove by. I waved, they stopped, and we talked for a bit about our days adventures under a nice rainbow.

3

They had tents to set up and I needed to get to bed early so we said our goodbyes, I ate the rest of my sandwich for dinner, and after a glass of Skrewball I went soundly to bed. I was on the trail at 4am. The Eider Creek Trailhead is located at the north end of the parking area, and immediately splits into two trails. Take the trail to the left.

4

Just after this split is a nice camping spot, no more than a few yards from the parking area

4

I followed the class 1 Eider Creek Trail, staying right at the first junction

6

And left at the second to stay on the Eider Creek Trail.

7

This trail was very easy to follow and well marked with signs.

8

There was one creek crossing that was easy to rock hop across (and a rather large tree you could traverse if you preferred, but I thought it overkill).

9

I stayed on the Eider Creek Trail for 3 miles and then left the trail, turned right and headed north through an area filled with downed trees. This was tons of fun to navigate in the dark.

10

Luckily this area was short, only lasting about 100 yards, before I came to a clearing.

11

From the clearing I needed to gain the ridge. There are several ways to do this, and both the gully on the left and the gully on the right ‘go’. I took the one on the left, hugging the aspen trees and then ascending via tundra and clumps of bunch grass.  This was by far the most difficult part of the hike: the terrain is much steeper than it looks, gaining 1650’ in less than 2 miles. It seemed never-ending.

12

13

Once on the ridge I turned left and followed the ridge northwest

14

From the ridge you can see both Campbell Peak (behind the obstacle) and Telluride Zero Peak

15

The obstacle took a little bit of maneuvering. Yes, you go right over the top, and this is class 3. I put on my helmet. These are the steps I took:

16

After ascending this little wall I was greeted with the crux of the route. Here’s how I climbed this point, first going to the right, and then left up the center. I placed some cairns here in key areas

17

18

The chimney has a lot of hand/foot holds, but beware: most of them are loose.

19

Once on top of the chimney I could see Campbell Peak. The rocks were loose but this was class 2 all the way to Campbell Peak

20

21

22

From Campbell Peak it’s an easy ridge hike to Telluride Zero, losing 200’ of elevation and gaining 750’ in just under a mile

23

This was a simple ridge hike, if a bit chossy. I stayed on the ridge direct for 95% of this part, and only dipped down when obvious to the right.

24

I summited Tellurize Zero Peak at 8:15am

25

Telluride Zero Peak:

It was a beautiful morning, so I stayed a little longer than usual on the summit, taking in the views.

Here’s the route back to Campbell Peak

26

And then down to the class 3 section. To get there, aim for the area that looks like a dropoff. I placed a few cairns here as well.

27

Here’s how to work your way back down the chimney. Here I threw my trekking pole down so I could use both hands to downclimb.

28

29

30

Once down the chimney I hiked down the little wall and followed the ridge to the gully. There are several gullies here: be sure to take the right one. I remembered the gully I took in because of the large rock outcropping on the other side of some aspen trees.

31

32

33

I was about a quarter of the way down the gully when I heard it: a loud clap of thunder to my right. I turned my head and saw a dark skies where just minutes ago there’d been blue, a flash of lightning, and heard another clap.

34

Where had that come from? It had been nice and sunny all morning. This storm must have built up on the other side of the ridge as I’d been hiking down the gully. I looked at my watch: 9:30am. Seriously? A thunderstorm at 9:30am? Rain had been forecasted as a possibility after 10am, but thunder wasn’t supposed to be a possibility until well after noon. This was just great. Another lesson from mother nature: mountains make their own weather. The storm looked close, and it looked to be building fast. There was nowhere for me to hide above treeline so I made a beeline for the trees.

35

This took an agonizing amount of time, as the storm kept getting fiercer and the terrain kept getting steeper. I could see the thunderclouds developing before my eyes. I had to be careful with each step not to twist an ankle, but wanted to get out of there as fast as possible. I made it to the end of the gully and sprinted through an open field towards the nearest trees I could find as thunder rolled all around me. Yes, I know how dumb that sounds in an electrical storm but that was my best option at the time: to get under the relative safety of the trees.

36

I made it to the trees, hiked about 10 yards into them for good measure, and stopped to catch my breath as the skies opened up and I started getting rained on.

37

I was now ‘safely’ in the trees, but had entered in a different area than I’d exited. I got out my map and compass and decided to head SSE through the deadfall, towards where the trail should be. I was thrilled when I finally stumbled upon the trail.

38

The trail was easy to follow back to the trailhead. The only downside? It rained the entire time. The thunder sounded kind of cool though. I felt bad for my friends attempting Dallas: this storm wasn’t giving up and I was fairly sure it would have been a miracle for them to have summited before it hit.

39

40

I made it back to my truck at 11:15am, making this a 12.06 mile hike with 5417’ of elevation gain in 7 hours, 15 minutes. Here’s a topo map of my route

41

As I drove back through Telluride I saw a herd of about 75 elk grazing in a soccer field. Colorado is so cool! I drove the 6.5 hours home and made my kids hamburgers for the 4th of July and watched the city fireworks from our front porch.  It rained the entire way.


Mt Emma – 13,592

1

RT Length: 4.48 miles

Elevation Gain: 1861’


After summiting Cirque and Gilpin it was still early in the day and the weather seemed to be holding so I decided to try and get one more bicentennial in. I drove down from Yankee Boy Basin to the junction with Governor Basin Road and took that 4WD road all the way up to Governor Basin. This is a narrow road and 4WD but luckily I only had to pass OHVs.

2

3

Originally, I parked at the top of the hill and started walking down into the basin, but when I saw other vehicles parked below I got back in my truck and drove all the way to the bottom.

4

Here’s an overview of the entire route:

5

From the parking area I crossed a small creek and followed the 4WD road.

6

When the 4WD road intersected with a small waterfall/drainage I turned right and headed northwest up the side of the mountain

7

8

This led me to a faint game trail that brought me around the mountain

9

There was a neat cave here that looks like it used to be a mine but now belongs to an animal (hence the game trail)

10

I rounded the corner of the mountain and Mt Emma came into view

11

12

I walked across the basin, crossing a small area of firm snow, and then continued hiking up the scree filled gully

13

14

This gully was very loose and for every two steps I took forwards I took a step back sliding down scree. I tried to stick towards the larger rocks when possible because they afforded me more traction hiking up.

Towards the top of the gully the scree changed to rocks and I did a little scrambling to gain the ridge.

15

Once on the ridge I turned right and headed northwest towards the summit towers, putting on my helmet as I went.

16

There seem to be endless ways to summit Mt Emma from this area, all class 3 and above.  I summited by going right first, up a small gully and then back down another before ascending a third to summit. I took a different, more direct route on my way back. These gullies ranged from bare, solid rock walls to being filled with soft sand. Microspikes helped here. I wore them until I made it back down to tundra later in the day.

Route on the way in:

17

18

Back down another gully

19

And back up a third gully

20

As soon as I went up this last gully I could see the summit

21

That had been easier than I’d expected. I snapped a picture, took two giant steps towards the summit, and felt it: Zzzzzzp! Zzzzzzp! Two quick buzzes just under my helmet accompanied by a tingling sensation. Even though I’d never felt this before I instantly knew what it was: indication of an imminent strike of lightning. I was just feet from the summit but I immediately turned and bolted for the gully I’d just ascended.

Well, that was unexpected! Sure, there were clouds and mist all around me, but none of the clouds looked threatening. As I sat there in the gully, looking at the summit just a few yards away, it started graupeling. Then raining. Then graupeling again. I sat and considered my options.

22

I could hike back down the mountain, but as soon as I left these gullies I’d be exposed for the rest of the hike. I did not want to be the tallest thing above treeline. I licked my finger and held it in the air to test the wind and watched the clouds: the storm was moving away from me. I looked all around and no, the clouds didn’t look menacing (even though it was raining all over). I decided to sit and wait the storm out. After about 30 minutes of sitting on the summit, not seeing any lightning or hearing any thunder, I tried again.

I quickly left my spot and scrambled the last few yards to the summit

23

I summited at 2:15pm. I was still very scared of lightning and instead of taking the time to set up my camera I took a selfie with my cell phone and a very quick summit video. That’s a nervous smile by the way: I still didn’t completely trust the weather and wanted to get out of there.

24

Mt Emma:

Despite my earlier plan of taking the time to check out the conditions of the peak for tomorrows hike I didn’t spend more than 30 seconds on that summit. I quickly turned around to head back. Circled in red is where I’d spent the past 30 minutes waiting out the weather. This is also the access point to the gully I descended on my way back.

25

From the summit I could see a more direct route back through a different gully and decided to take that route down. It’s still class 3, but you can see your objective the entire time. I went back down the last gully I’d ascended

26

And east towards the small saddle

27

28

Here’s looking back for those of you who want to ascend this way (I’d recommend doing so, it’s entrance is to the left of center of the summit area)

29

30

Back on the saddle the weather looked to be improving. I found the access point and headed back down the gully.

31

While descending I stuck to the areas of dirt and scree. My microspikes helped tremendously. At times the scree would give way and there would be sections of 10 feet or so where all of the rocks would loosen and slide together for a few yards. At one point my leg became buried in scree past my shin. My shoes had so much scree in them I had to take them off and shake them out twice before making it to the bottom. Tons of fun!

32

33

I retraced my steps out of the basin back down to my truck

34

35

36

37

38

The small waterfall/creek/runoff is a great visual for how to make it back to the 4WD road

39

40

I made it back to my truck at 3:10pm, making this a 4.48 mile hike with 1861’ of elevation gain in 3 hours (including the half hour spent waiting out the weather). It was raining as I made it back to my truck. Here’s a topo map of my route

41

On to the next trailhead!

Cirque Mountain – 13,686 & Gilpin Peak – 13,699

1

RT Length: 11.1 miles

Elevation Gain: 4382’


I’m kind of liking this ‘work from home’ thing that’s been going on for the past few months. Today I had a zoom meeting I attended at a Starbucks and then I was off to the Yankee Boy Basin (which I considered an appropriate place to spend the 4th of July weekend). The road to Yankee Boy Basin is easier than I remember. It’s only 4WD for the last mile or so. There’s a little bit of exposure but the road is plenty wide enough to pretend it’s not there.

2

I arrived at the trailhead and backed into a spot near the bathrooms (P.S. bring your own TP).

3

I got out and took a look around at the route I intended to take while it was still daylight. I was pretty sure I wanted to hit Cirque Mountain first, and then cross over to Gilpin Peak. Everything is different in the dark and a good visual in the daylight is helpful.

While I was looking around I heard a couple talking about Mt Sneffles. I went over to ask if they’d seen any snow on Cirque Mountain/Gilpin Peak while hiking. They were staying the night at the trailhead too, climbing Teakettle in the morning. We struck up a conversation and ended up exchanging beers and candy and 14er stories and caps full of whiskey. About an hour later two more of their friends showed up and we huddled around my truck as it rained a bit. When the rain stopped, they went over their gear and practiced some rappelling. They allowed me to tag along. I ended up calling it a night really early (I get up at 3am to work and get tired early in the evening). I’m sure I forgot to say it, so I’ll say it now: It was really nice getting to meet you all! Also, I will never be able to hear the word ‘traverse’ again and not say it twice @climbingcue, @dwoodward13, @hikesingeologictime, & @tallgrass!

4

I woke up at 3:30am, hit snooze once because I was really warm in the bed of my truck. I was ready to go a little before 4am. Tallgrass came to say goodbye and good luck. I was still groggy (I don’t wake up until about an hour into a hike). Thanks for the beer Tallgrass! I started by following the 4WD road northwest.

5

After hiking for almost half a mile I turned right and followed the small ridge up to the saddle of Kismet and Cirque.

6

7

The trail eventually narrowed and I went up a low flowing waterfall type gully

8

And then followed the scree filled gully to the saddle. All snow was avoidable.

9

10

11

At the saddle I turned right (east) and followed the ridge. Note, the point on the right isn’t a ranked peak. It’s easily bypassed by a trail to the left. I climbed it on my way back just to get in some added elevation and for the views.

12

I picked up my pace here because it looked like I could make it to the summit for the sunrise. Wow, that part of the hike hadn’t taken as long as I’d anticipated.

13

14

There was some choss and a chimney to climb. I put on my helmet and worked my way up.

15

16

There was some route finding for the last little bit as well as some easy scrambling

17

I summited Cirque Mountain at 5:45am

18

Cirque Mountain:

I made it a few minutes before sunrise and decided to stay to enjoy the show. It didn’t disappoint.

19

I also had some great views of Teakettle and Potosi to the southeast

20

I headed back the way I’d come, and decided to summit the small point and then head back down the gully

21

22

23

I didn’t go all the way down the gully. Instead when I hit tundra I turned right and headed west until I reached a small pond.

24

At the pond I hooked up with the Wrights Lake Spur trail and followed it until the first switchback.

25

Right about now it started to rain. I looked back on Teakettle and thought about my new friends hiking up there. I hoped they were staying dry.

26

The trail was an easy to follow, class 1 trail. At the first switchback I left the trail to continue heading west towards the saddle. There was a little bit of snow to contend with here so I put on my microspikes and walked across.

27

28

At this point I could see there was a gully I’d have to ascend that was still holding a little bit of snow at the top

29

Once on the saddle I followed it south. On the ascent I made the wrong choice and tried to ascend directly up the gully. This got me onto very loose, chossy terrain and took me longer than necessary to figure out. The rocks were the size of toasters and none of them were stable. Large sections would move below me at a time, taking me with them. On my way down I found a better route, so I’ll describe that route here.

From the ridge, dip down to the left to go around this first obstacle

30

Next, hug the area where the snow meets the rock. I’m pretty sure there’s an actual trail here under the snow

31

From here I’d wanted to ascend directly up the gully. DON’T DO THAT. Instead, try to make it as close to the ridge as you can

32

33

At the small saddle there was snow to contend with (a lot more snow than the pictures suggest). Glad to have brought my ice axe and crampons (something I do on every hike I don’t have beta on) and got to work kicking in steps and climbing over the snow. There was probably 30 feet worth of work to do over the snow at its narrowest point.

34

At the saddle I sat down to take off my crampons. From here it was a short trek to the summit, after first going over a false summit. This was all class 2, but I kept my helmet on.

35

36

37

I made it to the summit of Gilpin Peak at 9:30am. It was lightly snowing.

38

39

Gilpin Peak:

Here’s a look at the route I took out the basin from the summit

40

I turned and headed back over the false summit and headed back to the saddle

41

Because I’d already kicked in steps I made the decision to put on microspikes instead of crampons to go down the snow. This was a bad idea, but I didn’t realize it until I was already too committed. I made it down the snow safely, but I was shaking as I did so: crampons provide much more stability than microspikes (duh) and I wasn’t very stable on the downclimb. I relied a lot on my ice axe.

Here’s looking at the ridge back down

42

43

I re-crossed the snow below, this time without traction: I boot-slid my way across much of the snow.

44

I made it back to the trail and there was a family standing there, waiting for me. There was a mom and dad and grandparents with 6 kids who all had to be under 10 years old. They’d been watching my descent, and the father asked if I would show the kids my gear (crampons, helmet, ice axe). The kids were fascinated with the equipment, and proudly told me they were hiking to the lakes. I wished them luck and was on my way.

After making it to the pond I followed the class 1 trail above Sneffles Creek until I made it to a road, and followed the road back down to my truck.

45

Just before making it to the road I passed what I thought was a trail register. I opened it and found one of the most confusing maps ever! Not only did it not correspond with the visual direction of the peaks, north was at the bottom. This map is going to get a lot of people lost.

46

I passed a jeep that had gotten stuck. Everyone pitched in to get her un-stuck.

47

It was easy to follow the 4WD road back to where I’d parked my truck

48

I made it back to my truck at 11:15am, making this an 11.1 mile hike with 4382’ of elevation gain in 6 hours, 15 minutes.

49

I still had plenty of time left in the day, so I decided to drive to the next trailhead and attempt another mountain.

PT 13580

1

RT Length: 13.38 miles

Elevation Gain: 4934’


I chose this peak for today because it was the closest one on my list of unfinished bicentennials to Cielo Vista Ranch, where I’d just spent the morning hiking. I drove to the Willow Creek Trailhead and backed into the only available parking space. Vehicles were parked and double parked in each space, as well as several hundred feet down the road on the drive in. This is a popular trailhead and it was a Saturday afternoon.

It was raining a bit as I got out and looked around. There is an open and stocked bathroom here, and lots of signage.

2

3

I opened the trail register container and was disappointed to find another full register. Every page was so full people were just writing in the margins of past pages. This one is from 2019. There were probably 7 pages total, which could probably get filled up here in a week. How are these useful when they aren’t kept up to date? Signing these seems useless.

4

I went back to my truck and got my stuff ready for the hike tomorrow. I didn’t have a flashlight so I decided to use my phone’s flashlight app. That meant conserving battery, so I put it in airplane mode. Then I people watched. There was a man hiking with a small dog in a basket, a group of about 20 high school aged backpackers returning from what looked like their first outdoor experience, and two men hiking in to Willow Lake to summit Challenger and Kit Carson tomorrow. I spent a good 30 minutes watching a man trying to turn his pulled trailer around in the parking lot. He must’ve been looking for a dispersed camping spot and wasn’t able to find one before the trailhead. Turning his rig around in the parking lot of the Willow Lake trailhead was his only option, and it took dozens of attempts. His rig was loud and he set off several car alarms in the process. It was all quite entertaining.

When the mosquitoes came out I decided to call it a night and went to bed early. I woke up at 2:30am, decided I was way too comfortable, and went back to sleep. The only bad thing about having a bed in the back of my truck is I don’t seem to want to get up in the mornings. I was on the trail by 4am.

The trail starts at the east end of the parking lot and almost immediately comes to a junction. I turned right here, crossed a creek, and continued on a sandy trail.

5

6

7

During the first mile of this hike, as I was hiking in the dark, I kept hearing chirping. It sounded like one of those bird boxes that’s put in the middle of nowhere to monitor birds and chirps every few seconds was out there somewhere, and broken. It wasn’t chirping on my way back, so it either ran out of battery or was an actual bird going crazy at 4am. The Willow Creek Trail is a class 1 trail that switchbacks all the way up to Willow Lake. Here’s an overview

8

And some pictures of the trail

9

There are a couple of streams to cross, each with bridges/rocks

10

Before making it to the lake there’s a camping area. Someone has set up communal bear bag hanging areas, which I think was a brilliant idea. What’s even better is people actually seem to be using them. I saw two such areas, but there may be more.

11

After the camping area it’s a short distance to Willow Lake. I went up this rocky area

12

And was greeted by this sign and the lake. I turned left at the sign

13

I made it to Willow Lake after 5 miles of hiking

14

I continued following the trail until just before the boulder field. At this point I left the trail, turned left and continued north/north west up the hillside

15

16

17

There is no trail, but the route is easy to follow, as after I gained this small ridge I kept the creek to my left and willows to my right and continued north up to the basin.

18

It’s important to try to stay as much in the center here as possible, as to the right there are willows and shallow ponds to contend with. (I made this mistake on my way in, but was able to avoid it on my way out. I scared several deer out from willows in the process.). At the end of the basin you turn right and head east

19

20

This area was a bit mushy, so I went to the right around this rock/water to avoid getting wet, and then entered another basin

21

There were a lot of friendly deer here who didn’t seem to mind my hiking past them. I gave them room, but they let me get within 20 feet of them with no problem.

22

I headed east into the second basin, which was full of large rocks

23

There are a lot of ways to summit this point. I decided to gain the ridge and follow it to the summit of PT 13580

24

25

26

Once on the ridge it was an easy hike to the summit. The only problem was the sun was rising directly in front of me as I was hiking and I couldn’t see anything due to the glare. These pictures are from the way back down. While hiking up this ridge I heard someone from over on the Kit Carson/Challenger side yell “rock!” every couple of minutes. It’s amazing how sound carries out here.

27

28

I summited PT 13580 at 8:45am, after 6.8 miles of hiking

29

13580:

There was a summit cairn at the top, as well as a summit register. I didn’t open it, but I could read through the glass it was recently placed there (6/20/2020?)

30

It was a beautiful day and I stayed for a long time on the summit, enjoying the views

31

When it was time to go I retraced my steps back down the ridge into the basin. Here’s an overview, with Willow Lake to the south

32

And step by step…

33

34

Staying higher and dryer this time in the lower basin

35

36

It was easier this time to avoid both the willows and the creek

37

38

Once Willow Lake was in view it was easy to make my way back down to the trail

39

There are some beautiful waterfalls here

40

I made it to the camping area and was startled to see bighorn sheep just off the trail. The camping area was full of tents but the hikers were all out hiking. It seems while everyone is out hiking for the day the sheep came to play. They posed for me while I took a few pictures. Yes, they were a little unkempt, but friendly enough.

41

Here are some shots of the class 1 trail back down to the trailhead

42

43

44

45

I made it back to my truck at 12:30pm, making this a 13.38 mile hike with 4934’ of elevation gain in 8.5 hours.   Here’s a topo map of my route. Oh, and just for reference, using my iPhone’s flashlight took up 66% of it’s battery in 2 hours (while on airplane mode).

46

I drove back home, cleaned up, and noticed I was full of mosquito bites. Curiously, they were only on the left side of my body.

Alamosito – 13,466, Vermejo Peak – 13,723 & Purgatoire Peak – 13,676

1

RT Length: 9.74 miles

Elevation Gain: 4828’


First of all, I’d like to recommend doing this hike backwards from the way I took the hike: Route finding is easier and it’s much more straightforward; You’re above treeline almost immediately and have great visuals of all the peaks/route.

Secondly, Cielo Vista Ranch makes special arrangements for people to hike these southern peaks and because of this they require you to hike (or at least drive in and camp) as a group. They wouldn’t give me a reservation to go solo, so every month since December I emailed Carlos asking if anyone else was hiking and if I could tag along. I’d get a response saying he’s “look into it” and then he’d go silent. Thank you Rose for putting the ask out there and letting me tag along on your reservation!

We all met at a special entrance to the ranch and around 5:30pm. Carlos met us at the gate and had one of his guys drive us 7 miles up a dirt road to our campsite. This is a 4WD dirt road, and while 4WD wasn’t necessary the entire drive it did come in handy once or twice. Carlos gave us each his business card and asked that we text him when we exited the property the next day. At this point I view Carlos as a celebrity. I mean this in a positive way. Yes, he’s charging us all out the nose, but at least he’s nice about it. Also, he’s known by his first name.

2

3

Here’s a topo of the road we took. These roads are not shown on maps (CalTopo). I made a GPX file on the way back, which came in handy because there aren’t many ways to get lost on this road but I always seem to find them (I backtracked twice). We’d noticed on the way in the GPX file(s) we had were correct, but the road they took us on switched back and forth between the two files (apparently some of the roads are now washed out and impassable). Also, TONS of moths. Like, Biblical plague amounts. We had our Miller Moth season last month: Cielo Vista is experiencing it now.

4

Here’s a picture of where we parked our vehicles and camped for the night, around 11,750’

5

We all sat and chatted for a bit. I kept thinking to myself I should go look at the route I’d intended to start out on while it was still daylight, but I had a couple glasses of whiskey and I fear I was a bit too chatty. You see, I’m used to drinking alone (that sounded bad) but what I mean by that is when I usually hike/camp/etc. alone I have a few drinks, scope out the beginning of the route or at minimum where the trail starts, and call it a night. Early. Instead here I was, talking to people at camp. It was so nice to have like-minded people to talk to: we understood and appreciated each other’s mountaineering experiences and goals. That’s so much more refreshing than my mom freaking out every time I bring up hiking because she thinks I’m going to die. We discussed our intended routes for tomorrow and I decided to take the opposite route as the others so I’d be able to do it solo. I didn’t get to bed until a little after 9:30pm, and I never got a good look at the route I intended to take.

I woke up at 3:30am and decided I wasn’t ready to get up yet so I slept a bit more. I was way too comfortable. The third time my alarm went off I figured I’d better get going. I woke up, gathered my gear, and was off. My plan was to head northeast around the mountain and pick up a trail in the basin to the north of Purgatoire. After hiking for about a quarter mile I came to a rocky area that didn’t look passable in the dark. Well, it might have been, but at that moment my flashlight went out and I couldn’t see a thing (I later confirmed on the hike both visually and after talking with others telling me they’d turned around there as well that that route’s not passable). I decided to retrace my steps and try again.

Back at my truck I saw the others getting ready; their headlamps glowing inside their tents/trucks. I got a new flashlight from my truck (a headlamp: I’m not fond of headlamps as they make me dizzy but it was better than nothing). I restarted my tracker and was on my way, following the 4WD dirt road as it wound around the mountainside, losing about 450’ of elevation in the process (which was what I’d been trying to avoid by going around the mountainside first. Oh well).

6

After about a half mile my headlamp gave out. Great. Two flashlights out in the same hour. Who would have guessed? At least I was just following a dirt road and the sun would be rising soon. I’d just make a lot of noise to scare the larger critters who may be hiking with me this morning away.

I heard a loud noise ahead of me. An animal had been startled by the noise I’d made, ran through the deadfall for about 20 feet and then stopped. Knowing some animal was standing still ahead I made a lot of noise with my trekking pole. It didn’t budge. I slowly hiked forward and noticed whatever I’d scared into bolting for a little bit I’d scared pretty badly: I could tell by the smell.

The animal was still there, and now I could hear it breathing. I made noises again but it didn’t move. I was worried it may be an injured animal and wanted to know what it was, and obviously I didn’t feel comfortable turning my back to it. In the dark I got out my phone and decided to take a picture (thinking the flash would go off and I’d be able to see what it was, even if the photo didn’t turn out. Note: Later in my hike I realized I could have used the flashlight app on my phone, but since I’d never used it before the thought didn’t come to mind until later).

I took a picture and the beast in front of me was…. a cow. Yep, a cow, and the first of many I’d see today.

7

Well, that was anticlimactic! I’ve raised cows before (both dairy and beef) and I know how to handle them. I clapped my hands, waved and shouted “Move on!” held my walking stick parallel to the ground and advanced forward. The cow turned, moved out of my way, and I continued on. I saw about 10 more cows before it got light, but knowing what they were I didn’t have a problem with them anymore.

I followed the dirt road for about 1.25 miles until it came to a 3 way divergence. I randomly took the middle road as it looked to be heading in the direction I wanted to go and it turned out to be the right one.

8

I continued east through the trees, encountering more cows, until I made it to the basin. The sun was now up and my anxiety level dropped. There were still tons of cows, but now I could see them, as well as cow trails and ATV trails. I followed the ones that went east.

9

Once out of the trees I could easily see the path I wanted to take to summit Alamosito. (Note, some routes tell you to take the saddle and drop down into another basin and then gain another saddle, summiting Vermejo first then backtracking to Alamosito. The way I went just made more sense to me, but several routes all ‘go’. Alternately you could gain the Alamosito/Purgatoire saddle and summit from there as well).

10

This was straightforward, except for these cows who didn’t seem to want me to pass. I made noise and told them to “get along” they just stared at me. One even lifted its hind foot and stomped a few times, kicking up dust. I got the impression they were expecting something from me. Even the calves had ear tags, so they’re used to humans (at least in some part). I passed them to their left and they went back to grazing.

11

Here’s a look back from the saddle. I’ve circled the campsite in red, and the area that cliffed out in yellow. Note: Everyone else just went straight up the ridge to start (a better choice to begin). My route to the saddle is in orange.

12

From the saddle I turned right and headed east. This was a very straightforward ridge hike. In fact, they all were today.

13

I summited Alamosito at 6:45am, after 2 hours and 3.3 miles of hiking. There was a summit register in a glass jar buried in the cairn.

14

Alamosito:

I turned north and headed down the ridge to the Alamosito/Vermejo saddle

15

There was some rubble to contend with on the way down, but all class 2

16

From the saddle I turned right and headed east up to the summit of Vermejo Peak (that’s a false summit you’re looking at here). There was some rubble here as well

17

At the top of this easy ridge walk there was another .3 miles to go before making it to the summit, also an easy trek that reminded me of Ireland: the tundra was green and there were lots of black and white rocks. The picture doesn’t do that justice.

18

I summited Vermejo Peak at 7:45am. From Alamosito to Vermejo it’s just over a mile and a half of hiking. There was a summit register here as well (one of the pipe ones I can never open because: Raynauds).

19

Vermejo Peak:

There were great views of Red Mountain A and Culebra from the summit

20

I turned and headed back the way I came, towards the saddle and back up to Alamosito

21

22

23

From the saddle there’s a great view of both Purgatoire and Alamosito

24

From the saddle I made my way back up to summit Alamosito

25

26

I re-summited Alamosito at 9am and looked over at Purgatoire Peak

27

This was another easy ridge walk. Rubble turned to tundra as I made my way towards the saddle

28

29

Here’s looking back at Alamosito and Vermejo Peak from the Alamosito/Purgatoire saddle

30

The rest of the ridge to the summit of Purgatoire was straightforward

31

32

33

I summited Purgatoire Peak at 10am

34

Purgatoire Peak:

There was a summit cairn, and also this thing. I’m not sure what it is? I could probably look it up, but, thoughts?

35

I turned west to head down the way I should have headed up, back over this unnamed point (which has about 260’ of elevation gain from the saddle, and tops out at well over 13K)

36

Here’s looking at the route from the morning when I was hiking up Alamosito

37

It starts out as a simple ridge walk on tundra, dotted with rocks the size of toasters, and once at the saddle it looked like there may be some scrambling involved, but there’s actually a game trail to the left of the ridge that makes the ridge easy to follow

38

39

Here’s a look at the route from the saddle towards Purgatoire Peak

40

From the top of the point there’s a tundra ridge to walk down, and just a little bit of forest to go through before reaching the road. As long as you aim for the road you’ll be fine, as you can follow it to the campsite. Yes, I should have hiked the couple hundred feet up this last night: it would have made the entire route more obvious.

41

42

Here’s a look back from treeline on the point you need to ascend if heading this way

43

Once you’re in the trees navigation can be a little difficult. Just keep aiming west and you’ll hit the road. Oh, and you can’t see them in these pictures, but there were moths everywhere! Thousands of them swarming around. They apparently appreciate the elevation / pines today.

44

I made it back to the 4WD road we drove in on and followed it back to my truck. I arrived back at my truck at 11:45am, making this a 9.74 mile hike with 4828’ of elevation gain in 7 hours (not counting my early morning false start).

45

I got back in my truck and followed the road back to the gate. The route was much easier on the way down than on the way up. I unlocked the gate, re-locked it, drove through, and text Carlos to let him know I’d exited the property. Also, the lock was much easier to figure out than the one that was there when I hiked Culebra (but to be fair, it was also the first day they’d implemented that system).

46

47

Here’s a topo map of my route, as well as the drive in.

48

49

It was still early in the day. I ate a sandwich as I drove the 3 hours to the next trailhead during a thunderstorm.


Northwest Pole – 13,660, Pole Creek Mountain – 13,716 & PT 13,573

1

RT Length: 19.67 Miles

Elevation Gain: 5926’

I drove up to Carson Pass a few days before and slept in my truck, hiking Bent Peak the first day, and Carson Pass, Tundra Top, Cataract Peak, and PT 13581 the next. For details on the drive in, please see this post: Carson Pass.

2

I woke up before my alarm again today, but not because I was well rested: I was cold! As I turned on a light I realized I only had half of my blankets covering me. There wasn’t any wind last night, and when I looked outside I could see tons of stars. The clear skies had made for a cold night. I jumped in the cab of my truck to warm up and get ready for the day, noticing it was 32 degrees outside (as compared to yesterday morning’s 43). It was amazing what difference a few degrees makes.

I turned the truck on to turn on the heat and was once again disappointed to notice my ABS and Traction lights were still on, as well as my 4WD light still blinking. That was going to haunt me all day.

I was on the trail by 3:30am, and it was so cold I turned back at one point, intent on sitting in my truck a little longer, but I immediately turned back again: I’d knew I’d warm up a bit once I started moving. The weather forecast was better for today, but I still wanted to get an early start. I followed the 4WD dirt road 821 to the class 1 Trail 813 as it lost a total of 400’ as it wound down the canyon, and then gained almost 1000’ to the top of the pass.

3

There was one small section of snow to cross, but luckily the elk had already done a great job blazing the trail.

4

Once at the top of the pass I continued along the trail, dipping down into the basin, losing another 700’ of elevation.

5

After hiking for a total of 5 miles at this junction I turned and followed 822 southwest to the base of the Northwest Pole Ridge.

6

In the basin I left the trail and headed for the Northwest Pole Ridge

7

My goal here was to gain the ridge and follow it to the summit of Northwest Pole. Here’s an overview of the route:

8

And what it looks like gaining the ridge (yes, tons of elk out there today). Also, the basin was marshy, but since it was so cold and early in the morning it was frozen and crunchy. There were ribbons of water that I hopped across. I wouldn’t want to pass this area when it’s soggy and wet.

9

Once on the ridge it’s easy to see the snow free path to follow, all on tundra. This is all easy class 2

10

11

From the top of the ridge you dip down a little bit and then back up on loose rock

12

The crux of this climb comes at the very end. I spent some time trying to figure out how I wanted to summit. At first I tried to gain the block at the area where all the bird droppings were, but it didn’t look like it was the easiest way. Next I tried summiting up a chimney, but about halfway up I knew I’d need rope to get back down (I’m short) so I stopped and looked for another route. In the end I was able to summit by going up the area with all the bird droppings, just from a different angle. There is a lot of exposure here and small scree on the rocks, making it slippery and a fall dangerous.

Here’s the route I took:

I aimed for the bird droppings. Here’s what that looked like from a couple of different angles.

13

14

From there I traversed along the exposed edge towards the summit.

15

It looks easy, but this is the exposure, and yes, it included a trust jump (once again, I’m short, it could have been more of a long lean for someone over 6 feet tall, but I had to jump). Here’s looking back on the jump area (it’s too difficult to see in a picture coming from the other way, but this picture offers a good look back on the ridge too)

16

I summited at 9:45am

17

Northwest Pole:


Here I am getting ready to jump the area on the way back.

18

And from the top where the bird droppings are back down. Yes, it’s as steep as it looks

19

Back on solid ground I took a picture of the summit block and how I traversed it. I circled where I jumped.

20

Time to head over to Pole Creek Mountain. Here’s an overview of the route from Northwest Pole

21

I descended east towards the basin, first on loose rock that gave way to tundra, losing 850’ of elevation, crossing a stream, and heading back up towards Pole Creek Mountain.

22

Here’s looking back at Northwest Pole

23

I continued southeast towards Pole Creek Mountain. Here’s how I ascended; the snow was easy to avoid, and I used it to track where I wanted to go:

24

After ascending the ridge I aimed for the access gully, which had snow but enough dry areas to pass easily without traction

25

Then I just followed the ridge south towards the summit

26

I summited Pole Creek Mountain at 9:45am, after almost 10 miles of hiking

27

Pole Creek Mountain:

I headed back the same way I’d come in, following the ridge and then going back down the small access gully. Everything looked totally different on my way back and I second guessed myself a few times, but keeping Northwest Pole in sight helped.

28

Once back down in the basin between Pole Creek Mountain and Northwest Pole I wanted to stay high on my way back out to avoid the snow below Pole Creek Mountain to the east

29

I headed north, and then east around this small peak.

30

There was some snow here, but elk in the area make a great trail and traction wasn’t needed

31

I rounded the east side of the small peak

32

And unexpectedly came across a small herd of elk! This was so cool! I’ve heard of elk doing this, but I’d never actually seen it before: the mama elk were laying in a circle, with the babies laying down inside and two sentries standing guard. I saw them a split second before they saw me (the wind was blowing towards me, so they hadn’t heard/smelled me) and I was able to get a picture before they took off

33

As soon as one of the elk standing guard saw me I could almost hear him say:
“See? This is why we always employ the safety circle! Always! This is not a drill! Move! Move! Move!”
And they were off and down the hillside, out of sight.

Well, that had certainly been a neat experience! I continued rounding the peak and then made my way down the hillside, all the way to the basin floor. Here’s an overview of the route I took

34

And looking back, here’s the route I took down into the basin. For obvious reasons I’m now referring to this as “dementor ridge”

35

Once in the basin I was at the lowest elevation I’d be at all day, and still had a lot of hiking left to do. I aimed northeast until I hit a trail, and then followed it up. This was trail 822 that would bring me back to Trail 813 (if I chose to go that route). This was actually easier than it looks because there are a lot of good elk trails in the area, passing through the willows.

36

I followed the trail to a sort of a saddle, and stopped to think

37

From here the trail obviously dipped down once again, losing several hundred feet of elevation before reconnecting with Trail 813 and gaining the pass, then dipping back down into the basin and up again out. Here I was, sitting directly below PT 13580, a ranked 13er that I’d want to hike sometime in the near future, but in which I dreaded that drive into Carson Pass that would be necessary again next time. It was still early in the day and the weather was great. I decided to just summit PT 13580 now while I was in the area. I’d done some scouting yesterday and today, and I was sure the route from the summit of 13580 back to the pass ‘went’ easily and would be snow free. I turned right and headed east up the mountainside. This was a very straightforward hike up tundra

38

At the top the tundra turned to rock, all class 2 and easy to navigate

39

At the top of this rocky area was the summit. I summited at 2:15pm

40

PT 13,580:

Here’s a look back at the route

41

Now I decided to stay high on the ridge and aimed north, following the ridge towards the peaks I’d climbed yesterday

42

And then back down to the pass and trail 813

43

The hike out was uneventful. It was a beautiful day and I just followed the class 1 trail back. Oh, and I saw the moose again, in the same spot as yesterday.

44

45

I made it back to my truck at 4:15pm, making this a 19.67 mile hike with 5926’ of elevation gain in 12 hours, 45 minutes. Here’s a topo map of my route:

46

When I made it back to my truck I noticed a marmot running out from underneath. Great. I decided it would be best to try to drive my truck down today in the daylight in case I got stuck, but because I also didn’t want to encounter other vehicles (if possible) I decided to eat dinner first and take my time. Also, I wasn’t even sure yet my truck would drive.

When it was time to go I was able to get the truck to move and tried to see if I could get 4WD to engage by driving the truck around for a bit, but that didn’t work. So I decided to just go for it and head back down the road, going as slow as possible. I probably maxed out at 2mph. When I got to about a mile from the end of the 4WD road I saw another vehicle turning around. It took them 20 minutes to do so, and by this point I was feeling pretty confident about my truck.

47

I made it back to the 36, kept trying different things to get my 4WD light to stop flashing and realized it was hopeless. I drove home and the first thing the next morning went to the dealership. The diagnosis: rodent damage. One of those darn marmots, chipmunks, pikas (etc.) had bitten through the wiring. Luckily it was fixable, and I was out of there within a few hours. They put rat tape over the wires to hopefully prevent this from happening again. I’d never heard of rat tape before, but it sounds like it should be on all wires.

I consider myself lucky: after years of leaving my truck in the backcountry this is the first time I’ve ever had this issue where it’s caused concern. I’ve chased some porcupine’s out from underneath my truck before, but that was before any damage was done.

I’ve done some serious thinking about the issue, and I think a physical barrier is the only way I’m going to keep rodents out. So here’s my idea: tomorrow I’m going to Home Depot and buying a large tarp and some bungee cords. When I park at the next trailhead I’m going to lay out the tarp, drive over it, and then secure it around my truck with bungee cords to prevent critters from getting underneath.

This is just a thought at this point, but something I hope to implement and test soon.