PT 13336 and PT 13015

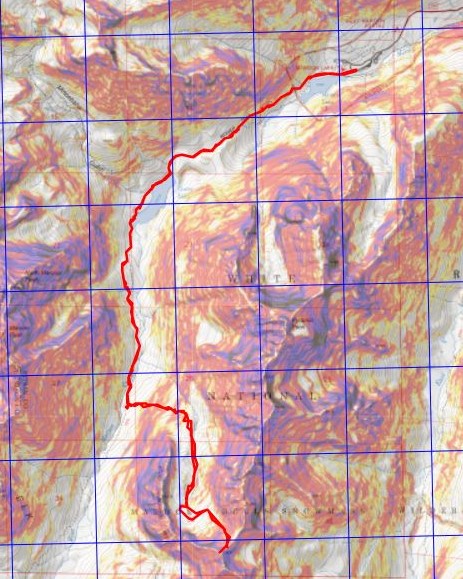
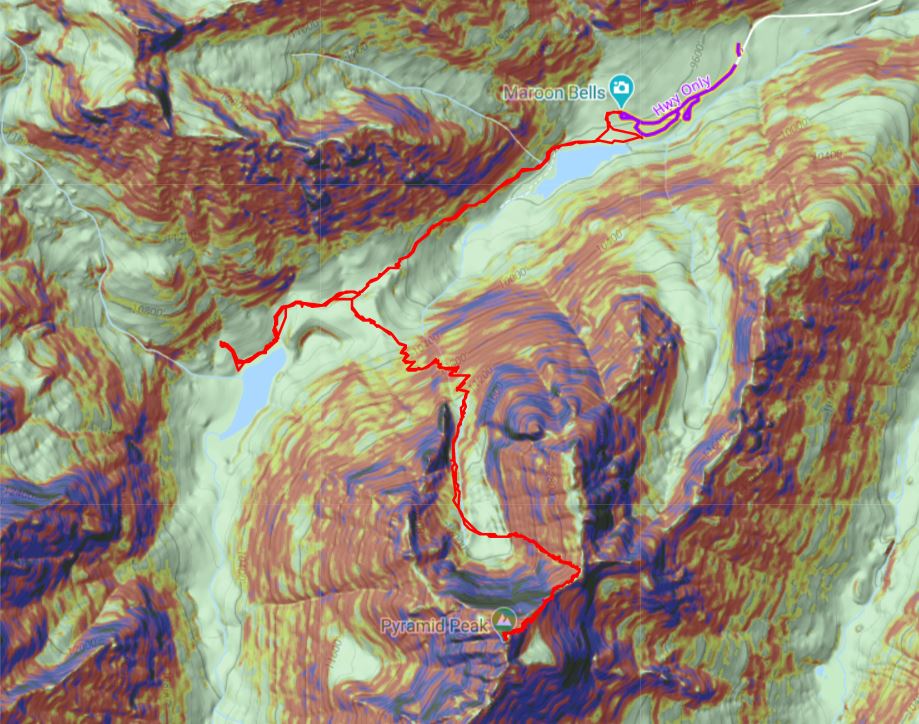
RT Length:  16.3 miles

Elevation Gain:  5815’

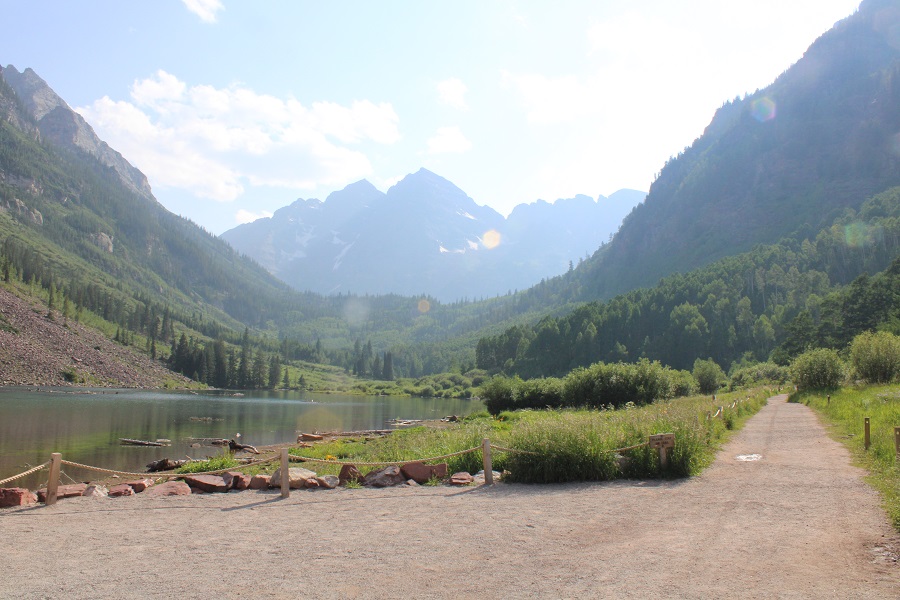
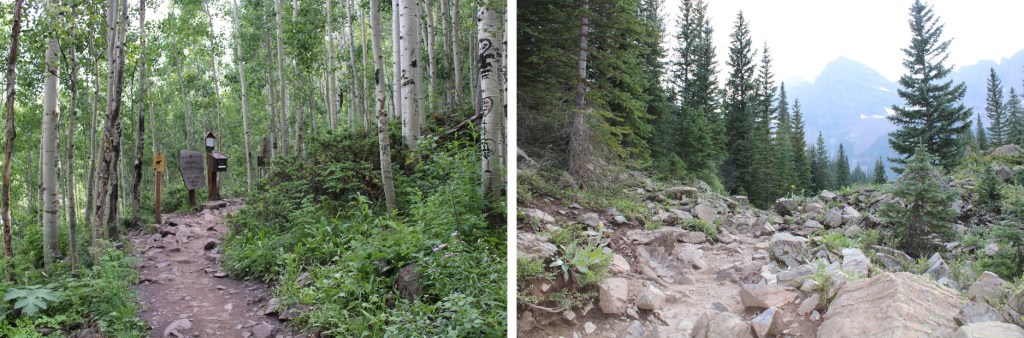
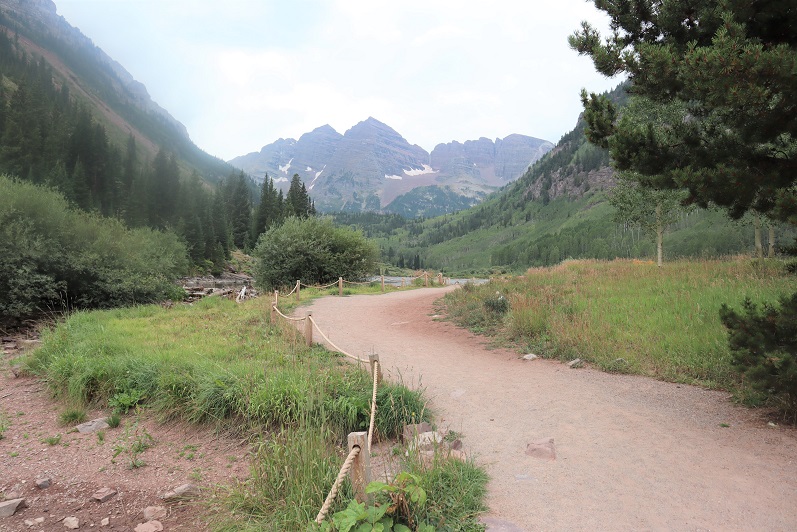
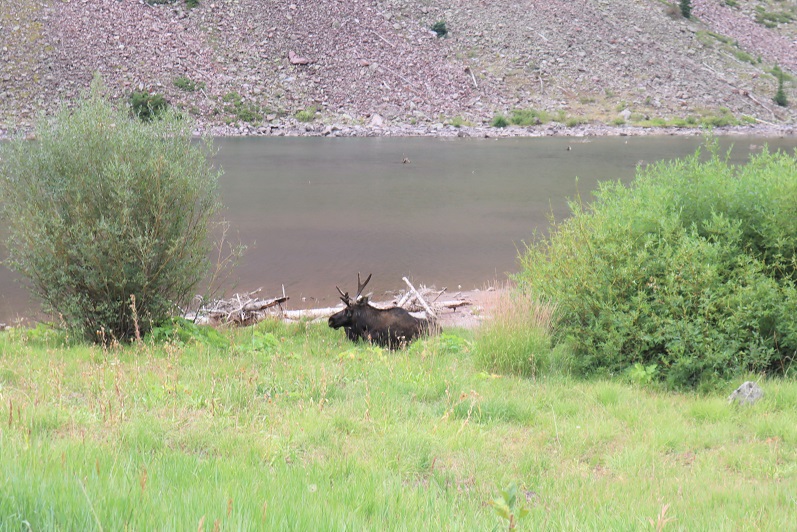
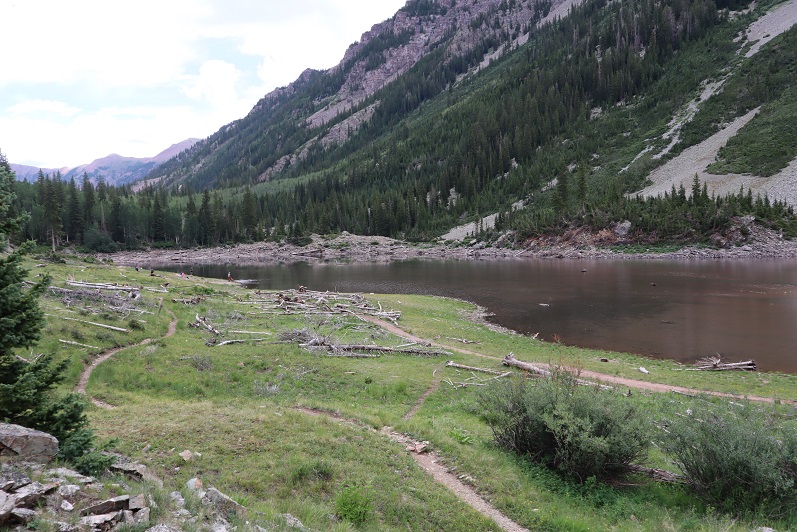
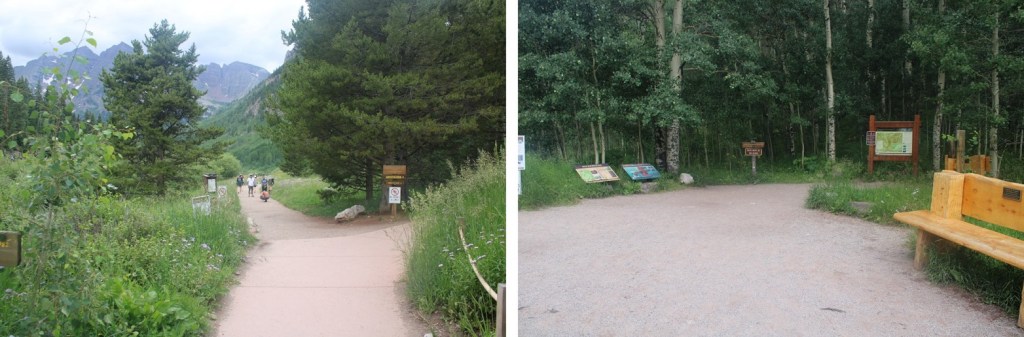
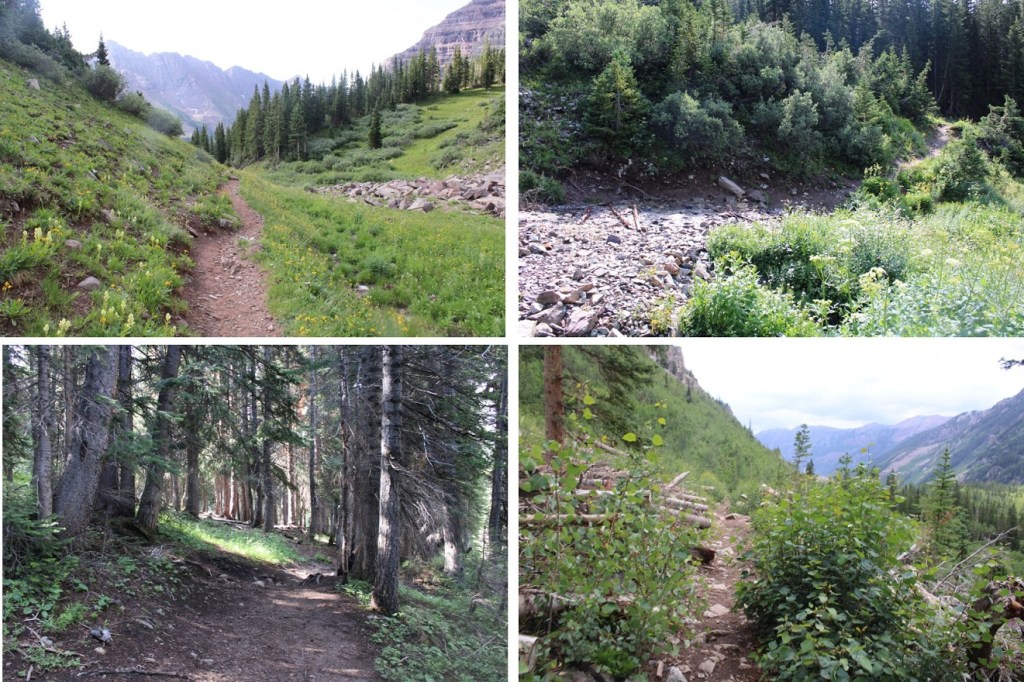
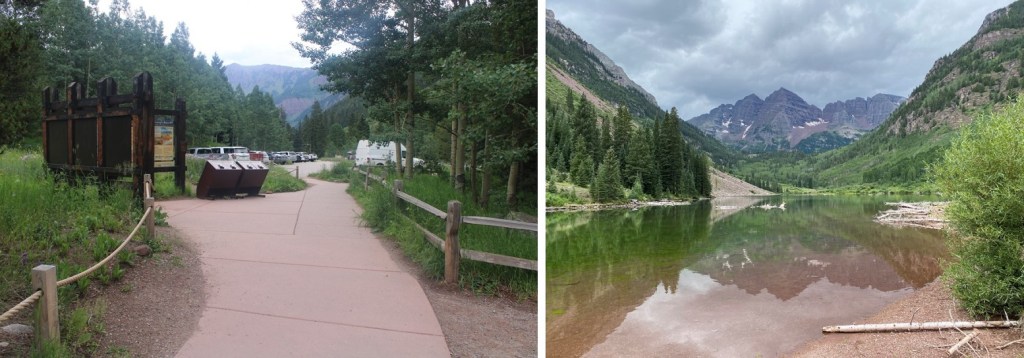
I decided to hike these peaks from the Maroon Bells area because I had a pass and was already there.  I knew today was going to be a straightforward but long day, and it was supposed to storm in the morning, so I was up extra early and on the trail at 2am.  I started at the Maroon Lake trailhead, and passed a few deer grazing in the dark.   I skirted Maroon Lake to the right, and continued on the trail towards Crater Lake.

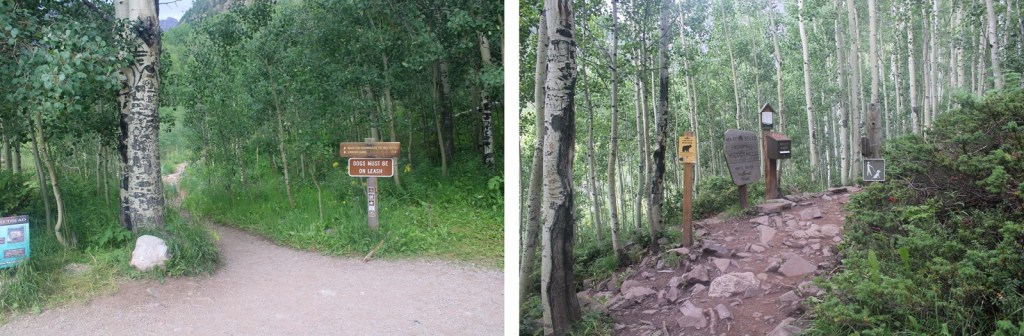
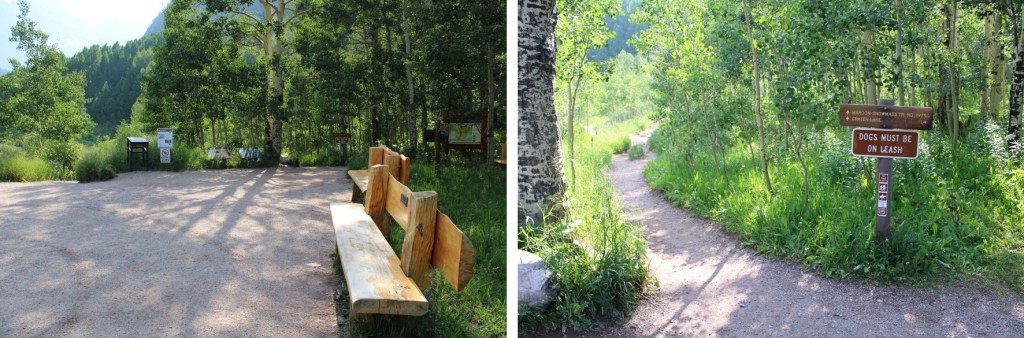
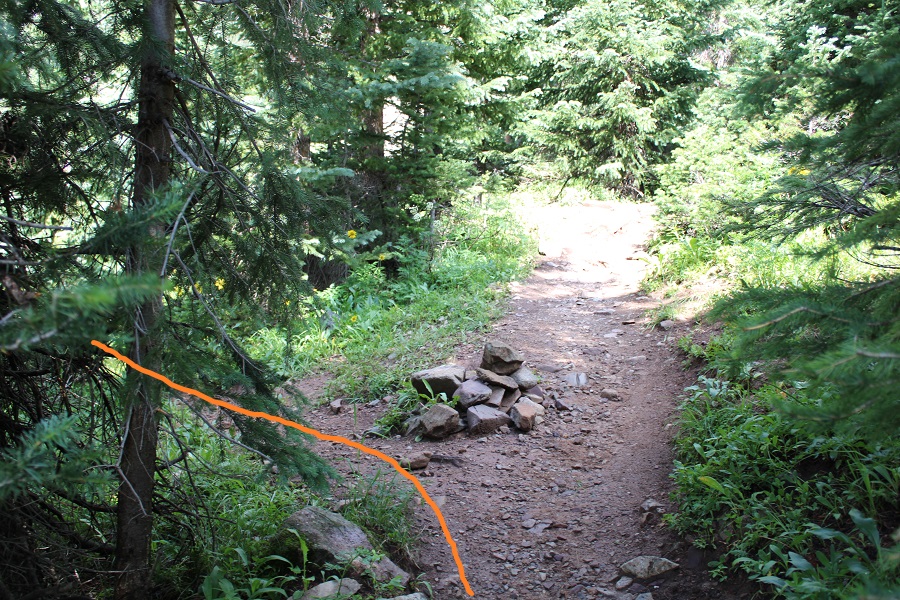
At the first junction I continued straight, and followed Maroon Snowmass Trail 1975 up into Minnehaha Gulch. 

I continued on this trail all the way to Willow Pass.

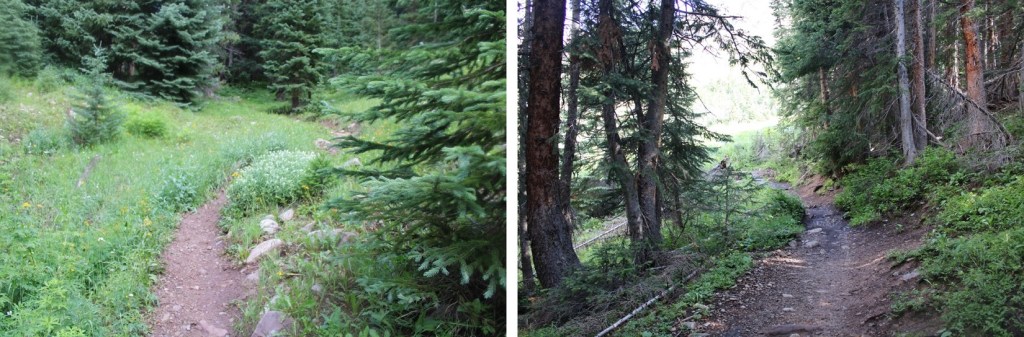
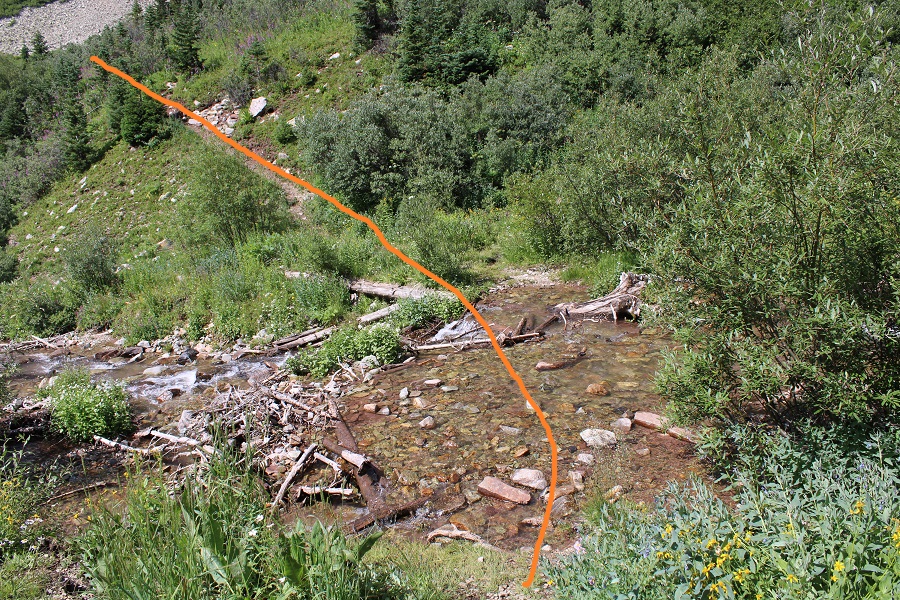
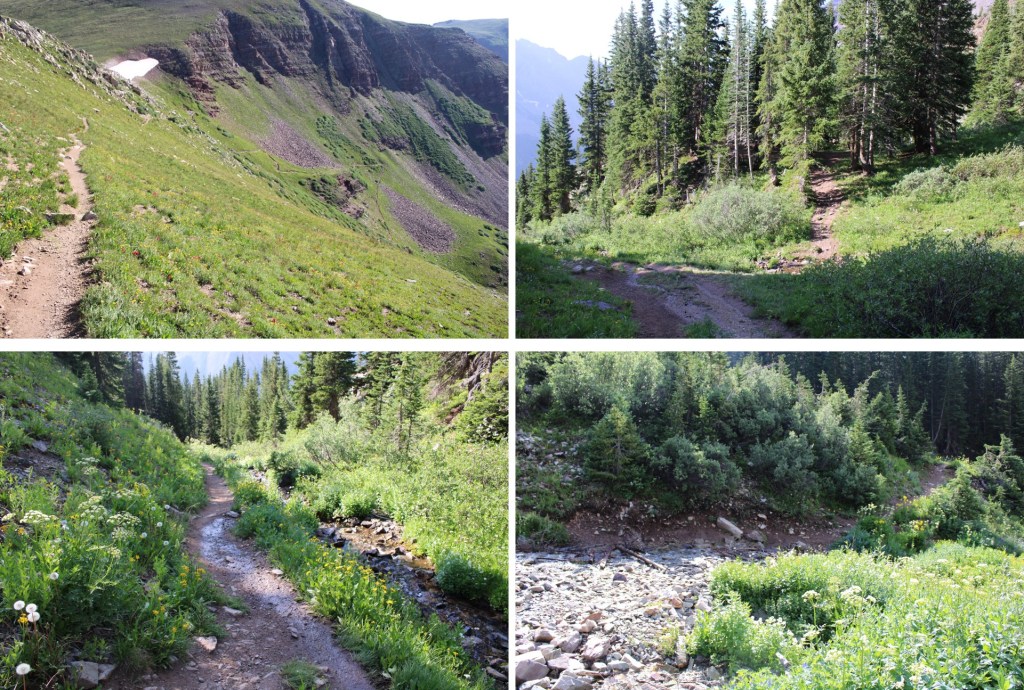
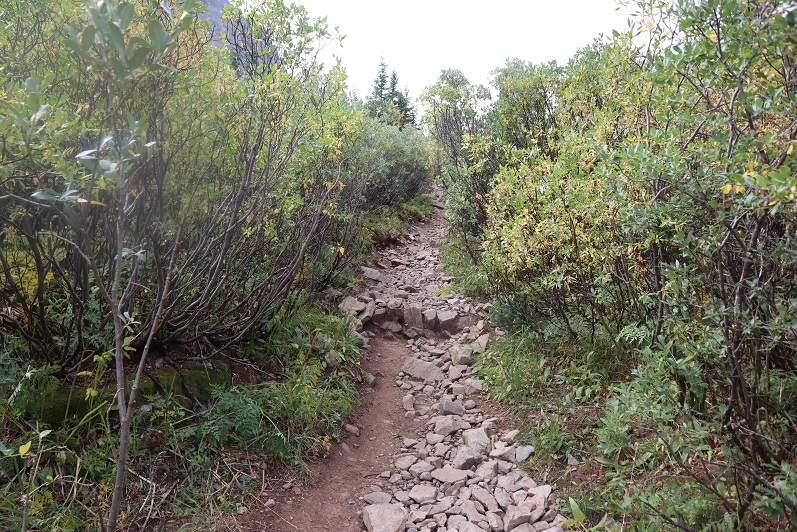
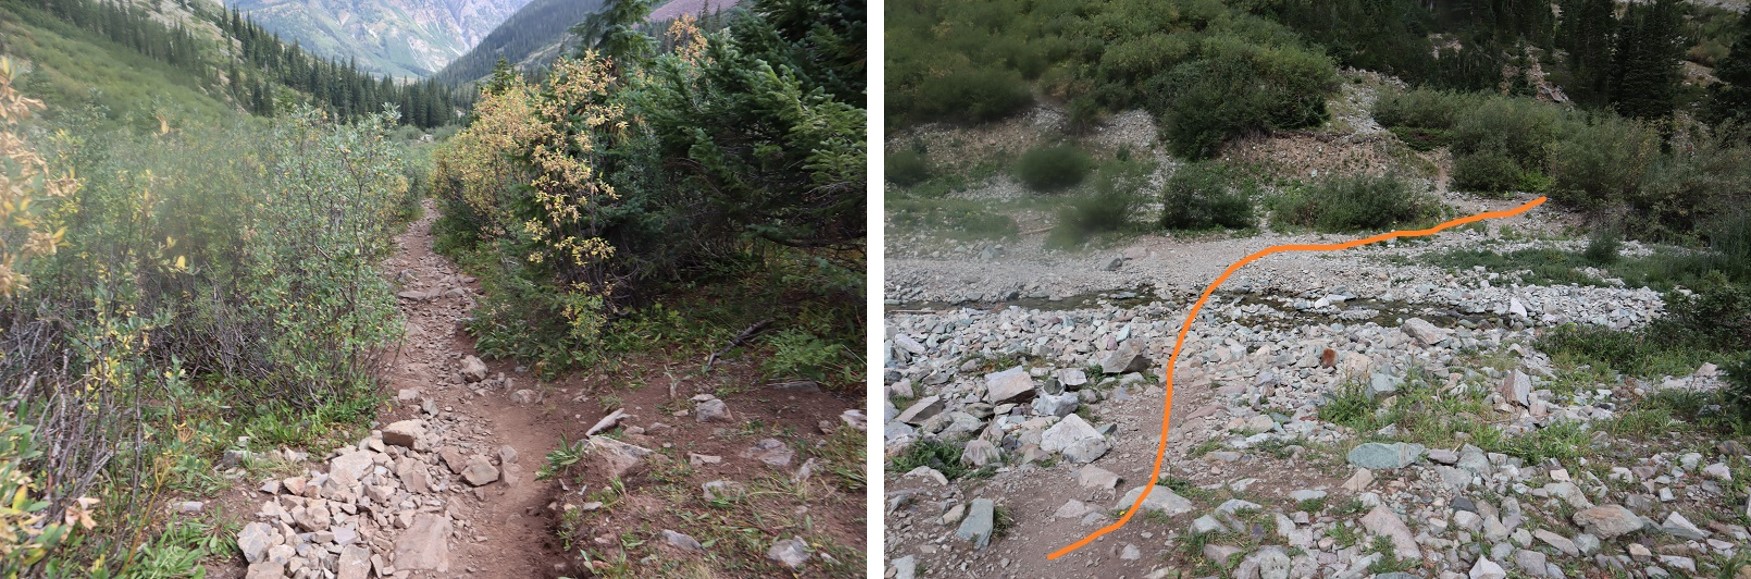
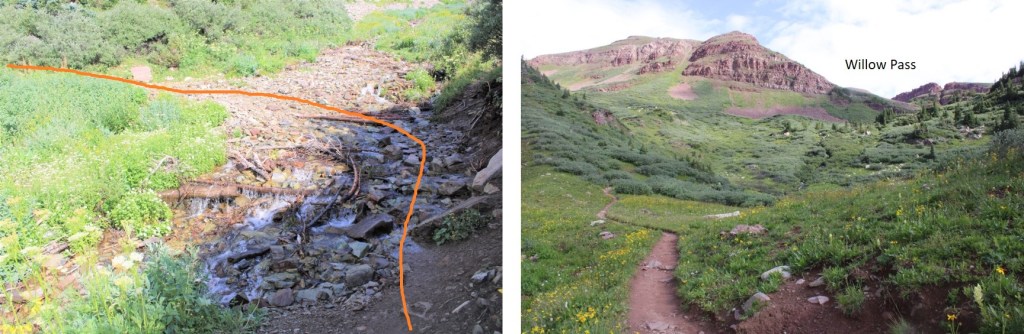
This is a class 1 trail that crosses a creek, then heads north through the basin.

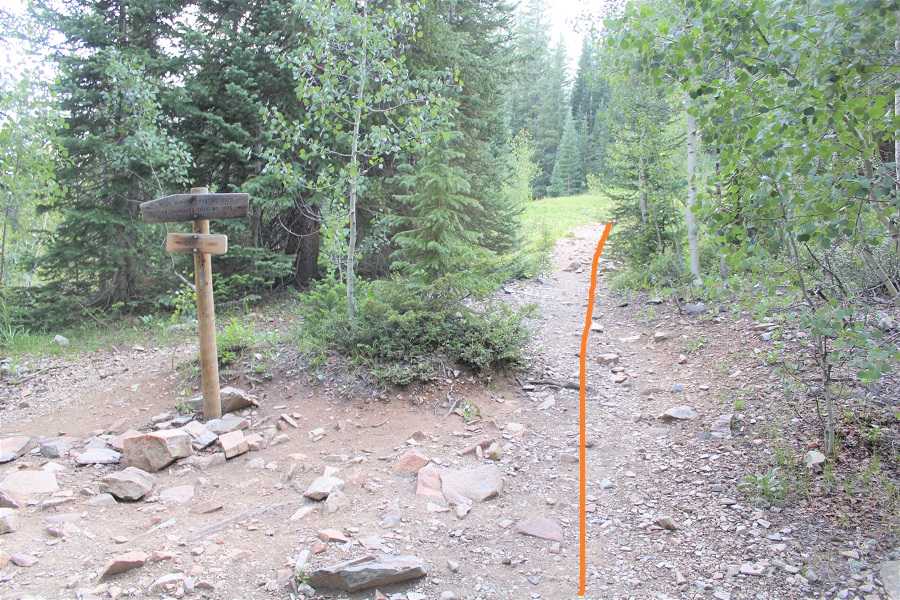
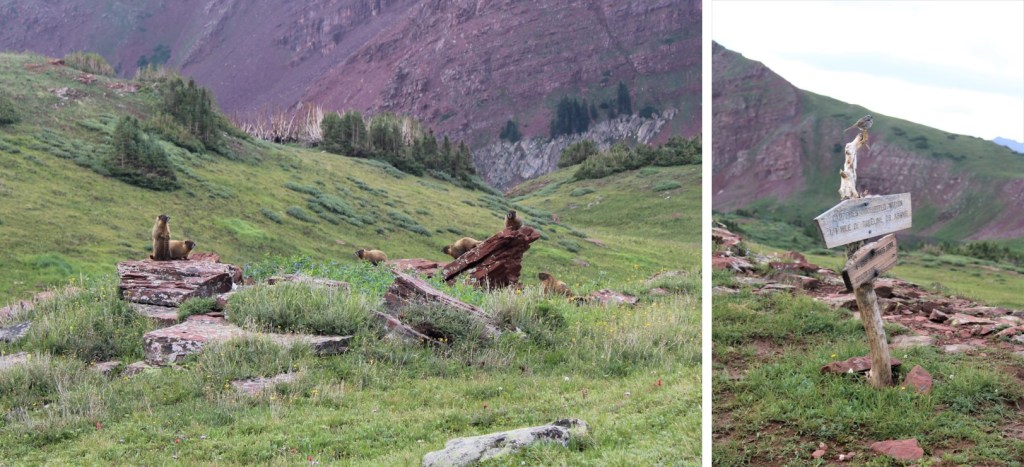
Stay right at this sign

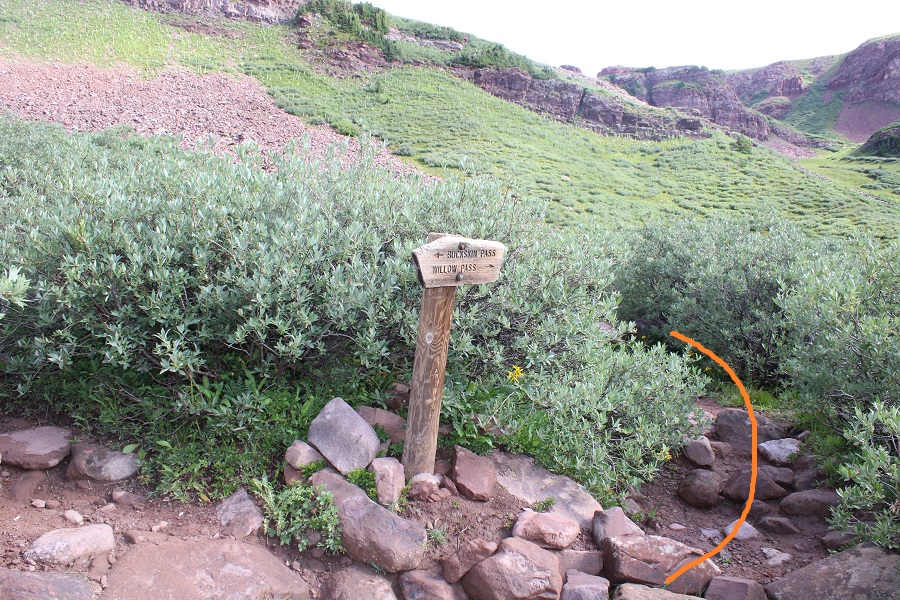
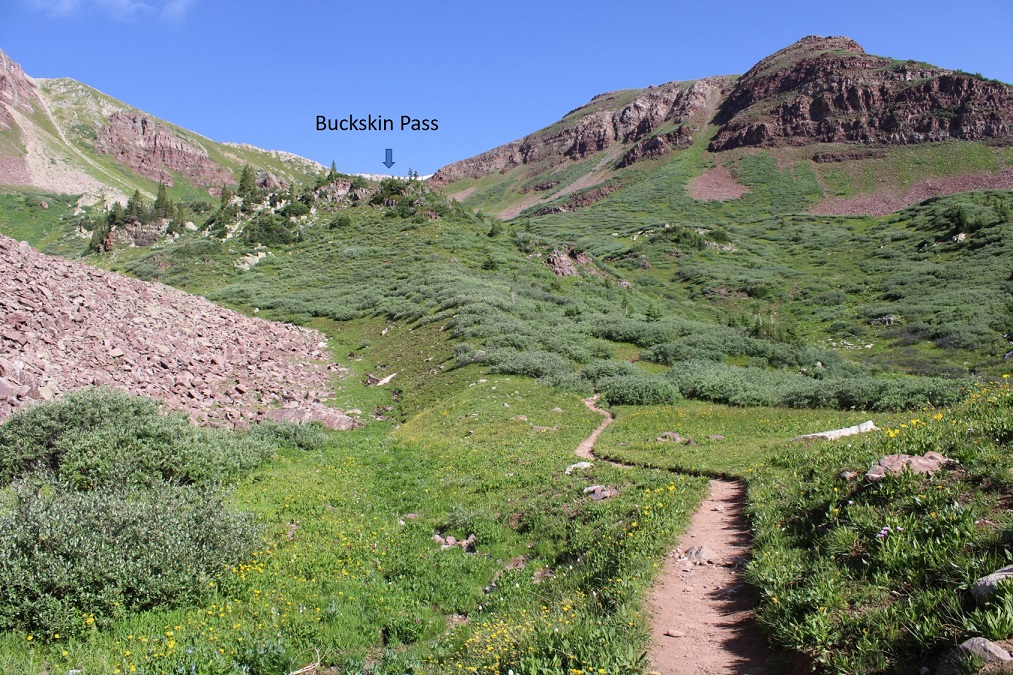
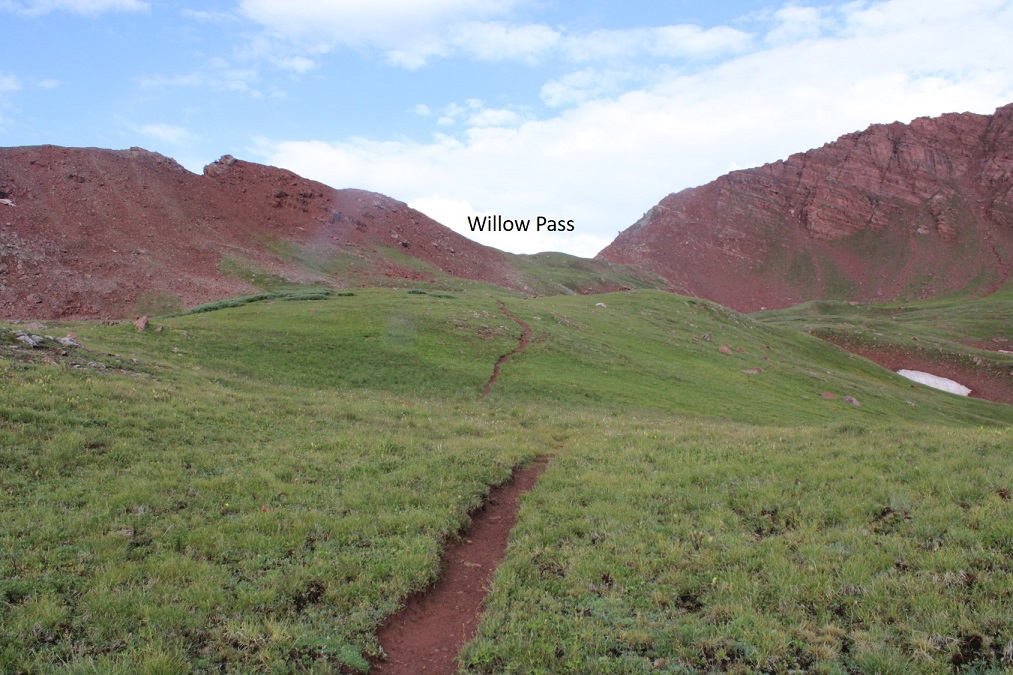
And follow the trail to Willow Pass.

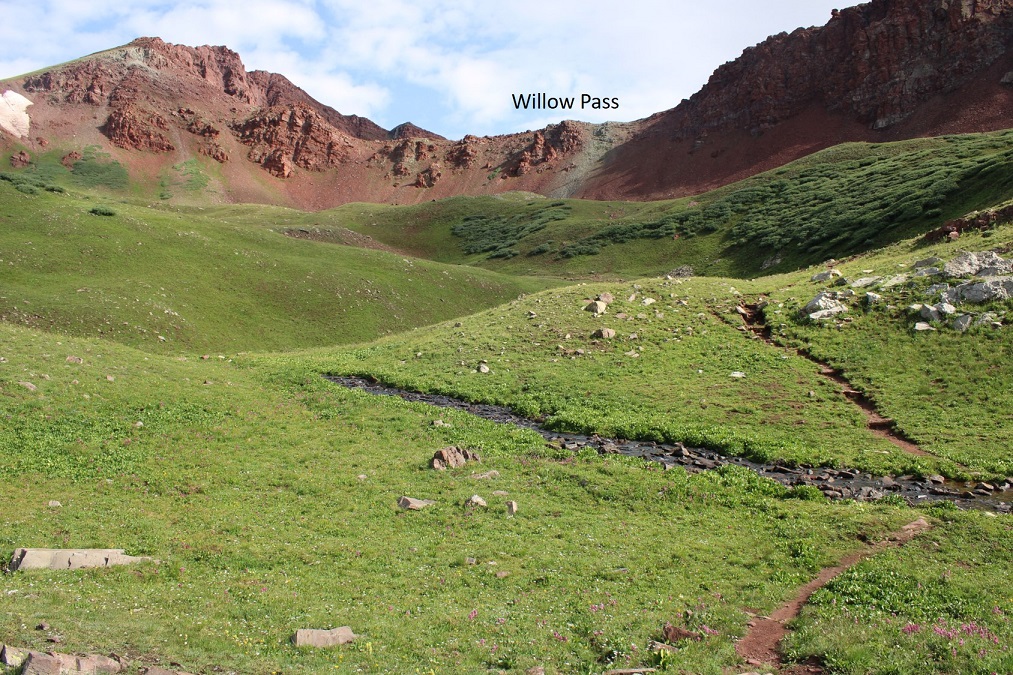
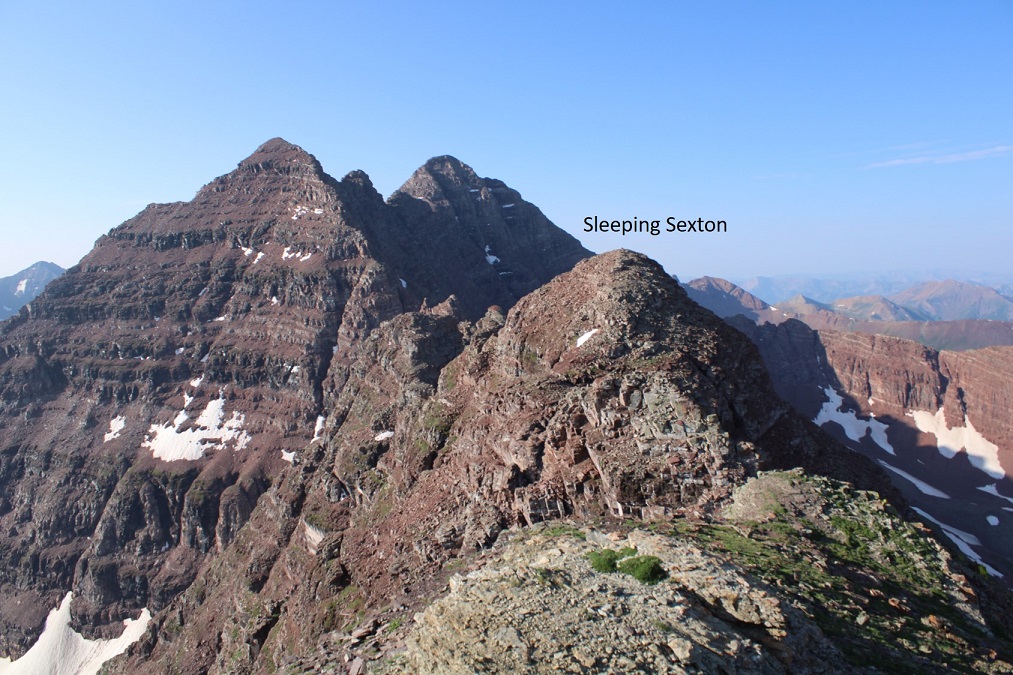
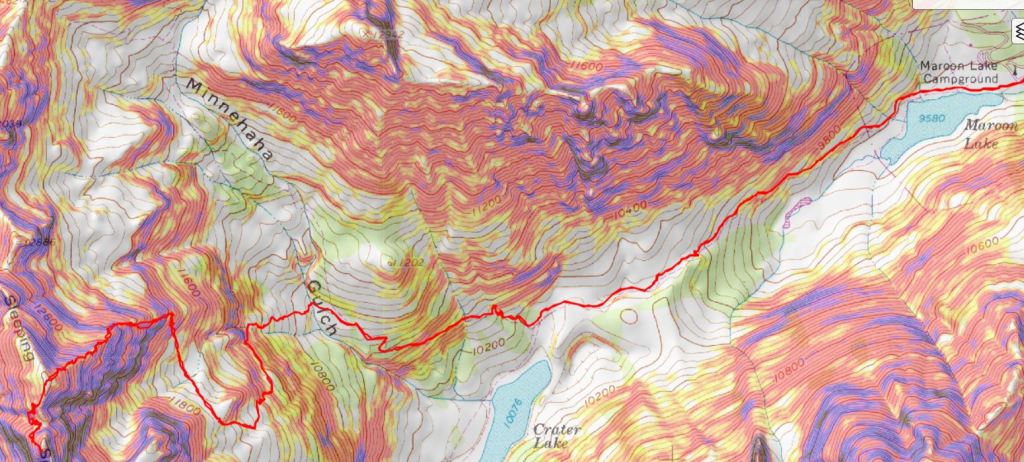
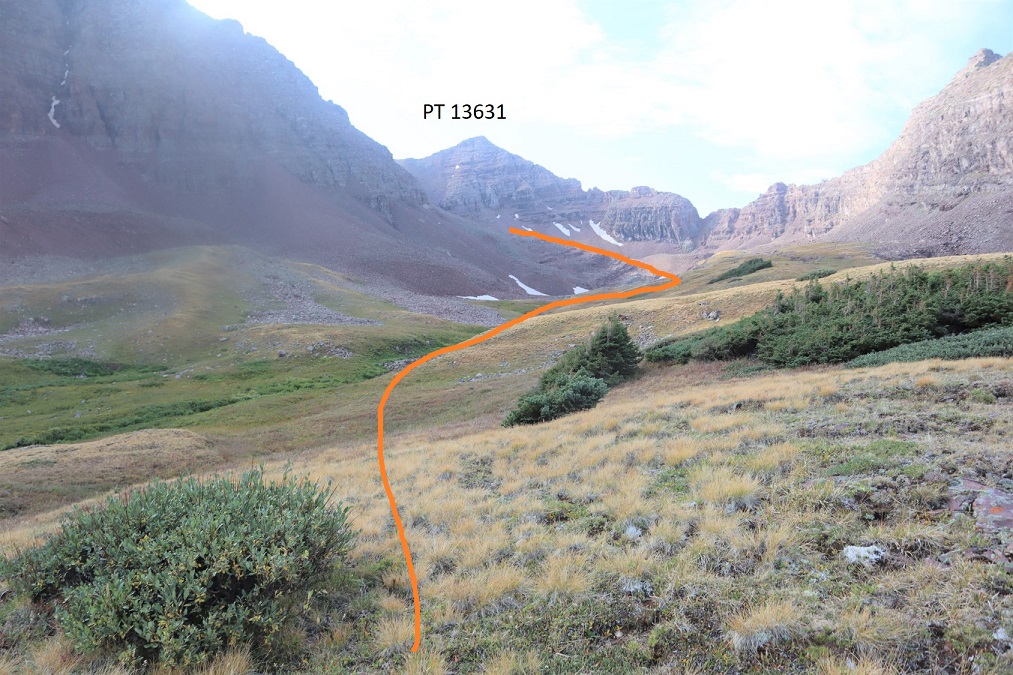
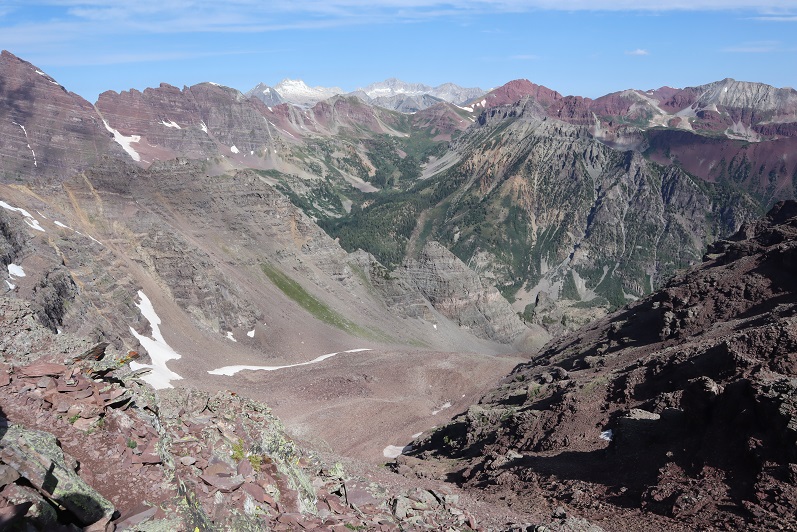
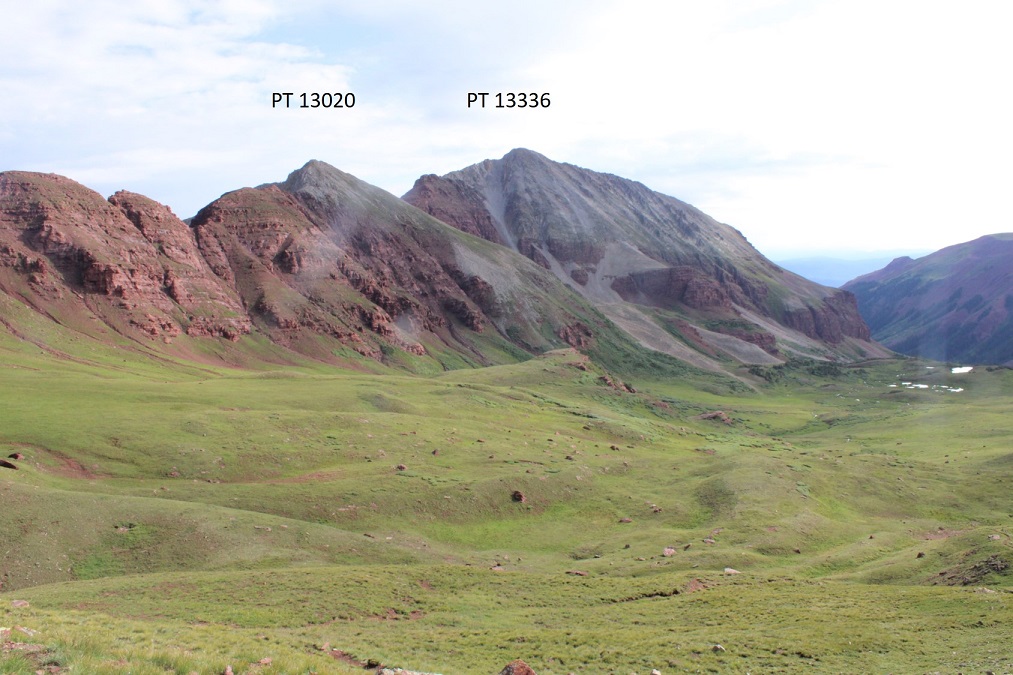
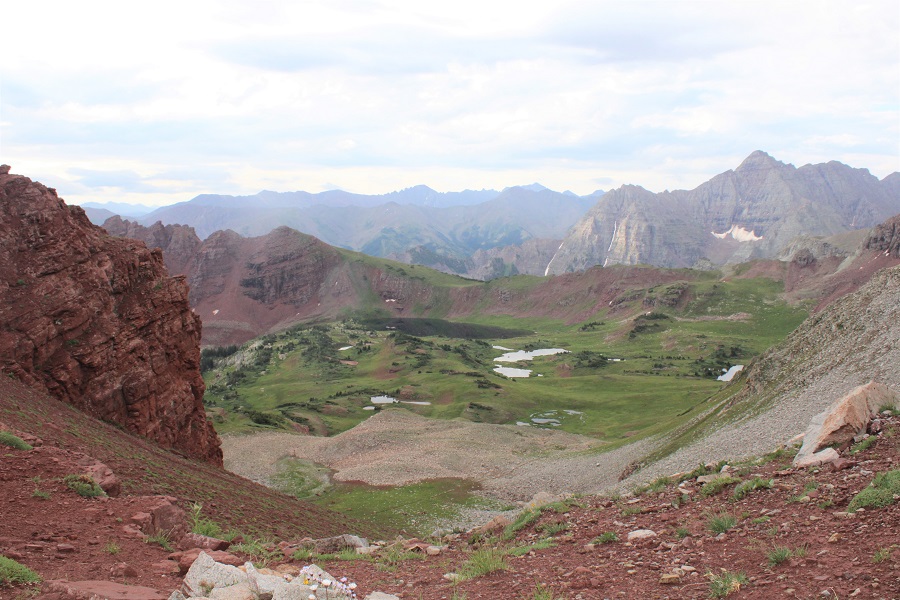
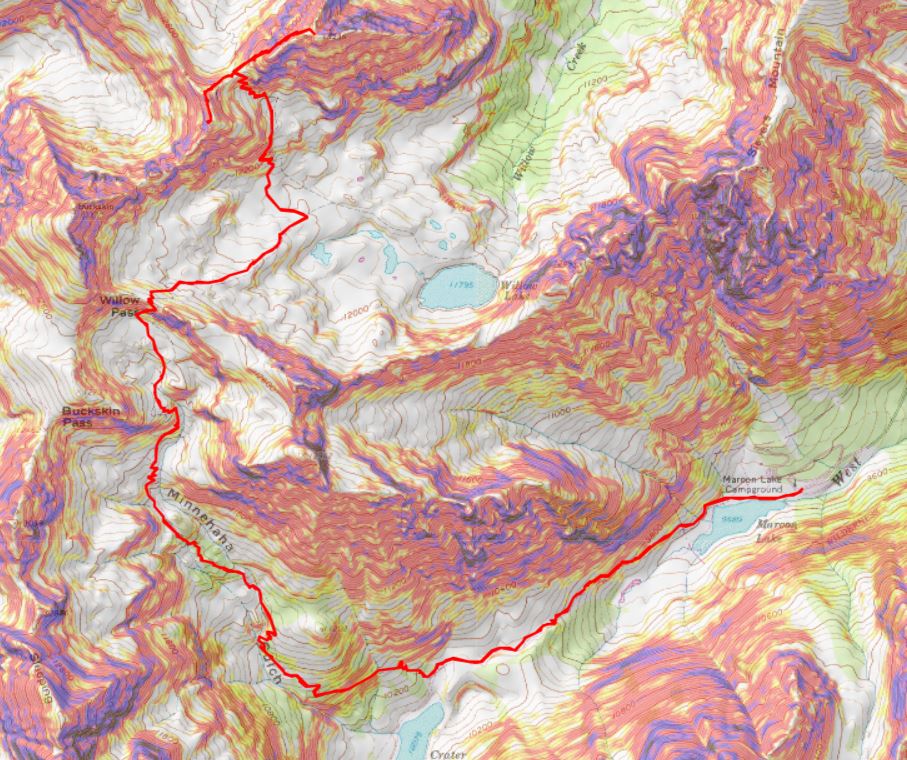
CalTopo tells me I hiked 5 miles from the parking area to Willow Pass.  From Willow Pass you can see today’s peaks

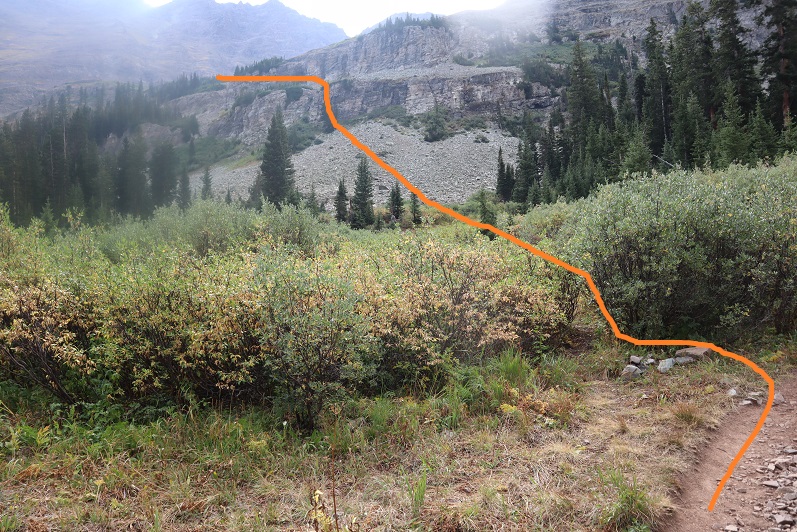
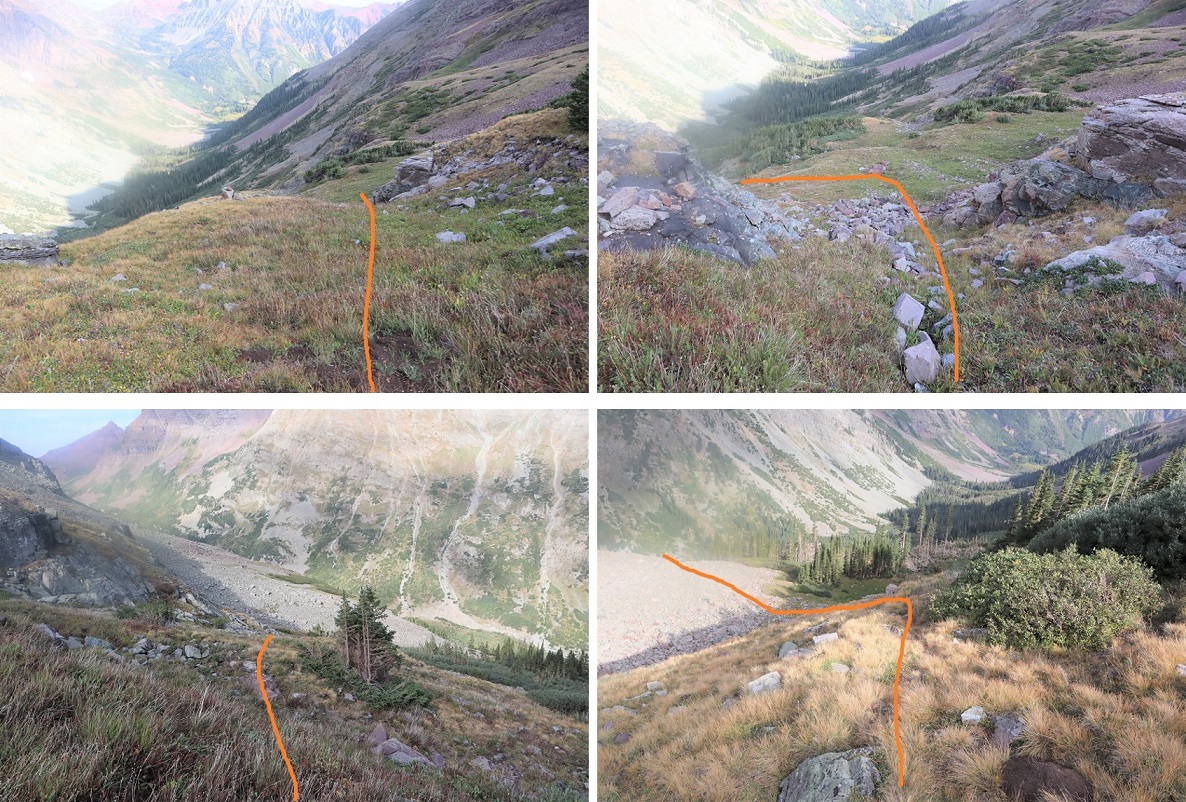
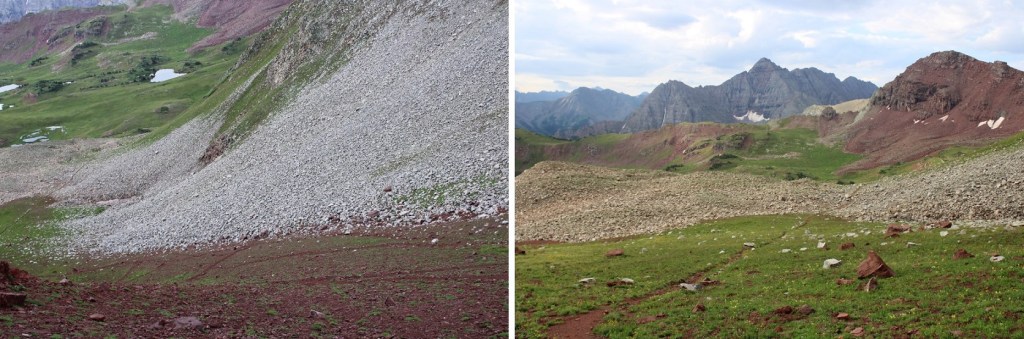
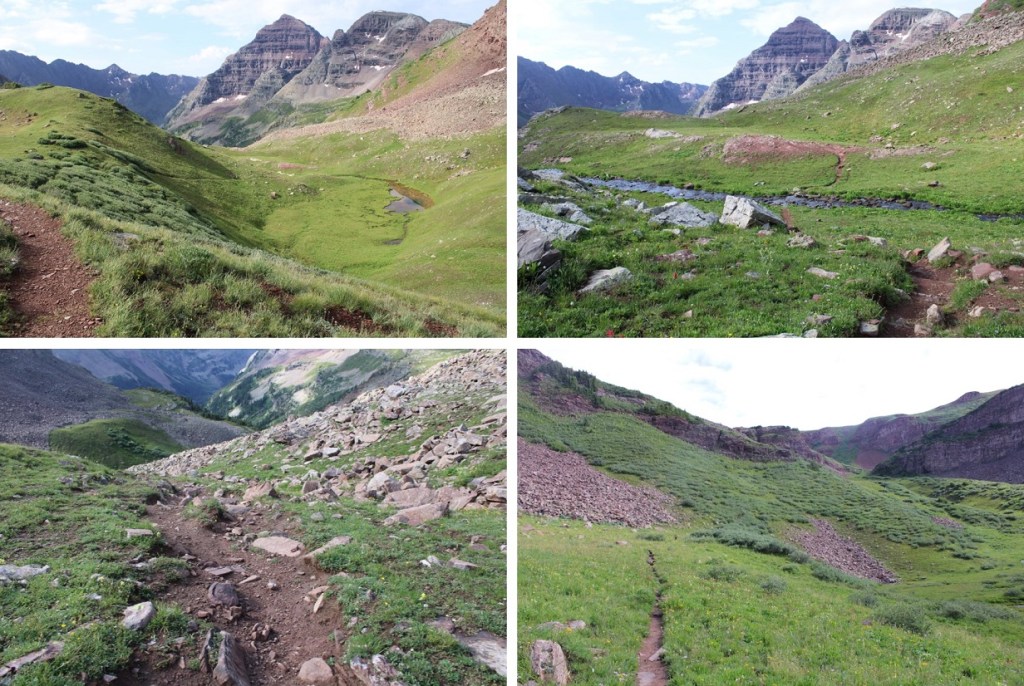
From Willow Pass I descended 560’ into the basin

I came to the Junction for East Snowmass Trail/Willow Lake, and turned left, following the East Snowmass Trail.  

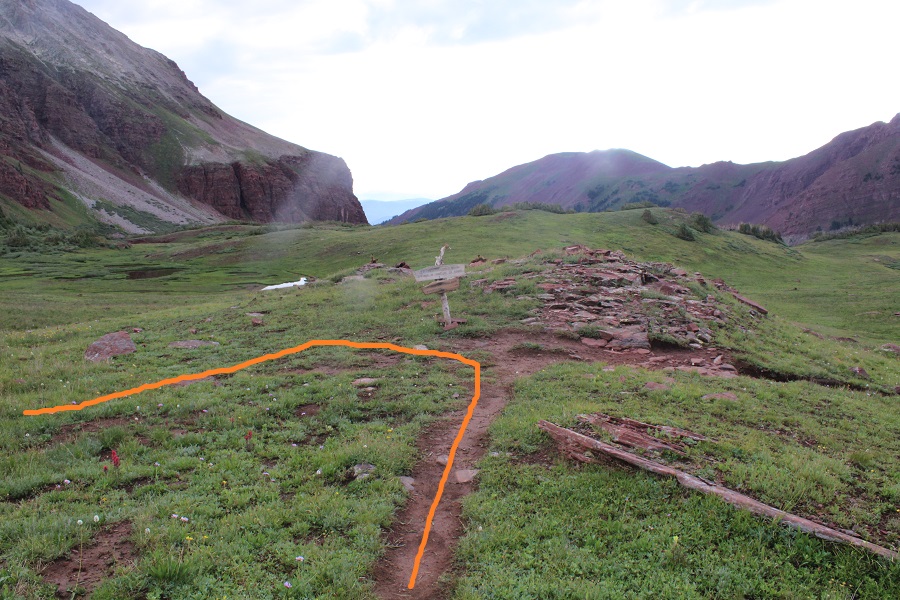
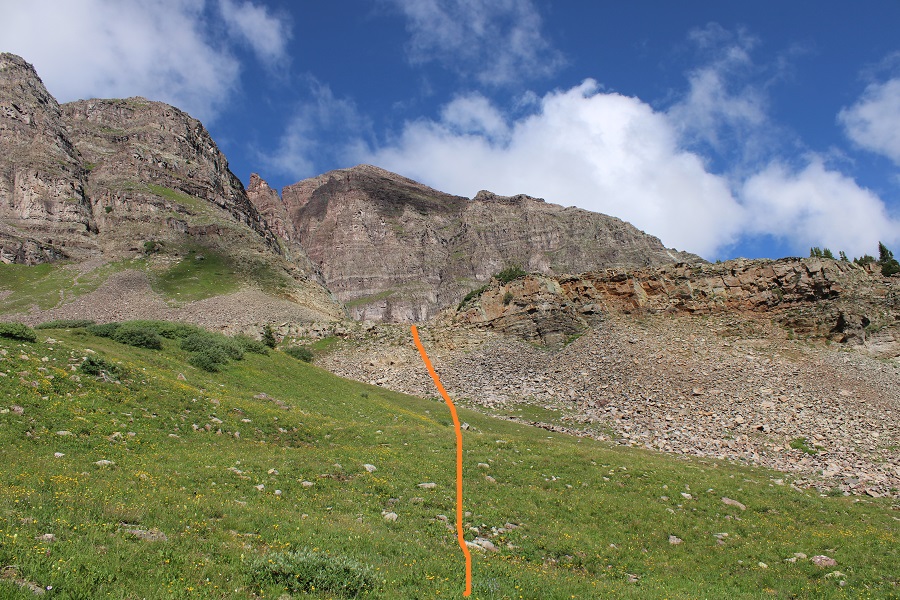
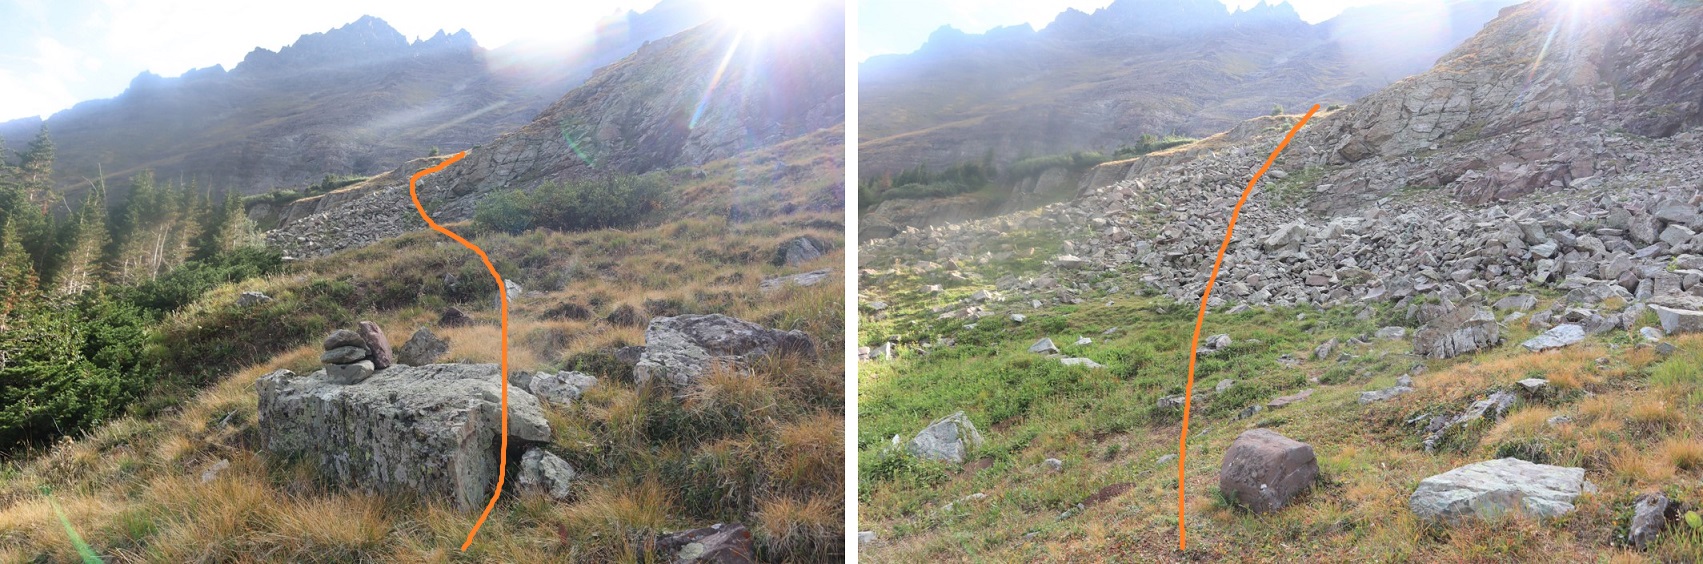
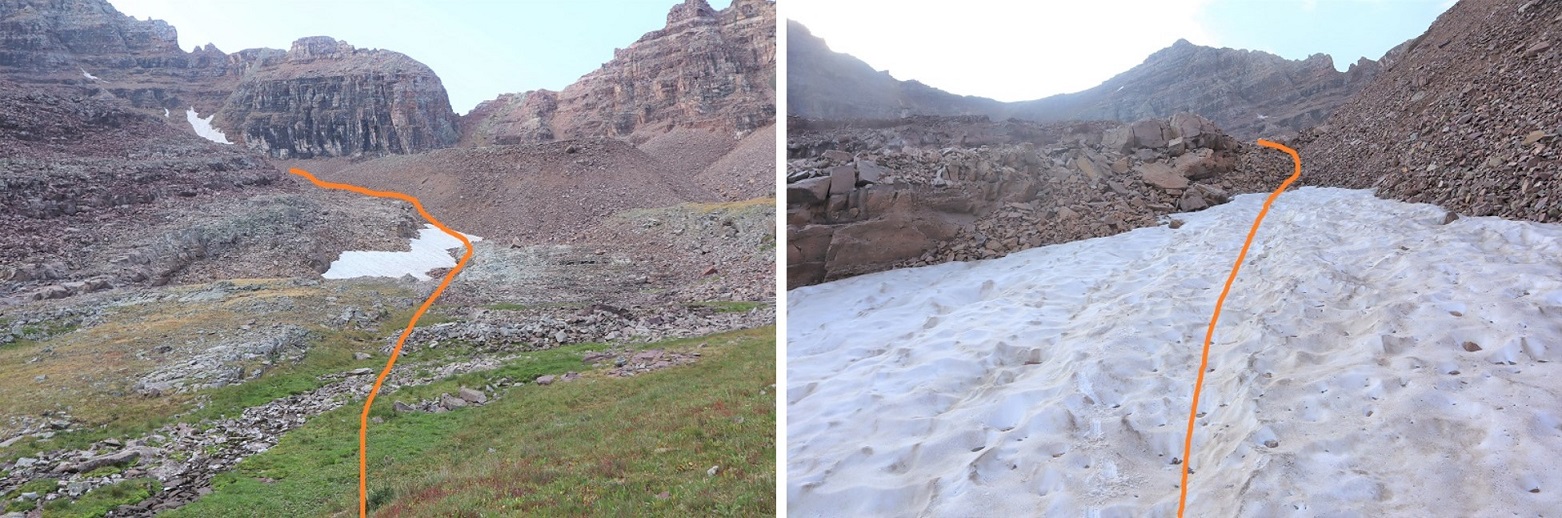
I was now following the trail towards the saddle of PT 13336 and PT 13020

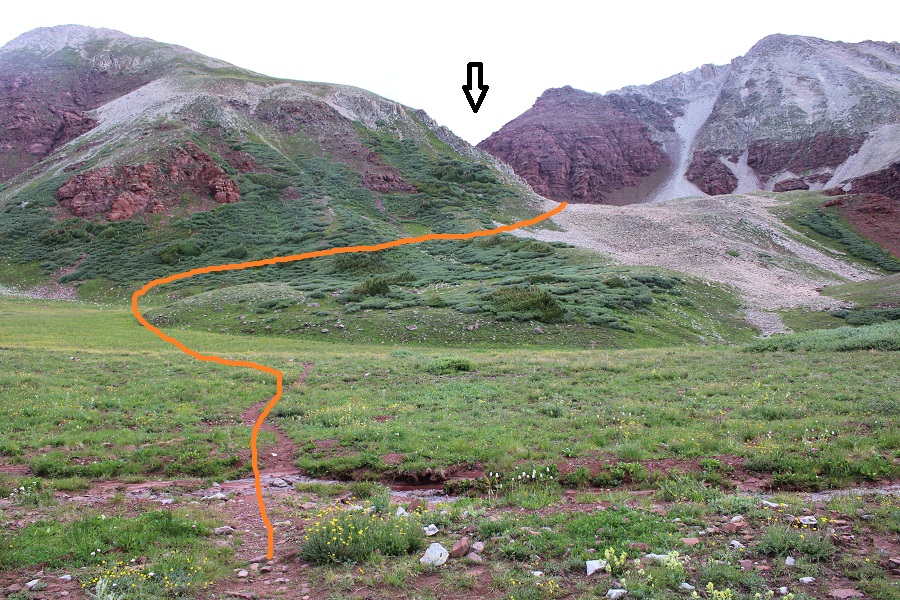
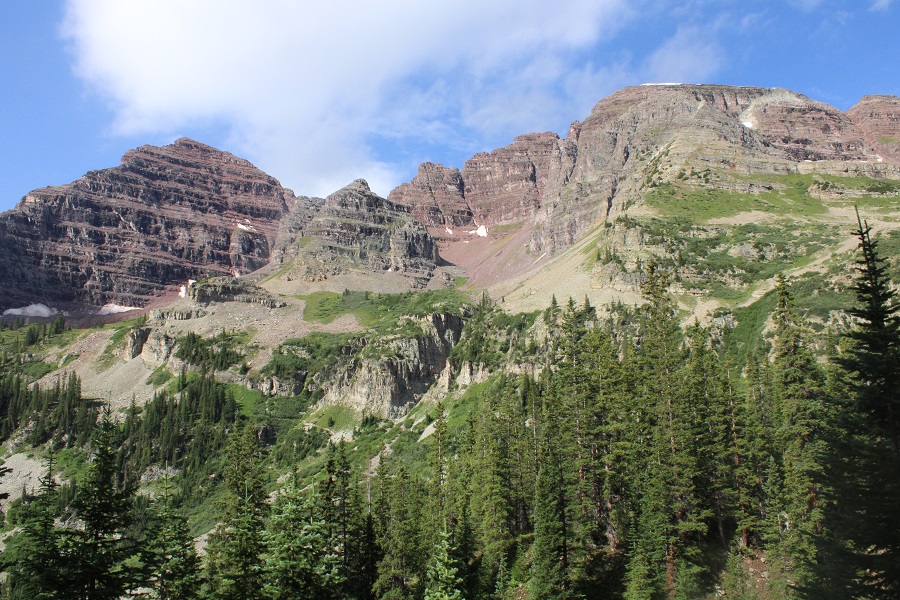
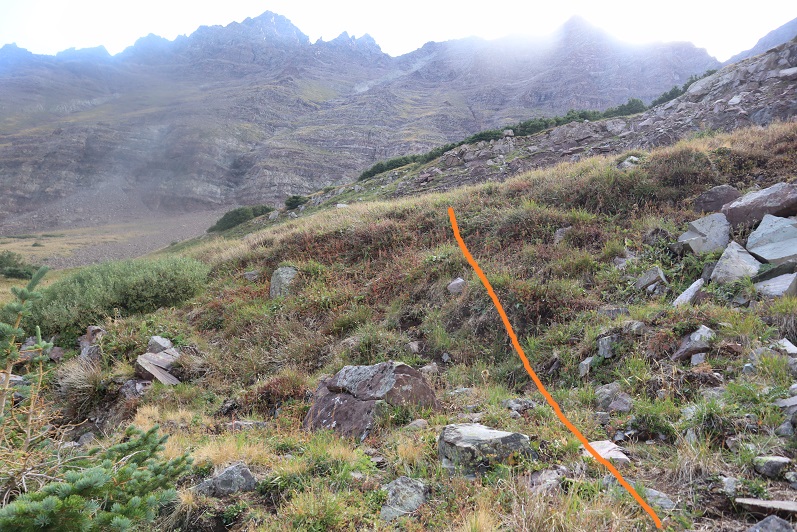
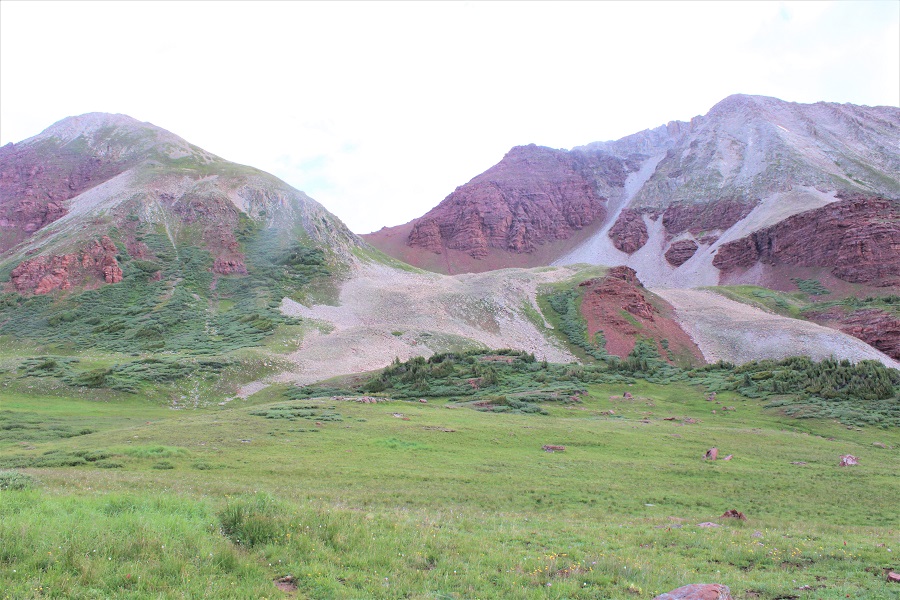
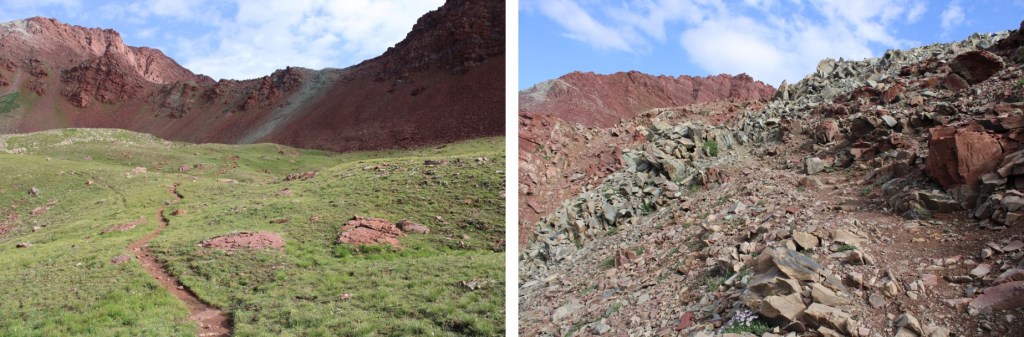
The upper basin was really neat, as I could see two different types of rocks, one coming from each mountain.  The color contrast was interesting.  The trail was still class 1 to the saddle, staying on the tundra/red dirt.

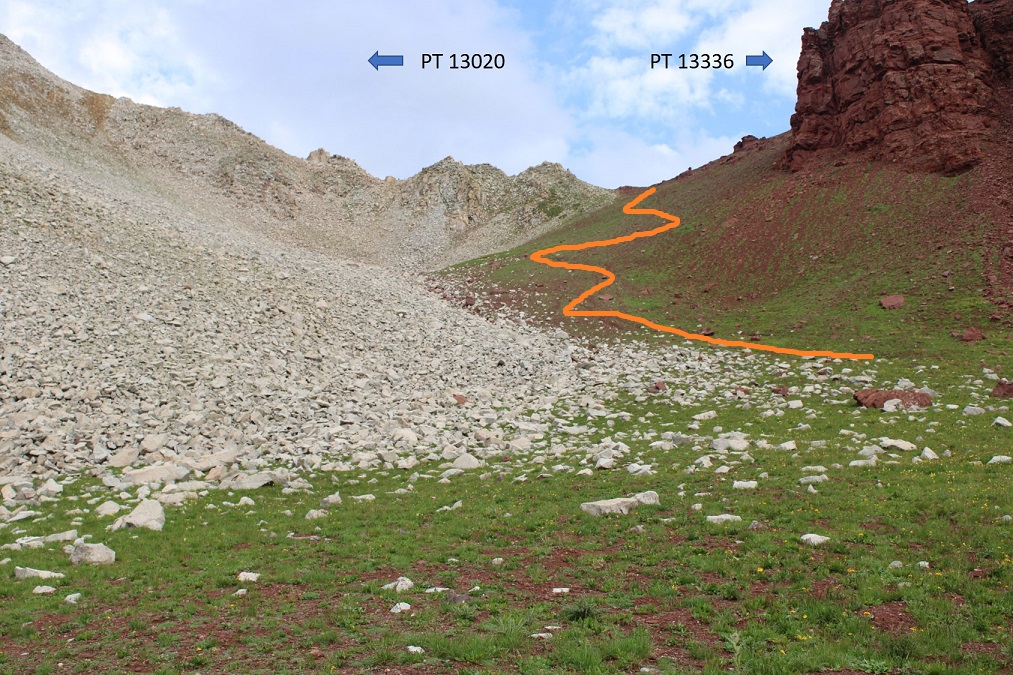
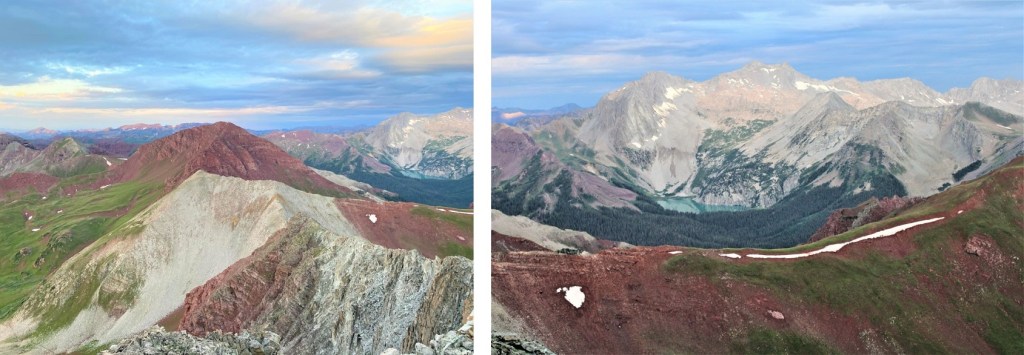
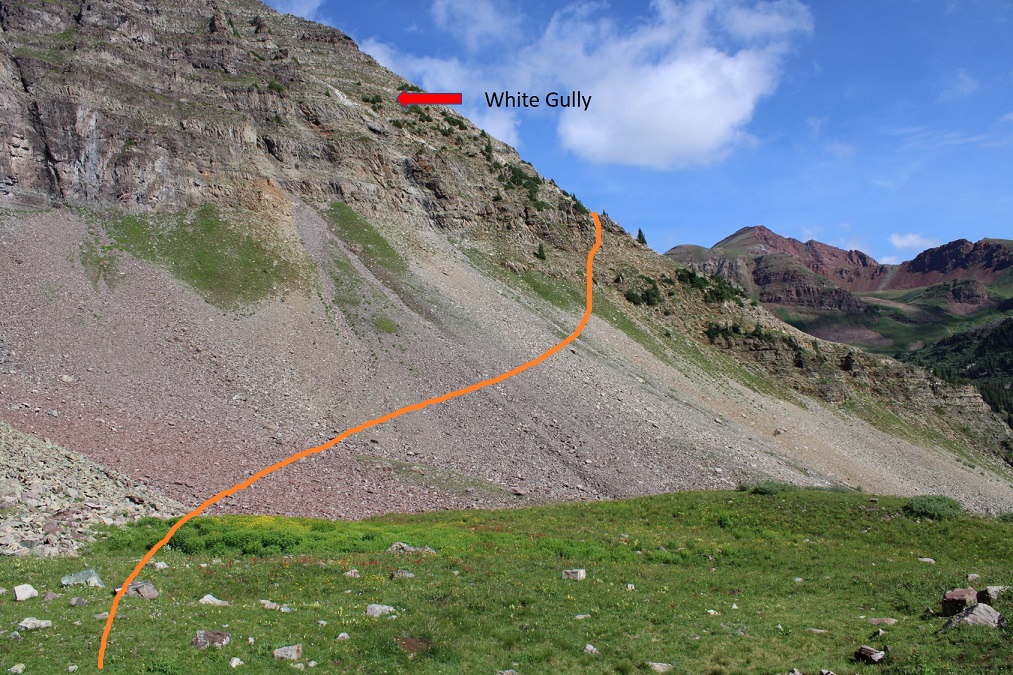
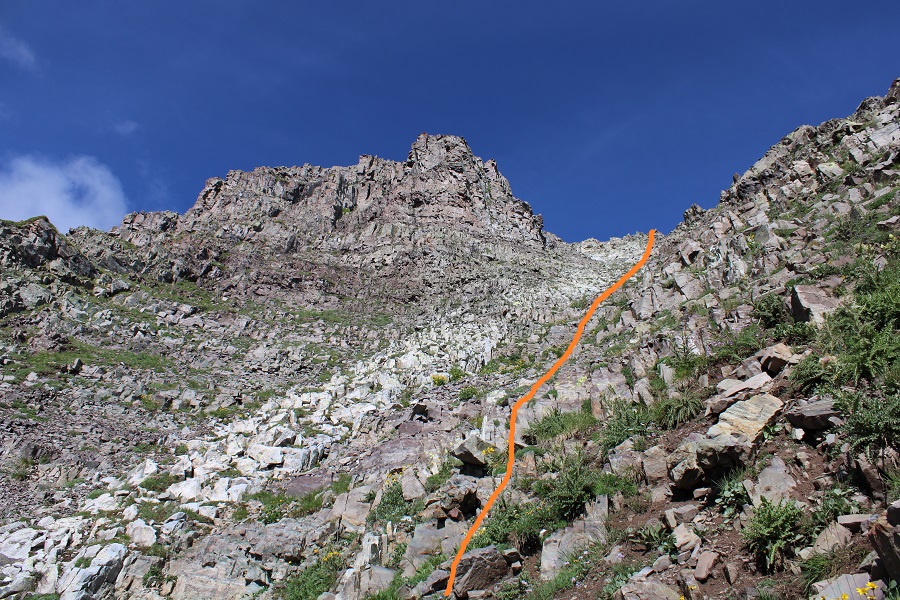
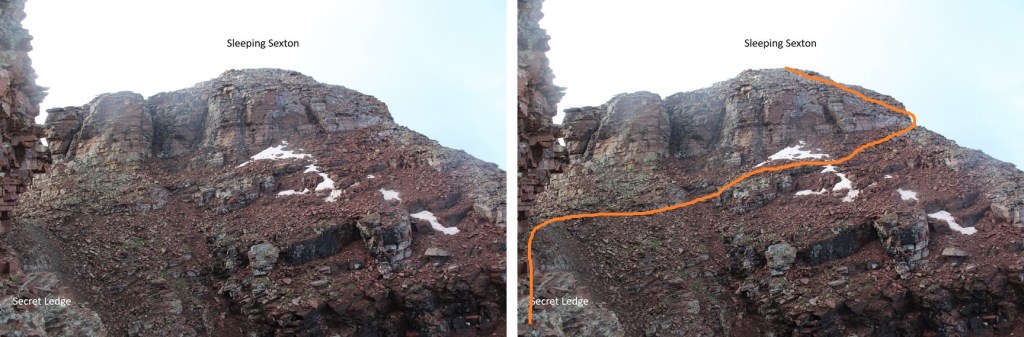
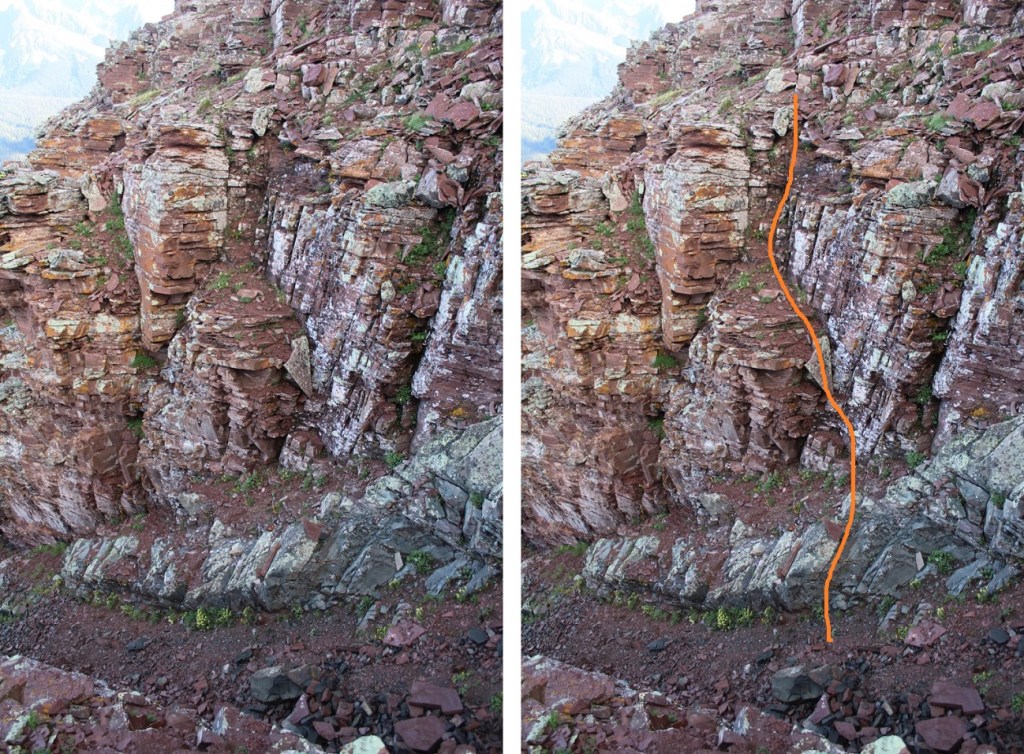
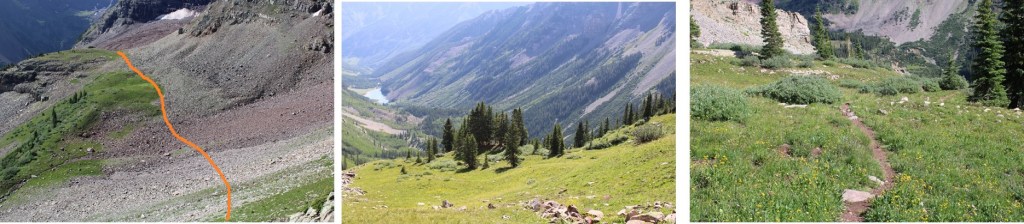
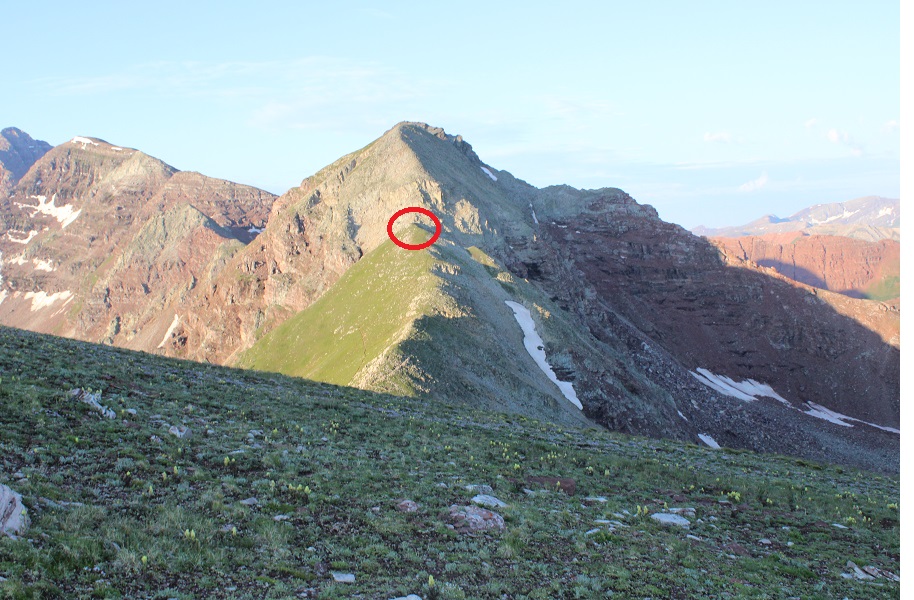
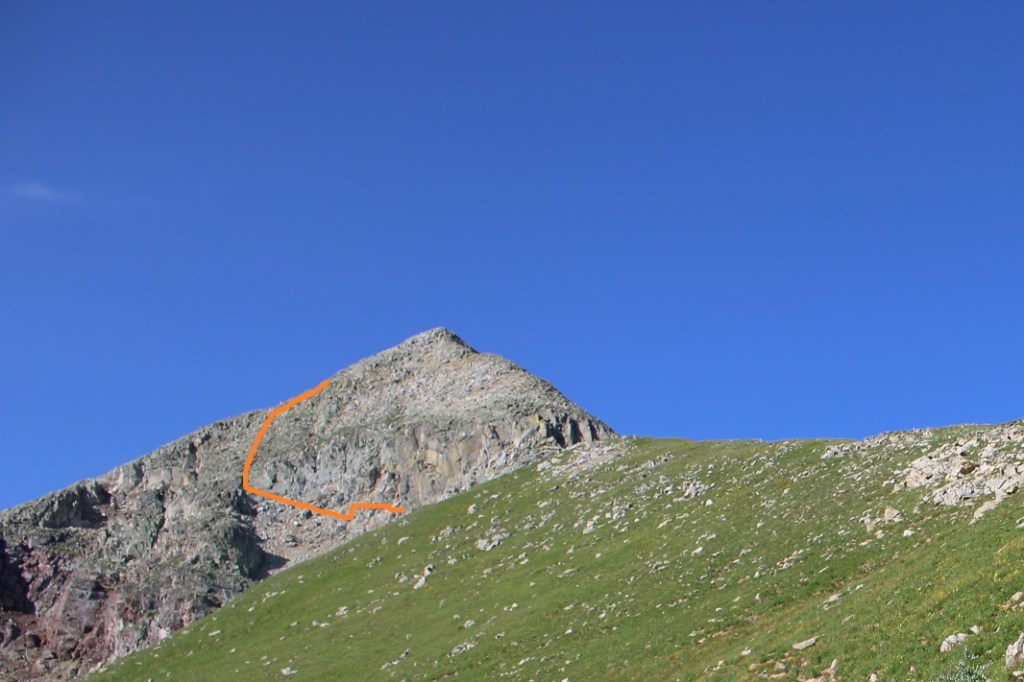
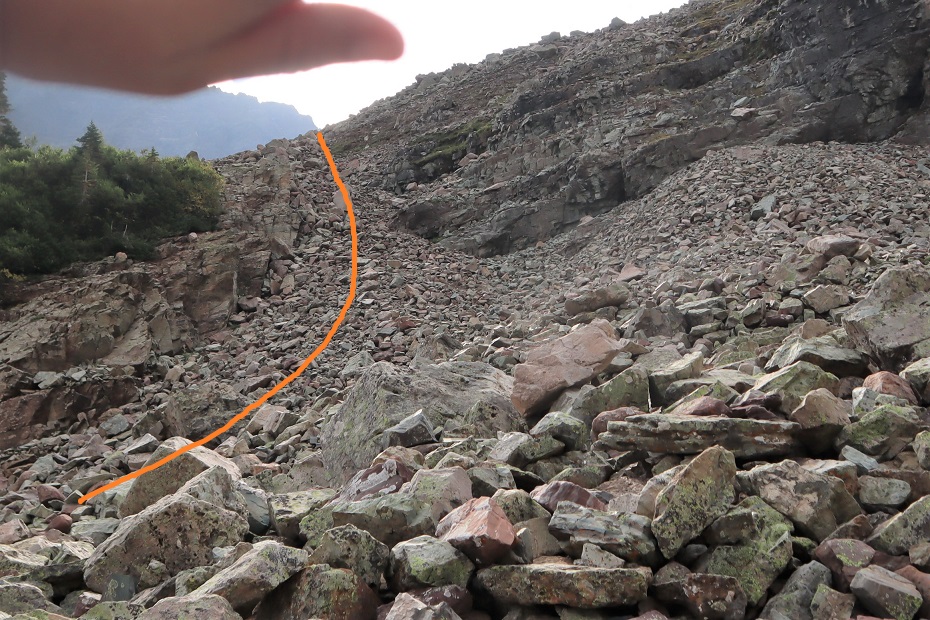
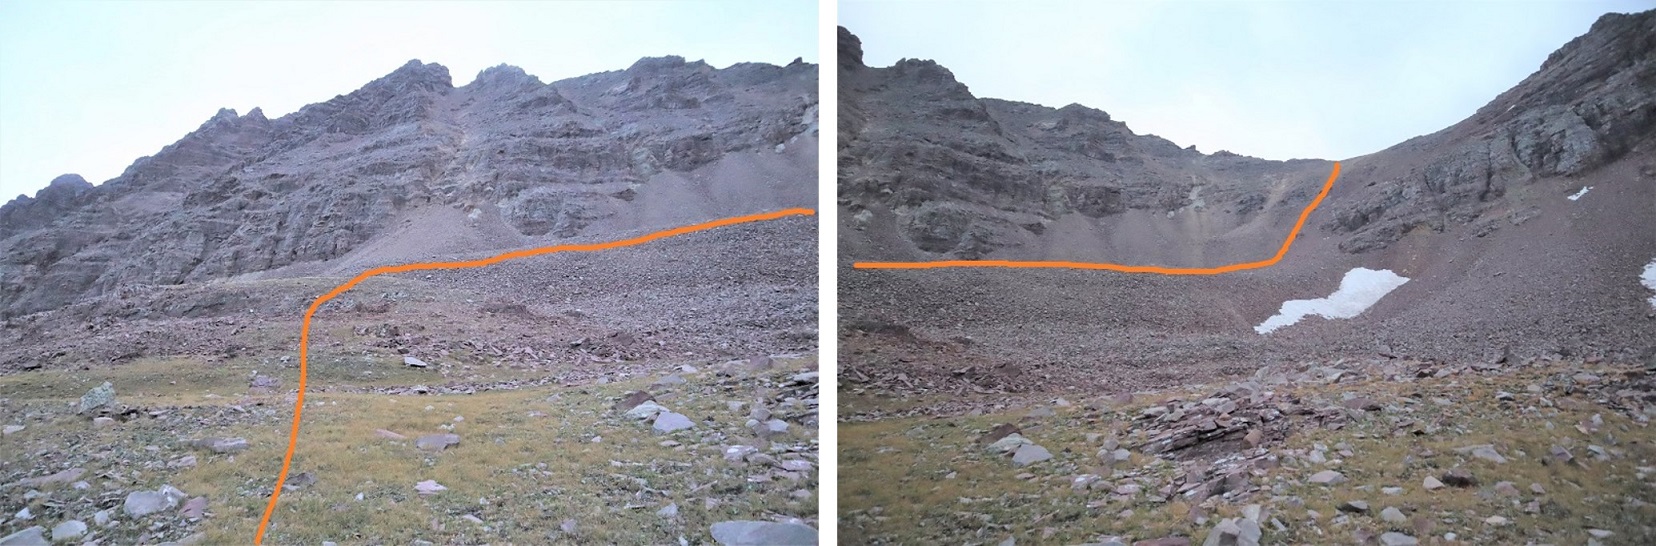
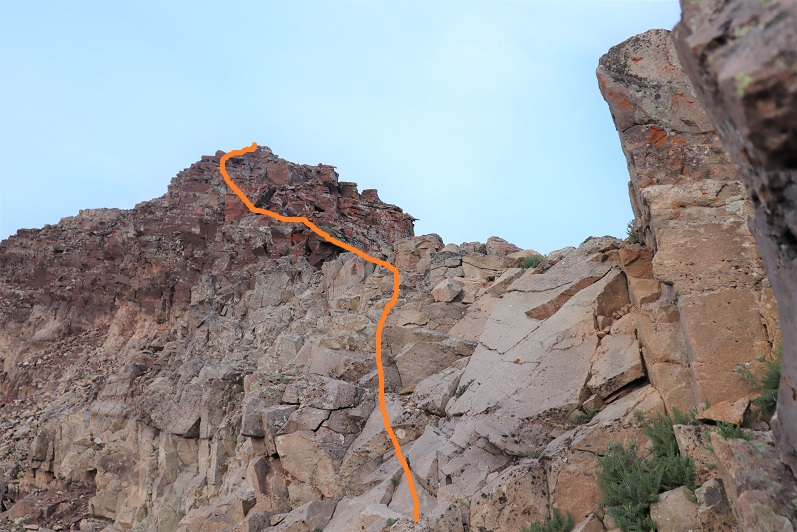
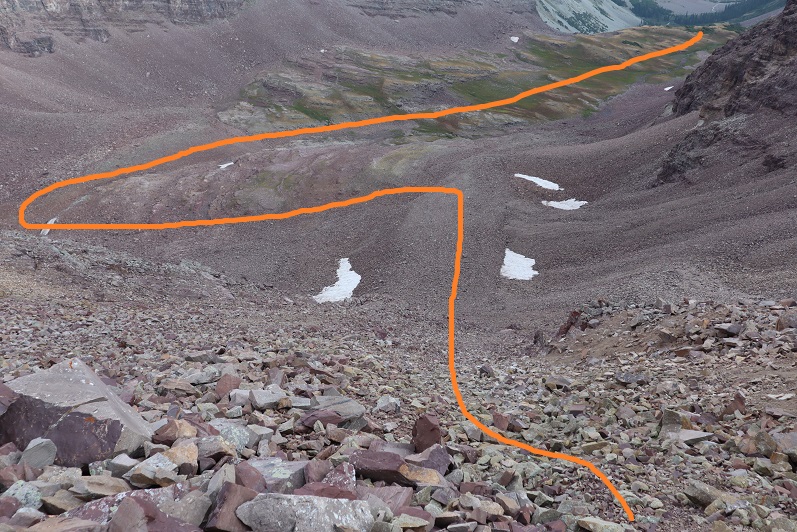
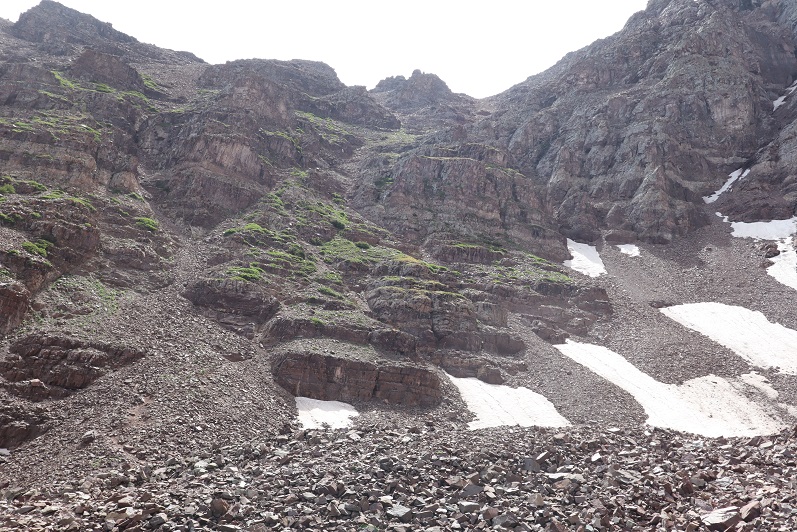
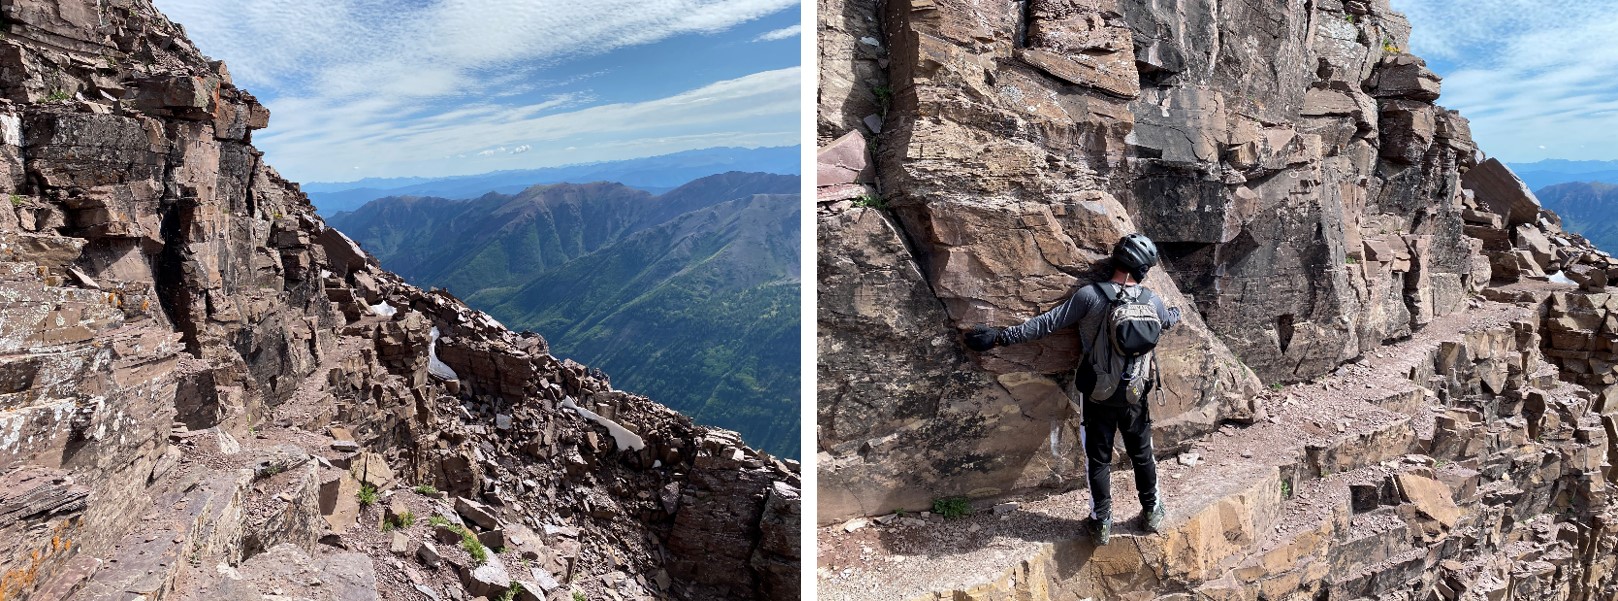
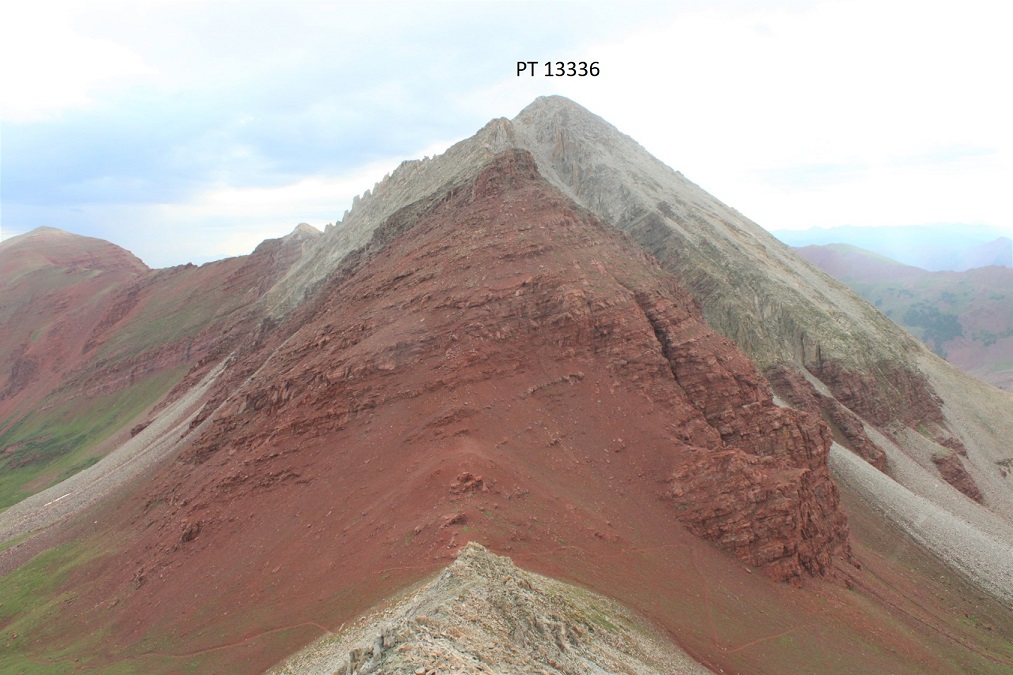
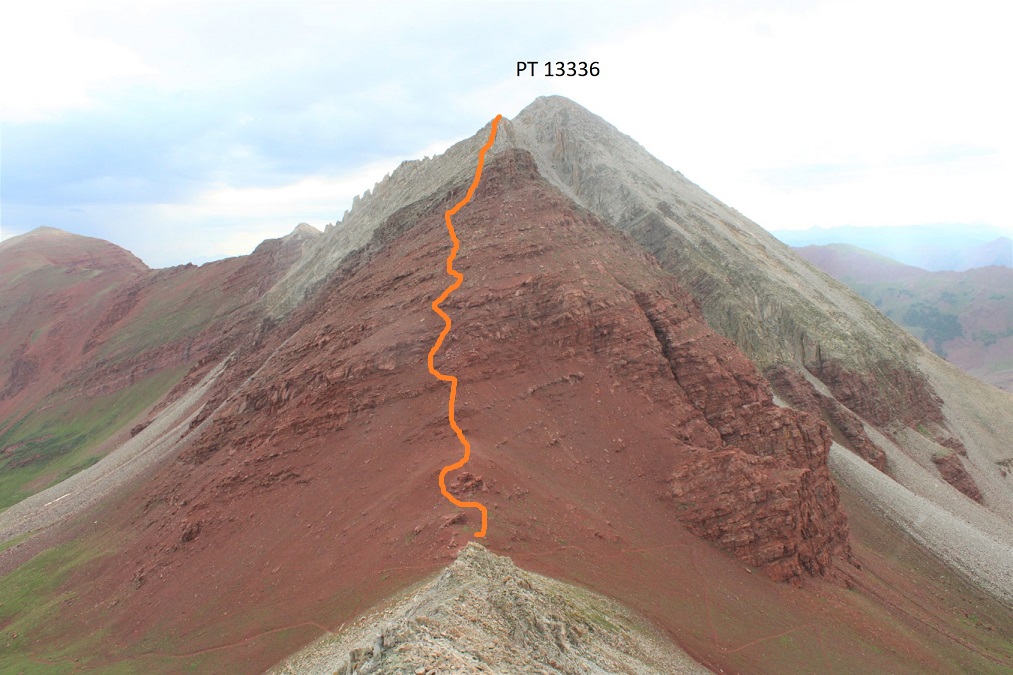
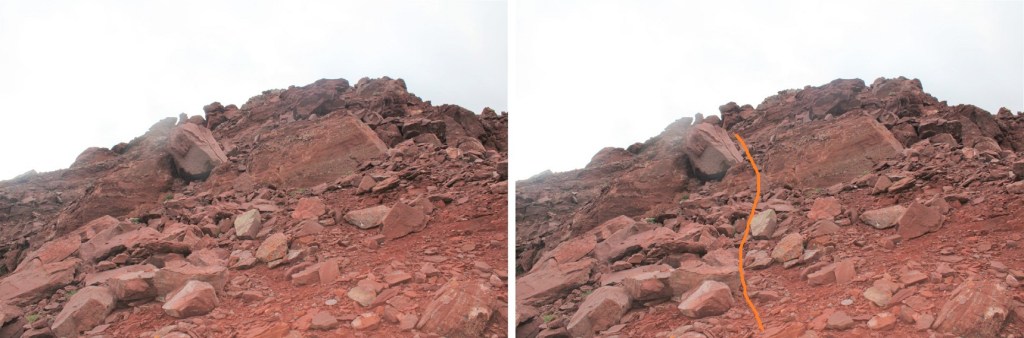
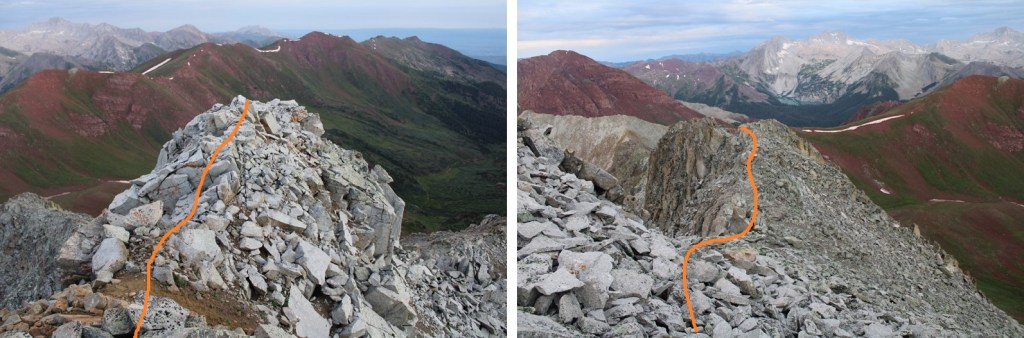
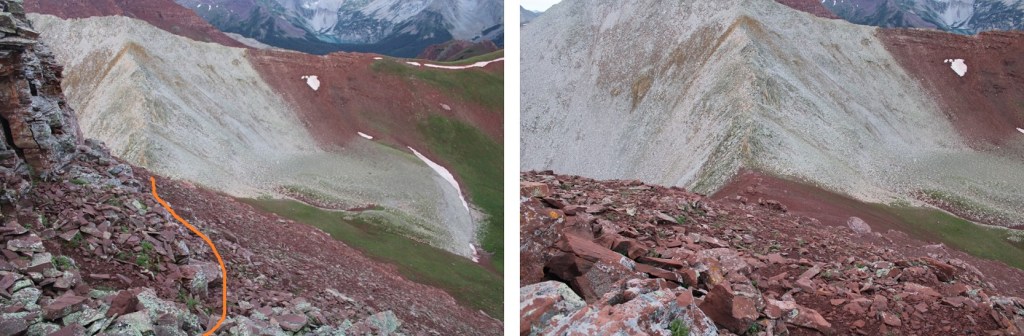
Once at the saddle it’s a good idea to put your helmet on.  I decided to tackle PT 13336 first.  This is class 3, and takes place on loose rock.  You may want to put on your microspikes for added traction.  The red dirt was mushy because it had recently rained, but it was still loose.  Here’s the route I took, as seen from higher up on PT 13020 later in the morning:

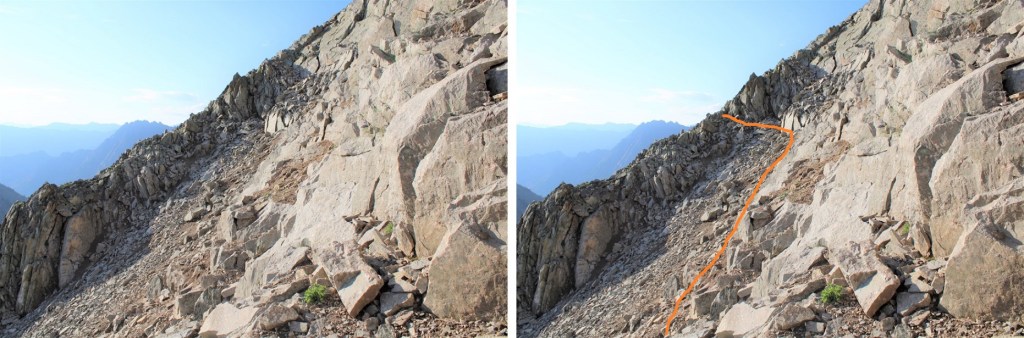
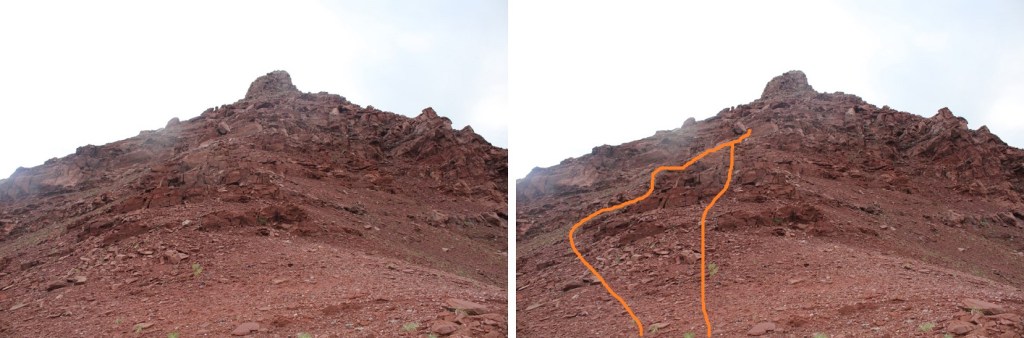
And here are some step by step pictures of the route:

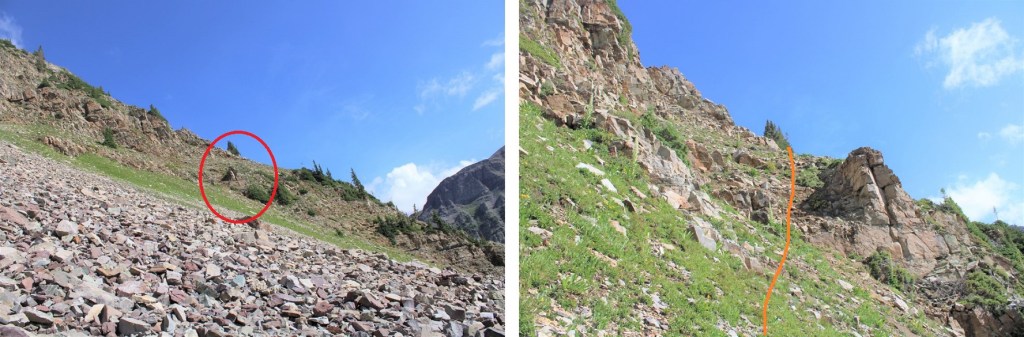
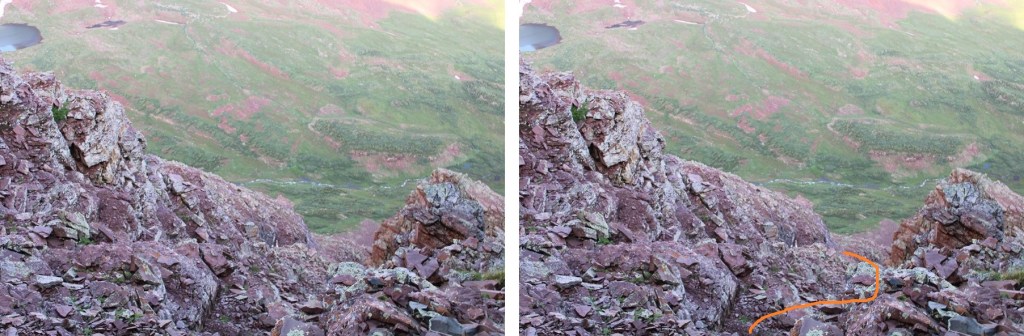
Easily walk around the first two obstacles to keep this part class 2

Next, you can either skirt the next obstacle to the left to keep this class 2, or go straight up and over if you like class 3

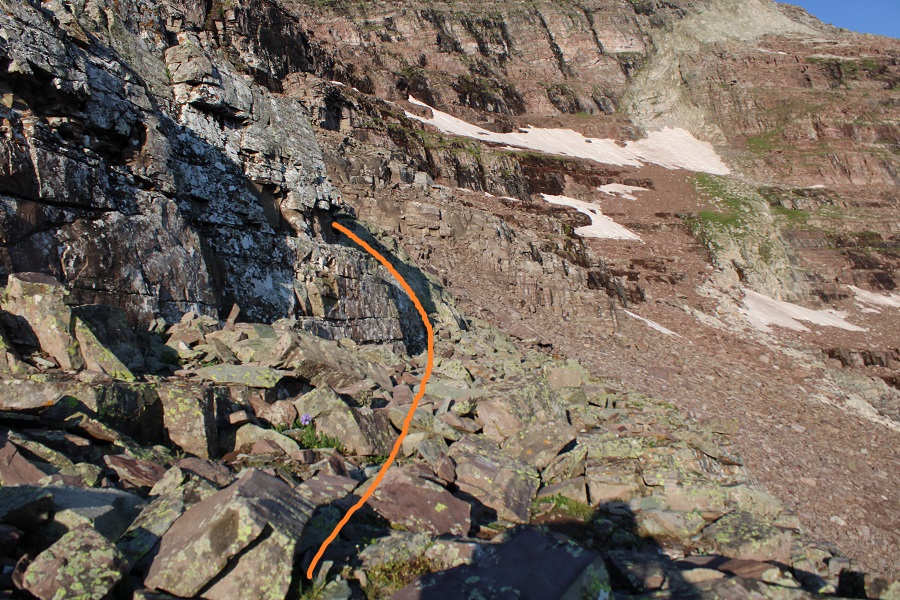
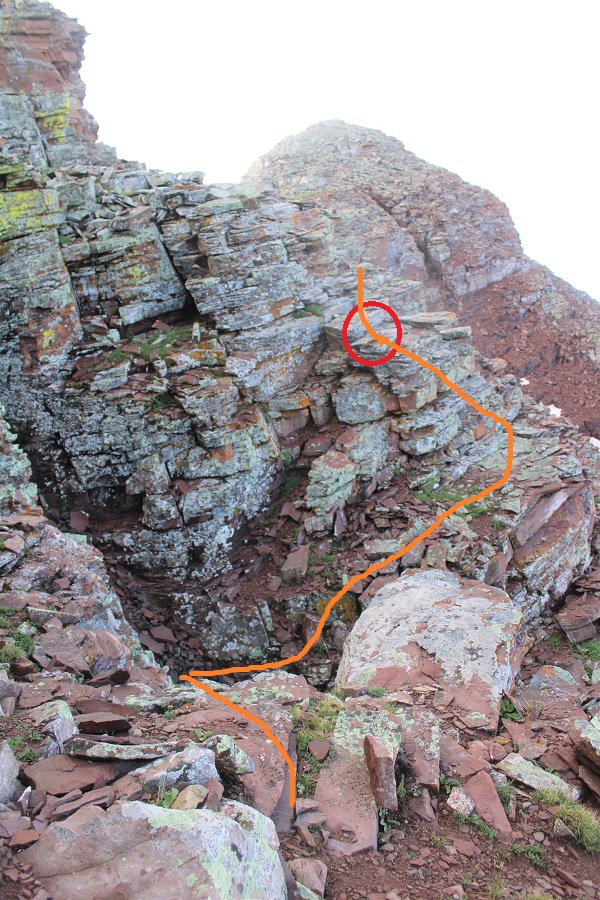
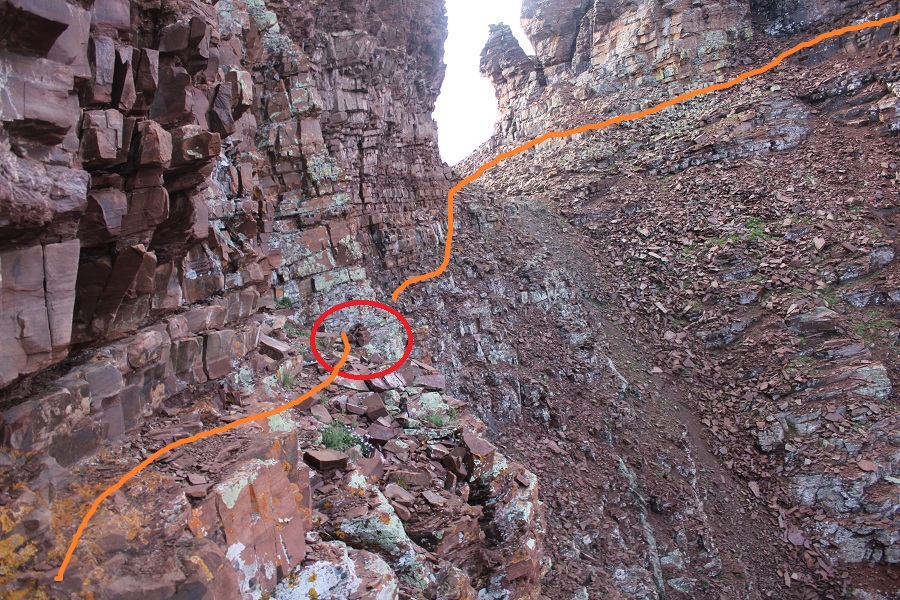
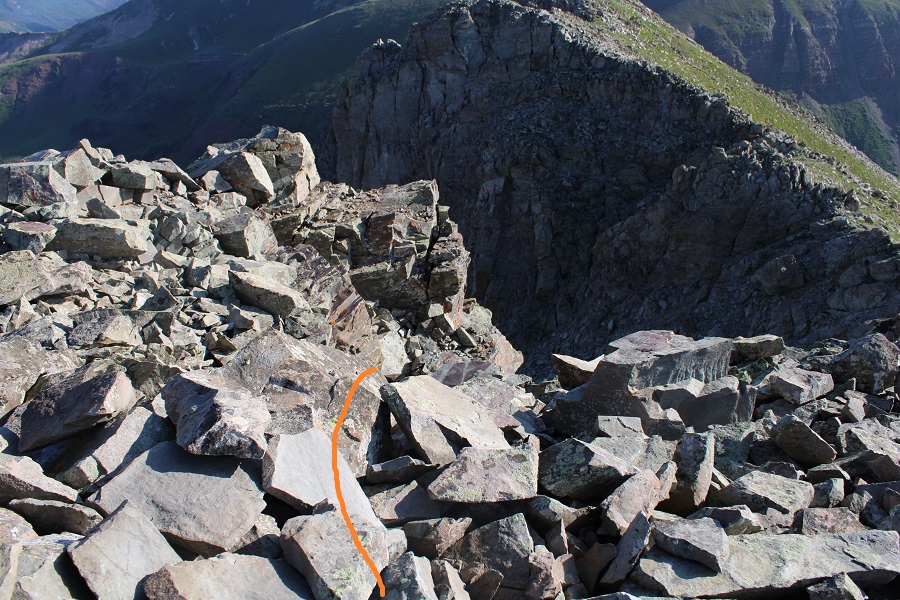
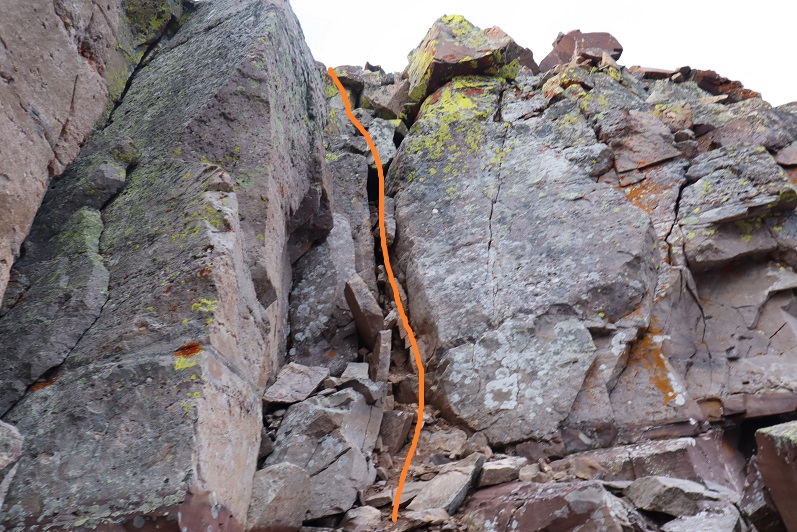
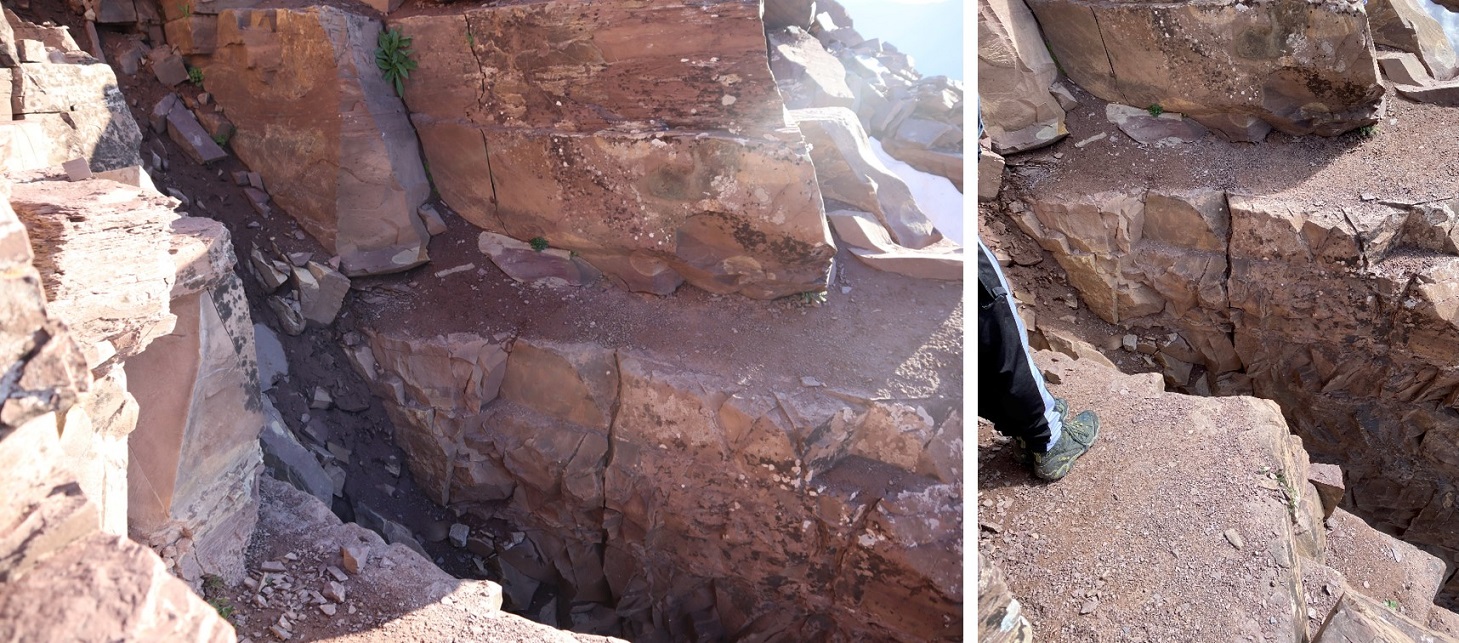
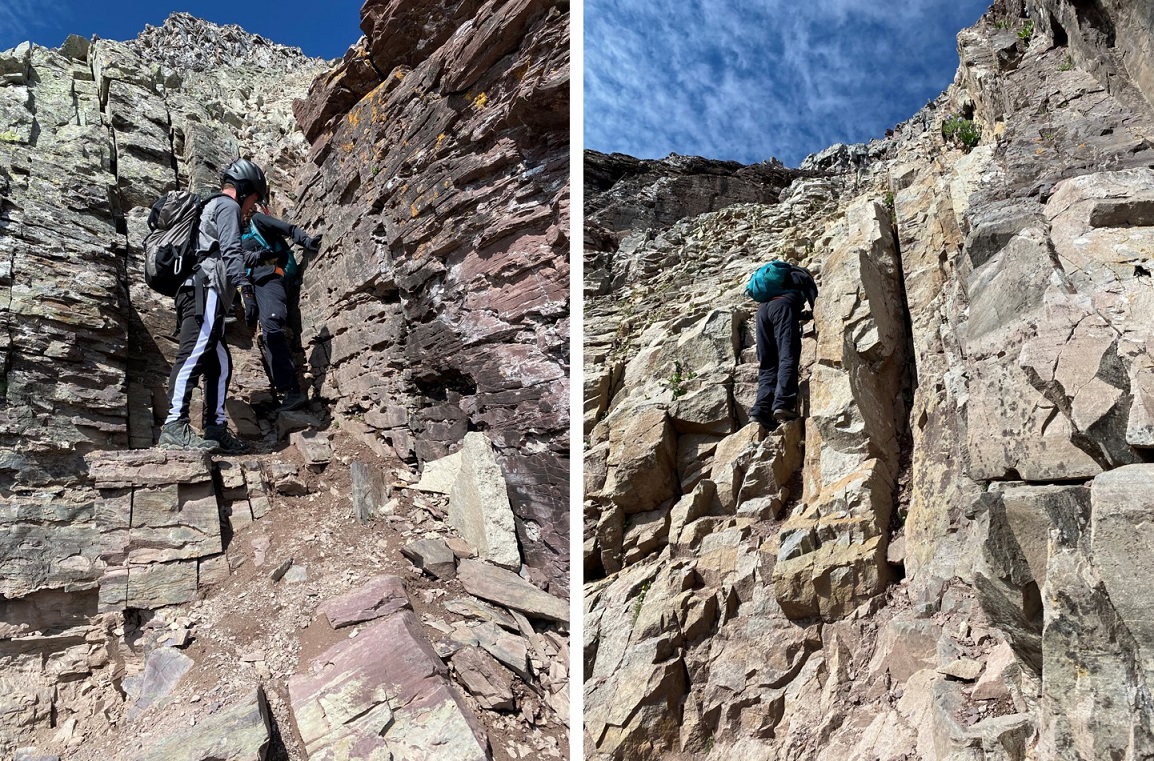
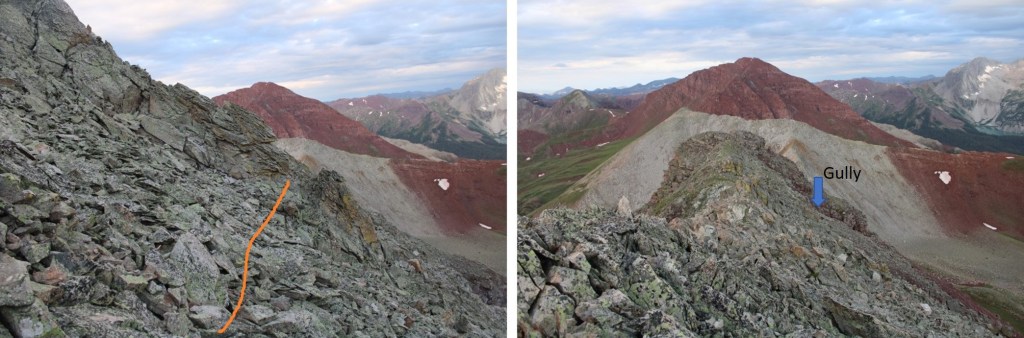
Now, keeping the ridge in front of you, the route becomes class 3.  Head between these two boulders and ease a little left

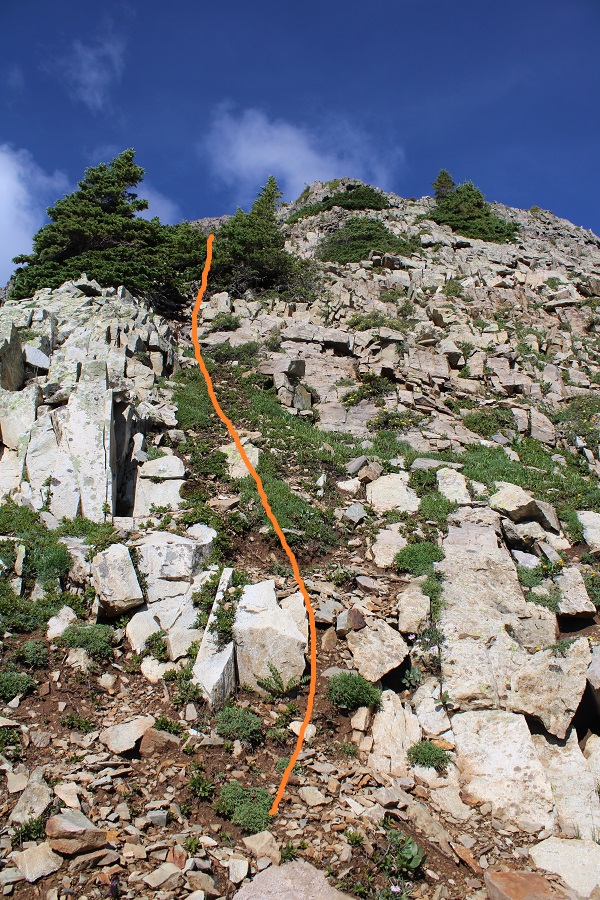
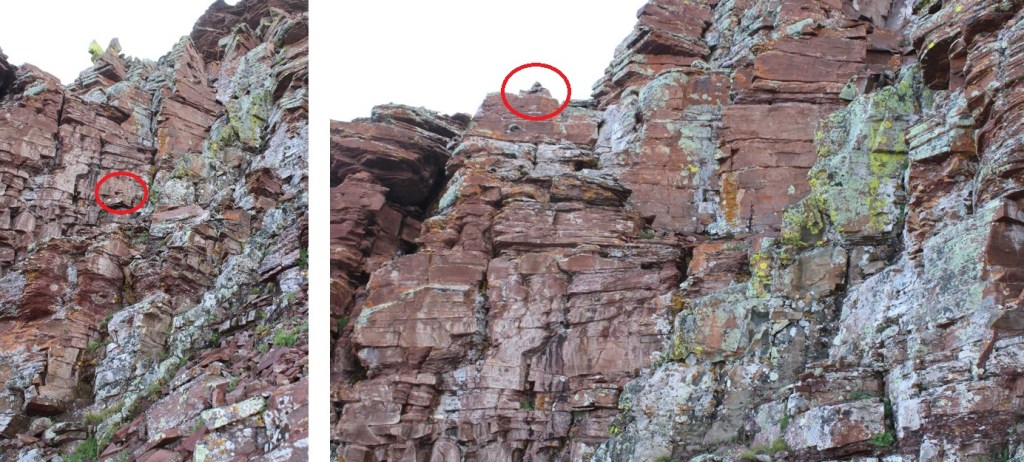
Look for a break in the rock formation and scramble up

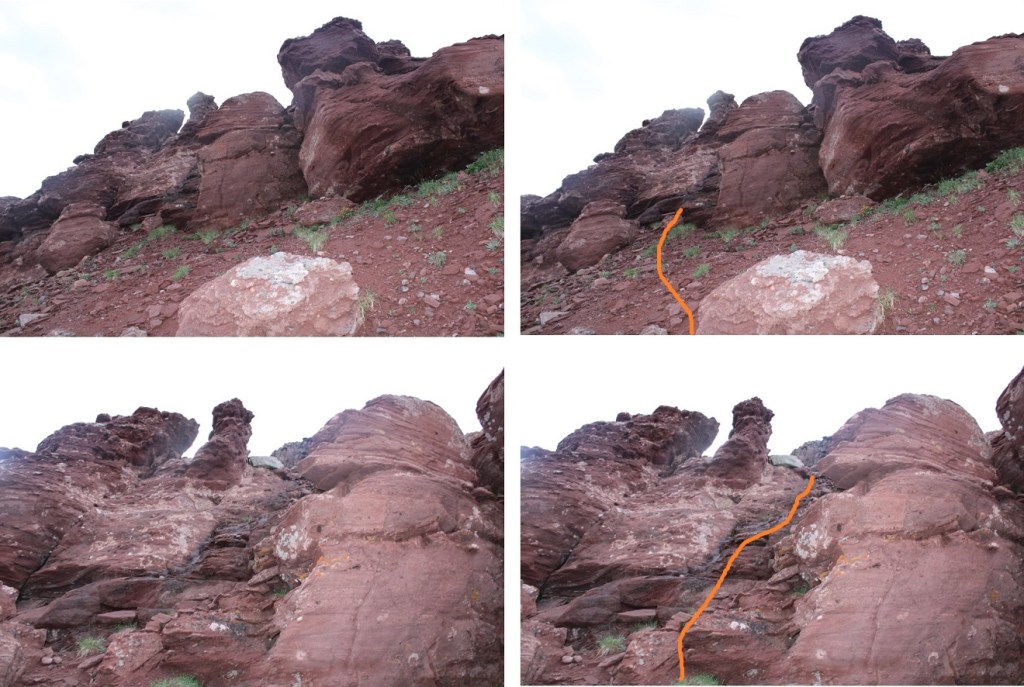
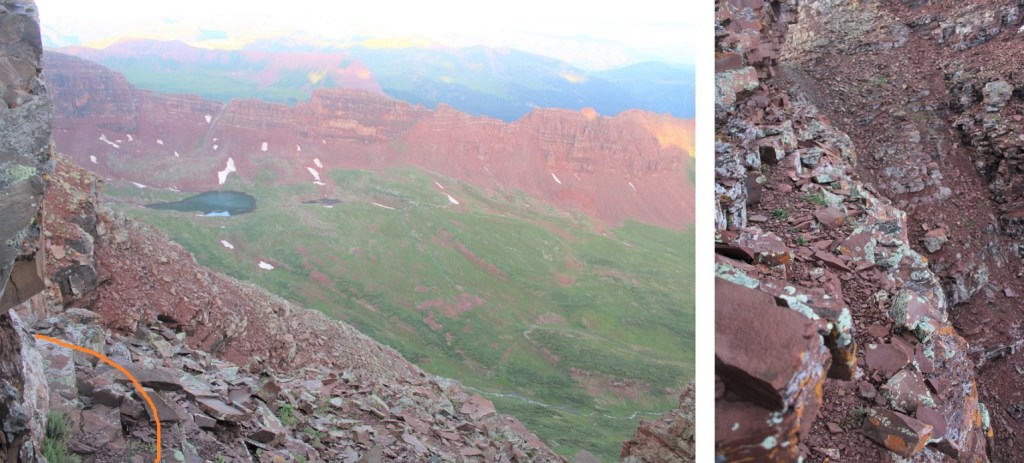
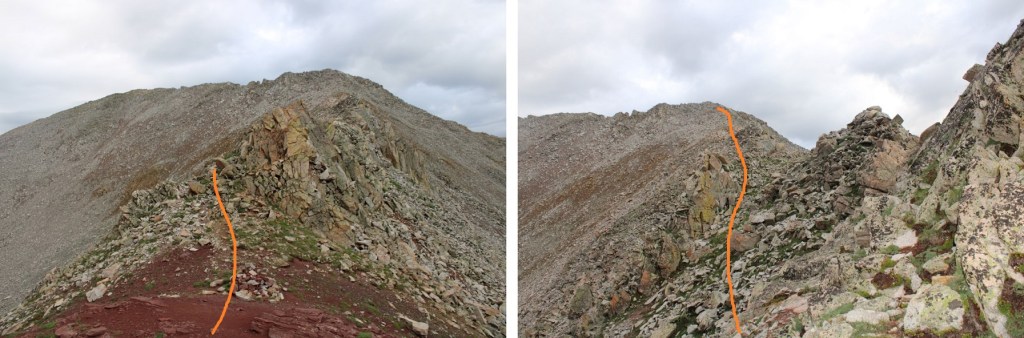
You can now clearly see the ridge.  Keep the ridge to your right, and skirt the north side of the ridge.  There is no need to go up and over the ridge at this point.

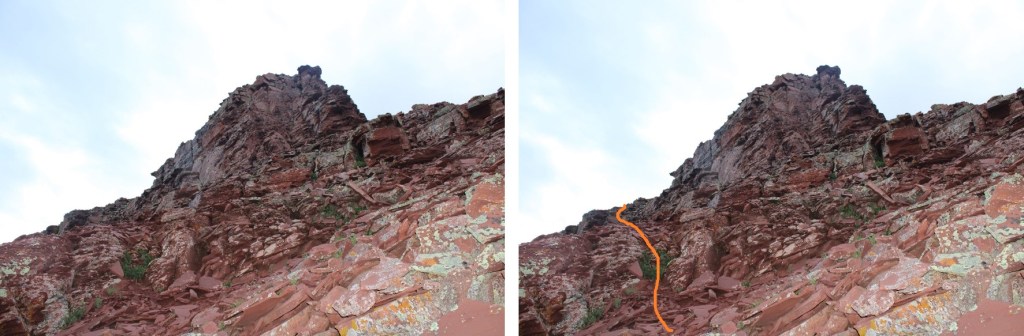
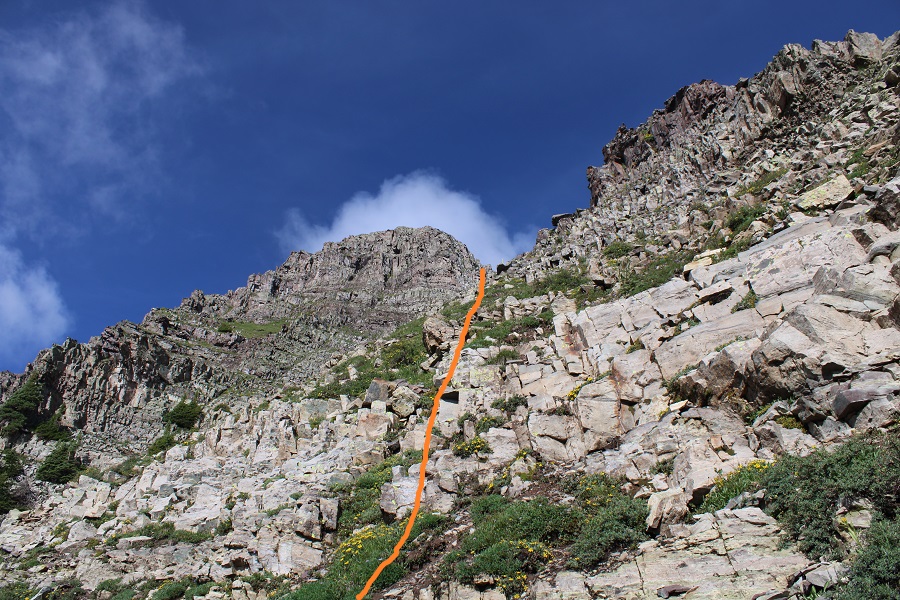
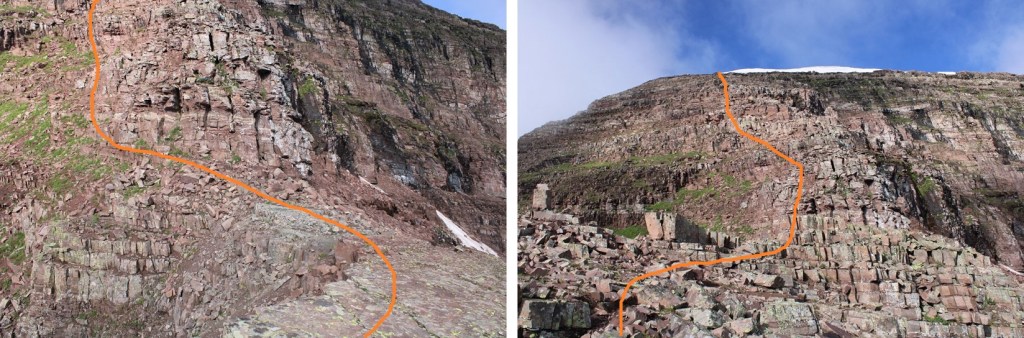
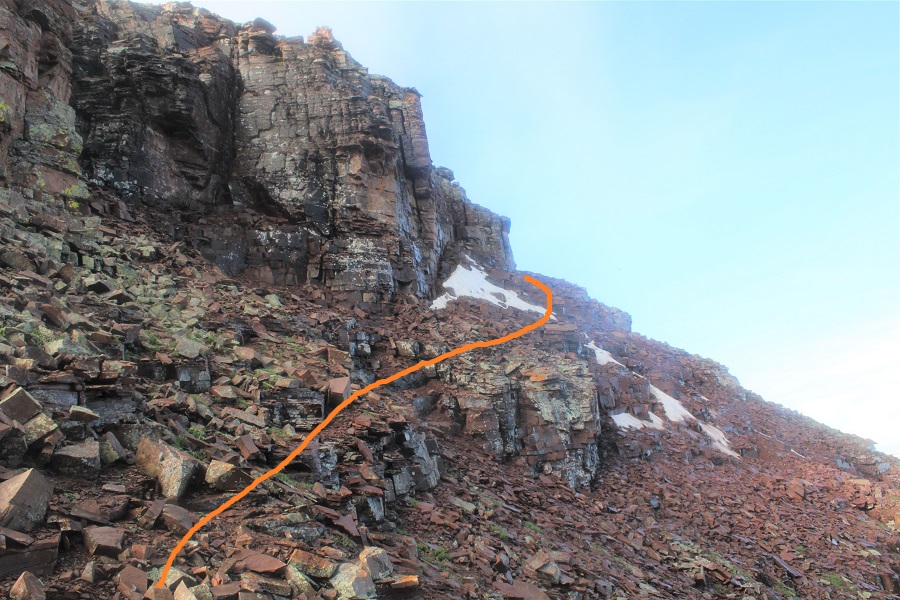
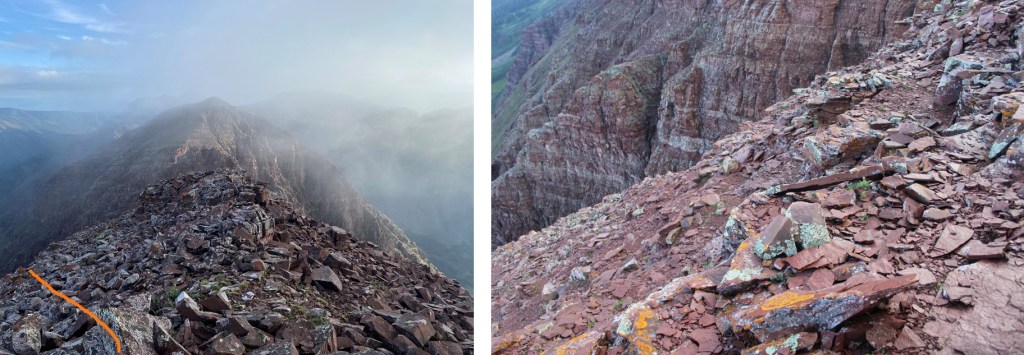
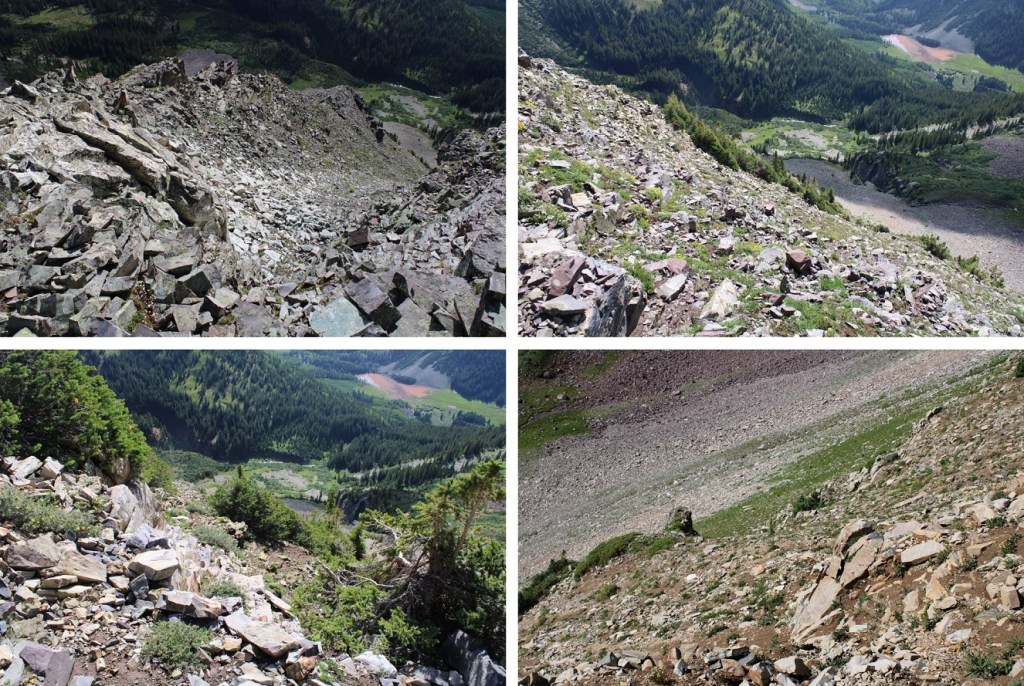
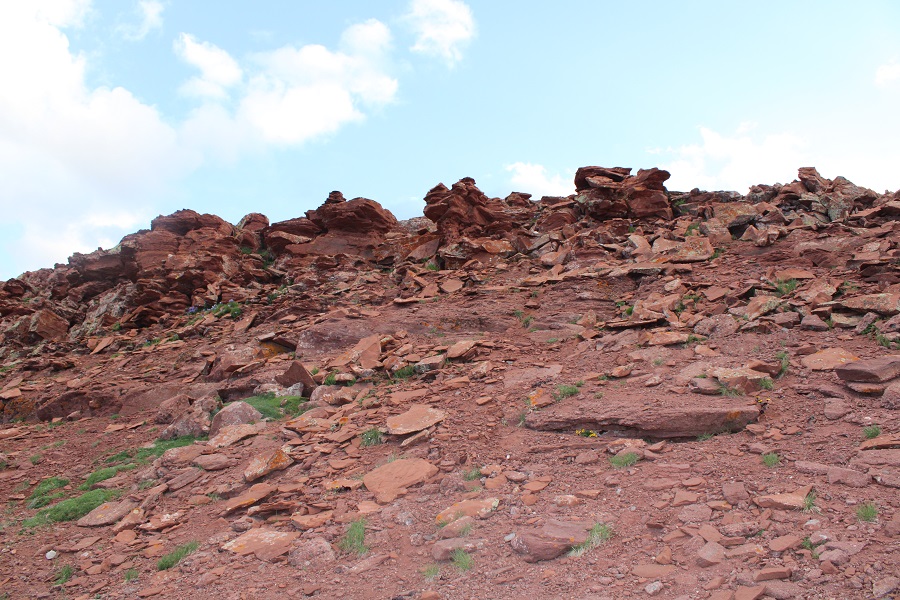
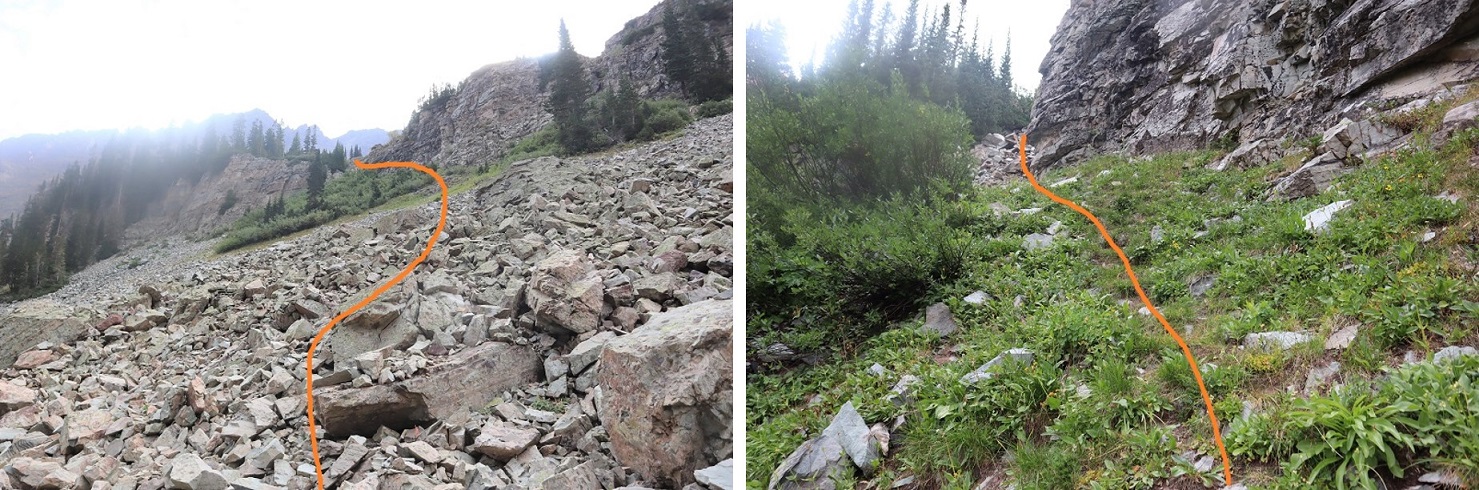
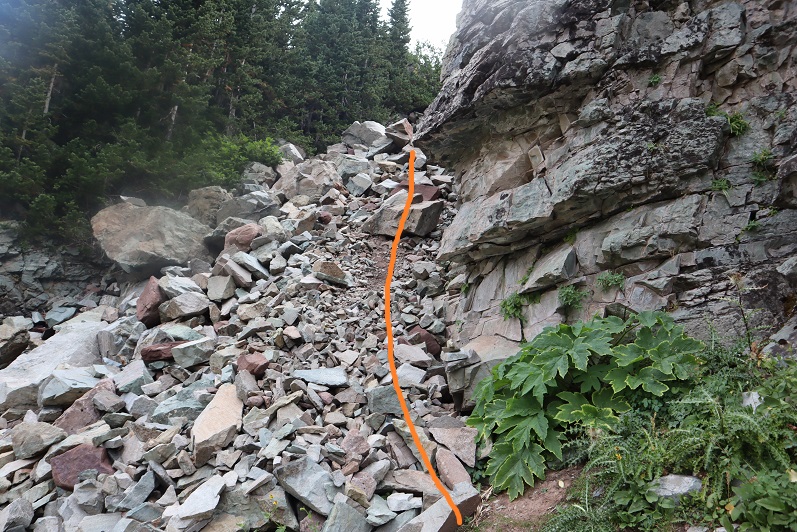
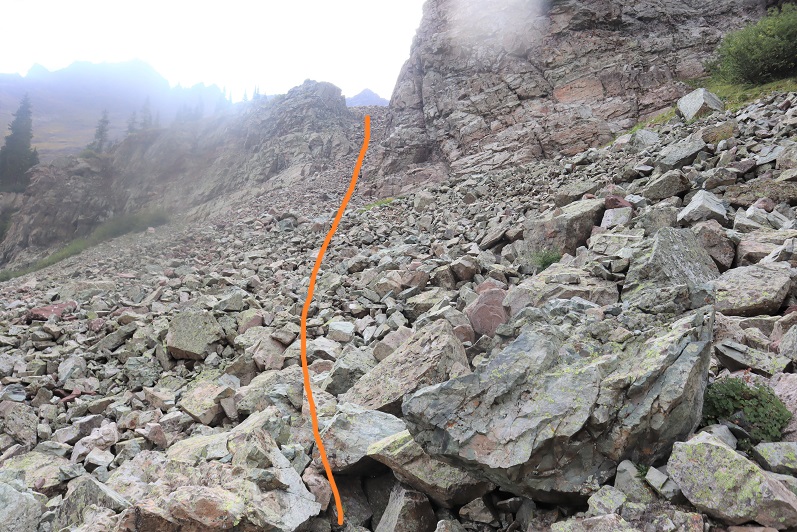
The rock here is loose, and only gets looser. Follow the loose rock up a sort of side gully.

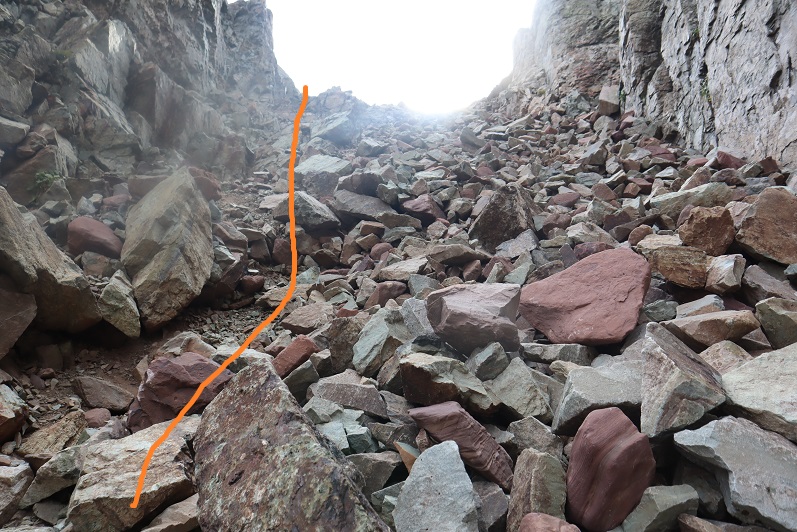
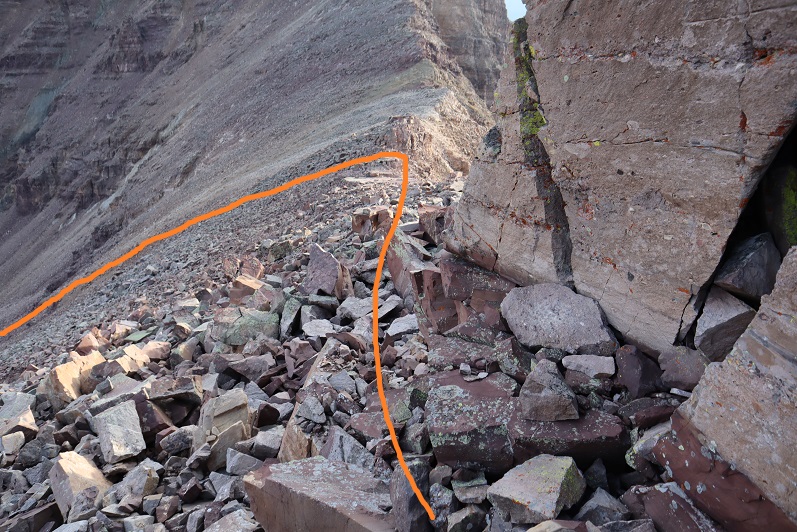
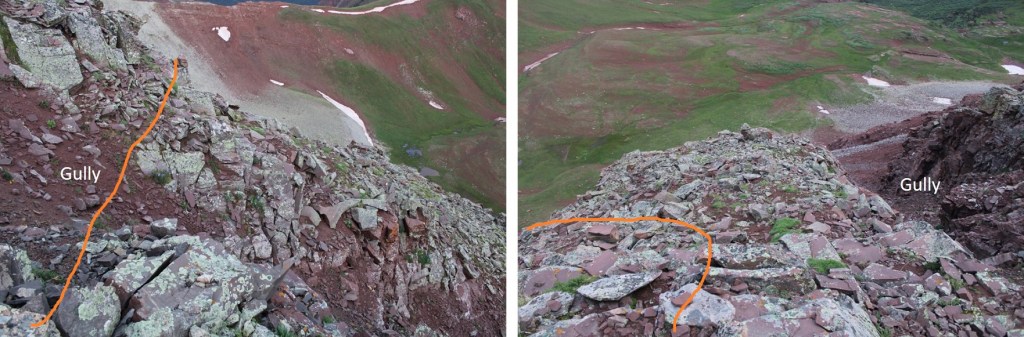
At the top of this rubble the rock changes.  It’s no longer the loose Maroon rock:  it now becomes the loose Snowmass rock.  This rock is very slippery when wet, and even when not, so take care.  These rocks are not stable.  Just assume they all move.  Cross this gully high.  There is still no need to gain the ridge, you can stay just a bit below

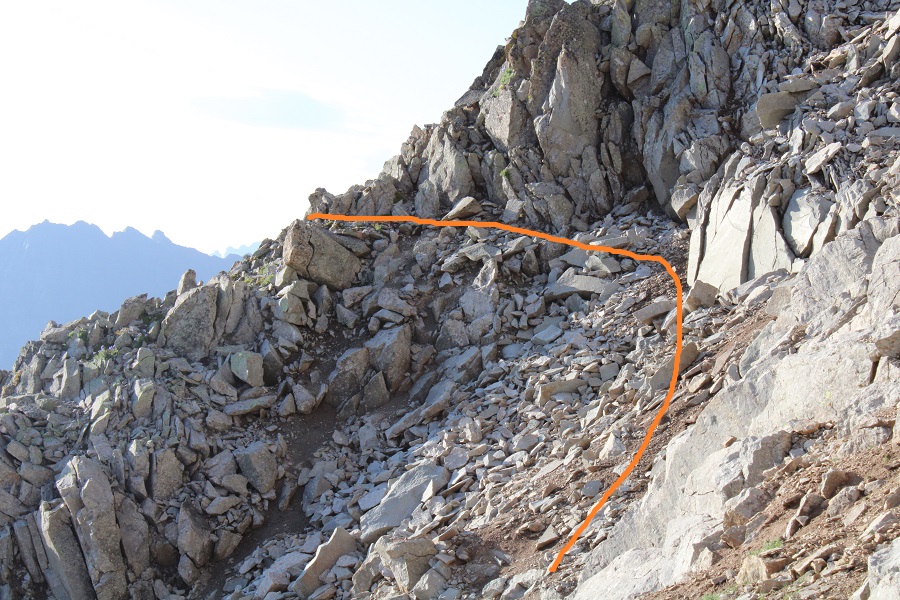
I have a feeling the terrain here shifts often, so pick your way carefully.  I traversed the ledge by staying about 50 feet below the ridge, and then gaining the ridge through a gully

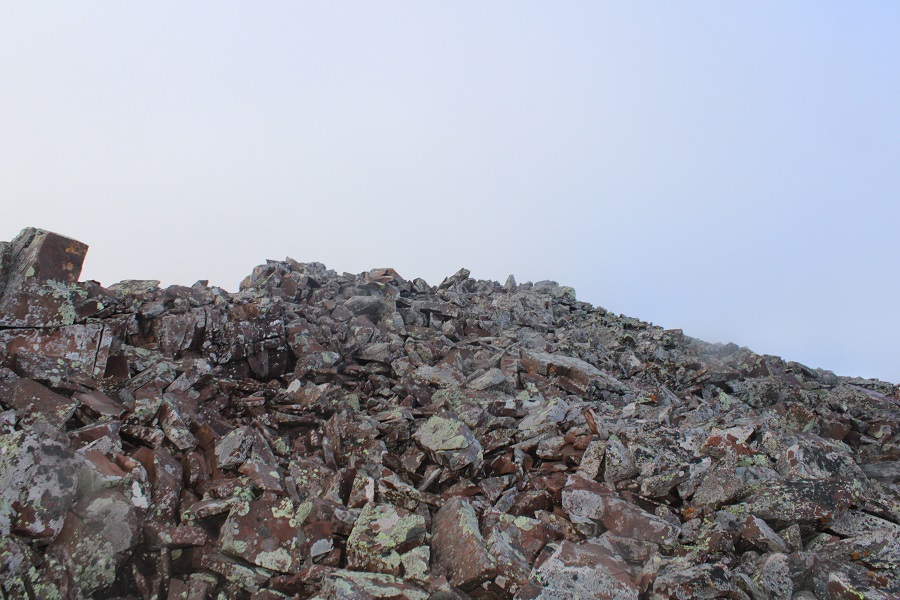
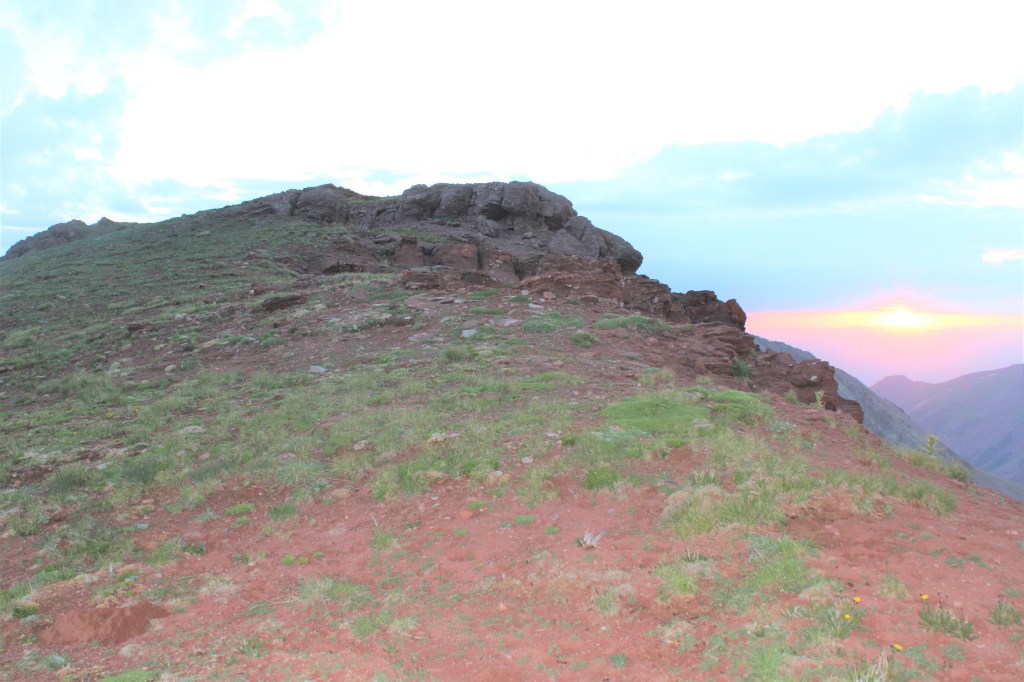
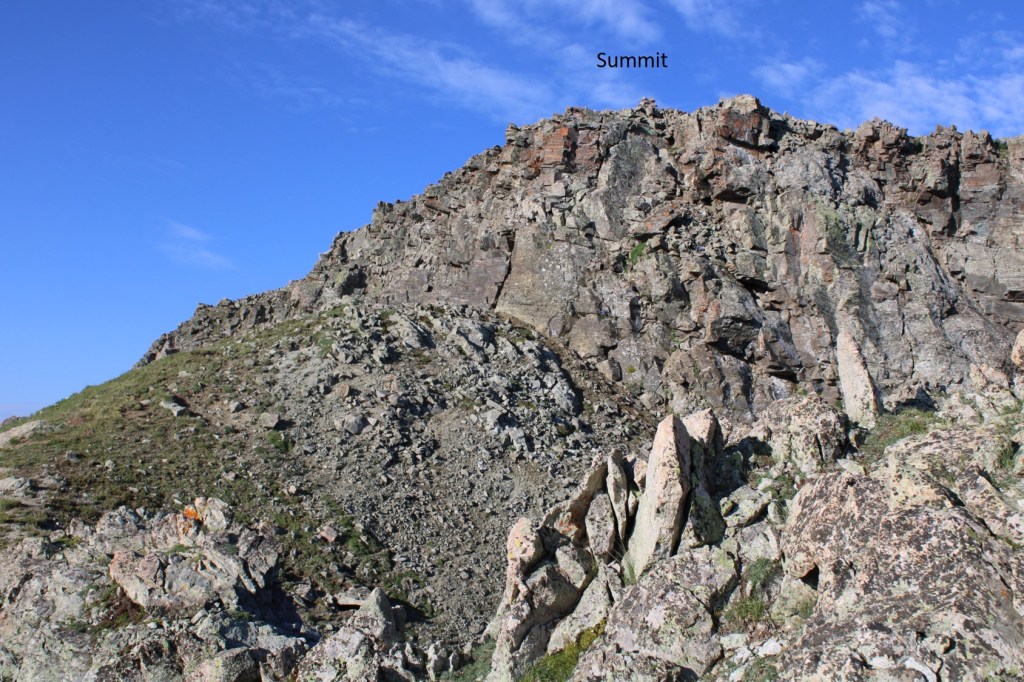
At the top of the ridge you can see the true summit of PT 13336.  The terrain stays just as loose as before.

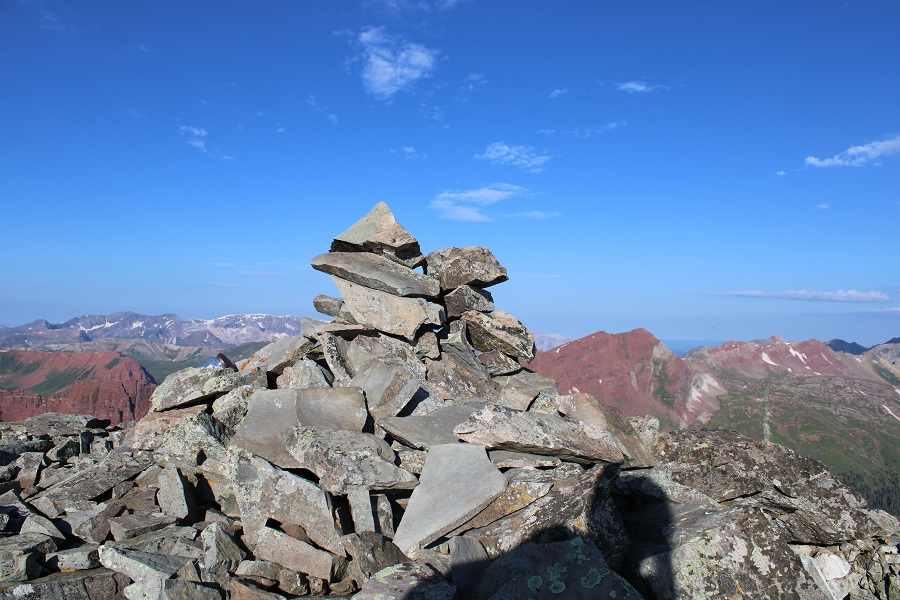
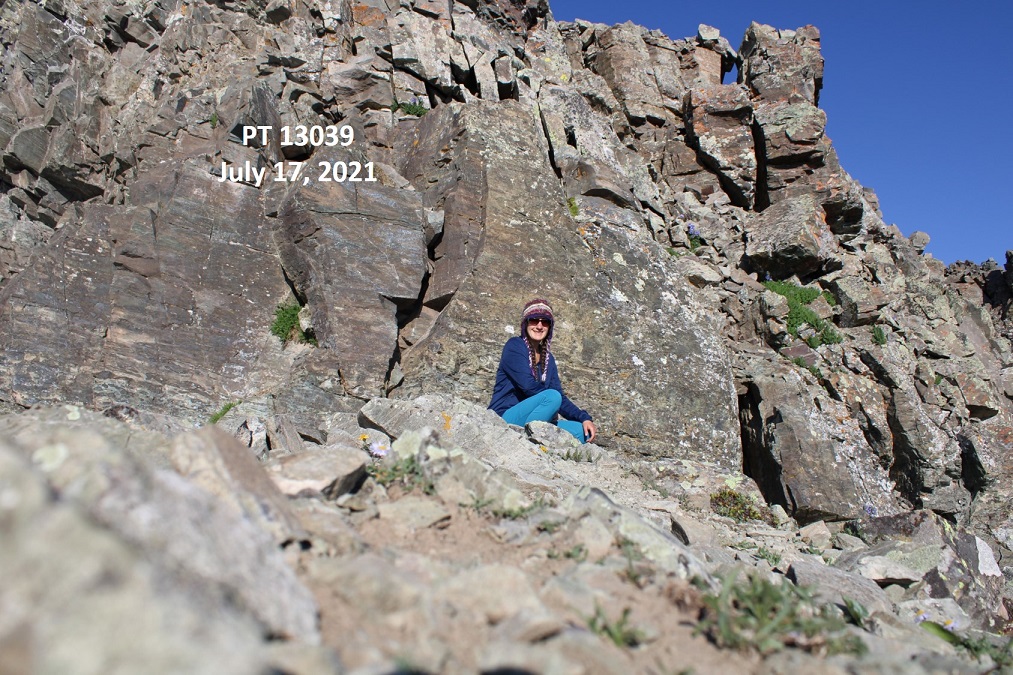
I summited PT 13336 at 6:10am

PT 13336: 

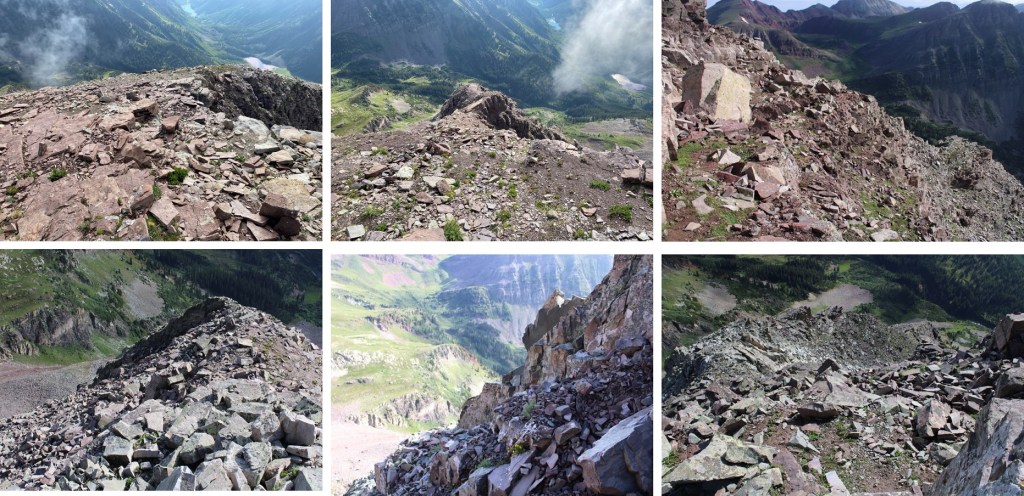
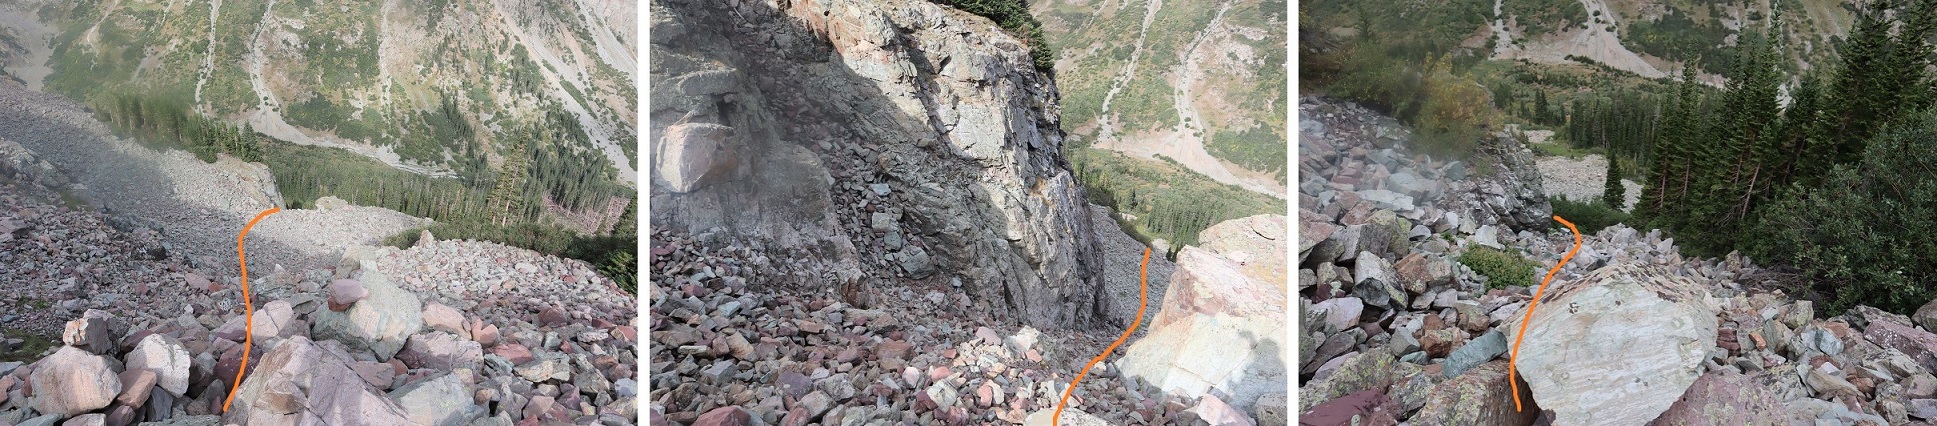
Here are some pictures of the way back to the saddle

Across the gully

And down the maroon scree

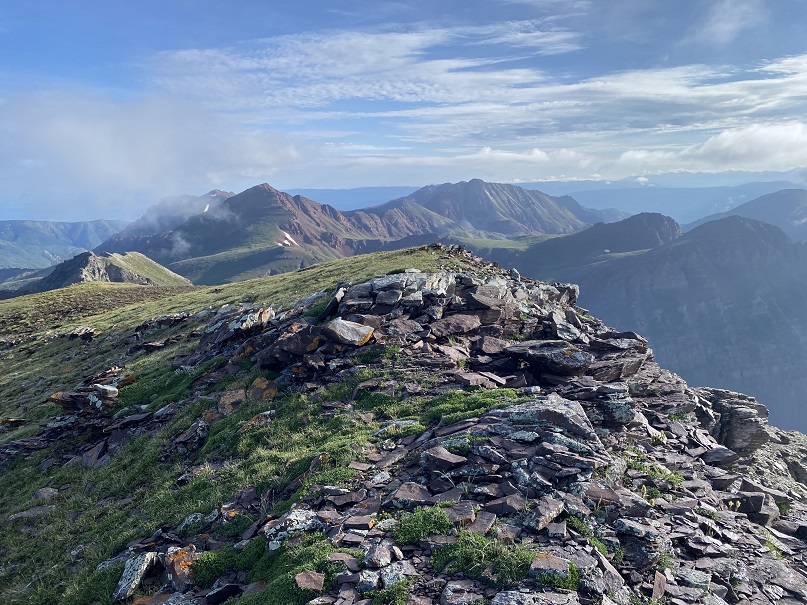
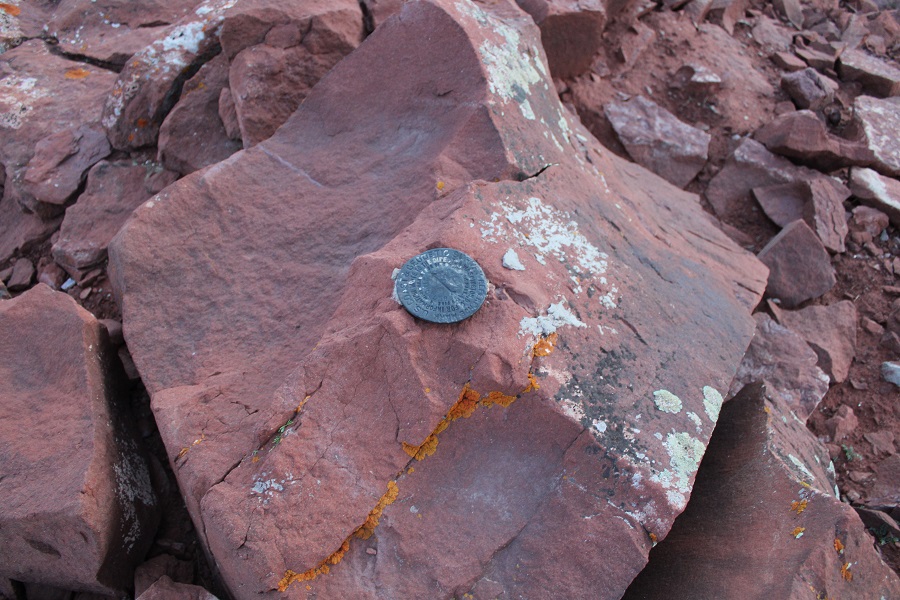
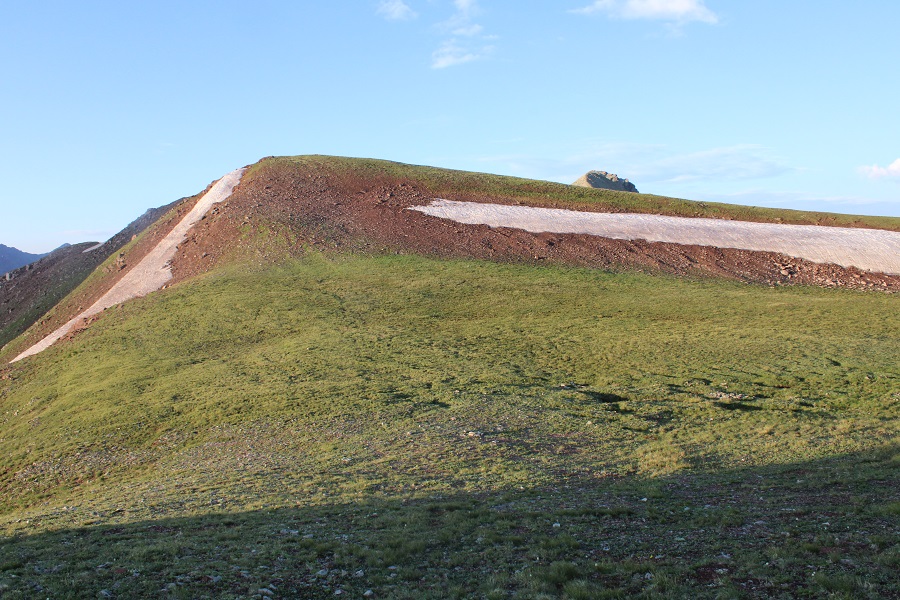
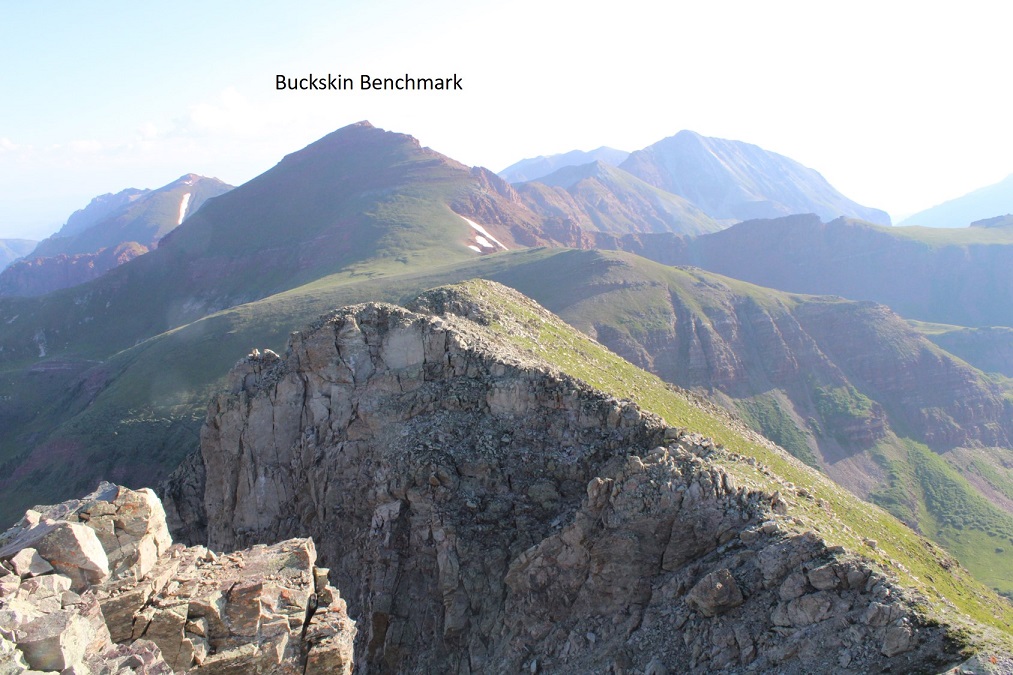
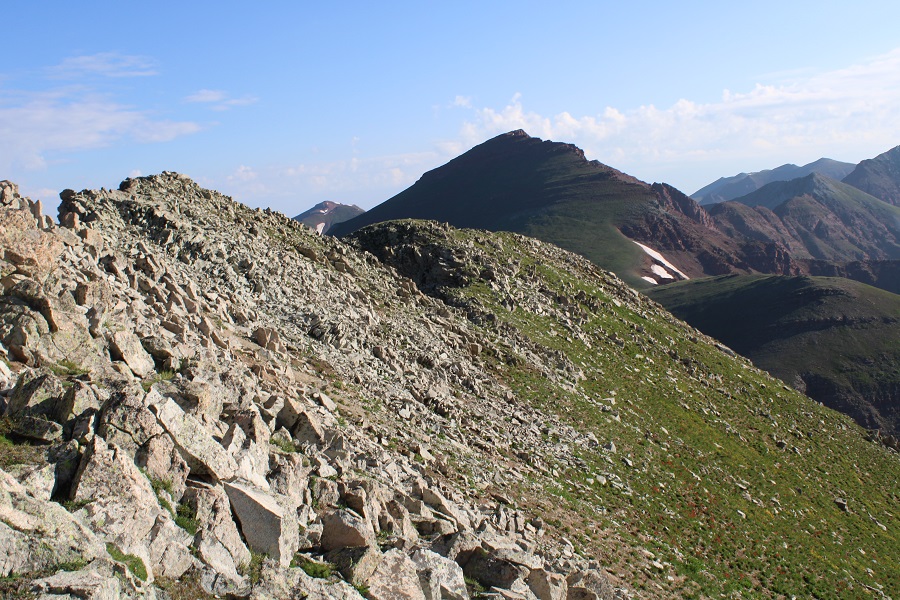
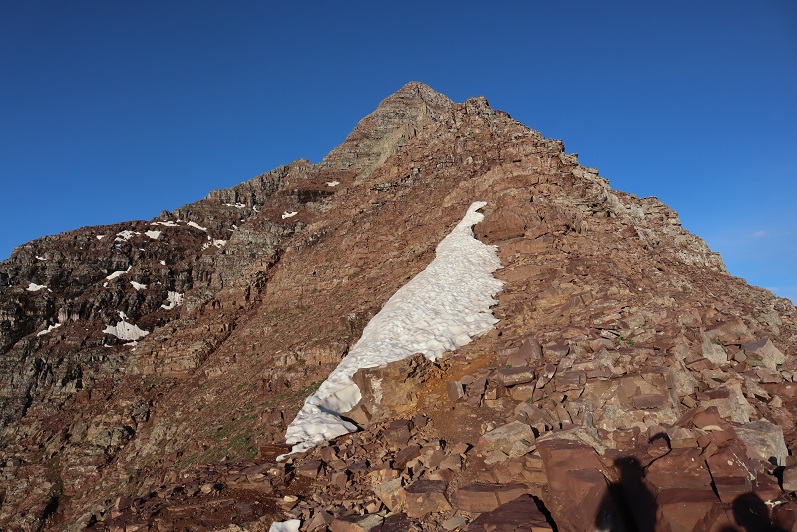
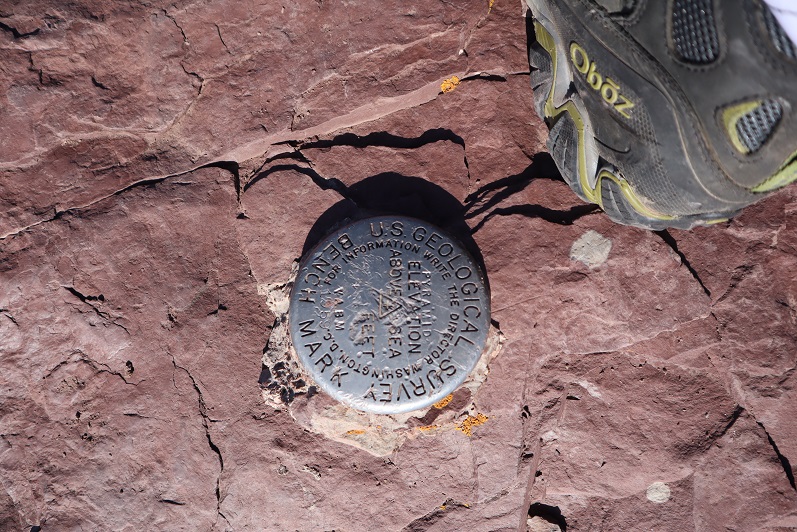
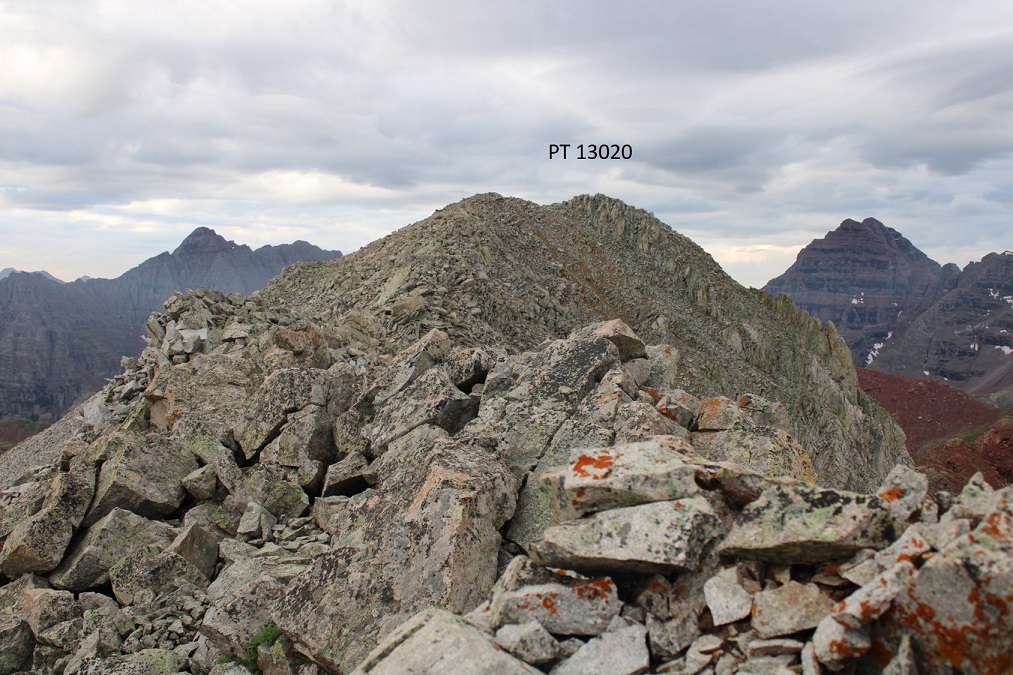
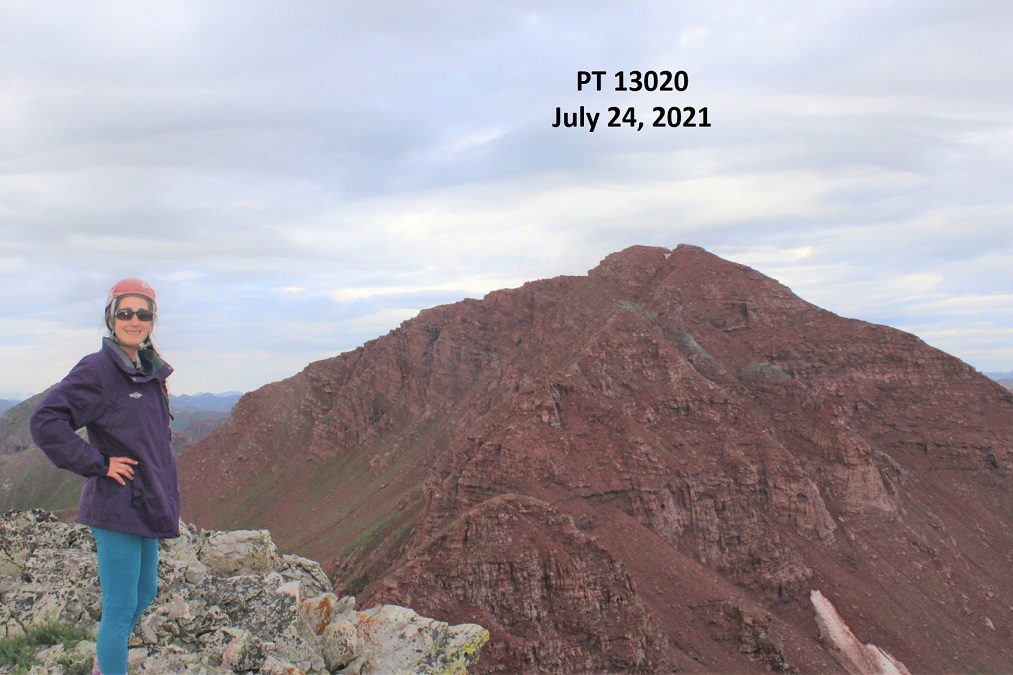
From here you can see the summit of PT 13020 and Buckskin Benchmark

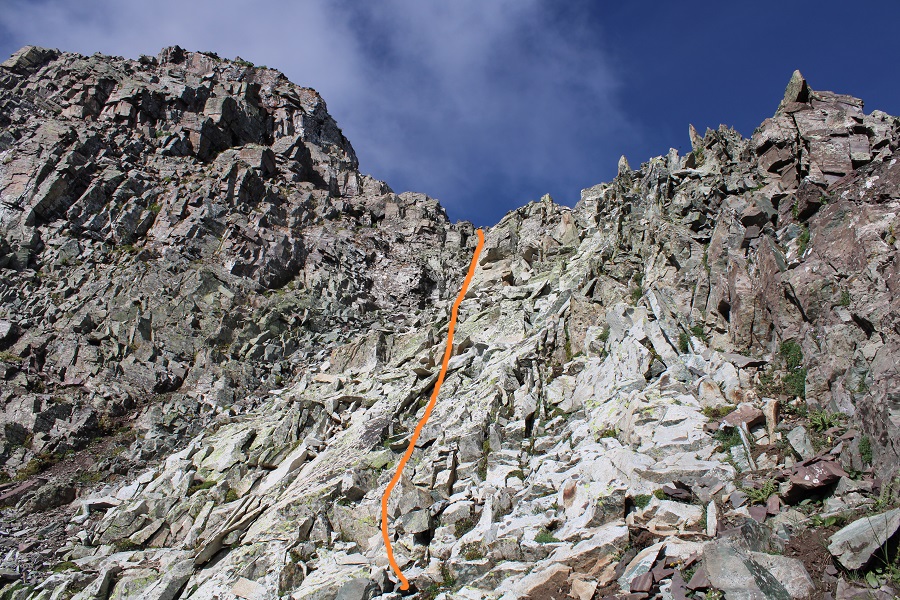
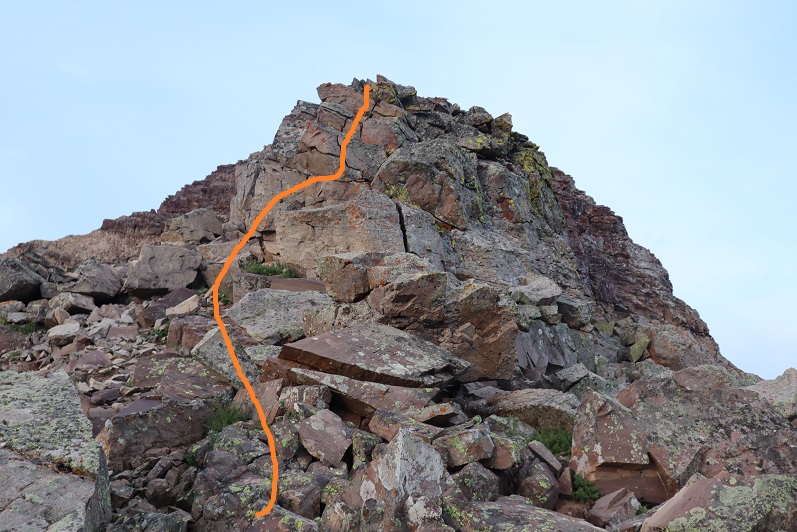
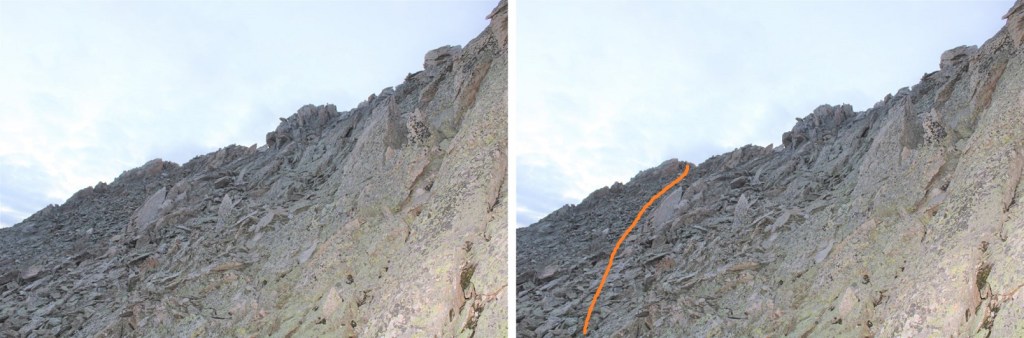
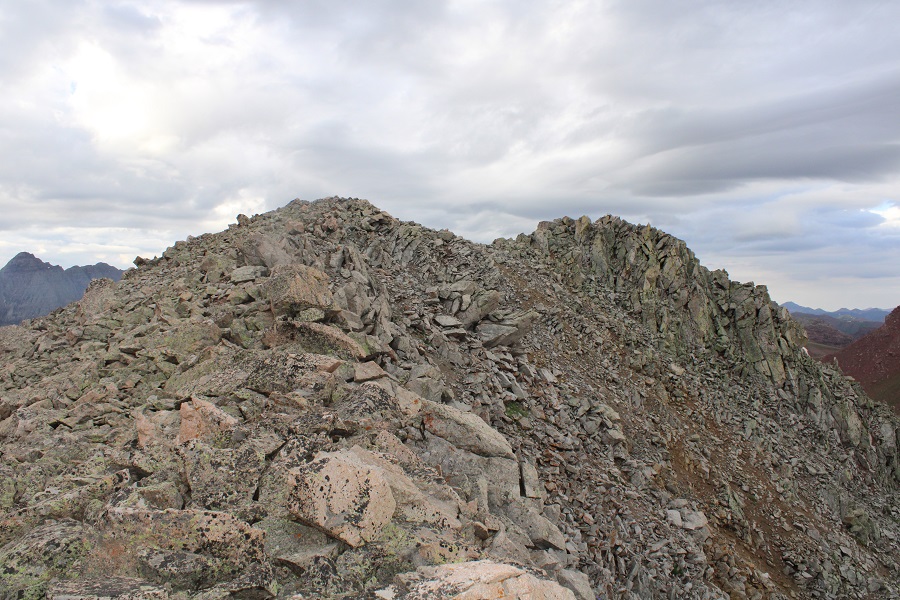
It was a simple ridge hike, with just a few fun moves to the summit of PT 13020.  Here’s the overall route

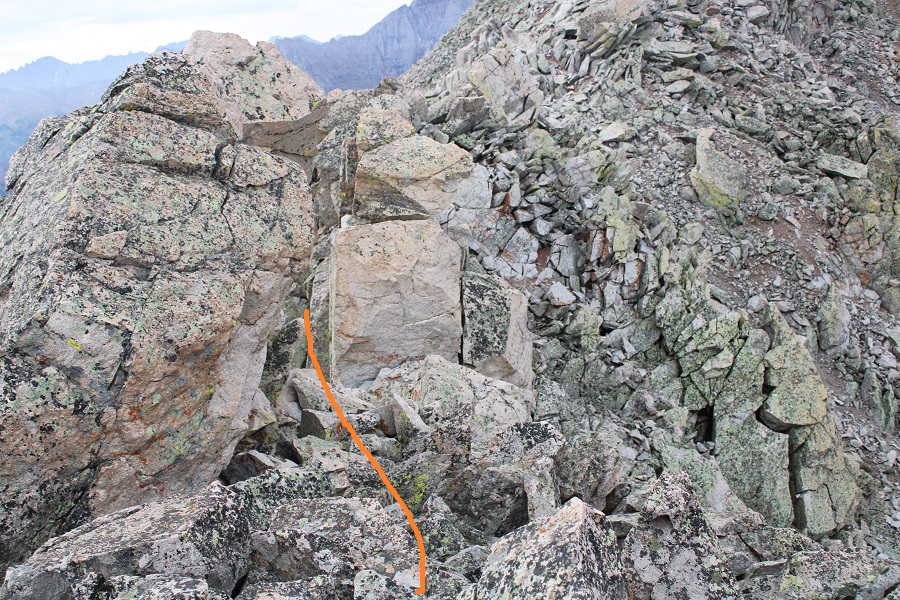
And some step by step pictures. To gain the upper ridge, I skirted the rock formations to the left, but still stayed as close to the ridge as possible.

Once on the upper ridge I followed it to the summit of PT 13020, only dipping down to the left once through a gap in the rocks to keep this class 2

I summited PT 13020 at 7:20am. 

PT 13020:  

It was starting to rain, so I headed back down the ridge to the saddle.

Once at the saddle, I followed the class 1 trail back to Willow Pass

There was a large family of marmots at the Willow Lake/East Snowmass/Willow Pass Junction.  As I approached, several jumped underneath the grass, not wanting to be photographed.  I turned and headed southwest towards Willow Pass

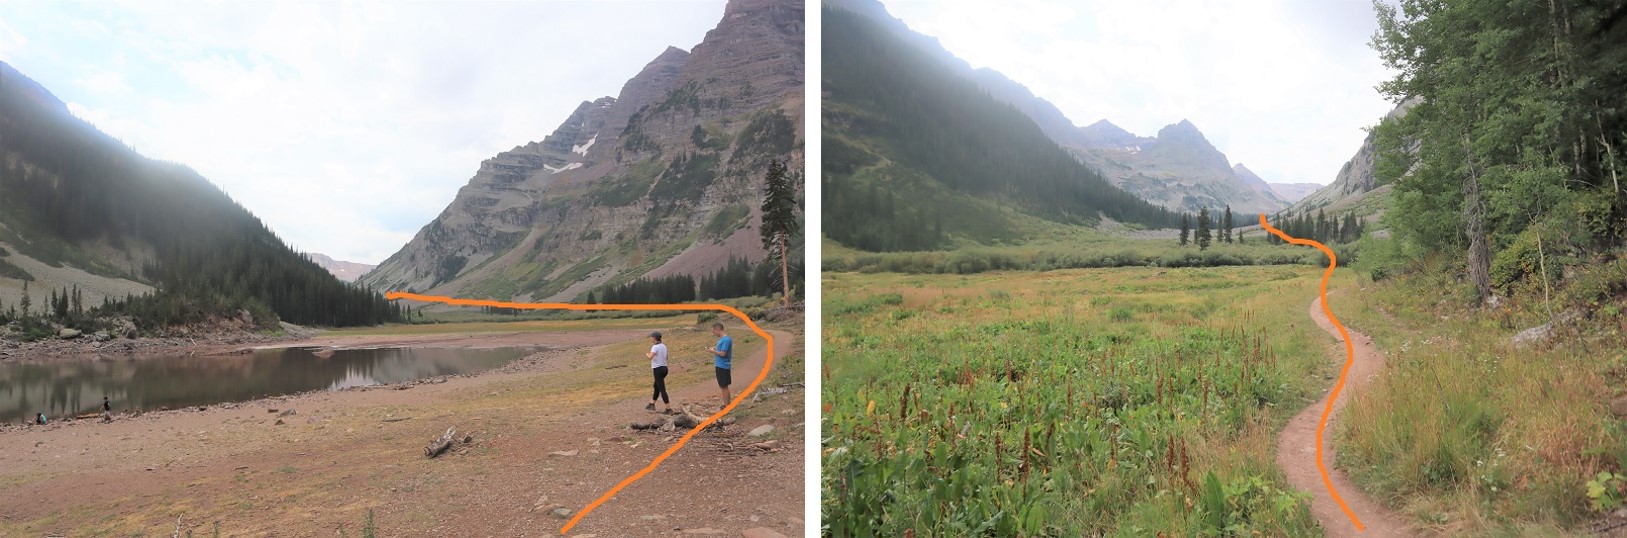
And from Willow Pass I followed the trail back to the Maroon Lake Trailhead

I made it back to the trailhead at 10:45am, making this a 16.3 mile hike with 5815’ of elevation gain in 9 hours, 45 minutes

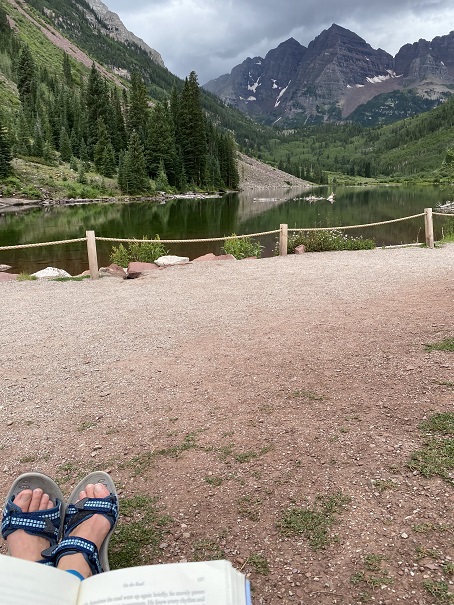
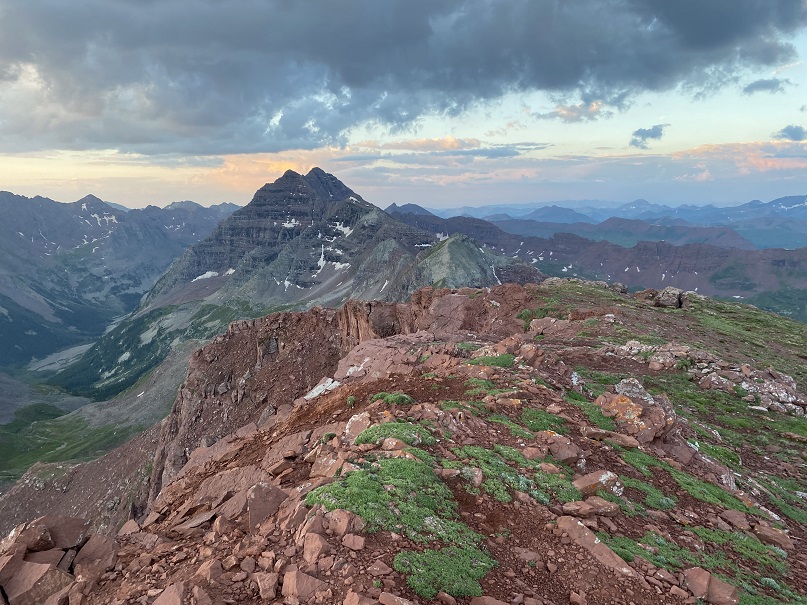
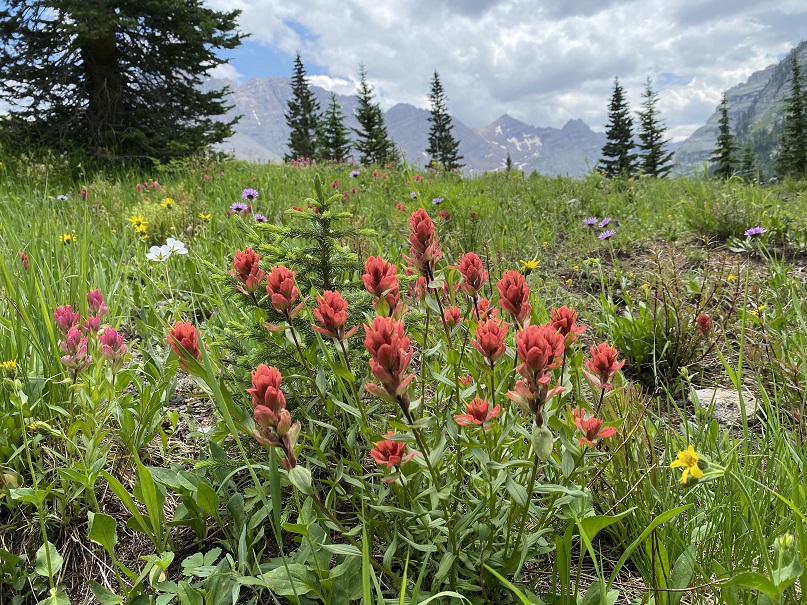
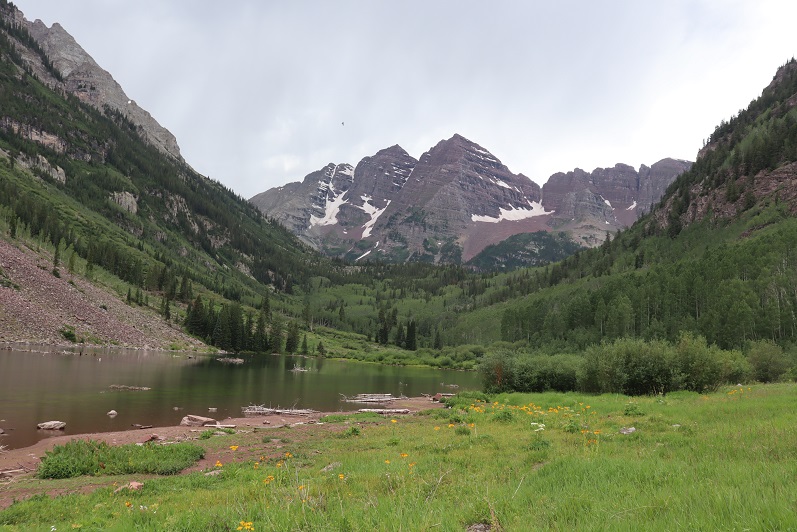
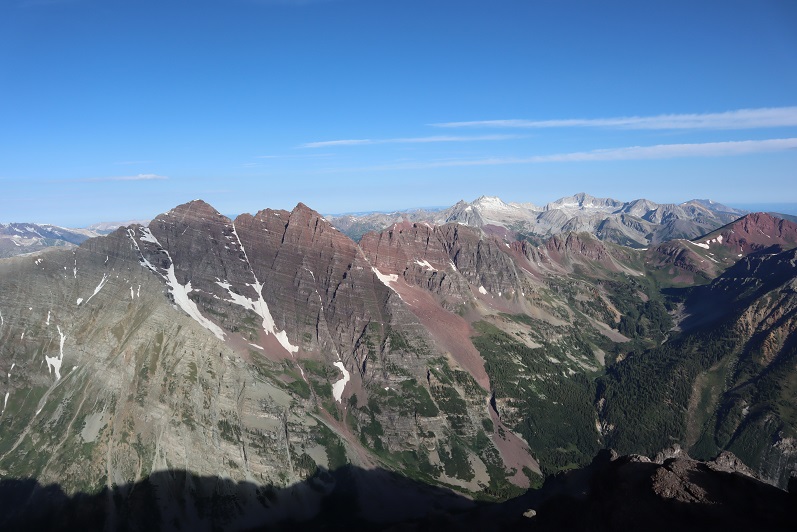
And, just because I have room for one more picture, can we all take a minute to appreciate jut how beautiful this area is?

Sleeping Sexton – 13,460

RT Length:  12.7 miles

Elevation Gain:  5156’

This was actually my second attempt on Sleeping Sexton:  I was here last week but got turned around at the false summit due to getting ‘buzzed’.  I figured it was for the best however, because I had done some serious route finding that morning and now I could provide a clear and useful GPX file for the route, instead of one with a lot of attempts that didn’t lead anywhere.

I made it to the Maroon Bells welcome station, and this time the attendant recognized me.  We chatted for a bit, as he was interested in some of the summits I was doing.  Then he referred me to talk with someone at their offices in town, and we’re basically best friends now.

It was raining when I arrived, but people were walking around Maroon Lake anyway. 

I was on the trail at 2:15am. 

From the parking area, here’s an overview of the route above treeline to the false summit

The trail starts by skirting Maroon Lake, then taking the Crater Lake trail southwest.

There was a full moon out, so I didn’t need my flashlight.

At the junction for Crater Lake I continued following trail 1975 northwest. This is the trail you take if you’re doing the Northeast route for North Maroon Peak.  There are camping spots just before the next junction.

The trail continues to be a well defined, class 1 trail.  At about 10775’ there’s another junction.  If you’ve hiked North Maroon Peak before, you’ll recognize this trail.  I turned left here and crossed the creek, following the North Maroon Peak Trail (still class 1)

Here’s an overview of the trek to the false summit (or ‘the crown’) from the creek crossing.  I followed the North Maroon Peak’s Northeast Ridge Route until I made it to tundra, at about 11,600’.  I then left the trail and headed northwest, behind this outcropping, to the base of the white gully. I then trekked up the ridge and followed the white gully until it ended. Here’s a basic overview.

Here are some step by step photos of the way I accessed the white gully:  I followed the North Maroon Trail to treeline

At 11,600’ I left the North Maroon Trail and headed northwest

Here you can see the base of the white gully.  I didn’t want to climb straight up the gully, as it was very steep.  Instead, I accessed the ridge, and followed the ridge to the white gully.  (I did this after spending a lot of time last week trying to see if the smaller gullies ‘went’ to access the white gully, and turned back every time because I didn’t have rope.  I believe it’s much easier to access the ridge first and then head up).

Here’s exactly where I entered and exited the ridge.  I found this to be class 2 and direct access.  Now’s a great time to put on your helmet if you haven’t already done so.

Once on the ridge I followed it west, staying in-between the ridge and the white gully (to the right of the gully, but left of the ridge).  If you look for them, you’ll find game trails here (you may have to duck under some branches to use them though).

Once near the white gully, I found the terrain to the right to be more stable than the white gully itself, especially on my way down.

Topping out of the white gully felt class 3

From here it became ‘choose your own adventure’ as I followed the ridge southwest. I started out rounding the ridge’s north side, and then went back and forth between north and south sides of the ridge a few times.  There are cairns here, and nothing is more difficult than class 4.  In fact, if you’re extra careful/spend a lot of time route finding, you can probably keep this at mostly class 3. Here’s the route I took:

From the top of the white gully I rounded the corner and made my way back to the ridge.  It had rained the night before, so I had to be extra careful with every foot placement (wet = slippery)

Once back on the ridge I followed it for a ways

Before hitting a bit of a shelf and crossing over to the south side of the ridge

I followed the ridge to the false summit / ‘the crown’

From the false summit you can see the true summit of Sleeping Sexton

And now, the fun route finding begins!  I descended the false summit 125’ and crossed a gully.  There were cairns here to help in the crossing (circled in red). These are steep and go at class 3/4

After crossing the first gully I descended once again, another 160’

I was now at 13,130’, and parallel with the saddle between Sleeping Sexton and the false summit.  I followed the contour of the mountain to the ‘secret ledge’. Here’s what that looks like heading in

I crossed the ledge to the ‘saddle’, then skirted the side of the mountain and headed up to the summit

The ledge is not as bad as it looks.  There’s a cairn here (circled in red) DO NOT DESCEND HERE.  Instead, use it as a reference point and stay level with it (especially on your way back) and continue following the ledge. If you do this, it stays class 2 to the saddle.

From there it was an easy trek to the summit, first skirting the mountainside

And then ascending the ridge

I summited Sleeping Sexton at 6:45am, just as the weather started rolling in

Sleeping Sexton: 

Since the weather wasn’t cooperating I didn’t stay long.  I turned and headed back the way I’d hiked in.  Here’s looking back at the false summit / ‘the crown’

And a view making it back to the ledge

Here are some more images of that ledge, looking back.  Remember to look for the cairn, and stay level with it.

For reference, here’s the size of the route.  The route can clearly be seen over my shoulder (to the left)

I rounded the corner, and ascended the gully, aiming for the cairns

Crossed the next gully

And gained the ridge to the false summit / ‘the crown’

I actually stayed here for a bit because I had cell service.  I let my family know I was ok, and downloaded the weather forecast for the next day.  However, eventually the clouds told me to get going.

Clouds rolling in: 

Here are some pictures of my way back to the white gully

Back down the white gully to the ridge

And from the ridge back to the trail

Once back on the trail it was an easy, class 1 hike back to the parking area.

I made it back to my truck at 11:30am, making this a 12.7 mile hike with 5156’ of elevation gain in 9 hours, 15 minutes. 

It was still early in the day, so I ate lunch by Maroon Lake, read for a bit, looked at topo maps for tomorrow, and jotted down notes in my journal before making it an early night.  Oh, I forgot to mention the goats:  They were the same two goats I saw last week, and if for no other reason than them, wear your helmet until you make it back onto the class 1 trail:  They were kicking rocks down the gullies the entire time I was there. 

Buckskin Benchmark – 13,370 and PT 13039

RT Length:  18 miles

Elevation Gain: 5800’

I’ve said it before, and I’ll say it again:  I’m NOT a fan of the permit system. Even though I was on their website exactly when permits were released, I wasn’t able to get an overnight permit for Maroon Bells on a date I could go, so I had to get three back-to-back permits instead.  When I pulled up at the gate my paperwork confused the attendant.  He didn’t know what type of a parking pass to give me, but settled on an overnight pass that expired in two days time.  He then asked me to park in the further lot, as the closer lot was intended for day use. 

I balked at this:  I’d wanted a 2 night pass, but because of the reservation system I couldn’t get one.  Instead, I paid 3 times what those who were able to score a longer permit were paying for the same amount of time in the park.  I felt if I was paying that much more, the least they could do was give me a better parking spot.  Also, while annoying, the main reason I don’t like the permit system isn’t because of stuff like this:  it’s because it encourages bad decision making among people who feel they need to hike/continue when dangerous because it’s difficult to get a permit, etc.  One of the reasons I left California in 2006 was because of the permit system, and all the fees associated with said system. I hate seeing it brought to Colorado.

Ok, rant over.  I was on the trail around 5:30pm.  It was my intention to camp around 11,000’ and start early the next morning.  For those of you who haven’t hiked the Maroon Bells area before, the trail is obvious:

I followed the trail west, staying right at the junction for Crater Lake

And continued up the hillside to my camping spot at 11,100’.  I was surprised no one else was camping here, as it’s the perfect spot. 

I’ll spare you the details of the next day’s hike, as I came back to this spot, spent the night, and started from here the next morning.  I’d gotten to bed early after a long day of hiking, and woke up to sunlight.  I looked at my phone and it showed 5:30!  Ack!  I initially thought I’d slept through my alarm, and started rolling up my sleeping bag.  About 30 seconds later I realized I’d only been sleeping about an hour, so I happily went back to bed and slept soundly until 3:30am the next morning. I left my new water filter bag inside my tent and was on my way.

I was on the trail by 3:45am, heading northeast along the well-defined trail through Minnehaha Gulch. I crossed a stream and continued along the trail, not really ‘feeling it’ today.  I was more tired than I should have been, and wasn’t feeling very motivated.

I followed the trail all the way to Buckskin Pass

Once at Buckskin Pass, I turned right and headed north towards Buckskin Benchmark

This was an easy, class 2 hike, mostly on tundra

Towards the top it got a little rocky, but stayed class 2.  I saw several ptarmigans here, and a few crows

Right about now the sun was starting to rise, along with my motivation. 

Here’s the last bit to the summit.  It stays class 2 if you keep left

I summited Buckskin Benchmark at 6am

Buckskin Benchmark: 

The benchmark

The views from up here were amazing!  My spirits lifted, I actually ate a snack, and headed back down to Buckskin Pass. 

On my way down I made some mountain goat friends (those are Snowmass and Capitol peaks in the background)

My next peak was PT 13039

It was a tundra walk back to Buckskin Pass

And a trail hike up to the point circled in red

This is where it got interesting.  I wanted to go straight up and over the face, but it seems as if there have been several slides in the area, and nothing went at class 2.  This was supposed to be a class 2 hike, so I looked for a better way. My advice here is NOT to go directly up one of these gullies (you probably can, but they all looked sketchy/prone to slides).

Instead, dip down to the left.  This area stays class 2. 

Here’s what my route looks like from below

Once I was past this area, I turned right and headed southwest to the ridge (still class 2).

Then I followed the ridge south.  I could clearly see the cairn indicating the top of 13039

At the edge of the ridge is where it got spicy.  It turned form a class 2 hike into a class 4 climb.  I looked around for an alternate route, and realized the only way up to the summit was to climb the 30-40 feet or so up the chimney/gully to the summit block

I was a little disappointed because I’d left my helmet back in my tent.  I debated if I should continue or not, and in the end I figured I did enough class 4 climbing yesterday without incident and was warmed up:  I should be fine today.  Also, I’d recommend wearing a helmet.   I dropped my gear and headed up with just my camera.  Here’s the route I took

I made it about halfway up the chimney, and once again had second thoughts.  I continued on however, because I knew the worst was behind me and either way I’d have to downclimb that area again. Here’s another angle

I summited PT 13039 at 7:45am

PT 13039:

Here’s looking back at Buckskin Benchmark

From the summit you can see where I left my gear. 

I turned and exited the way I came

The initial downclimb was steep and committing.  I turned and faced the rock for this part.

I made it about halfway down and realized I hadn’t taken a picture of myself on the summit, but I wasn’t willing to re-summit again.  I figured I’d just get a photo at the bottom. 

I made my way back down the ridge

And back to Buckskin Pass

From the pass it was an easy, class 1 hike back to my campsite.

Side note:  there are also good camping sites at 11,500’.  Once at my campsite I was disappointed to find my water filter had leaked water all over the bottom of my tent.  I dried it out the best I could, packed up my gear, and headed down.

Also, the wildflowers were on point today

Here are some pictures from the trek out

Once I made it back to the Crater Lake area I started seeing tons of people on the trail.  They travelled in groups, and were spaced about 15 minutes apart (I’m guessing this is due to the bussing times). I met one lady who asked me how fat it was to Crater Lake, and when I told her it was another mile or so she looked like I’d just told her it was another 20 miles.  She was exhausted, and I’m pretty sure she turned around (the round trip hike to Crater Lake is about 4 miles).  There were several groups being led by guides, which leads me to believe guiding companies may be buying up the permits.

I made it back to the parking lot, cleaned up, and headed out.

I had another entire day of hiking yesterday, so my stats are estimates based on CalTopo math:  Today’s hike was 18 miles with 5800’ of elevation gain. 

Len Shoemaker Peak -13,642

1

RT Length:  14.93 miles

Elevation Gain: 4584’


This is the third time I’ve been to Maroon Bells this month.  I was able to secure 3 separate permits, and the past few weeks went with friends to summit North Maroon and Pyramid.  Today I was here to tag a new 13er for myself: PT 13631.  Since I70 is now open (it was closed due to fires) I was the only one driving on HWY 82.  I didn’t pass one vehicle between Granite and Aspen.  It was awesome.  I did see 2 vehicles parked at a trailhead near Independence Pass, and two scruffy porcupines to go with them, merrily munching on the wires underneath.  The owners of those vehicles were not going to be happy when then made it back to their cars.  I’d have gotten out and shooed them, but, you know, they may be slow but they have quills.  I saw three other porcupines waddling along the highway as I drove.  HWY 82 is popular among porcupines.

As I passed the parking structure for Maroon Bells I saw a pear shaped bear butt running away from a trash can and then jump over a fence.  It was cute to see it bounding away (although I kind of wanted to get a picture so I wished it had stood still for a second).

I had a permit to park at Maroon Bells from 12am-4:30pm.  It was 1am when I arrived and I felt it was still a little too early to head out so I took a quick nap.  A large group of hikers passed by at 2:40am and woke me up, so I was on the trail by 2:45am.

The trail starts at the west end of the parking area

2

And follows a well-defined path around Maroon Lake

3

At the end of the lake I followed the trail towards crater lake.  I noted the signs:  One said “bear activity in area” as of August 23 (August 1st had been crossed out) and there was also a sign saying there was a moose in the area.  In the last few weeks I’ve seen a bear standing on the side of the road while taking the shuttle ride out and a moose standing in Maroon Lake, so I knew these signs to be true.

4

This is a class 1 trail to Crater Lake

5

I turned left at the junction for Crater Lake

6

And then followed the trail (still class 1) around the ‘lake’ and up the basin.

7

I passed a few camping areas while it was still dark.  In one a large man was standing by the trail, bald, shirtless, and in possession of a rather hairy pot belly.  He seemed to be waiting for me to pass by.  Luckily this is a well-travelled trail, especially at this time in the morning when others are looking to summit Maroon Peak (I count the flashlights so I know who’s ahead of/behind me when it’s dark out:  that large group of hikers wasn’t too far away).  I could see him because he had a headlamp shining from his forehead.  I didn’t see his dog, who started barking at me as I neared.  Of course, I jumped.  The man seemed to think it was funny.  I continued on.  Also, it wasn’t funny.  Here’s an overview of the next few steps, as I made my way up to Len Shoemaker Basin

8

After hiking for 4 miles from the trailhead, and at 10515’ I left the trail to cross Maroon Creek (which at this point of the year isn’t flowing much, but earlier in the season is several feet deep).  There are cairns in the area.  An obvious trail picks up on the other side.

9

10

I followed this trail for .25 miles, until I saw a cairn to my left and then followed a very faint trail east through and then out of the willows, and up the side of the mountain, towards the basin.

11

Making it to the basin required ascending a series of gullies.  I’ve been here several times, and the route gets easier to find each time. This time there were plenty of cairns indicating the way.  However, the route sometimes doesn’t seem like it should follow the cairns, but trust me, it does.  Here’s the route step by step into the basin.  After exiting the willows and crossing a small boulder field there is a faint trail behind the next set of bushes/willows that will lead to the first gully.  Now’s a good time to put on your helmet.

12

I ascended the loose gully, staying to the right for more traction

13

At the top of the first gully you’ll see another gully to your left.  (These are tons of fun in winter BTW, so bring your crampons and ice axe if you expect snow).  Ascend the second gully, this time sticking to the left for more stable ground

14

15

At the top of this gully is… another gully.  Sorry for the hand in this picture:  the sun was at an unfortunate place in the sky while I was trying to take pictures and this was my solution.

16

From here I aimed for the grassy slope and went behind it, angling towards the ridge

17

And could see another gully to my left.  (This entire time I was heading east)

18

Next, I aimed for the grassy slopes, and the final gully that would take me to the upper basin.

19

20

Here I got my first view of PT 13631.  I just followed the basin south towards the end

21

The end of the basin was still holding some snow. This was a light snow year, so I expect there’s snow here almost year-round.  The snow can be avoided, but I just walked over it into another basin

22

I followed the talus rib towards the base of the gully that would lead me to the saddle of Lightening Pyramid and PT 13631

23

This is the last gully of the day.  It’s class 2 but the scree is loose.  I looked for larger rocks whenever possible.  There is no direct path but there are a bunch of game trails.  No area seems to cliff out, so you can pick your line depending on conditions.

24

25

At the saddle I turned right and headed southwest up the ridge.  Most of this was easy scrambling, after first initially gaining the ridge.  To do this I went right, found a class 3 chimney and ascended it.  This was the most difficult part of the entire hike, and I probably could have found a class 2 option around this if I tried harder. I felt this chimney was pretty easy.

26

Here’s looking up at the chimney.  There are plenty of hand/foot holds.  It’s only about 8 feet high and all of the rocks are stable.

27

Once on the ridge I scrambled my way to the summit. This is all easy class 3, just scout around for the best route.

28

29

30

The summit is relatively flat.  There’s a summit cairn with two summit registers.  The metal one is closed and has 2 pens inside.  The white one is open (without a lid) and is empty. Bring some paper if you want to sign this register.

31

I summited PT 13631 at 7:20am

32

PT 13631:

The views were great, but the smoke from nearby fires shaded them a bit.

33

Here’s the route back down the ridge

34

Down the chimney (you can see my trekking pole below for reference)

35

And back around to the saddle.

36

Once again, great views

37

Back down the gully and through the basin

38

And back down the gullies, following the cairns west along the way.

39

40

41

Through the willows

42

Back to the trail that would lead me across the creek

43

And back to West Maroon Creek Trail 1975 and Maroon Lake

44

When I was here last week there’d been a moose standing in the lake.  Guess what?  He was still there (this time lounging by the lakeshore).  Pretty cool!

45

46

I made it back to my truck at 11:45am, making this a 14.93 mile hike with 4584’ of elevation gain in 9 hours (with some time spent ogling the moose).

47

Here’s a topo map of my route.  I have to say, the views were incredible but the peak itself was kind of a letdown.  It had just been too easy, when I’d been expecting the more intense scramble over crummy rock the Elks are known for.  It almost wasn’t worth bringing my helmet, but the moose was an added bonus.

48

On to the next trailhead!


Pyramid Peak – 14,018

1

I had some friends ask if I’d hike with them this weekend a peak I’d already summited.  Normally I like to hike solo, but it was fun hiking with others.  Everyone seemed to have a similar pace, which was nice.  What wasn’t so nice was the reservation system to get a permit to hike.  We paid $30 to park in the parking structure and take the bus in because we weren’t able to get a permit. That meant this had to be a multiple day hike.  They only let 15 people on the bus at a time (due to COVID).

I don’t have a lot of pictures of the hike because I’ve already done a trip report, so I’ll just post some highlights.

Our campsite, which had about 20 or so other people camping within a few yards

2

Crater Lake (near the campsite)

3

The gully, which had an actual TRAIL this time!  Last time I was here there was no  trail and the scree was awful.  What a nice surprise today!

4

The ridge to the summit after the gully

5

The “Leap of Faith”

6

The ledge

7

Some chimney climbing/scrambling

8

A rather cheeky goat that followed us all the way to the summit!!!

9

10

The summit

11

The summit marker

12

Views from the summit

13

14

Some goats just before the gully on the way down… also, a baby goat separated from its herd sounds just like a 3rd grader blowing as loud as they can through a recorder.  Seriously.

15

A look at the amphitheater from the top of the gully

16

And a topo map of the route

17

The Pyramid Peak Summit Sticker can be found here