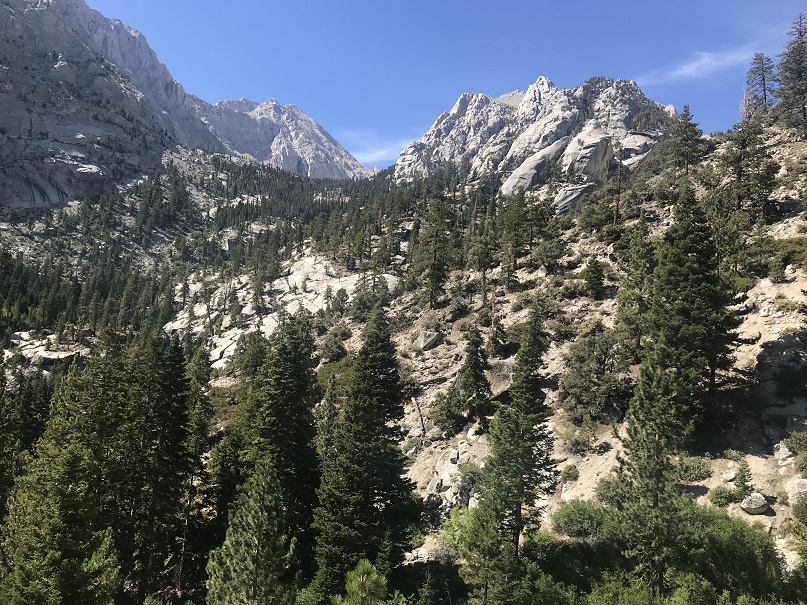
After hiking Mt Whitney I drove my rental vehicle to a Subway, got lunch/dinner, and paid too much for gas
My goal was to drive as close to the Boundary Peak trailhead as I could get in the Toyota Corolla I’d rented. I’d heard a lot of different things about the drivability of this road and since I didn’t have a 4WD or even a vehicle with much clearance (5.2 inches) I was a little worried. About 30 miles from the turnoff my cell phone lost service, and I knew I’d be on my own if I got a flat tire or damaged the vehicle on the 4WD road.
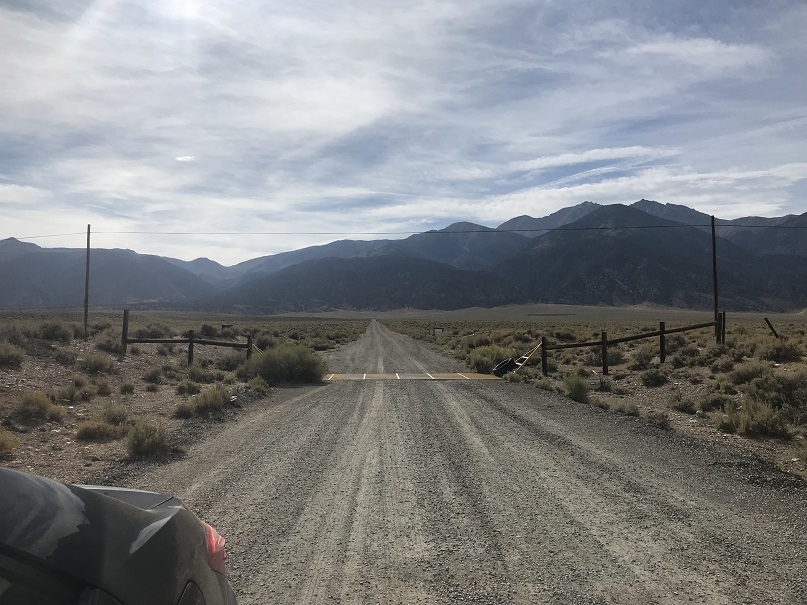
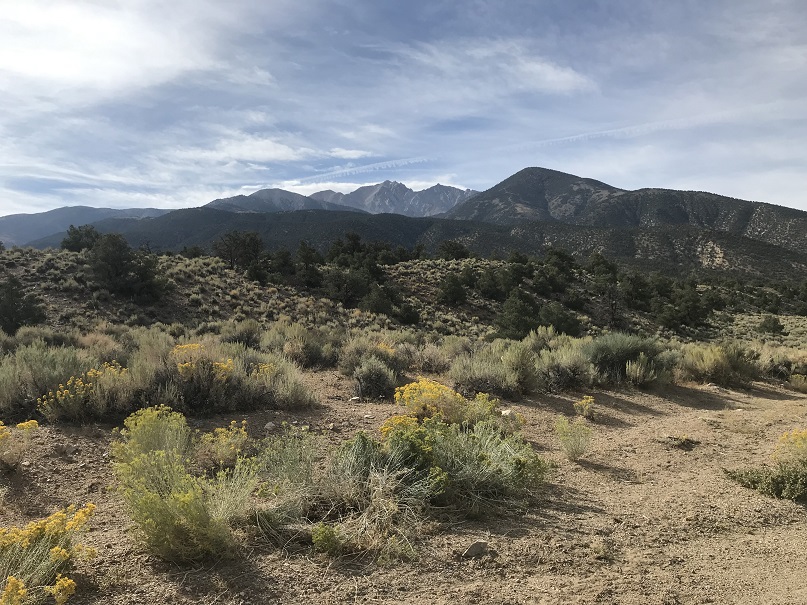
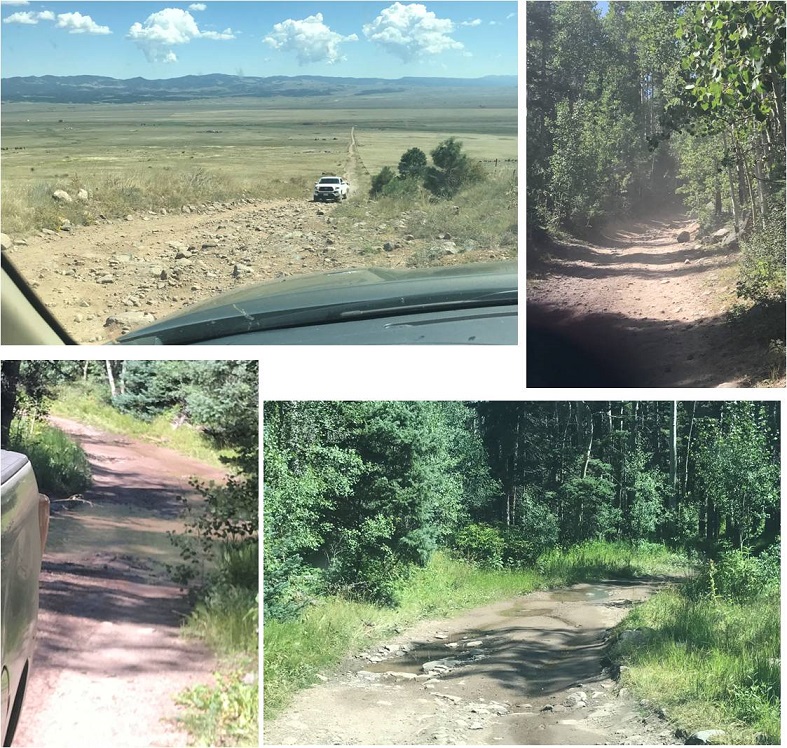
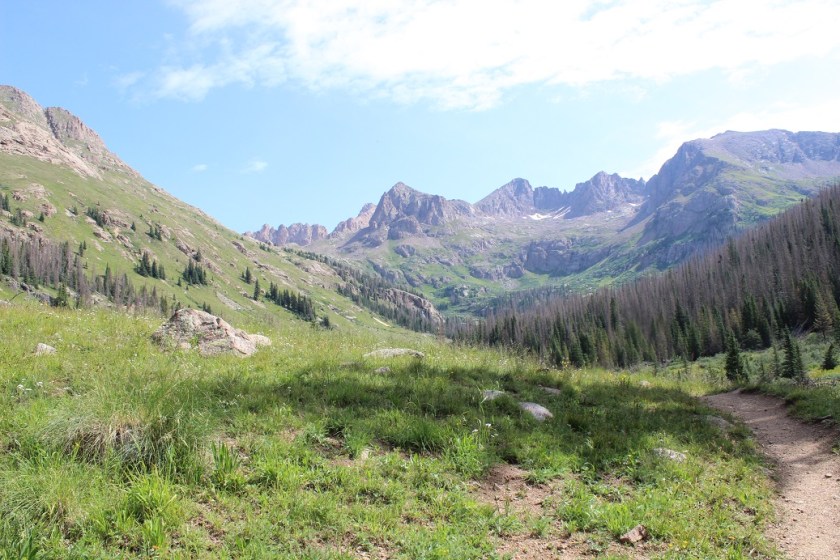
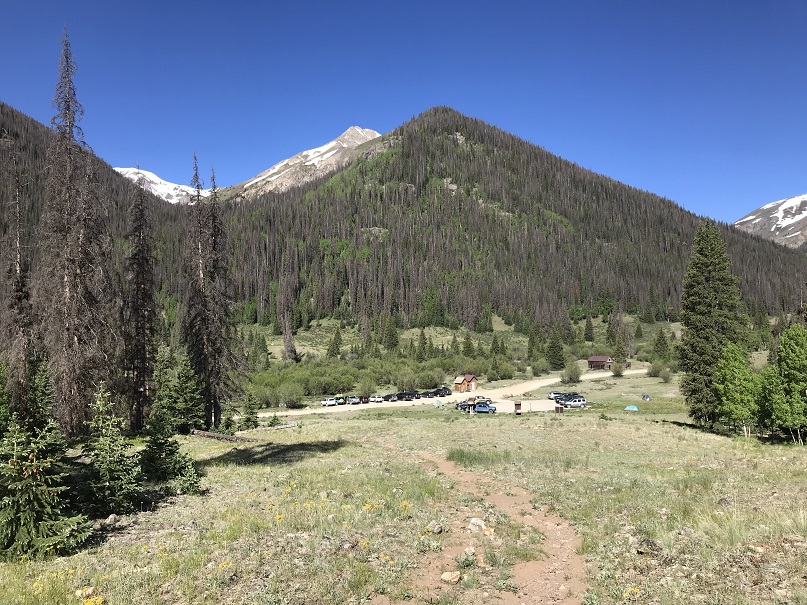
I was pleasantly surprised when I turned off US 6 and this is what I saw
I knew the Queen Canyon Trailhead was about 6 miles from here, and it looked like I’d be taking a well maintained 2WD dirt road for at least the first few miles. The first two miles were flat and relatively easy, and with each passing mile I became more confident and a little more excited to be getting closer to the trailhead.
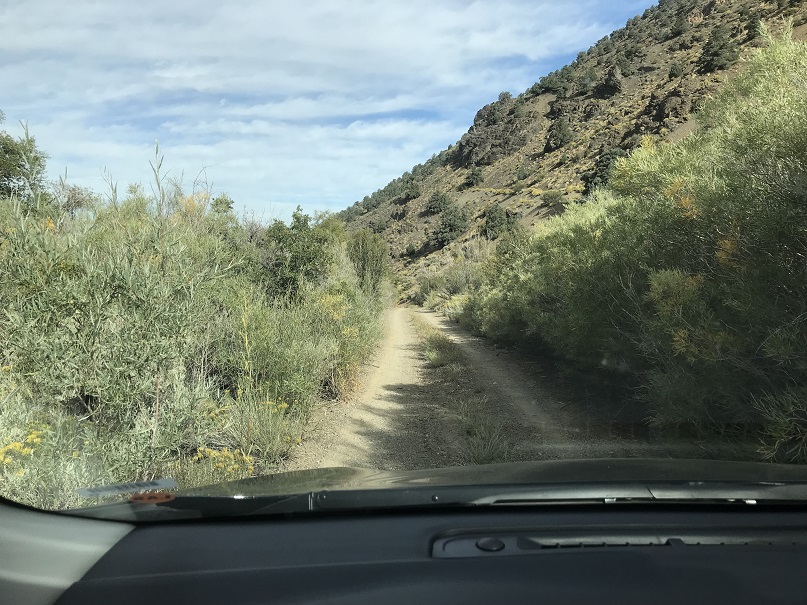
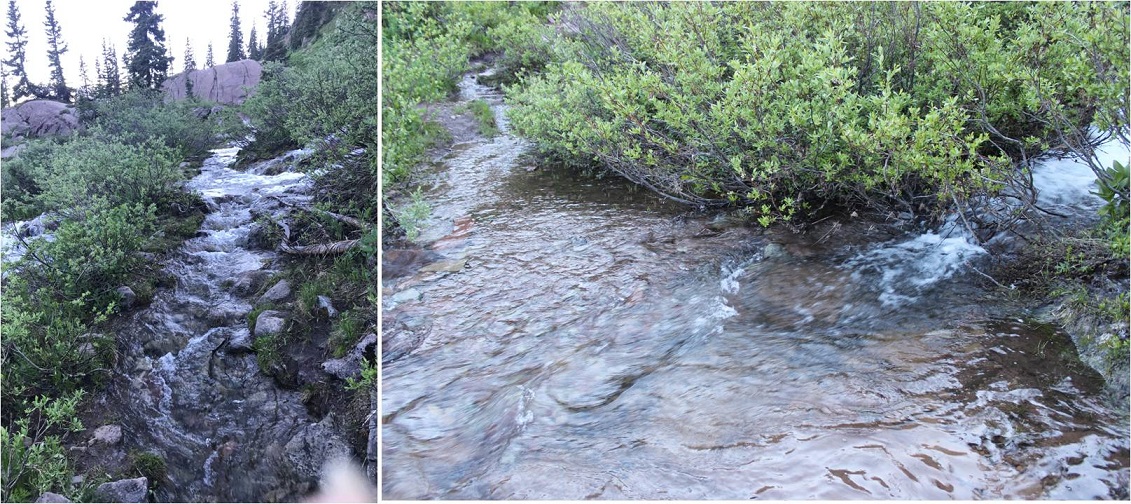
Around the 3rd mile the road became one lane and entered the canyon. I was a little skeptical about the road because I couldn’t see what was ahead of me, but I figured if I couldn’t turn around at least I’d be able to back up. Here the willows brushed both sides of the vehicle as I drove past, and the grass growing from the middle of the road made whooshing noises as it hit the underside of the vehicle.
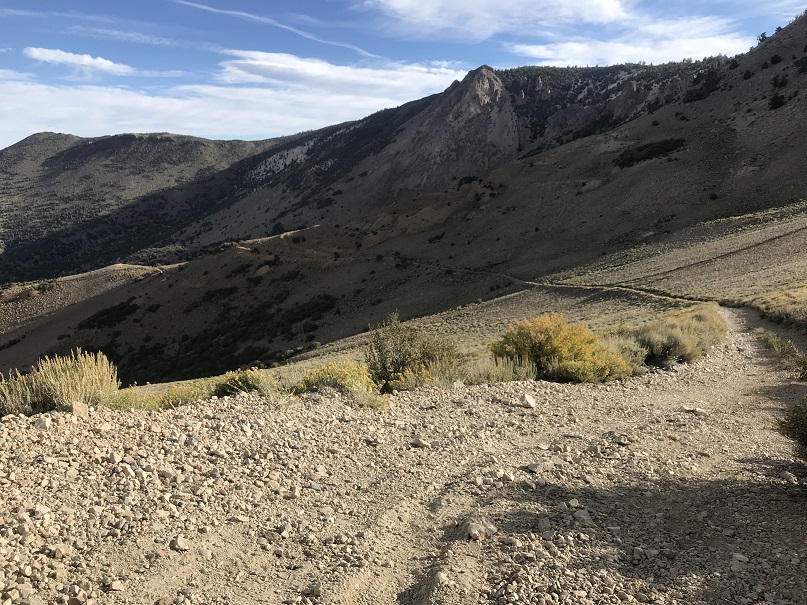
I was beginning to think I’d be able to drive all the way to the trailhead when around mile 4 I came to a roadblock: the road had washed out a little bit and with the low clearance vehicle it became too difficult to navigate. I got out of the car and walked up and looked for a fancy way around that wouldn’t require bottoming out and was unsuccessful. I was a little bummed because this section was so short and the road looked clear if I could just make it past this section about 10 yards long, but I didn’t want to get stuck and I seriously didn’t want to get stuck with paying for damages to the rental vehicle.
So I made a 10 point turn and looked for a spot to park. I was able to find a small pullout (thankfully the vehicle was small) but unfortunately it wasn’t in the shade (there wasn’t any).
I relaxed, ate my sandwich, and pulled out my altimeter: I’d parked at 8220’. I did the math and figured this would add a little over 2000’ to my hike tomorrow and 2 miles each way. I liked those numbers, but they meant I’d only be hiking Boundary Peak and not adding on Montgomery Peak (because I had a plane to catch). I really wanted to get some sleep, but it was 4pm in Nevada in September and 95* outside. I tried to lie down in the back of the Corolla in my sleeping bag but it was just too hot to sleep. Rolling down the windows just invited the flies in, so I tossed and turned for quite a bit. The last thing I remember before drifting off to sleep was seeing a red Jeep race down from the road above and pass by my vehicle. It was the only other car I saw the entire time I was there.
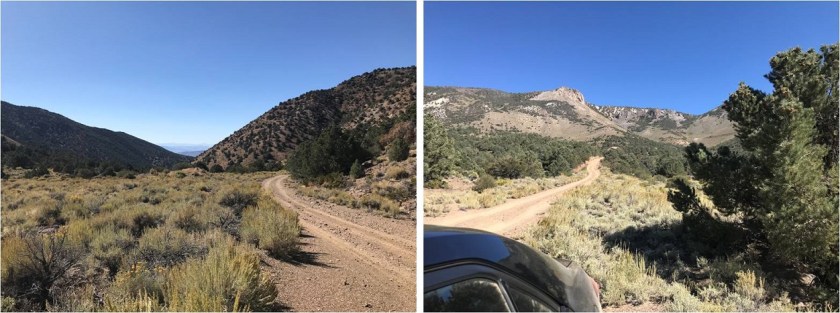
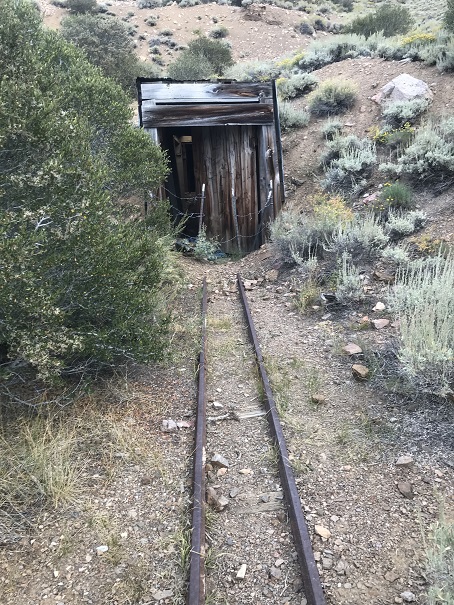
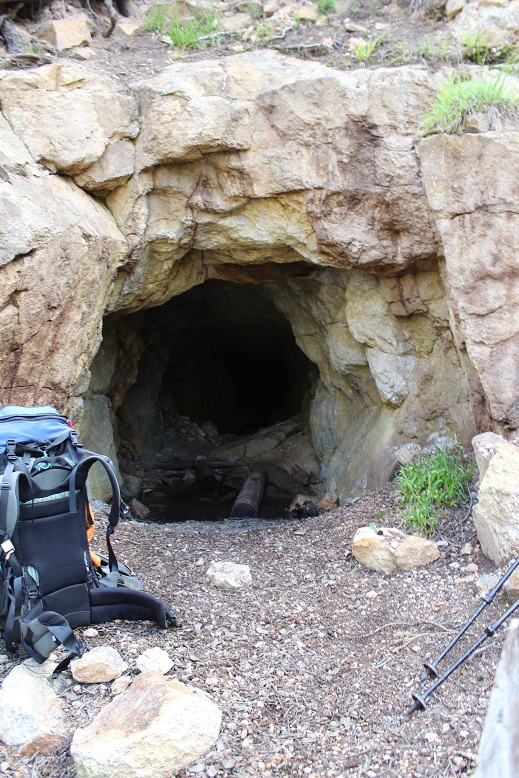
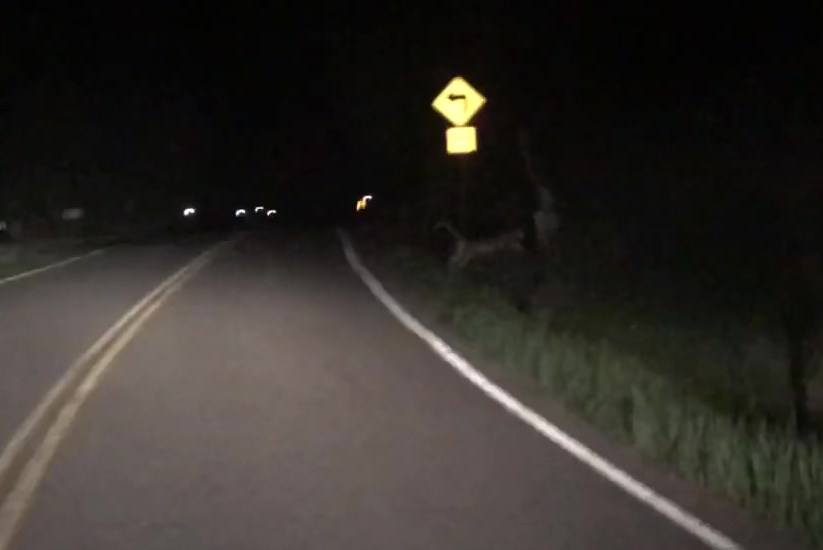
I woke up at 1:30am and was on the trail before 2am. I started up the 1N146 road, forgot to turn on my tracker, stopped, turned it on, and was on my way. The road was very easy to follow to the trailhead; just stay on it and don’t take any turns. In the dark I passed a mine (I noticed on the way back there was a light on inside and wondered at why I hadn’t seen it on my way in).
This mine is at 9010’ and provides a great place to camp before the road becomes 4WD
After the mine there’s still a mile left to go, and the road indeed becomes 4WD, although you could probably do it in a high-clearance vehicle that isn’t 4WD as well. The Corolla never would have made it.
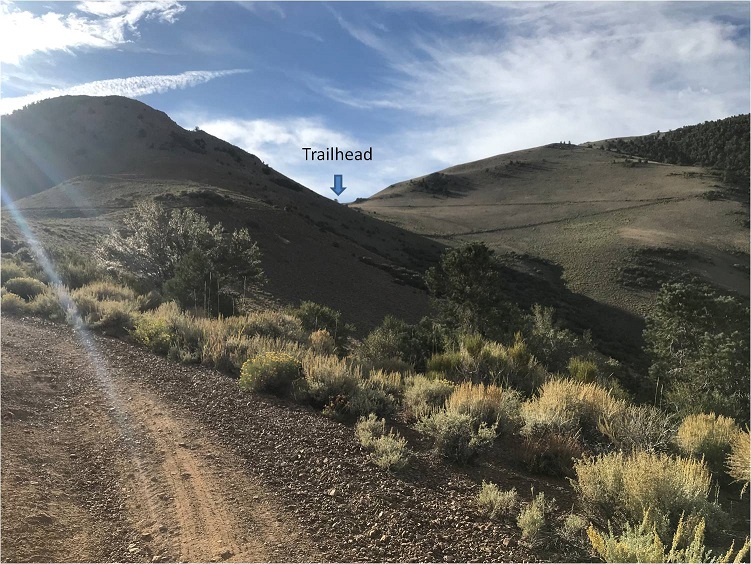
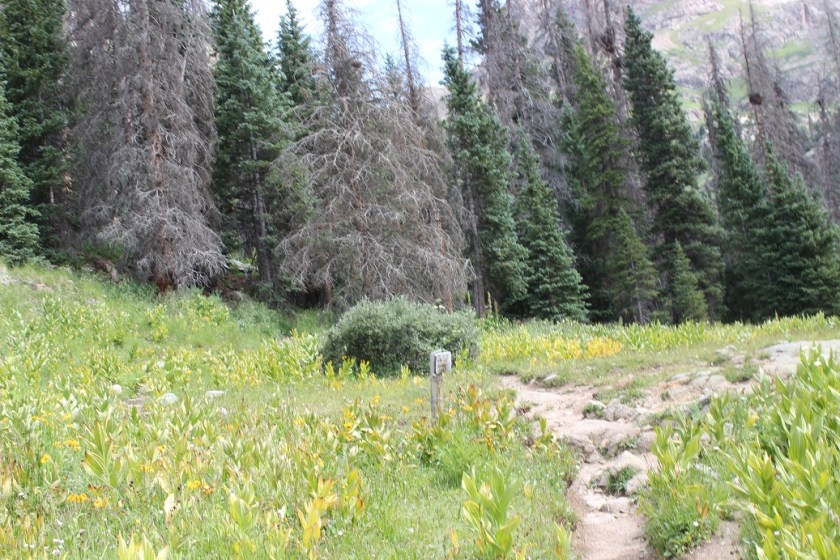
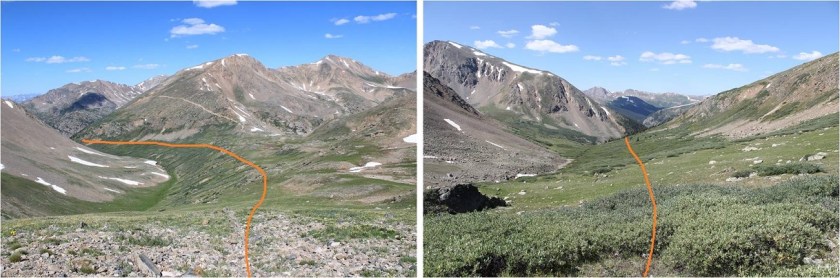
You can see how easy it is to follow the road to the trailhead
As I was walking along the road something bobbled past me and flew like an awkward cross between a bat and a bird. It landed in the grass in the middle of the road, so as I approached it I aimed my flashlight at it to get a closer look. It looked up at me with a round face and large, yellow eyes. It was a fledgling burrowing owl. “Oh! You’re a baby!” I said to the owl. It hopped twice, jumped about 6 feet in the air, and once again awkwardly and silently glided into the brush on the other side of the road. That had been a fun encounter!
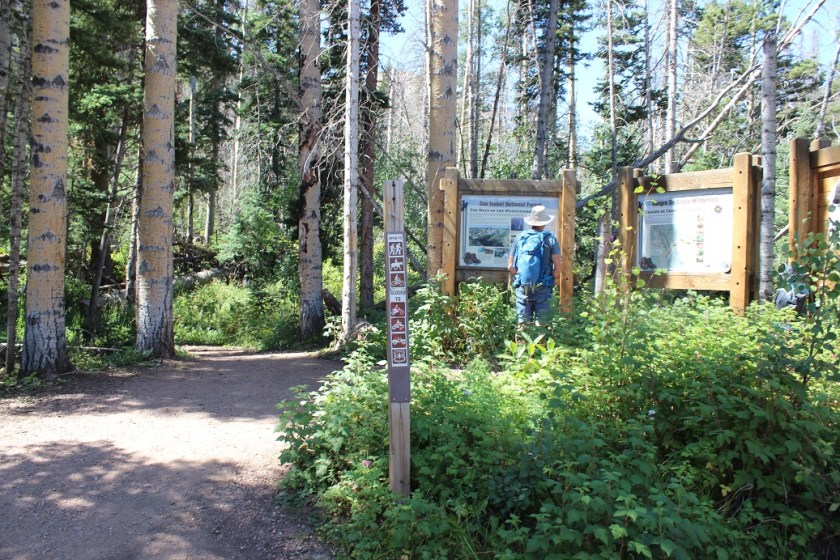
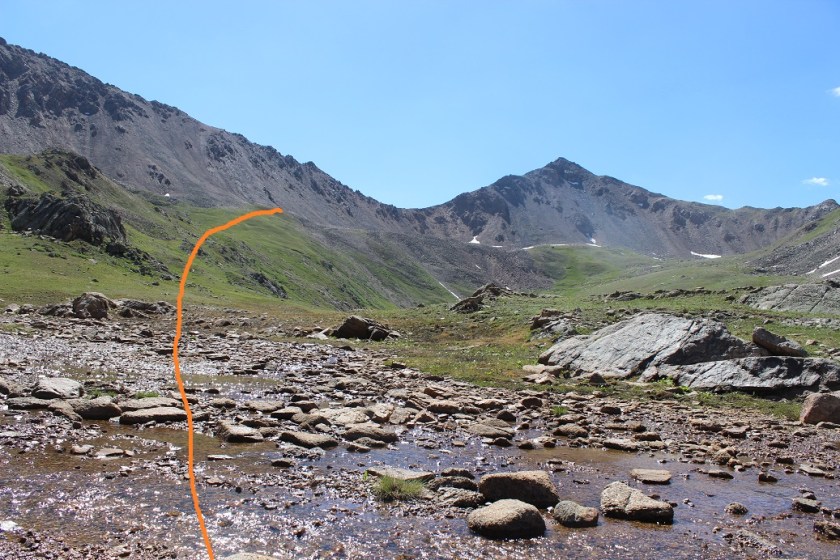
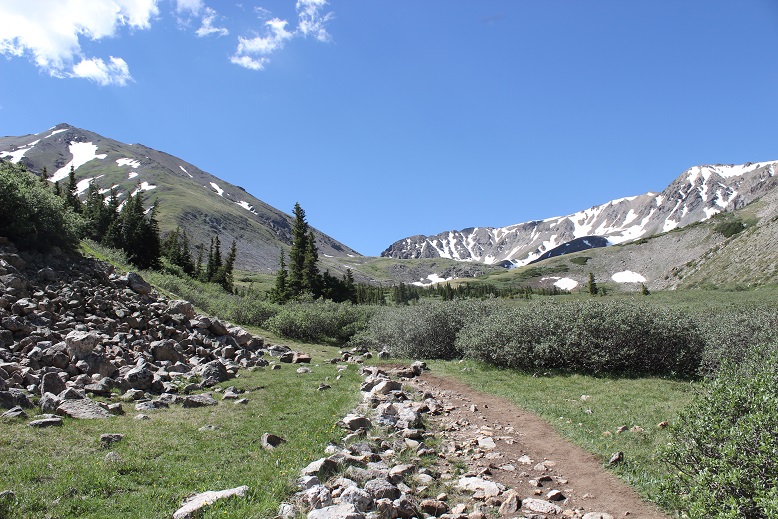
The trail starts at the right (south side) of the saddle around 10,000’.
As I made it here I thought to myself “I should have brought my bivy with me”. It doesn’t weigh that much and it would have been a great idea to have hiked up here last night, slept, and started the trail from here. Oh well, next time I’ll add it to my pack on trips like this because it only weighs 1 pound.
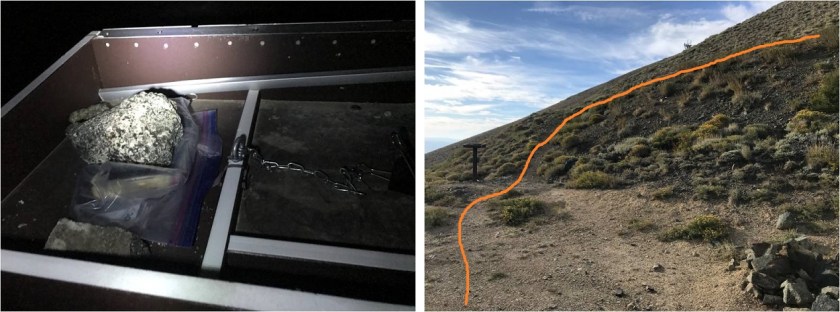
I followed the trail a short distance to a trail register that was lacking a lid, arriving at 3:55am. I signed the register, replaced it in the ziplock bag and was off.
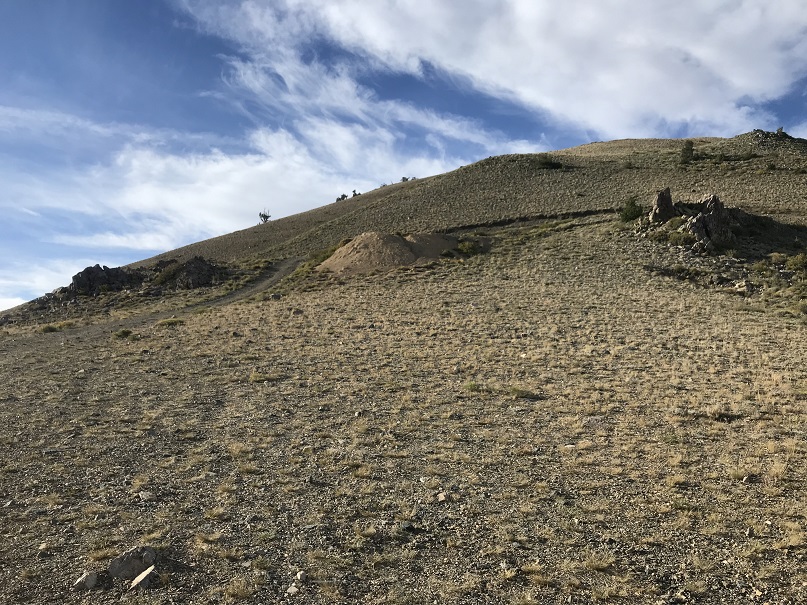
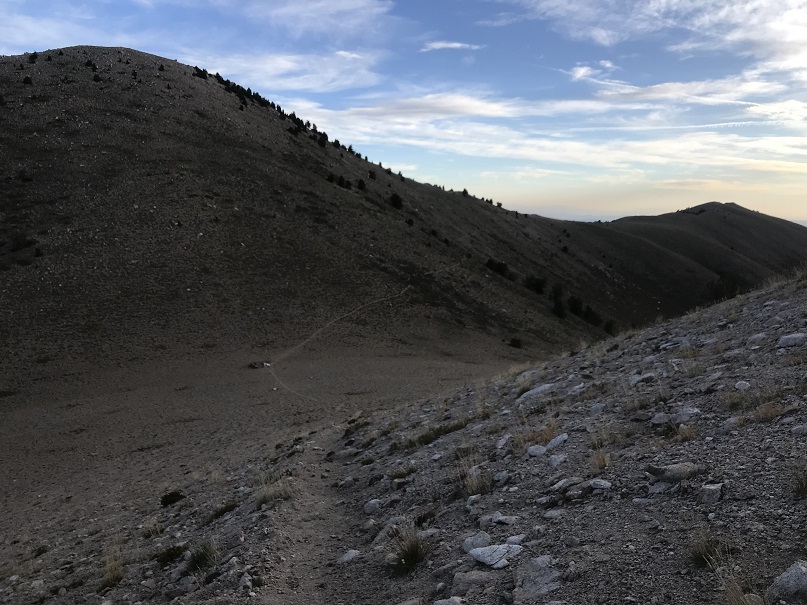
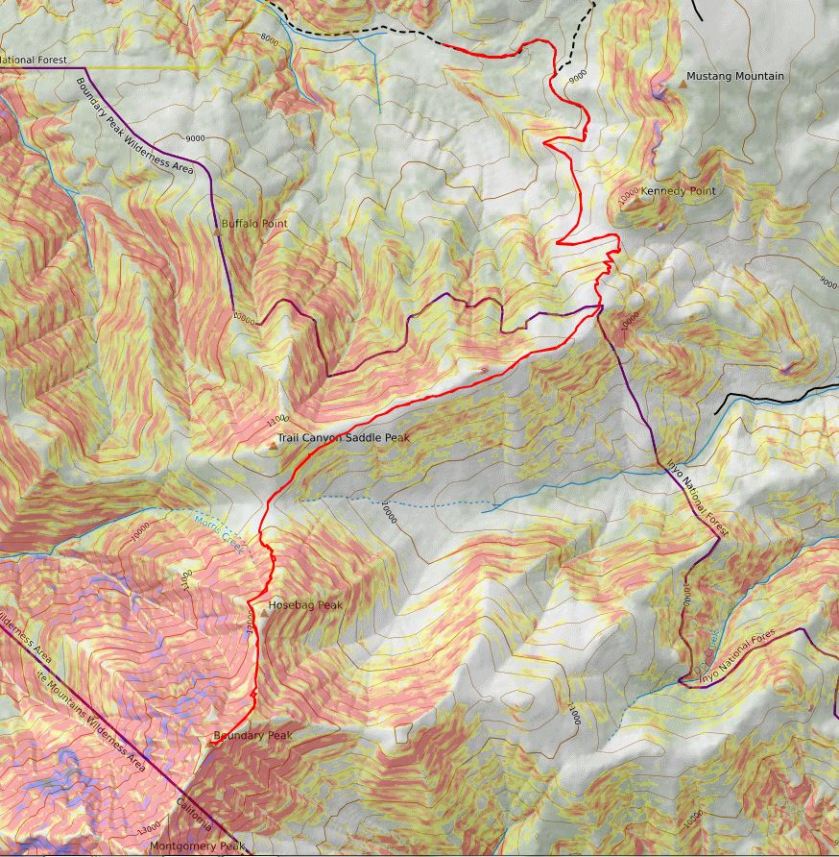
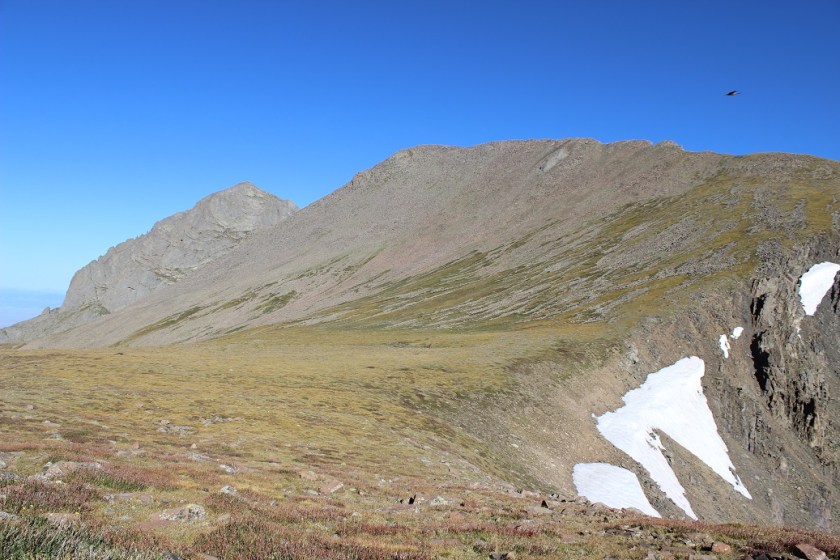
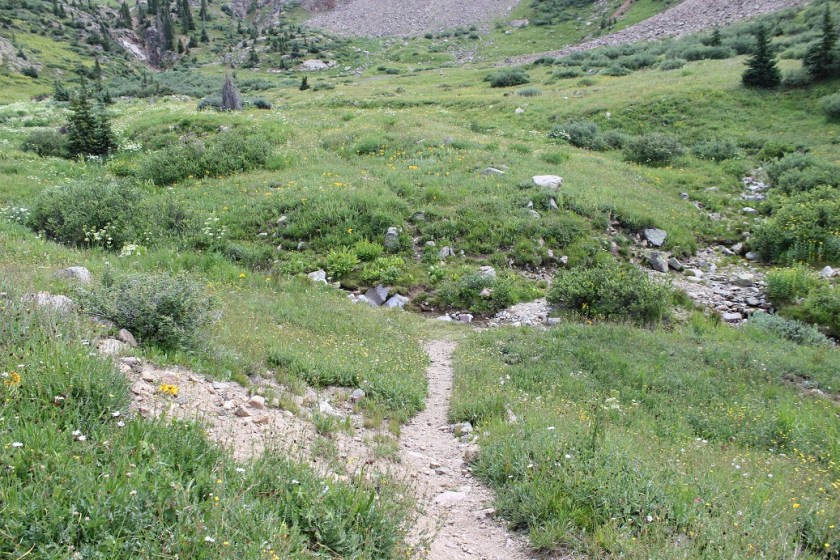
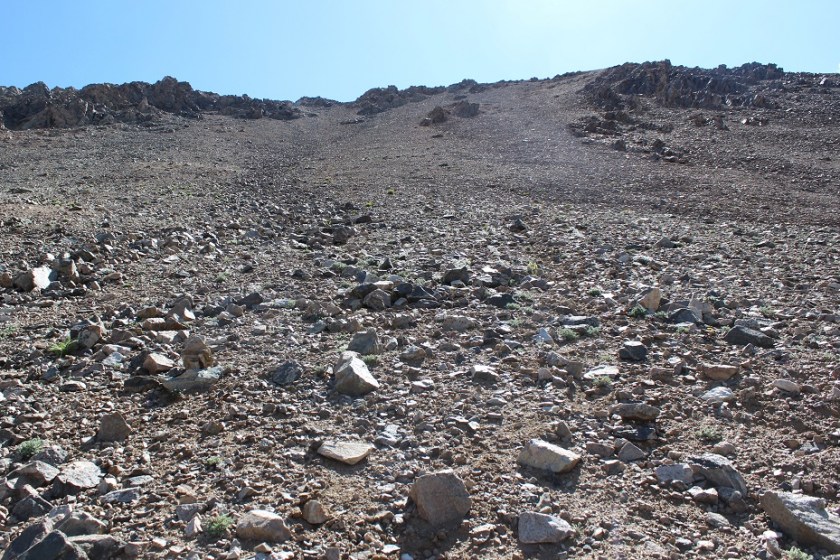
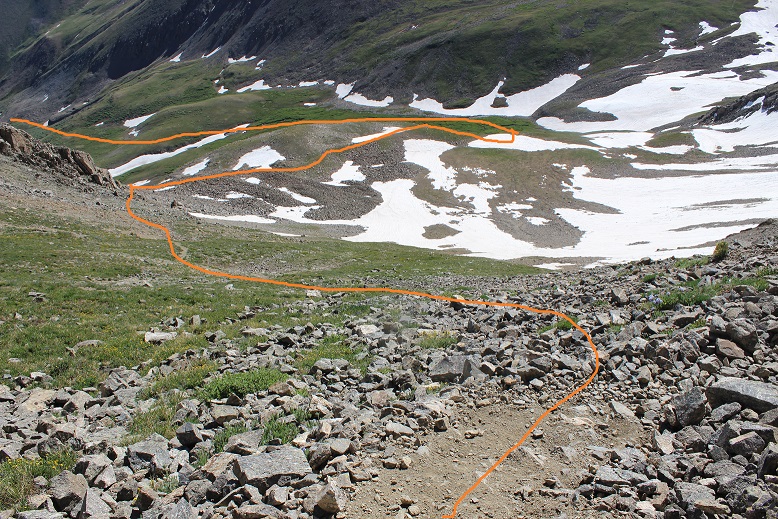
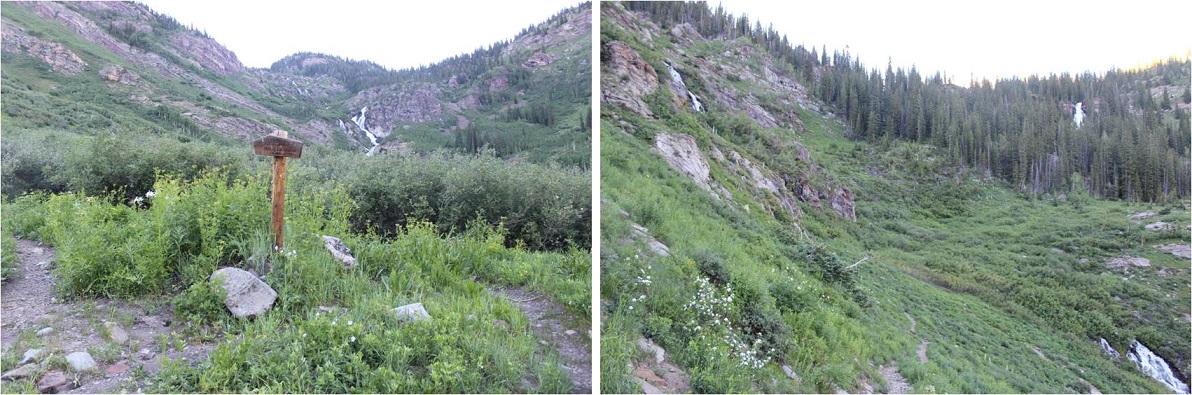
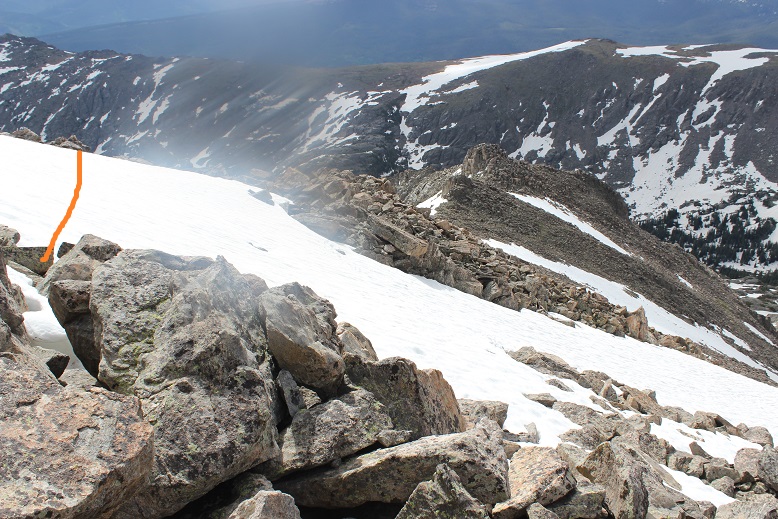
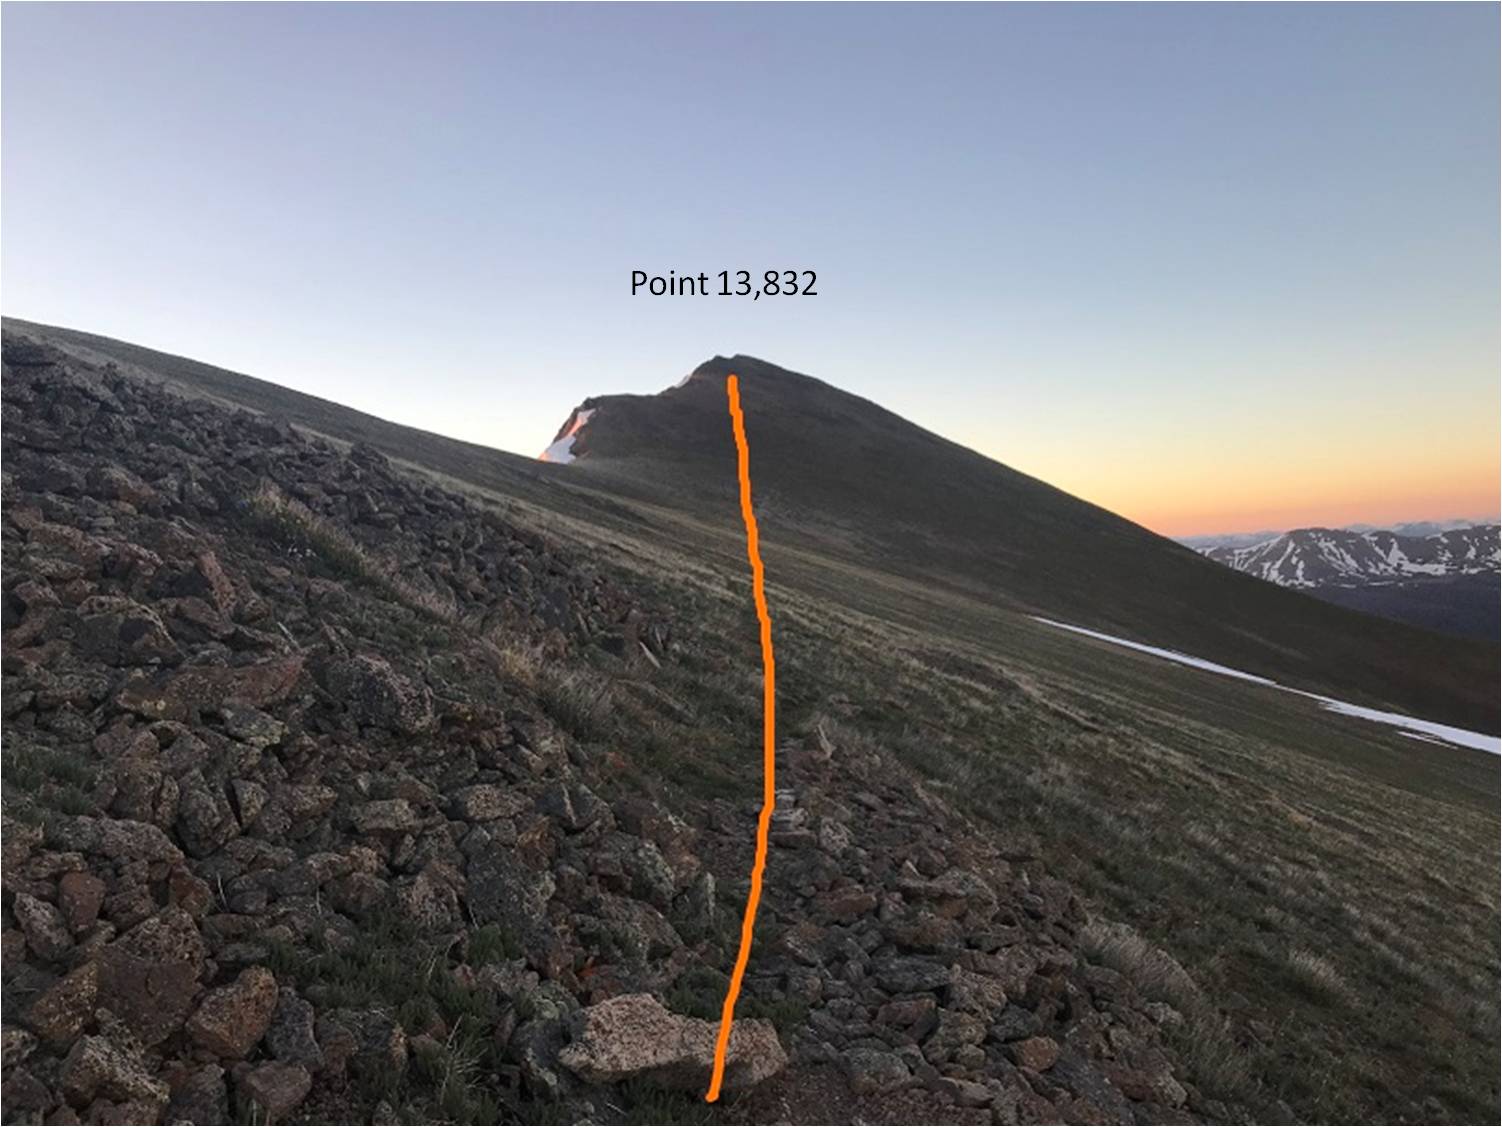
The trail begins with about 1000’ of elevation gain as it heads south and switchbacks easily up the hillside
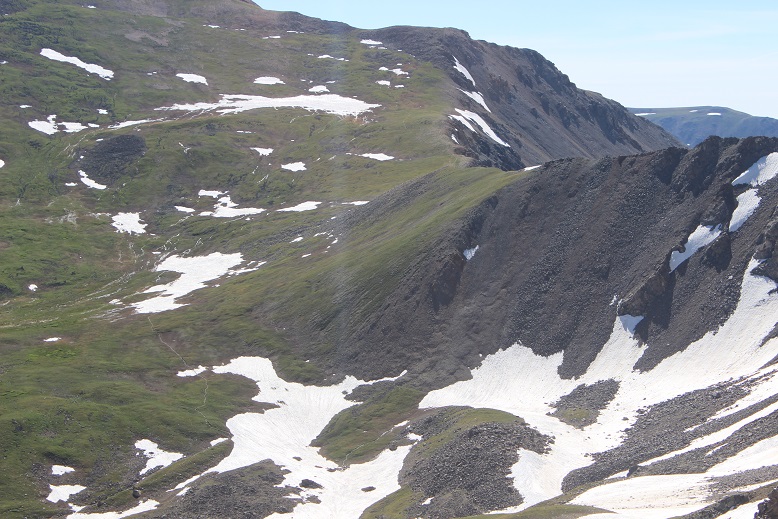
From the top of the hillside it’s a little disappointing as you then spend the next mile and a half losing 300’ in elevation, aiming for the saddle between Trail Canyon Saddle Peak and Boundary Peak.
Here I started seeing horse manure, and quite a bit of it. Initially I thought how crazy someone must be to take a horse up at this elevation, but then I noticed there was a lot of it off trail as well and figured there must be wild horses in the area.
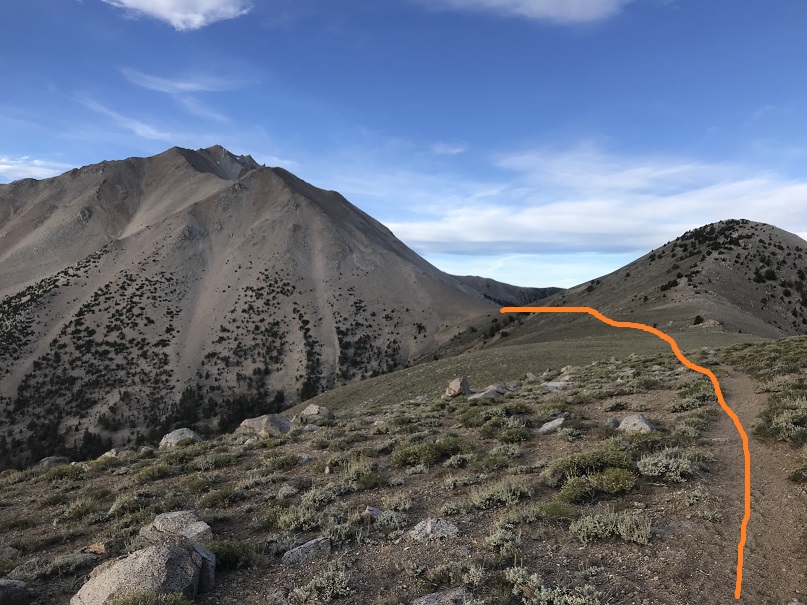
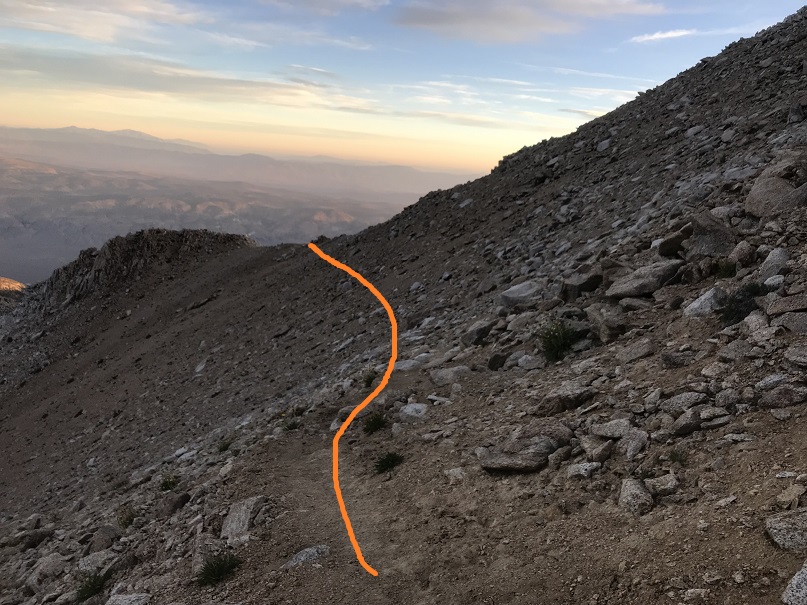
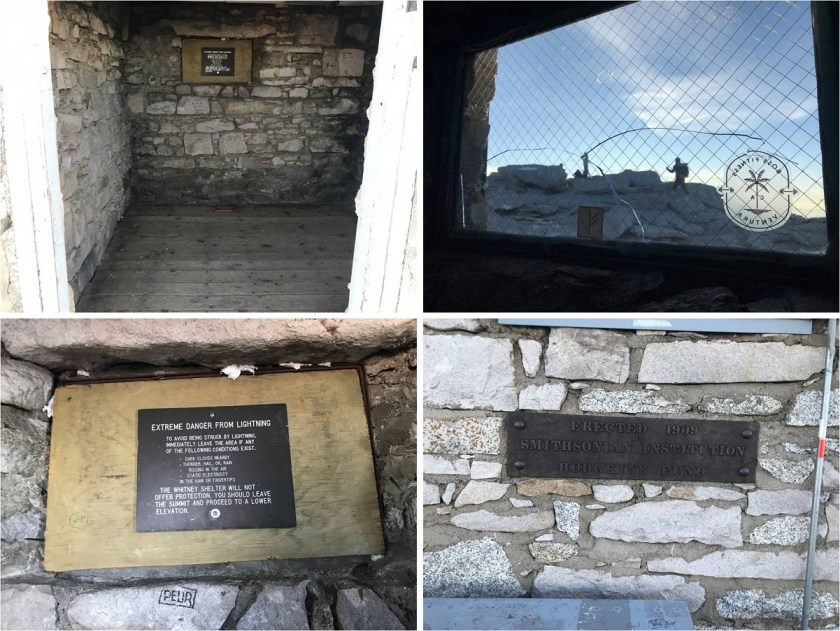
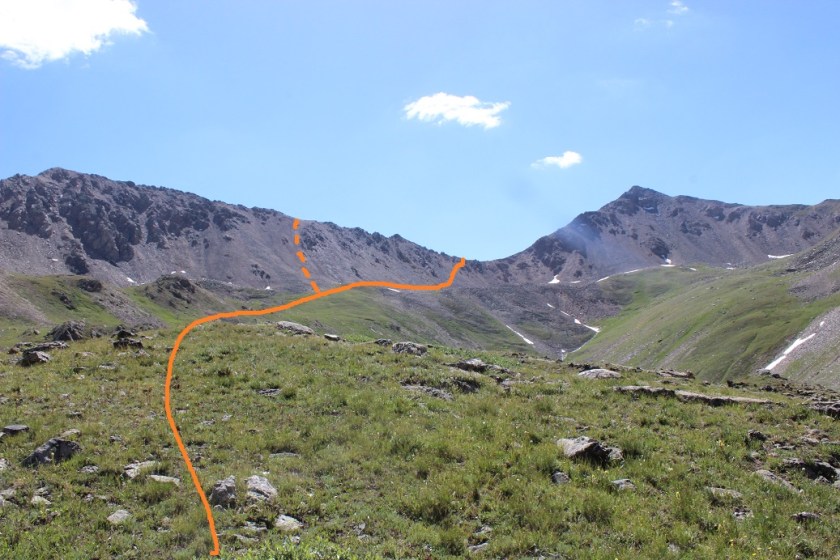
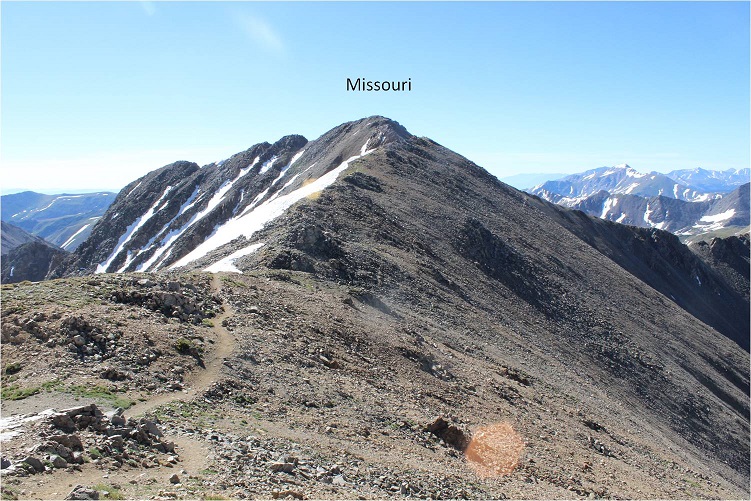
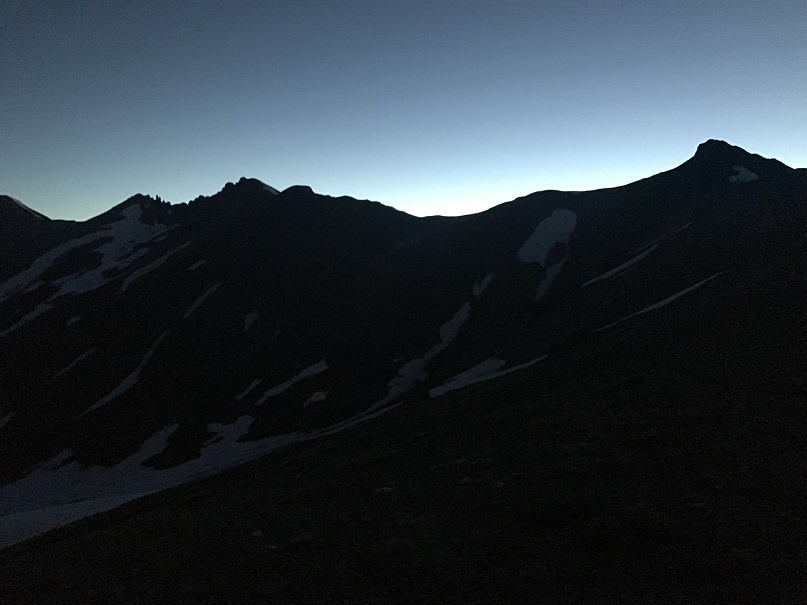
Once at the saddle there’s a cool wind shelter made out of bristlecone pine and rocks and an obvious trail that goes up the mountain.
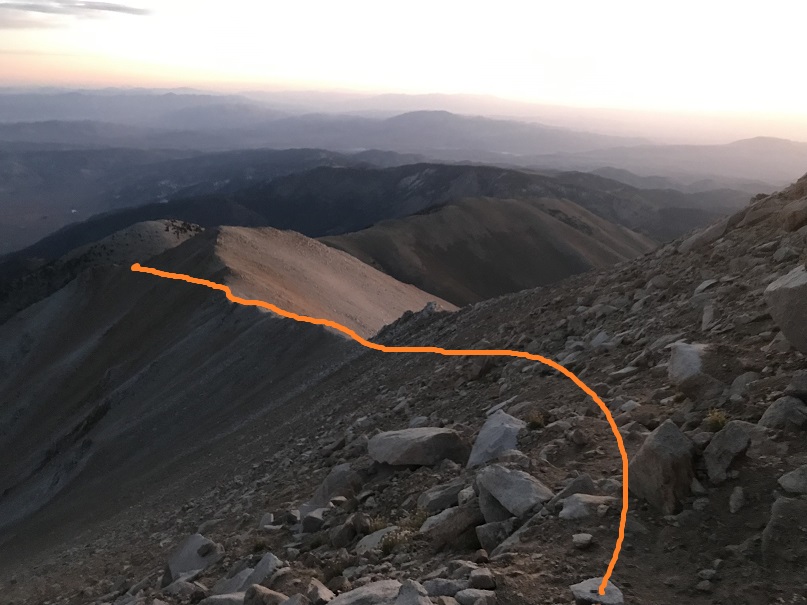
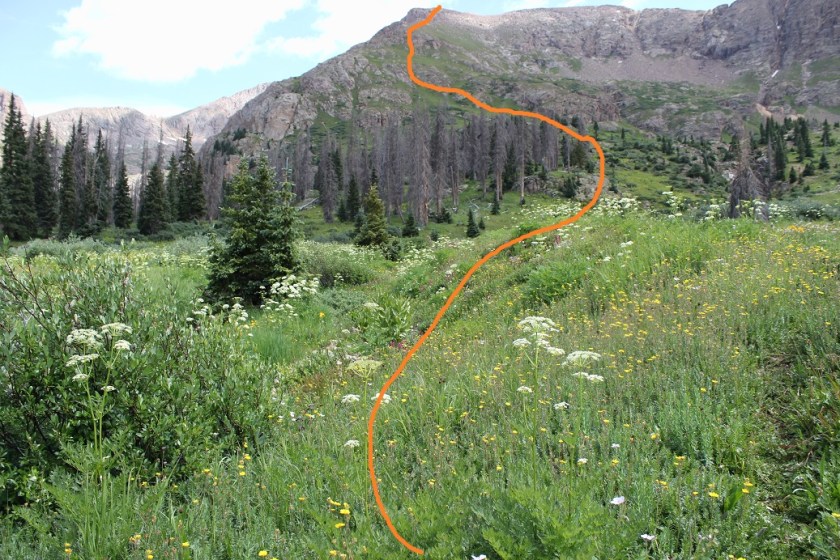
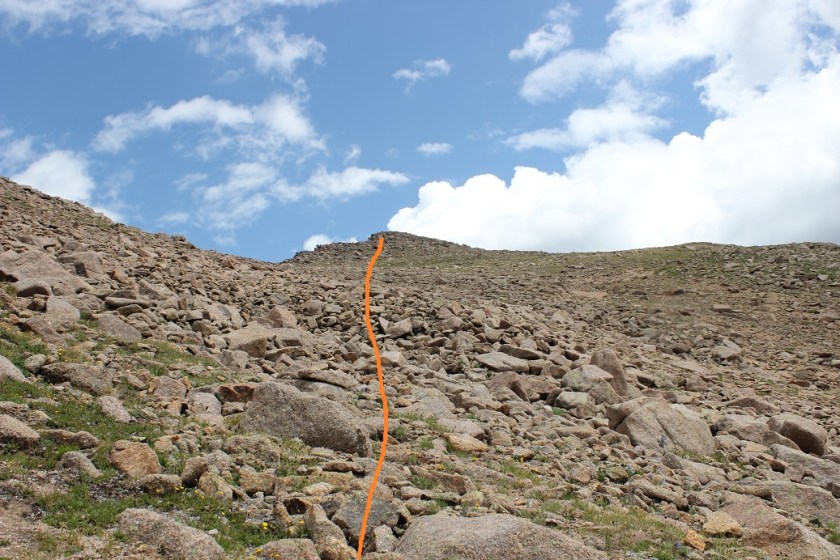
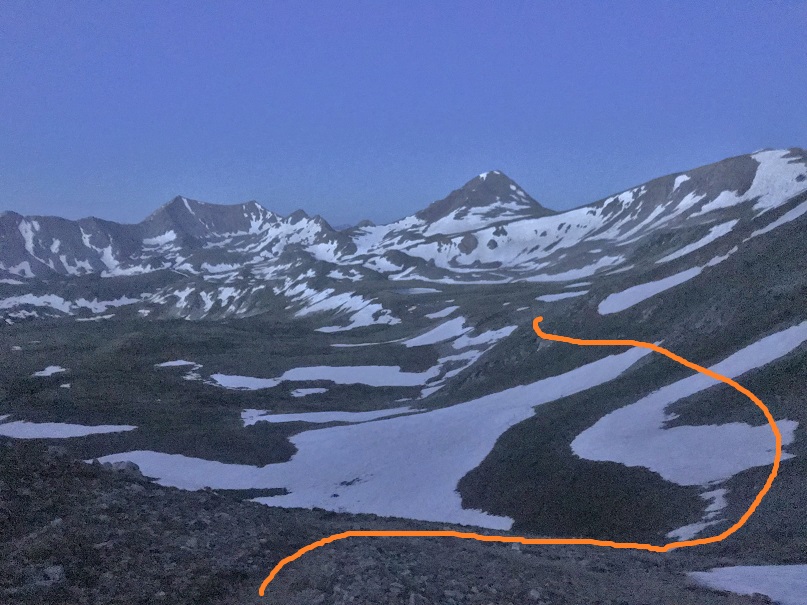
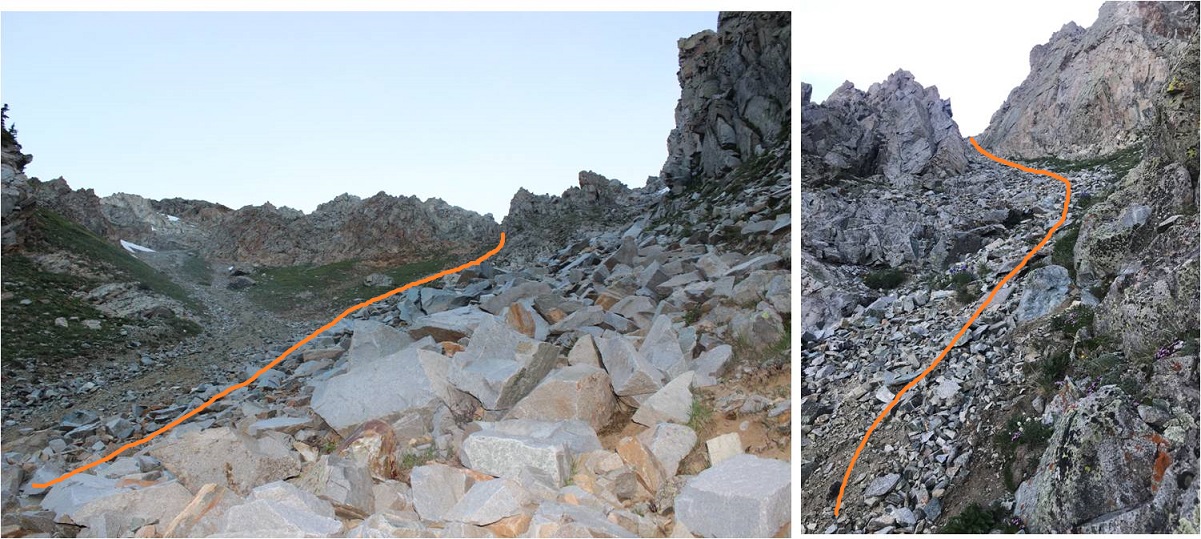
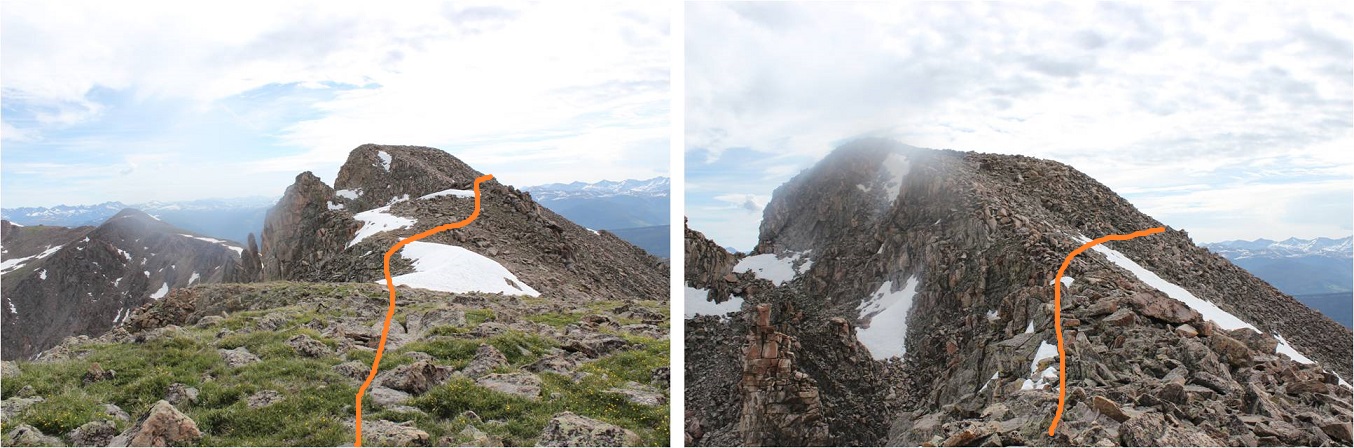
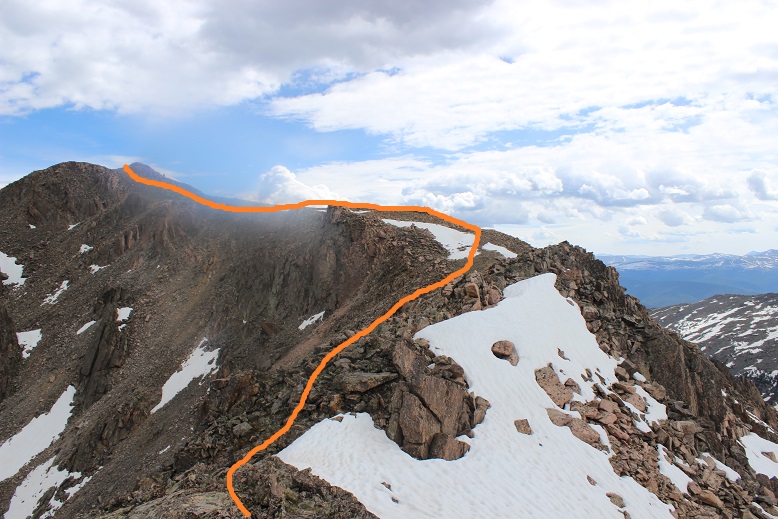
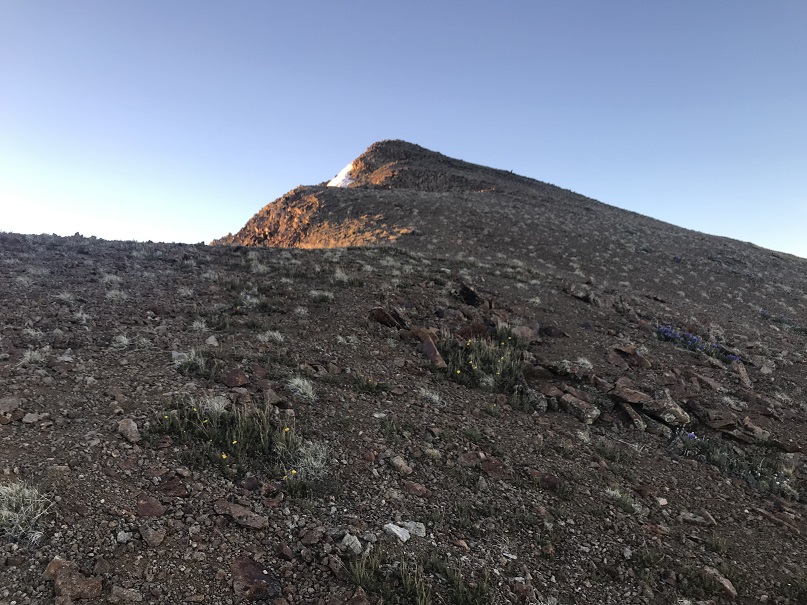
This is the path the trail takes. It’s obvious in the daylight, but in the dark there were a lot of social trails and I kept getting off trail, yet stayed pretty much on course
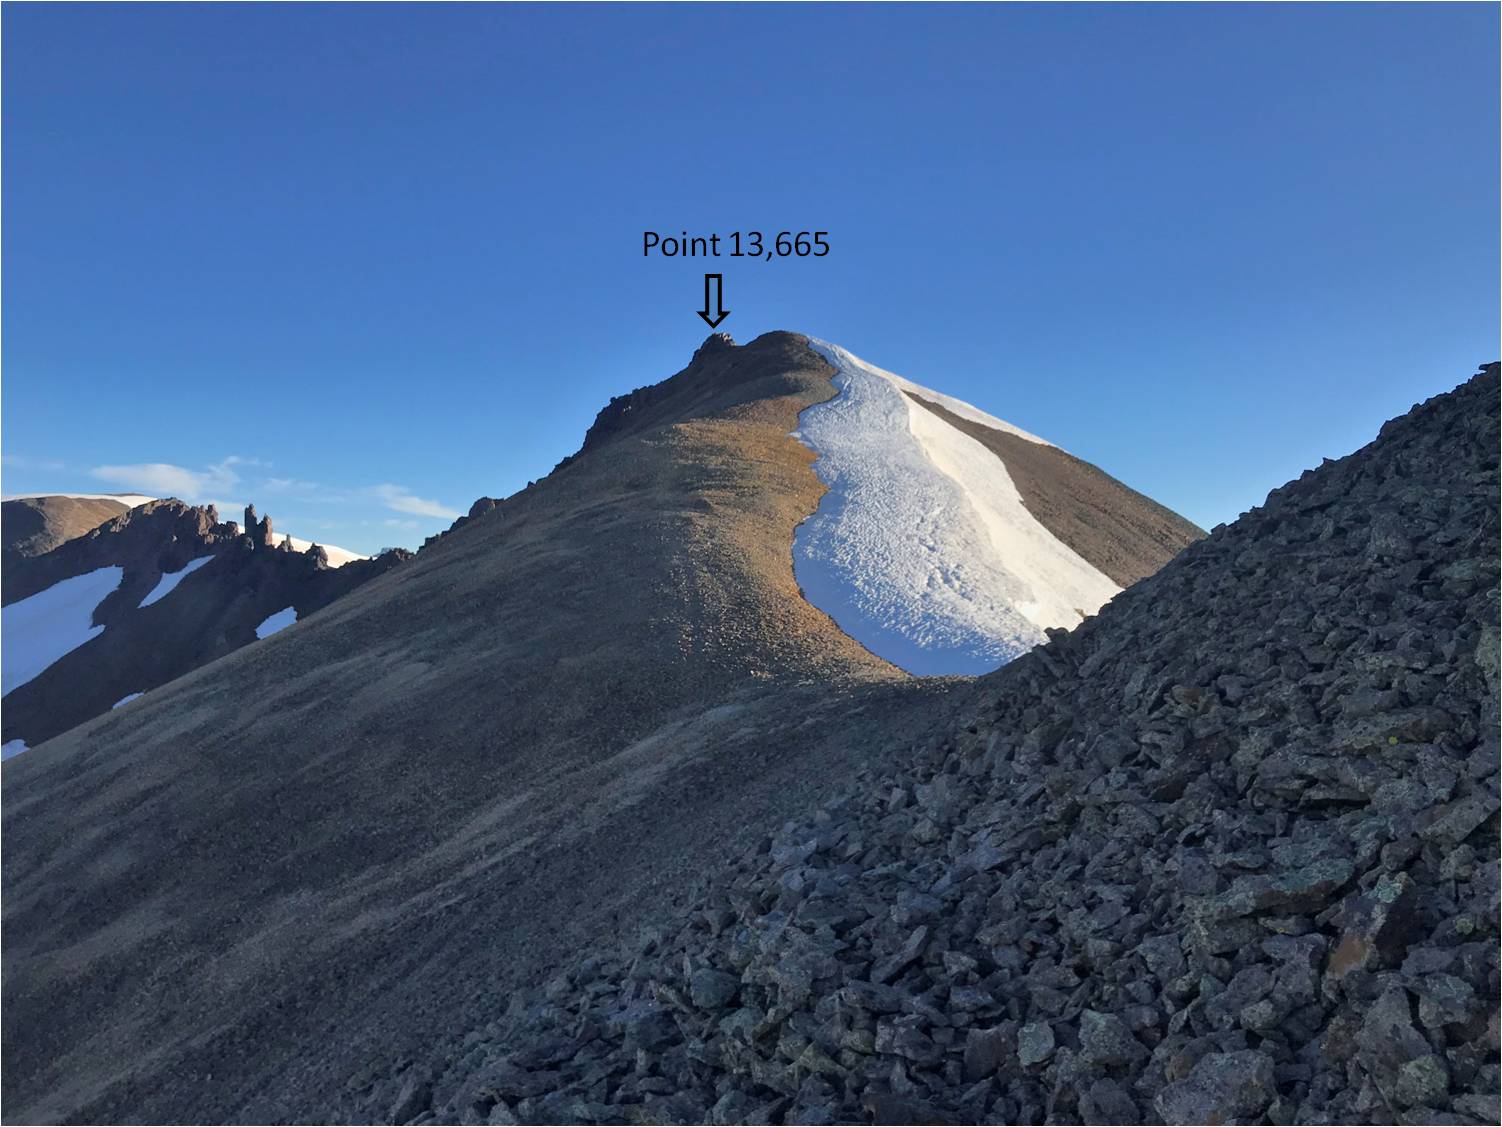
Oh, and the top of this hill is NOT Boundary Peak.
Around this time is when my tooth started hurting again. I took some ibuprofen and thought to myself “well, isn’t this fun?”
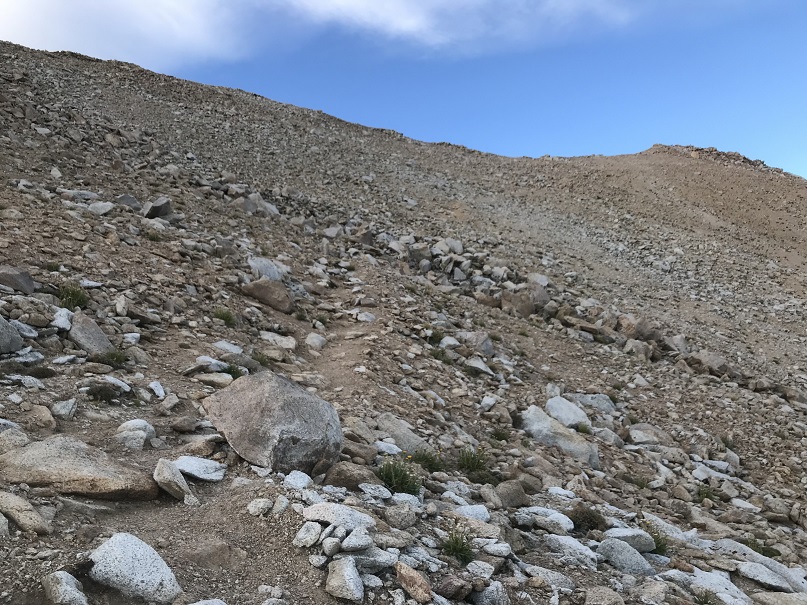
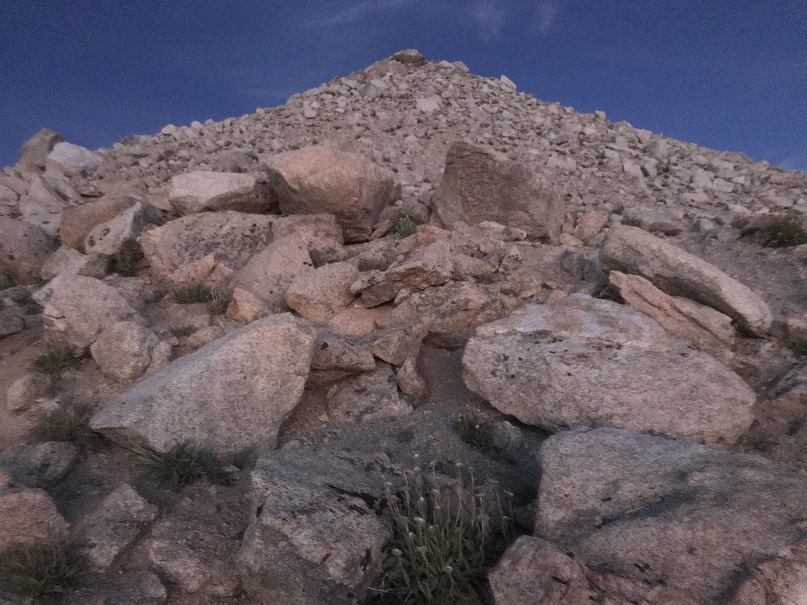
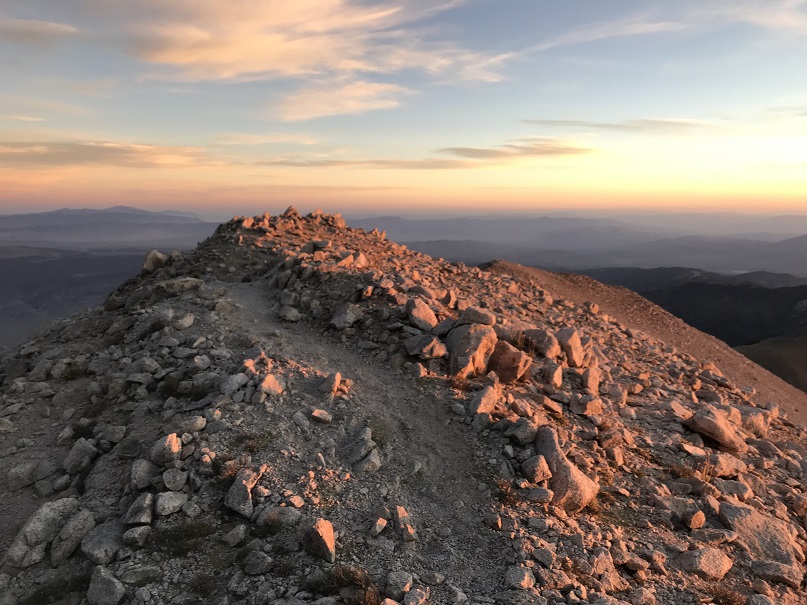
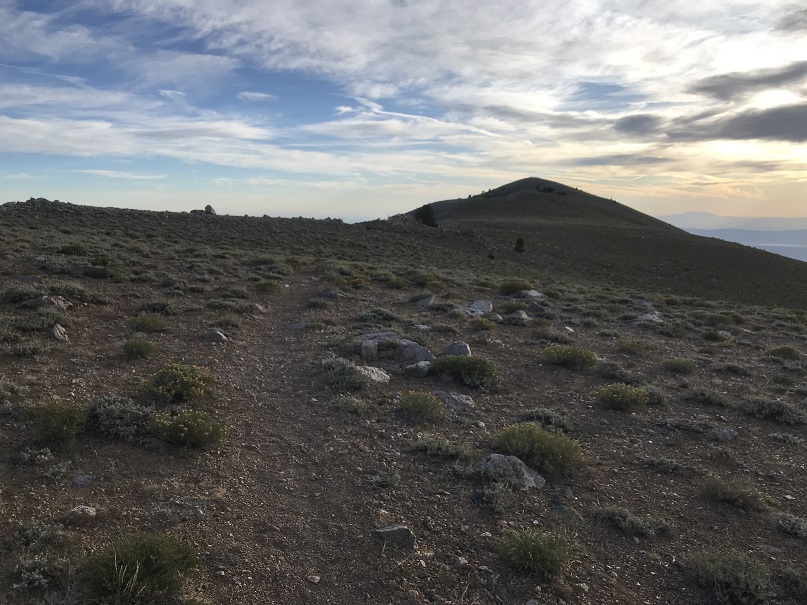
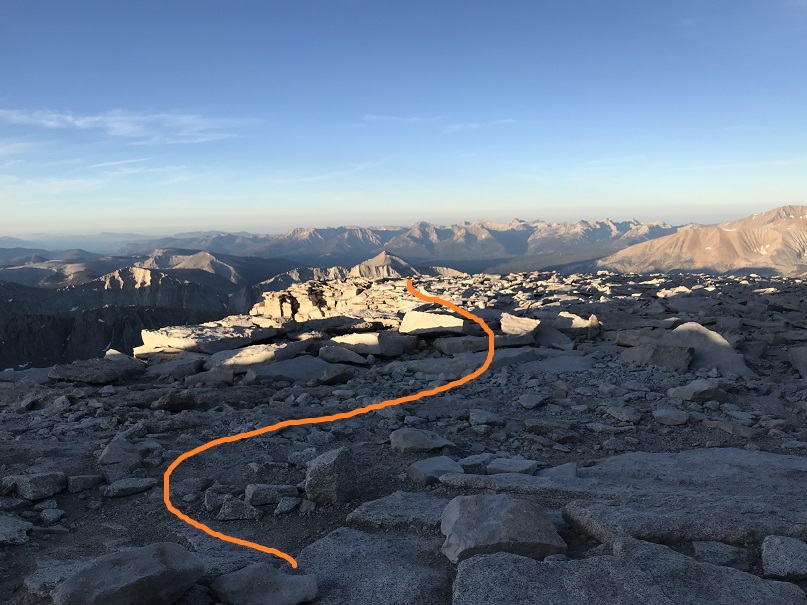
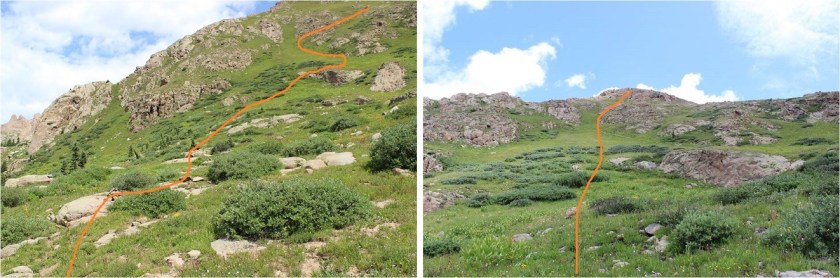
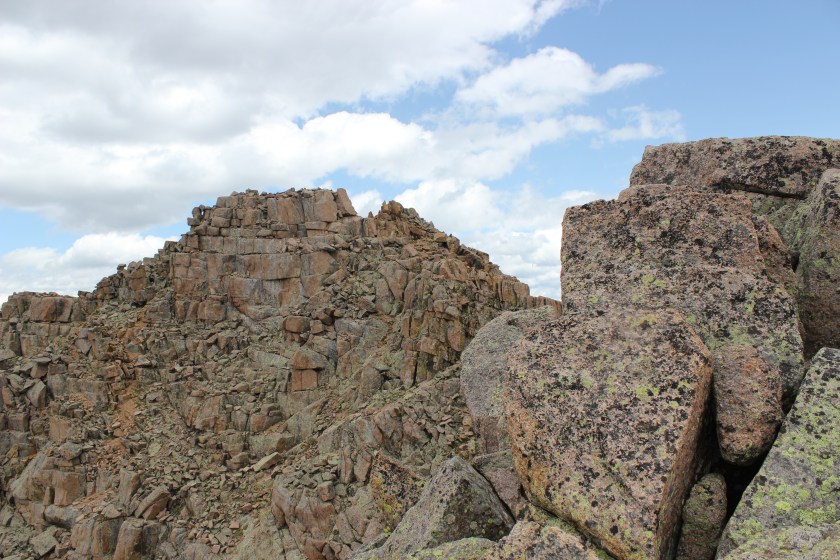
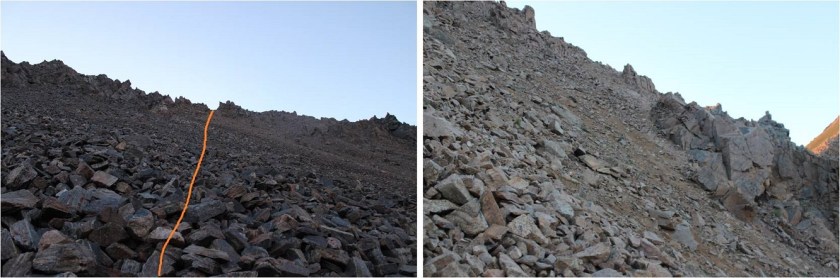
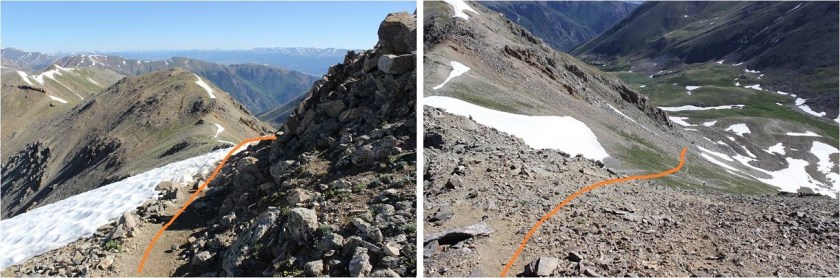
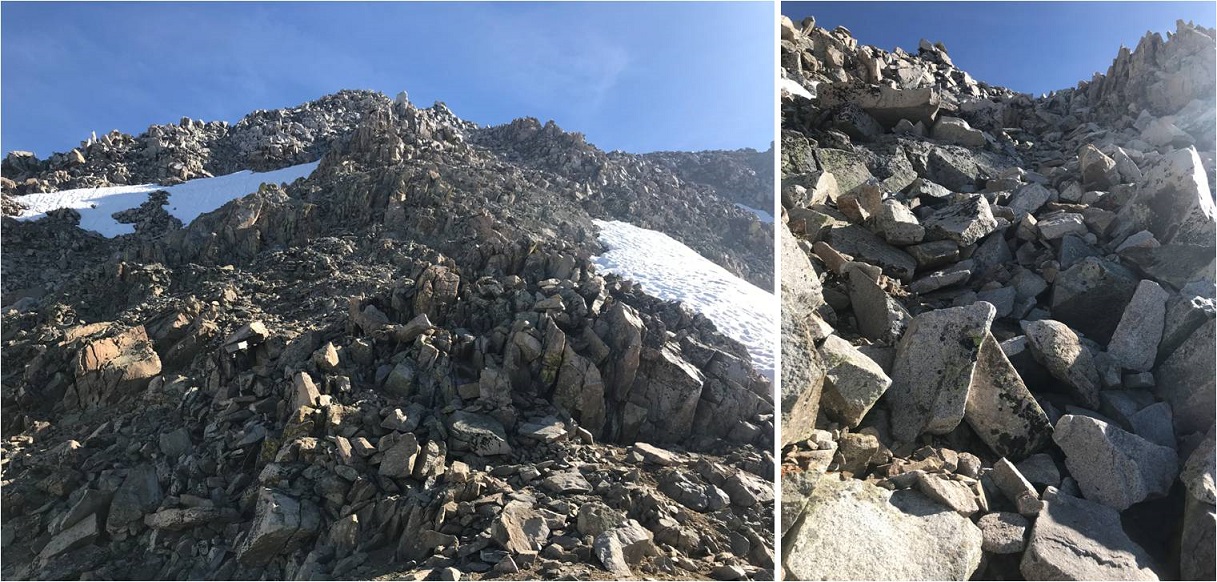
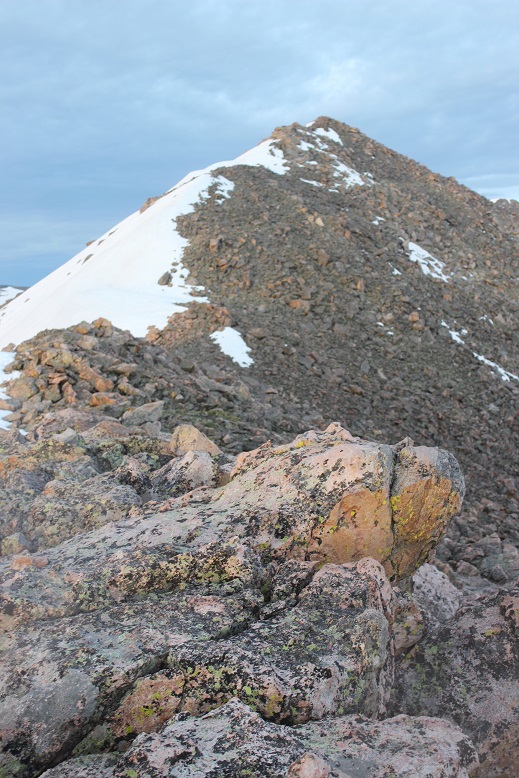
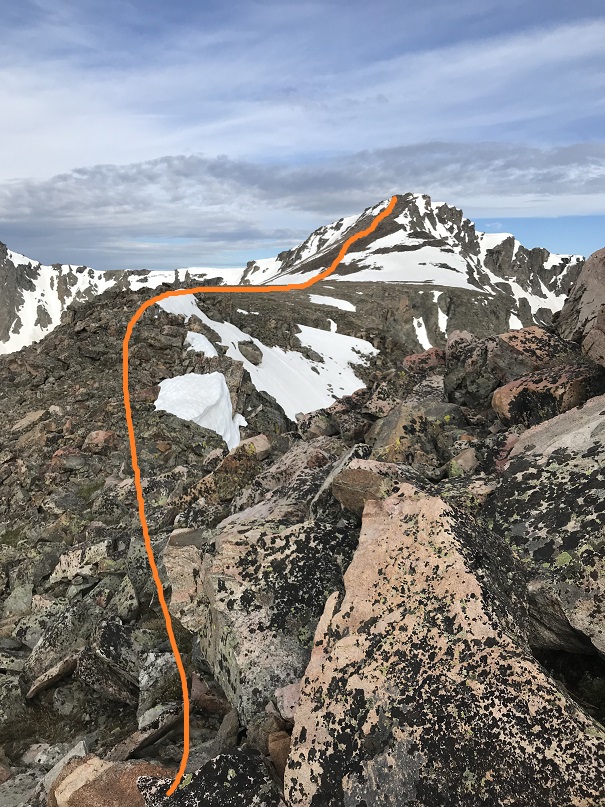
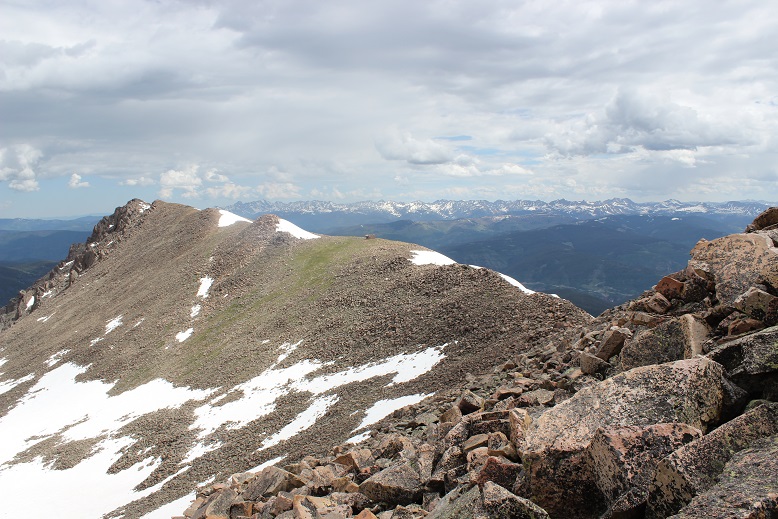
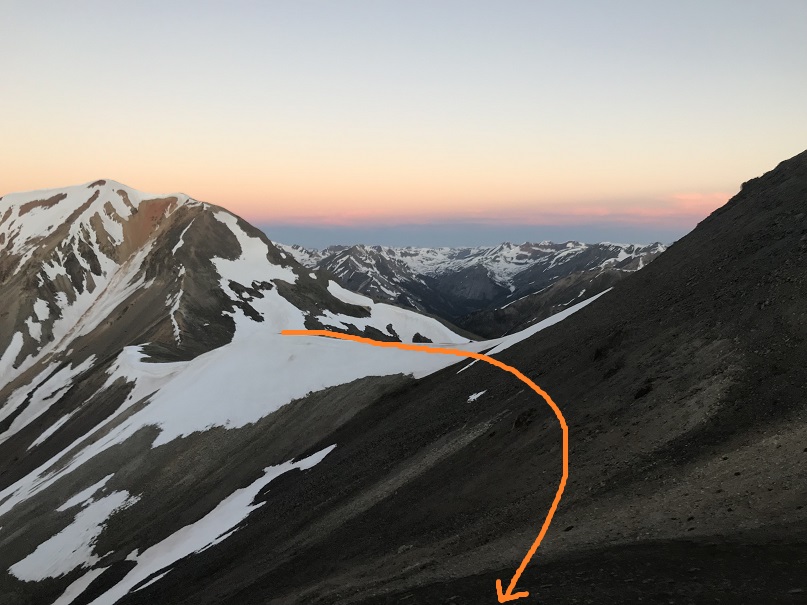
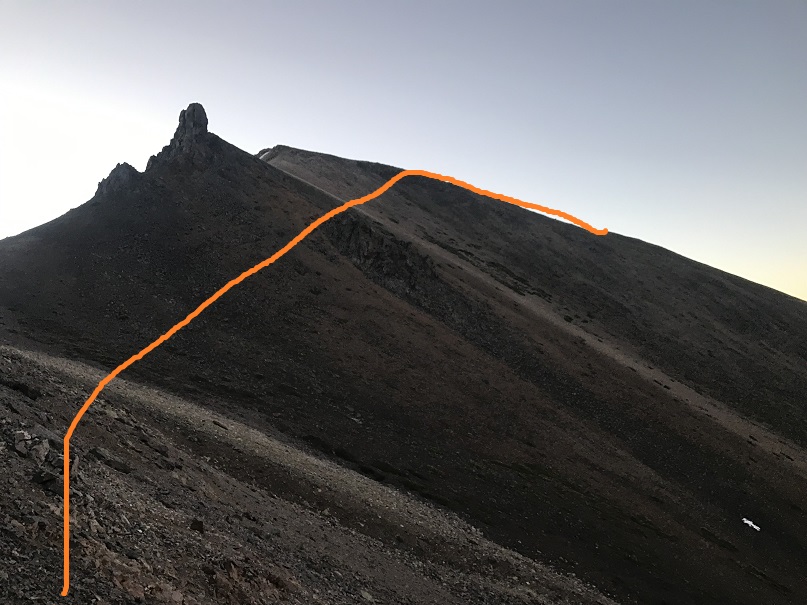
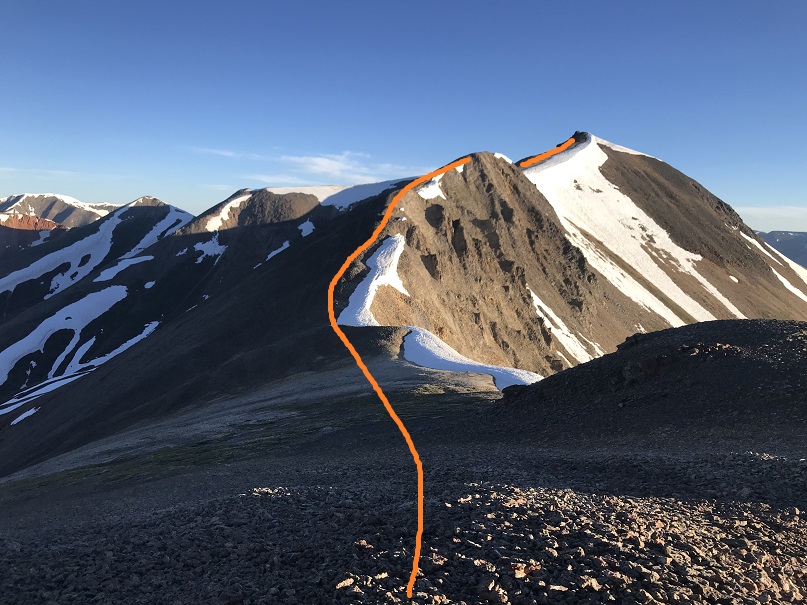
Once you reach the top this is the path before you
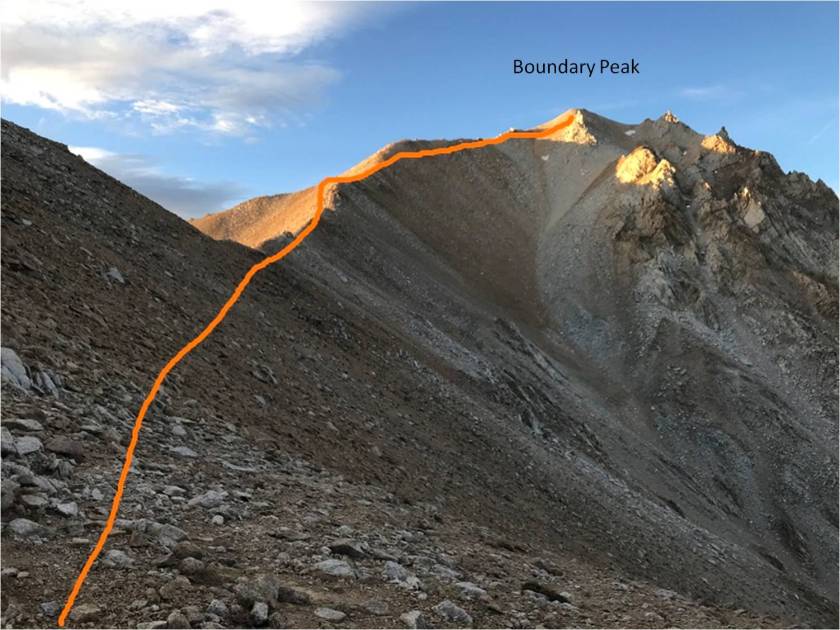
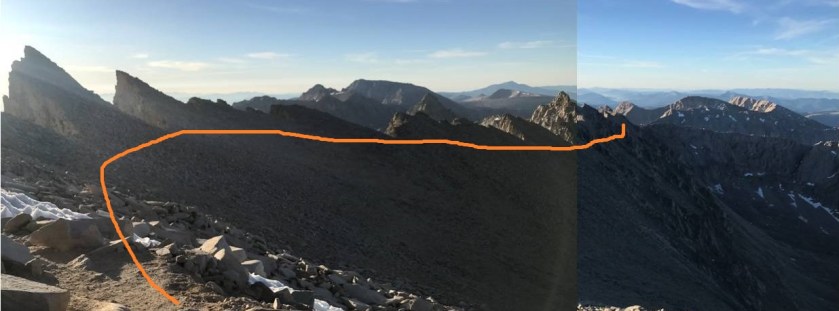
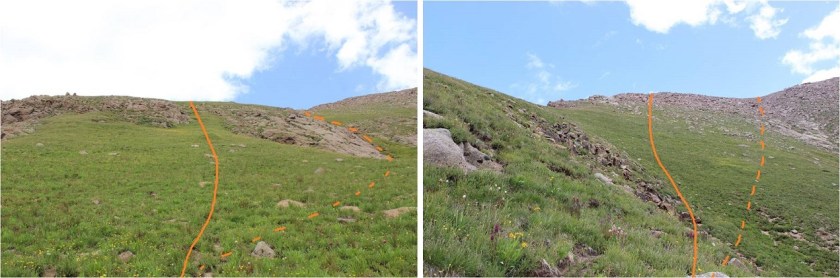
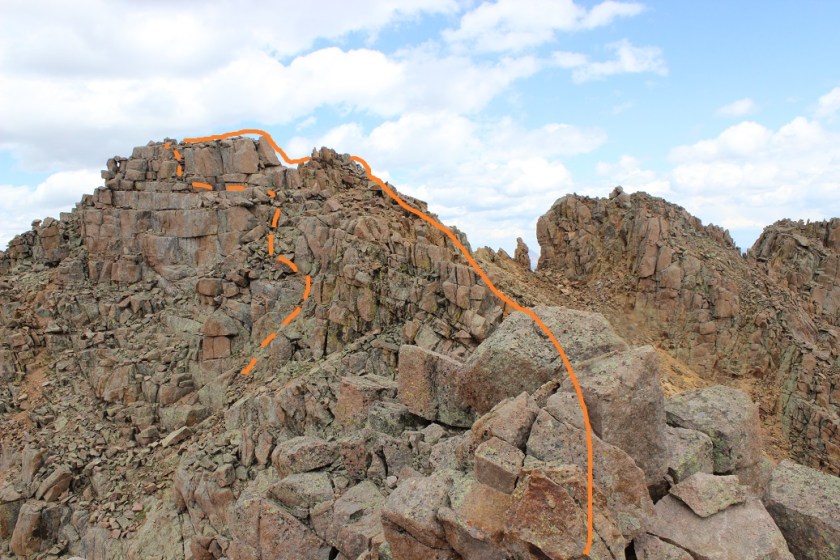
The trail splits a lot in places, but basically follows the ridge to Boundary Peak. It doesn’t matter which path you follow, they all stay at class 2 or below. This is the path I took
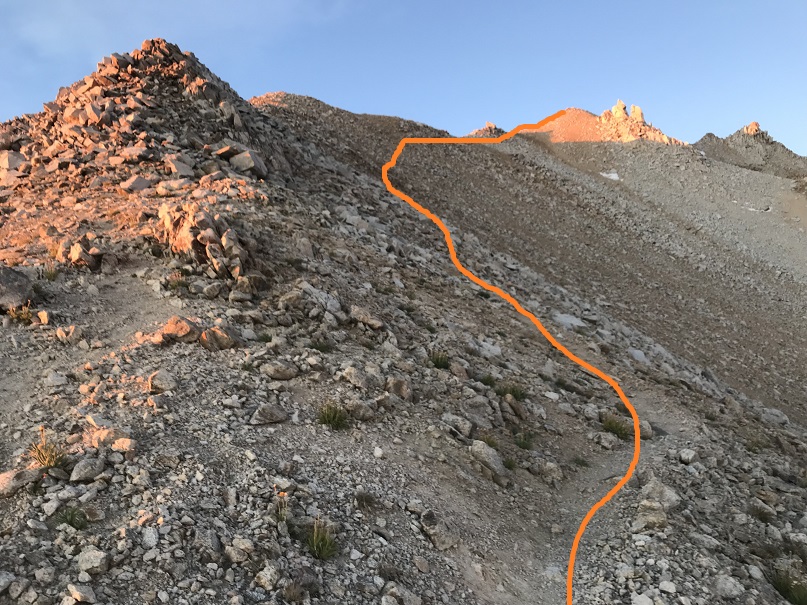
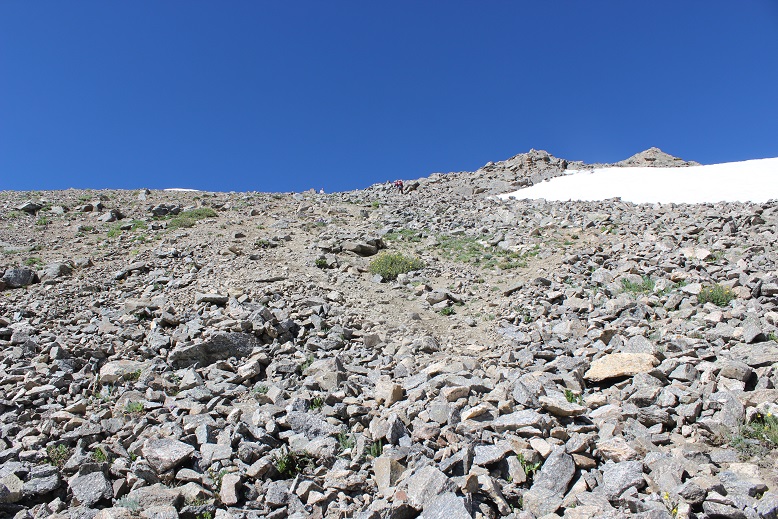
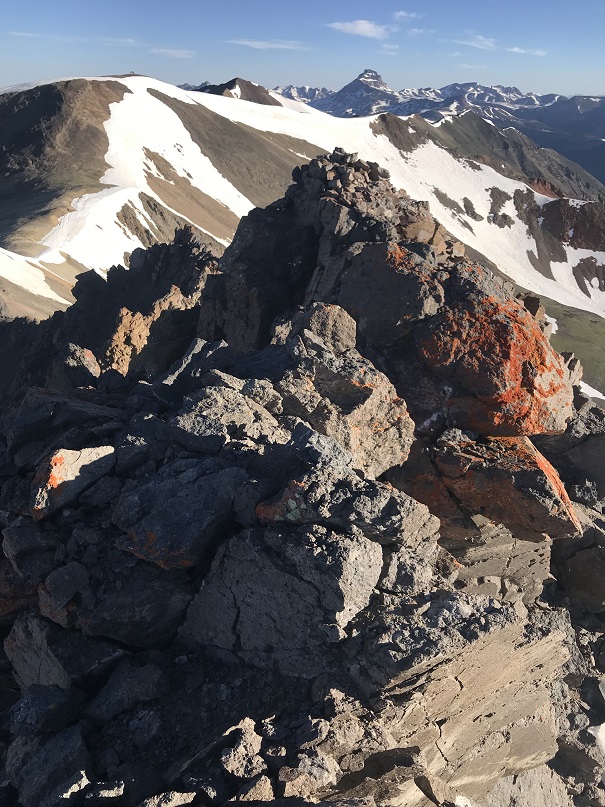
The last little bit to the summit has larger rocks but still stays at class 2
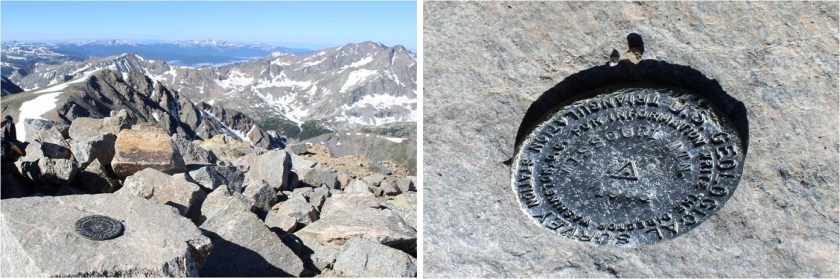
I summited at 6:45am, and the sun still hadn’t risen. My glasses are on to hide the crows feet…
Boundary Peak Summit:
It was very cold at the summit, and since I still didn’t have my new camera I had to keep taking off my gloves to get pictures on my iPhone: my hands were freezing! I took a few pictures and (again) actually signed the summit register. I figured I should eat something so I got out some dried mangoes, took one bite and felt the most intense dental pain I’ve ever felt in my life! Oh no! This was NOT good! Tears came to my eyes and I decided right then and there I was going to see a dentist as soon as I got home.
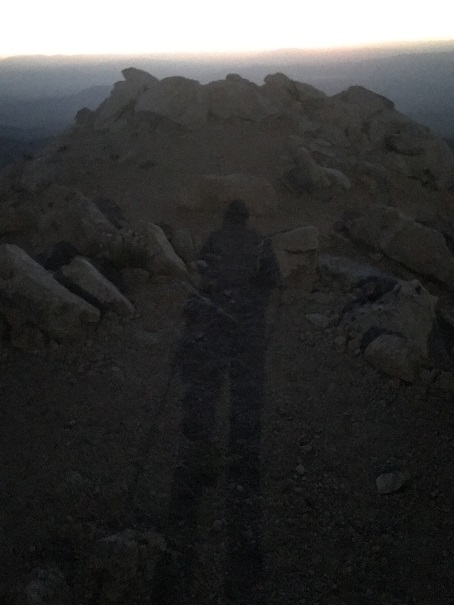
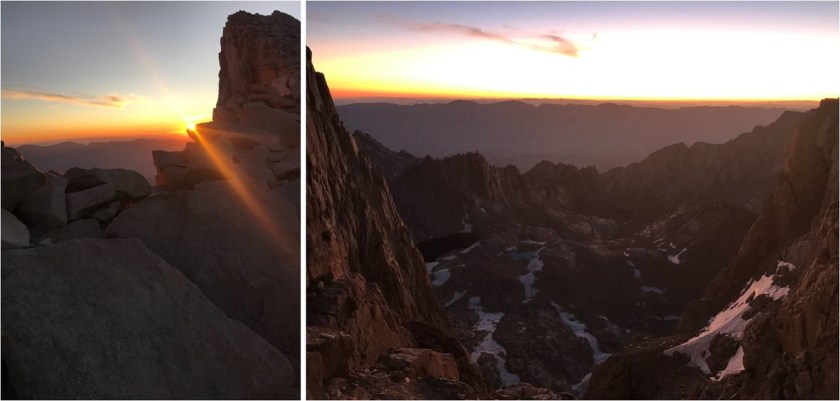
I sat here for a minute and contemplated watching the sunrise, but it was just too cold (and I figured I’d have a great view of it as I hiked back down). The moon was full and extremely bright, so I got a shadowselfie in the moon-glow
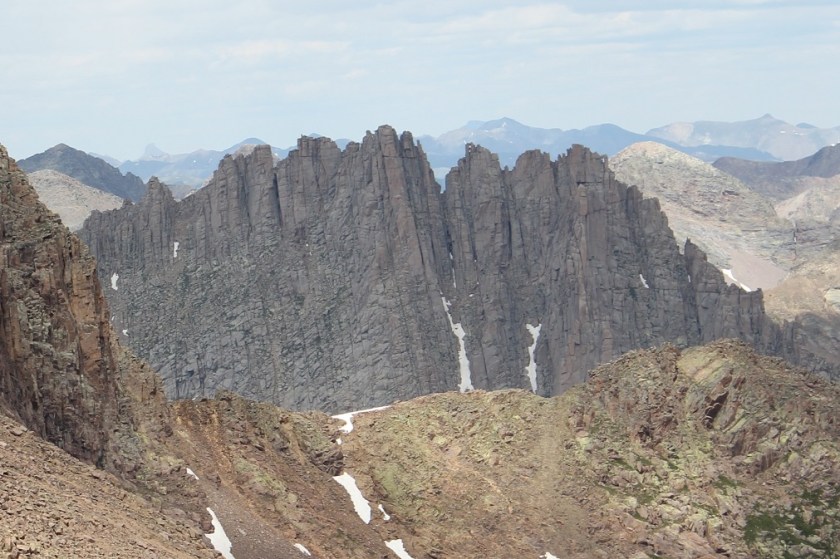
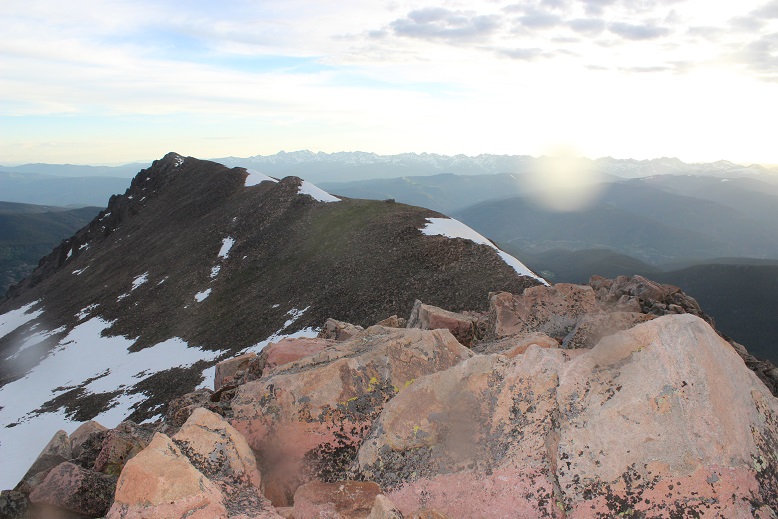
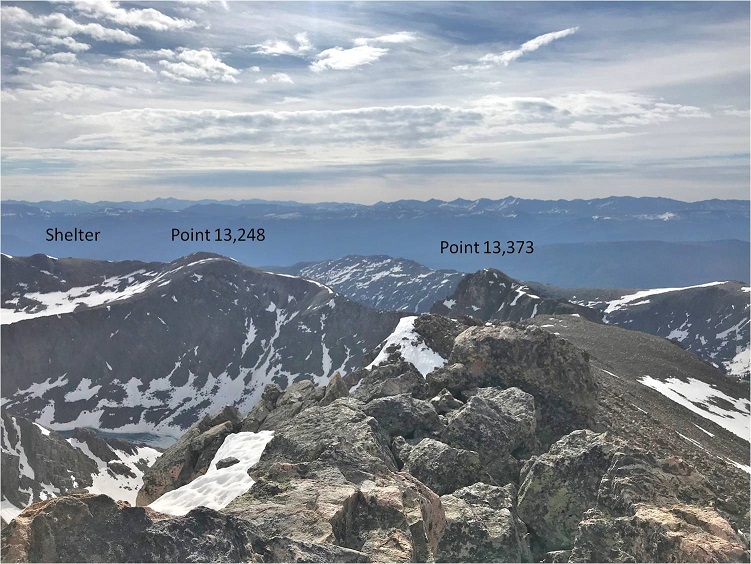
I also took some pictures of Montgomery Peak and the summit I was currently on (I lightened them up a bit so you can see detail)
I headed back down, and within about 10 minutes there was enough light to see the path ahead of me. It was so nice to be able to see an actual trail instead of guess where it was in the dark!
I sneezed and my teeth bumped together in the process. The pain was so intense I stood there for 3 full minutes waiting for it to subside. The sun finally rose at 7:35am (which I thought was late, but maybe that’s normal for Nevada?)
I followed the trail back down the same way I came up
Back down to the saddle and then up to regain those 300’ I’d lost
Regaining the elevation actually wasn’t that bad, but I was also lucky the sun had gone behind the clouds and it wasn’t that warm out. It felt like I was hiking in the shade, and at this point my dental pain was more of an annoying dull ache and I was beginning to think the pain was directly related to elevation.
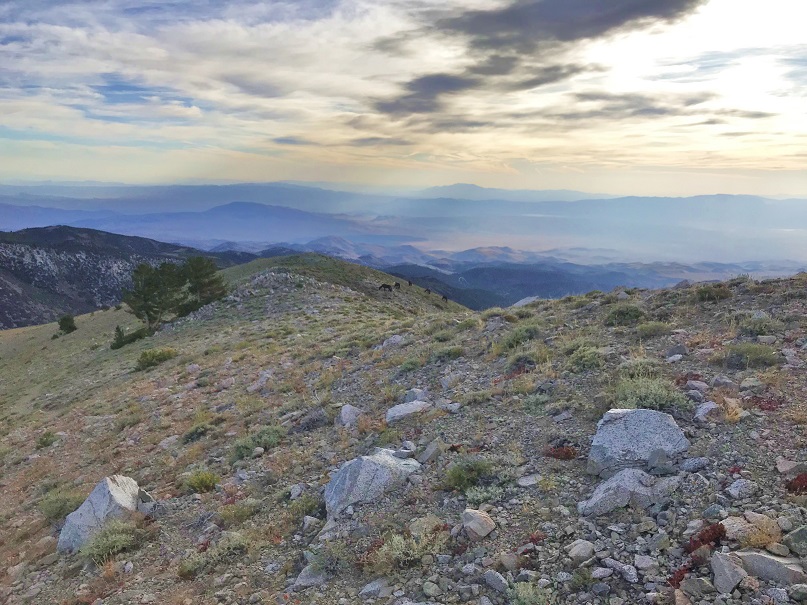
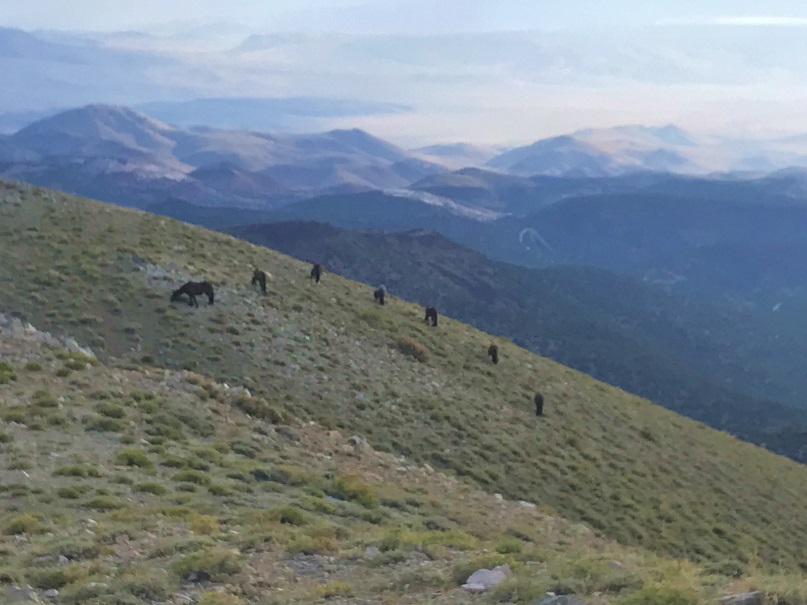
I came across a few deer near the trail, and as I rounded the last bit of hillside I saw a small herd of horses, grazing in a semi-circle on the hill.
Boundary Peak Horses:
I made noise but they didn’t really seem to care I was there. Once again I wished I had my good camera with me and not just my cell phone: these could have been awesome pictures!
From here it was all downhill back to the trailhead
I signed out of the register and headed back down the road to my vehicle.
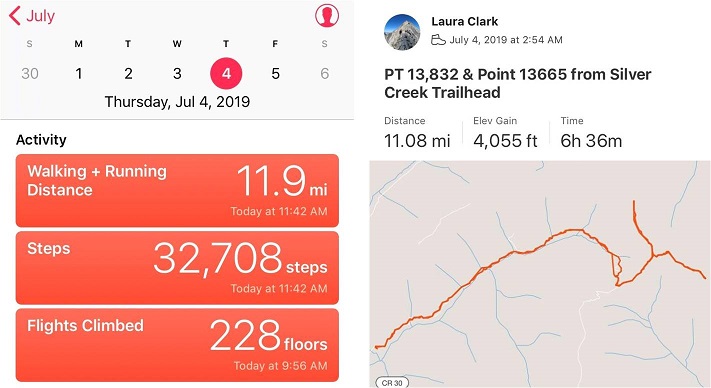
I made it back to the car at 9am, making this a 13 mile hike with 5144’ in elevation gain in 7 hours 15 minutes.
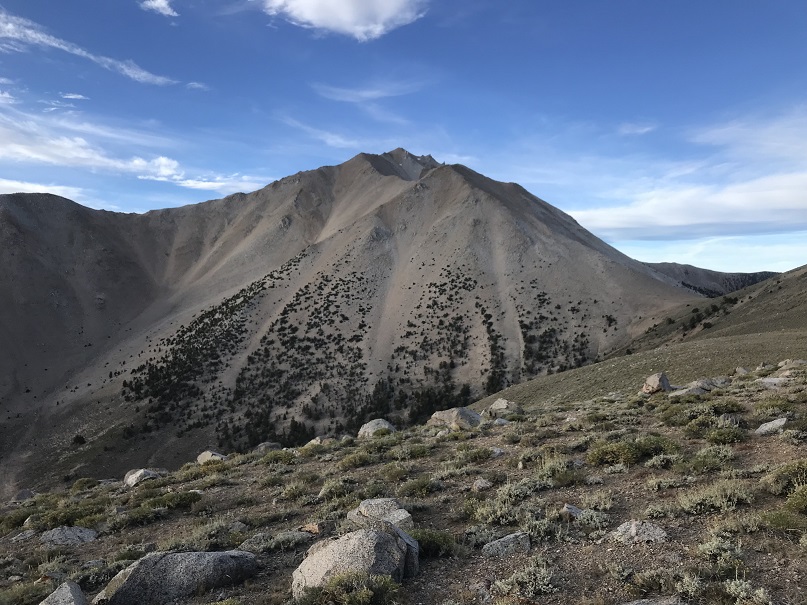
Once back at the car I cleaned up and got ready to head out, saying a silent prayer I didn’t do any permanent damage to the vehicle in the next 4 miles. I knew I’d be ok as long as I just drove slow, and since I hadn’t seen any vehicles since that Jeep last night I wasn’t too worried about the need to pass another car in the tight spots. In the daylight I saw an abandoned house
And a really neat view of Boundary Peak
I made it back to US 6 without incident, but the vehicle was quite dirty and had pinstripes from the willows. It was a 5 hour drive from here back to Las Vegas. I spent it with the radio turned up to avoid the constant “not in your lane beeping”. Once in Vegas I looked for a car wash to try and buff out he streaks. It was surprisingly difficult to find one that was open and operating (I found a bunch of closed or non operational car washes however).
After driving around for half an hour I was finally able to find a car wash, paid the $7 and was extremely happy with how everything turned out: no scratches left on the rental car! Woot! Now it was off to return the car (I didn’t have any issues) and to get to the airport early, hopefully to change my flight to an earlier one so I could hike again tomorrow.
My flight didn’t leave until 9pm and I was at the airport by 3pm. I went to the desk to try and get an earlier flight but even on standby they wanted more than double what I’d paid for both tickets combined to take an earlier flight home. I was not ok with this, so I decided to take a shower and eat instead (yes, the Las Vegas airport has showers, if you know where to look).
I spent the next few hours relaxing before my flight home, listening to others talk about what they’d done during their Bachelor/Bachelorette parties that weekend. I was a little upset I’d get back to late to hike the next day, but all in all considered my birthday weekend a win!
I won the lottery! Well, not really. I applied for the Whitney Lottery, didn’t win any of the dates I selected (even though I put in 15 different dates) and then had to hound the site for a dropped spot. Long story short I scored a day trip pass to hike Mt Whitney and considered it my birthday present this year, as every year around my birthday I try to check off a bucket list adventure, and it’s my birthday this week.
Hiking Mt Whitney has been a goal of mine ever since I attended Girl Scout camp in middle school. I didn’t know much about it other than it was the highest point in the continental United States and was supposed to be a strenuous hike. At this point in my life as a mountaineer I can tell you the most difficult part of this hike was obtaining the permit: basically it’s a long walk up a very well maintained trail with no route finding involved. I didn’t get out my map once (but bring one!)There aren’t cairns because they aren’t needed. If you’re in good shape, the weather’s good and you start early you should have no difficulty hiking this mountain.
I was a little bummed my new camera hadn’t arrived yet: My old camera had been destroyed in the weather on Jagged, so I’d ordered a new one and it was supposed to arrive the day before my trip (side note: it still hasn’t arrived, even almost a week later). This meant I’d need to use my phone camera, which wasn’t ideal because it had been acting “iffy” lately, but worked as a decent backup. It just meant selfies as summit shots.
I woke up at 1am, worked out on the treadmill for an hour and drove 2 hours to the airport. I was very light on gear, bringing only my small backpack and small hiking pack, both carry-ons. The only reason I needed two packs was my sleeping bag took up too much room in my day pack, so I had to bring another. They were both light and no I had problem carrying them through the airport.
I get stopped at security every time I pass through an airport. Every time. Usually it’s because of some sort of food item (dried mangoes, beef jerky, Girl Scout cookies, etc.) but this time it was for a valid reason: I’d left a small pocket knife in one of my bags (an honest mistake, as I’d thought I’d cleared all such items out before packing but apparently I’d missed the knife as it fell into the spot my water bladder rested). Funny thing, they took no issue with my crampons. My flight was only about half full so I got a window seat and sat back and relaxed. There must be a body building competition in Vegas this weekend because the plane was full of body builders. My toes were already burning so I took off my shoes, sat back, and read a book.
My first stop after landing in Las Vegas was to obtain my rental car. I’d reserved one online, intending to upgrade when I got to the facility. The lady at the reception desk was nice but English was her second language and her first was outside of my skill set (Thai?). I asked her over and over again about ground clearance and told her I’d be driving on 2WD dirt roads. To her my only options were a Toyota or a Hyundai. I took the Toyota Corolla and was on my way.
My second stop was the local Walmart for supplies I couldn’t take with me on the plane: food, bottled water, and a trekking pole. I also picked up a few birthday crowns (they were out of hats, boas, etc, so I took what I could get) and snacks (peanut butter – also not allowed on planes, milk duds, and dried mangoes).
I’m not a fan of Las Vegas. I used to frequent the city as a teenager (read fake IDs and freedom 3 hours from So Cal) but once I turned 21 it lost its appeal. Las Vegas today was simply a conduit for a larger goal: it was the closest reasonable airport to Mt Whitney, and still a 4 hour drive to get there.
No worries though, because I love to drive! The only downside was the automatic beeping noise the rental car dashboard made when I was “drifting into the next lane”, which drove me crazy because:
I wasn’t drifting into the next lane
I was driving on curvy mountain roads and at times if I wasn’t hugging the center line I’d be falling over a cliff
It went off when I wasn’t using my blinker and switching lanes (who uses their blinker when they’re the only one driving for as far as you can see?)
It oftentimes mistook skid lines on the road for the center line and went off ‘randomly’
It told me it was time to pull over and take a “coffee break” because I was driving erratically (this was a bit insulting, but I understood the intended purpose)
In short, I will NEVER buy a vehicle that has this mechanism. I’m sure there was a way to turn it off but I was unable to figure it out. The constant beeping was annoying, but I got over it by turning up the volume on the radio.
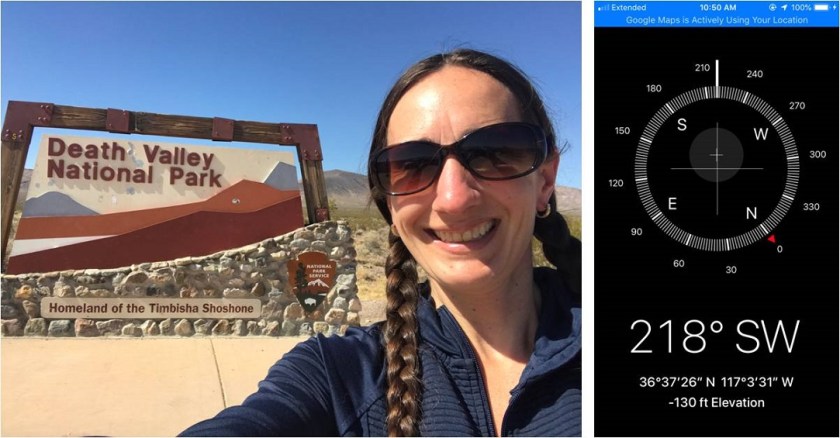
My drive took me through Death Valley which was cool because its lowest point is 282 feet below sea level (the lowest point in the US) and the next day I’d be hiking to the highest point in the continental US, so it seemed fitting to start from the bottom. The lowest elevation I was able to tag as a photo with my phone altimeter was 130 feet below sea level. The weather was about 100 degrees outside; not bad for September.
I drove from Las Vegas to the Eastern Sierra Interagency Visitor Center to pick up my permit.
Side note about the permit process: I completely understand the need for a permit system on this mountain, yet I seriously hope the permit system never comes to Colorado. The permit system as it applies to hiking is one of the (many) reasons I left California: you need to get the permit several months in advance of your intended hike, they cost money, parking is an extra fee (passes were $60 a year when I left in 2007) and you’re screwed if the weather is bad on the date of your intended hike (especially if you’re coming from out of state). Many people feel the financial NEED to summit on their given permit date due to the time/work it takes to obtain a permit and the necessary reservations for the hike.
There are also separate overnight and fire permits you need to apply for in addition to a hiking permit (god forbid you need a fire and don’t have a permit to build one…). I also don’t like the government knowing where I am at any given time (weird, I know, but it bothers me). I’m not averse to paying to use public lands (although many people are), I just don’t appreciate the lottery system: It took me years to obtain a permit to hike this one mountain. Also, walk-up permits are no longer allowed. I’d be more in favor of a hiking license (similar to a hunting/fishing license). I’m not sure how this would look exactly, but in any event, I beg you Colorado: please don’t implement the permit system: It stinks!
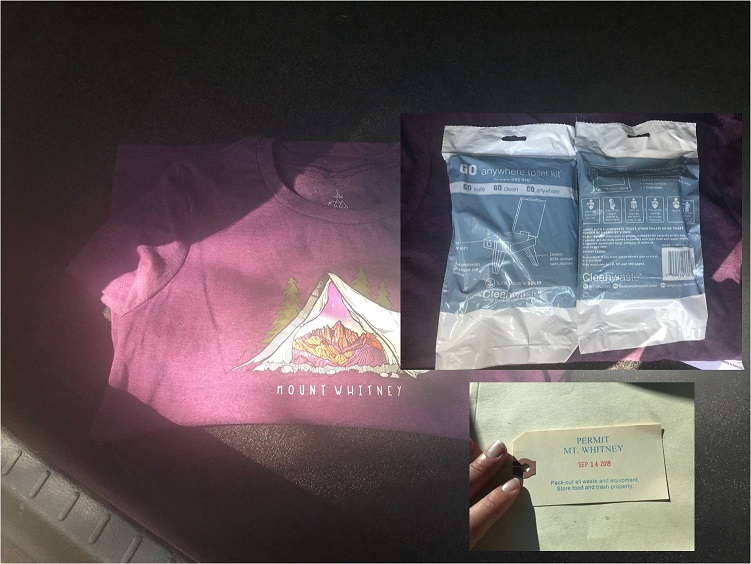
Ok, off my soap box. I picked up my permit, wag bag, and bought a shirt and patch for good measure. I was extremely lucky the weather forecast was perfect for this weekend.
There were several people waiting outside the permit office hoping to get a day permit. Most were internationals who didn’t understand they don’t issue day permits for Mt Whitney. These people were seriously bummed (having travelled thousands of miles for this opportunity) and were told to keep scrolling online, looking for a dropped spot. I felt sorry for them: permit slots aren’t open immediately after someone drops them; they come up randomly afterwards with no rhyme or reason.
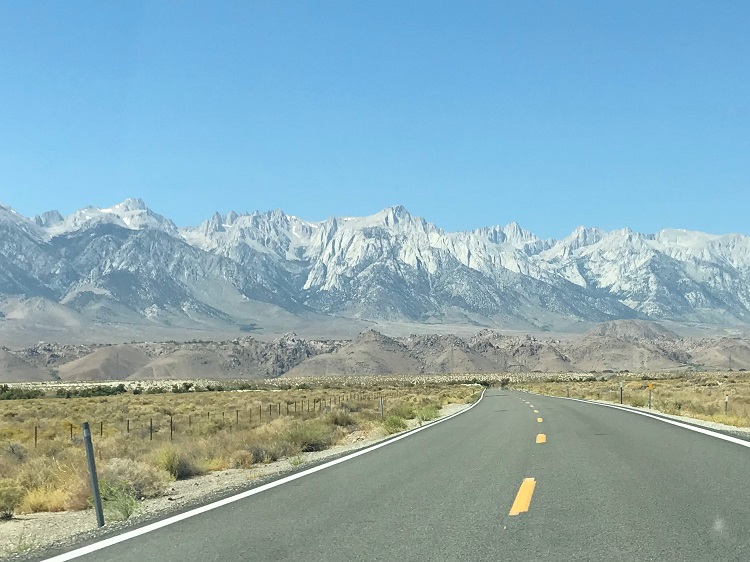
From the permit office I travelled north on US 395 to the first and only stop light in town, turned left, and drive for 13 miles to the Whitney Portal/parking/camping area for the Whitney trail.
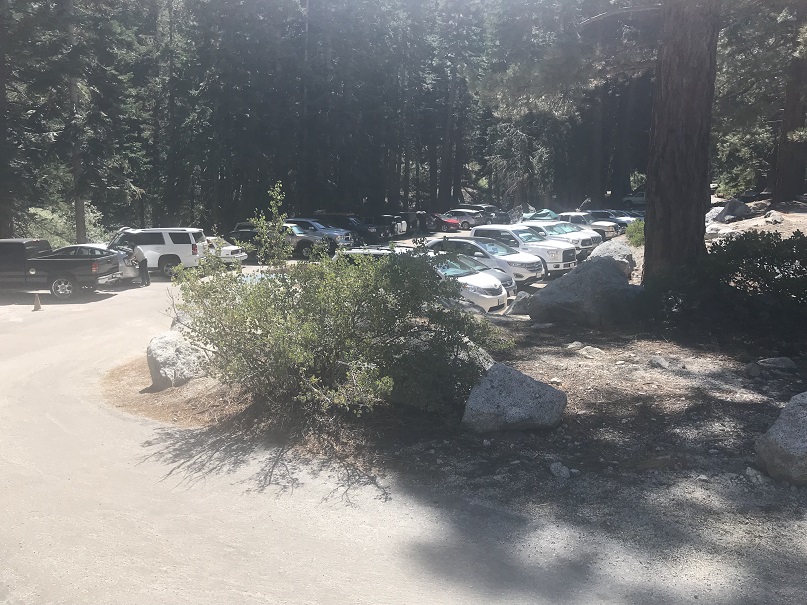
The parking area held about 200 vehicles and was completely full, so I drove around and finally found a parking spot in the overflow area. Bonus: it was in the shade! The campground looked like a typical California campground with sites piled on top of each other, all full, with no privacy from the campers next to you.
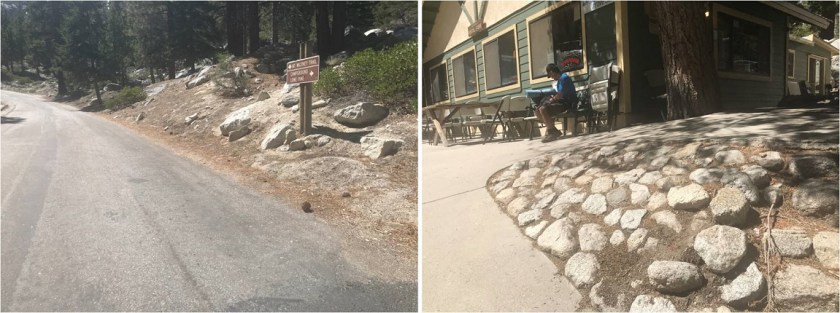
I parked the Corolla in backwards and since it was still early I decided to do a little exploring. I walked a quarter mile up the road to the portal store
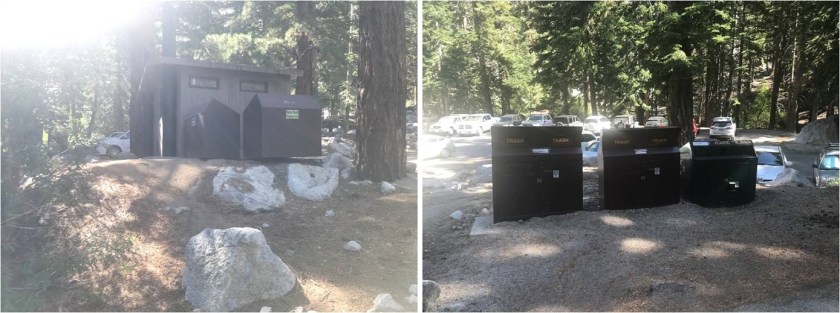
The portal store was like a mini and overpriced REI, with everything from camp stoves and winter weather gear to patches, souvenirs, t-shirts, duct tape, and emergency supplies. I wasn’t in need of any gear so I walked around a bit more. There were bathrooms and a place to throw away wag bags and a separate area for all kinds of trash.
There was a water pump directly outside the bathrooms with a sign indicating you couldn’t wash there, which is totally understandable but a missed opportunity for income on the part of the portal: They should have paid showers somewhere in this place. I’d have paid for them, and I know tons of other thru hikers would have seized the opportunity as well.
I’d heard from people there was no overnight camping in your vehicle at the portal, yet there were dozens of people doing so and no signs indicating you weren’t allowed to. I saw trucks with tents set up in their beds, and even RVs in parking spaces (you KNOW people are sleeping in those).
I felt it was busy, yet overheard the workers at the portal store comment on how slow it was for a Friday, and how the season must be winding down. When I asked the lady working at the portal store if I was allowed to sleep in my vehicle she said “Why not? Everyone else does.” So that’s what I decided to do.
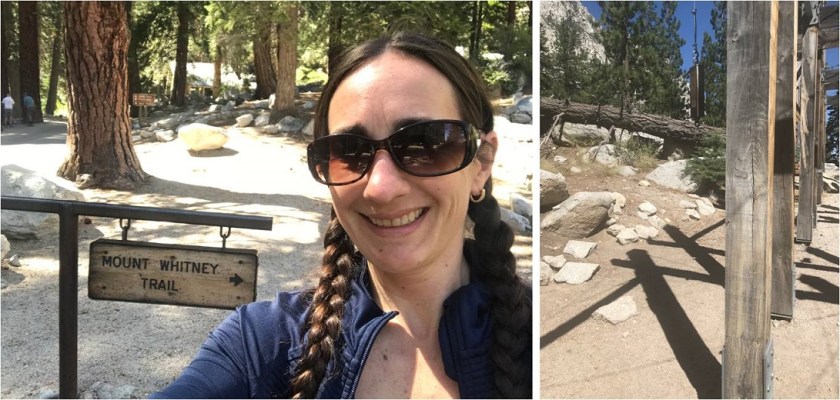
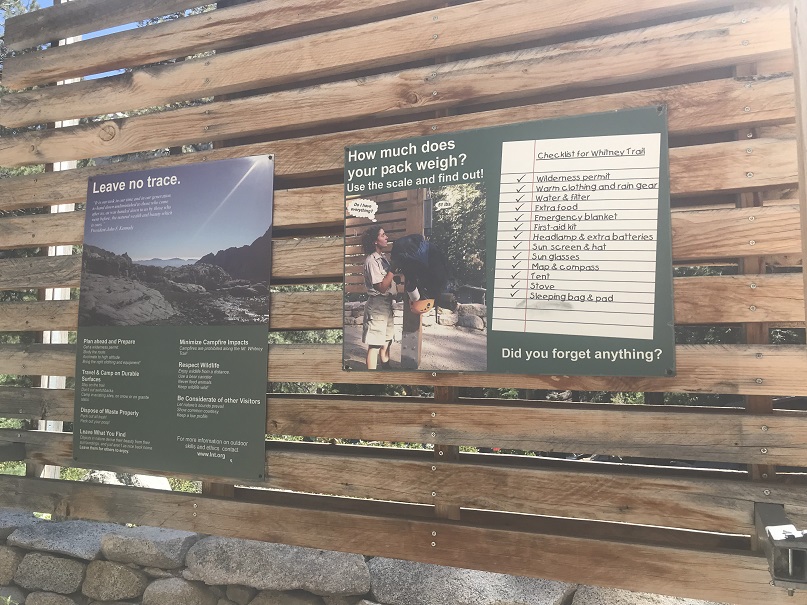
I took a selfie at the beginning of the trail and also took a picture of where people weigh their bags before beginning their hike. Today I was hiking light (my pack couldn’t have been more than 10lbs) so I didn’t weigh it.
I talked to a bunch of people while walking around and everyone I talked to said they intended to be “on trail” by 1am. I thought that sounded like a great idea so I decided to get to bed early for an early start. I packed up all my gear, set out what I needed for the morning, and was asleep in the back of the Corolla by 4pm. The last thing I saw before closing my eyes was a very small and very pink smart car racing down the road back to US 395.
I woke up at 1am and groggily took a look around. What I thought were dozens of people with flashlights getting ready to hike ended up being the full moon reflected on the windshields of all the vehicles in the parking lot. I was on the trail by 1:30am, curious how I couldn’t see any flashlights ahead of me.
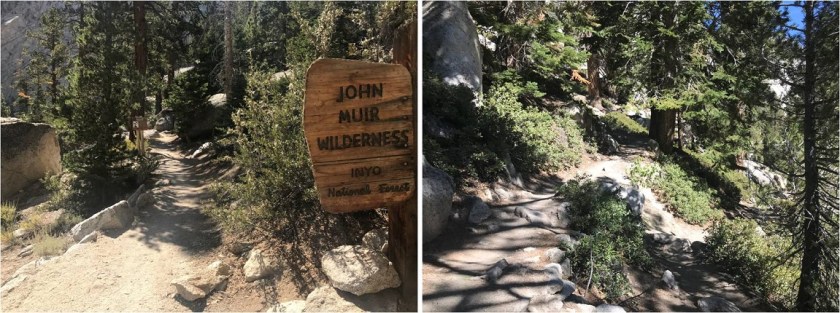
The first thing I thought to myself as I started this hike was “it smells like the California mountains”. I’m not sure how to describe it, but the mountains here just smell different than the ones we have in Colorado. It must be the serrano, sage, mahogany, pine and scrub oak combination.
The hike starts at the Mount Whitney Trail and switchbacks and switchbacks and switchbacks. And switchbacks. If you’re on the Mount Whitney Trail you’re on a switchback. The first set of switchbacks head north and then west
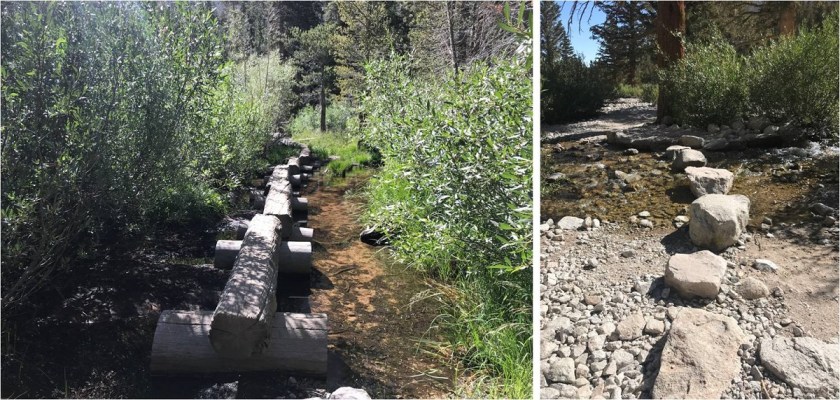
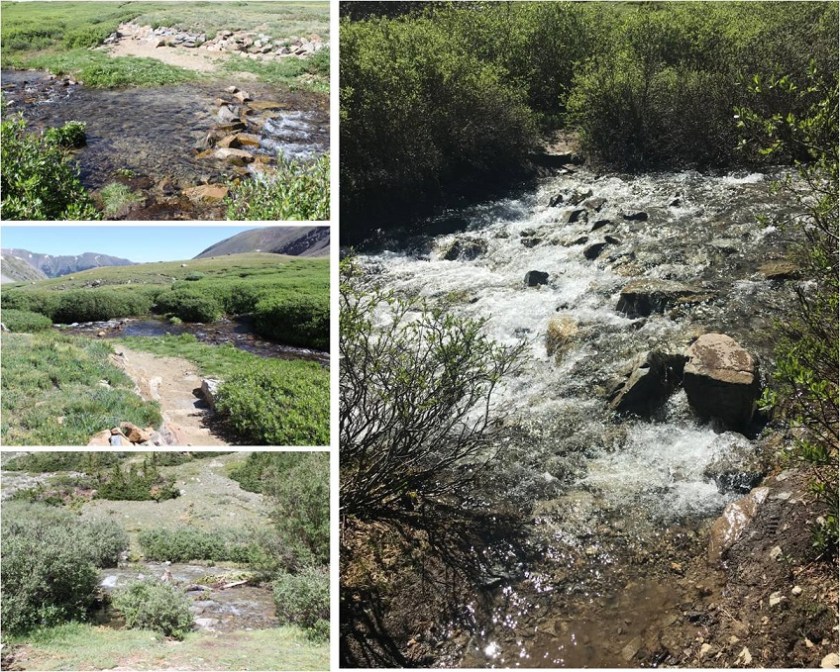
I crossed several well-maintained creek crossings in the dark (so well maintained they took the “fun” out of crossing the creek)
And after 3.1 miles came across this sign (apparently up until this point you don’t need a permit to hike here?)
I crossed some more well maintained creek crossings
And in the dark saw the bear canisters set out on rocks before the tents at outpost camp. I couldn’t help thinking what a rotten place this seemed to camp: full of rocks and dirt.
There were people still sleeping in their tents so I passed through quietly and continued up the trail
The moon was bright and I didn’t need my flashlight to see. I still couldn’t see any flashlights shining ahead of me and wondered about all those others who’d intended on a 1am start?
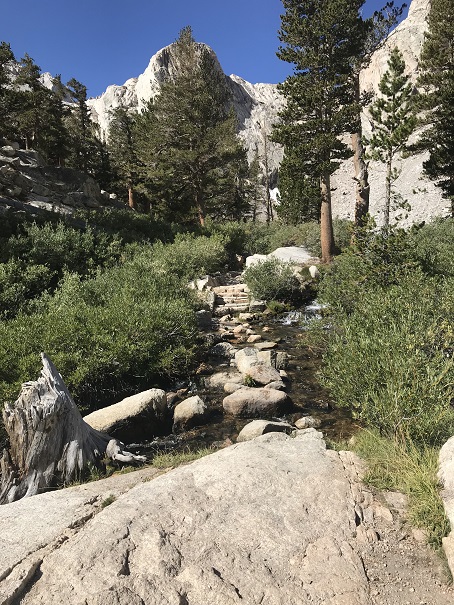
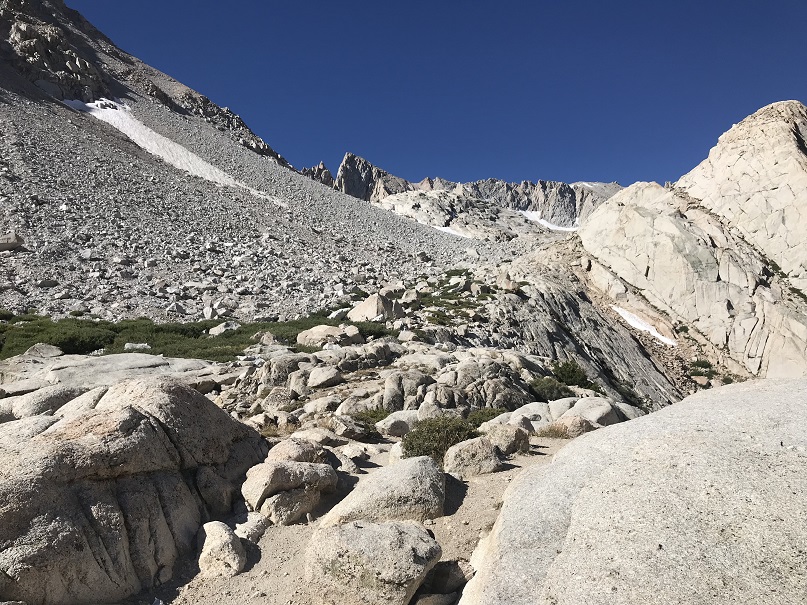
Treeline in California seems much lower than in Colorado (I encountered it here at 10,800’) so much of this hike was done surrounded by huge boulders.
Luckily there was an easy trail to follow: I had no difficulties in the dark
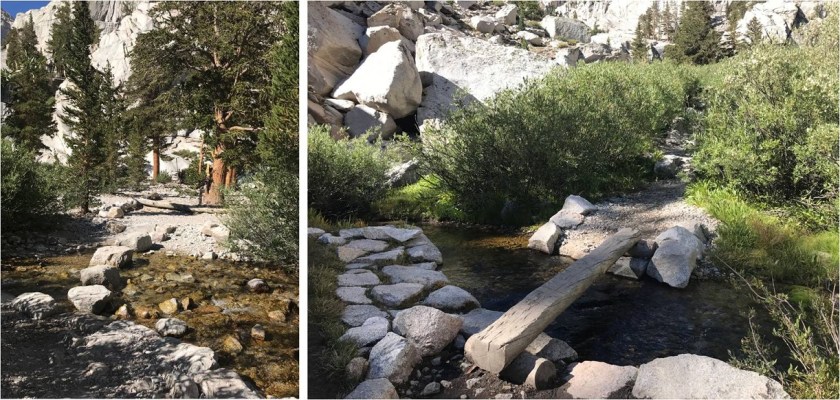
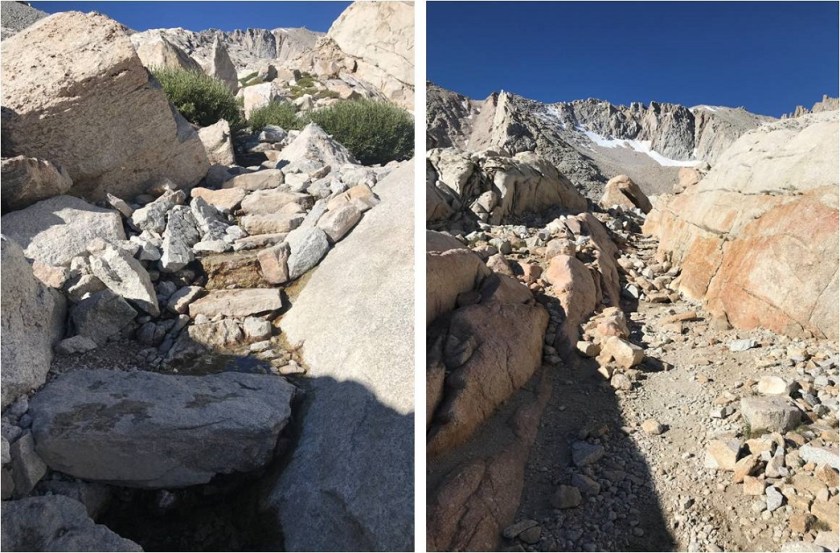
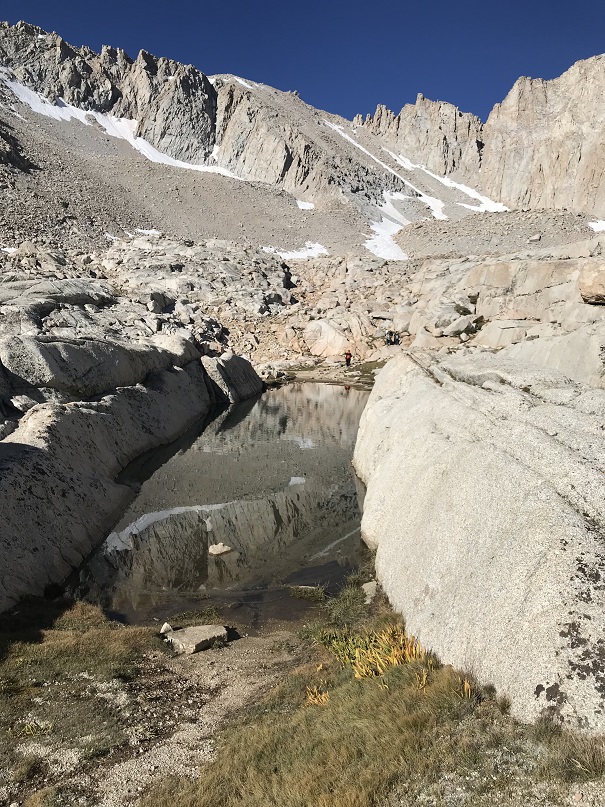
This area was kind of fun. In the dark it looked like you were supposed to just walk right through the water to get to the other side, so I just rock hopped the large boulder to the left. On the way back I could see an obvious trail to the right and took that instead
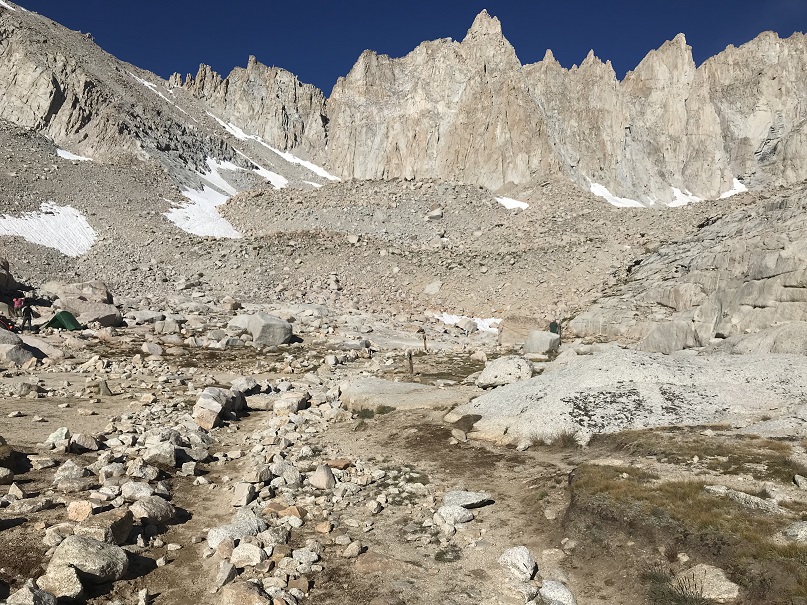
Now I was in a big basin. Here I saw dozens of flashlights and wondered how so many people got ahead of me so quickly, until I saw all the tents. This is another camping area (Trail Camp) which also looked like a bummer place to camp (similar to the Boulder Field on Long’s Peak).
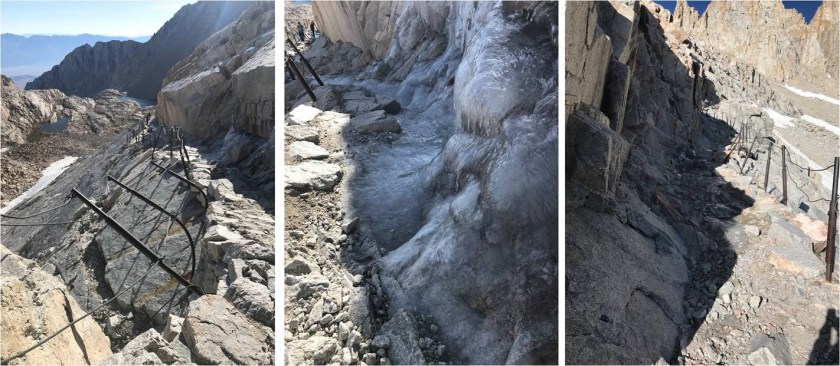
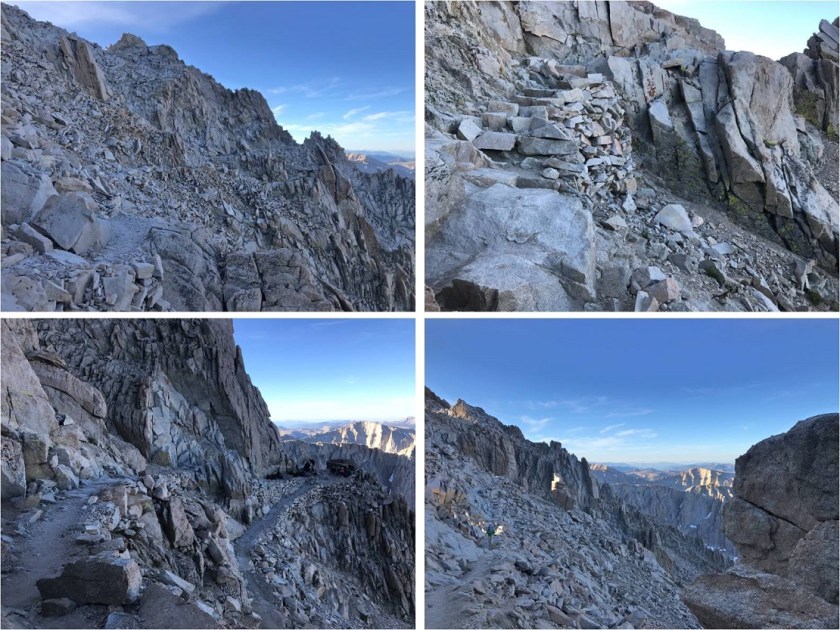
Still on a well maintained trail I continued and encountered more switchbacks. I couldn’t help but think of all the work put into this trail: it was amazingly easy to follow. There’s a “cables section” on this route where I encountered some ice. In an online forum I’d been told to bring microspikes for this area, but these people obviously didn’t have much mountaineering experience/know what microspikes are for: they would have been useless here, and in any event, the ice was avoidable.
Here’s looking down on some of those switchbacks…
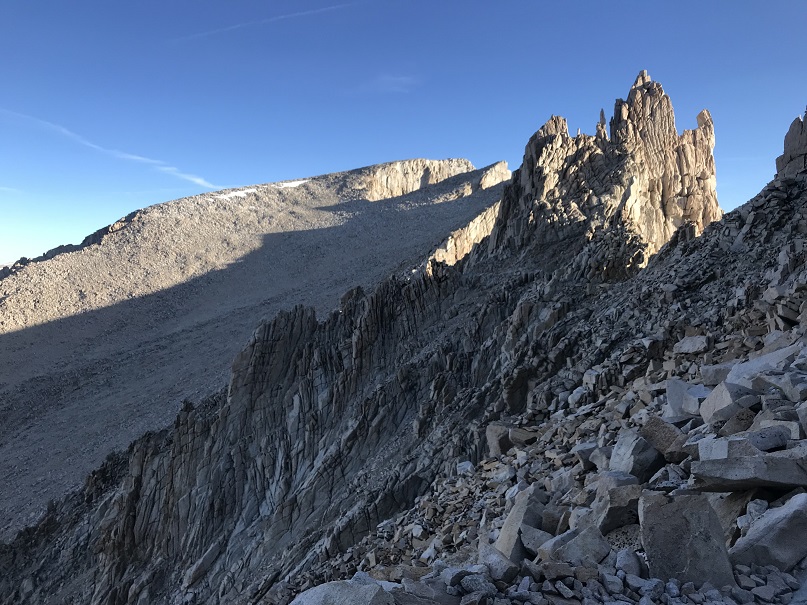
I started passing hikers in this area, saluting “good morning” as I passed. My aim was this notch, which is the “trail crest”. This is where my mouth started hurting: my back left molar curiously started throbbing so I took a few ibuprofen and continued on.
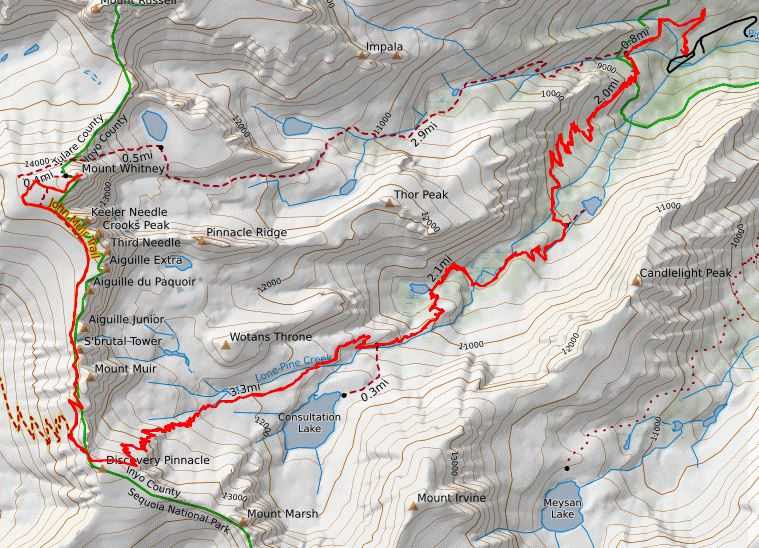
The trail crest is at 13,000’: 8.8 miles from the Whitney Portal. I reached it at 5:45am. It took me 4 hours and 20 minutes to get there. From here I could see dozens of headlamps shining on the trail below.
From the trail crest the trail loses a couple hundred feet in elevation as it snakes northwest towards the John Muir Trail. The junction is obvious and less than .2 miles away.
I saw a bunch of gear stashed here that looked like it was from thru hikers who didn’t want to haul all their stuff to the summit: there were bear canisters and even full overnight packs. The views were amazing as the sun began to rise. I kept wanting to stop and take pictures but it was getting cold and I had a summit to gain.
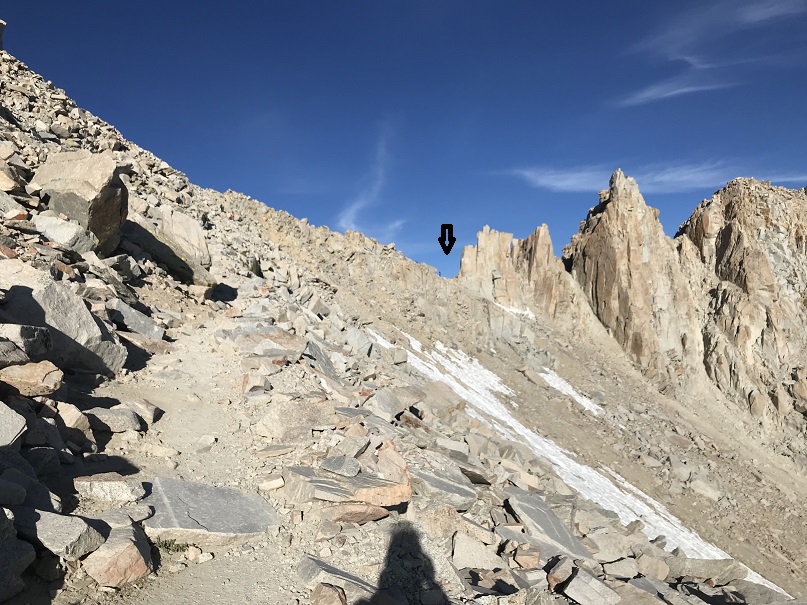
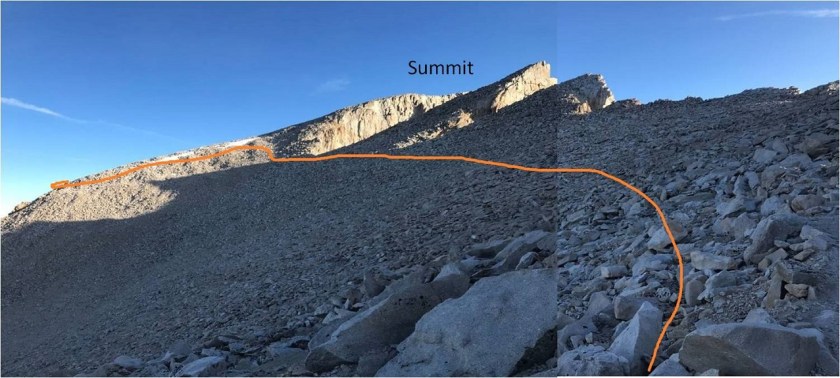
Here’s the trail as it curves around to just below the summit
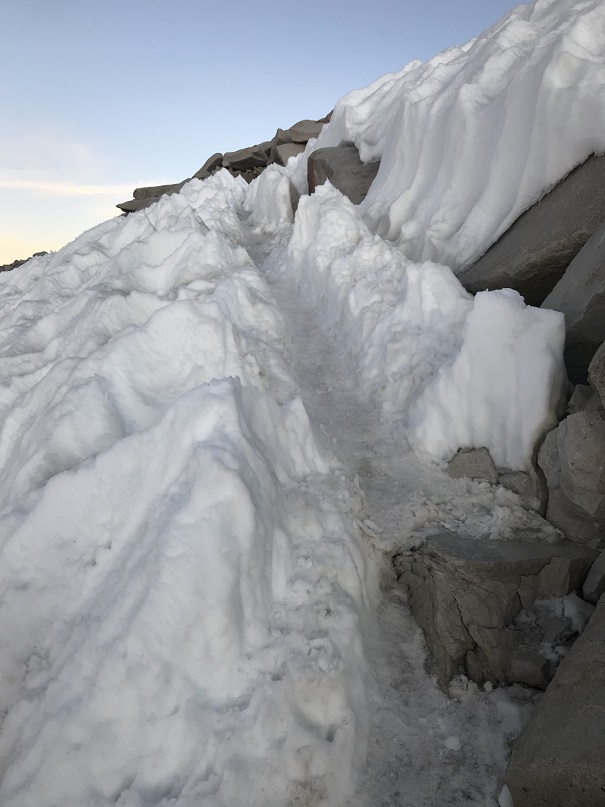
In this area I encountered a small (40 foot long?) patch of snow that was easily navigable
I turned the corner and followed the trail northeast to the summit of Mt Whitney
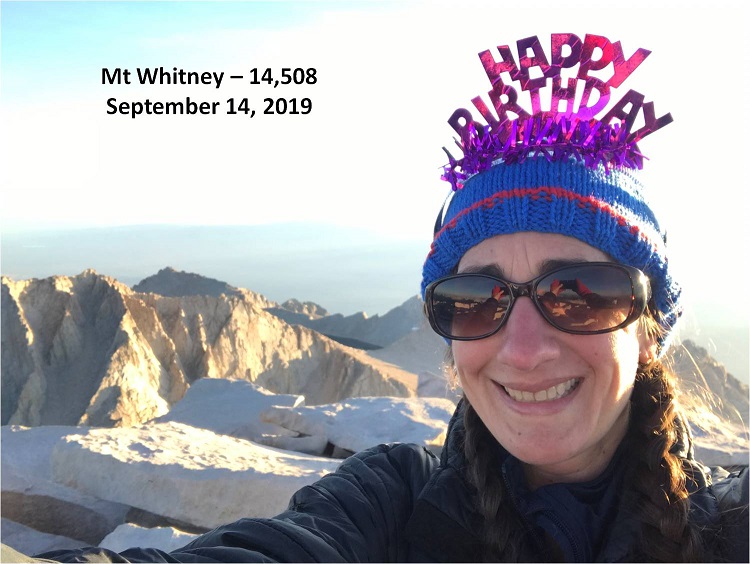
I summited at 6:50am: it had taken me 5 hours 20 minutes to hike 11 miles. I reached the summit to cheers: a group of 4 were perched atop a large boulder. They’d been finishing the JMT and hiked up from their camp below. It had been their gear I’d seen on my way in stashed at the junction. One was snuggled in a sleeping bag, another cooking up breakfast in a jetboil. I reached into my pack and took out the ‘Happy Birthday’ crown I’d bought at Walmart the day before and snapped a quick photo.
Summit of Mt Whitney:
It’s your birthday?!?!?! They exclaimed, and then we proceeded to chat for a bit. I actually had cell service (3 bars: Verizon) and they did not (T-mobile). We discussed previous hikes and goals and why we each looked so familiar?
There are a lot of boulders at the top of Mt Whitney, so I started boulder hopping around. There are also a ton of summit markers! I got pictures of a few…
They were all pretty tough to read, and I figured they were from all the various surveys of this mountain (14,494 – 14,496 – 14,505 – 14,508). Currently Mt Whitney’s measured at 14,508’
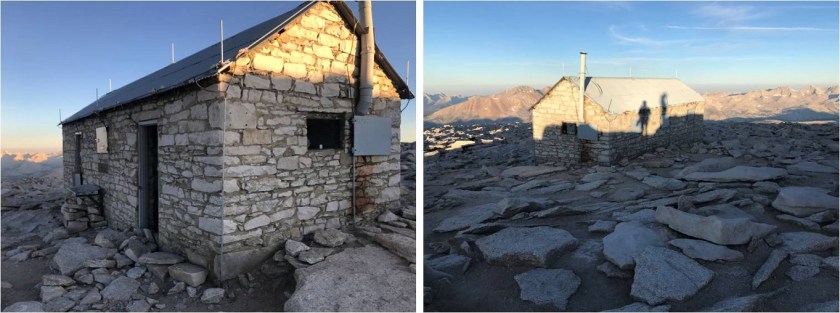
I was seriously cold (I’m guessing it was closer to the 20* right now than the forecasted 50*) and my tooth has started hurting again so I didn’t stay long. I took a quick look at the cabin
Signed the register (shocking, I know… I’m not sure why I did it?) and was on my way back down, my fingers frozen at this point (I’d need to look into buying gloves at the portal store before tomorrow’s summit)
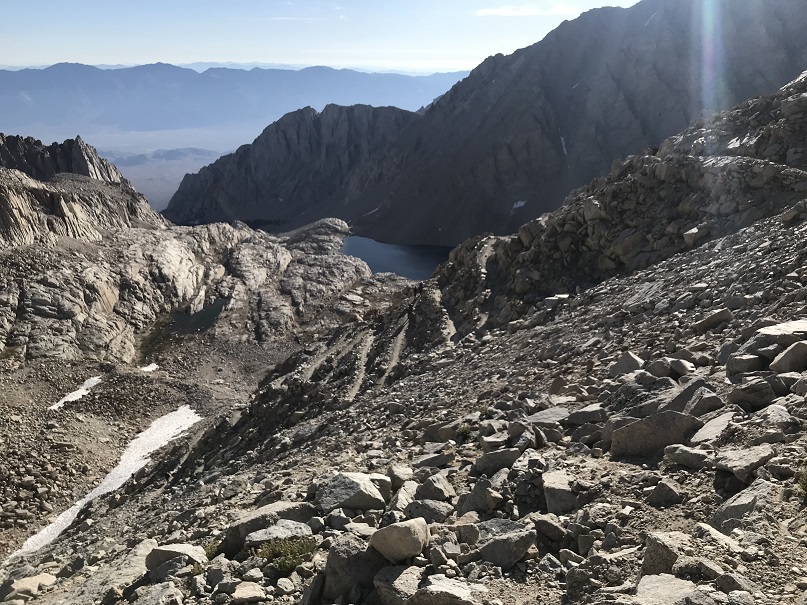
Here’s a look at hike back to the trail junction
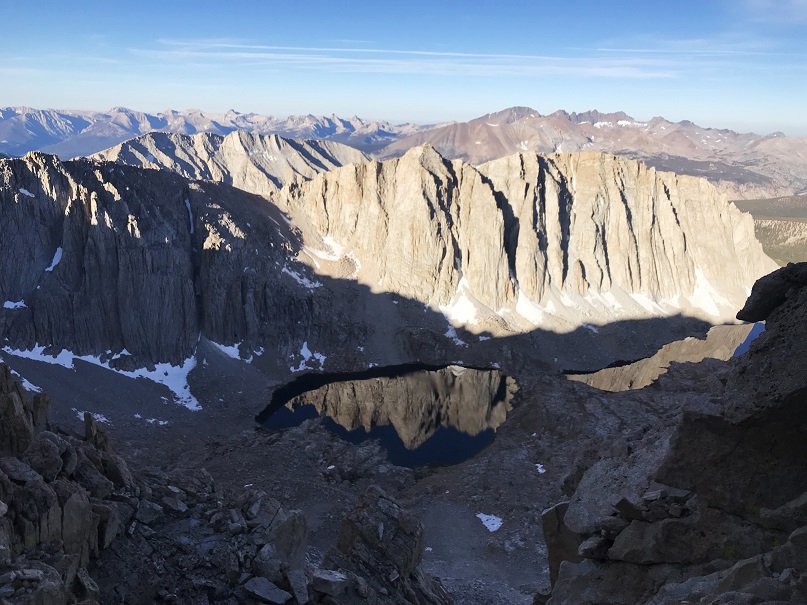
I loved the way this hike looks from just before the trail junction up to trail crest: It’s like something from out of a Tolkien novel.
There were a bunch of people stopped at the junction of the Whitney/John Muir Trails. I’d forgotten I still had on my crown, and several people wished me a happy birthday. It was cool hearing all the different accents from the hikers, and at this point I decided to wear the crown for the rest of the hike.
Check out the reflection of the Hitchock Lakes
Back through the notch I went, and took another selfie
At this point I really started passing people (all those flashlights I’d seen on my way up were now at the switchbacks below the notch). I’m not the kind of person who likes to draw attention to myself so keeping the birthday crown on was a conscious decision I was ready to take back at any moment, but the positive comments I got from the other hikers was a huge incentive to keep wearing it. I got a reaction from about 90% of the people I passed on my way back down (the other 10% were too tired to even look up and notice me).
It was cool: someone would notice my crown and their eyes would light up as they said “Happy Birthday!” No matter how exhausted they were a smile would come to their face when they read the words on the crown. It was like my birthday was giving them some small pleasure. I could tell if they were here visiting from another country (“You have birthday today?!?”) and a few were celebrating a birthday of their own (so I shared my crowns: 4 came in the package). All in all it was a fun experiment and very gratifying. So much so I’m considering wearing a birthday hat on my next popular 14er just to encourage others on the hike (not really, but if it’s your birthday you should wear one; you’d be surprised at how much you’ll brighten everyone’s day). Also, I got really good at saying “Thank You”, something I personally need to work on.
About halfway down the switchbacks below the notch my fingers had thawed out and the sun was getting intense so I stopped to put on my sunscreen. I wasn’t able to find it and realized I must have left it in my other bag in the car. Whoops!
Another note: I passed so many people who looked absolutely exhausted and were only 1/3 of the way (or less) done with this hike. I have doubts as to whether they made it, and physically they should have been up for the challenge. This isn’t a technical hike: the only difficulty is the length and being at elevation. If you’re in decent shape you should be able to summit this mountain. The path is easy to follow (too easy in my opinion) and the elevation gain is spread out over a long distance. I wasn’t even winded when I reached the top, and I’d never taken a single break (but my body’s conditioned to hiking at altitude). The mistake these hikers were making was starting after sunrise. I started at 1:30am and this was a great time to start, but I could have made the sunrise if I’d started half an hour earlier. I wouldn’t start this hike after 3am.
I passed a group of hikers on my way down and we chatted for a bit. Their leader (a male in his late 20s) was taken aback when I said the hike wasn’t really that challenging. He looked like I’d just said the hardest thing he’d ever done in his life was akin to a walk in the park. I had to quickly add “well, it’s going to be much more difficult for you because you’re doing it during the hottest part of the day”. This mollified him a bit, and it’s totally true: why would anyone do this hike, and especially the hardest part of the hike, in the heat of the California sun? My advice is to start early, hike in the dark, and summit as close to sunrise as possible. Then you get to enjoy the scenery on the way down in the daylight when you’re not too tired to enjoy it. This also saves water weight, as you won’t be drinking because you’re hot but instead when you’re thirsty.
I’ve had people ask me which was harder, Mt. Whitney or Pikes Peak via Barr trail? Pikes Peak. Mt Whitney was shorter, had less elevation gain, and felt like a steady climb, whereas Pikes Peak packs most of its elevation gain into the last 3 miles.
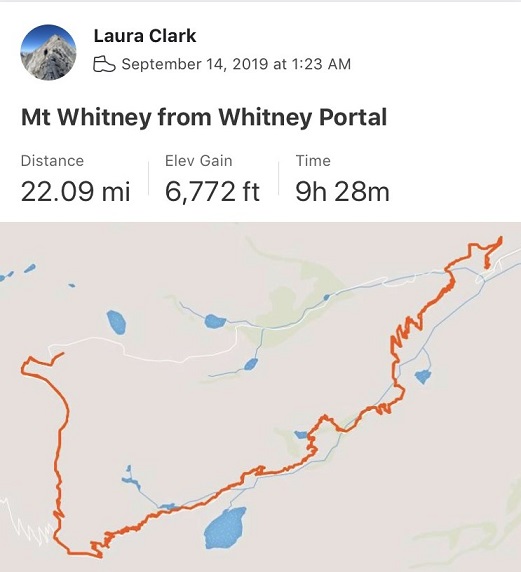
I made it back down to the trailhead at 11:20am, making this a 22 mile hike with 6772’ of elevation gain in just under 9.5 hours.
Bucket list item checked!
I headed to the portal store to look for some gloves but didn’t buy any, as their cheapest pair was $50. Don’t they understand thru hikers are poor? Back at the car I immediately put my sunscreen in my hiking bag and got out a fresh set of clothes. I took a wet wipe bath and was quickly on my way to my Nevada for my next summit: Boundary Peak.
The low tire pressure light was on in my rental vehicle which bothered me a bit, but I also knew this was common at higher elevations and crossed my fingers it would go off soon (it did).
It’s officially High School Football season which means late Thursday/Friday night games. Luckily for me my daughter performs at half time and can drive herself home so I was able to get in 2 hours of sleep before waking up at midnight to drive to the trailhead.
And what a drive it was! This is my 6th or 7th time at the South Colony Lakes Trailhead, and the last 3 miles were the worst I’ve ever seen them. The drainpipe was actually one of the easier parts. Because of the rough road I drove a little slower than I normally would and wasn’t on the trail until 2:30am. (Sorry, these pictures are of the easier areas, as I needed both hands on the wheel to navigate the tougher ones).
One side of the parking lot was completely full: I was the first to park on the opposite side.
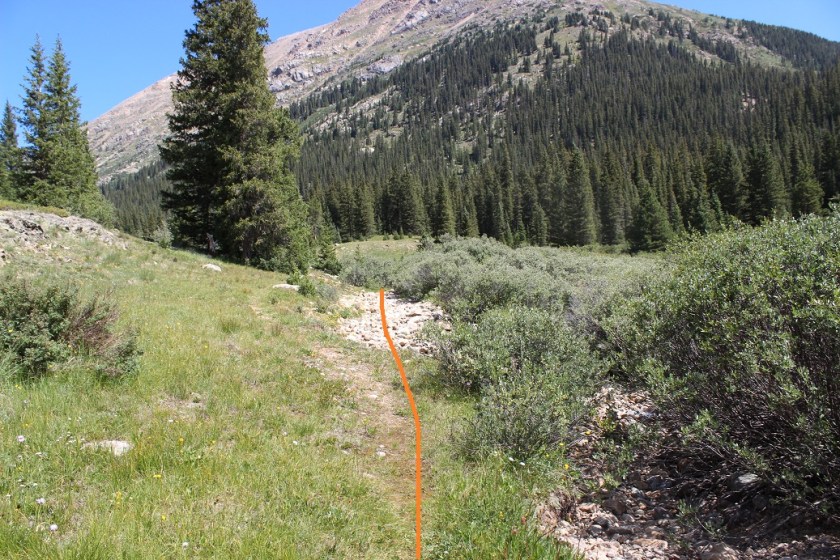
I followed the South Colony Lakes trail, which starts at the west end of the parking area
There’s a register to sign and then immediately I crossed a bridge and headed left (west) along an old 4WD road that’s no longer maintained.
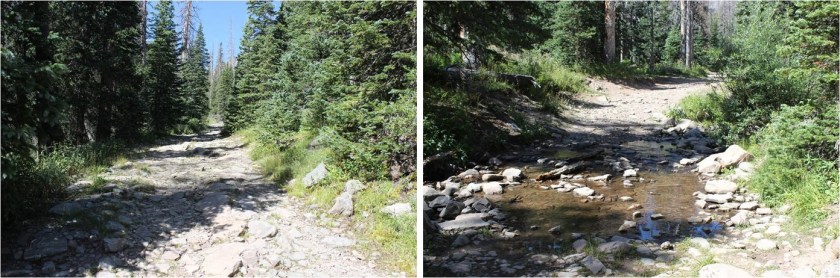
There were a few mud puddles here and some running water, but nothing that actually got my boots wet.
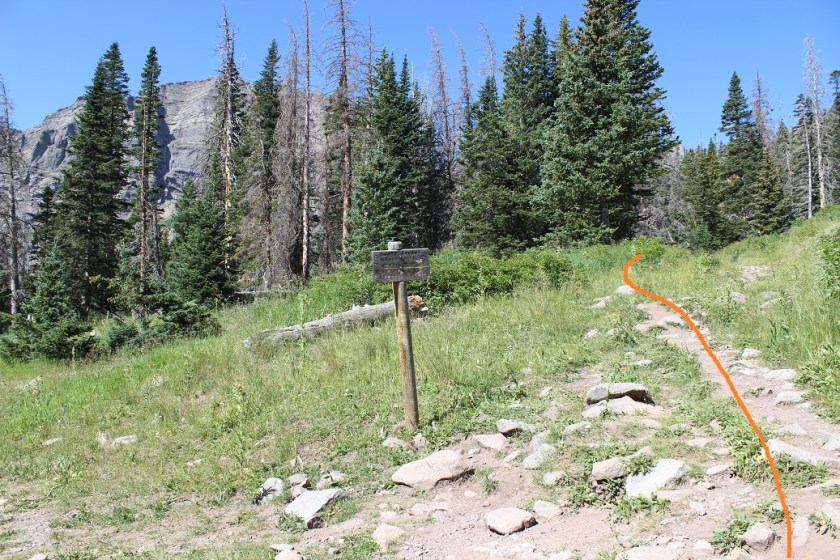
After hiking for 2.6 miles I came to this junction and went right to follow the Humboldt Peak / South Colony Trail.
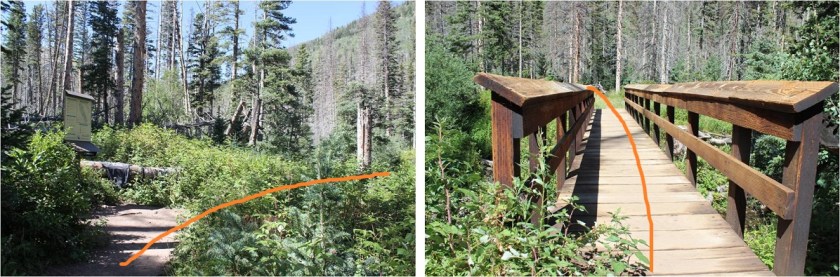
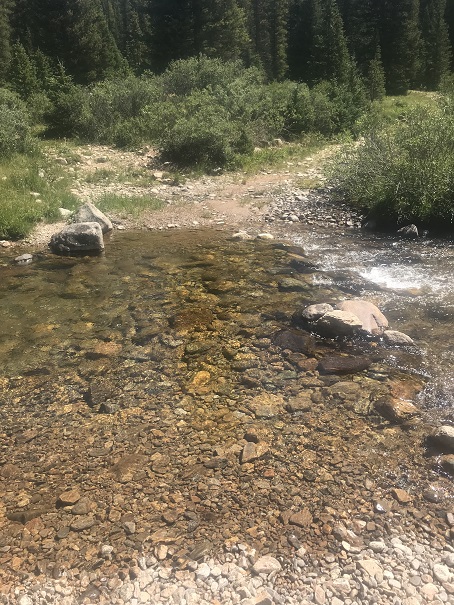
Here the road ends and it actually becomes a trail, crossing a few minor bridges and a small boulder area
before entering the South Colony Lakes Basin. Here the willows were overgrown and made the trail ‘fun’ to follow at night (spiderwebs).
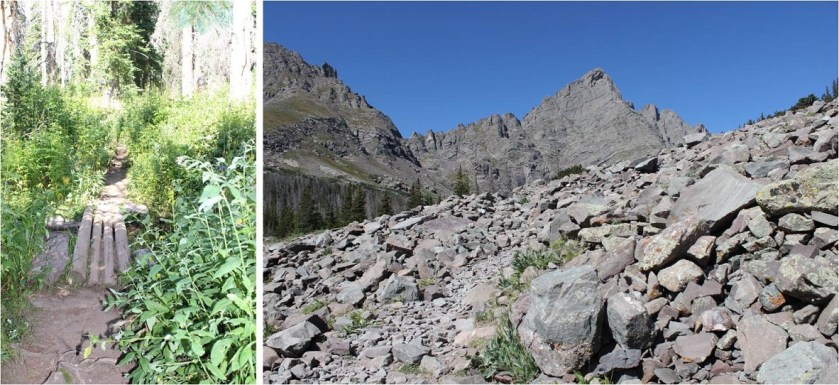
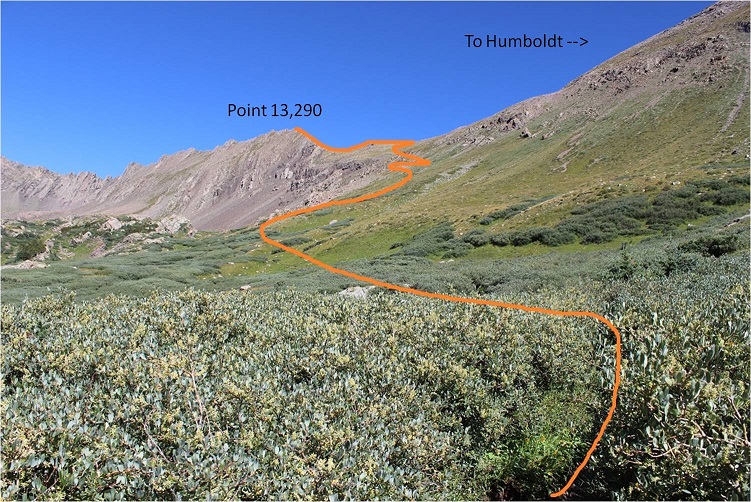
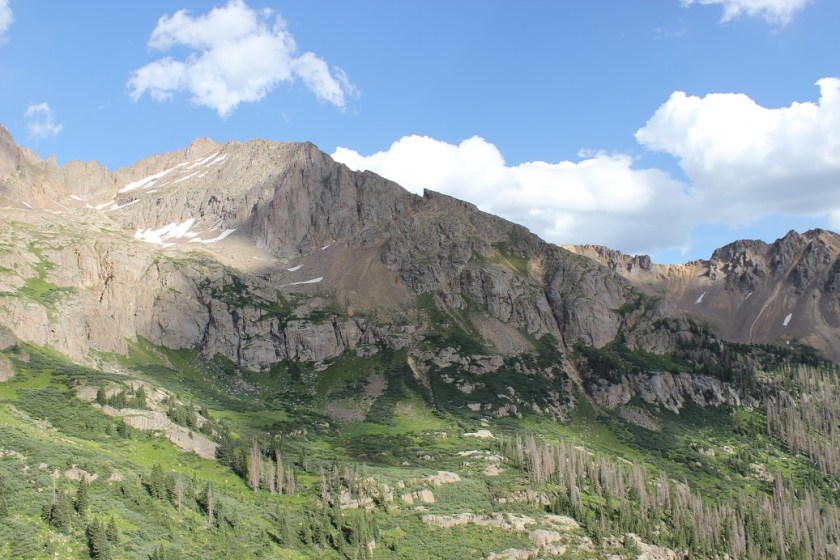
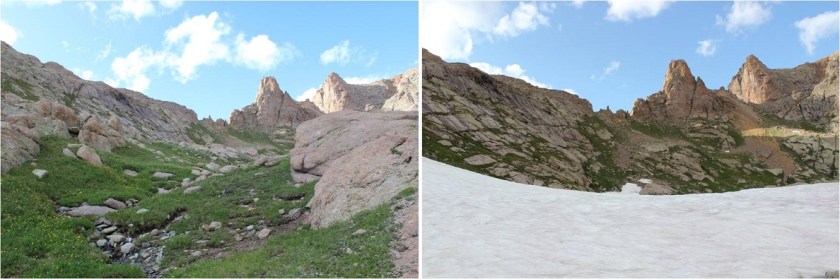
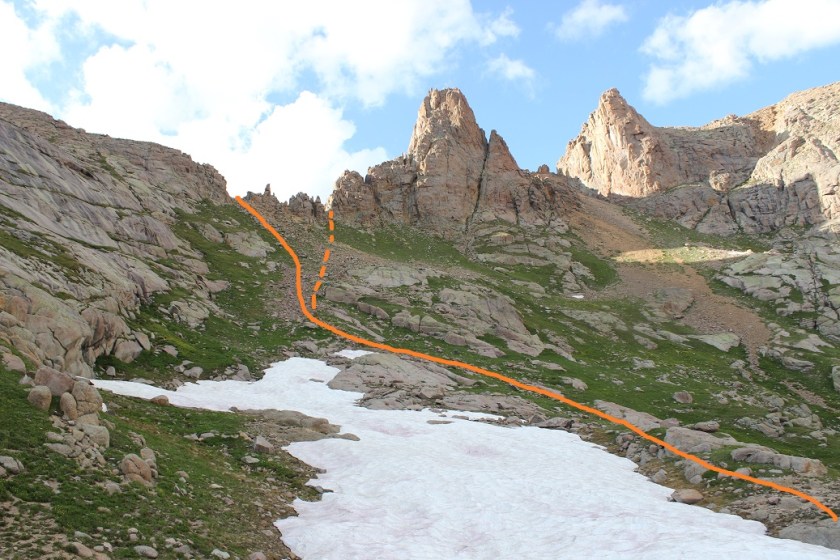
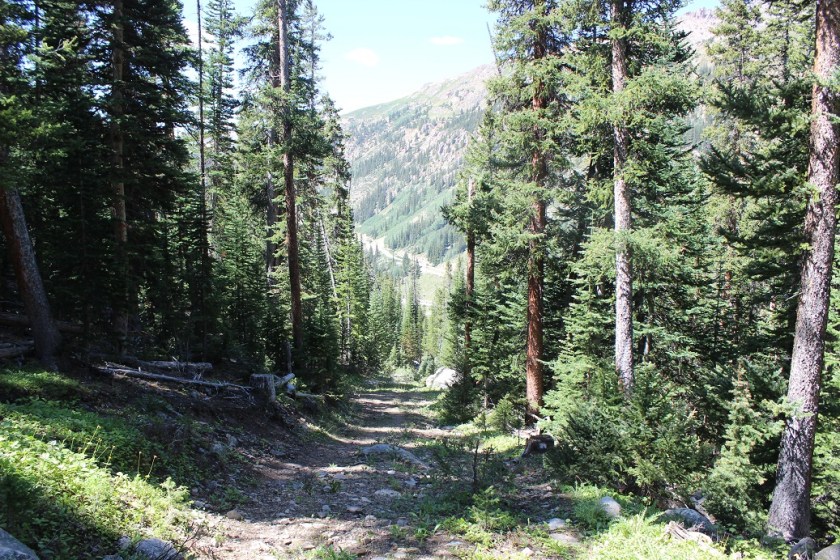
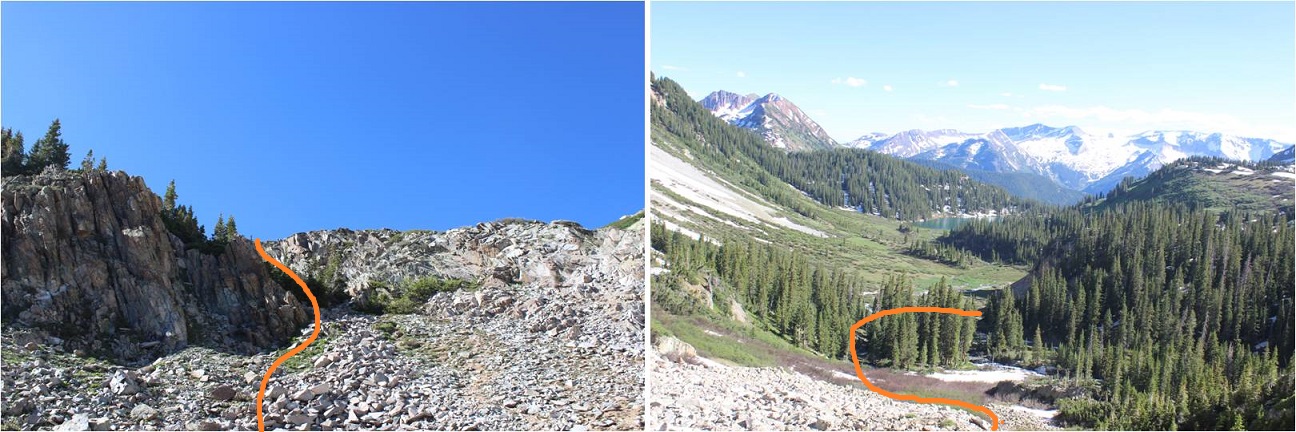
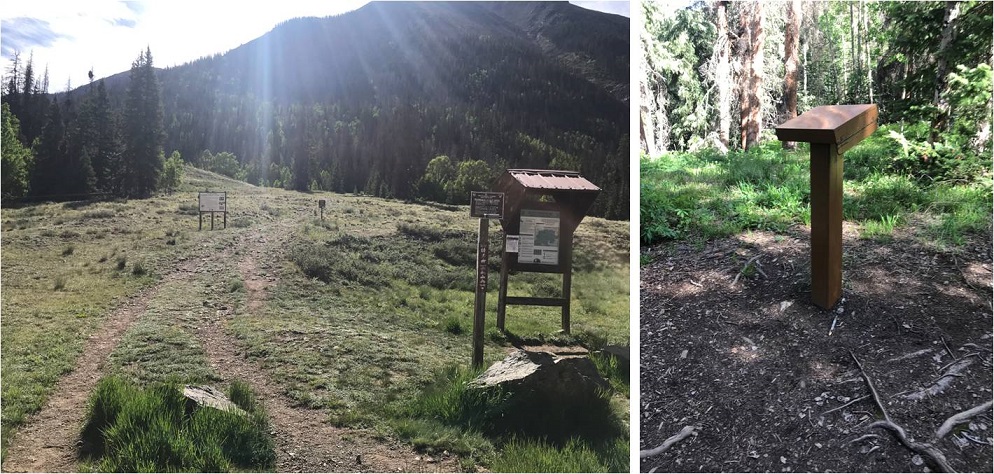
In the daylight it’s easy to see where you’re headed: Follow the well defined Humboldt Trail to the saddle of PT 13,290 and Humboldt
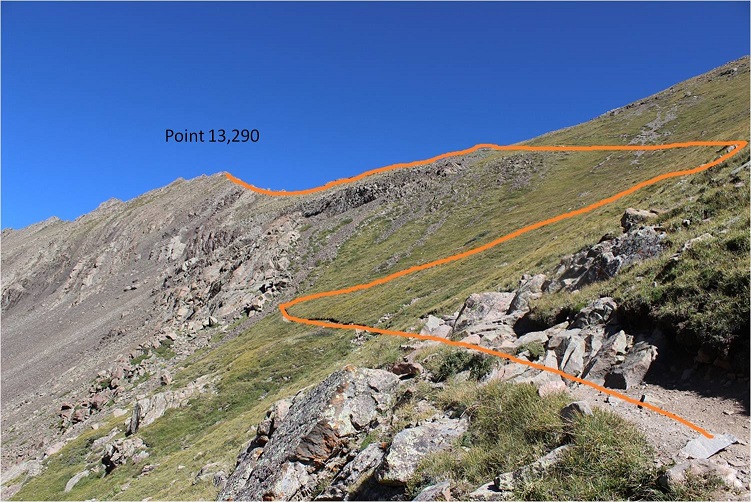
Making it to the saddle was straightforward, but here the trail ended. I turned west (left)and continued on towards point 13,290
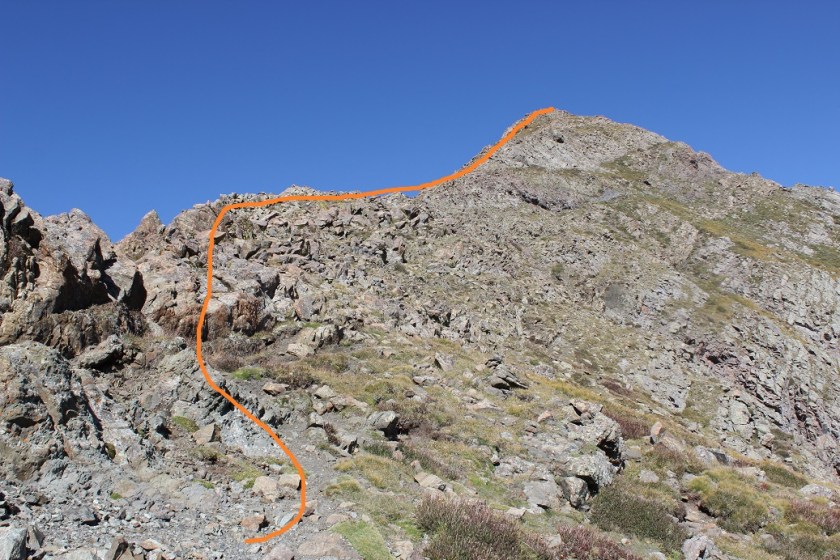
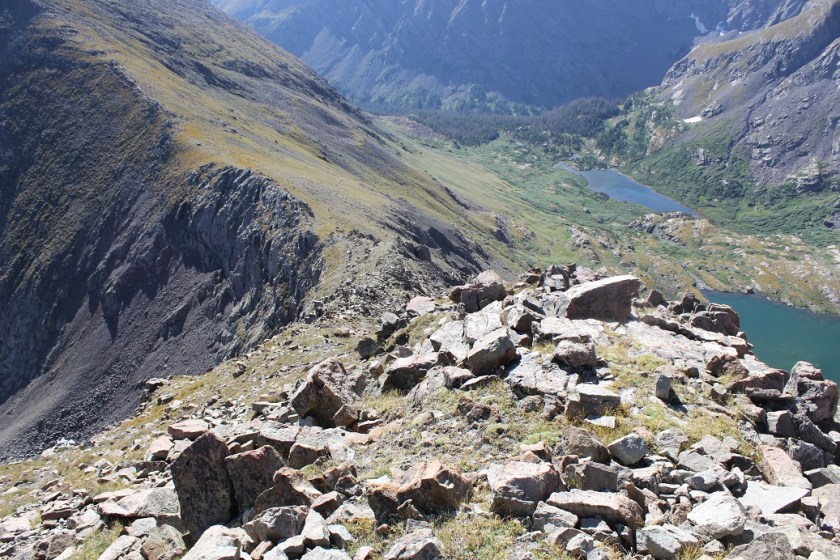
I followed the ridge to the top of the point
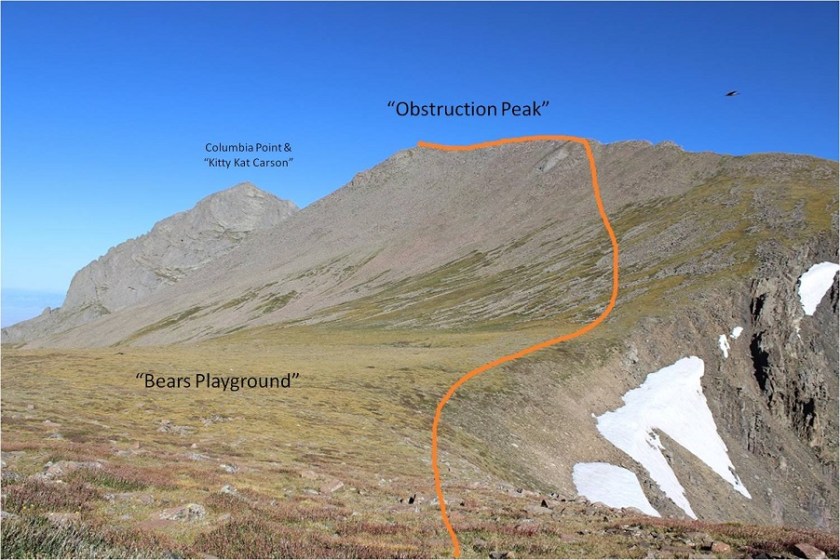
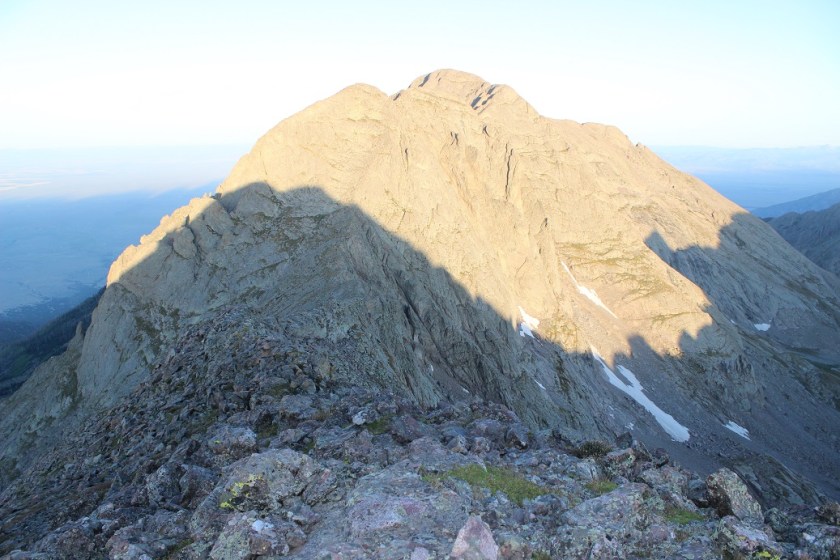
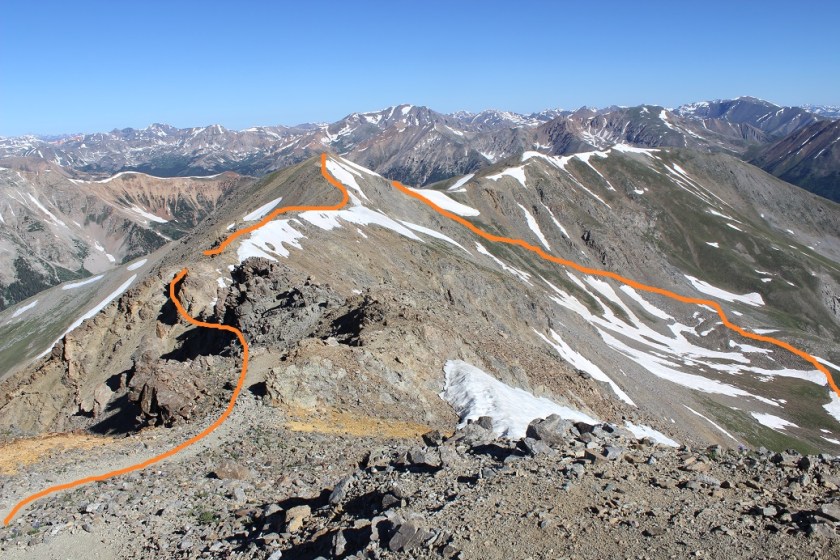
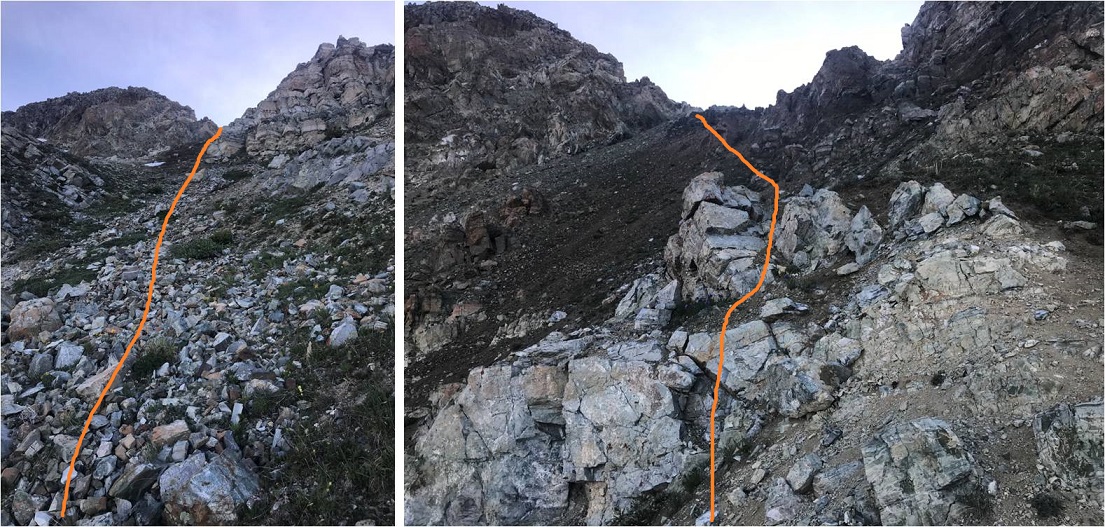
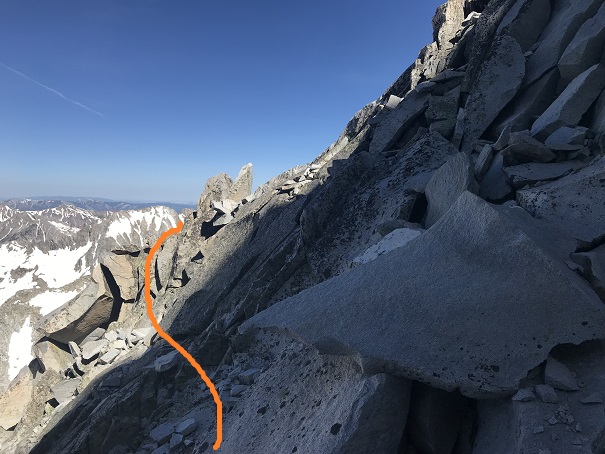
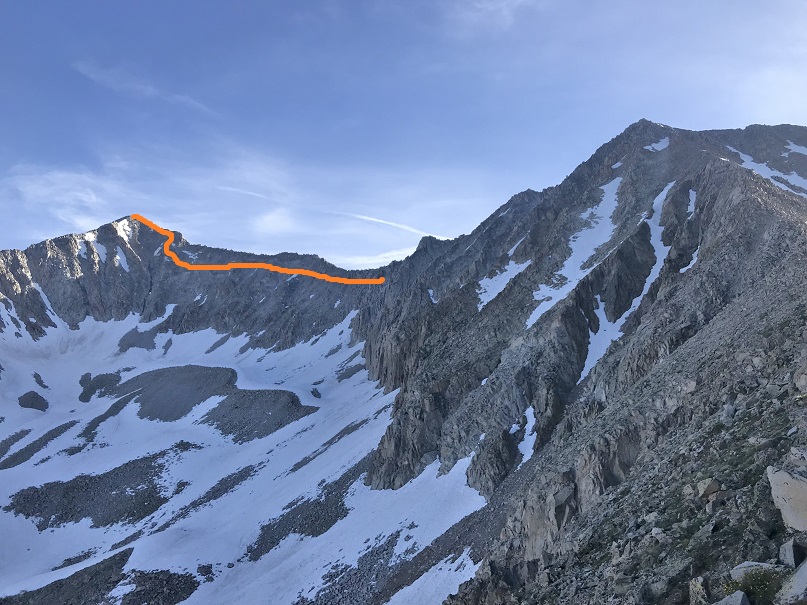
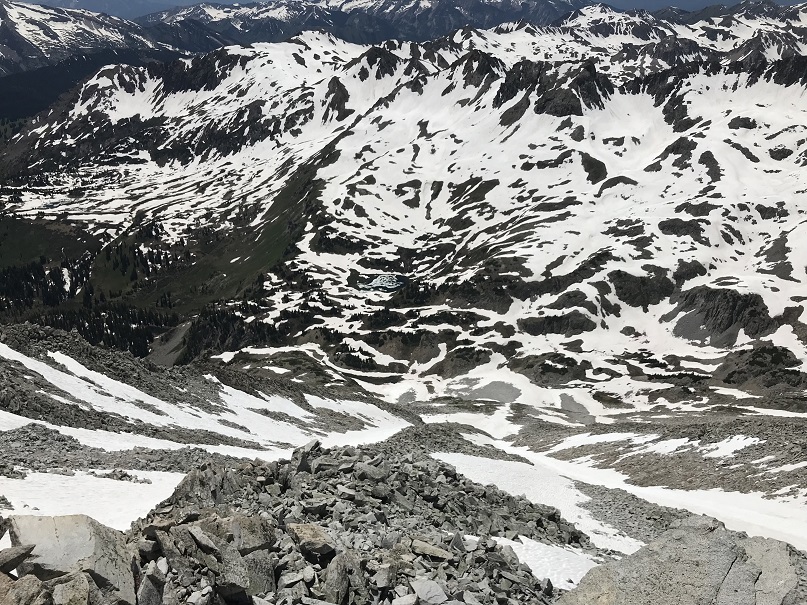
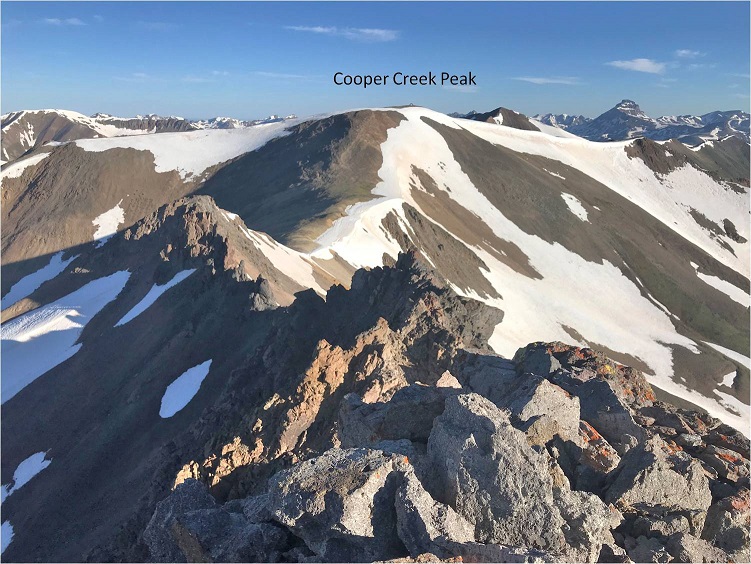
From here you can see the rest of the route up to “Obstruction Peak”, but I couldn’t because it was still dark
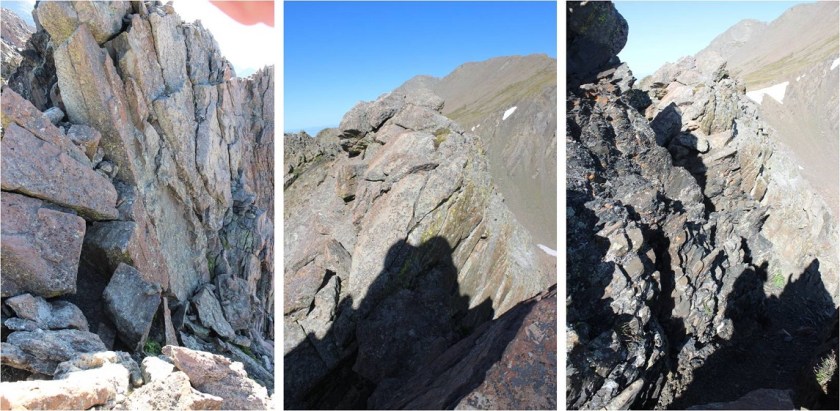
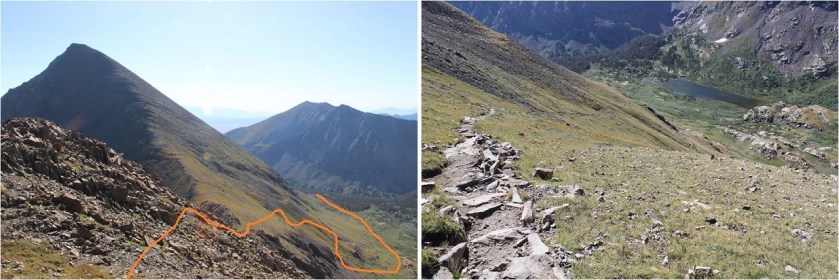
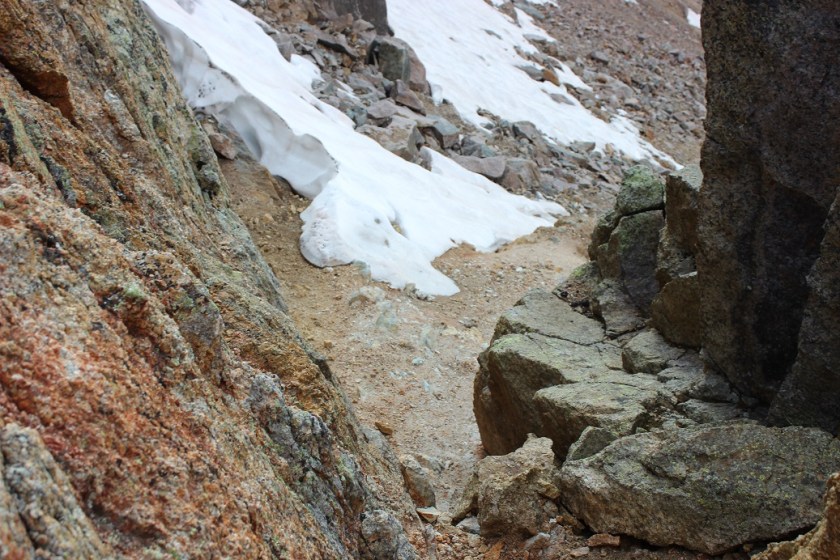
This ridge is NOT fun to cross in the dark. I wasn’t able to see much of what was ahead of me, which made route finding tricky. I also couldn’t tell how much exposure there was, which was positive at times. I mentally wished for my helmet and just stuck to the ridge, doing my best to anticipate the proper route and backtracking and trying again when necessary. On my way back I could clearly see a class 2+ path, but in the dark it was slow going.
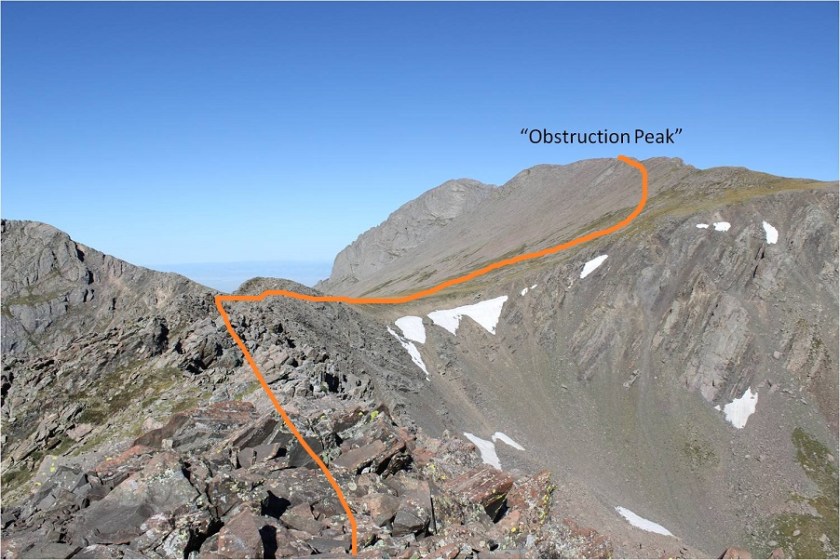
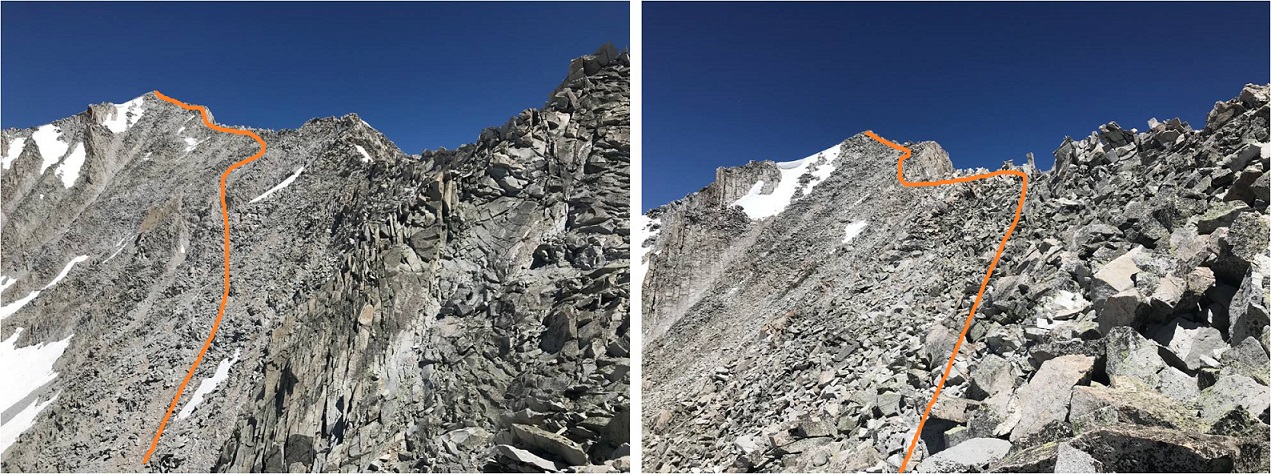
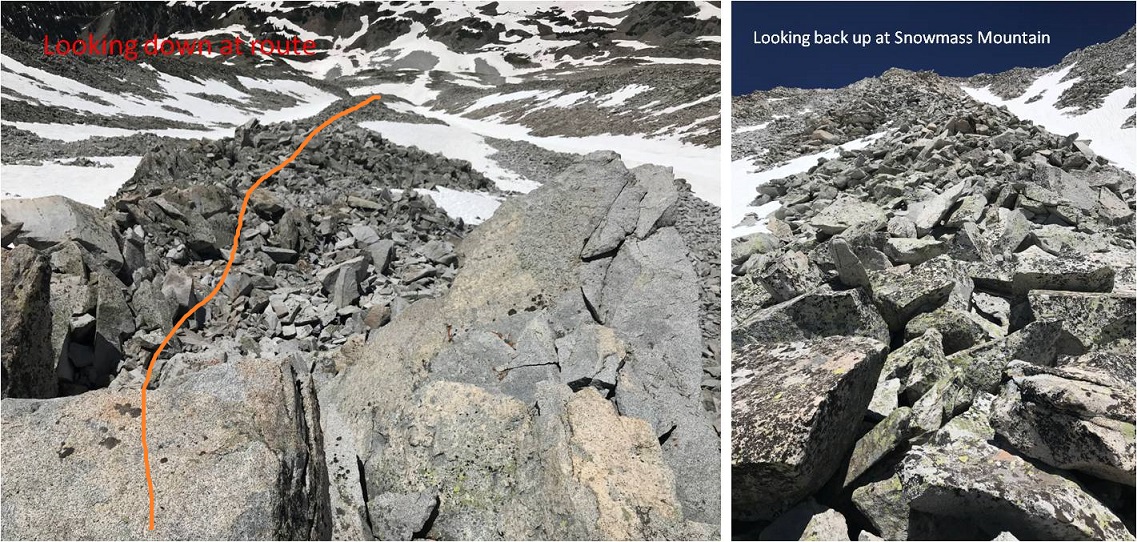
Here’s the ridge
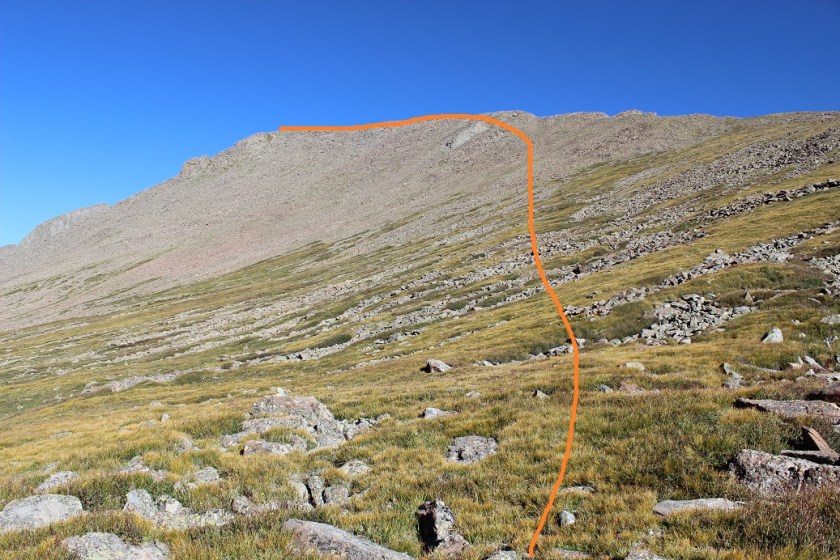
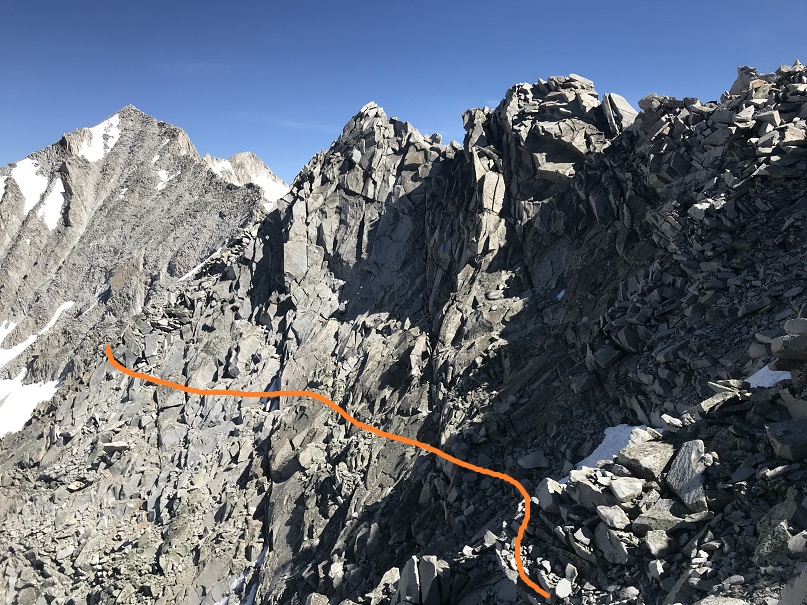
After crossing the ridge I crossed a relatively flat area known as “Bears Playground” and headed northwest up towards “Obstruction Peak” first over tundra and then rocky areas
It was actually difficult to tell exactly where the summit of “Obstruction Peak” was so I decided to make it to the ridge early and just walk across the entire ridge. I’m pretty sure the true summit is at the most westerly point.
I summited at 6:45am
“Obstruction Peak”:
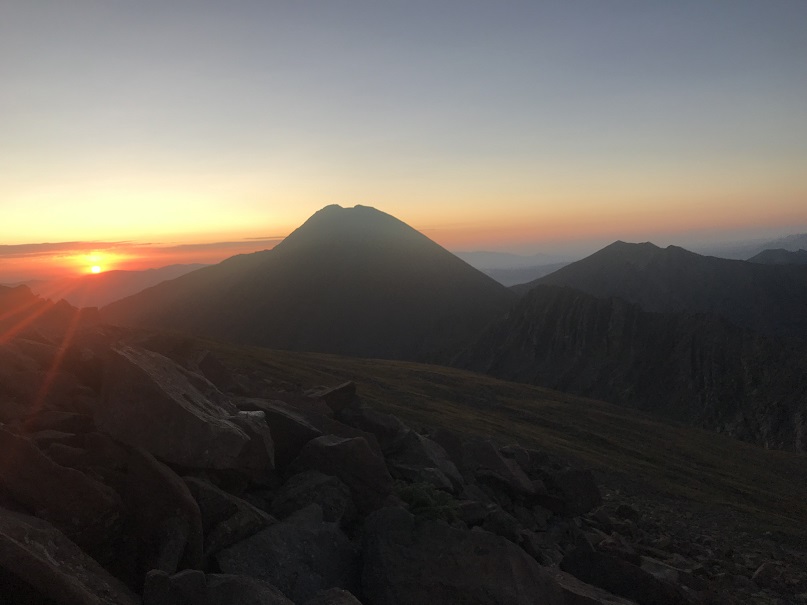
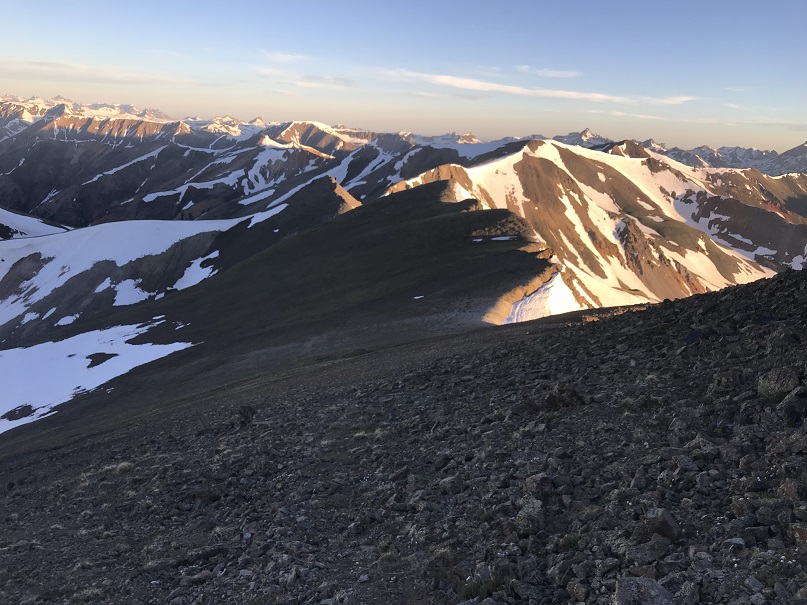
As I turned and looked east I could see the sunrise
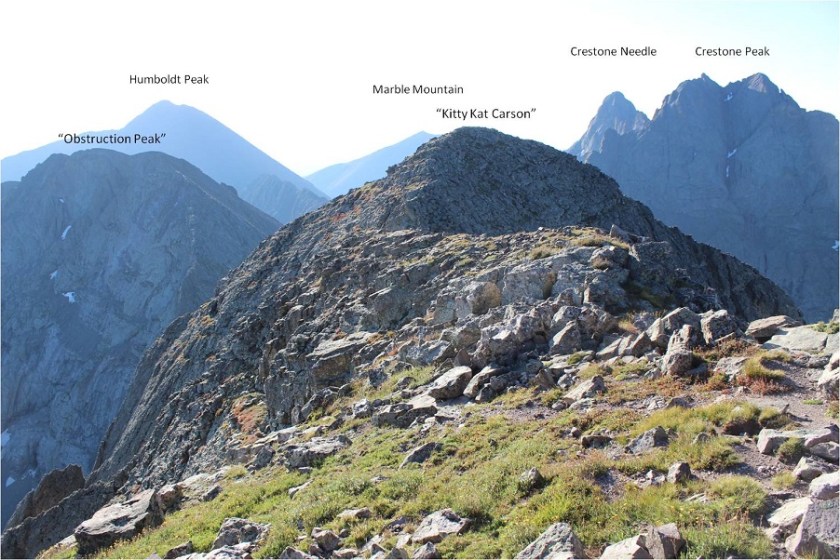
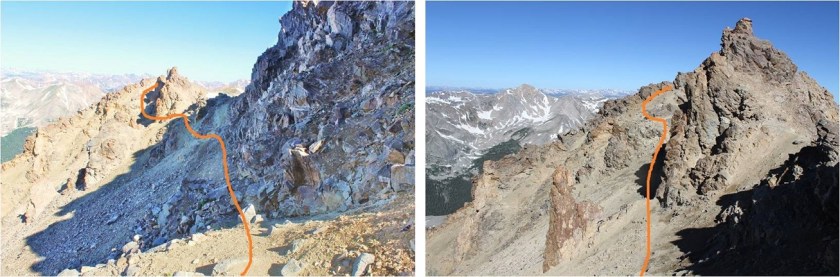
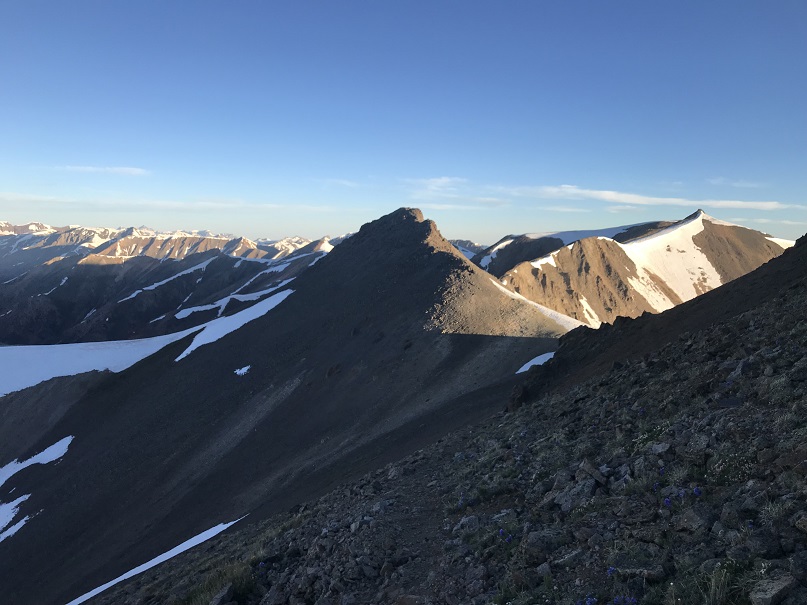
From the summit of “Obstruction Peak” the path to “Kitty Kat Carson” and “Colombia Point” was clear
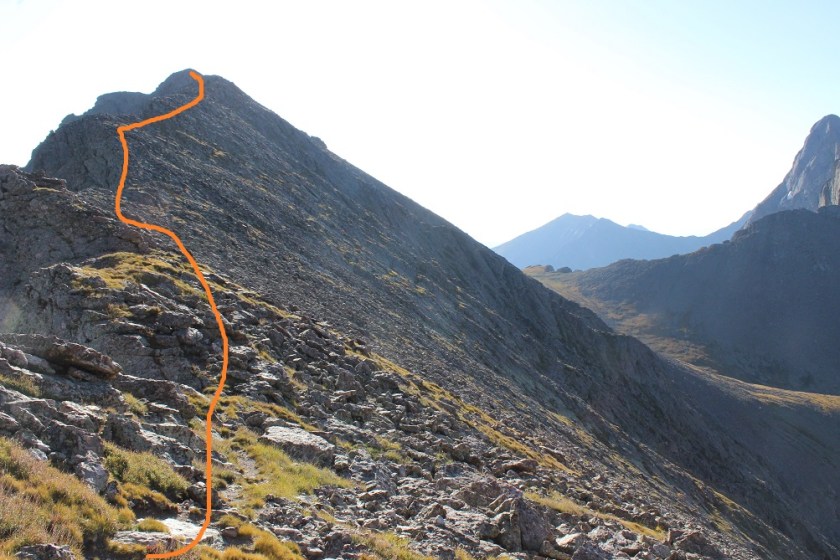
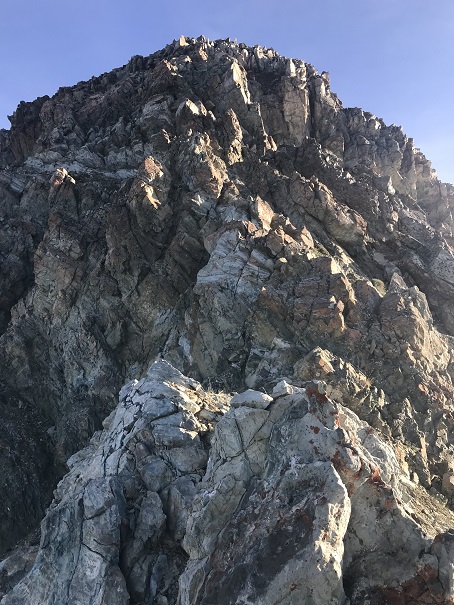
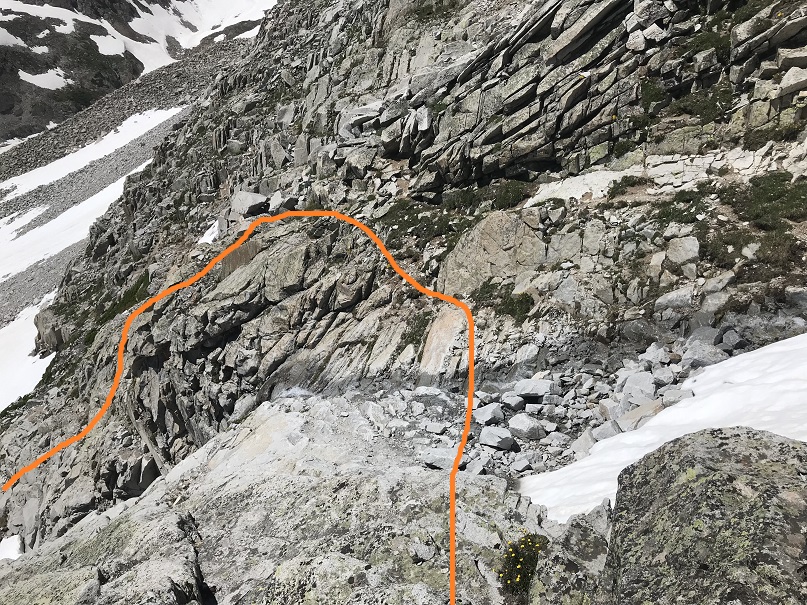
I hiked down “Obstruction Peak” towards “Kitty Kat Carson”. The ridge down was rocky but stable
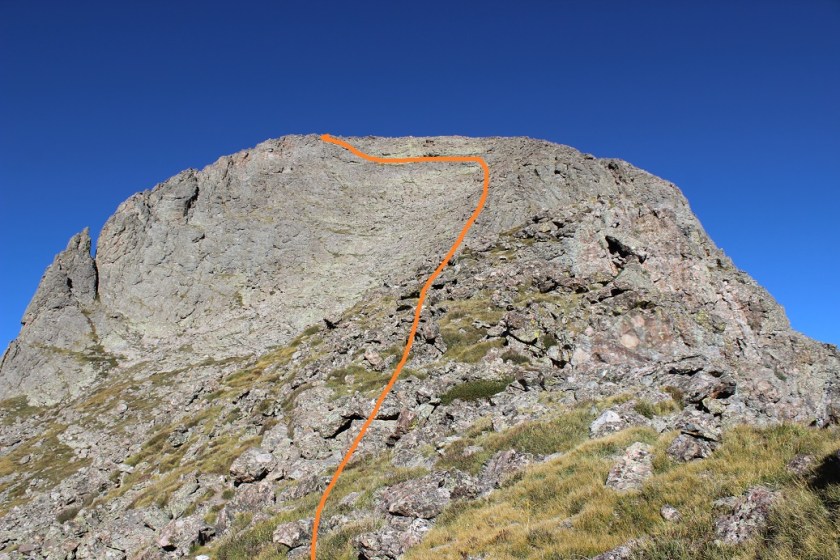
Once at the saddle “Kitty Kat Carson” looked imposing, but wasn’t too much of a challenge. There were a lot of cairns here, especially towards the top, which made them useless. I stayed to the right for most of the ridge, and then headed left to summit
The terrain here was classic Crestone: lots of steep, grippy rock
I summited “Kitty Kat Carson” at 7:28am
“Kitty Kat Carson”:
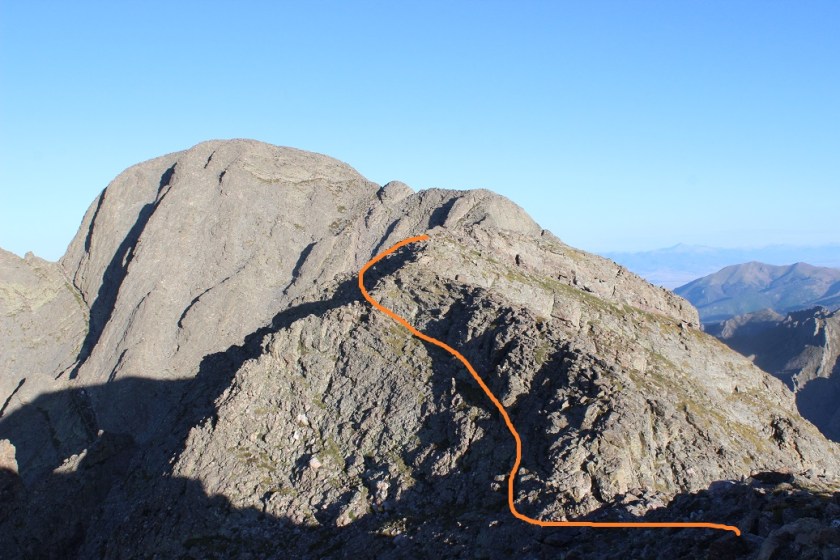
It took me less than 10 minutes to traverse from “Kitty Kat Carson” over to Columbia Point, losing about 50’ in elevation and then regaining it back. This was all class 2+ climbing
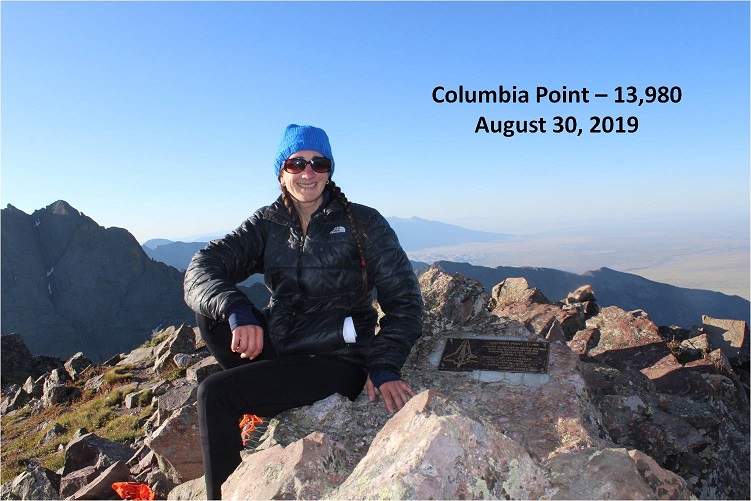
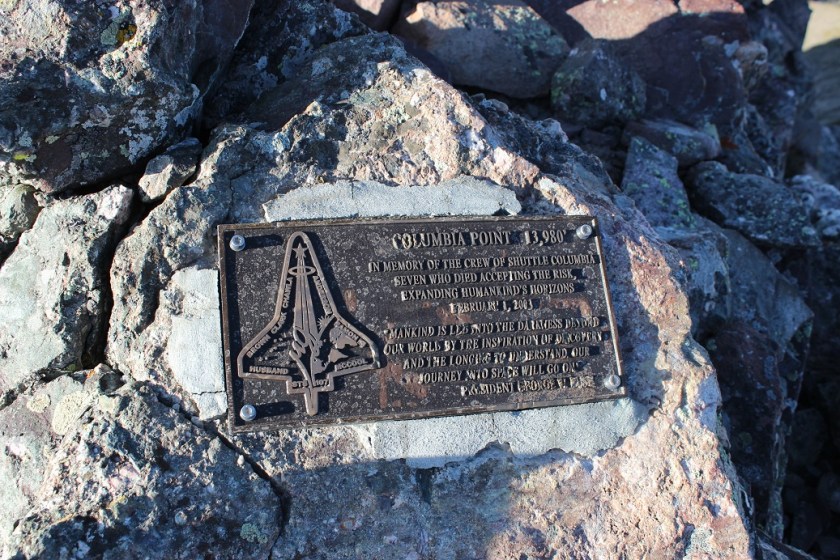
I summited Columbia Point at 7:39am
Columbia Point:
There’s a plaque at the summit commemorating the crew of the shuttle Columbia
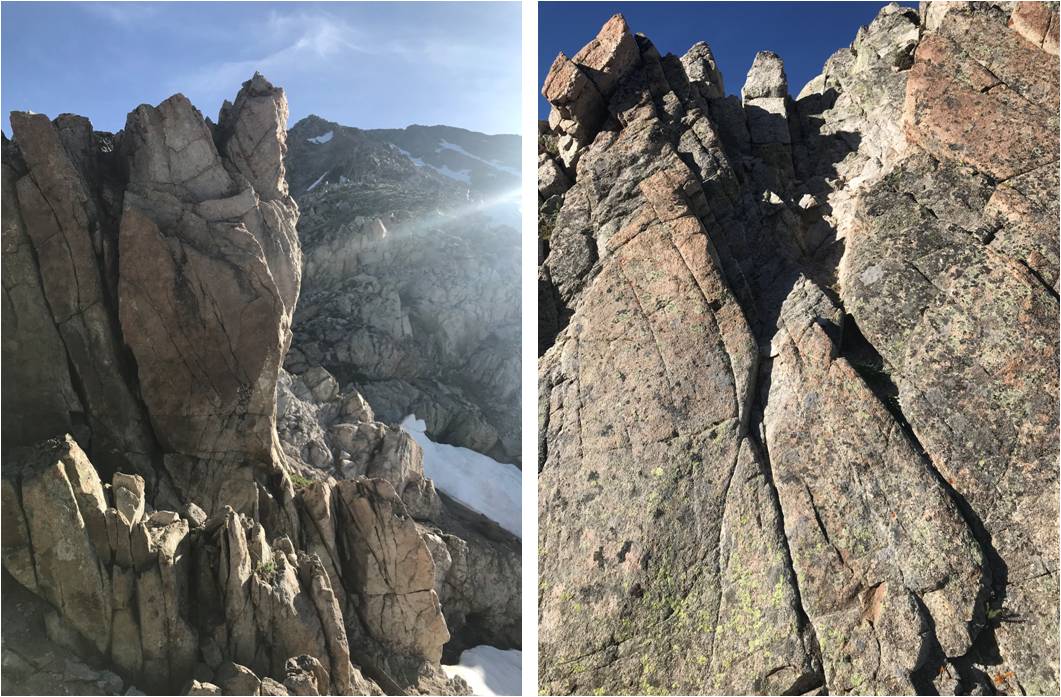
Here’s looking back on “Kitty Kat Carson”
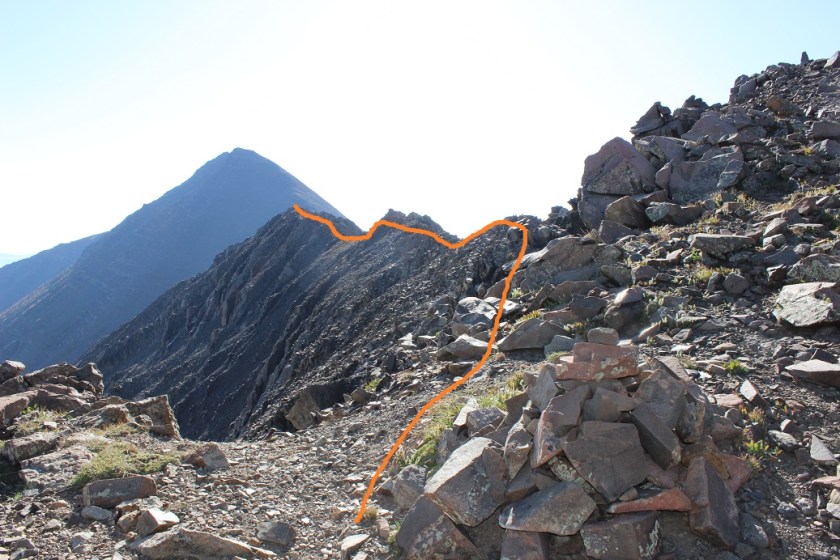
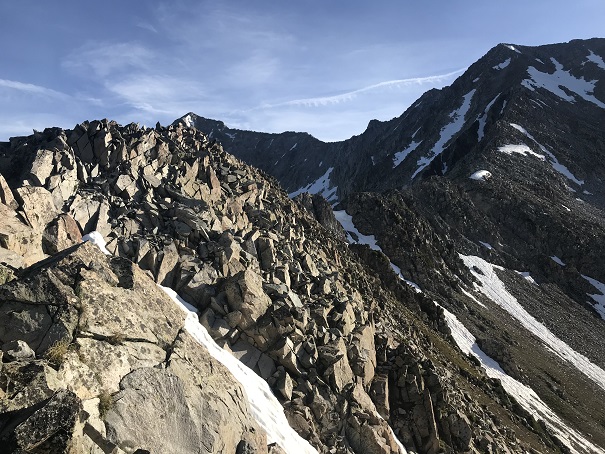
Time to head back. Here’s the route towards “Kitty Kat Carson”
And down the saddle and back up to “Obstruction Peak”
Once at “Obstruction Peak” I made my way back down Bears Playground and over to the ridge. That had been quite a time in the dark!
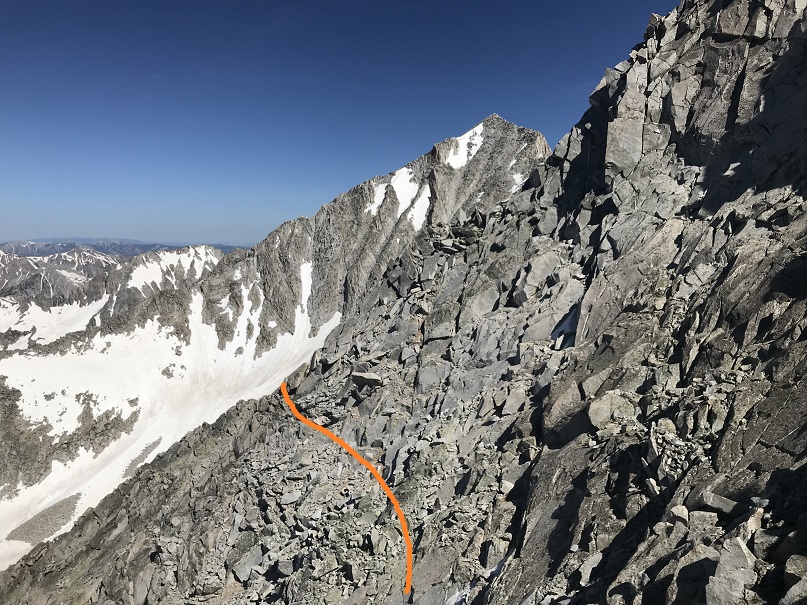
I was so glad to be able to see the route in the daylight. I didn’t need to stick to the ridge the entire time, and mainly stuck to the left/north when I wasn’t on top of the ridge. I found this was a rather quick traverse when I could see what was in front of me.
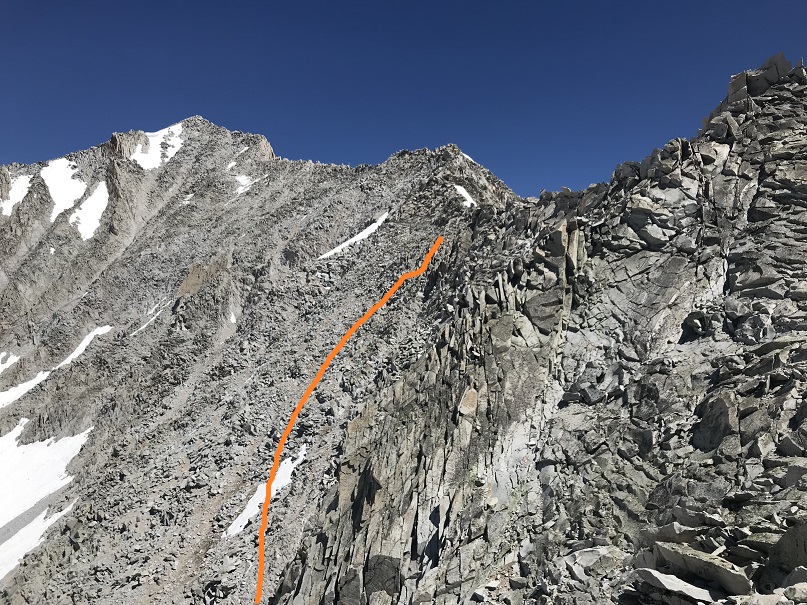
What took longer than I’d remembered was the hike down from Point 13290 and back to the Humboldt Saddle
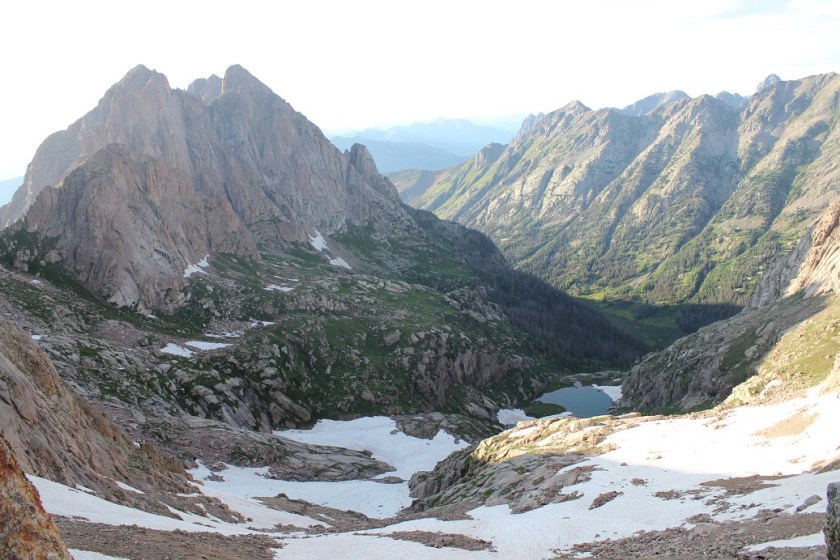
Here’s the route to the South Colony Lakes area
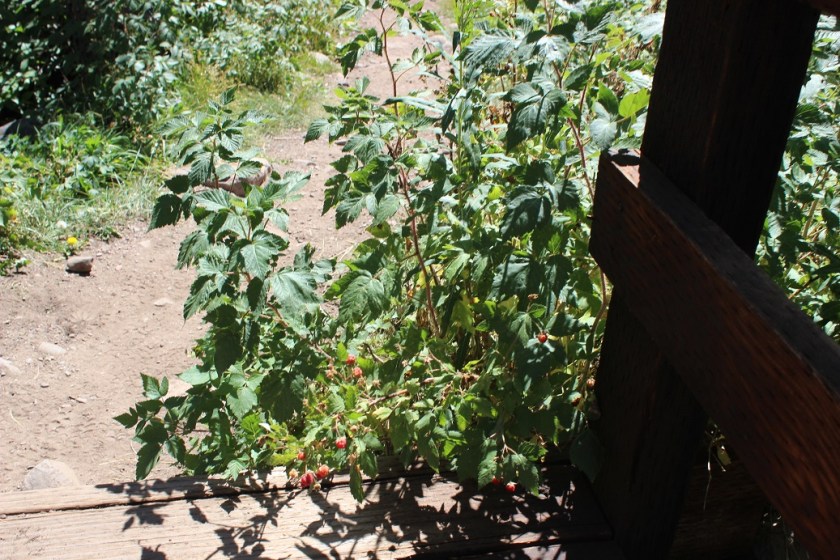
The hike back was rather uneventful. I saw over a dozen hikers and was reminded how popular the 14er trails are. I stopped and talked to several people intent on Humboldt, and even saw a few friends intent on some of the other 14ers. I was in a rush though: I had to be home by 2pm to take my daughter camping, which meant I had to make it back to the trailhead no later than 11:35am. It was a beautiful day and I wasn’t carrying a full pack so I was able to hike pretty quickly. I made it to the bridge crossing and saw some raspberries.
I decided to try one: it was sour, and unfortunately not as good as the ones from Purgatory, so I only ate one and left the rest for woodland creatures to enjoy. I made it back to the trailhead at 11:30am, making this a 14.5 mile hike with 5304’ in elevation gain in just under 9 hours. The best part (besides making it home at 1:58pm)? No mosquitoes!!!
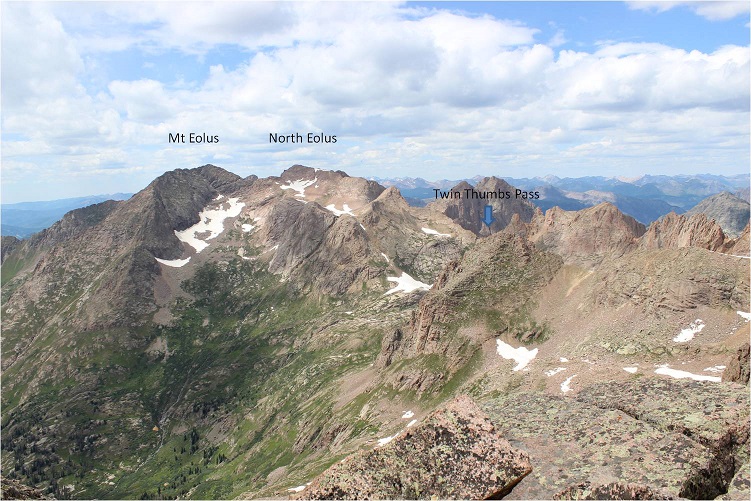
I did a ton of research before setting out for this hike. It was my goal to link up the Chicago Basin with the Noname Creek Approach via Twin Thumbs Pass. All of my research said it was “doable”, but I hadn’t found a trip report indicating it had ever been done, so I went in kind of expecting to fail. I was trying to eliminate hiking into the Chicago Basin to summit Jupiter and then hiking back out and attempting Jagged Mountain via the Noname Creek Approach. If I could link up the hike via Twin Thumbs Pass I’d be saving about 20 miles and several thousand feet of elevation gain. And it almost worked…
Sleep is for armatures, so I left my house at 8pm after hosting a Girl Scout awards ceremony, arriving at the Purgatory Trailhead at 2:15am. I was on the trail by 2:30am. The first 10 steps hurt. A lot. My pack was wayyyyy too heavy. I’d gone through it multiple times eliminating what wasn’t absolutely necessary and it was still painfully heavy. I’m not sure how much it actually weighed (I was too scared to weigh it) but I’m guessing it was around 45-50lbs. That’s excessive, especially for someone who only weighs 105lbs. But I just couldn’t lose any more weight: I’d already thrown out unnecessary items like a camp stove (it was all peanut butter and beef jerky for me this weekend) a pillow (not needed), a change of clothes, bug repellant, etc. and had switched my “good” backpacking sleeping bag for a lighter weight one. What was weighing me down was all the gear: rope, harness, carabiners, webbing, etc. All that stuff was necessary if I wanted to attempt Jagged this weekend, which I did.
So those first 10 steps hurt and I should have known then to stop and reassess this adventure, but I told myself it would eventually get easier if I just kept moving so I just kept moving. Yep, I kept moving but it didn’t get easier. I gingerly hiked my way down the Purgatory trail towards Cascade Creek, losing elevation the entire way and thinking to myself “hiking down shouldn’t be this difficult”.
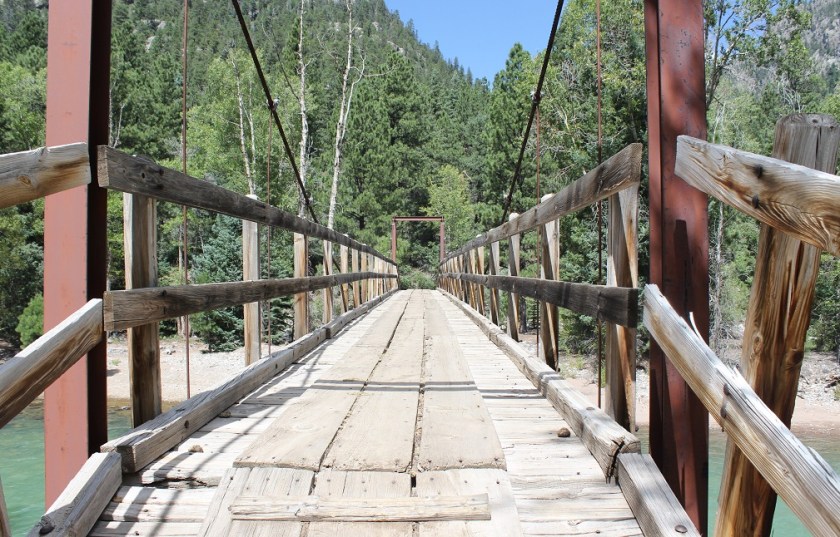
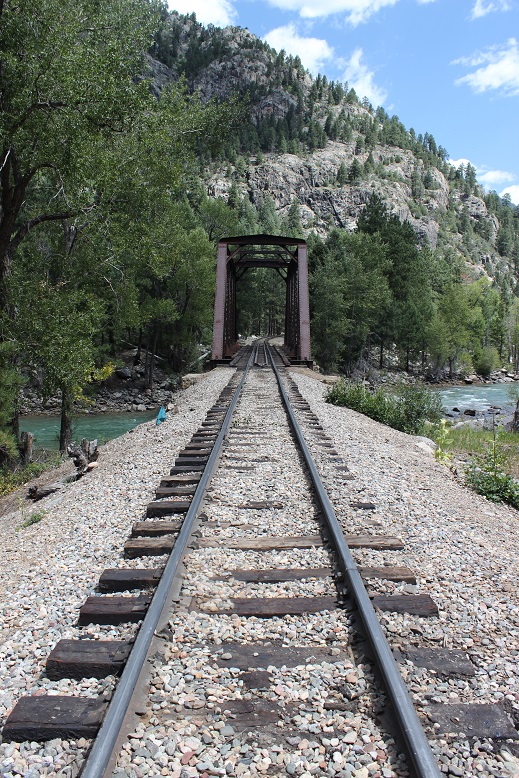
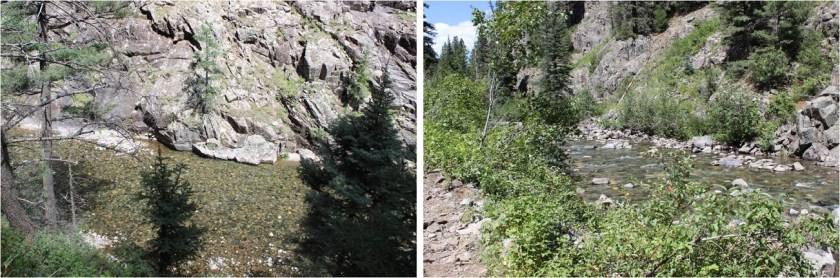
The trail follows Cascade Creek southeast towards the Animas River. There’s a bridge here to cross
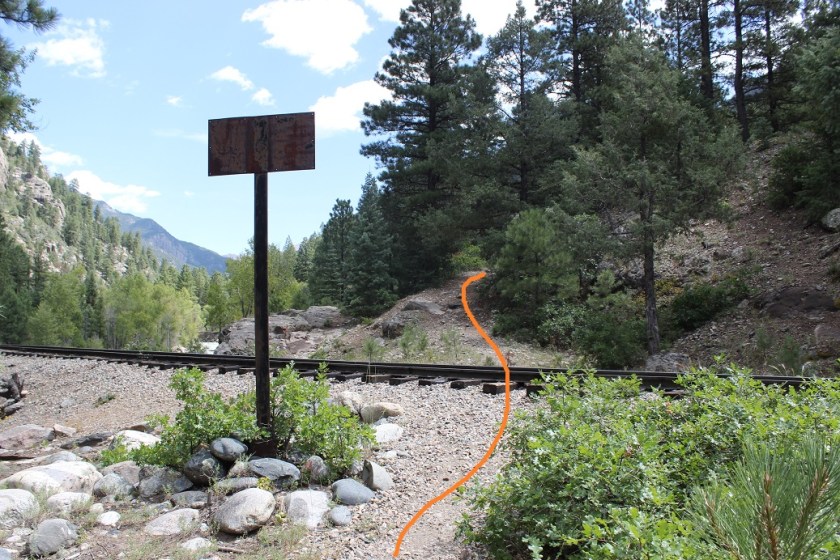
and a good trail to follow to the Railroad tracks. I crossed the tracks and continued on the Animas River Trail.
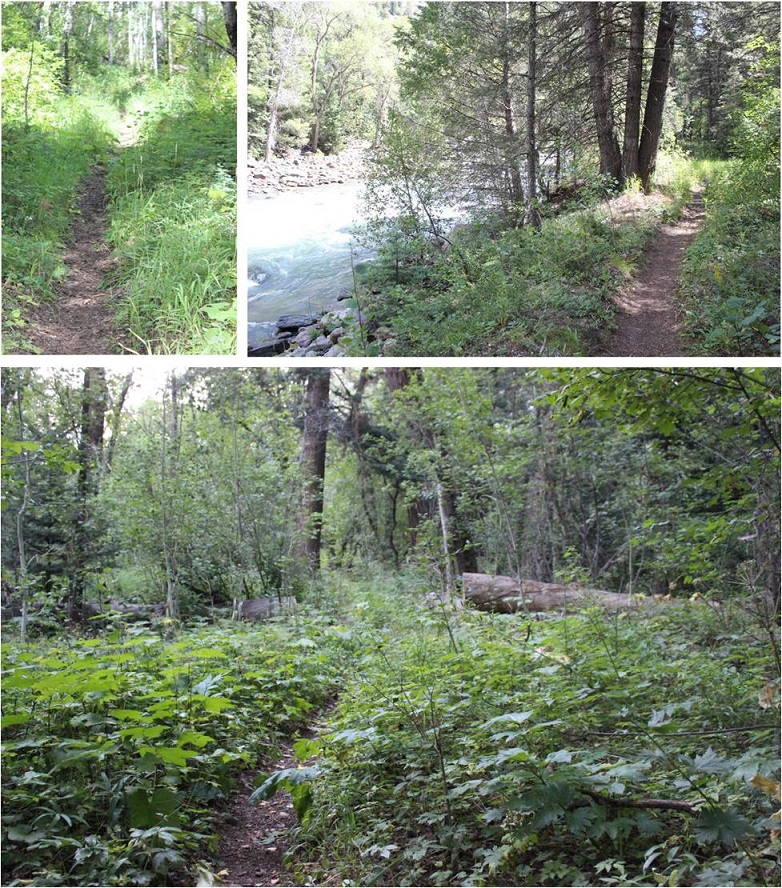
The trail is easy to follow, but was overgrown in areas. It follows the Animas River, which I could hear but not see in the dark.
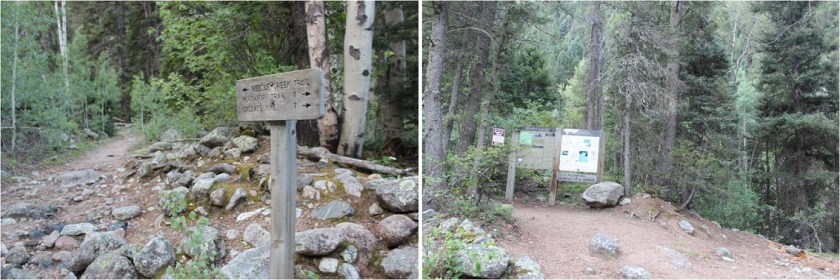
While the trail follows the river it still has numerous small ups and downs in elevation, which I thought were completely unnecessary: I’d rather stay at a steady elevation. The sun started to rise and I made it to the Needleton/Purgatory/Cascade Junction and followed the Needleton Creek Trail to Chicago Basin. Side note: It is not 7 miles to the Purgatory Trailhead. From this point my tracker says it’s 10 miles. A little ways up there’s a trail register and information area. I didn’t sign the trail register because I hadn’t intended on exiting this way.
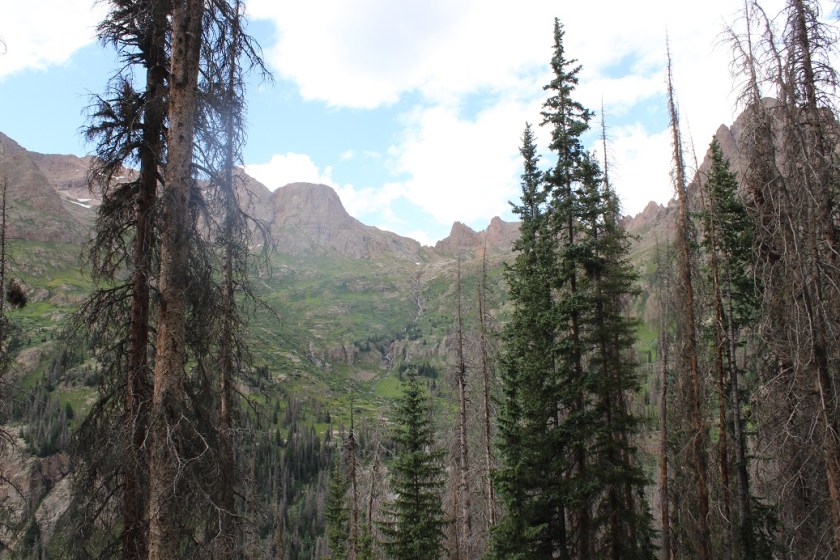
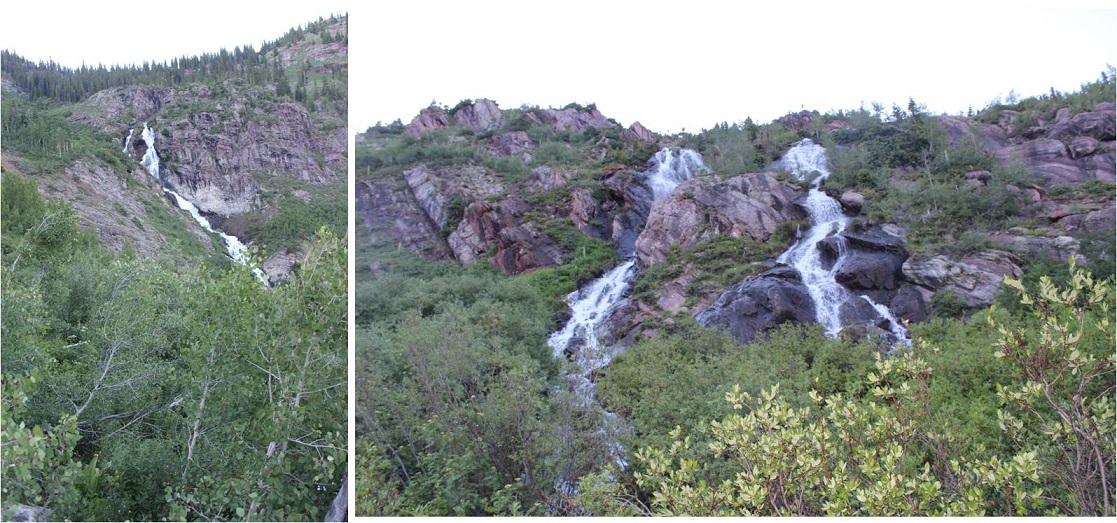
From this area it’s another 6 miles to the Chicago Basin. This part of the trail follows Needle Creek as it climbs towards the basin. I loved hearing the water rushing past and seeing the waterfalls along the way.
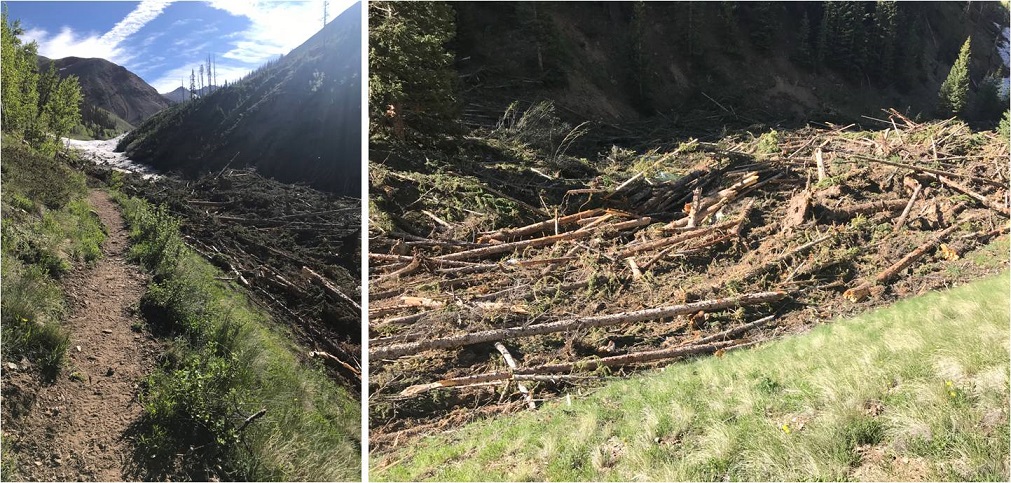
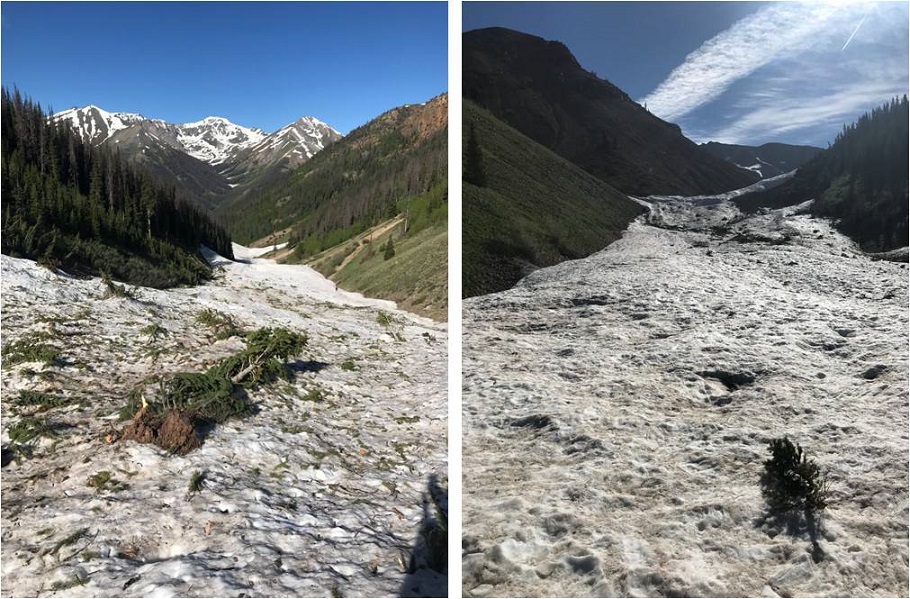
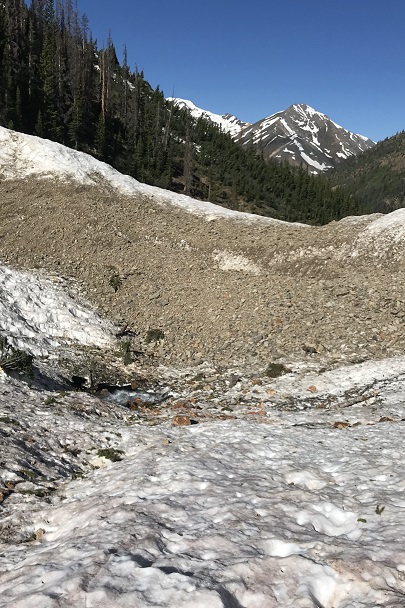
It seemed like it took forever to make it to the basin. I realized I was almost there when I saw the avalanche debris. There really wasn’t very much damage, and luckily there were already clearly established trails as a workaround.
The hike into Chicago Basin is indeed beautiful!
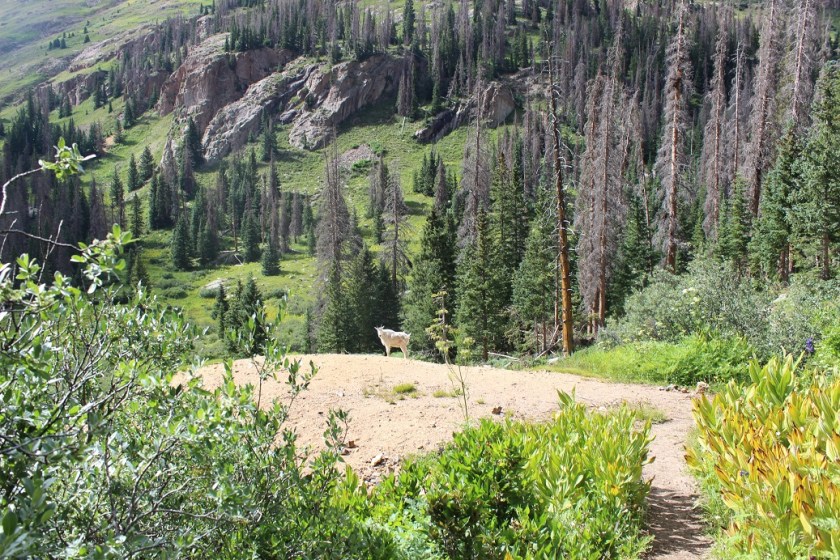
I didn’t see much evidence of mountain goats. I was here last year and they were everywhere. This year I saw a couple, but nowhere near as many as before.
Normally I like to do the hardest peak first, but today the easier peak was my first goal for several reasons: I wanted to get a look at the backside of Jagged to see how much snow there was on route and I wanted to see if there was still snow on Twin Thumbs Pass. I knew I didn’t need all my gear to summit Jupiter so I stashed my pack and just brought the essentials: water, my camera, and some snacks. Oh yeah, snacks. I should probably eat something? I had about 12 almonds and kept them down so I considered it a win.
If you go left at this junction it takes you up to Twin Lakes. If you continue straight it will take you on a well established path towards Jupiter.
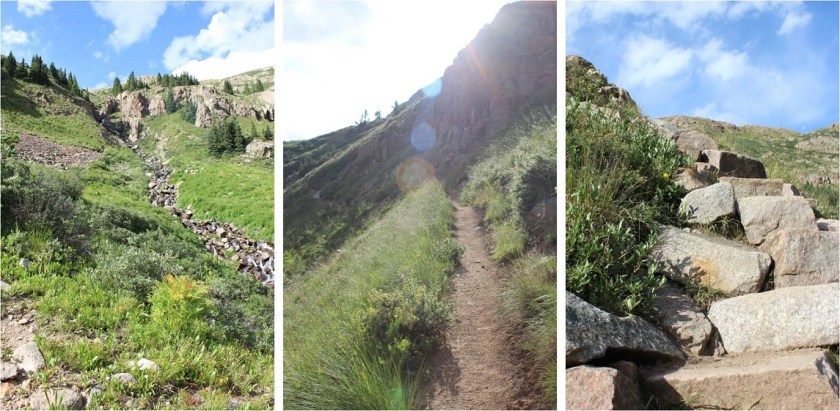
The trail crosses Needle Creek and heads west up the hillside
About halfway up the hillside there’s an old mine. I’d already explored this mine the last time I was here so I didn’t feel the need to go inside, but I did see a pack outside, and called in to say hello to whoever was exploring.
I met a man who was really excited about the mine. His hands were white from the walls, and it looked like he’d been having a time. We chatted for a bit: He’s already hiked the Colorado Trail and was now looking for a way back to Durango. He asked me if I knew if the trail “went” and since I’d already done a lot of research on the Johnson Creek/Vallecito trails when planning this trip I knew if he made it to the saddle he could take Columbine pass over. I envied this man his freedom to just explore and not worry about time and wished him luck. I wish I had more time to adventure!
I continued on the trail to treeline, crossed a creek, and here the trail (mostly) stopped. I felt so much better hiking with just the essentials: I felt like I could skip up this mountain!
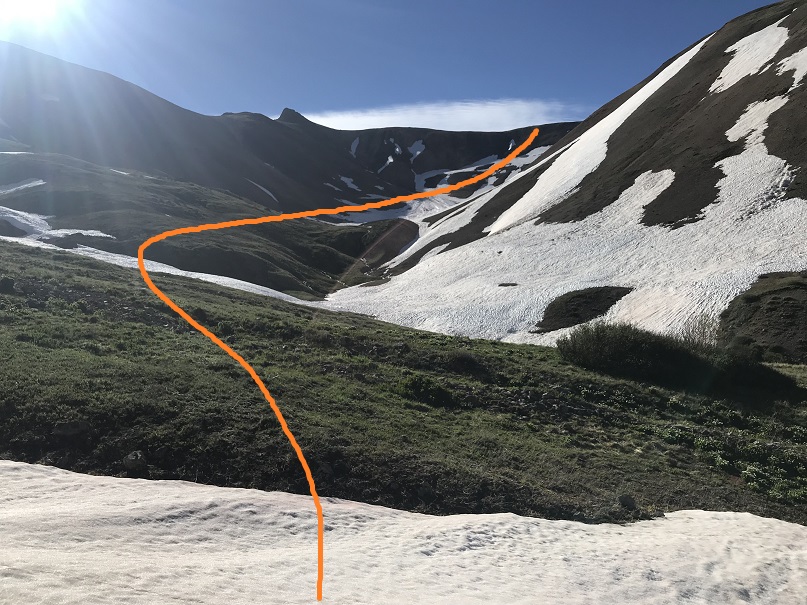
There were a few cairns and what looked like overgrown social trails but no established trail after the small creek crossing. Here’s the route I took up the side of Jupiter.
It’s much steeper than it looks, but the wildflowers made up for the difficulty.
About halfway up the hillside I started getting worried about the weather. There was a 30% chance of rain today between 2-4pm, and the clouds forming didn’t look good. Luckily the wind was blowing them away from me, but I kept an eye on them just in case. I really, really didn’t want to turn back at this point (but I would have if necessary). I kept looking for the man I’d met, watching for his ascent of Columbine pass, but I never saw him again (even from a distance).
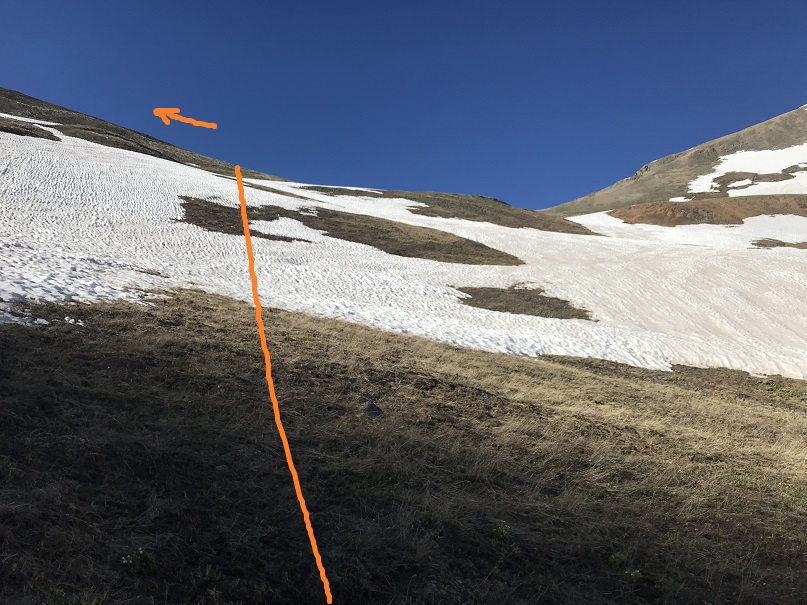
I continued on and came across cairns. There seemed to be several ways around this part. I took the solid line up, the dotted line back down.
I continued up the side of the mountain, aiming for the cairn I could see at the top of that pile of rocks, sure that was the summit (spoiler alert: it wasn’t)
Imagine my surprise when I made it to the top of that pile of rocks, only to see… this
Wait? I thought this was a class 2 hike? That looked like class 3 scrambling to me. I was a little put off I’d left my helmet back with my gear in the basin and a little upset with discovering this had been a false summit, but decided to just go ahead and finish. I took the solid route up, the dotted line down. I felt the dotted line route was indeed class 2+, but the solid route was class 3. There were several ways to summit here, and so many cairns they lost their intended purpose.
I summited Jupiter Mountain at 2pm.
Summit Video:
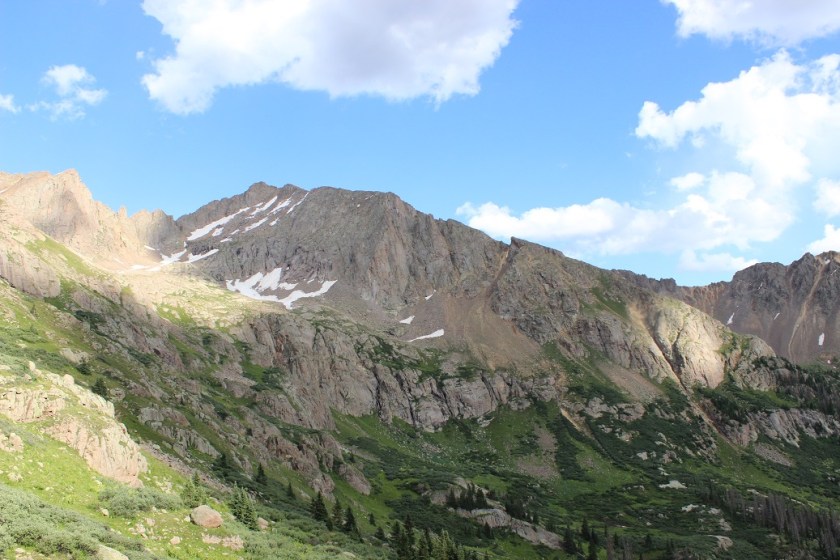
I’d been hiking for almost 12 hours at this point, but without my full gear for the past 2 hours I was feeling pretty good. I decided to take a look around. Jagged from this side was mostly snow free!
Twin Thumbs pass was obscured by Point 13,472, but it looked mostly clear of snow as well. This was all good news. Now I only had to worry about the north facing sides of the mountains (which hold snow longer).
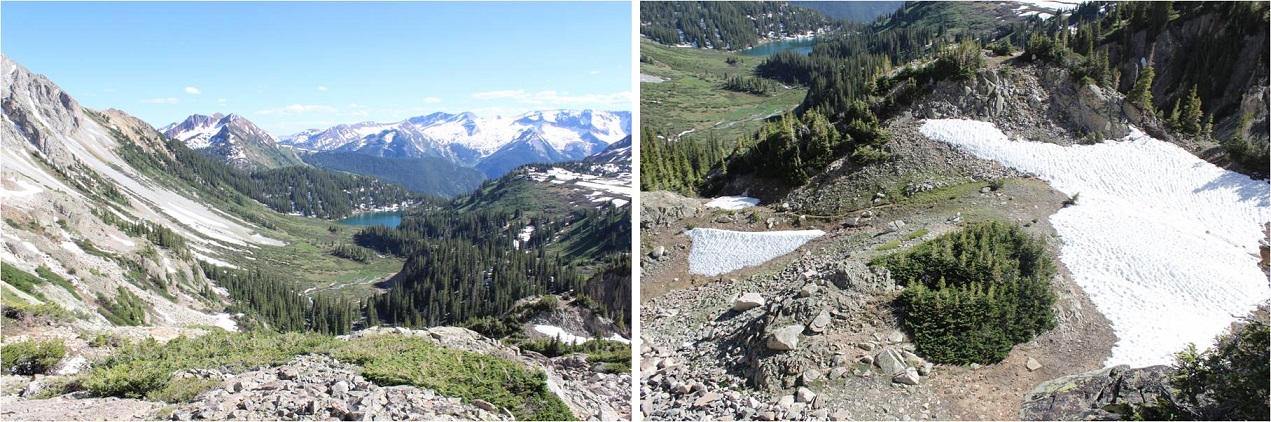
Time to head back. Here’s the route I took off Jupiter (this also shows Columbine pass in the background)
And back down to treeline
Back at treeline I had a better view of Twin Thumbs pass. It appeared clear. Now it was time to retrieve my gear and head up to Twin Lakes.
I saw my first mountain goat of the day here
I re-crossed Needle Creek and stopped to filter some water. It was a warm day and I was forcing myself to drink. It was making me nauseous, but at least I wasn’t light headed. The cool water felt really good, and I started just drinking it from the filter to save time. After my water bladder was full I went to find my pack. Argh! I wasn’t able to find it! This was not good. I was sure I’d left it by the sign? After about 5 minutes of searching I realized there were two similar signs and I was at the wrong one. I made my way about 10 yards further and was relieved to find my pack where I’d left it, and as an added bonus, no goat/marmot damage to be seen. The downside? There were so many mosquitoes here! I’d wanted to rest for a bit, but the mosquitoes wouldn’t quit, so I decided to just get going.
My pack was on the ground so I sat down to put it on and groaned as I leaned to the side to stand up. That pack was heavy!!! Time to trudge up to Twin Lakes. Luckily this is a very well marked trail.
About halfway up I saw my second set of goats for the day. They were directly on the trail and looked me straight in the eye as I got close. I was wondering how we would pass each other politely when one of them just veered off the path a little to the left, went around me, and then hooked back up with the trail. They must be used to this…
From this angle Jupiter looks imposing
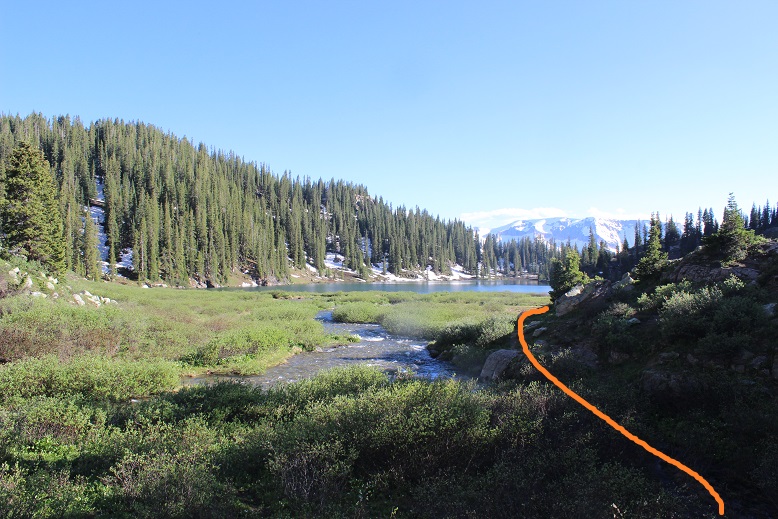
As I continued on I saw a sign that said “No camping beyond this point: Including Twin Lakes Basin”. Well shoot. There went my “Plan B” of sleeping at Twin Lakes if I couldn’t make it over the pass. Oh well, it looked like the path was clear, so it shouldn’t matter anyway.
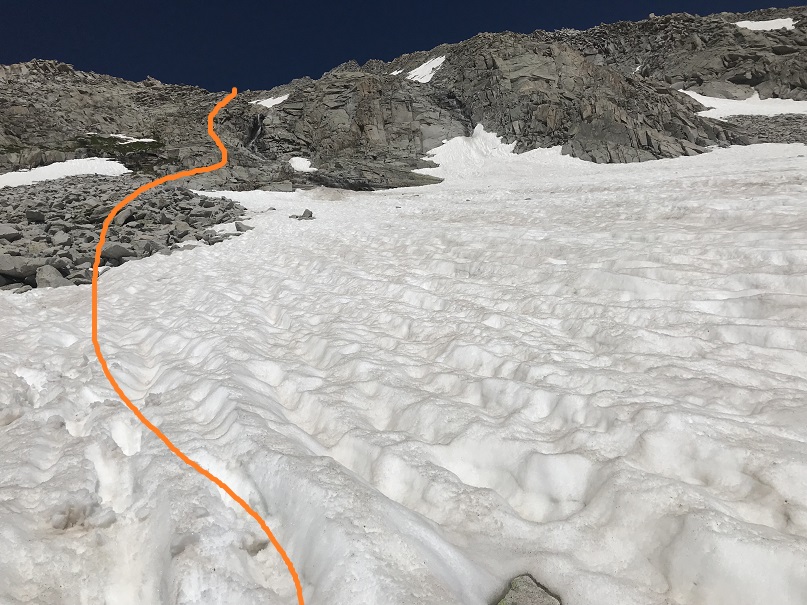
I made it to the Twin Lakes area and had a great view of my intended route. There looked to be a little snow, but nothing I couldn’t handle
Also, there’s hidden snow here, more than anticipated
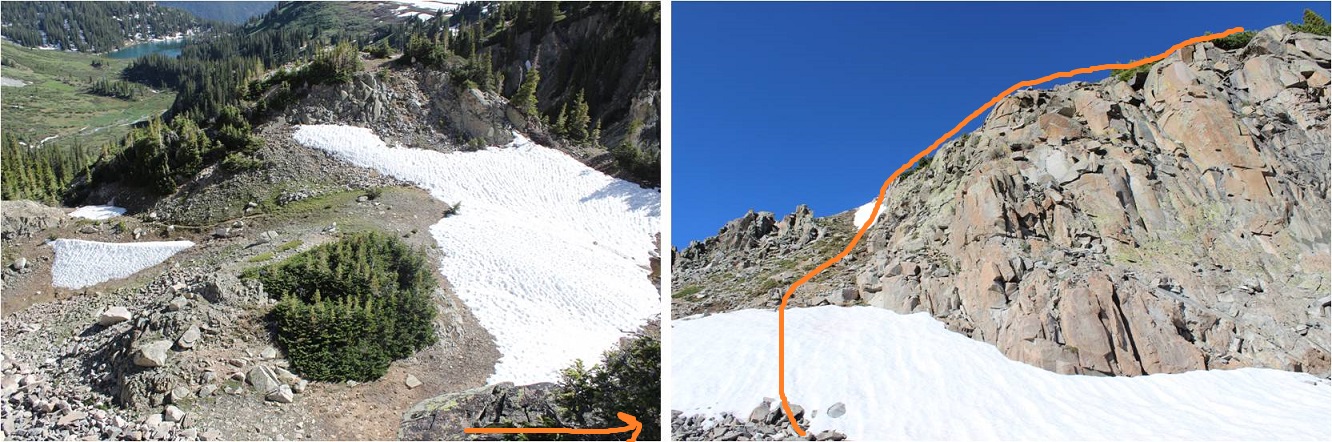
No worries though: I just put on my crampons, tested the snow for stability, and easily traversed over to the final gully before Twin Thumbs pass. I took the solid route up, and the dotted route down (the dotted route is the better route).
There were no cairns or paths or footprints here, or anything indicating anyone had used this route in the past. I was huffing and puffing by this point but really wanted to just get over the pass. When I made it to the top this is what I saw
Ok, this looks good! I could see where I wanted to be and the path I wanted to take to get there.
Right now I was pumped! I probably had 2 hours left of daylight and a clear visual of where I wanted to be. And it was all downhill. I began my descent through a class 4 chimney (not as easy as it sounds with a full pack on my back. Also, this move wouldn’t have been necessary had I taken the dotted line route.) I was immediately taken aback by how steep the scree here was.
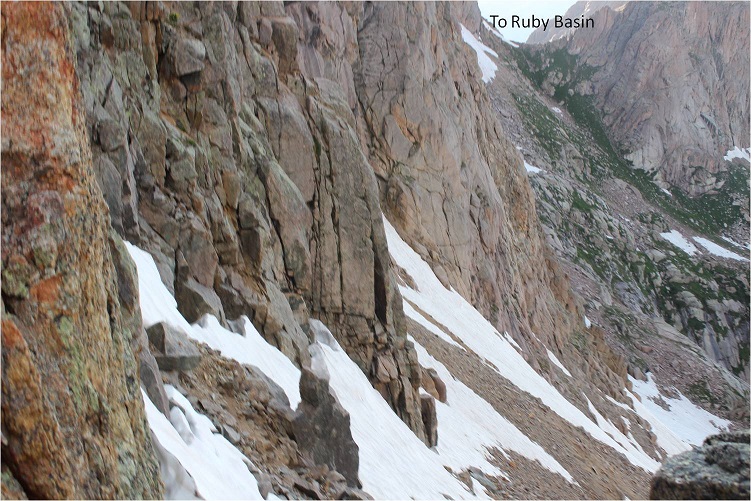
It quickly became apparent the route up to Ruby Basin (should I need to use it) was much steeper than it looked on a topo map.
This is where my trouble began. I made it to the first patch of snow and thought it would be similar to the snow I’d encountered in the Twin Lakes area. I stepped on it and promptly sank up to my waist. My feet however were still dangling in the air beneath the snow. This was not good. It wasn’t lost on me I’d narrowly avoided breaking a leg. My large pack is what had caught me and kept me from sinking further. It took some time but I was able to get myself out of the hole I’d fallen into.
A bit shaky now I stood where I was and considered my options. I probed the snow a bit with my trekking pole and realized there was a layer of snow a couple of inches thick over the rocky ground. This layer broke easily (obviously) and I did not feel comfortable traversing on it, even with crampons. I looked for a clear line of scree/rocks to traverse to get me where I wanted to go and just couldn’t make out a snow free path.
I could continue to descend and look for a snow free path, but I gave finding one a low probability since the areas I couldn’t see were the steeper parts of the route. It looked like no matter what I was going to have to cross snow. The sun had already gone down behind the mountains and I figured I had about an hour of daylight left. There was nowhere to camp on this side of the mountain.
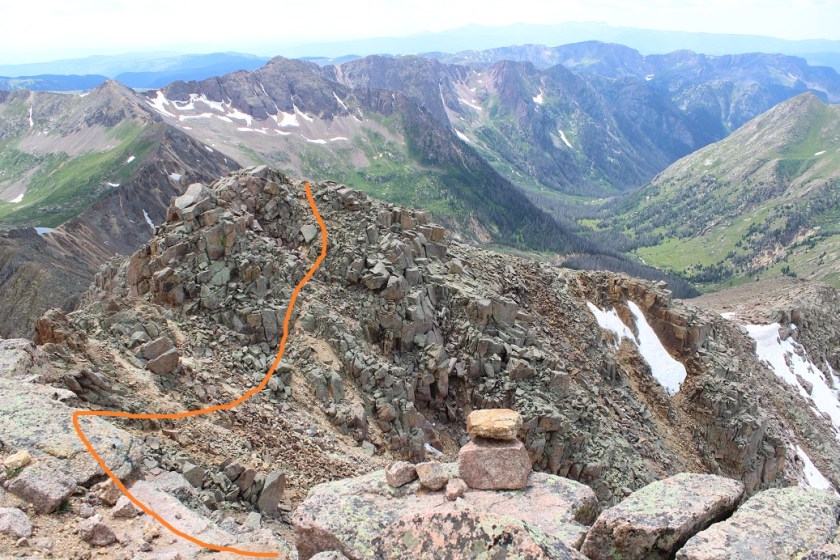
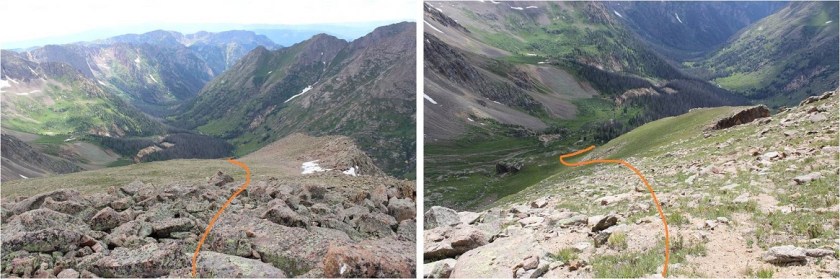
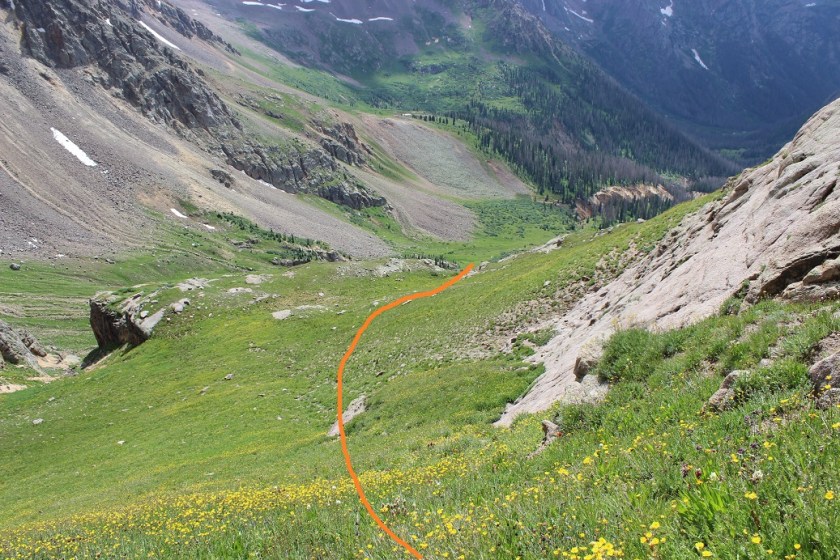
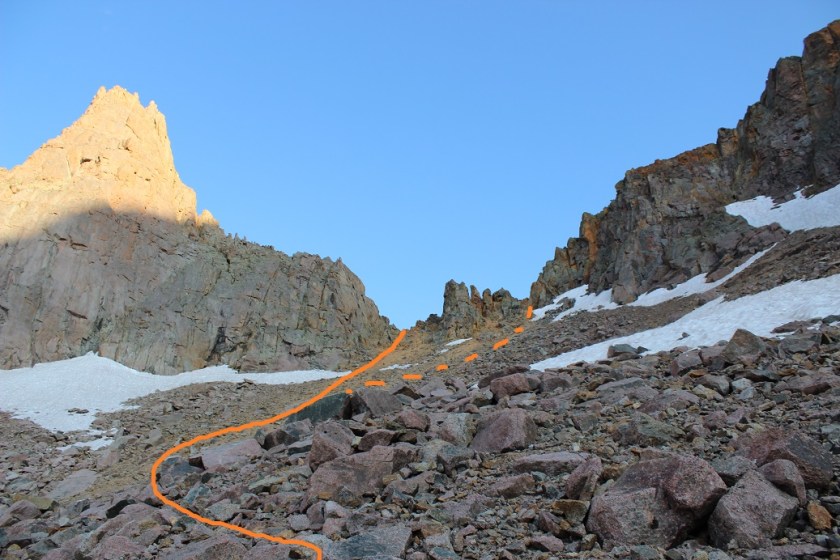
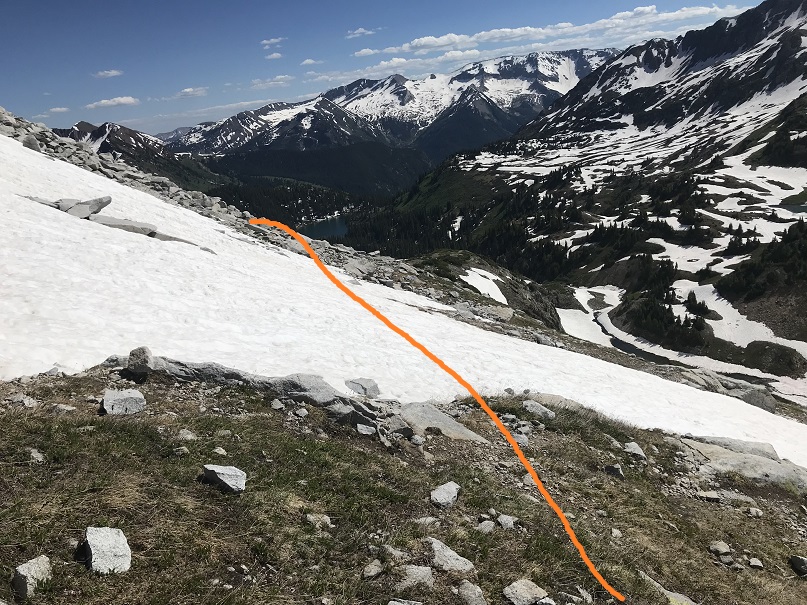
I had two options: either continue on and hope to find an area without snow I could cross or to turn around and head back. The choice was obvious. I wept a few silent tears, turned around, and started my ascent back up and over Twin Thumbs Pass: making it to Noname creek was optional, making it back to my truck was mandatory. Here’s the path I took back up to the pass. The dotted line is the path I took down. I’d recommend the solid line.
Ok, so I turned to head back to the pass but my shoes immediately slipped as if I were wearing ice skates. This wasn’t good. The scree here was terrible for an ascent. I hadn’t brought along my microspikes (to save weight) but I did have my crampons, so I took those out, strapped them on, and wouldn’t you know it? Better than microspikes! Sure, I was ruining the crampons, but at this point the benefits outweighed the risks.
I knew I was racing against the clock: the sun was rapidly setting and I needed all the daylight I could get. I found an unexpected boost of adrenaline and booked it up to the pass. I was shocked at how quickly I moved, and actually entertained the idea of hiking all the way back to Needleton tonight and attempting Jagged in the morning.
I made it up and over the pass and kept my crampons on until I made it past the snow near Twin Lakes. Here I stopped to take off my crampons and at this point the adrenaline stopped and exhaustion took over. I took off my crampons but was too tired to take off my pack and put them away so I carried them in my left hand. This worked well until it got too dark to see and I needed to carry a flashlight (I’m not a fan of headlamps).
I was stumbling in the dark. Stumbling because at this point I was exhausted and also because I’d completely ruined my hiking boots: they had holes in them the size of quarters and the tread was completely gone. That pass had been more brutal than I’d anticipated. Every few steps I’d slide due to lack of traction and catch myself. One time I didn’t catch myself quick enough and I landed on my shoulder in a bunch of willows. Ouch. That was it; I needed to stop and set up camp. Now. Gone were my fantasies of setting up camp at Needleton, or even in Chicago Basin for that matter.
But I’m a rule follower and I’d seen the sign. I wasn’t allowed to camp here, and I knew it. So I kept on. It seemed like I’d hiked for miles before I finally made it to the “no camping past here” sign, and when I did I dropped all my gear and haphazardly set up my tent directly in front of it. I did a terrible job: I couldn’t see in the dark and honestly I was too tired to care what I was doing. It took me twice as long as it should have to set up and I did so directly beside the trail. Dumb move, and I knew it, but I didn’t care. I needed to rest. Oh, and eat. So far all I’d had were a few almonds and I knew I needed more calories. I opened my bear sack and had tons of options: beef jerky, tuna, almonds, peanut butter. I chose dried mangoes. Not the most caloric but it was what my body was craving. I only wished I’d brought more.
I fell asleep around 10:30pm and woke up every half hour after midnight. You see, I was camped directly next to the trail, so every set of early morning hikers intent on Eolus, Windom, and Sunlight passed right by me. As they did so they all directed their flashlights at my tent. What they most likely didn’t realize is that when you shine a light on a tent it doesn’t allow you to see inside of it, but it does brightly illuminate the inside of the tent. So every 30 minutes or so it was like someone turned on a light inside my tent. My fault for so many reasons I know, but I was too tired to care. And cold. It had been a bad idea to swap my good sleeping bag for a lighter weight one.
In the middle of the night I could hear a goat beside my tent. It was occupying itself with the bandana I’d left outside. I could actually hear him a foot or so from my head, and mentally visualized him picking up the bandana with his teeth and swishing it from side to side.
I left my tent at daylight. My bandana was now separated from my trekking pole but lying inches from where I’d been in my tent. Apparently the goat didn’t want the souvenir. I wasn’t hungry but forced myself to eat a packet of tuna and quickly packed up my gear. Taking down the tent was the worst: my fingers were frozen stiff, despite it being about 40* the night before. My whole body ached from yesterday. I wasn’t sure I was going to be very efficient today, and laughed at myself for thinking last night I could even attempt Jagged today. I was honestly considering camping at Needleton and making the rest of the journey tomorrow.
It was Saturday morning but I didn’t pass many people as I exited the basin. I hurt all over, but especially my shoulders, and specifically my right shoulder. I was worried I’d broken my clavicle when I’d fallen into the willows yesterday. Every hundred feet or so I had to stop and lean over to take the weight off my shoulders for a bit. I tried re-adjusting my straps to distribute the weight more evenly but that wasn’t helping. When I made it to the bridge 2 miles from the Needleton junction I stopped and took off my pack. I realized one of the upper straps had come unbuttoned and fixed it. This seemed to help a bit, but I was still worried about my shoulder. It was red and sore and there was an unfortunate bump right on the collarbone. It wasn’t lost on me I’d carried most of this gear for nothing…
I’d rested for a bit and decided that was enough for today and was on my way. I met a trail runner who stopped to talk for a bit. “Isn’t Chicago Basin as close to heaven on Earth as you can get?” she asked. I agreed, but mentally thought Purgatory was a more apt name, and most likely why Chicago Basin felt like heaven. I really thought she was running to the junction and back but I never saw her again (and she should have caught back up with me if she were doing so).
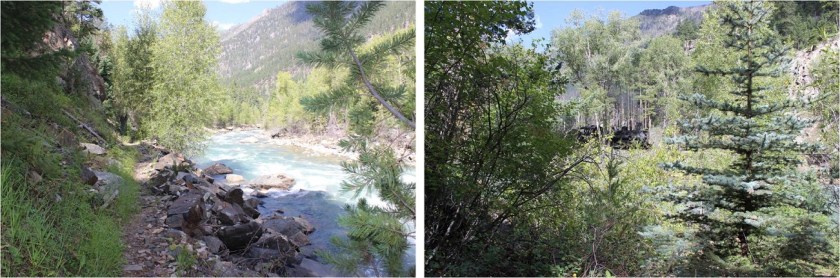
I was bummed. The weather was perfect, which meant I was wasting a perfect day not summiting something. And I hurt. I was sore and each step hurt more than the last. My shoes were trashed and I’d carried 30 extra pounds of unnecessary gear for dozens of miles and elevation gain for naught except conditioning. Suddenly Sherpas made sense. By the time I made it to the Animas River I was done feeling sorry for myself and instead decided to focus on the positive: I’d been here three times but never hiked the trial in the daylight. I was going to enjoy the view of the river and the shade and the occasional view of the train passing by
I was actually making good time and made it to the railroad crossing around lunchtime.
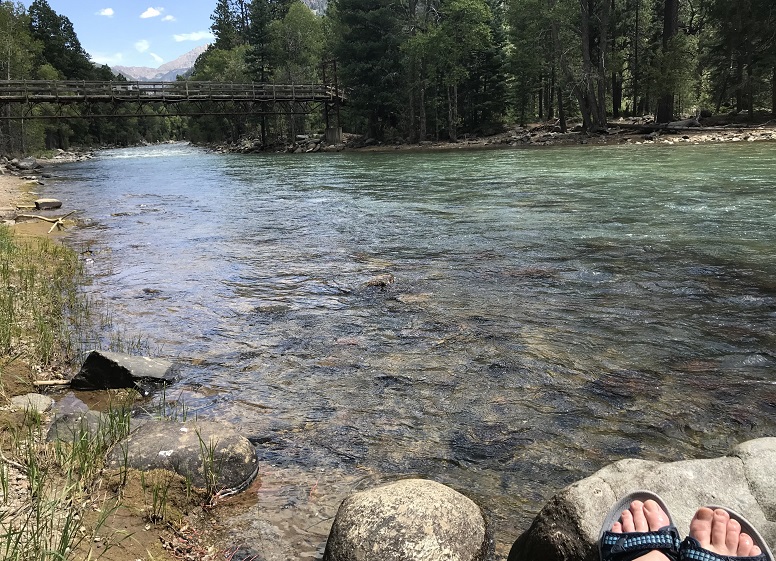
I’d made a deal with myself here I’d take off my pack for a long time (at least 15 minutes) and have lunch and soak my feet in the river. The mosquitoes had other plans however. Eventually I figured out they came in small swarms and if I killed all 12-15 of them I’d have a solid 2-3 minutes before the next swarm arrived. On the positive side the water was cool and it felt good to sit for a bit.
Animas River:
Lunch was a couple spoonfuls of peanut butter. I strapped on my gear and got ready for the hardest part of the hike: the last 4 miles and several thousand feet of elevation gain. I headed northwest and hugged the side of the mountain
I was pleasantly surprised to realize this trail is mostly in the shade. I was also surprised to realize just how closely this trail comes to Cascade Creek. Hiking this at night I’d always assumed the creek was down much further from the trail than it actually is.
So the shade was nice but the elevation gain was exhausting! I kept gaining and then losing elevation for what seemed like no purpose whatsoever. Why couldn’t the trail just gain steadily in elevation? It was disheartening to gain a couple hundred feet just to lose it again.
There were raspberries on this trail, and while I’m not fond of raspberries these were by far the best I’ve ever had. I couldn’t collect them fast enough (sorry woodland creatures that would have benefited from them, but they were delicious).
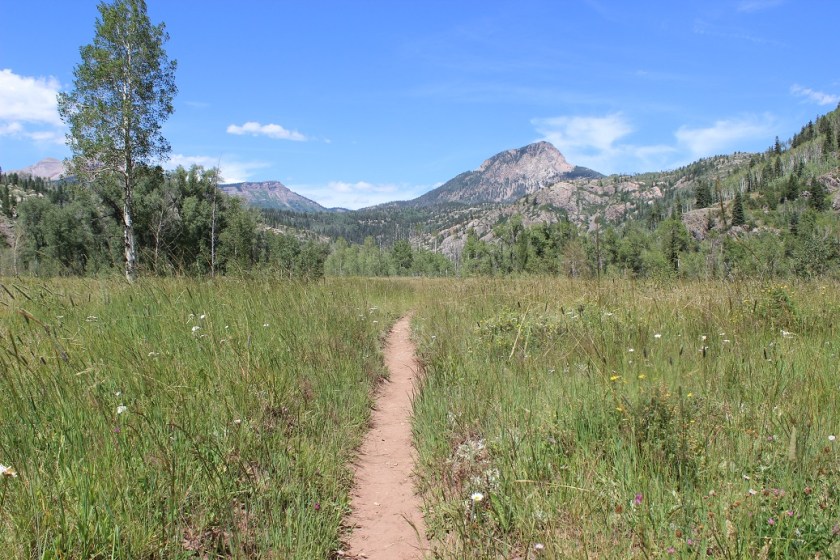
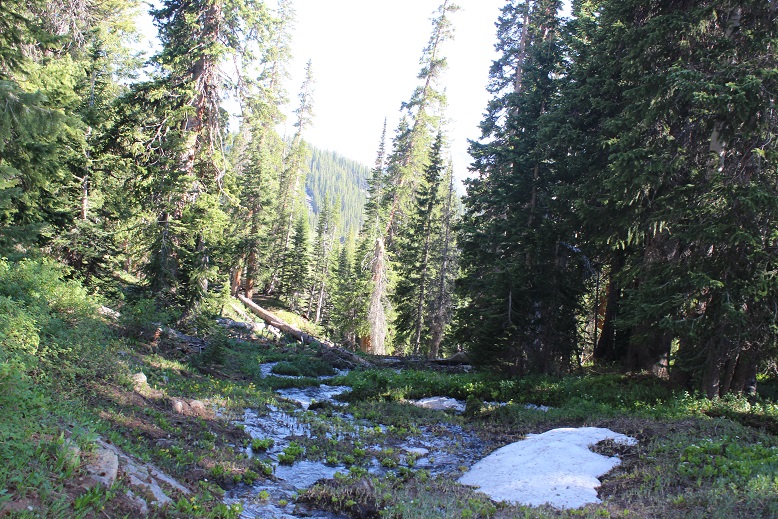
This meadow looks totally different in the daylight
The last quarter mile was the worst of the entire hike for several reasons: This part was a steep uphill climb, the sun came out again from behind the clouds, I was tired, my pack was heavy, and I ran out of water just as it began. This last quarter mile took me half an hour to complete (which is very, very slow for me).
Last time I was here I’d hiked Pigeon and Turret’s 39 miles in a day and I’d had hallucinations. This time I realized I’d gladly hallucinate again if it meant not being in this much physical pain from carrying such a heavy load. The only redeeming factor to the weight was I’d used every piece of equipment I’d brought (except the climbing gear, but that was necessary if I’d intended to climb). The physical pain was terrible, and I wondered to myself how long it would take me to forget the torture I’d put myself through over the past two days. Hopefully less than two weeks because I totally plan on doing this again. Soon.
I made it back to my truck at 2:30pm, making this a 41.5 mile hike with 11,098’ in elevation gain in 37 hours.
But my adventure wasn’t over yet. I limped back to my truck and set my pack on my tailgate. I unlocked my truck and downed an entire 2 quart bottle of cranberry juice in-between huge gulps of air. It was still early enough to make today productive, so I decided to drive to a Subway, get dinner, and then sit in my truck and figure out what to do next. A nap was definitely in the plan.
Did you know it’s difficult to find a place to sleep in your car in Durango? Seriously. Every parking lot I entered had “no camping” signs, and many even had “no sleeping in your car” signs. So I drove to a park on the edge of town, thinking this would be a good place to rest for a while. I got out my list of peaks I want to attempt in the next few months and did some calculations. None of them were close enough to drive to tonight to make them worth summiting tomorrow. Drat. It looked like tomorrow was shot as well. Which was probably for the best seeing as how I couldn’t move at the moment, but I was still disappointed.
It was too hot to sleep in my truck without the windows open and there were a surprising number of children screaming at the park as if being there itself were pure torture. I gave up on the nap and drove for a few hours until I found a National Forest Trailhead I could park at for the night, avoiding suicidal deer running across the road. This was a fabulous idea and I was able to sleep under the stars.
I woke up as the sun began to rise and drove the rest of the way home. I was itching all over, and when I looked in the mirror I noticed I had so many mosquito bites it looked like I had the chicken pox. Lovely. I randomly picked a CD out of the glove compartment and began singing 9-5 at the top of my lungs along with Dolly, my mood instantly improved. Until I stopped for gas. I slid out of the truck and my legs buckled underneath me. I quickly looked around to make sure no one had noticed me, and then pulled myself back up into my truck, laughing at myself for even thinking I could’ve hiked another peak today. My body needed a few days to rest, and I need to figure out a way to lighten my pack…
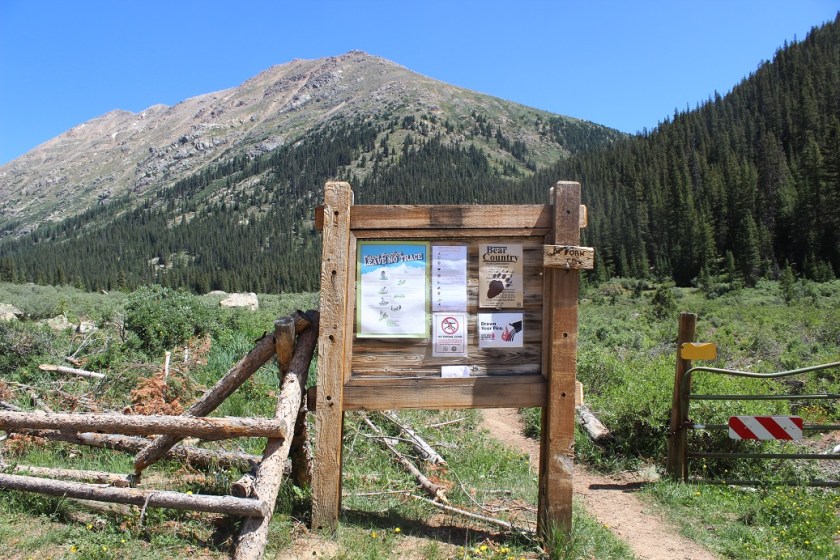
I chose this route mainly because I haven’t used the North Lake Creek Trailhead before, and since all the other routes started from trailheads I’ve already used I wanted to try something new. I began at 3am, and when I arrived at the trailhead my truck was the only vehicle in the lot.
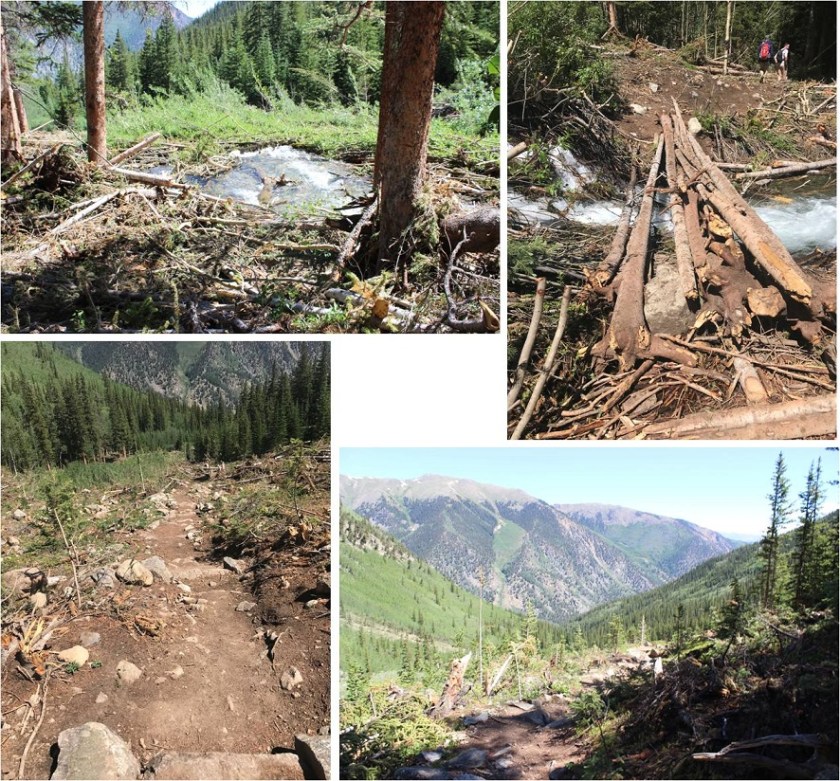
The trail begins at the east side of the parking area, heading north-northwest. There had been a recent avalanche in this area but the debris had been cleared off the path and in the dark I couldn’t even tell there had been an avalanche.
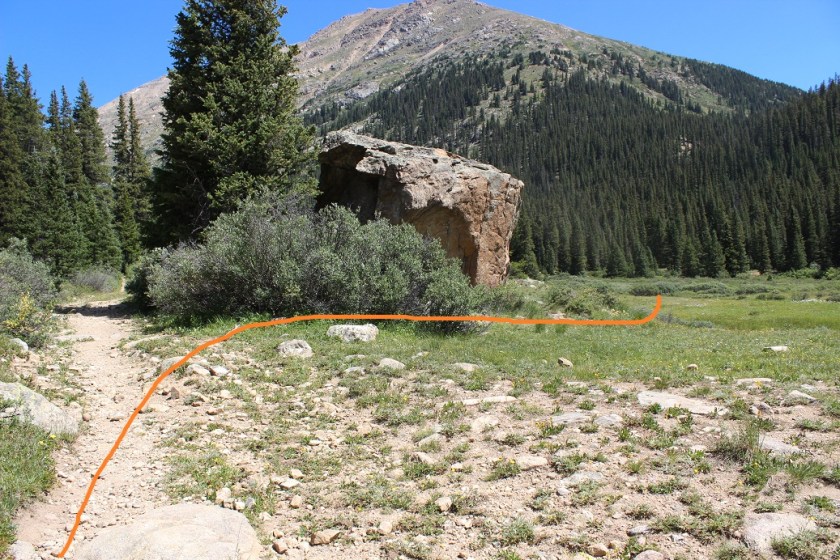
After about 1/10 of a mile I turned right at this boulder.
There is no distinct trail here, but if you continue northeast you’ll eventually run into what could have been a trail at one time (or a dried up creek bed).
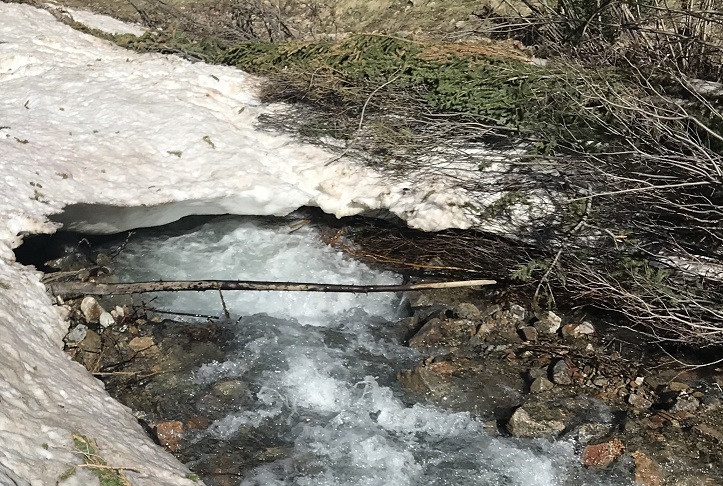
This led me to a creek crossing that was just deep enough to make it necessary for me to take off my shoes.
There was another crossing just after this one, but it was small and easy to cross. From here I followed an overgrown 4WD dirt road switchbacking up the mountainside.
Curiously there was an old outhouse right alongside the trail, which looked useable.
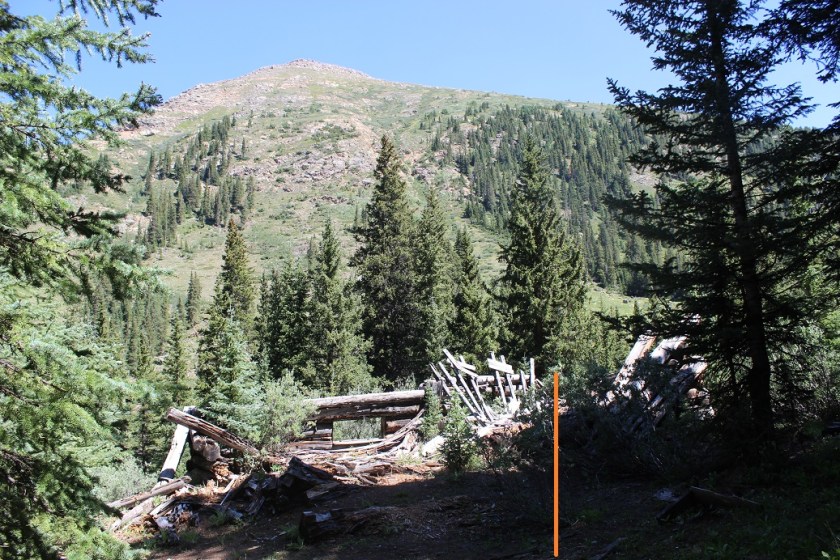
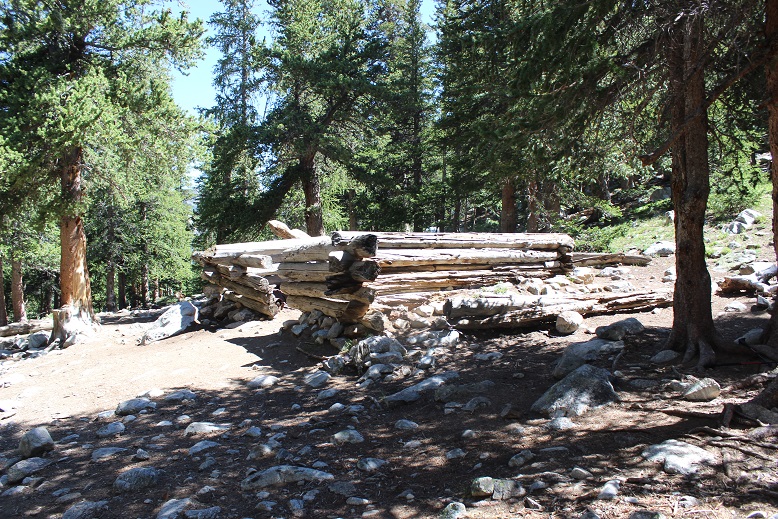
The 4WD road led to a smaller trail that led to a bunch of dilapidated cabins (I’m guessing there were 3?) and here is where the trail ended.
From here the goal is to head down the hillside that’s behind this cabin (a few dozen yards), cross the creek, and continue west.
However, I was doing this in the dark on my way in and it proved to be more difficult that it sounds, especially the creek crossing. I was unable to find a crossing in the dark due to avalanche debris in all the wrong places, so I once again sat down, took off my shoes, put on my sandals, and crossed the creek. On my way back I noticed snow bridges that were no longer usable, but also a few areas to cross on the rocks.
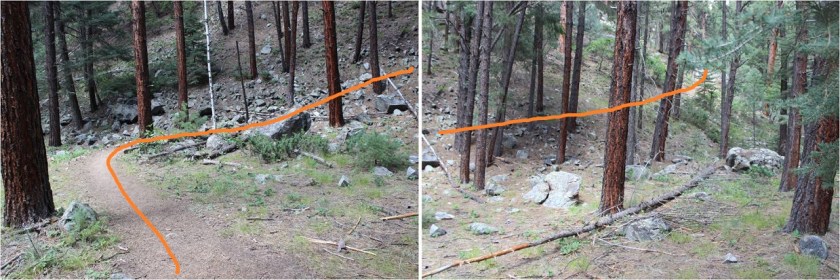
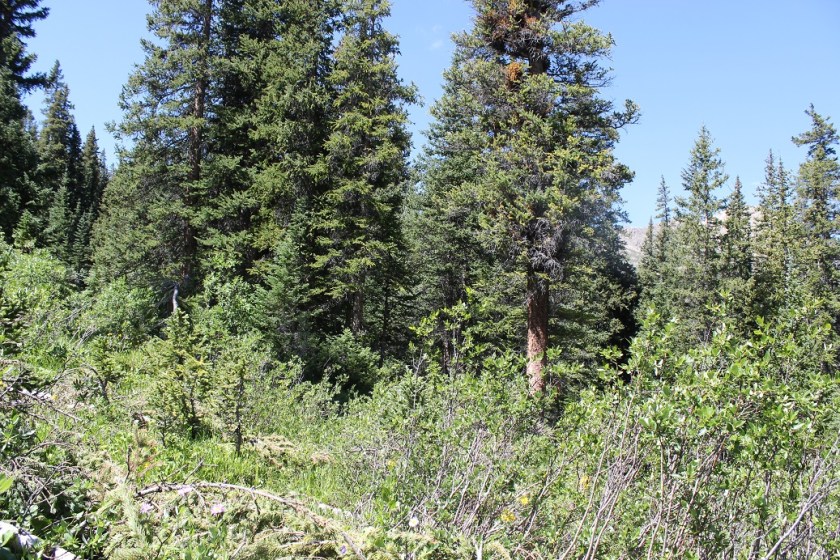
This part of the hike was actually a challenge in the dark, but simple in the daylight. There was no defined trail here, but many game/social trails. I tried to follow a trail alongside the creek, but there just wasn’t one that was continuous. What made this difficult in the dark were the overgrown grass and downed trees everywhere.
However, if you just follow the creek (staying about 10 yards to the north of it) it will lead you up and out of Lackawanna Gulch and into an unnamed basin. Every once in a while I’d come across what looked like a proper trail, and even a cairn or two, but the trail always ended (usually at a tree or bush or over a cliffside).
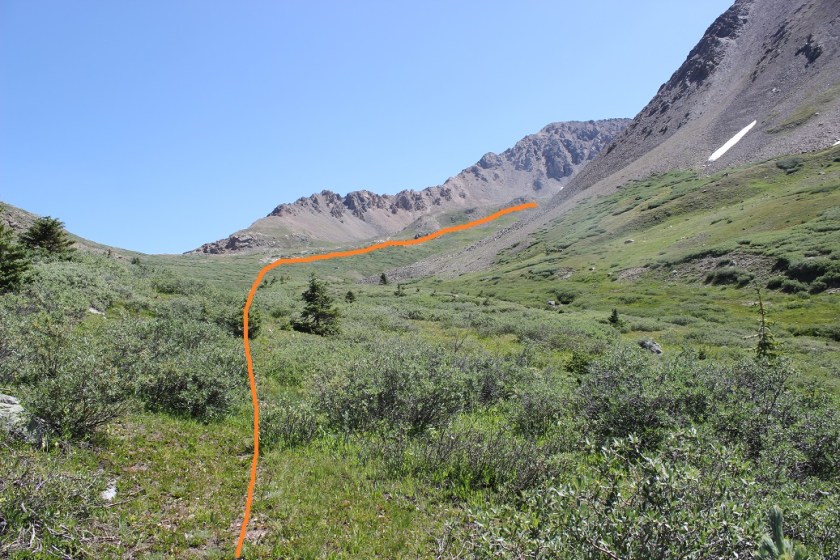
Here’s your path through the basin. You’re aiming for a low ridge at the end of the basin. Once again, there are lots of trails here, but I’m pretty sure they’re all game trails. Also, the willows aren’t that high and the ground was mushy with water. This wasn’t fun to cross in the dark, but at least there weren’t any trees to contend with. In the daylight it was beautiful.
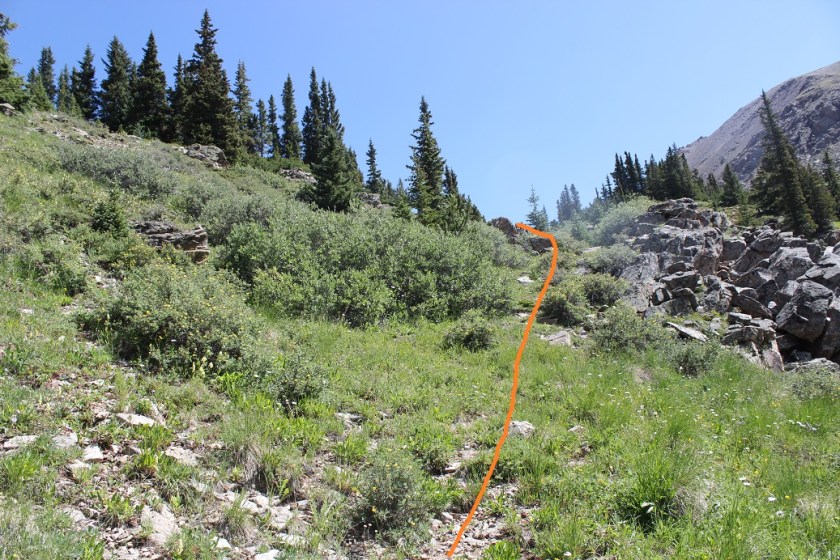
I was fully expecting to see some sort of wildlife, especially with all the hoofprints and game trails I was coming across, but alas, nope. From the north end of the basin I continued east on a low lying ridge towards Casco Peak. Knowing there was a lot of loose rock above me I was aiming for the lowest point on the ridge for my ascent. You can basically gain the ridge from anywhere. I took the solid line up, dotted line down.
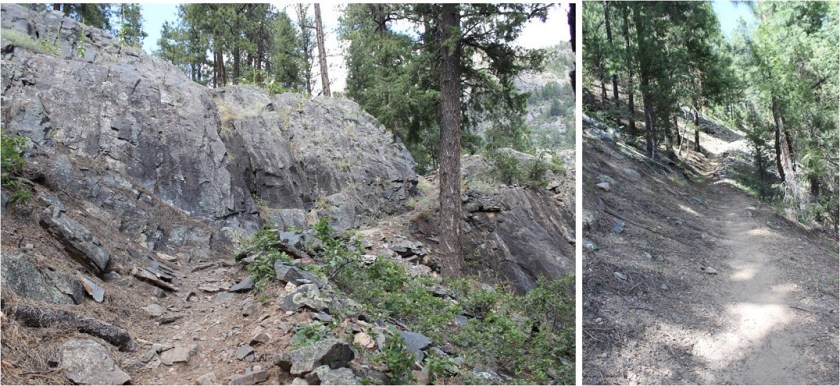
Before gaining the ridge I passed through some muddy/wet areas
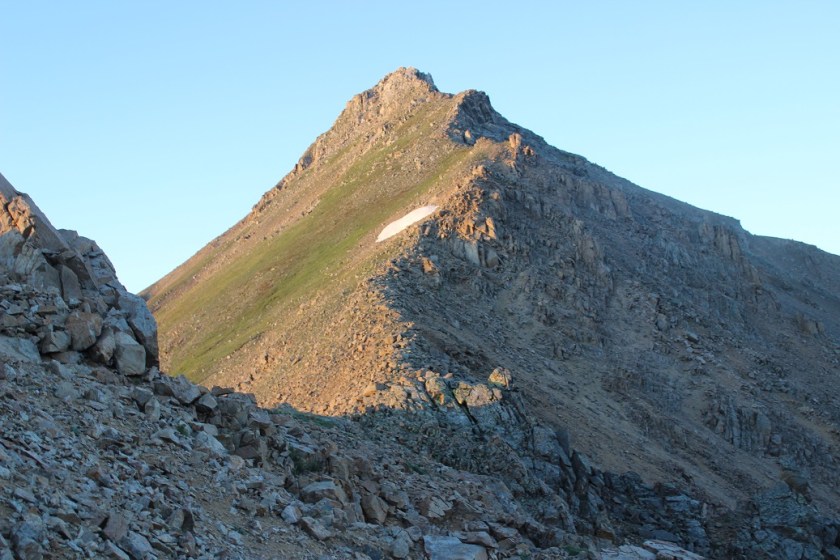
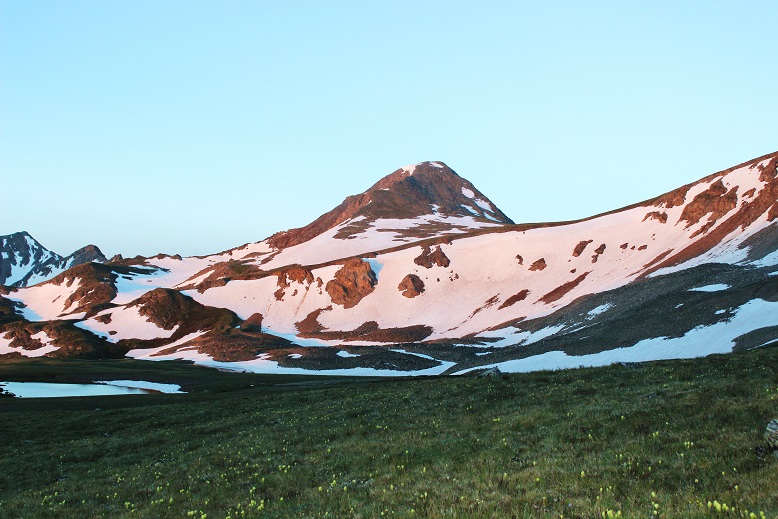
Here’s what it looked like as I was nearing Casco Peak
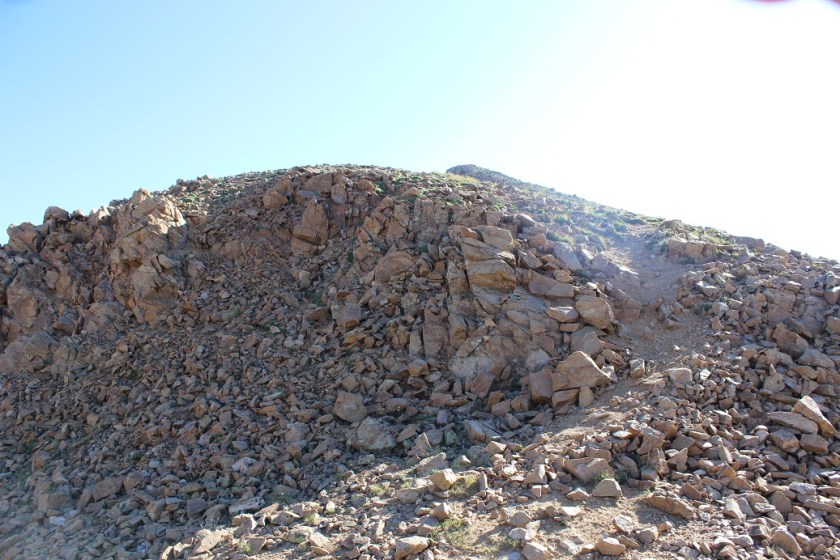
I couldn’t see much but the sun was beginning to rise, which was helpful. I could tell the scree was pretty bad in some areas, but it looked like there was talus ahead (which I prefer to scree for an ascent) so I headed for the lowest point in the ridge and began the climb. The talus eventually turned to scree just before the ridge.
Ridge gained I turned right (south) and looked at the rest of the route before me
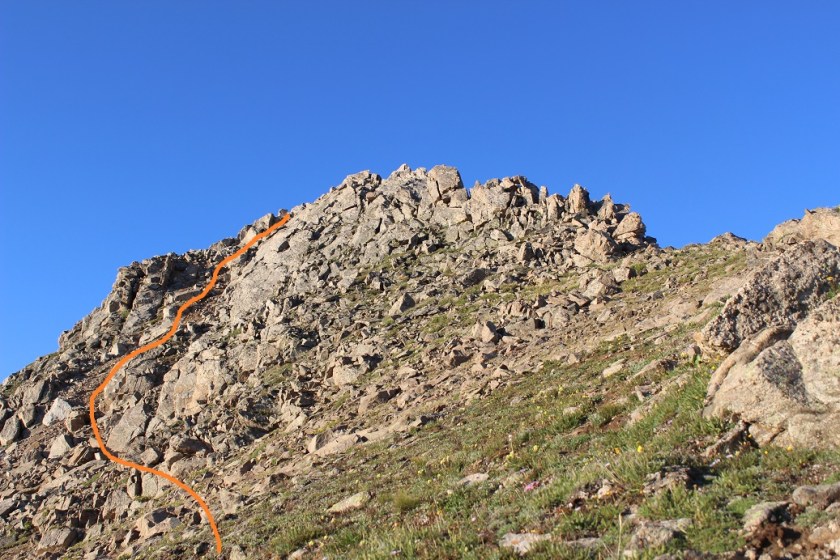
This wasn’t technical in the slightest. I just stuck to the ridge until I came to the base of the summit. Here it became a short class 2+ trek to the top.
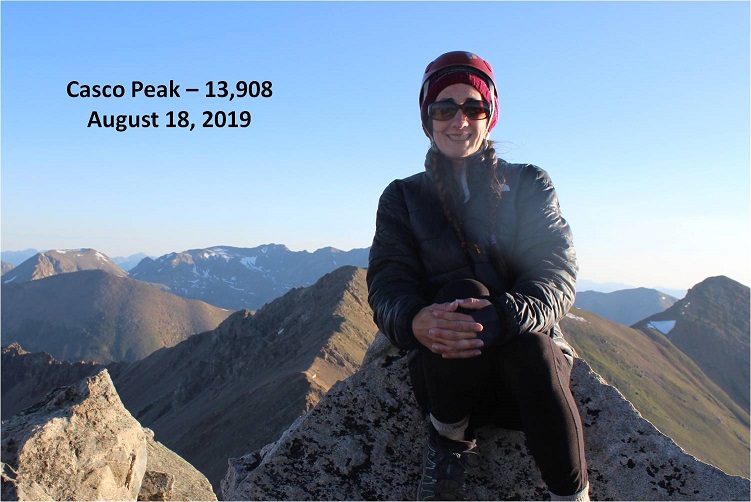
I summited Casco Peak at 7am
Casco:
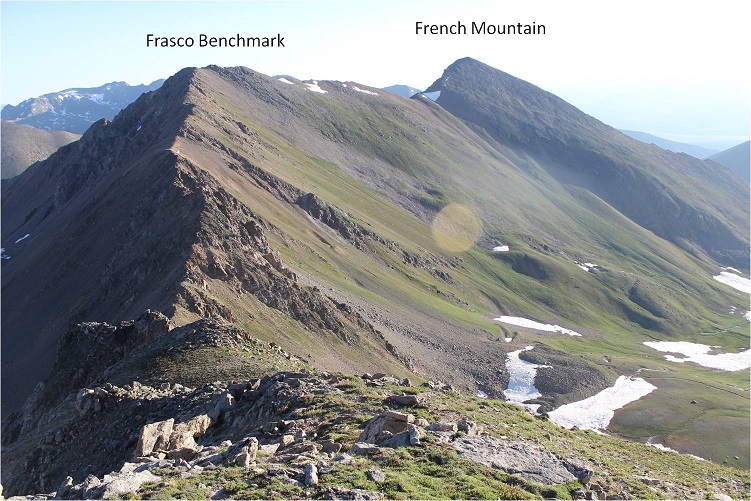
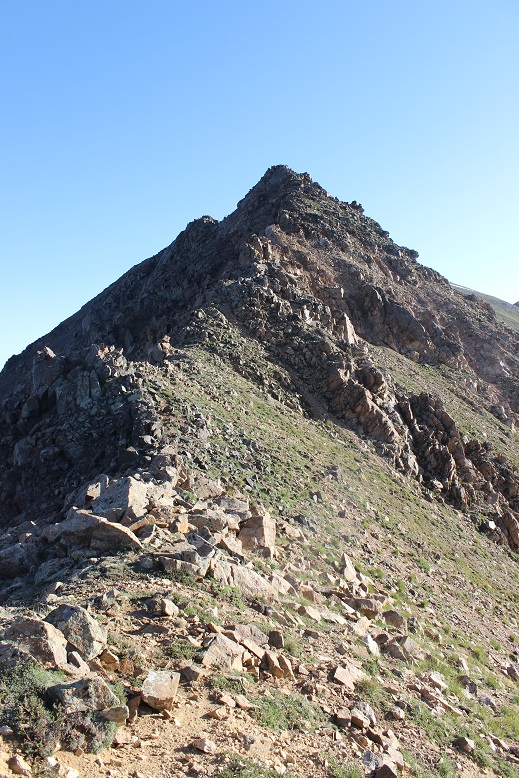
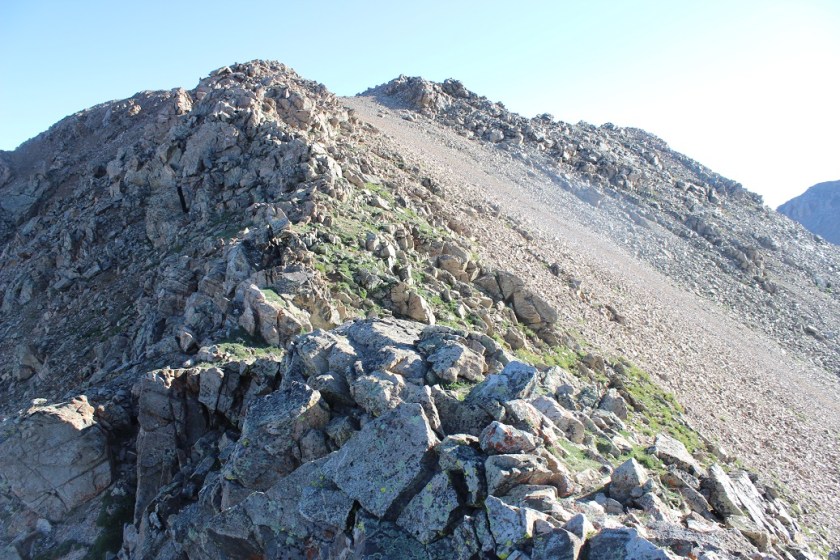
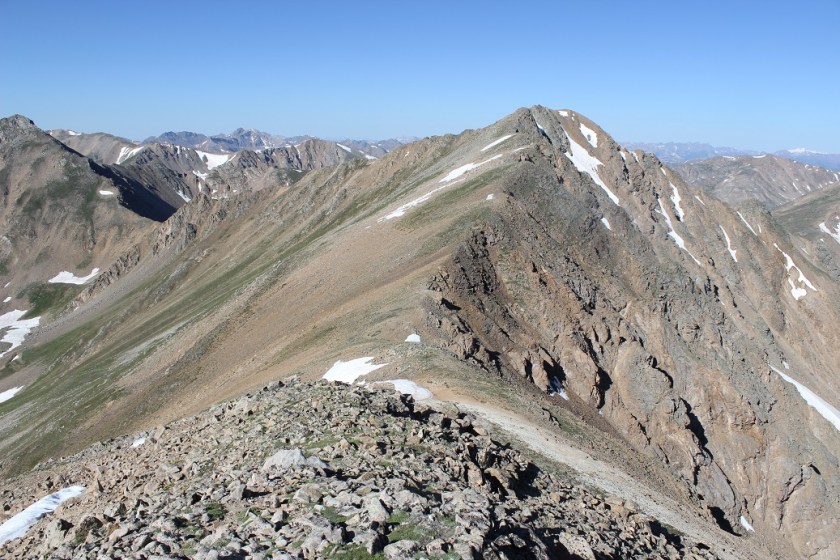
From here the route to Frasco looked straightforward, but let me tell you, that section north of the saddle (named Fiascol) was a rough and loose ridge
Here’s your first look at the ridge
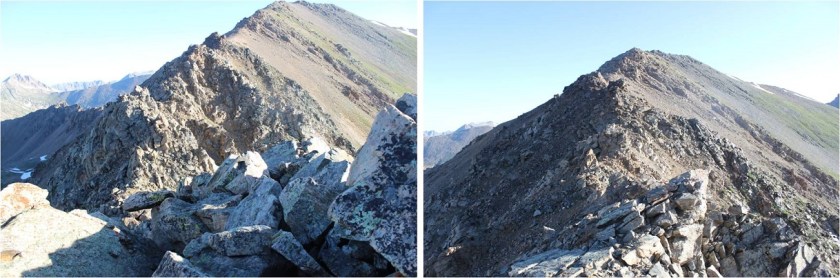
This is a class 2+ ridge that looks harder than it is. It took careful footing but wasn’t actually technical. I mainly stayed to the top of the ridge, dropping to the left or right as needed. Most of the time if I had to drop off the ridge it didn’t matter if I went left or right: both ways went. Here are some close ups of the route
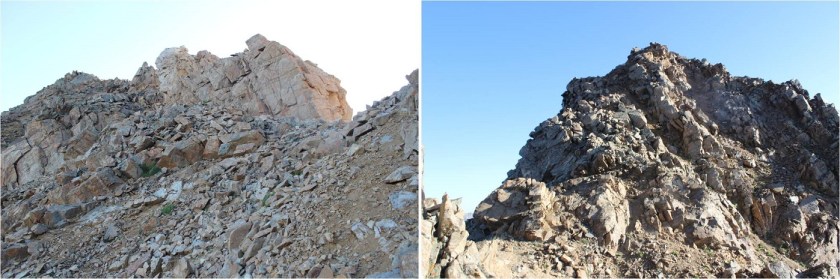
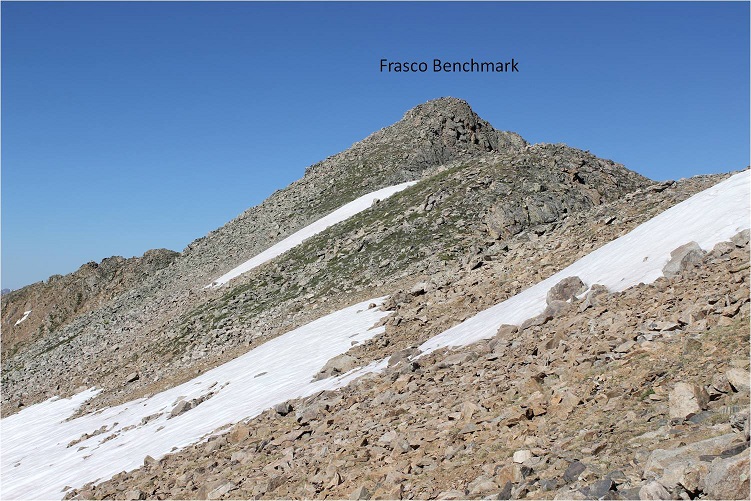
The final push to the top of Frasco is actually longer than it looks, with a small false summit
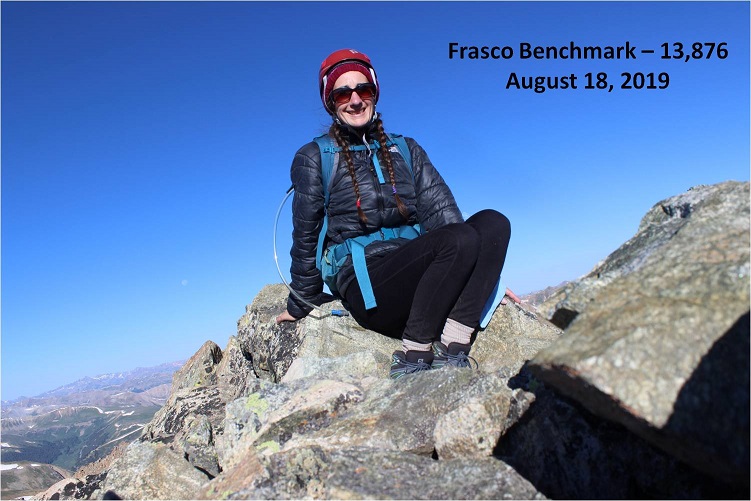
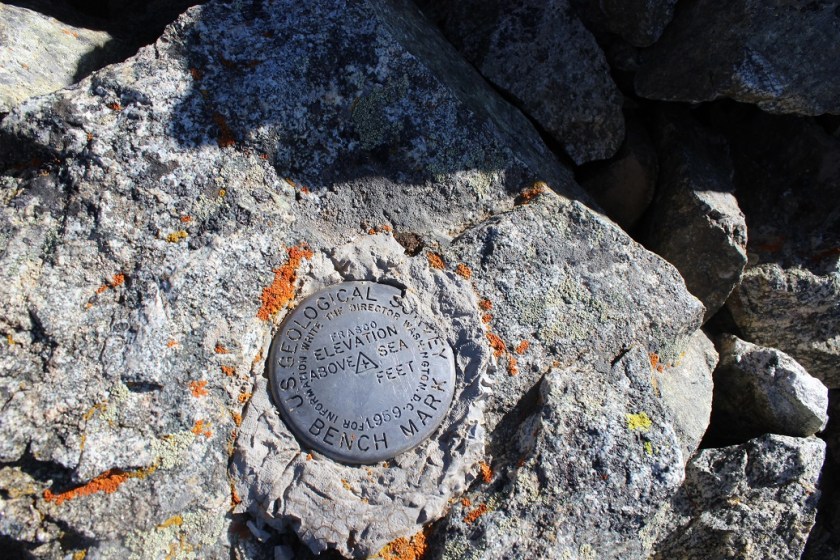
I summited Frasco Benchmark at 8:30am
Frasco:
This summit had a summit marker (curious, the unranked peak had a marker, yet neither of the ranked ones did?).
To get to French Mountain from Frasco is straightforward: just follow the ridge (named Friscol). I was surprised at how narrow the beginning part of this traverse was.
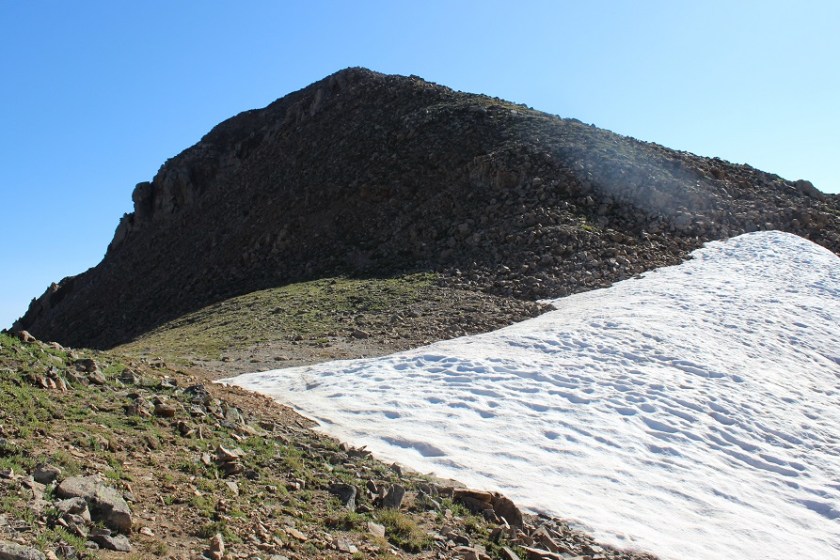
I descended 250’ to the Frasco/French saddle, stayed left (north) to avoid a snow patch
and then ascended 320’ to the summit of French Mountain.
I summited French Mountain at 9am
French:
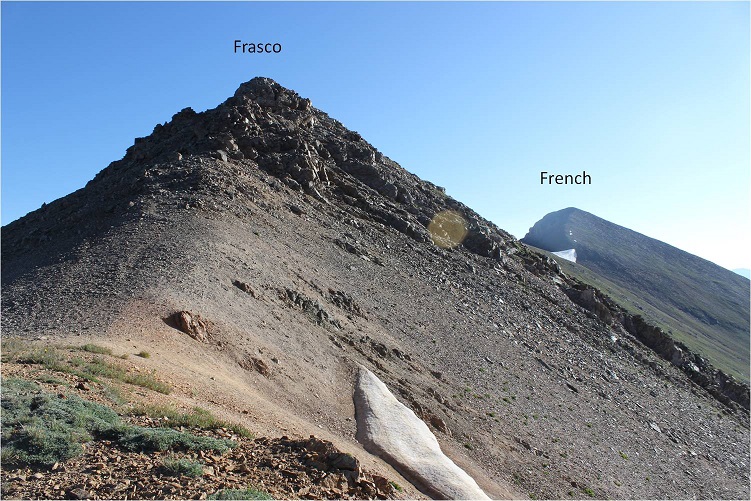
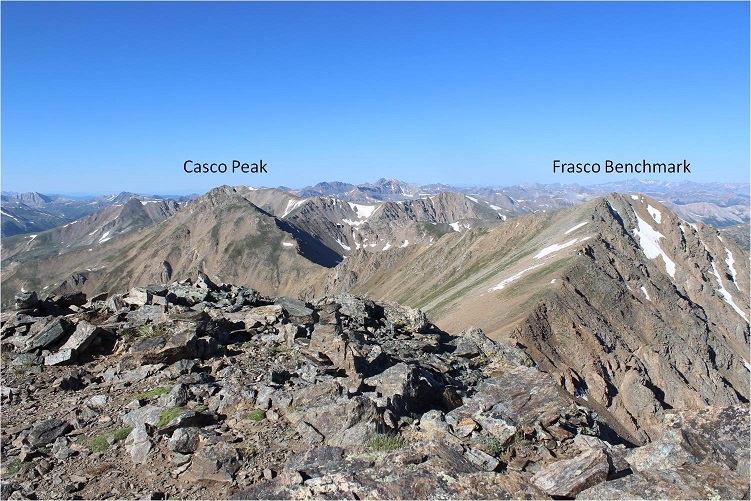
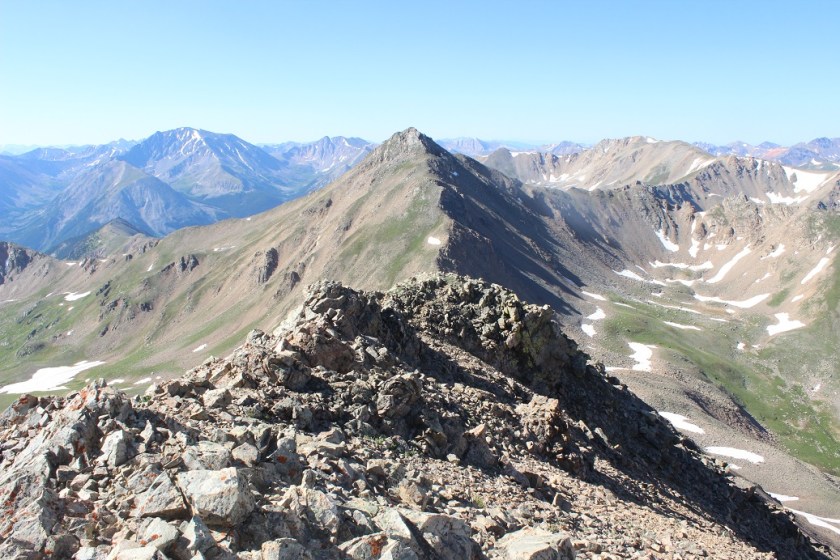
From French, here’s a look back on the route from Casco to Frasco to French
It was a beautiful day so I sat for a bit on the summit, enjoying the views before starting my way back.
Here’s a look at the look to Frasco from French
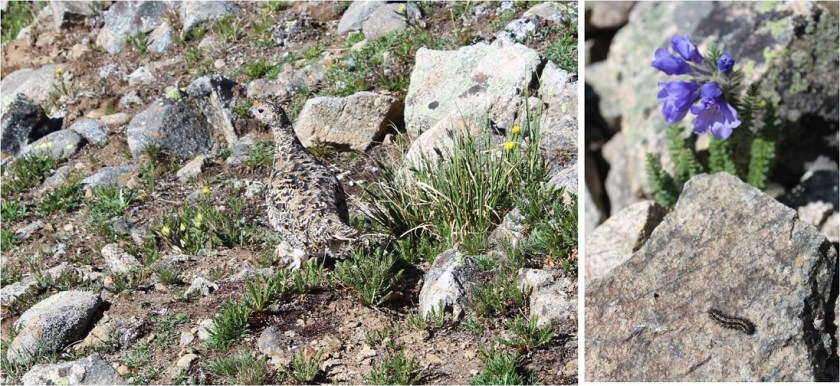
I mainly stuck to the ridgeline. Around the French/Frasco saddle I saw a ptarmigan and a caterpillar I thought was living pretty high
Here are the areas of avoidable snow on the ascent of Frasco from French
After summiting Frasco a second time it was time to head back towards the Casco/Frasco saddle for my descent. Also, it wasn’t lost on me how much easier the route looked coming up from the Halfmoon Creek area: the scree was almost nonexistent on that side when compared to the Lackawanna Gulch side. The decent along the ridge to the saddle was uneventful.
However, I didn’t go all the way to the saddle: Instead I chose to descend earlier because I liked the scree here better.
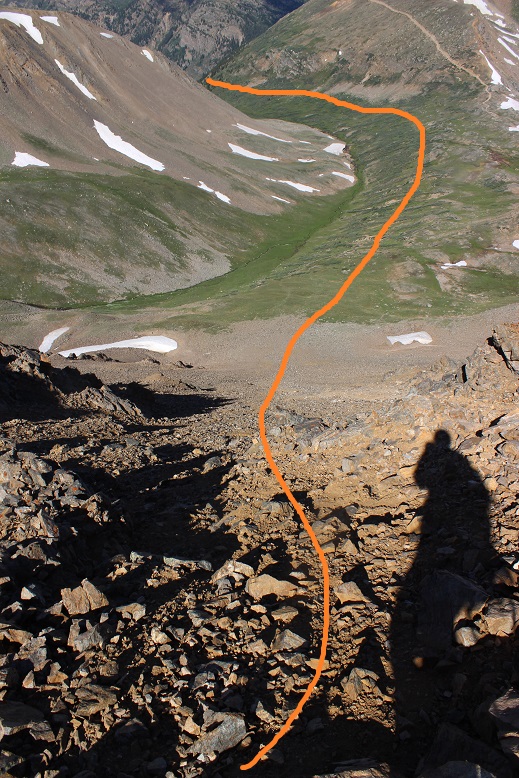
Here’s a look at the route back down the basin and towards the creek
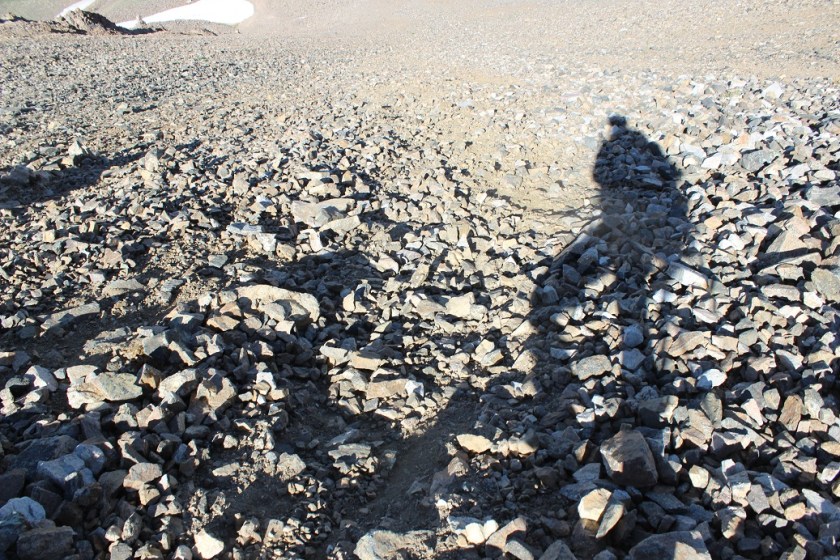
The scree here was the kind of scree you want to descend, not ascend. It allows you to scree surf, but doesn’t allow for much traction. I put on my microspikes and headed down the slope, sliding one foot in front of the other. I got a quick video: quick because it wasn’t safe to take a video while scree surfing, but I was basically moving down the hillside with the sliding scree. You can see why this wouldn’t be fun to climb up.
Scree:
Here’s a look back up that scree slope from the bottom
and a look at the route out of the basin
Also, the flowers here didn’t disappoint
As I exited the basin and descended into the Lackawanna Gulch I couldn’t help but think how much easier route finding was in the daylight. I wasn’t concerned as much with where I was because I had visuals that told me I was ‘close enough’ to where I needed to be. I could tell the difference between game trails and actual trails (which is much harder than you’d think in the dark).
The hike back was beautiful! I loved seeing the cabins, flowers, trees, and creeks in the daylight. I took off my hiking boots and put on sandals for the last creek crossing. The cold water felt wonderful on my feet! I decided to keep my on sandals for the rest of the trek to my truck (maybe a quarter mile).
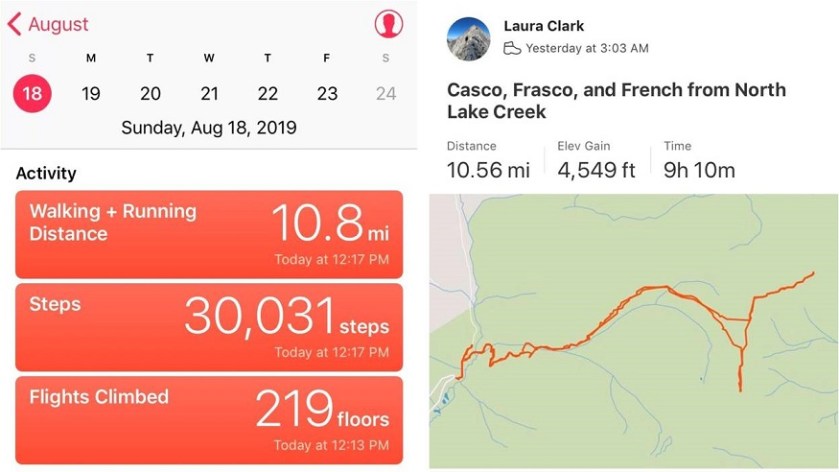
When I made it back to my truck at noon my feet were still wet. This was a 10.5 mile hike with 4549’ in elevation gain completed in 9 hours.
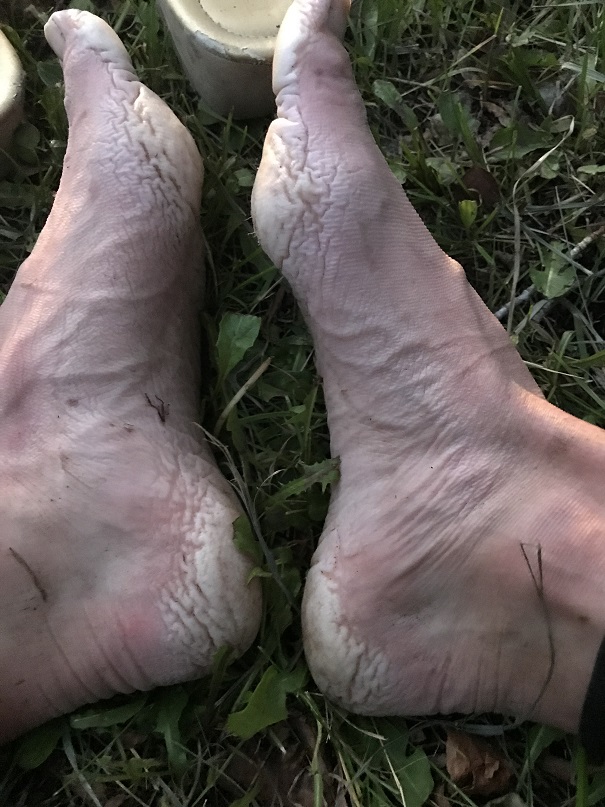
No, I didn’t drive straight to the Missouri Gulch trailhead. It took me forever to drive home going 50mph on the I70. I made it home at 7am and limped out of the truck. My feet seemed to hurt more now than they did last night. They’d dried out, but were now red and raw. I decided to take a few hours ‘off’ to let my feet rest. After cleaning up and pampering my feet I took a 5 hour nap. When I woke up my feet had dried out and I was able to get a better look. No blisters. That was a relief. They were still red and swollen though, meaning I’d had a Raynaud’s attack yesterday. It all made sense, and was most likely caused by the 20 minutes I spent trying to dig out my water shoes from the cold creek combined with a long, physical day.
Driving home had been the right thing to do. By the middle of the day my feet were still sore but I found I could walk on them. Kind of… you see, it hurt terribly to begin walking, but after the 10th step or so the pain went away. So I figured I just had to start hiking and not stop and I’d be fine.
At 9pm I made the decision to drive to the trailhead, try to nap for an hour, and attempt another hike. It was either that or stay home and do the treadmill thing in the morning, which did not sound appealing with sore feet.
Everything went well. I made it to the trailhead and slept for an hour before my alarm went off at 2am. There were tons of vehicles at the trailhead. As I was putting on my hiking boots a couple drove up in a Subaru. We were hitting the trail at the same time, so when I got out of my truck I waved and said hi to them. No response. Hmmmm… ok. Maybe they hadn’t seen me (or that the lights on in my truck)? I turned on my flashlight, walked over to the trailhead and once again said “hi guys!” I was hoping to just chat and see where they were going before setting off. When I see others at trailheads I like to connect in case something happens (to either of us). Once again, they didn’t respond (but their dog looked back at me). Maybe the creek was making too much noise for them to hear me? Ok, well, I don’t like to be rude but I’d tried to be nice. Maybe I’d see them on the way down. I didn’t say anything as I quickly scooted past them and headed down to the stream, crossed the bridge, and headed up the trail.
Yes, my feet hurt, but I had a plan: don’t stop. Also, take ibuprofen every 4 hours. The first few steps were painful, but after that as long as I kept moving the pain went away. This was my second attempt of Emerald/Iowa, and my 4th time hiking via the Missouri Gulch trailhead. Call me crazy, but those switchbacks are getting easier. Also, the baby grave doesn’t bother me so much anymore.
The avalanche area has been nicely cleared, and now there’s a log bridge over the creek and a nicely manicured trail through the avy debris.
I made it to the cabin in exactly 1 hour and thought that was pretty good time, considering.
I entered Missouri Gulch and had no problems following the well established trail. The willows seem so much bigger without all the snow.
I turned right at the junction for Elkhead Pass/Belford and followed the trail towards Elkhead Pass.
There were several stream crossings to navigate here. These were not fun in the dark, but in the daylight didn’t pose much of a problem. Oh, and there aren’t any ‘easier’ ways to cross: just cross them right where they intersect with the trail.
I felt like I was making pretty good time. It’s amazing how much easier the gulch is to navigate without snow. I made it to the Elkhead Pass/Missouri Mountain junction
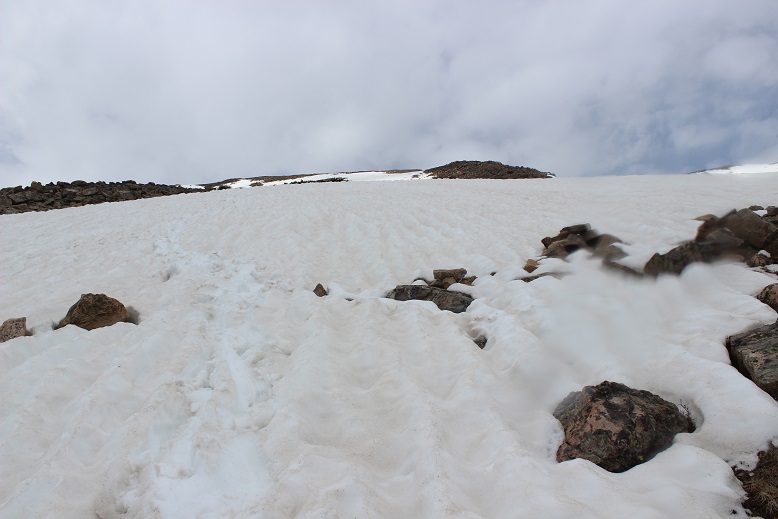
This is where I got a little worried: this is the first hike all year I haven’t brought along my snowshoes, and the area before Elkhead Pass looked to be full of snow. Luckily there actually wasn’t that much and what snow there was was solid in the morning so I didn’t need traction (I had spikes and crampons in my bag, but didn’t need them).
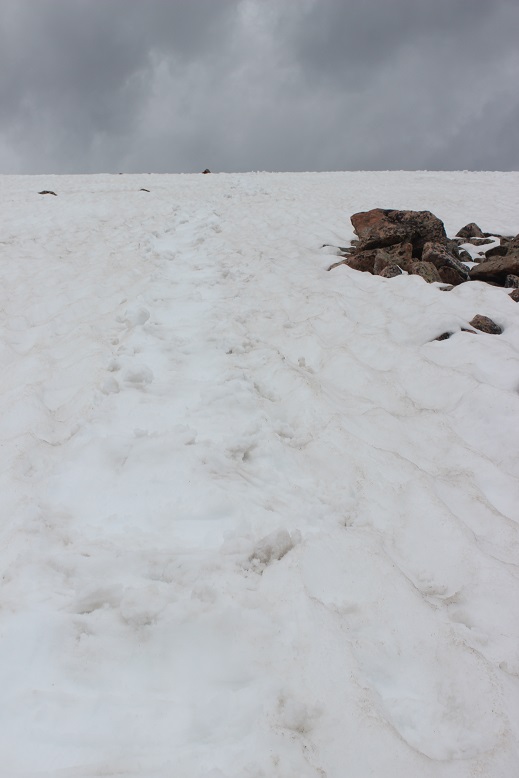
It was still dark as I navigated my way through the snow and sometimes trail up to Elkhead Pass. Here’s a look at the route from later in the day coming down from Missouri. The snow was easily navigable, but seems like much more when you’re down there hiking through it.
I found myself at the top of Elkhead Pass at 5:15am. It had taken me 3 hours to get here (4.1 miles and 3580 in elevation gain). Remembering how icy conditions had forced me to turn around here last time I was a bit worried to see snow at the top of the pass, but as I got closer I noticed there wasn’t as much snow as I’d initially thought. (Sorry for the poor quality of the next few photos: I took them in the dark and had to lighten them up so show details)
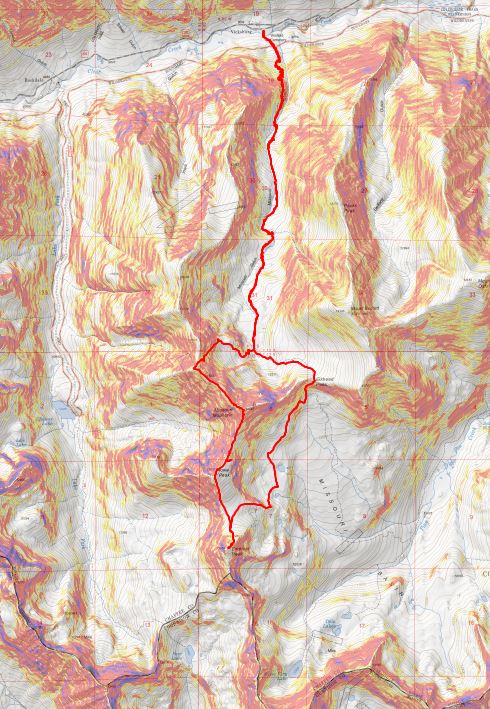
I descended Elkhead Pass, but not all the way to the bottom of Missouri Basin (Yes, Missouri Basin, not Missouri Gulch. We need to get more creative with these names people!). I found a cliff band below Missouri and followed that towards the little lakes, as I didn’t want to lose more elevation than necessary. Here’s the path I took hugging Missouri
At the cliff band I descended the least amount possible, heading towards the lakes
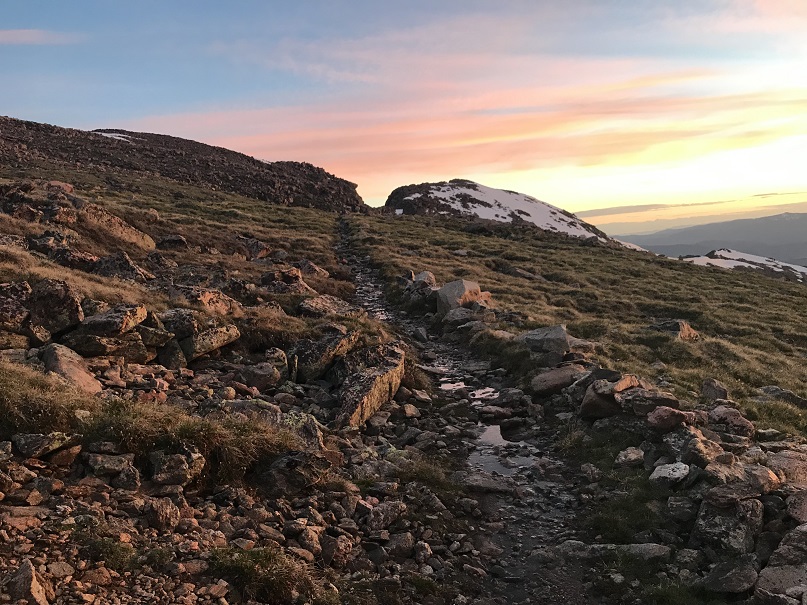
Here’s looking back at Elkhead Pass and the way down (don’t drop lower than necessary: there’s a trail that takes you all the way to the bottom; avoid that).
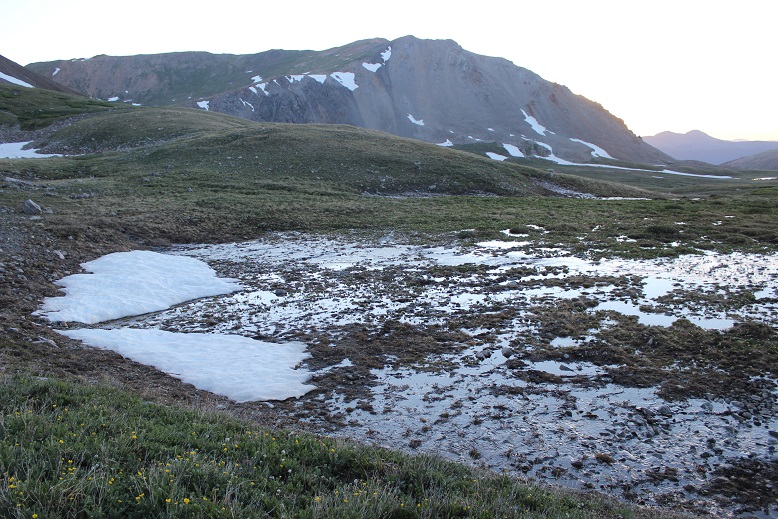
The area between Missouri and Emerald was mucky
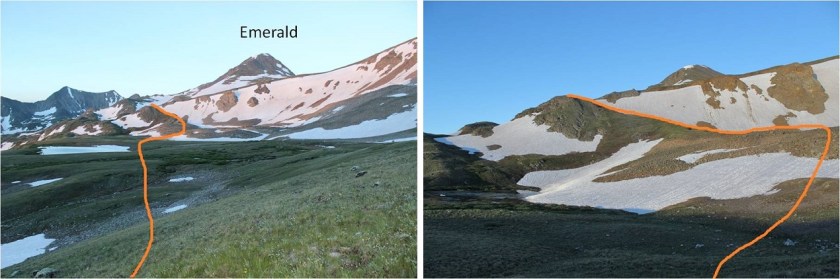
There are several ways to gain Emerald’s ridge. There was snow surrounding the access area to the south, so I went a little further north and took this path, avoiding the lakes and snow as much as possible.
Here’s a look back at the route and Elkhead Pass
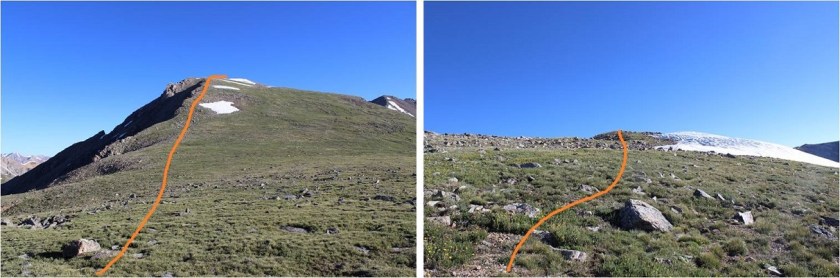
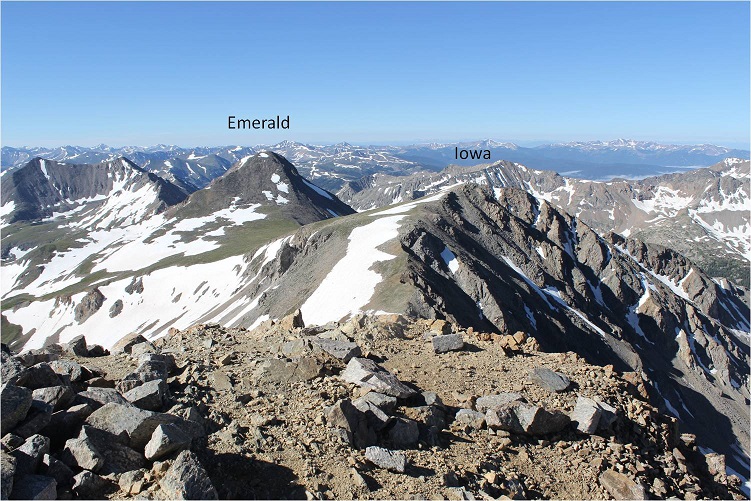
Once I gained the ridge I turned right (west) and followed a faint trail up the ridge. (Note: the standard route up is the dotted line. I did not take this route because I wanted to avoid kicking in steps in the snow: I wasn’t sure my feet would appreciate that today)
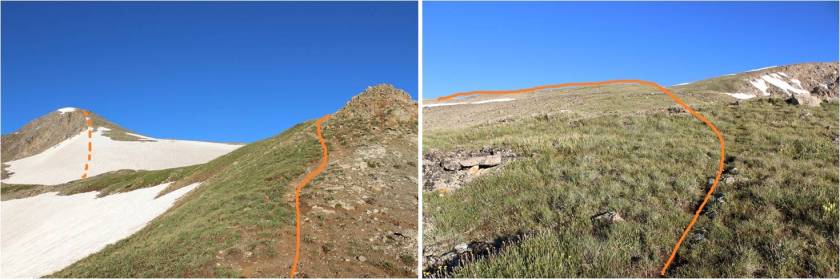
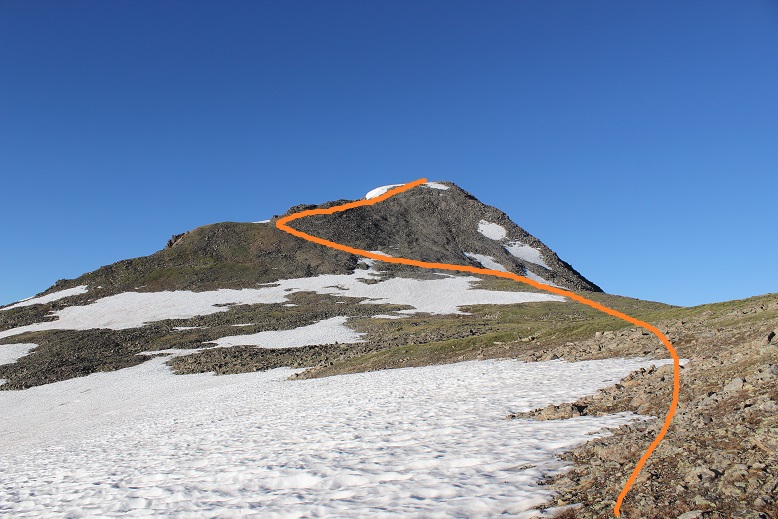
Instead I skirted the mountain to the northwest to the saddle between Emerald and Iowa and summited via Emerald’s north slopes
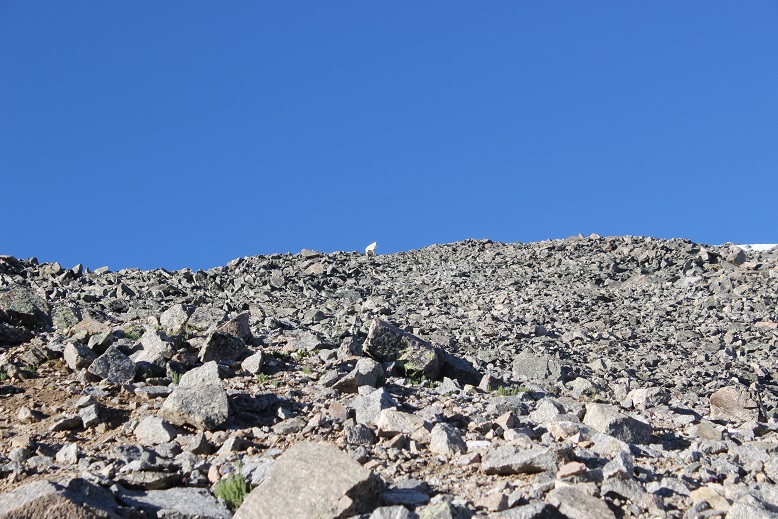
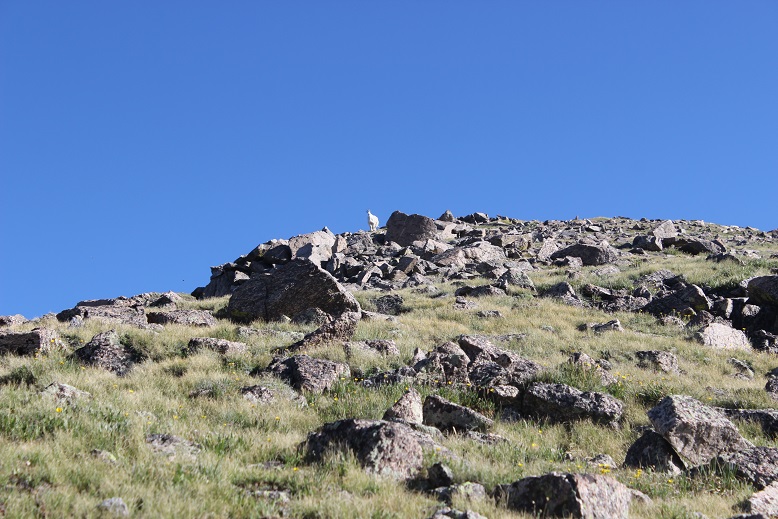
The last 500 feet or so to the summit were filled with scree/talus and tons of goat/social trails. Just aim for the ridge
I had a goat watch me the entire way, then disappear when I reached the ridge
From the ridge I turned right (west) and walked my way to the summit
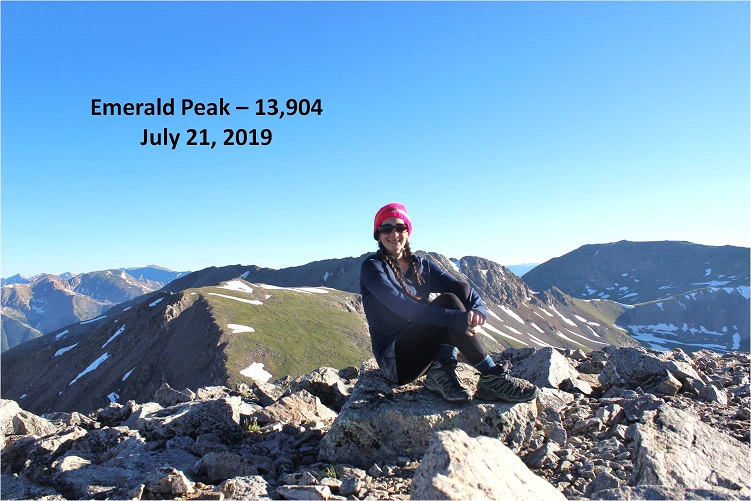
I summited Emerald Peak at 7:20am
Emerald:
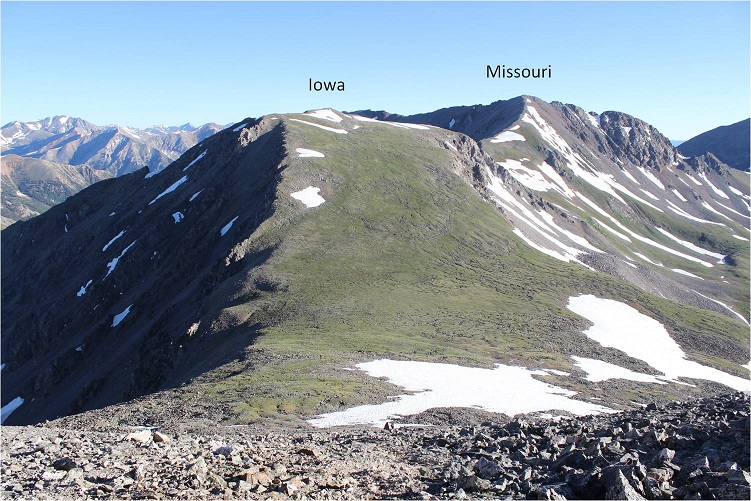
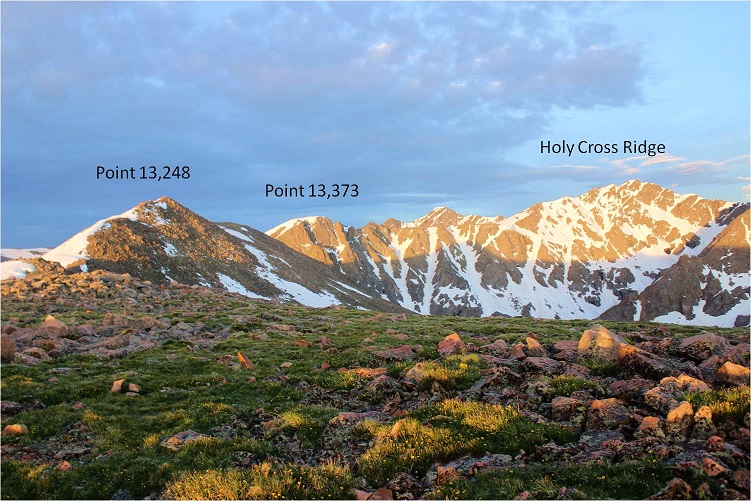
Despite the threat of forecasted afternoon storms this morning was beautiful! I looked over to Iowa and back at the route I’d taken thus far. An idea came to me: it looked like similar elevation gain/loss going over Missouri as it did going back over Elkhead pass. I might as well tag Missouri again. I decided to wait and see if the weather held out before making a final decision, but it seemed a draw either way. Oh, and my feet were holding up, so that’s a plus.
The route to Iowa and Missouri was obvious. I headed down Emerald’s north slopes and towards the Emerald/Iowa saddle and up to the summit of Iowa
The hike up to Iowa’s summit was easier than expected; I just stayed to the left of the snow on the ridge. Once again, a goat watched my ascent.
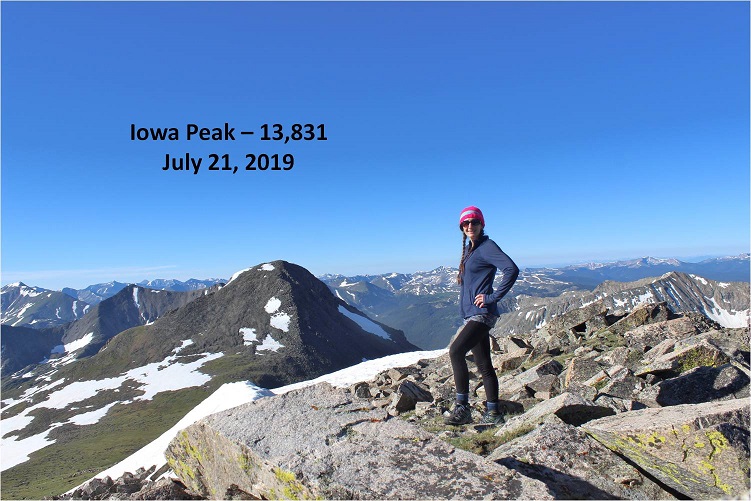
I summited Iowa Peak (an unranked 13er) at 8:10am. You can see Emerald Peak in the background of this picture
Iowa:
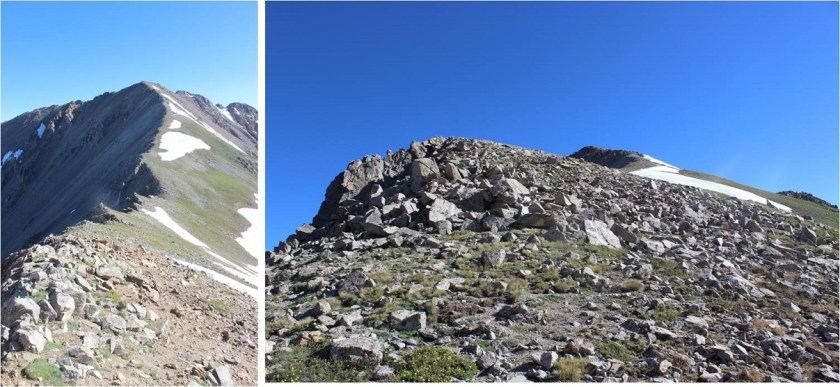
The decision had been made: on to Missouri! Initially I tried to descend Iowa too far to the right (east) and had to turn back due to snow I didn’t particularly want to cross. To avoid all snow it was easier just to follow Iowa’s ridge to the Iowa/Missouri saddle.
Looking back at Iowa from the Iowa/Missouri Saddle
The ridge up to Missouri was much, much easier than anticipated. I don’t know if it was the ibuprofen I took on Iowa or just conditioning, but I felt the ridge from Iowa to Missouri wasn’t very challenging at all. In fact, when I made it to the top I’d assumed I was only halfway up, and actually asked the 10 other people I saw as I was approaching “Is this seriously the summit!?!?” (Note to self: not a good question to ask a group exhausted hikers when you aren’t even winded. Tone it down a bit.).
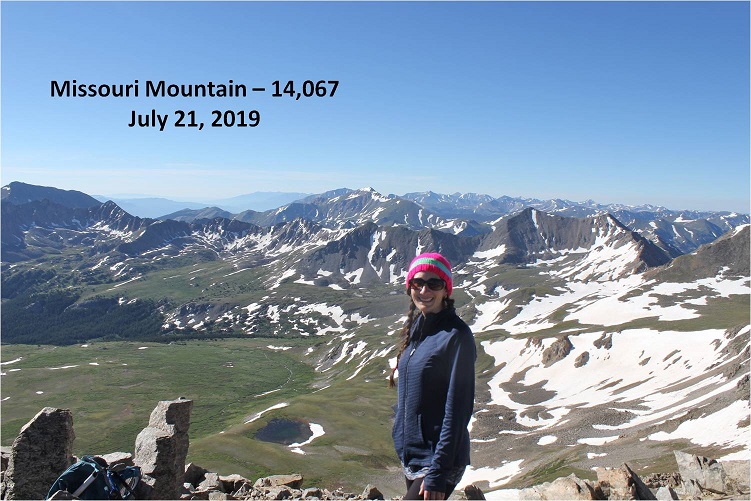
I reached Missouri at 9am and asked one of the other hikers to take my photo because I thought it would look silly setting up my gorillapod.
Missouri:
Missouri had been an added and unexpected bonus peak today, and it has a summit marker!
Here’s a look back on Emerald and Iowa
Knowing I couldn’t let my feet stop moving for long I thanked the photographer for taking my picture and headed back down via Missouri’s northwest ridge. There’s a great trail the entire way from the summit back to the Missouri Gulch Trailhead. Here’s the route of the ridge
The crux area was much easier to navigate than I remember it being when I hiked Missouri last time. This time I could even hold onto the rock face for added stability if needed
Is this rabbit named?
Here’s a look back at the ridge
Exiting the ridge is marked by a cairn (and today a tiny bit of snow). After rounding the corner get ready to do some scree surfing. (Note: if you’re not a fan of scree (who is?), microspikes help provide traction. Seriously, try them on scree, it’ll change your life).
Looking back up at the scree slope to gain the ridge
There were some slight snow fields to cross, but nothing that required traction
From here there’s an obvious trail back down to the gulch.
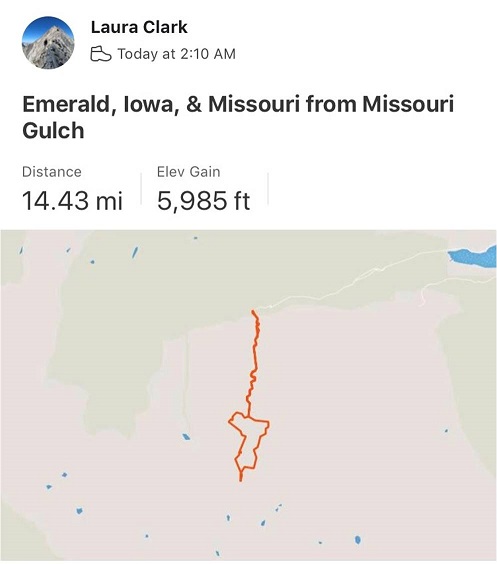
I met tons of people hiking on the way down from Missouri. It was the perfect day for a 14er, there are 3 in the area, and everyone was out. I made it back to my truck at 11:45am, making this a 14.5 mile hike with 5985’ in elevation gain in 9.5 hours.
My feet did not look pretty when I was done but I was very pleased with today’s hike. I didn’t feel tired, even at the end. My feet successfully made it the entire way without complaining (too much). I think the ups and downs in elevation gain on the ridges gave me little breaks that made all the difference. I’m sure you could do this hike in reverse and feel the same way. I never saw the couple I’d seen at the trailhead in the morning, but I’m hoping they stayed safe and had a fabulous hike as well!
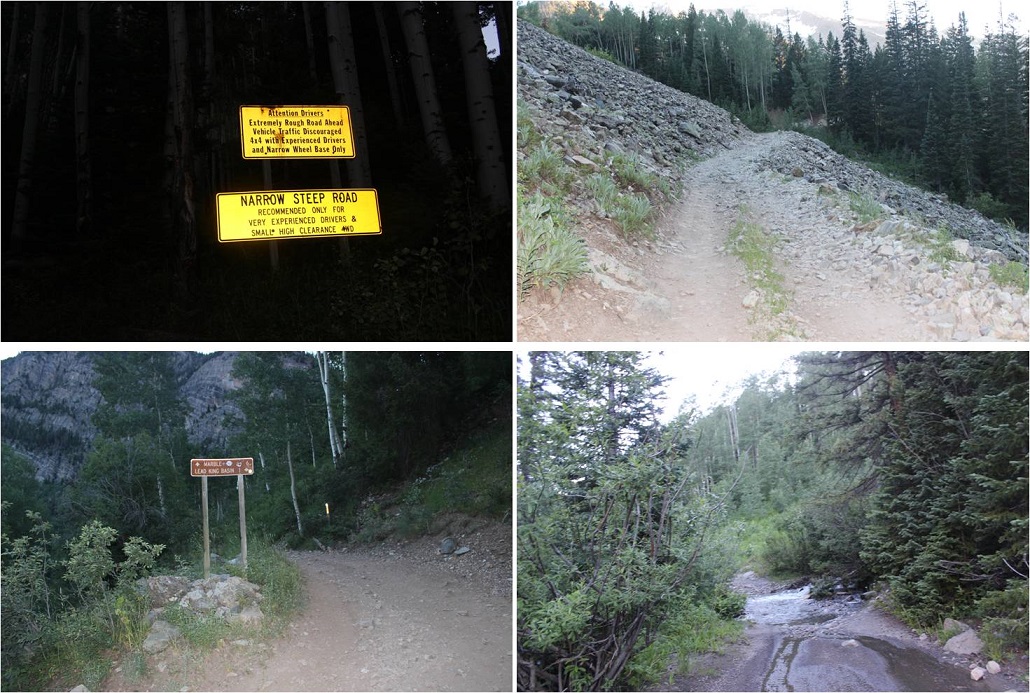
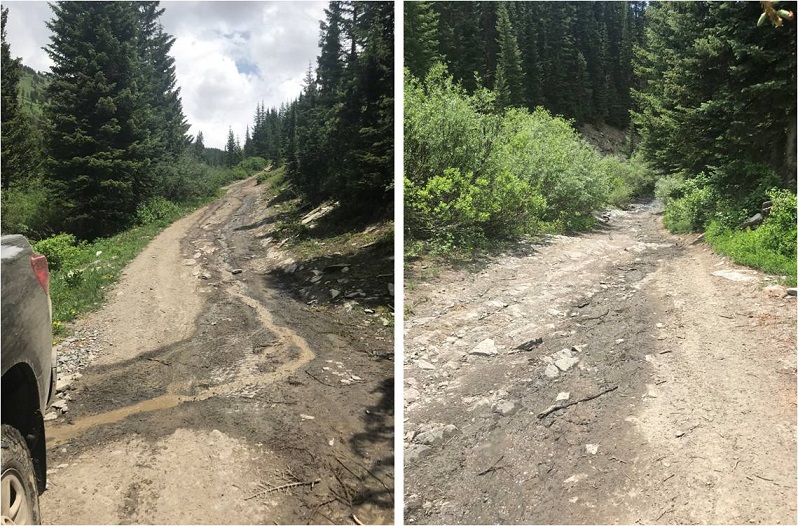
After my failed attempt last week I decided to do more research and try Hagerman again today. I learned the upper road to Lead King Basin had an avalanche about 1 mile after the stream crossing (very close to where I’d parked) so I decided to take the lower road from Marble to Crystal instead. I’d heard a lot of conflicting reports on this road, but when I searched it online I found this video, which was very helpful.
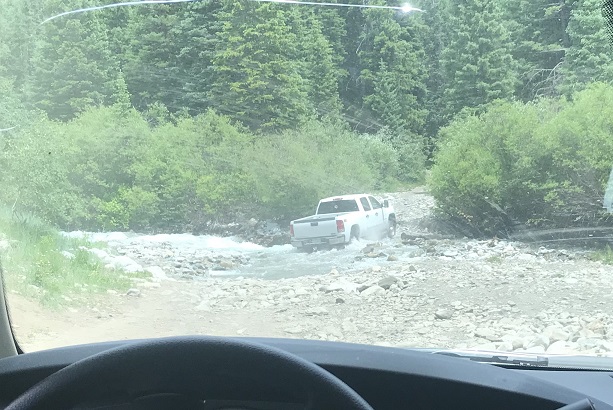
The road itself wasn’t that difficult with a 4WD (I wouldn’t attempt in a 2WD), and my Tundra handled it just fine. The only problems I can foresee would be passing other vehicles. Luckily there are a lot of small turnout areas on this road, especially before and after the committing areas. I drove in at night to ensure I wouldn’t need to pass oncoming vehicles, which I knew would be problematic in my big truck, no matter the size of the other vehicle.
Since I drove in when it was dark I wasn’t able to see the Crystal Mill, but I expected to see it on my way out the next day.
I made it to Crystal around 10pm on a Thursday night and all the lights in the ‘city’ were out. As I passed the Crystal Mill I saw a sign saying Lead King Basin was closed, so I dimmed my lights and parked at the east end of town, mentally calculating the extra mileage and what time I needed to start in the morning. Looks like I was getting about 3.5 hours of sleep.
As I was preparing to go to bed (my lights were out) I saw the lights go on in the second story windows of a cabin across the street. The two story 18th century style wood cabin had two tiny windows upstairs, covered in lace curtains. The light from the windows was glowing pale blue, and I saw the silhouette of a woman walking around. She was wearing a long nightgown and her hair was pinned up in a bun. The woman slowly walked around the room, picking up objects and setting them back down. Then the lights went out.
I set my alarm for 2am. When I woke up I crawled from the back seat into my front seat and started putting on my shoes. I didn’t need to turn on any lights because the full moon was shining bright enough to allow me to see. I saw a fox run down the center of the road, and then noticed the lights in the second story window of the house across the street turn on. Once again I saw the silhouette of a woman walking around. She was wearing a long nightgown and her hair was pinned up in a bun. She slowly walked around the room, picking up objects and setting them back down. Then the lights went out.
Whoa. That was spooky. I knew I hadn’t woken her up because I hadn’t made any noise, opened any doors, turned on any lights, etc. I was going to have to investigate that house in the daylight upon my return because that was just… weird. I mean, what are the chances she was up at 10pm and 2am, just like I was? Also, how many women still wear nightgowns to bed?
Ok, so I was on the trail at 2:15am. It was a 2 mile hike to Lead King Basin along a 4WD road that didn’t offer many turnouts, but was indeed open and my truck could have made it just fine to the trailhead. Oh well, I was getting in 4 extra miles today.
The trailhead was about 2 miles from Crystal. I didn’t see any of this in the dark (these signs seriously need reflective elements to them for us who start before daylight).
There’s a nice junction where you turn left to head up and around the north end of Lead King Basin to Geneva Lake
Here the trail was quite overgrown with flowers, plants, and trees. I thought to myself how it felt a little like being in a rainforest, and how much fun the flowered areas would be on my way back (I’m not a fan of flying-stinging insects, so I was being sarcastic). On the positive side: no mosquitoes!
It was in this area I saw my first ever porcupine on the trail. I see them along the side of the road when I’m driving to trailheads quite a bit, and one time I heard one under my truck at the Grizzly Gulch trailhead and had to fend it off in the middle of the night, but this was the first one I’d encountered on the trail.
He was just sitting there, staring at me. So I talked to him to get him to move. He turned around and waddled ahead of me, staying directly in the middle of the trail. I didn’t really want to follow a porcupine to the lake, so I talked a little louder to him. He scurried into the bushes and I immediately realized the error of my ways: now I couldn’t see him and didn’t know where he was. I didn’t want to experience porcupine quills and all that entails, so I nicely talked to the porcupine in a sing-song voice as I passed where I’d last seen him, crossing my fingers I hadn’t made him mad/scared and that he wasn’t sitting in the bushes: poised to shoot.
Mission “pass the porcupine” accomplished I continued on to the lake. The moon was full and bright so I conserved flashlight battery and hiked by the moonlight. Just as I made it to the lake I heard a faint barking in the distance. I was worried there was a lost dog out there somewhere (hey, it’s happened) but as I rounded the bend to the lake the barking got louder, and then I saw a flashlight turn on. The owner was pointing the flashlight in the direction opposite of me, and the dog was starting to bark really loud. I yelled up at them “It’s just a hiker!” I received no response, but the dog stopped barking and the flashlight turned off. It was about 4:45am. I immediately felt more secure hiking in the dark: I was pretty sure there wasn’t another animal in the area, as that dog would have been alerted to it.
Just north of the lake the trail continues north and then there’s a stream crossing. There were tons of areas to cross here, and all required taking off my shoes. At times the water was knee deep (I’m 5’4”), but mostly it was just high on my shins. Also, it was cold. When I was done my water shoes were quite muddy so I left them on a rock to dry and to pick up later.
This is where my trip report diverges from some of the more popular field guides. I took the 1st west side gully to the southwest ridge.
I crossed the creek and headed north for about 100 yards, looking for a gully to my right (west gully). I’d seen pictures of the access gullies on the east that were still full of snow, so by taking the west side I was hoping to avoid any snow filled gullies. I wasn’t disappointed. Here’s the gully I took:
This gully was steep and loose. I did not feel comfortable sticking to the scree in the middle, so I stuck to the right side where the rocks were larger.
My goal was to gain the ridge as quickly as possible, aiming for this small saddle
Here’s looking back on the route
From the small saddle you can see Hagerman Peak
I turned left (north) and faced a class 3 section and headed up and over the ridge.
At the top of this point I could see the rest of the route before me
It’s important to note if you’re attempting this ridge to start early and make sure you have a large weather window. This ridge is very committing. I went at it slowly and carefully. The rocks here crumble: I’d find a hand hold, grip, and the rock would crumble in my hands. I had to make sure to test out each hold several times before using it to secure myself. Luckily, the ridge was snow free.
This is definitely a ridge you take by… sticking to the ridge. I was able to go directly up and over most areas, dipping to the left or right just a couple of times. As I ascended the rocks stopped crumbling and started tipping a bit (nothing fell, but not much was stable). Here’s the final push to the summit.
I made it to the summit at 9:10am
Hagerman:
I started the ridge at 7:15am and ended at 9:10am, making this a 2 hour ridge to cross. Here’s looking back at the route
The day was absolutely beautiful and it was still early morning so I considered traversing over to nearby 14er Snowmass Mountain. I’d done a lot of research and came up pretty empty with details, but I knew it could be done. I spent quite a bit of time looking around at possible paths before deciding if I was going to attempt traversing or not. I looked at Snowmass Mountain’s east side: nope, that was a no go. Tons of snow and no way I could see to begin from the summit. Next I looked to the left (west). A lot less snow but the shadows weren’t helping much.
I stopped and did a lot of thinking here. I knew the traverse was possible. The rock looked loose, but I could also see goat trails (or maybe those were gullies…). I was confident I could find traction in the dirt. I mentally calculated how much time I had, the weather, and looked for exit strategies in case I got to a place where I couldn’t continue. I decided both time and weather were in my favor today so I decided to go for it.
Note: This may not be the safest way to traverse from Hagerman to 14er Snowmass Mountain. For me and my abilities, it was the safest way on this particular day.
The first move committed me to the traverse: I down climbed about 50 feet of… this. I’m not sure I could have climbed back up this wall. (Ok, I could have or I wouldn’t have climbed down, but it would have been a lot of work).
I turned and looked towards Snowmass Mountain. This is what I saw. So I headed northeast and rounded the corner.
I was taking this one section at a time, focusing on what was directly in front of me but glancing up at the rest of the route every so often to make sure I was on course. I found myself trying to stick to the ridge, but that is not the way to do this traverse: you need to drop down much lower than you want to. Every time I tried to regain elevation I was forced to head back down.
My advice is to descend lower than the saddle, and then take the scree line up to where the trail connects with the east route. The best terrain was consistently 100-200 feet below the ridge.
Once you connect with the ridge where the east route links up you can easily follow the cairns to the summit.
This was a very slow climb. Everything was loose and what wasn’t loose was scree. I took extra time to be careful with each and every step, and kept the entire route in view as often as possible. I most likely made this take longer than necessary, but I stayed safe. I made it to the summit of Snowmass Mountain at 12:50pm, making this a traverse that took over 3.5 hours to complete. Here’s looking back at the route
Summit photo
Summit Video
I spent a lot of time on this bluebird day taking pictures. It’s harder than you think to set an automatic timer and then scramble up to the summit block. It took a few tries… and the ones that actually turned out were fuzzy, so I gave up.
After spending much more time on the summit than necessary I needed to make the decision of how I was going to head back down. I’d been hoping, similar to the west side of Hagerman, that the west side of Snowmass Mountain would be free from snow. No such luck. There was still snow in the gullies.
I did not want to do the traverse back to Hagerman because that and another 3 hour traverse would have been exhausting. I could tell the gullies on the west side of Snowmass Mountain ended/cliffed out in a waterfall area, but I could also see bare rock I could traverse either north or south to connect up where I needed to be. I decided to head down Snowmass Mountain’s west side, but for safety I would slightly alter the traditional route. It was too late in the day to safely take the gullies, so I was going to take the rock rib that wasn’t a rib but a bunch of loose rock that bulged from the mountainside. Here’s the route I took
Do not let these photos fool you: this is where I encountered the loosest rock of the day. These rocks are the size of refrigerators and tables. Every 3rd rock would tip, and I would think to myself: “That’s a lot of rock to tip!” Luckily not one rock actually tipped/fell/tumbled/caused a rock slide.
This was a very slow process but eventually I made it to the waterfall area. My feet were starting to hurt at this point from all the rock work.
The snow ended just at the waterfall and surprisingly I crossed the waterfall pretty easily here and headed down. I made it down to this area at 3:30pm.
The snow started up again after the waterfalls
From here I looked down at the basin, and unfortunately there was a lot of snow covering the trail I was supposed to take back to Geneva Lake. That snow was going to be several feet of mush at this time of day so I decided to traverse south along the mountainside, looking for a safer route down.
I made it here and unfortunately cliffed out yet again… but I could see where I needed to be: That goat trail should get me down.
After searching around for a bit I was able to find a way off this spot by circling the area to the north and down the small cliff
From here I followed the goat trail that went down a forested gully and came out ready to exit and head towards Geneva Lake.
The area through the trees to the stream crossing was wet.
At the stream crossing I reconnected with my water shoes. They were now dry but had been scattered and were now no longer sitting on the rock together but in the grass a few feet apart. I changed out of my shoes into my water shoes and crossed the creek
I’m ashamed to say the creek ate my water shoes. Seriously. The banks were quite muddy and during the last two steps my water shoes got sucked off my feet and into the muck. I spent 20 minutes trying to dig them out with my ice axe, but no dice. I couldn’t find them. They were buried in the banks of the stream. Ugh. From here I sat and put on my shoes and new, dry socks. I looked back at the route I’d taken to Hagerman.
My feet were hurting, and I still had 4 miles to go. Time to hit the trail. I skirted the lake and headed back towards Lead King Basin.
One great part of this hike was being able to see the waterfalls. And, since it was so late in the day: no bees!
At the base of the waterfalls the trail was running with quite a bit of water.
In the daylight I could see the upper 4WD trail to Lead King Basin
This is where my feet really started burning. I was surprised, since I’ve done more challenging hikes with greater mileage/elevation gain than this one, yet my feet were very sore. I made it past the Lead King Basin trailhead as the sun set and each step I took hurt more than the last. I wanted to cry. I’ve never felt foot pain like this. Also, I’d been hoping to stop in Carbondale tonight to get Subway for dinner, but it looked like I wasn’t going to make it back in time for that to happen.
It seemed as if it were taking forever to reach Crystal. I eventually came across a sign that said “Private Property next 2.5 miles” and mentally freaked out for a second. There was NO WAY it was 2.5 miles to Crystal! Not only could I physically not make it 2.5 more miles (My feet! My feet!!!) but I was pretty sure it had been 2 miles to the upper trailhead. Had I been wrong and it’d been 4? Ugh, I needed rest and I needed calories because my mind was playing tricks on me. Luckily it was only half a mile past that sign to the town of Crystal. I finished this hike at 8:45pm, making this a 15.5 mile hike/climb with 6211’ in elevation gain in 18.5 hours.
Read on for gross feet pictures and segue into the next hike…
I limped to my truck and sat down by a small access creek about 1 foot wide on the side of the road. I took off my shoes and gasped: Yuck! My feet had never looked like that before! The heels and pads were completely swollen and red/gray, and very painful to the touch (no blisters though).
I decided to wash them off in the water. I placed them both in at the same time and immediately felt relief, and then 2 seconds later started screaming because they started burning as if I’d placed them into a pot of boiling water. My feet turned bright red and were rendered useless. Seriously.
I couldn’t walk the 5 feet to my truck so I sat there for half an hour in the wet creek bank and thought about what I was going to do. I was supposed to drive to the next trailhead for my hike tomorrow, but doing the math if I left now I would get there and only have 1 hour to sleep before starting again. This hike had taken much longer than anticipated. I’d only had 3 hours of sleep last night so it was a bad idea to try to drive and then hike at this point. Also… my feet. I wasn’t sure they’d function tomorrow. They needed time to dry out. But long distance runners/thru hikers have this stuff happen, right? They just tape them up and hike/run anyway. I decided I was really, really tired and should sleep before attempting anything. I’d adjust my schedule as needed.
I had pain killers but decided not to take them: I wanted to be sure of an accurate pain level when I woke up so I could plan my day accordingly. Unfortunately, I never really made it to bed. I crawled into the cab of my truck, thankful I hadn’t rolled up my sleeping bag this morning. I tried to nap but even though I was exhausted I couldn’t get myself to fall asleep. After 2 hours I gave up and decided to drive home, with the added bonus of doing so in the dark late at night so I most likely wouldn’t need to pass anyone on the shelf road out. My feet had dried out a bit and were raw but less sore. They still overreacted every time I tried to use them. My right foot was healthier than my left; I couldn’t press down on the pedal very hard, so I drove slowly, but I made it.
Oh, and since I’d returned in the dark I never got to see the Crystal Mill, or get a good look at that old house with the lady in the windows…
I really did’t want to write this one up because I made some amateur mistakes, but I also learned something, so here it goes…
My goal today had been 13er Centennial Hagerman Peak. I drove from the Cathedral Lake Trailhead and set my GPS to Geneva Lake, where the trailhead was supposed to begin. Just after the small town of Marble (which had tons of marble statues on front lawns) the road became rough and honestly quite fun in my 4WD Tundra. The dirt road was narrow, and I had to pull over a few times to let OHVs by, but all in all I was having a great time.
I came to a stream crossing and looked at my navigation. I was 5.5 miles from the trailhead. Not bad. Even if I decided to stay where I was and camp for the night I could still do the hike in under 20 miles. Totally doable. It’s important to note at this point I had no signal, so I was just going off this picture of my location (which rotated as I drove).
As I sat in my truck eating dinner (I’d found a Subway on the drive in) I watched several vehicles attempt to cross the creek.
The water was just to the top of most of their wheels. The OHVs were lower to the ground and thus their occupants got soaked. The vehicles did just fine crossing though. I watched a GMC truck get stuck, but after some back and forth action it was able to get unstuck. Then I saw an F150 cruise across the stream and thought “My truck can do anything those trucks can do and more” so I put it in drive and crossed the stream, no problem.
About a mile and a half up the road began to get rough. I’m talking closed upper south colony lakes trailhead rough (the part you can no longer drive on). My truck was handling just fine, but huge boulders and water were increasing on the trail and there weren’t many (any) places to turn around, so I used a switchback to reverse my course and ended up parking back at 9960’. I was pleased with this spot, as I was now 4.2 miles from the trailhead.
I got out my topo and did my best to guestimate where I was on the map. Unfortunately I was pretty sure I was currently “off map” at this point, but figured I was about here (red x). I realized later I was indeed correct in my assumed location.
Had I had a better topo or cell service I would have realized my mistake instantly, but going off of what I had I was sure of my current location (and actually, I was). I just needed to follow the 4WD road to the trailhead and I could pick it up from there. I had several great topo maps that started at the trailhead, as well as a pre-loaded GPX file. I spent the next 15 minutes or so going over the route again, and calculating how much elevation gain I’d add from starting from my current location. It looked like an extra 700’ each way, so no more than 1500’in total. I was willing to live with that.
I made it an early night and woke up at 10:30pm to start my adventure. I was on the road by 10:50pm. It started out easily enough: I just followed the 4WD road. I didn’t think to take out my map (etc) because I was just following the road. After about a mile the snow started, and it was obvious no vehicle had been in this area yet this year. Hmmm. That was curious: I saw a conditions report from last week stating it was snow free to the lake. I should have stopped and reassessed here, but if I had I wouldn’t be telling this story. Also, some people lie on conditions reports (it’s happened before).
I continued on and thought to myself “Wow! This sure does feel like more than 700’ in elevation gain! I must still be sore from yesterday.” There was a full moon out but it was obscured by the trees. I kept following the road through increasing snow until the road just stopped. That was curious. It just ended and there was no trail to hook up with it. There was supposed to be an obvious trailhead… and I’d never decreased in elevation.
I took out my phone and looked at the picture I had of where I was going, and then looked at my tracks so far. It sure seemed I was going in the right direction. At least my tracks looked similar to the route description. The trail must hook up here somewhere close. I got out my GPS track and yes, it looked like I just had to head in that direction and I’d make it. The problem was ‘that direction’ led me over a cliff.
I kept scouting around and found what looked like fresh tracks. Awesome! Someone had been here after all. I walked over to them and noticed the tracks were from a mama bear and cub, and yes indeed they looked fresh. That did it. I was turning back and heading back to my truck. I did not feel confident continuing in the direction I was going, and I was sure something was wrong with my navigation (I just wasn’t sure what I’d done wrong).
I followed my tracks back to my truck and made it back a little before 1:30am. Drat. It was too late to drive somewhere else and start another hike. The day was shot. What really stinks is I lost an entire day of potential hiking. I decided to drive back home and figure out where I went wrong. On the positive side I was the only one on the 4WD road at 1:30am, so I didn’t need to move over for any passing vehicles.
OK, so here’s what I’d done wrong: I followed the orange line, when I was supposed to follow the red line. Note: the orange trail hadn’t been on my map, so I didn’t even know it had been an option. I just figured I was following the same 4WD road.
But if you look at my tracks, they do look pretty similar when you rotate them (which was what was happening as I was hiking)
On the positive side, I ended up unknowingly summiting Sheep Mountain, a ranked 11er, so there’s that. Also, I got in 1659’ in elevation gain (see, I knew I’d gained more than 700’). So, lesson learned. Have topo maps that cover the approach in, even when it’s on a road. I’m going to have to attempt this one again… luckily it’s only a 5 hour drive.
After 2 hours of sleep I woke up at 9:30pm to drive to the Halfmoon/Tigiwon/Fall Creek Trailhead. My kids think I’m nuts, but starting early when hiking above treeline really has its advantages. I was afraid of encountering afternoon thunderstorms, as there was a 50% chance after noon, and while I didn’t know if I’d be encountering any snow it was likely and would soften up during the day so I wanted an early start. The 2WD dirt road in was a little rough but easy to navigate. I arrived at the trailhead at 2:15am and took one of the last available parking spots.
There’s a ton of signage at this trailhead and multiple routes up to the same peak(s). I chose to take the Fall Creek Trail, heading south.
This trail is well established and well maintained. The first half mile or so was dry
And then the trail was completely covered in several inches of water. I took off my boots to cross the waterfall area (about 1.5 miles into the trail)
At 2.4 miles I came to a trail junction for Lake Constantine and Notch Mountain Trail, taking Notch Mountain Trail west.
This trail switchbacked up the side of the mountain for another mile or so, and where there wasn’t water there was snow
At 11,750’ I came to the base of the slope up to the ridge, and needed snowshoes
In the dark I could only see a few feet in front of me and there was a lot of snow, so here I lost the defined trail and just hiked straight up the ridge. Snowshoes were very helpful here! It’s also steeper than it looks
About 150’ from the ridge the snow stopped and I was able to follow a snow free trail to the ridge
The sun was beginning to rise, and I love sitting and watching sunrises, so as soon as I reached the ridge I ascended a small (and unranked) slope to sit and enjoy the view
The sunrise didn’t disappoint!
The best view was behind me though, of 14er Mt of the Holy Cross. Wow! It’s beautiful in the morning light.
After enjoying the sunrise I walked over to the ridge shelter and was excited to find it unlocked (well, it had a lock but the lock wasn’t securing the door).
The shelter’s actually quite roomy, with a fireplace (not that there’s any firewood above treeline) and a great view of Mt of the Holy Cross. This would be a nice place to shelter if a storm hit the ridge.
From the cabin I could see much of the rest of the route: Up Point 13,248, over to Point 13,373, and across to Holy Cross Ridge
The hike over to Point 13,248 was full of large rocks and hollow snow: the kind where you step on it and sink in a hole between the rocks up to your waist. After the first few postholes I stuck to the rocks
I summited Point 13,248 at 6:20am
Point 13,248
Here’s looking back at the shelter
And here’s the route before me. It didn’t look like the sun wanted to peak out above the clouds this morning
Here’s where I got a little nervous. The ridge looked like it was covered in more snow than I’d anticipated.
But when I made my way down there (losing about 600 feet in elevation along the way) the ridge was snow free enough to walk across. Well, not really walk, but more like scramble up and down on the rocks. Sticking to the ridge worked well.
I was a bit worried about the large patches of snow I saw, hoping they weren’t hollow like the snow I’d encountered higher up on the ridge. Luckily, the snow here was solid
This is also where the crux of the route began. The solid line is the route I took up, and the dotted one is the route I took on the way down.
On my way up I went straight across the slope and then up the ridge
If I were to do this again I’d take the route I took down up as well. I didn’t initially because the rocks looked loose and unstable, but on my way down I found them to be stable and easy to climb through. I needed my ice axe and crampons for this part (on the way up and down) because the snow was steep. The traverse across the slope on my way in was sketchy, as every few feet or so I’d hit an air pocket and sink to my waist. I went slowly, seriously worried at some point I was going to slip and fall. Once I’d traversed the slope I needed to gain the ridge. This was steep as well. I couldn’t have done this without my ice axe and crampons
I breathed a sigh of relief when I finally gained Point 13,373. That had been more difficult than anticipated. I took a look back at Point 13,248
And at the rest of the route before me
I descended a bit, and then traversed a flat area before ascending once again. The last few hundred feet go up and down in elevation quite a bit, creating a few small false summits. My advice is not to go straight up the ridge, but circle the mountain to the left (west), gaining in elevation as you go
There were several large patches of snow to traverse here as well, and just my luck, the sun started to peek out from behind the clouds, making these crossings tricky as well
I summited at 8:30am
Holy Cross Ridge:
Here’s looking back on the route I took along the ridge
Ok, the sun was really warming things up and I was debating how safe the route back down Point 13,373 was going to be with soft snow. The ridge to Mt of the Holy Cross looked quite easy, and I considered just making this a loop, but I really wanted pictures of the route I took in, meaning I was going back the same way. Time to head back.
This time instead of going directly over the top of Point 13,373 I skirted the mountain to the right (east)
This put me at a great place to descend, so I once again put on my crampons and got out my ice axe and garden tool
The snow had indeed softened up, but was now perfect for kicking in steps. I felt much more comfortable traversing down than I had up, and the best part was the rocks I thought had been loose were really much larger and stable than they’d looked from across the ridge. Here’s the route I took down
And now the fun part: re-ascending point 13,248
I skirted the summit of this one as well, sticking to the left and then heading back to the shelter
Once at the shelter I met a couple eating lunch and taking a break. They’d intended on hiking the ridge today as well but were turning back due to weather/conditions. I thought this was a great idea, and noted it did look like we were indeed going to get some thunderstorms today after all.
I made it back to the switchbacks and when I came to snow put back on my snowshoes. This section looks short, but it’s actually a long and steep descent (which is made ‘easier’ with the switchbacks I couldn’t see under the snow, so I just headed straight down).
The sun had warmed up the snow, and what had been solid on my way in was now the consistency of a slushie. Each step I took I sank in the snow past my knees, and my trekking pole and ice axe were useless. I was sliding everywhere, and finally gave up and glissaded down. The couple behind me kept getting their feet stuck in the snow between rocks. The conditions were terrible, and I mentally high-fived myself for an early start: I wouldn’t have been able to descend Point 13,373 at this time of day.
Oh, and I saw a ptarmigan. I love those guys!
Snow stopped at about 11,700’ and everything was wet again, including my feet. The slushy snow had gotten inside my boots and my feet were soaked through. Changing socks wouldn’t have helped because my boots were wet as well. I didn’t even bother taking off my boots for the creek/waterfall crossings because they were already soaking wet
I made it back to my truck at 1:30pm, making this a 13.5 mile hike with 4863’ in elevation gain in 11 hours.
I had a totally different set of peaks in mind for the 4th of July weekend, but due to the (still) high levels of snow in the San Juan’s my plans changed a bit. I feel a bit out of shape because haven’t been out hiking in 2 weeks: I took my Troop Hammock Camping (it snowed on us in June!) and then to Alaska/Canada for a week, staying mostly at or around sea level. I got home the night of the 3rd late, decided to get in a 2 hour nap and was up and on the road at 9pm, headed to Lake City. To most this schedule may seem crazy, but I suffer from nightmares when I get too much sleep so I’d rather keep myself busy.
The drive up until Lake City was uneventful, except for a cop that pulled me over doing 61 in a 60mph zone coming over a hill in Nathrop. This is the second time this has happened in the same area, which means I didn’t learn the first time. Of course I was let off with a warning, and this time he didn’t try to give me his phone number. Also, he had no idea where Lake City was.
I was about 2 miles from Lake City when I saw it: My first thought was “Wow! A mountain lion!” Then quickly afterwards “Wait, that’s too big to be a mountain lion…” I was asking myself what animal could have a tail like that and be bigger than a mountain lion when it turned and looked at me: White muzzle, pink nose, dark alert whiskers, and tan face. That was definitely a mountain lion! Woot! And a healthy one to boot: I’m talking African Lioness size, brawny and muscular.
I slowed down my truck to get a better look. He(she?) was walking on the side of the road, seemingly not in any hurry. I’ve hiked thousands of miles in Colorado, and this was the first mountain lion I’ve seen here, and also by far the biggest mountain lion I’ve ever seen. Naturalist Nerd that I am, I’ve spent whole days at the Rocky Mountain Wild exhibit at the zoo, just sitting and watching Mountain Lions. Those mountain lions at the zoo had pouchy stomachs and loose skin, but not this guy! He was all muscle.
I was also a Park Ranger when I lived in California, and one time I encountered a Mountain Lion as I was leading a class of 3rd graders to the picnic area. It saw us coming, jumped out of the tree it was lounging in and quickly bounded away (30 lunchtime 3rd graders will do that to wildlife). While collared, that one must have been a juvenile because it had nothing in size on the one currently walking front of me.
After about 30 seconds I came to the conclusion I should try to get a picture. My cell phone was in my lap, so I turned off navigation and clumsily opened the camera app. I took a quick video and tons of pictures and studied him until he eventually turned around and bounded up the hillside. Imagine my disappointment when the video was too dark to see anything, and none of the pictures turned out of him sitting and looking straight at me. The best one I got was of him jumping, which wasn’t too great to begin with. In any event, it was a cool experience. Lake City has some big mountain lions!
The Grizzly Gulch / Silver Creek trailhead was full when I arrived at 2:30am and I had to get creative to find a parking spot in the parking lot big enough to fit my truck.
I headed northeast and was on the trail before 3am, a little jumpy after seeing the mountain lion but confident he was at least 20 miles away from my current location. I just tapped my trekking pole on every rock I saw and hoped I was scaring unwanted encounters away. Also, there’s a trail register at this trailhead; one of those big metal ones that makes a terrible creaking sound when it’s opened and closed, and a big bang when the lid drops. After signing my name and closing the lid I’m pretty sure I scared every creature within a couple mile radius.
Almost immediately there was evidence of avalanche activity along the trail, and while it was still dark and I couldn’t see the downed trees I could smell the fresh pine scent that accompanies an avalanche.
This is a very easy trail to follow, as it parallels Silver Creek all the way to the basin. As the trail began to follow Silver Creek I found myself walking on ice. At first I thought the creek was frozen, but quickly realized the creek wasn’t frozen but covered in a layer of ice several feet thick.
The ice was solid and reminded me of the glaciers I’d just seen in Alaska. It looked like an ice flow, but was most likely caused from avalanches throughout the basin. Mixed in were various tree branches and avy debris
And even areas of rockslides (the creek was flowing swiftly underneath all the debris).
Once in the basin I ascended the slope to the saddle between Redcloud and Point 13,561. This was fairly straightforward, and while it was covered in snow I didn’t need traction.
At the top of the saddle I turned left
The sun was starting to rise so I dug in my backpack for my camera, but unfortunately must have left it at home. Drat! I bring along my DSLR for pictures because taking photos on a phone is difficult with Raynaud’s: any type of touch screen is an issue as my finger touches don’t always register, but it’s much worse when my fingers are cold. I inwardly sighed and crossed my fingers there wouldn’t be too much wind, mentally resigning myself to not getting summit photos today (or tomorrow, as I was staying in Lake City hiking for a few days).
From the saddle I could see the rest of the route before me, and rejoiced it was basically snow free!
I looked left and was greeted with an unexpected view: I’d planned on summiting “Cooper Creek Peak” today as well, but hadn’t realized while going over my topo map there were gendarmes and a rocky ridge involved (and I didn’t have a helmet). Looks like I was only summiting one peak today.
I headed towards the patch of snow on point 13,561
This was easy to cross. Here’s looking back at Redcloud and the patch of snow
I followed a faint trail across the ridge
The path to the summit was tundra mixed with small rocks.
I summited at 6am, thrilled I was able to take photos with my phone (yet upset I was forced to take a selfie). Also, the sun was in my eyes
I crossed back over the patch of snow and thought again about Cooper Creek Peak. It was still really early and I wasn’t tired. I didn’t think I could summit, but I could make it to the halfway point (Point 13,665) and add some extra mileage and elevation gain to today’s hike, helping to keep me at my 10 mile/4000’ average. Here’s the path I took from the saddle
This was more challenging than Point 13,832, but in no way difficult. I just followed the ridge
I just kept to the left of the snow, hiking up surprisingly stable scree
The fun part came at the end. The actual ‘summit’ is the bump to the left
This ended up being quite a fun (if short) scramble to the top!
It reminded me a bit of the final scramble on El Diente (but with a lot less scrambling to get there).
Yes, there were a few chosen class 4 moves and some exposure as well.
From here I could see the summit of Cooper Creek Peak, and once again verified I wouldn’t be climbing the ridge connecting it with point 13,665 today (next time I’ll bring a helmet)
I had a really cool view of PTs 13,811 & 13,832 as well
Here’s a look back on the route
I trekked back to the saddle, having fun taking shadowselfies now that the sun was in the perfect position to do so
Back in the basin the 4th of July weekend was ramping up: I saw a couple dozen people on their way to Redcloud. I was glad I’d started early! The snow was softer on the way out, but I still didn’t need traction.
In the daylight the trail was much easier to follow: I just walked along the river of ice.
I made it back to my truck at 9:30am, making this an 11 mile hike with 4055’ of elevation gain in 6.5 hours
I hopped back into my truck and drove to the next trailhead, anxious to find a spot on a busy 4th of July weekend. No need however, since I was the only one there when I arrived (besides thousands of mosquitoes of course). I forced myself to eat (a bagel, tuna, and some dried fruit) and appreciated the close and clean bathroom. Eventually some dispersed campers wearing tank tops, flip flops, shorts, and backwards baseball camps arrived and I went to talk with them before heading to bed early (I’d only had 3 hours of sleep in the past 48 and needed to do some catching up: Luckily, even though I’m prone to nightmares I’ve never had one while camping so I was hoping to get in a solid 10-12 hours or so).
I talked with the other campers about the trail I was taking for tomorrows hike, as they’d attempted the approach today but were unsuccessful. They hadn’t been able to make it more than 2 miles due to avalanches and high creek crossings. I mentally filed this information away for tomorrow. Between slapping mosquitoes and trail talk I discovered they were camping to celebrate the holiday weekend with a dozen or so of their closest friends and they offered me a Coors Light later if I was interested? I thought back fondly to my days as a young 20-something, dispersed camping in the middle of nowhere with cheap beer, and then thought of the bottle of Knob Creek I had waiting for me in my truck. I thanked them, but they didn’t need a 38 year old parental figure spoiling their fun… and I was pretty sure I was all set in the alcohol department.