Northwest Pole – 13,660, Pole Creek Mountain – 13,716 & PT 13,573

1

RT Length: 19.67 Miles

Elevation Gain: 5926’

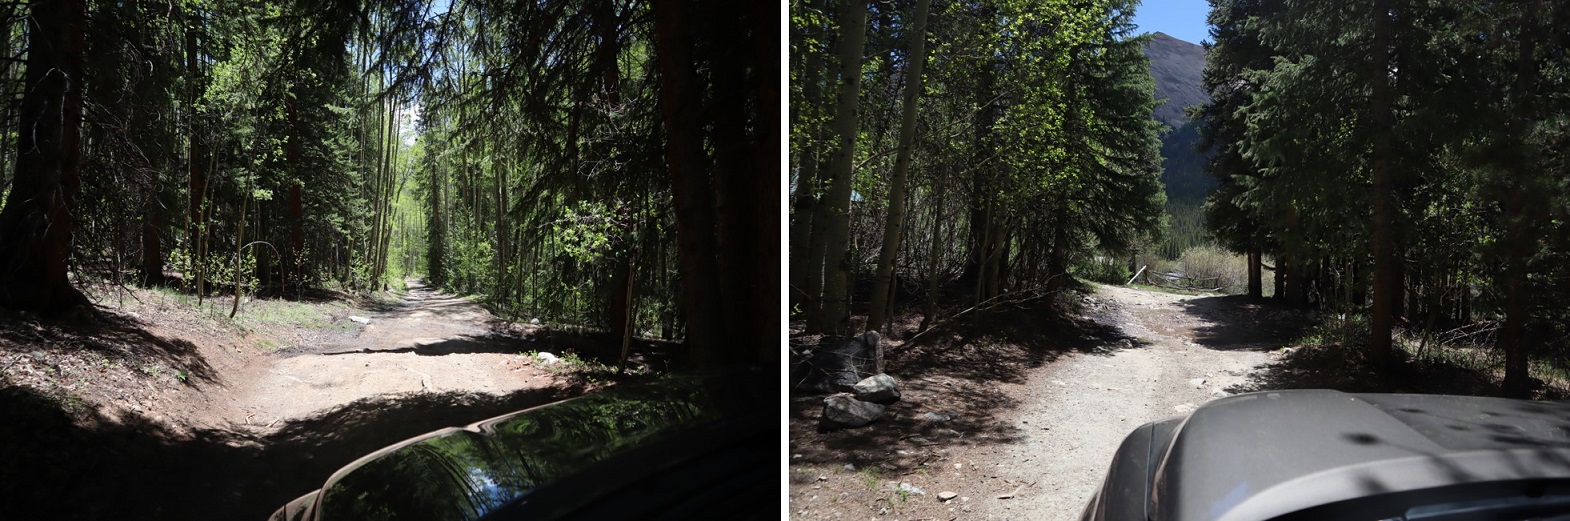
I drove up to Carson Pass a few days before and slept in my truck, hiking Bent Peak the first day, and Carson Pass, Tundra Top, Cataract Peak, and PT 13581 the next. For details on the drive in, please see this post: Carson Pass.

2

I woke up before my alarm again today, but not because I was well rested: I was cold! As I turned on a light I realized I only had half of my blankets covering me. There wasn’t any wind last night, and when I looked outside I could see tons of stars. The clear skies had made for a cold night. I jumped in the cab of my truck to warm up and get ready for the day, noticing it was 32 degrees outside (as compared to yesterday morning’s 43). It was amazing what difference a few degrees makes.

I turned the truck on to turn on the heat and was once again disappointed to notice my ABS and Traction lights were still on, as well as my 4WD light still blinking. That was going to haunt me all day.

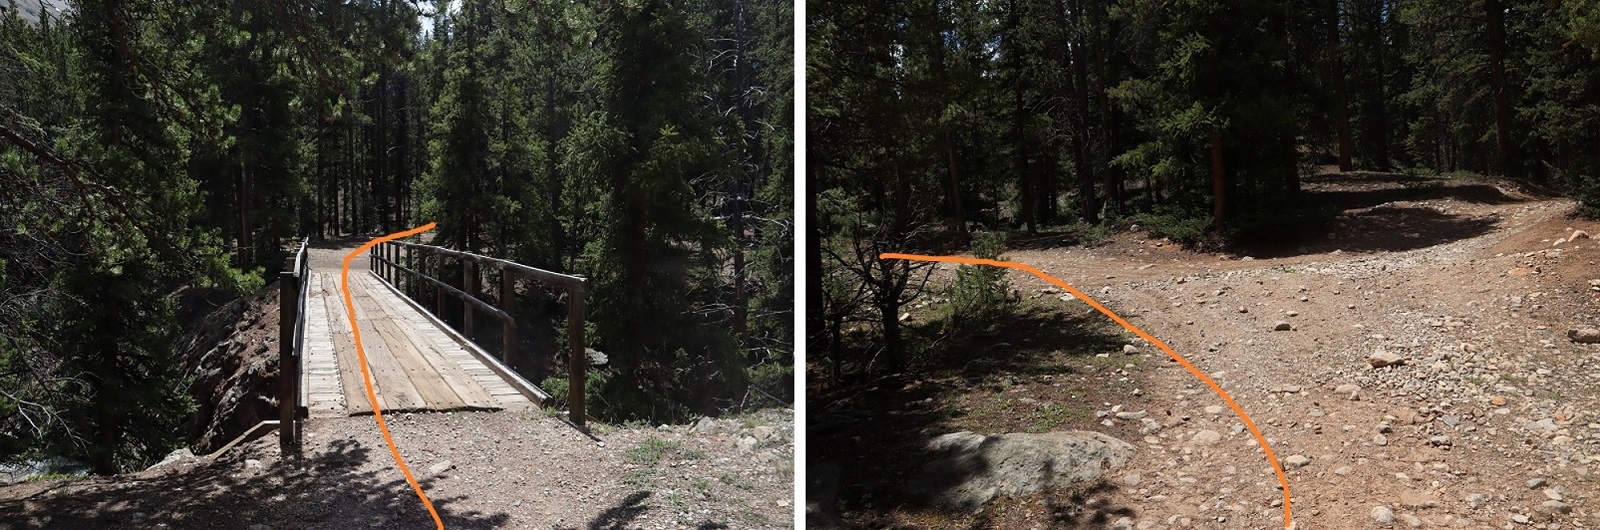
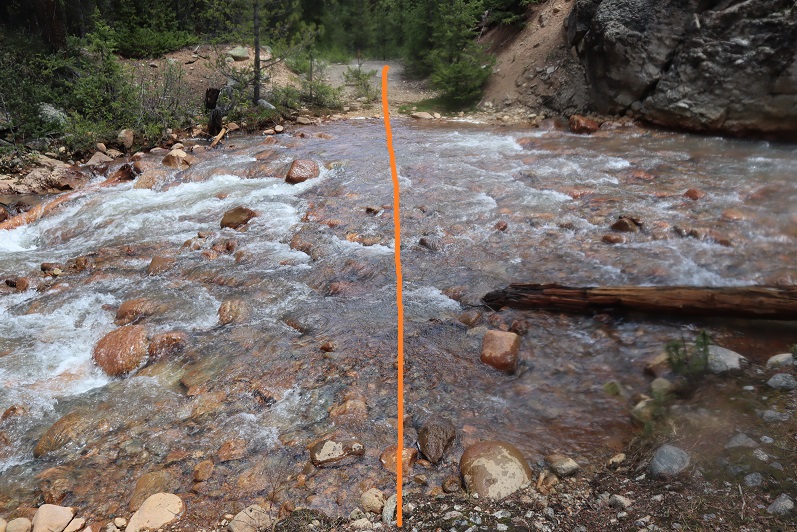
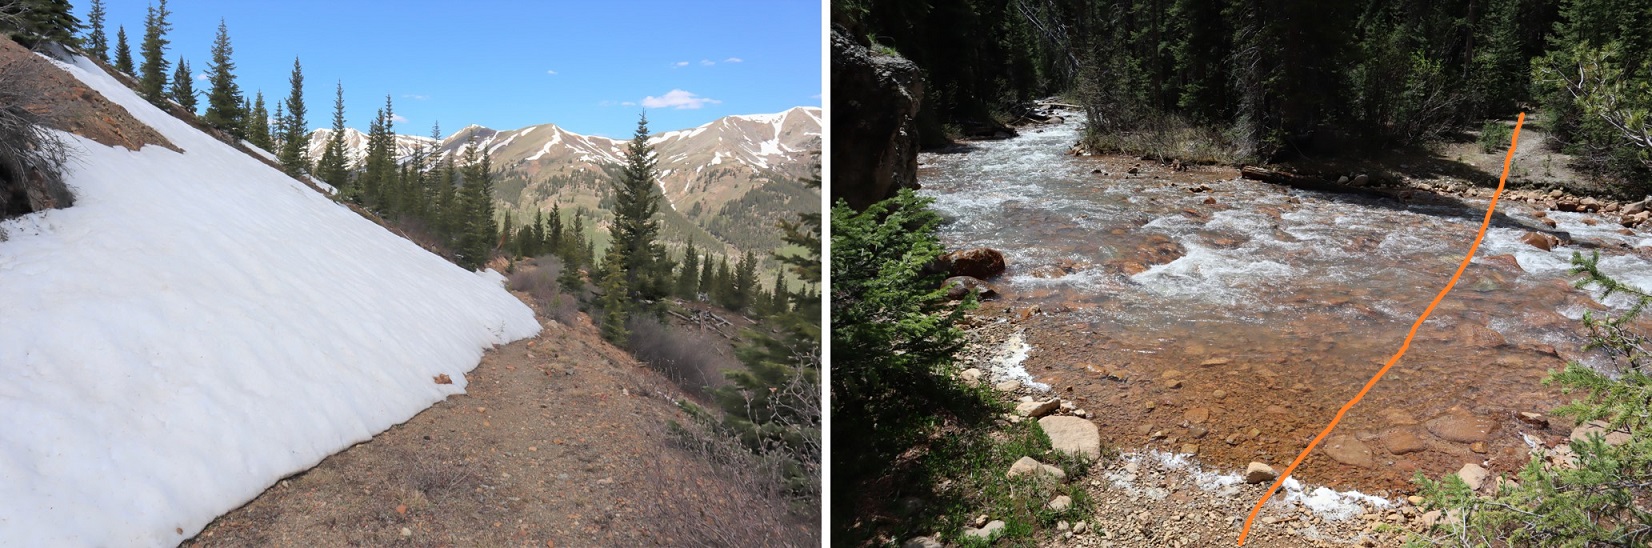
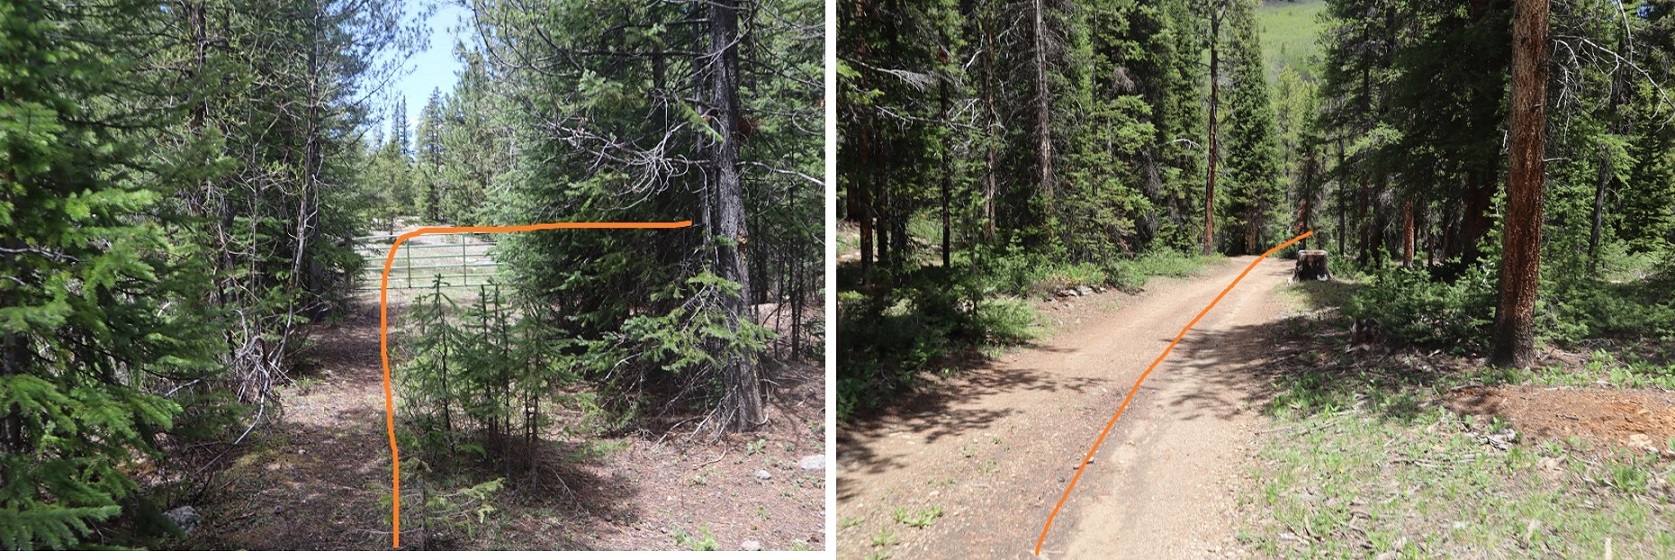
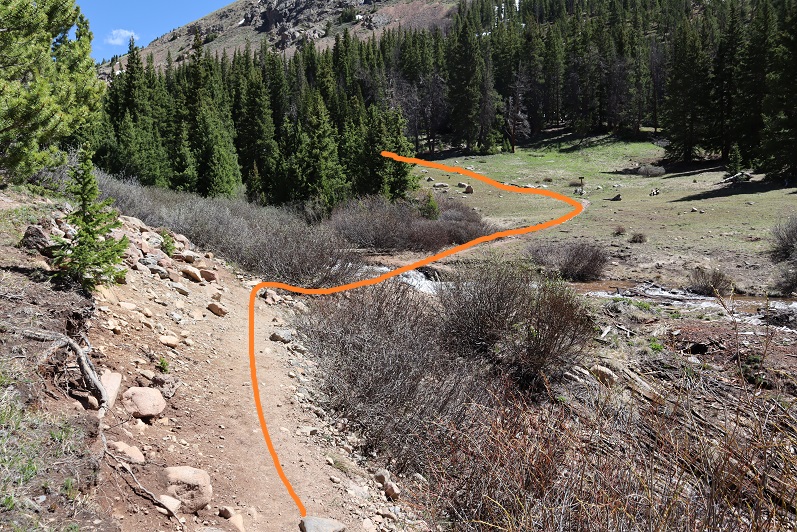
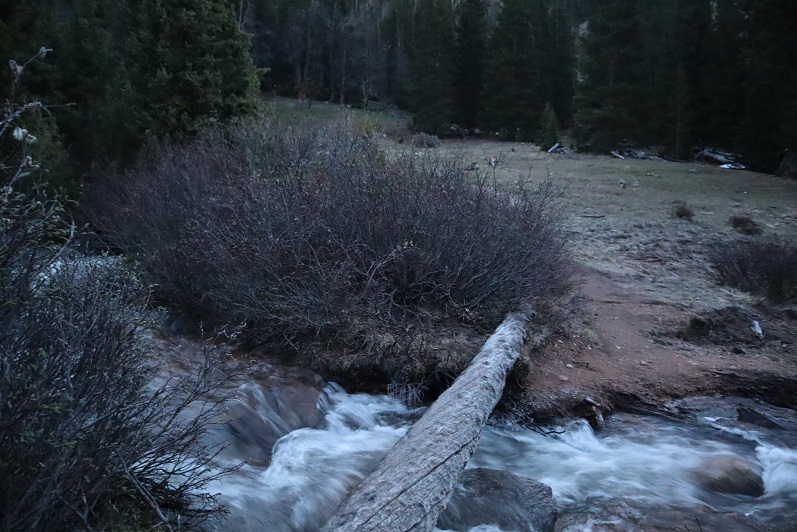
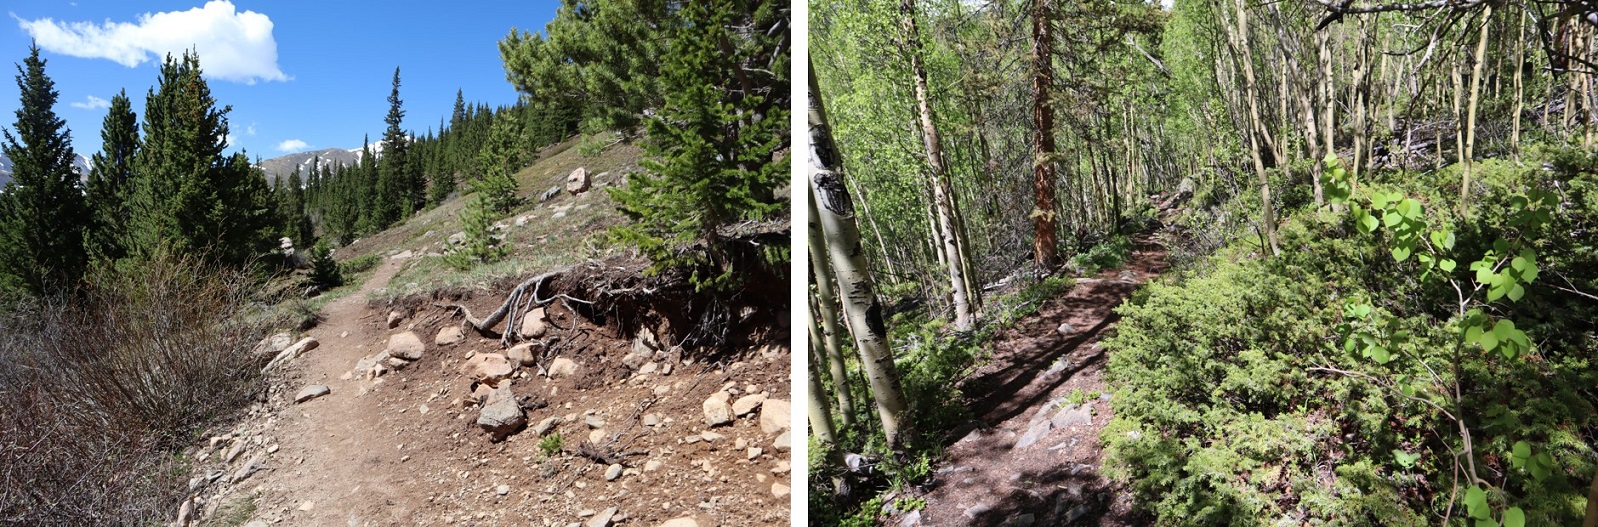
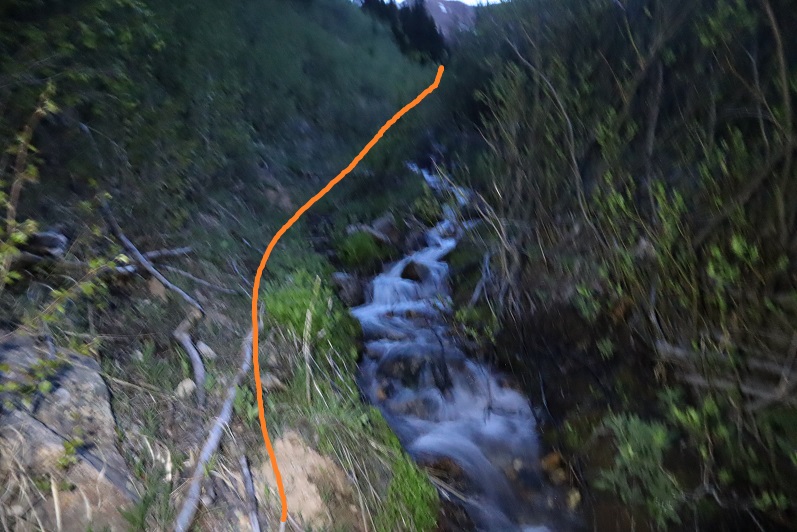
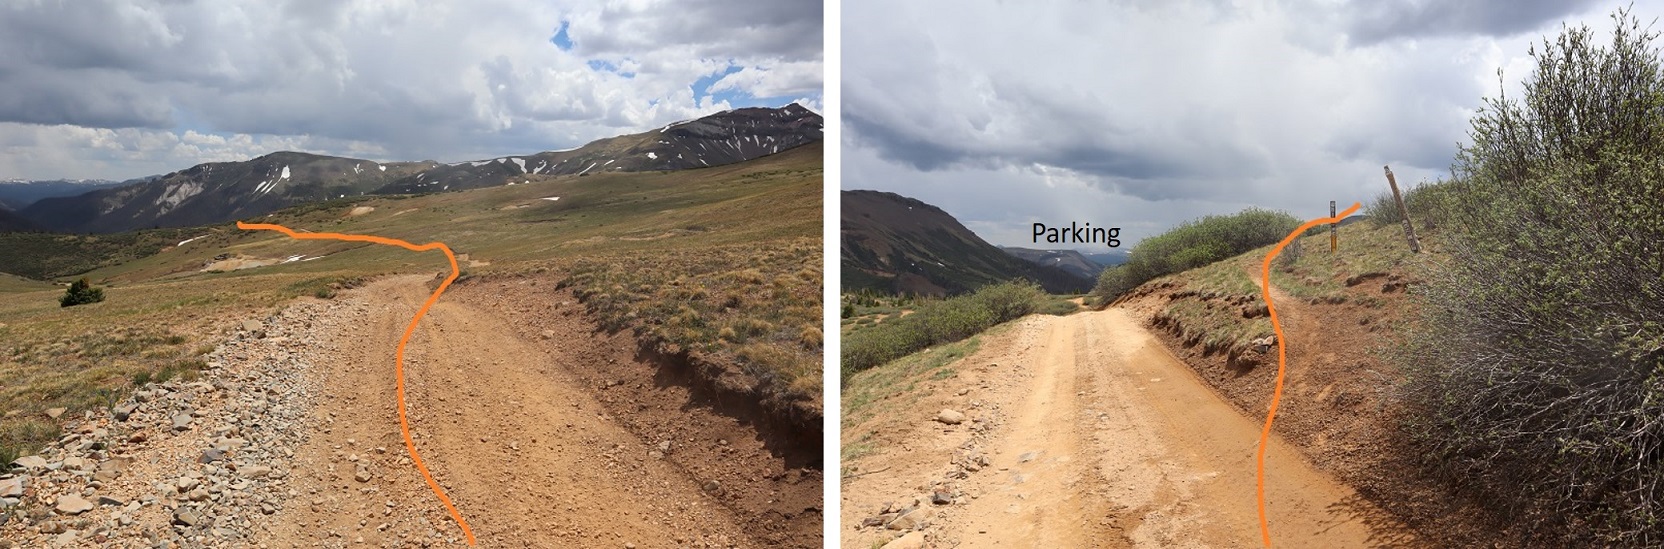
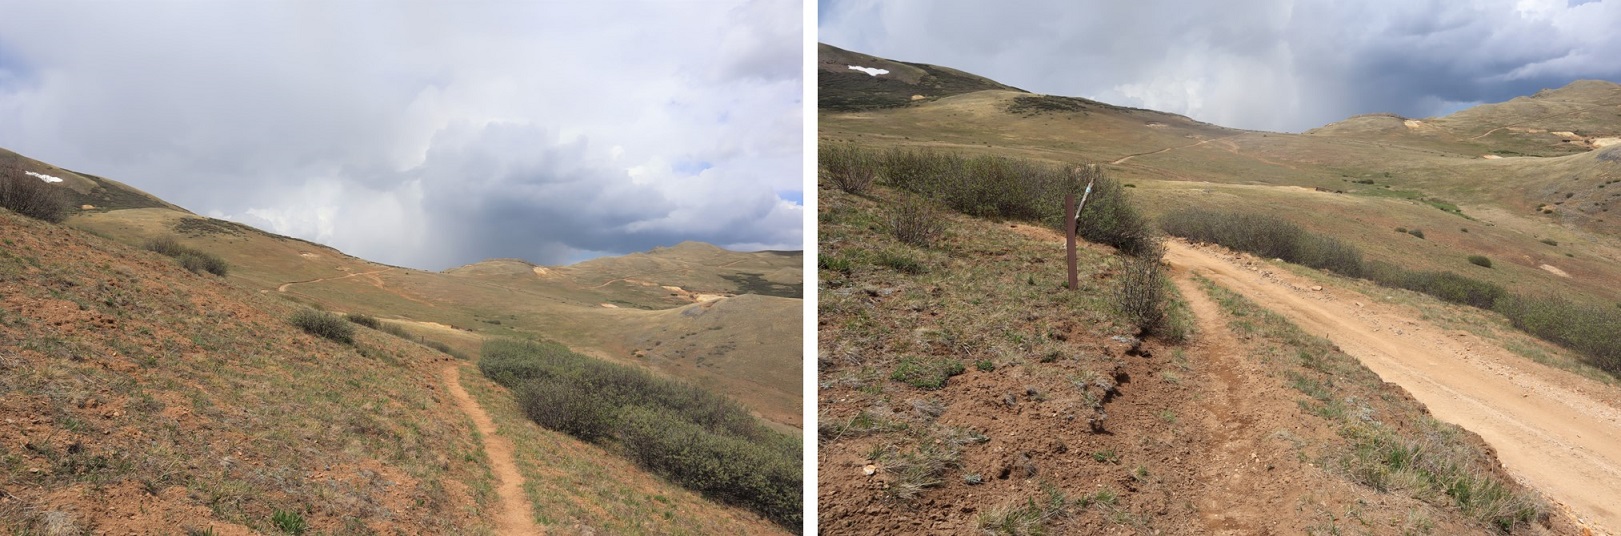
I was on the trail by 3:30am, and it was so cold I turned back at one point, intent on sitting in my truck a little longer, but I immediately turned back again: I’d knew I’d warm up a bit once I started moving. The weather forecast was better for today, but I still wanted to get an early start. I followed the 4WD dirt road 821 to the class 1 Trail 813 as it lost a total of 400’ as it wound down the canyon, and then gained almost 1000’ to the top of the pass.

3

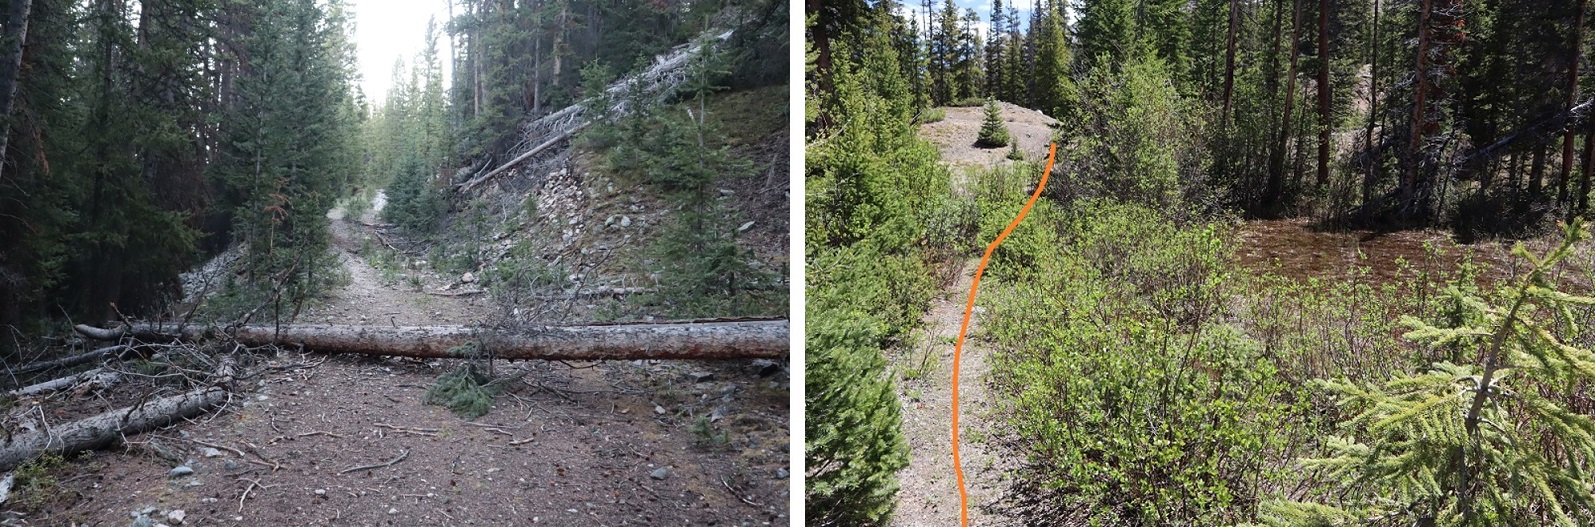
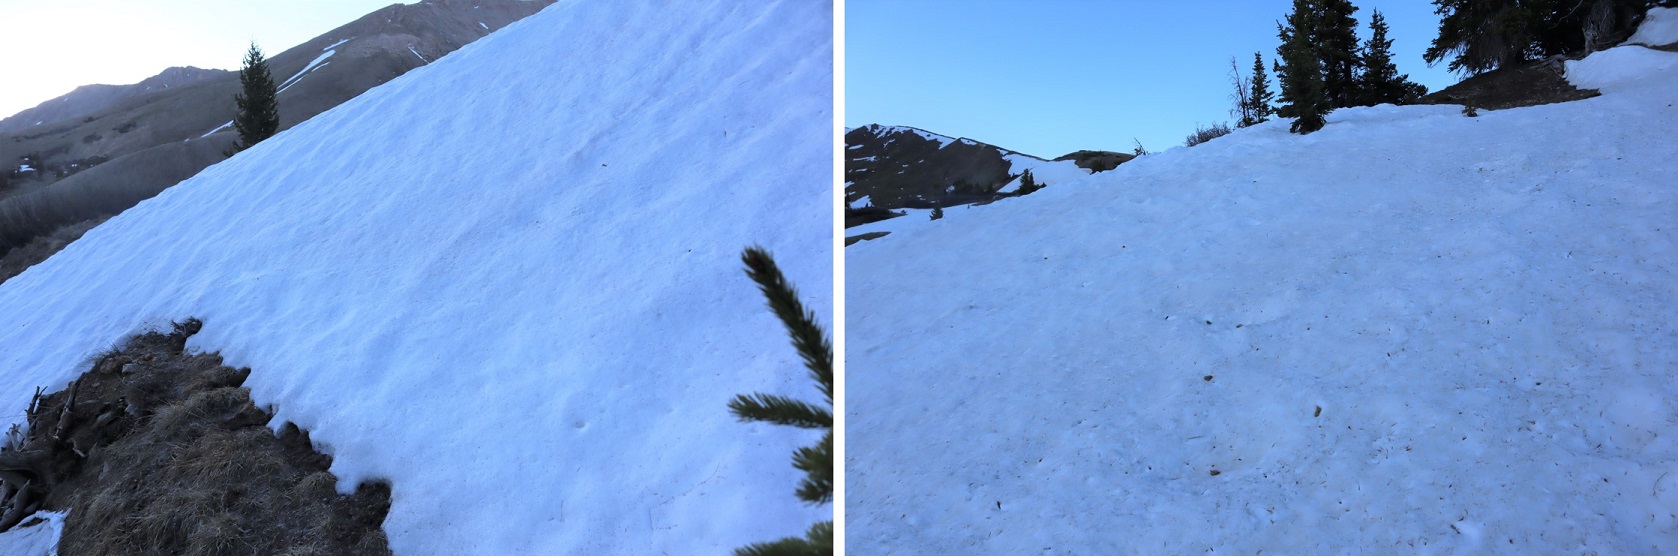
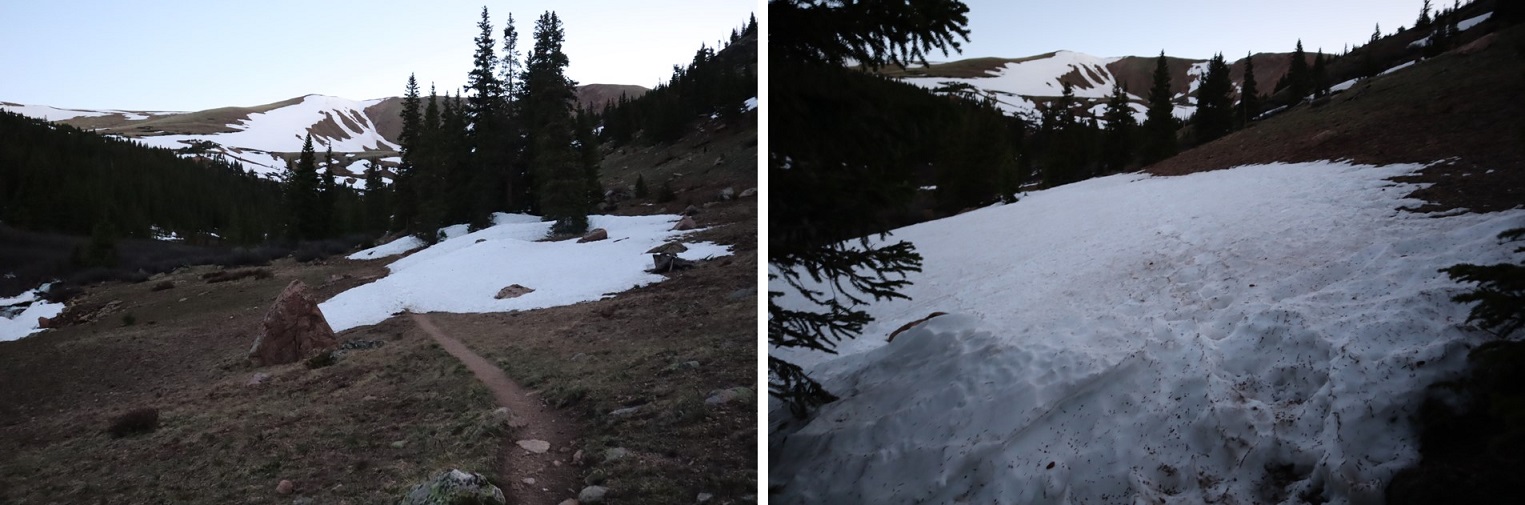
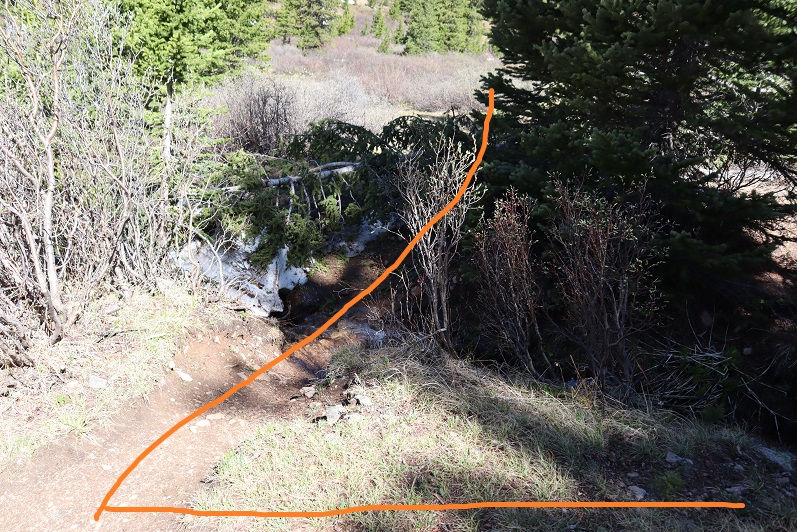
There was one small section of snow to cross, but luckily the elk had already done a great job blazing the trail.

4

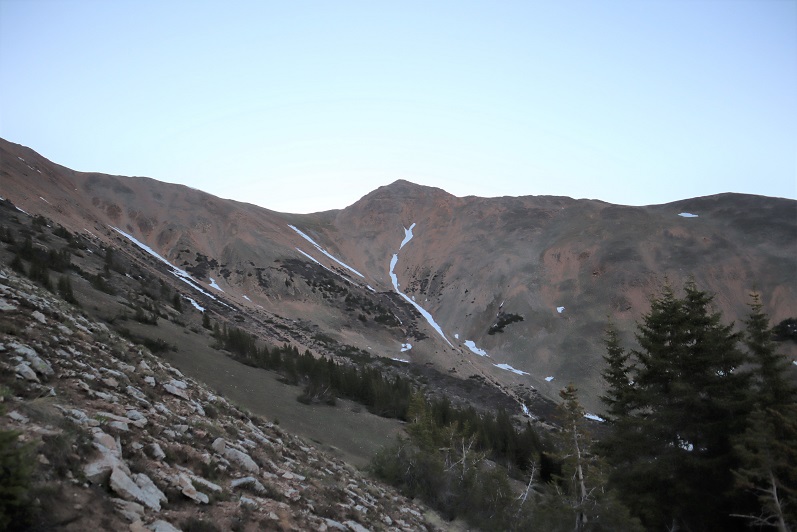
Once at the top of the pass I continued along the trail, dipping down into the basin, losing another 700’ of elevation.

5

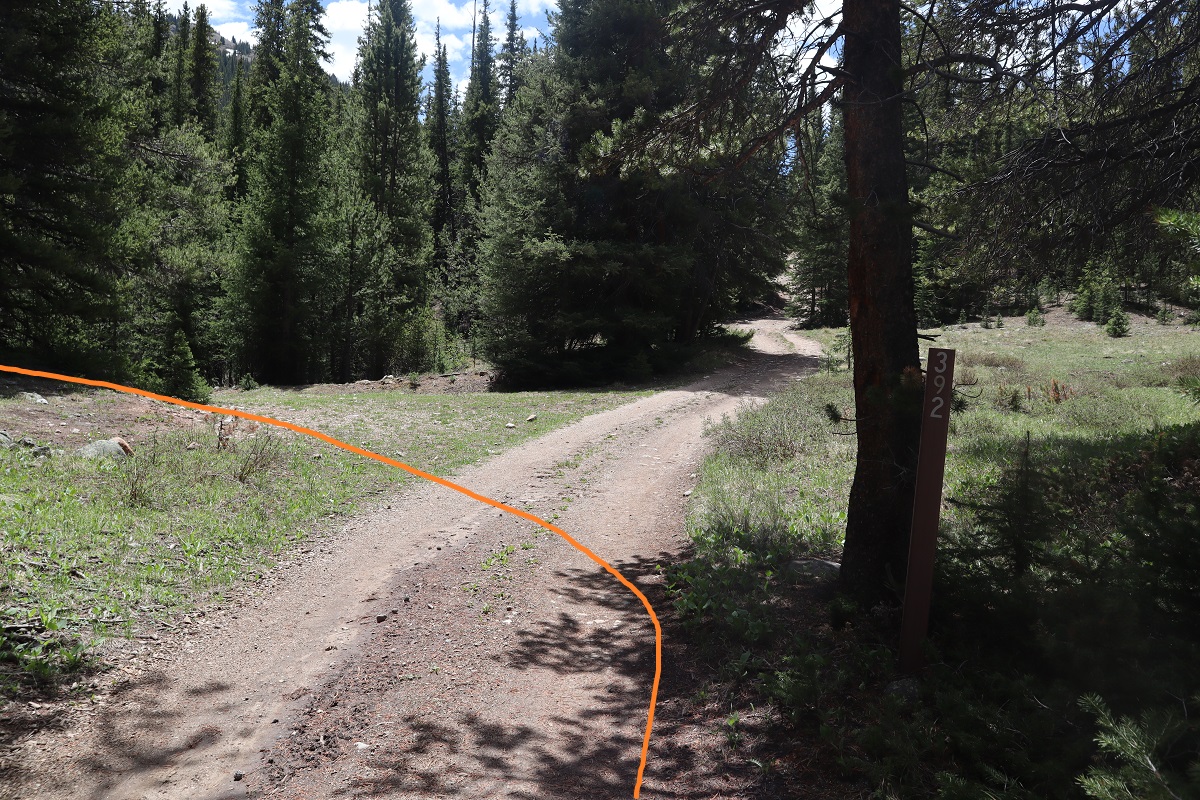
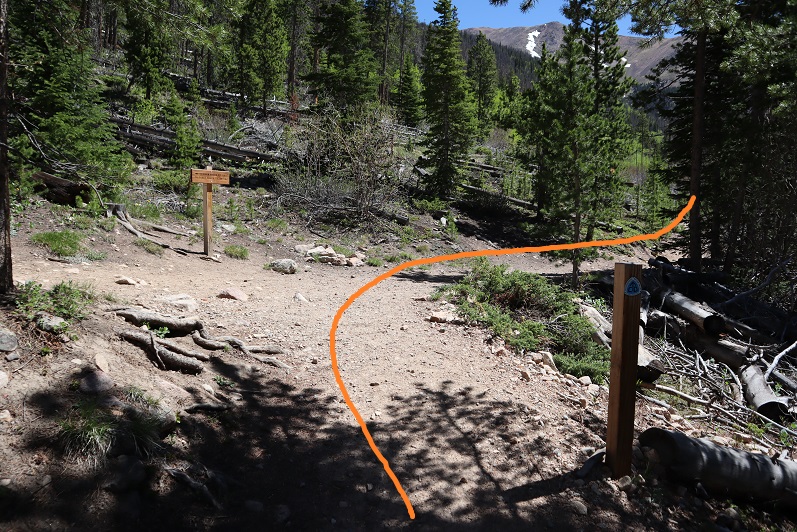
After hiking for a total of 5 miles at this junction I turned and followed 822 southwest to the base of the Northwest Pole Ridge.

6

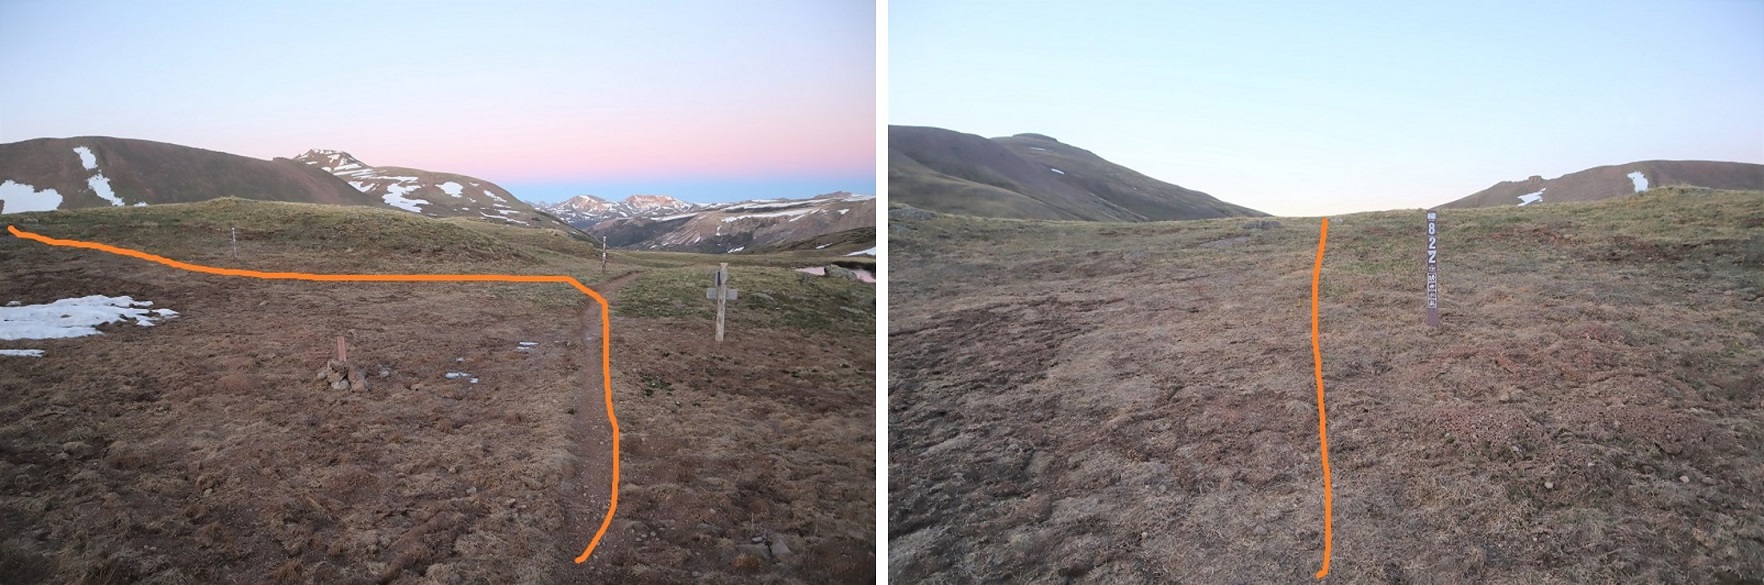
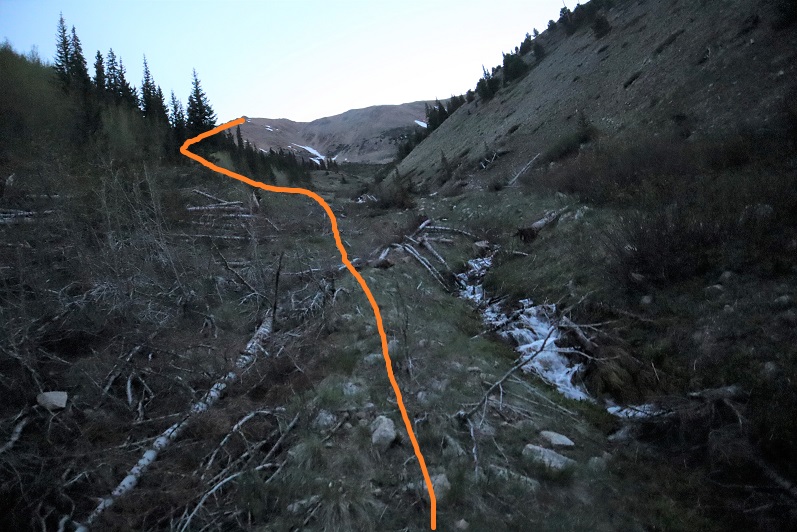
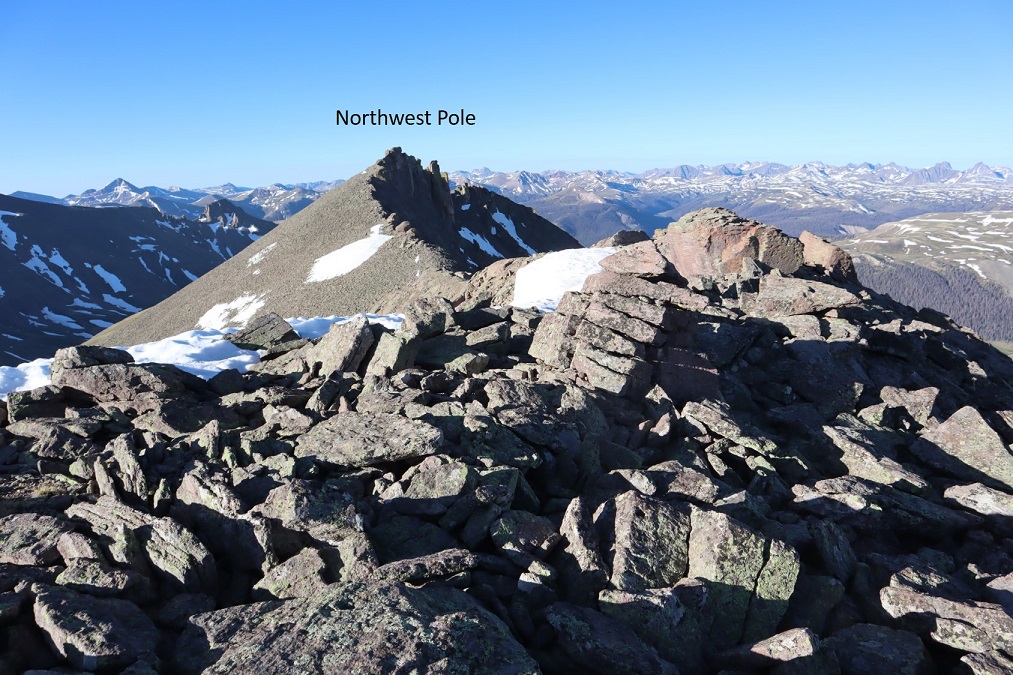
In the basin I left the trail and headed for the Northwest Pole Ridge

7

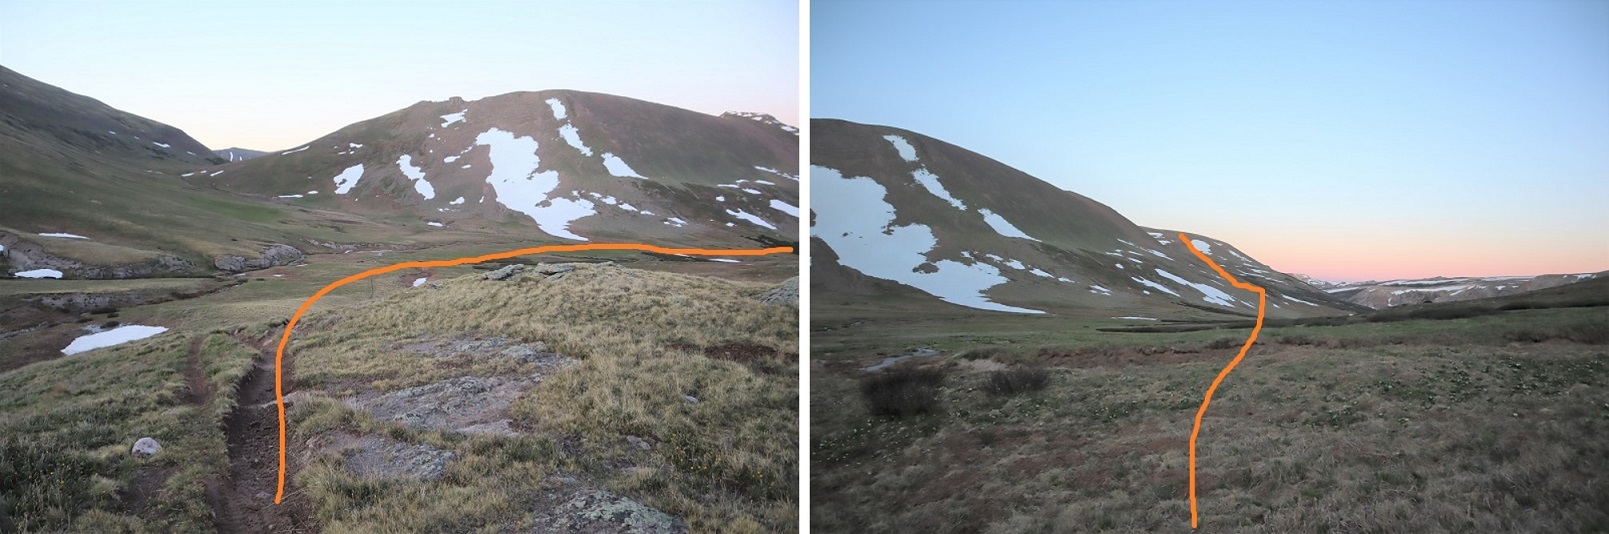
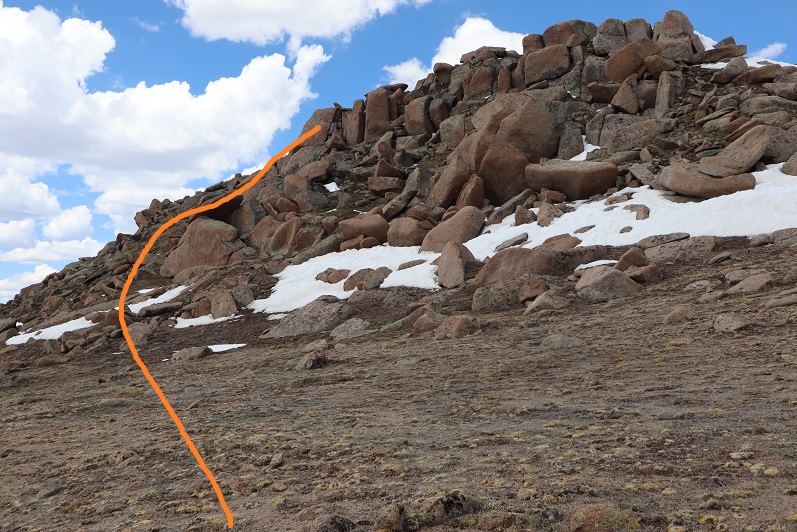
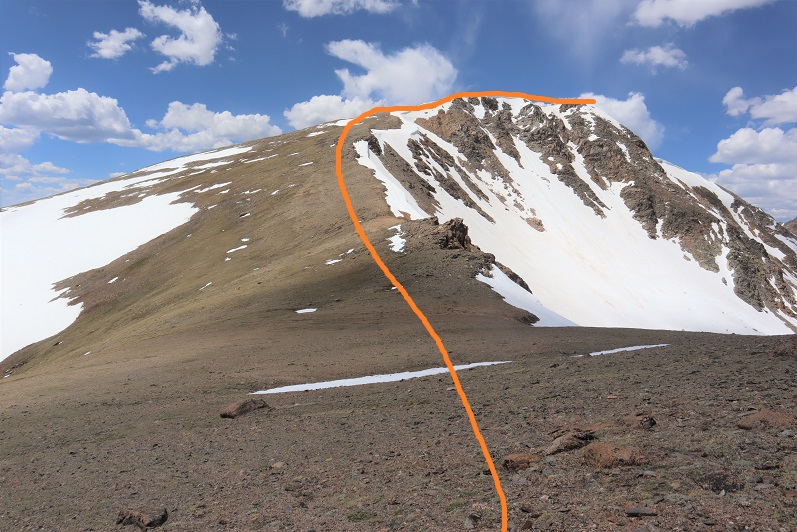
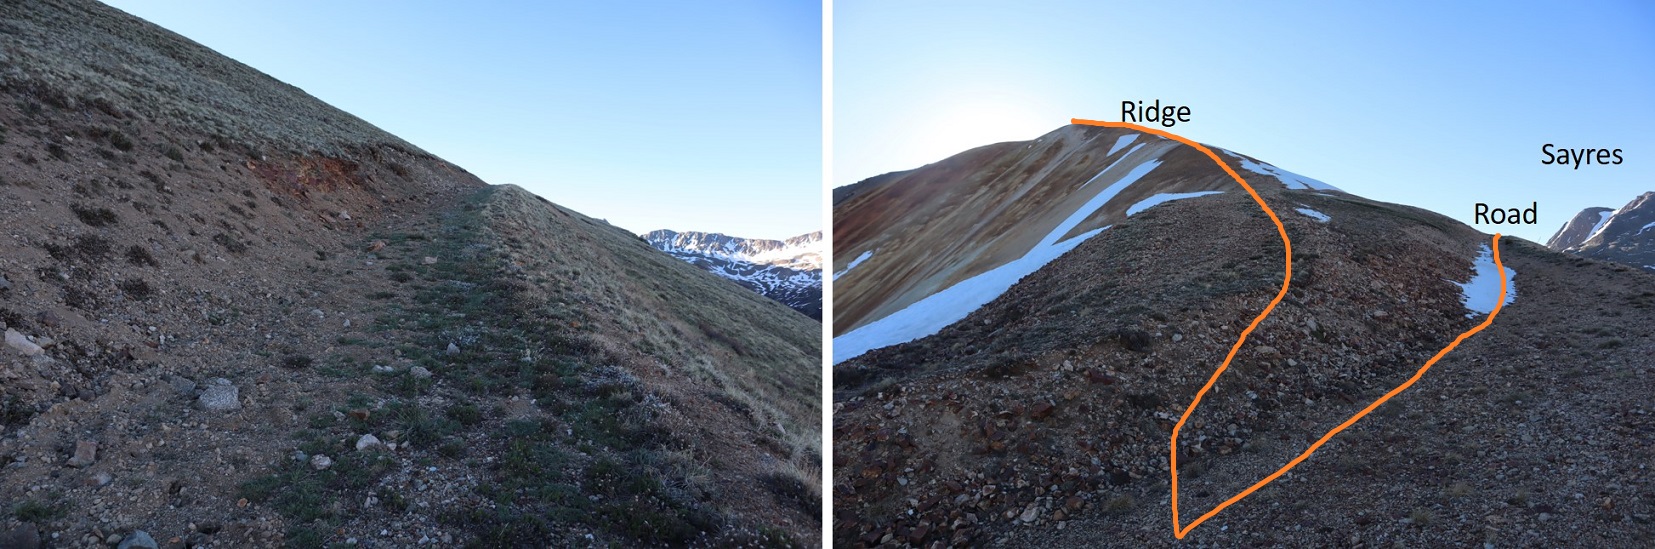
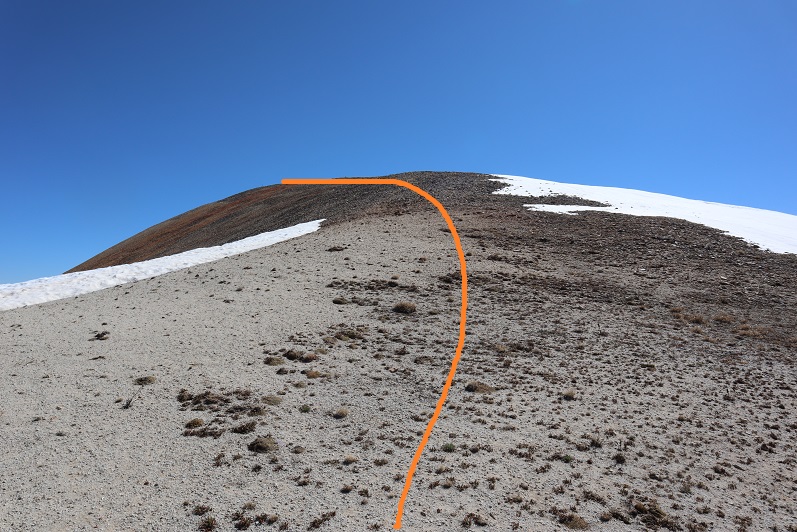
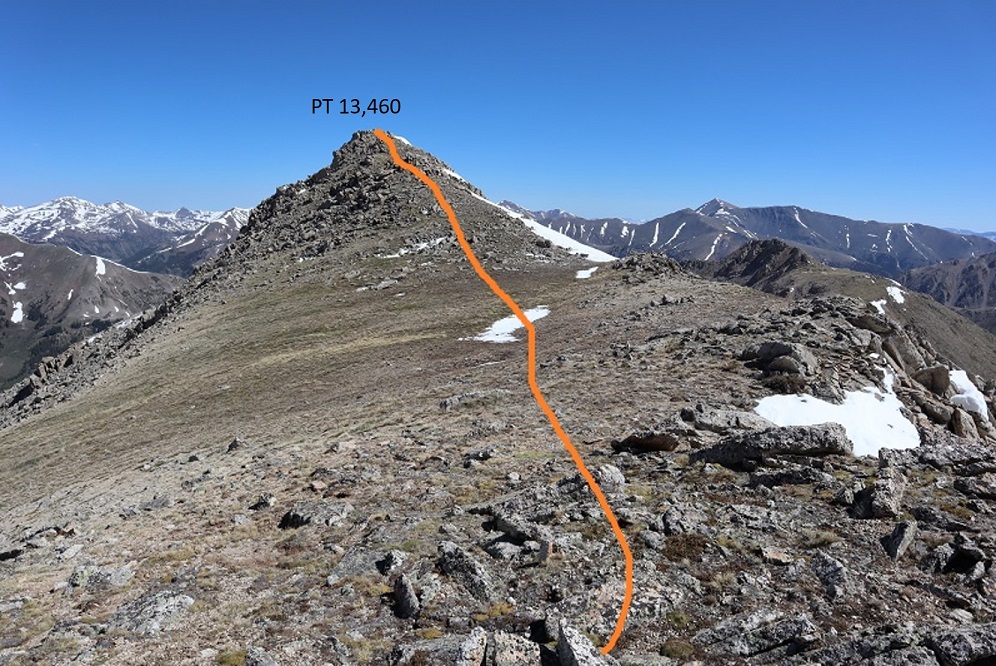
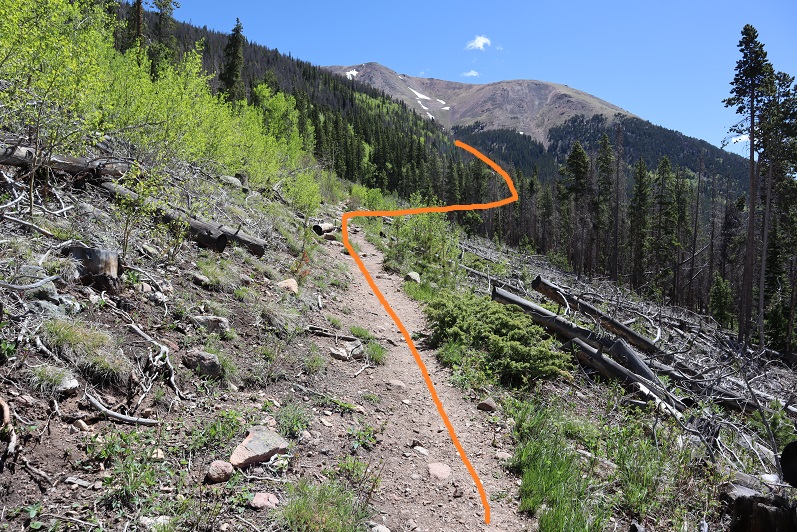
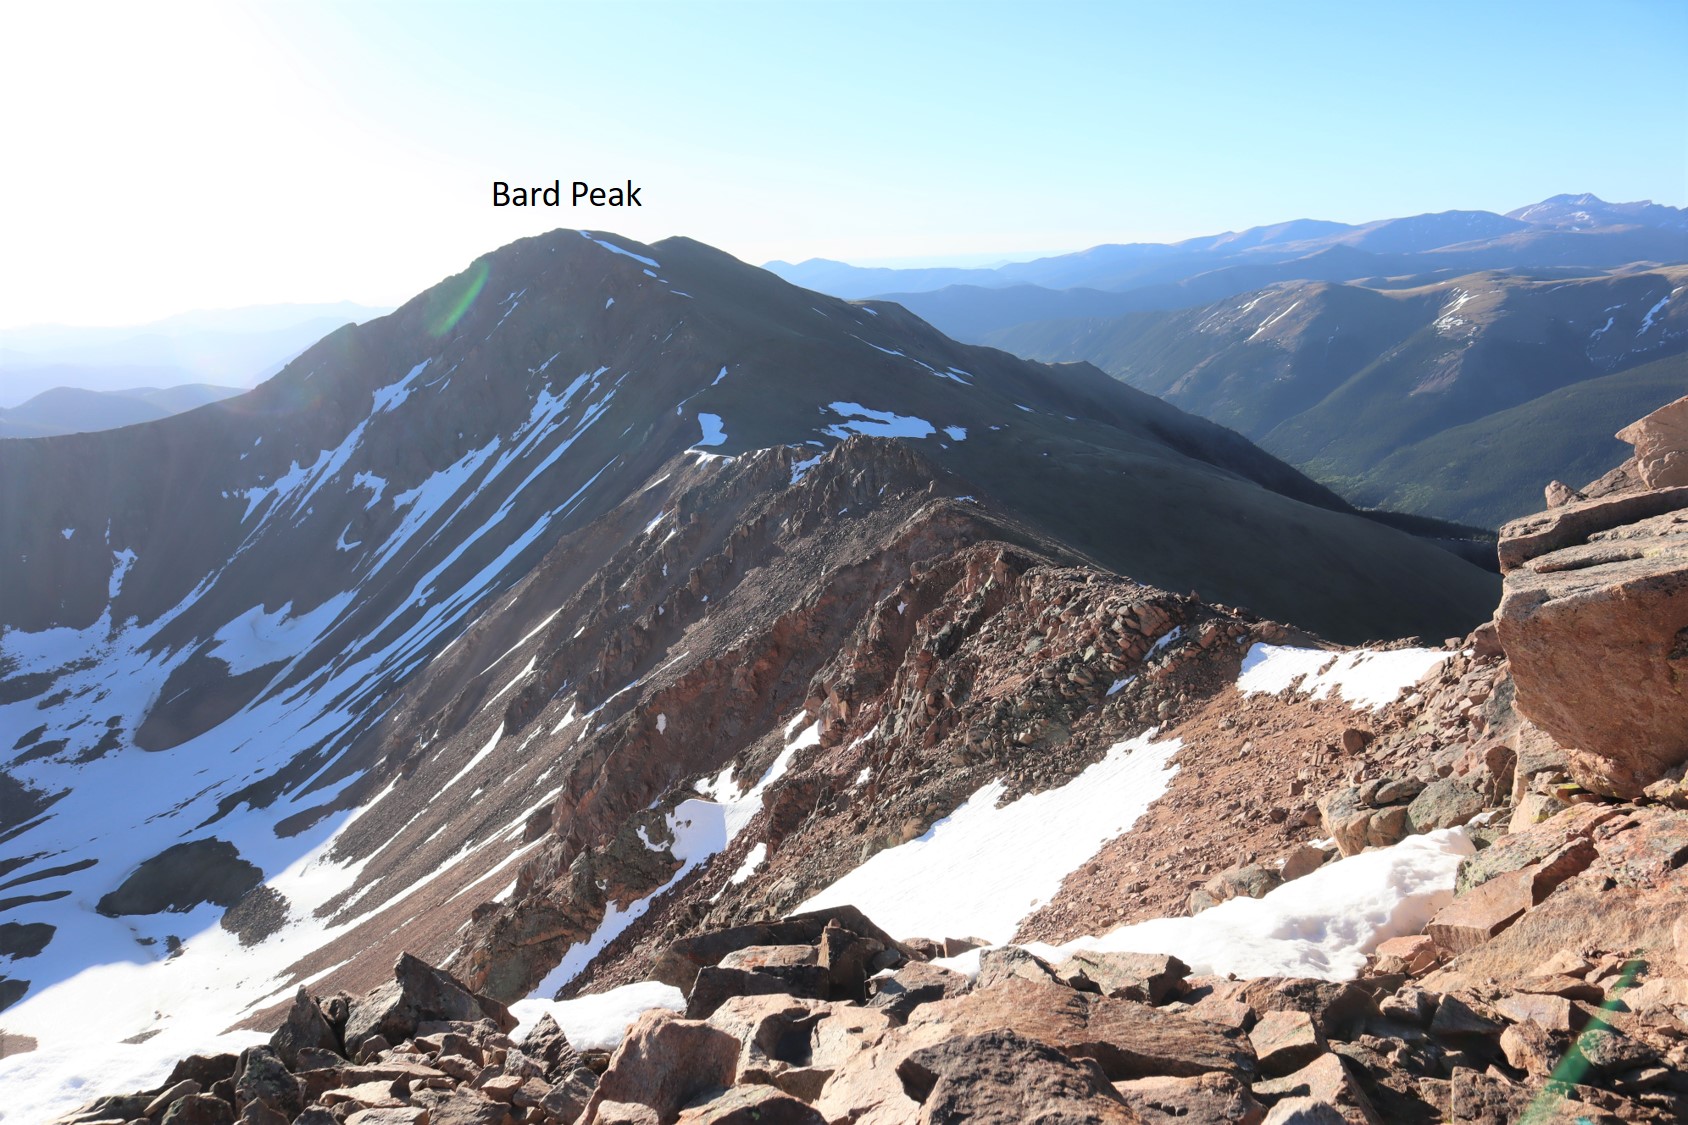
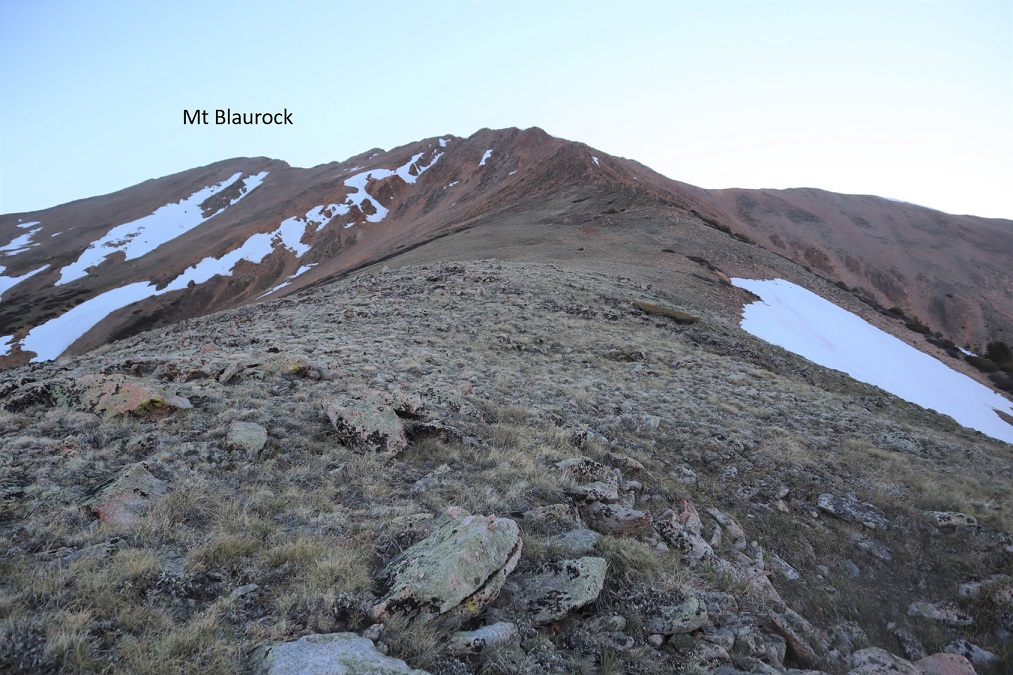
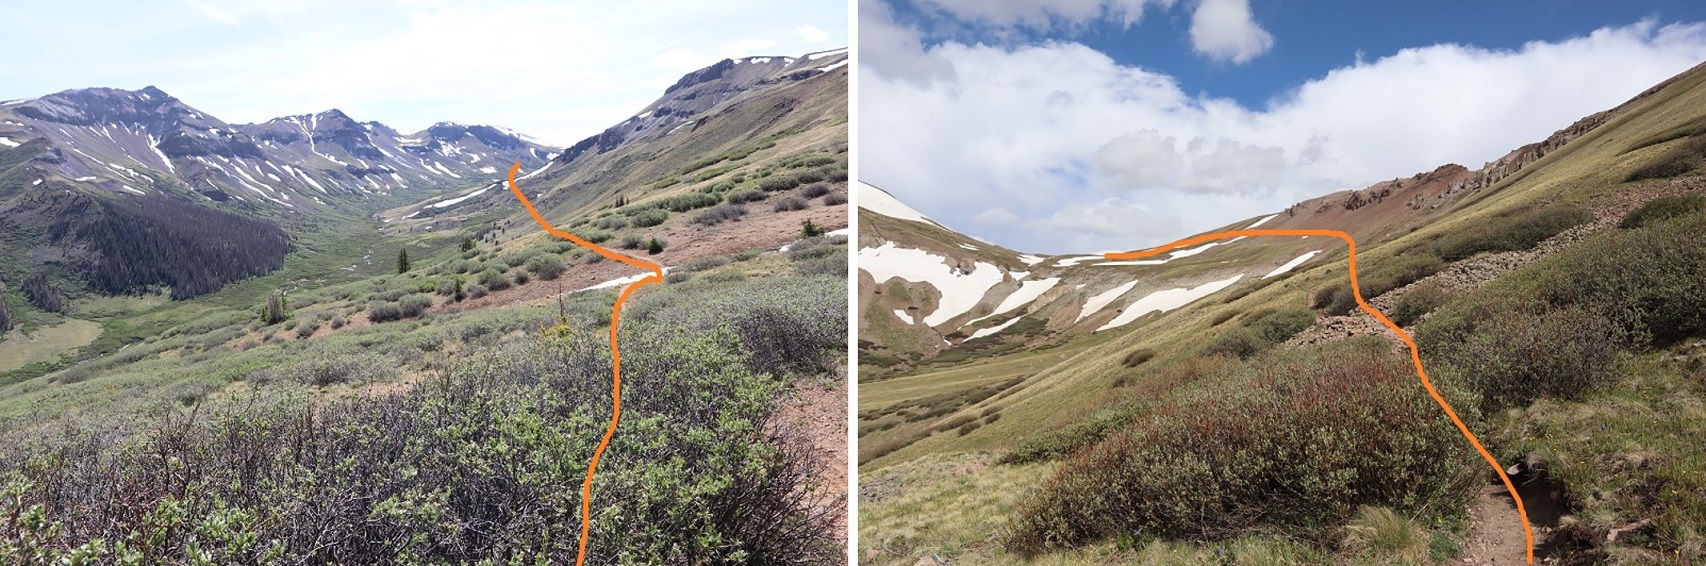
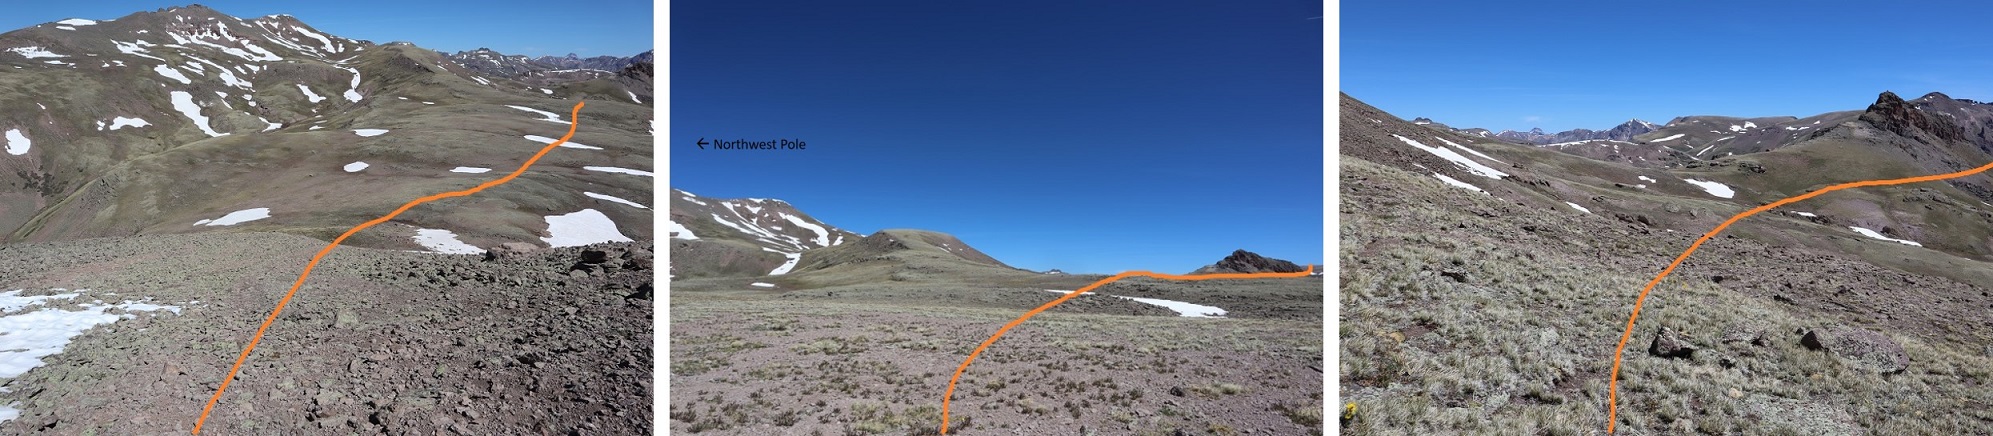
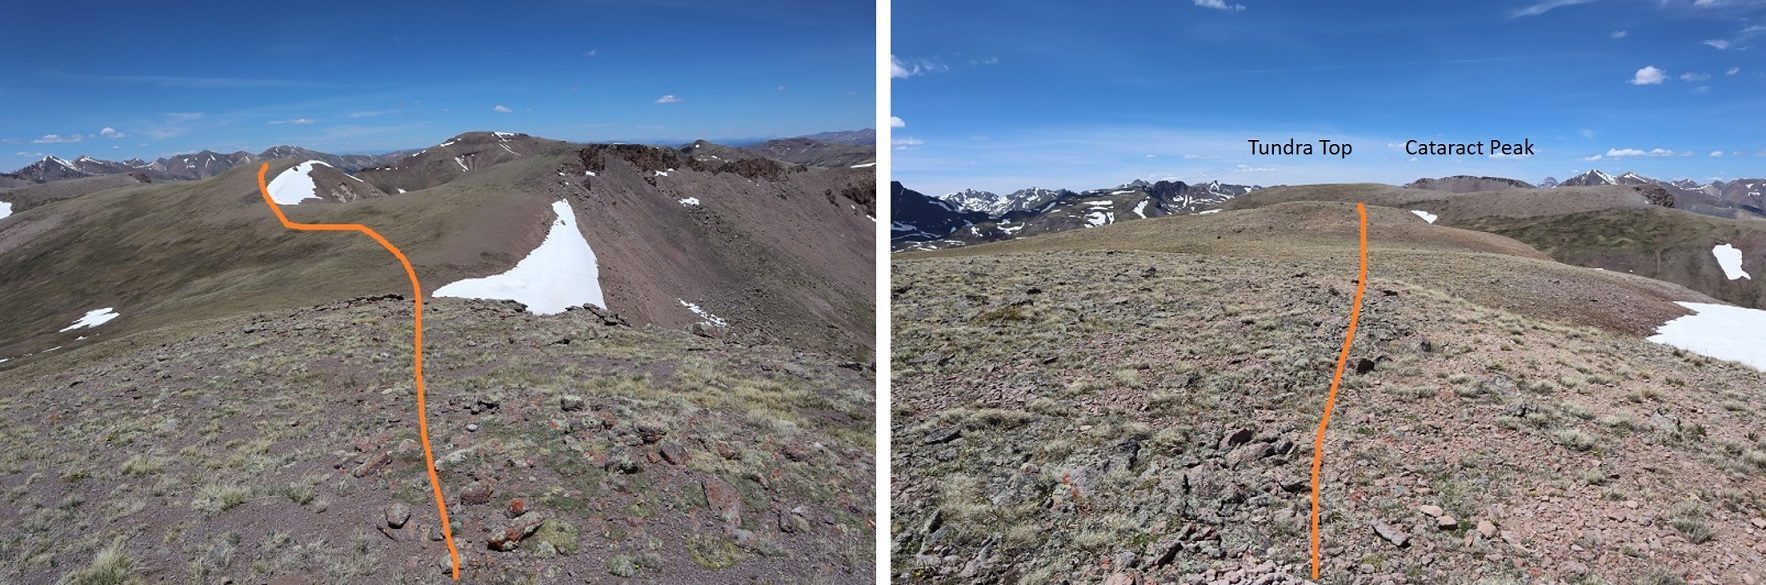
My goal here was to gain the ridge and follow it to the summit of Northwest Pole. Here’s an overview of the route:

8

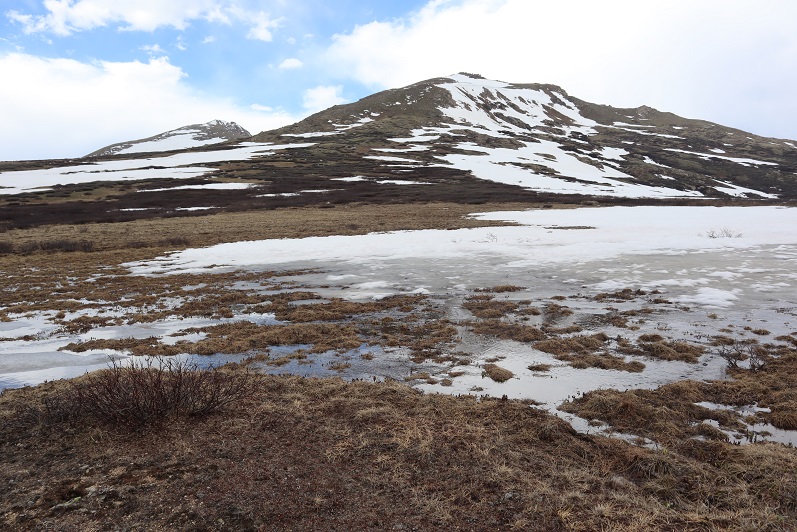
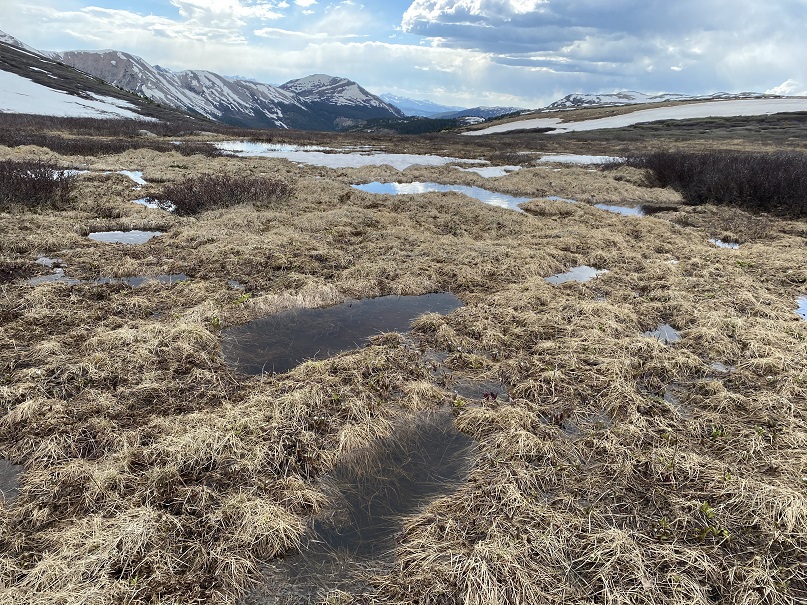
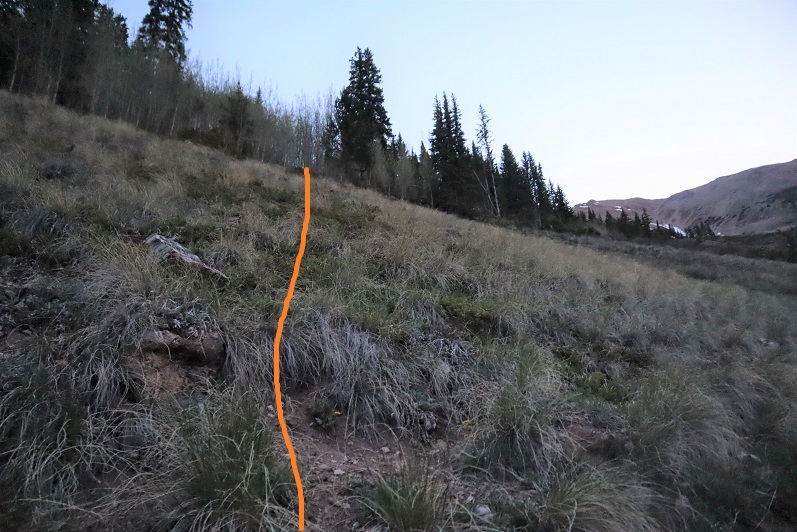
And what it looks like gaining the ridge (yes, tons of elk out there today). Also, the basin was marshy, but since it was so cold and early in the morning it was frozen and crunchy. There were ribbons of water that I hopped across. I wouldn’t want to pass this area when it’s soggy and wet.

9

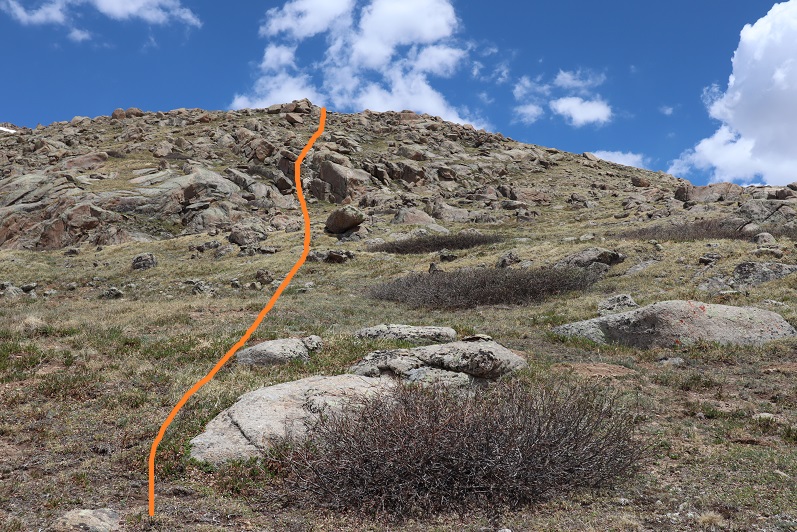
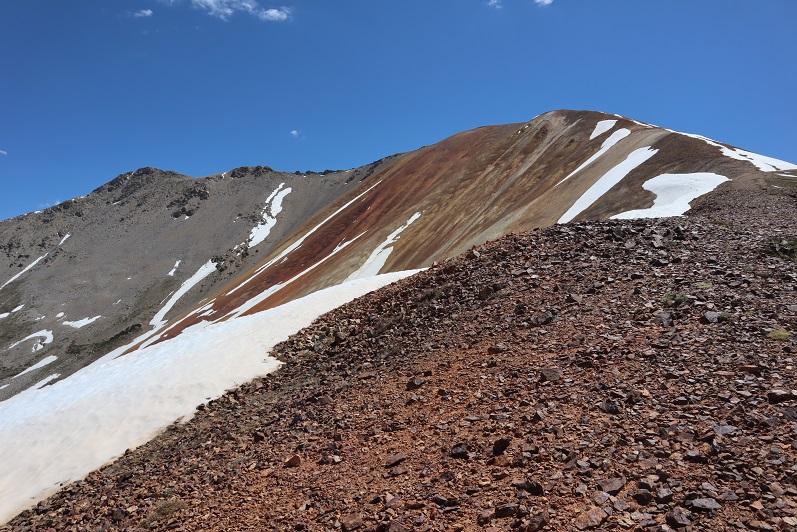
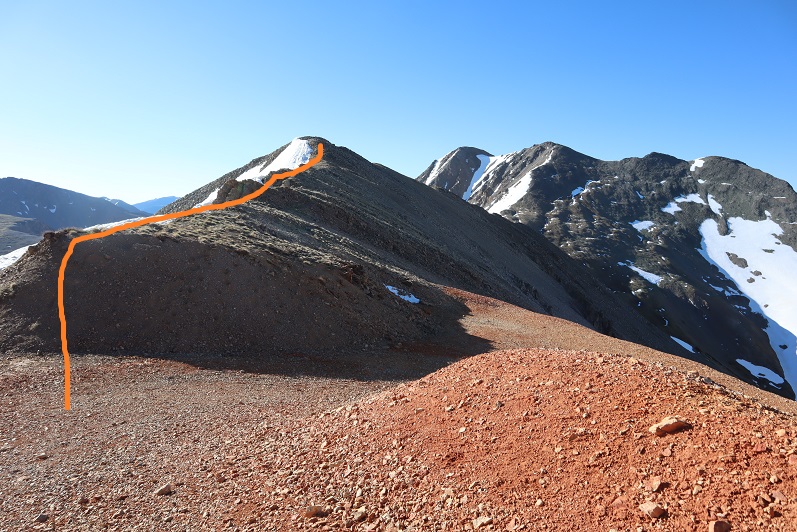
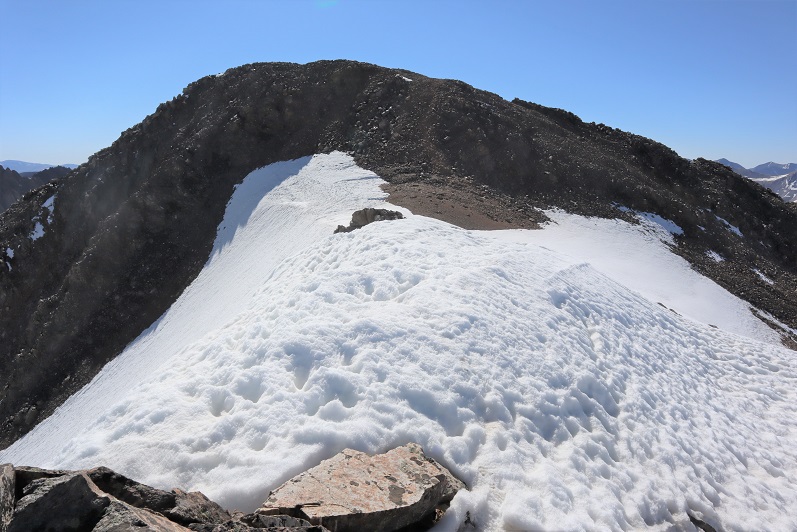
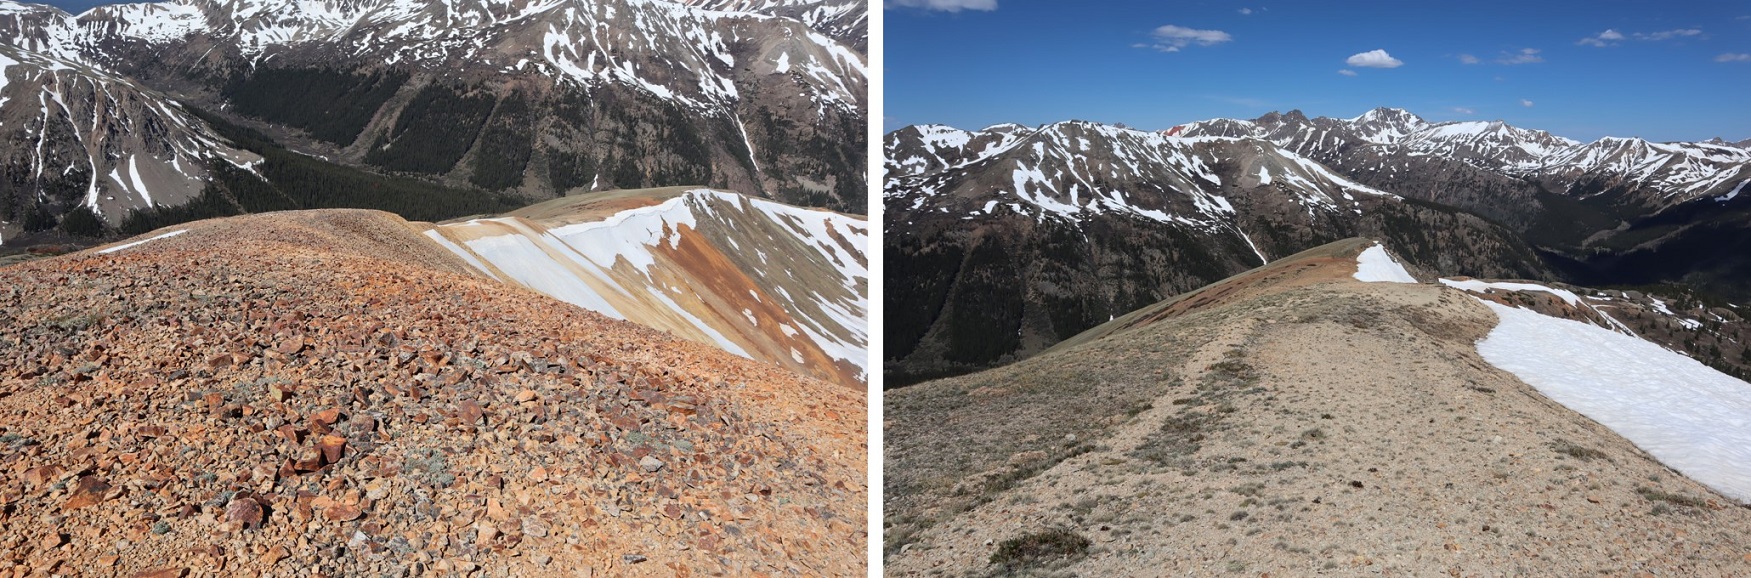
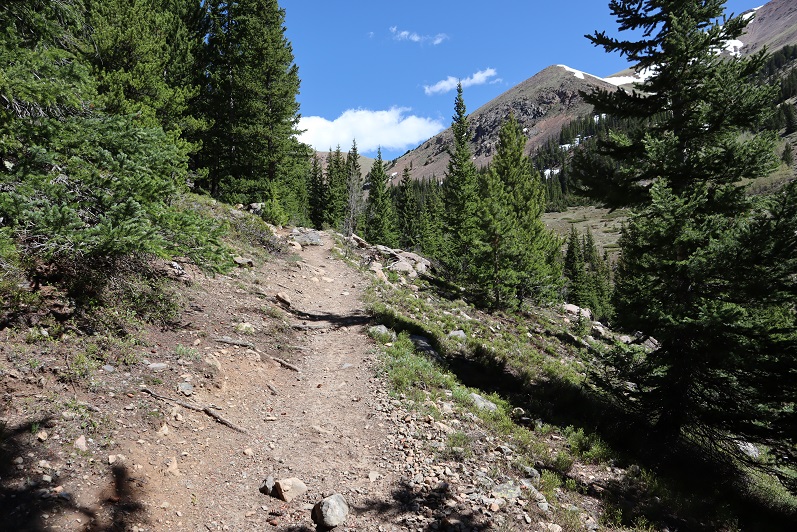
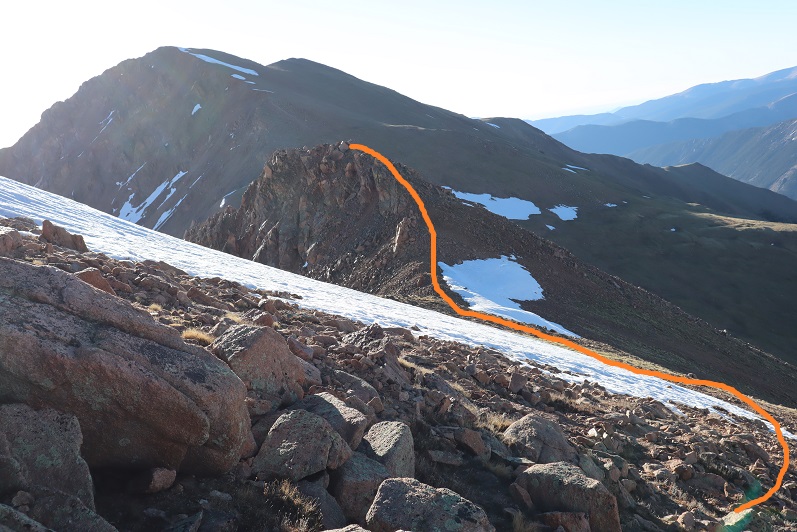
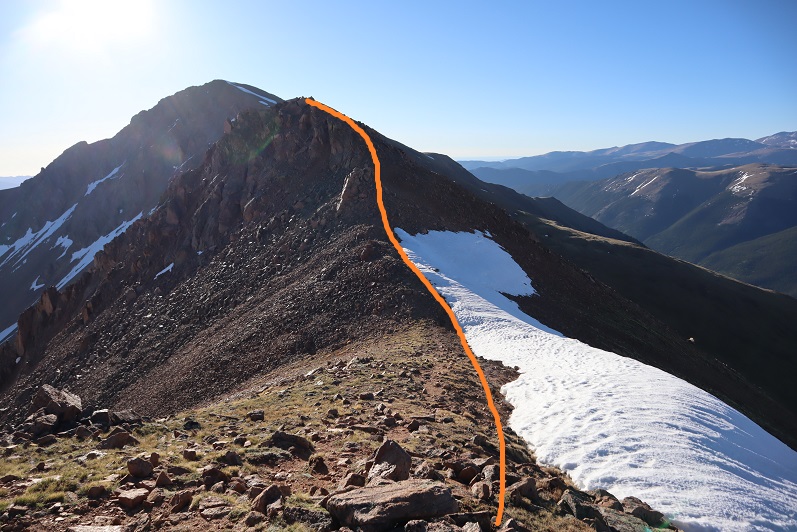
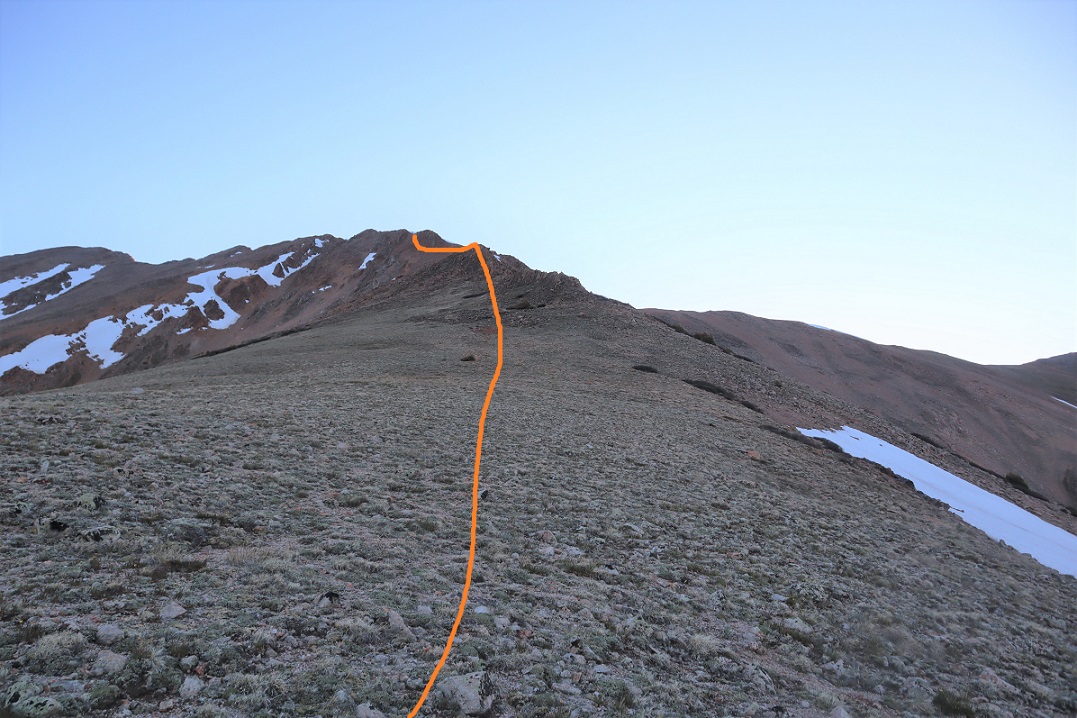
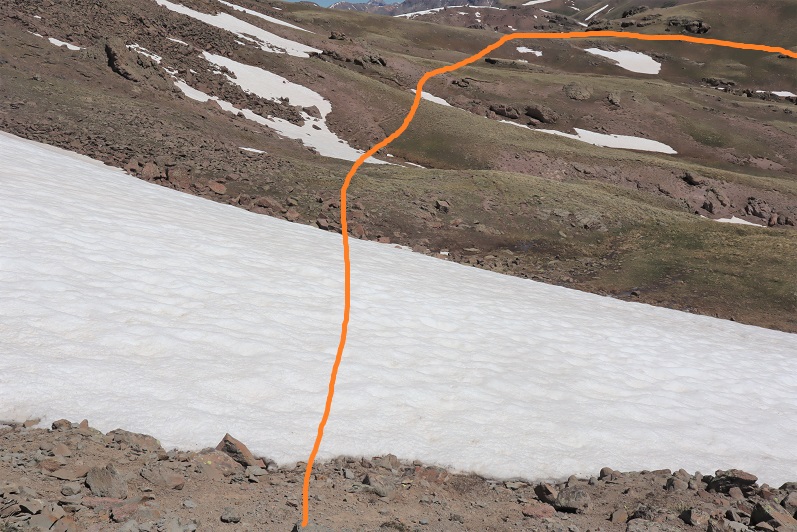
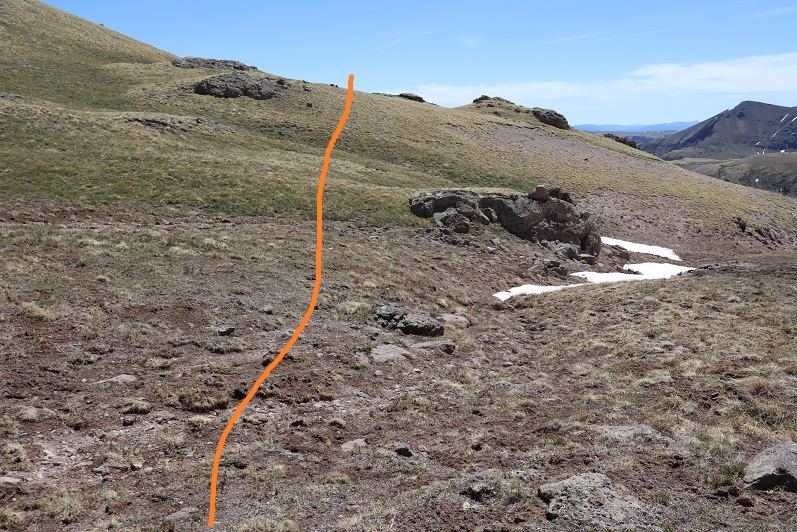
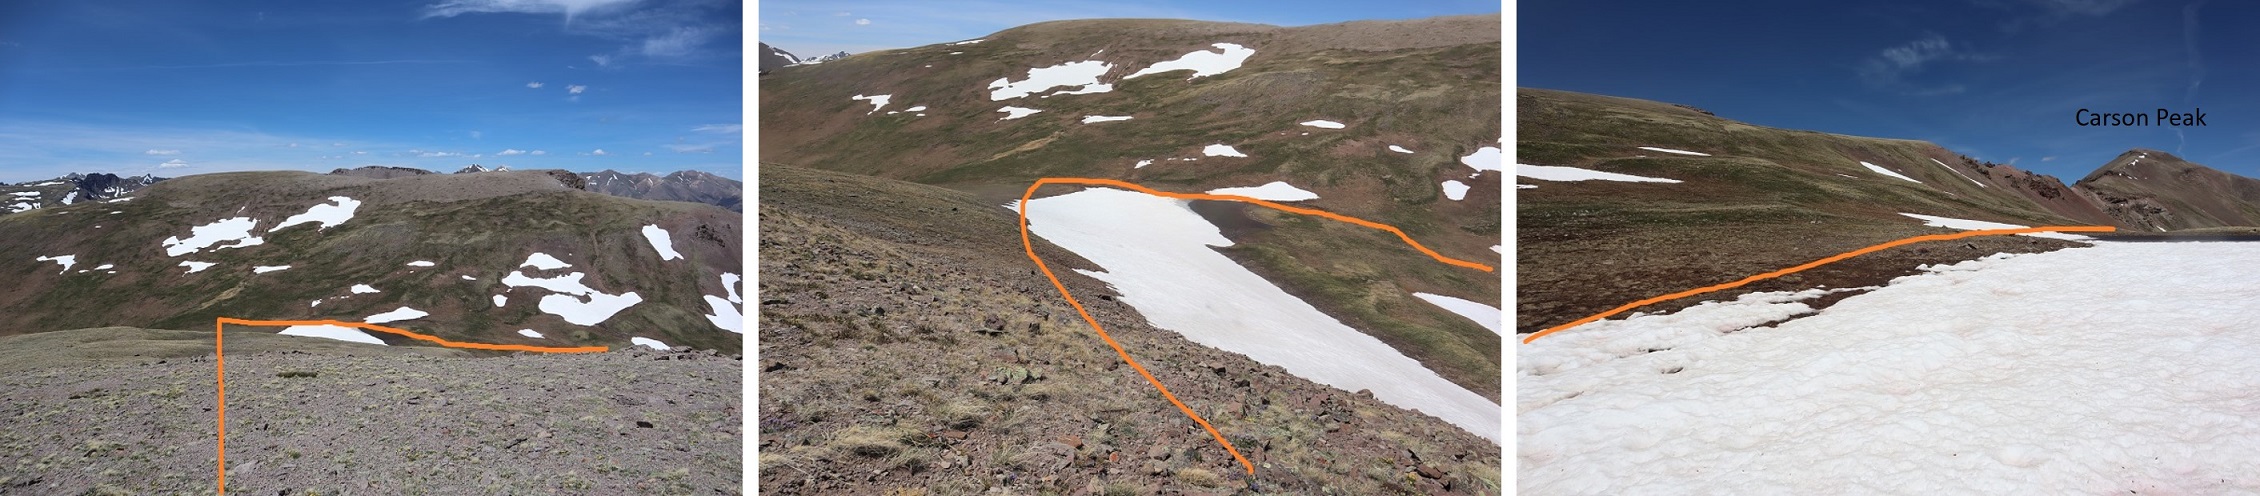
Once on the ridge it’s easy to see the snow free path to follow, all on tundra. This is all easy class 2

10

11

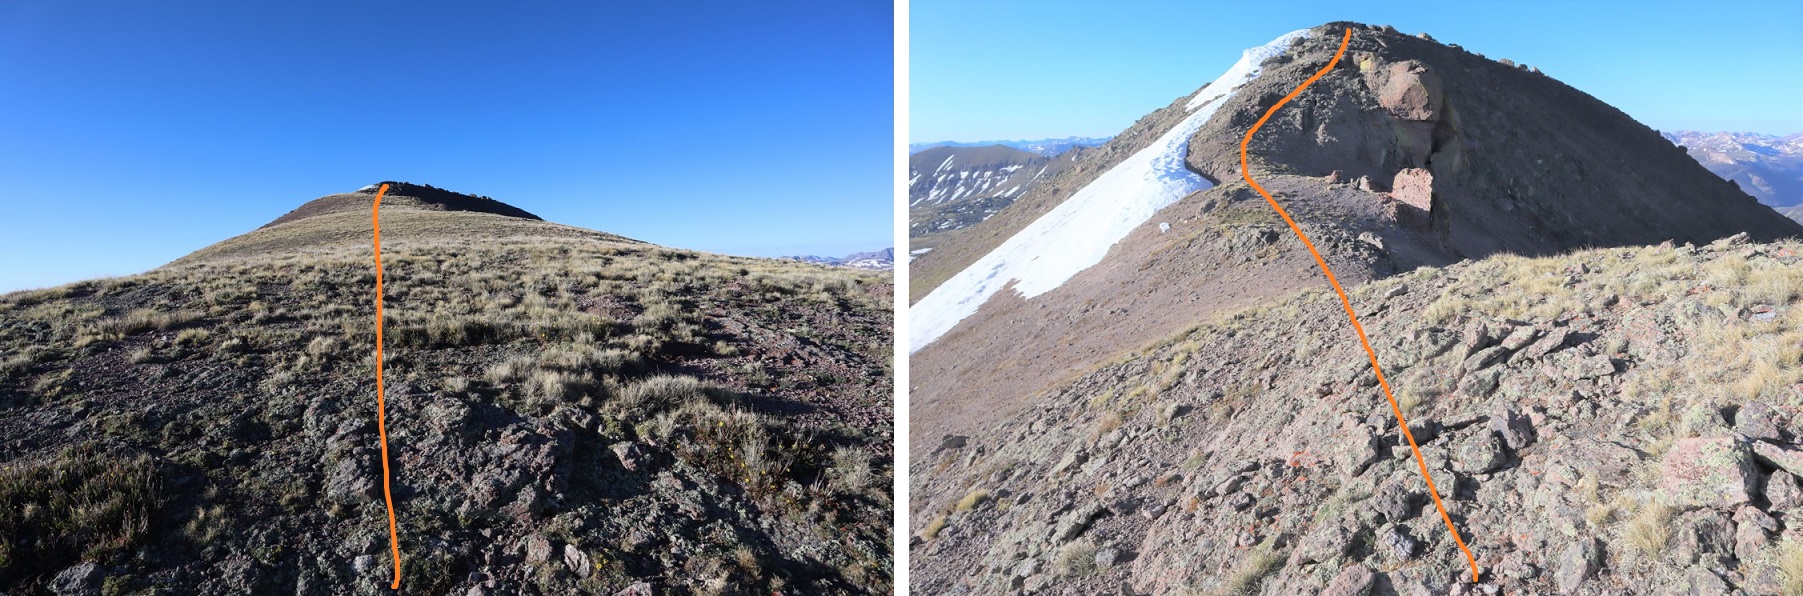
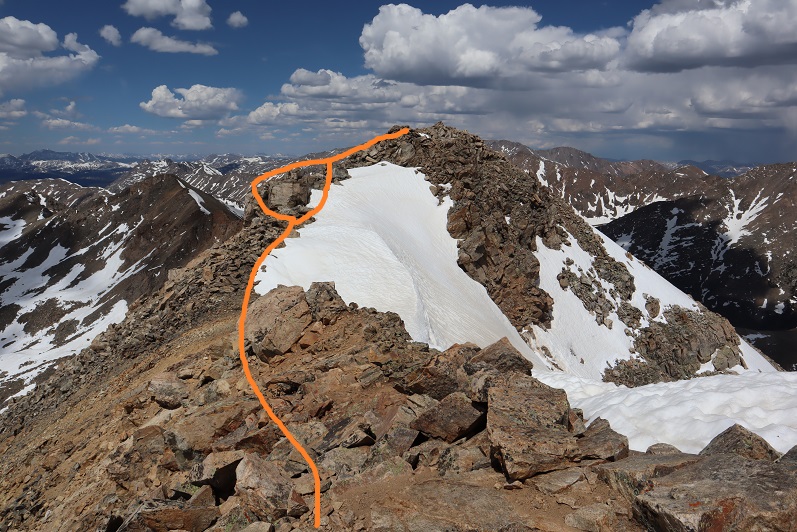
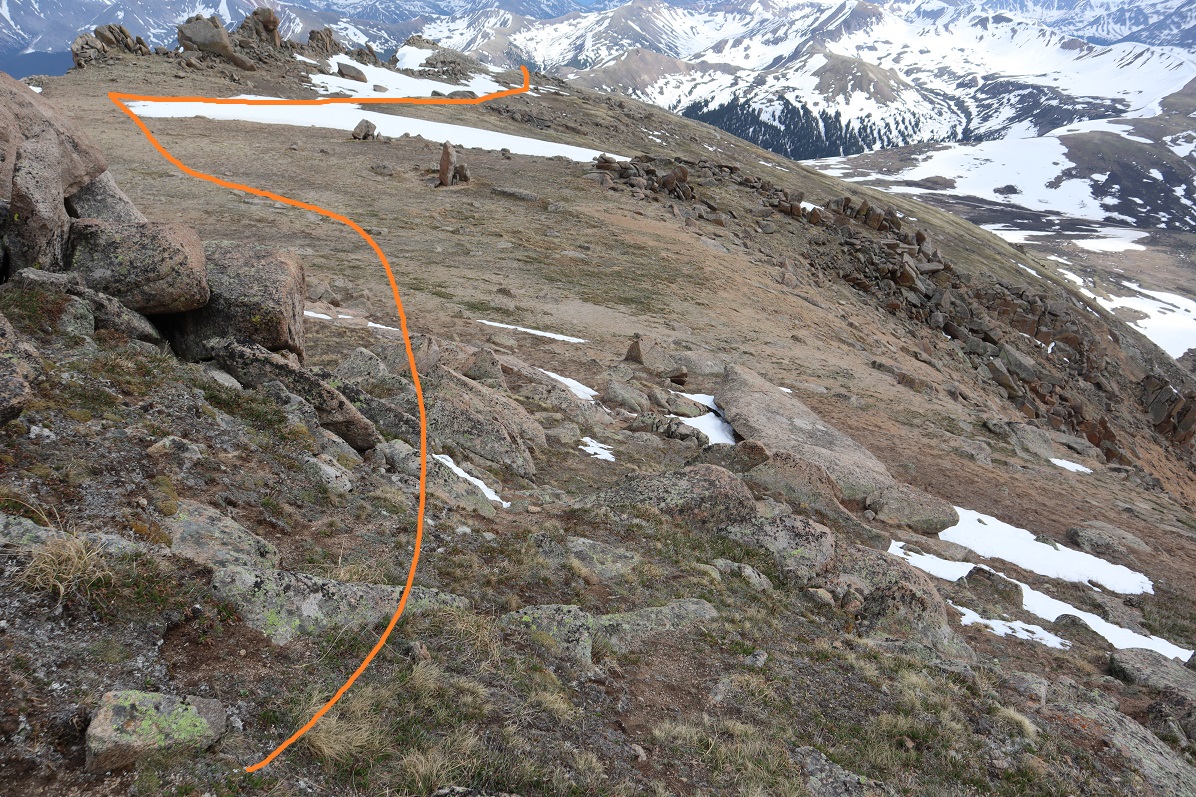
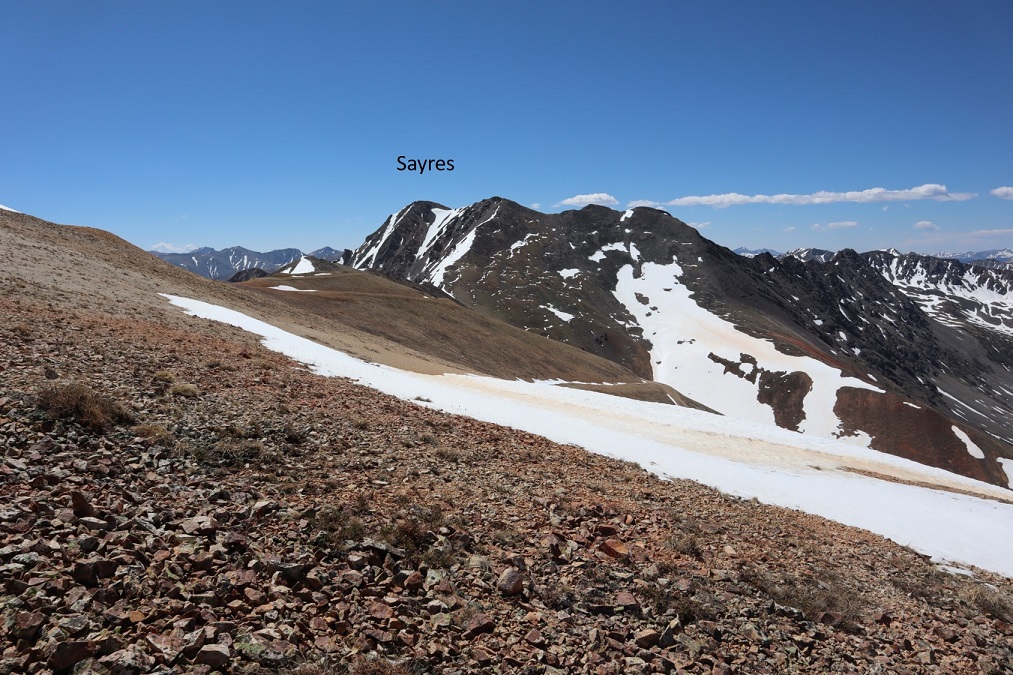
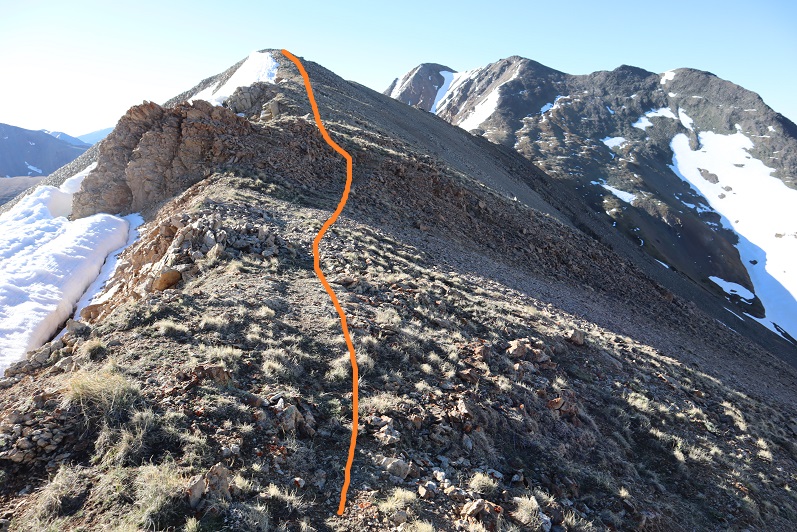
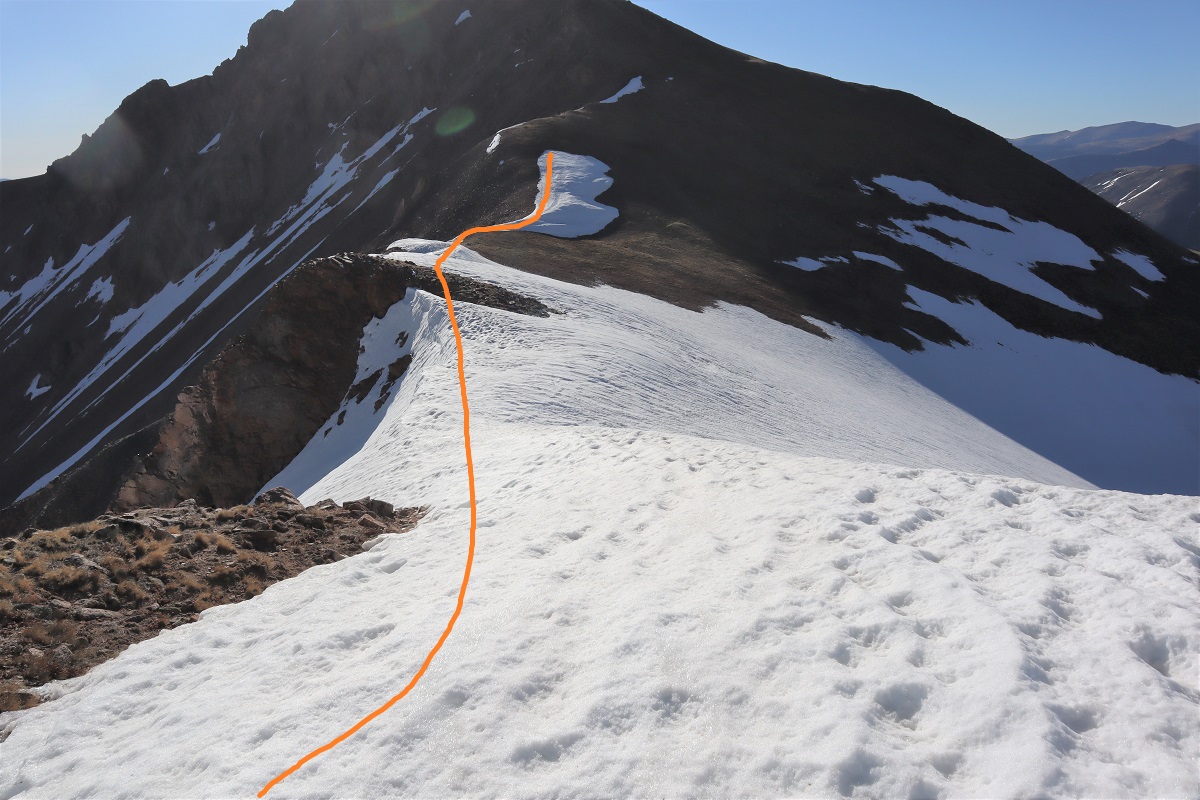
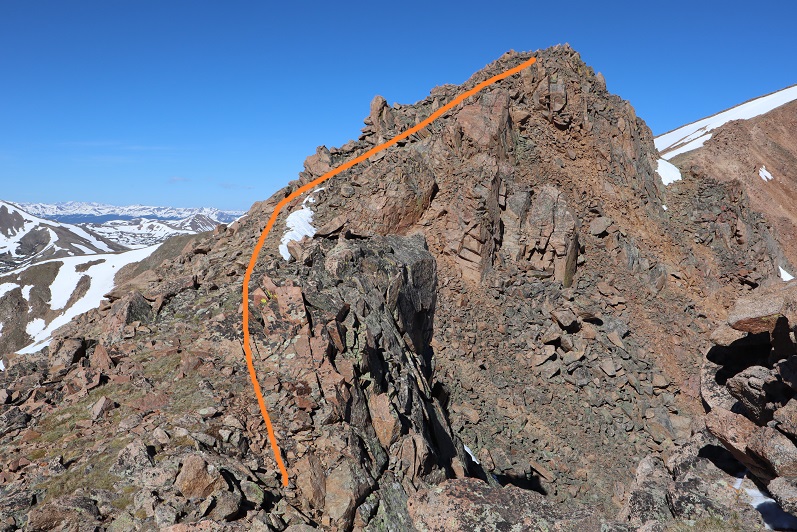
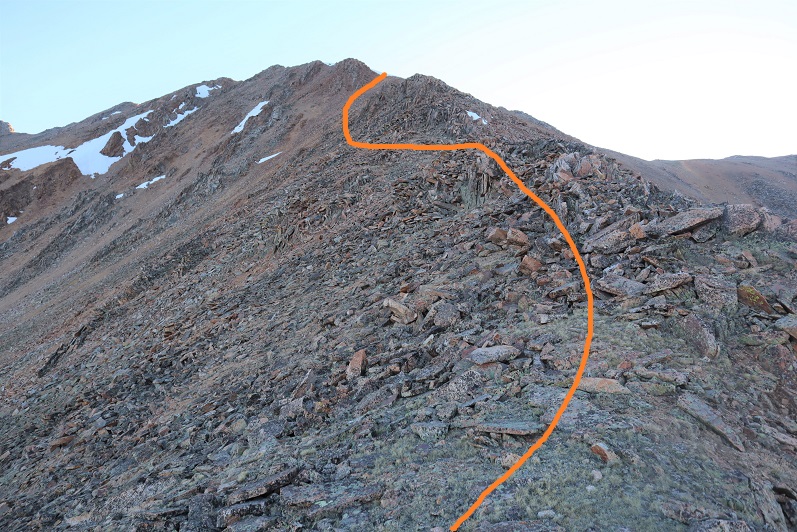
From the top of the ridge you dip down a little bit and then back up on loose rock

12

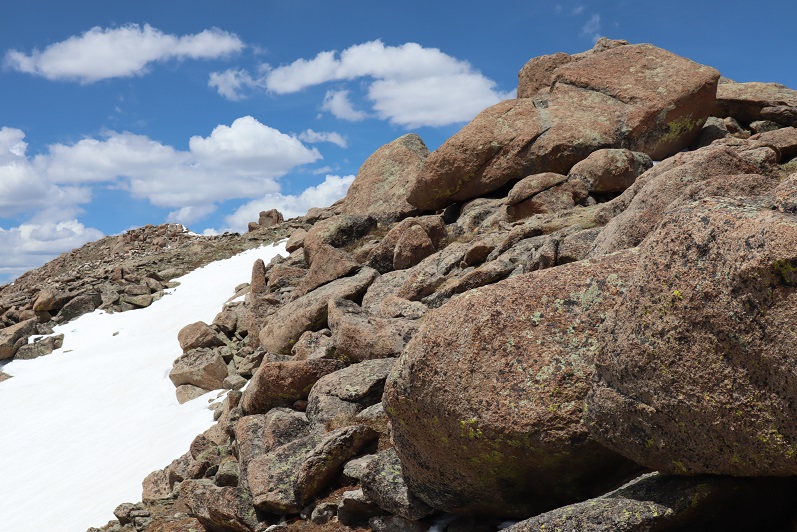
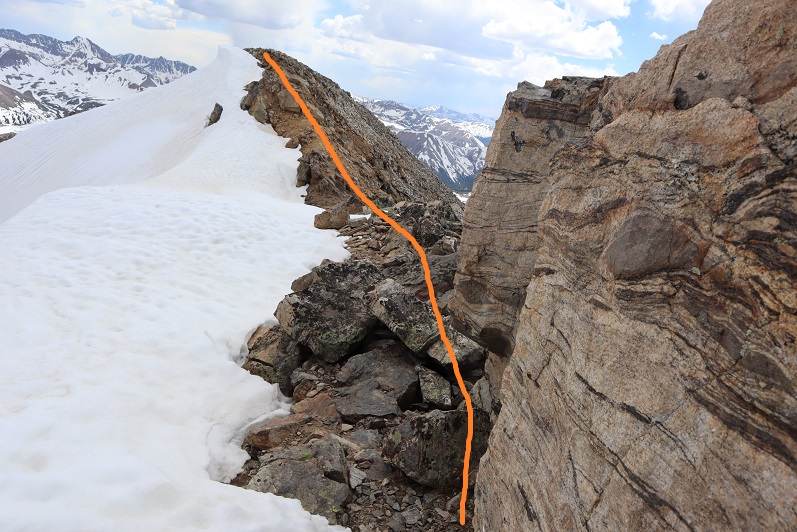
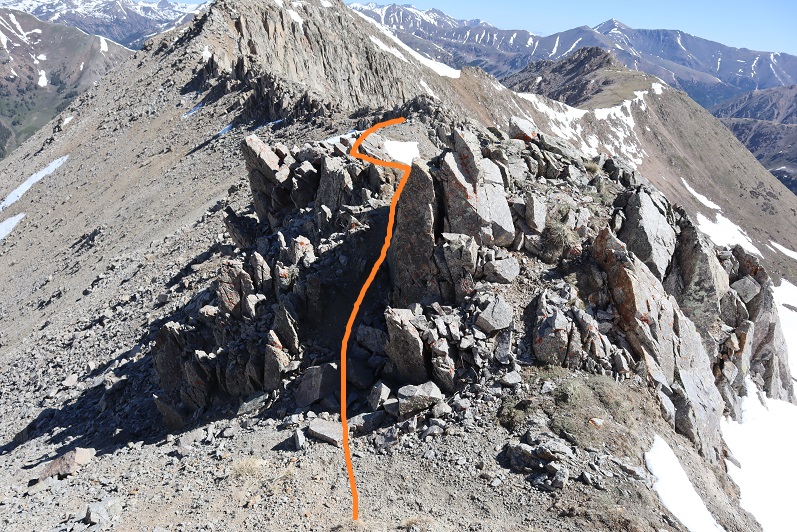
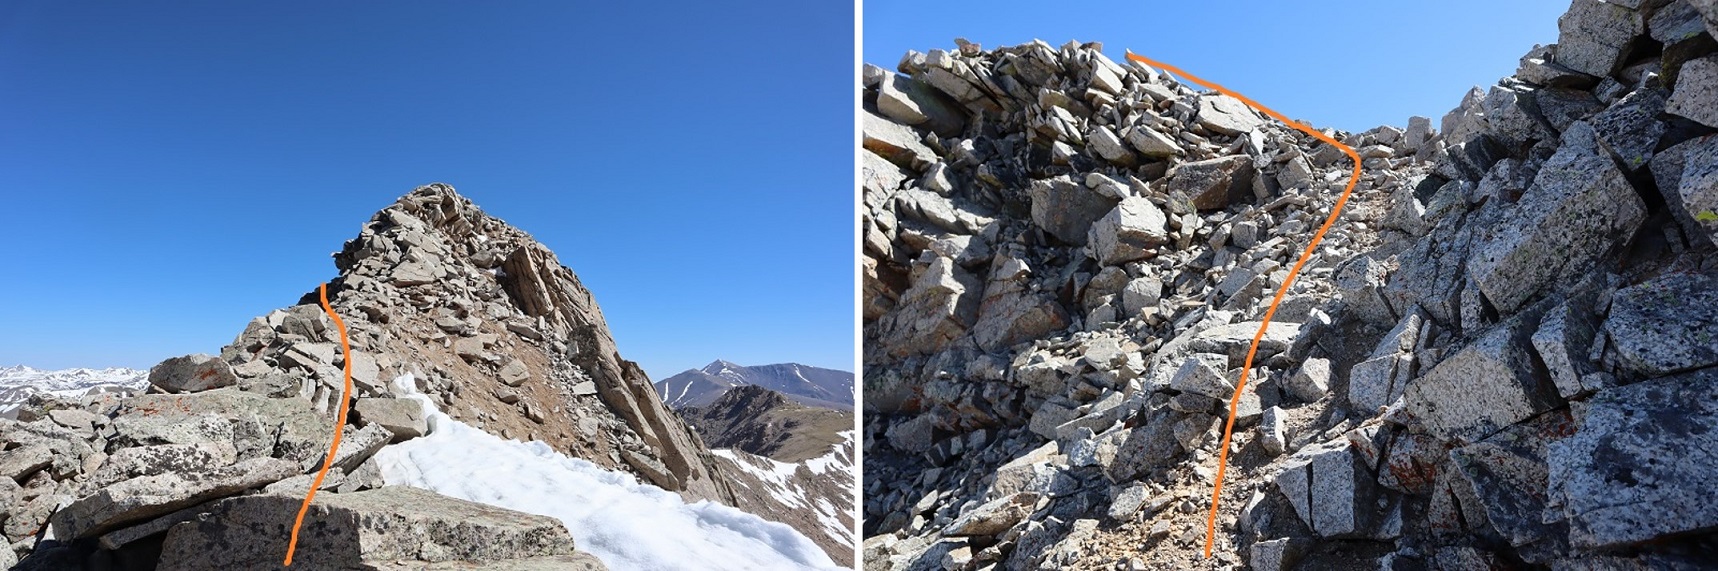
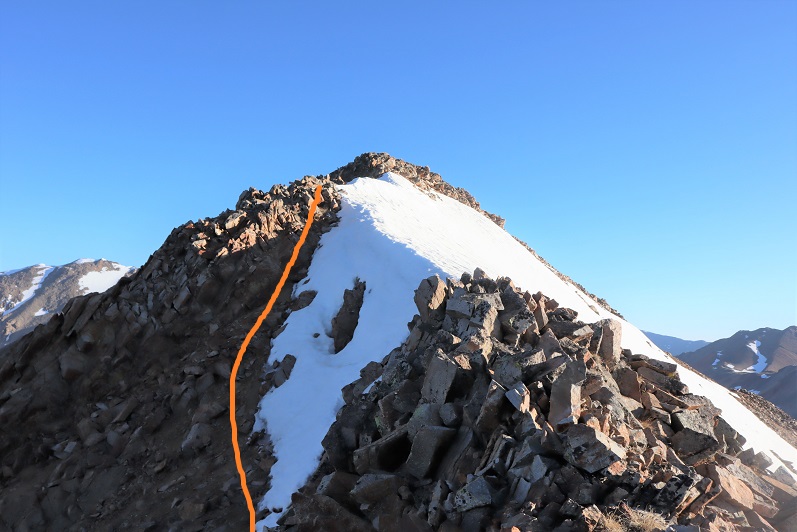
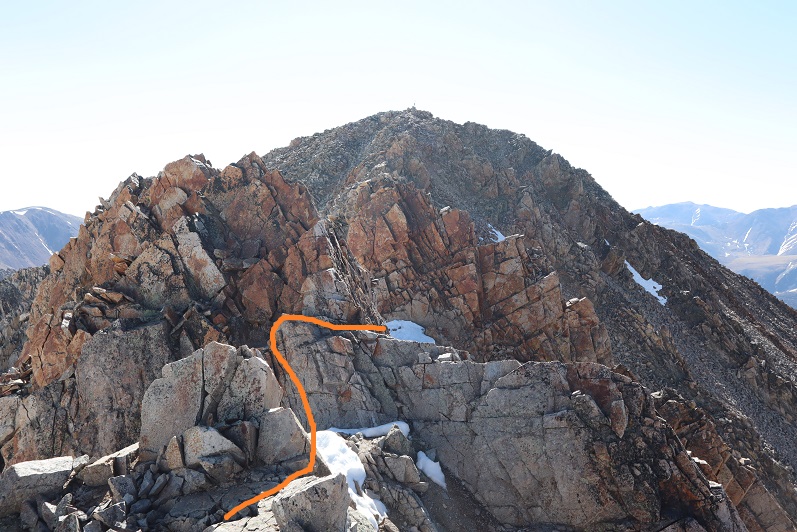
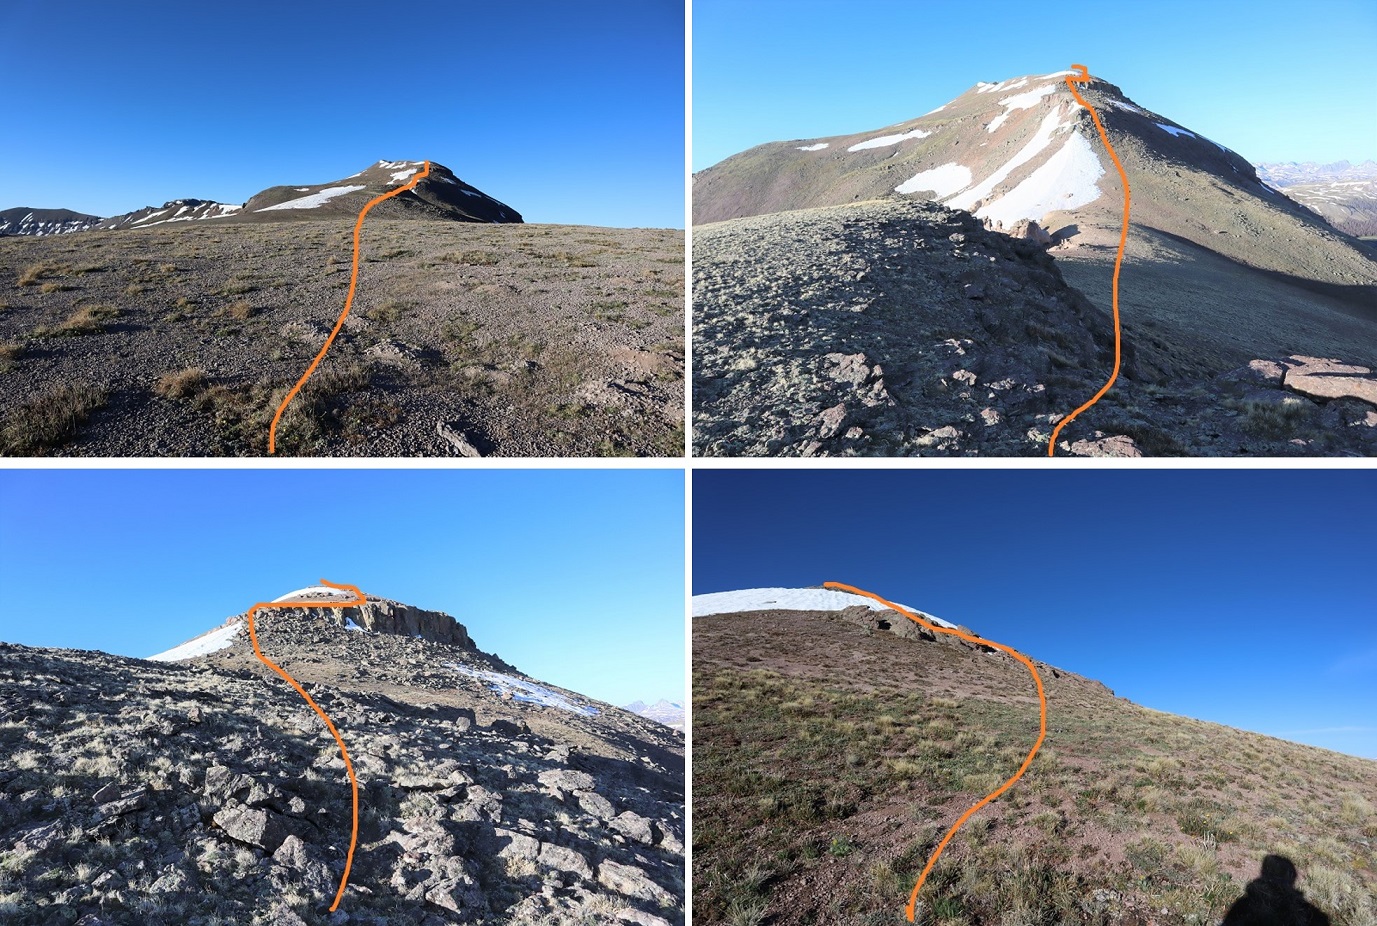
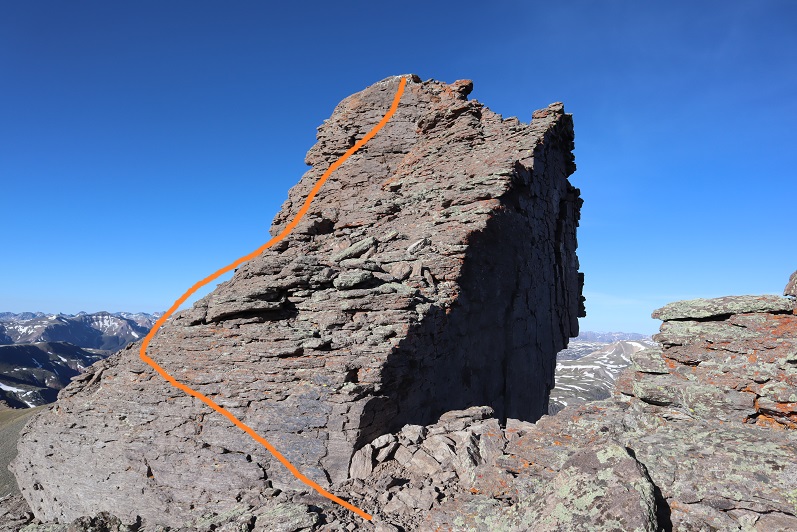
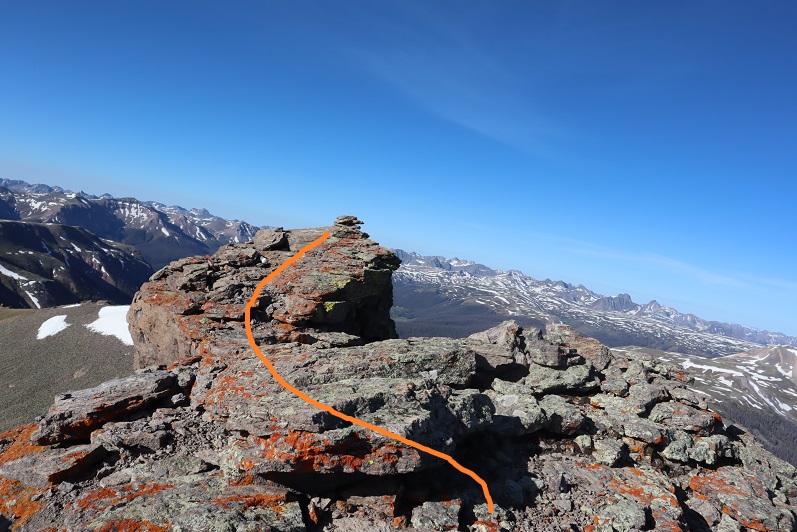
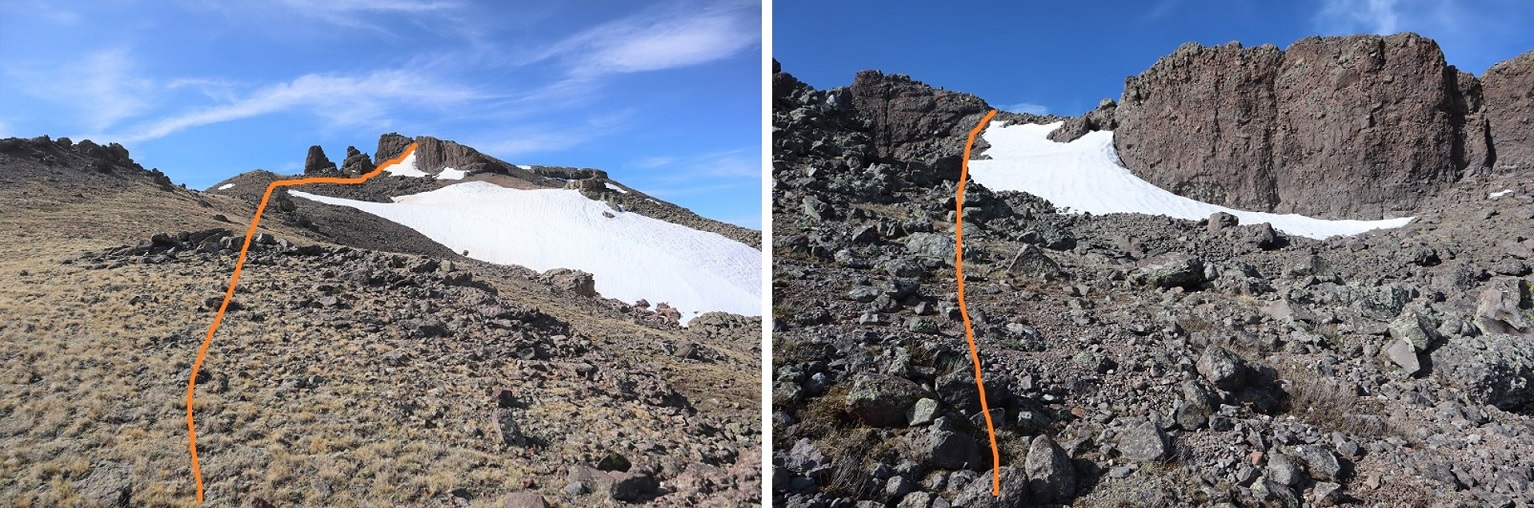
The crux of this climb comes at the very end. I spent some time trying to figure out how I wanted to summit. At first I tried to gain the block at the area where all the bird droppings were, but it didn’t look like it was the easiest way. Next I tried summiting up a chimney, but about halfway up I knew I’d need rope to get back down (I’m short) so I stopped and looked for another route. In the end I was able to summit by going up the area with all the bird droppings, just from a different angle. There is a lot of exposure here and small scree on the rocks, making it slippery and a fall dangerous.

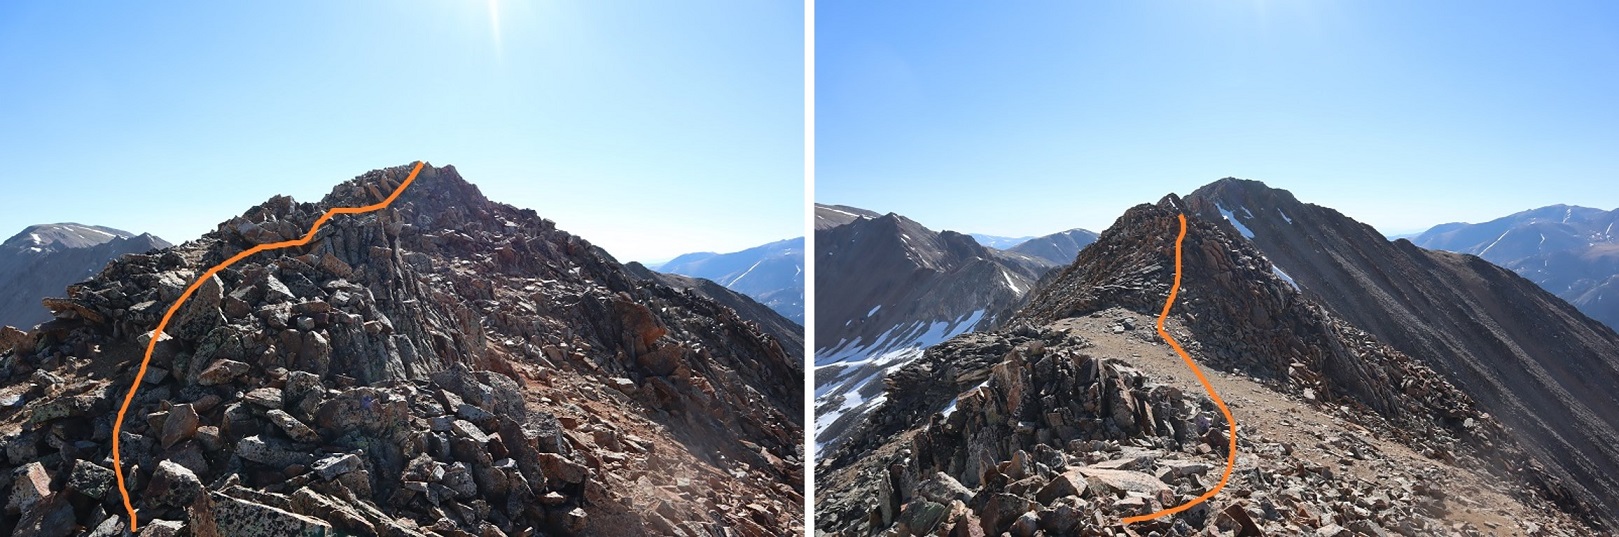
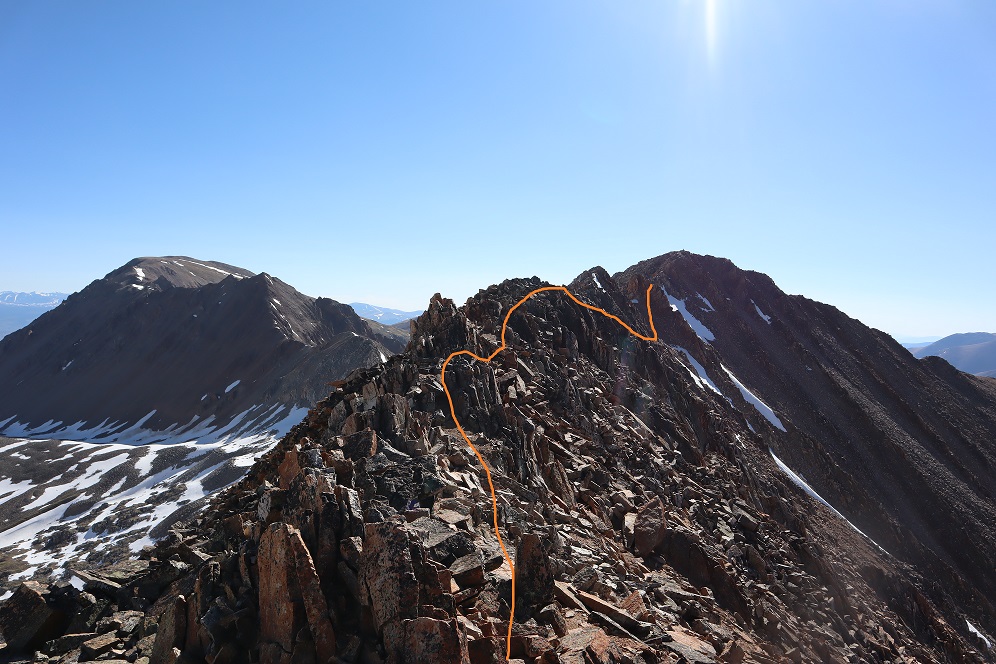
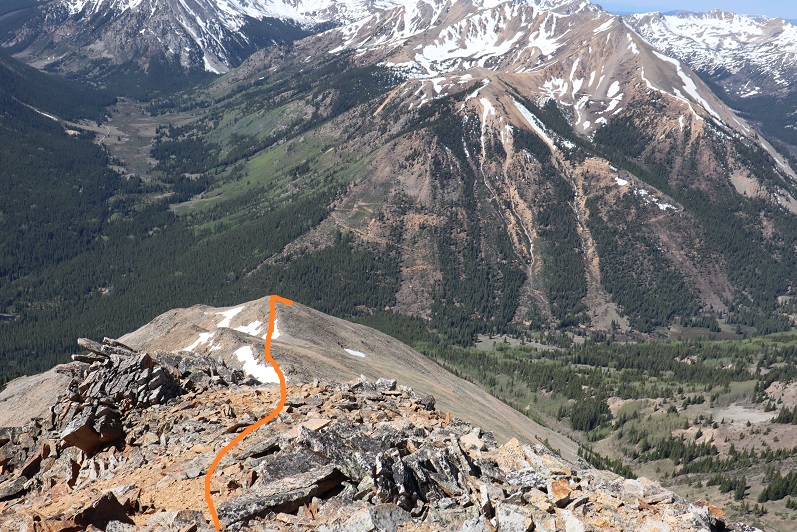
Here’s the route I took:

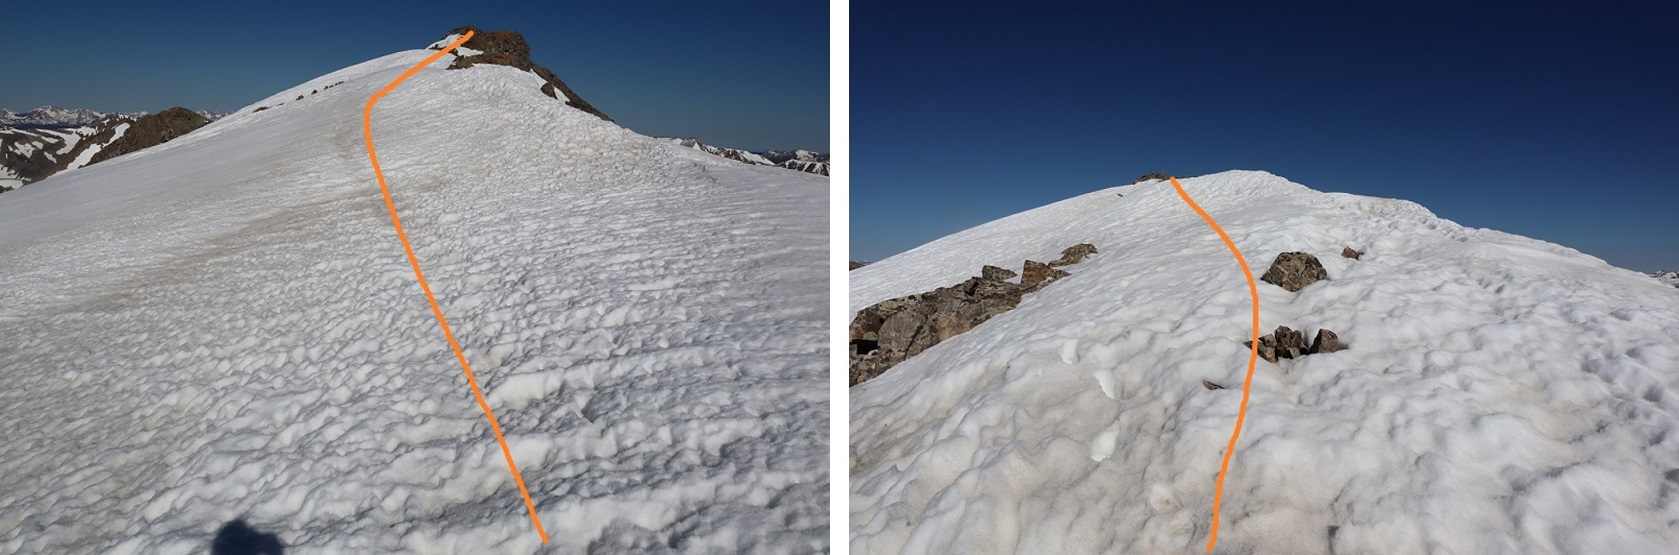
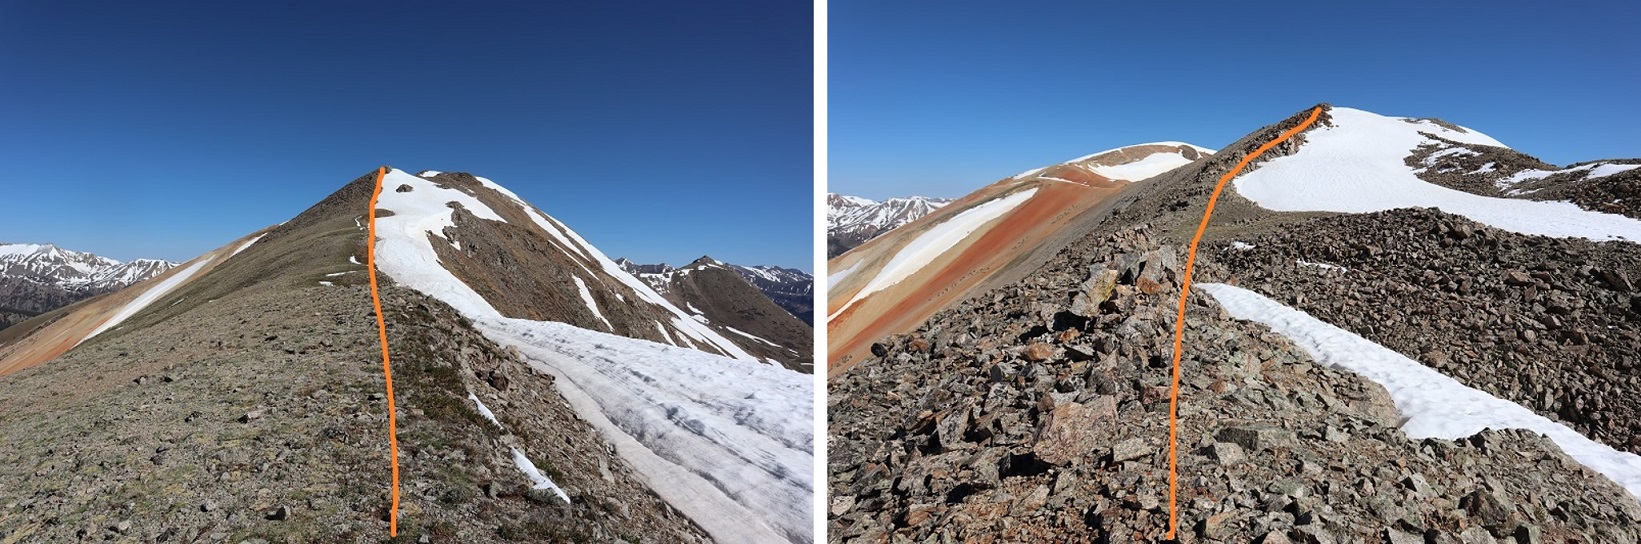
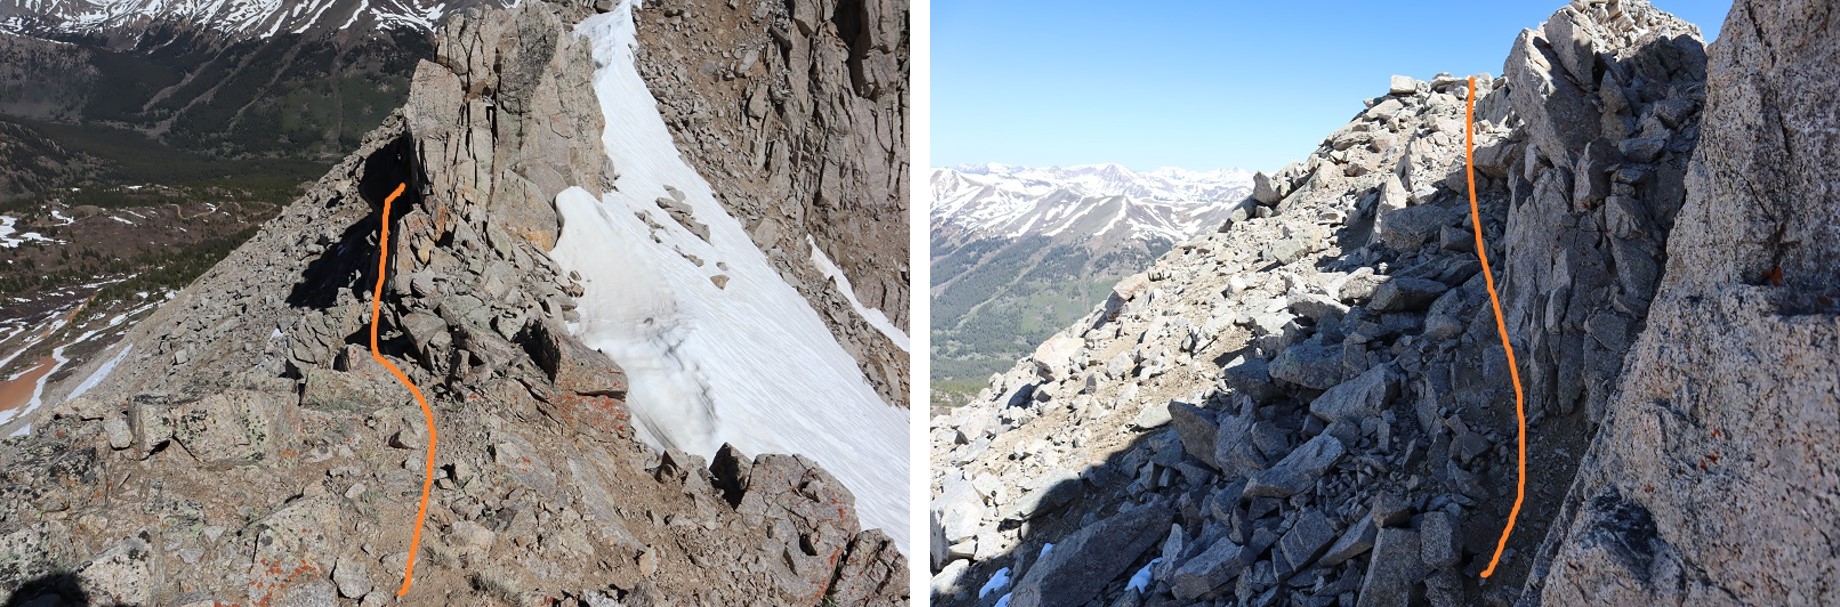
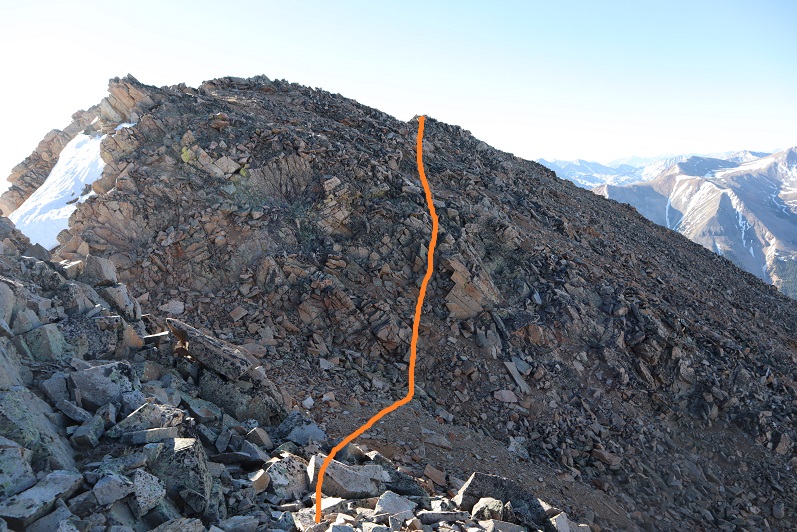
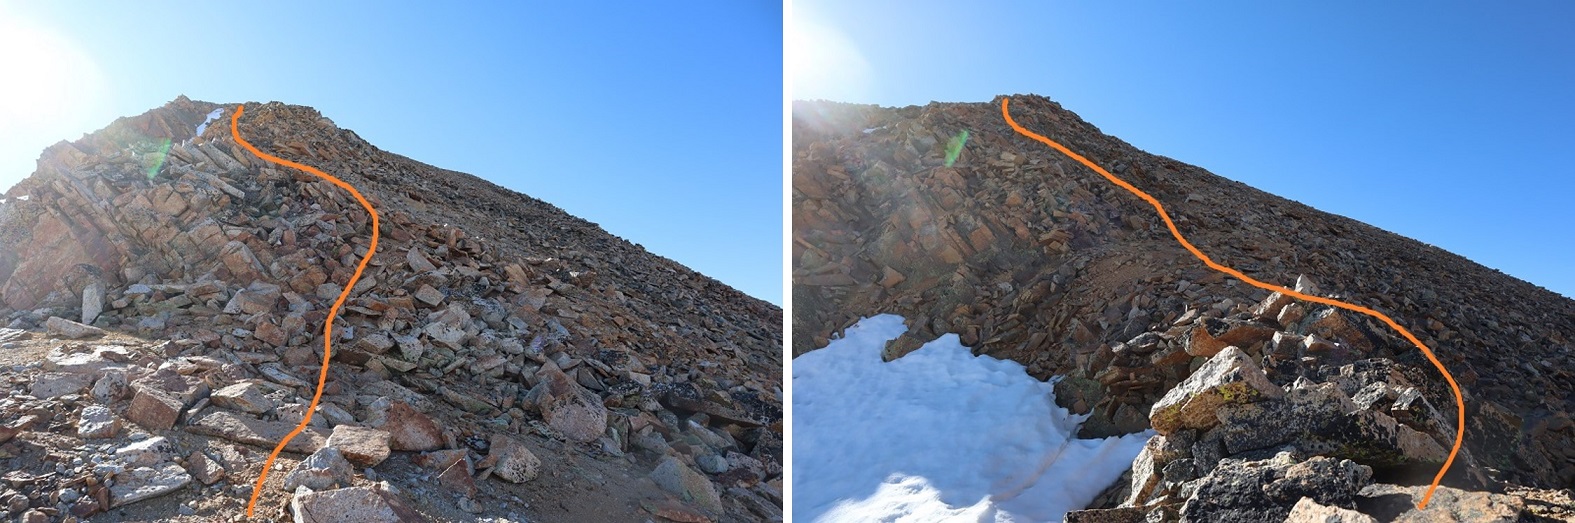
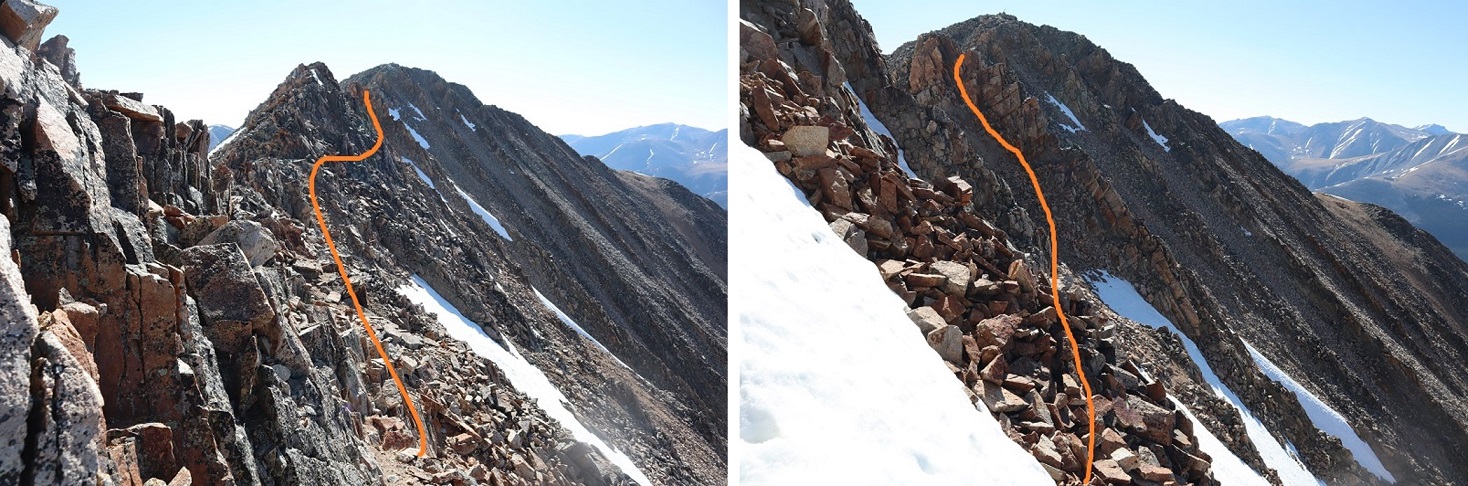
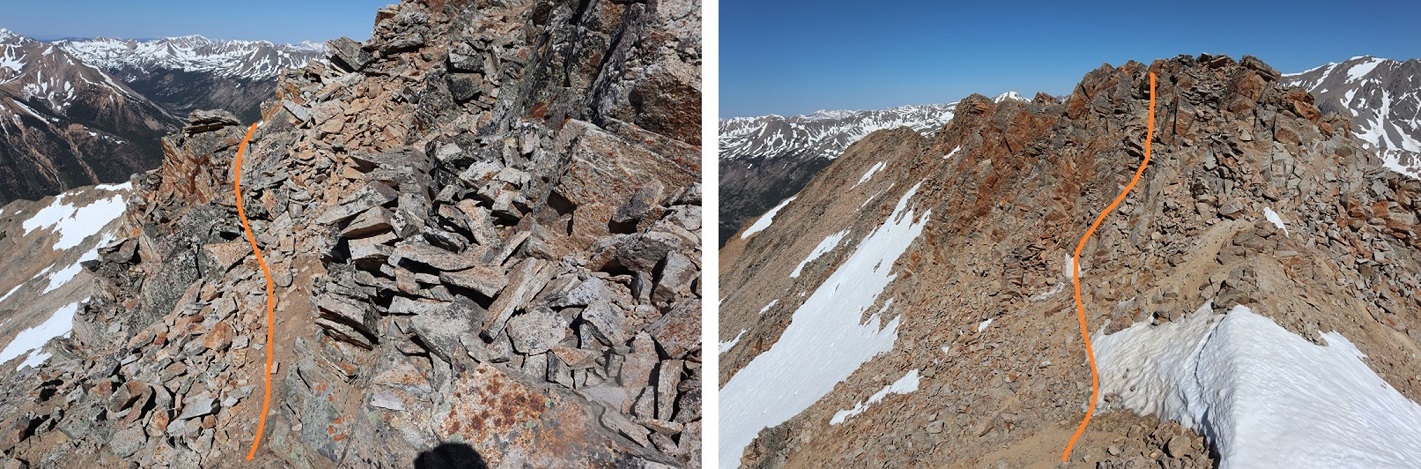
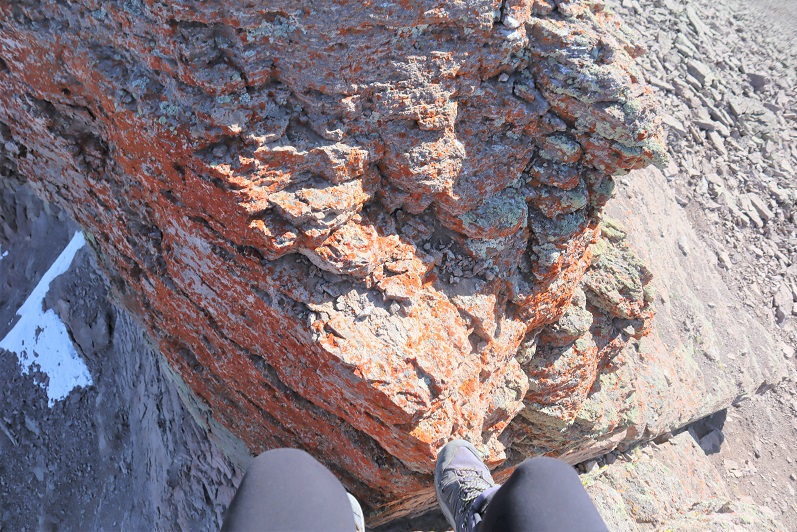
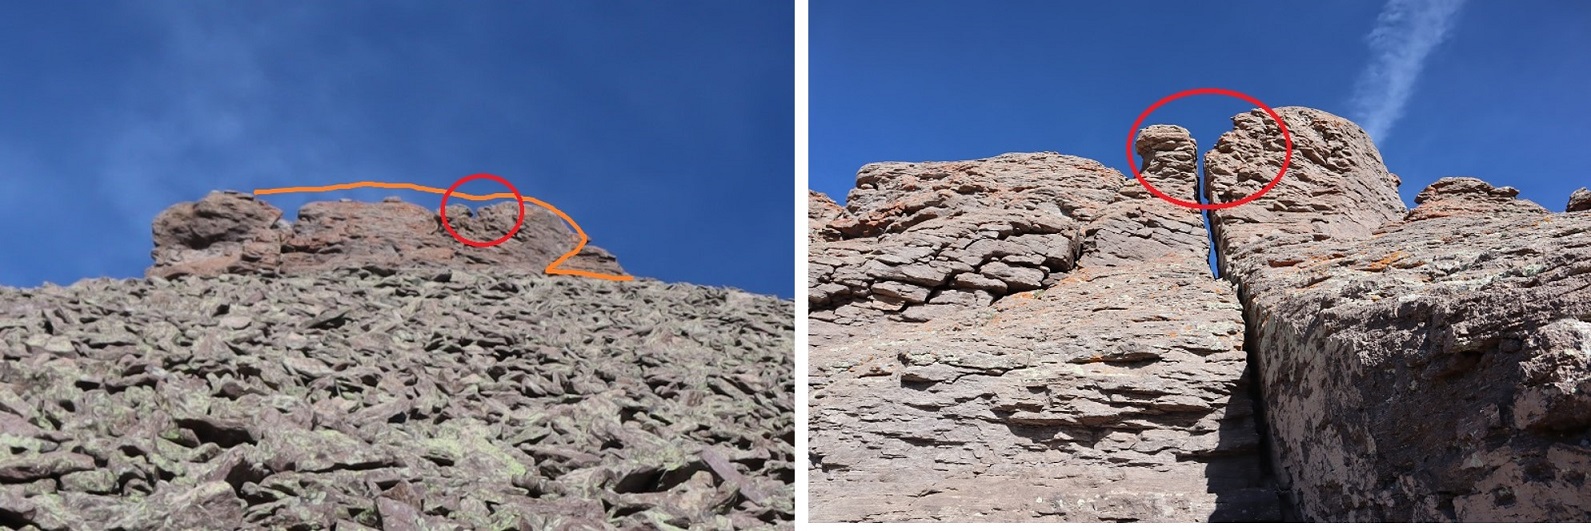
I aimed for the bird droppings. Here’s what that looked like from a couple of different angles.

13

14

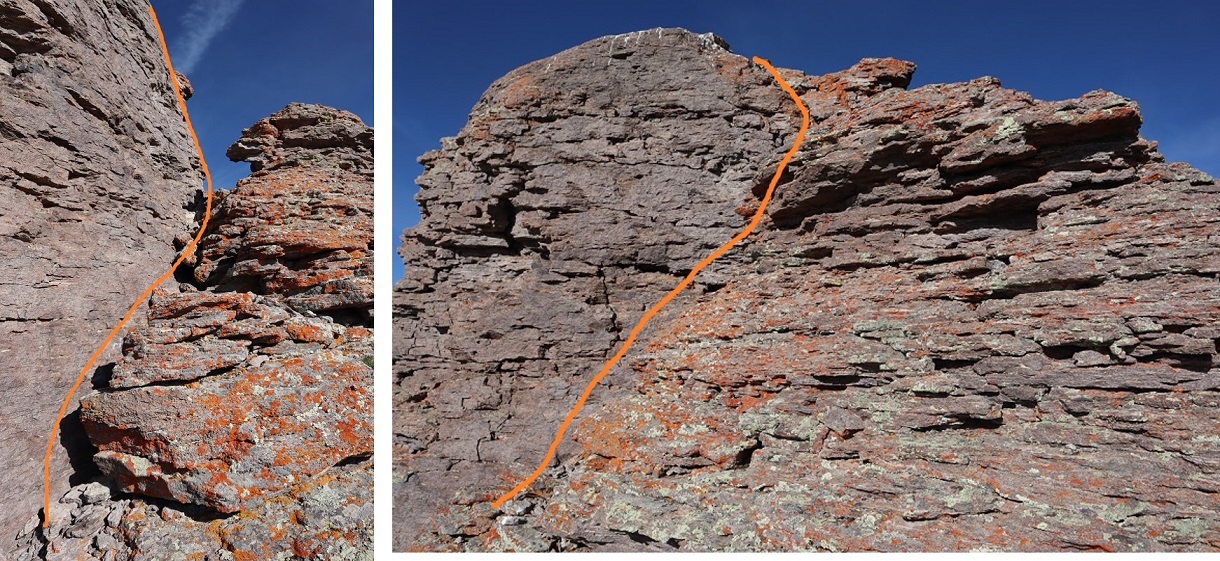
From there I traversed along the exposed edge towards the summit.

15

It looks easy, but this is the exposure, and yes, it included a trust jump (once again, I’m short, it could have been more of a long lean for someone over 6 feet tall, but I had to jump). Here’s looking back on the jump area (it’s too difficult to see in a picture coming from the other way, but this picture offers a good look back on the ridge too)

16

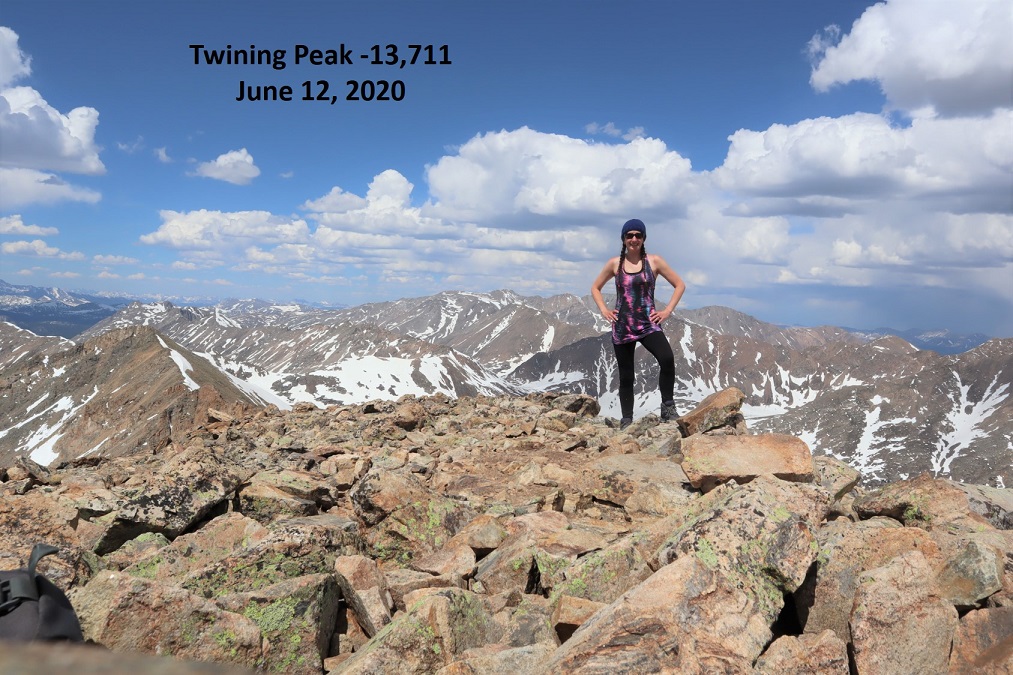
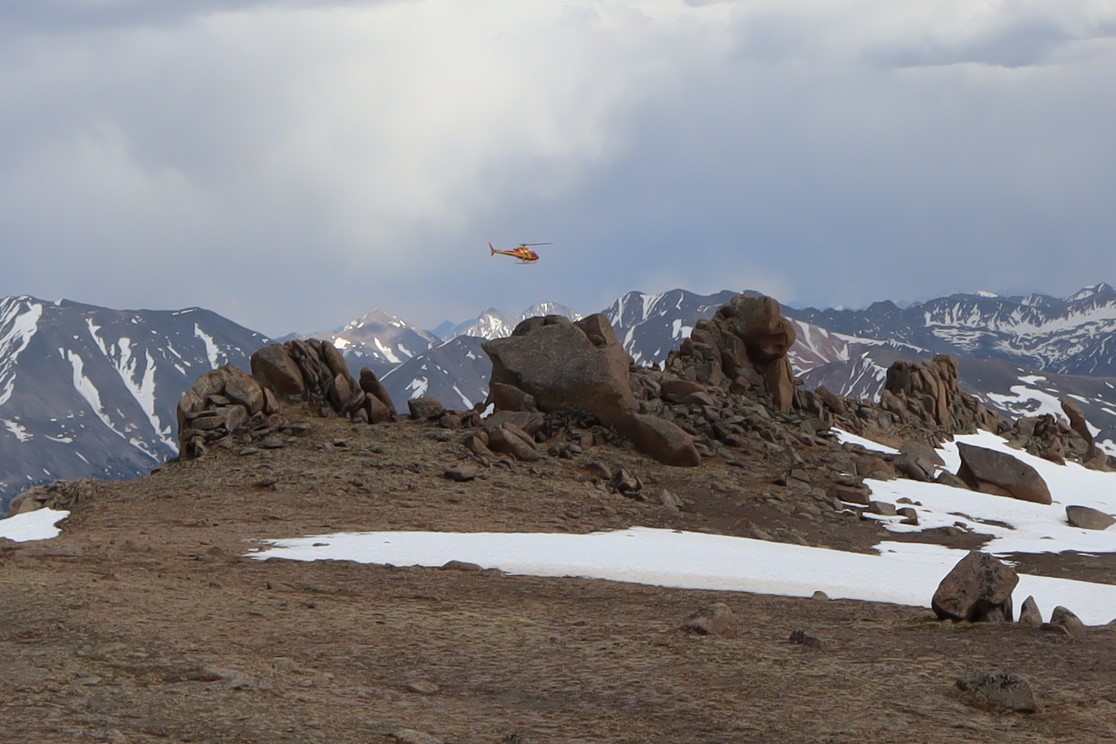
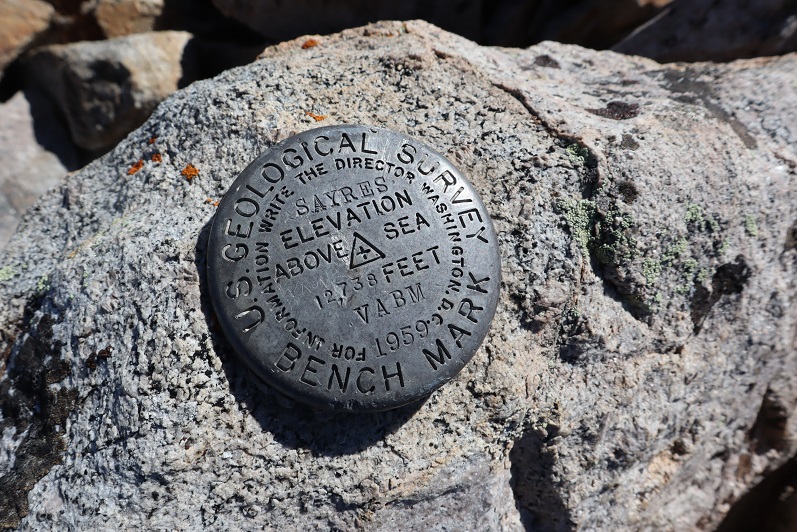
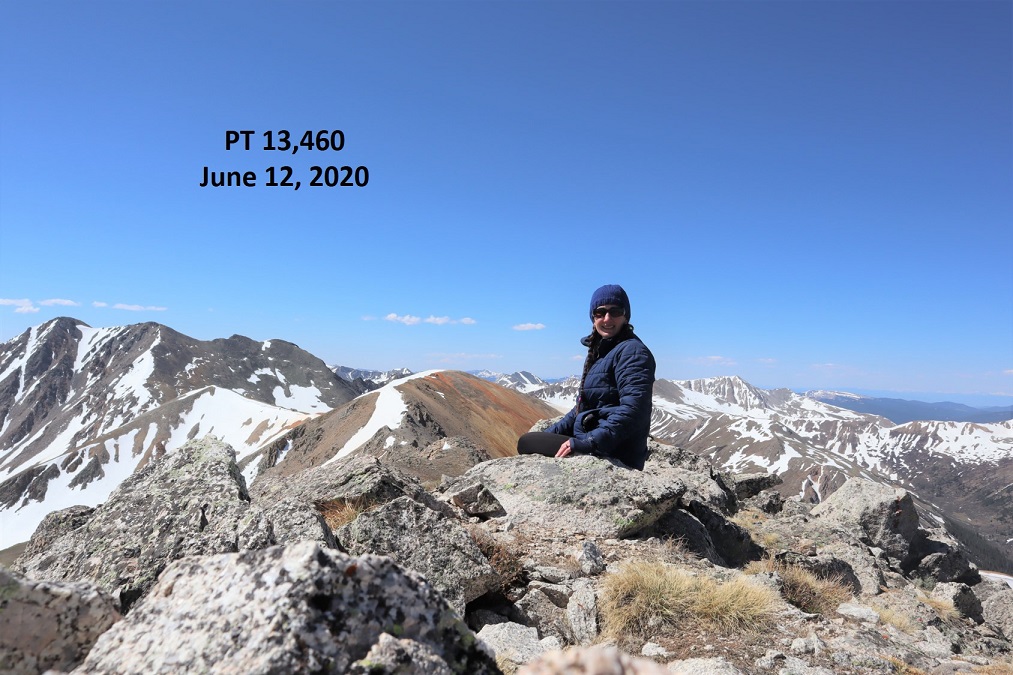
I summited at 9:45am
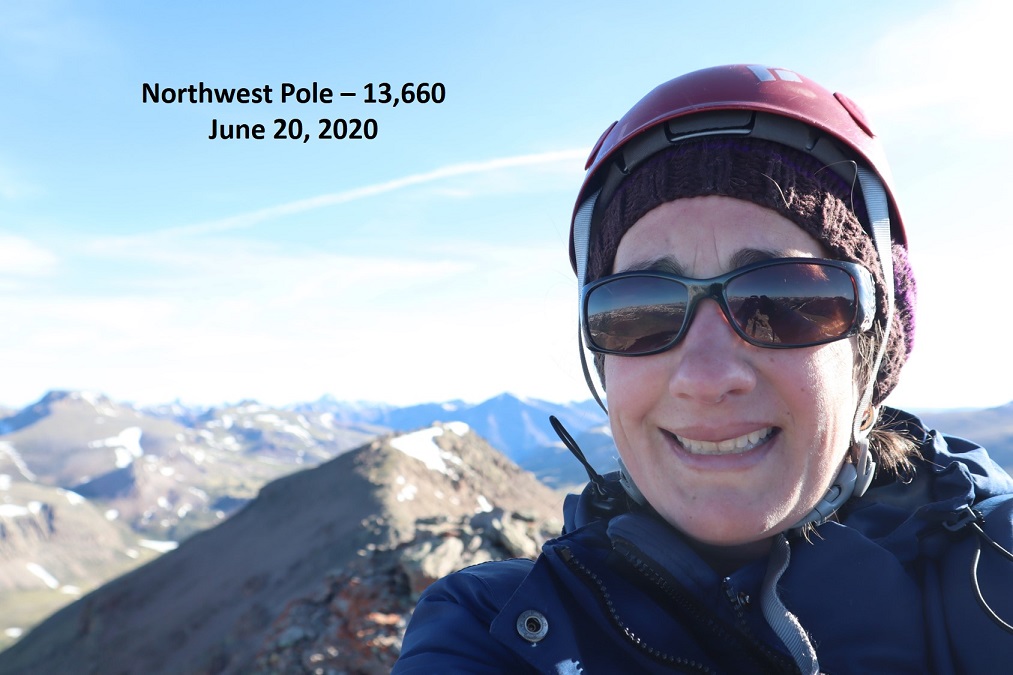
17

Northwest Pole:


Here I am getting ready to jump the area on the way back.

18

And from the top where the bird droppings are back down. Yes, it’s as steep as it looks

19

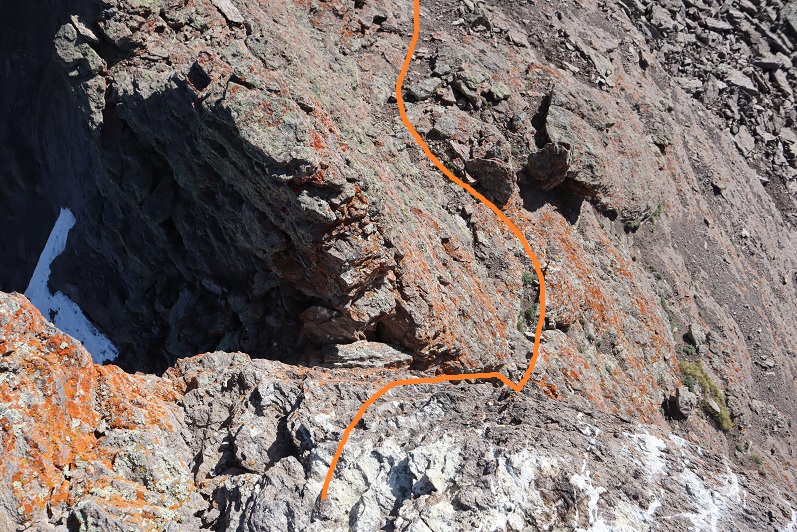
Back on solid ground I took a picture of the summit block and how I traversed it. I circled where I jumped.

20

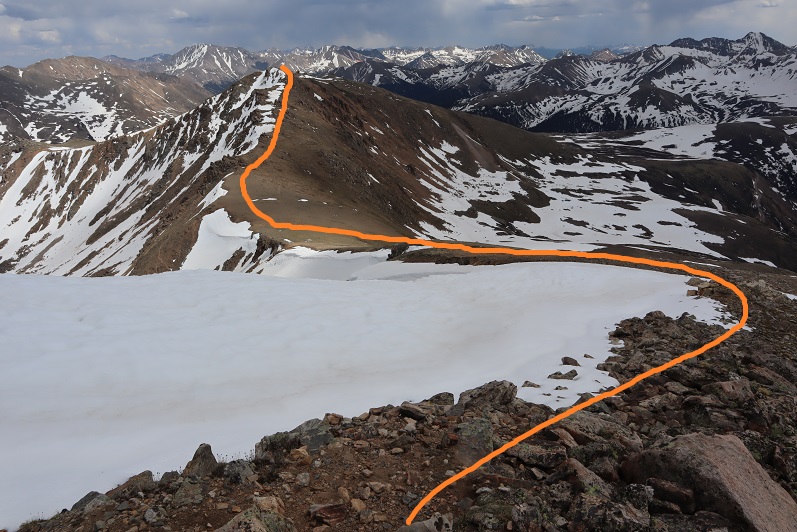
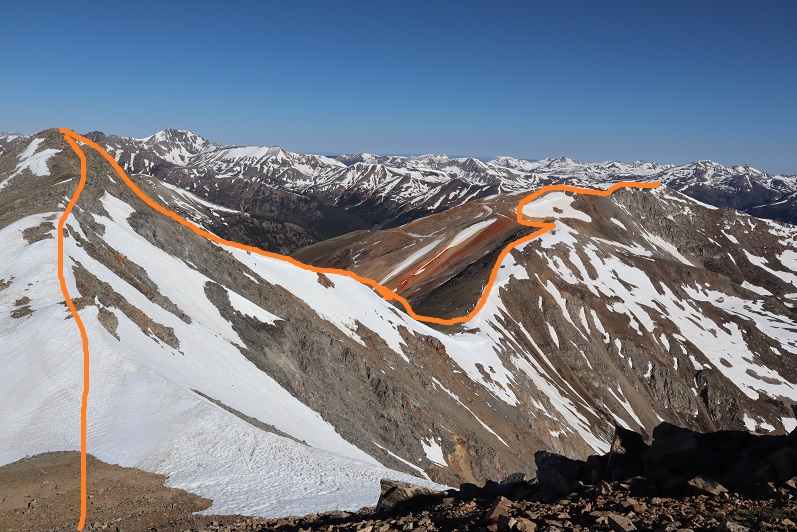
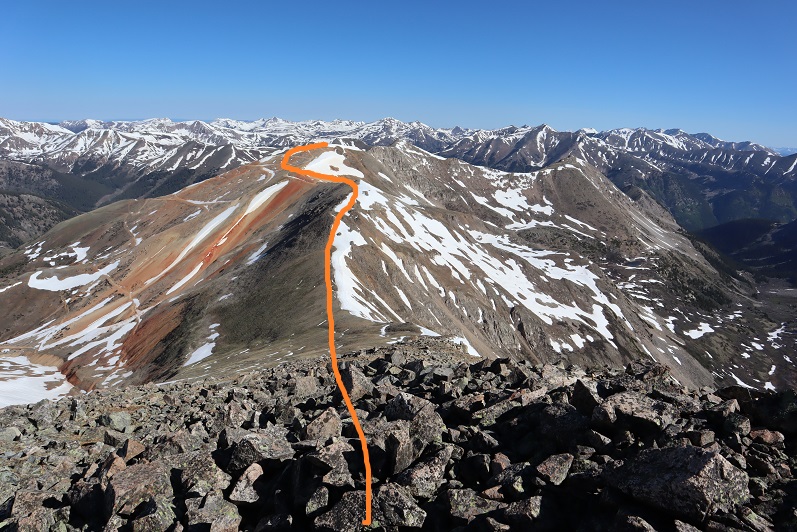
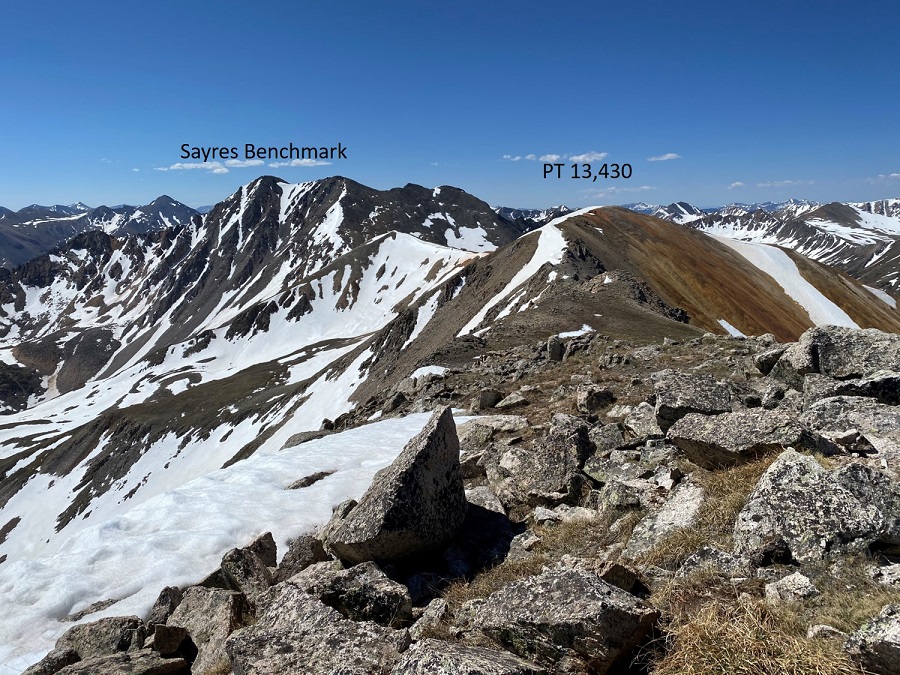
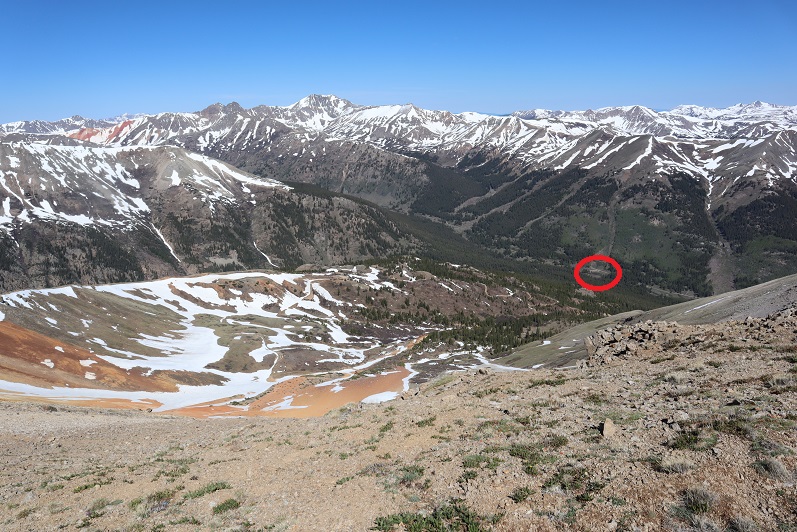
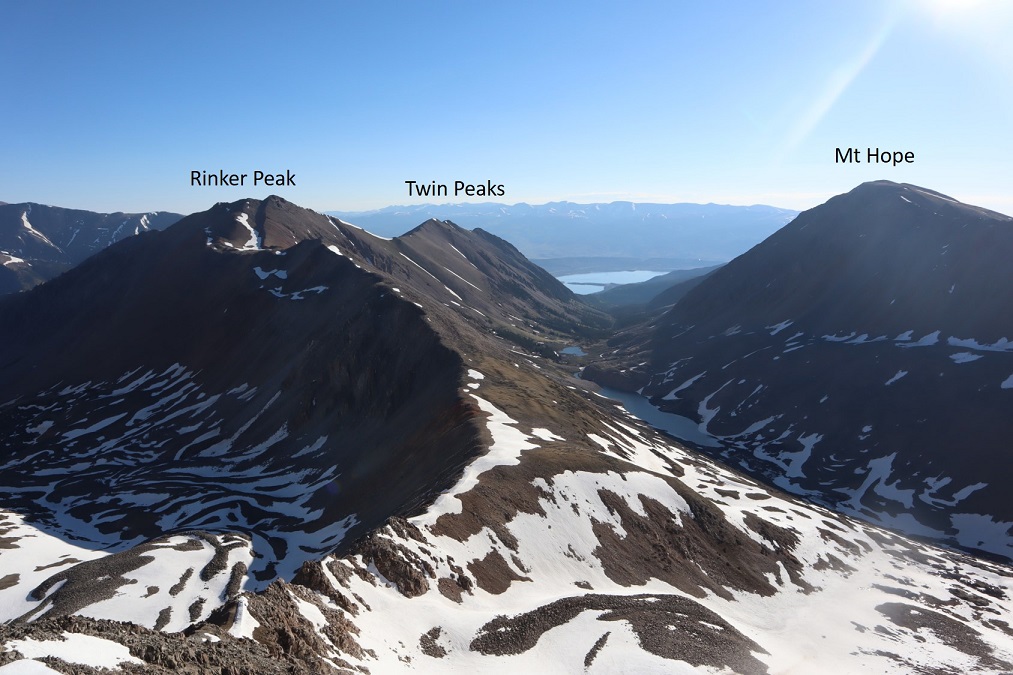
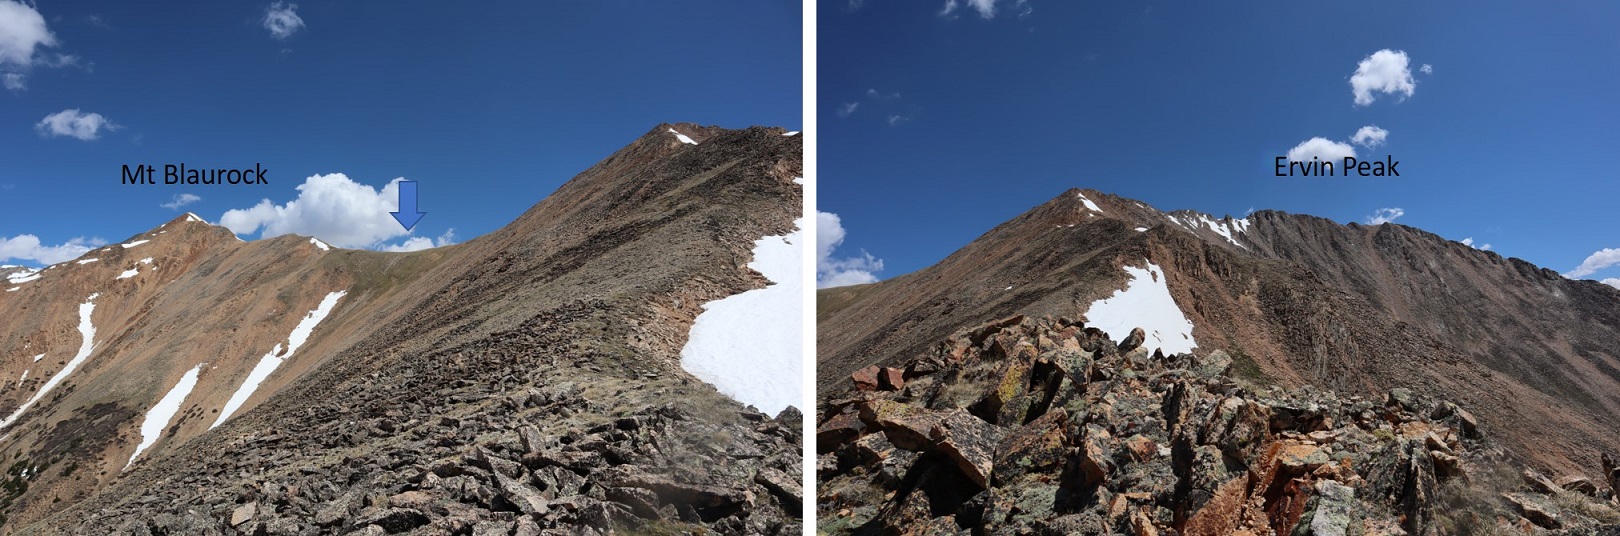
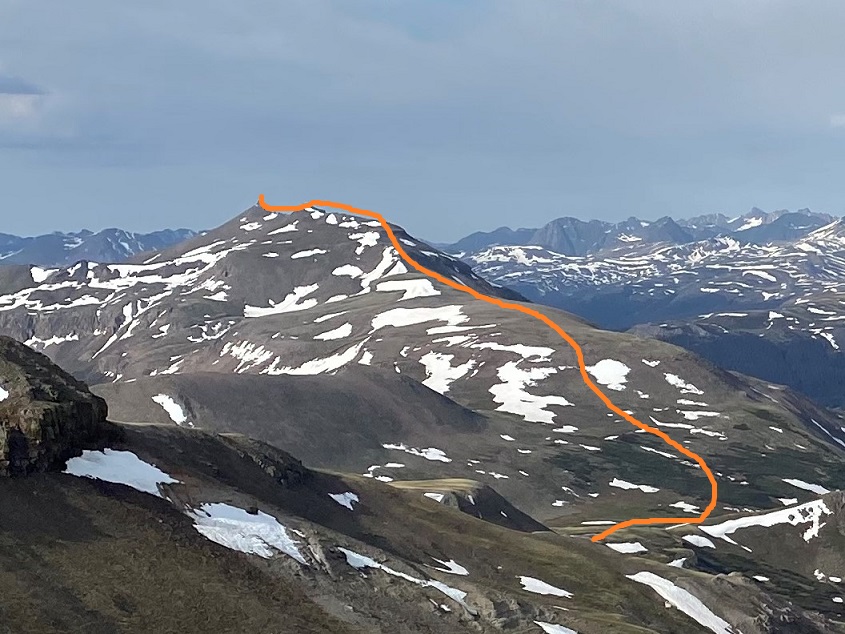
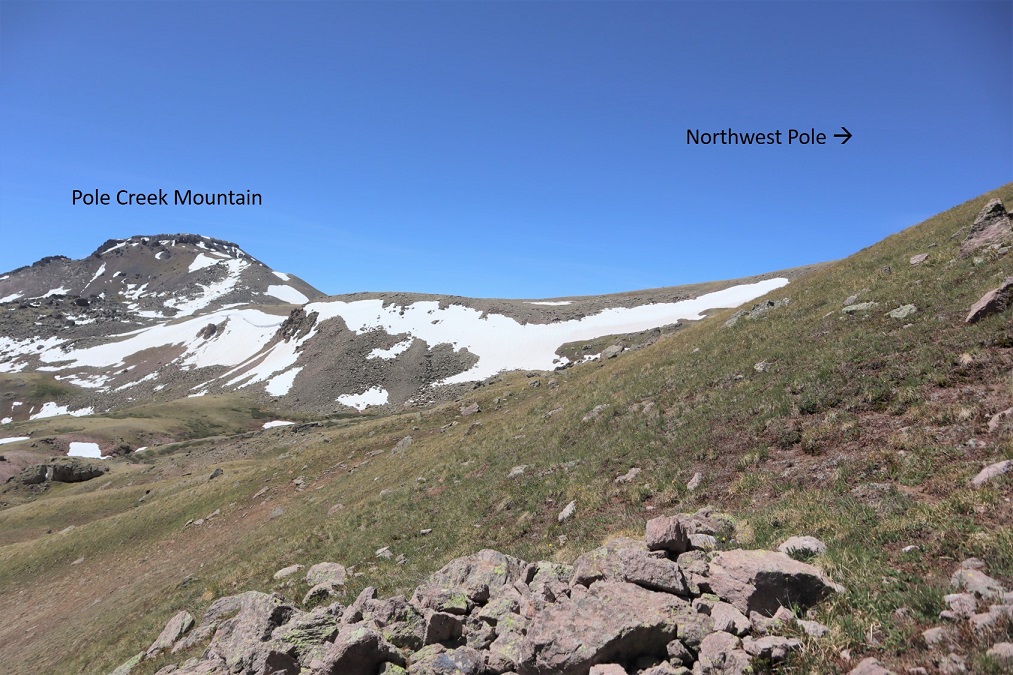
Time to head over to Pole Creek Mountain. Here’s an overview of the route from Northwest Pole

21

I descended east towards the basin, first on loose rock that gave way to tundra, losing 850’ of elevation, crossing a stream, and heading back up towards Pole Creek Mountain.

22

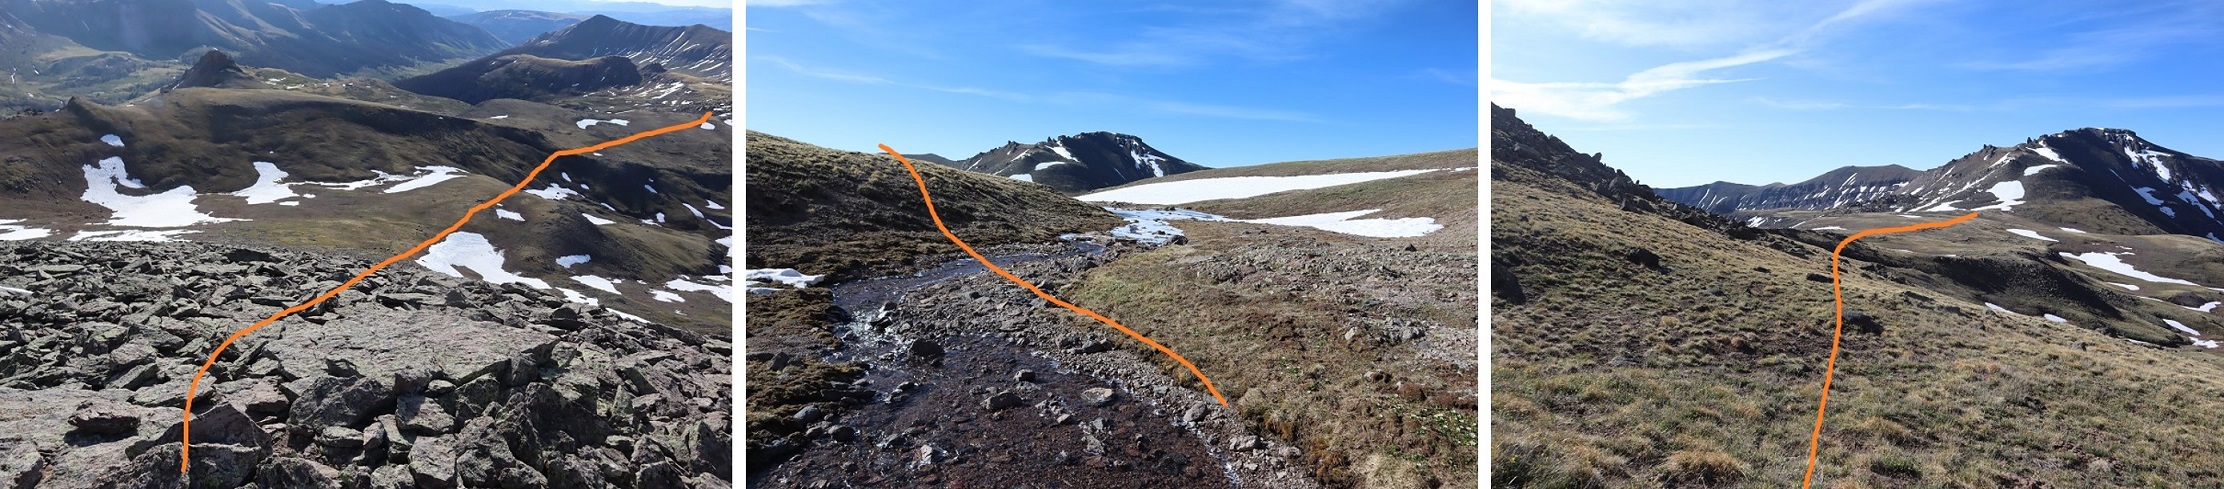
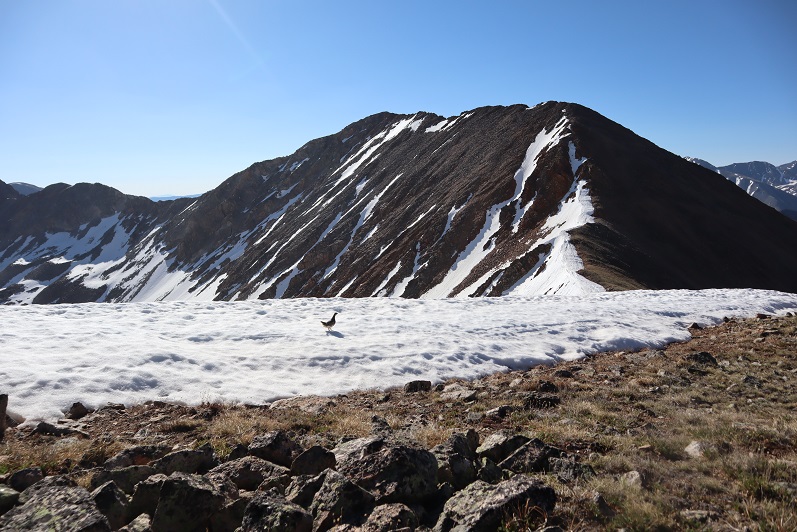
Here’s looking back at Northwest Pole

23

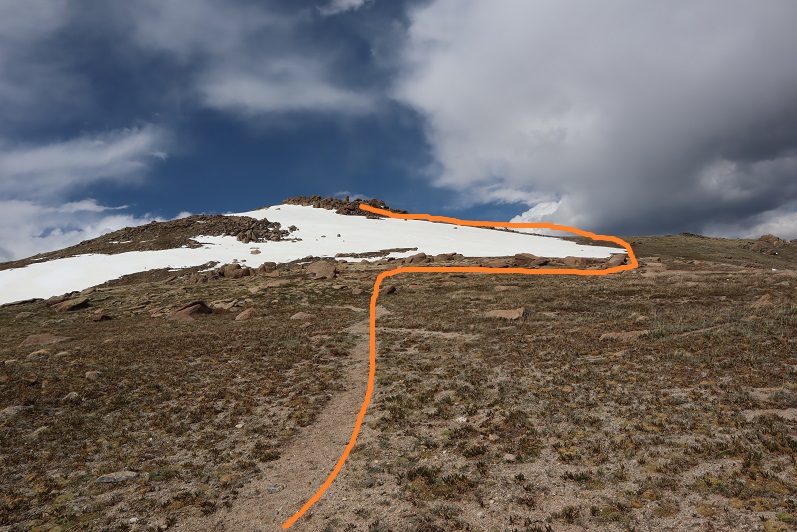
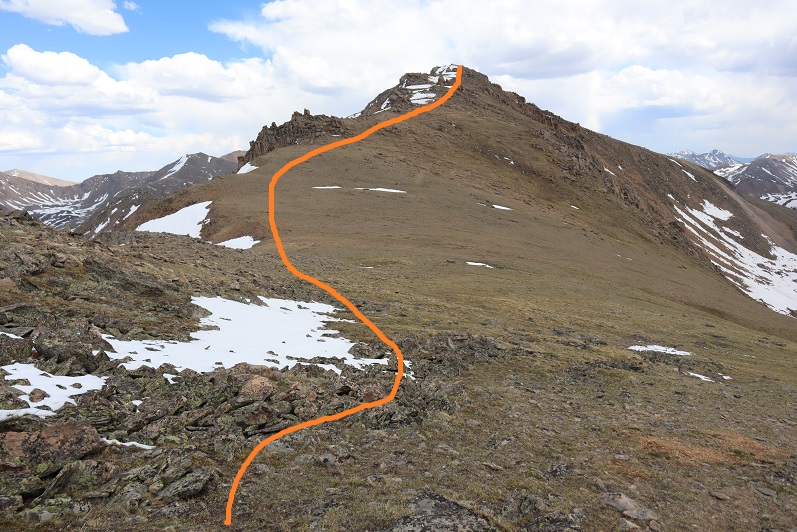
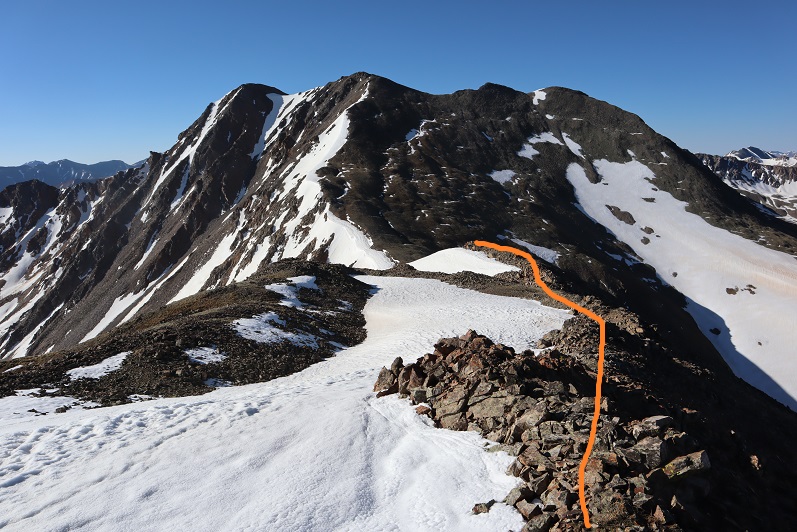
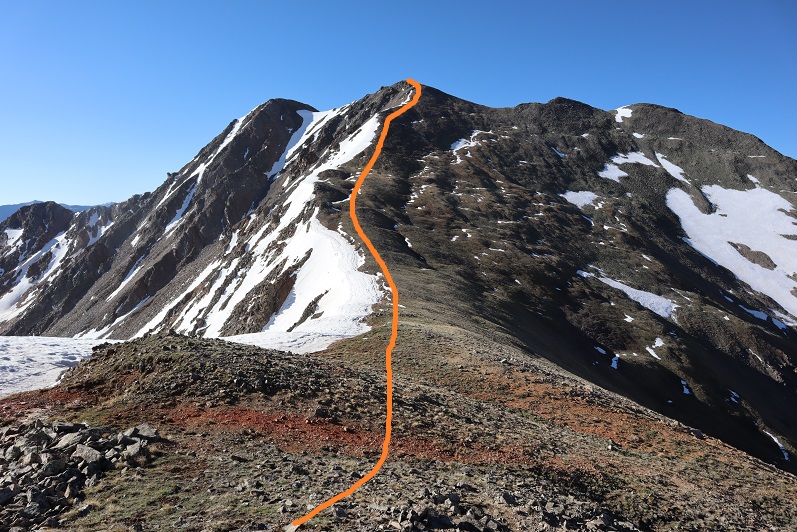
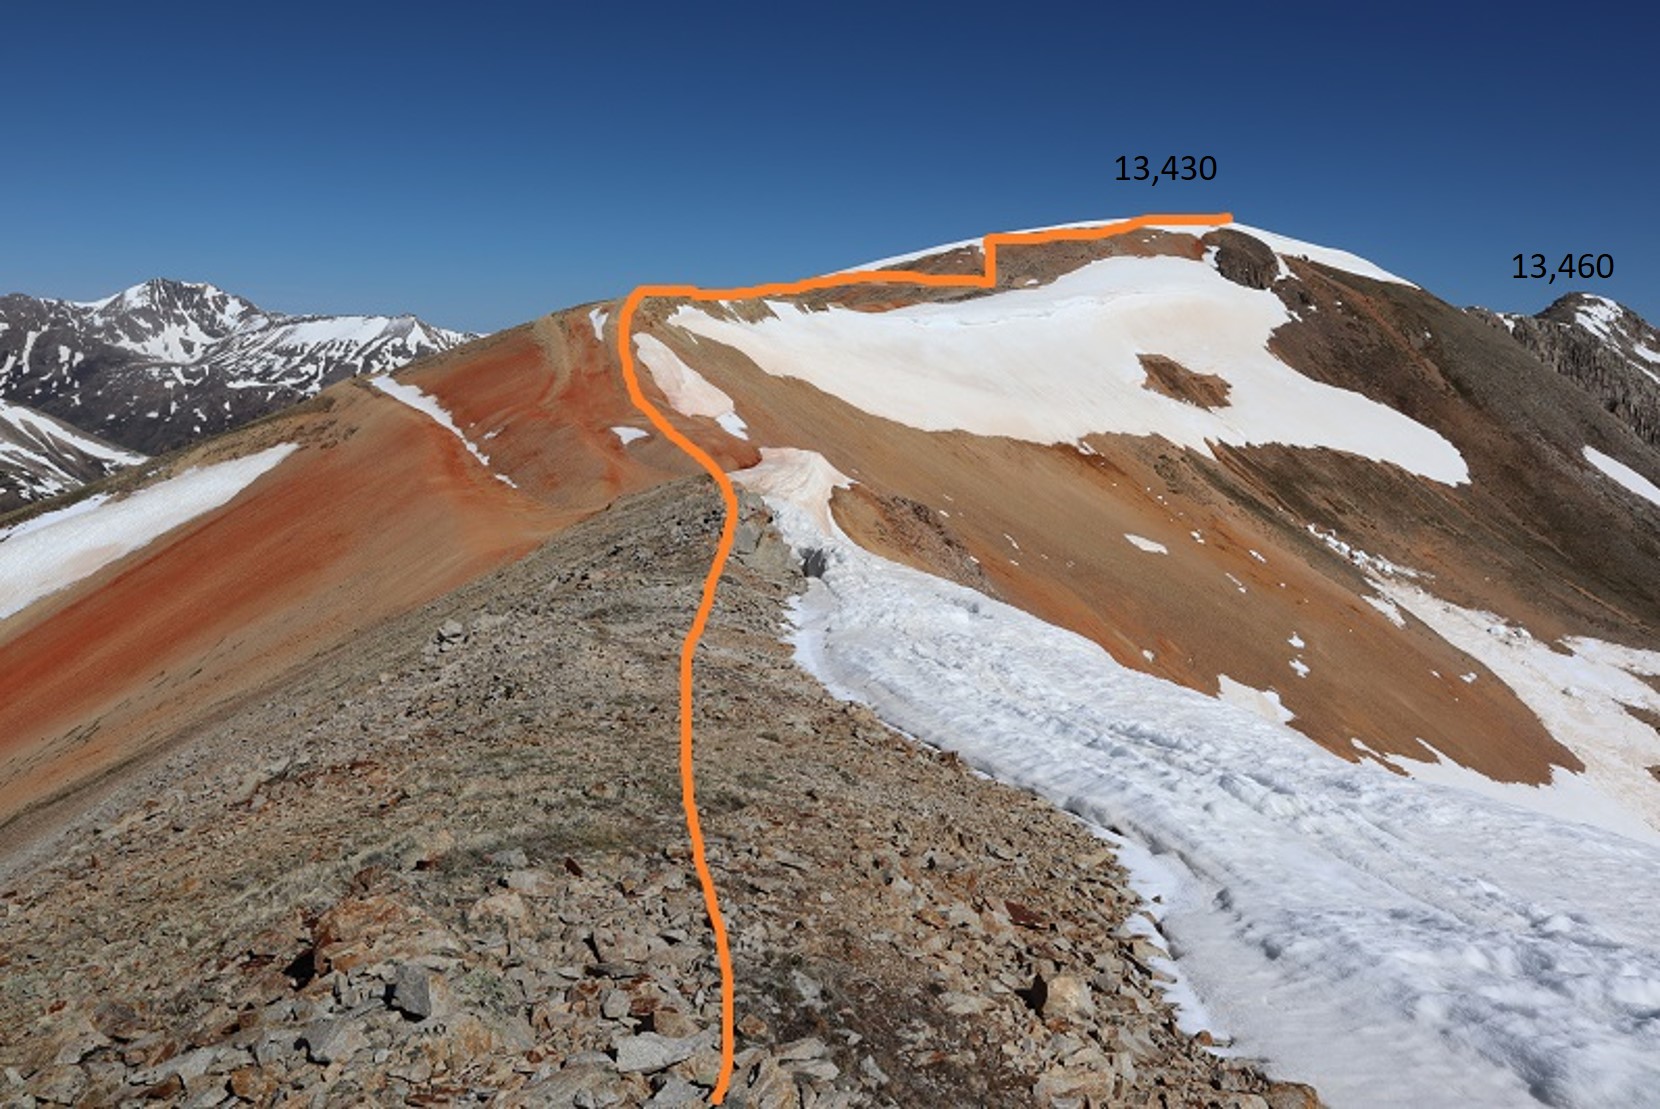
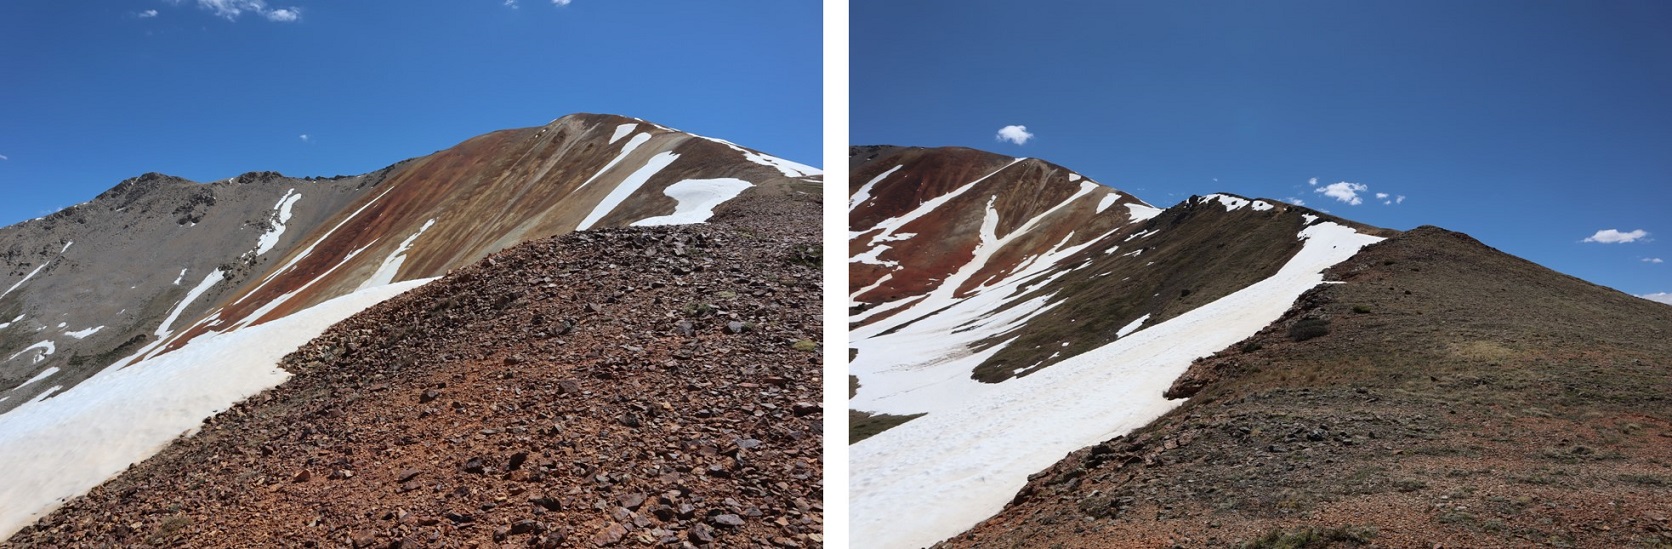
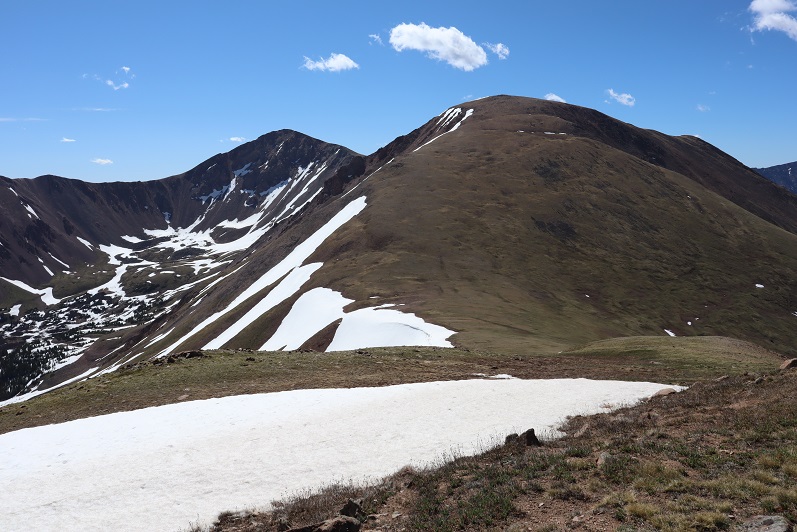
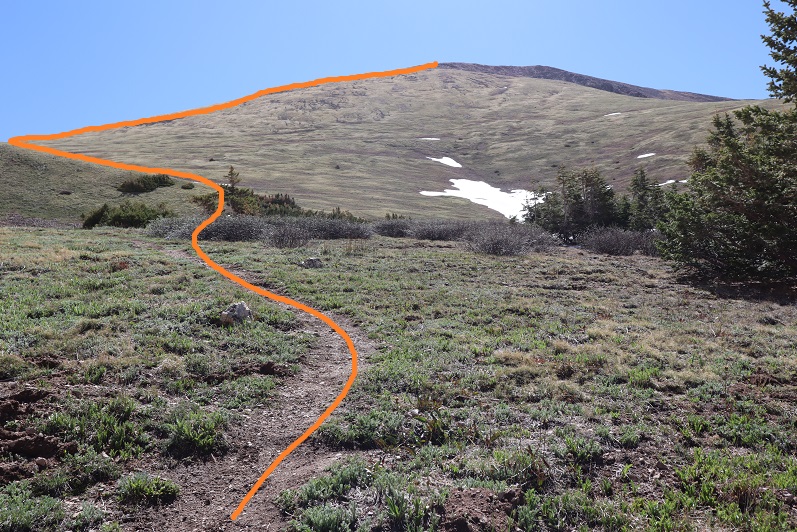
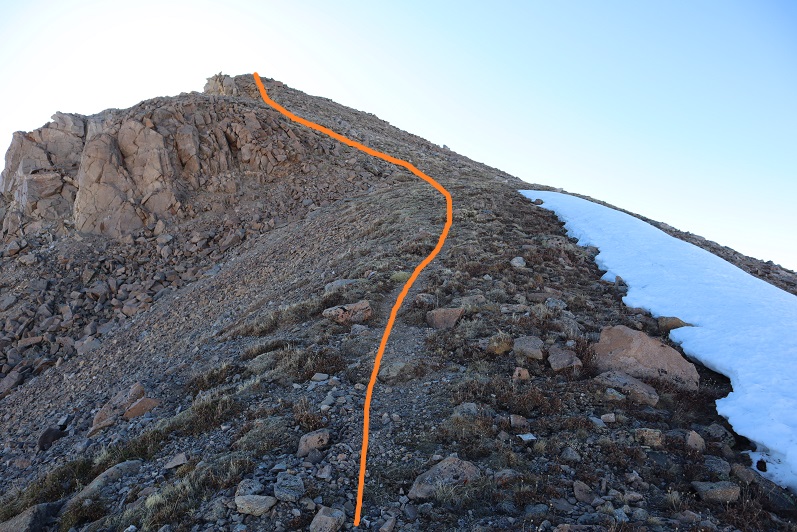
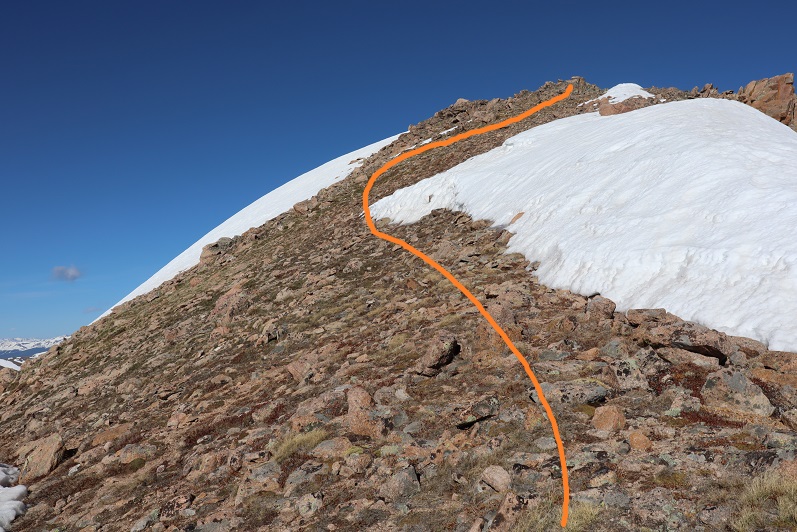
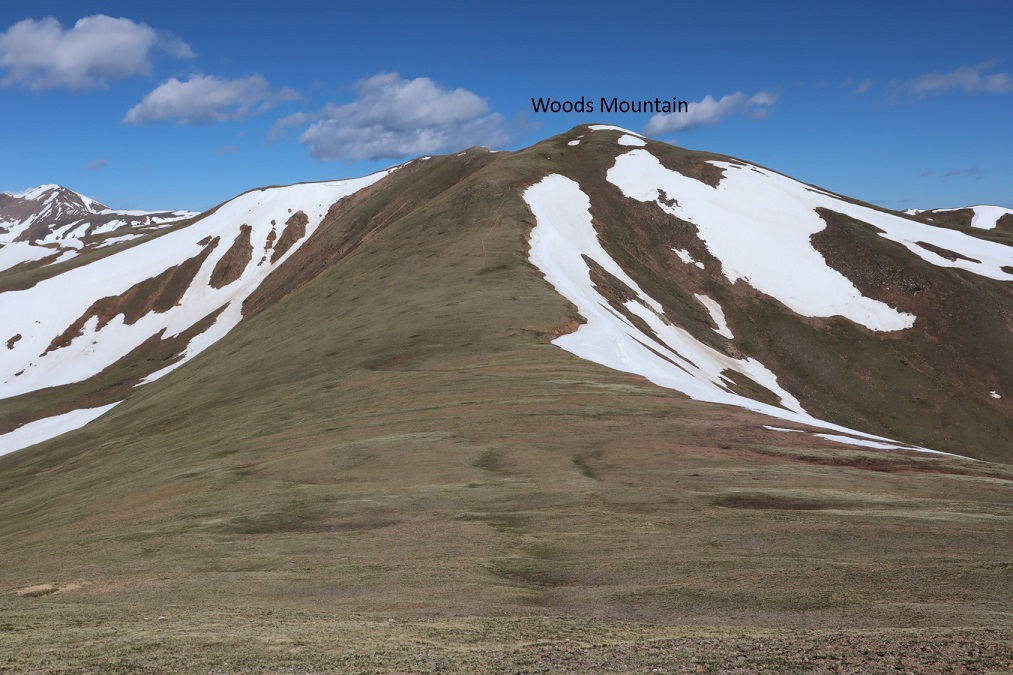
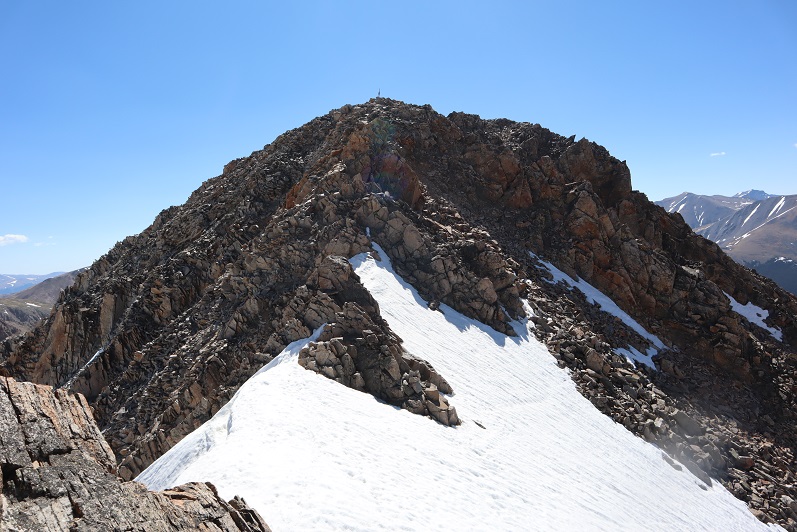
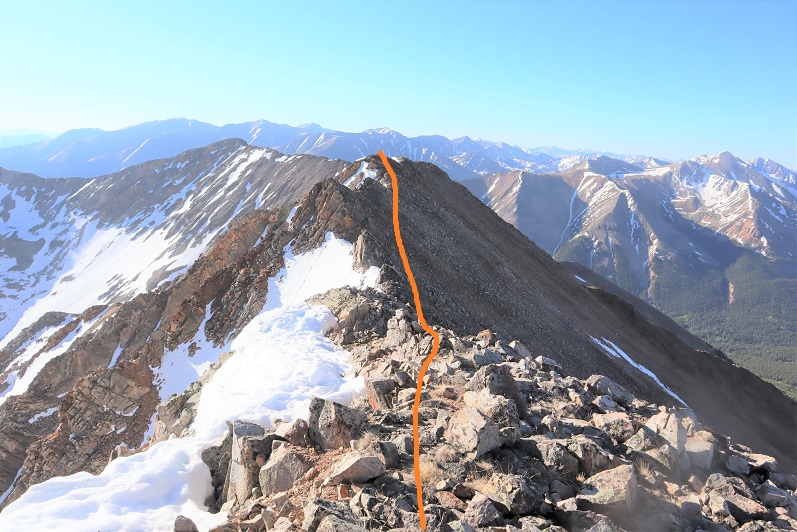
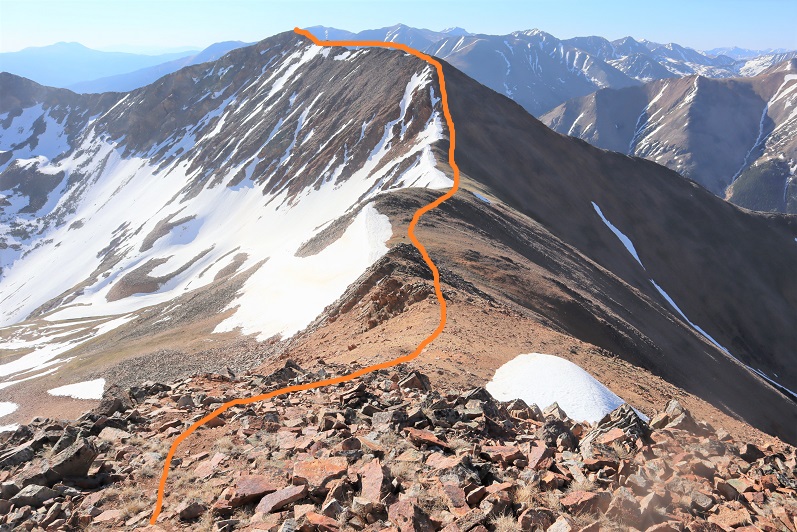
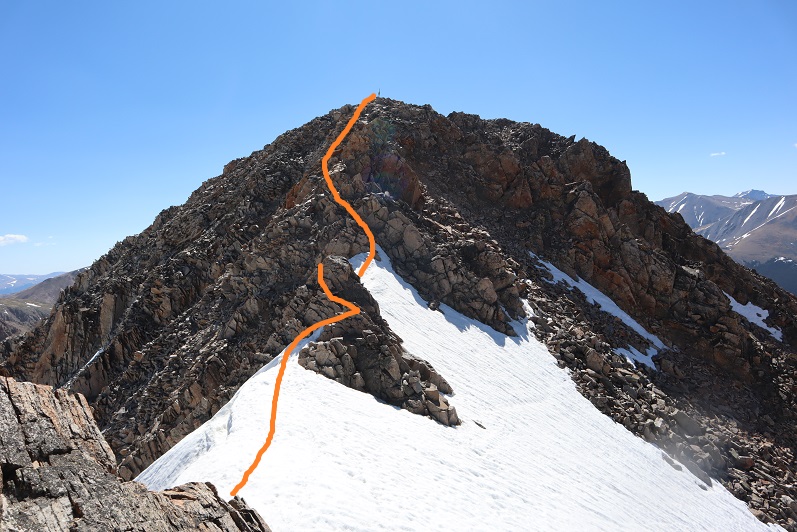
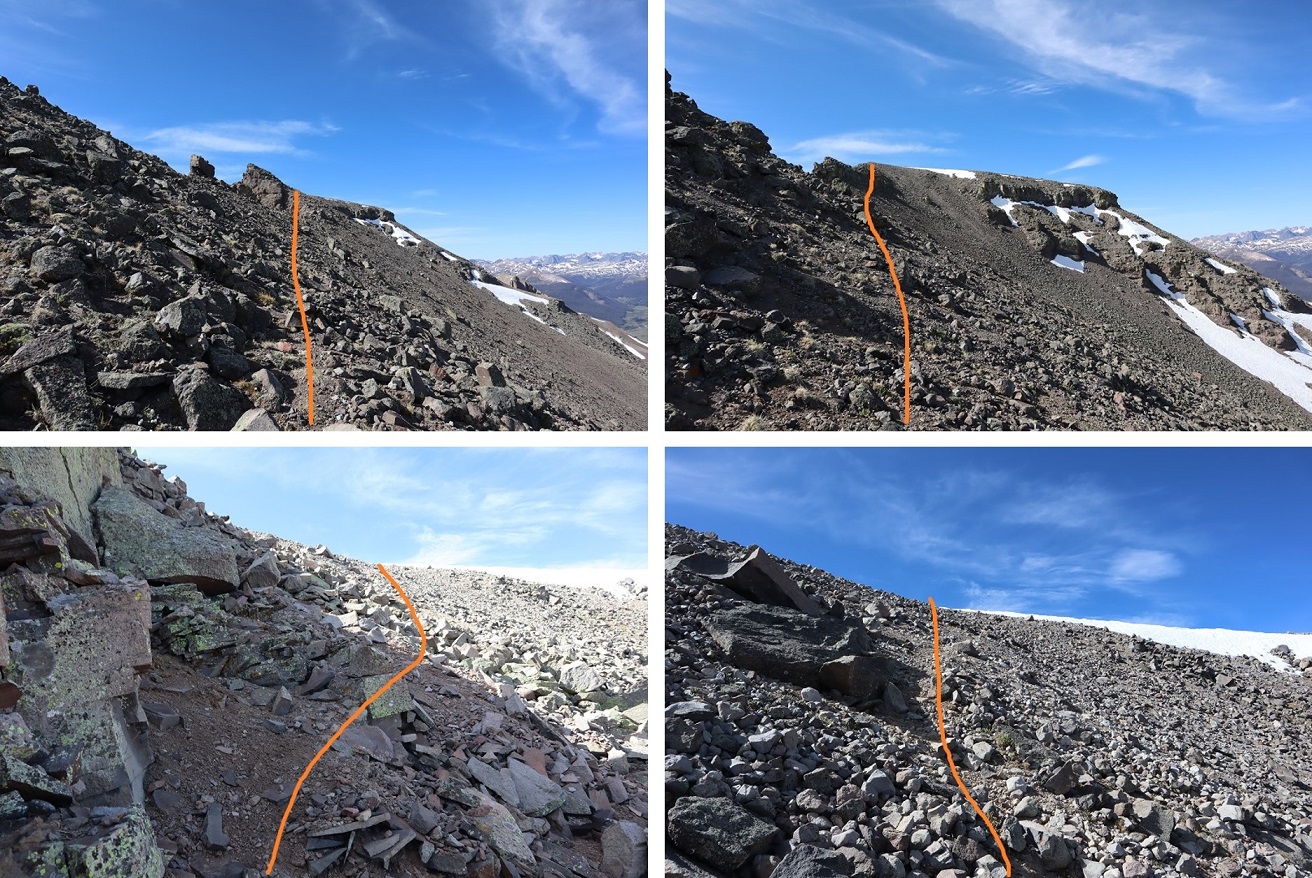
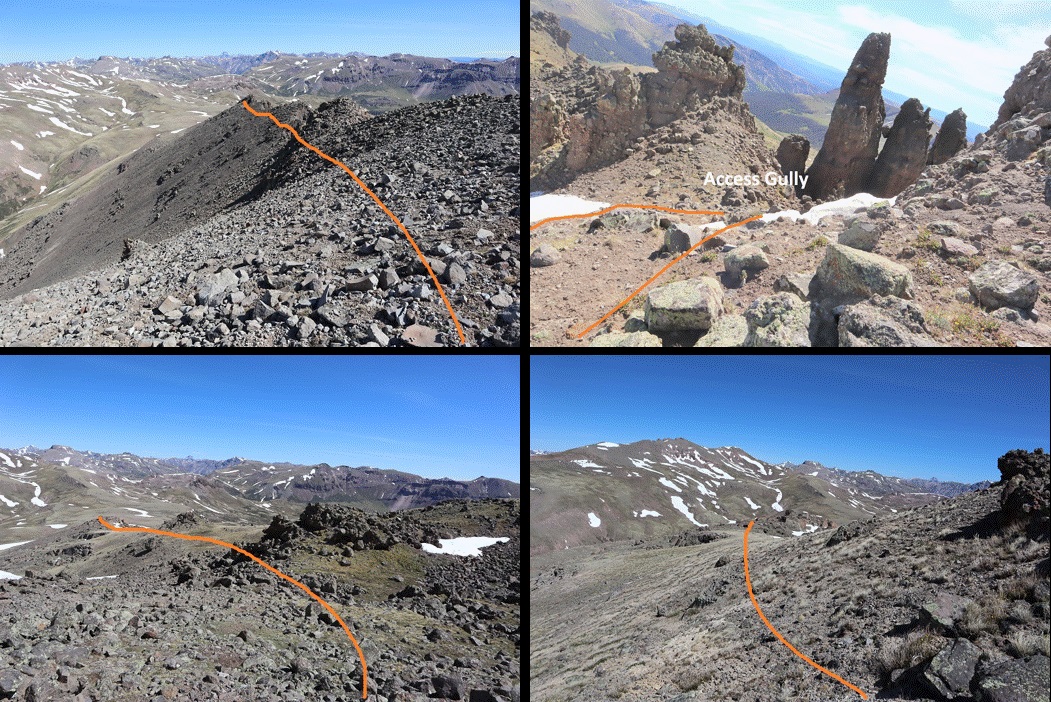
I continued southeast towards Pole Creek Mountain. Here’s how I ascended; the snow was easy to avoid, and I used it to track where I wanted to go:

24

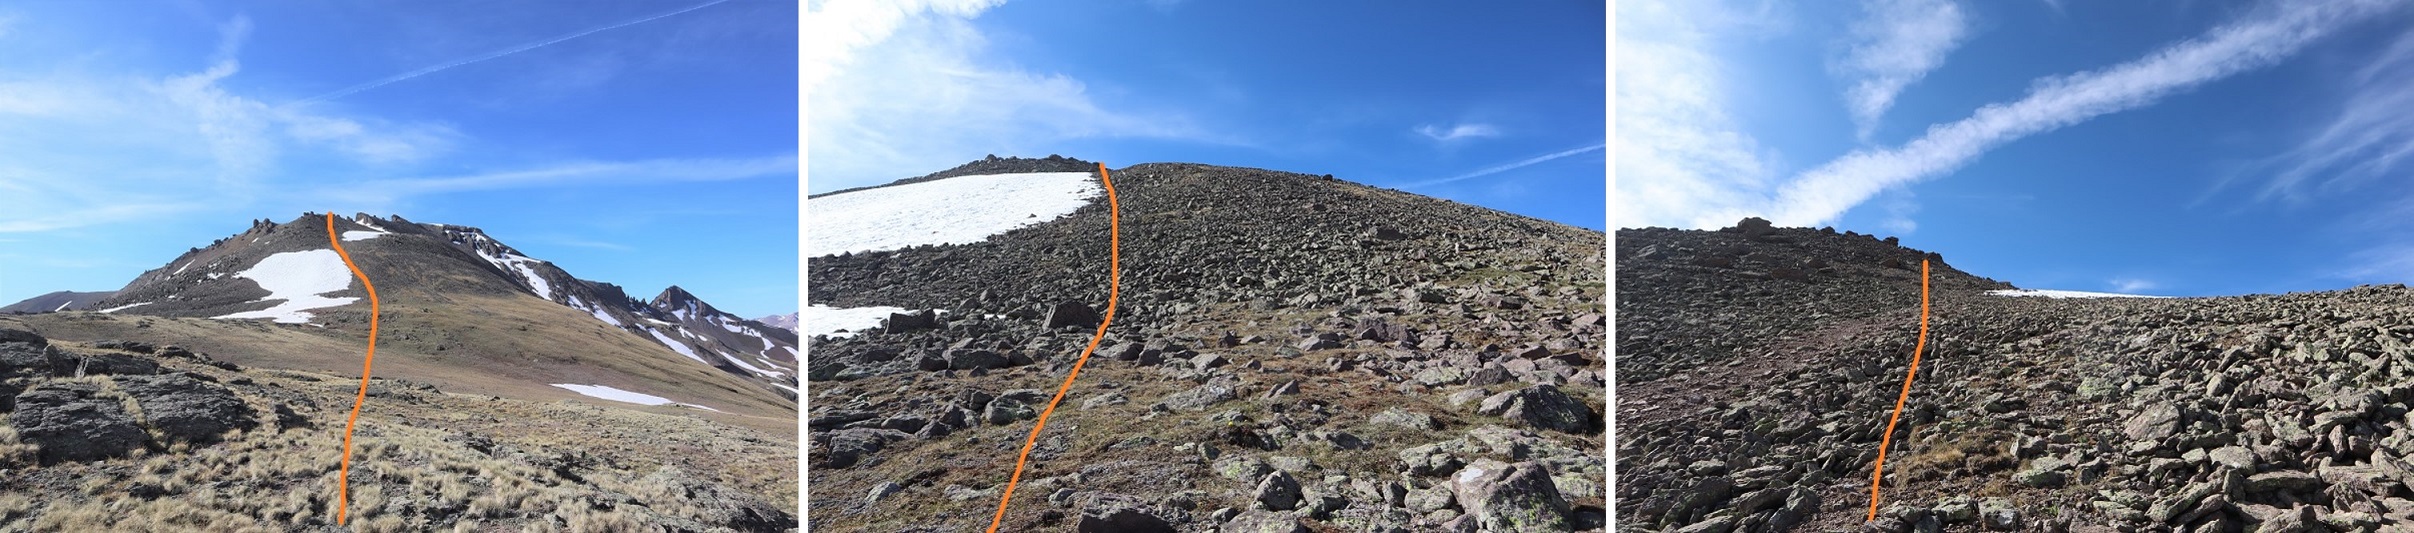
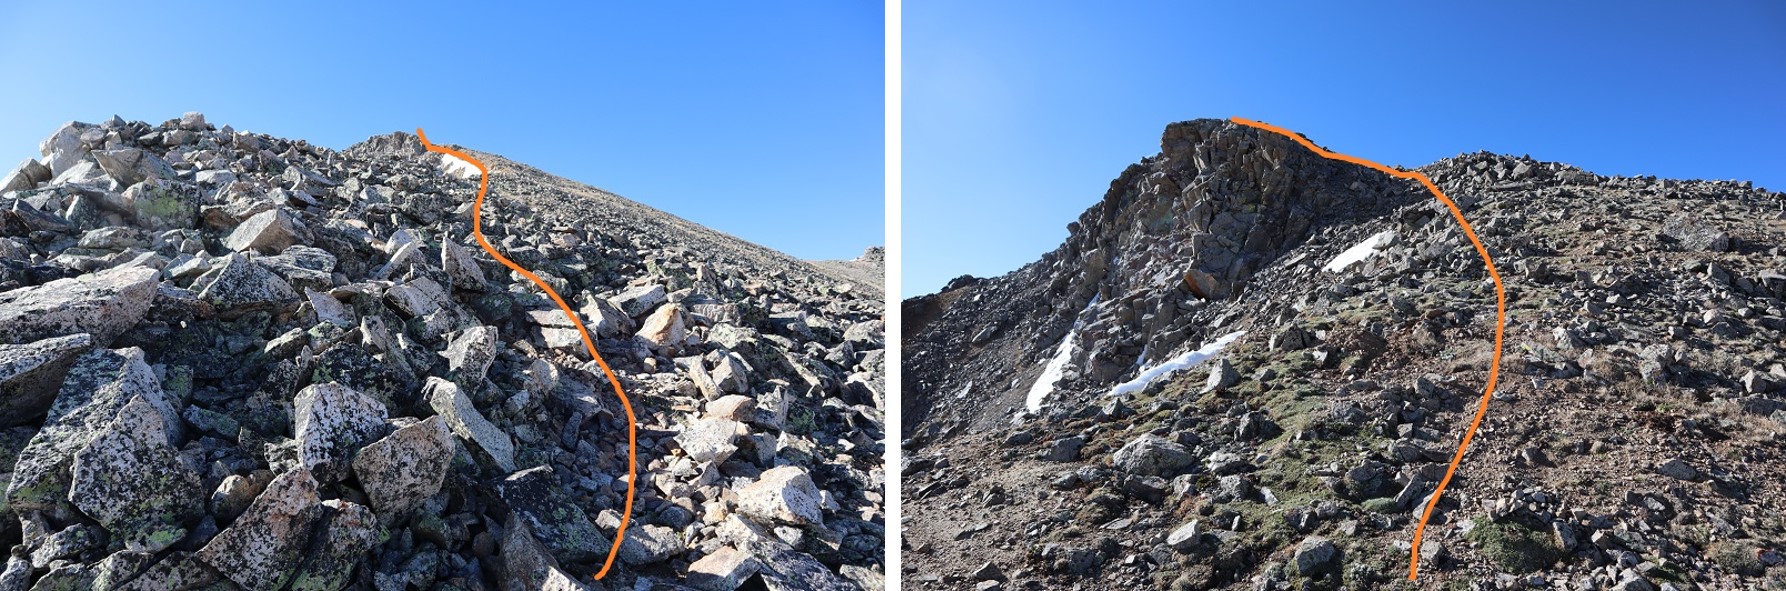
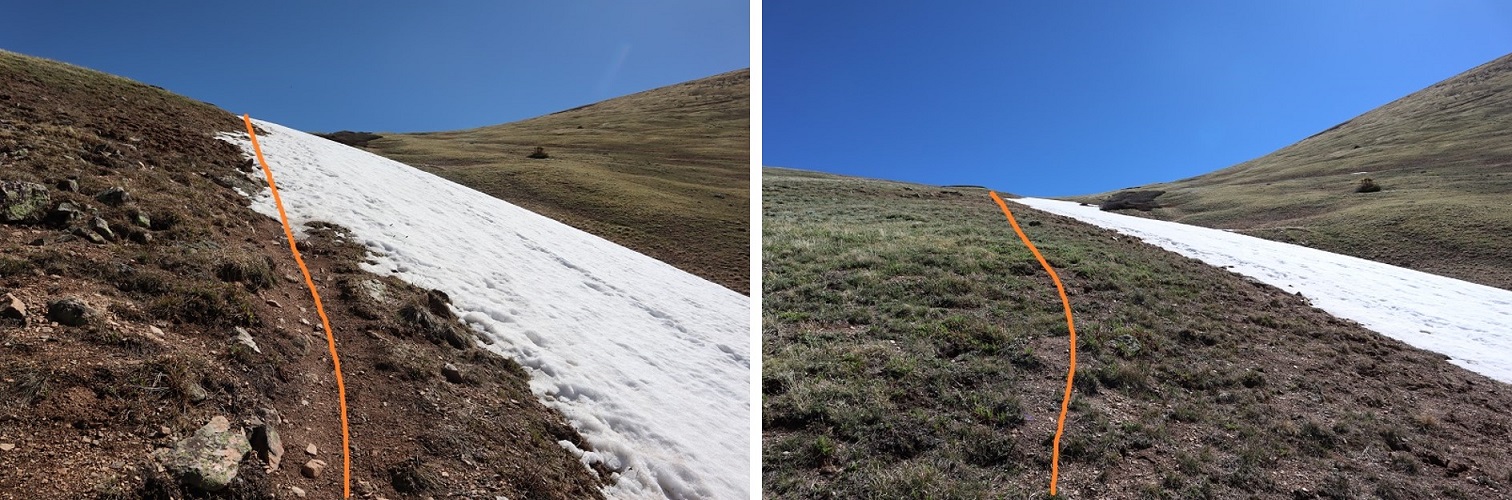
After ascending the ridge I aimed for the access gully, which had snow but enough dry areas to pass easily without traction

25

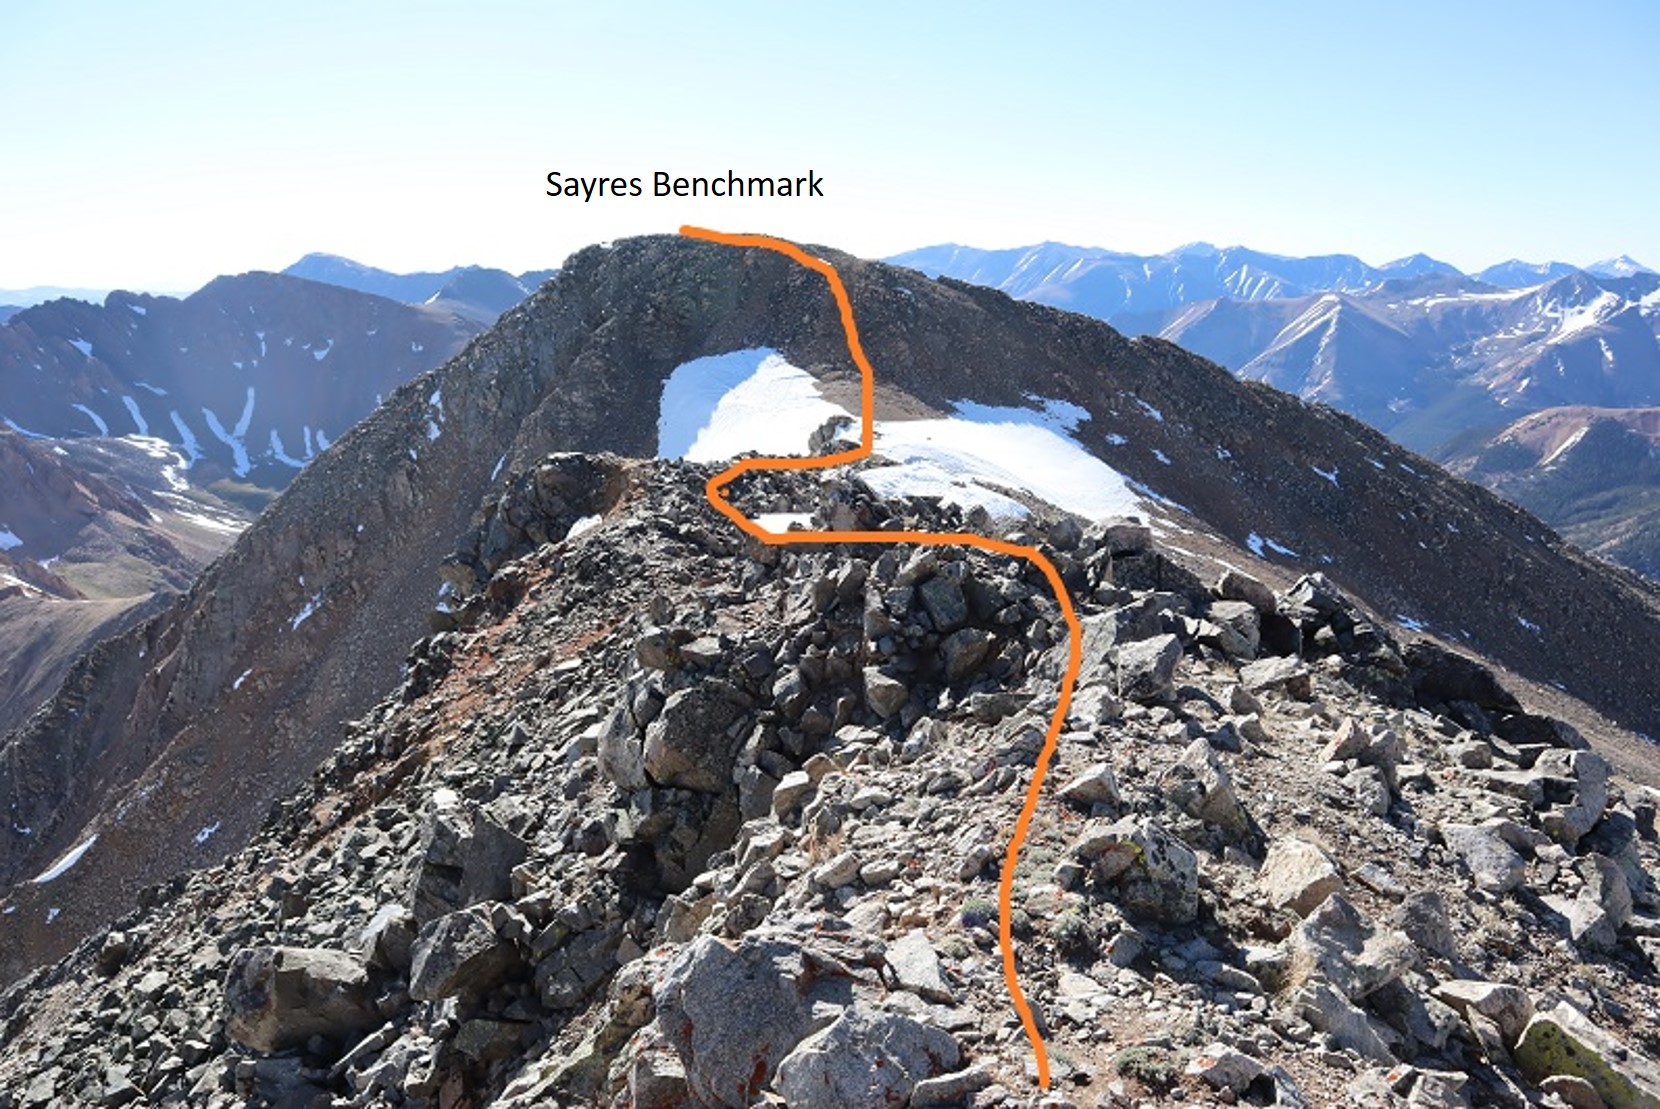
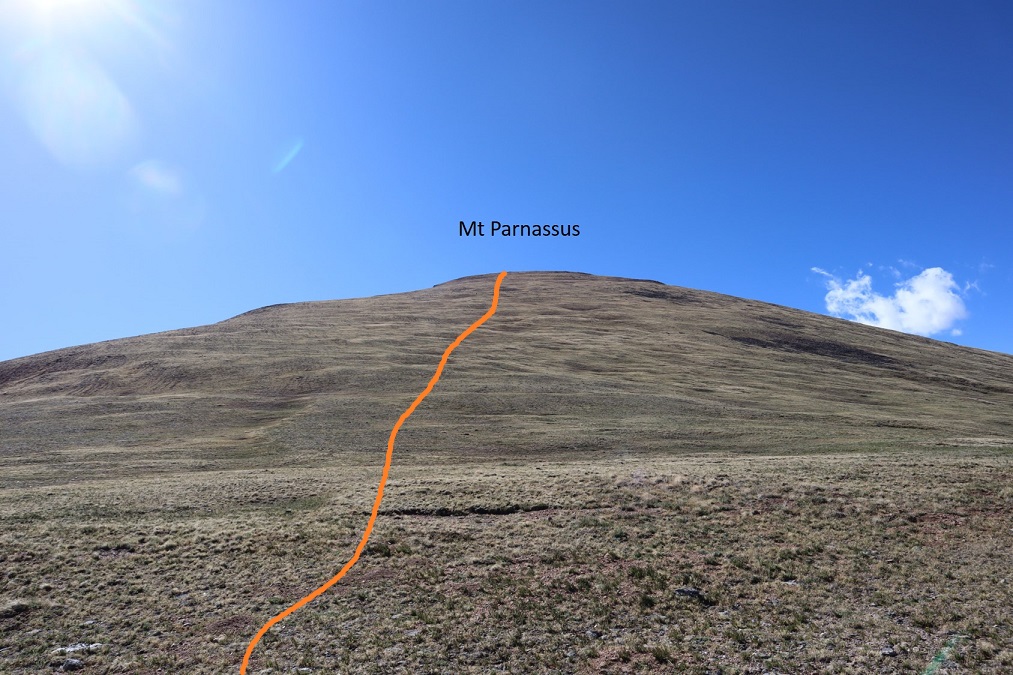
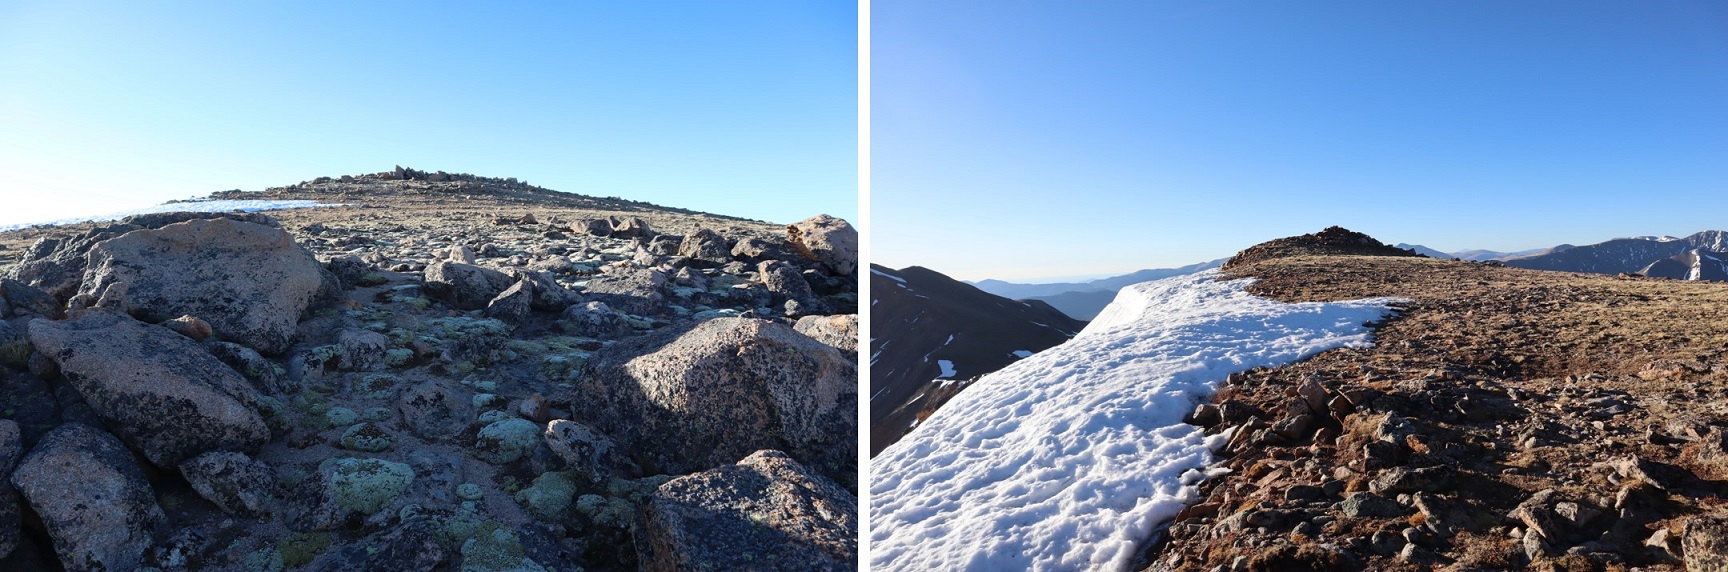
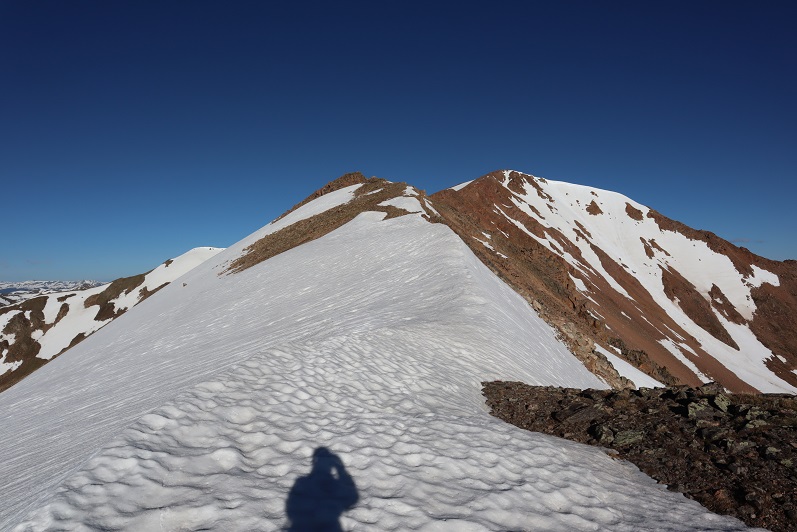
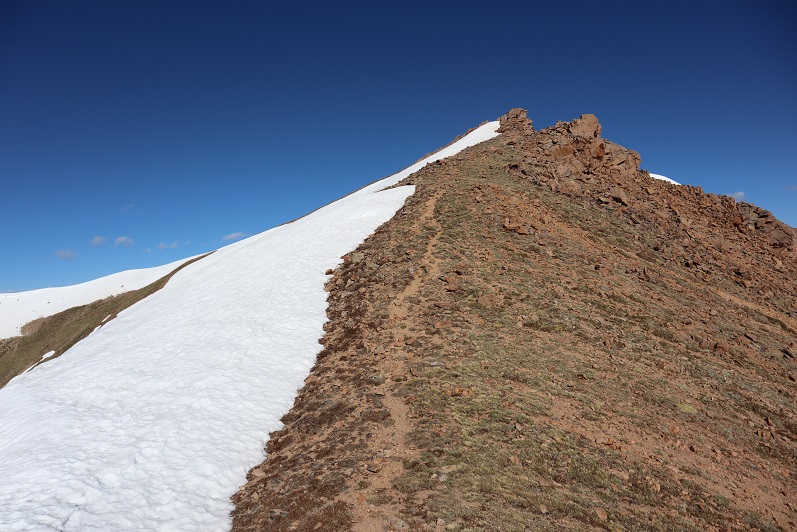
Then I just followed the ridge south towards the summit

26

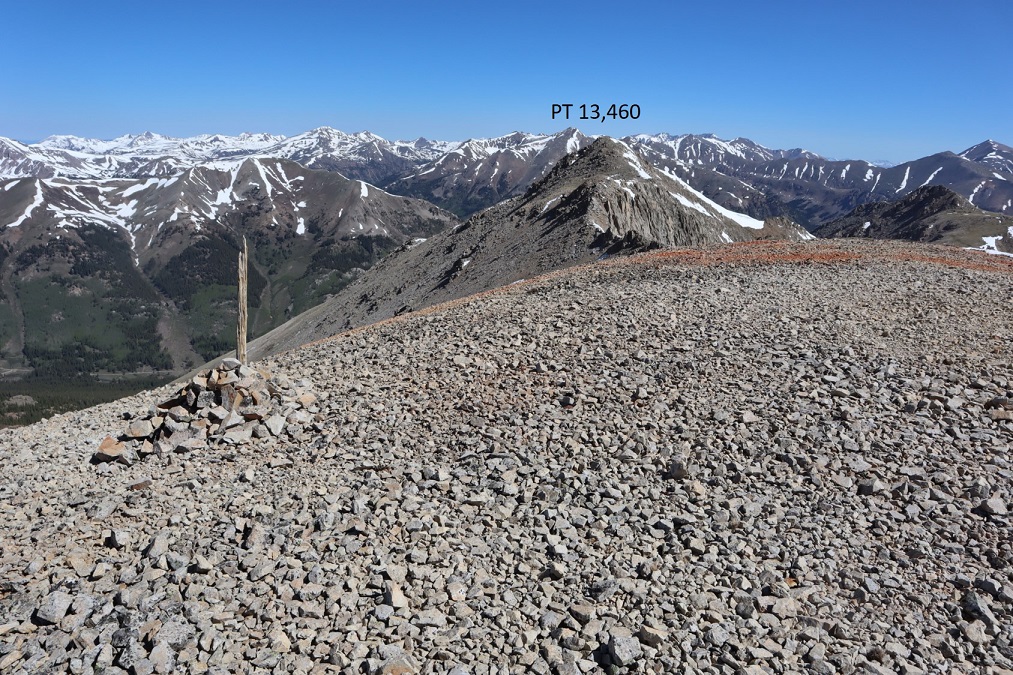
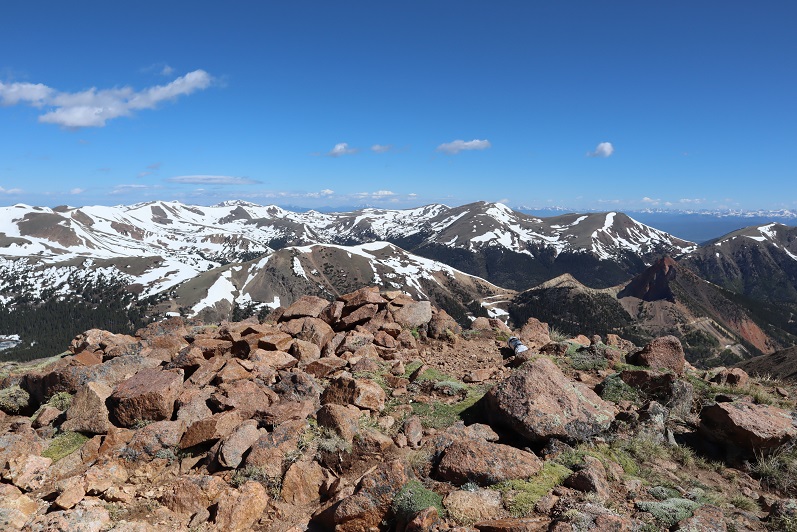
I summited Pole Creek Mountain at 9:45am, after almost 10 miles of hiking

27

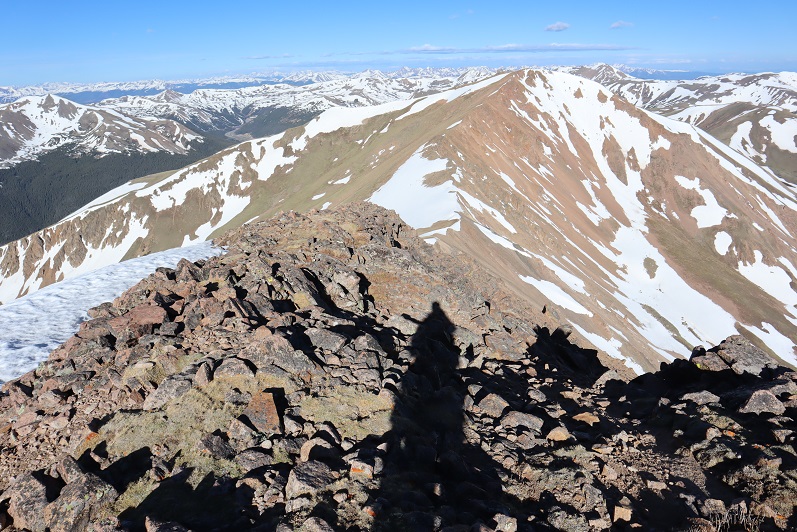
Pole Creek Mountain:

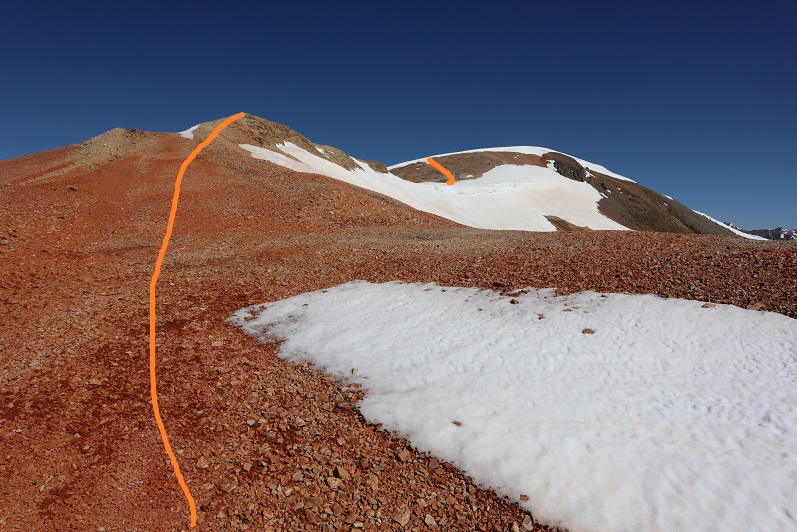
I headed back the same way I’d come in, following the ridge and then going back down the small access gully. Everything looked totally different on my way back and I second guessed myself a few times, but keeping Northwest Pole in sight helped.

28

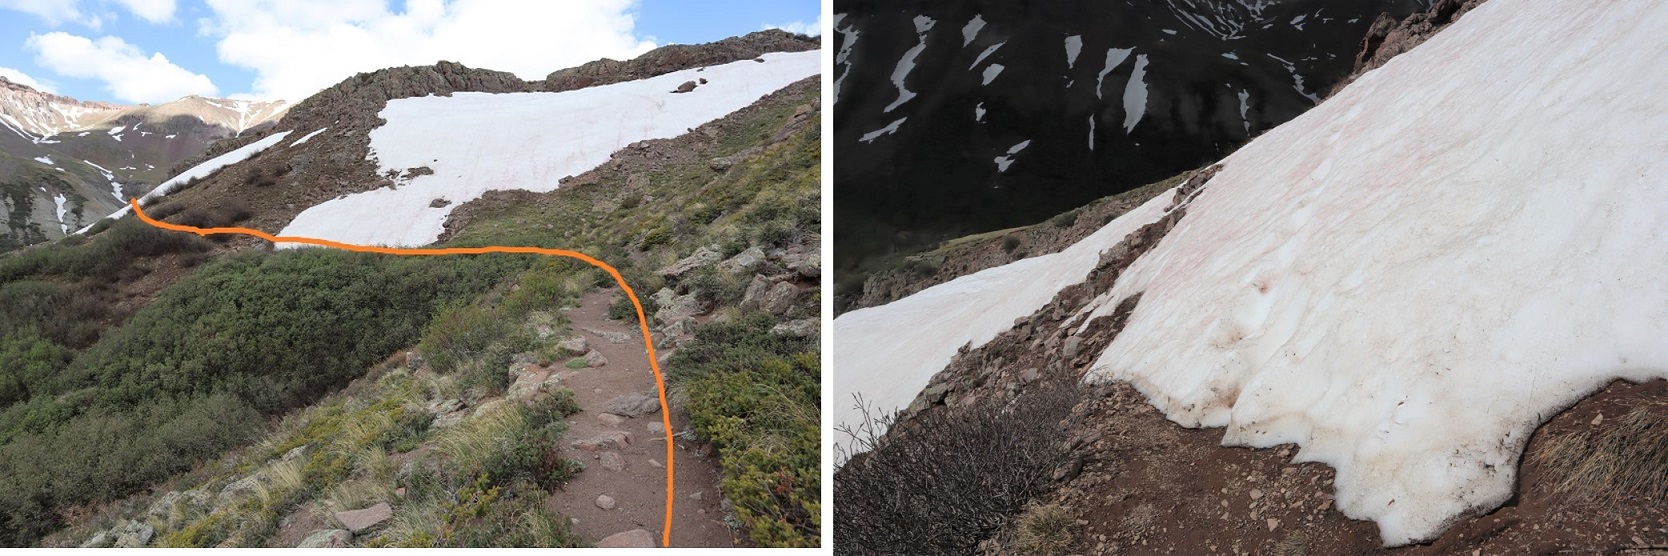
Once back down in the basin between Pole Creek Mountain and Northwest Pole I wanted to stay high on my way back out to avoid the snow below Pole Creek Mountain to the east

29

I headed north, and then east around this small peak.

30

There was some snow here, but elk in the area make a great trail and traction wasn’t needed

31

I rounded the east side of the small peak

32

And unexpectedly came across a small herd of elk! This was so cool! I’ve heard of elk doing this, but I’d never actually seen it before: the mama elk were laying in a circle, with the babies laying down inside and two sentries standing guard. I saw them a split second before they saw me (the wind was blowing towards me, so they hadn’t heard/smelled me) and I was able to get a picture before they took off

33

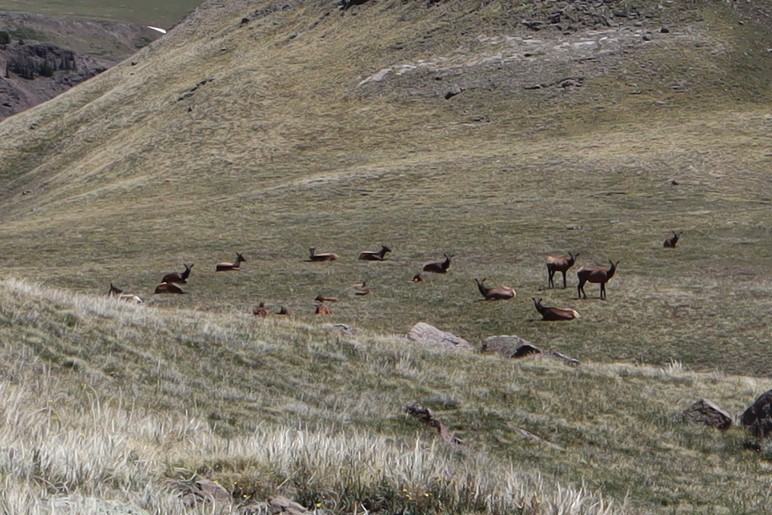
As soon as one of the elk standing guard saw me I could almost hear him say:
“See? This is why we always employ the safety circle! Always! This is not a drill! Move! Move! Move!”
And they were off and down the hillside, out of sight.

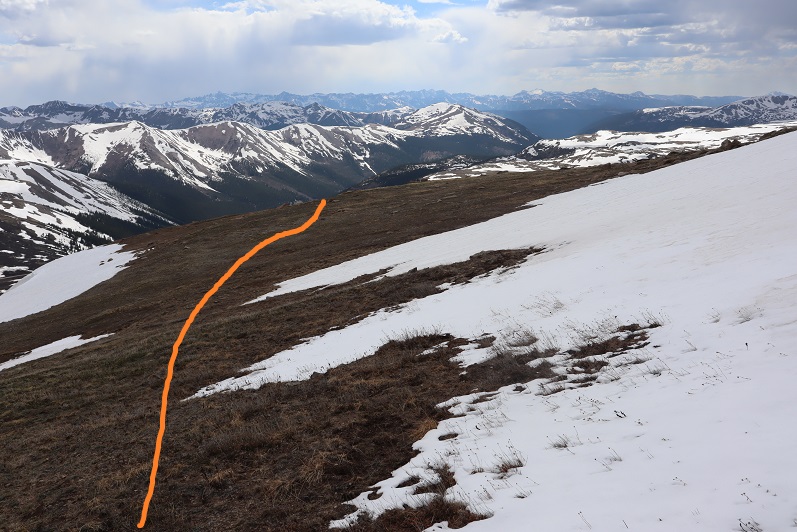
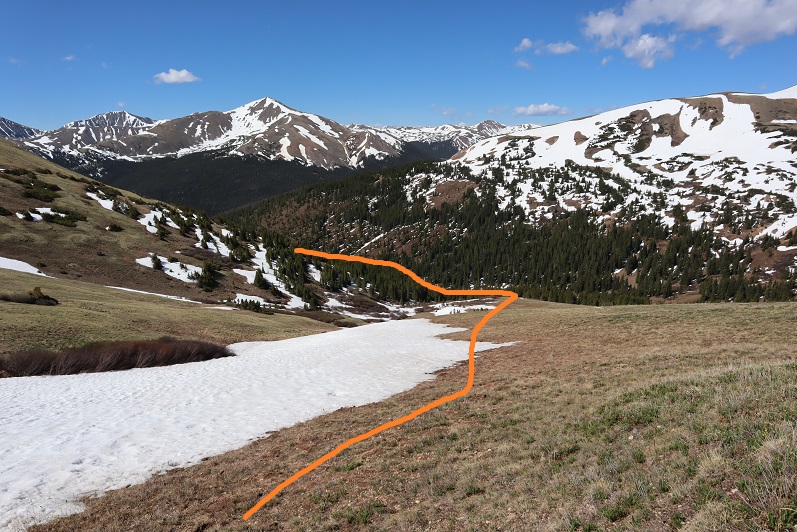
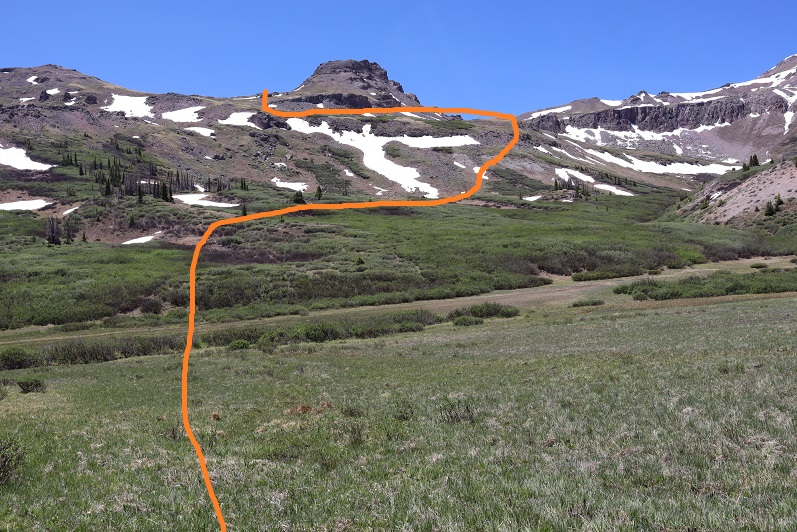
Well, that had certainly been a neat experience! I continued rounding the peak and then made my way down the hillside, all the way to the basin floor. Here’s an overview of the route I took

34

And looking back, here’s the route I took down into the basin. For obvious reasons I’m now referring to this as “dementor ridge”

35

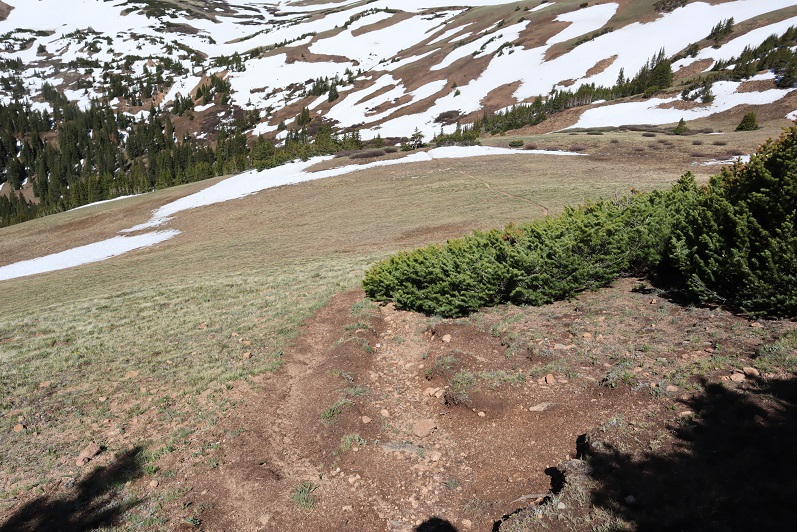
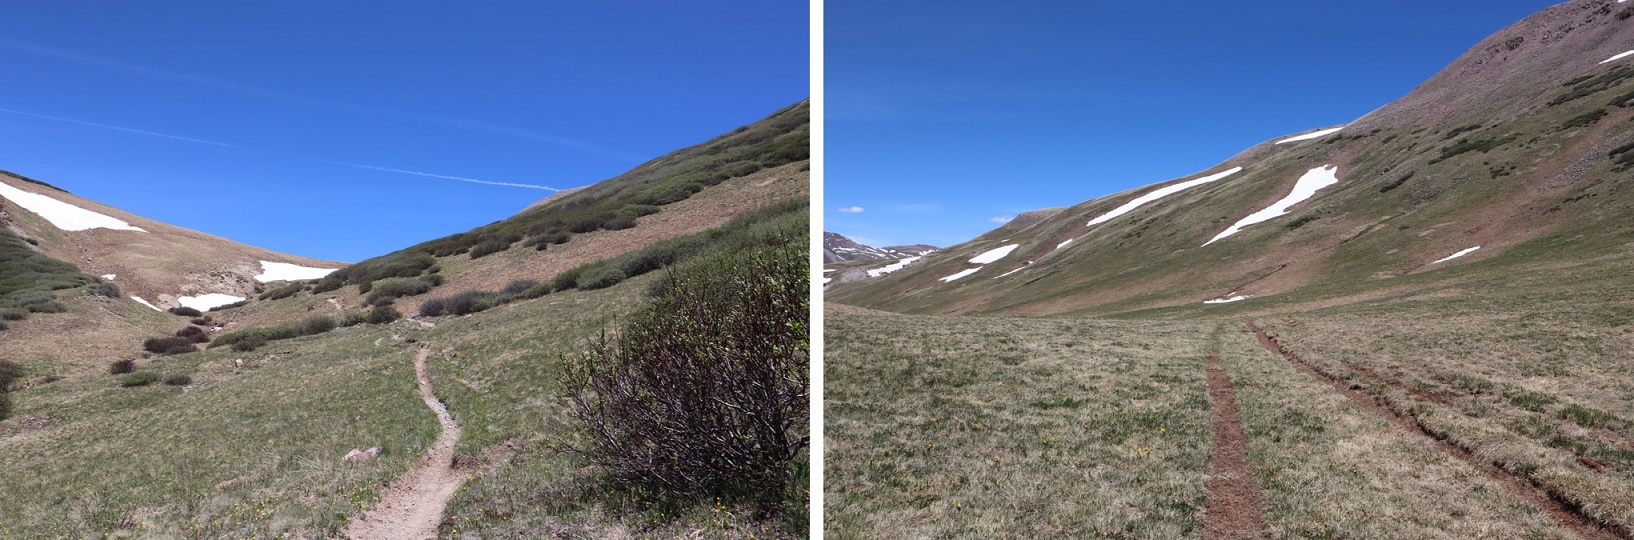
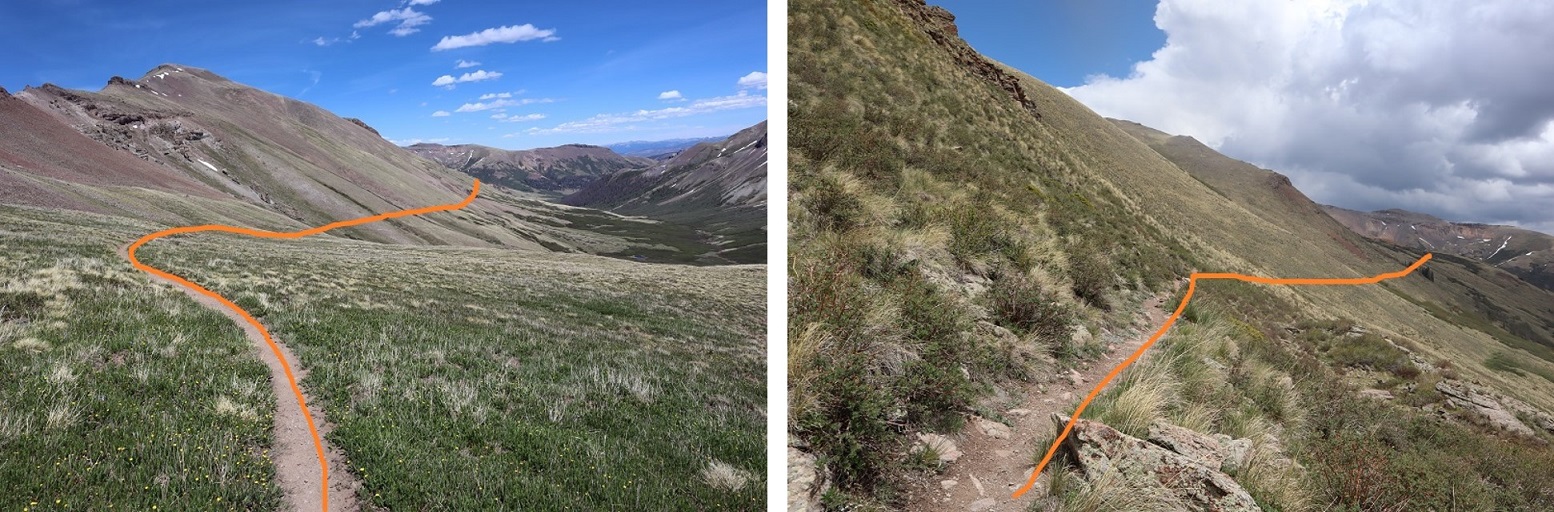
Once in the basin I was at the lowest elevation I’d be at all day, and still had a lot of hiking left to do. I aimed northeast until I hit a trail, and then followed it up. This was trail 822 that would bring me back to Trail 813 (if I chose to go that route). This was actually easier than it looks because there are a lot of good elk trails in the area, passing through the willows.

36

I followed the trail to a sort of a saddle, and stopped to think

37

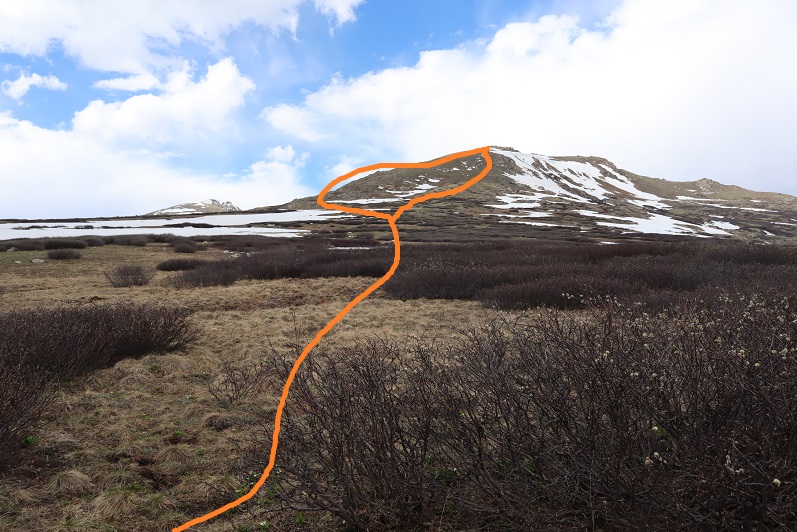
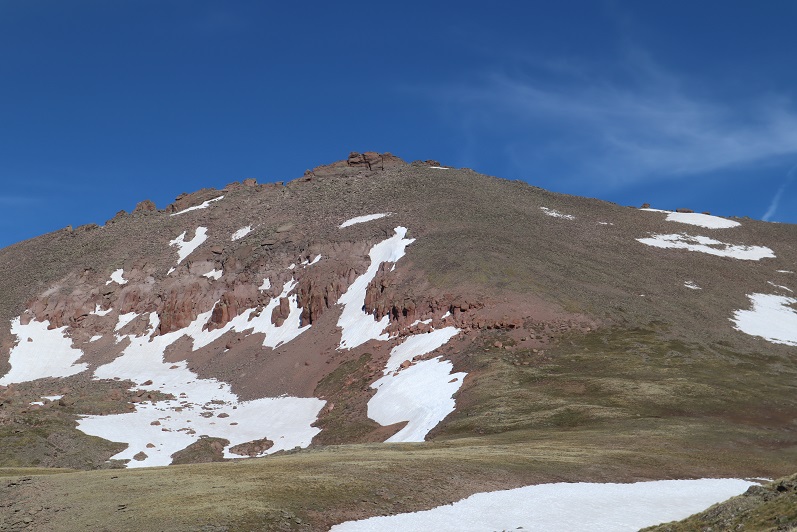
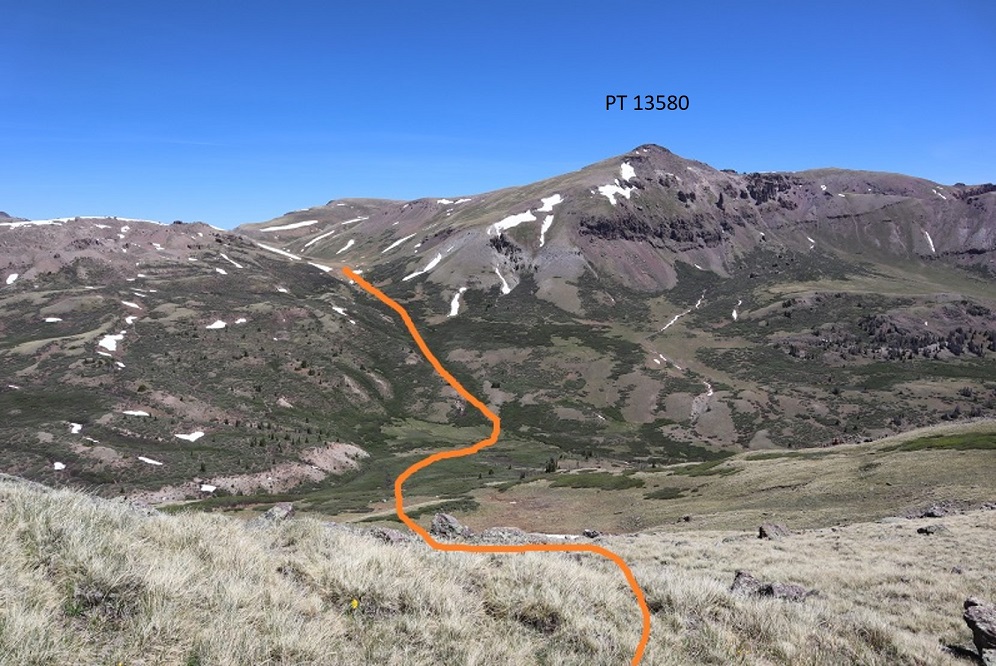
From here the trail obviously dipped down once again, losing several hundred feet of elevation before reconnecting with Trail 813 and gaining the pass, then dipping back down into the basin and up again out. Here I was, sitting directly below PT 13580, a ranked 13er that I’d want to hike sometime in the near future, but in which I dreaded that drive into Carson Pass that would be necessary again next time. It was still early in the day and the weather was great. I decided to just summit PT 13580 now while I was in the area. I’d done some scouting yesterday and today, and I was sure the route from the summit of 13580 back to the pass ‘went’ easily and would be snow free. I turned right and headed east up the mountainside. This was a very straightforward hike up tundra

38

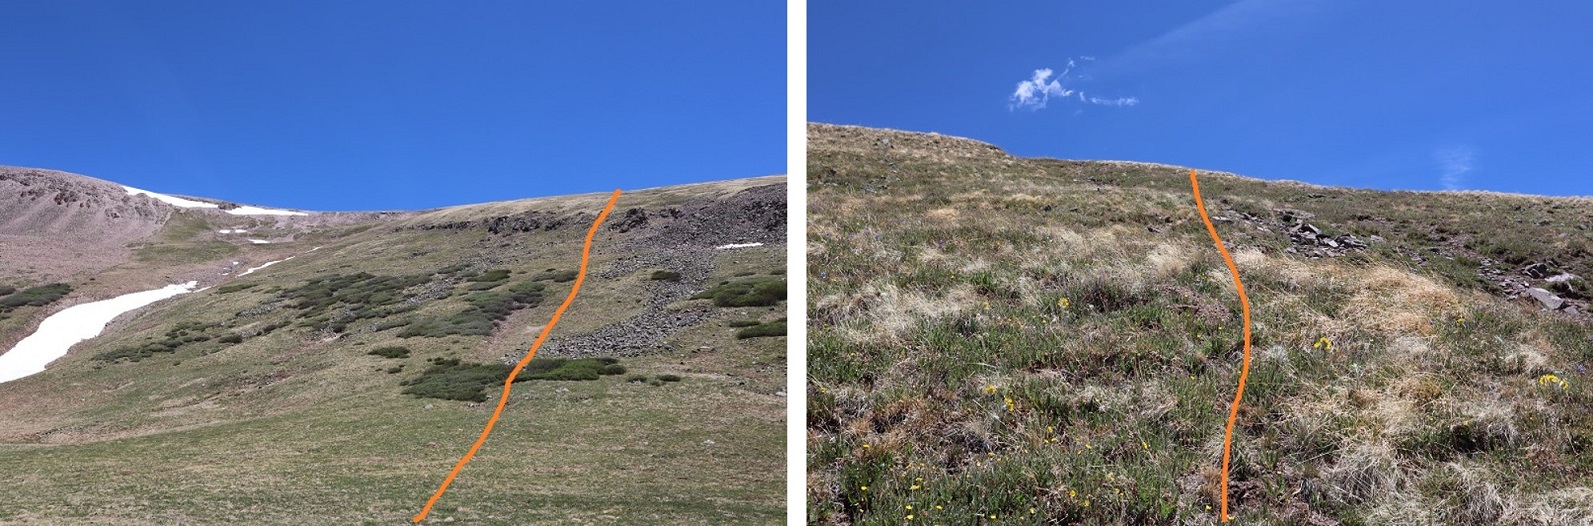
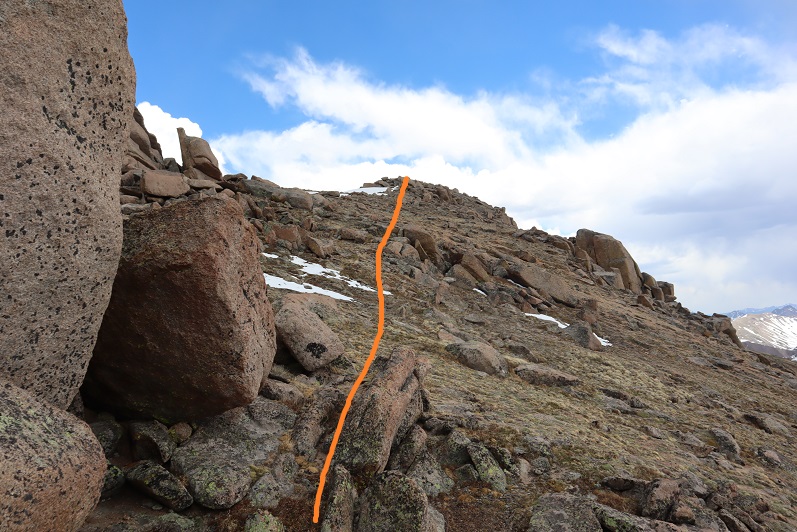
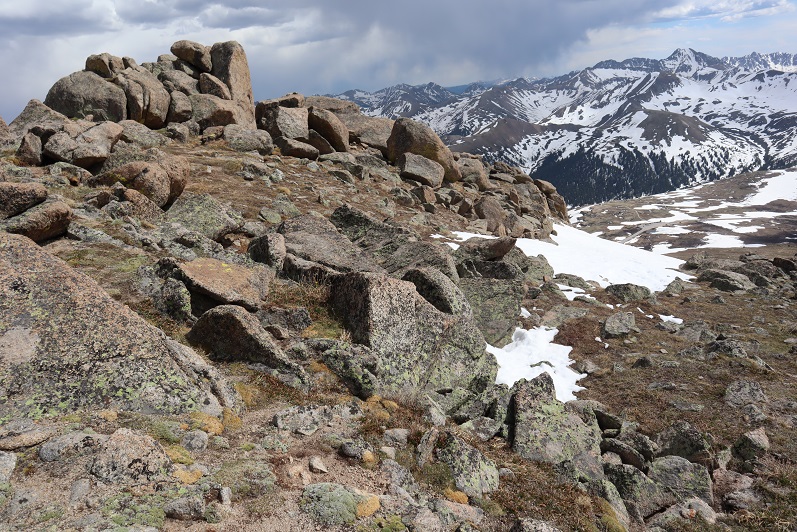
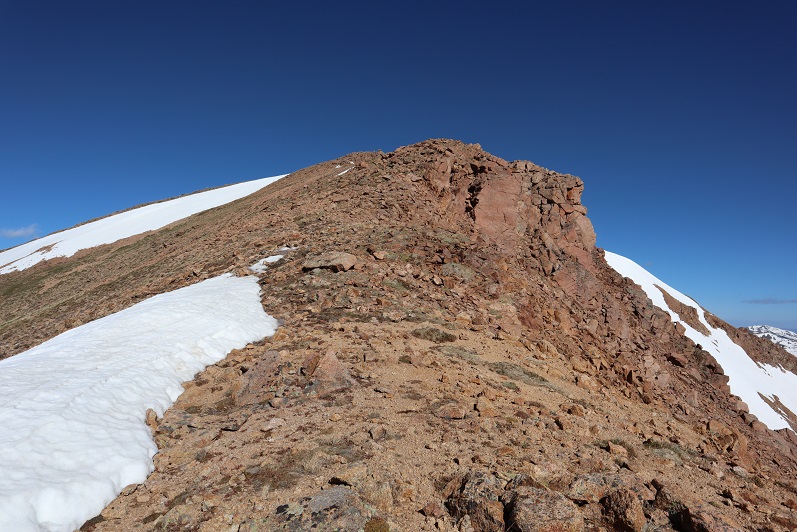
At the top the tundra turned to rock, all class 2 and easy to navigate

39

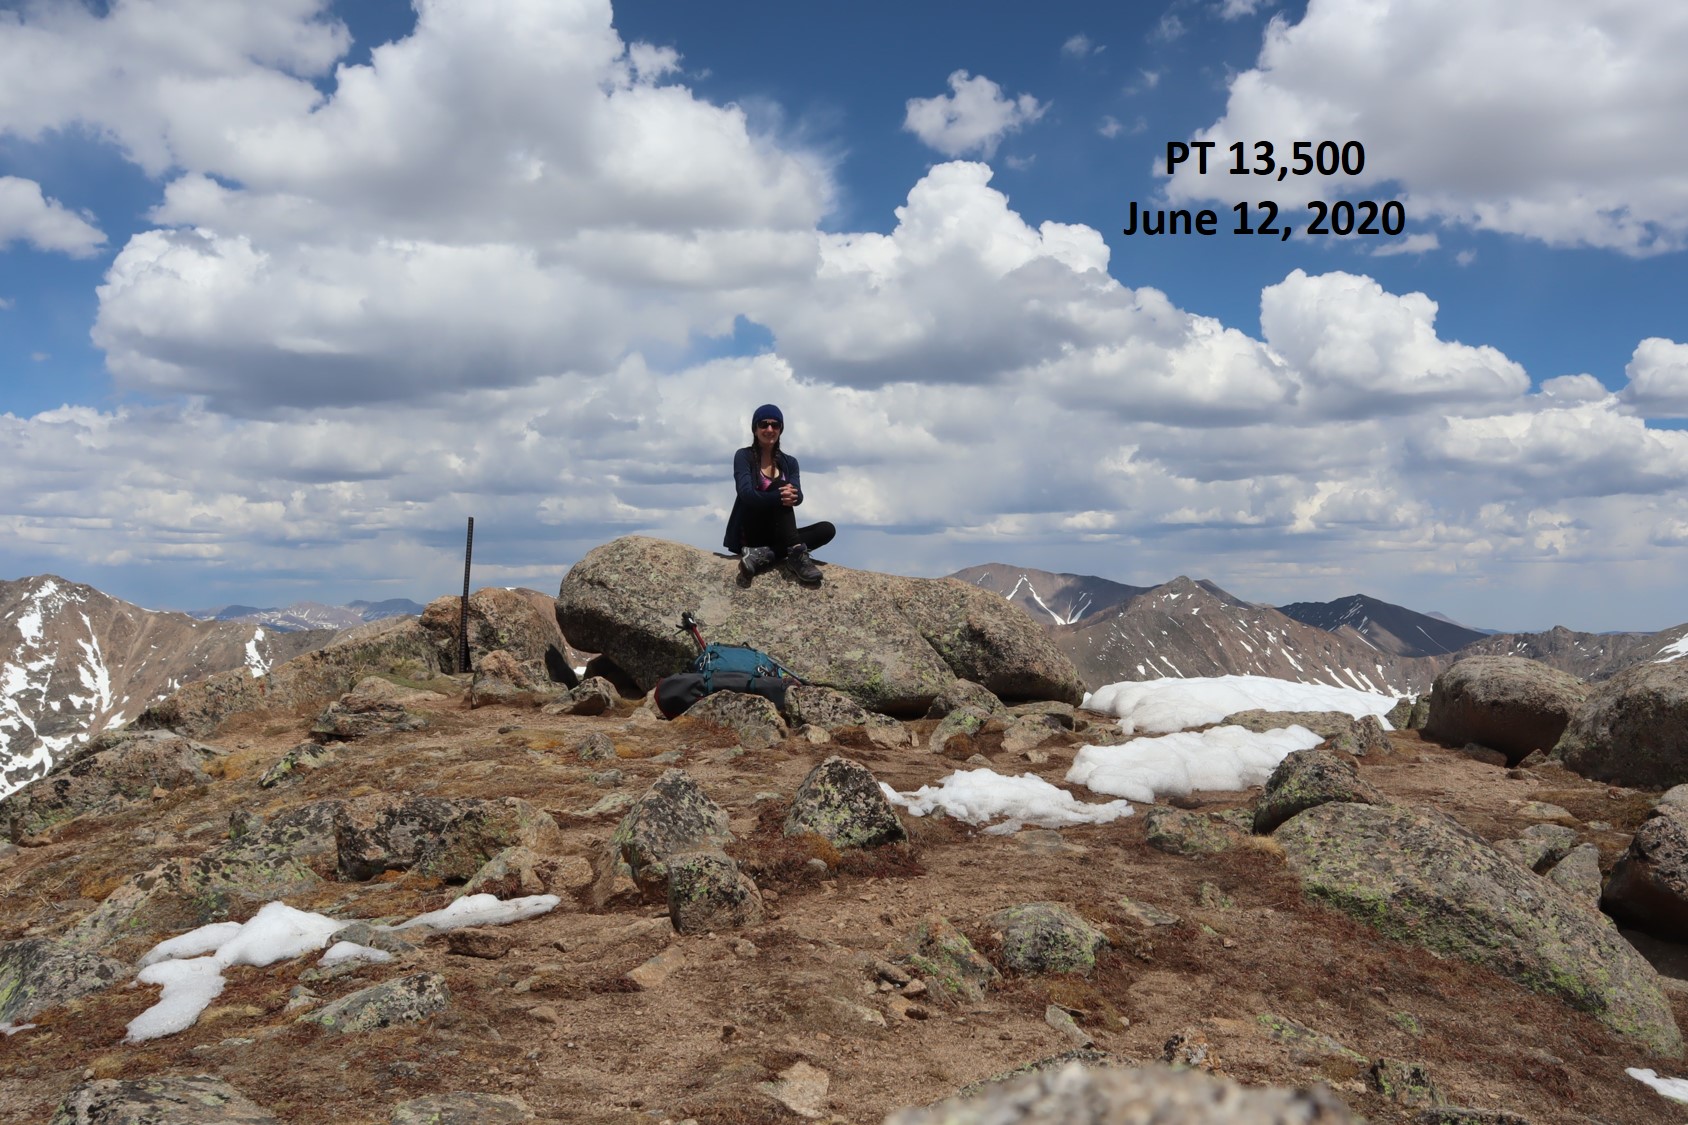
At the top of this rocky area was the summit. I summited at 2:15pm

40

PT 13,580:

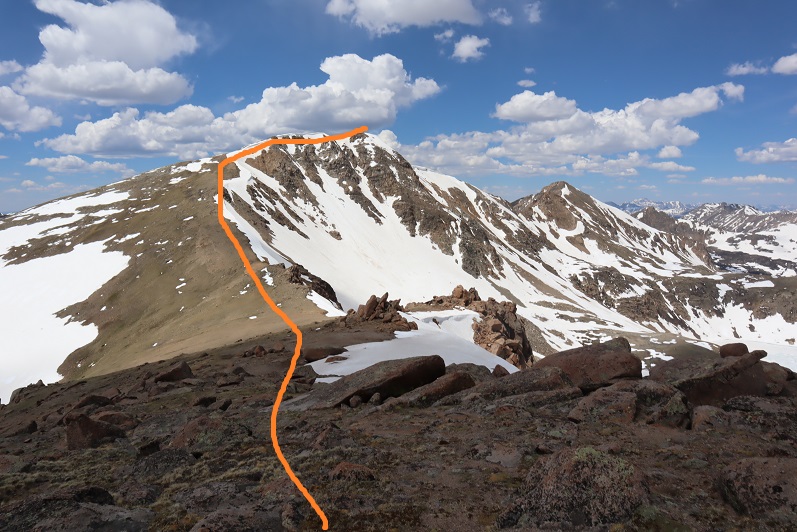
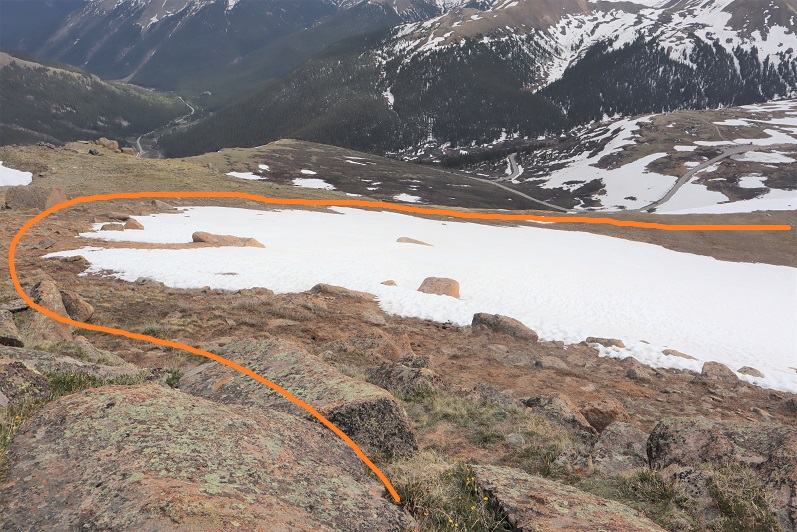
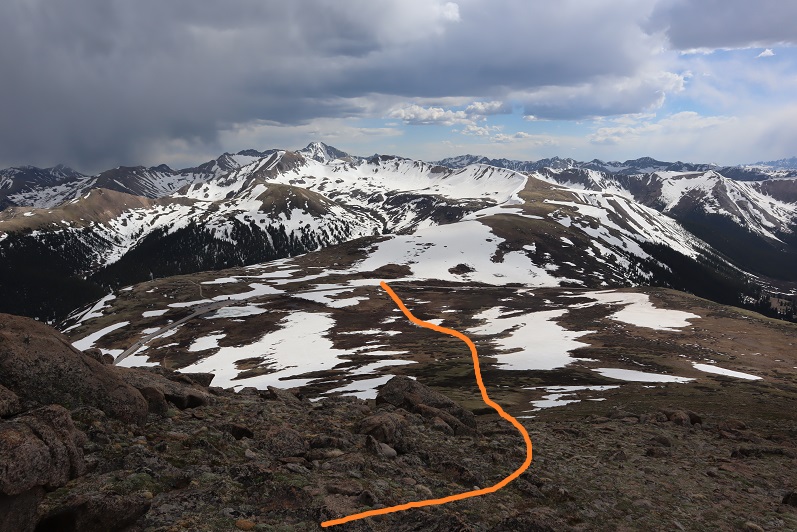
Here’s a look back at the route

41

Now I decided to stay high on the ridge and aimed north, following the ridge towards the peaks I’d climbed yesterday

42

And then back down to the pass and trail 813

43

The hike out was uneventful. It was a beautiful day and I just followed the class 1 trail back. Oh, and I saw the moose again, in the same spot as yesterday.

44

45

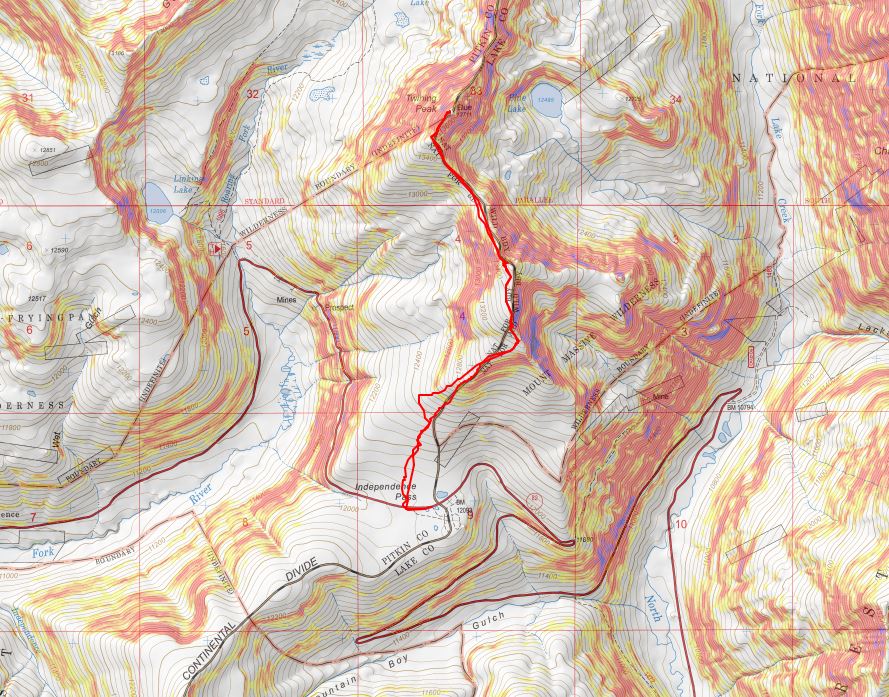
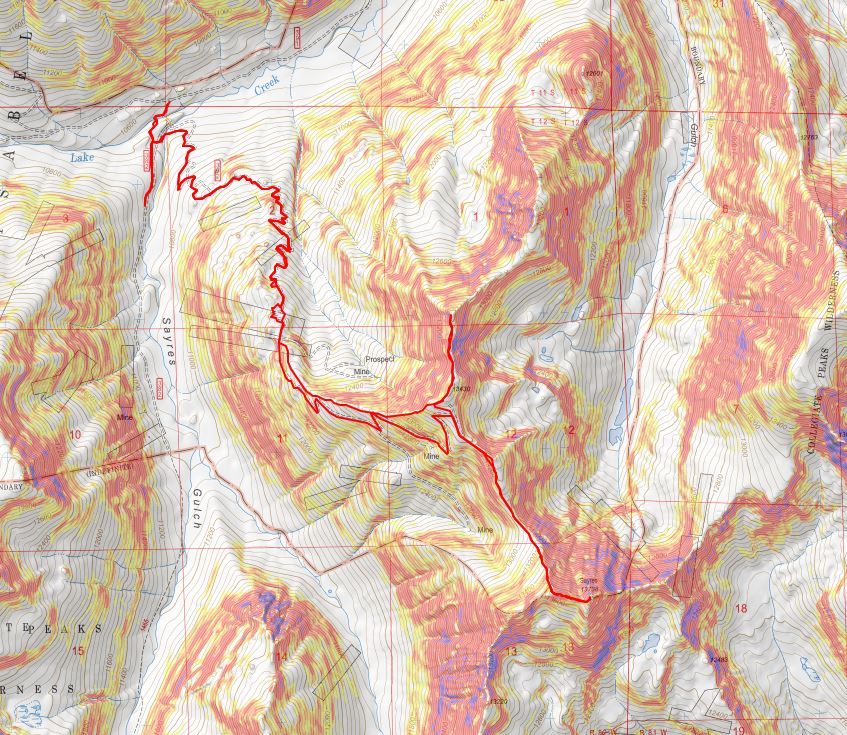
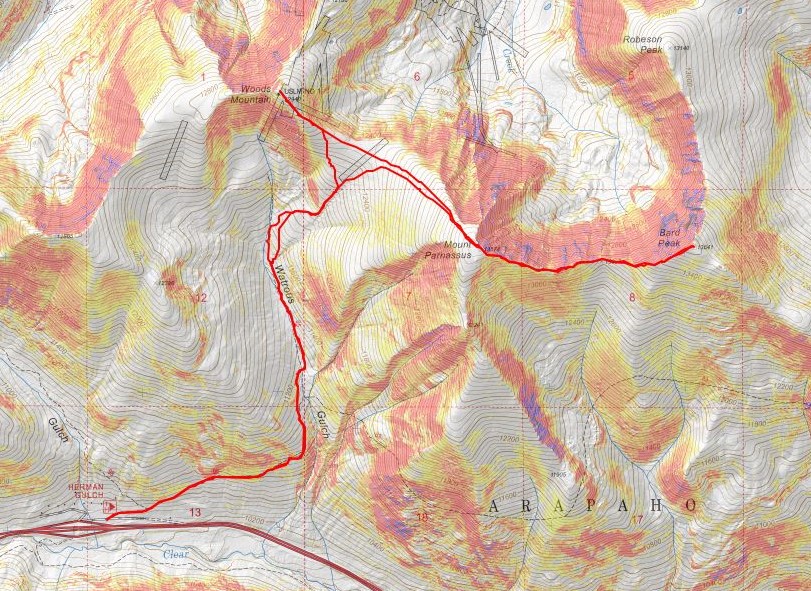
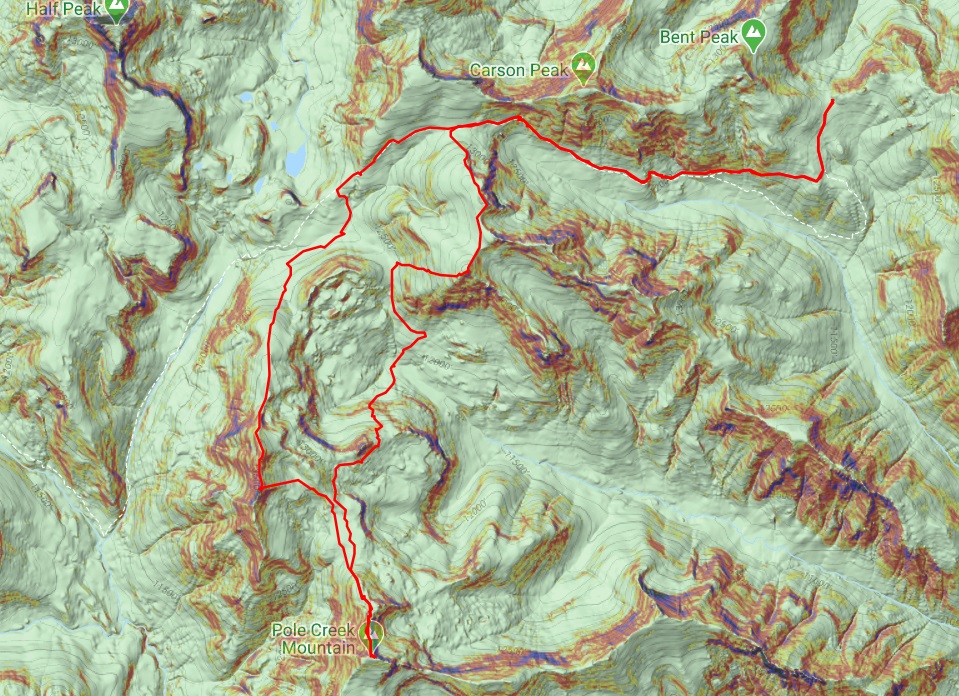
I made it back to my truck at 4:15pm, making this a 19.67 mile hike with 5926’ of elevation gain in 12 hours, 45 minutes. Here’s a topo map of my route:

46

When I made it back to my truck I noticed a marmot running out from underneath. Great. I decided it would be best to try to drive my truck down today in the daylight in case I got stuck, but because I also didn’t want to encounter other vehicles (if possible) I decided to eat dinner first and take my time. Also, I wasn’t even sure yet my truck would drive.

When it was time to go I was able to get the truck to move and tried to see if I could get 4WD to engage by driving the truck around for a bit, but that didn’t work. So I decided to just go for it and head back down the road, going as slow as possible. I probably maxed out at 2mph. When I got to about a mile from the end of the 4WD road I saw another vehicle turning around. It took them 20 minutes to do so, and by this point I was feeling pretty confident about my truck.

47

I made it back to the 36, kept trying different things to get my 4WD light to stop flashing and realized it was hopeless. I drove home and the first thing the next morning went to the dealership. The diagnosis: rodent damage. One of those darn marmots, chipmunks, pikas (etc.) had bitten through the wiring. Luckily it was fixable, and I was out of there within a few hours. They put rat tape over the wires to hopefully prevent this from happening again. I’d never heard of rat tape before, but it sounds like it should be on all wires.

I consider myself lucky: after years of leaving my truck in the backcountry this is the first time I’ve ever had this issue where it’s caused concern. I’ve chased some porcupine’s out from underneath my truck before, but that was before any damage was done.

I’ve done some serious thinking about the issue, and I think a physical barrier is the only way I’m going to keep rodents out. So here’s my idea: tomorrow I’m going to Home Depot and buying a large tarp and some bungee cords. When I park at the next trailhead I’m going to lay out the tarp, drive over it, and then secure it around my truck with bungee cords to prevent critters from getting underneath.

This is just a thought at this point, but something I hope to implement and test soon.


Pt 13500 & Twining Peak – 13,711

1

RT Length: 5.39 Miles

Elevation Gain: 2443’

After summiting Sayres Benchmark I noticed the day was still nice and I had plenty of time to spare so I drove to Independence Pass to try my hand at Twining Peak. I’ve already been here once this year after another hike, but the conditions weren’t… favorable. Lots of wet marshy mush to get through to the good stuff, and I don’t like hiking with soggy socks.

When I got to the Independence Pass parking area I backed in my truck and took a look around. Yep, it was still marshy.

2

The weather looked good, and I could see a clear line to the ridge. I decided to gather all my gear (crampons, ice axe, snowshoes, new socks, etc.) and hit the trail. I walked west along HWY 82 until I reached this sign, which happened to be where the snow ended. From here I turned right (north) and headed for the ridge.

3

Yes, this was still marshy, but I could avoid the snow and getting my feet wet with careful navigation. I aimed for the ridge, intending to see what the basin looked like before determining if I would summit first via the 13500/Twining saddle or go over 13500 instead.

4

When I made it to the ridge I looked over at Twining Peak. If it were earlier in the day I would have crossed the basin and gained the saddle first (as outlined below).

5

However, it was now almost 2pm and I knew that snow was soft. Yes, I had snowshoes, but no, I didn’t want to posthole with them through the basin. So instead I turned right (northeast) and followed the ridge to 13,500. This was all class 2

6

7

There seemed to be a bit of a trail in areas that went straight up through the snow. I didn’t want to do that so when I encountered snow I just went around it. This is an easy ridge to follow.

8

9

There was a little bit of rock hopping, all class 2, and easy fun. The boulders are big and pretty stable. Just hug the ridge to the left and don’t try to go straight over the ridge and you’ll be fine.

10

11

Here’s the last bit to the summit

12

I summited at 2:15pm

13

Pt 13,500:

There wasn’t a summit register. Turning northwest I could see my path to Twining Peak

14

This was an easy ridge walk, with a little easy rock hopping and the snow was totally avoidable

15

16

The tundra changed to rocky terrain

17

There was some snow on the last section. I decided to drop to the left and find a gully to summit, but I wouldn’t recommend that route: the gully was loose and on my way back I found out the snow was actually solid near this boulder, so I should have just summited by walking across it.

18

Summit of Twining Peak

19

I summited Twining Peak at 3pm

20

Twining Peak:

The weather was starting to turn; I could see rain showers all around so I didn’t stay long on the peak. I put on my jacket and headed back down, this time going over the snow and large boulder I’d gone around on my way up.

21

And back down the ridge, sticking to the right to avoid the snow

22

23

24

I re-summited PT 13,500 as it was lightly snowing.  There was a young man at the summit who was super excited: this was his first 13er! He’s never gotten this far before on this peak, and he was excited.  He wanted to know what all the peaks were that we could see, and I obliged him for a bit. Also introduced him to 14ers.com because he’s interested in tackling more 13ers and 14ers (please be nice).

I headed back down the ridge

25

Unfortunately, at about this time I saw a flight for life helicopter whiz by. Never a good sign. Later, as I was driving back down HWY 82 I saw a police officer and a tow truck driver putting a motorcycle on the back of the tow truck, lots of lights flashing, no other vehicle/animals involved.  Ouch. I sincerely hope everyone is ok. Also, the accident happened in a straight area of the HWY, so I don’t think HWY curves were involved. In any event, please adventure carefully!

26

I took a slightly different path on my way down than I did on my way up, as I could see a clearer path that avoided marsh/snow

27

28

29

I eventually came upon a trail, but it led to snow/marsh, so I avoided it and went back down the ridge

30

The nice thing about this hike is you can see your vehicle for most of it, and at a minimum HWY 82, so it’s difficult to get lost. I just aimed for the road, avoiding the snow/mush

31

32

Here’s an overview of my hike up to the ridge and back down more to the center (after realizing the basin wasn’t something I wanted to experience today)

33

I made it back to my truck at 5:45pm, making this a 5.39 mile hike with 2443’ of elevation gain in 3.5 hours. Please don’t judge the time: I’d already hiked 12.5 miles and 4652’ of elevation this day and I was a bit tired; this hike can most likely be done faster.

Here’s a topo map of my route

34

OK, on to the next trailhead!

Sayres Benchmark – 13,746 & PT 13,440

1

RT Length: 12.61 Miles

Elevation Gain: 4652’


I drove to the La Plata Gulch Traihead and then took 391 for a little over 2.5 miles to a junction with 382, 391, and 392, where I parked my truck. This is an easy 4WD road in, with a few water holes to navigate.

2

I parked at what looked to be an avalanche runout area.

3

Initially I’d intended to make this a loop and incorporate Unnamed 13,300F and PT 12,601, but the area that I’d exit the hike as a loop with had a lot of “no trespassing” signs, so I decided early on just to make this a 2 peak hike.

4

At 5am I gathered my gear and headed southwest, following 392, passing some dispersed campsites and wiki-ups.

5

I crossed a bridge and turned right, following 392. There are more dispersed campsites here. The dispersed campsites make it a little difficult to follow/see the road.

6

In the dark I ended up going too far south on 382, missing the obvious 392 sign, and the not so obvious road. Turn left at this sign, even though there’s no road.

7

And pass through a gate, now following the 392 4WD road.

8

Almost immediately I came to a creek crossing that required me to take off my shoes and get out my sandals. The creek was cold (especially at 5am) but the water only went up to my knees in the deepest of places.

9

Shoes back on, I followed the 4WD road. “4WD Road” is a bit of a misnomer. This was probably a road decades ago, but it has gone into disrepair and hasn’t been used for quite a while. It’s easy to follow, but overgrown in many areas with willows, aspens, and even 10+ foot pine trees.

10

At 11,950’ I came to a small cabin with a great view.

11

I peered inside: someone had left a peanut bottle full of trail mix (peanuts and M&M’s?) on a shelf. It was dark and cold inside and I’ve seen horror movies so I didn’t take the bait. I turned around and considered my options. Here the road still had some snow/ice covering it, but early in the morning I could walk across it when necessary without traction. On the way back I was able to see dry spots to navigate down and avoided the snow.

12

My options were to either take the road or follow the ridge. I decided to take the road up and follow the ridge back down. I wasn’t disappointed. I also placed a cairn here to show where you leave the trail to follow the ridge (even though it should be obvious).

13

The road really didn’t have much snow on it after I passed this point and was quite easy to follow all the way to the saddle. Several times I intersected with the ridge route as I followed the road.

14

From the ridge you can see the road, and the path you take to get to Sayres Benchmark

15

I was really glad I decided to take the road up. Not because it was easier than the ridge, but because it was here I saw some elk. My favorite were the calves, suckling breakfast until they noticed me and their mamas decided it was time for them to leave.

16

Elk:

Following the road to 13275 feel of elevation I then turned right (south) and followed the ridge, losing 300 or so feet of elevation as I made my way to the saddle. I decided to just follow the ridge, even though it meant going up and down in elevation a few times. (This is all class 2)

17

18

19

There was still some snow on the ridge. I made the 50/50 decision to stick to the right of the ridge and wasn’t disappointed, as later I could see the ridge to the left was impassable due to snow.

20

I stuck to the right of the snow

21

Towards the top the tundra gave way to rocks

22

The top of this is unfortunately not the summit of Sayres Benchmark, even if it looks like it is from far away. Nope, when you get to the top of the ridge turn left (northeast) and hike to another small saddle and then up to the summit of Sayres.

23

There was more snow here than I would have liked, but it was firm this early in the morning. I decided against putting on spikes or crampons and just hiked across.

24

After this small saddle I picked one of the many dirt filled gullies and climbed to the top

25

I summited at 8:40am.

26

Summit of Sayres:

There was a benchmark that I’m pretty sure is off by 1000’ or so…

27

There was a summit register, but as always, I didn’t open it. Time to head back the way I came. I turned back and headed towards the small saddle, retracing my steps. Here’s an overview of the route to PT 13460

28

I was glad the snow was still firm enough not to need traction. Today there was minimal exposure as well.

29

30

Here’s an overview of the route back to PT 13,430 (not considered ranked or unranked)

31

Notice the snow? It’s good here to stick to the left (west side)

32

33

Here’s a visual of the route to the top of PT 13,430

35

I took the road to the ridge, turned right (northeast) and once I was on the ridge the ground turned sandy for a bit, but mostly it was crushed rock.

36

Here’s a view of PT 13,460 from PT 13,430

37

Here’s the route I took to get to PT 13,430. I tried to stick to the ridge, but when that wasn’t possible I dipped to the left. This is all class 2, maybe easy 2D (if that can be a thing?)

38

39

Here you dip down to the left and climb back up through a short gully

40

The final trek to 13,460

41

I summited PT 13,460 at 10:20am. There was as a summit register here.

42

Summit of 13,460:

Here’s looking back at today’s peaks

43

I made my way back to PT 13,430, retracing my steps. Here’s an overview of the route back down from the ridge before PT 13,460. You can clearly see the road at the end of the ridge. I circled where my truck is parked.

44

The ridge started out as rubble and turned to tundra before making it back to the road

45

Here’s looking back at the ridge. While hiking the ridge I ran into another hiker! I hadn’t expected to see anyone at all today, and as we passed I was thrilled to see she was another female solo hiker. It’s nice to see other women out rocking the mountains. We talked for a bit. I was probably a bit clipped because I had other plans for today and wanted to keep moving, but she did too so after chatting about the weekend weather around the state and other peaks for this weekend we were both on our way.

46

I followed the road back to the creek crossing, through the gate, turned right, and followed the trail back to my truck. I kept my sandals on after the creek crossing, since it was such a short distance and I’d be changing back into them when I was done anyway.

47

48

49

I made it back to my truck at 12:30pm, making this a 12.61 mile hike with 4652’ of elevation gain in 7.5 hours.

50

Since it was still early, the weather seemed to be holding up, and I wasn’t yet exhausted I decided to drive over to Independence Pass and see if I could hit a few more ranked 13ers today. As I drove out all of those empty dispersed camping spots were full.

Mt Parnassus – 13,580, Bard Peak – 13,641 & Woods Mountain 12,940

1

RT Length: 10.25 miles

Elevation Gain: 4965’

This was my third attempt going for Bard Peak. The first time I made it as far as Parnassus, but the wind and cold temperatures (and Raynaud’s) prevented me from going any further. My second attempt was from the Berthoud Falls area, and the snow just wasn’t cooperating. Imagine my surprise when I found out today this is actually an easy trail when not in full winter conditions!

I parked at the Herman Gulch trailhead and was on the trail by 4:30am. This trailhead has tons of parking, but beware: it fills up fast. There was a full moon and I could see by looking at the mountains I wouldn’t be needing snowshoes today, so I left them in my truck.

2

The trail starts in the middle of the parking area. I took the Herman Gulch trail to begin, which is just behind the information signs.

3

4

After hiking .2 miles I turned right (east) at this junction to follow the Waterous Gulch Trail.

5

This trail is an easy, class 1 trail all the way to the basin. Last time I was here the area was covered in snow and I had no idea there was a trail that went that far. Today the hike was easy! No real route finding below treeline.

6

7

After hiking for about 1.5 miles I came to a creek crossing in Waterous Gulch, crossed the creek on an icy log by sitting down, straddling the log, and shimmying across (due to the ice I would definitely have slipped if I’d tried to cross standing up). I turned left and headed north through the gulch on a great trail (still the Waterous Gulch Trail).

8

9

10

Starting here there was snow on the trail, but just enough to be annoying: I could still figure out where the trail went

11

I crossed a small stream and continued on the trail. Note: You can also choose to go right and not cross the stream here and take a parallel trail that leads you to the exact same place as the Waterous Gulch trail. I stayed straight here and continued to the end of the gulch on the way in and took the parallel trail on the way out. They were similar, but the one that follows the gulch also follows the stream, which was nice.

12

I followed the class 1 trail to the end of the gulch, and after 2.2 miles of hiking turned right and continued following the trail up to the saddle of Woods/Parnassus. There are a lot of ways to gain the summit of Parnassus. Last time I hiked further south, avoiding the saddle, and I would not recommend that route. Instead, take the easy gully and aim for the saddle and go as far as you can before turning right and heading southeast towards the summit. This is where the intense wind started and didn’t stop. Forecasted winds were 17-24mph, but those winds don’t knock you over. For the rest of this hike I was using my trekking pole for stability, hiking sideways into the wind.

13

The trail stopped here somewhere under the snow. I paralleled the snow to the saddle

14

At the saddle I turned right and headed southeast towards the summit of Mt Parnassus. This is an easy hike on tundra.

15

The terrain gets a bit rockier near the top.

16

The summit is relatively flat. I summited Mt Parnassus at 6:40am, after just over 3.5 miles and 2 hours of hiking. Since this is my second summit of Mt Parnassus I’ll spare you the selfie and let you watch the summit video instead.

Mt Parnassus:

Bard Peak is just over a mile east of Mt Parnassus.

17

There’s a bit of a trail from Parnassus to Bard. I followed it where I could. It was faint, so sometimes I lost it, but mostly followed the ridge. It’s important to follow the ridge when snow is present. This ridge is easy class 2 ‘scrambling’. Just watch for loose rocks. I could see a faint trail go to the right of the ridge (south), but it became covered in snow and would have been difficult to cross. Here’s an overview of my route

18

And some close-ups in order:

19

20

21

When I got to this section I did not feel comfortable traversing without crampons and my ice axe (luckily I had both). I sat down, strapped on my crampons, and crossed the snow. The snow was slippery at this time in the morning (not mushy, more like icy). You could probably traverse this section with just microspikes if you were here at the right time of the day.

22

Because I could I kept the crampons on until the last of the snow.

23

Here’s looking back on the section you want to avoid, and the reason I stuck to the ridge. You can also see a slip here would take you a ways.

24

After taking off my crampons and putting them away I headed up to the summit of Bard Peak, keeping close to the ridge

25

26

I summited Bard Peak at 7:50am, after 4.7 miles of hiking.

27

Bard Peak:

There was a broken summit register and a benchmark on the summit

28

Now to head back to Mt Parnassus. I backtracked down to the saddle, put on my crampons again, got out my ice axe, and crossed the snow.

29

30

31

It was easy to avoid the snow on the rest of the way back to Parnassus

32

33

34

35

From the summit of Mt Parnassus I descended the way I’d summited, back down to the Woods/Parnassus saddle

36

When I made it to the saddle I still wasn’t tired so I decided to summit 12er Woods Mountain as well. This summit doesn’t require much guidance: it’s an easy tundra stroll to the top. This added 460’ of elevation gain to the hike. This is where the wind became the most intense (yes, it was still blowing). It was so windy I was hiking sideways with each step, and had to over-compensate each step to stay in a straight line, crisscrossing my steps as I went.

37

I reached the summit of Woods Mountain at 9:40am. I’ll spare you the selfie of this one as well, since I’ve already summited this peak. Here’s the summit register and a video

38

Woods Mountain:

This wind was insane! Time to head back down to the saddle and back down to the gulch

39

40

41

I followed the trail back down the gulch, over the log bridge, and back to the trailhead. This is where I started seeing a lot of other hikers. When I made it to the trailhead the large parking area was completely full.

42

43

44

I made it back to my truck at 11am, making this a 10.25 mile hike with 4965’ of elevation gain in 6.5 hours. Here’s a topo map of the route:

45

I felt really good about the hike today: The weather had been warm, no clouds, not much route finding, and when I made it back to my truck I wasn’t even tired yet. The only thing that could have been better was the wind. It’s amazing how good conditions can change the outcome of a hike!

Mt Blaurock – 13,626 & Ervin Peak – 13,538

1

RT Length: 6 miles

Elevation Gain: 3821’

There’s currently a curfew in place in Colorado Springs, so the beginning of the drive felt a bit ominous: I didn’t see any other vehicles on the road until I made it to the freeway, and even then there were very few vehicles compared to normal, even for 1am, and even when compared to being quarantined. I’d stopped for gas the day before so I didn’t need to stop at all this morning. With less people out I felt like I saw more wildlife: 4 foxes and a dozen or so elk. I made it to Winfield around 4am and decided to take the easy 4WD dirt road a little further, past the cemetery to some dispersed camping spots .85 of a mile from Winfield. You can park at Winfield and it won’t add more than 2 miles to this hike.

2

3

4

5

Looking at a topo map, I wanted to follow Grey Copper Creek to begin. After finding a dispersed parking spot I headed northwest in the dark, following game trails, zig-zagging in what felt like I was in a horror movie until I hit the creek. The creek was easy to find because there’s been a recent avalanche in the area.   This also made the creek easy to follow (after initially climbing over some downed trees).

6

I crossed the creek and stayed on the west side, startling a porcupine as I went. There are new game trails starting here that parallel the creek.

7

There are a few ways to summit Mt Blaurock: You can follow the creek until it ends and continue climbing until you make it to the Blaurock/Ervin saddle, or gain the south ridge and follow that route. There was still some snow in the gully so I decided to take the south ridge route.

8

There is no special point to gain the south ridge. I turned and headed west after a little over a mile of hiking, aiming for the ridge

9

From treeline it was easy to see the route, following the ridge northeast

10

The first part of the ridge is an easy stroll on tundra

11

Once the tundra ended the loose rock began and didn’t quit until the hike was almost over and I was back at the avy area. I’d call it rotten rubble, or choss most of the way. I rounded the first bump in the ridge to the left, climbed straight over the second, and then took a gully up to the top. There is some loose rock here.

12

13

14

9

Here’s a look back down to this point

16

Turning left (northwest) I dipped down to the left a few times to avoid snow and unnecessary ridge crossings

17

18

Of course, the summit is the furthest ‘hump’ on the ridge

19

I followed a small, rock filled gully to the summit

20

I summited Mt Blaurock at 7:30am

21

Mt Blaurock Summit:

There are some great views of surrounding peaks, a few of which I visited last week;

22

23

I headed back over the ridge on the same path I took in:

24

25

26

Here’s looking down at the traverse between Blaurock and Ervin Peak. The hike down to the saddle from Blaurock is easy

27

I met a nice ptarmigan along the way

28

Here’s a look from the saddle of the ridge to Blaurock and Ervin

29

This is where it gets tricky. Here’s the route I took to avoid the snow:

30

31

It looks like there might be a class 2 path here along the right (south) side, but with the snow in key areas I wasn’t able to take that route. There was snow in this section, turning the rest of the hike into class 3 on loose rock. I had one rock the size of a microwave fall while I was testing it. Luckily, I was just testing and didn’t have any weight on the rock. It scared me though. A helmet would be a good idea. Note which areas actually “go”: The dirt gullies here make it look like there are trails where there are not. Here are pictures of how I navigated the ridge. This took quite a bit of careful route finding.

32

33

34

35

This is actually easier than it looks. Class 3, and I placed a cairn here so I’d remember how to get back (there are a lot of drastic drops in this area).

36

The last hurdle was unavoidable snow just before the summit. I tested the snow and honestly considered turning back. The snow was slippery and a fall would have took me a long way. In the end I strapped on my crampons and got out my ice axe, glad I’d brought both. I traversed these two areas (about 40 feet each) gingerly.

37

The last bit up to the summit was full of loose rock but was straightforward

38

I summited Mt Ervin at 9:30am (that’s Mt Hope in the background)

39

Ervin Peak Summit:

I didn’t stay long on the summit. The day was warm and the snow was melting fast: I wanted to cross the snowy areas as quickly as possible to avoid slipping. I turned around and headed back the way I’d come.

40

41

I was making this a loop, so when I hit the westernmost part of the ridge I turned and headed southwest down. This ridge was easy to navigate but full of loose, rolling rocks. It was slow going because I had to be careful with foot placement. This ridge kind of turns right as it goes. Here’s a hint: If it’s daylight, just keep heading towards the switchbacks that you can see in the middle of the picture below.

42

From about halfway down the ridge here’s looking back at Mt Blaurock and Ervin Peak. The blue arrow points to where you could hike from the landslide area straight to the saddle instead of taking the ridges up and down

43

Here you can see you want to meet back up with the landslide area, and that to do so you’ll be bushwhacking through dense aspen. I could still see the switchbacks, but only just barely and only because the aspens aren’t completely full of leaves yet.

44

There were enough game trails here to follow not to make this too difficult. It would have been easier if I were 2 feet tall though, because those trails go under logs and through brush.

45

I made it back to the landslide area, took a picture of it in the daylight, and turned and headed south towards my parking space.

46

47

I made it back to my truck at 12pm, making this a 6 mile hike/climb with 3821’ of elevation gain in 8 hours, most of it spent route finding and watching for rolling rocks.

48

Here’s a picture of the saddle, should you choose to ascend that way

49

When I got home and started jotting down notes I realized today I’d hiked my 145th unique 13er, as well as my 145th unique bicentennial. Pretty cool!

Also, it’s time to retire my hiking boots, as they are no longer waterproof. They almost made it a year….

50