PT 13580

1

RT Length: 13.38 miles

Elevation Gain: 4934’


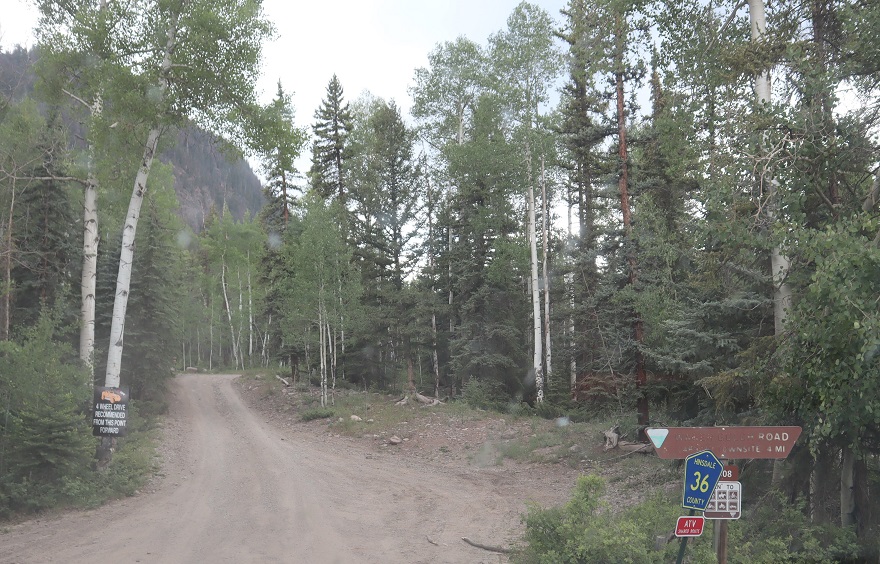
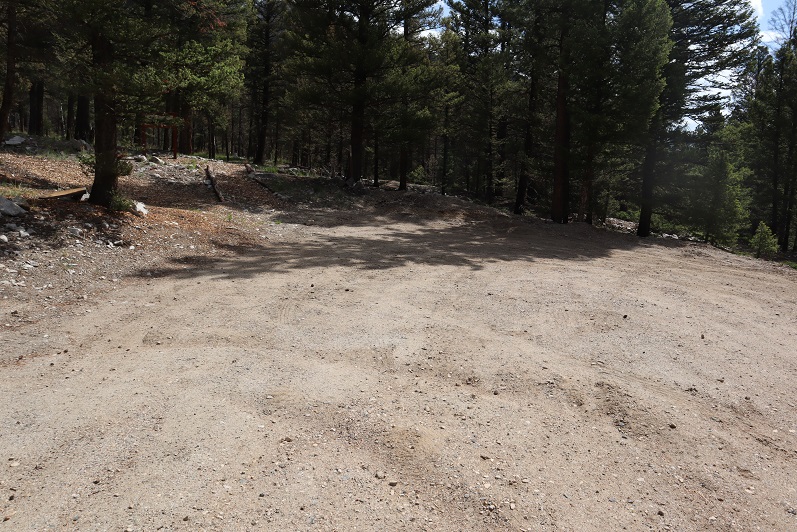
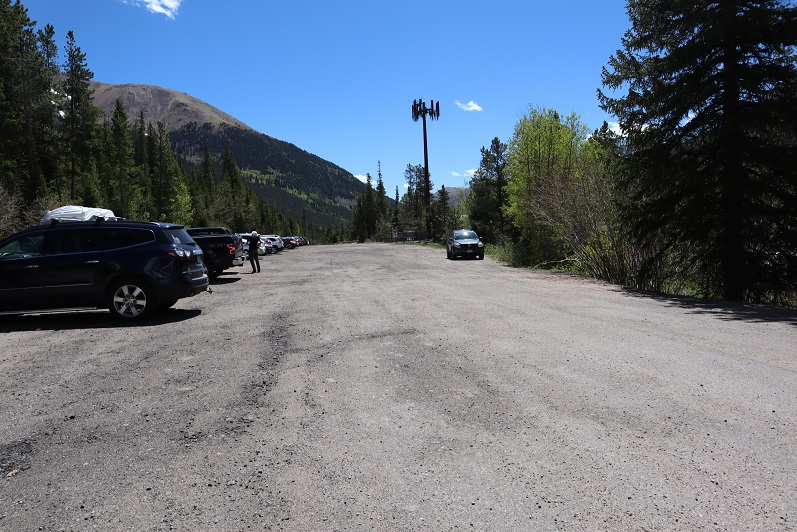
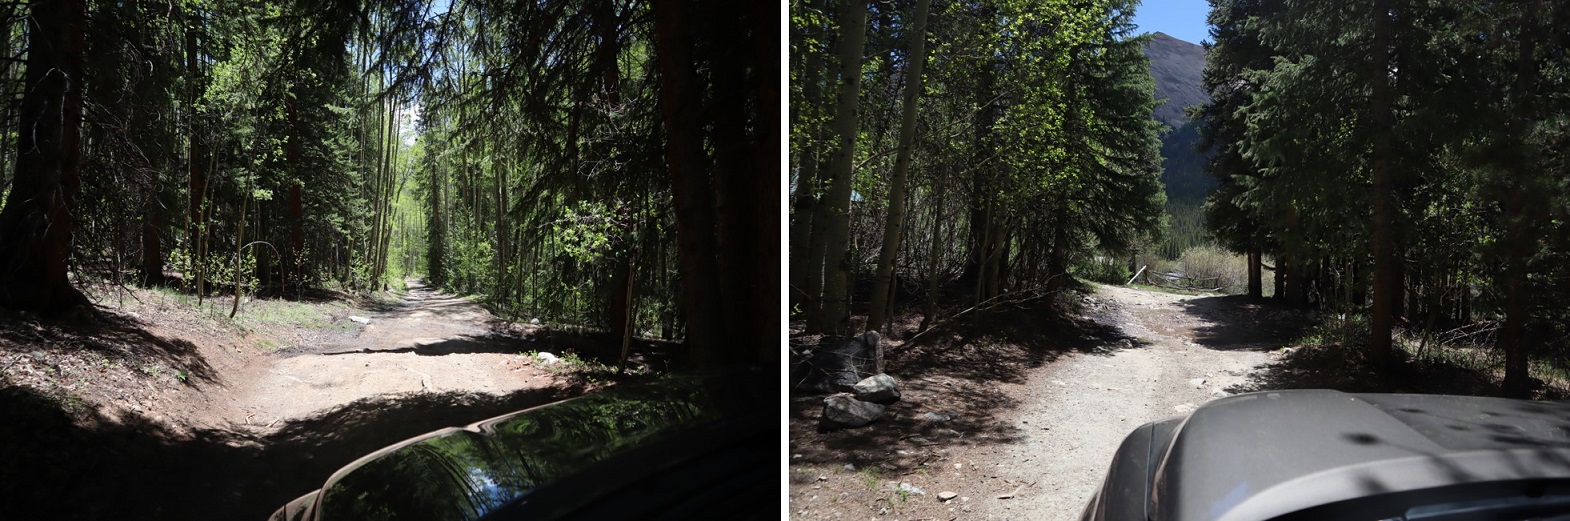
I chose this peak for today because it was the closest one on my list of unfinished bicentennials to Cielo Vista Ranch, where I’d just spent the morning hiking. I drove to the Willow Creek Trailhead and backed into the only available parking space. Vehicles were parked and double parked in each space, as well as several hundred feet down the road on the drive in. This is a popular trailhead and it was a Saturday afternoon.

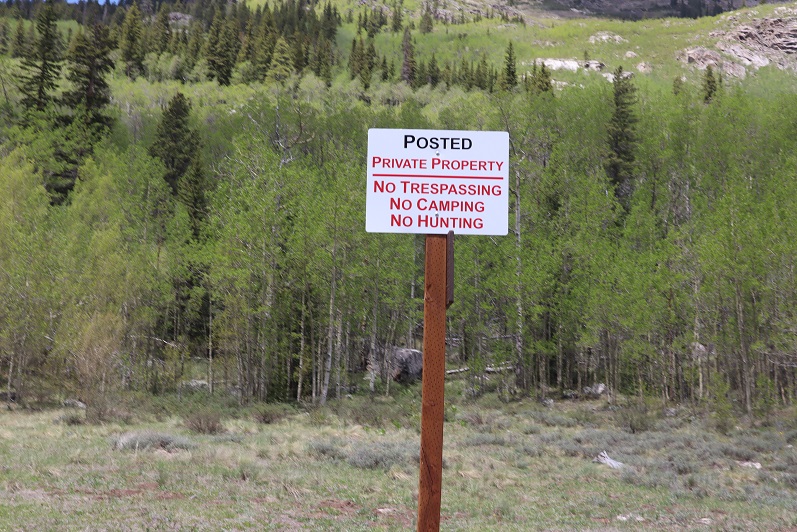
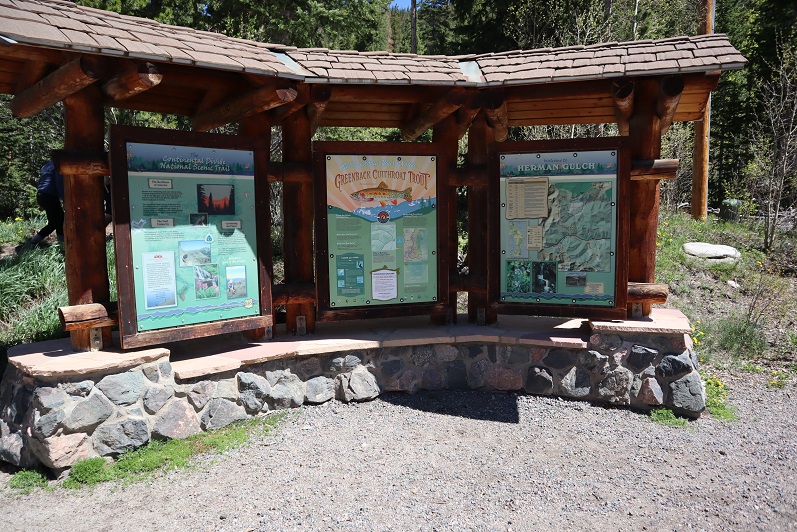
It was raining a bit as I got out and looked around. There is an open and stocked bathroom here, and lots of signage.

2

3

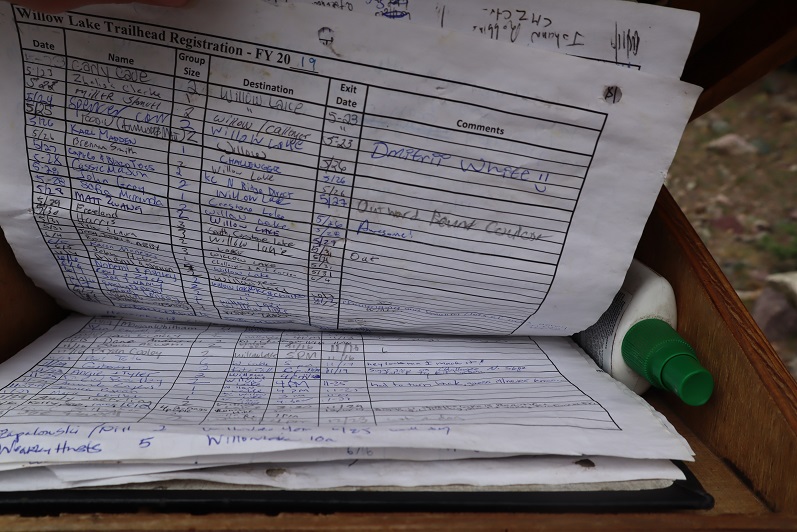
I opened the trail register container and was disappointed to find another full register. Every page was so full people were just writing in the margins of past pages. This one is from 2019. There were probably 7 pages total, which could probably get filled up here in a week. How are these useful when they aren’t kept up to date? Signing these seems useless.

4

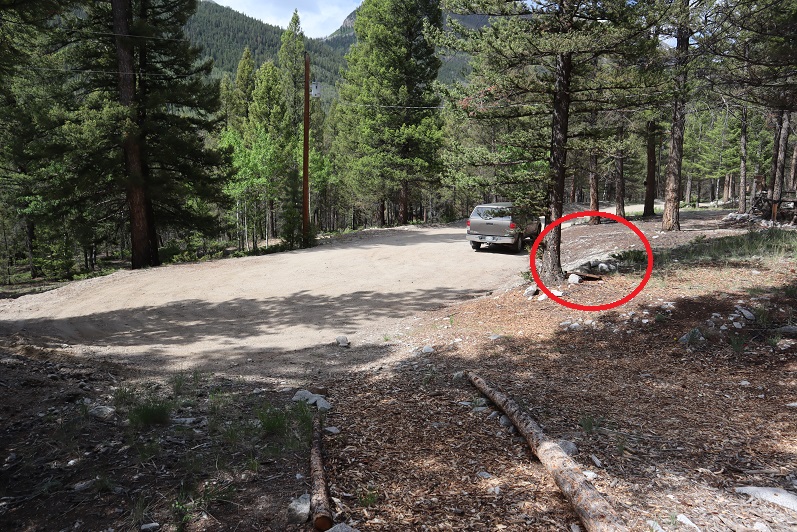
I went back to my truck and got my stuff ready for the hike tomorrow. I didn’t have a flashlight so I decided to use my phone’s flashlight app. That meant conserving battery, so I put it in airplane mode. Then I people watched. There was a man hiking with a small dog in a basket, a group of about 20 high school aged backpackers returning from what looked like their first outdoor experience, and two men hiking in to Willow Lake to summit Challenger and Kit Carson tomorrow. I spent a good 30 minutes watching a man trying to turn his pulled trailer around in the parking lot. He must’ve been looking for a dispersed camping spot and wasn’t able to find one before the trailhead. Turning his rig around in the parking lot of the Willow Lake trailhead was his only option, and it took dozens of attempts. His rig was loud and he set off several car alarms in the process. It was all quite entertaining.

When the mosquitoes came out I decided to call it a night and went to bed early. I woke up at 2:30am, decided I was way too comfortable, and went back to sleep. The only bad thing about having a bed in the back of my truck is I don’t seem to want to get up in the mornings. I was on the trail by 4am.

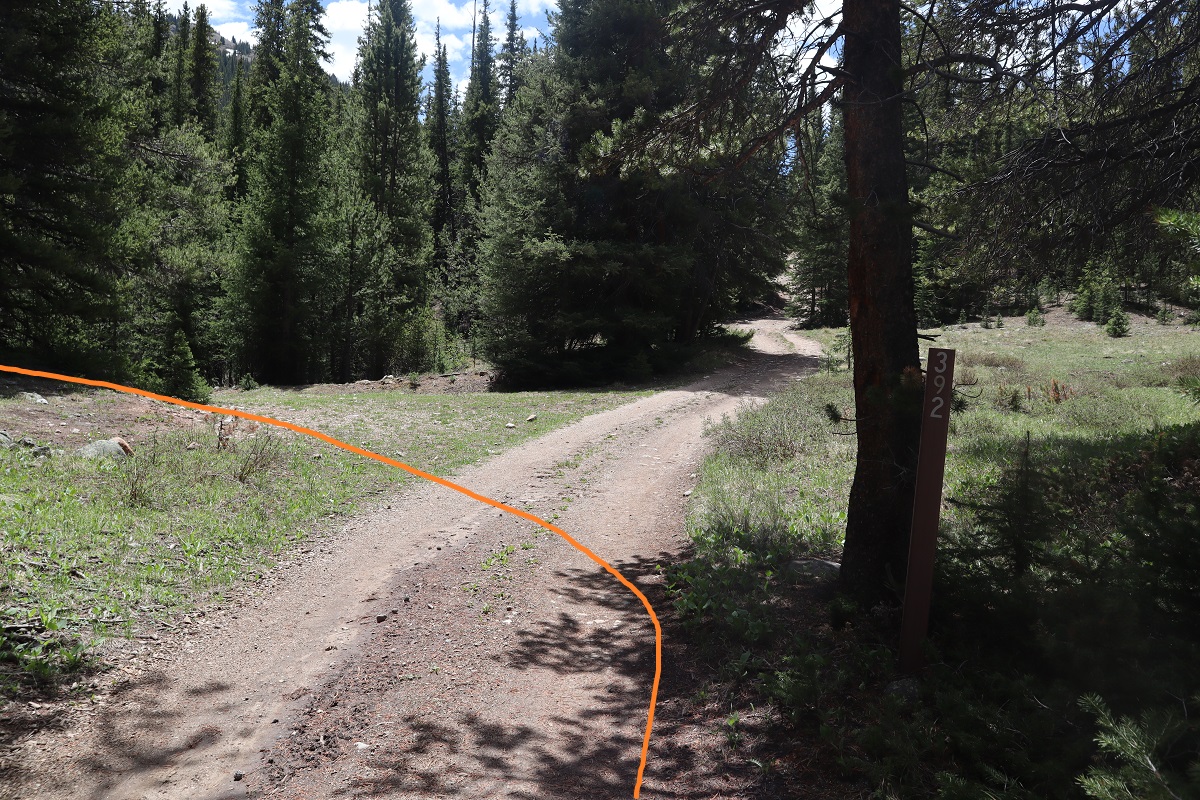
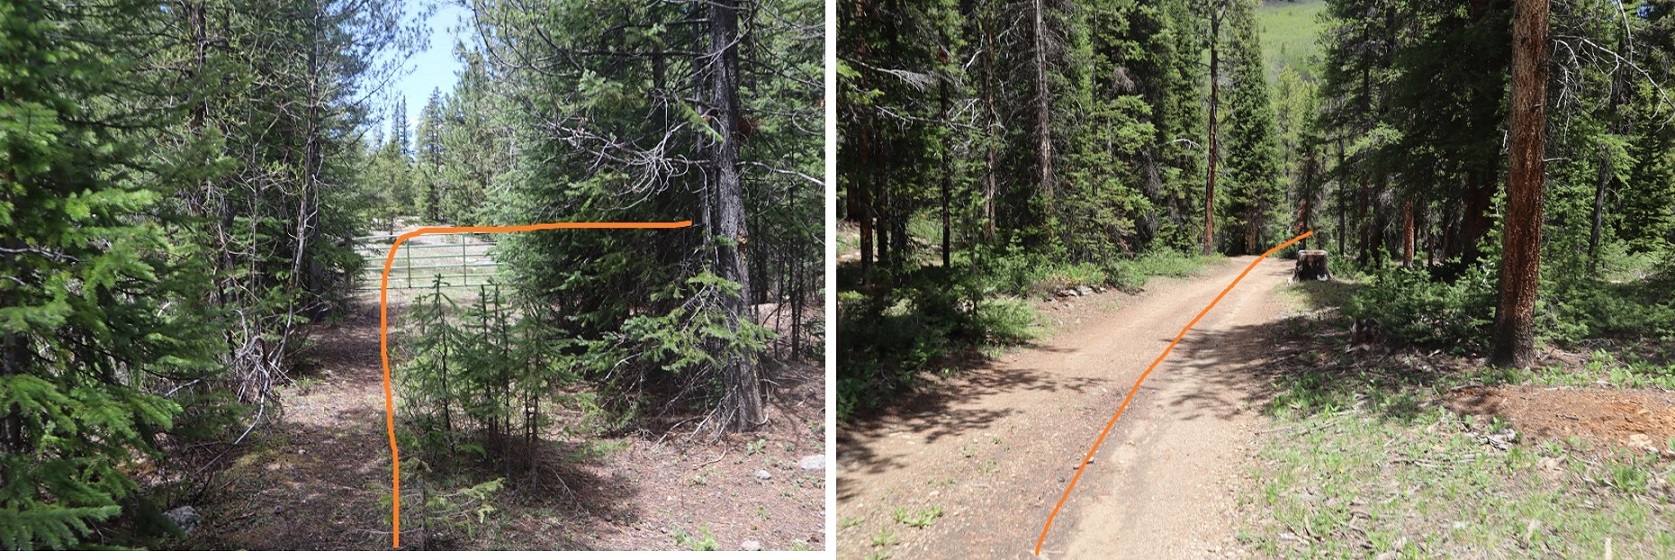
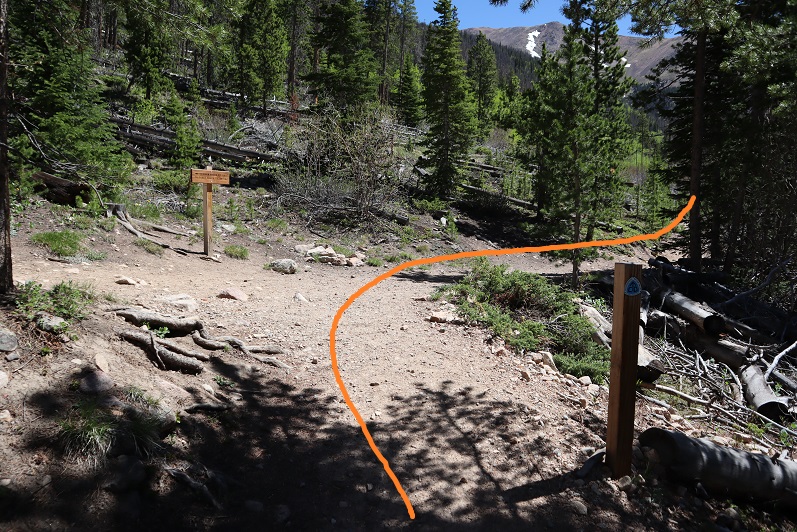
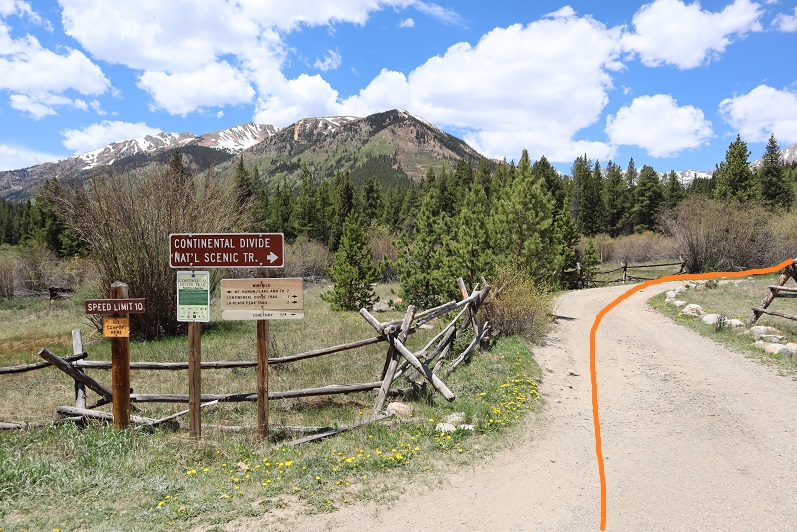
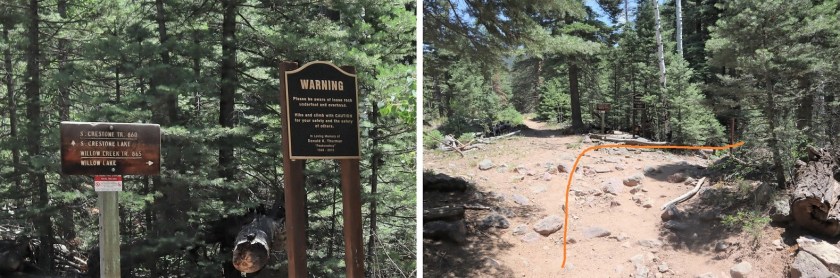
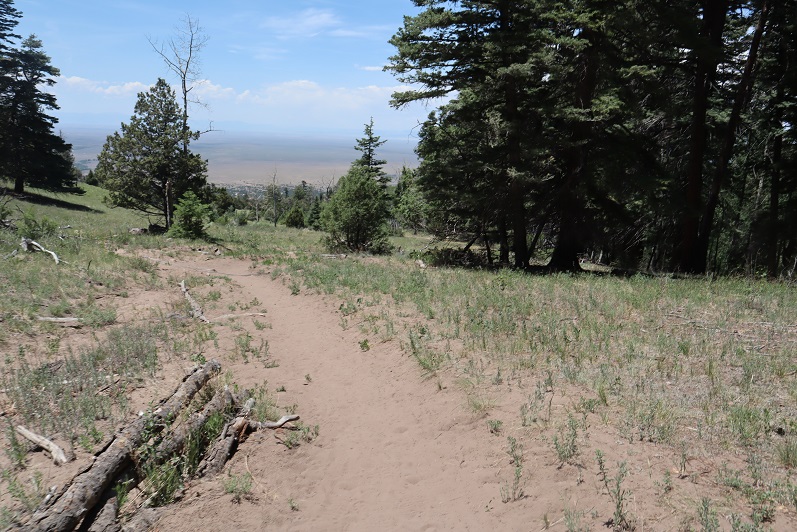
The trail starts at the east end of the parking lot and almost immediately comes to a junction. I turned right here, crossed a creek, and continued on a sandy trail.

5

6

7

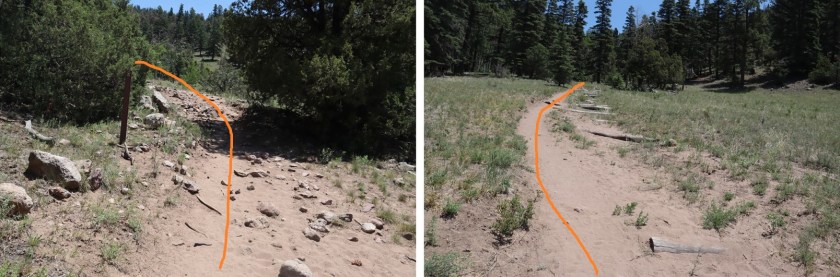
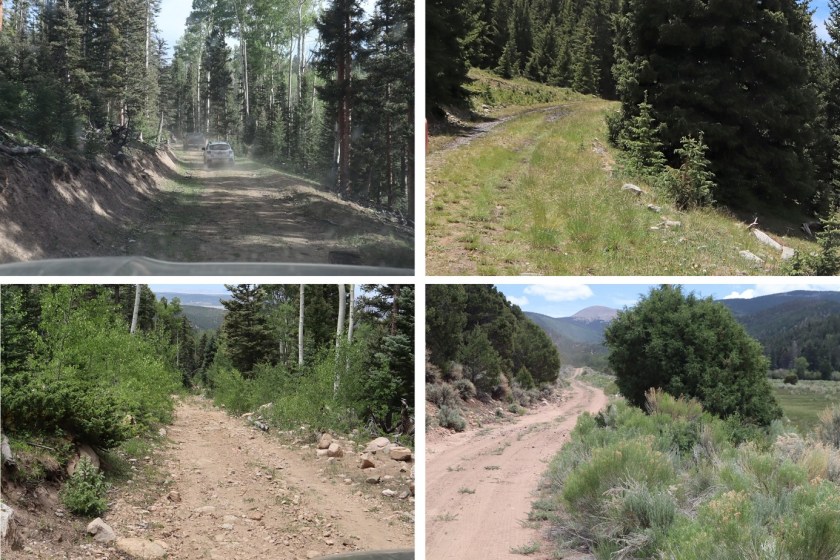
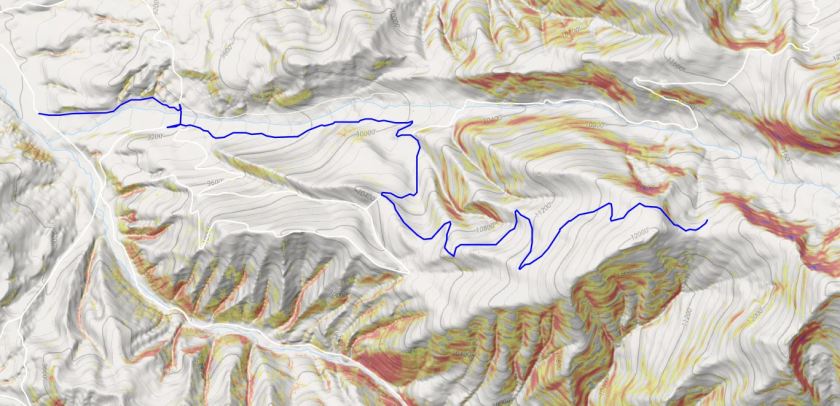
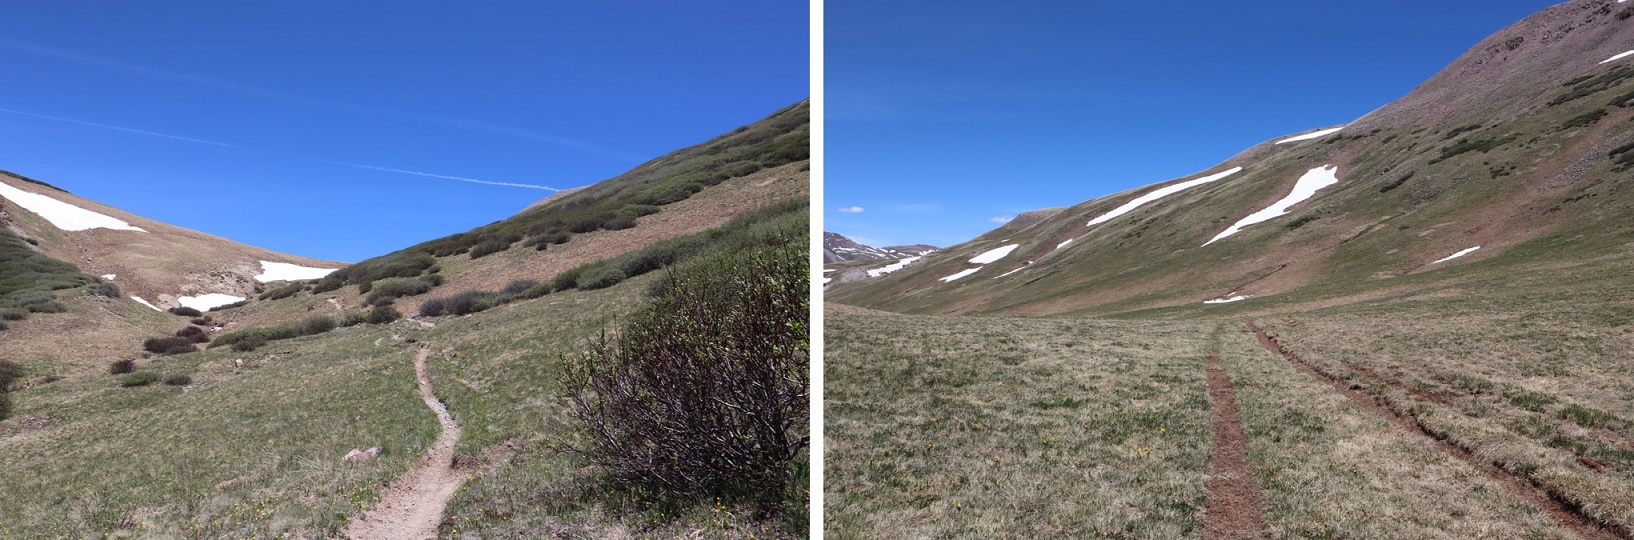
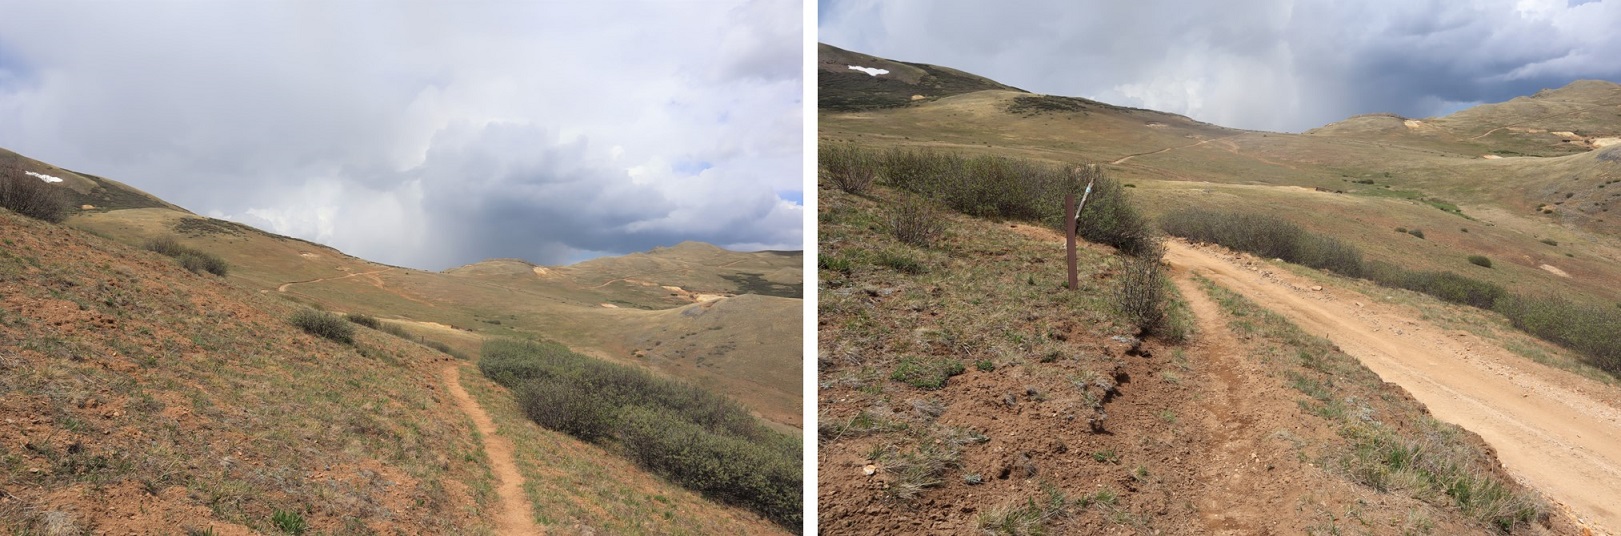
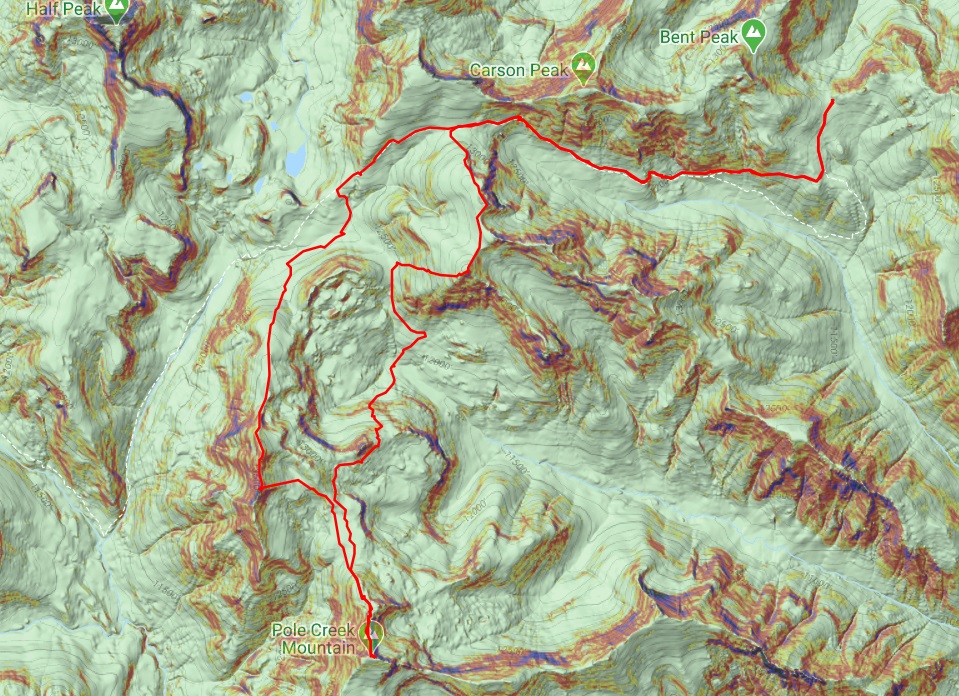
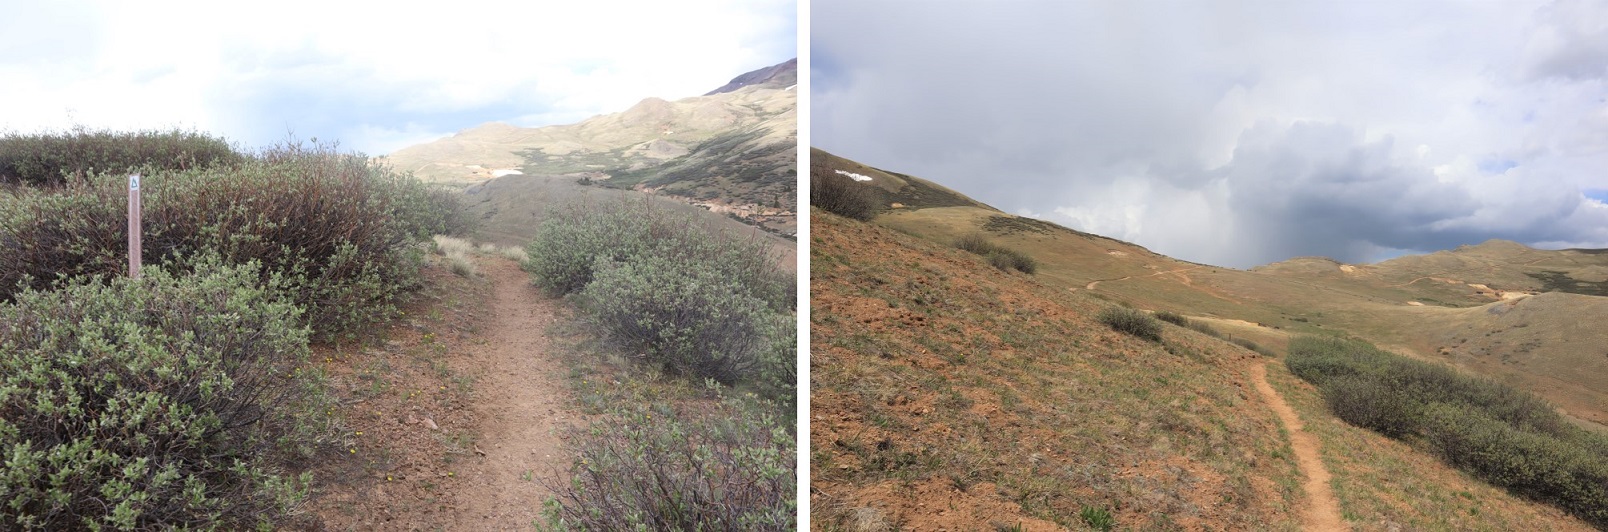
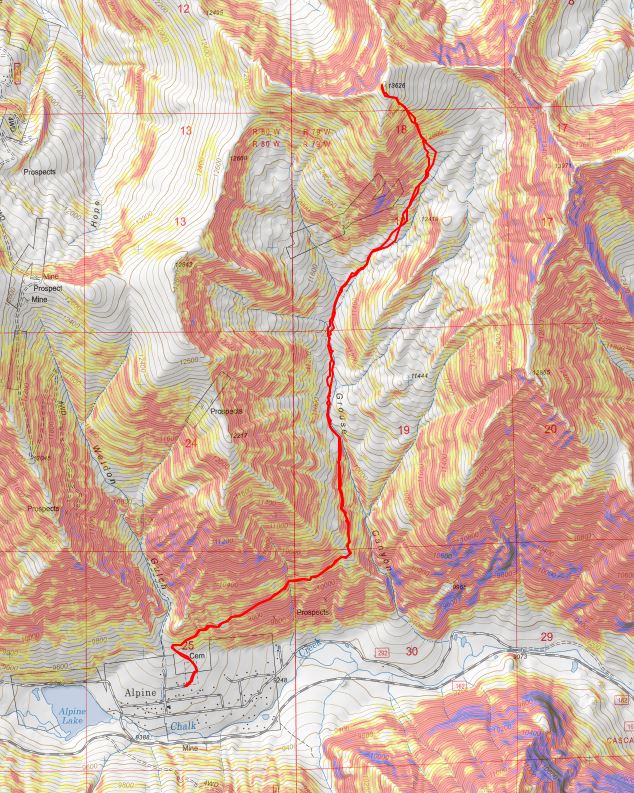
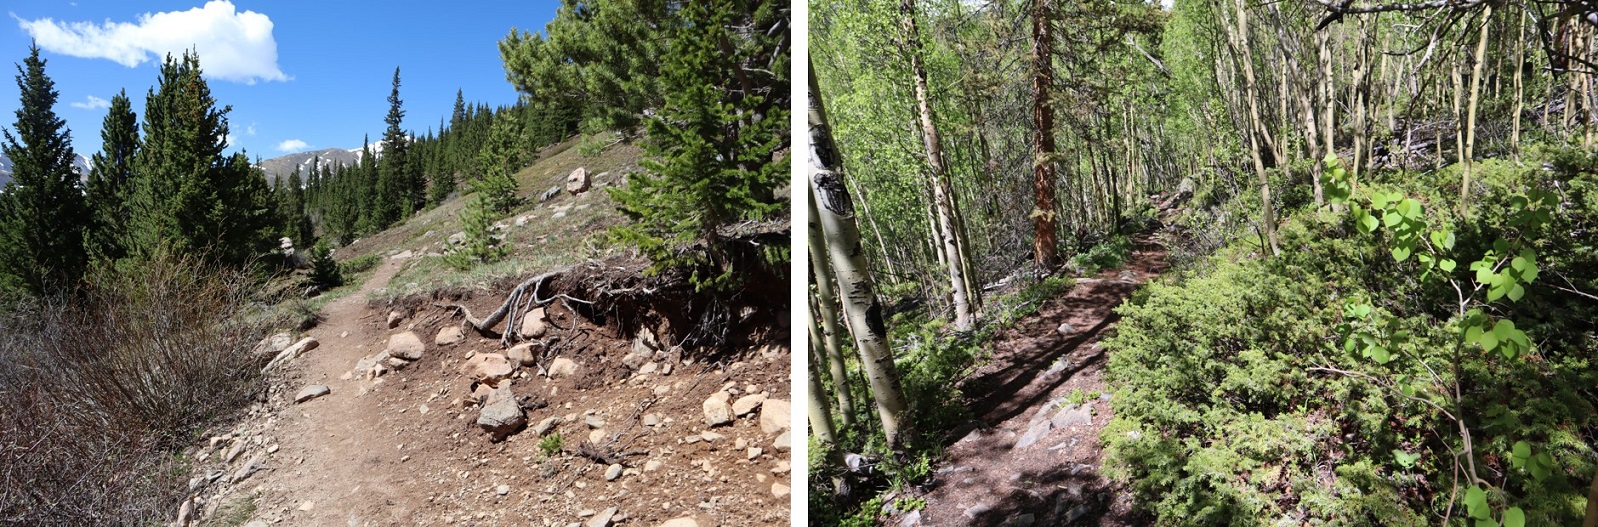
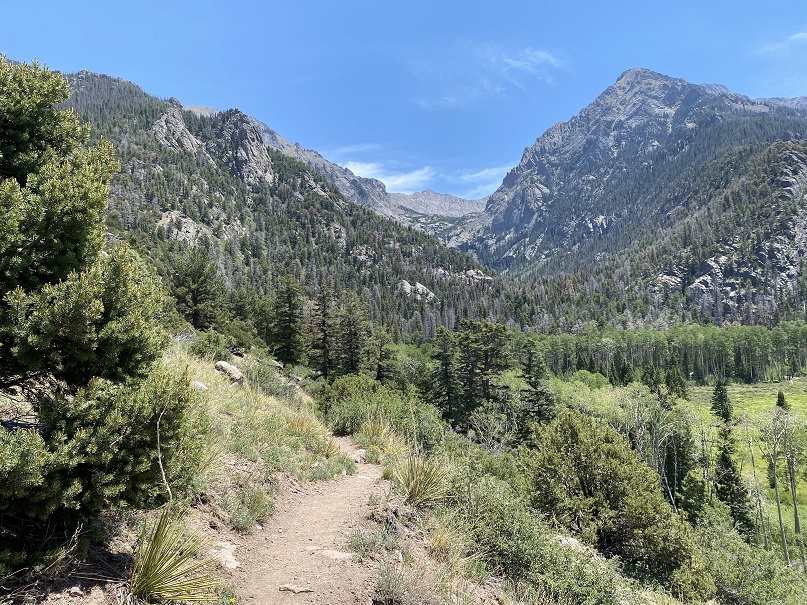
During the first mile of this hike, as I was hiking in the dark, I kept hearing chirping. It sounded like one of those bird boxes that’s put in the middle of nowhere to monitor birds and chirps every few seconds was out there somewhere, and broken. It wasn’t chirping on my way back, so it either ran out of battery or was an actual bird going crazy at 4am. The Willow Creek Trail is a class 1 trail that switchbacks all the way up to Willow Lake. Here’s an overview

8

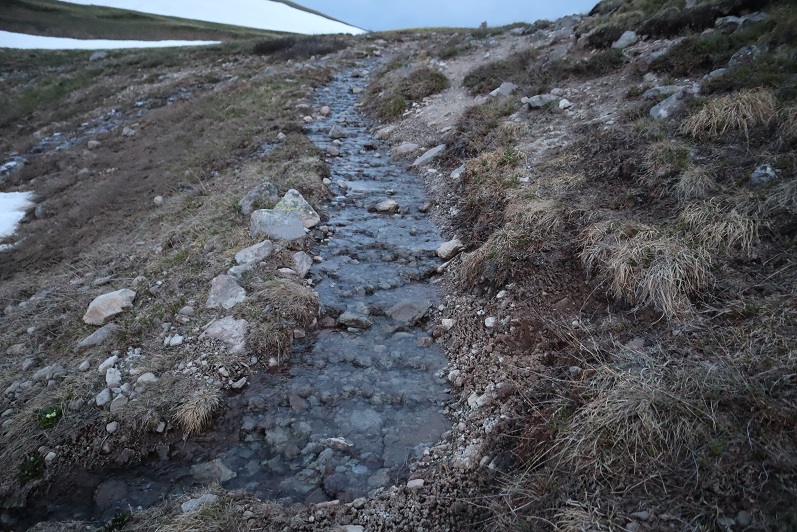
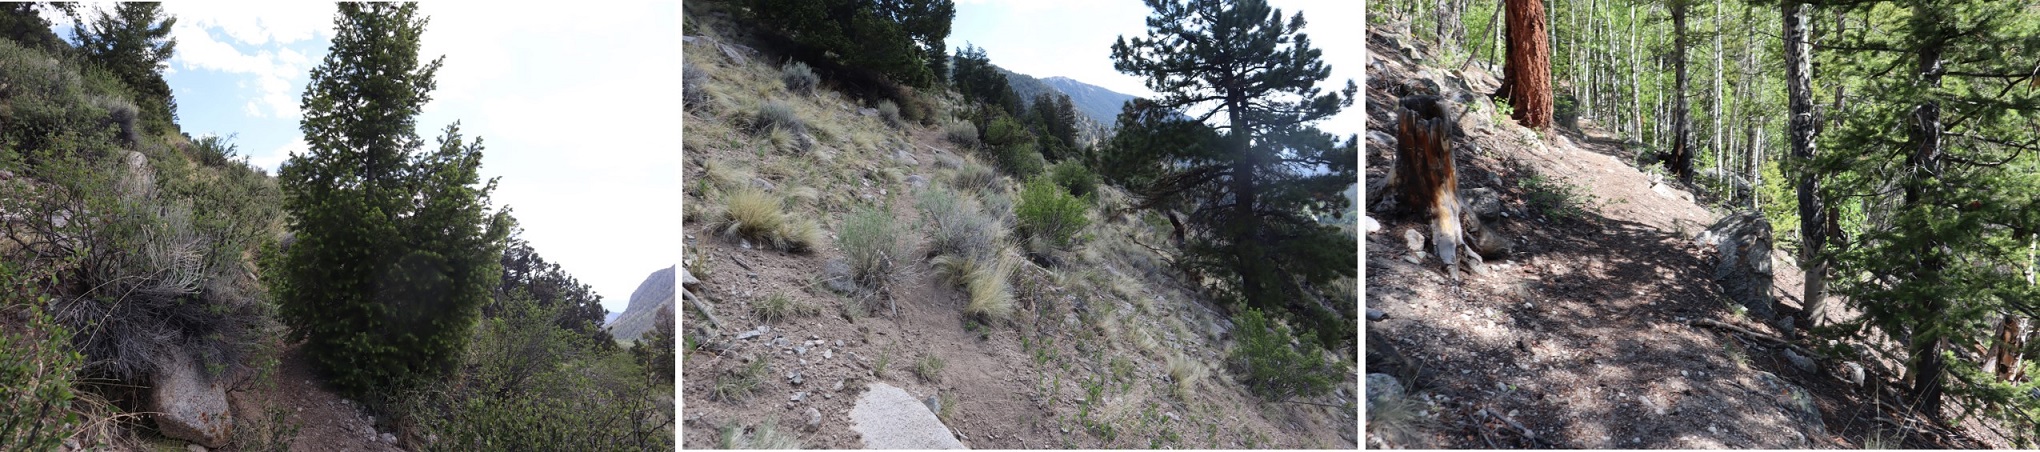
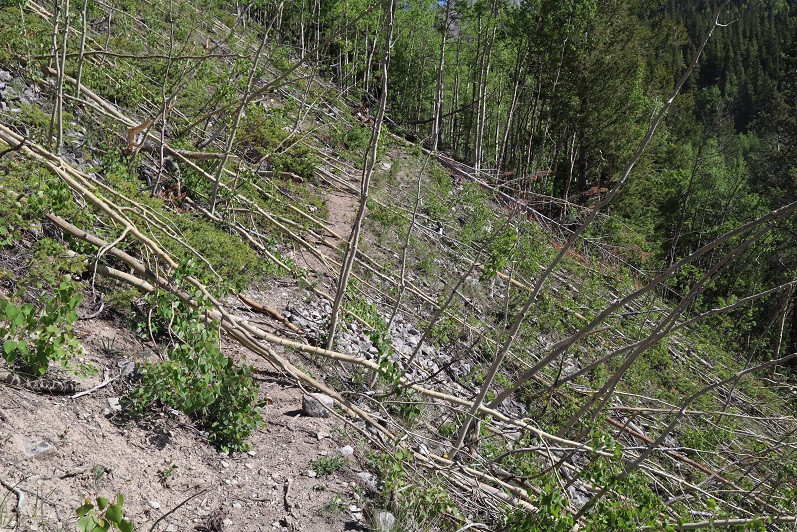
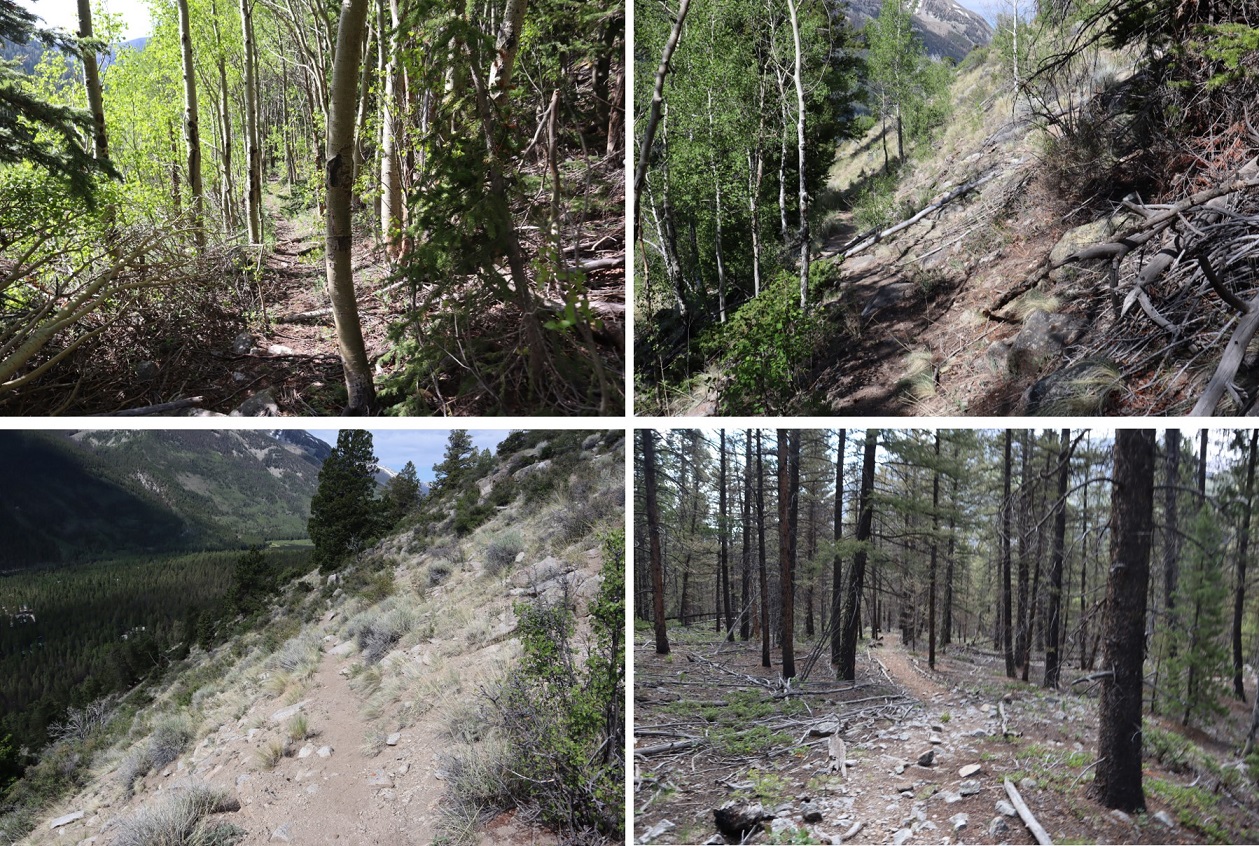
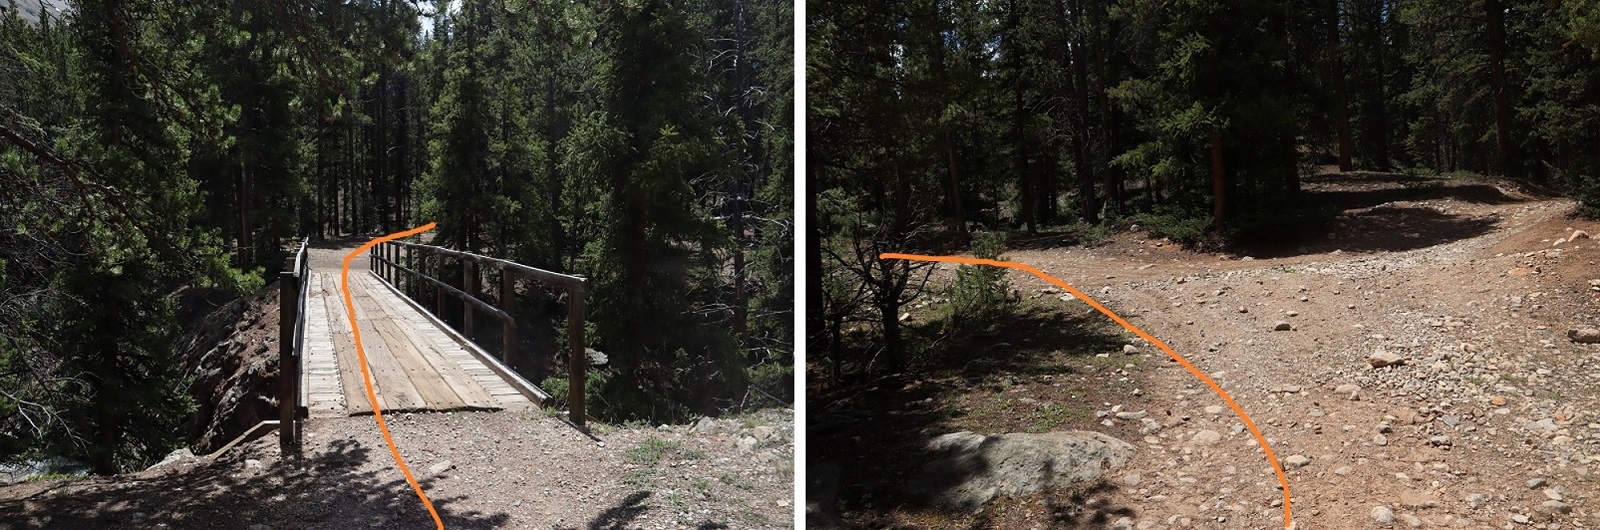
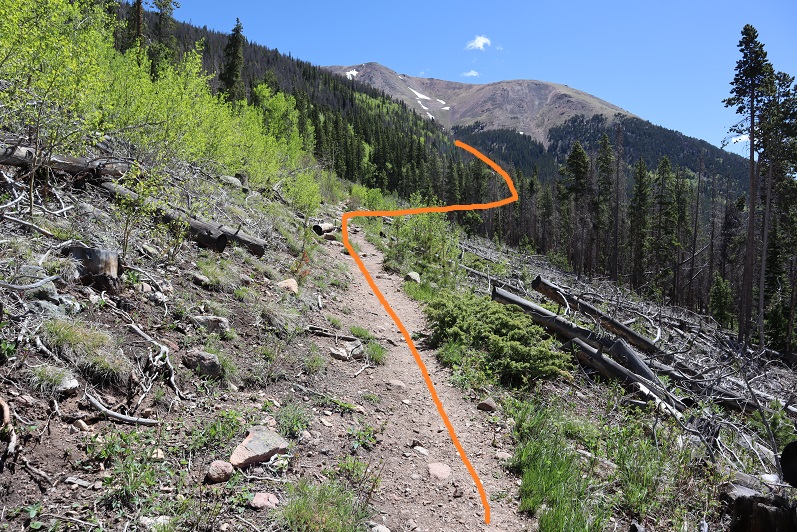
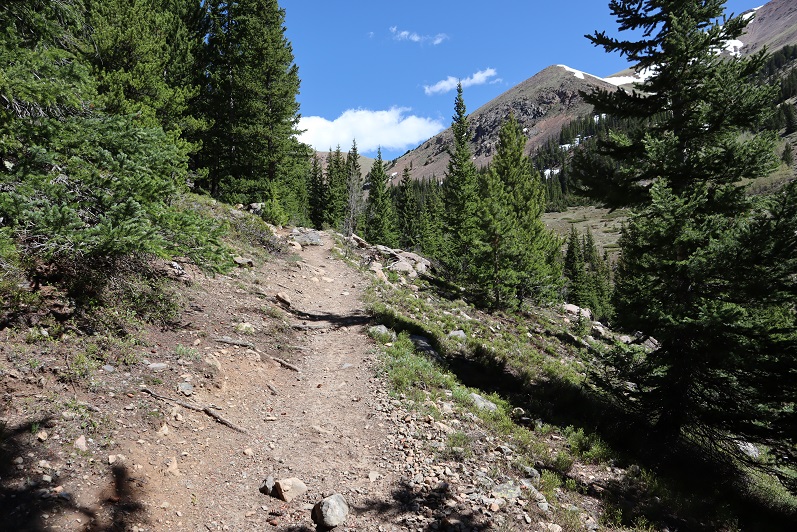
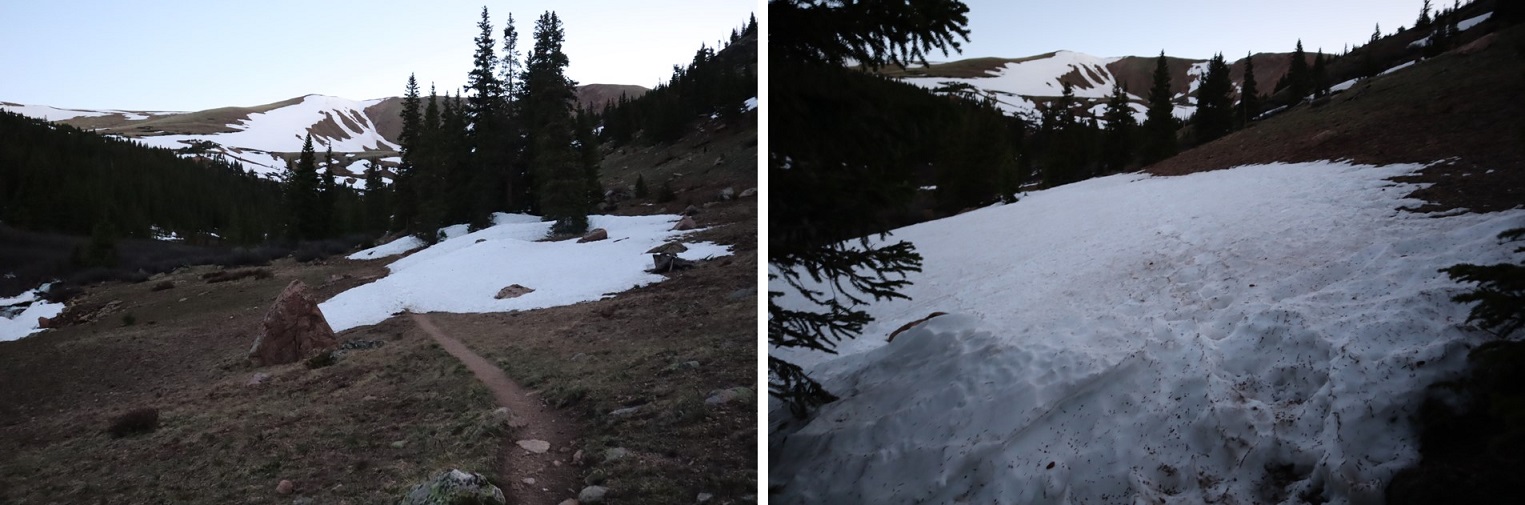
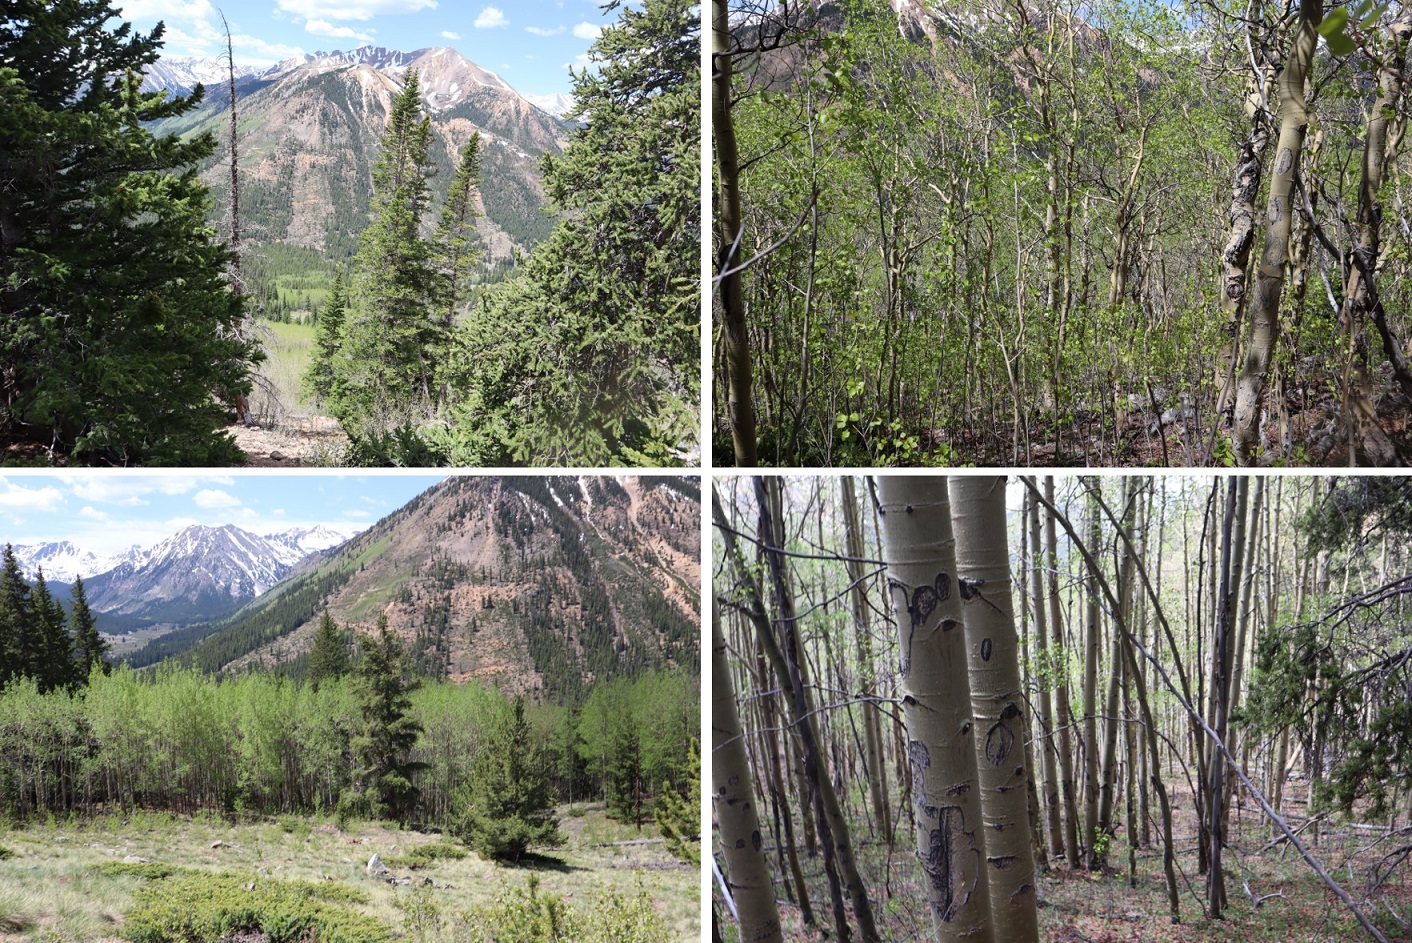
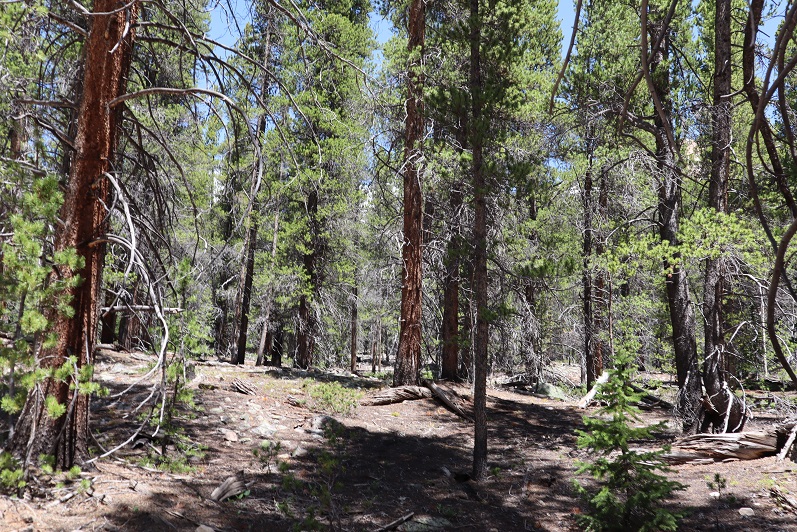
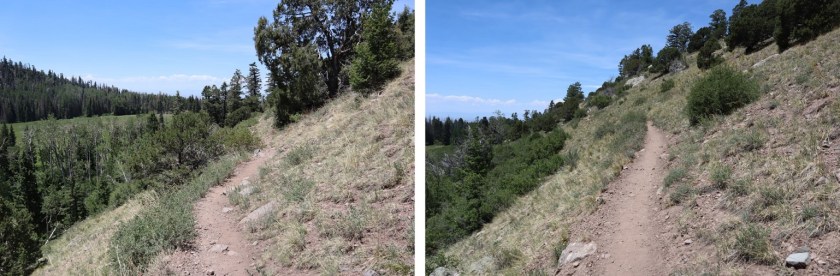
And some pictures of the trail

9

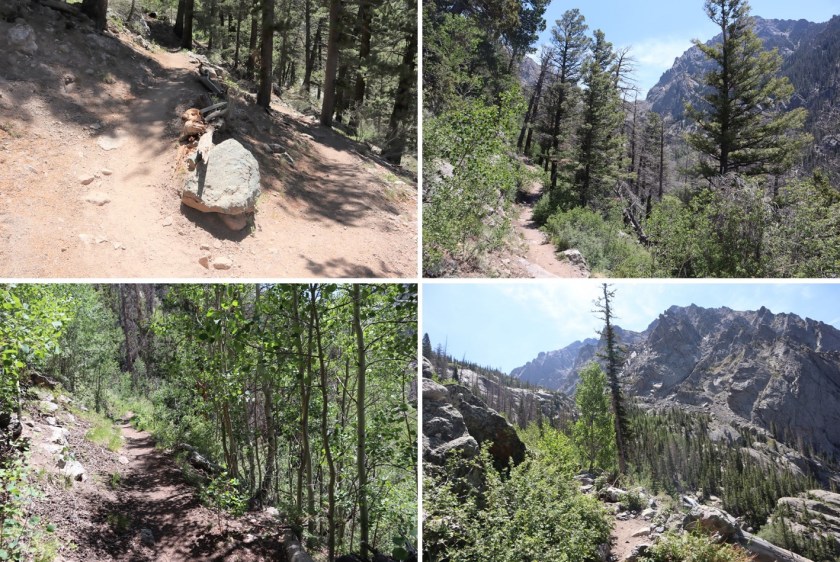
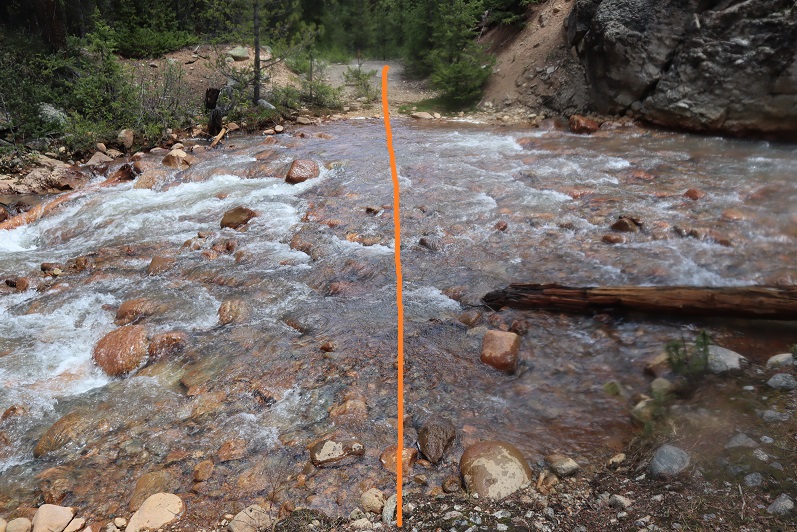
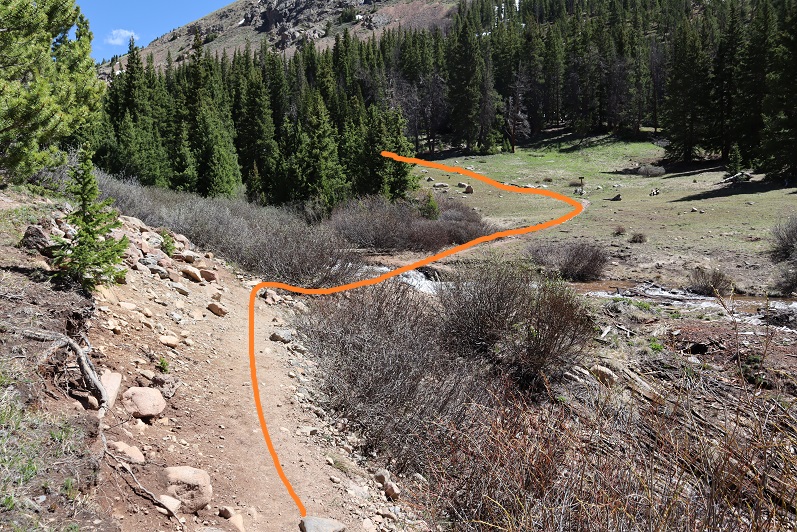
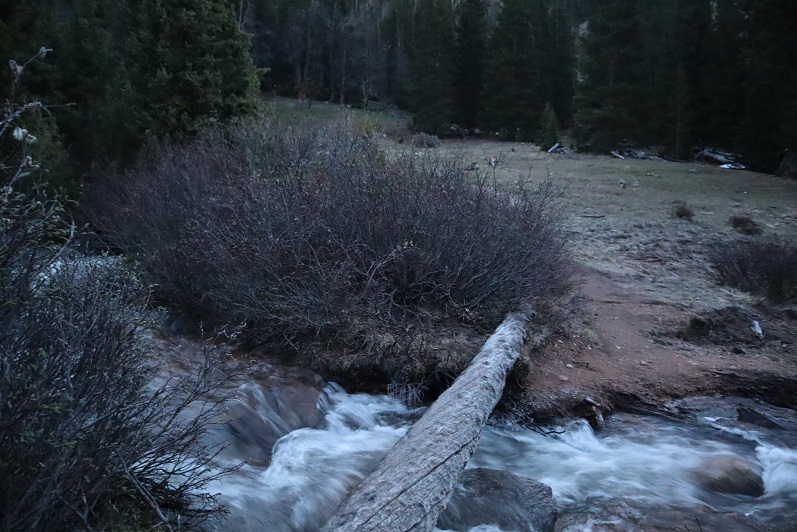
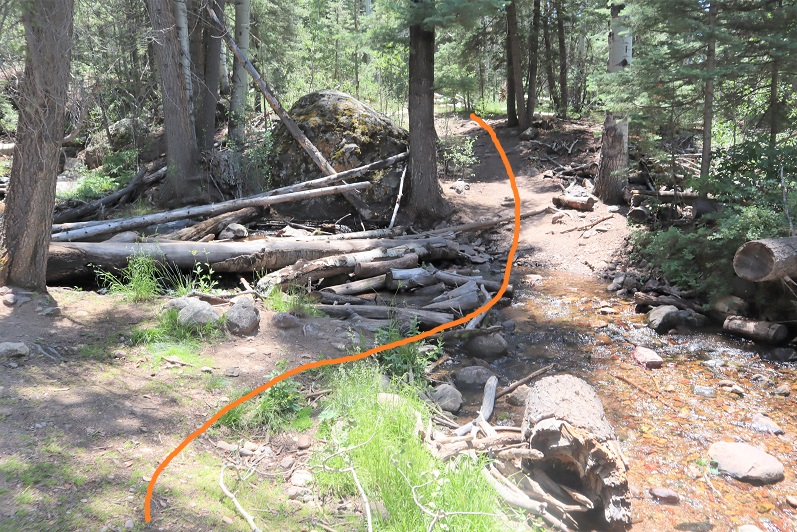
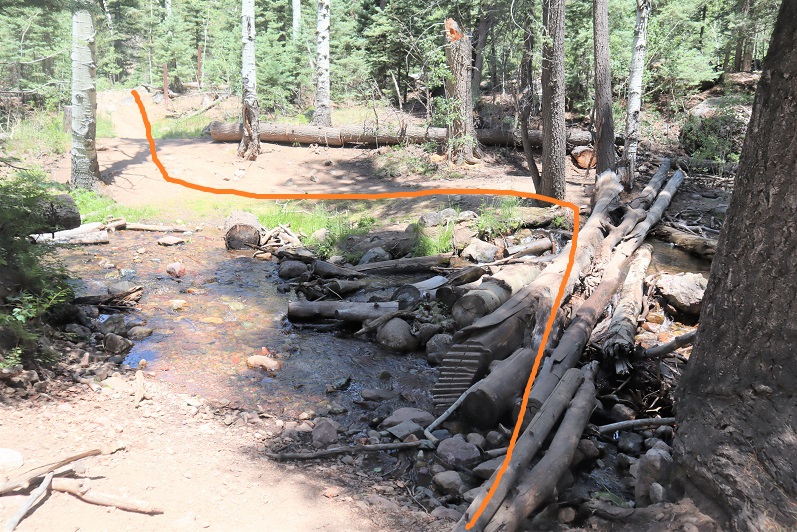
There are a couple of streams to cross, each with bridges/rocks

10

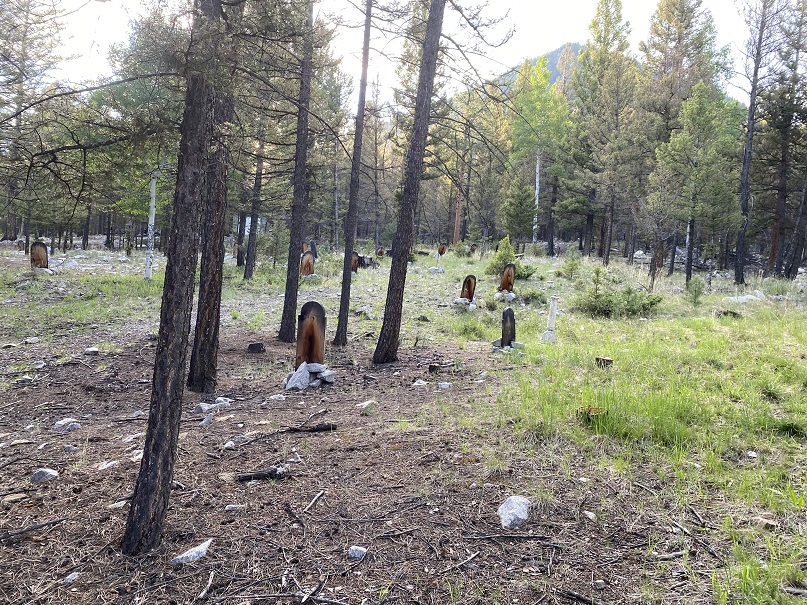
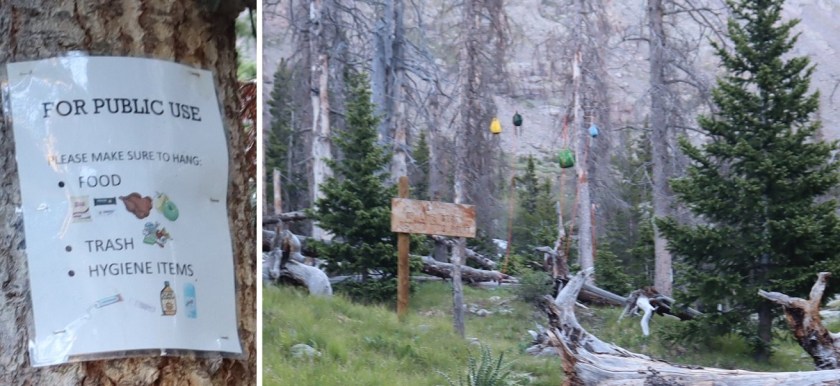
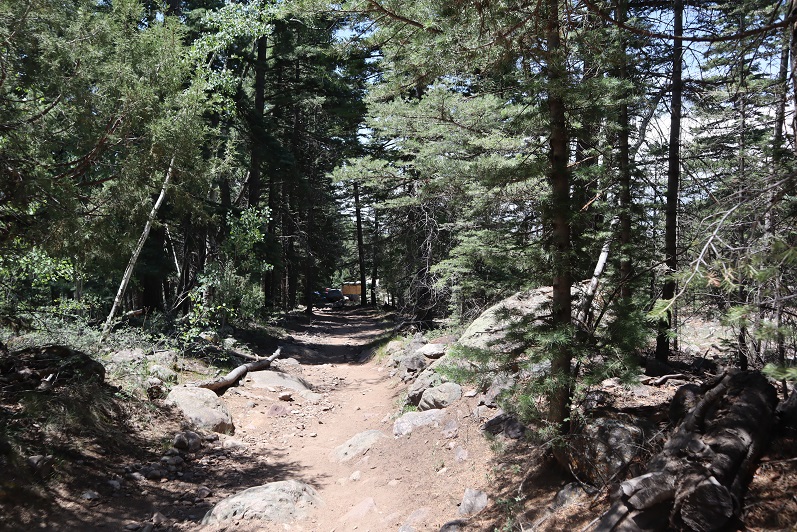
Before making it to the lake there’s a camping area. Someone has set up communal bear bag hanging areas, which I think was a brilliant idea. What’s even better is people actually seem to be using them. I saw two such areas, but there may be more.

11

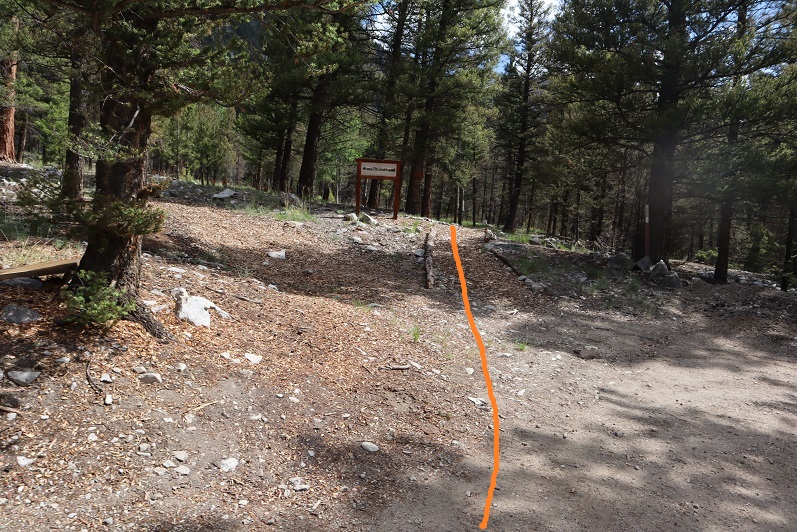
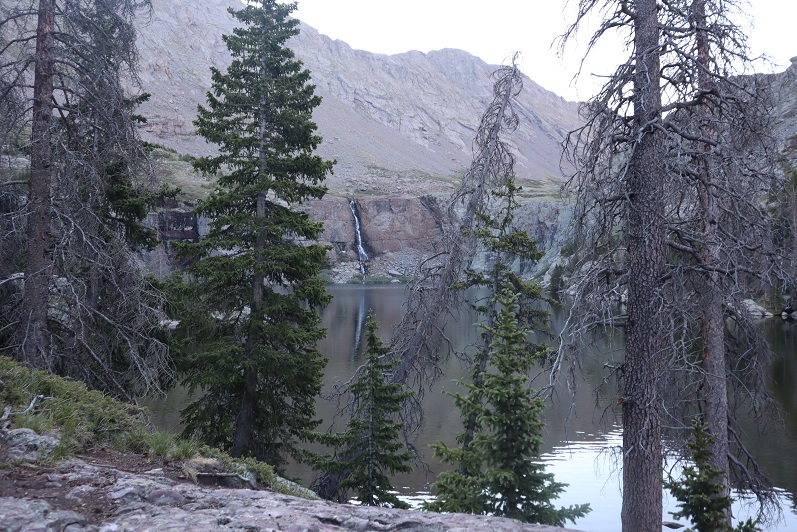
After the camping area it’s a short distance to Willow Lake. I went up this rocky area

12

And was greeted by this sign and the lake. I turned left at the sign

13

I made it to Willow Lake after 5 miles of hiking

14

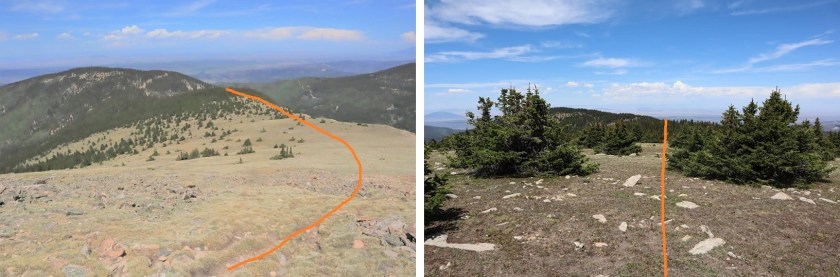
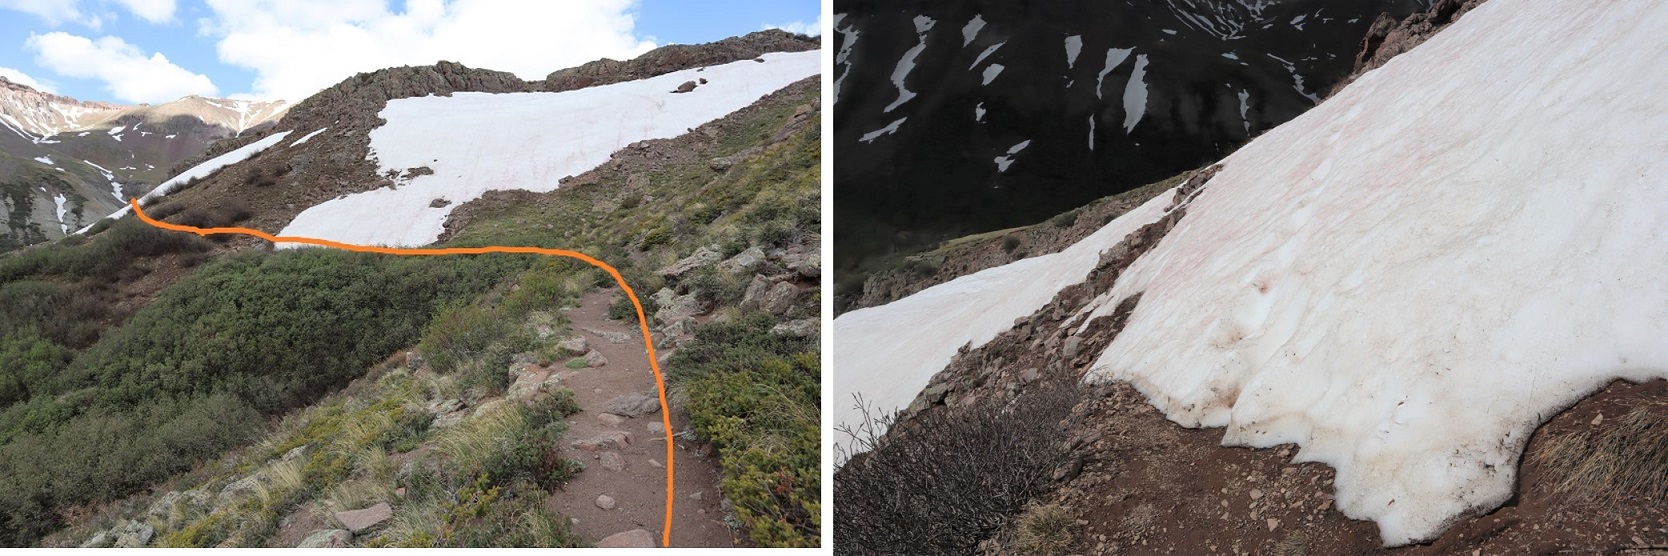
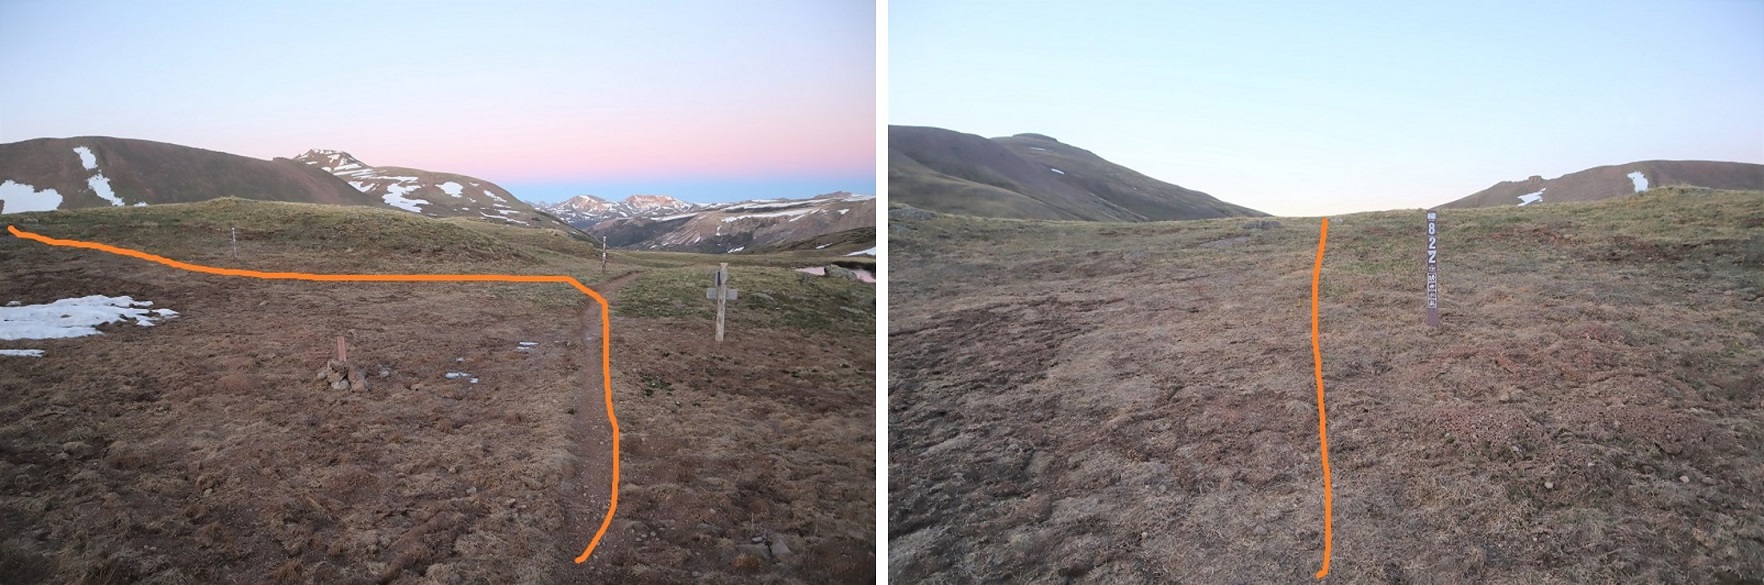
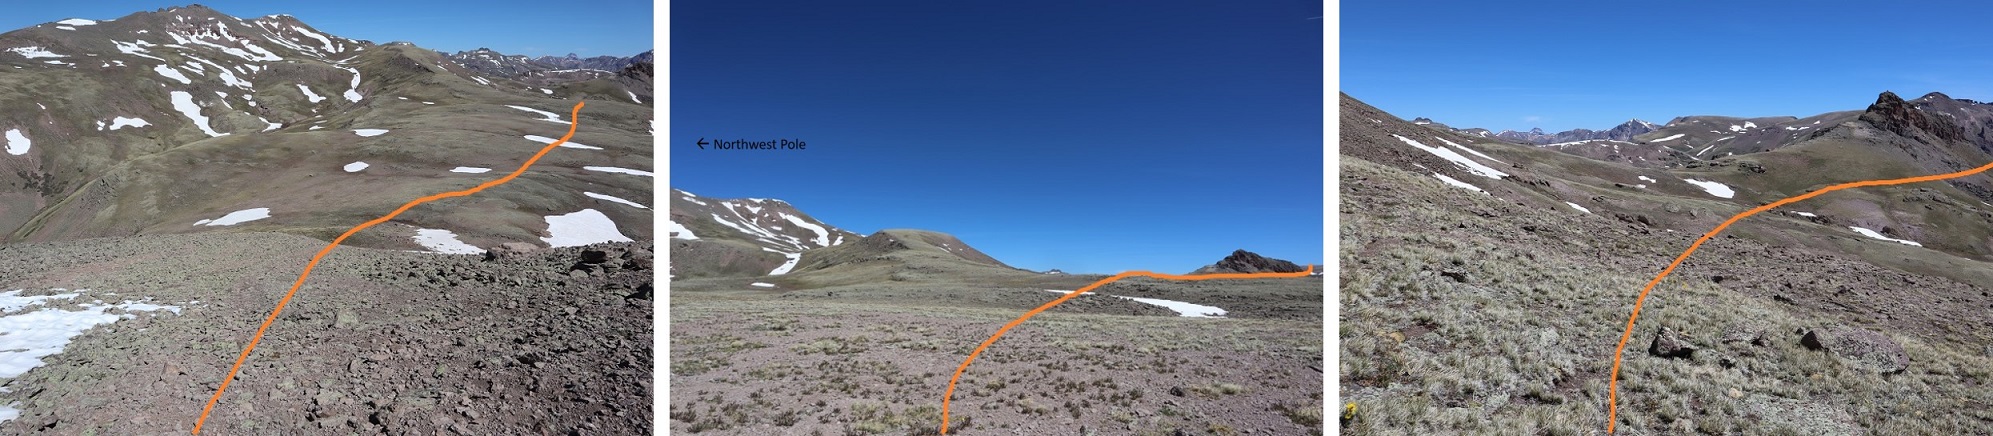
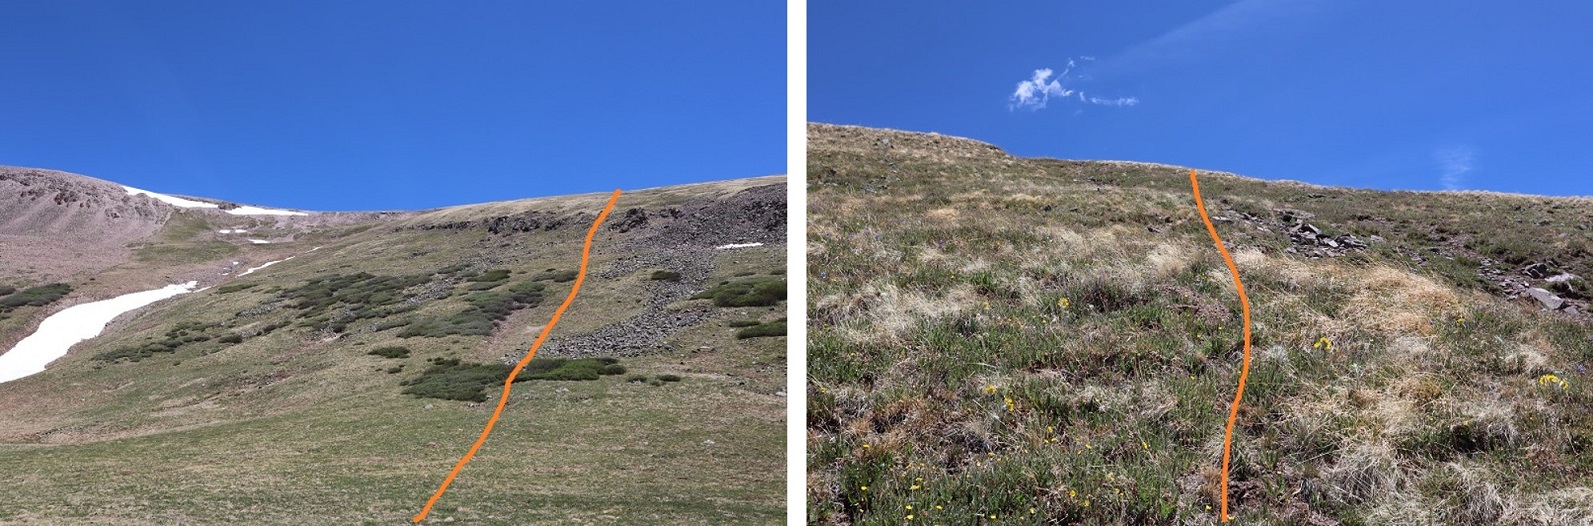
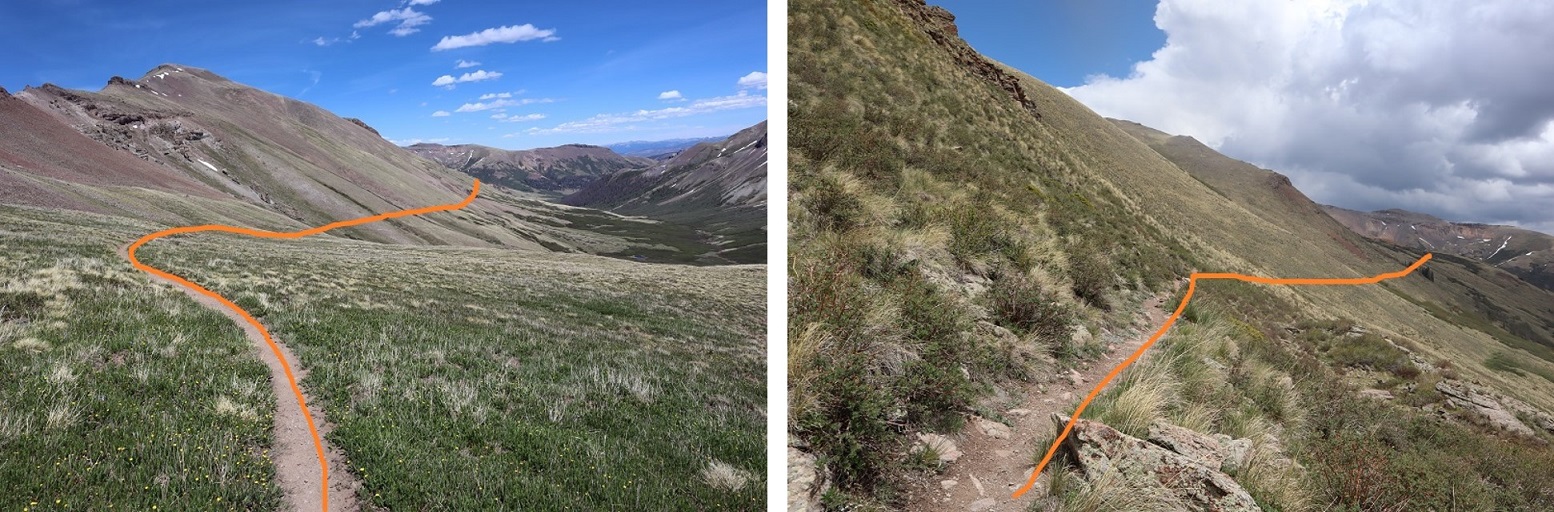
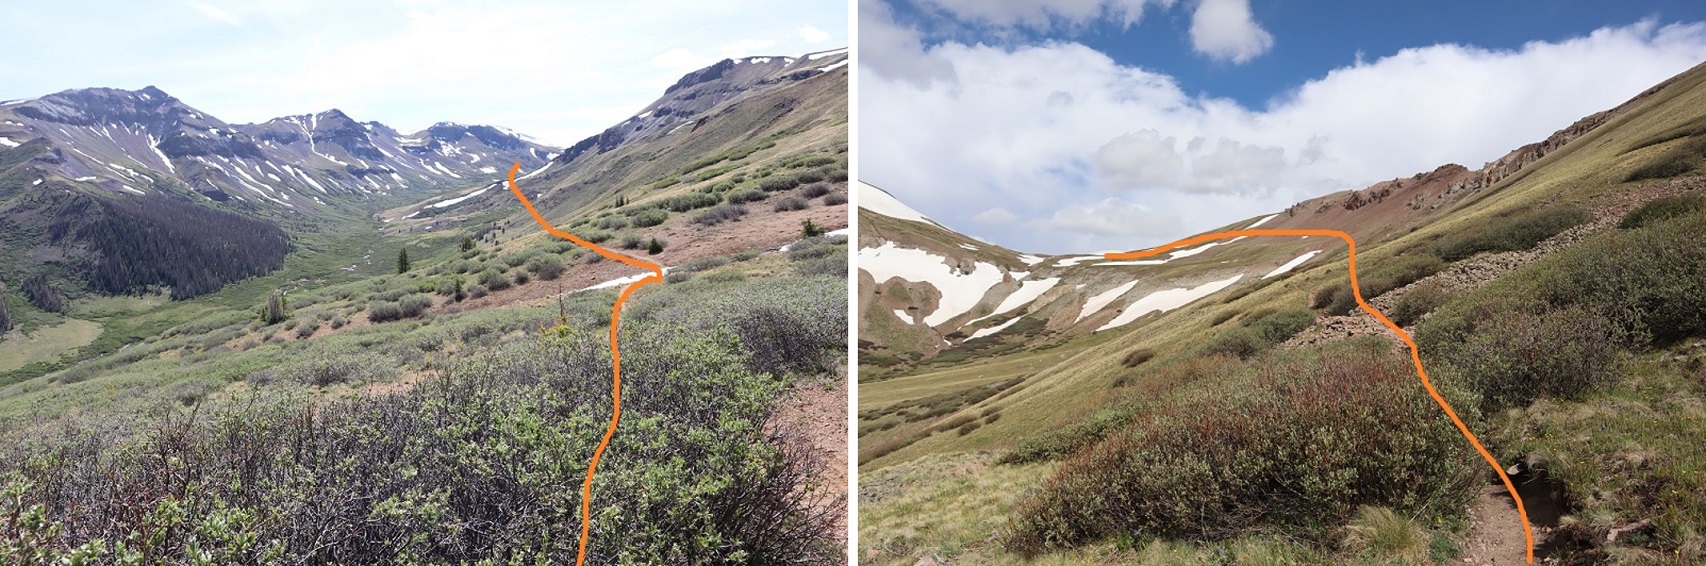
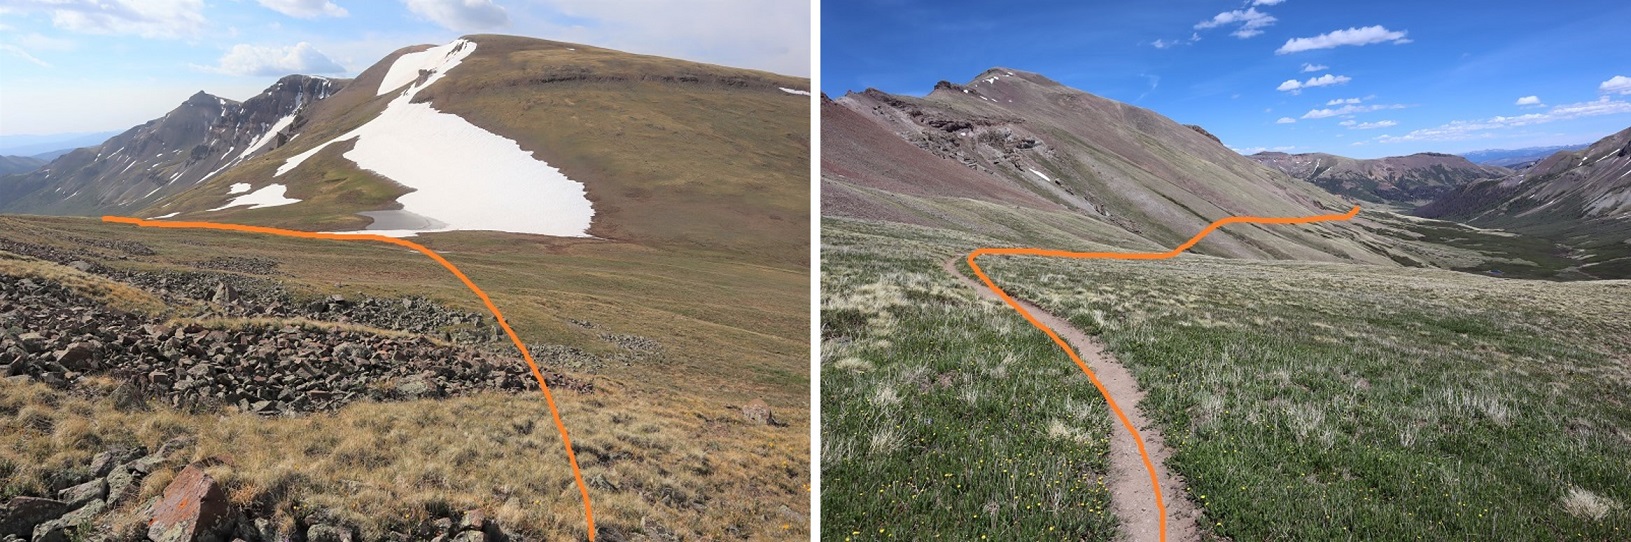
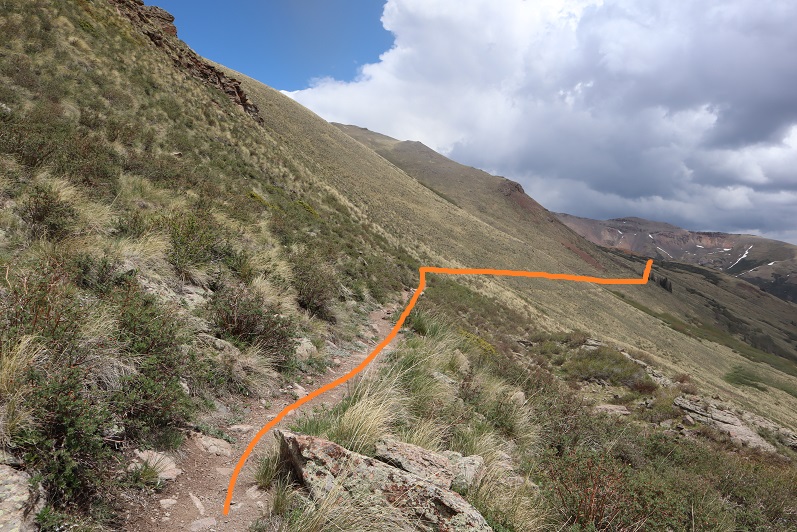
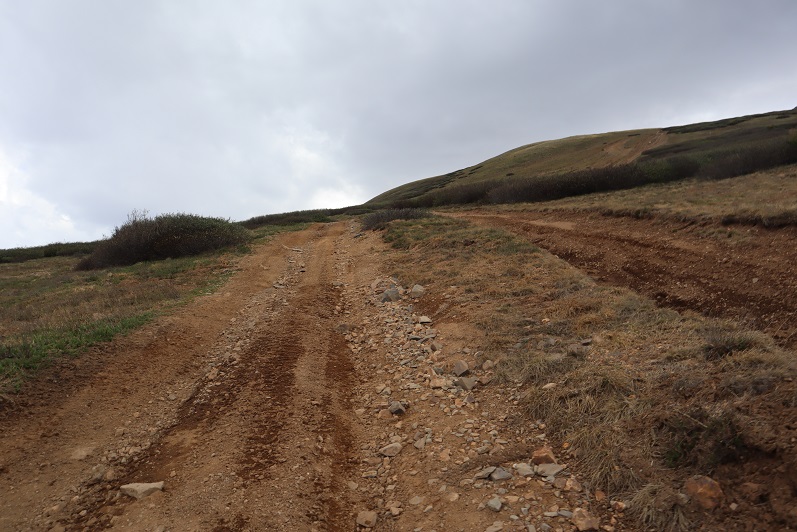
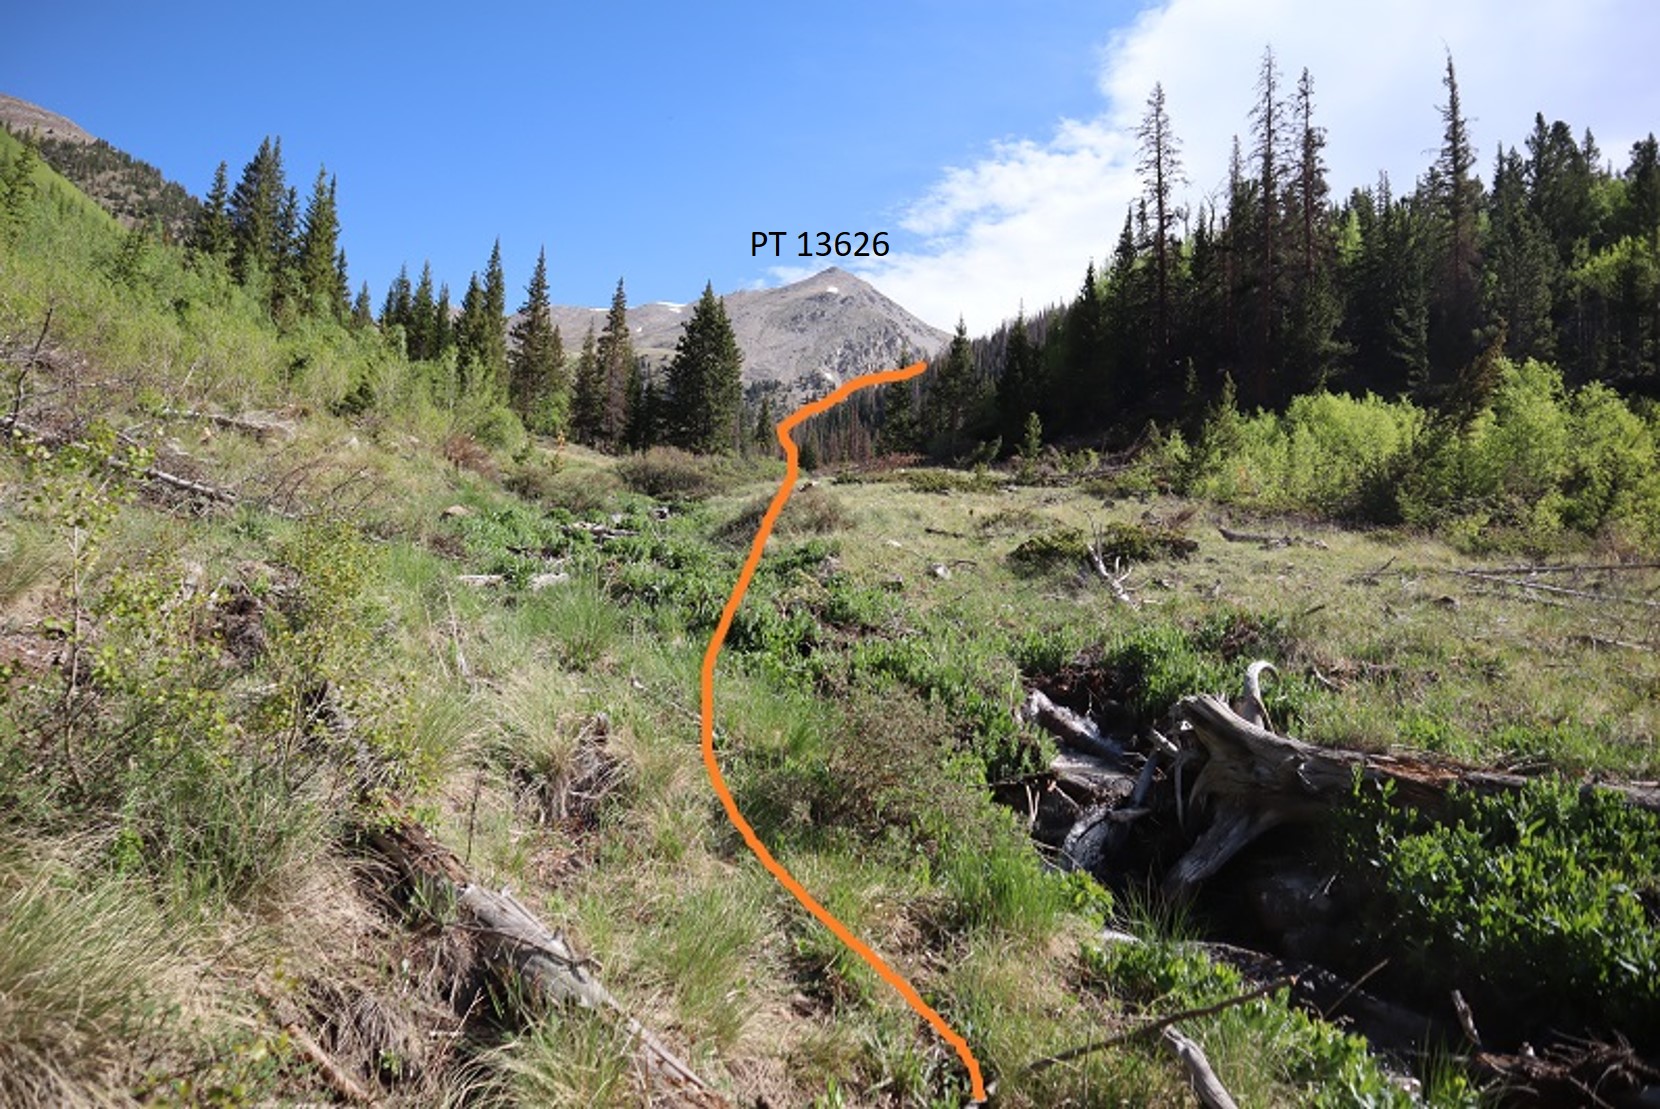
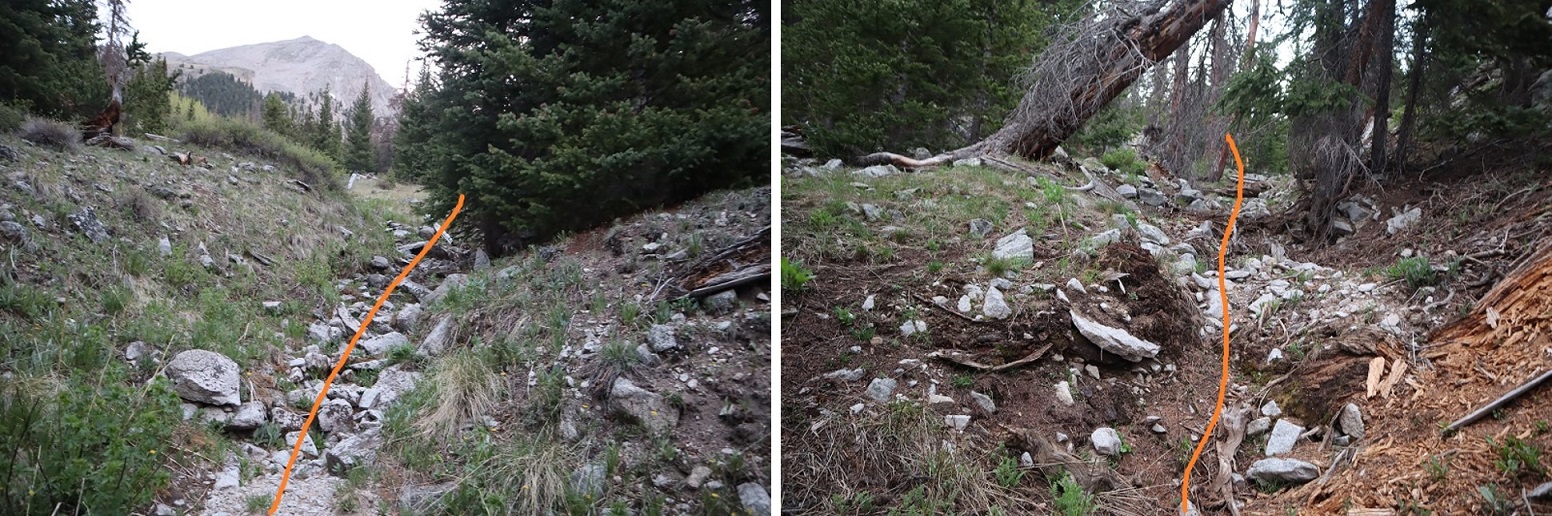
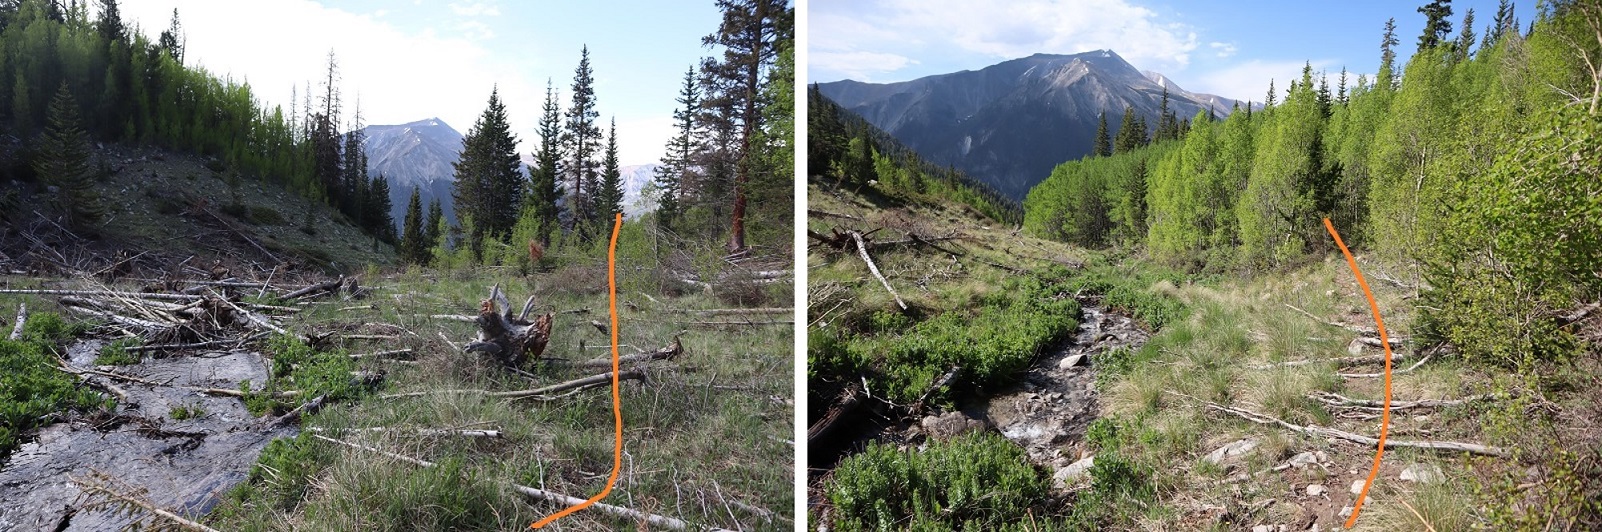
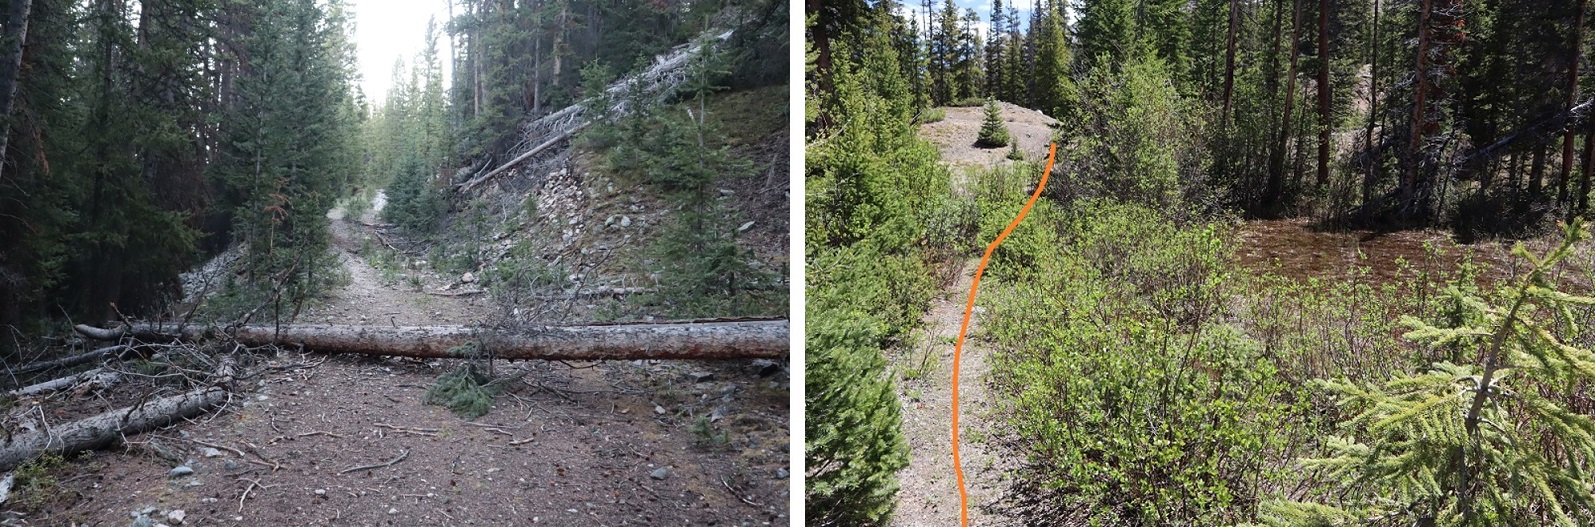
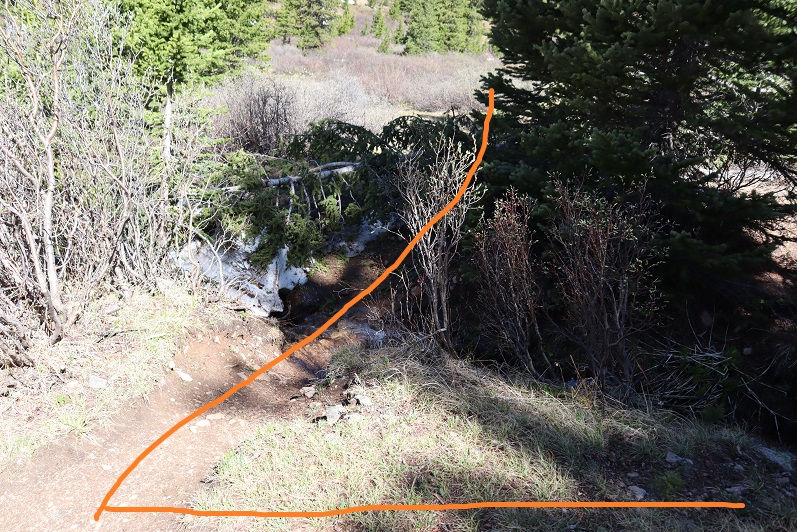
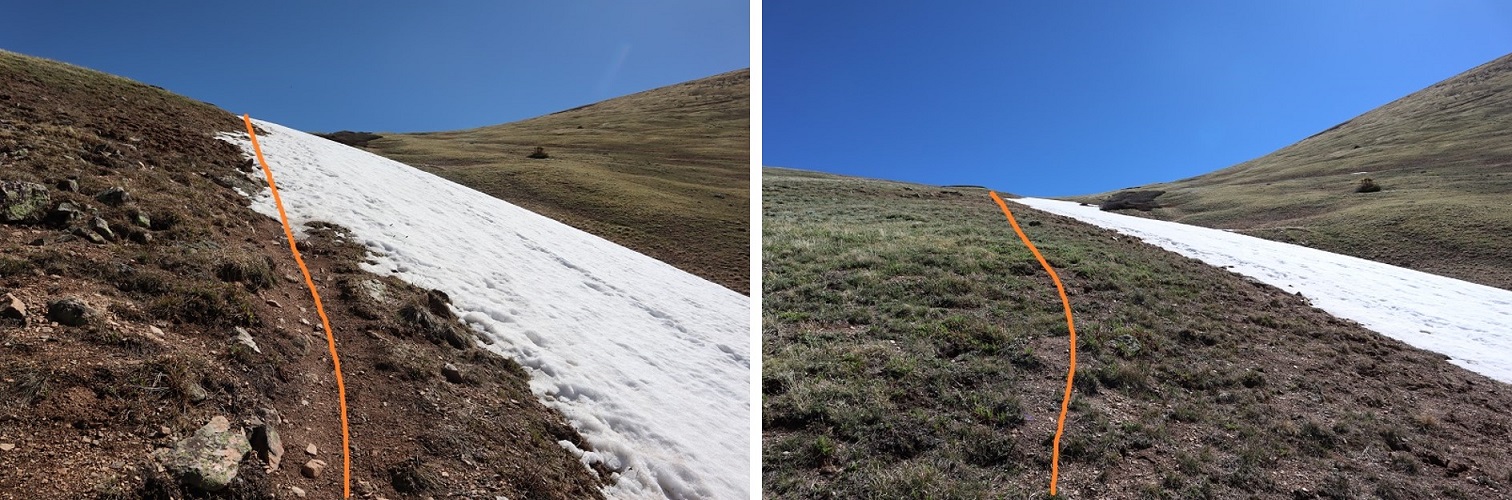
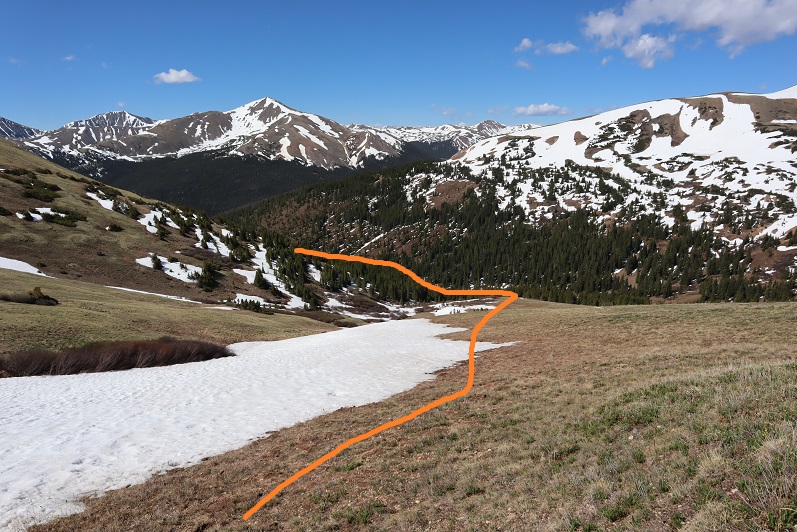
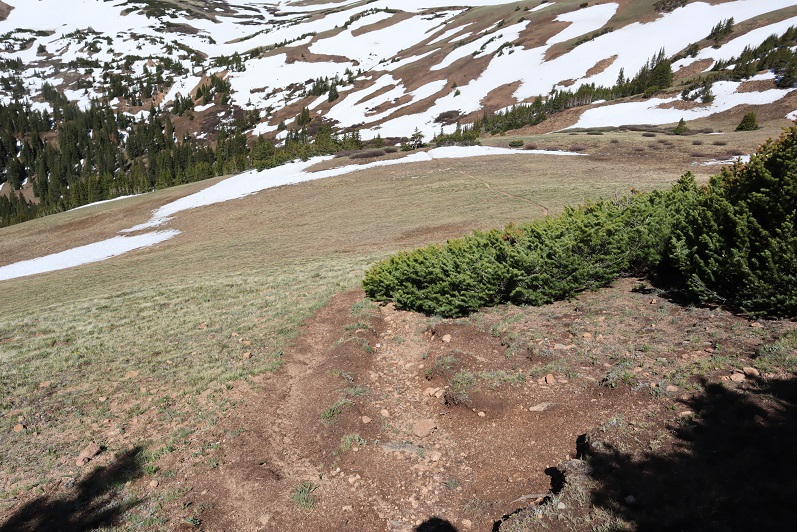
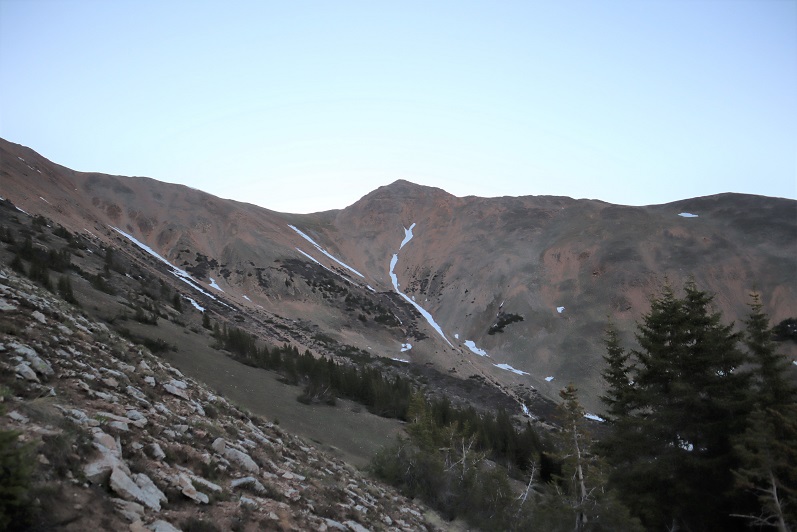
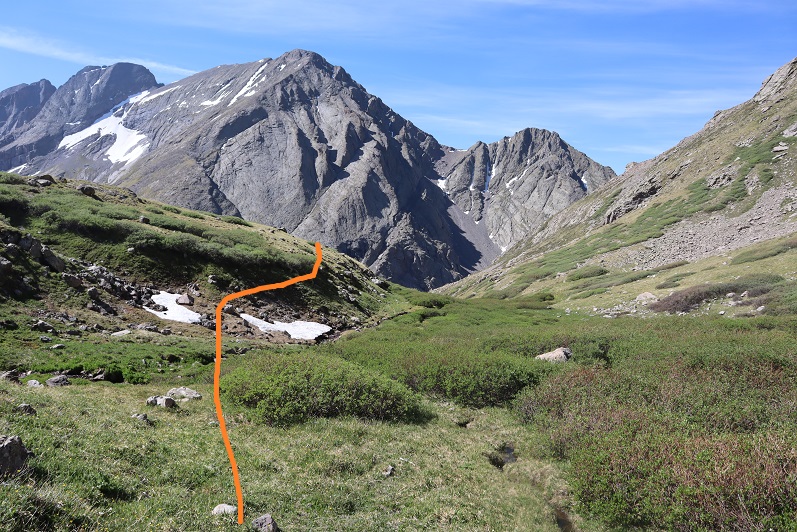
I continued following the trail until just before the boulder field. At this point I left the trail, turned left and continued north/north west up the hillside

15

16

17

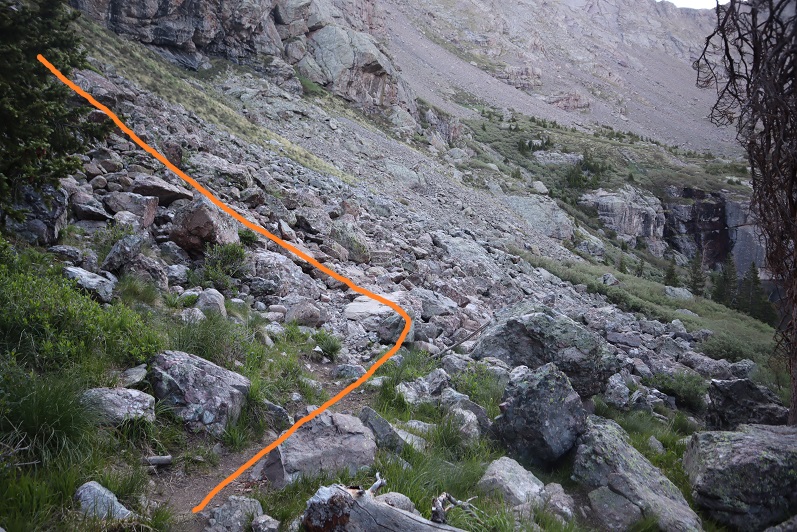
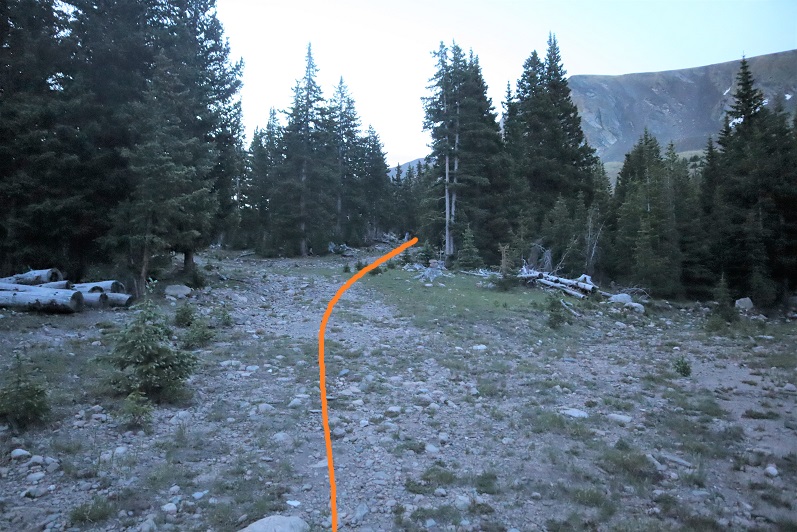
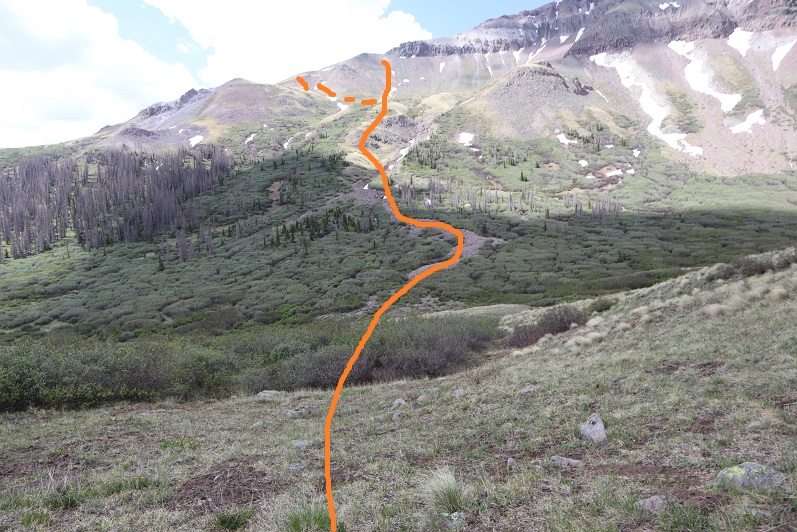
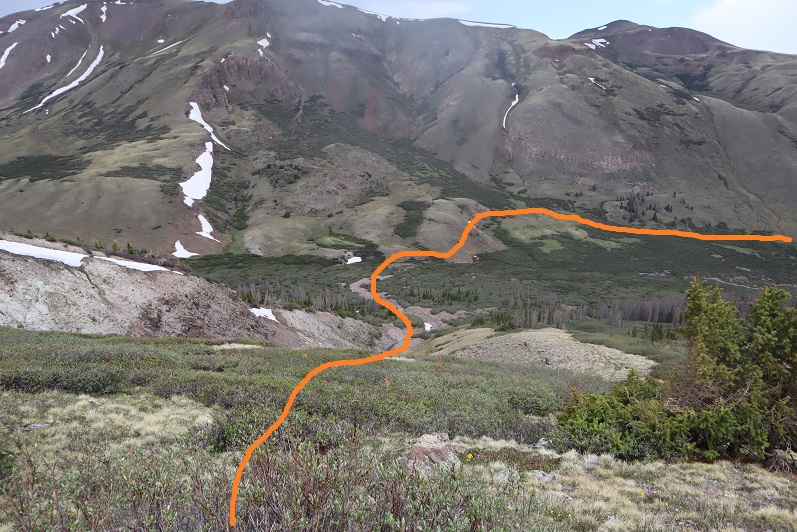
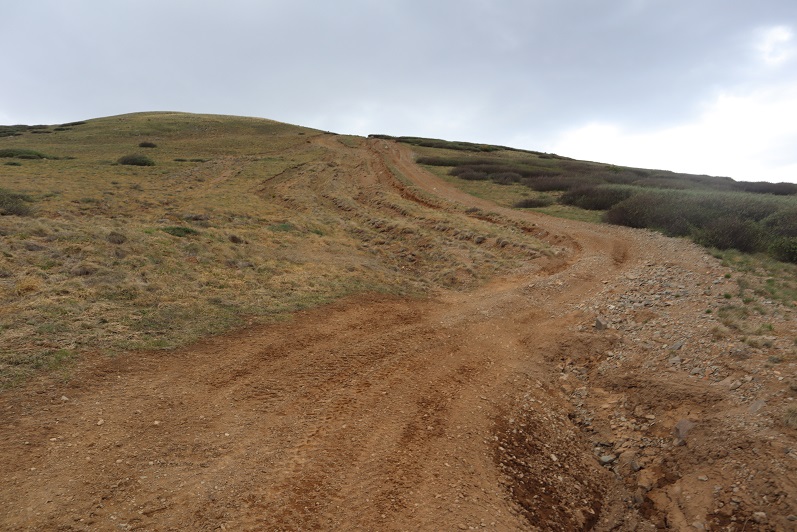
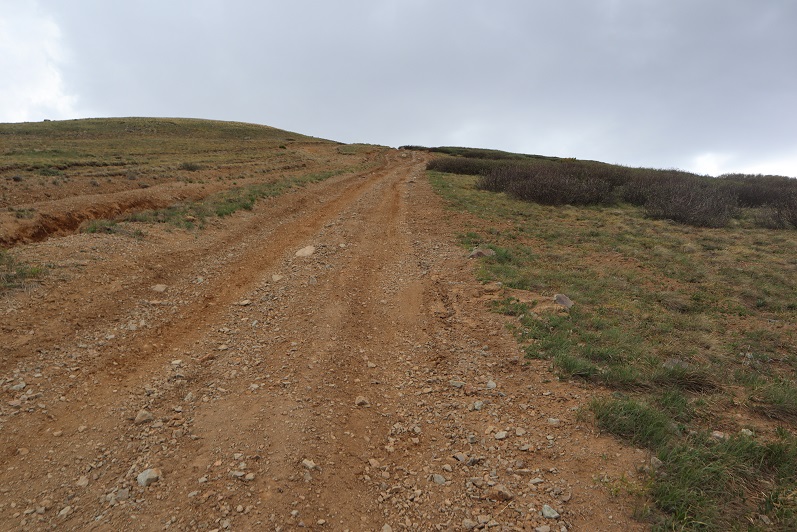
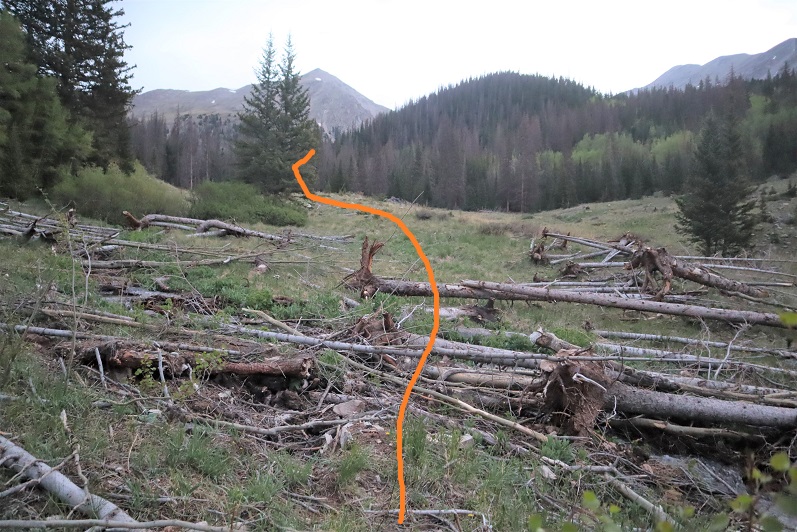
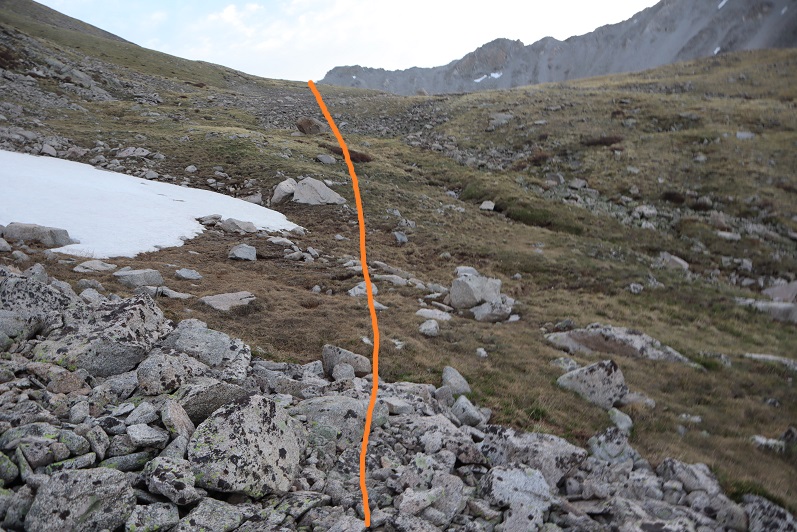
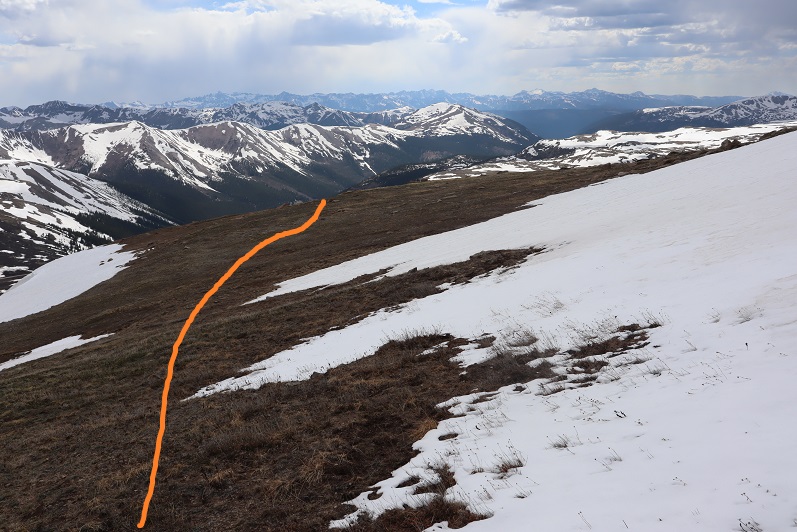
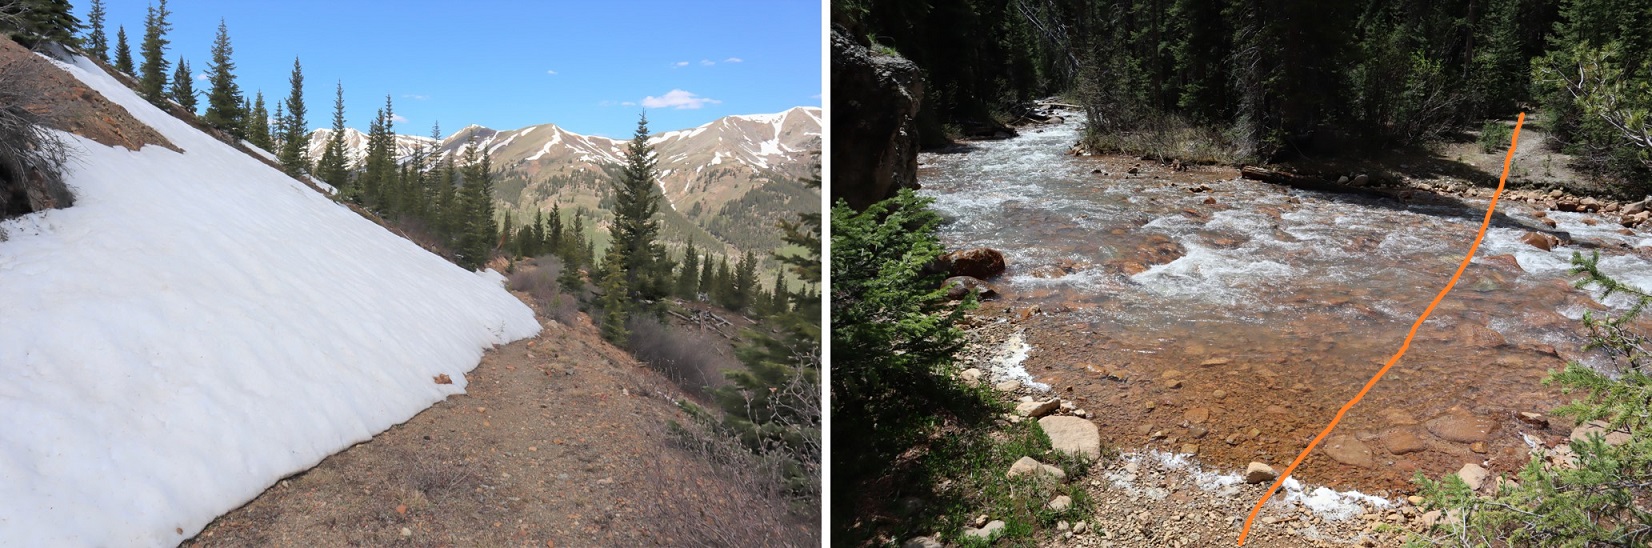
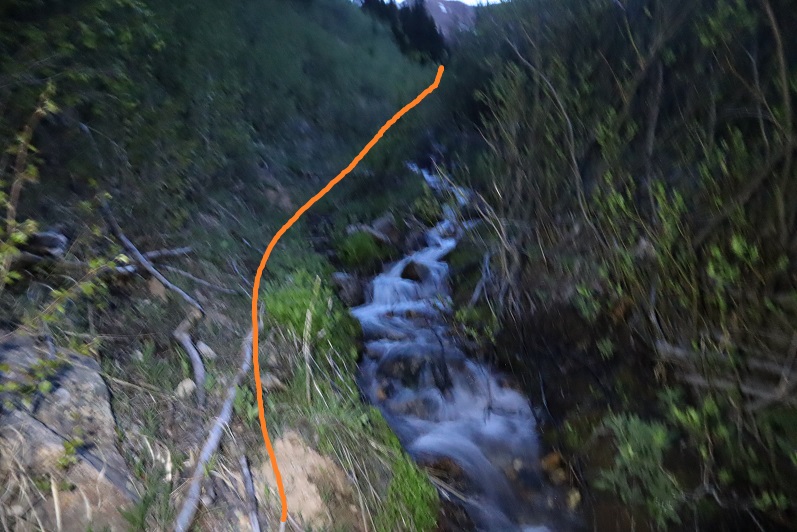
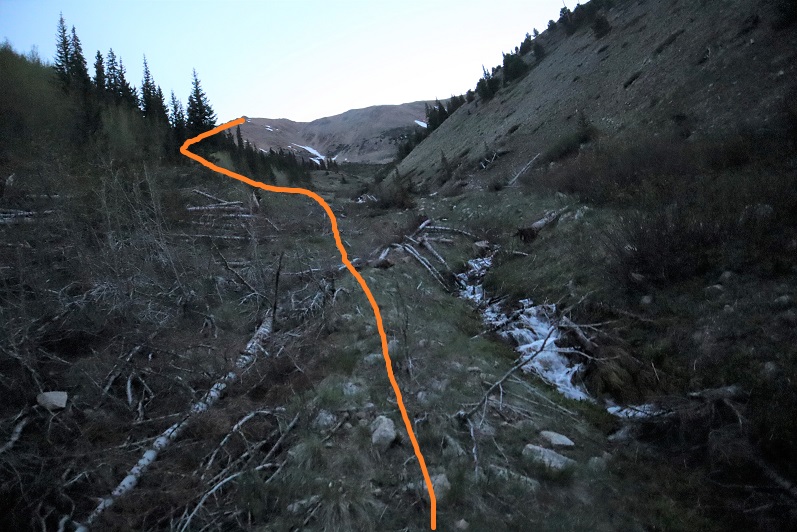
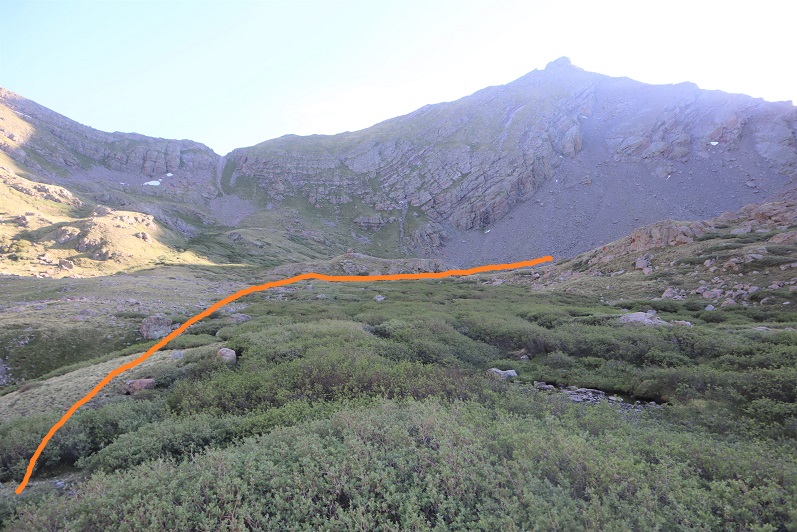
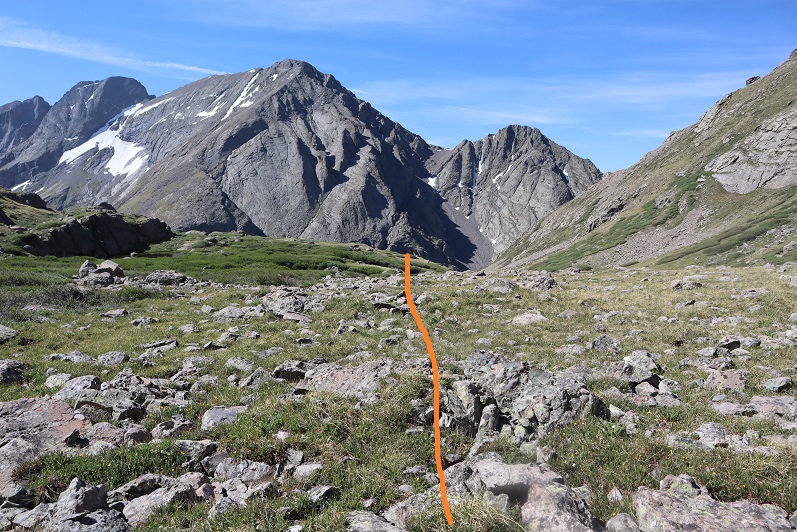
There is no trail, but the route is easy to follow, as after I gained this small ridge I kept the creek to my left and willows to my right and continued north up to the basin.

18

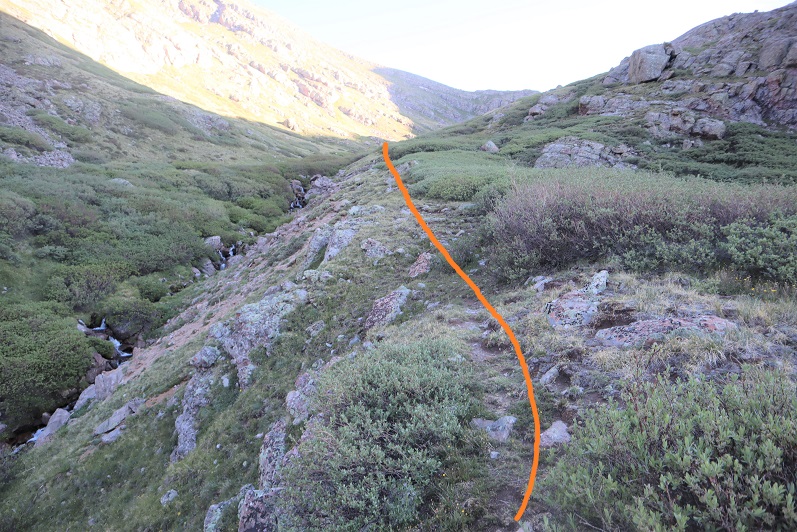
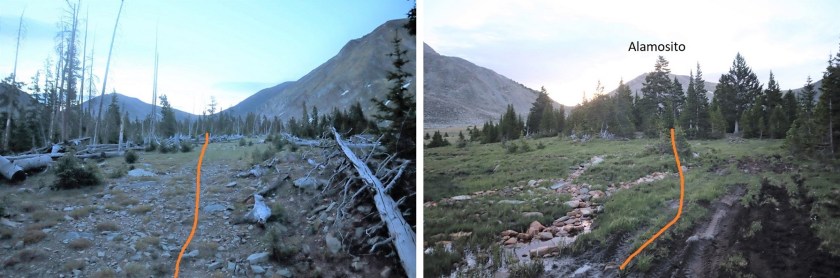
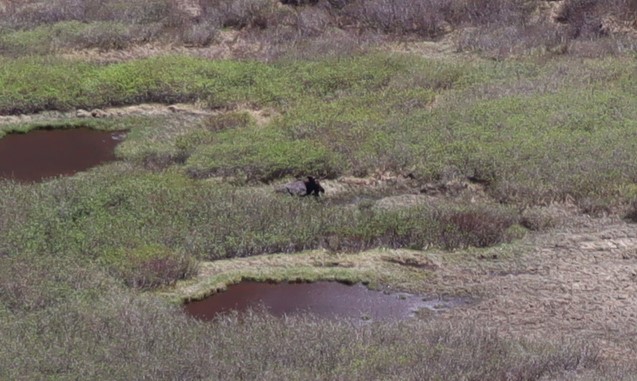
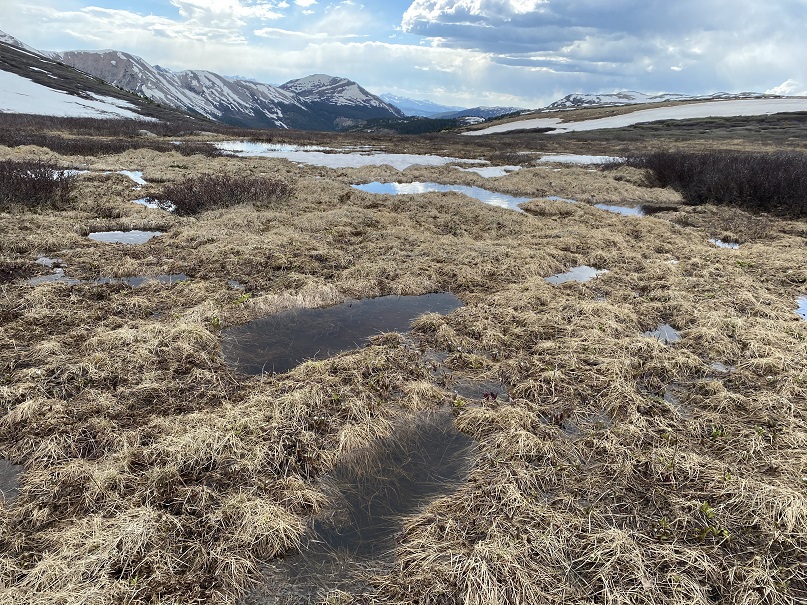
It’s important to try to stay as much in the center here as possible, as to the right there are willows and shallow ponds to contend with. (I made this mistake on my way in, but was able to avoid it on my way out. I scared several deer out from willows in the process.). At the end of the basin you turn right and head east

19

20

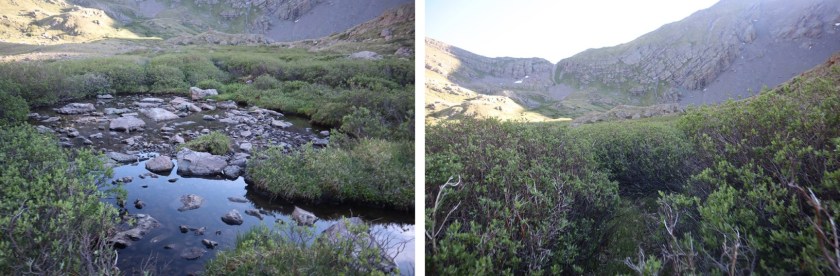
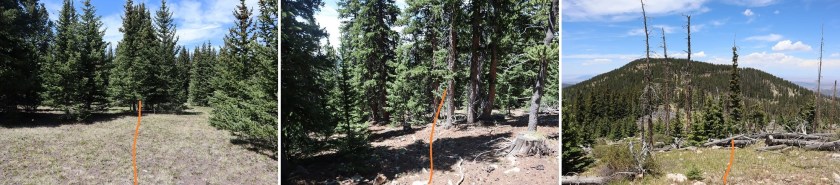
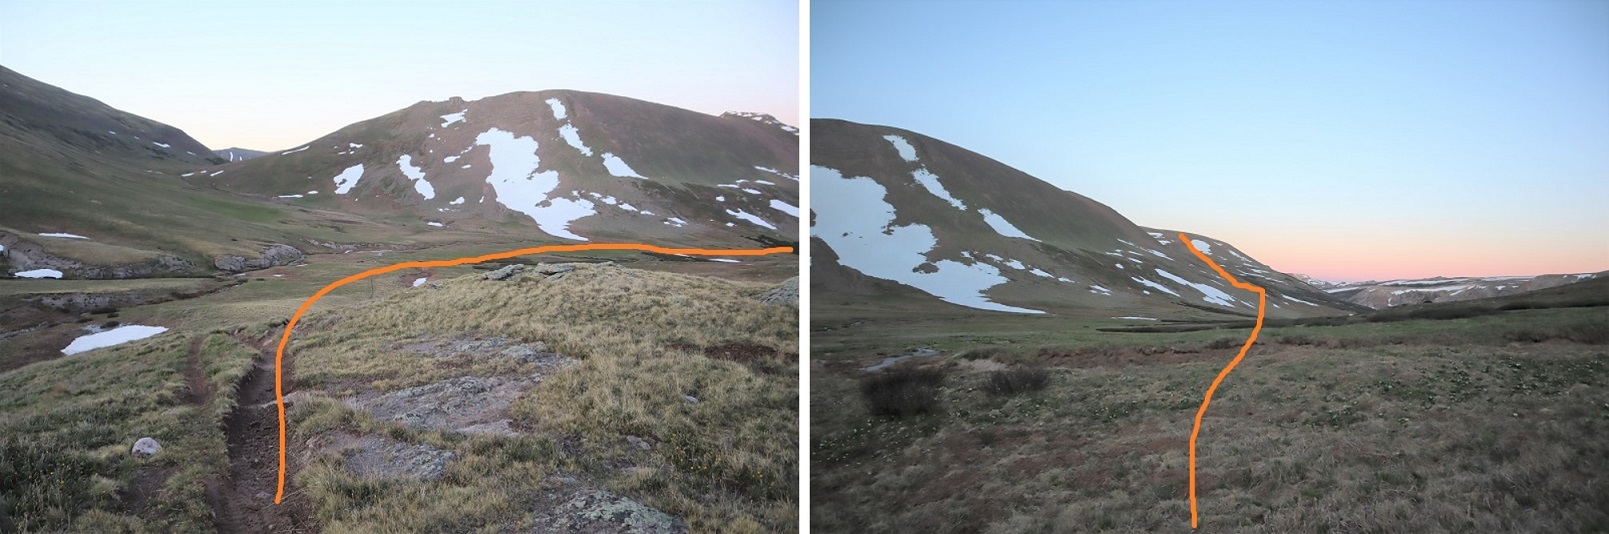
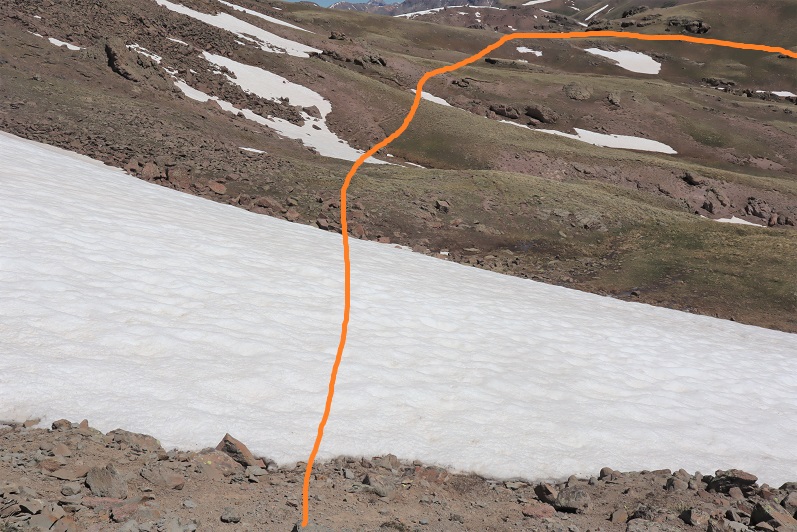
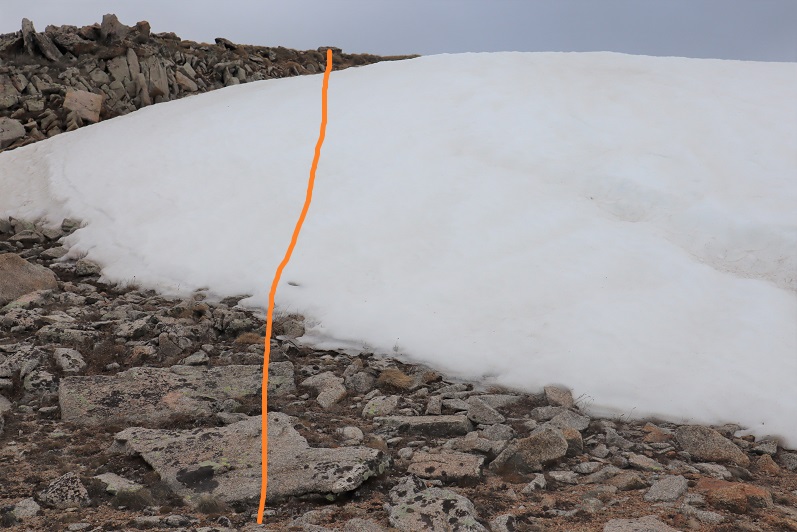
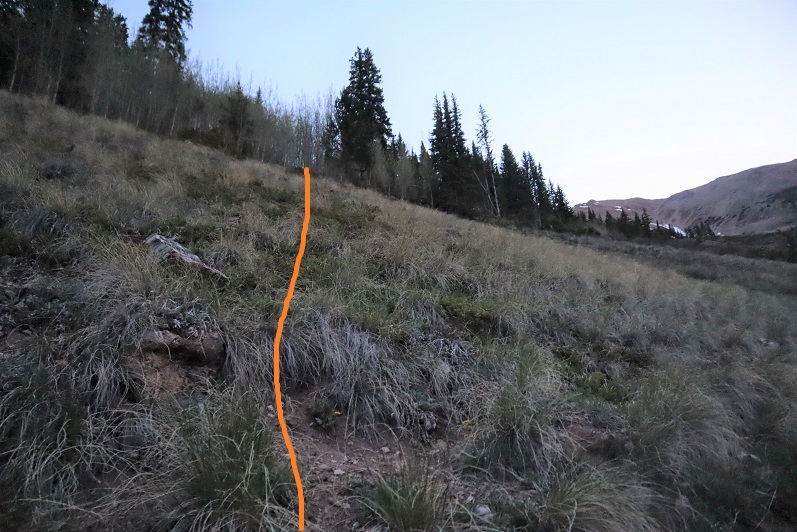
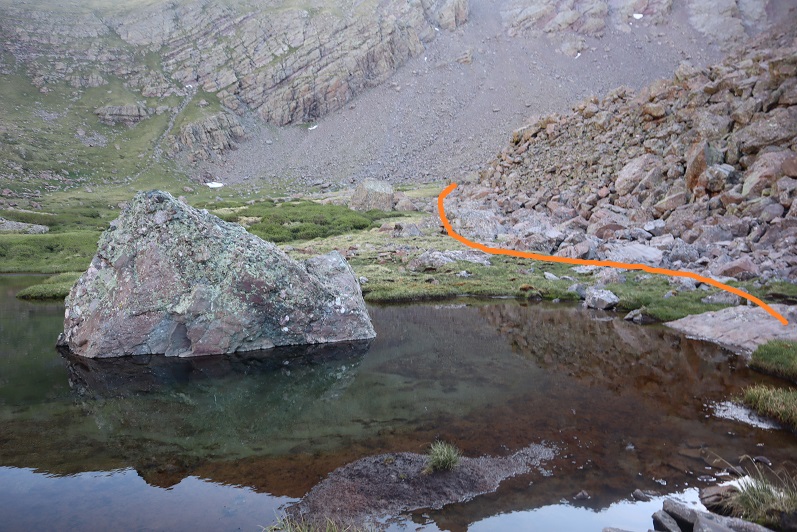
This area was a bit mushy, so I went to the right around this rock/water to avoid getting wet, and then entered another basin

21

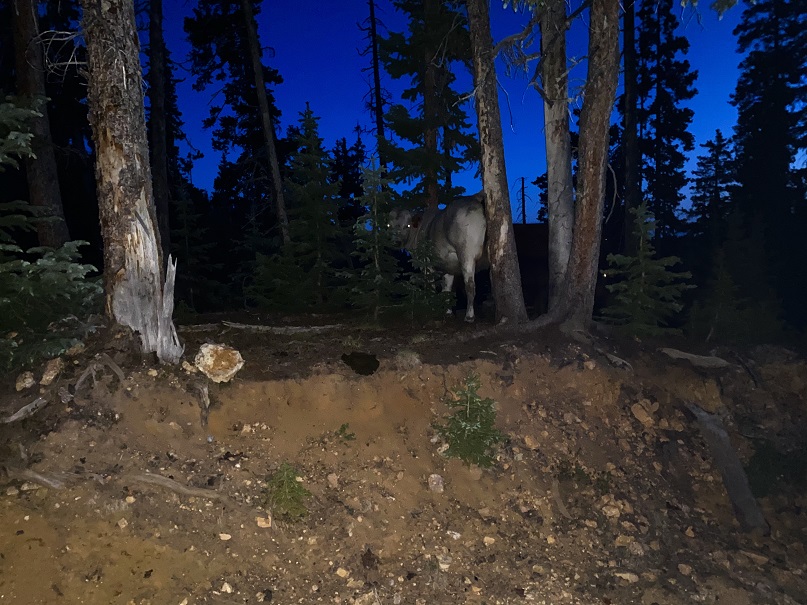
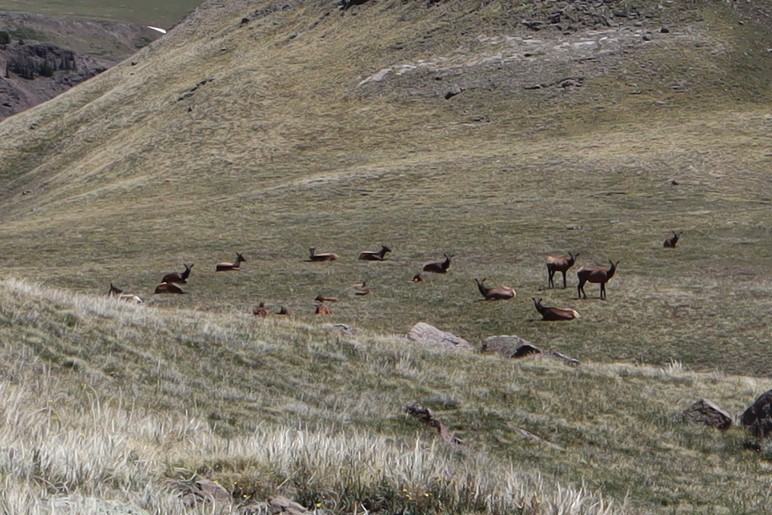
There were a lot of friendly deer here who didn’t seem to mind my hiking past them. I gave them room, but they let me get within 20 feet of them with no problem.

22

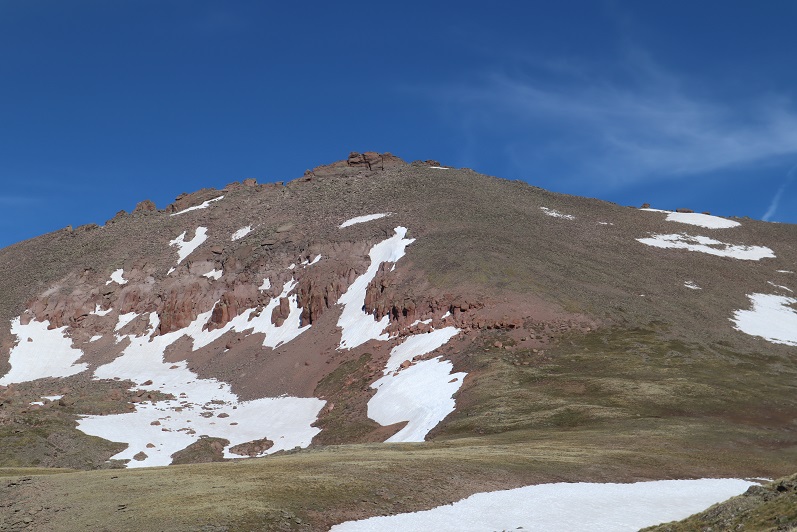
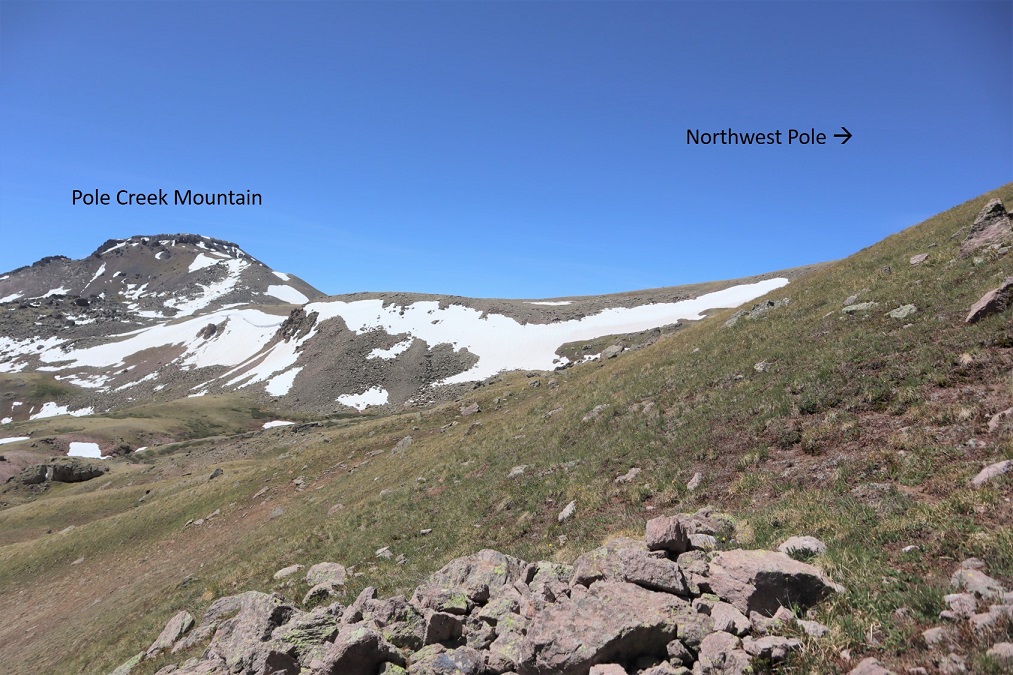
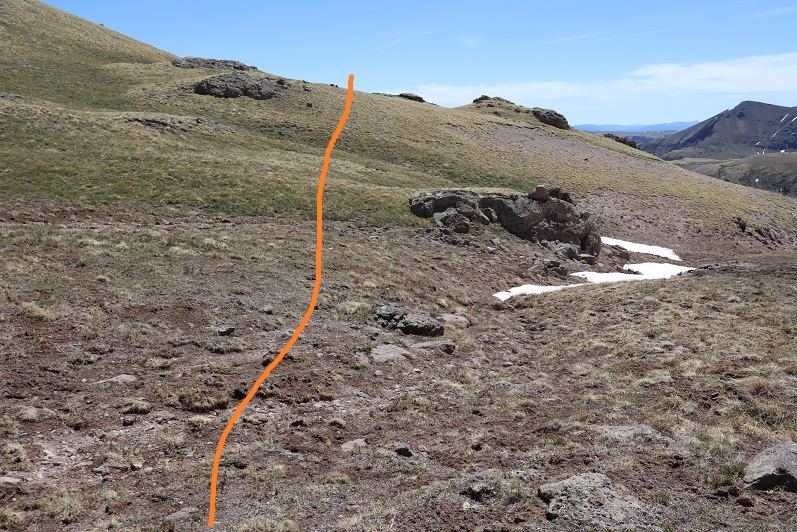
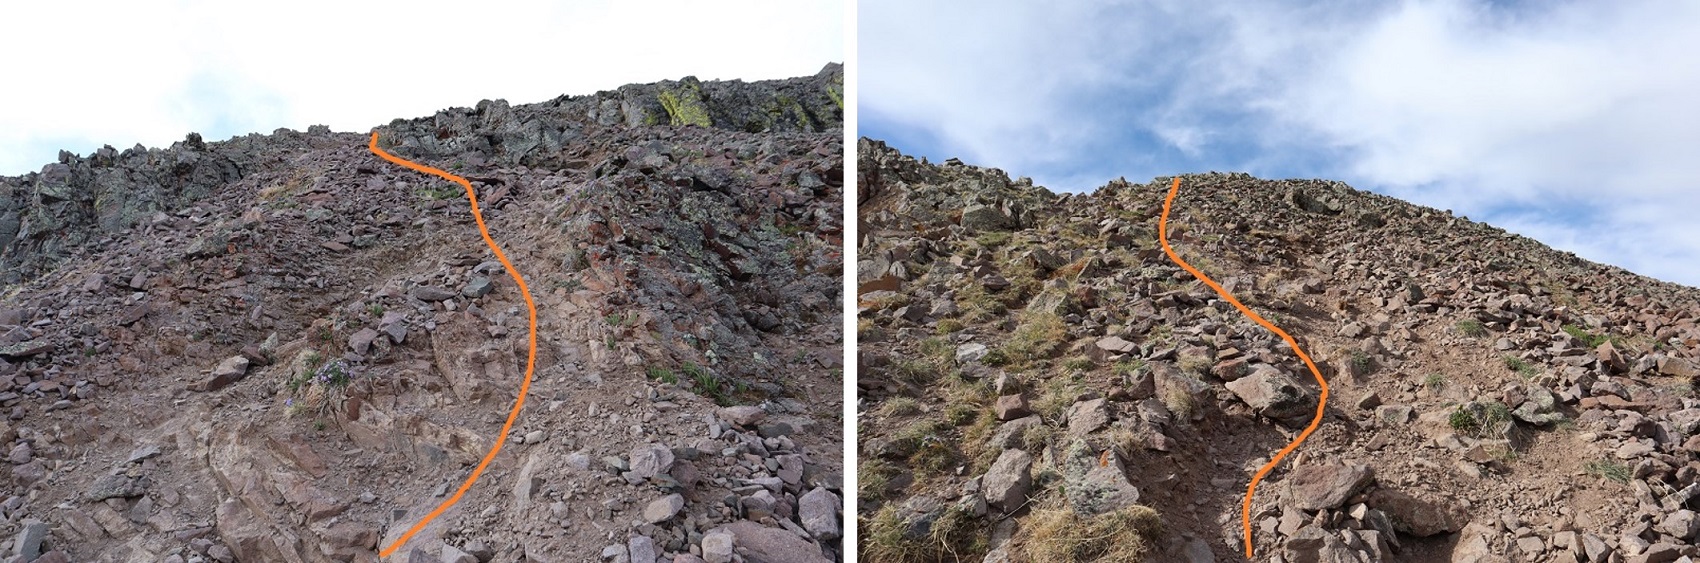
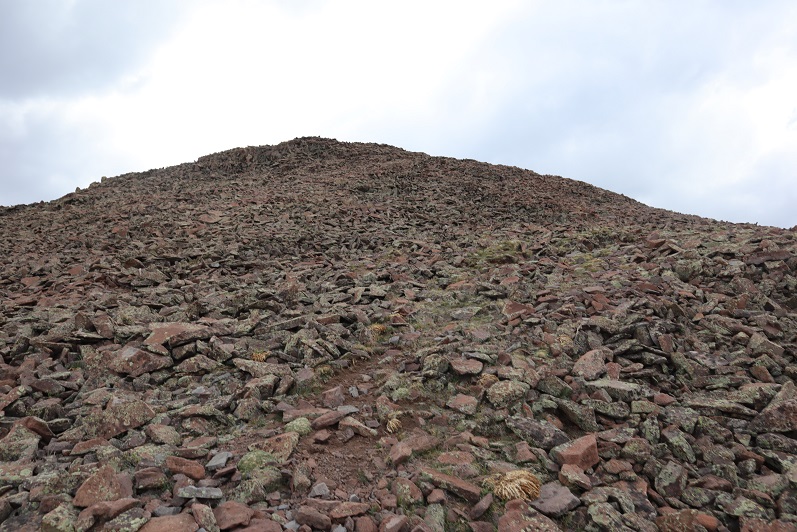
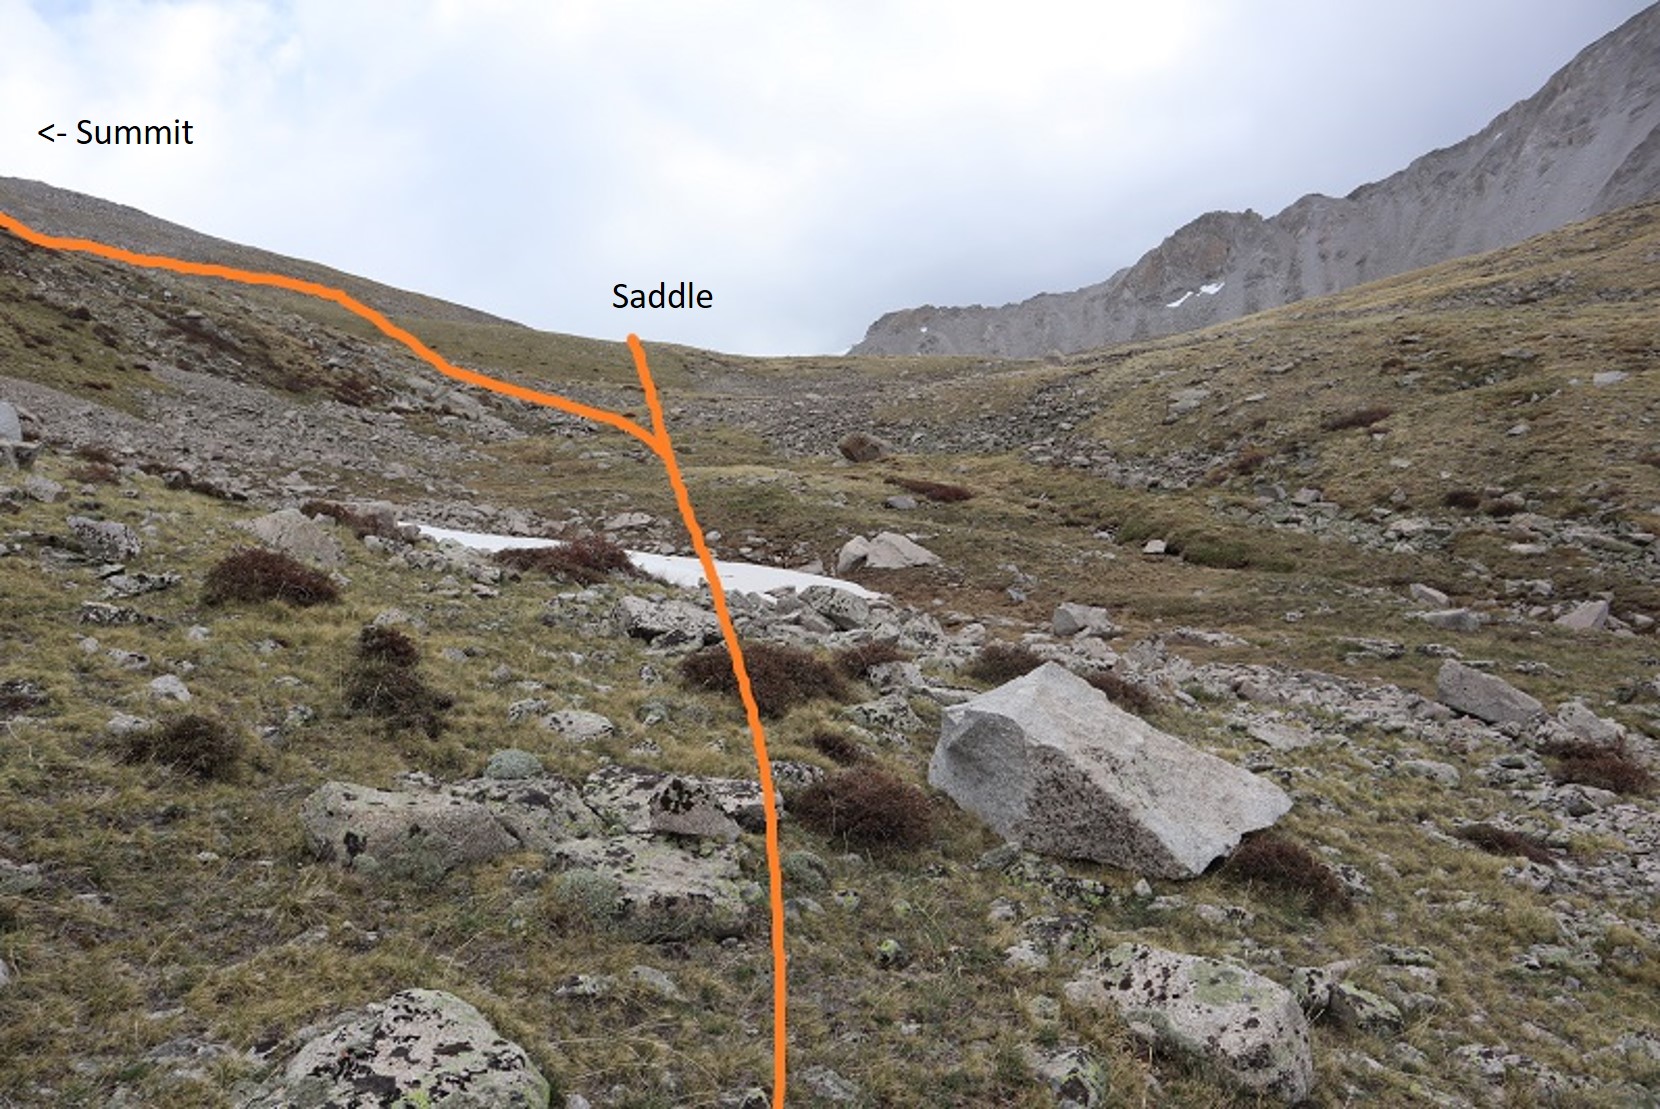
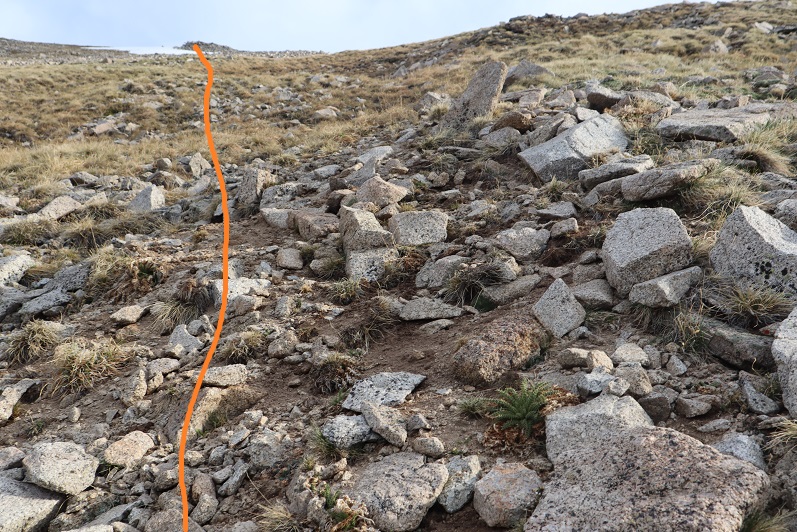
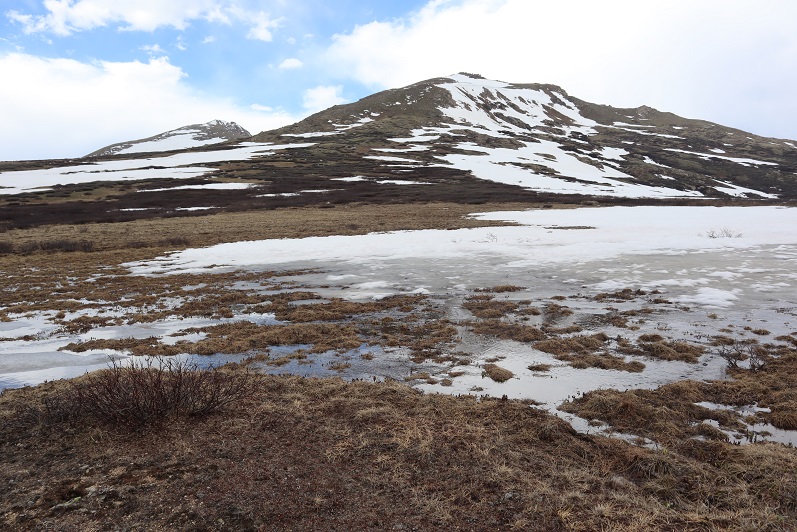
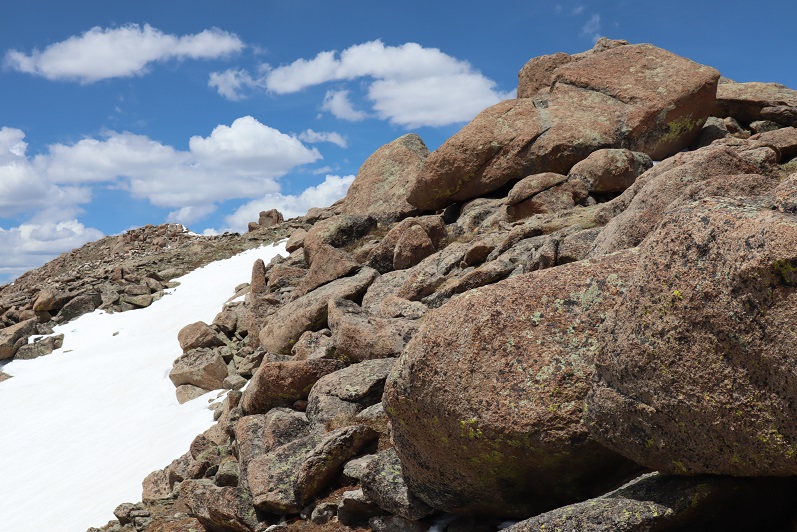
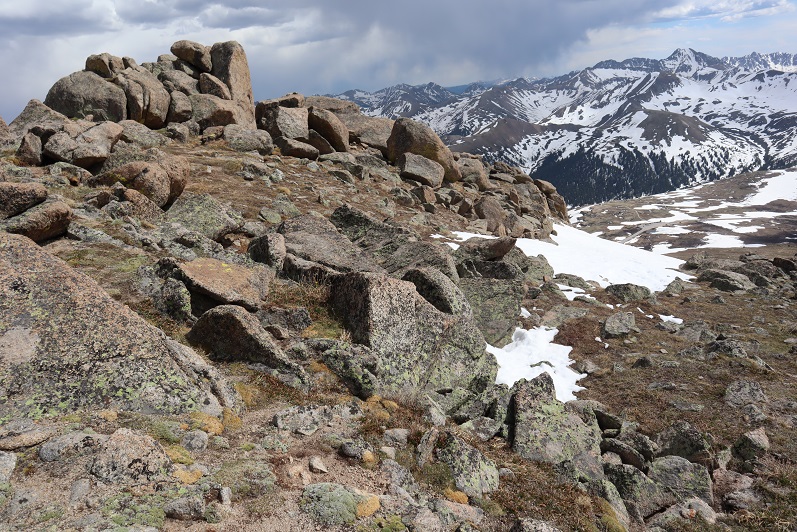
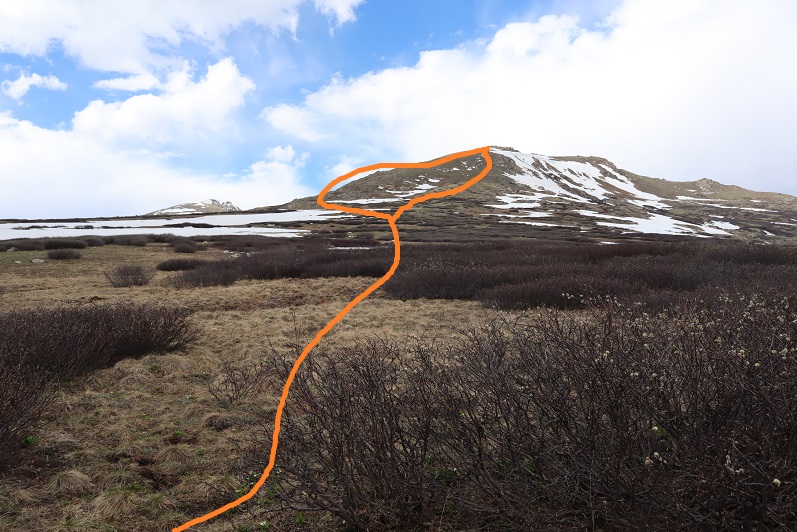
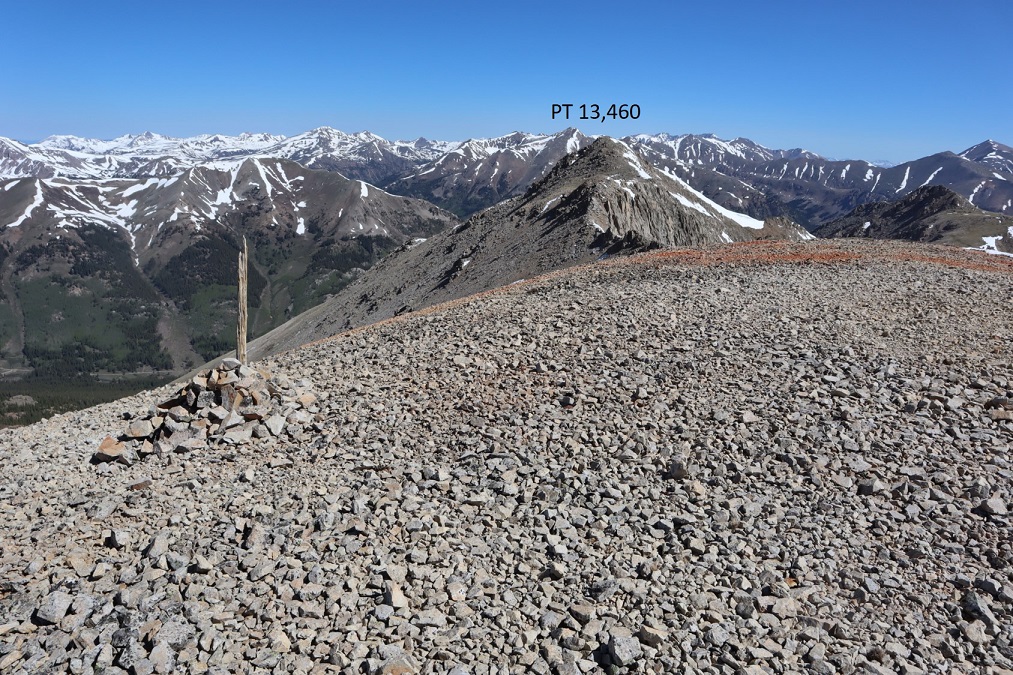
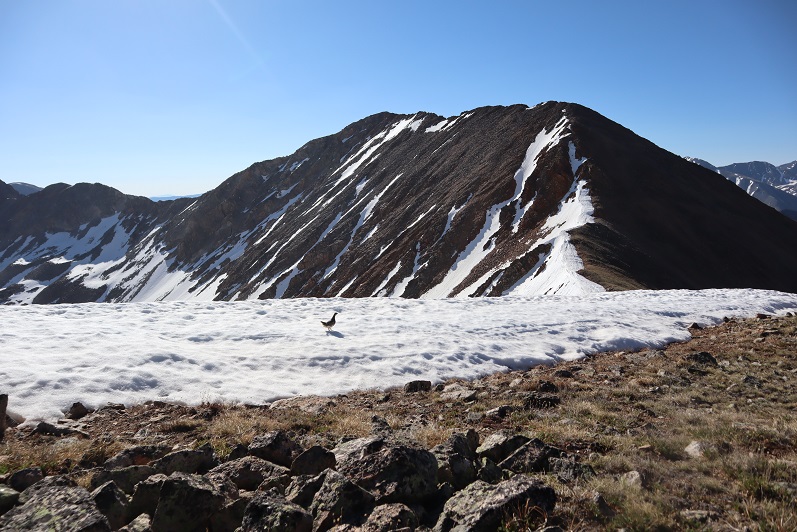
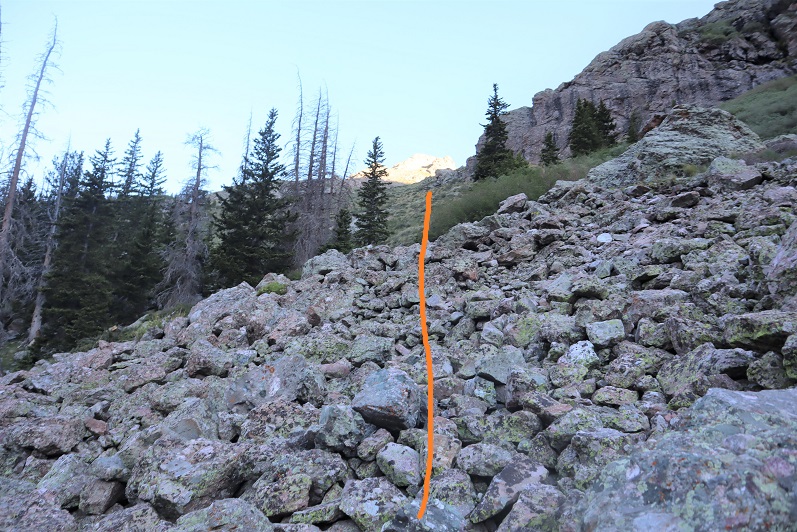
I headed east into the second basin, which was full of large rocks

23

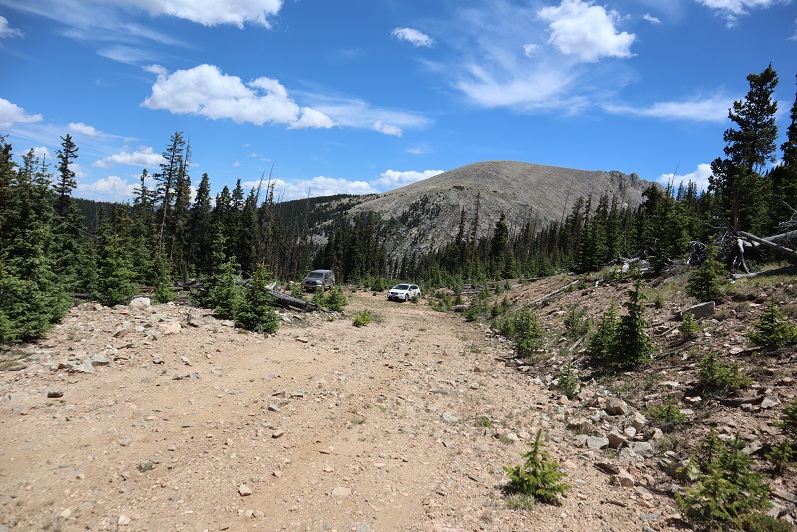
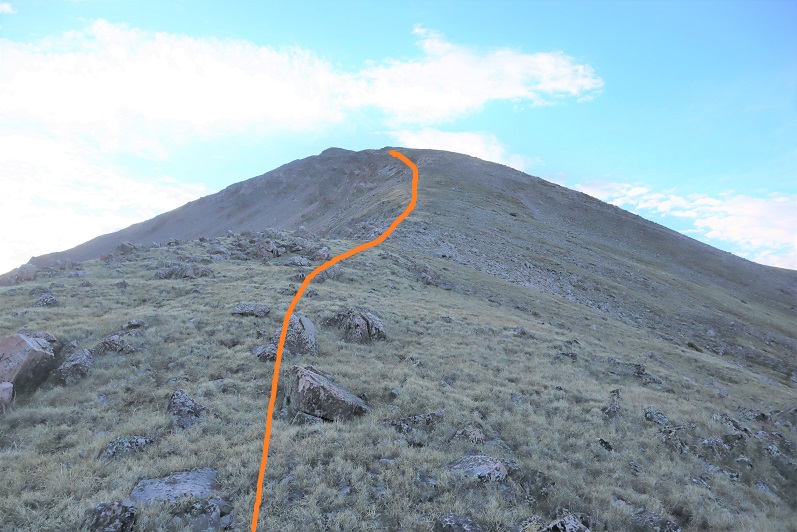
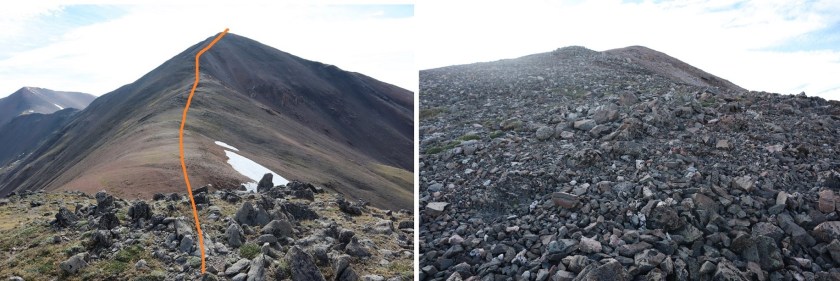
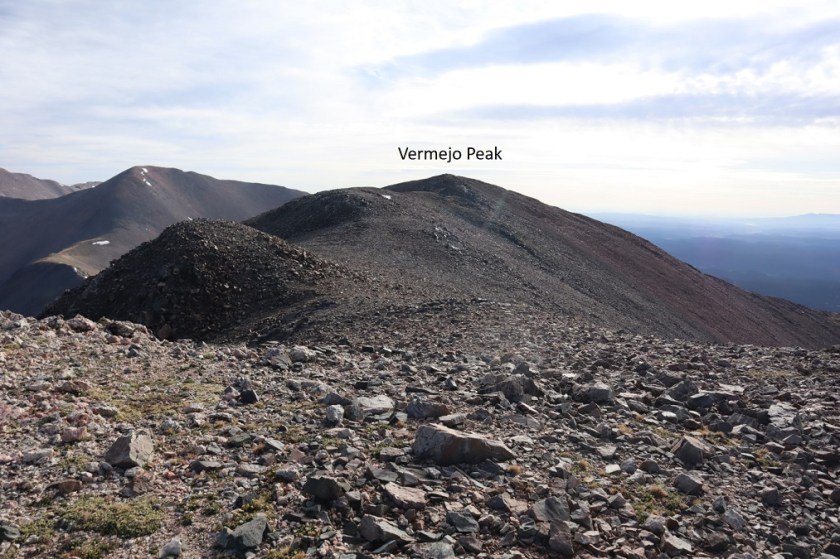
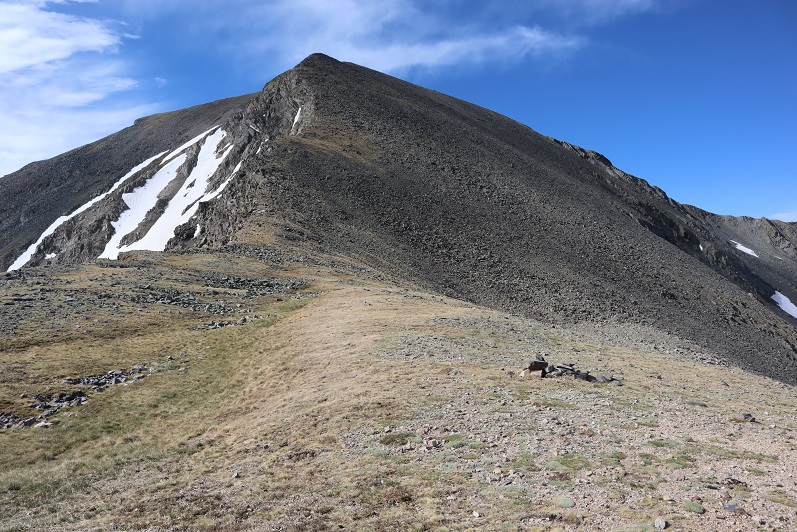
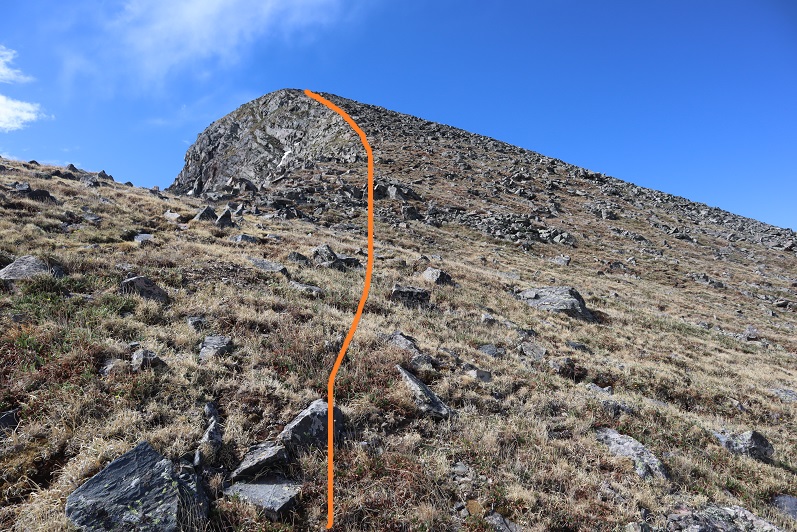
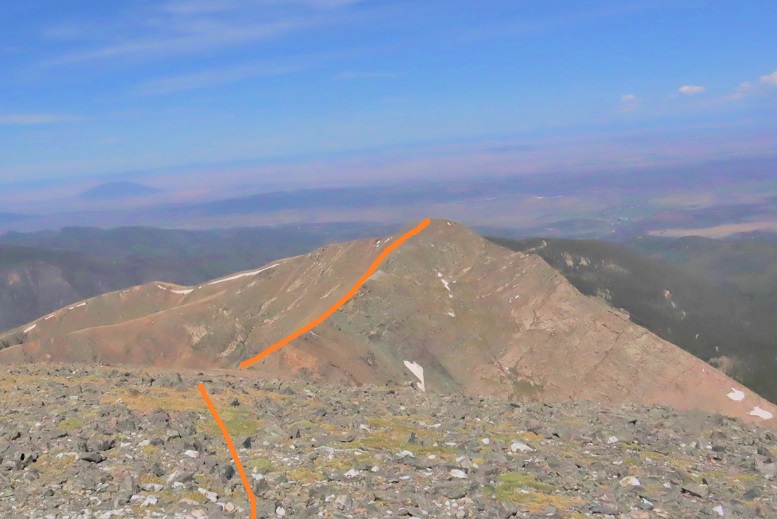
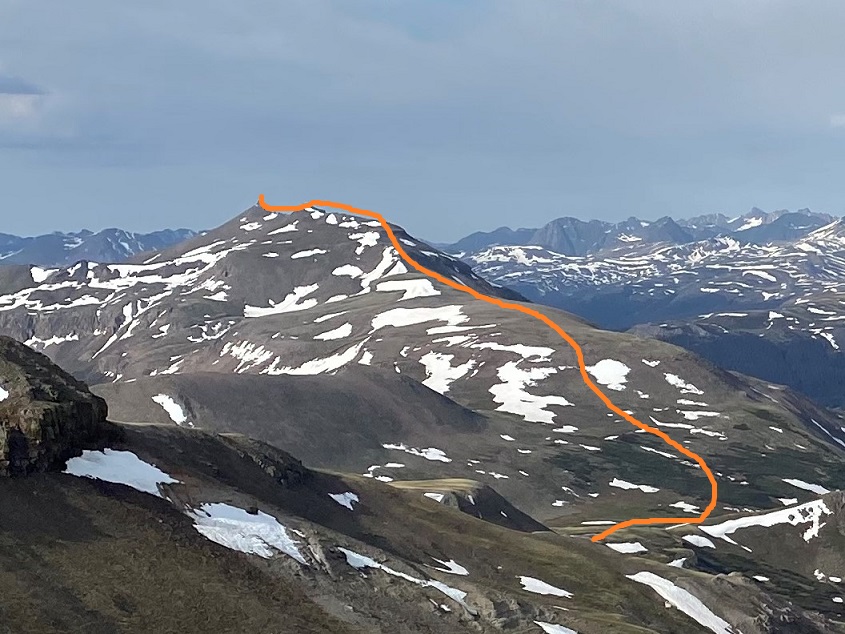
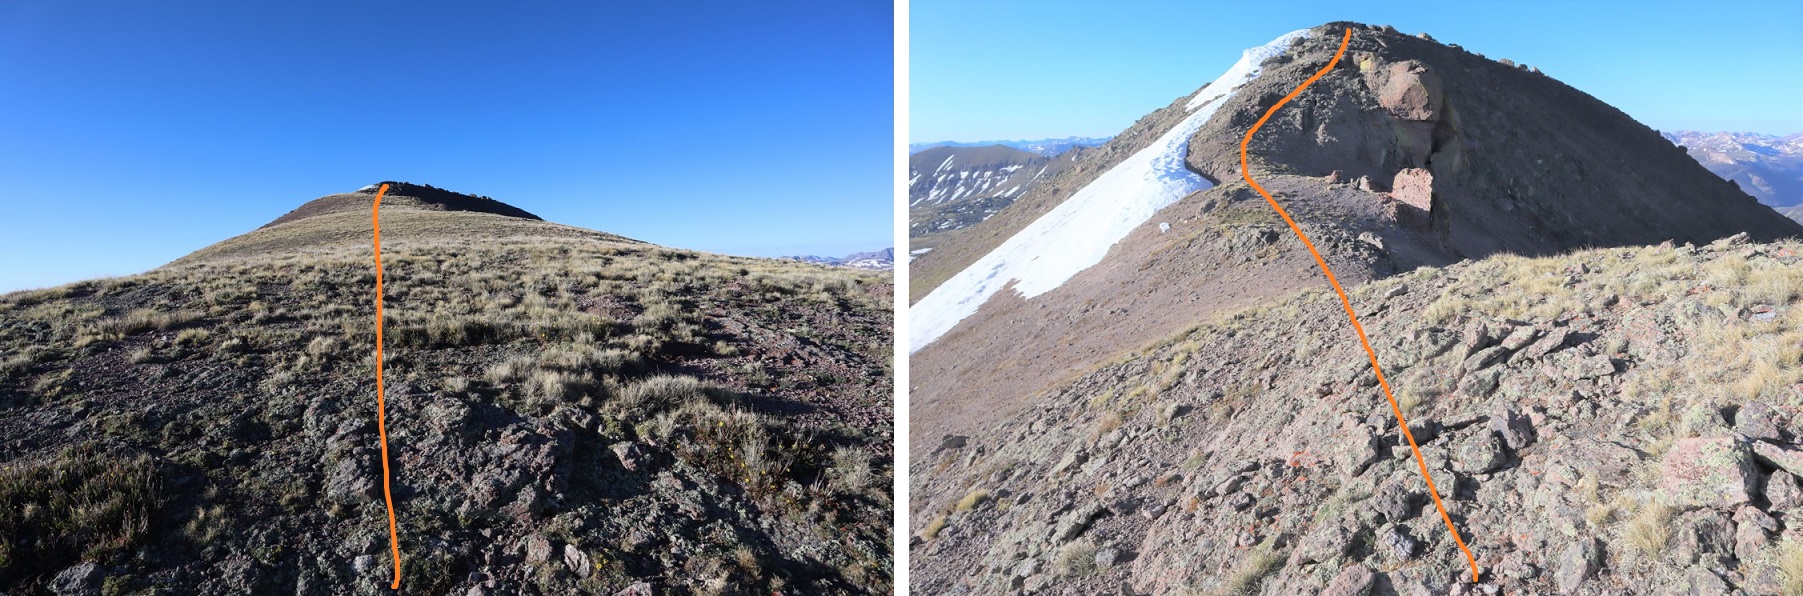
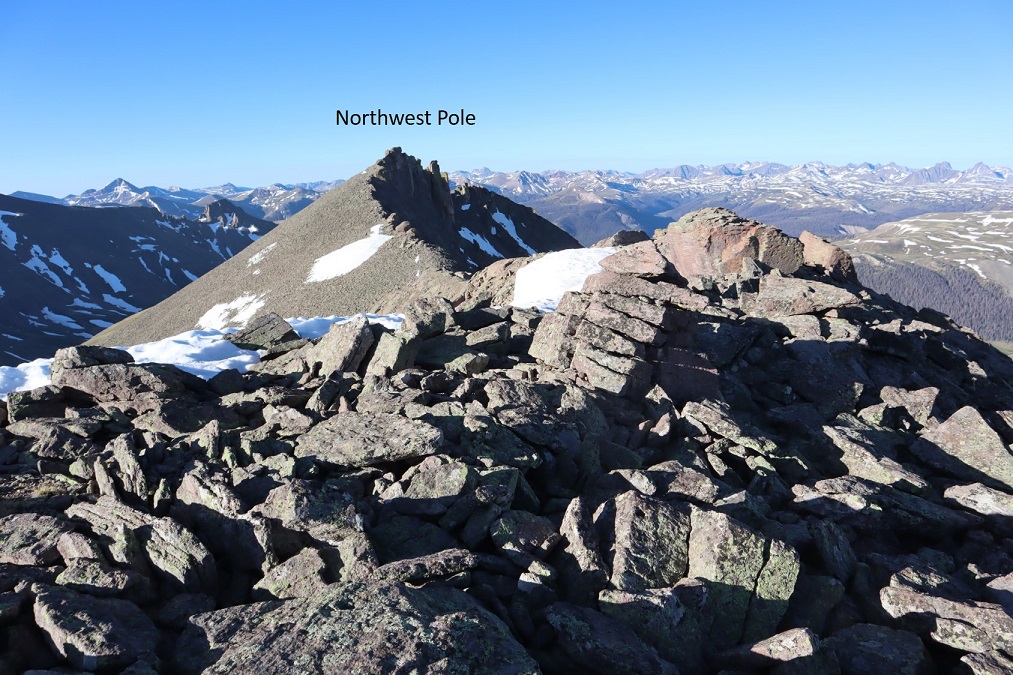
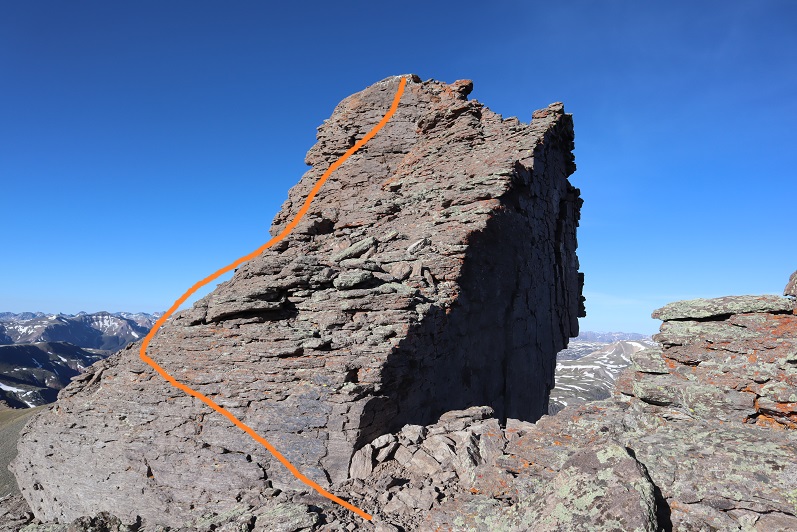
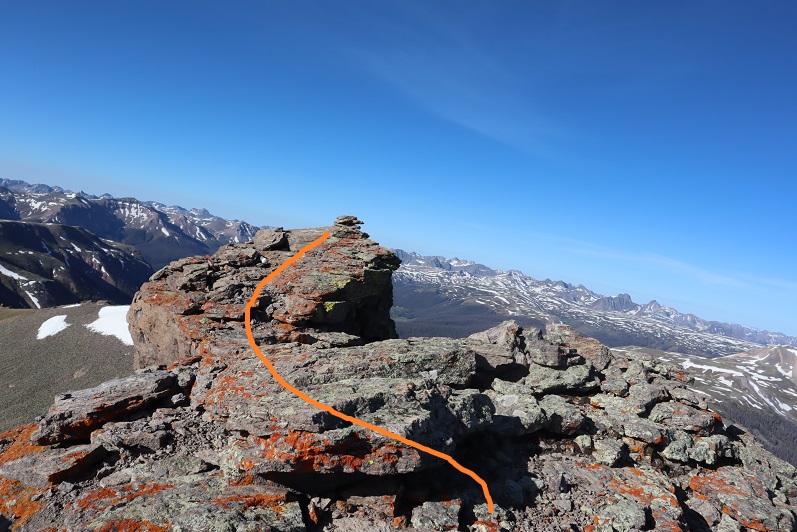
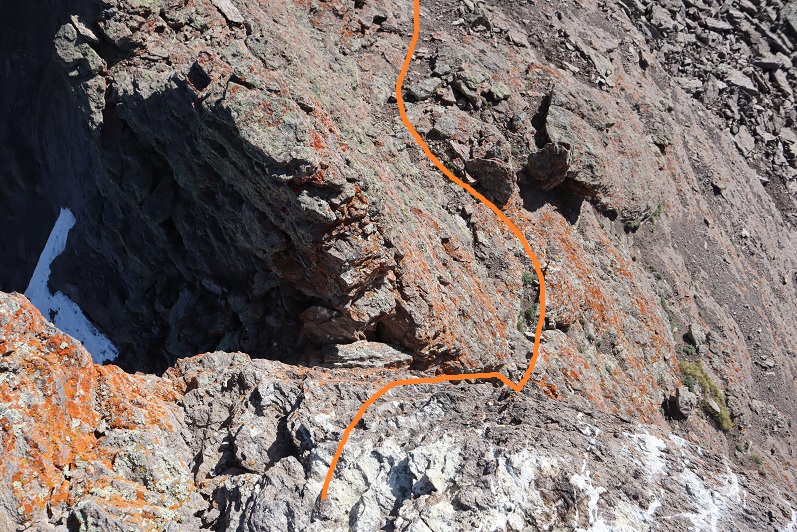
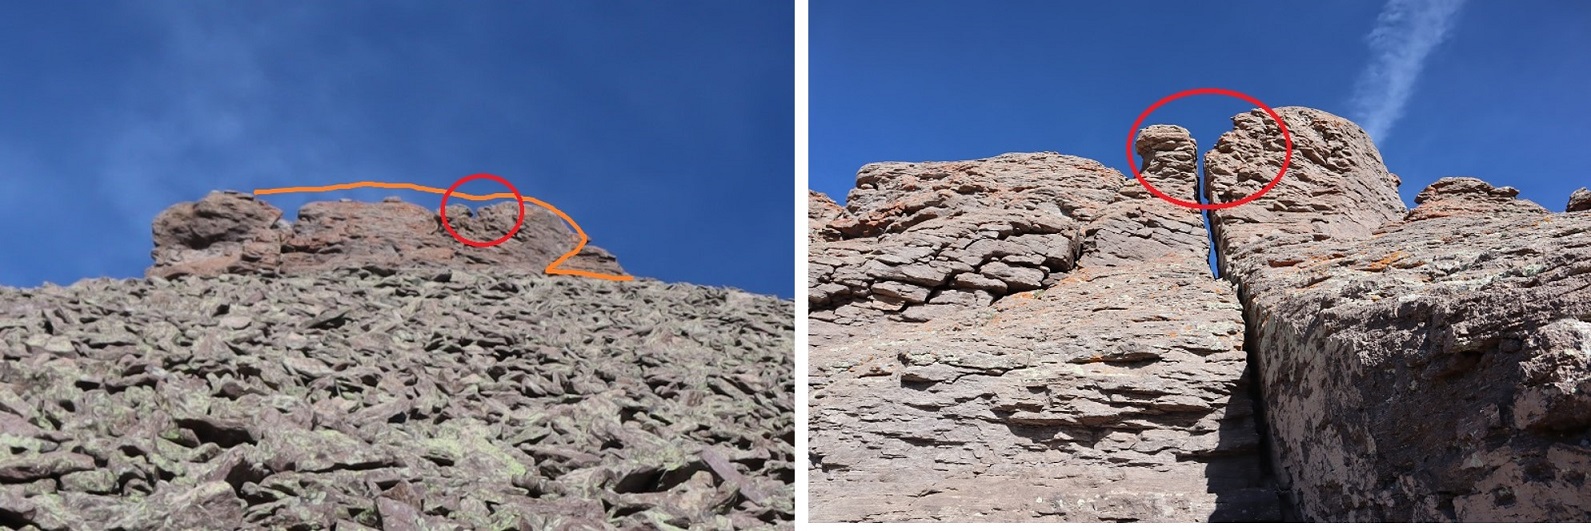
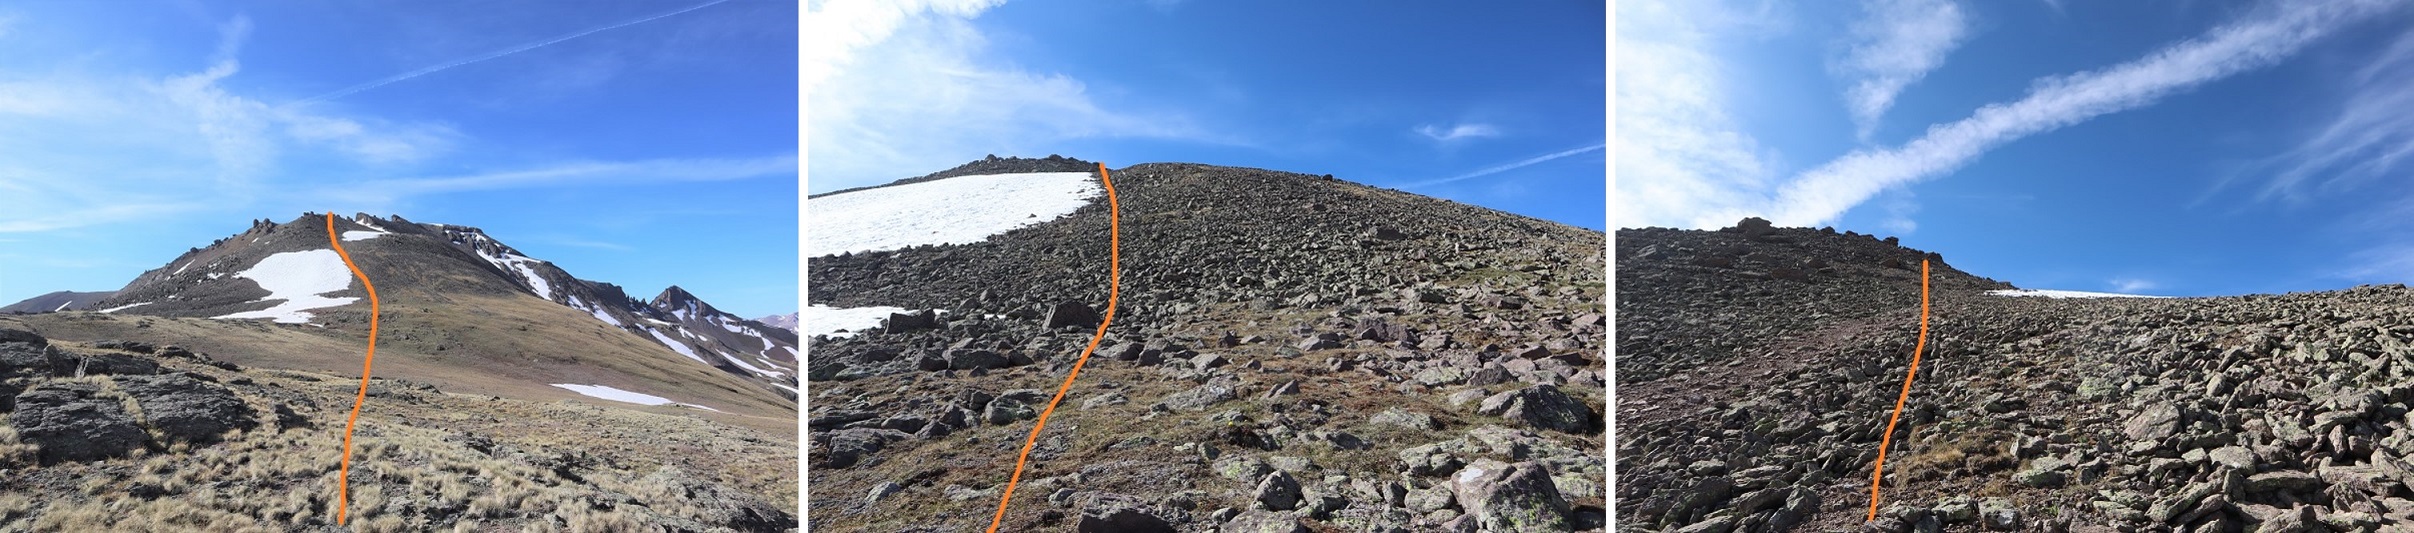
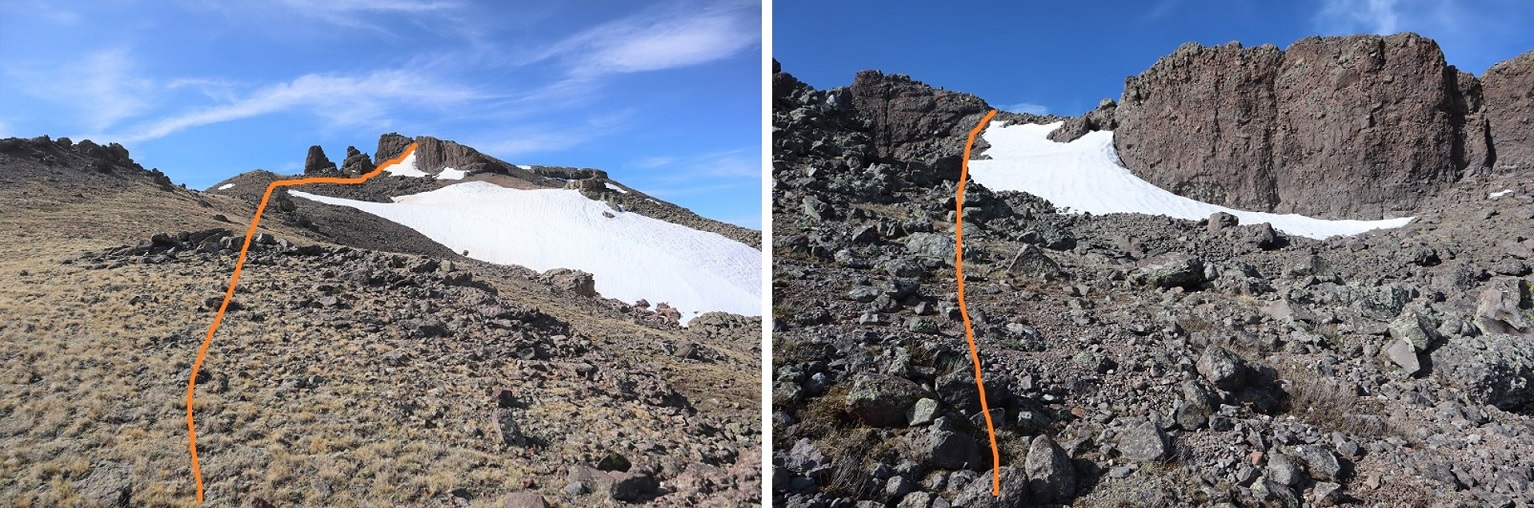
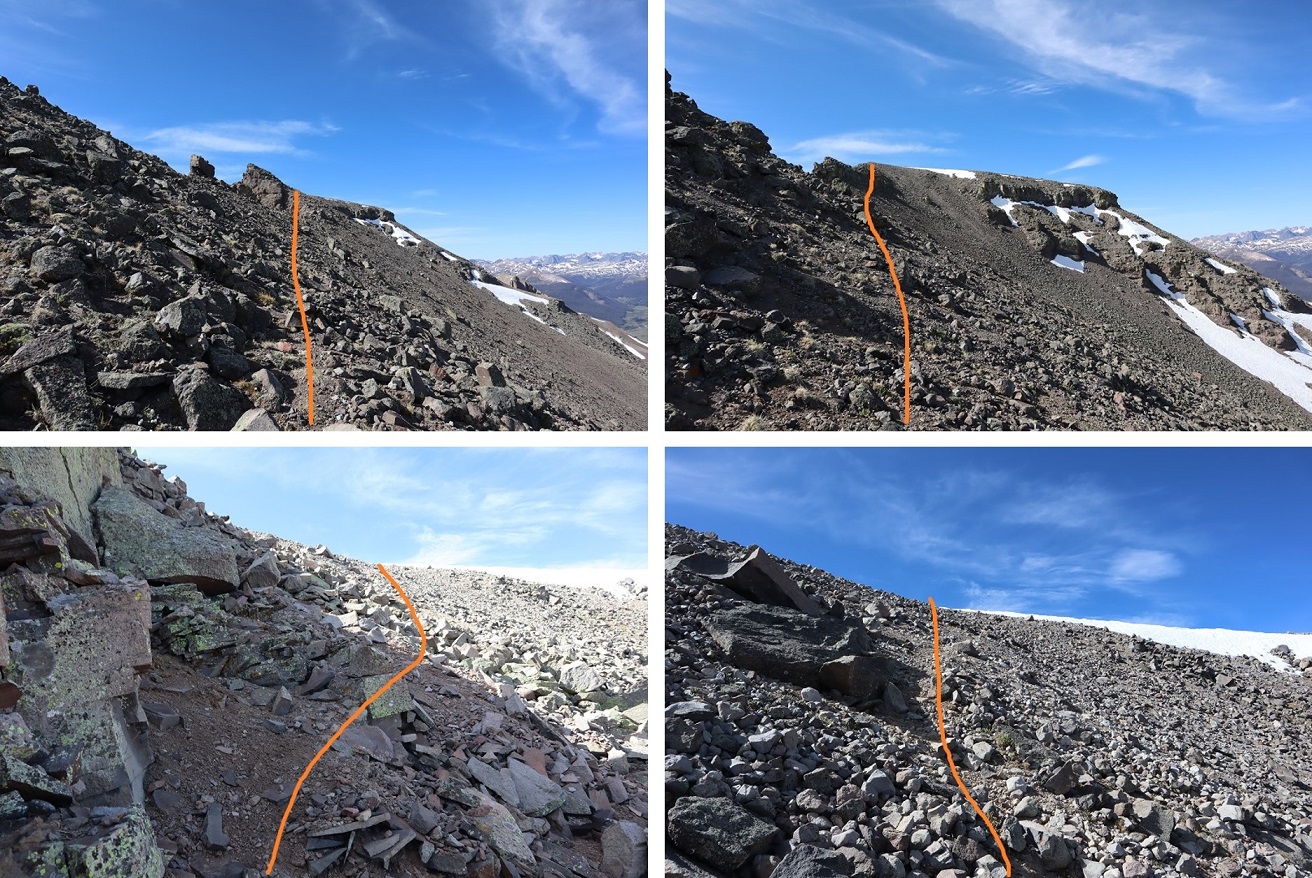
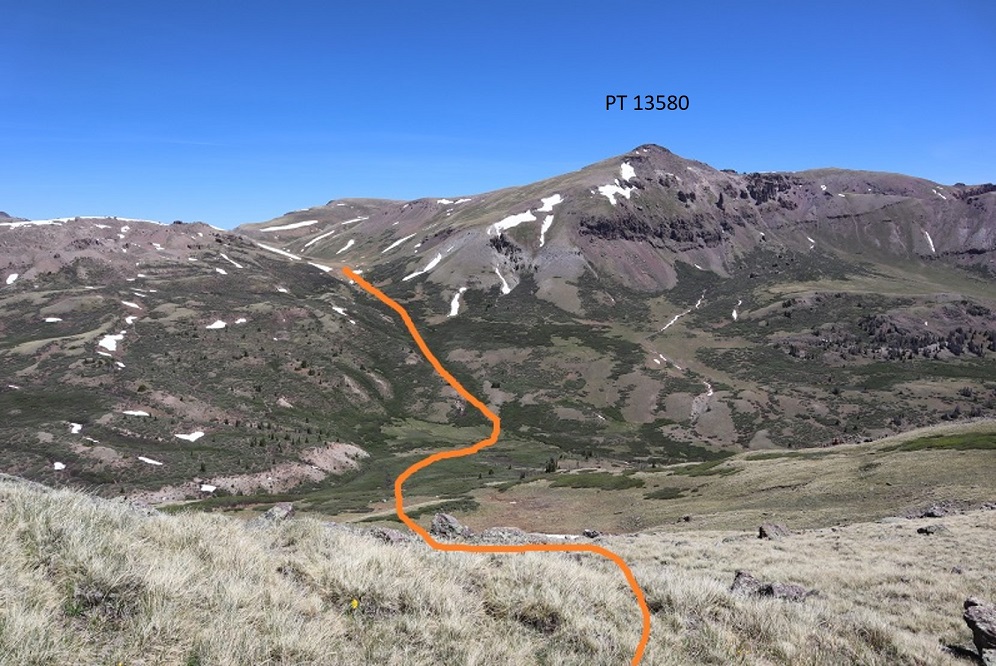
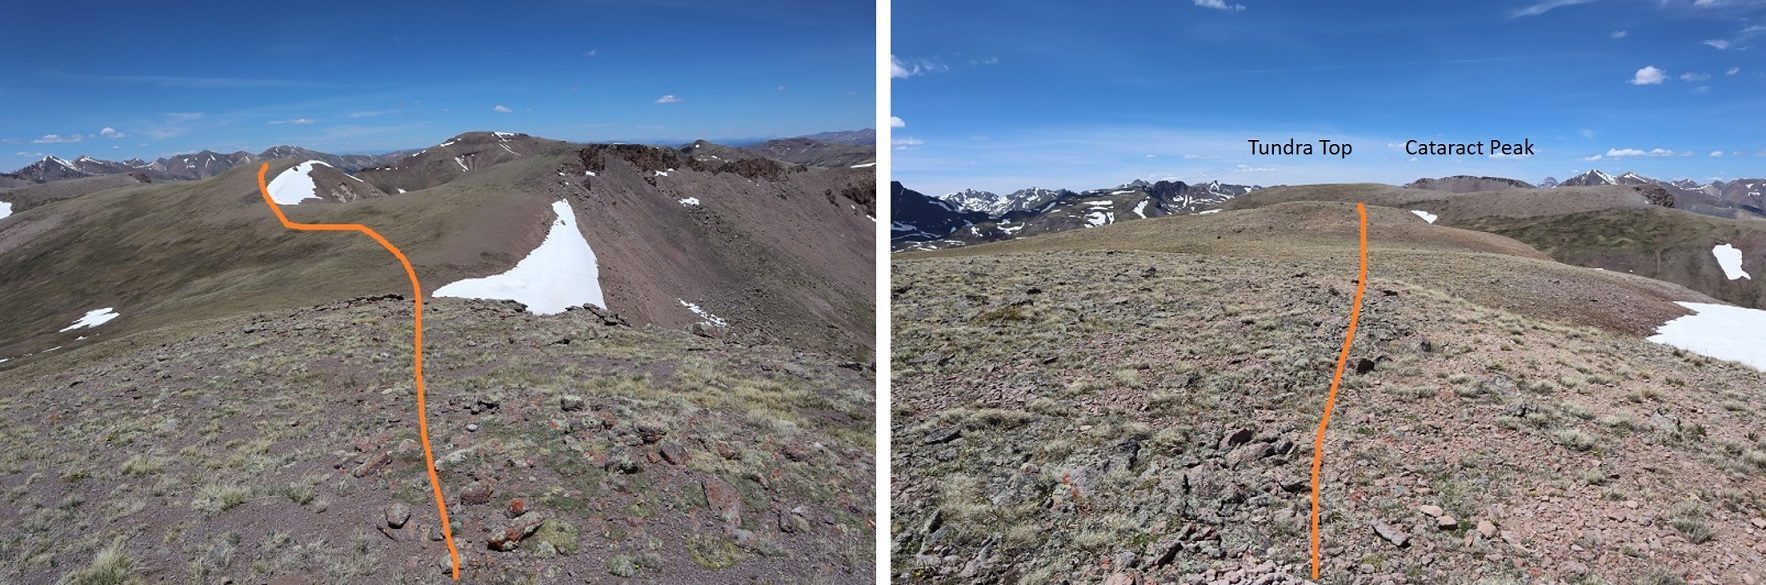
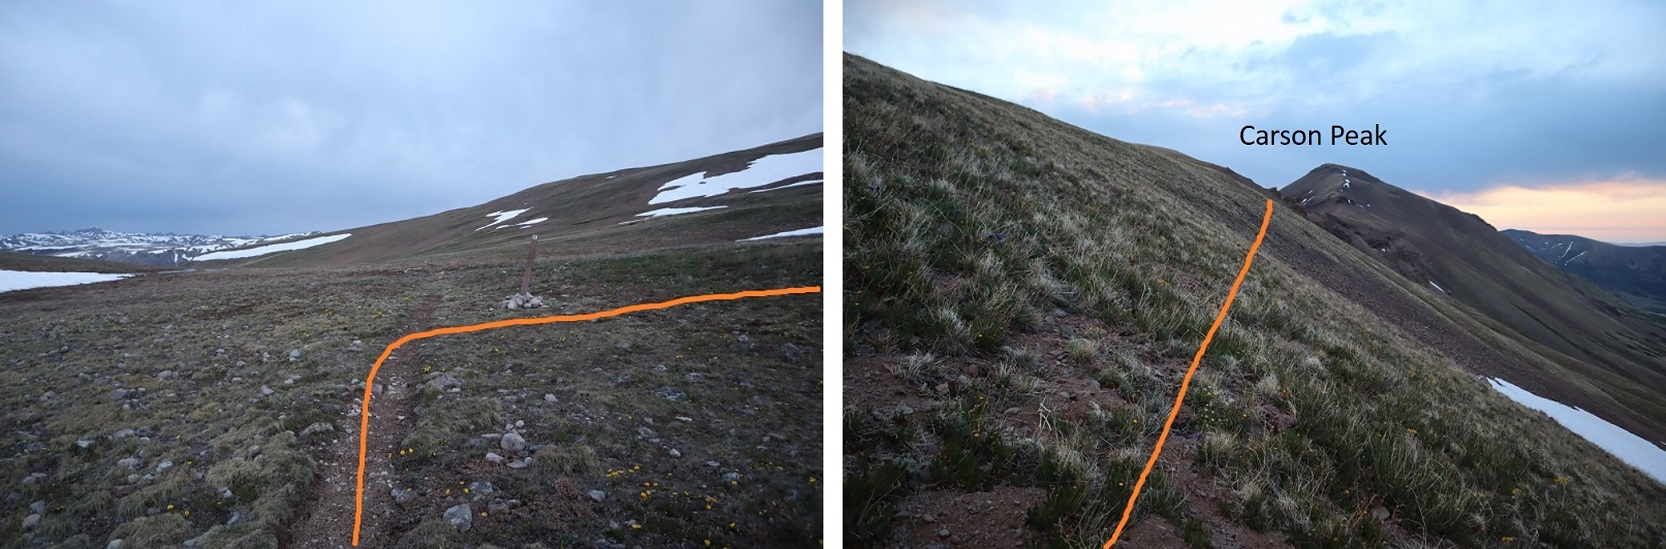
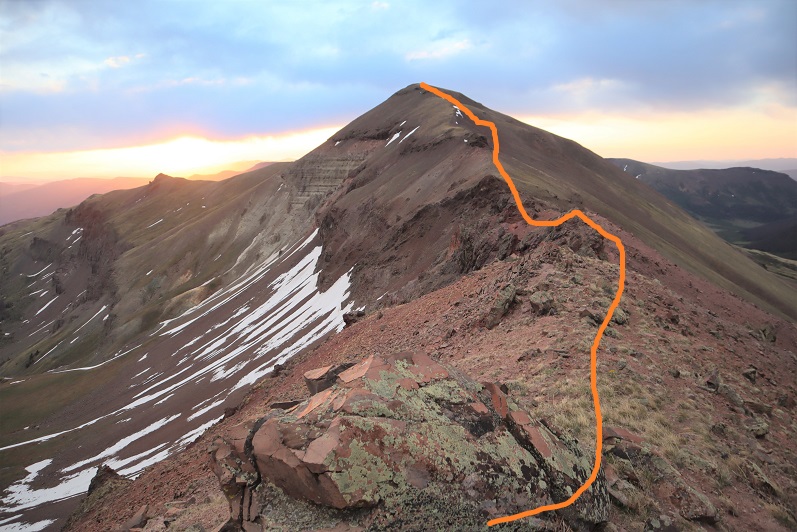
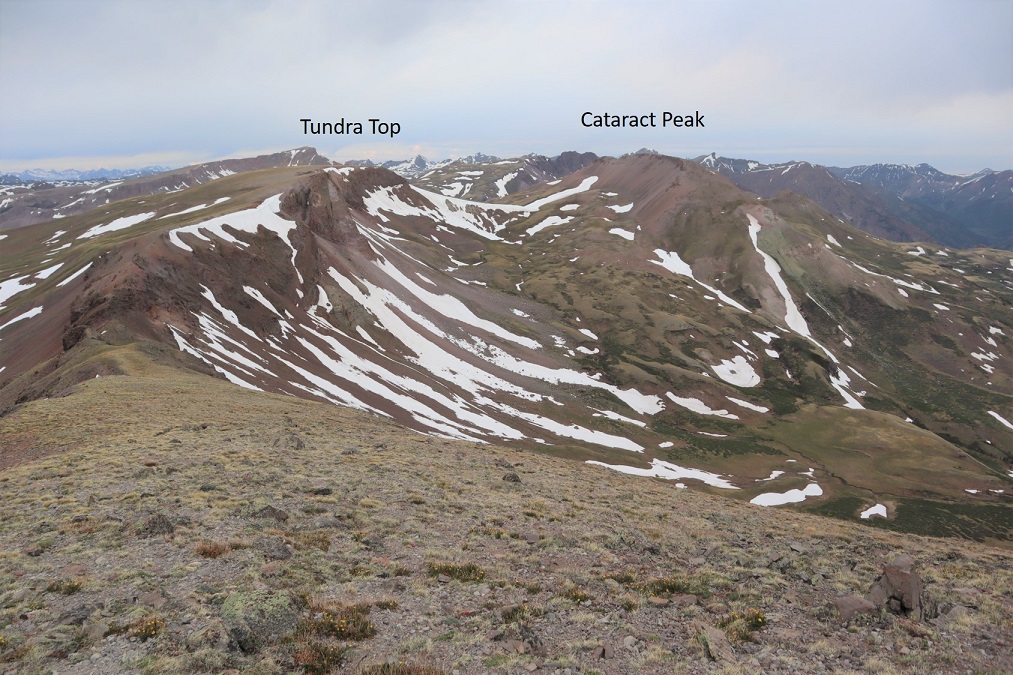
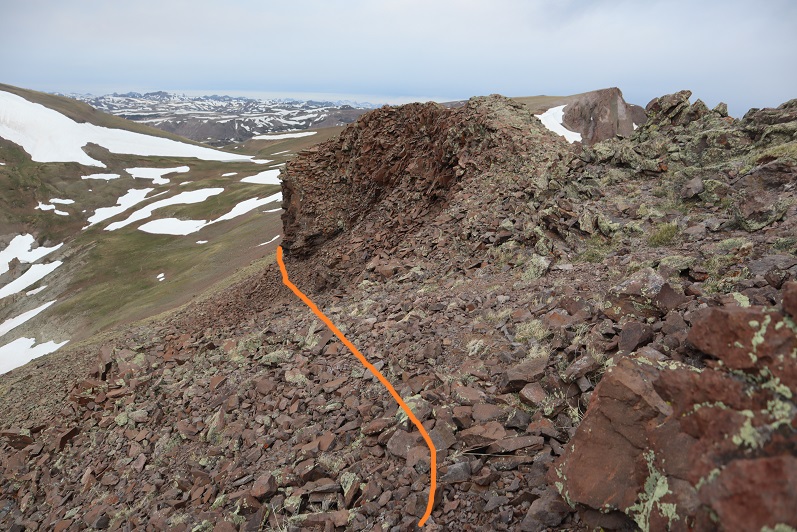
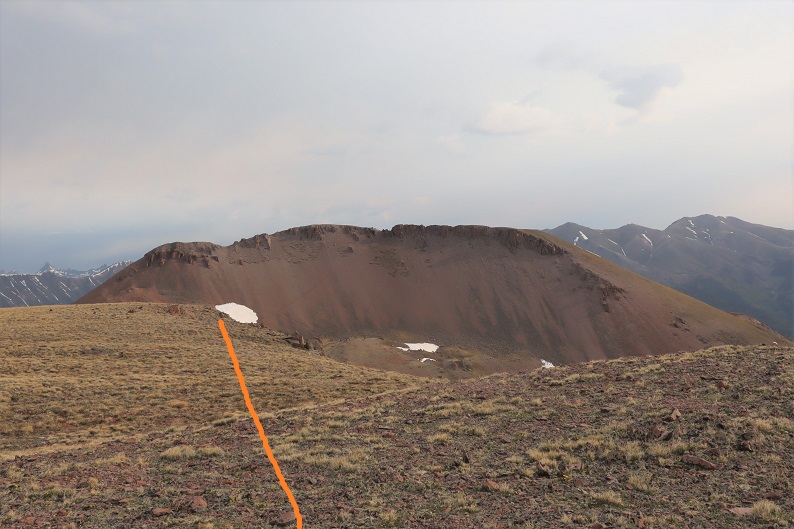
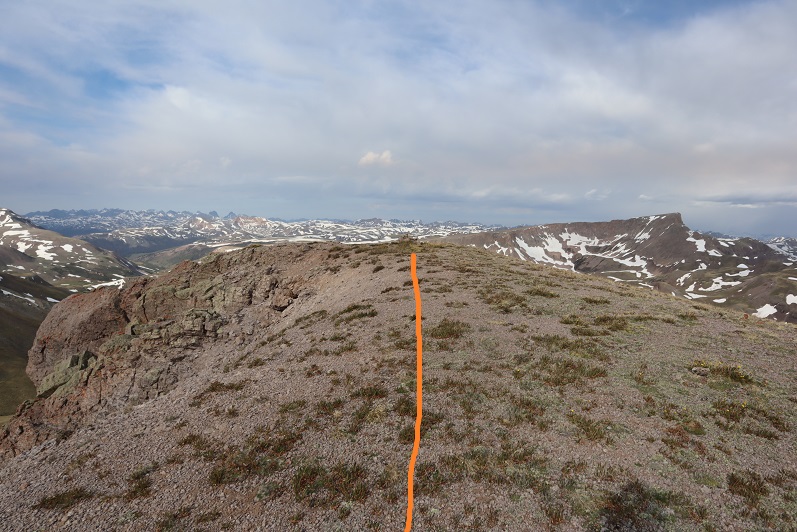
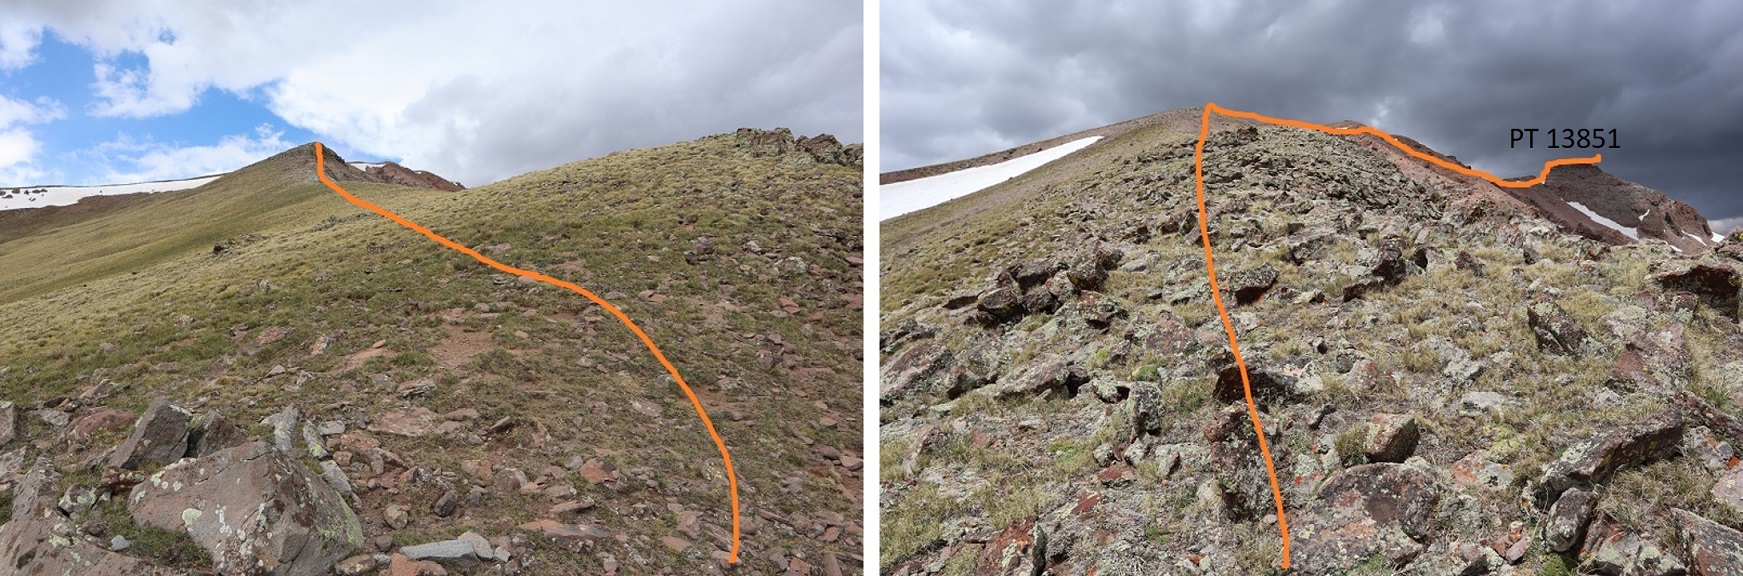
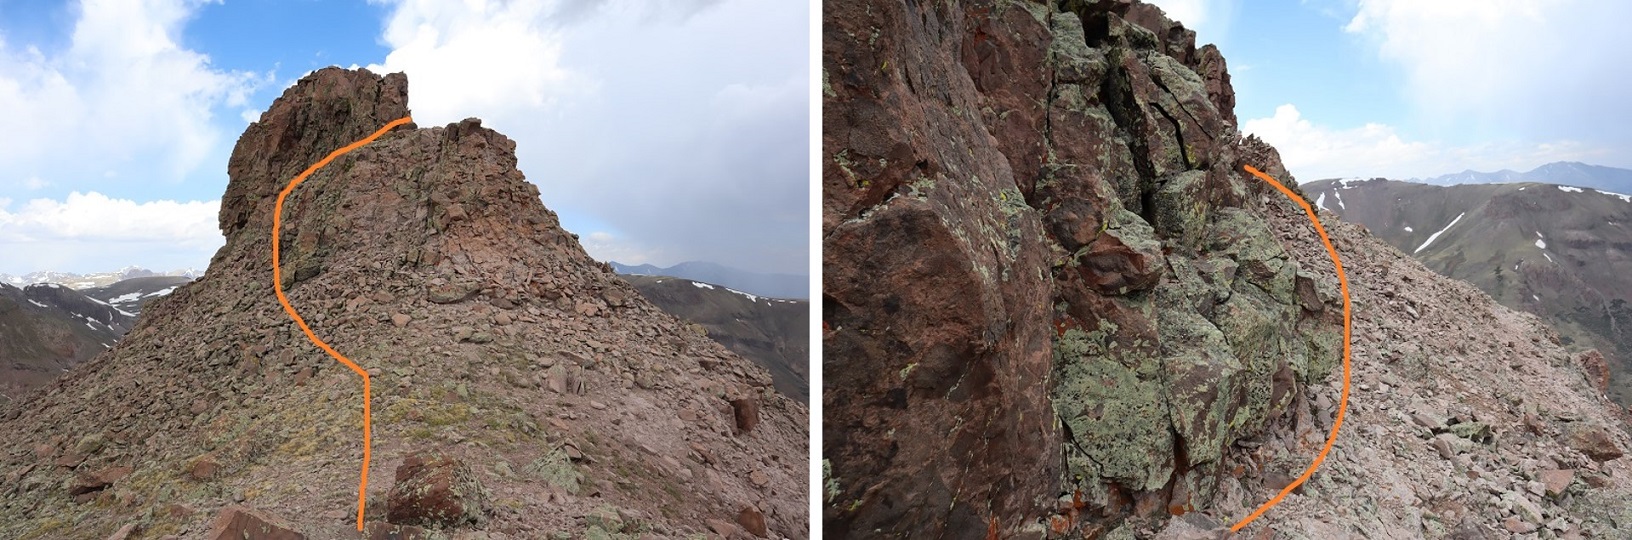
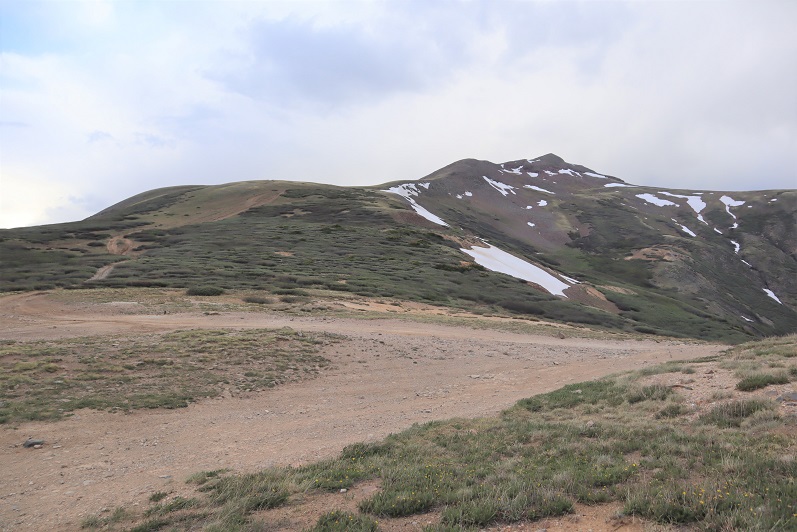
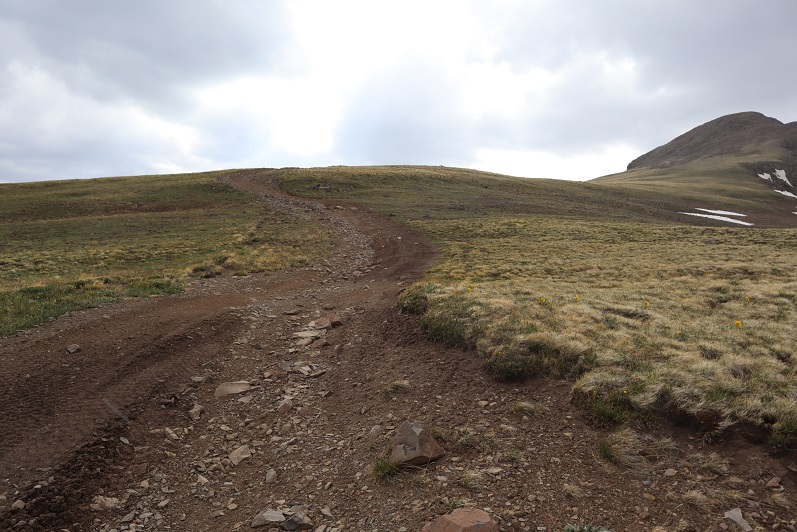
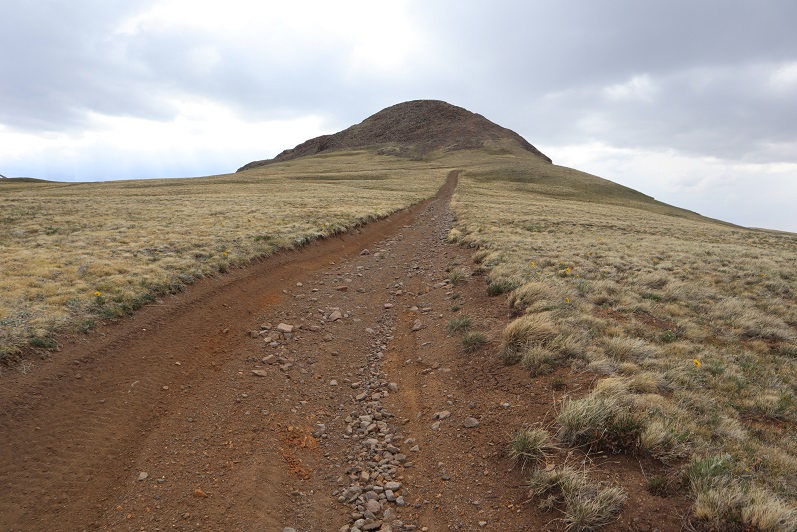
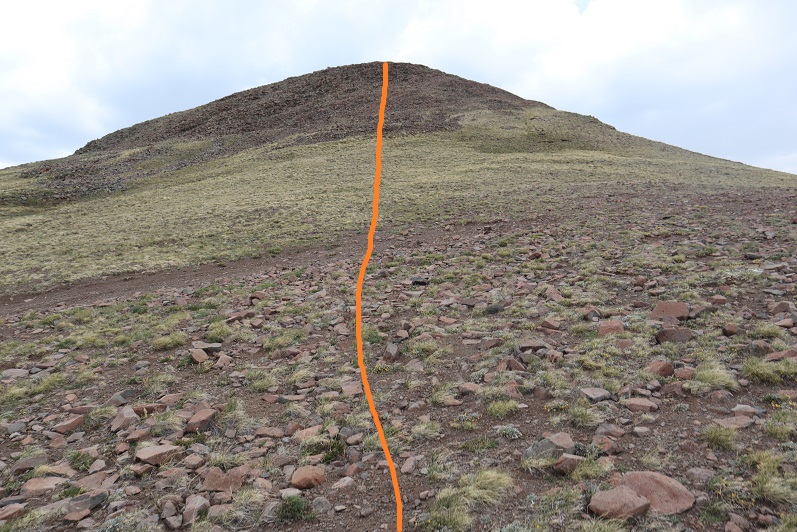
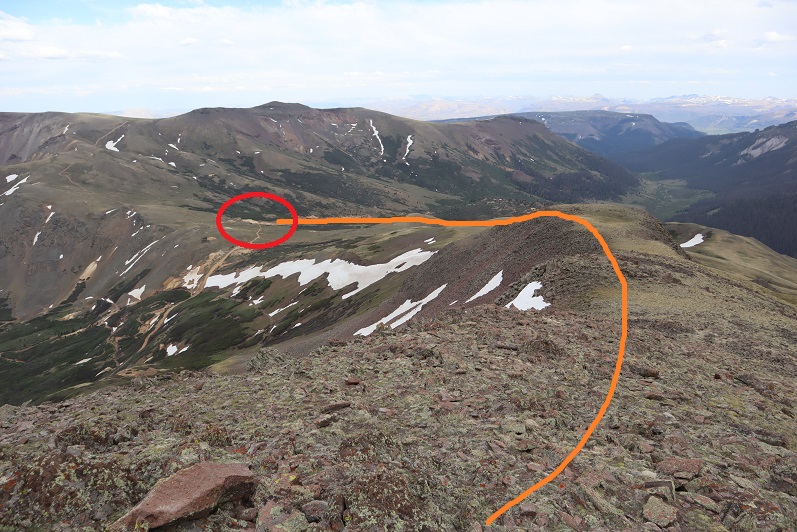
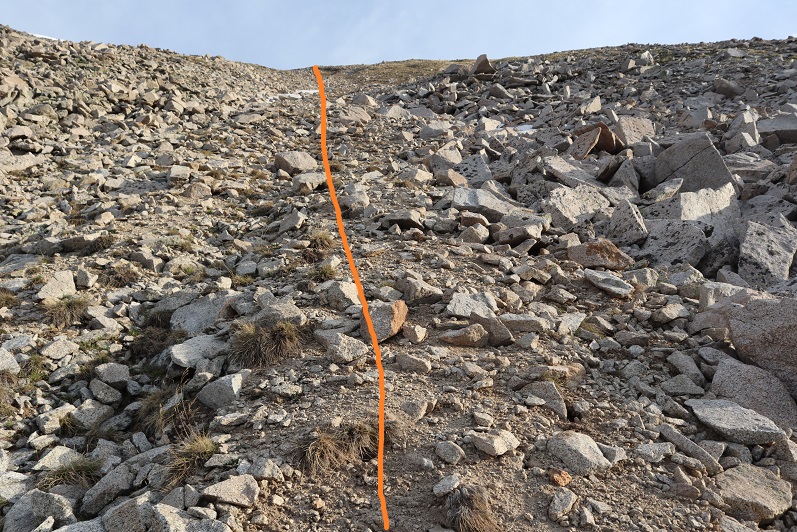
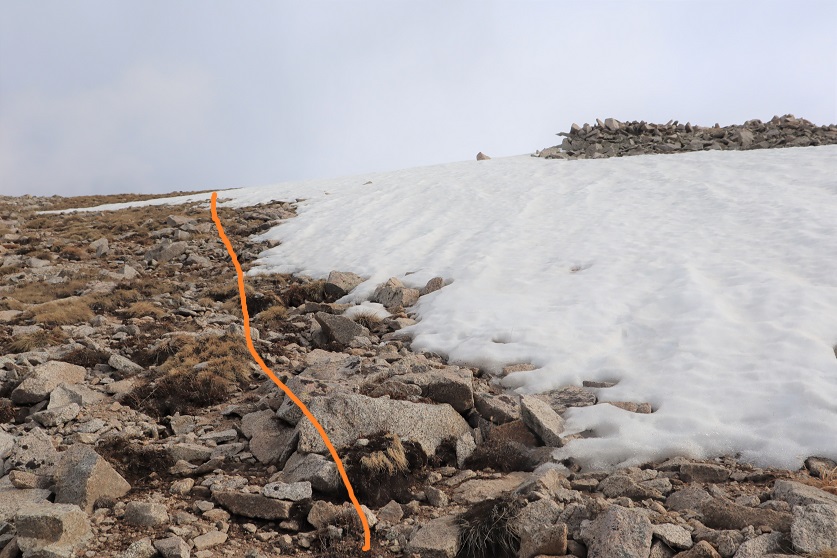
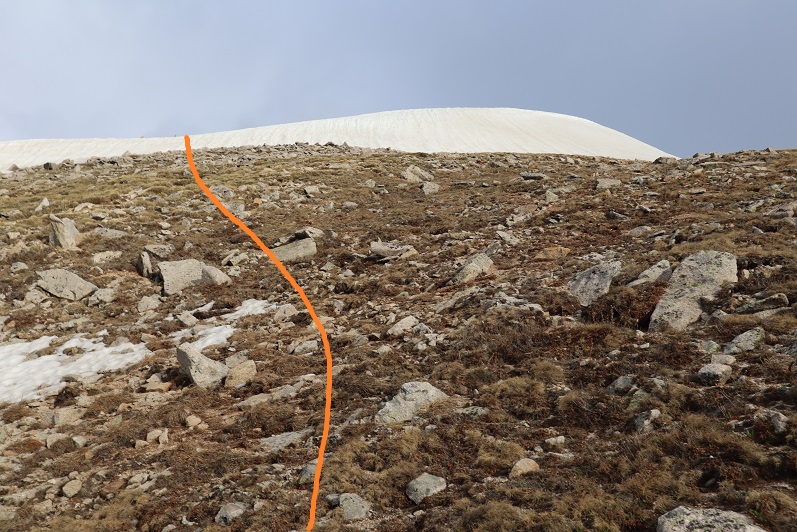
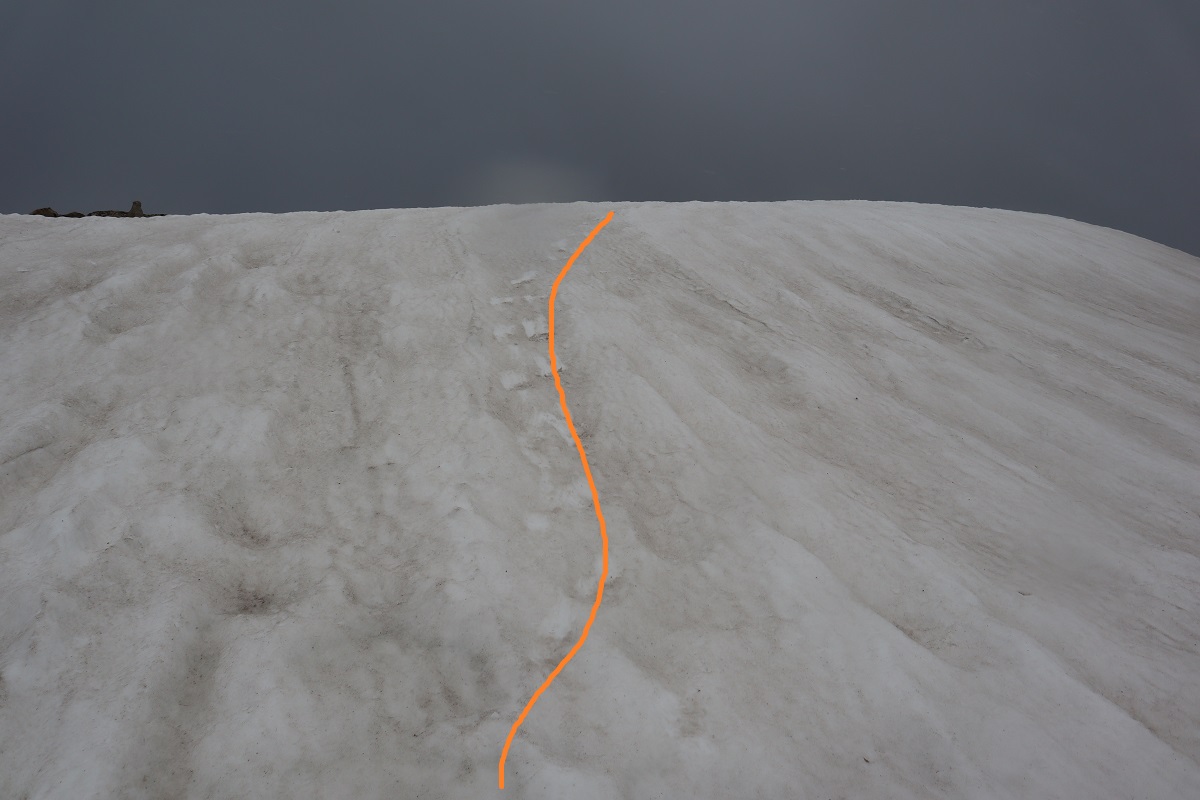
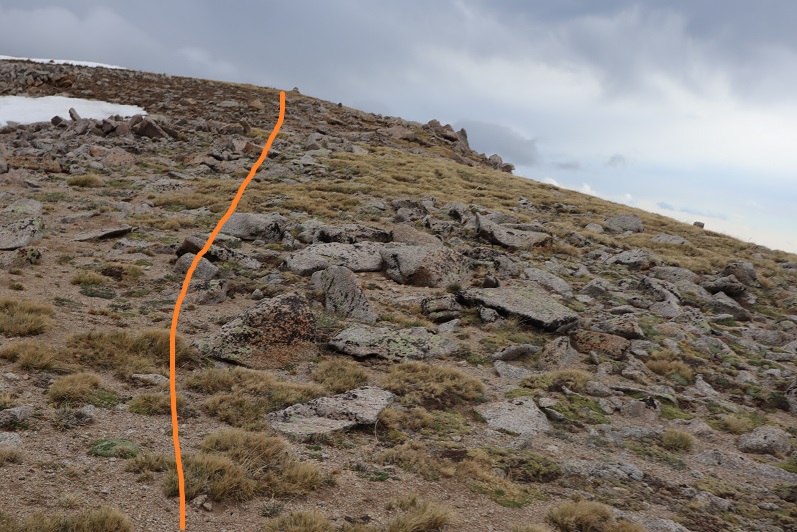
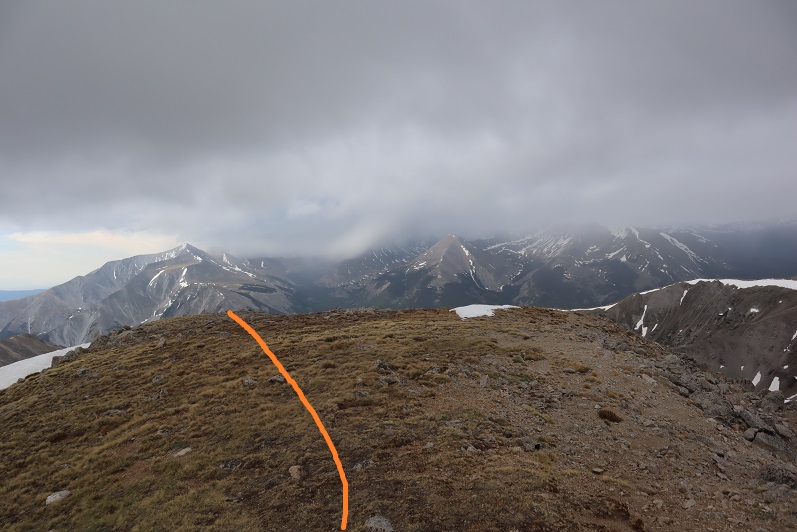
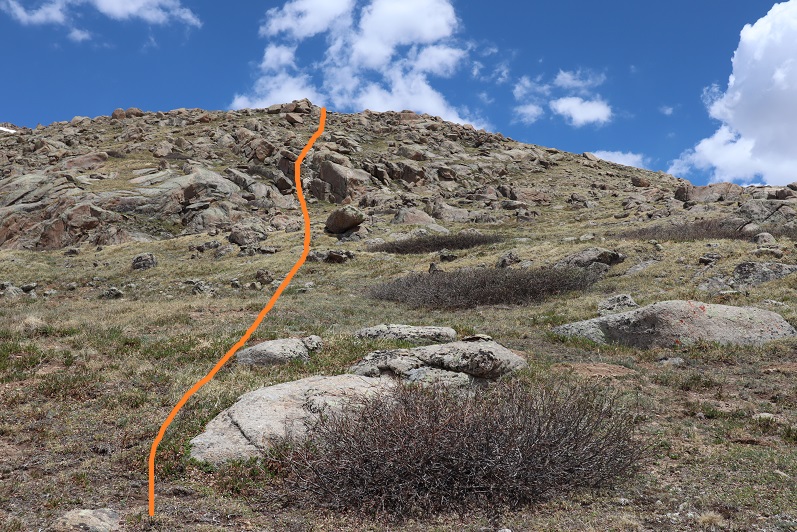
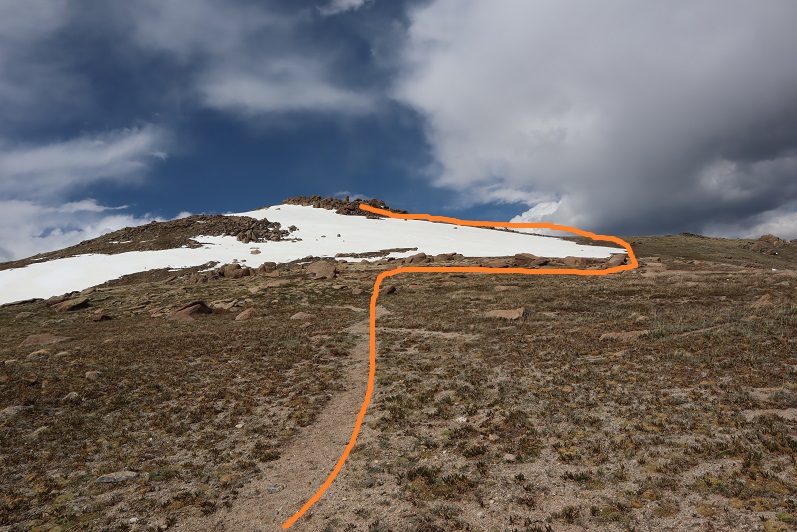
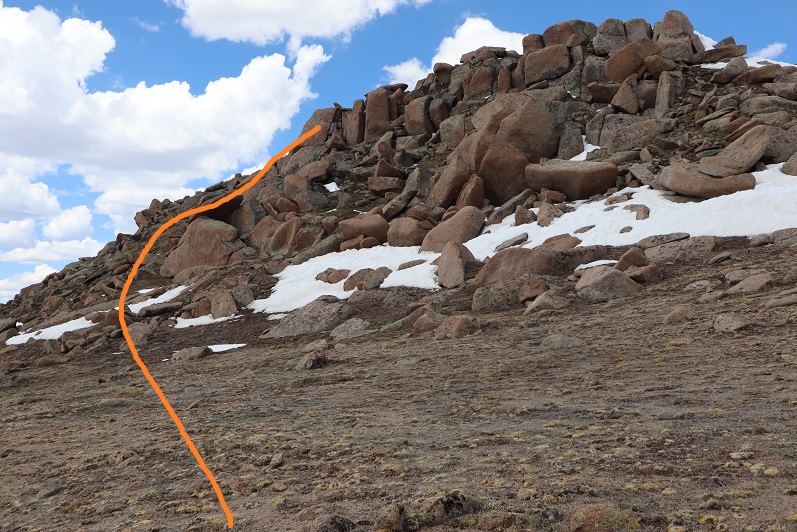
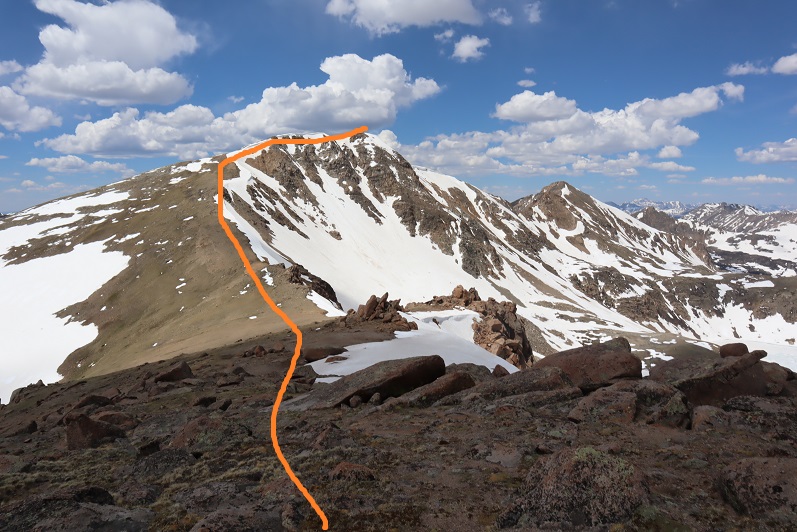
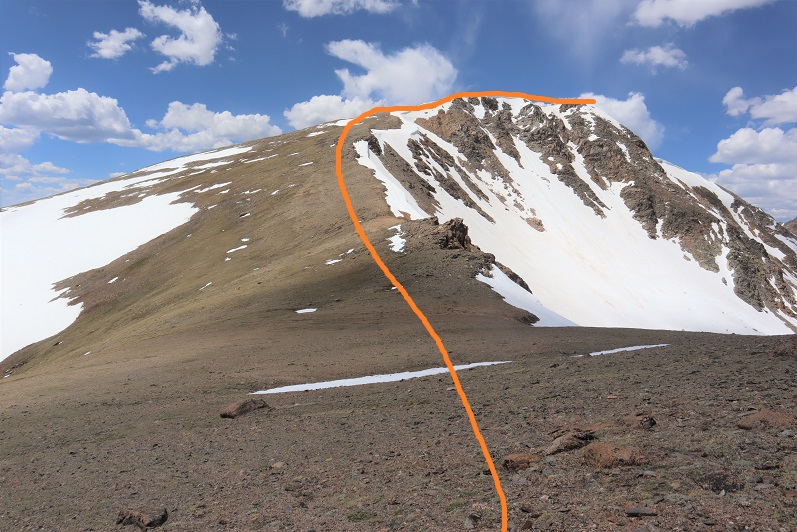
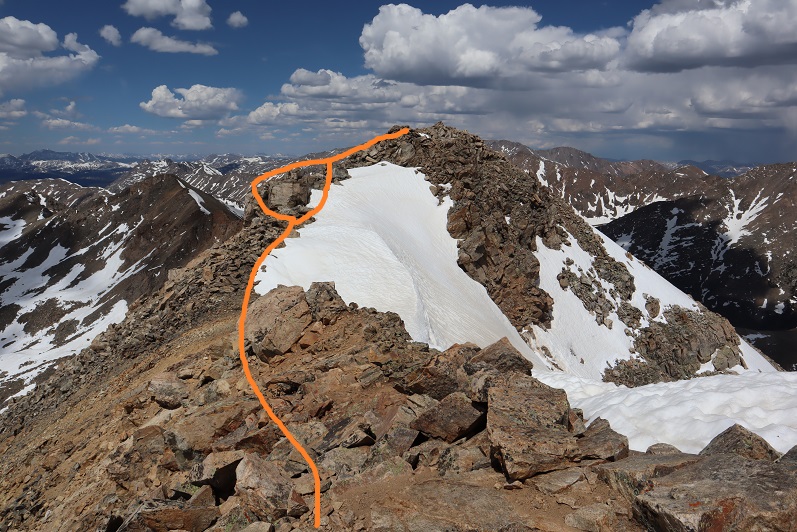
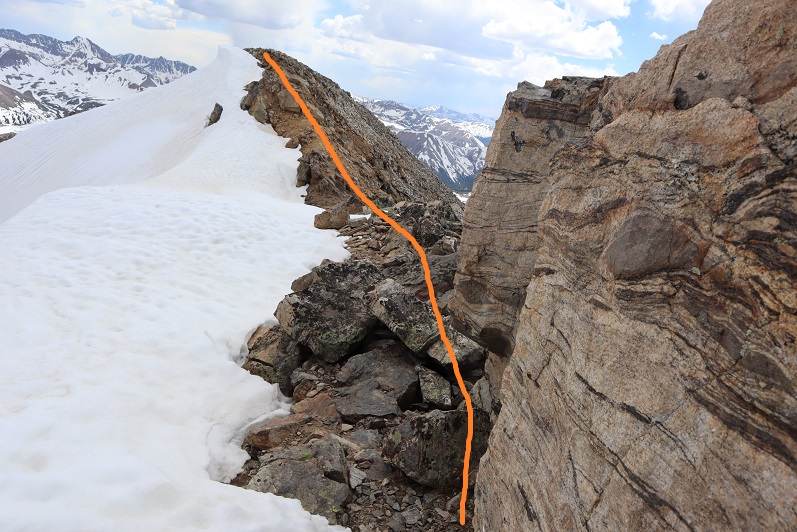
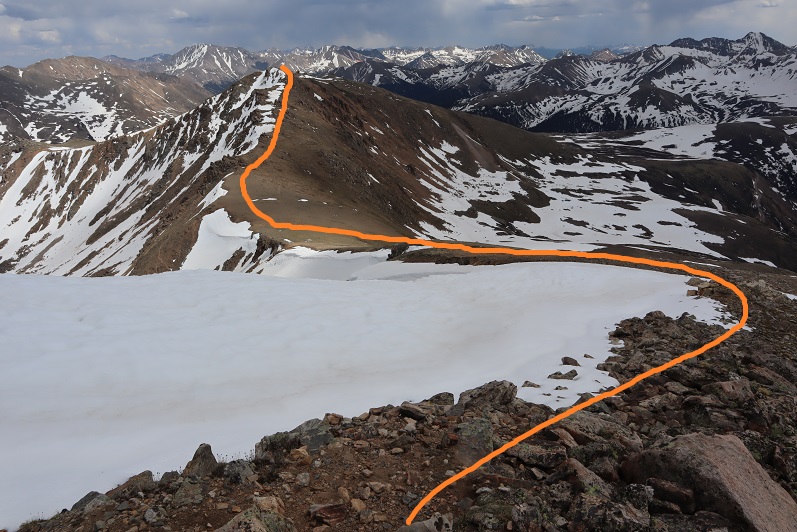
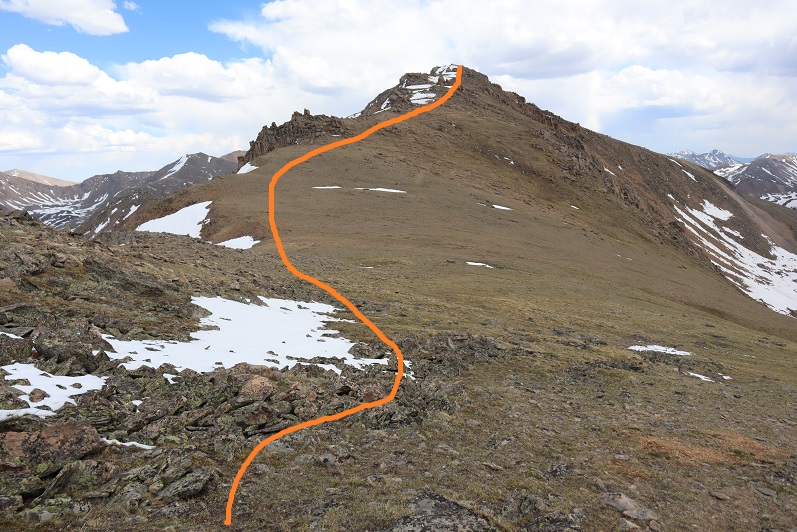
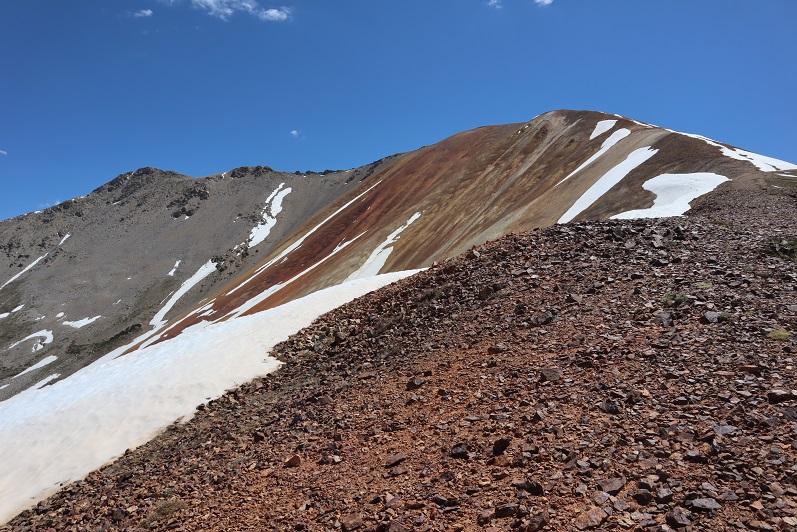
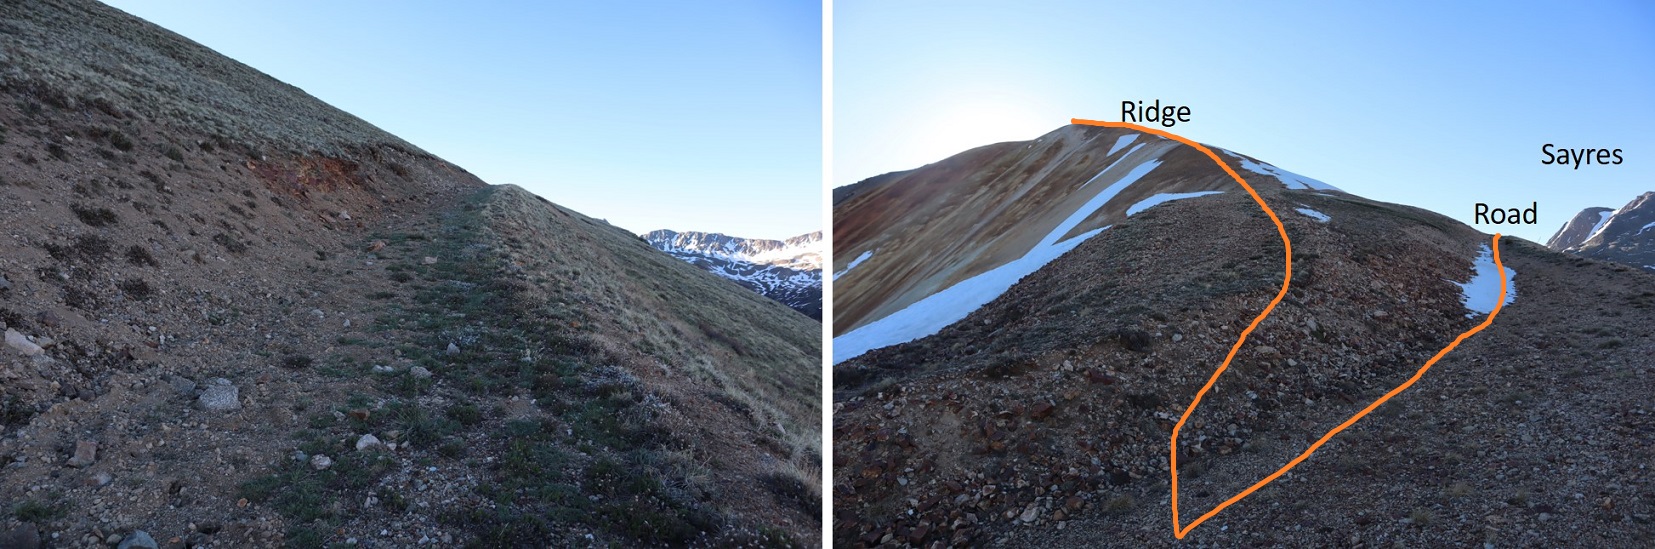
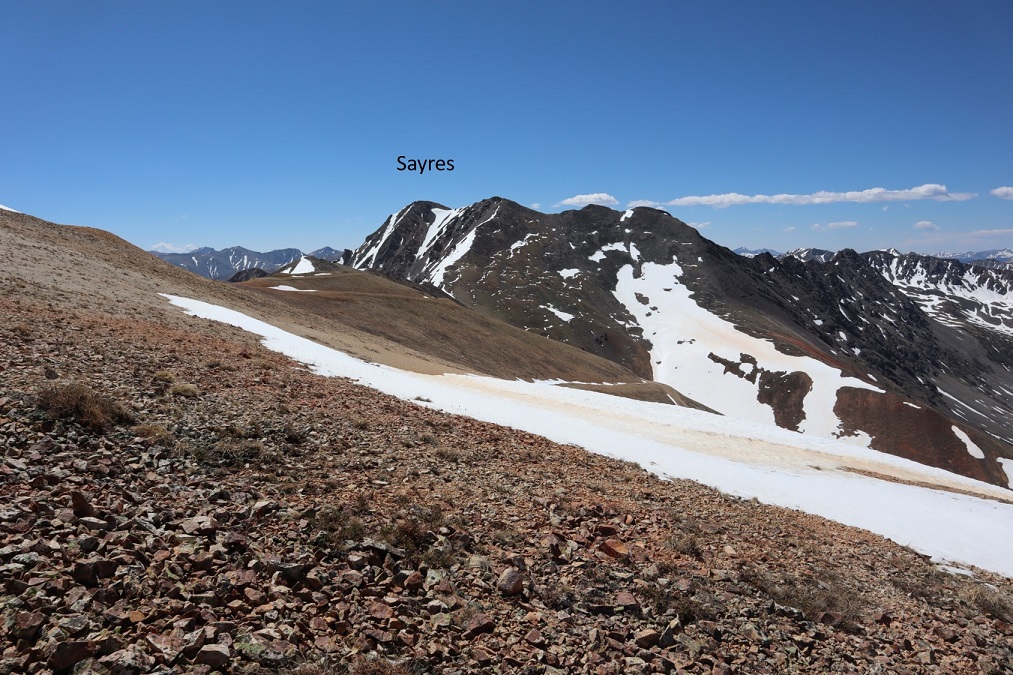
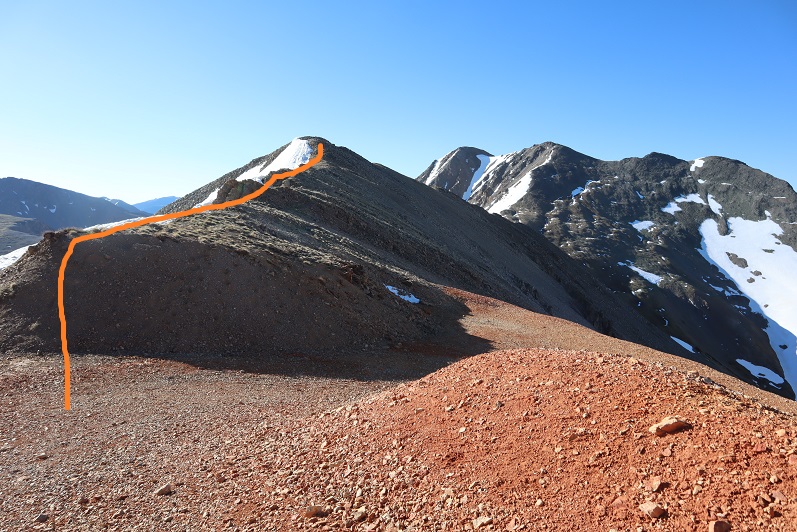
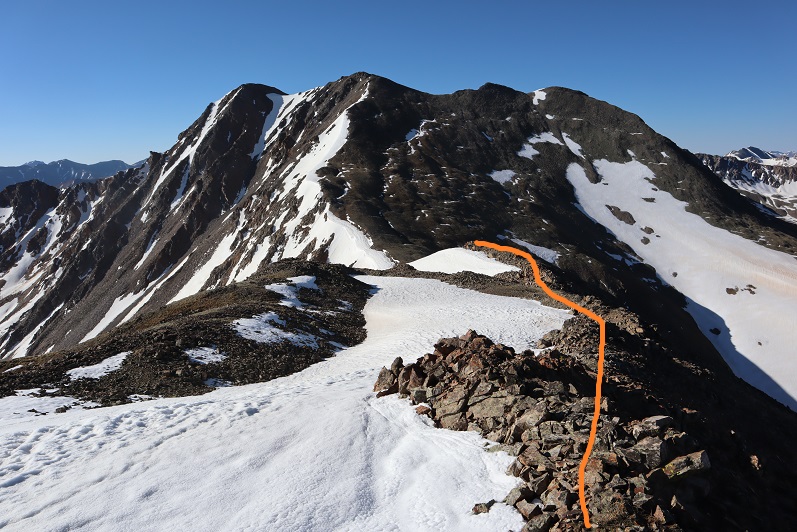
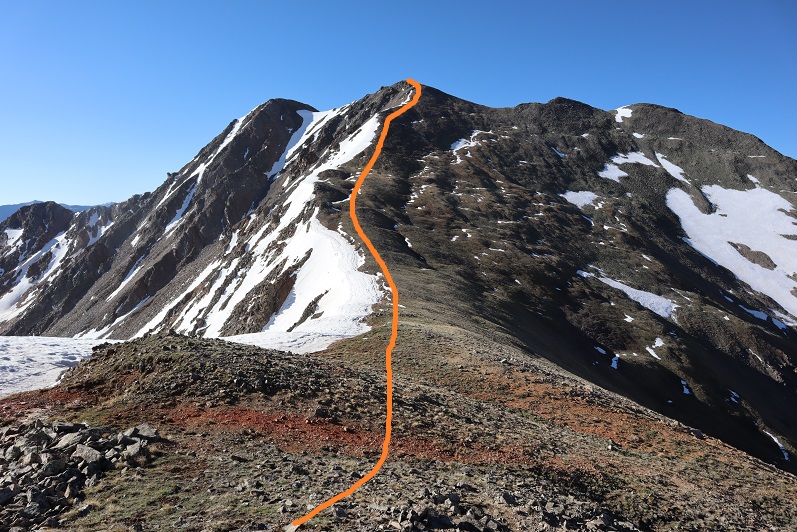
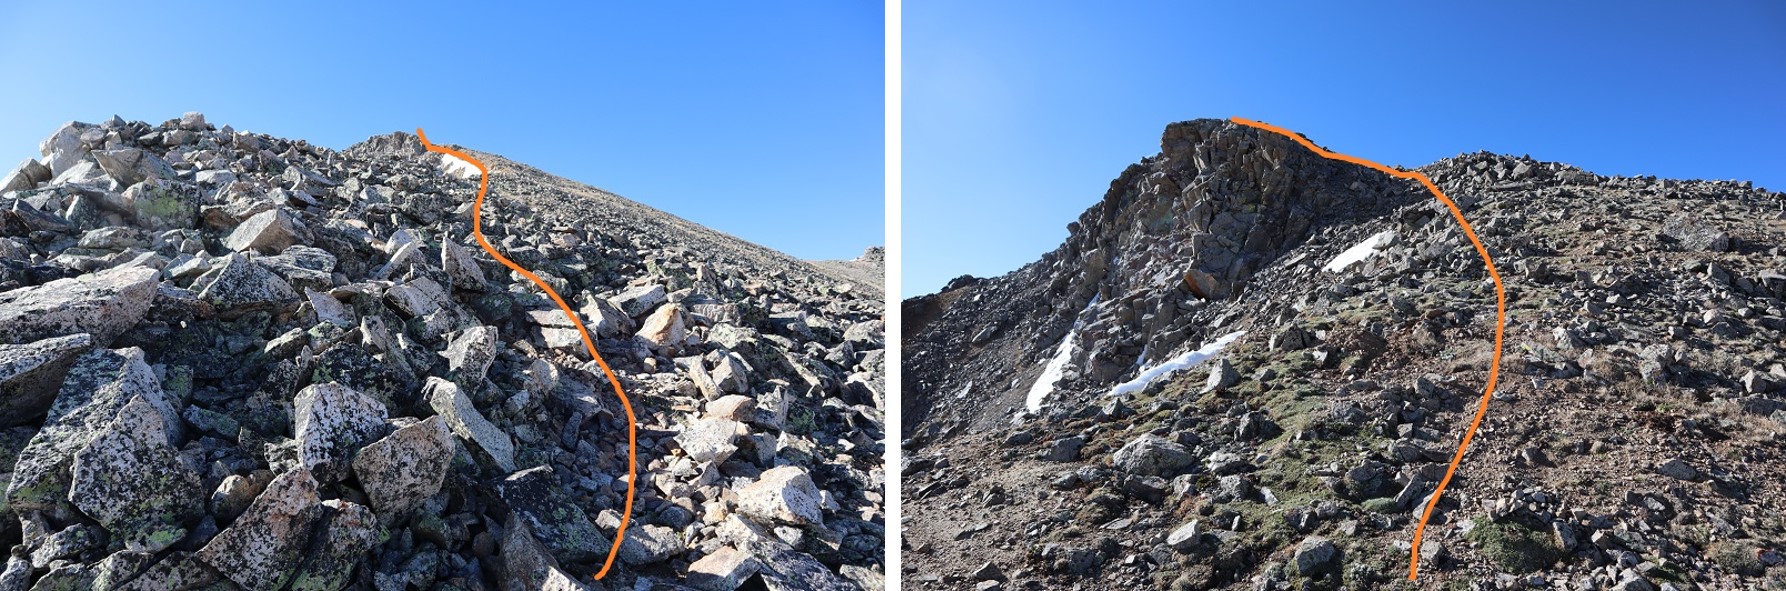
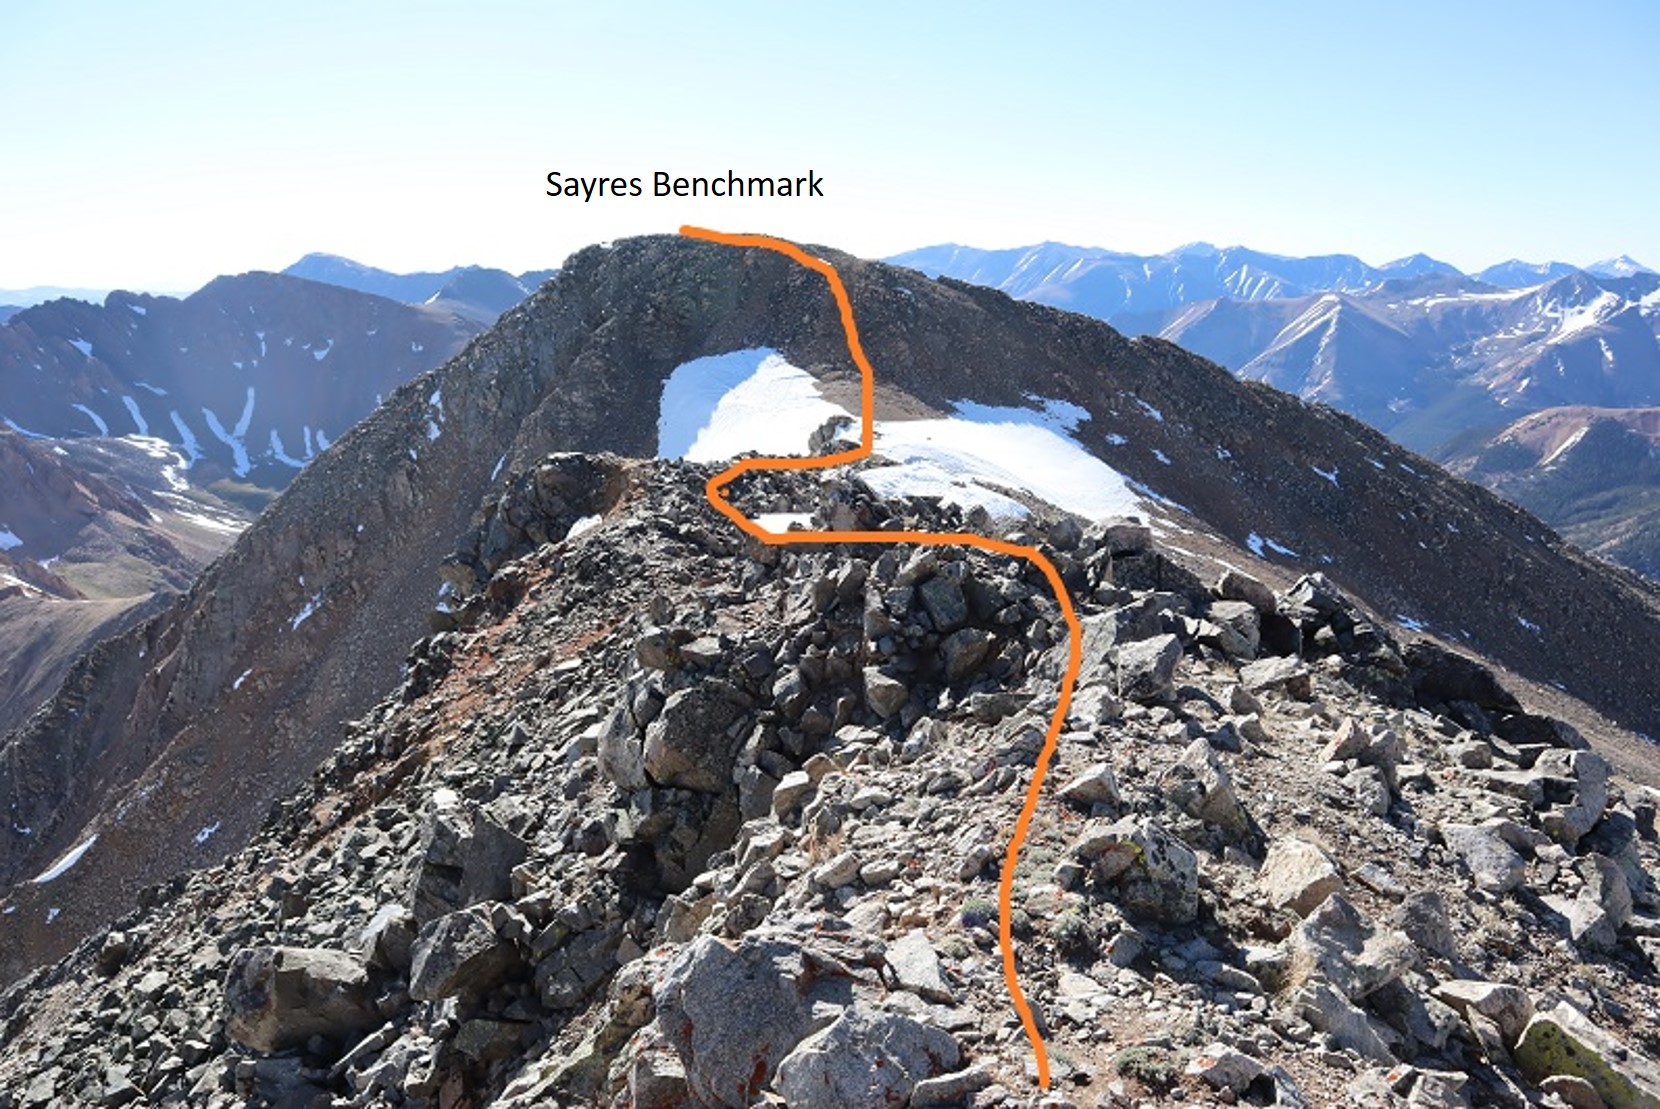
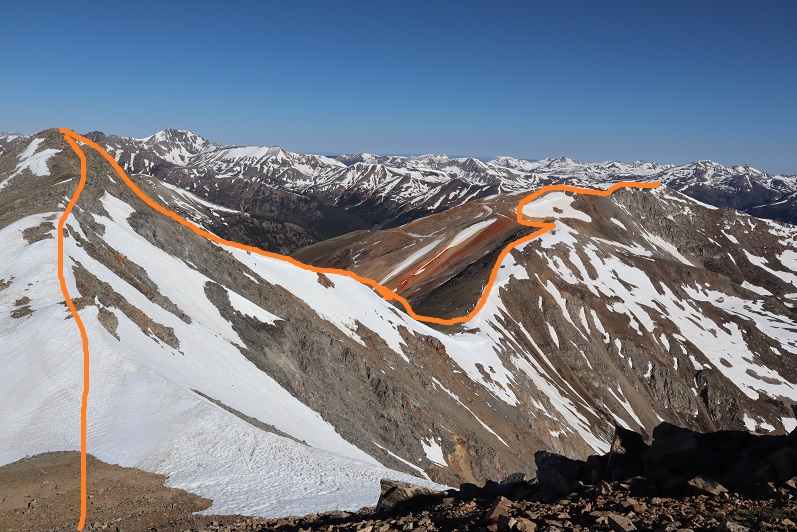
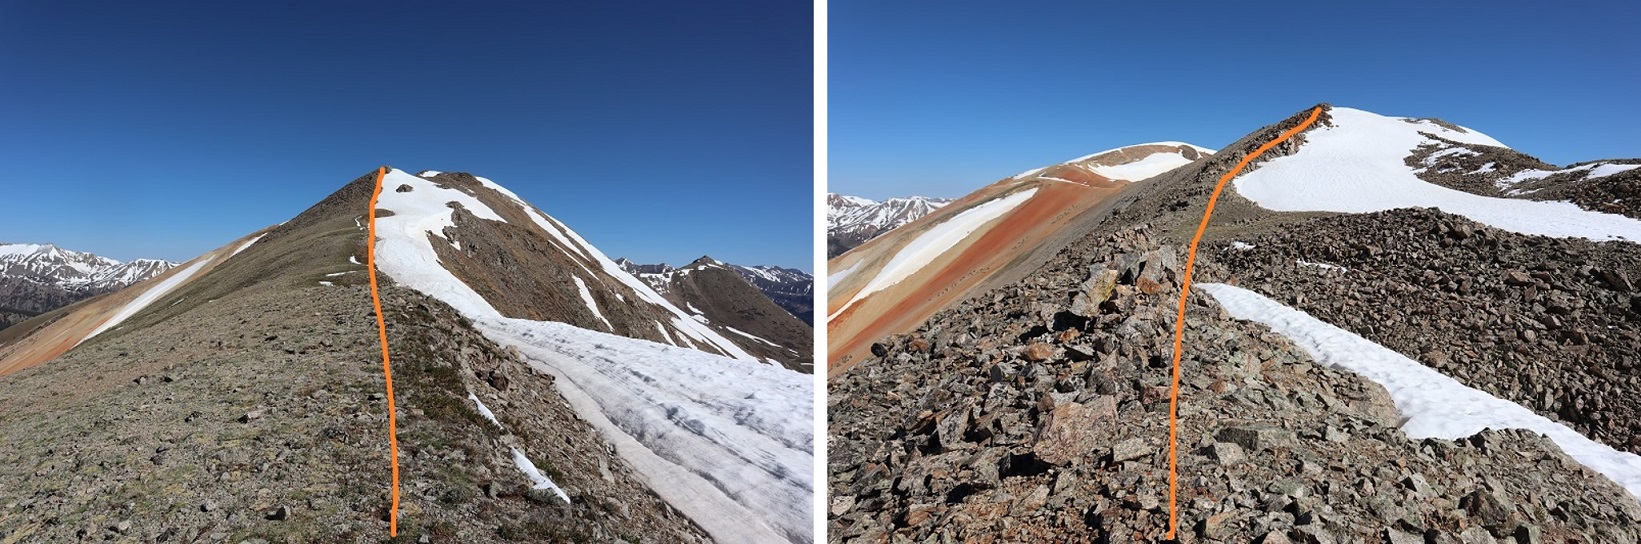
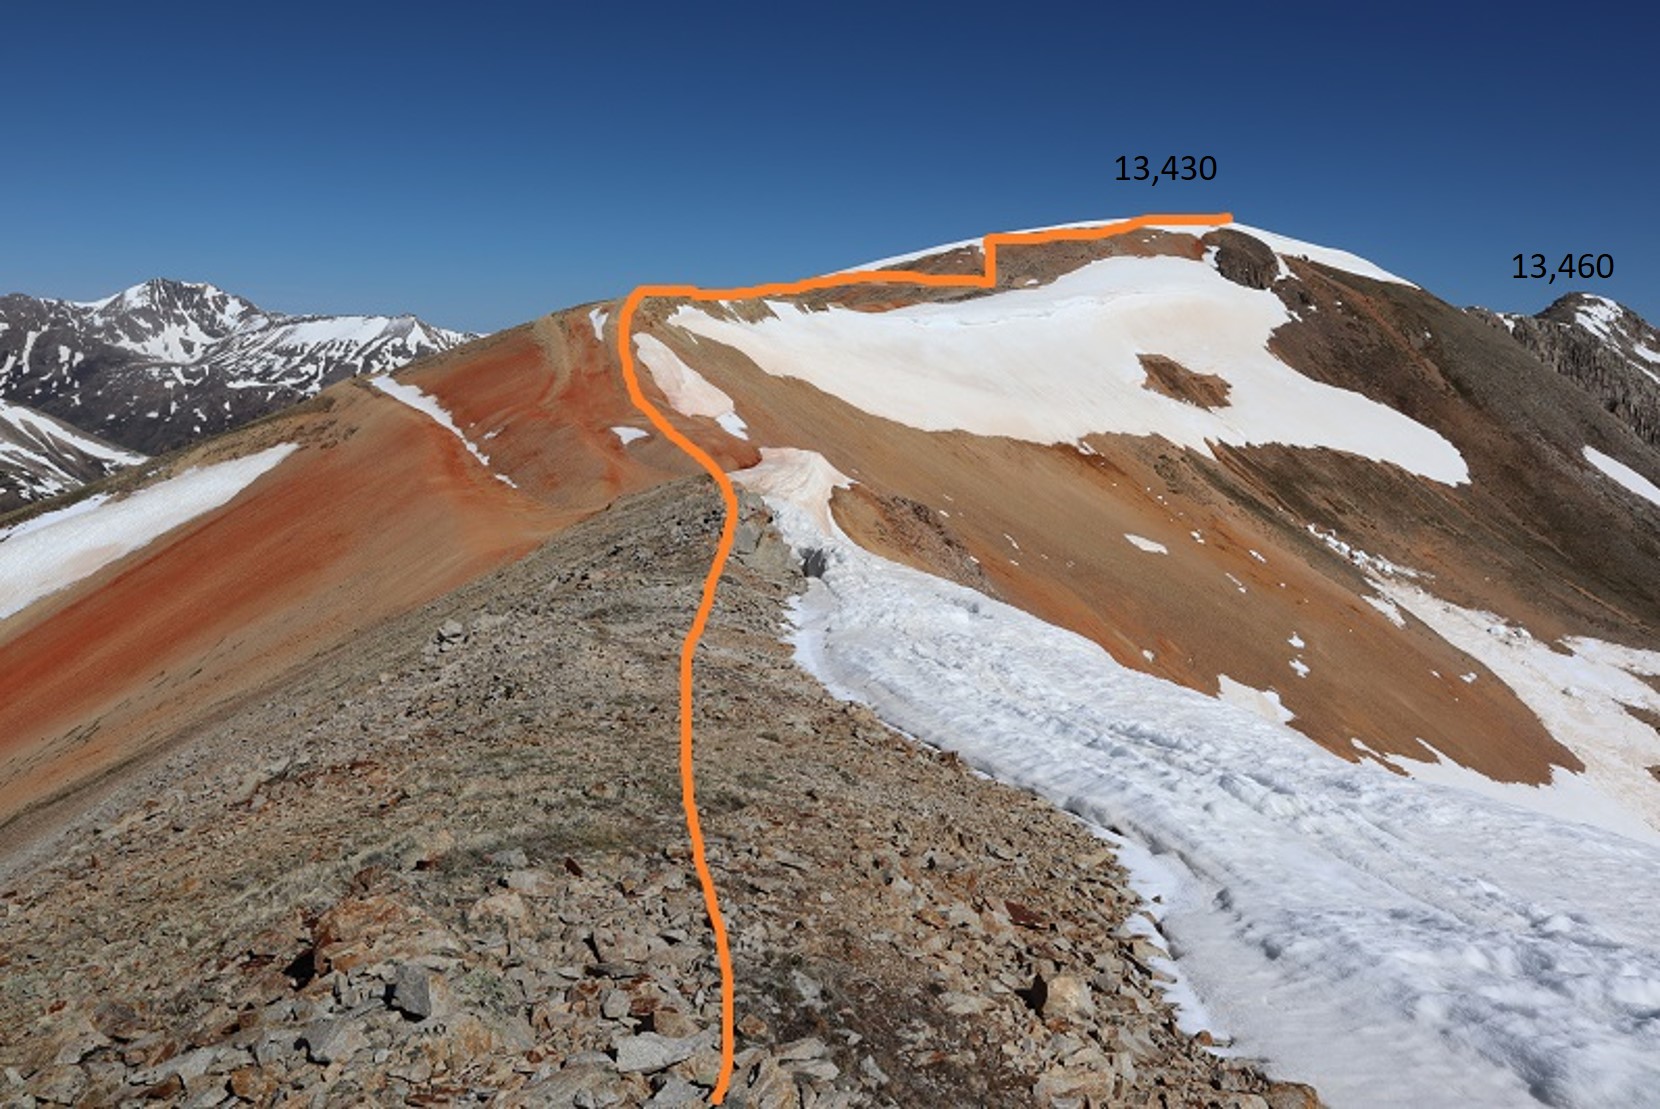
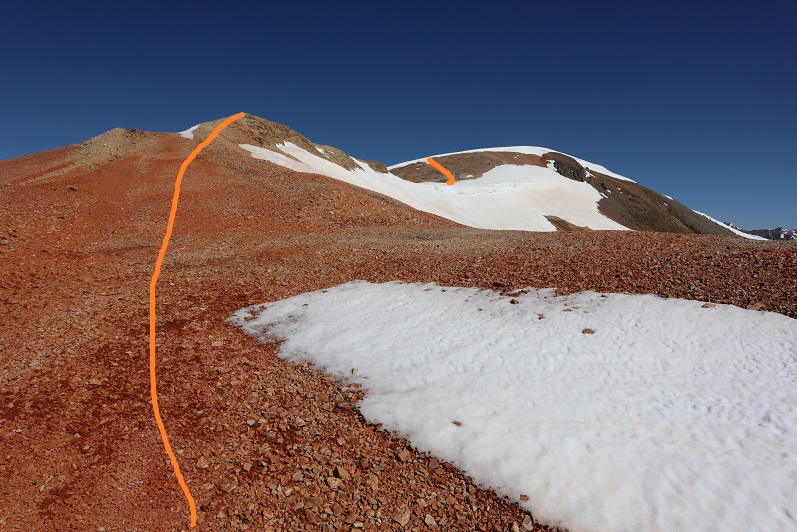
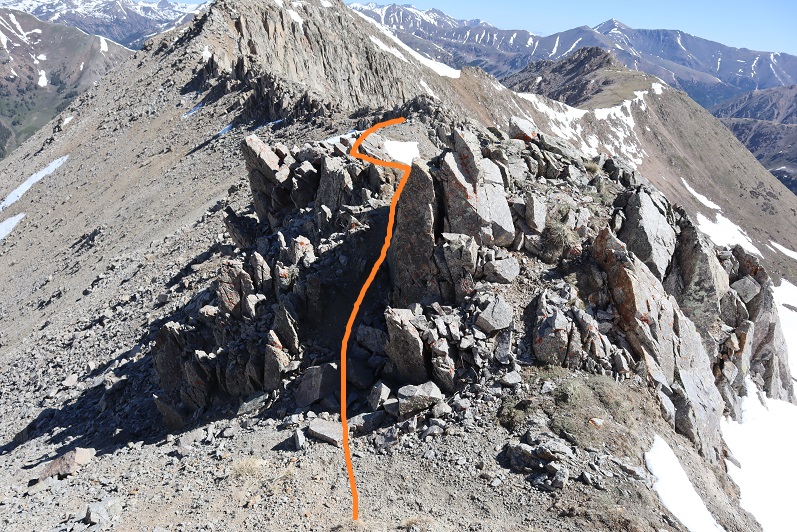
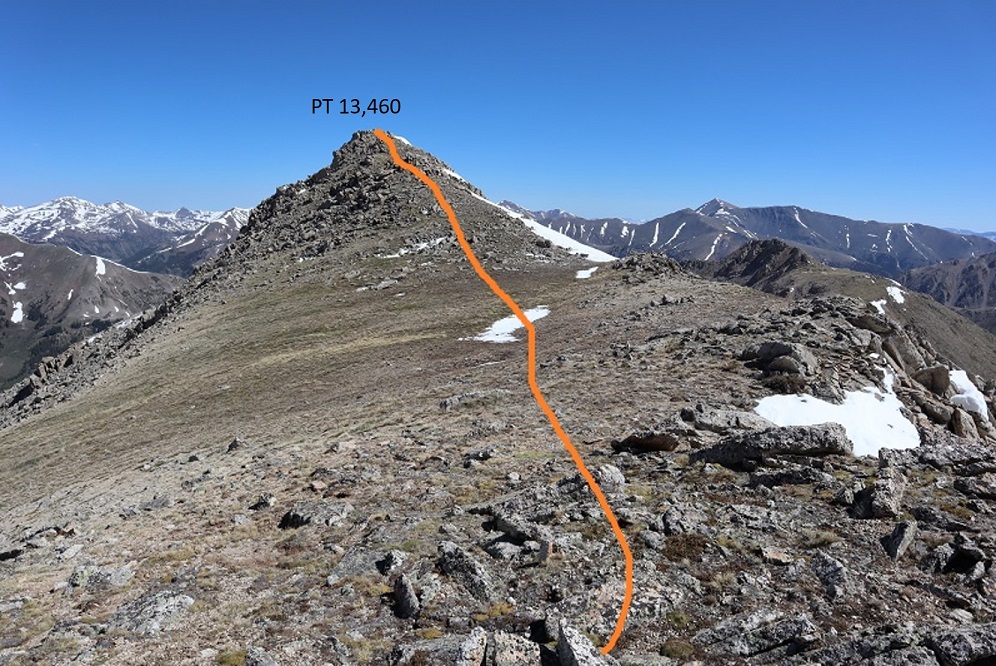
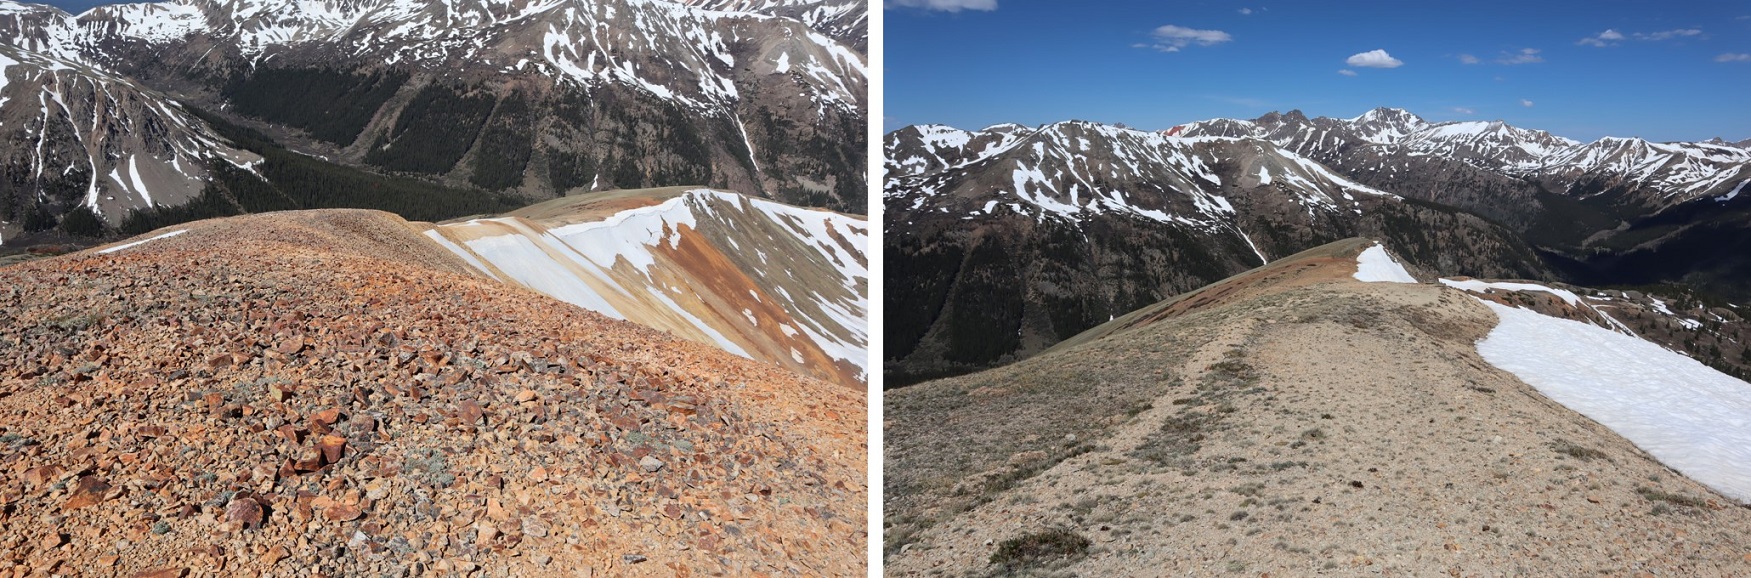
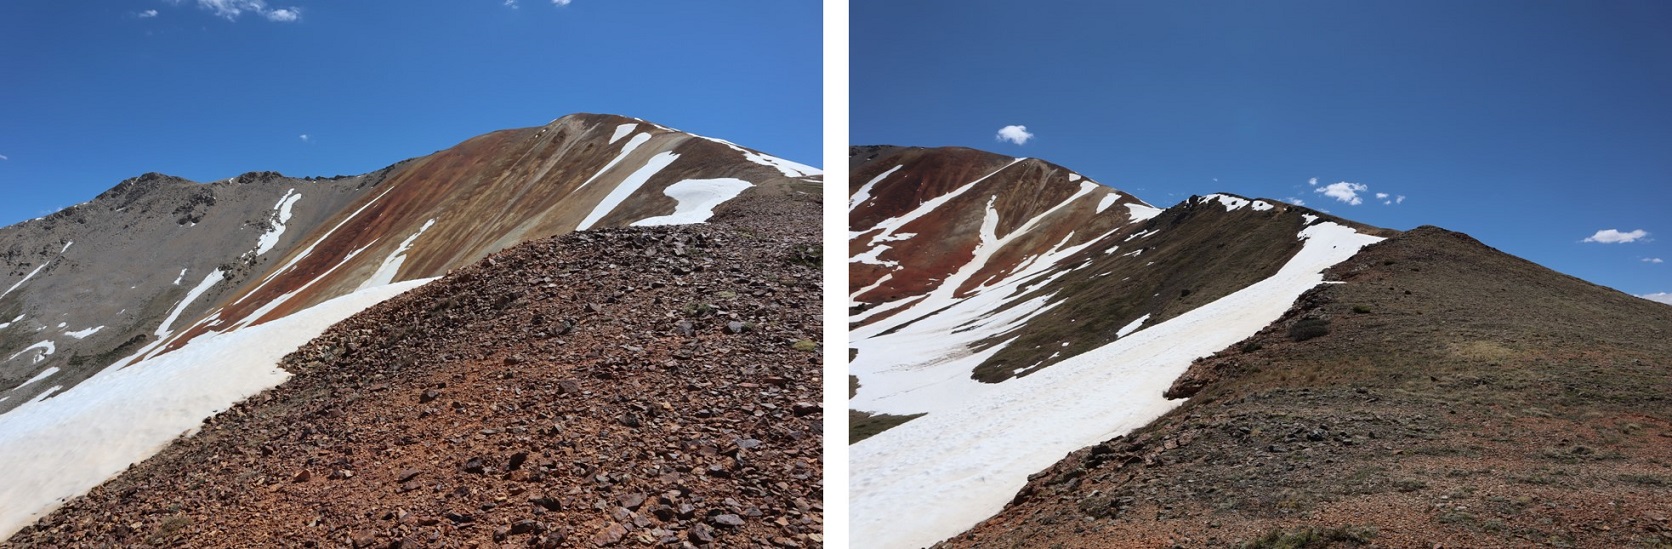
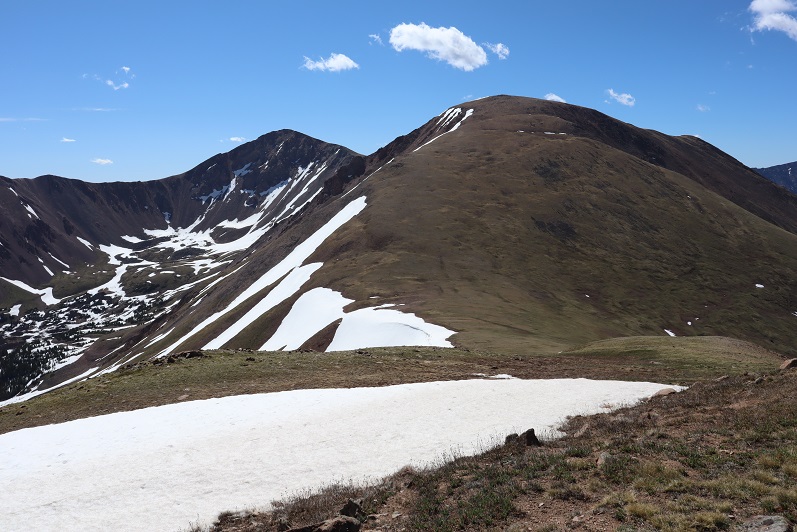
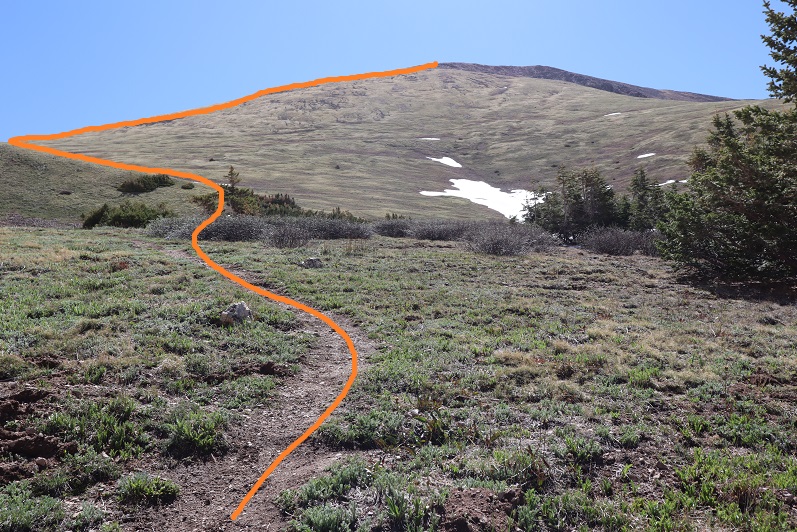
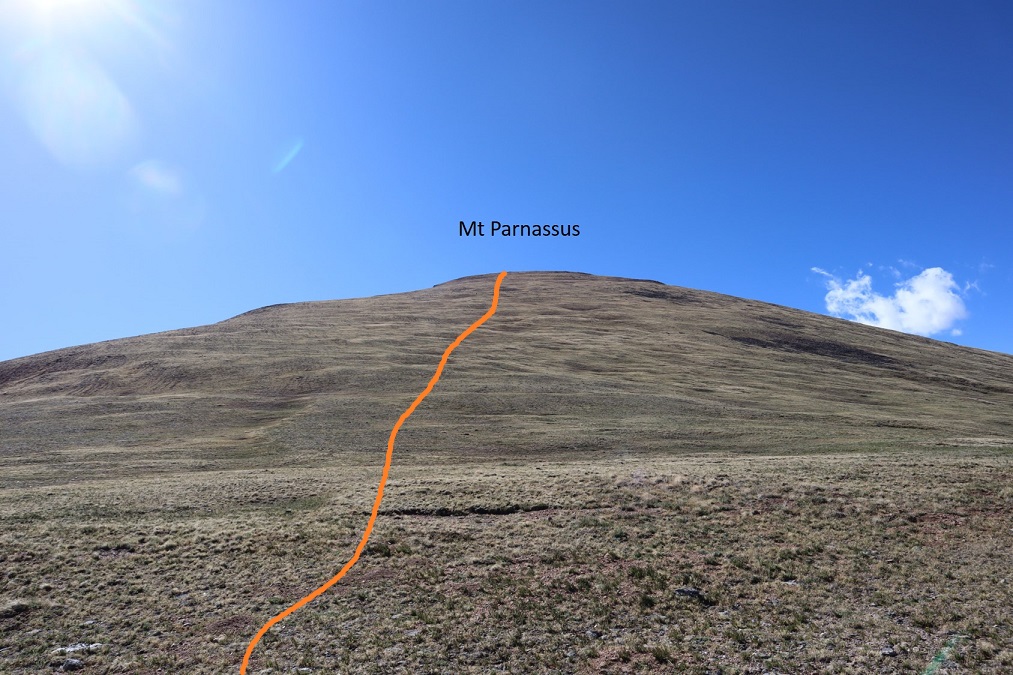
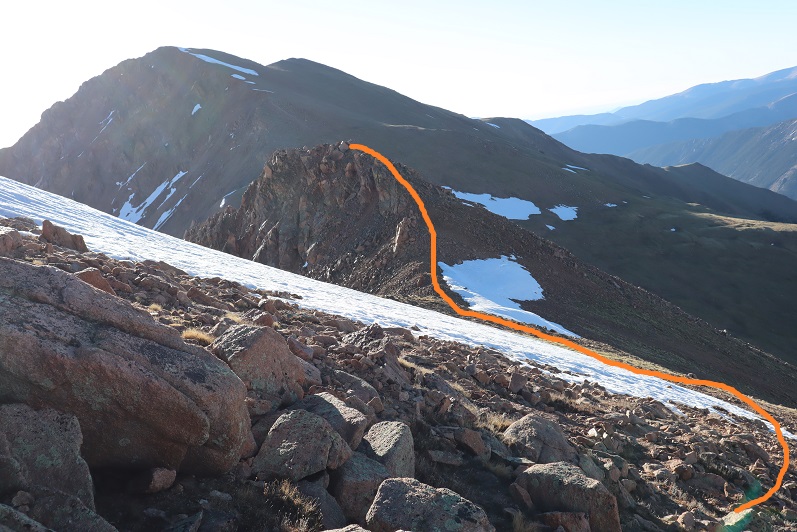
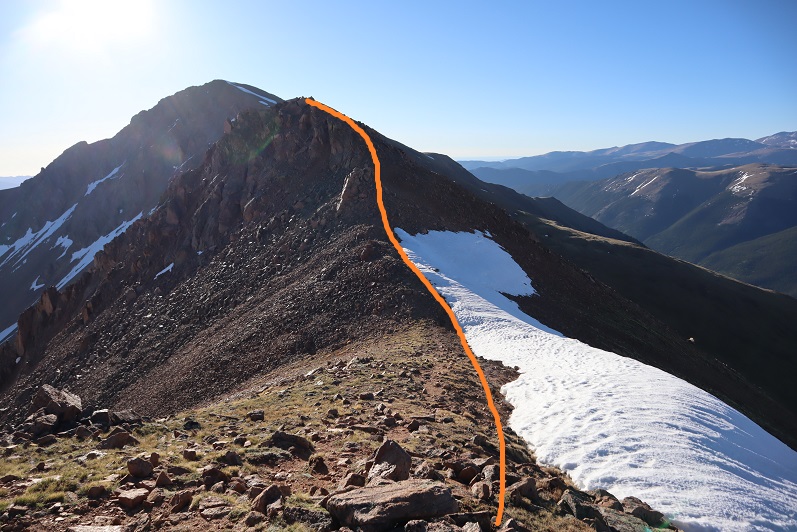
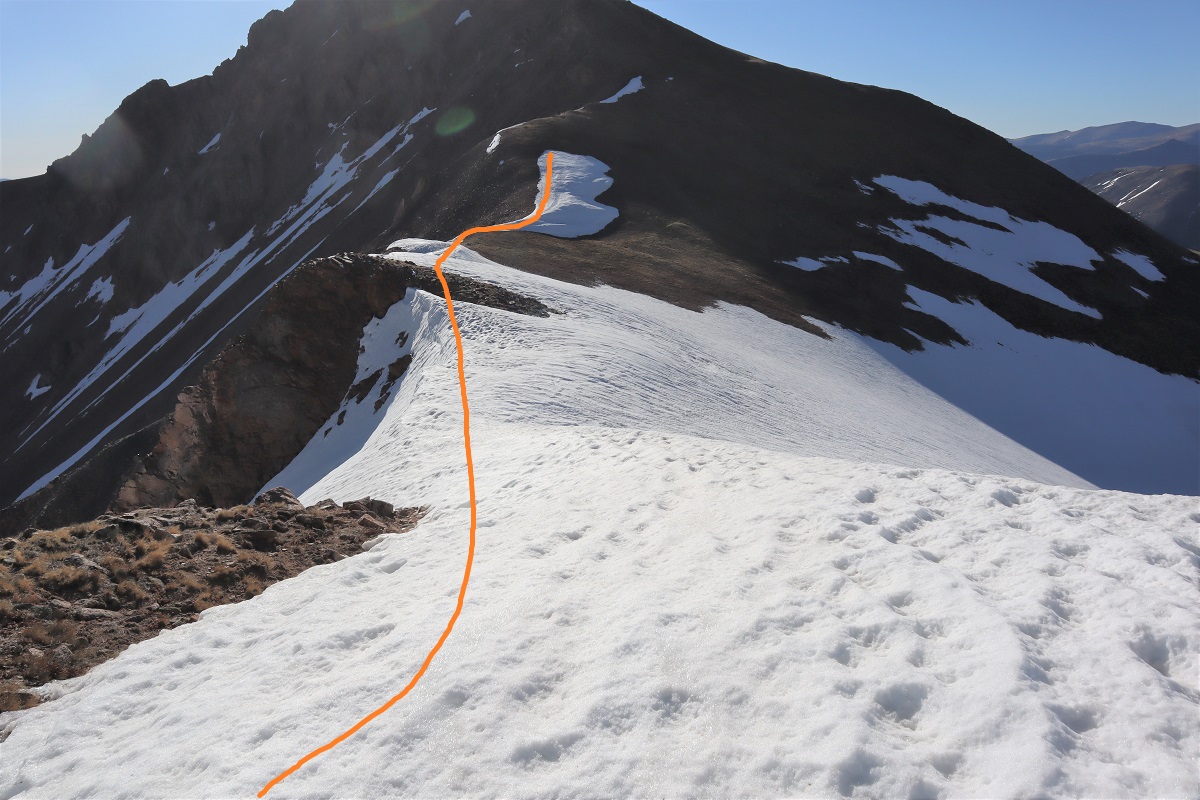
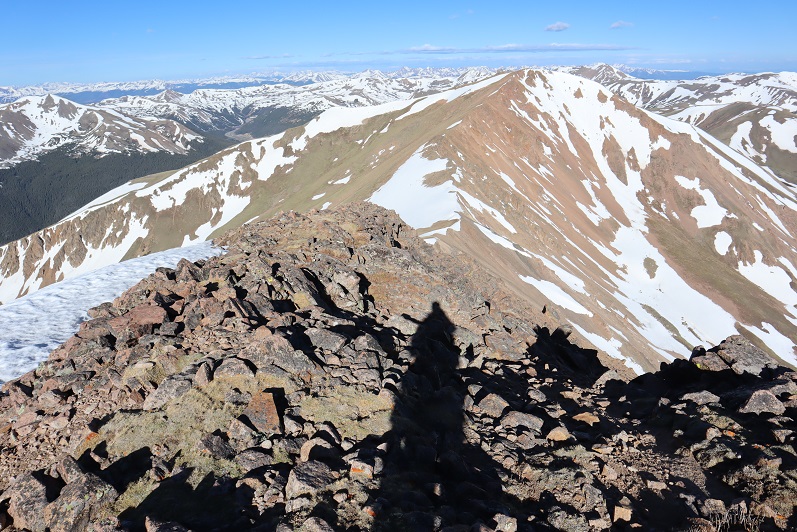
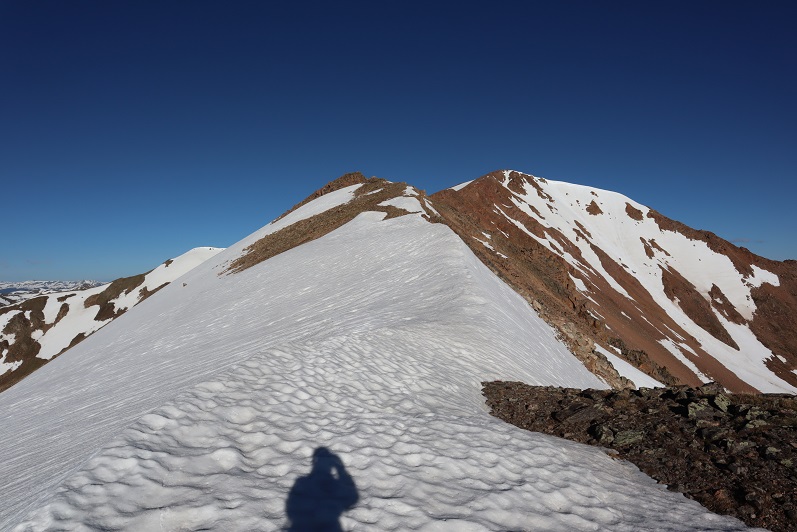
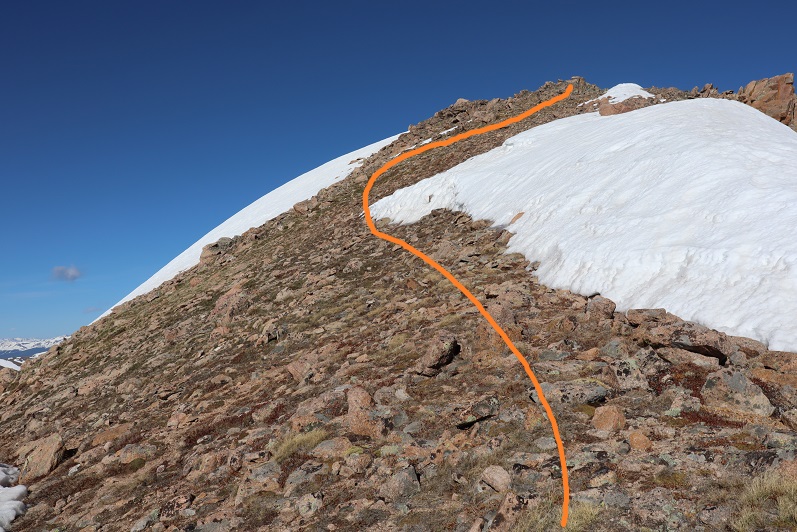
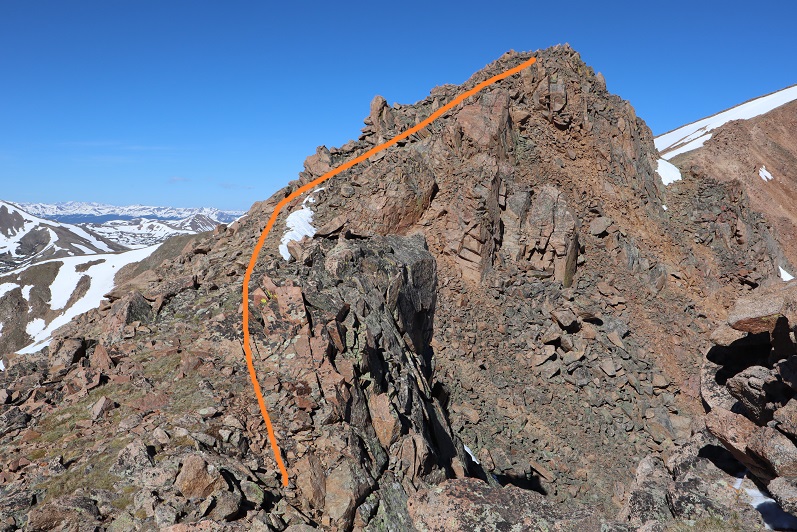
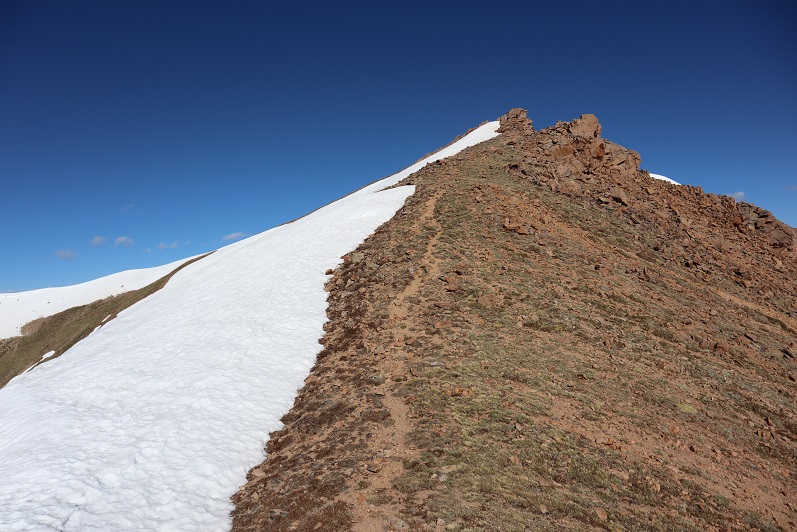
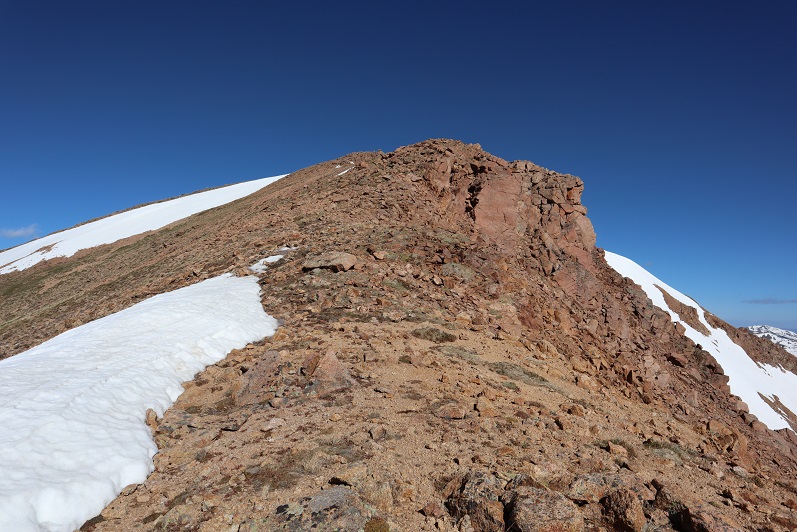
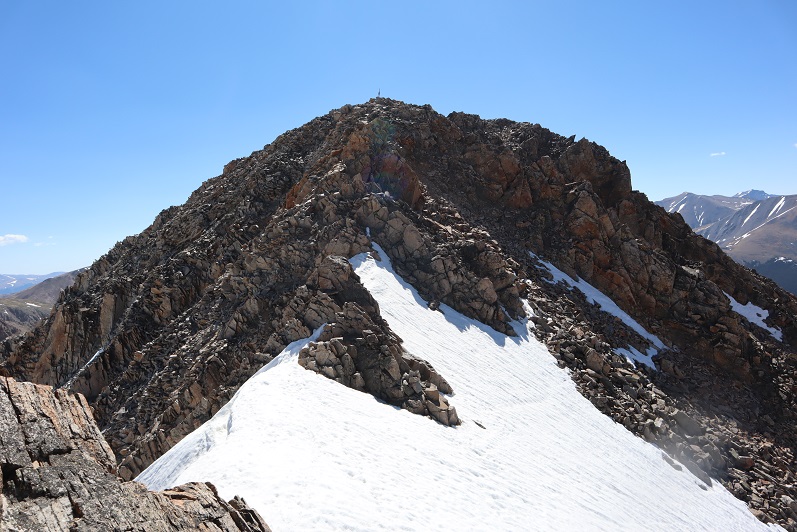
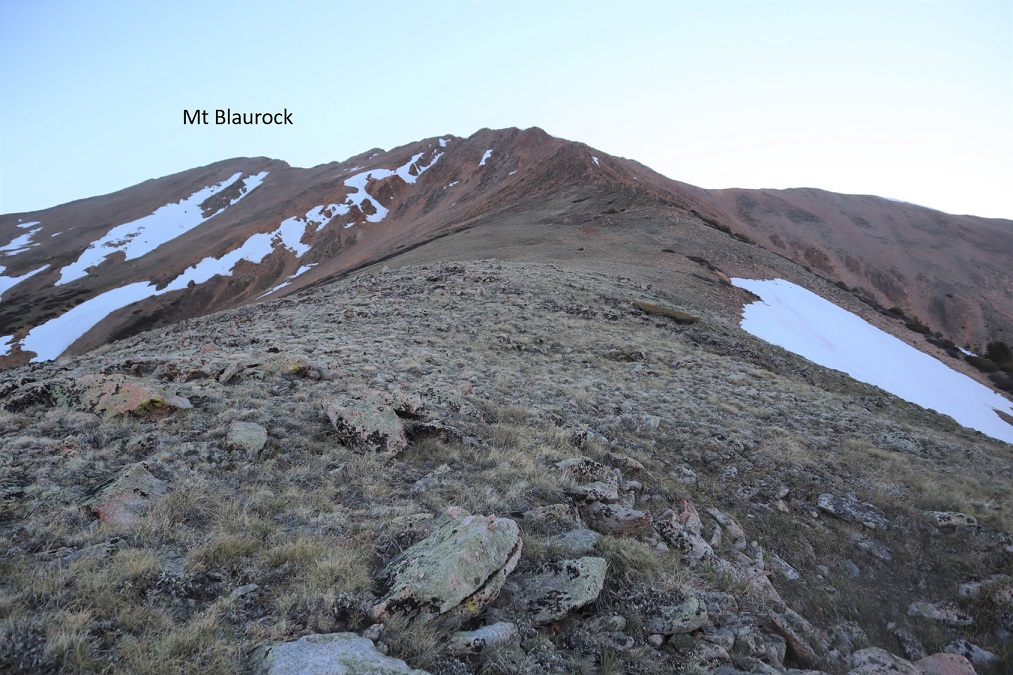
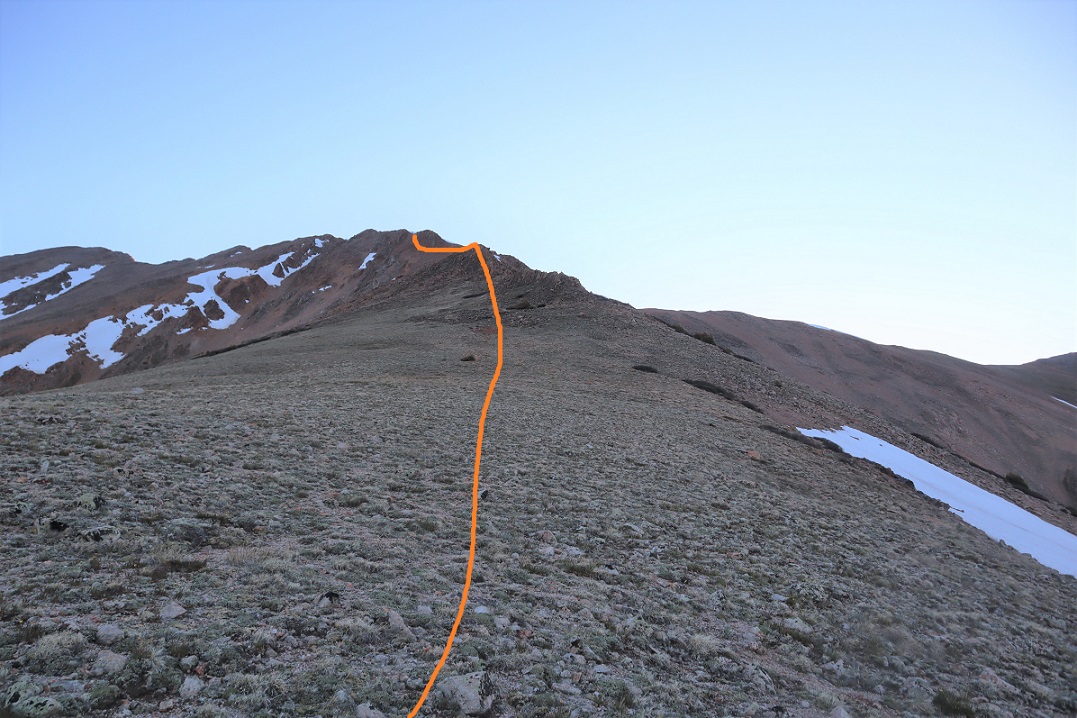
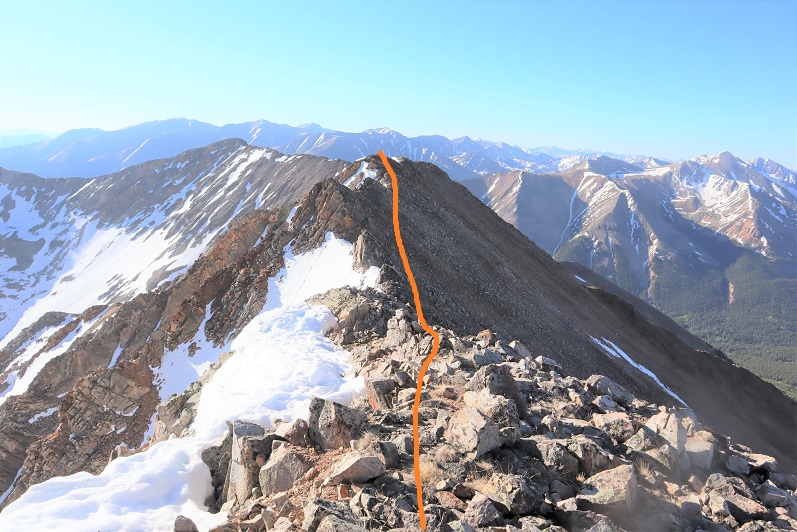
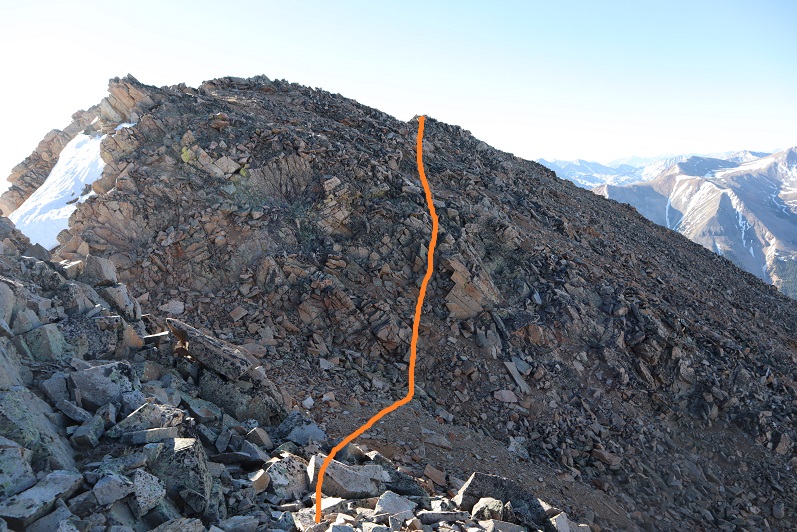
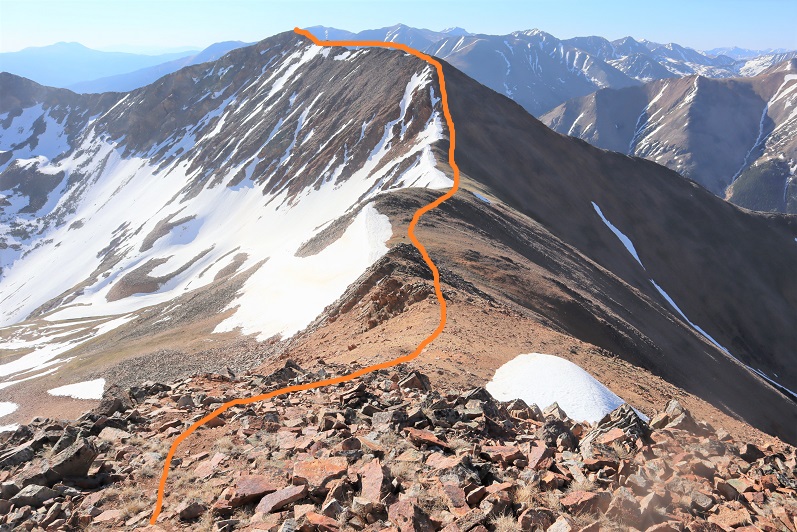
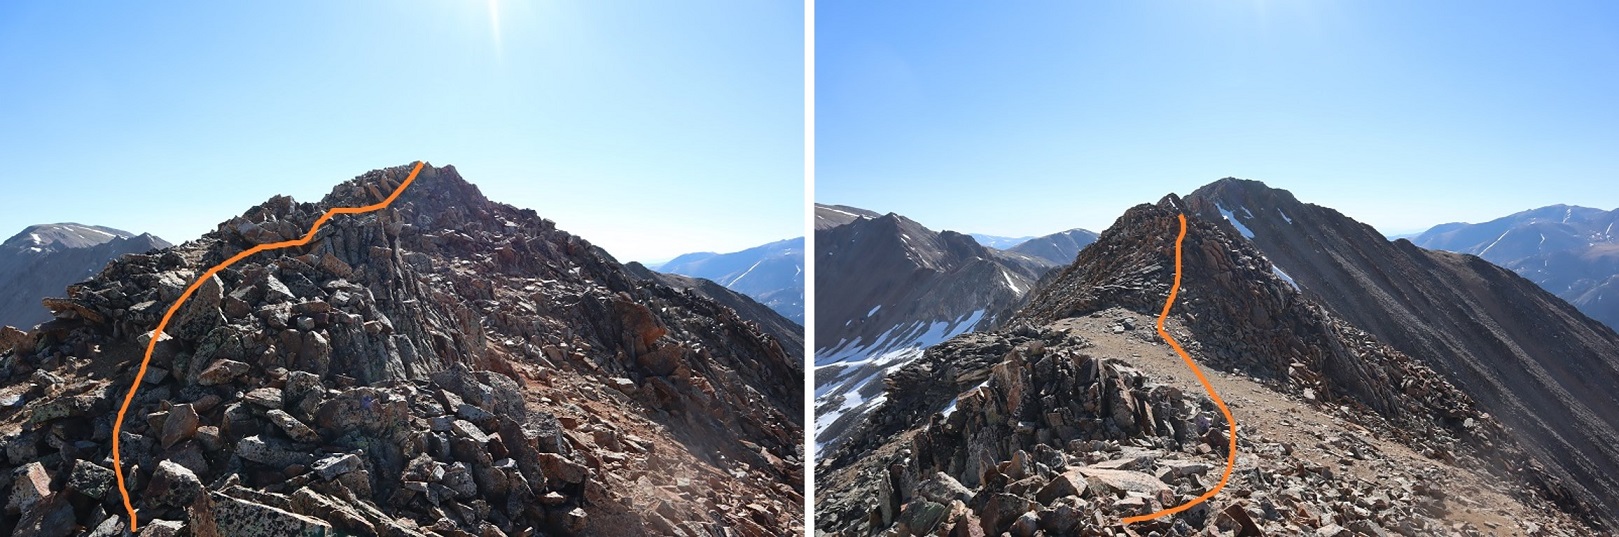
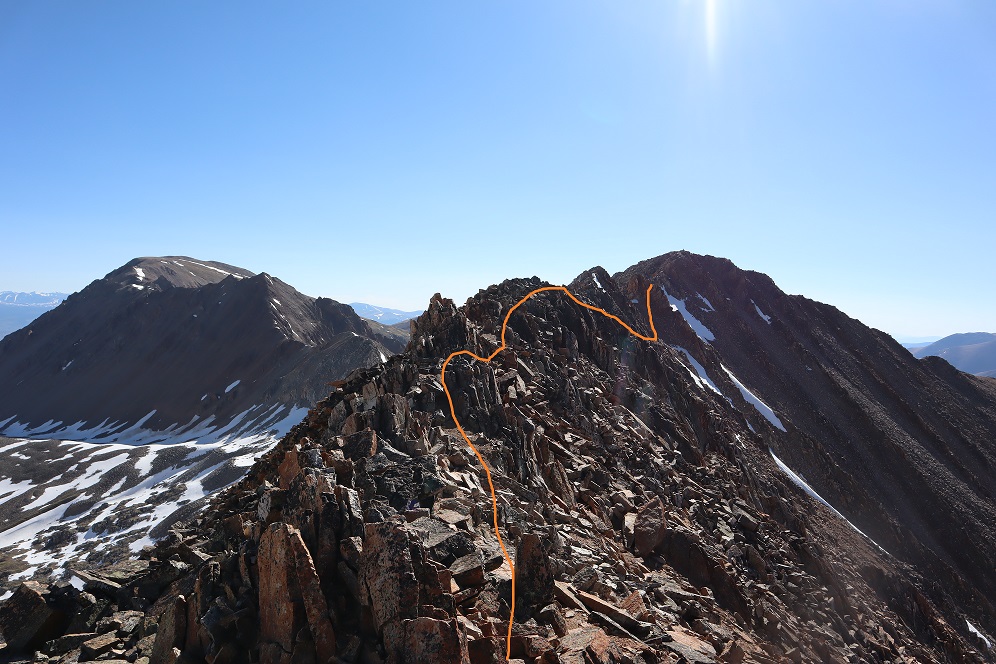
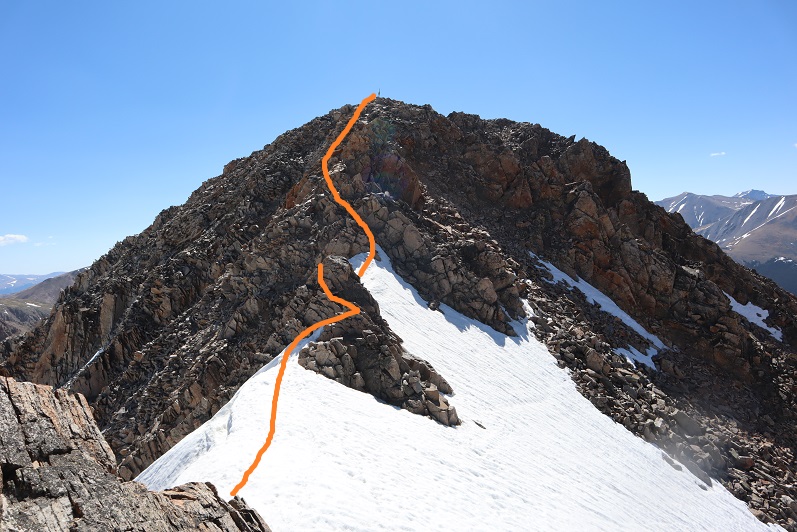
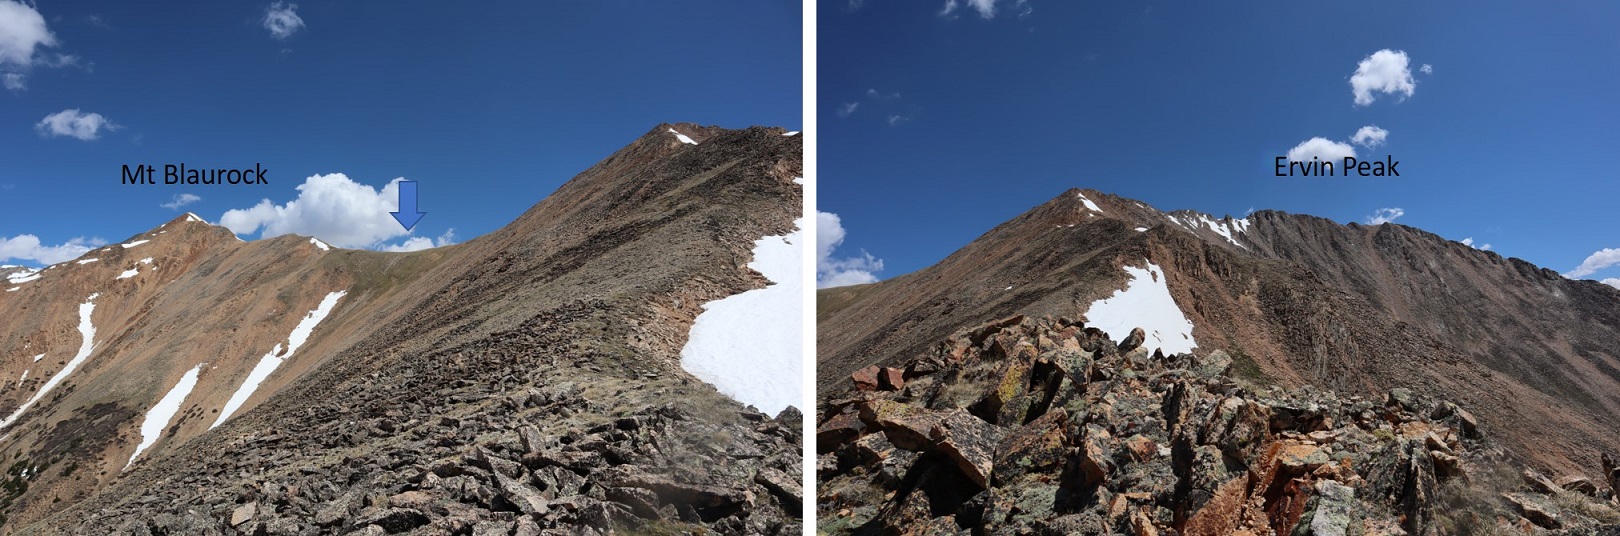
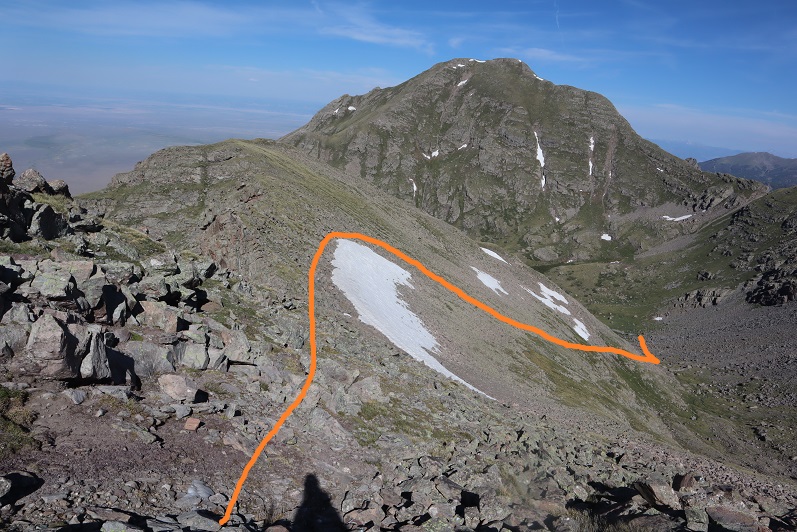
There are a lot of ways to summit this point. I decided to gain the ridge and follow it to the summit of PT 13580

24

25

26

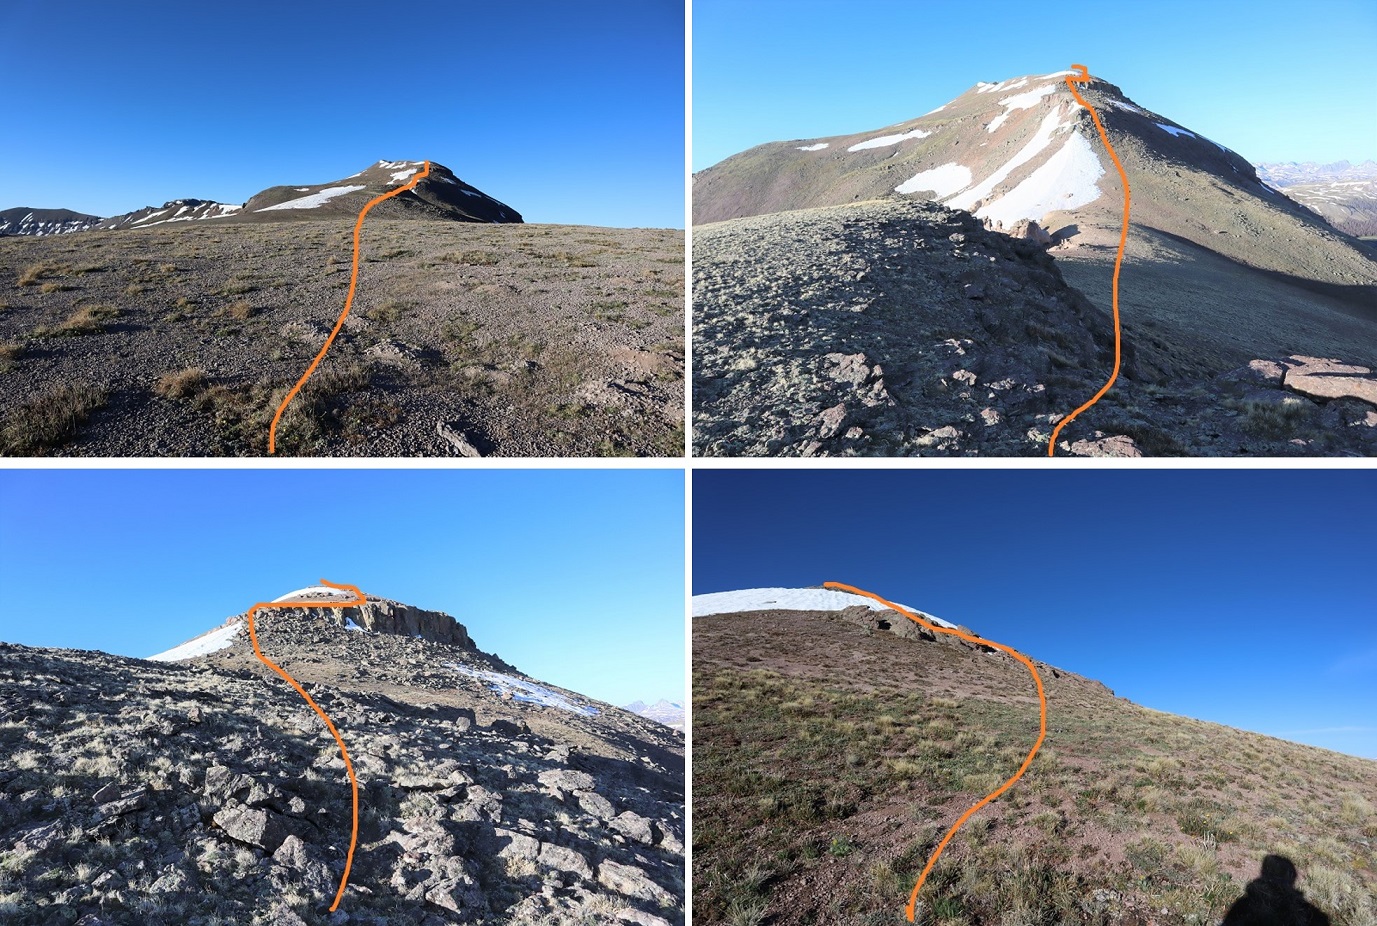
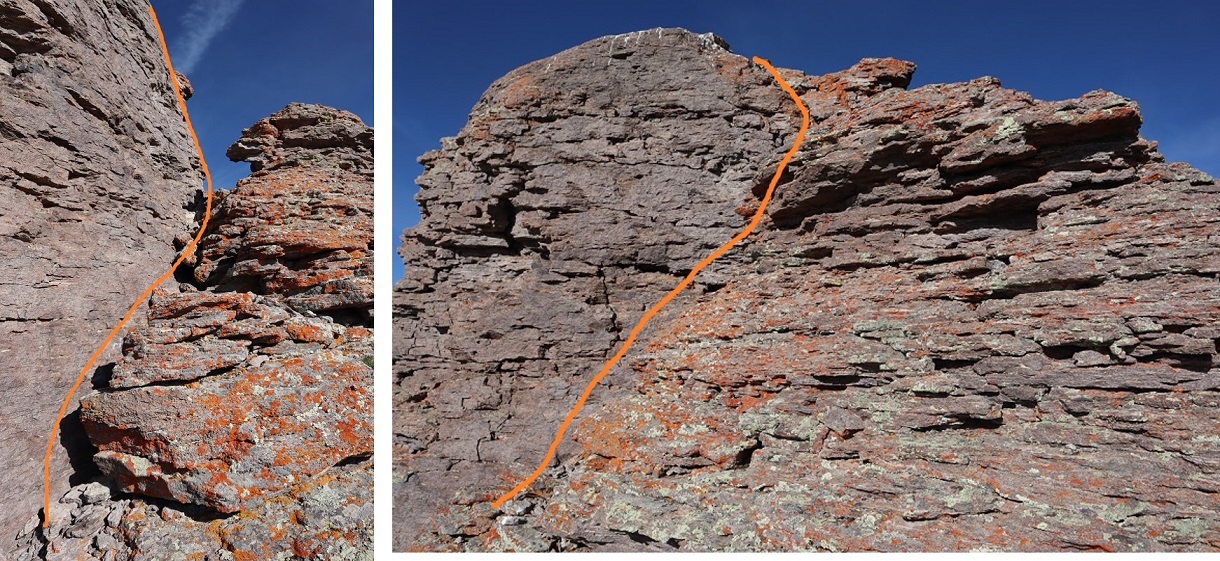
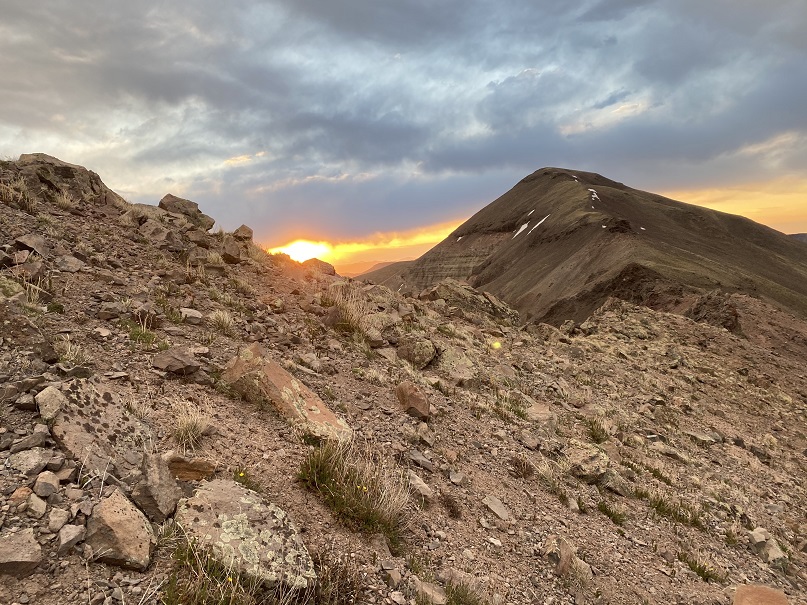
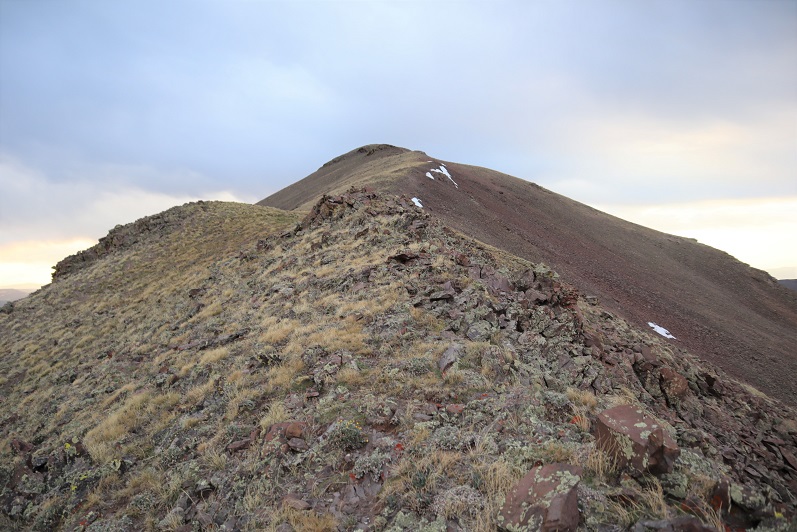
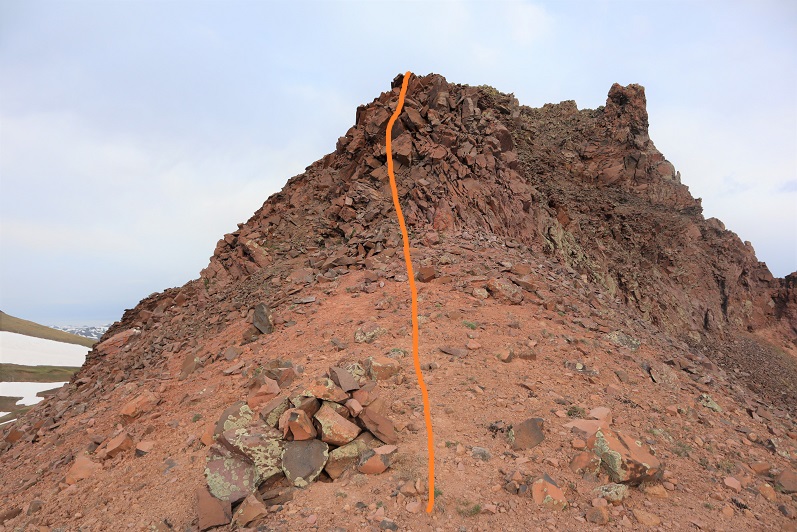
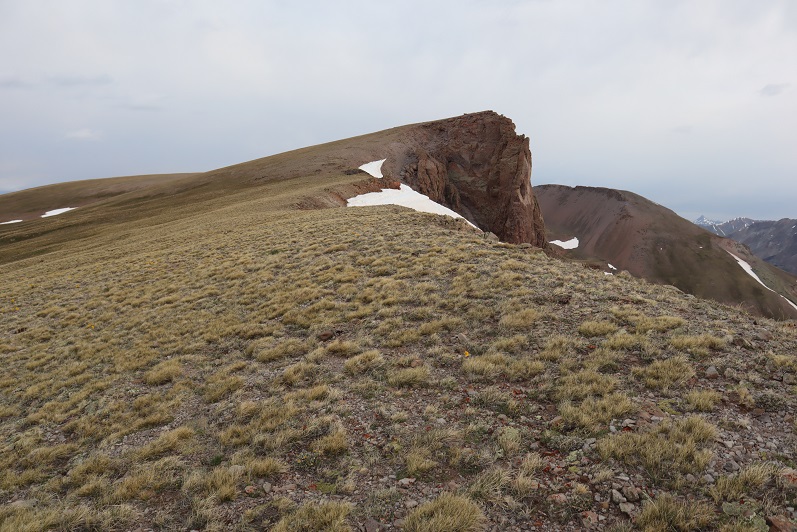
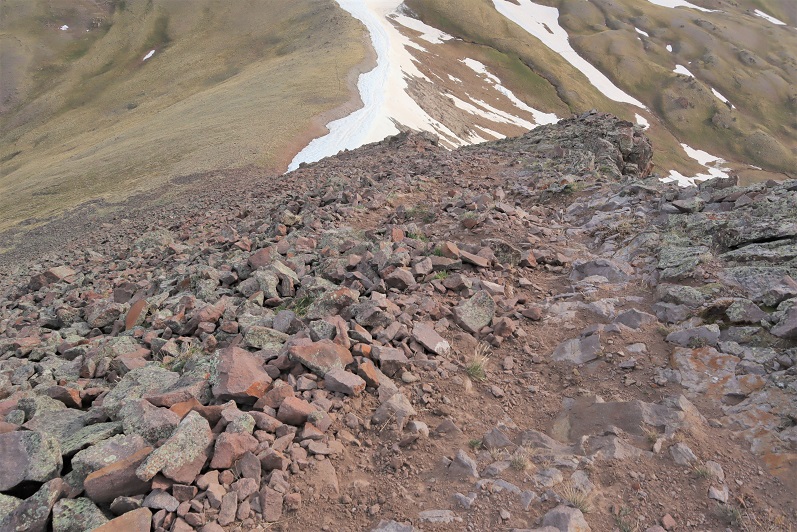
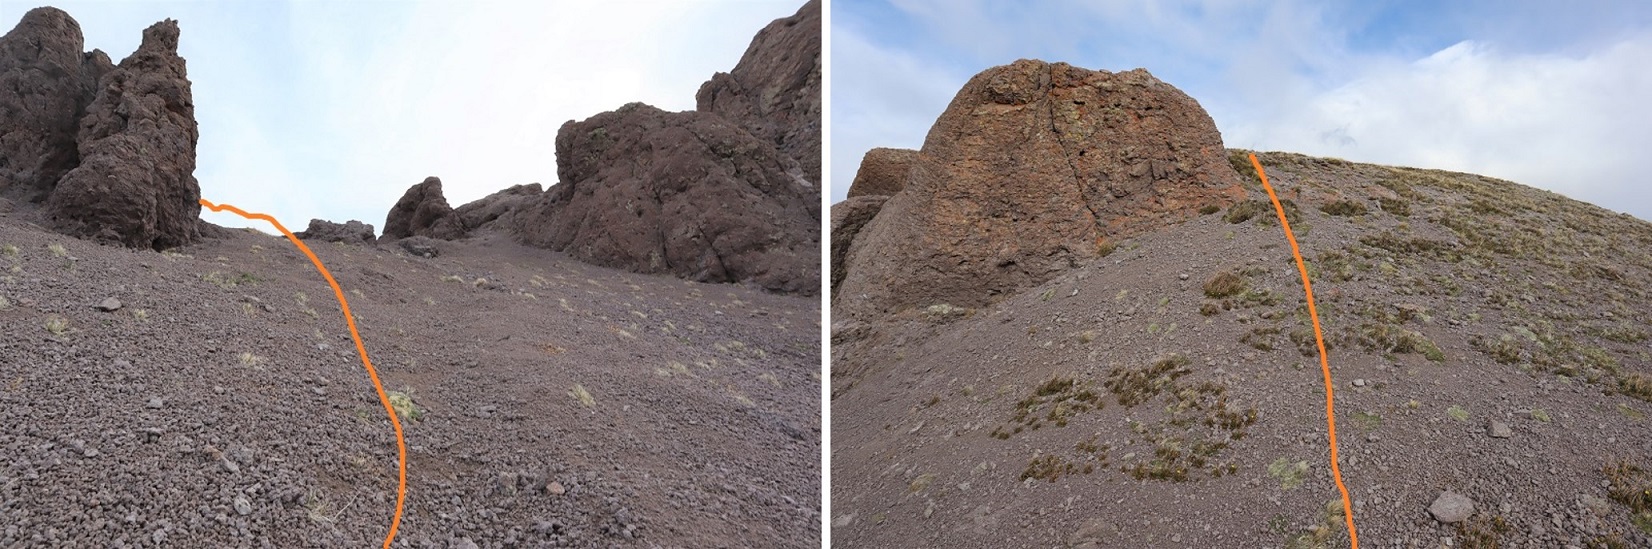
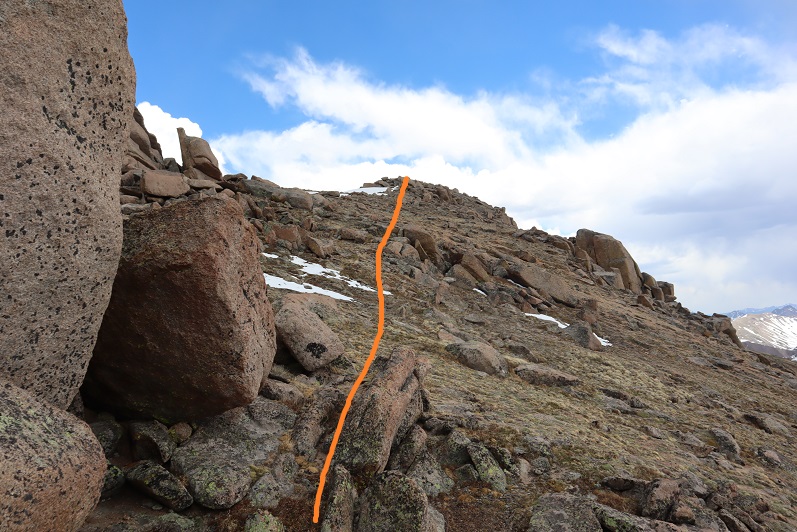
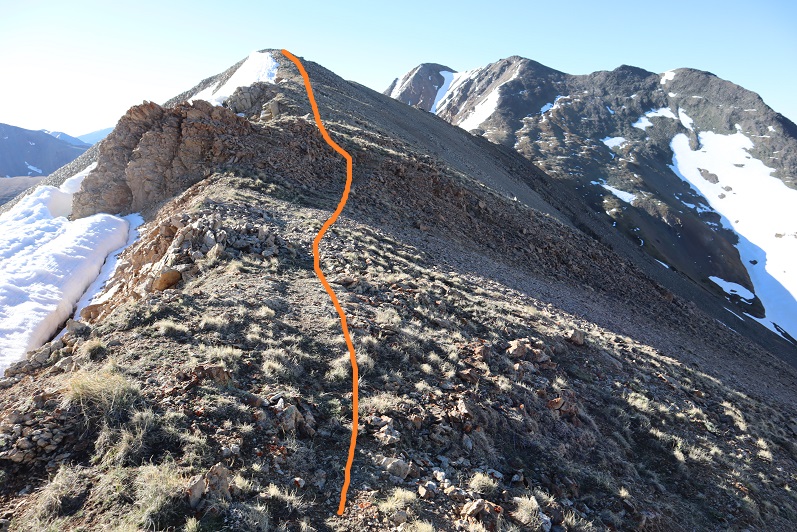
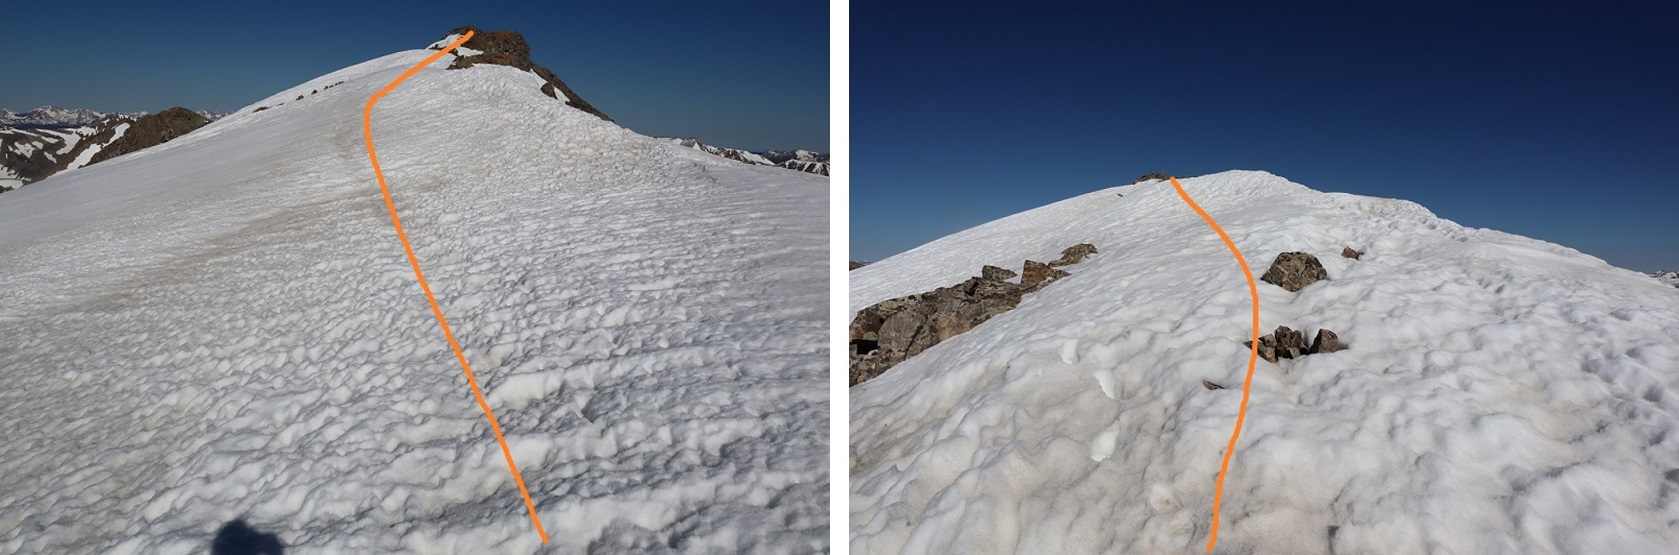
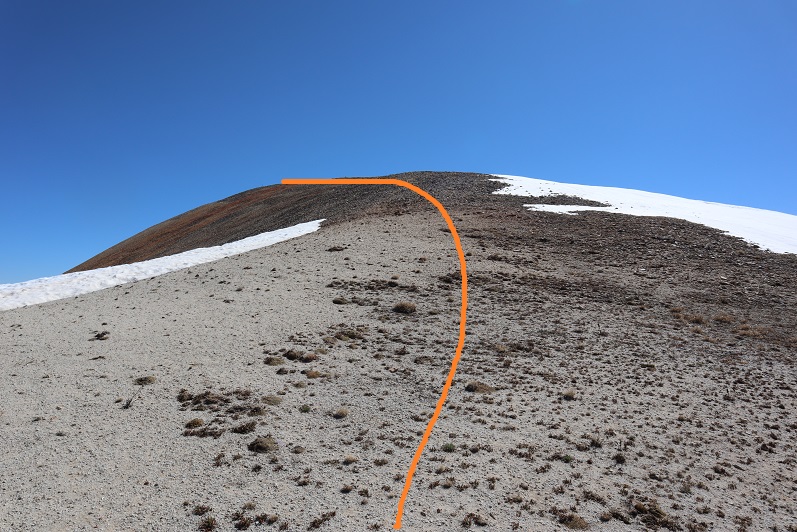
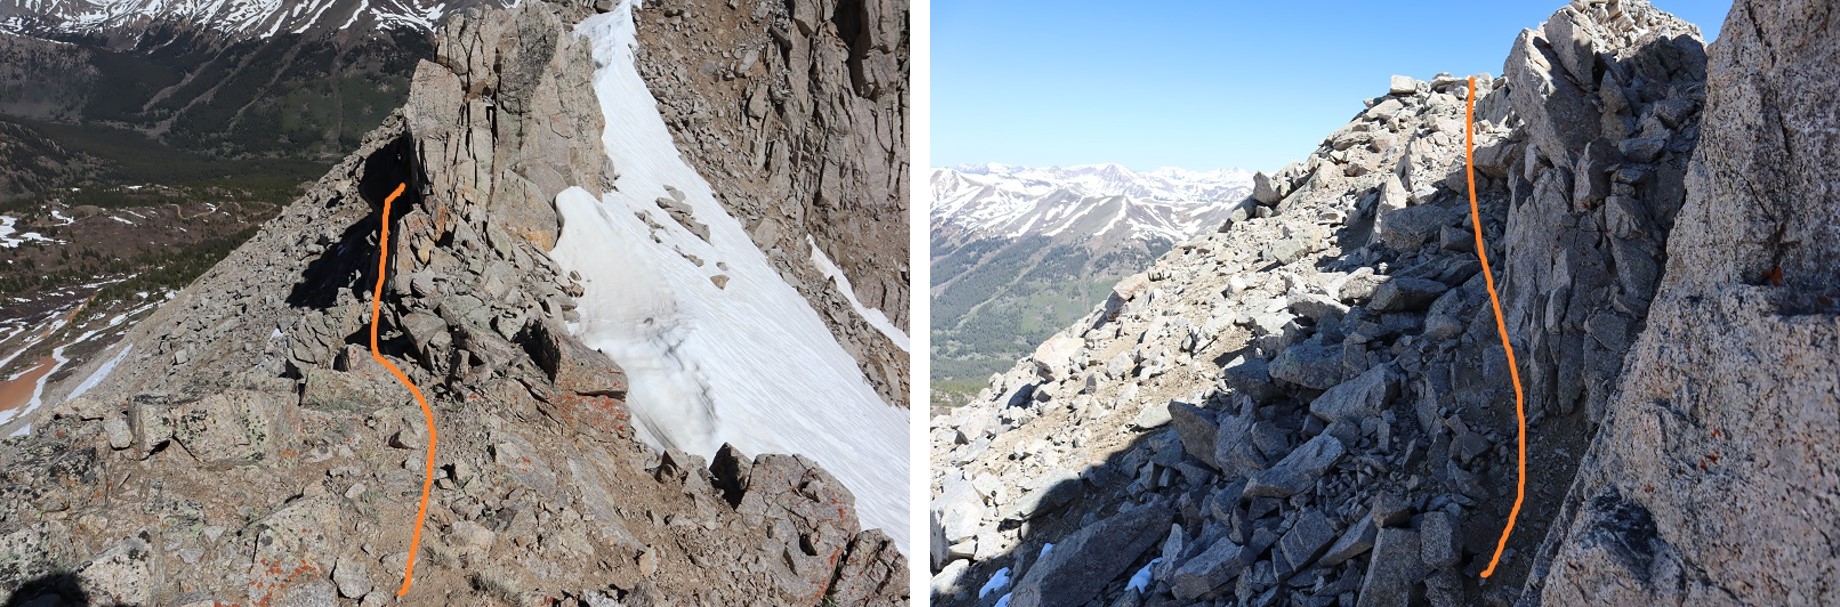
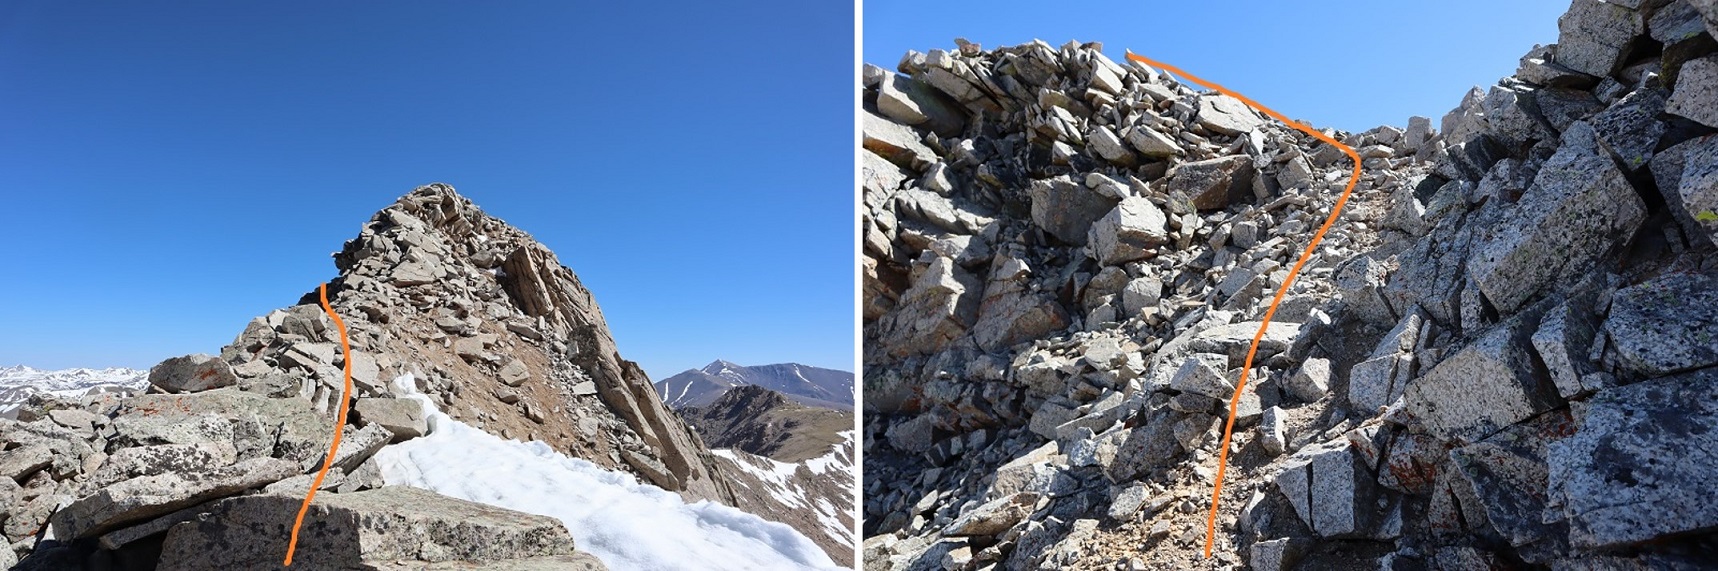
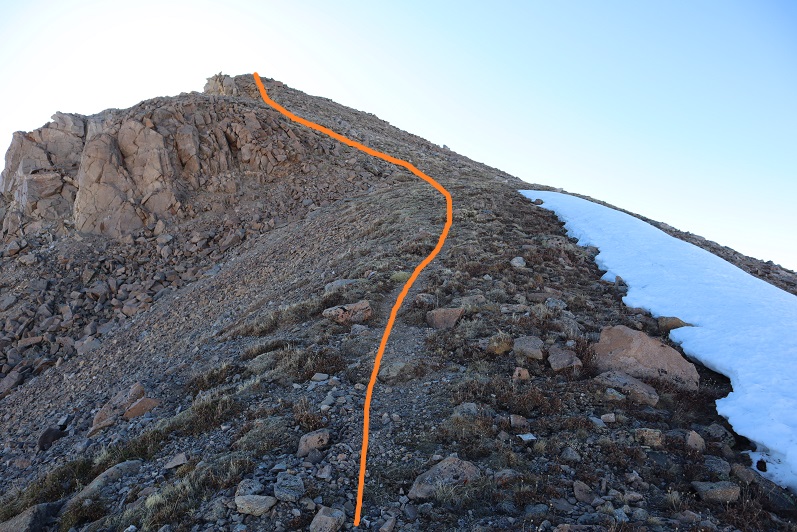
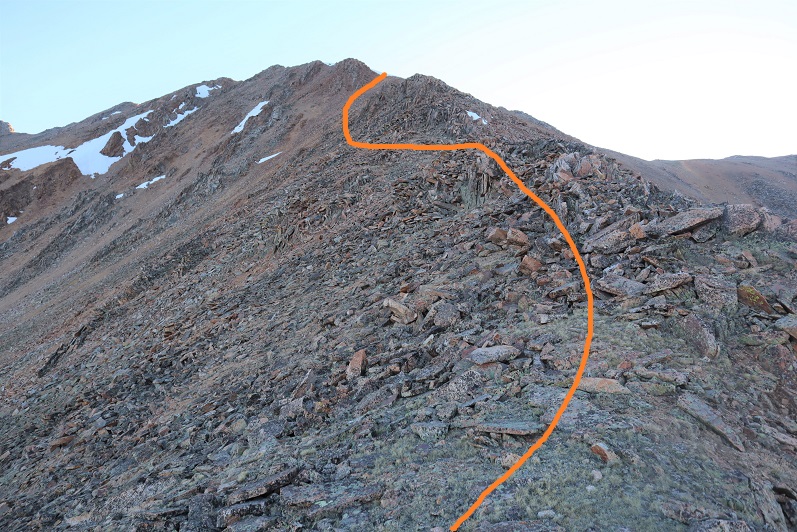
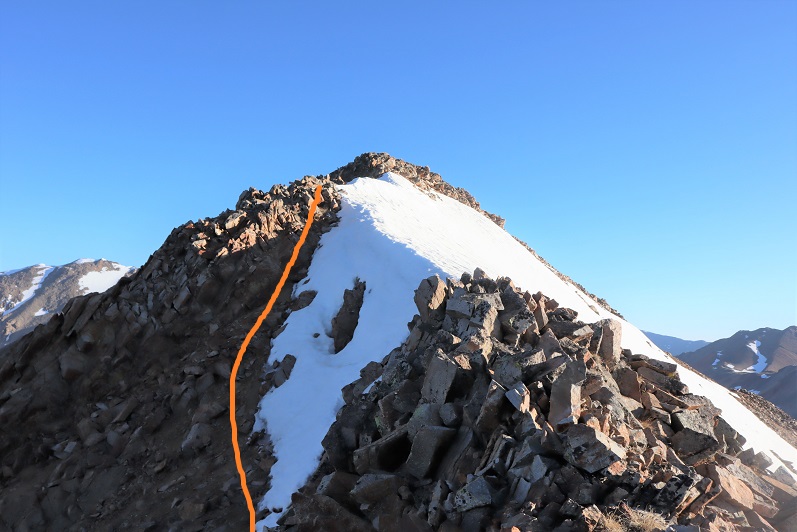
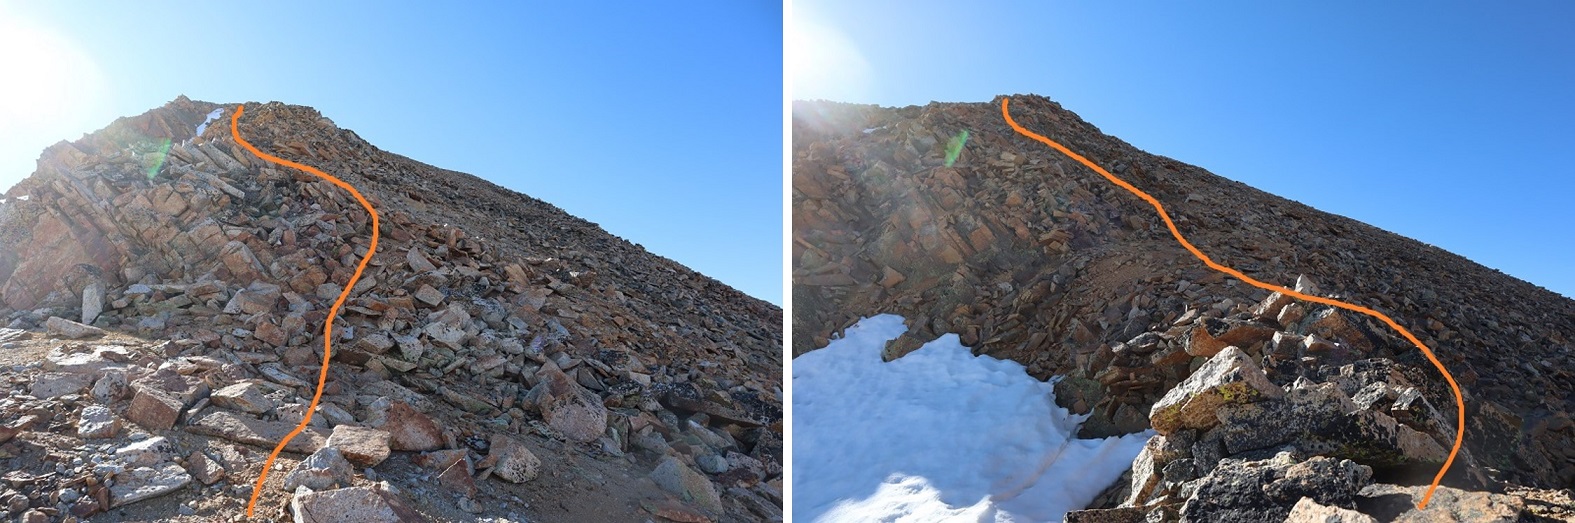
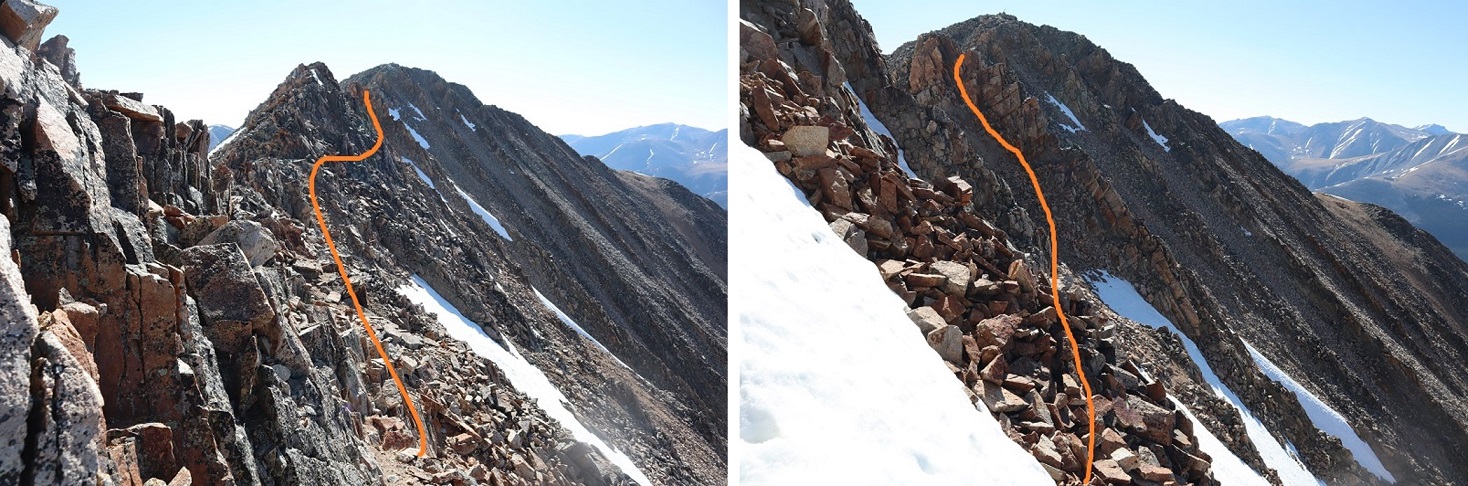
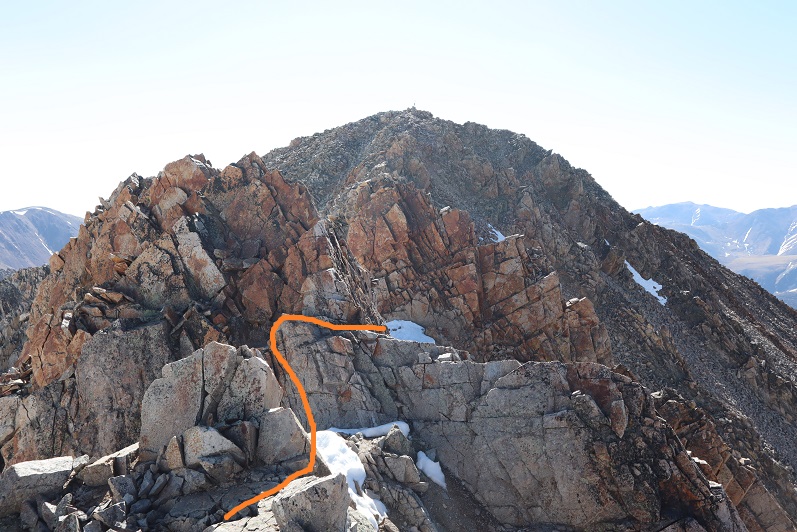
Once on the ridge it was an easy hike to the summit. The only problem was the sun was rising directly in front of me as I was hiking and I couldn’t see anything due to the glare. These pictures are from the way back down. While hiking up this ridge I heard someone from over on the Kit Carson/Challenger side yell “rock!” every couple of minutes. It’s amazing how sound carries out here.

27

28

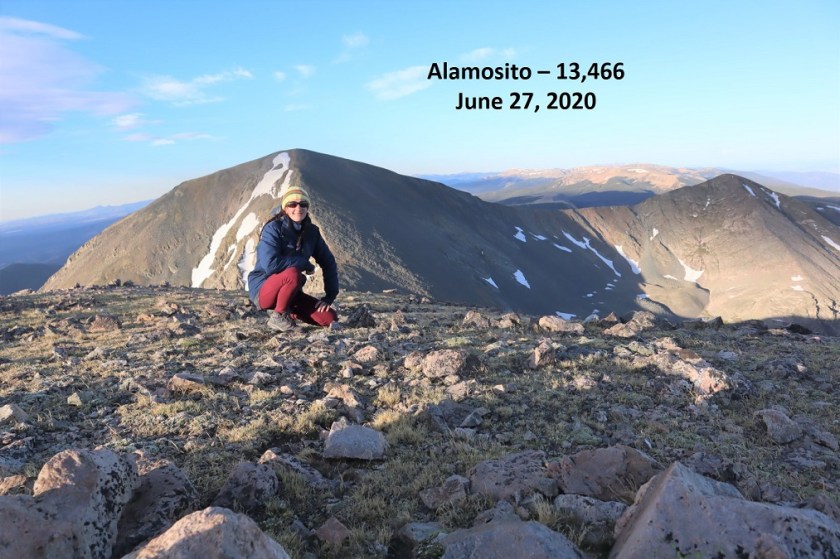
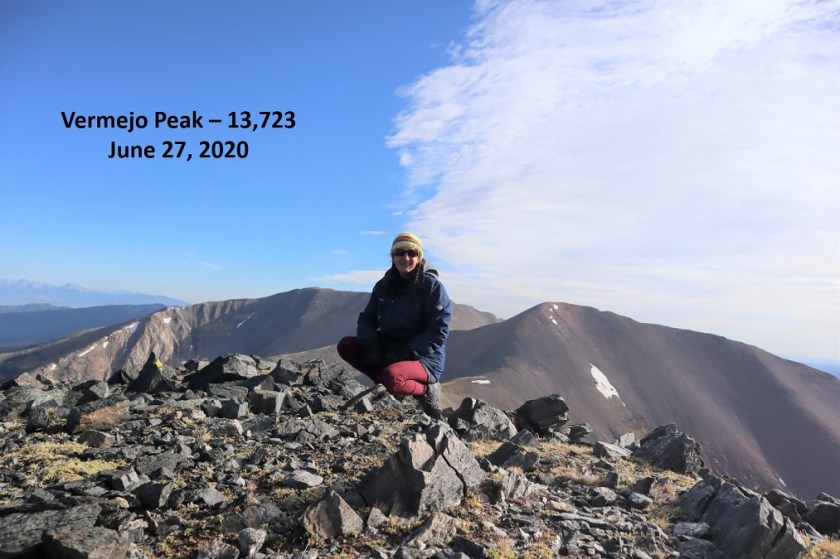
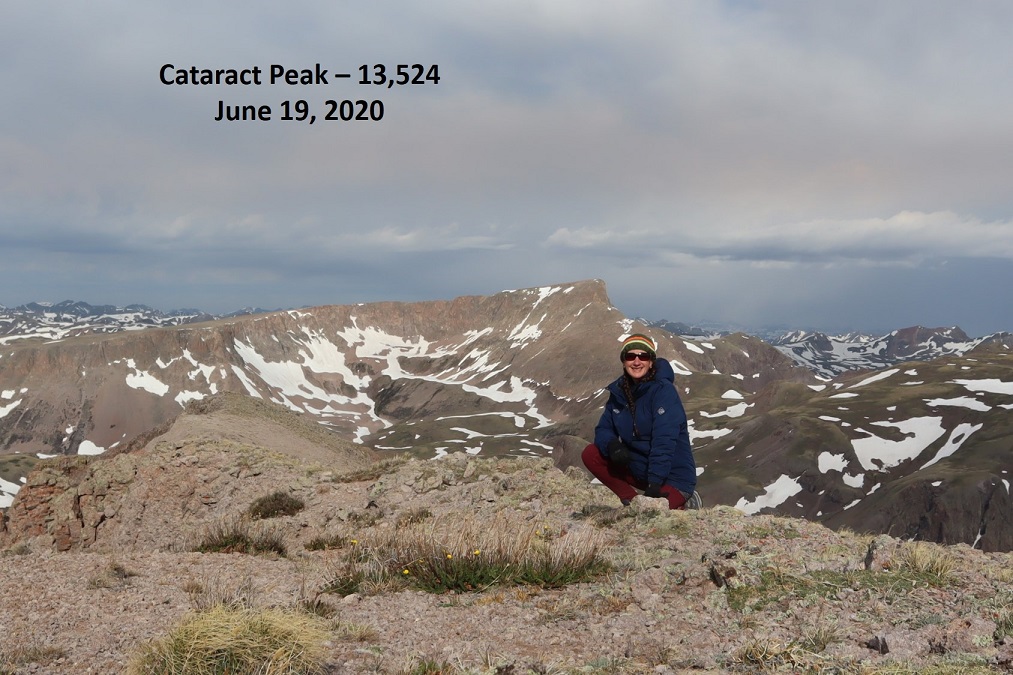
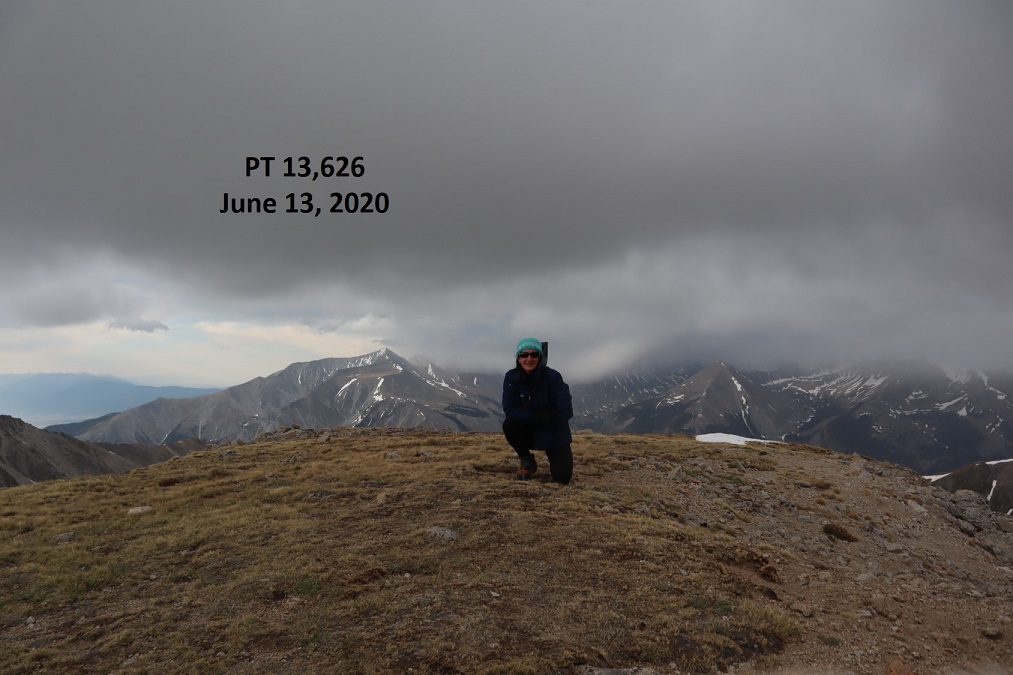
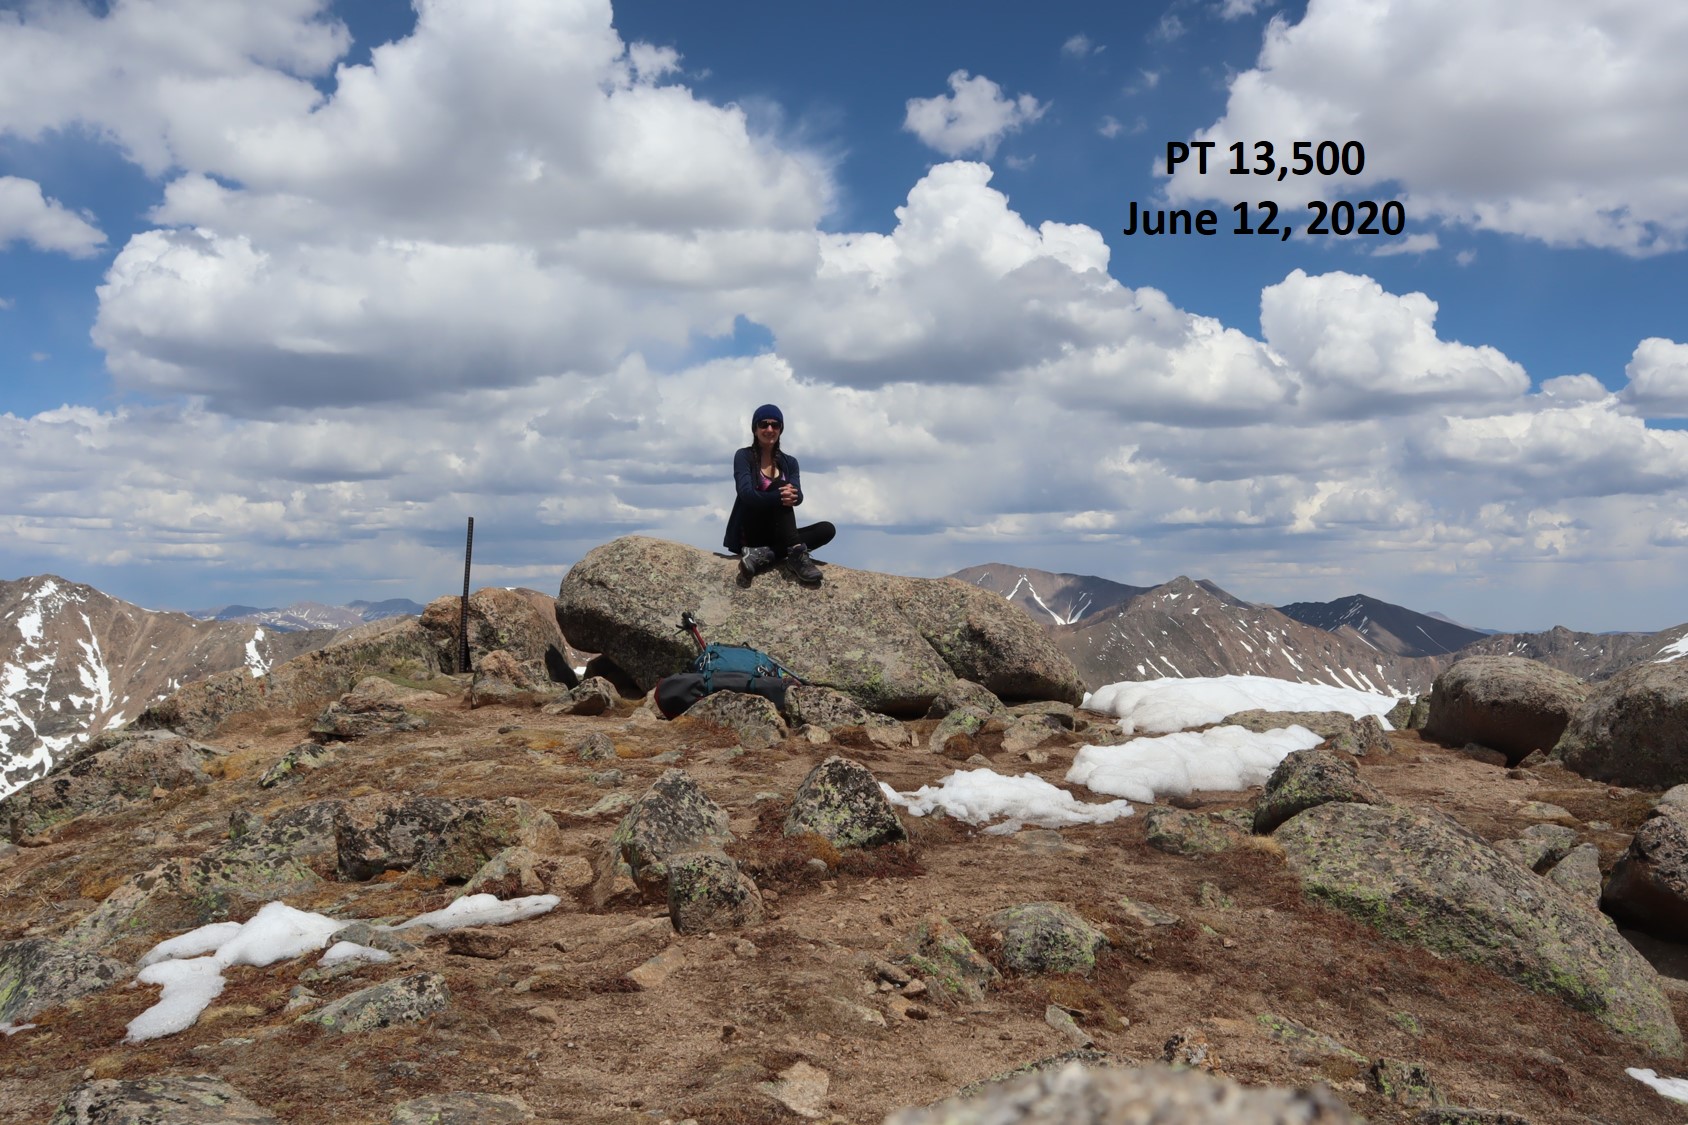
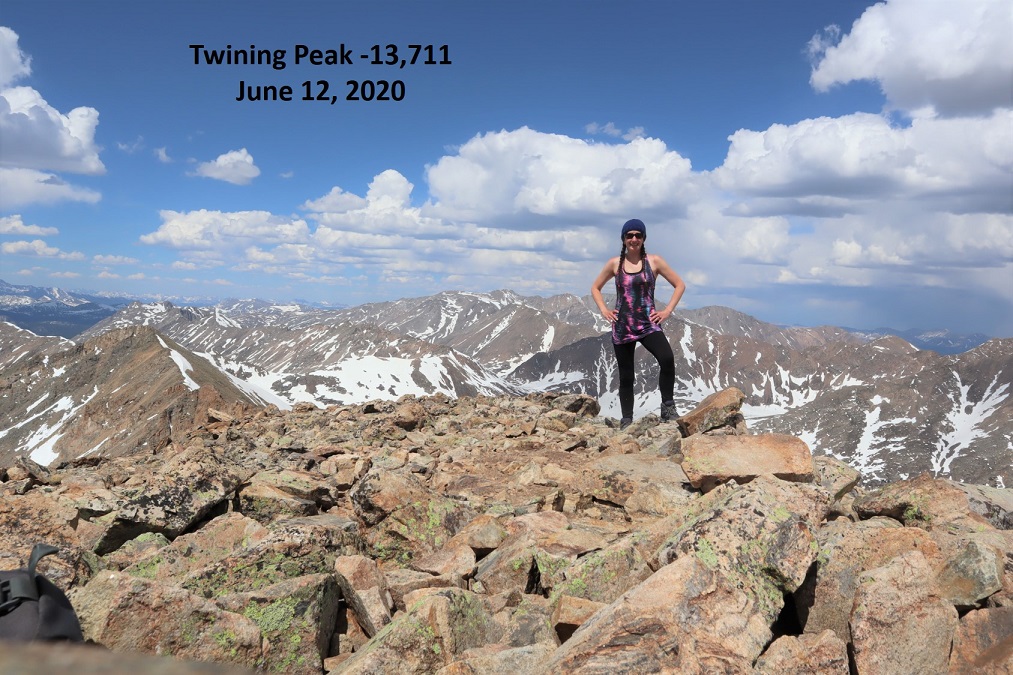
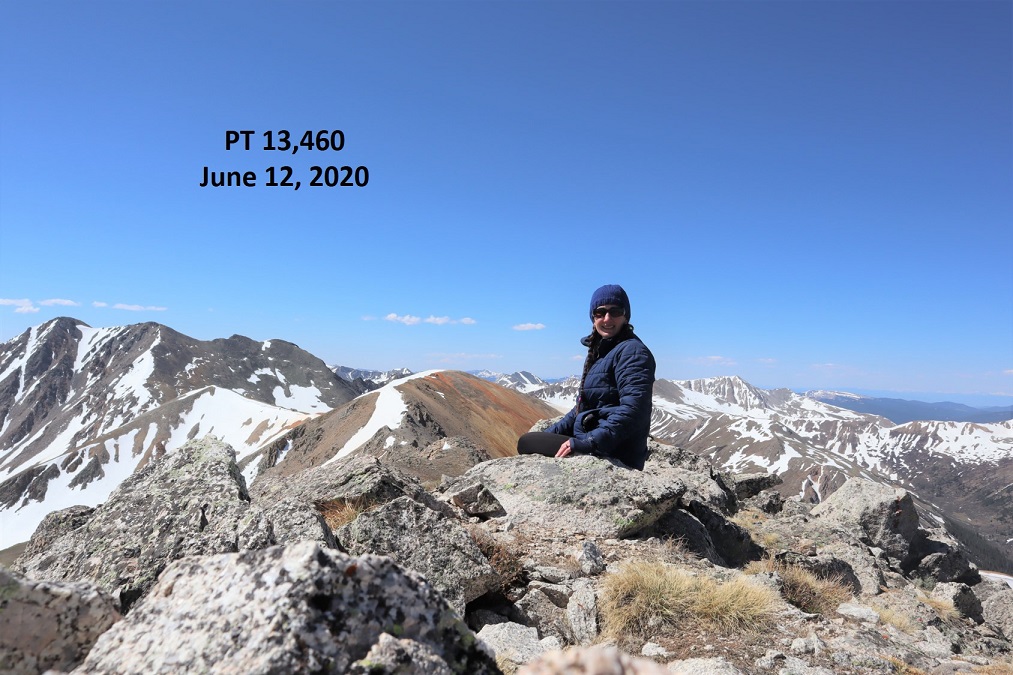
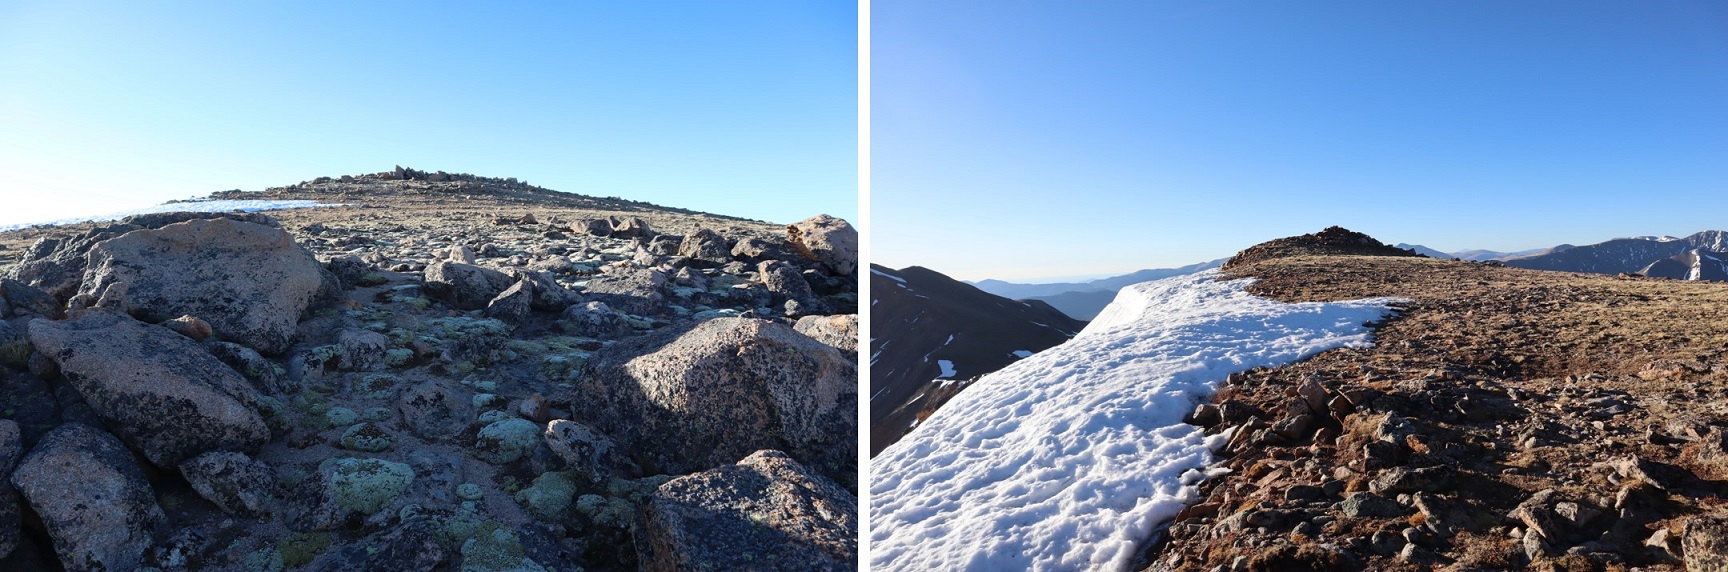
I summited PT 13580 at 8:45am, after 6.8 miles of hiking
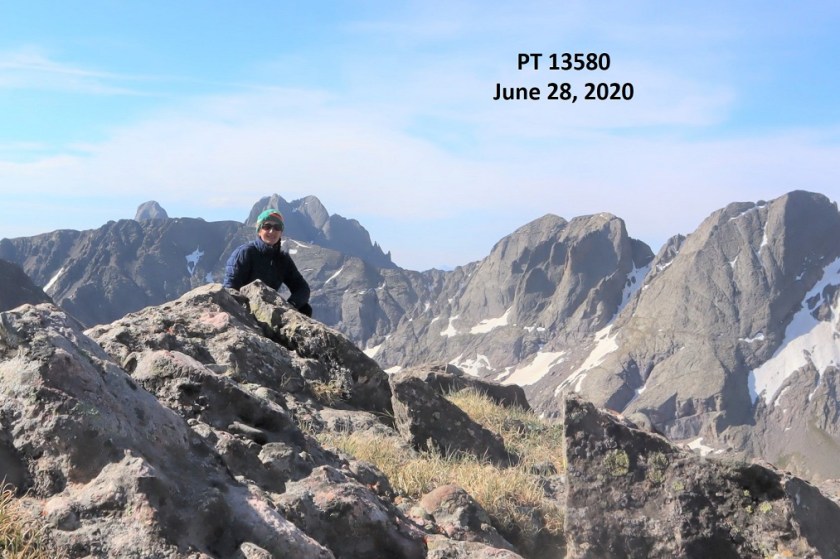
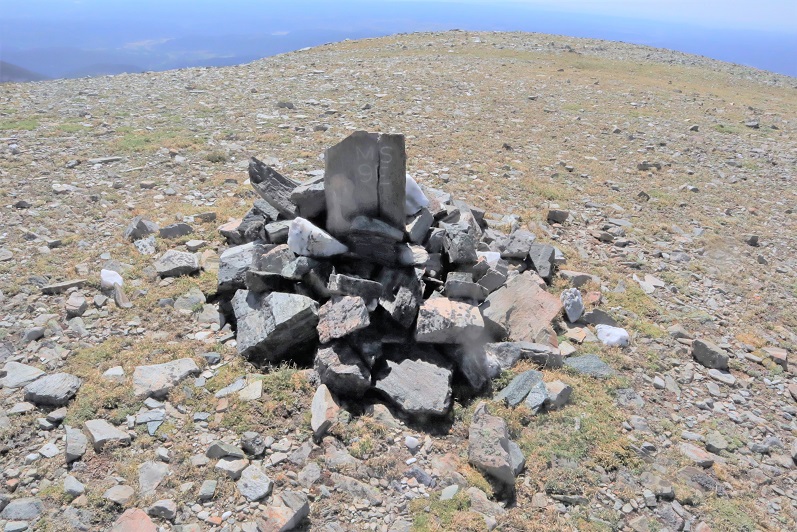
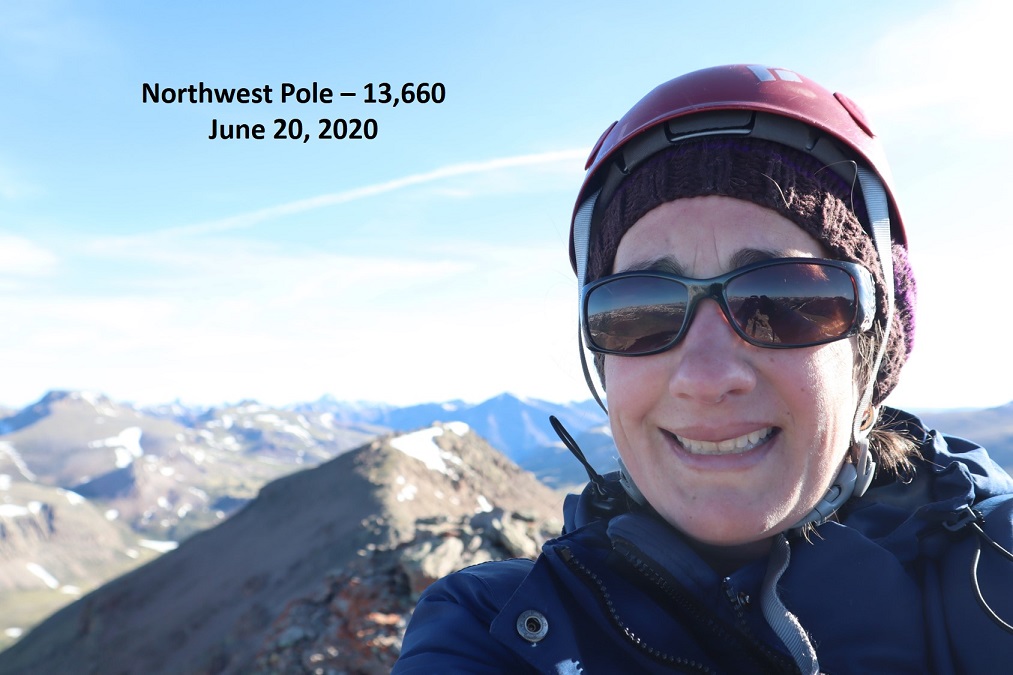
29

13580:

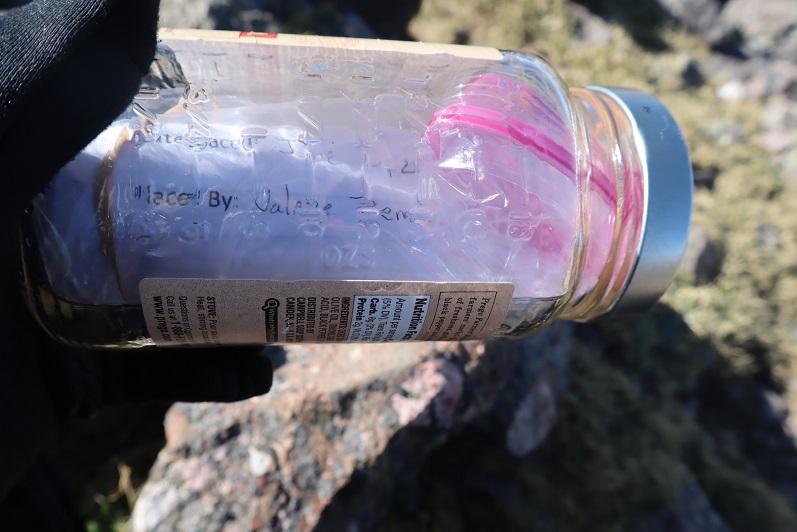
There was a summit cairn at the top, as well as a summit register. I didn’t open it, but I could read through the glass it was recently placed there (6/20/2020?)

30

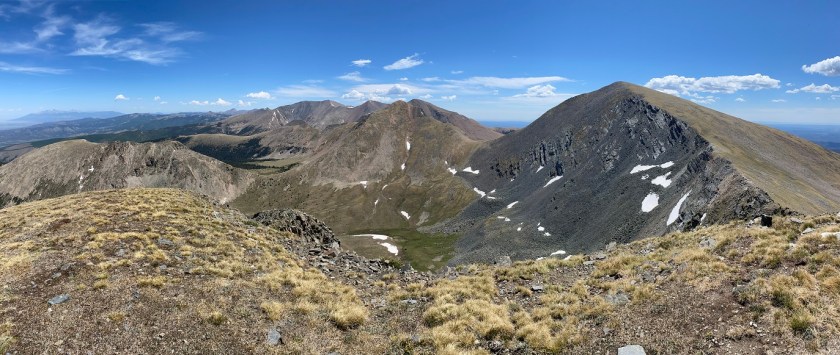
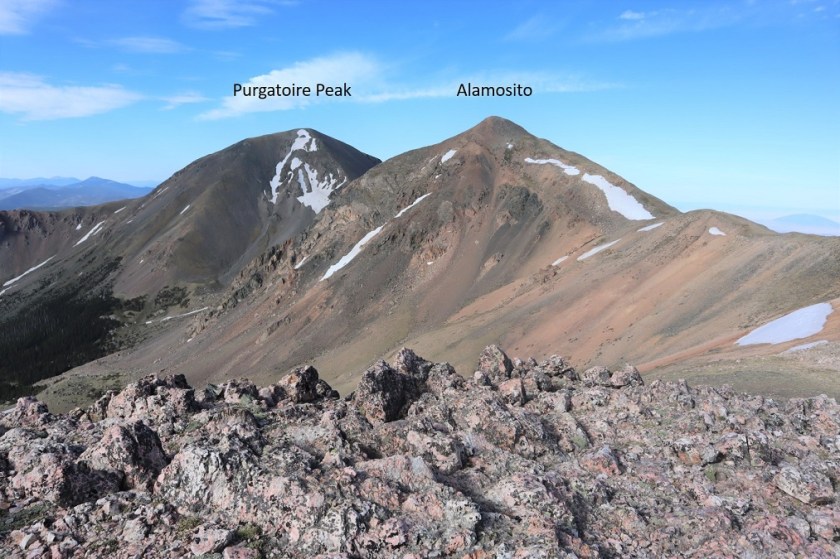
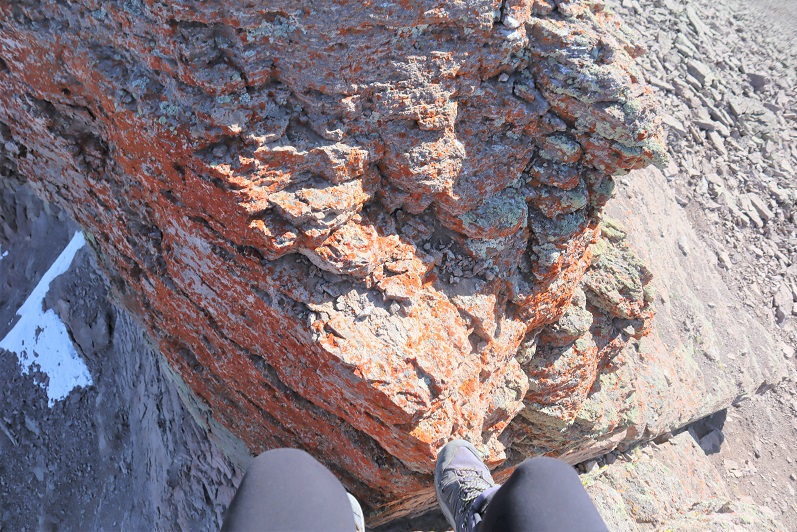
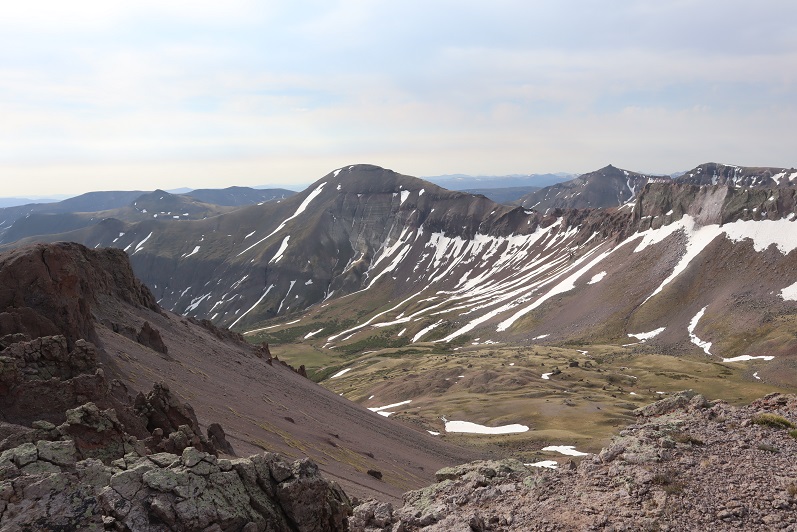
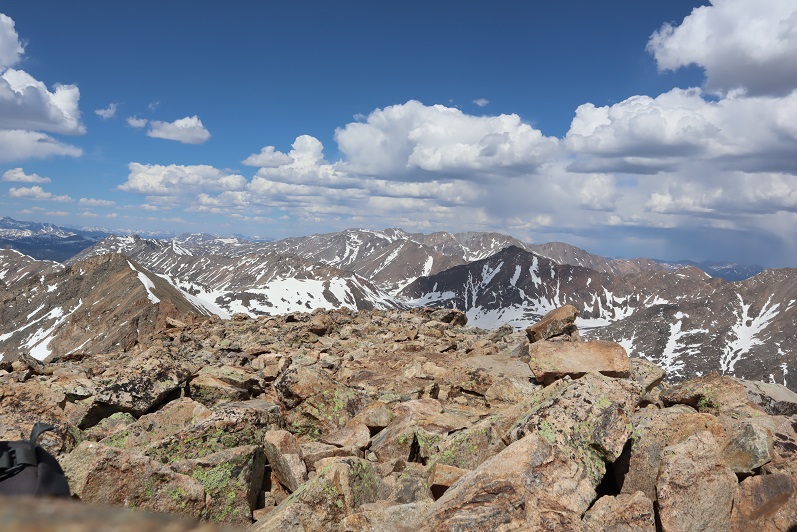
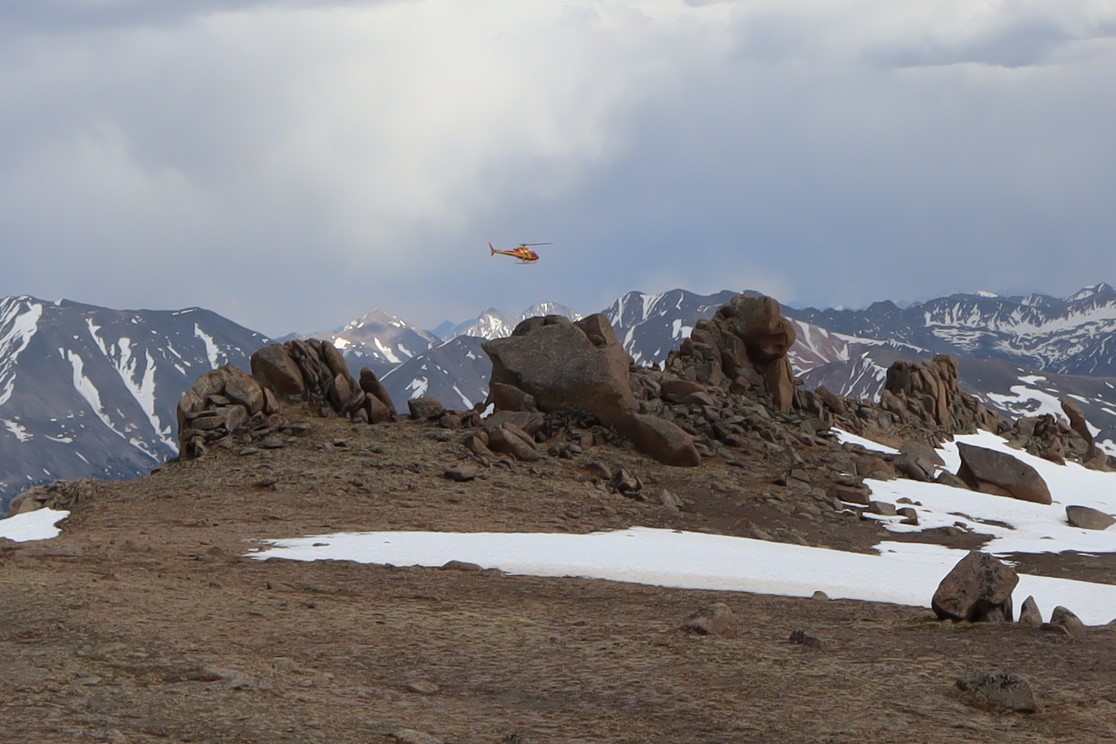
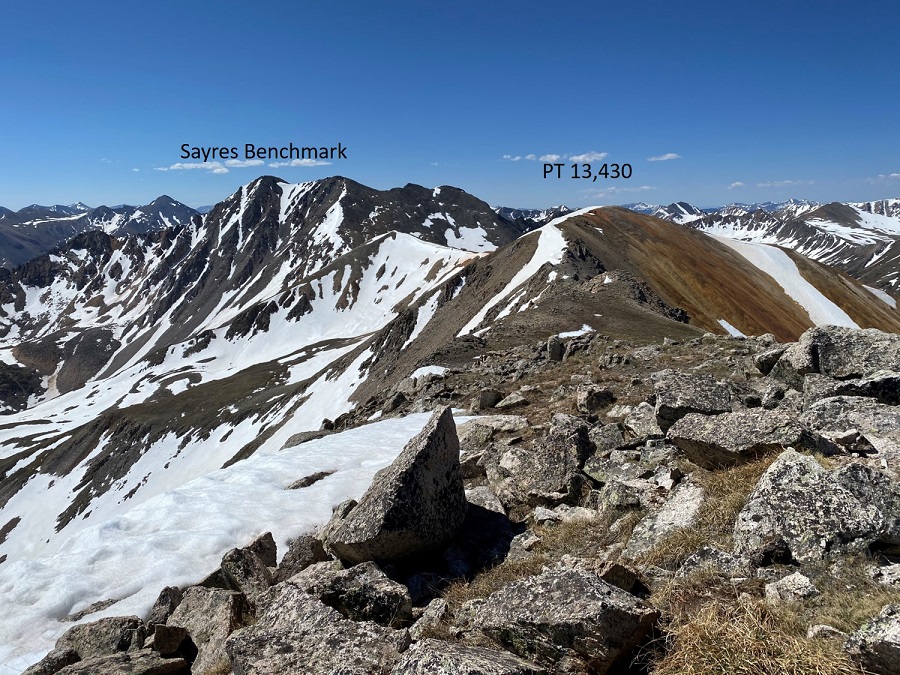
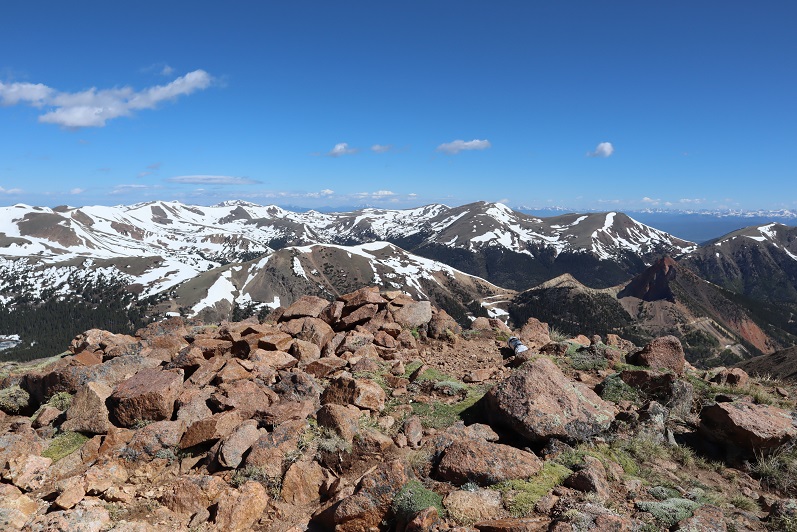
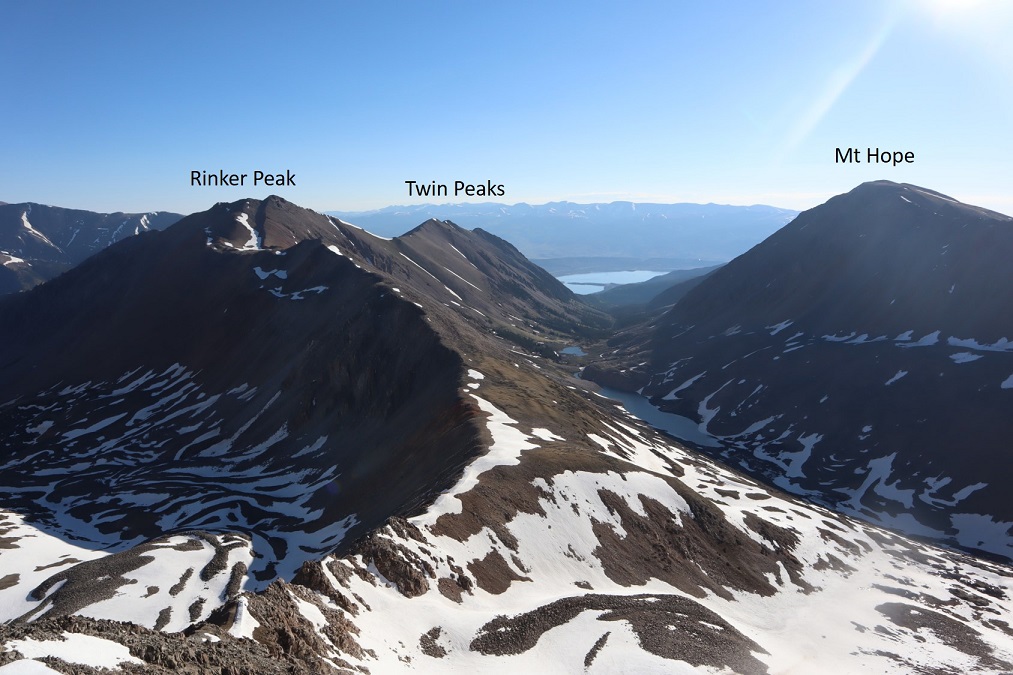
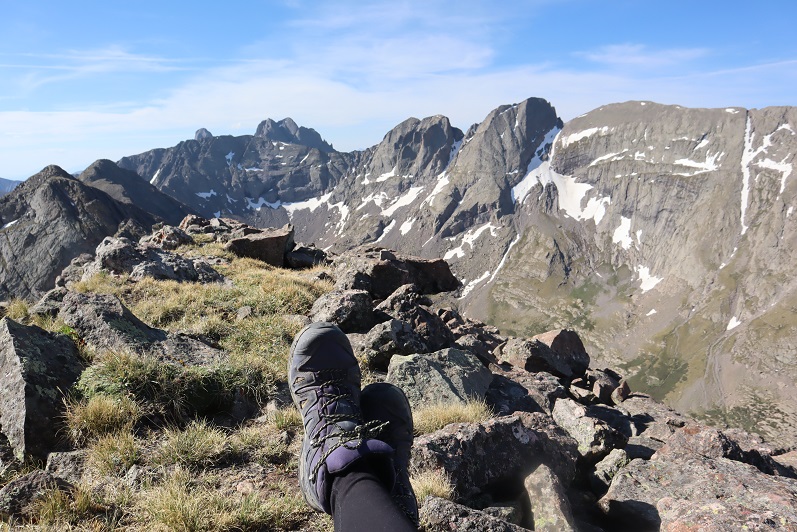
It was a beautiful day and I stayed for a long time on the summit, enjoying the views

31

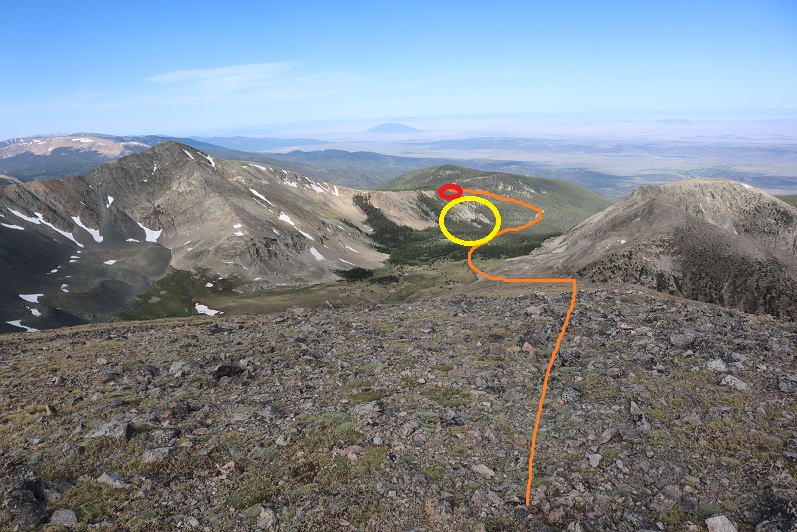
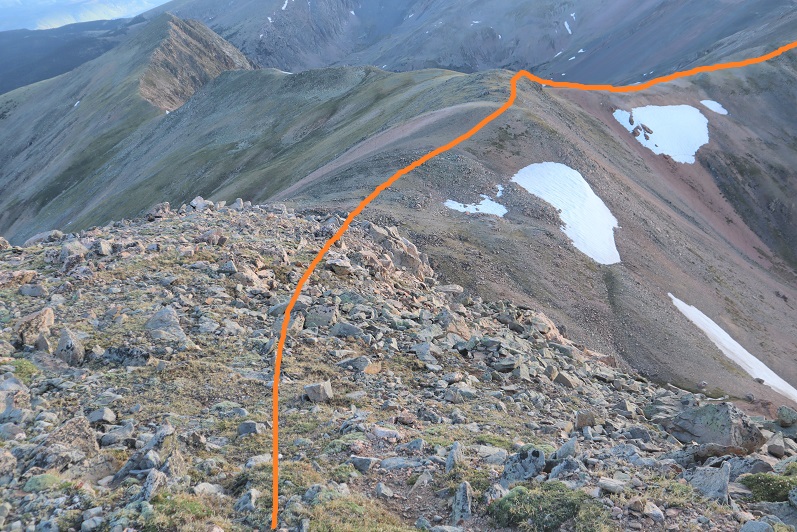
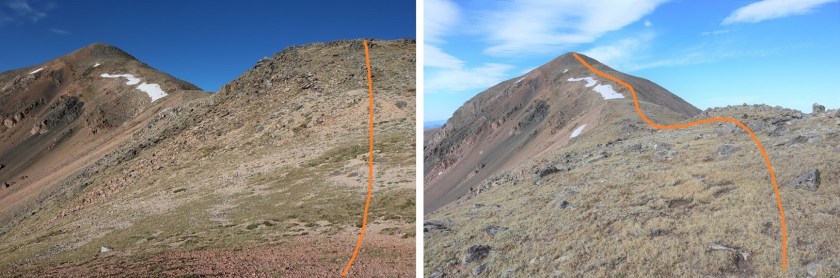
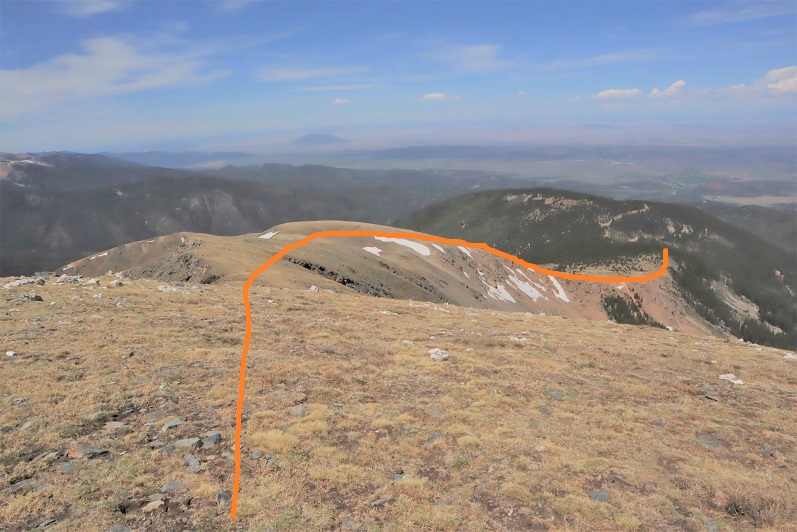
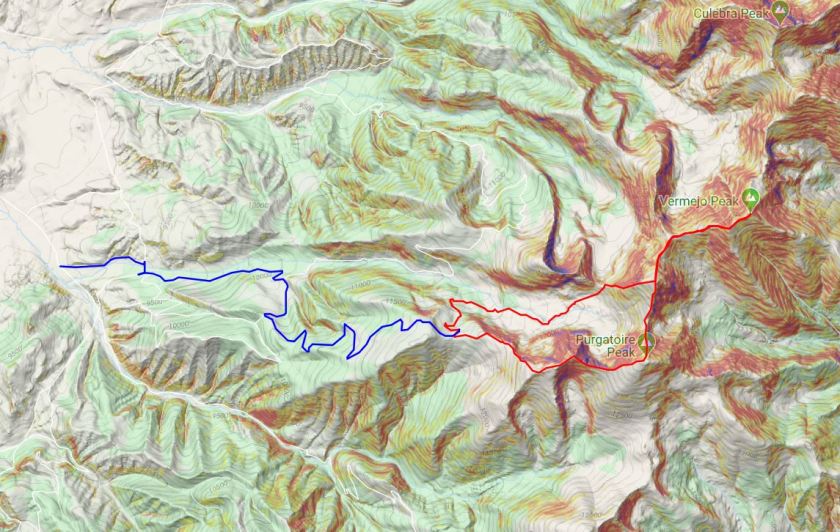
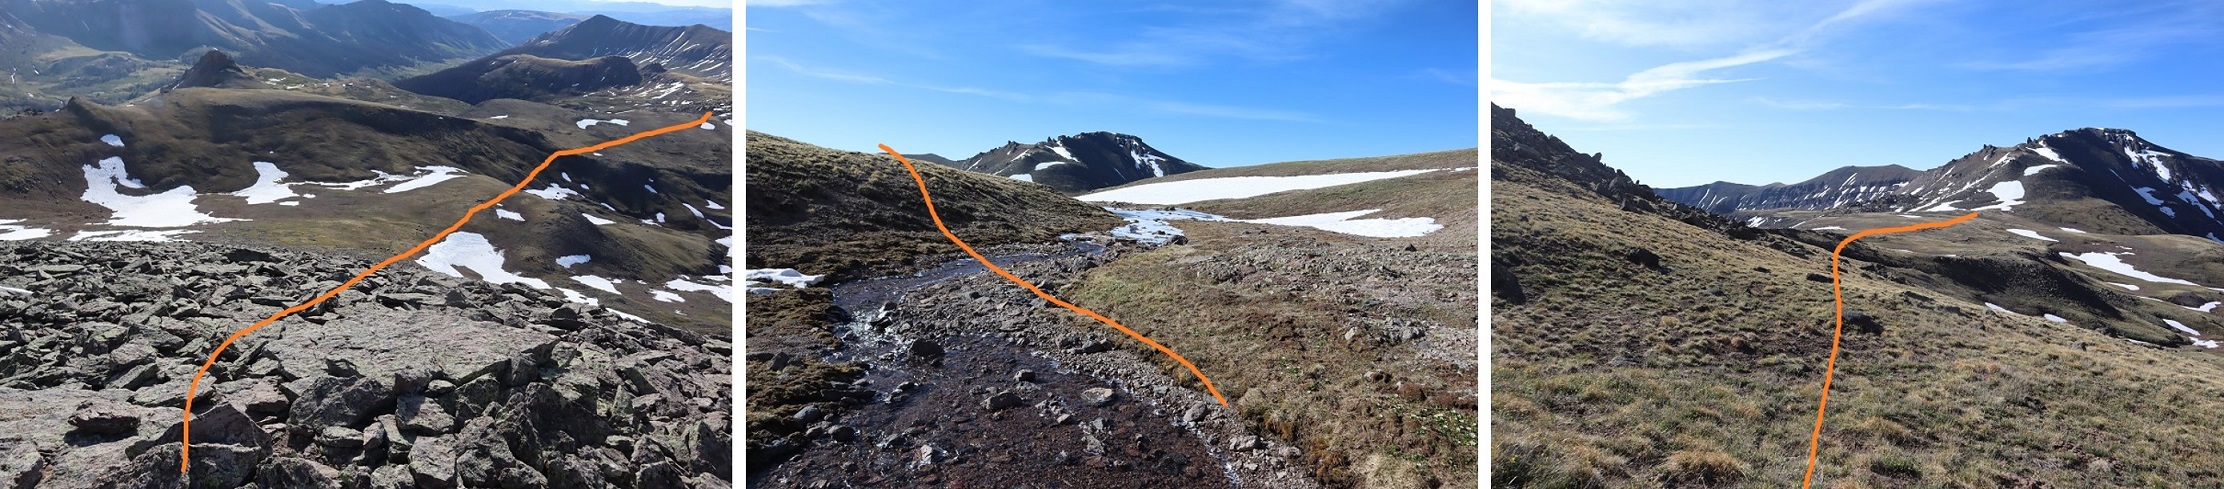
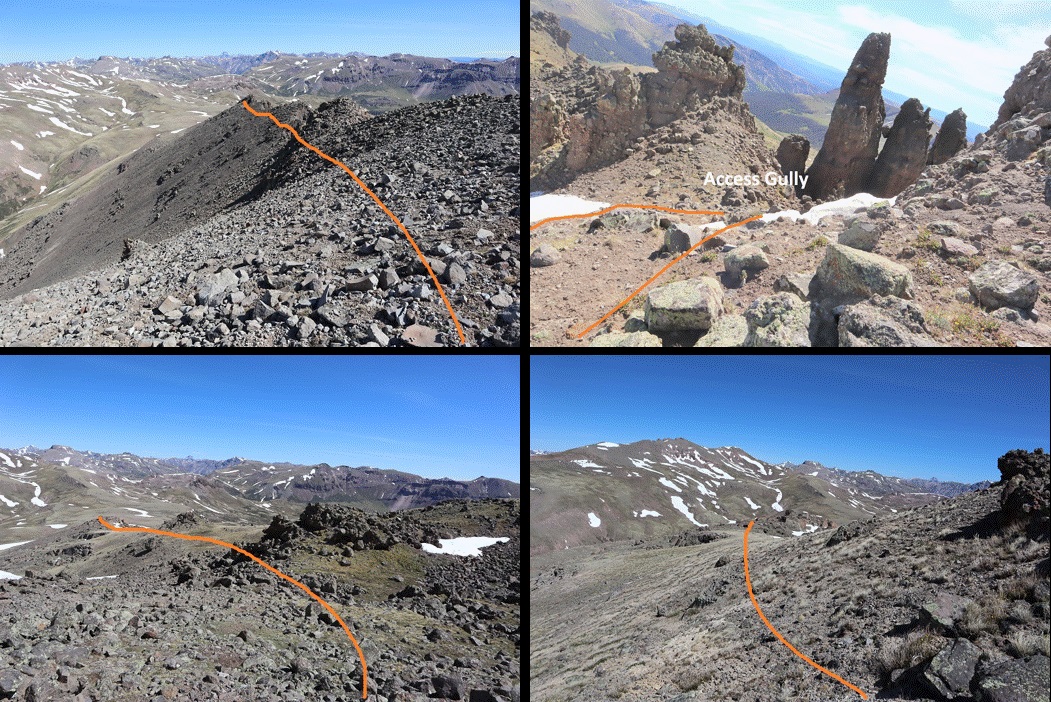
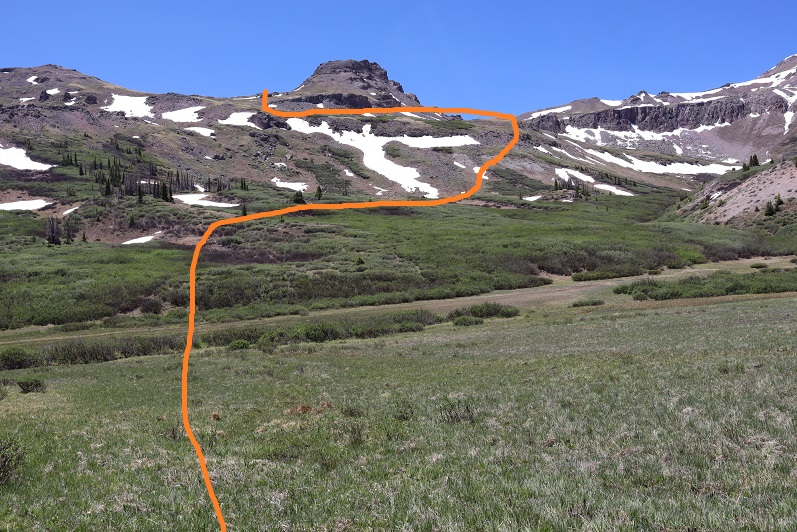
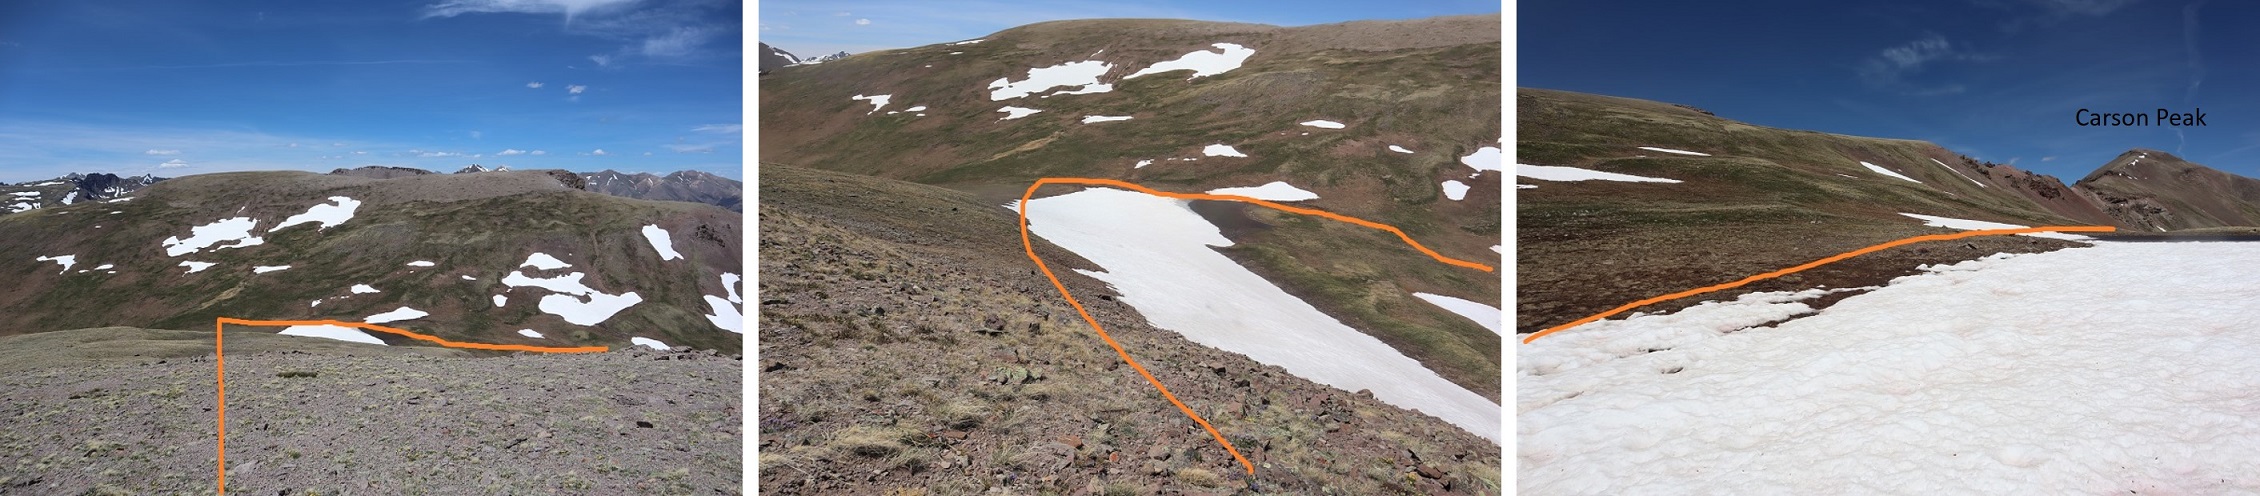
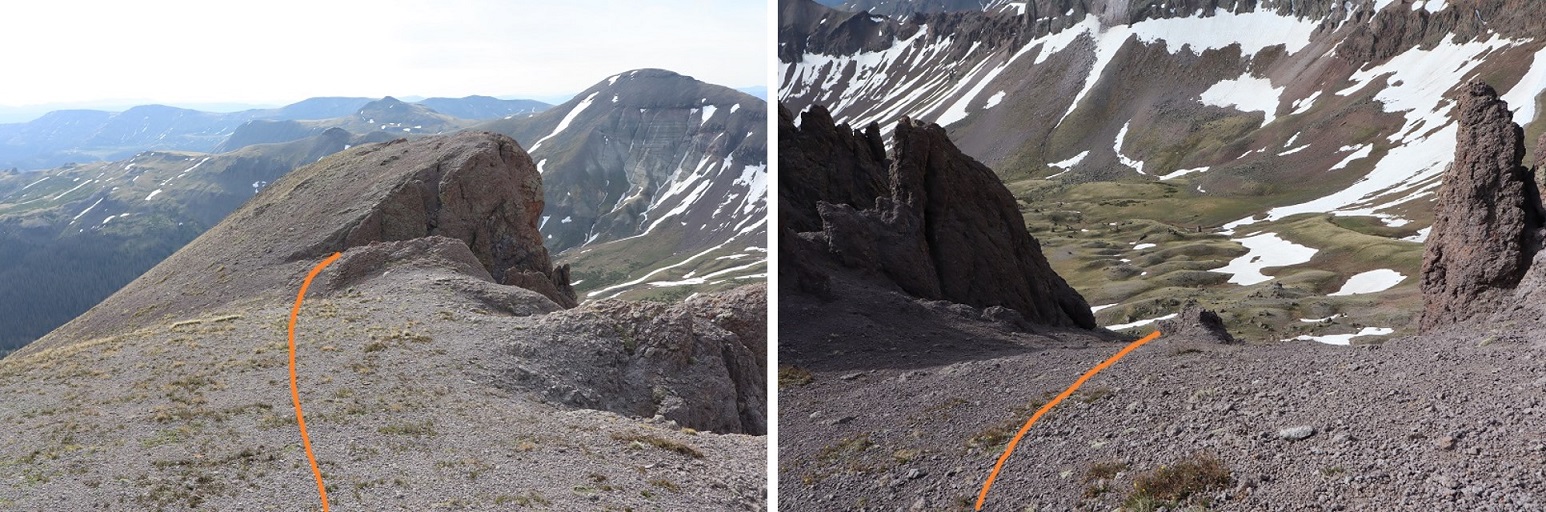
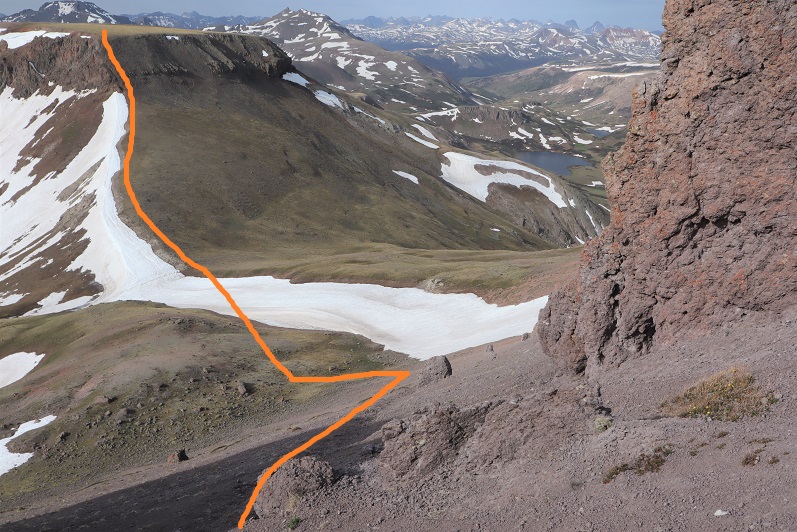
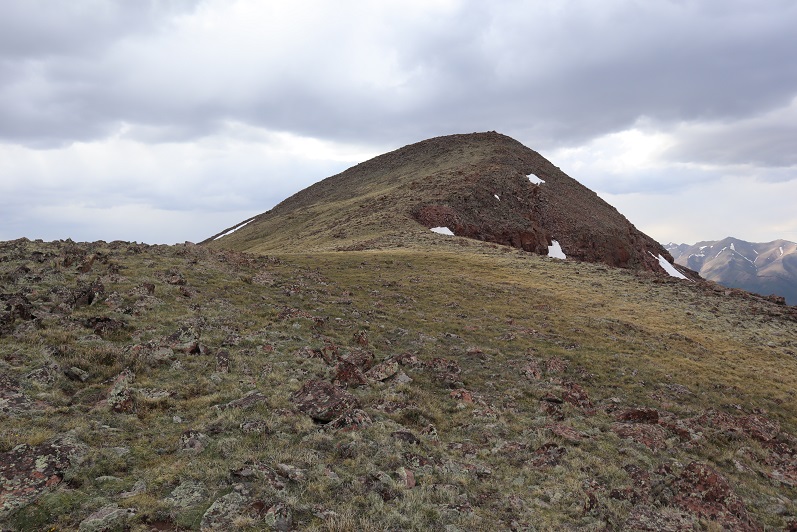
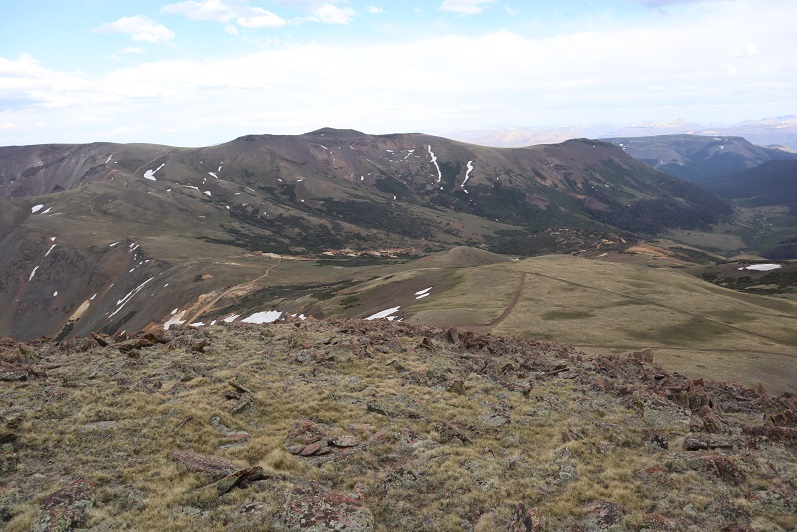
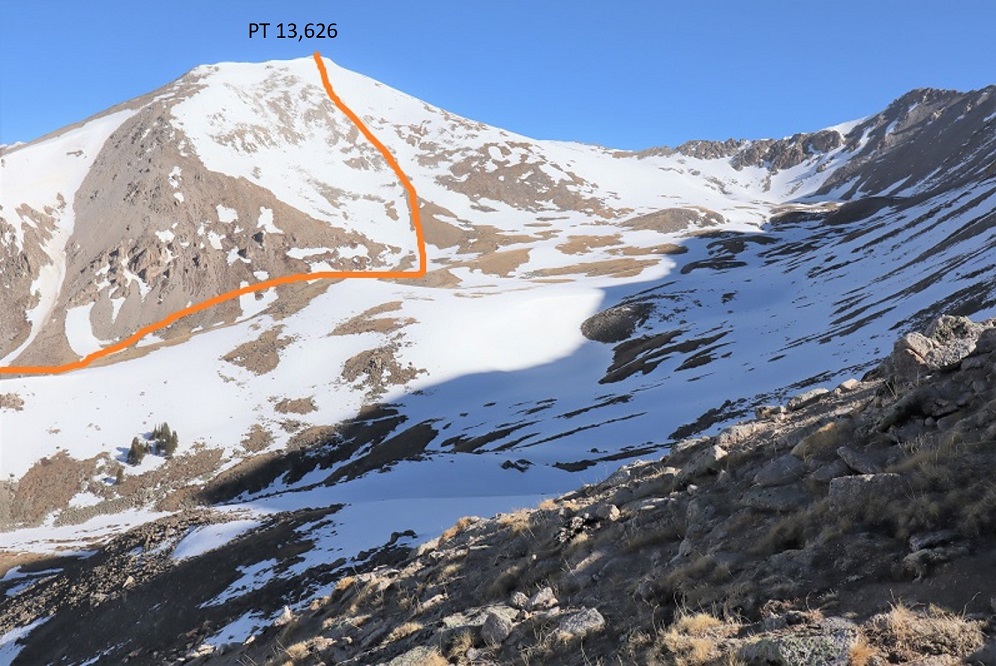
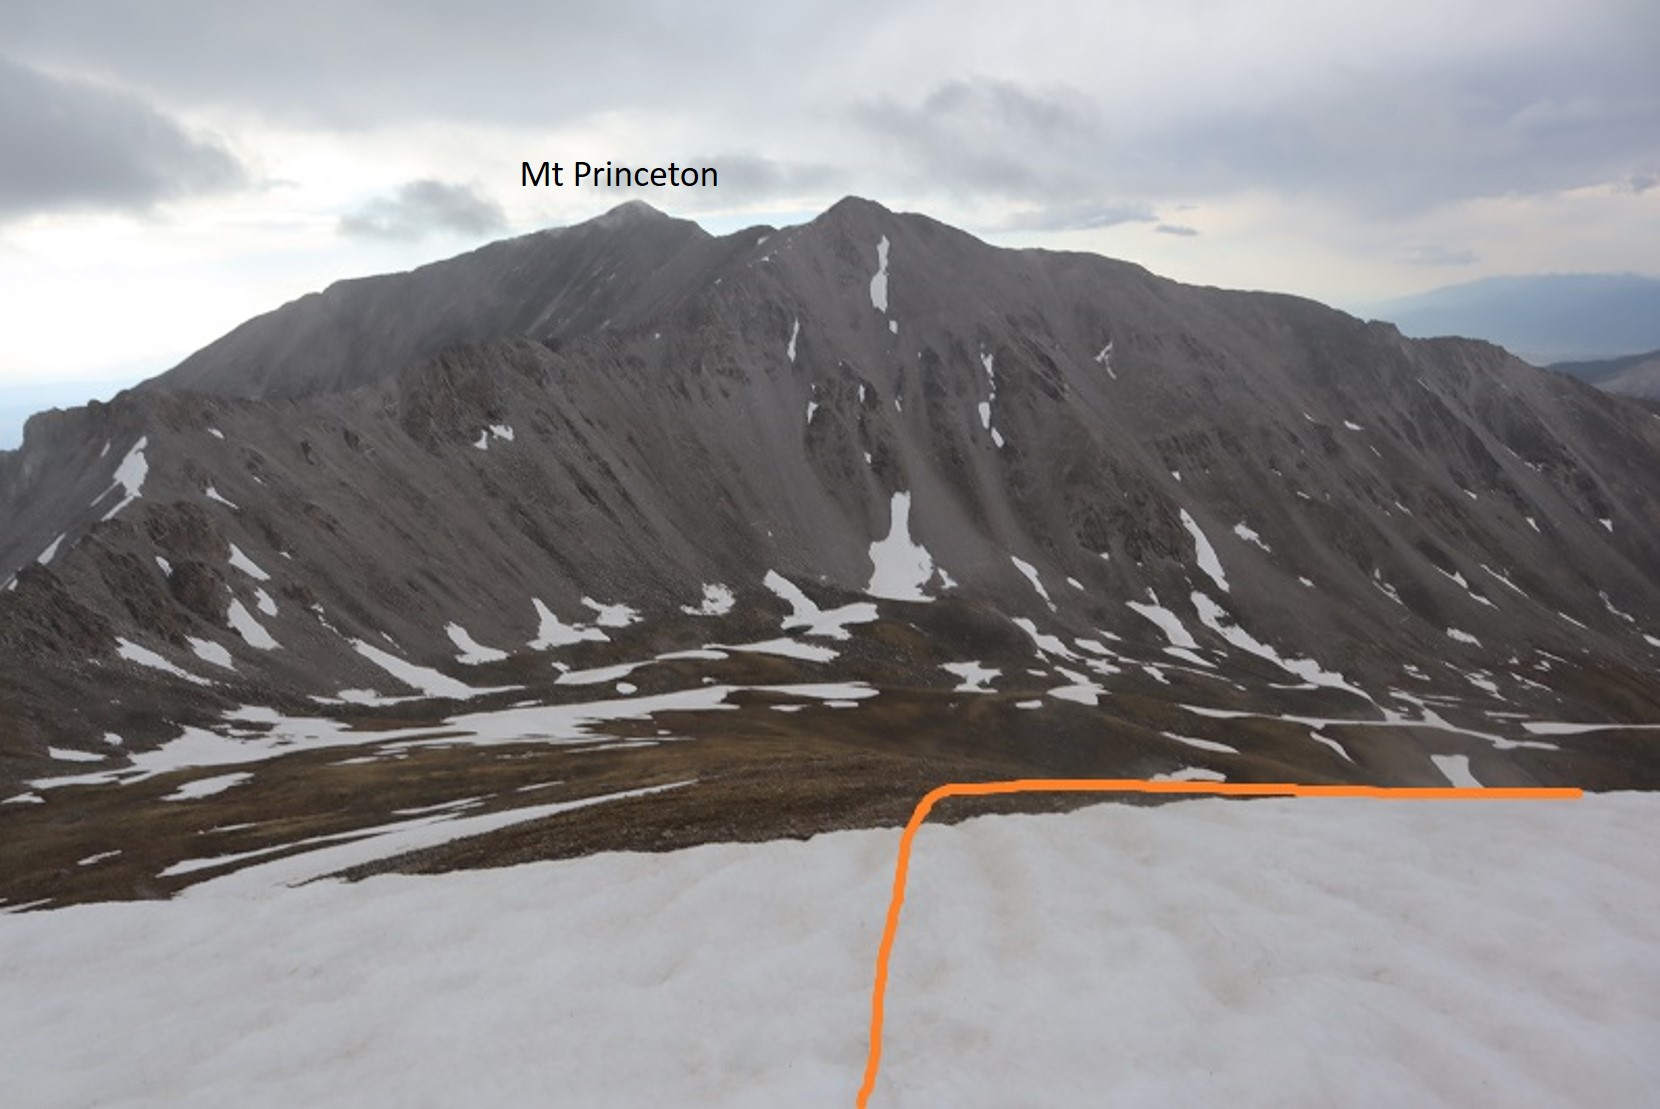
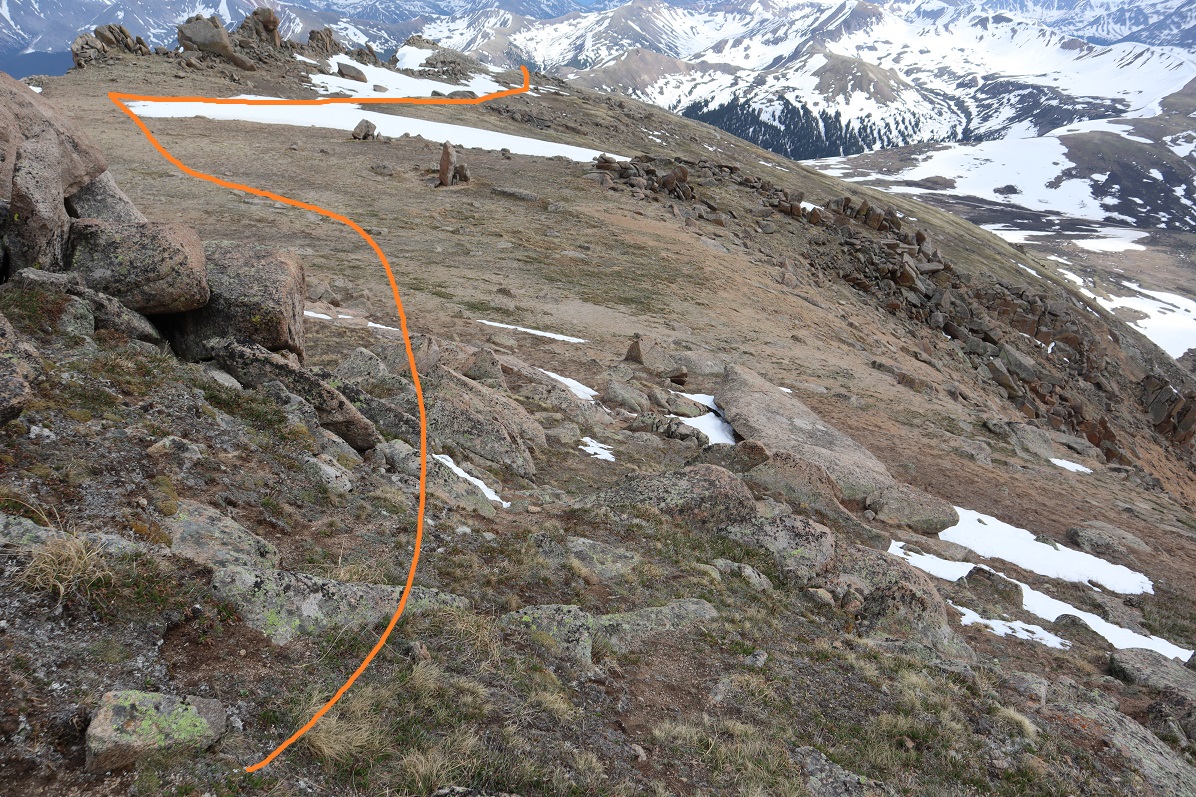
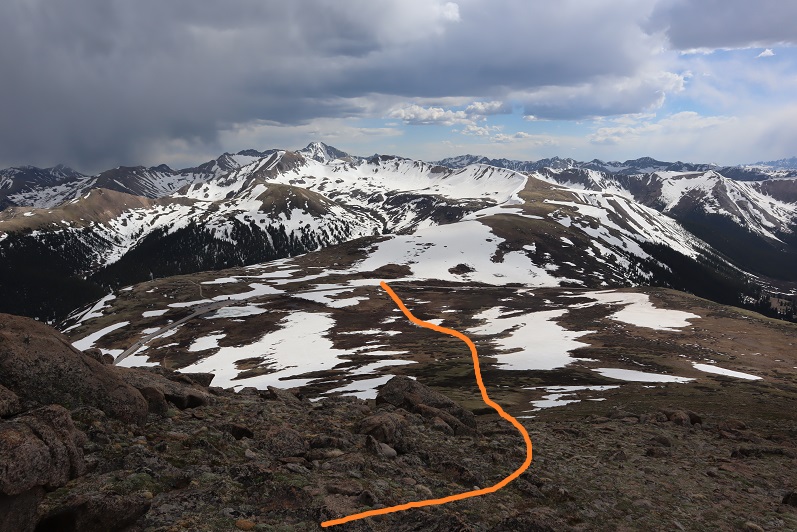
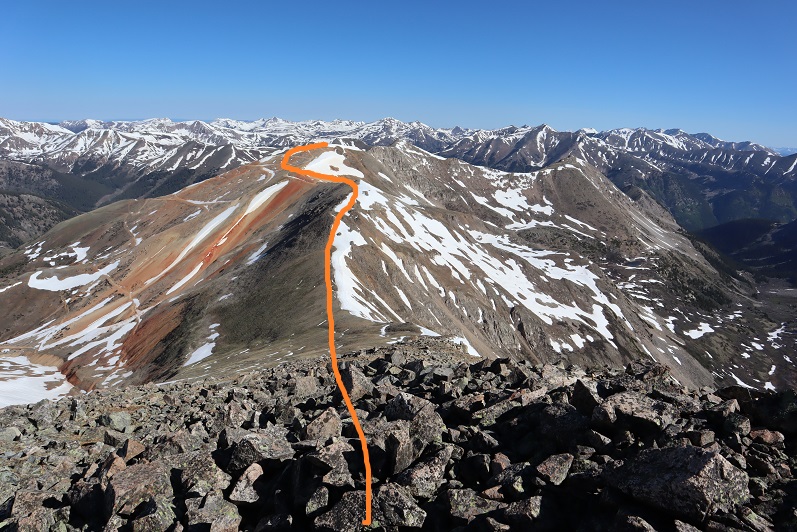
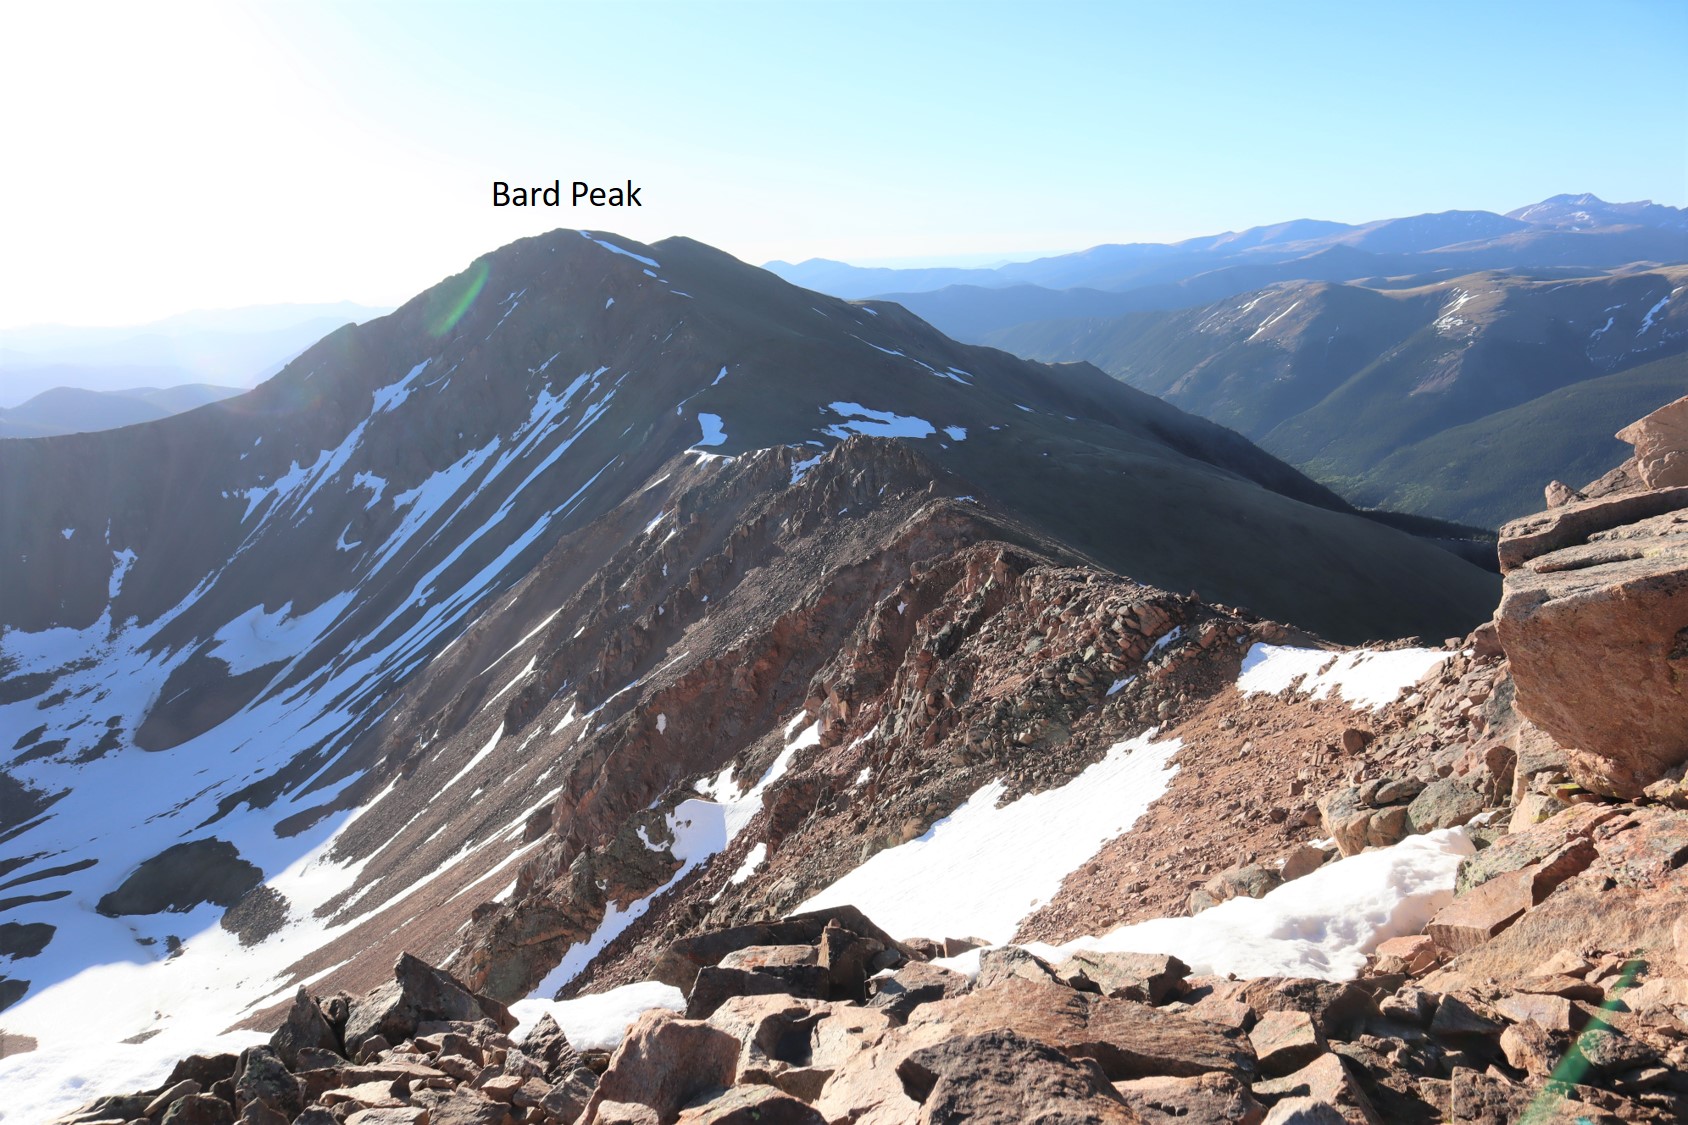
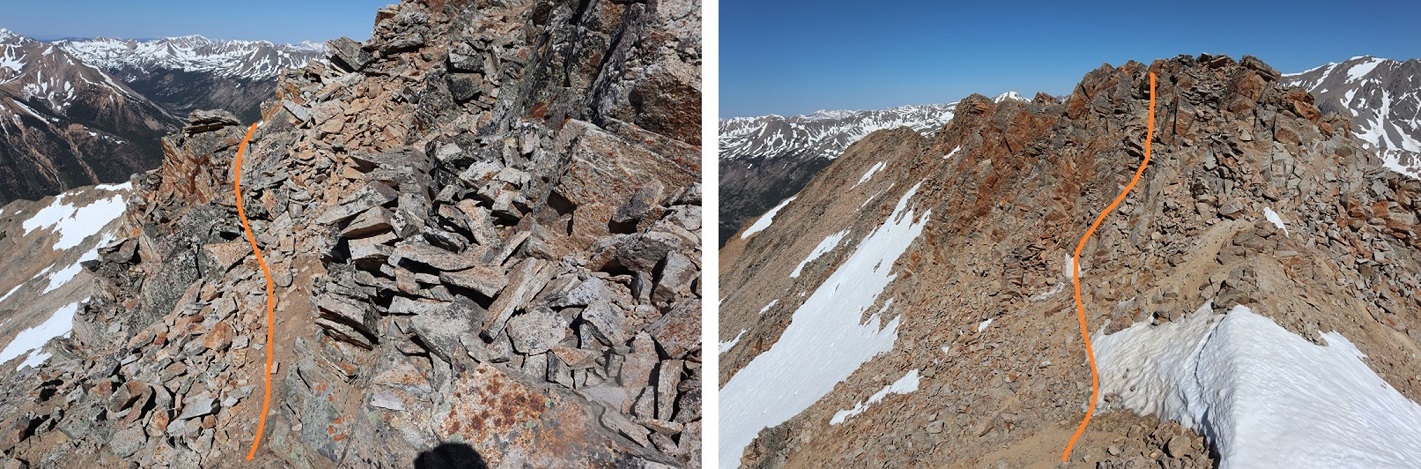
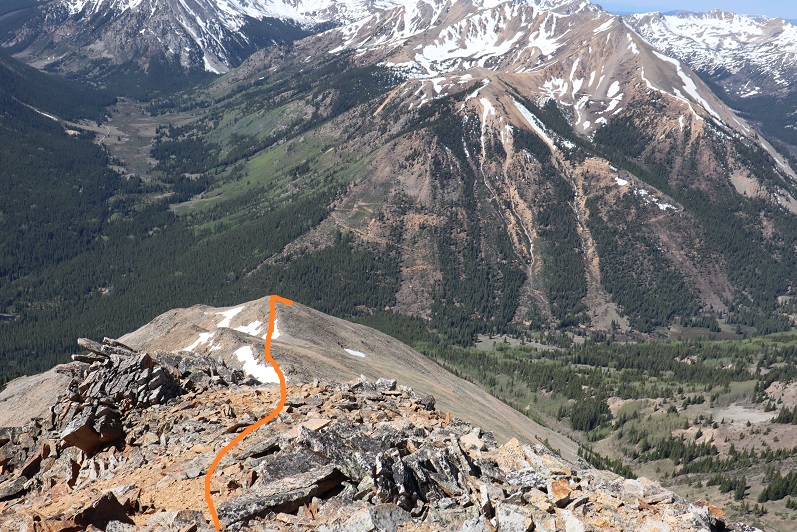
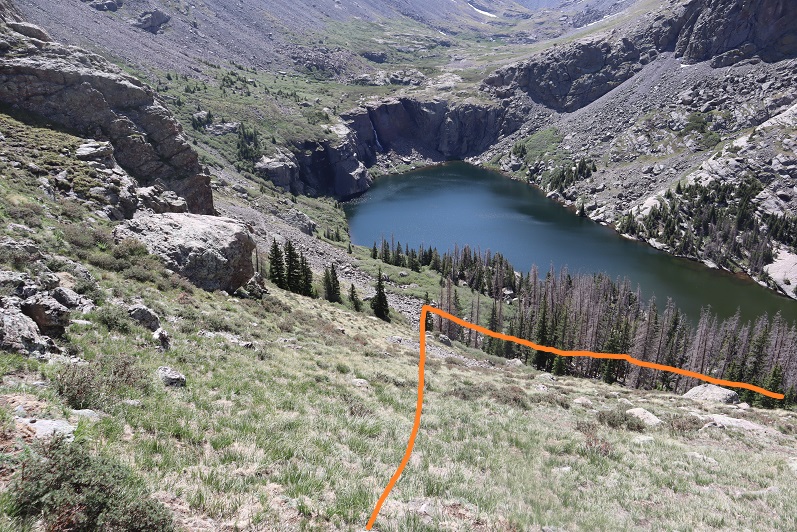
When it was time to go I retraced my steps back down the ridge into the basin. Here’s an overview, with Willow Lake to the south
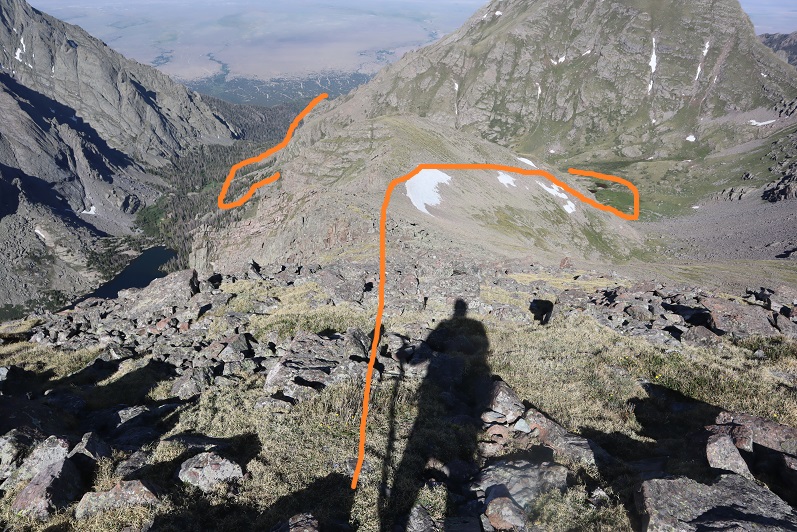
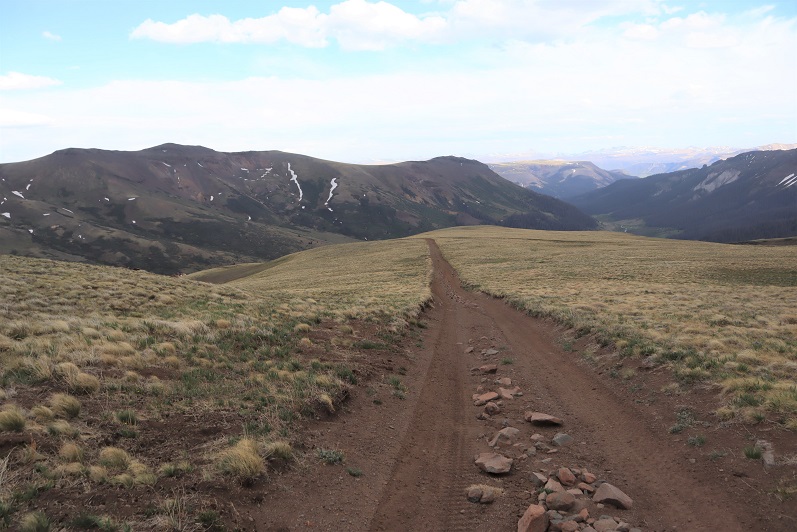
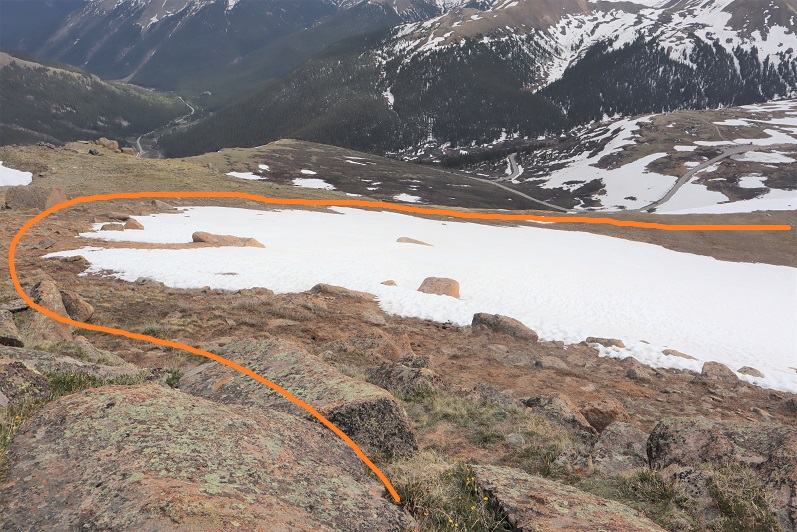
32

And step by step…

33

34

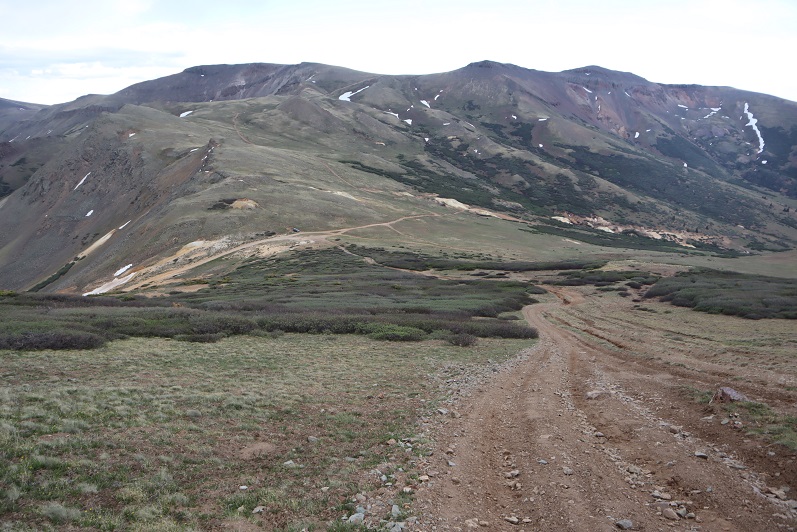
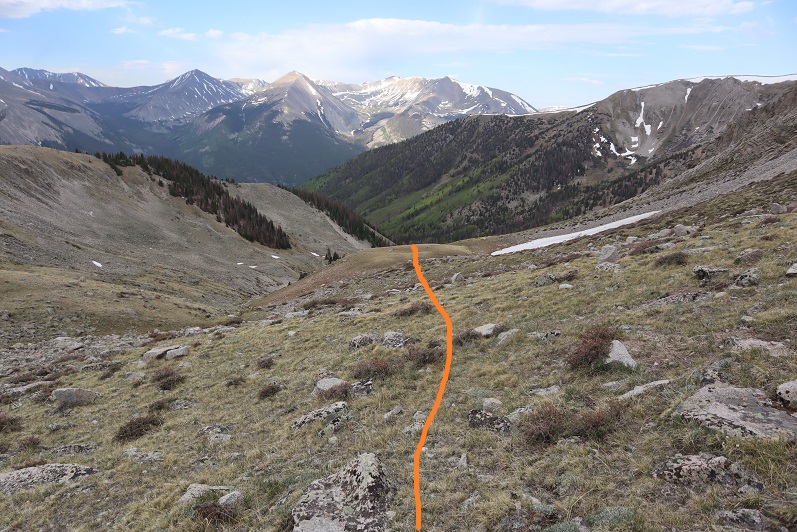
Staying higher and dryer this time in the lower basin

35

36

It was easier this time to avoid both the willows and the creek

37

38

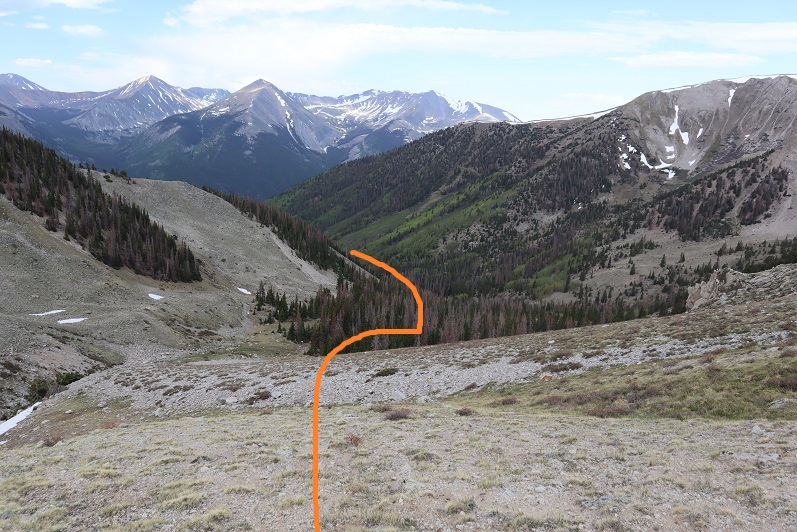
Once Willow Lake was in view it was easy to make my way back down to the trail

39

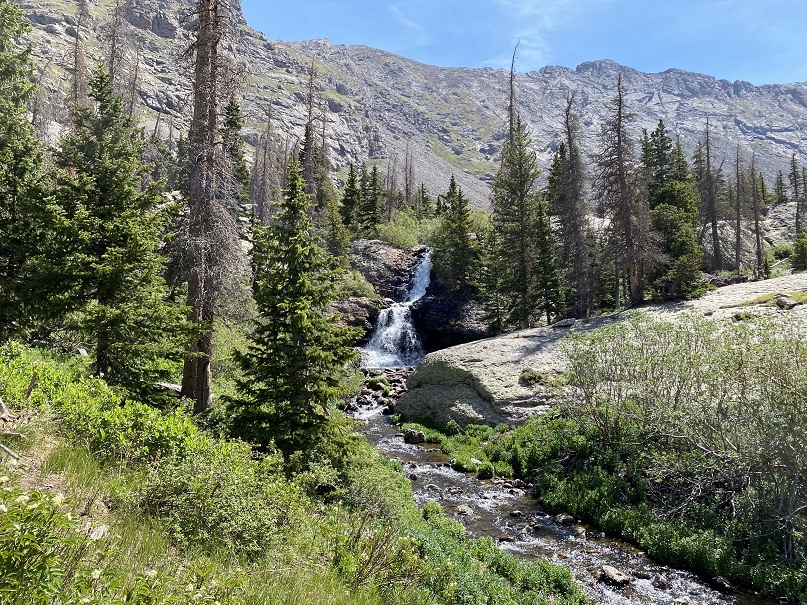
There are some beautiful waterfalls here

40

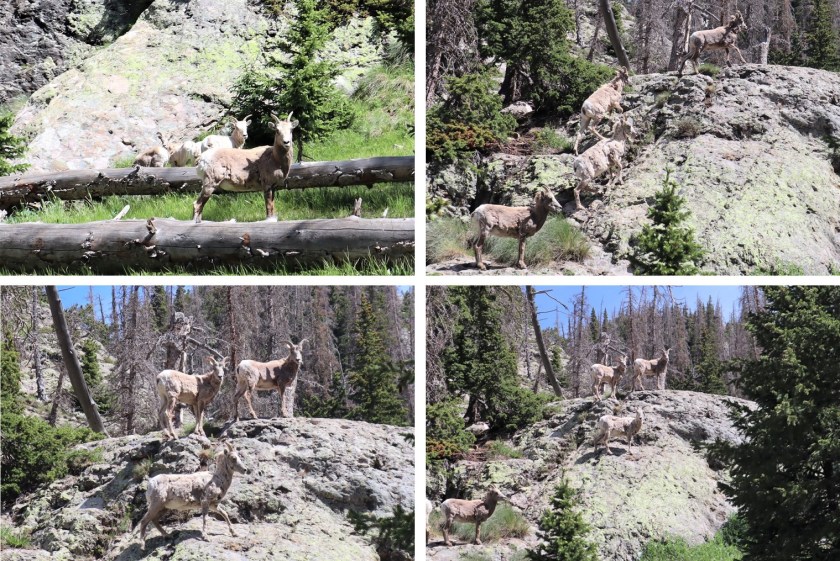
I made it to the camping area and was startled to see bighorn sheep just off the trail. The camping area was full of tents but the hikers were all out hiking. It seems while everyone is out hiking for the day the sheep came to play. They posed for me while I took a few pictures. Yes, they were a little unkempt, but friendly enough.

41

Here are some shots of the class 1 trail back down to the trailhead

42

43

44

45

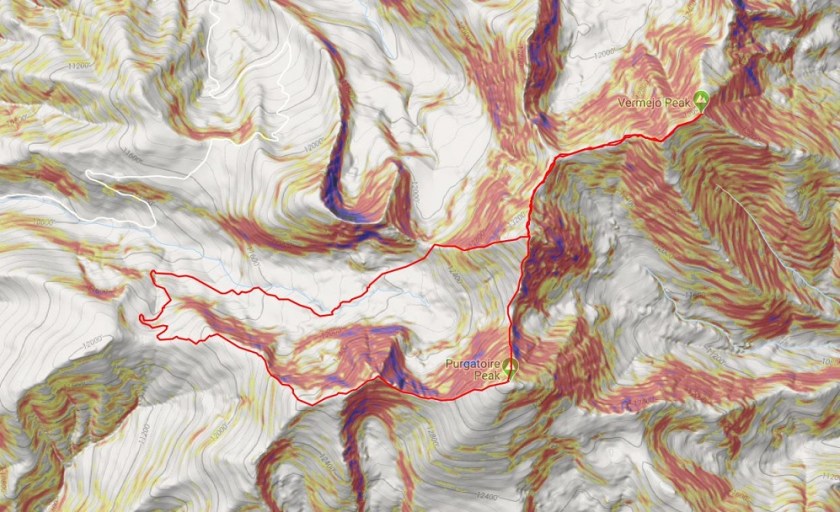
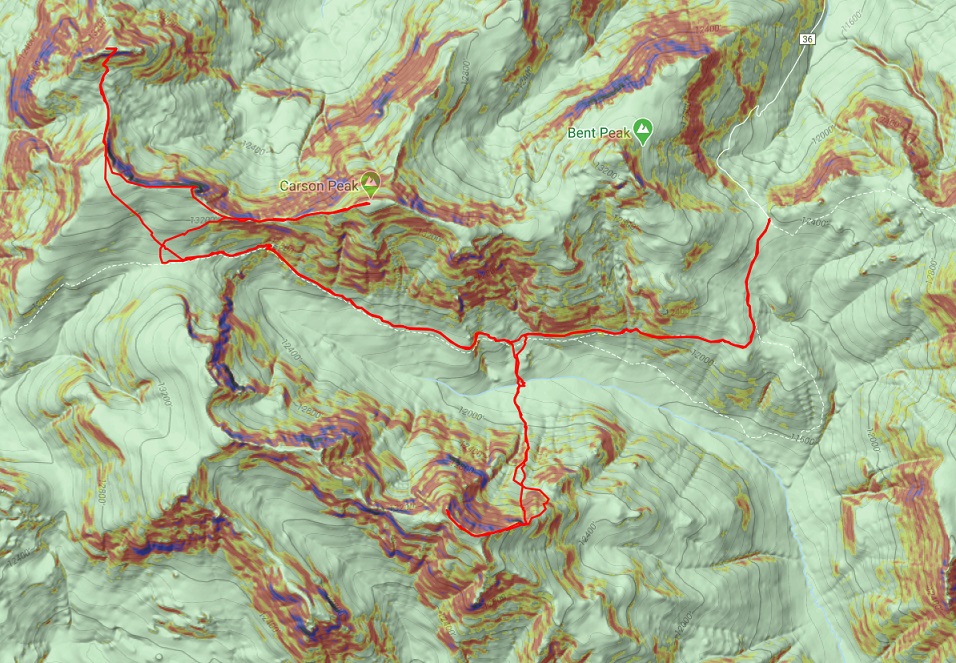
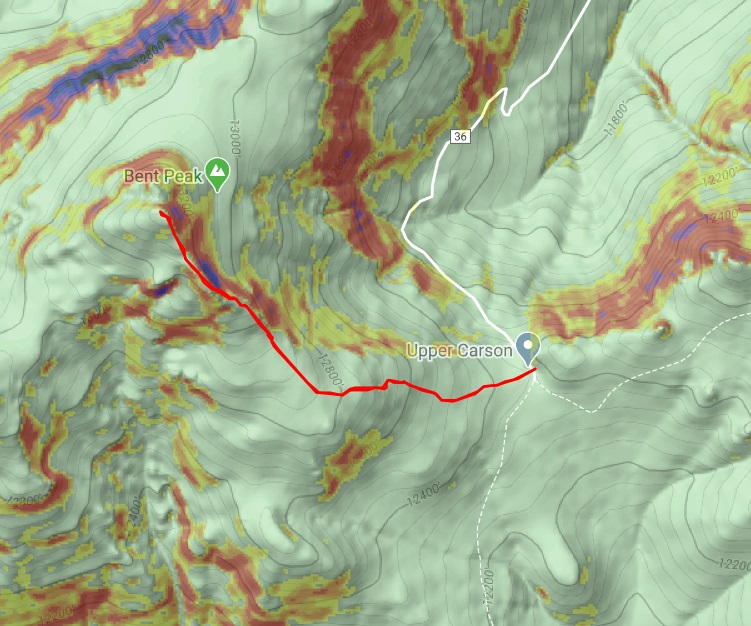
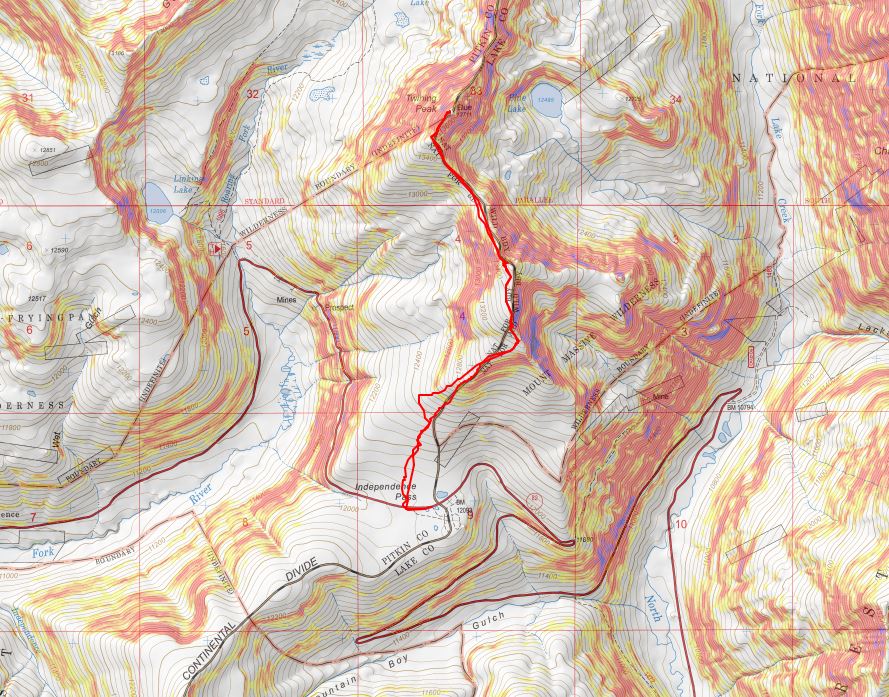
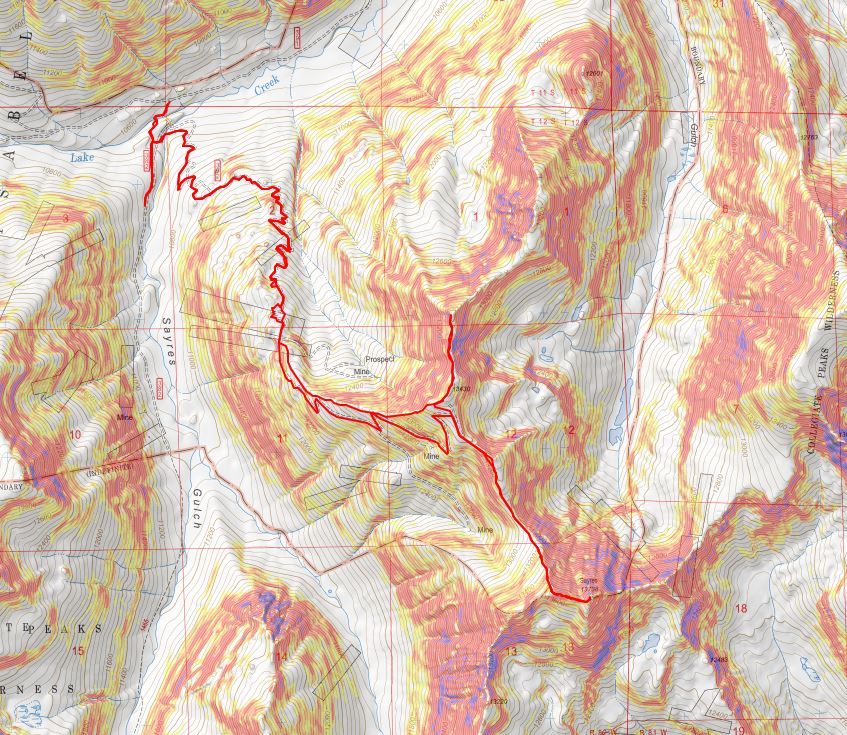
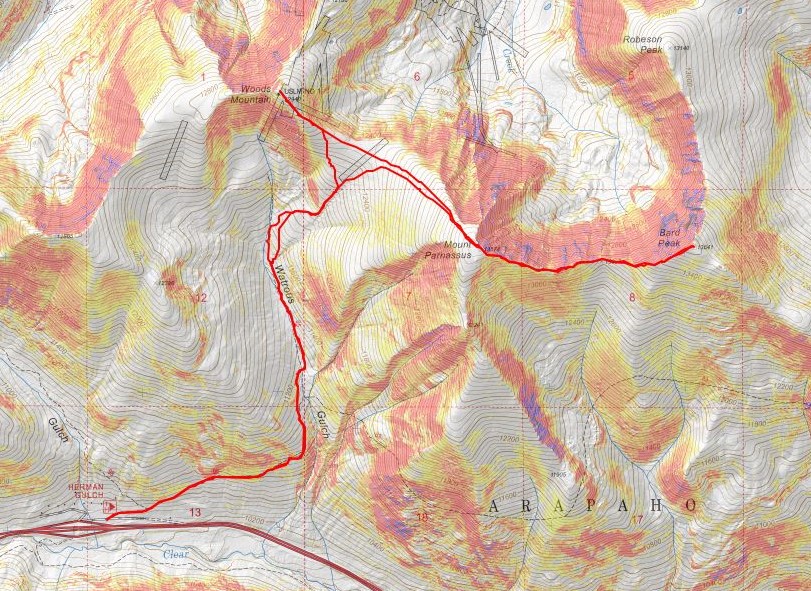
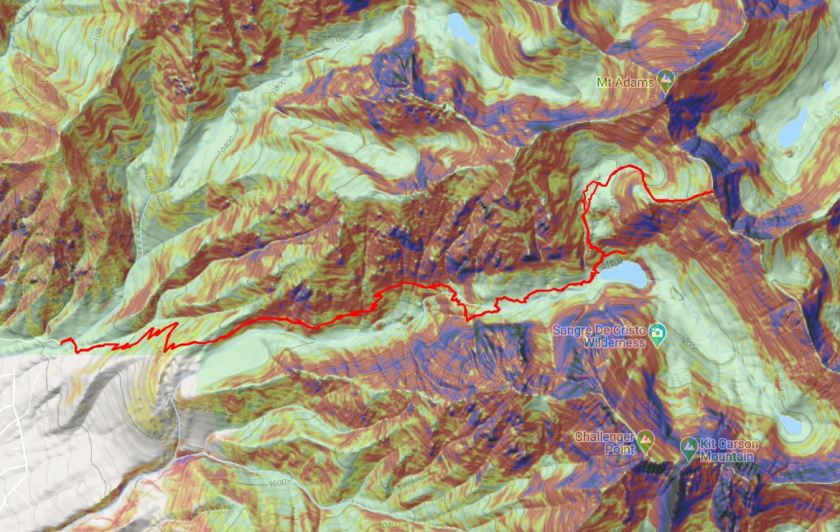
I made it back to my truck at 12:30pm, making this a 13.38 mile hike with 4934’ of elevation gain in 8.5 hours.   Here’s a topo map of my route. Oh, and just for reference, using my iPhone’s flashlight took up 66% of it’s battery in 2 hours (while on airplane mode).

46

I drove back home, cleaned up, and noticed I was full of mosquito bites. Curiously, they were only on the left side of my body.

Alamosito – 13,466, Vermejo Peak – 13,723 & Purgatoire Peak – 13,676

1

RT Length: 9.74 miles

Elevation Gain: 4828’


First of all, I’d like to recommend doing this hike backwards from the way I took the hike: Route finding is easier and it’s much more straightforward; You’re above treeline almost immediately and have great visuals of all the peaks/route.

Secondly, Cielo Vista Ranch makes special arrangements for people to hike these southern peaks and because of this they require you to hike (or at least drive in and camp) as a group. They wouldn’t give me a reservation to go solo, so every month since December I emailed Carlos asking if anyone else was hiking and if I could tag along. I’d get a response saying he’s “look into it” and then he’d go silent. Thank you Rose for putting the ask out there and letting me tag along on your reservation!

We all met at a special entrance to the ranch and around 5:30pm. Carlos met us at the gate and had one of his guys drive us 7 miles up a dirt road to our campsite. This is a 4WD dirt road, and while 4WD wasn’t necessary the entire drive it did come in handy once or twice. Carlos gave us each his business card and asked that we text him when we exited the property the next day. At this point I view Carlos as a celebrity. I mean this in a positive way. Yes, he’s charging us all out the nose, but at least he’s nice about it. Also, he’s known by his first name.

2

3

Here’s a topo of the road we took. These roads are not shown on maps (CalTopo). I made a GPX file on the way back, which came in handy because there aren’t many ways to get lost on this road but I always seem to find them (I backtracked twice). We’d noticed on the way in the GPX file(s) we had were correct, but the road they took us on switched back and forth between the two files (apparently some of the roads are now washed out and impassable). Also, TONS of moths. Like, Biblical plague amounts. We had our Miller Moth season last month: Cielo Vista is experiencing it now.

4

Here’s a picture of where we parked our vehicles and camped for the night, around 11,750’

5

We all sat and chatted for a bit. I kept thinking to myself I should go look at the route I’d intended to start out on while it was still daylight, but I had a couple glasses of whiskey and I fear I was a bit too chatty. You see, I’m used to drinking alone (that sounded bad) but what I mean by that is when I usually hike/camp/etc. alone I have a few drinks, scope out the beginning of the route or at minimum where the trail starts, and call it a night. Early. Instead here I was, talking to people at camp. It was so nice to have like-minded people to talk to: we understood and appreciated each other’s mountaineering experiences and goals. That’s so much more refreshing than my mom freaking out every time I bring up hiking because she thinks I’m going to die. We discussed our intended routes for tomorrow and I decided to take the opposite route as the others so I’d be able to do it solo. I didn’t get to bed until a little after 9:30pm, and I never got a good look at the route I intended to take.

I woke up at 3:30am and decided I wasn’t ready to get up yet so I slept a bit more. I was way too comfortable. The third time my alarm went off I figured I’d better get going. I woke up, gathered my gear, and was off. My plan was to head northeast around the mountain and pick up a trail in the basin to the north of Purgatoire. After hiking for about a quarter mile I came to a rocky area that didn’t look passable in the dark. Well, it might have been, but at that moment my flashlight went out and I couldn’t see a thing (I later confirmed on the hike both visually and after talking with others telling me they’d turned around there as well that that route’s not passable). I decided to retrace my steps and try again.

Back at my truck I saw the others getting ready; their headlamps glowing inside their tents/trucks. I got a new flashlight from my truck (a headlamp: I’m not fond of headlamps as they make me dizzy but it was better than nothing). I restarted my tracker and was on my way, following the 4WD dirt road as it wound around the mountainside, losing about 450’ of elevation in the process (which was what I’d been trying to avoid by going around the mountainside first. Oh well).

6

After about a half mile my headlamp gave out. Great. Two flashlights out in the same hour. Who would have guessed? At least I was just following a dirt road and the sun would be rising soon. I’d just make a lot of noise to scare the larger critters who may be hiking with me this morning away.

I heard a loud noise ahead of me. An animal had been startled by the noise I’d made, ran through the deadfall for about 20 feet and then stopped. Knowing some animal was standing still ahead I made a lot of noise with my trekking pole. It didn’t budge. I slowly hiked forward and noticed whatever I’d scared into bolting for a little bit I’d scared pretty badly: I could tell by the smell.

The animal was still there, and now I could hear it breathing. I made noises again but it didn’t move. I was worried it may be an injured animal and wanted to know what it was, and obviously I didn’t feel comfortable turning my back to it. In the dark I got out my phone and decided to take a picture (thinking the flash would go off and I’d be able to see what it was, even if the photo didn’t turn out. Note: Later in my hike I realized I could have used the flashlight app on my phone, but since I’d never used it before the thought didn’t come to mind until later).

I took a picture and the beast in front of me was…. a cow. Yep, a cow, and the first of many I’d see today.

7

Well, that was anticlimactic! I’ve raised cows before (both dairy and beef) and I know how to handle them. I clapped my hands, waved and shouted “Move on!” held my walking stick parallel to the ground and advanced forward. The cow turned, moved out of my way, and I continued on. I saw about 10 more cows before it got light, but knowing what they were I didn’t have a problem with them anymore.

I followed the dirt road for about 1.25 miles until it came to a 3 way divergence. I randomly took the middle road as it looked to be heading in the direction I wanted to go and it turned out to be the right one.

8

I continued east through the trees, encountering more cows, until I made it to the basin. The sun was now up and my anxiety level dropped. There were still tons of cows, but now I could see them, as well as cow trails and ATV trails. I followed the ones that went east.

9

Once out of the trees I could easily see the path I wanted to take to summit Alamosito. (Note, some routes tell you to take the saddle and drop down into another basin and then gain another saddle, summiting Vermejo first then backtracking to Alamosito. The way I went just made more sense to me, but several routes all ‘go’. Alternately you could gain the Alamosito/Purgatoire saddle and summit from there as well).

10

This was straightforward, except for these cows who didn’t seem to want me to pass. I made noise and told them to “get along” they just stared at me. One even lifted its hind foot and stomped a few times, kicking up dust. I got the impression they were expecting something from me. Even the calves had ear tags, so they’re used to humans (at least in some part). I passed them to their left and they went back to grazing.

11

Here’s a look back from the saddle. I’ve circled the campsite in red, and the area that cliffed out in yellow. Note: Everyone else just went straight up the ridge to start (a better choice to begin). My route to the saddle is in orange.

12

From the saddle I turned right and headed east. This was a very straightforward ridge hike. In fact, they all were today.

13

I summited Alamosito at 6:45am, after 2 hours and 3.3 miles of hiking. There was a summit register in a glass jar buried in the cairn.

14

Alamosito:

I turned north and headed down the ridge to the Alamosito/Vermejo saddle

15

There was some rubble to contend with on the way down, but all class 2

16

From the saddle I turned right and headed east up to the summit of Vermejo Peak (that’s a false summit you’re looking at here). There was some rubble here as well

17

At the top of this easy ridge walk there was another .3 miles to go before making it to the summit, also an easy trek that reminded me of Ireland: the tundra was green and there were lots of black and white rocks. The picture doesn’t do that justice.

18

I summited Vermejo Peak at 7:45am. From Alamosito to Vermejo it’s just over a mile and a half of hiking. There was a summit register here as well (one of the pipe ones I can never open because: Raynauds).

19

Vermejo Peak:

There were great views of Red Mountain A and Culebra from the summit

20

I turned and headed back the way I came, towards the saddle and back up to Alamosito

21

22

23

From the saddle there’s a great view of both Purgatoire and Alamosito

24

From the saddle I made my way back up to summit Alamosito

25

26

I re-summited Alamosito at 9am and looked over at Purgatoire Peak

27

This was another easy ridge walk. Rubble turned to tundra as I made my way towards the saddle

28

29

Here’s looking back at Alamosito and Vermejo Peak from the Alamosito/Purgatoire saddle

30

The rest of the ridge to the summit of Purgatoire was straightforward

31

32

33

I summited Purgatoire Peak at 10am

34

Purgatoire Peak:

There was a summit cairn, and also this thing. I’m not sure what it is? I could probably look it up, but, thoughts?

35

I turned west to head down the way I should have headed up, back over this unnamed point (which has about 260’ of elevation gain from the saddle, and tops out at well over 13K)

36

Here’s looking at the route from the morning when I was hiking up Alamosito

37

It starts out as a simple ridge walk on tundra, dotted with rocks the size of toasters, and once at the saddle it looked like there may be some scrambling involved, but there’s actually a game trail to the left of the ridge that makes the ridge easy to follow

38

39

Here’s a look at the route from the saddle towards Purgatoire Peak

40

From the top of the point there’s a tundra ridge to walk down, and just a little bit of forest to go through before reaching the road. As long as you aim for the road you’ll be fine, as you can follow it to the campsite. Yes, I should have hiked the couple hundred feet up this last night: it would have made the entire route more obvious.

41

42

Here’s a look back from treeline on the point you need to ascend if heading this way

43

Once you’re in the trees navigation can be a little difficult. Just keep aiming west and you’ll hit the road. Oh, and you can’t see them in these pictures, but there were moths everywhere! Thousands of them swarming around. They apparently appreciate the elevation / pines today.

44

I made it back to the 4WD road we drove in on and followed it back to my truck. I arrived back at my truck at 11:45am, making this a 9.74 mile hike with 4828’ of elevation gain in 7 hours (not counting my early morning false start).

45

I got back in my truck and followed the road back to the gate. The route was much easier on the way down than on the way up. I unlocked the gate, re-locked it, drove through, and text Carlos to let him know I’d exited the property. Also, the lock was much easier to figure out than the one that was there when I hiked Culebra (but to be fair, it was also the first day they’d implemented that system).

46

47

Here’s a topo map of my route, as well as the drive in.

48

49

It was still early in the day. I ate a sandwich as I drove the 3 hours to the next trailhead during a thunderstorm.


Northwest Pole – 13,660, Pole Creek Mountain – 13,716 & PT 13,573

1

RT Length: 19.67 Miles

Elevation Gain: 5926’

I drove up to Carson Pass a few days before and slept in my truck, hiking Bent Peak the first day, and Carson Pass, Tundra Top, Cataract Peak, and PT 13581 the next. For details on the drive in, please see this post: Carson Pass.

2

I woke up before my alarm again today, but not because I was well rested: I was cold! As I turned on a light I realized I only had half of my blankets covering me. There wasn’t any wind last night, and when I looked outside I could see tons of stars. The clear skies had made for a cold night. I jumped in the cab of my truck to warm up and get ready for the day, noticing it was 32 degrees outside (as compared to yesterday morning’s 43). It was amazing what difference a few degrees makes.

I turned the truck on to turn on the heat and was once again disappointed to notice my ABS and Traction lights were still on, as well as my 4WD light still blinking. That was going to haunt me all day.

I was on the trail by 3:30am, and it was so cold I turned back at one point, intent on sitting in my truck a little longer, but I immediately turned back again: I’d knew I’d warm up a bit once I started moving. The weather forecast was better for today, but I still wanted to get an early start. I followed the 4WD dirt road 821 to the class 1 Trail 813 as it lost a total of 400’ as it wound down the canyon, and then gained almost 1000’ to the top of the pass.

3

There was one small section of snow to cross, but luckily the elk had already done a great job blazing the trail.

4

Once at the top of the pass I continued along the trail, dipping down into the basin, losing another 700’ of elevation.

5

After hiking for a total of 5 miles at this junction I turned and followed 822 southwest to the base of the Northwest Pole Ridge.

6

In the basin I left the trail and headed for the Northwest Pole Ridge

7

My goal here was to gain the ridge and follow it to the summit of Northwest Pole. Here’s an overview of the route:

8

And what it looks like gaining the ridge (yes, tons of elk out there today). Also, the basin was marshy, but since it was so cold and early in the morning it was frozen and crunchy. There were ribbons of water that I hopped across. I wouldn’t want to pass this area when it’s soggy and wet.

9

Once on the ridge it’s easy to see the snow free path to follow, all on tundra. This is all easy class 2

10

11

From the top of the ridge you dip down a little bit and then back up on loose rock

12

The crux of this climb comes at the very end. I spent some time trying to figure out how I wanted to summit. At first I tried to gain the block at the area where all the bird droppings were, but it didn’t look like it was the easiest way. Next I tried summiting up a chimney, but about halfway up I knew I’d need rope to get back down (I’m short) so I stopped and looked for another route. In the end I was able to summit by going up the area with all the bird droppings, just from a different angle. There is a lot of exposure here and small scree on the rocks, making it slippery and a fall dangerous.

Here’s the route I took:

I aimed for the bird droppings. Here’s what that looked like from a couple of different angles.

13

14

From there I traversed along the exposed edge towards the summit.

15

It looks easy, but this is the exposure, and yes, it included a trust jump (once again, I’m short, it could have been more of a long lean for someone over 6 feet tall, but I had to jump). Here’s looking back on the jump area (it’s too difficult to see in a picture coming from the other way, but this picture offers a good look back on the ridge too)

16

I summited at 9:45am

17

Northwest Pole:


Here I am getting ready to jump the area on the way back.

18

And from the top where the bird droppings are back down. Yes, it’s as steep as it looks

19

Back on solid ground I took a picture of the summit block and how I traversed it. I circled where I jumped.

20

Time to head over to Pole Creek Mountain. Here’s an overview of the route from Northwest Pole

21

I descended east towards the basin, first on loose rock that gave way to tundra, losing 850’ of elevation, crossing a stream, and heading back up towards Pole Creek Mountain.

22

Here’s looking back at Northwest Pole

23

I continued southeast towards Pole Creek Mountain. Here’s how I ascended; the snow was easy to avoid, and I used it to track where I wanted to go:

24

After ascending the ridge I aimed for the access gully, which had snow but enough dry areas to pass easily without traction

25

Then I just followed the ridge south towards the summit

26

I summited Pole Creek Mountain at 9:45am, after almost 10 miles of hiking

27

Pole Creek Mountain:

I headed back the same way I’d come in, following the ridge and then going back down the small access gully. Everything looked totally different on my way back and I second guessed myself a few times, but keeping Northwest Pole in sight helped.

28

Once back down in the basin between Pole Creek Mountain and Northwest Pole I wanted to stay high on my way back out to avoid the snow below Pole Creek Mountain to the east

29

I headed north, and then east around this small peak.

30

There was some snow here, but elk in the area make a great trail and traction wasn’t needed

31

I rounded the east side of the small peak

32

And unexpectedly came across a small herd of elk! This was so cool! I’ve heard of elk doing this, but I’d never actually seen it before: the mama elk were laying in a circle, with the babies laying down inside and two sentries standing guard. I saw them a split second before they saw me (the wind was blowing towards me, so they hadn’t heard/smelled me) and I was able to get a picture before they took off

33

As soon as one of the elk standing guard saw me I could almost hear him say:
“See? This is why we always employ the safety circle! Always! This is not a drill! Move! Move! Move!”
And they were off and down the hillside, out of sight.

Well, that had certainly been a neat experience! I continued rounding the peak and then made my way down the hillside, all the way to the basin floor. Here’s an overview of the route I took

34

And looking back, here’s the route I took down into the basin. For obvious reasons I’m now referring to this as “dementor ridge”

35

Once in the basin I was at the lowest elevation I’d be at all day, and still had a lot of hiking left to do. I aimed northeast until I hit a trail, and then followed it up. This was trail 822 that would bring me back to Trail 813 (if I chose to go that route). This was actually easier than it looks because there are a lot of good elk trails in the area, passing through the willows.

36

I followed the trail to a sort of a saddle, and stopped to think

37

From here the trail obviously dipped down once again, losing several hundred feet of elevation before reconnecting with Trail 813 and gaining the pass, then dipping back down into the basin and up again out. Here I was, sitting directly below PT 13580, a ranked 13er that I’d want to hike sometime in the near future, but in which I dreaded that drive into Carson Pass that would be necessary again next time. It was still early in the day and the weather was great. I decided to just summit PT 13580 now while I was in the area. I’d done some scouting yesterday and today, and I was sure the route from the summit of 13580 back to the pass ‘went’ easily and would be snow free. I turned right and headed east up the mountainside. This was a very straightforward hike up tundra

38

At the top the tundra turned to rock, all class 2 and easy to navigate

39

At the top of this rocky area was the summit. I summited at 2:15pm

40

PT 13,580:

Here’s a look back at the route

41

Now I decided to stay high on the ridge and aimed north, following the ridge towards the peaks I’d climbed yesterday

42

And then back down to the pass and trail 813

43

The hike out was uneventful. It was a beautiful day and I just followed the class 1 trail back. Oh, and I saw the moose again, in the same spot as yesterday.

44

45

I made it back to my truck at 4:15pm, making this a 19.67 mile hike with 5926’ of elevation gain in 12 hours, 45 minutes. Here’s a topo map of my route:

46

When I made it back to my truck I noticed a marmot running out from underneath. Great. I decided it would be best to try to drive my truck down today in the daylight in case I got stuck, but because I also didn’t want to encounter other vehicles (if possible) I decided to eat dinner first and take my time. Also, I wasn’t even sure yet my truck would drive.

When it was time to go I was able to get the truck to move and tried to see if I could get 4WD to engage by driving the truck around for a bit, but that didn’t work. So I decided to just go for it and head back down the road, going as slow as possible. I probably maxed out at 2mph. When I got to about a mile from the end of the 4WD road I saw another vehicle turning around. It took them 20 minutes to do so, and by this point I was feeling pretty confident about my truck.

47

I made it back to the 36, kept trying different things to get my 4WD light to stop flashing and realized it was hopeless. I drove home and the first thing the next morning went to the dealership. The diagnosis: rodent damage. One of those darn marmots, chipmunks, pikas (etc.) had bitten through the wiring. Luckily it was fixable, and I was out of there within a few hours. They put rat tape over the wires to hopefully prevent this from happening again. I’d never heard of rat tape before, but it sounds like it should be on all wires.

I consider myself lucky: after years of leaving my truck in the backcountry this is the first time I’ve ever had this issue where it’s caused concern. I’ve chased some porcupine’s out from underneath my truck before, but that was before any damage was done.

I’ve done some serious thinking about the issue, and I think a physical barrier is the only way I’m going to keep rodents out. So here’s my idea: tomorrow I’m going to Home Depot and buying a large tarp and some bungee cords. When I park at the next trailhead I’m going to lay out the tarp, drive over it, and then secure it around my truck with bungee cords to prevent critters from getting underneath.

This is just a thought at this point, but something I hope to implement and test soon.


Carson Peak – 13,657, Tundra Top – 13,450, Cataract Peak – 13,524 & PT 13,587

1

RT Length: 15.41 miles

Elevation Gain: 5543’

I drove up to Carson Pass the night before and slept in my truck. For details on the drive in, please see this post: Carson Pass.

That night was a rough night, not only because my mind wouldn’t turn off, but because the winds were constant and curiously loud. I woke up before my alarm and decided to sit in the cab of my truck with the heat on to warm up a bit before starting out. I turned the ignition, heard a “thunk” and noticed my ABS and traction control lights were on. Oh, and my 4WD light was blinking. That seemed strange, and a little troublesome. I tried turning the truck off and on again and taking it in/out of 4WD but I couldn’t get it to engage. I didn’t like this turn of events but figured I might just need to get the truck moving to get it to work. Hopefully it was just an actuator problem. I was on the trail at 4am.

The forecast called for rain today, which most likely would transfer to snow at this altitude. I usually like to do the longer hike first, but today I was afraid I’d get caught too far when weather hit and since these entire hikes are above treeline that just didn’t sound safe. I grabbed my helmet and figured I’d play it by ear.

From my parking spot I traveled south for half a mile along trail 821 before turning right onto the Continental Divide Trail/The Colorado Trail/Trail 831. I didn’t know it at the time, but just past this junction there is actually a parking area, so if you wanted to cut off a mile from this hike (and extra elevation gain) you could just park there.

2

I followed the class 1 Trail 813 as it lost a total of 400’ as it wound down the canyon, and then gained almost 1000’ to the top of the pass.

3

There was one small section of snow to cross, but luckily for me the elk had already done a great job blazing the trail.

4

I saw quite a few elk this weekend. They are definitely all over this basin. The first ones I encountered at about 5:30am. Of course they trotted away from me, but I was able to get a photo of one up on the ridge (I’d be on that ridge in about half an hour)

5

Up towards the top of the pass the trail got a little wet, but it was still easy to follow.

6

From the top of the pass I left the trail, turned right and headed northeast to the ridge.

7

I aimed for the saddle and got a great view of the sunrise.

8

From here it was a class 2 ridge hike. I stayed on the ridge when possible, and when not I dipped to the right. Here’s the route I took:

9

In the beginning there were some steep sections to navigate. Nothing too difficult, but it’s all choss and there’s some decent exposure, so choose your footing carefully. This area was about a foot and a half wide in places.

10

This section is easier than it looks: Just dip down to the right

11

From there it’s an easy walk up tundra to the summit

12

I summited at 6:40am

13

Carson Peak:

I turned around and headed back over the ridge. From here I had a good view of my next 2 objectives: Tundra Top and Cataract Peak

14

The route looks a little different on the way back.

15

Go straight over this part. Once again, there is some exposure here, along with loose rocks. Be sure of your footing.

16

And straight up this. Once again: loose, but straight up is the way to go

17

Once the ridge section is done it’s an easy walk up tundra

18

The only problem? I’m not sure exactly where the summit is to Tundra Top. It looks like it’s at the jagged point you can see from Carson Peak, and indeed that feels like the summit and also has a large cairn, but when I used my altimeter I measured the middle of the flat, open space further to the west as being 30 feet higher. Also, there are cairns all over the summit, as well as at the high point after the ridge. So I basically walked all over the mountain (between summiting the first time and when I came back over from Cataract) and I’m considering it a summit.

19

In any event, here’s a couple of summit photos from somewhere on the top of Tundra Top, and a video (not sure if the video is from the actual summit though)

20

Tundra Top:

I turned north and headed over towards Cataract Peak

21

The hike down started with unstable rocks and then switched to scree. This was class 2, and I’m pretty sure I was using game trails, making my way towards the saddle.

22

There are two ways to summit Cataract Peak: you can go to the left (west), gain the ridge, and then summit, or go straight up the south face. Not knowing ridge conditions, I decided to go straight up the south face, even though that meant crossing some snow. (After summiting Cataract I realized the ridge is easy class 2 and a viable option).

23

24

After crossing the snow I made my way up the mountainside on loose scree, which was steep at times. I followed an obvious game trail with one switchback.

25

At the top of the ridge I turned left, went around this boulder, and hiked the short distance to the summit (which had a cairn)

26

27

I summited Cataract Peak at 8:25am

28

Cataract Peak:

I re-traced my steps back to Tundra Top

29

30

Encountering an elk on the ice flow before the easy hike up to Tundra Top

31

32

From Tundra Top you could see a bunch of the peaks I was hiking this weekend. I spent a lot of time here, checking out the weather and looking at routes for tomorrow to see if they were clear or not. Unfortunately, these peaks require a lot of ups and downs through basins, and while I could see ridges were clear, I had no idea what the basins looked like.

33

I headed back to the pass, picked up the trail, and headed back down into the basin.

34

When I got to the lowest point in the basin I decided to attempt PT 13581 today as well. The weather looked like it would hold, and I was so close (and not yet tired) that I figured I should at least give it a try. I eyeballed this one, looking for the best route up. I decided to leave the trail, cross Lost Trail Creek, and follow the drainage until I hit the tundra that paralleled willows. Then I would stay on the tundra, using the willows as guidance before taking a gully up. To gain the ridge I took the solid line up, the dotted line down.

35

This proved to be a fabulous plan. The only downside was the gully: it had recently melted out and was still soft. I almost lost a hiking boot in the mud, and it was very steep. It almost felt like it should have been a winter route with snow, an ice axe and crampons.

Here it is in a little more detail:

36

At the top of the ridge I turned right and followed the ridge to the summit block

37

I was keeping a close eye on the weather. The clouds were building, and fast. Luckily, they looked like snow clouds and not thunderclouds. I had a feeling that 40% chance of rain was going to happen.

When I made it to the summit block I was surprised to find it wasn’t a class 2 hike as my (quick) research had told me. Nope, this was definitely class 3. I was glad I’d brought my helmet. I strapped it on and left my pack and trekking pole and headed in to figure out how to summit. This is the route I took: I circled around to the left, found a bunch of easy class 3 access gullies, took one up, followed the ridge around to another access gully and climbed to the top. There was exposure in the second gully.

38

39

I summited at 12pm

40

PT 13581:

The weather was turning so I quickly retraced my steps back down the gullies to my gear, then followed the ridge

41

On the way out I took the second gully down, which wasn’t as steep, and then followed the same path I’d used as on my way in back to the trail.

42

The wind picked up as I hit the gully and it started snowing. Not big fluffy flakes, but more like slush being carried by the wind that splattered when it hit me. I put on better gloves and kept hiking.

43

The hike out was uneventful, as it was on a well maintained class 1 trail. The extra 600’ of elevation gain on the way out was kind of a bummer, so I just took it slow. The trail actually inclines gradually, so it wasn’t too bad.

44

45

Oh, and I saw a moose in the basin, so that was kind of cool. It was a little far to get a good picture of, but it’s a male.

46

I made it back to my truck at 2pm, making this a 15.41 mile hike with 5543’ of elevation gain in 10 hours.

47

Here’s a topo map of my route:

48

It was still early so I decided to clean up, get something to eat, and try to start my computer. It lit up but quickly turned off. Maybe it will dry out overnight and work tomorrow? OK, with my computer out I decided to do some reading. My favorite book for a long time has been “Death in the Grand Canyon”, so I picked up it’s sequel, “Death in Yosemite” and have been reading it the past few weeks. Lovely how the book reiterates, several times, how it’s important to always make good choices, retrace your steps before committing when you’re unsure if you can continue, and not to go solo. Also, don’t be a male between 20-30 years of age. I like to remind myself of these things often and use these stories to try to learn from others’ mistakes.

Idea: Devotionals for hikers (not necessarily religious) that are quick, a page or two, and detail real accidents and how they occurred. Then discussion questions to see what steps could have been employed to prevent the accident. In other words, more books like “Death in the Grand Canyon”, just in a different format.

From inside my truck I watched the marmots and pikas and chipmunks go about their business. They couldn’t see me in the topper, and it was fun to watch them skitter around. One marmot chirped incessantly for over an hour, and I as I sat there my thoughts drifted to how everyone should get to experience climbing in the mountains at least once in their life.

After reading I got out my topo map and looked at routes for the next day, prepped my gear, and got to bed early. I wanted to get a lot of rest before an early start tomorrow, and I was still a little worried about my 4WD and computer problems…


Bent Peak – 13,393

1

RT Length: 2 miles

Elevation Gain: 1032’


Woohoo! It’s finally summertime and I’m in the mood to start doing some serious hiking. I drove down to Lake City after work on Thursday, intending to find a parking spot on Carson Pass, spend the night, and get up early to start hiking. I looked up Carson Pass for road conditions on Bushducks and wasn’t able to find any information so I figured this was an easy 4WD road. (Note, I found out later it’s listed under Wager Gulch).

I turned left from 30 onto 36, or Carson Road. There’s a sign that says “4WD recommended”

2

Ha! I found out rather quickly This is a serious 4WD road. It’s narrow, has a minimum of 4 blind-hairpin turns, water crossings, and some serious rocks/trees/etc. to navigate.

3

4

5

The good news is if you can make it after the first mile you can make it all the way. On my drive back down I saw someone turn around just before making it a mile. It took them a good 20 minutes to turn their vehicle around. I hope they found a dispersed campsite elsewhere. Here’s a picture of the truck that turned around. My Tundra handled it famously, but this is a road better suited to vehicles with a short wheel base.

6

After driving for 3.5 miles I made it to Carson. It’s a ghost town, and just before reaching it there are a few dispersed campsites.

7

Instead of stopping I drove 1.5 miles further on the road to the top of Carson Pass. The entire drive was almost exactly 5 miles from the turnoff from 30.

8

There was a little bit of snow towards the top, but nothing that interfered with driving.

9

I made it to the top of Carson Pass, backed into in the only available parking space (I’m assuming a lot of vehicles just park on the tundra) and realized it was only 5pm.

10

Hmm. I had a flexible itinerary for the weekend that included up to 8 peaks depending on weather/conditions, and while I’d already done an hour on the treadmill today I was in no way tired. I decided to tackle the peak in front of me because I had plenty of time and wanted to get the most out of this trip. Read: I did not want to make that drive again (if possible) and wanted to get in all 8 peaks.

I gathered my backpack and headed west up the side of Bent Peak, following the 4WD road.

11

12

This hike is straight forward. You just follow the road until it ends

13

14

15

16

17

When the road ends, continue northwest up the side of the mountain

18

The tundra turns to rocky terrain

19

And then to a mix of tundra and rocks

20

And then back to rocks

21

The summit was rocky and had a bunch of cairns.

22

I summited at 5:50pm.

23

Bent Peak:

I took a good look at the conditions of the nearby peaks I intended to tackle this weekend. It didn’t look like I’d be needing traction. I turned around and re-traced my steps back to the road, and my truck (circled)

24

25

26

27

28

I made it back to my truck at 6:15pm, making this a 2 mile hike with 1032’ of elevation gain in 1 hour.

29

Here’s a topo of my route:

30

I was really glad I’d decided to tackle this quick peak today. Now it was time to eat some dinner and prep for tomorrow. It was now I noticed the cooler I’d brought had tumbled during the drive and leaked water all over my laptop. Oh no! My laptop was fried. Great. This was not a good start to the weekend.

The wind started to pick up and I could tell it was going to be a long night. I decided to fuel up on calories, and as I was eating dinner and sipping whiskey I thought about a movie on Amazon I’d recently watched: Ouray 100, which is about a 100+ mile endurance run in Ouray, CO. that includes 42K+ in elevation gain (84K in elevation change). I’ve been intrigued by this run, but also by one of the pacers. She’s a woman around 25 years old who at one point in the movie said “Give me some Gu, I don’t care what flavor, I just need the calories”. I need to be more on her level: I have a hard time forcing myself to eat anything while hiking, and she doesn’t seem to care; she just wants the calories. I also just want the calories but feel like I have to throw up after consuming them.

I tried to get to bed early but all I could think about was driving that road back down when it was time to leave. I was not looking forward to it. Don’t get me wrong, I have no problem driving 4WD roads and I actually enjoy doing so because my truck has always done everything I’ve asked it to do. What I don’t enjoy is passing other vehicles on the roads because my truck is big and passing can get tricky when the road is narrow. There aren’t a lot of turnouts on the road to Carson Pass and uphill has the right of way so mentally I tried to figure out the best time to drive down: Do I leave in the middle of the night at some point this weekend? If I do and encounter another driver how much fun will it be backing up in the dark on that road? How likely was that to happen? Or do I leave early morning and risk early adventurers driving up? Or late afternoon?  That’s when most people are driving down, right? So drivers coming up expect a lot of drivers driving down and are more likely to avoid that time? How many people would drive up to see the sunset? What time am I least likely to encounter another driver? Is there a time the Jeeps are due back when rented? Ugh. I wish I could have just turned my mind off at this point, as it was useless worrying about something I couldn’t control. I guess I’d be flexible depending on how much hiking I was able to get in.

I noticed my truck was by far the largest vehicle up there all weekend: lots of Jeeps and ATVs and OHVs were on the road, but no larger vehicles/trucks.

Oh, and the wind never stopped, but it did start snowing.

PT 13626

1

RT Length: 8.14 miles

Elevation Gain: 4197’

I am so glad I drove to the trailhead when it was daylight! I didn’t have good directions: google maps stopped at Alpine Lake and when I CalTopo’d the drive from there I unknowingly set my route through private property (that wished to remain private). So I drove around for a bit and eventually found a road that went straight to the Alpine Cemetery Trailhead:

Directions to Alpine Cemetery: From 162 turn right onto 292B, and then take your third right onto 292B. It’s the street that has a sign that says “dead end”, which I chuckled at because it ends at a cemetery. It’s also the only street in the area that’s a dead end.

2

There’s room for a handful of cars at the dead end.

3

I parked my truck and took a look around. The trail started at the east end of the parking area and wove through the Alpine Cemetery to begin. Yes, I was extra glad I came here while it was still light out, as I was able to locate the beginning of the trail and walk it in the daylight (tomorrow I’d start in the morning when it was still dark). I also discovered there were tons of tiny worms hanging on threads from the trees. This was also something I was glad to know: they’d be no fun walking through in the dark through the cemetery, but at least I’d know what they were. I’d be hiking and using my trekking pole as a web catcher through here. There was a sign telling the history of the cemetery at the trail entrance. It looked like the ‘headstones’ were all re-done a few years ago, and already deteriorating.

4

Oh, and there are graves that go right up to the road.  That’s my truck, and circled is a gravesite.

5

I walked around the cemetery for a bit, then headed back to my truck to make dinner.

6

When I spend the weekends hiking and sleeping in the back of my truck I try to make meals as easy as possible, mainly because I just don’t get hungry when I hike so it’s worthless to spend a lot of time preparing them. Today I’d hiked 18 miles with 7100’ of elevation gain and I wasn’t hungry. But I knew I had to eat for tomorrow’s hike of PT 13,626 so I heated up dinner anyway. Yesterday I’d cooked some brats on the grill and put one in a ziplock bag for today. I filled my JetBoil with water, put the brat inside to heat it up, and got a glass of wine. As soon as the water was boiling I picked up the brat with a fork and poured the water into a Cup Noodles container to warm up the rest of my dinner.

I took a bite out of the brat. Nope, I wasn’t hungry. Ugh. Hearing a noise I turned around and saw the largest Golden Retriever I’ve ever seen trotting over to me. She sat down in front of me and smiled. Three high school aged girls came up behind her and asked me if she was my dog.

Me: “No, sorry, I don’t have a dog”

Girls: “We didn’t think so but we thought we’d check. Her collar says her name is Molly and she has the same last name as the sign in front of a house down the street, so we’ll take her there”

Me: “Good idea. Good luck!”

The girls called for Molly to follow them but Molly had gotten wind of my brat and wasn’t budging. She sat there and looked at the sausage longingly. Molly wasn’t my dog, and even though I didn’t want the brat I didn’t feel right giving it to her because I didn’t know her diet, so I did the only thing I could do: I ate it as fast as I could. I probably finished it in 30 seconds and in 4 bites. Now I really felt sick. To add insult to injury when I was done eating Molly didn’t turn and walk away: She rolled on the ground, shook back and forth and asked for belly rubs.

It took the girls a solid 5 minutes to get Molly up off the floor and to walk with them towards her owners’ house. I tried but was too full to eat my cup noodles, and after 3 bites pretty much wasted the rest. It’s weird how I can burn thousands of calories on a hike but can’t force myself to replenish those calories afterwards without feeling like I was going to throw up. A couple hundred calories wasn’t going to do it for tomorrow, but oh well; it would just be a slow day.

I’d wanted to make this an early night, but after jotting down some trip notes from today and making dinner and walking around it was getting late. After slapping the third mosquito I closed my truck and sat in the back with the doors closed. I lit a candle, writing by candlelight. I have lights set up I could have turned on, but candlelight just felt better. Ambiance = candlelight in a cemetery. Trust me.

I was finally ready to go to bed around 9pm. I blew out the candle and set up the curtains over my back window and noticed some of the graves had solar powered lights outlining them. Oh great: So now even in the dark I’ll know where the graves are (that’s sarcasm). I really didn’t think this whole “sleep at the cemetery trailhead” thing through. I went to bed wondering if I knew any good cemetery songs? I’m a Girl Scout Leader and have a song for every occasion, but currently I was drawing a blank.

Interestingly that night I slept at the cemetery was probably the most peaceful night I’ve ever had sleeping at a trailhead. You could say I ‘slept like the dead’. Seriously: no noises woke me up in the middle of the night, no wind, no animals, no chatter from dispersed campers. It was great!

I woke up at 3:45am and was on the trail by 4:15am. This was my second attempt of PT 13,626, the first one foiled due to snow in the basin and a lost water bottle. Also, I took a different route on that hike.

The trail starts at the Alpine Cemetery sign and winds around the cemetery, following a crumbling trail outlined by tree branches.

7

The trail is a bit rough to start but there are signs that while they aren’t the most elaborate, indicate the way

8

After you get past the cemetery the trail narrows and is more defined. The trail changes from pine trees to chaparral to aspens as it hugs the south side of the mountain, gaining elevation for 1.3 miles until turning left and heading north up Grouse Canyon. The trail is a little overgrown but easy to follow. I kept thinking “This route is SO MUCH EASIER than the last route I’d tried to summit PT 13,626. So. Much. Easier.” Images of bushwhacking and ticks and tons of compass time flashed through my head and I wondered why last time I’d chosen the route with no trail?

9

After hiking for 1.6 miles I encountered a small avalanche area, easily crossable

10

I hiked for about a tenth of a mile more and the trail stopped in a larger avalanche area. From here on out there was no trail to the summit. However, there is a creek. If you follow the creek it will take you through to the basin. I ended up crisscrossing it several times when there seemed to be more of a trail on one side or the other.

11

Here are some pictures of the route up the valley

12

13

14

After hiking for 2.7 miles the drainage curved to the right (east) and I followed it up to the basin. This looked like a dry creek, but was probably due to snow runout

15

This brought me to treeline, and rocks. I stayed high and left here and didn’t regret it, but you could also follow the drainage to the right all the way up to the basin.

16

The rocks turned to tundra

17

There are multiple ways to summit here. You can keep going northeast and follow the ridge to the summit or go straight up the face (northwest). This is all class 2.

18

I decided to go straight up the face. This was steep but easy to navigate, with a lot of tundra and stable sand in the gullies.

19

20

I started encountering a little bit of snow as I made it to the top. Easily avoidable snow as I just stayed to the left

21

There was a cornice at the top

22

I headed towards the smallest part of the cornice to investigate. I took off my pack and decided to put on microspikes and get out my ice axe. I realized halfway up the snow crampons would have been a better choice but I was already committed and the spikes held. Also, here it started snowing.

23

24

When I got to the top I turned right. There was still a little more snow to contend with before reaching the summit, but the summit itself was dry

25

26

I summited PT 13,626 at 7:30am. It was lightly snowing and cold and very windy. The forecast had mentioned thunderstorms after noon but said nothing about snow this early in the day. I wasn’t sure how I felt about it. Yes I was. Cold. I felt cold.

27

PT 13,626:

There was a nice summit register under the cairn. As always, I didn’t open it. Here’s a picture of the route I took in this time (taken from the route I attempted last time. Unfortunately, the way I came today didn’t afford any good views of the peak)

28

This wind was insane. And cold. Time to head back down.

29

30

I took off my microspikes and headed back down to the basin, following the same way I went in

32


Staying high and then dropping down into the drainage, following it down

33

34

35

36

Until I reached the avalanche area and once again found the trail

37

The trail was easy to follow back to the trailhead

38

I made it back to my truck at 10am, making this a 8.14 mile hike with 4197’ of elevation gain in 5 hours, 45 minutes. Here’s a topo map of my route:

39

Pt 13500 & Twining Peak – 13,711

1

RT Length: 5.39 Miles

Elevation Gain: 2443’

After summiting Sayres Benchmark I noticed the day was still nice and I had plenty of time to spare so I drove to Independence Pass to try my hand at Twining Peak. I’ve already been here once this year after another hike, but the conditions weren’t… favorable. Lots of wet marshy mush to get through to the good stuff, and I don’t like hiking with soggy socks.

When I got to the Independence Pass parking area I backed in my truck and took a look around. Yep, it was still marshy.

2

The weather looked good, and I could see a clear line to the ridge. I decided to gather all my gear (crampons, ice axe, snowshoes, new socks, etc.) and hit the trail. I walked west along HWY 82 until I reached this sign, which happened to be where the snow ended. From here I turned right (north) and headed for the ridge.

3

Yes, this was still marshy, but I could avoid the snow and getting my feet wet with careful navigation. I aimed for the ridge, intending to see what the basin looked like before determining if I would summit first via the 13500/Twining saddle or go over 13500 instead.

4

When I made it to the ridge I looked over at Twining Peak. If it were earlier in the day I would have crossed the basin and gained the saddle first (as outlined below).

5

However, it was now almost 2pm and I knew that snow was soft. Yes, I had snowshoes, but no, I didn’t want to posthole with them through the basin. So instead I turned right (northeast) and followed the ridge to 13,500. This was all class 2

6

7

There seemed to be a bit of a trail in areas that went straight up through the snow. I didn’t want to do that so when I encountered snow I just went around it. This is an easy ridge to follow.

8

9

There was a little bit of rock hopping, all class 2, and easy fun. The boulders are big and pretty stable. Just hug the ridge to the left and don’t try to go straight over the ridge and you’ll be fine.

10

11

Here’s the last bit to the summit

12

I summited at 2:15pm

13

Pt 13,500:

There wasn’t a summit register. Turning northwest I could see my path to Twining Peak

14

This was an easy ridge walk, with a little easy rock hopping and the snow was totally avoidable

15

16

The tundra changed to rocky terrain

17

There was some snow on the last section. I decided to drop to the left and find a gully to summit, but I wouldn’t recommend that route: the gully was loose and on my way back I found out the snow was actually solid near this boulder, so I should have just summited by walking across it.

18

Summit of Twining Peak

19

I summited Twining Peak at 3pm

20

Twining Peak:

The weather was starting to turn; I could see rain showers all around so I didn’t stay long on the peak. I put on my jacket and headed back down, this time going over the snow and large boulder I’d gone around on my way up.

21

And back down the ridge, sticking to the right to avoid the snow

22

23

24

I re-summited PT 13,500 as it was lightly snowing.  There was a young man at the summit who was super excited: this was his first 13er! He’s never gotten this far before on this peak, and he was excited.  He wanted to know what all the peaks were that we could see, and I obliged him for a bit. Also introduced him to 14ers.com because he’s interested in tackling more 13ers and 14ers (please be nice).

I headed back down the ridge

25

Unfortunately, at about this time I saw a flight for life helicopter whiz by. Never a good sign. Later, as I was driving back down HWY 82 I saw a police officer and a tow truck driver putting a motorcycle on the back of the tow truck, lots of lights flashing, no other vehicle/animals involved.  Ouch. I sincerely hope everyone is ok. Also, the accident happened in a straight area of the HWY, so I don’t think HWY curves were involved. In any event, please adventure carefully!

26

I took a slightly different path on my way down than I did on my way up, as I could see a clearer path that avoided marsh/snow

27

28

29

I eventually came upon a trail, but it led to snow/marsh, so I avoided it and went back down the ridge

30

The nice thing about this hike is you can see your vehicle for most of it, and at a minimum HWY 82, so it’s difficult to get lost. I just aimed for the road, avoiding the snow/mush

31

32

Here’s an overview of my hike up to the ridge and back down more to the center (after realizing the basin wasn’t something I wanted to experience today)

33

I made it back to my truck at 5:45pm, making this a 5.39 mile hike with 2443’ of elevation gain in 3.5 hours. Please don’t judge the time: I’d already hiked 12.5 miles and 4652’ of elevation this day and I was a bit tired; this hike can most likely be done faster.

Here’s a topo map of my route

34

OK, on to the next trailhead!

Sayres Benchmark – 13,746 & PT 13,440

1

RT Length: 12.61 Miles

Elevation Gain: 4652’


I drove to the La Plata Gulch Traihead and then took 391 for a little over 2.5 miles to a junction with 382, 391, and 392, where I parked my truck. This is an easy 4WD road in, with a few water holes to navigate.

2

I parked at what looked to be an avalanche runout area.

3

Initially I’d intended to make this a loop and incorporate Unnamed 13,300F and PT 12,601, but the area that I’d exit the hike as a loop with had a lot of “no trespassing” signs, so I decided early on just to make this a 2 peak hike.

4

At 5am I gathered my gear and headed southwest, following 392, passing some dispersed campsites and wiki-ups.

5

I crossed a bridge and turned right, following 392. There are more dispersed campsites here. The dispersed campsites make it a little difficult to follow/see the road.

6

In the dark I ended up going too far south on 382, missing the obvious 392 sign, and the not so obvious road. Turn left at this sign, even though there’s no road.

7

And pass through a gate, now following the 392 4WD road.

8

Almost immediately I came to a creek crossing that required me to take off my shoes and get out my sandals. The creek was cold (especially at 5am) but the water only went up to my knees in the deepest of places.

9

Shoes back on, I followed the 4WD road. “4WD Road” is a bit of a misnomer. This was probably a road decades ago, but it has gone into disrepair and hasn’t been used for quite a while. It’s easy to follow, but overgrown in many areas with willows, aspens, and even 10+ foot pine trees.

10

At 11,950’ I came to a small cabin with a great view.

11

I peered inside: someone had left a peanut bottle full of trail mix (peanuts and M&M’s?) on a shelf. It was dark and cold inside and I’ve seen horror movies so I didn’t take the bait. I turned around and considered my options. Here the road still had some snow/ice covering it, but early in the morning I could walk across it when necessary without traction. On the way back I was able to see dry spots to navigate down and avoided the snow.

12

My options were to either take the road or follow the ridge. I decided to take the road up and follow the ridge back down. I wasn’t disappointed. I also placed a cairn here to show where you leave the trail to follow the ridge (even though it should be obvious).

13

The road really didn’t have much snow on it after I passed this point and was quite easy to follow all the way to the saddle. Several times I intersected with the ridge route as I followed the road.

14

From the ridge you can see the road, and the path you take to get to Sayres Benchmark

15

I was really glad I decided to take the road up. Not because it was easier than the ridge, but because it was here I saw some elk. My favorite were the calves, suckling breakfast until they noticed me and their mamas decided it was time for them to leave.

16

Elk:

Following the road to 13275 feel of elevation I then turned right (south) and followed the ridge, losing 300 or so feet of elevation as I made my way to the saddle. I decided to just follow the ridge, even though it meant going up and down in elevation a few times. (This is all class 2)

17

18

19

There was still some snow on the ridge. I made the 50/50 decision to stick to the right of the ridge and wasn’t disappointed, as later I could see the ridge to the left was impassable due to snow.

20

I stuck to the right of the snow

21

Towards the top the tundra gave way to rocks

22

The top of this is unfortunately not the summit of Sayres Benchmark, even if it looks like it is from far away. Nope, when you get to the top of the ridge turn left (northeast) and hike to another small saddle and then up to the summit of Sayres.

23

There was more snow here than I would have liked, but it was firm this early in the morning. I decided against putting on spikes or crampons and just hiked across.

24

After this small saddle I picked one of the many dirt filled gullies and climbed to the top

25

I summited at 8:40am.

26

Summit of Sayres:

There was a benchmark that I’m pretty sure is off by 1000’ or so…

27

There was a summit register, but as always, I didn’t open it. Time to head back the way I came. I turned back and headed towards the small saddle, retracing my steps. Here’s an overview of the route to PT 13460

28

I was glad the snow was still firm enough not to need traction. Today there was minimal exposure as well.

29

30

Here’s an overview of the route back to PT 13,430 (not considered ranked or unranked)

31

Notice the snow? It’s good here to stick to the left (west side)

32

33

Here’s a visual of the route to the top of PT 13,430

35

I took the road to the ridge, turned right (northeast) and once I was on the ridge the ground turned sandy for a bit, but mostly it was crushed rock.

36

Here’s a view of PT 13,460 from PT 13,430

37

Here’s the route I took to get to PT 13,430. I tried to stick to the ridge, but when that wasn’t possible I dipped to the left. This is all class 2, maybe easy 2D (if that can be a thing?)

38

39

Here you dip down to the left and climb back up through a short gully

40

The final trek to 13,460

41

I summited PT 13,460 at 10:20am. There was as a summit register here.

42

Summit of 13,460:

Here’s looking back at today’s peaks

43

I made my way back to PT 13,430, retracing my steps. Here’s an overview of the route back down from the ridge before PT 13,460. You can clearly see the road at the end of the ridge. I circled where my truck is parked.

44

The ridge started out as rubble and turned to tundra before making it back to the road

45

Here’s looking back at the ridge. While hiking the ridge I ran into another hiker! I hadn’t expected to see anyone at all today, and as we passed I was thrilled to see she was another female solo hiker. It’s nice to see other women out rocking the mountains. We talked for a bit. I was probably a bit clipped because I had other plans for today and wanted to keep moving, but she did too so after chatting about the weekend weather around the state and other peaks for this weekend we were both on our way.

46

I followed the road back to the creek crossing, through the gate, turned right, and followed the trail back to my truck. I kept my sandals on after the creek crossing, since it was such a short distance and I’d be changing back into them when I was done anyway.

47

48

49

I made it back to my truck at 12:30pm, making this a 12.61 mile hike with 4652’ of elevation gain in 7.5 hours.

50

Since it was still early, the weather seemed to be holding up, and I wasn’t yet exhausted I decided to drive over to Independence Pass and see if I could hit a few more ranked 13ers today. As I drove out all of those empty dispersed camping spots were full.

Mt Parnassus – 13,580, Bard Peak – 13,641 & Woods Mountain 12,940

1

RT Length: 10.25 miles

Elevation Gain: 4965’

This was my third attempt going for Bard Peak. The first time I made it as far as Parnassus, but the wind and cold temperatures (and Raynaud’s) prevented me from going any further. My second attempt was from the Berthoud Falls area, and the snow just wasn’t cooperating. Imagine my surprise when I found out today this is actually an easy trail when not in full winter conditions!

I parked at the Herman Gulch trailhead and was on the trail by 4:30am. This trailhead has tons of parking, but beware: it fills up fast. There was a full moon and I could see by looking at the mountains I wouldn’t be needing snowshoes today, so I left them in my truck.

2

The trail starts in the middle of the parking area. I took the Herman Gulch trail to begin, which is just behind the information signs.

3

4

After hiking .2 miles I turned right (east) at this junction to follow the Waterous Gulch Trail.

5

This trail is an easy, class 1 trail all the way to the basin. Last time I was here the area was covered in snow and I had no idea there was a trail that went that far. Today the hike was easy! No real route finding below treeline.

6

7

After hiking for about 1.5 miles I came to a creek crossing in Waterous Gulch, crossed the creek on an icy log by sitting down, straddling the log, and shimmying across (due to the ice I would definitely have slipped if I’d tried to cross standing up). I turned left and headed north through the gulch on a great trail (still the Waterous Gulch Trail).

8

9

10

Starting here there was snow on the trail, but just enough to be annoying: I could still figure out where the trail went

11

I crossed a small stream and continued on the trail. Note: You can also choose to go right and not cross the stream here and take a parallel trail that leads you to the exact same place as the Waterous Gulch trail. I stayed straight here and continued to the end of the gulch on the way in and took the parallel trail on the way out. They were similar, but the one that follows the gulch also follows the stream, which was nice.

12

I followed the class 1 trail to the end of the gulch, and after 2.2 miles of hiking turned right and continued following the trail up to the saddle of Woods/Parnassus. There are a lot of ways to gain the summit of Parnassus. Last time I hiked further south, avoiding the saddle, and I would not recommend that route. Instead, take the easy gully and aim for the saddle and go as far as you can before turning right and heading southeast towards the summit. This is where the intense wind started and didn’t stop. Forecasted winds were 17-24mph, but those winds don’t knock you over. For the rest of this hike I was using my trekking pole for stability, hiking sideways into the wind.

13

The trail stopped here somewhere under the snow. I paralleled the snow to the saddle

14

At the saddle I turned right and headed southeast towards the summit of Mt Parnassus. This is an easy hike on tundra.

15

The terrain gets a bit rockier near the top.

16

The summit is relatively flat. I summited Mt Parnassus at 6:40am, after just over 3.5 miles and 2 hours of hiking. Since this is my second summit of Mt Parnassus I’ll spare you the selfie and let you watch the summit video instead.

Mt Parnassus:

Bard Peak is just over a mile east of Mt Parnassus.

17

There’s a bit of a trail from Parnassus to Bard. I followed it where I could. It was faint, so sometimes I lost it, but mostly followed the ridge. It’s important to follow the ridge when snow is present. This ridge is easy class 2 ‘scrambling’. Just watch for loose rocks. I could see a faint trail go to the right of the ridge (south), but it became covered in snow and would have been difficult to cross. Here’s an overview of my route

18

And some close-ups in order:

19

20

21

When I got to this section I did not feel comfortable traversing without crampons and my ice axe (luckily I had both). I sat down, strapped on my crampons, and crossed the snow. The snow was slippery at this time in the morning (not mushy, more like icy). You could probably traverse this section with just microspikes if you were here at the right time of the day.

22

Because I could I kept the crampons on until the last of the snow.

23

Here’s looking back on the section you want to avoid, and the reason I stuck to the ridge. You can also see a slip here would take you a ways.

24

After taking off my crampons and putting them away I headed up to the summit of Bard Peak, keeping close to the ridge

25

26

I summited Bard Peak at 7:50am, after 4.7 miles of hiking.

27

Bard Peak:

There was a broken summit register and a benchmark on the summit

28

Now to head back to Mt Parnassus. I backtracked down to the saddle, put on my crampons again, got out my ice axe, and crossed the snow.

29

30

31

It was easy to avoid the snow on the rest of the way back to Parnassus

32

33

34

35

From the summit of Mt Parnassus I descended the way I’d summited, back down to the Woods/Parnassus saddle

36

When I made it to the saddle I still wasn’t tired so I decided to summit 12er Woods Mountain as well. This summit doesn’t require much guidance: it’s an easy tundra stroll to the top. This added 460’ of elevation gain to the hike. This is where the wind became the most intense (yes, it was still blowing). It was so windy I was hiking sideways with each step, and had to over-compensate each step to stay in a straight line, crisscrossing my steps as I went.

37

I reached the summit of Woods Mountain at 9:40am. I’ll spare you the selfie of this one as well, since I’ve already summited this peak. Here’s the summit register and a video

38

Woods Mountain:

This wind was insane! Time to head back down to the saddle and back down to the gulch

39

40

41

I followed the trail back down the gulch, over the log bridge, and back to the trailhead. This is where I started seeing a lot of other hikers. When I made it to the trailhead the large parking area was completely full.

42

43

44

I made it back to my truck at 11am, making this a 10.25 mile hike with 4965’ of elevation gain in 6.5 hours. Here’s a topo map of the route:

45

I felt really good about the hike today: The weather had been warm, no clouds, not much route finding, and when I made it back to my truck I wasn’t even tired yet. The only thing that could have been better was the wind. It’s amazing how good conditions can change the outcome of a hike!

Mt Blaurock – 13,626 & Ervin Peak – 13,538

1

RT Length: 6 miles

Elevation Gain: 3821’

There’s currently a curfew in place in Colorado Springs, so the beginning of the drive felt a bit ominous: I didn’t see any other vehicles on the road until I made it to the freeway, and even then there were very few vehicles compared to normal, even for 1am, and even when compared to being quarantined. I’d stopped for gas the day before so I didn’t need to stop at all this morning. With less people out I felt like I saw more wildlife: 4 foxes and a dozen or so elk. I made it to Winfield around 4am and decided to take the easy 4WD dirt road a little further, past the cemetery to some dispersed camping spots .85 of a mile from Winfield. You can park at Winfield and it won’t add more than 2 miles to this hike.

2

3

4

5

Looking at a topo map, I wanted to follow Grey Copper Creek to begin. After finding a dispersed parking spot I headed northwest in the dark, following game trails, zig-zagging in what felt like I was in a horror movie until I hit the creek. The creek was easy to find because there’s been a recent avalanche in the area.   This also made the creek easy to follow (after initially climbing over some downed trees).

6

I crossed the creek and stayed on the west side, startling a porcupine as I went. There are new game trails starting here that parallel the creek.

7

There are a few ways to summit Mt Blaurock: You can follow the creek until it ends and continue climbing until you make it to the Blaurock/Ervin saddle, or gain the south ridge and follow that route. There was still some snow in the gully so I decided to take the south ridge route.

8

There is no special point to gain the south ridge. I turned and headed west after a little over a mile of hiking, aiming for the ridge

9

From treeline it was easy to see the route, following the ridge northeast

10

The first part of the ridge is an easy stroll on tundra

11

Once the tundra ended the loose rock began and didn’t quit until the hike was almost over and I was back at the avy area. I’d call it rotten rubble, or choss most of the way. I rounded the first bump in the ridge to the left, climbed straight over the second, and then took a gully up to the top. There is some loose rock here.

12

13

14

9

Here’s a look back down to this point

16

Turning left (northwest) I dipped down to the left a few times to avoid snow and unnecessary ridge crossings

17

18

Of course, the summit is the furthest ‘hump’ on the ridge

19

I followed a small, rock filled gully to the summit

20

I summited Mt Blaurock at 7:30am

21

Mt Blaurock Summit:

There are some great views of surrounding peaks, a few of which I visited last week;

22

23

I headed back over the ridge on the same path I took in:

24

25

26

Here’s looking down at the traverse between Blaurock and Ervin Peak. The hike down to the saddle from Blaurock is easy

27

I met a nice ptarmigan along the way

28

Here’s a look from the saddle of the ridge to Blaurock and Ervin

29

This is where it gets tricky. Here’s the route I took to avoid the snow:

30

31

It looks like there might be a class 2 path here along the right (south) side, but with the snow in key areas I wasn’t able to take that route. There was snow in this section, turning the rest of the hike into class 3 on loose rock. I had one rock the size of a microwave fall while I was testing it. Luckily, I was just testing and didn’t have any weight on the rock. It scared me though. A helmet would be a good idea. Note which areas actually “go”: The dirt gullies here make it look like there are trails where there are not. Here are pictures of how I navigated the ridge. This took quite a bit of careful route finding.

32

33

34

35

This is actually easier than it looks. Class 3, and I placed a cairn here so I’d remember how to get back (there are a lot of drastic drops in this area).

36

The last hurdle was unavoidable snow just before the summit. I tested the snow and honestly considered turning back. The snow was slippery and a fall would have took me a long way. In the end I strapped on my crampons and got out my ice axe, glad I’d brought both. I traversed these two areas (about 40 feet each) gingerly.

37

The last bit up to the summit was full of loose rock but was straightforward

38

I summited Mt Ervin at 9:30am (that’s Mt Hope in the background)

39

Ervin Peak Summit:

I didn’t stay long on the summit. The day was warm and the snow was melting fast: I wanted to cross the snowy areas as quickly as possible to avoid slipping. I turned around and headed back the way I’d come.

40

41

I was making this a loop, so when I hit the westernmost part of the ridge I turned and headed southwest down. This ridge was easy to navigate but full of loose, rolling rocks. It was slow going because I had to be careful with foot placement. This ridge kind of turns right as it goes. Here’s a hint: If it’s daylight, just keep heading towards the switchbacks that you can see in the middle of the picture below.

42

From about halfway down the ridge here’s looking back at Mt Blaurock and Ervin Peak. The blue arrow points to where you could hike from the landslide area straight to the saddle instead of taking the ridges up and down

43

Here you can see you want to meet back up with the landslide area, and that to do so you’ll be bushwhacking through dense aspen. I could still see the switchbacks, but only just barely and only because the aspens aren’t completely full of leaves yet.

44

There were enough game trails here to follow not to make this too difficult. It would have been easier if I were 2 feet tall though, because those trails go under logs and through brush.

45

I made it back to the landslide area, took a picture of it in the daylight, and turned and headed south towards my parking space.

46

47

I made it back to my truck at 12pm, making this a 6 mile hike/climb with 3821’ of elevation gain in 8 hours, most of it spent route finding and watching for rolling rocks.

48

Here’s a picture of the saddle, should you choose to ascend that way

49

When I got home and started jotting down notes I realized today I’d hiked my 145th unique 13er, as well as my 145th unique bicentennial. Pretty cool!

Also, it’s time to retire my hiking boots, as they are no longer waterproof. They almost made it a year….

50